1
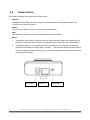
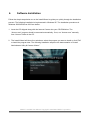
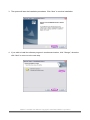
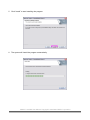
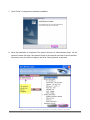
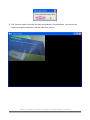
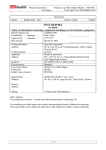
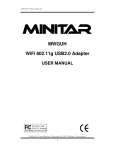
MWIPC-1510WG Internet Camera Quick Installation Guide The QIG will guide you through the basic setup of your product. The detail instruction is stated in the user’s manual. MWIPC-1510WG User Manual Copyright © 2006/2007 Minitar Corporation 1. Check your package contents One Internet Camera One Power Adapter One Camera Stand One 100M Category 5 Ethernet Cable One Quick Installation Guide One CD (Including Manual/Utility/Driver) One Antenna(*Wireless Model Only) If any of the above items are missing, please contact your supplier. 2. System Requirement System requirement for PC, MAC or Notebook PC to access the Internet Camera are: OS System: Windows 98, ME, 2000, XP + SP2, Server 2003 CPU: Intel Pentium III 750MHz above or Intel Celeron 1GHz above Memory Size: 128MB (256MB recommended) VGA Card Resolution: 800 x 600 or above 3. Hardware Installation 3.1. LED and Focusing The Camera head and its focus ring allow you to modify the aim and focus of the Camera. To adjust the Camera’s focus, rotate the dark focus ring. There are three LEDs indicating the camera status and networking status. y Power When the camera is power on and ready for access, the LED will light. y LAN When the Internet Camera is linking to wired network, the LED is lighting. The LED is flashing when video is transmitted or received through wired network. MWIPC-1510WG User Manual Copyright © 2006/2007 Minitar Corporation y WLAN When the Internet Camera is linking to wireless network, the LED is lighting. The LED is flashing when video is transmitted or received through wireless network. Wireless SMA Connector (*Wireless Model Only) LED Green: LAN Activity Focus Ring LED Amber: WLAN Activity LED Blue: Power On MWIPC-1510WG User Manual Copyright © 2006/2007 Minitar Corporation 3.2. Camera Ports The Camera features three ports and a Reset button. y Antenna Standard reverse SMA connector where any antennas with reverse SMA connector can connect to the Internet Camera. y Power The Power port is where you can connect the power adapter. y LAN The LAN port is where you can connect the Ethernet network cable. y Reset 1. If problems occur with your Internet Camera, press the reset button with a pencil tip (for less than 2 seconds) and the Internet Camera will reboot itself with your configurations. 2. If problems persist or you experience extreme problems or you forgot your password, press the reset button for longer than 5 seconds. The Internet Camera will reset itself to the factory default settings (warning: your original configurations will be replaced with the factory default settings). Power Jack LAN Port Reset Button MWIPC-1510WG User Manual Copyright © 2006/2007 Minitar Corporation 3.3. Installation Procedure 1. Unpack the Internet Camera package and verify that all the items listed in the Chapter 1 are provided. 2. Connect the Internet Camera to your network by attached the network cable from the switch/router to the LAN port of the Internet Camera. 3. Connect the power adapter to the Internet Camera and plug the power adapter to power outlet. The Internet Camera will be powered on. When the Internet Camera is ready, the Ready LED will light. Note: It is highly recommended to use the power adapter shipped with the Internet Camera, do NOT use any other power adapter from any sources. MWIPC-1510WG User Manual Copyright © 2006/2007 Minitar Corporation 4. Software Installation Follow the simple steps below to run the Install Wizard to guide you quickly through the Installation process. The following installation is implemented in Windows XP. The installation procedures in Windows 2000/XP/Server 2003 are similar. 1. Insert the CD shipped along with the Internet Camera into your CD-ROM drive. The “Autorun.exe” program should be executed automatically. If not, run “Autorun.exe” manually from “Autorun” folder in the CD. 2. The Install Wizard will show four selections, select the program you want to install or click “Exit” to install the program later. The following installation steps are the demonstration of “Install Administrator Utility & Camera Viewer”. MWIPC-1510WG User Manual Copyright © 2006/2007 Minitar Corporation 3. The system will start the installation procedures. Click “Next” to continue installation. 4. If you wish to install the software program in an alternate location, click “Change”; otherwise click “Next” to move on to the next step. MWIPC-1510WG User Manual Copyright © 2006/2007 Minitar Corporation 5. Click “Install” to start installing the program. 6. The system will install the program automatically. MWIPC-1510WG User Manual Copyright © 2006/2007 Minitar Corporation 7. Click “Finish” to complete the software installation. 8. When the installation is completed. The system will auto run ”Administrator Utility“. On the Internet Camera first page, the cameras found in the network are listed in the left window. Choose the one you want to configure and click “Setting Wizard” to proceed. MWIPC-1510WG User Manual Copyright © 2006/2007 Minitar Corporation 9. Please enter the default password “1234” and click “OK” to login to the IP setup page. 10. Internet Camera is working through the network (TCP/IP Protocol). The IP address setting must be correct, or you cannot access to the camera. The wizard program will detect the IP address status of your network automatically and suggest a free IP address for the Camera. You can accept the suggested value or enter the value manually. If you enter the value manually, please be aware that the “Subnet Mask” must be the same for both the camera and the PC. Click “Finish” to apply the configuration. 11. This wizard will pop up a window to ask you if you want to run the “Camera Viewer” and see the video of the Camera immediately. Select “OK” to run “Camera Viewer”. MWIPC-1510WG User Manual Copyright © 2006/2007 Minitar Corporation 12. The “Camera Viewer” will show the video automatically. Congratulations, you can use the camera through the network to view the video from now on. MWIPC-1510WG User Manual Copyright © 2006/2007 Minitar Corporation Internet Camera MWIPC-1510WG User Manual Copyright © 2006/2007 Minitar Corporation