1
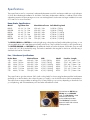
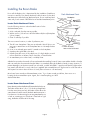
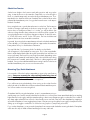
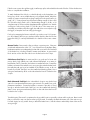
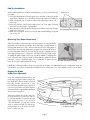
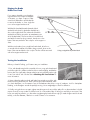
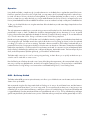
Martinus Van Breems, Inc.
54A Beach Road, Norwalk, CT 06855
Tel. 203-838-0375 Fax 203-838-0377
OWNER’S MANUAL
BOOM BRAKE
Boom Brake Owner’s Manual
Introduction
The Dutchman Boom Brake is simple, reliable device to regulate the boom speed. How well the Brake will work
depends on proper installation. You also will have set the tension correctly for different wind speeds. Please follow
these instructions carefully.
Thank you for your purchase of a Dutchman Boom Brake. We work hard to produce high quality, effective products,
and provide excellent customer service. We’re here to help you. Call, fax, or contact Martin van Breems. Let us know
if you are not totally happy. Bear in mind that we guarantee your satisfaction with our products. See our guarantee for
more details. Finally, we know many of our sales come from customer recommendations, for which we thank you very
much.
Pre Installation Checklist
You will need the following tools and parts.
•
•
•
•
Needle nosed pliers and/or a marlin spike, regular pliers.
A thin, long blade slotted screwdriver.
Indelible ink marker.
Tools and parts to mount brake to boom (typ; bail, supplied bushings, bolt, drill and bits).
• Tools and parts to attach brake line to deck / run back to cockpit
(typ; turning block, fairleads).
• Hardware to adjust tension on brake line (winch or block & tackle).
Properly installed and used, the
brake will allow you to safely and
easily control the boom entirely
from the cockpit.
Table of Contents
Subject
Page
Introduction ............................................................................................
Specifications .............................................................................................
Installing the Boom Brake ....................................................................
Locate Deck Attachment Points ......................................................................
Locate Boom Attachment Point ......................................................................
Check Line Tension ......................................................................................
Mounting Tips, Deck Attachment ...................................................................
Mounting Tips, Boom Attachment ..................................................................
Rigging the Brake, Brake Line Adjustable .......................................................
Rigging the Brake, Brake Line Fixed ..............................................................
Testing the Installation ..................................................................................
Operation ...............................................................................................
MOB Info ..................................................................................................
Legal Information and Warranty ...................................................................
Page 1
1
2
3
3
3
4
4
6
6
7
7
8
8
9
Specifications
These specifications are for conventional, moderate displacement monohulls, and are provided as a rough indication
of which Boom Brake and installation kit should be used. Heavy displacement sailboats or sailboats which will be
undertaking extensive offshore passages must use oversized equipment. Use the next size larger installation kit to start
off. Contact us for more information.
Boom Brake Specifications
Model
Typl Boat Size
Max Mainsail area Safe Working Load
BB250
BB250B
BB500
BB500B
BB750
BB750B
20 - 32' / 6 - 10m
20 - 32' / 6 - 10m
30 - 45' / 9 - 14m
30 - 45' / 9 - 14m
42 - 60' / 13 - 19m
42 - 60' / 13 - 19m
250 sq ft / 23m
250 sq ft / 23m
500 sq ft / 45m
500 sq ft / 45m
750 sq ft / 68m
750 sq ft / 68m
1,600 lbs / 700 kg
1,600 lbs / 700 kg
2,700 lbs / 1,200 kg
2,700 lbs / 1,200 kg
4,100 lbs / 1,800 kg
4,100 lbs / 1,800 kg
The BB250, BB500 and BB750 are used with rigid vangs, where they are fitted just behind the rigid vang, or in a
soft vang application with 2 attachment points (bails) on the boom. They would also be used if you don’t have a vang.
The BB250B, BB500B and BB750B have an additional shackle secured to the bottom of the brake. They are used
on boats with ‘soft’ (block and tackle) vangs. The brake is attached to the vang bail on the boom, while the vang is
shackled to the bottom of the brake.
Line / Hardware Specifications
Brake
250
250
500
500
750
750
Boat
20-28' / 6-8m
26-32' / 8-10m
30-38' / 9-11m
35-45' / 11-14m
42-52' / 13-16m
48-60 / 15-18m
Mainsail Area
200 sq ft / 18m
280 sq ft / 25m
390 sq ft / 35m
500 sq ft / 45m
620 sq ft / 56m
750 sq ft / 68m
SWL
1,200 / 500 kg
1,600 / 700 kg
2,250 / 1,000 kg
2,700 / 1,200 kg
3,500 / 1,600 kg
4,100 / 1,800 kg
Model
IK200
IK280
IK390
IK500
IK620
IK750
Line Dia - Length
1/4" - 36' / 6mm - 11m
5/16" - 40' / 8mm - 12m
3/8" - 44' / 10mm - 13m
7/16"- 50' / 11mm - 15m
1/2" - 60' / 13mm - 18m
5/8" - 75' / 16mm - 23m
These specifications give the minimum SWL’s (safe working loads) for the mounting hardware and the line diameter
and length to run the line back to the cockpit. Any parts you supply or use should follow these SWL recommendations.
These specifications are provided as a starting point. You may need to go up one size, depending on what kind of use
you are planning, and if the attachment points are farther inboard than normal.
Pictured are our BB750, top,
BB500, left, and BB500B,
right. The 500 Series is used
on boats 26’ to 45’ with
mains to 500 square feet.
The 750 Series is used on
boats 42’ to 65’ with mains to
750 square feet.
Page 2
Installing the Boom Brake
How well the Brake works is determined by the installation. Read these
instructions carefully. First, identify the best possible locations for the deck
attachment point, then the boom attachment point. Do not install any hardware until you are certain of BOTH the boom and deck attachment points.
Deck Attachment Points
Chainplate
B. Car on track
Locate Deck Attachment Points
C. Pad eye
Use the following criteria to select the ideal location for the
deck attachment points.
1. As far outboards from the mast as possible.
2. Within one foot / 30 cm fore or aft of the farthest aft (shroud) chainplate
(closer is better).
3. Clear of walkways if possible.
1. As far out as possible
The most common locations, in order of preference, are:
A. The aft lower chainplates if they are set inboards. We will discuss an
easy way to attach items to the chainplates later on. Normally the best
location.
B. A car on an inboard genoa track if it extends to the chainplates.
C. A pad eye through bolted to the deck.
D. A pad eye at the corner of the cabinhouse, if a high cabinhouse with
narrow decks like on Valiants, Pacific Seacrafts, or Island Packets.
E. An attachment point on the toerail, or midships cleat.
2. Within one foot
fore or aft of aft shroud
A Brake line secured to the toerail will cause a hazard when walking forward. Some owners add a shackle so that the
ends can easily be disconnected when the Brake is not needed, although the Brake is handy in many situations. To
prevent damage to an aluminum toerail from a shackle, consider Winchard’s” special toerail shackle. Higher aluminum toerails will deform if too much side force is applied. We noticeably bent a 2" high toerail on a 38' boat with a
400 square foot main in about 20 knots of wind. (We now have our own test boats!)
Most boats have several possible attachment points. Try to locate several possibilities, then move on to
locating the boom attachment point. Again, don’t install anything yet. We’ll
deal with that later.
Locate Boom Attachment Point
Next, determine where the Brake will be attached to the boom.
The brake will be about 1/4 to 1/3 the boom length back
from the mast. More precisely, the brake will be about the
same distance from the mast as the deck attachment point is
from the mast. Use the existing boom vang attachment point
or bail as a starting point. If the boat is fitted with a rigid
vang, the Brake should be aft of the vang.
Yes
Page 3
OK
No
Check Line Tension
Set the boom height to the lowest normal sailing position and snug up the
vang. Locate the boom on the centerline. Temporarily run a line through a
block or a shackle temporarily secured to the boom attachment point. Tie or
tape the block or shackle to the boom if needed. Then run the line down to the
potential deck attachment points. Snug up the line and secure it with tape to
the deck if needed.
Now swing the boom out, and observe the tension on the line. The line tension
should not change significantly as the boom swings through it’s arc. If the
tension does not change more than 1 to 2 inches, you will be able to jibe
without touching the main sheet, as the tension on the line will be constant. As
a rough guide, the tension should not change more than 4” for the 250 series,
6” for the 500 series, and 9” for the 750 series. The line should become
tighter as the boom moves towards the centerline.
Temporarily run line
In general, by moving the boom attachment point back or the deck attachment
point outboards, you will make the line tighter as it approaches the centerline.
It may take a few try’s to find the best combination.
Swing boom out, check line tension
You may find that, if you have any kind of a cabinhouse, the Brake
will rub against it or the handrails at some point. This is often unavoidable.
Bear in mind that the Brake slides along the line and the line itself does not
move significantly. The line will not cause significant chafe, depending on the
angle and contact material. Install stainless steel or bronze chafe strips along
the contact area if needed, particularly if the line is rubbing against a teak
handrail. Once you have determined the best mounting locations for the boom
and deck attachment points, move on to the next section.
Mounting Tips, Deck Attachment
It is essential to follow the load recommendations given in the specifications
section. You must ascertain the safe working load of any piece of
hardware that you install or use. The failure of any part connecting or
tensioning the brake line could have dire consequences.
If you will be tensioning the brake by a line running to the cockpit from the
mast, both ends of the brake line will be secured at the deck attachment point.
You will not need to mount a turning block.
Line attached to toggle
Chainplates We like using the chainplates, since it’s one attachment point you
can be pretty sure of, and it’s exactly where the line should run to on most boats. Never attach the brake line to anything
higher than the lower toggle, and never attach anything so that it can pull apart a toggle or turnbuckle. File or sand off
any sharp edges where the line will touch. We normally secure one end of the line to the chainplate by wrapping it
around the chainplate or lowest toggle at least 3 times. One pass must go though the lower toggle, to keep the line from
sliding up on the toggle or turnbuckle. Tie off the line using a splice or, temporarily, a bowline.
If you use the chainplates, you must test the chainplate for movement under load after mounting the brake. Chainplates
which are thin strips of metal will bend and fatigue from any side load.
Page 4
If the line can not pass through the toggle, install an eye splice with a thimble in the end of the line. Follow the directions
below to complete the installation.
To attach hardware like a block or a shackle directly to the chainplates, use
lacing line, which is more reliable than a poorly aligned shackle. Adjust the
number of wraps to meet the safe working loads given in the specifications. A
good 1/8" / 3 mm polyester line will have a breaking strength of about 300
lbs. The safe working load is 20% of the breaking strength or 60 lbs, so 20
complete wraps of line around the chainplate and through the block or shackle
would give a safe working load of 1,200 lbs. Most of the wraps must go
completely around the turnbuckle toggle, but add a few more wraps through
the toggle, to keep the line from riding up the toggle.
Finish up by wrapping the line around itself, to provide a cover for UV protection. By wrapping the line up to and around the shackle, after the line has
been tensioned, you can help hold the block or shackle in the correct orientation.
Genoa Tracks: Genoa tracks often provide a convenient point, if they are
set inboard and extend to within 12" / cm of the aft lower chainplate. Many
hardware manufacturers make pad eye’s that slide on a track for the fixed end
of the brake line, including Schaefer, Lewmar and Harken. A genoa track
block can be used on the other side to turn the line back to the cockpit.
Cabinhouse Pad Eye’s: As mentioned, this is a good spot for boats with
narrow decks, high cabinhouses, and outboard chainplates, as on many Island Packets, Pacific Seacrafts, and other more traditional boats. Contact the
builder to ascertain if the cabinhouse is strong enough to take the brake loads.
Normally the pad eye’s must be installed on the Cabinhouse top, as far outboards as possible. Pad Eye’s must be installed with backing plates. Use a
spring mounted stand up block on the side where the line will run back to the
cockpit.
Deck Mounted Pad Eye’s: An inboard deck location may be the best
option for some boat where there are no genoa tracks. This makes for a good,
permanent installation. Contact the builder to ascertain if the deck is strong
enough to take the brake loads. Pad Eye’s must be installed with backing
plates. Use a spring mounted stand up block on the side where the line will
run back to the cockpit.
Seizing block to toggle
Line run to cabinhouse
Toerail mounted brake
Toerail Mounting The toerail is sometimes the only possible location, especially on boats with long booms. Bear in mind
that you will have to step over the line when going forward. Fortunately, the brake eliminates one of the reasons to go
forward. Again, be very careful what you attach the brake line to. Stanchion bases and midship cleats often are not
strong enough.
Page 5
Pad Eye Installation
When installing pad eye’s in Balsa cored fiberglass, you must use the following
procedure.
1. Drill a hole the diameter of the through bolt you intend to use through only the
upper layer of the deck. If you drill all the way through, tape over inside hole.
2. Bend a sturdy nail over, so the short side from the right angle is about 1/4” /
6mm long.
3. Insert long end into a drill. Remove balsa core 1/4” from edge of existing
hole. Now you are ready to rig the Brake.
4. Mix some epoxy with high density filler. Epoxy should be consistency of heavy
cream. Pour into holes.
5. Redrill hole for fastener, and mount using an appropriate bedding compound
such as 3m 101.
Balsa Core
Fill with epoxy and refill hole
Mounting Tips, Boom Attachment
Often it’s possible to use an existing boom eye or bail for mounting the brake,
especially with the beckett style brake, where the brake normally attaches to
the vang attachment point. Also, many modern booms have sliding bails under the boom. By removing the fasteners, a spare bail can be slide into position and refastened. Otherwise, mount a through bolted, V shaped boom bail
in the appropriate position. Some booms will need reinforcing if light weight.
A rectangular plate riveted to the boom should be added to strengthen the
boom where the bail will be mounted, for boats planning extensive offshore
passages. Contact a qualified rigger. Try to isolate the SS parts from the
boom by using the supplied plastic bushings.
Beckett Style Brake mounted
If the brake will be tensioned by a line running back from the mast, a V shaped Bail must be used (and the longer the
V, the better). You will also need another attachment point on the boom to turn the line back to the front of the mast.
Rigging the Brake
Brake Line Adjustable
Once the needed attachment points are
positioned, rigging the brake is simple. Attach the Brake to the boom bail. Note that
the brake shackle can be front or side
mounted. Wire the shackle pin to prevent it
from turning. Run the line from the deck attachment point, through the Brake, and back
down to the turning block.
The line should then be run aft to the cockpit. Adjust the tension on the line with a 6
to 1 block and tackle or run the line through
a line stopper to a winch. If you use a 4 to
1 block and tackle, you may also need a
winch to get the line tight. You will be adjusting the tension on this line to secure the
boom, or allow it to jibe.
Boom Brake
Turning Block
Brake line led aft to winch
or block & tackle
Page 6
Rigging the Brake
Brake Line Fixed
If you want to be able to run the adjusting line back to the cockpit from the base
of the mast, you have 2 options. Either
use a block and tackle to pull the bail aft
to tension the brake, or use a single line
run to a line stopper and a winch.
With the block and tackle method, attach a block
and tackle to the bail (or the brake shackle that is
also run through the bail. The other end of the block
and tackle would be secured to an attachment point
aft of the brake bail. The line would run from the block
and tackle forward to the gooseneck, then down to the
base of the mast, and aft to the cockpit to a line stopper or
cleat.
With the winch method, run a single line from the bail, aft a foot or
so around a block and back forward to the gooseneck, down to the
base of the mast and back to the cockpit. The line will be tensioned
with a line stopper and a winch.
Using a single line to pull bail back
Testing the Installation
Before you head off sailing, you’ll want to test your installation.
1. First, with the adjusting knob loosened by 2-3 turns, snug up the brake and
push it through it’s arc. Make sure the line can not catch anything, and that the
tension does not significantly change as the boom swings all the way through
it’s arc from side to side. See the section Checking the Line Tension for
more information.
2. Next, tighten the adjusting knob and brake line as tight as possible, with
the boom swung all the way out. Have someone pull in the mainsheet, while
you check that there is no movement of any of the hardware that shows a sign of weakness. Look for chainplates
bending, or the fiberglass around the pad eye moving. Use a straightedge to check for deflection.
3. Finally, swing the boom out again, tighten everything as much as possible, and pull in on the mainsheet. It should
require as much force as it takes to pull the boom in on the windiest day of sailing you are likely to encounter. If the
boom can easily be pulled in, you are either not tightening the brake line enough (you need a higher ratio block and
tackle), or the line diameter / brake is too small. Contact us for assistance.
Page 7
Operation
Using the Boom Brake is simple enough. Just adjust the tension on the Brake line to regulate the speed of the boom.
Practice to get a feel of how this works. In light winds, you may want to let off on the adjusting knob to reduce friction.
In winds over about 10 knots, the knob must be tightened. If you find that the Brake provides too much or too little
friction no matter how you adjust the knob, try using a smaller diameter line (for less friction) or a larger line (for more
friction). Mark the Brake line with an indelible ink marker to serve as a reference to help correctly tension the Brake line.
To jibe, you should pull the boom in using the mainsheet. Allow the brake to provide some drag to keep the boom from
suddenly flying across.
The only maintenance needed is an occasional rinsing to remove salt from the line. Also check the line and other fittings
periodically for wear or chafe. The Brake line should be changed regularly, due to the nature of it’s use. A special
locking compound has been applied to the threads for the knob, to keep it from easily coming off. Do not take the knob
off, or loosen it more than 3 turns. Doing so will remove some of the locking compound.
Besides serving as a preventer, you’ll find other uses for the Brake. At anchor, tighten up on the Brake to keep the boom
from swinging around. The Brake can also be used to hold the boom out for picking up objects (such as an outboard
or a dingy ) or to allow you to fit a sun awning. The brake is almost essential for offshore man overboard drills, as it
prevents the boom from swinging around while you hoist the man over board out of the water. The mainsheet should be
fitted with a snap shackle, so it can be used to hoist up the man over board. You can even use it to sail backwards! With
the jib rolled up, the Brake tight, and the boom out at least 40 degrees, backwind the main. The boat will quickly slow
down, and with experience (and the right boat), you’ll be able to sail backwards.
The Brake really comes into it’s own for running wing and wing, in that it allows you to quickly set the boom up or
switch it over for wind shifts or a new course.
Best of all the boom will always be under control, even while jibing when a preventer is disconnected and useless. We
are sure you will be very pleased with it, and we look forward to hearing from you. The section below on MOB drills
is taken from the Cruising Sailing course we teach at our affiliated Sailing School, Sound Sailing Center.
MOB - Quickstop Method
The Brake makes MOB recoveries quite a bit easier, as it allows you to hold the boom over the water, and use the main
sheet to hoist up the MOB.
We recommend using the Quickstop method with a Lifesling, as it’s easy to do with limited crew, and the heave to
aspect helps quiet the boat down if you’re out in any wind. You must practice this at least once on any boat you are
unfamiliar with, to see how the boat heaves to, and figure out how to hoist the Lifesling up. Every boat will behave and
is rigged differently. Even the same boat will heave to quite differently with a 110 or 150 up. Masthead rigs with large
genoa’s may be hard to jibe from the hove to position. With that warning in mind, here are the general steps to follow.
Page 8
1.
2.
3.
4.
5.
6.
7.
8.
9.
10.
11.
12.
Tack immediately. Shout MOB. Assign a spotter for the MOB if possible.
Let the jib or spinnaker back wind. Do not touch the sheets. You will be hove to.
Deploy the lifesling immediately.
Point so you are heading 1 boat length upwind of MOB.
Jibe when you pass MOB.
Circle MOB (tacking and jibing without touching jib sheets) till they grab float.
Head upwind. Roll up jib, drop main. Do not start motor. Prop should be locked.
Pull in Lifesling and MOB as much as possible. Secure line.
Assume MOB can not climb swim ladder (often they are in shock, with waterlogged clothes).
Attach main halyard to boom end, slacken vang / brake line and main sheet, raise boom 4-5 feet.
Disconnect main sheet lower block (should have a snap shackle), attach to lifesling bridle.
Lower lifelines, set up brake, hoist MOB back onboard.
By tacking immediately, you stay close to the victim. By hoving to, you will slow the boat down, and things will be more
controlled. Don’t come too close to the MOB after your tack. By practicing this with a real person, you will gain a great
appreciation for how much someone weights in the water fully clothed, and how difficult it is to move around or climb
the swim ladder when a boat is pitching in the waves. Add a little shock, and it’s all most people can do to get into the
Lifesling. Remember that the topping lift is often not sized for pulling up a MOB. Use the main halyard attached to the
end of the boom. You may think you can hoist up the MOB by using the main halyard and a winch, but on most boats,
this is too difficult. Finally, using the motor is a great way to kill the MOB. The motor should be OFF, with the gearshift
lever in reverse to stop the prop from turning.
The Lifesling brochure talks about rigging another block and tackle to hoist the person on board, and leaving the
mainsheet hooked up. We recommend using the mainsheet with a snap shackle on the lower block, since it’s already
there. It may not be a good idea to have people trying to find a piece of gear when there is a MOB situation. This is
only our personal opinion. Practice and see what works well for you. The Boom Brake is used to keep the boom from
swinging around.
Many MOB’s (and probably most fatal MOB’s) are the result of accidental jibes. With the brake properly installed and
used, this possibility is greatly reduced. Still, it is good seamanship to practice your MOB drills. Your crew, especially
if they are not experienced, will appreciate knowing there is a plan if someone goes over. Spend a few minutes as you
head out running through the MOB drill, and practice it. A great time to practice it is when someone loses something
over. Time yourself, and see how fast you can make it back. In our sailing school, we find that with practice, a student
can get the retrieval times down from 10-15 minutes on a first attempt, to under 3 minutes after a few practices.
Legal Information and Warranty
Dutchman is a Registered Trademark of Martinus Van Breems, Inc. This Owner’s Manual is Copyright 1997 by Martinus
Van Breems, Inc., P.O. Box 2875 Saugatuck Station, Westport, Connecticut, 06880, U.S.A.,
tel 203 838 0375. Fax 203 838 0377 Martinus Van Breems, Inc. reserves the right to change all prices, hardware,
and specifications without notice at any time. U. S. and Foreign patents pending.
Warranty: Satisfaction with the Dutchman Boom Brake is guaranteed if we are informed in writing of any dissatisfaction within One Year of the Date of Purchase. Please note that if the Boom Brake is not working correctly, it is usually a
matter of incorrect installation.
The Dutchman Boom Brake is unconditionally guaranteed against defects in materials supplied by MVB Inc. for a
period of 5 years. Normal wear to or by the rope is excluded. Defective items must be returned shipping prepaid to
MVB Inc. and will be repaired or replaced at the option of MVB Inc. Return of defective products or a claim of
dissatisfaction must be accompanied by a letter giving name, address, phone number, copy of original invoice, size,
builder, year, name and location of boat, and an explanation of the defect or problem. This warranty does not apply
to or include any products which were improperly installed or maintained, nor to any consequential or incidental losses
or damages arising from the product or its use. This warranty is in lieu of all other implied, express and statutory
guarantees, and in no event shall MVB Inc. be liable for special, incidental, or consequential damages.
Page 9
Licensing Card
Please fill out and return this licensing card.
This licensing card will help us to provide you with product updates.
Thank you very much, and please tell your friends about our products.
Thank you for you selection of a Dutchman product. Please complete and return this
warranty card as soon as possible. Thank you.
I bought a ____________________________________ Date ___________________
Purchased From _________________________________________________________
Make / Size / Year of Boat ______________________________________________
Name / Home Port of Boat _______________________________________________
My Name ______________________________________________________________
Address _______________________________________________________________
______________________________________________________________________
Tel. Number ____________________________________________________________
Comments _____________________________________________________________
______________________________________________________________________
______________________________________________________________________
______________________________________________________________________