1
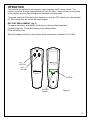
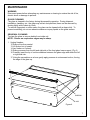
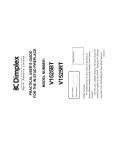
PRACTICAL USER’S GUIDE
FOR THE DIMPLEX 36” OUTDOOR
ELECTRIC FIREPLACE
MODEL NUMBER:
DFO3607
Quality checked by:
Serial Number _________________
Model Number _________________
CAT Number
__________________
Valued Customer,
We are pleased that you have chosen to purchase an electric fireplace
manufactured by Dimplex North America Ltd. Over the years, valuable
memories will occur around the warmth and comfort of your hearth. Thank
you for allowing our product to be the backdrop for those special moments.
7207980300REV00
QUICK REFERENCE GUIDE FOR THE DIMPLEX
ELECTRIC FIREPLACE
1. Prior to the first use of the fireplace verify the following:
• Are the circuit breakers for the socket the unit uses on?
2. The information regarding the model of your fireplace can be found
on the rating plate. See Page 2 for location.
3. If you have any technical questions regarding the operation or
service of your fireplace have your Model and Serial Number ready,
and contact Dimplex North America technical support at 1-888DIMPLEX (1-888-346-7539) before returning the product to the point
of purchase.
CONTENTS
PAGE 1
Important Instructions
PAGE 2
Unpacking Instructions
PAGE 3
Model and Serial Number
Information
PAGE 4
Site Selection and Preparation
PAGE 5
Fireplace Installation
PAGE 5
Operation
PAGE 7
Maintenance
PAGE 8
Stereo Instructions
PAGE 13
Warranty
IMPORTANT INSTRUCTIONS
SAVE THESE INSTRUCTIONS
PLEASE RETAIN THIS USER’S GUIDE FOR FUTURE REFERENCE
When using electrical appliances, basic precautions should always be followed to reduce the
risk of fire, electric shock, and injury to persons, including the following:
1. Read all instructions before using the electric fireplace.
2. Always unplug the electric fireplace when not in use.
3. Do not operate any unit with a damaged cord or plug, or if the electric fireplace has
been dropped or damaged in any manner. Return unit to authorized service facility for
examination, electrical or mechanical adjustment, or repair.
4. Do not run the cord under carpeting. Do not cover cord with throw rugs, runners, or
the like. Arrange cord away from traffic area and where it will not be tripped over.
5. To disconnect the unit, turn the controls off, then remove the plug from the outlet.
6. Do not modify the electric fireplace. Use it only as described in this manual. Any
other use not recommended by the manufacturer may cause fire, electric shock or
injury to persons.
7. Do not burn wood or other materials in the electric fireplace.
8. Do not strike the fireplace glass.
9. Always use a certified electrician should new circuits or outlets be required.
10. Always use properly grounded, fused and polarized outlets.
11. Disconnect all power supply before performing any cleaning, maintenance or
relocation of the unit.
12. Do not use a pressure washer to clean unit.
13. When transporting or storing the unit and cord, keep in a dry place, free from
excessive vibration and store so as to avoid damage.
NOTE: Procedures and techniques that are considered important enough to emphasize.
CAUTION: Procedures and techniques which, if not carefully followed, will result in damage
to the equipment.
WARNING: Procedures and techniques which, if not carefully followed, will expose the user
to the risk of fire, serious injury, illness or death.
1
UNPACKING INSTRUCTIONS
1.
2.
3.
4.
Remove firebox from carton.
Carefully lay unit on it’s back.
Remove screws from the left and right side of the front glass lower support.
Carefully insert the tip of a slot screwdriver between the glass edge and either the left
or right side trim.
5. Using the screwdriver as a lever, gently apply pressure in a downward motion, forcing
the edge of the glass up.
6. Remove packing foam from the top of the log set.
7. Pull the front edge of the plastic ember bed or plastic grate up and forward until the
rear tab releases from the ledge located at the bottom.
8. Remove packing material from around the log set.
9. Clean front glass if needed.
10. Re-assemble logset and front glass.
2
IMPORTANT INSTRUCTIONS
If you have any questions regarding our products please have the product model and serial
numbers available upon calling Dimplex customer service or technical support. To locate the
model and serial number labels see below (Figure 1). Record the Model number, Serial
number, and CAT number on the front cover of this manual for future reference.
Model Number
Serial Number
Serial Number
Model Number
Model Number
Serial
Number
Firebox
Carton
Figure 1
3
NOTE 1
A 15amp, 120 volt outdoor GFI is required. Additional appliances on the same circuit may
exceed the current rating of the circuit breaker.
WARNING
Ensure the power cord and transformer are not installed so that it is pinched or against a
sharp edge and ensure that the cord and transformer are stored or secured to avoid tripping
or snagging to reduce the risk of fire, electric shock or injury to persons.
Construction and electrical outlet wiring must comply with local building codes and other
applicable regulations to reduce the risk of fire, electric shock and injury to persons.
Do not attempt to wire your own new outlets or circuits. To reduce the risk of fire, electric
shock or injury to persons, always use a licensed electrician.
SITE SELECTION AND PREPARATION
This section provides instructions for selecting a location and preparing the site to install the
fireplace into your Dimplex mantel surround.
1. Select a suitable location.
2. For ease of electrical hook up you may wish to locate the fireplace near an existing
outlet. (refer to NOTE 1).
NOTE
The dimensions of the fireplace are 37.60”wide X 26.25” high X 11” deep. The viewing area
is 36” wide and 19.25” high.
20 Feet
4
FIREPLACE INSTALLATION
11. Install the fireplace assembly only into the Dimplex outdoor mantel.
(refer to mantel assembly instructions)
OPERATION
ELECTRIC FIREPLACE MANUAL CONTROL
The manual controls for the firebox are located in the upper right hand corner behind the
access panel. To access the controls, open the upper access panel by pulling forward and
down.
To locate controls refer to Figure 2.
NOTE: The main on/off switch, flame action and flame brightness controls are always
illuminated as long as the unit is plugged in.
A. Main On/Off Switch
The ON/OFF SWITCH supplies power to all fireplace functions (Flames/Flame speed
Control/Dimmer Control).
B. Flame Action Control
Press the up or down arrow to adjust the flame speed to the desired level.
C. Flame Brightness Control
Press the up or down arrow to increase or decrease the brightness of the overhead lights.
D. Storage Compartment
A convenient location to place your CD’s or MP3 player.
E. Stereo/MP3/CD Player
This fireplace is equipped with a built-in stereo.(refer to page 8 for operation)
NOTE: This unit does not have a heat option
E
D
C
B
A
Access
Panel
FIGURE 2
5
OPERATION
The fireplace is supplied with an integrated radio frequency on/off remote control. The
remote control has a range of approximately 50 feet (15.25m), it does not have to be pointed
at the fireplace and can pass through most obstacles (including walls).
To operate, push the ON button to turn fireplace on, push the OFF button to turn the fireplace
off. This remote does not control the stereo system.
BATTERY REPLACEMENT (fig. 3)
To replace the battery, slide battery cover open on the hand held transmitter.
Correctly install one 12 volt (A23) battery in the battery holder.
Close the batter cover.
Store the fireplace remote in a dry location where temperature is between 15 C to 35C.
ON
BUTTON
OFF
BUTTON
BATTERY
BATTERY
COVER
Figure 3
6
MAINTENANCE
WARNING
Disconnect power before attempting any maintenance or cleaning to reduce the risk of fire,
electric shock or damage to persons.
GLASS CLEANING
The glass is cleaned in the factory during the assembly operation. During shipment,
installation, handling, etc., the glass may collect dust particles; these can be removed by
dusting lightly with a clean dry cloth.
To remove fingerprints or other marks, the glass can be cleaned with a damp cloth. To
prevent scratching, do not use abrasive cleaners or spray liquids on the glass surface.
SEASONAL CLEANING
To clean the glass or remove debris from inside unit.
NOTE: Gloves are required as edges may be sharp.
1. Unplug fireplace
12. Remove top from mantel.
13. Lift firebox out of mantel.
14. Lay firebox on it’s back.
15. Remove screws from the left and right side of the front glass lower support. (Fig 4)
16. Carefully insert the tip of a slot screwdriver between the glass edge and either the left
or right side trim.
17. Using the screwdriver as a lever gently apply pressure in a downward motion, forcing
the edge of the glass up.
SCREWS
GLASS
Figure 4
7
STEREO INSTRUCTIONS
IMPORTANT INSTRUCTIONS
1. Never repair the stereo unit yourself. In case of any failure, please turn off the power,
and contact Dimplex North America. This unit is composed of many precision
electronic components. The dismantling or repair may cause damage.
2. Keep the unit away from humidity, dust, steam, smoke, direct sunlight, etc. Do not
use any chemical detergent on unit.
3. Use soft rag to clean the surface of the unit.
4. Store faceplate in dry areas where temperature is
between –10 C to 60 C.
5. Prevent unit from falling or encountering any serious impact.
6. Close access panel when not in use, or after operation.
Control Panel Functions
1. Panel Open Button
2. Eject Button
3. Select Button
4. Volume Adjustment
5. Clock Button
6. Radio Preset 1/Disc Introduction
7. Radio Preset 2/Disc Repeat
8. Radio Preset 3/Disc Random
9. Radio Preset 4
10. Radio Preset 5
11. Radio Preset 6
22
4
5
12. Play Button
13. Band Button
14. Program-Preview/Search-Down
15. Program-Next/Search-Up
16. Reset
17. Preset-EQ
18. Station Auto-Scan and Save Aps
19. Auxiliary Button
20. Auxiliary Input Jack
21. Equal Loudness Compensation
22. Power Button
21
19
1
14
20
17
2
15
3
12 13
6
7
8
9
10
11
18
Stereo Chassis
16
8
BASIC OPERATION
ON/OFF
Press the on/off button to power on and press it again to power off.
Press the on/off button to power the Radio CD and AUX/MP3 functions.
DIS: Display the clock and the clock adjustment
(1) Connect the faceplate to the stereo chassis and power on; the LCD will display the
radio frequency.
(2) Press the
, the LCD will display the current time; press and hold the
button
and the hours on the LCD will flash.
(3) Press the
or
button to set the hour and then press the
button again,
the minute will flash. Press the
or
button to set the minute.
(4) Lock the time memory by pressing the clock button after proper time is set. The
flashing will stop and the player will again display the radio frequency 5 seconds
later.
VOL UP/DOWN
To adjust volume up, turn the volume knob “clockwise” (max 63) or to adjust the
volume down turn the volume knob “counter clockwise“(min 01). When the volume
knob is turned the screen will display the volume level. When the volume is turned
counter clockwise fully “mute” will be displayed on the screen.
EQ FUNTION
Press “EQ” button continuously and choose from three factory preset sound settings.
NOTE: If the factory EQ is activated the base and treble are inactive.
BAS
Press the SEL button once to enter the BAS mode and the screen will display the sign
of “BAS”.
To adjust the base level up or down turn the volume knob “clockwise” to increase the
base or “counter clockwise“ to decrease the base.
TRE
Press the SEL button twice to enter the TRE mode and the screen will display the
sign of “TRE”.
To turn the treble level up or down turn the volume knob “clockwise” to increase the
treble or “counter clockwise“ to decrease the treble.
LEFT/RIGHT BALANCE
Press the SEL button three times or once (EQ Preset Mode) to enter the
LEFT/RIGHT BALANCE mode. The screen will display “BAL”.
To adjust the balance left or right, turn the volume knob “clockwise” for the right
speaker or “counter clockwise“ for the left speaker.
9
FAD BALANCE
Press the SEL button four times or twice (EQ Preset Mode) to enter the FAD mode
and the screen will display “FAD”.
There are no rear speakers so this setting can stay at default or max out the front fade
by turning the volume knob clockwise.
ERROR & RECOVERY
1. In case of any error during the process of radio or disc playing “ERROR” will
appear on the screen, you will then have to restart the device.
2. If the sign of “ERROR” remains it is recommended that you press the RESET
button with a fine tipped tool through the small hole located in the lower left corner
of the stereo chassis.
CD/MP3: BASIC OPERATIONS
INSERT/EJECT: Press the button on the panel, the faceplate will open. Select a
disc and insert into the disc holder with the printed side facing up. Press EJECT to
take the disc out of the holder. If the disc is not removed from the holder within 10
seconds it will automatically go back inside the holder. When the disc is taken out of
the holder the stereo will automatically enter into radio (BAND) mode.
OPEN Button:
Press to open the front panel to access the CD.
PLAY/PAUSE
When a disc is in the disc holder press the PLAY button to play the disc. This function
will also work when in the RADIO mode. To pause press the play button, the display
will show “ ----“; press the play button again to resume play.
(1) NEXT SEARCH
In the PLAY mode press the
button to skip to the next track on the CD/MP3, the
new track number will be displayed in the display. Press
for the desired track
number.
(2) PREV SEARCH
In the PLAY mode press the
button to skip to the previous track on the CD/MP3,
the previous track number will be displayed in the display. Press
for the desired
track number.
(3) FAST FORWARD
In the PLAY mode press and hold the
button to fast forward through the current
track, then release the button and press the
button to stop and play the current
track.
(4) REWIND
In the PLAY mode press the
button to reverse through the current track.
Release the button and press the
button to stop and play the current track.
INT: Browse Programs
Press the INT button and the LCD will display the sign of “INT”, the player will play the
introduction (5 seconds) of each track on the disc. Press the INT button again to stop
browsing and enter into normal play mode.
10
RPT: Repeat Playing
Press the RPT button, the LCD will display “RPT”. The player will continuously repeat
the selected track. To cancel this function press the RPT button again.
RDM: Play at Random
Press the RDM button, the LCD will display “RDM”. This setting will play all tracks on
the current CD randomly. Press RDM button again to cancel this selection.
RADIO OPERATION
STATION-SWITCH BAND
Press the “BAND” button to enter the radio mode. There are 3 FM bands (FM1, FM2,
FM3), as well as AM1 and AM2. Each has 6 radio presets. In the radio mode, press
the
button or
button to manually search upward or downward. Press the
button or
button for more than one second to automatically search for the next
station.
STATION-PRESET Button
There are 6 STATION-PRESET buttons that you can save your favorite stations in
each band. FM1, FM2, FM3 and AM1 and AM2. 30 stations may be stored in total.
STATION-SAVE Button
Press the BAND button to select the bands of the FM radio stations you want to save,
including FM1, FM2, FM3, AM1 and AM2. Press the TUNE button to select your
favorite station. Press one of the preset radio stations buttons (1 to 6) for more than 3
seconds; the station will then be stored in the selected preset radio station. To listen
to one of the stations saved, press the preset button it was saved in.
Auto Scan/Auto Save of Station
When in radio mode press the “APS” button to automatically scan the preset stations.
Each channel will be played for 5 seconds. During this process when you reach your
favorite channel press the “APS” again to stop scanning. Press “APS” and hold for 3
seconds to automatically scan and save a station, this will cancel the original memory
and re-save the stations with the strongest signals from 1 to 6. During this process
press “APS” again to stop automatic saving.
11
Notes for Using CD
1.
2.
3.
4.
5.
Keep the disc clean as possible.
Do not play damaged or deformed discs.
Keep the disc away from direct sunlight or high temperatures.
Put the disc in case after use.
Fingerprints or other smears left on the disc may affect sound quality. You may use a
dry soft cloth to clean the disc surface. If necessary, you may also use a soft damp
cloth to clean more stubborn smears or fingerprints.
6. Be sure to clean the disc from its center to edge rather than along the edge.
General Performance
Frequency Modulation
Tuning Range………87.5 – 108MHz
Mid Frequency……..10.7MHz-0.3
Sensitivity of Noise Limit…..400db
Image Rejection…………40db
Amplitude Modulation
Tuning Range……….522-1620KHz
Mid Frequency………455Hz-5
Sensitivity Noise Limit….below 32db
Image Rejection…………above 34db
CD
Laser………………….semiconductor laser, Wavelength 780 NM
Frequency Sonority…...20Hz-20KHz
SNR……………………>80 db
Harmonic Distortion…...<0.012% (1KHz)
Others
Output Power (10% THD)……….2 x 25W
Power source voltage…………….11-13.8V Negative Pole Earthed
Loudspeaker Impedance…………4-8 Ohm/Sound Channel
Installation Dimension…………..172 (W) x 165 (D) x 50 (H) mm
Weight……………………………2.0kg
12
LIMITED WARRANTY
Products to which this limited warranty applies
This limited warranty applies to your newly purchased Dimplex outdoor fireplace or outdoor
stove. This limited warranty applies only to purchases made in any province of Canada
except for Yukon Territory, Nunavut, or Northwest Territories or in any of the 50 States of
the USA (and the District of Columbia) except for Hawaii and Alaska. This limited warranty
applies to the original purchaser of the Product only and is not transferable.
Products excluded from this limited warranty
Light bulbs are not covered by this limited warranty and are the sole responsibility of the
owner/purchaser. Products purchased in Yukon Territory, Nunavut, Northwest Territories,
Hawaii, or Alaska are not covered by this limited warranty. Products purchased in these
States, provinces, or territories are sold AS IS without warranty or condition of any kind
(including, without limitation, any implied warranties or conditions of merchantability or
fitness for a particular purpose) and the entire risk of as to the quality and performance of
the products is with the purchaser, and in the event of a defect the purchaser assumes the
entire cost of all necessary servicing or repair.
What this limited warranty covers and for how long
Products covered by this limited warranty have been tested and inspected prior to shipment
and, subject to the provisions of this warranty, Dimplex warrants such products to be free
from defects in material and workmanship in respect to the fireplace components of this
product for a period of 12 months; and in respect to the compact-disc player, stereo
speakers and stereo components of this product for a period of 90 days from the date of the
first purchase of the Product.
This limited warranty period also applies to any implied warranties that may exist under
applicable law. Some jurisdictions do not allow limitations on how long an implied warranty
lasts, so the above limitation may not apply to the purchaser.
What this limited warranty does not cover
This limited warranty does not apply to Products that have been repaired (except by Dimplex
or its authorized service representatives) or otherwise altered. This limited warranty does
further not apply to defects resulting from misuse, abuse, accident, neglect, incorrect
installation, improper maintenance or handling, operation with an incorrect power source, fire
or other circumstance outside of Dimplex's control including, without limitation, an Act of God.
What you must do to get service under this limited warranty
Defects must be brought to the attention of Dimplex Technical Service by contacting Dimplex
at 1-888-DIMPLEX (1-888-346-7539), or 1367 Industrial Road, Cambridge Ontario, Canada
N1R 7G8. Please have proof of purchase, catalogue/model and serial numbers available
when calling. Limited warranty service requires a proof of purchase of the Product.
What Dimplex will do in the event of a defect
In the event the Product or part covered by this limited warranty is proven to be defective in
material or workmanship during, in the One Year Warranty or 90 Day Warranty period, as
applicable, you have the following rights:
13
Dimplex will in its sole discretion either repair or replace such defective Product or
part without charge. If Dimplex is unable to repair or replace the Product or part, or if
repair or replacement is not commercially practicable or cannot be timely made,
Dimplex may, in lieu of repair or replacement, choose to refund the purchase price for
the Product or part.
Limited warranty service will be performed solely by dealers or service agents of
Dimplex authorized to provide limited warranty services.
The purchaser is responsible for removal and transportation of the Product or part
(and any repaired or replacement Product or part) to and from the authorized dealer's or
service agent's place of business.
This limited warranty does not entitle the purchaser to on-site or in-home services.
On-site or in-home services may be performed at the purchaser's specific request and
expense at Dimplex’s then-current rates for such services.
Dimplex will not be responsible for, and the limited warranty services shall not
include, any expense incurred for installation or removal of the Product or part (or any
replacement Product or part) or any labour or transportation costs. Such costs shall be
the purchaser’s responsibility.
What Dimplex and its dealers and service agents are also not responsible for:
IN NO EVENT WILL DIMPLEX, OR ITS DIRECTORS, OFFICERS, OR AGENTS, BE
LIABLE TO THE PURCHASER OR ANY THIRD PARTY, WHETHER IN CONTRACT, IN
TORT, OR ON ANY OTHER BASIS, FOR ANY INDIRECT, SPECIAL, PUNITIVE,
EXEMPLARY, CONSEQUENTIAL, OR INCIDENTAL LOSS, COST, OR DAMAGE
ARISING OUT OF OR IN CONNECTION WITH THE SALE, MAINTENANCE, USE, OR
INABILITY TO USE THE PRODUCT, EVEN IF DIMPLEX OR ITS DIRECTORS,
OFFICERS, OR AGENTS HAVE BEEN ADVISED OF THE POSSIBILITY OF SUCH
LOSSES, COSTS OR DAMAGES, OR IF SUCH LOSSES, COSTS, OR DAMAGES ARE
FORESEEABLE. IN NO EVENT WILL DIMPLEX, OR ITS OFFICERS, DIRECTORS, OR
AGENTS BE LIABLE FOR ANY DIRECT LOSSES, COSTS, OR DAMAGES THAT
EXCEED THE PURCHASE PRICE OF THE PRODUCT.
SOME JURISDICTIONS DO NOT ALLOW THE EXCLUSION OR LIMITATION OF
INCIDENTAL OR CONSEQUENTIAL DAMAGES, SO THE ABOVE LIMITATION OR
EXCLUSION MAY NOT APPLY TO THE PURCHASER.
How State and Provincial law apply
This limited warranty gives you specific legal rights, and you may also have other rights
which vary from jurisdiction to jurisdiction. The provisions of the United Nations Convention
on Contracts for the Sale of Goods shall not apply to this limited warranty or the sale of
Product covered by this limited warranty.
1-888-DIMPLEX
1367 Industrial Road
Cambridge, Ontario
Canada, N1R 7G8
1-888-346-7539
14