1
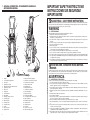
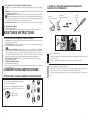
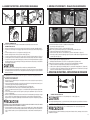
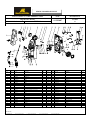
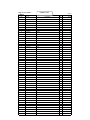
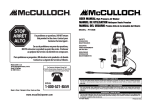
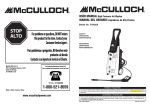
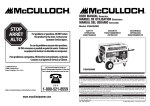
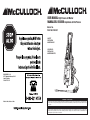
USER MANUAL High Pressure Jet Washer
MANUAL DEL USUARIO Limpiadoras de Alta Presion
Model No.
FHH18A/FHH20C
SAFETY
OPERATION
MAINTENANCE
SEGURIDAD
OPERACION
MANTENIMIENTO
ON
OFF
McCULLOCH U.S.A
10715 Springdale Avenue, Unit 2
Santa Fe Springs,
CA 90670 U.S.A
Made in China / Hecho en China
WARNING • PLEASE READ
For your own safety please read this manual before attempting to operate your new unit. Failure to follow instructions
can result in serious personal injury. Spend a few moments to familiarize yourself with your Pressure Washer before
each use.
ADVERTENCIA • FAVOR DE LEER
Para su propia seguridad, favor de leer este manual antes de intentar operar su unidad nueva. Si no se siguen estas
instrucciones se pueden provocar serias heridas personales. Dedique unos cuantos momentos a familiarizarse con
su limpiador a presión antes de cada uso.
PN 7096-H18A03
Printed in China
PLEASE READ
Dear Customer,
Thank you for purchasing a McCulloch product. With proper operation and maintenance it will provide you with years of service.
1 - GENERAL INFORMATION - GENERALITES
INFORMACION GENERAL
In order to make the best use of your investment, be CERTAIN to familiarize yourself with the contents of the ENTIRE User Manual
SPECIFICATIONS
before attempting to operate and maintain your unit.
Model No. . . . . . . . . . . . . . . . . . . . . . . . . .FHH18A . . . . . . . . . . . . . . . . . . . . . . .FHH20C
Be sure to carefully follow the step-by-step illustrations in this manual to start, operate and maintain your new product.
Input . . . . . . . . . . . . . . . . . . . . . . . . . . . . .13 Amp . . . . . . . . . . . . . . . . . . . . . . . .13Amp
E
N
G
L
I
S
H
In the manual there will be the following call-outs: NOTE, WARNING / CAUTION and
WARRANTY.
A NOTE is used to convey additional information, to highlight a particular explanation, or expand a step description.
A WARNING or CAUTION identifies a procedure which, if not undertaken or if improperly done, can result in serious personal
injury or damage to the unit and/or both.
The
(WARRANTY SYMBOL) serves notice that unless instructions or procedures are followed, any damage caused will void
the warranty and repairs will be at owner’s expense.
Service other than user maintenance should be performed by a McCulloch Authorized Service Center. Damage or conditions
Nozzle Pressure (Max.) . . . . . . . . . . . . . .1800 psi (125 Bar) . . . . . . . . . . . . . . .2000 psi (140 Bar)
E
N
G
L
I
S
H
which render this product inoperable caused by improper maintenance practices will void the manufacturer’s warranty.
Pump Pressure . . . . . . . . . . . . . . . . . . . . .1160 psi (80 Bar) . . . . . . . . . . . . . . . .1330 psi (91 Bar)
Water Flow (Max.) . . . . . . . . . . . . . . . . . .1.45 GPM (5.5 L/m) . . . . . . . . . . . . . .1.45 GPM (5.5 L/m)
Cleaning Units (Max.) . . . . . . . . . . . . . . . .1682 . . . . . . . . . . . . . . . . . . . . . . . . . .1928.5
Cord Length (Max.) . . . . . . . . . . . . . . . . .35 ft. (10.67m) . . . . . . . . . . . . . . . . . .35 ft. (10.67m)
Hose Length . . . . . . . . . . . . . . . . . . . . . . .19 ft. (6m) . . . . . . . . . . . . . . . . . . . . . .19 ft. (6m)
Spray Angle . . . . . . . . . . . . . . . . . . . . . . .0˚-30˚ . . . . . . . . . . . . . . . . . . . . . . . . .0˚-30˚
Net Weight . . . . . . . . . . . . . . . . . . . . . . . .20.9 Lbs. (9.5 kg) . . . . . . . . . . . . . . . .31.9 Lbs. (14.5 kg)
FOR WARRANTY OR SERVICE CONTACT THE NEAREST McCULLOCH AUTHORIZED SERVICE CENTER
LISTED UNDER “SAWS” IN YOUR TELEPHONE DIRECTORY YELLOW PAGES.
• P.S. The nozzle pressure (max.) is measured at the distance of 10 cm from the nozzle.
McCulloch Corporation
Product Service Department
ESPECIFICACIONES
Modelo No.. . . . . . . . . . . . . . . . . . . . . . . .FHH18A . . . . . . . . . . . . . . . . . . . . . . .FHH20C
FAVOR DE LEER
Potencia . . . . . . . . . . . . . . . . . . . . . . . . . .13 Amp . . . . . . . . . . . . . . . . . . . . . . . .13Amp
Estimado Cliente,
Gracias por comprar un producto McCulloch. Con una operación y mantenimiento adecuados le proporcionará años de servicio.
Con el objeto de hacer un mejor uso de su inversión, ASEGURESE de familiarizarse con el contenido de TODO el Manual del Usuario antes
de intentar operar o dar mantenimiento a su unidad.
Asegurarse de seguir cuidadosamente las ilustraciones graduales de este manual para poner en marcha, operar y dar mantenimiento a su
nuevo producto.
En el manual se encontrarán las siguientes señales: NOTA, ADVERTENCIA / PRECAUCION y
E
S
P
A
Ñ
O
L
GARANTIA.
Una NOTA se utiliza para comunicar una información adicional, para enfatizar una explicación particular, o para extender la descripción de un
paso.
Una ADVERTENCIA o PRECAUCION identifica un procedimiento que, si no se lleva a cabo o se hace en forma inadecuada, puede provo-
La Bompa Presiona . . . . . . . . . . . . . . . . .1160 psi (80 Bar) . . . . . . . . . . . . . . . .1330 psi (91 Bar)
Aguas Fluyen (Max.) . . . . . . . . . . . . . . . .1.45 GPM (5.5 L/m) . . . . . . . . . . . . . .1.45 GPM (5.5 L/m)
Limpiar las Unidades (Maximum) . . . . . . .1682 . . . . . . . . . . . . . . . . . . . . . . . . . .1928.5
Longitud de la Cuerda (Max.) . . . . . . . . . .35 ft. (10.67m) . . . . . . . . . . . . . . . . . .35 ft. (10.67m)
iegue con una manga la Longuitud . . . . .19 ft. (6m) . . . . . . . . . . . . . . . . . . . . . .19 ft. (6m)
Ángulo de Rociada . . . . . . . . . . . . . . . . . .0˚-30˚ . . . . . . . . . . . . . . . . . . . . . . . . .0˚-30˚
car serias heridas personales o daños a la unidad y/o ambas cosas.
La
La Presión de la Boca (Max.) . . . . . . . . . .1800 psi (125 Bar) . . . . . . . . . . . . . . .2000 psi (140 Bar)
E
S
P
A
Ñ
O
L
(SIMBOLO DE GARANTIA) notifica que a menos que se sigan las instrucciones o procedimientos, cualquier daño causado anulará
la garantía y las reparaciones correrán a cuenta del propietario.
Peso neto
. . . . . . . . . . . . . . . . . . . . . . . .20.9 Lbs. (9.5 kg) . . . . . . . . . . . . . . . .31.9 Lbs. (14.5 kg)
• P.S. La presión (max.) de la boca se mide en la distancia de 10 cm de la boca.
Todo el servicio que no sea el mantenimiento del usuario se llevará a cabo en un Centro de Servicio Autorizado McCulloch. Los daños o las
condiciones que hagan inoperable este producto debido a las prácticas inadecuadas de mantenimiento anularán la garantía del fabricante.
PARA GARANTIA O SERVICIO CONTACTE A SU CENTRO DE SERVICIO AUTORIZADO McCULLOCH MAS
CERCANO LISTADO BAJO “SIERRAS” EN LAS PAGINAS AMARILLAS DE SU DIRECTORIO TELEFONICO.
McCulloch Corporation
Departamento de Servicio
1
2
1 - GENERAL INFORMATION - RENSEIGNMENTS GENERAUX INFORMACION GENERAL
1
IMPORTANT SAFETY INSTRUCTIONS
INSTRUCCIONES DE SEGURIDAD
IMPORTANTES
PLEASE READ - SAVE THESE INSTRUCTIONS
When using an electrical appliance, basic precautions should always be followed to assure maximum safety and optimum performance. Read this manual before assembling and operating this appliance. Failure to comply with instructions may result in electrical shock, burns, fire, or personal injury.
17
WARNING
2
16
1-1. SAFETY WARNING!
3
16
ON
OFF
6
15
E
N
G
L
I
S
H
18
4
5
14
7
8
FAVOR DE LEER - CONSERVE ESTAS INSTRUCCIONES
12
11
13
1.
2.
3.
4.
5.
6.
7.
8.
9.
10.
11.
12.
13.
14.
15.
16.
17.
18.
3
Handle
On-Off Switch Trigger Switch
Hose Hook
High Pressure Outlet
Water Inlet (water inlet filter#13 inside)
High Pressure Hose
Safety Lock
Trigger Gun
Lance Extension
Spray Wand
Screw-type female connector
Cleaning needle
Water Inlet Filter
Chemical Tank Ι
Chemical Tank ΙΙ
Holder
Accessories Box
Upper tank cap
When using this product, basic precautions should always be followed:
1. Read all the instructions before using the product.
2. High pressure jets can be dangerous if subject to misuse. The jet must not be directed at persons, animals, electrical devices, or the machine itself.
3. To reduce the risk of injury, do not operate the machine near children. Keep operating area clear of all persons
and pets.
4. Learn how to stop the machine and release pressure quickly. Be throughly familiar with the controls.
5. Stay alert - watch what you are doing.
6. Wear safety goggles.
7. Do not use acids, solvents, or any flammable material in this product. These products can cause physical injuries
to the operator and irreversible damage to the machine.
8. Do not operate the product when fatigued or under the influence of alcohol or drugs.
9. Do not overreach or stand on unstable surfaces. Keep good footing and balance at all times.
10. To reduce the risk of electrocution, keep all connections dry and off the ground. Do not touch plug with wet hands.
11. The gun Safety Lock PREVENTS the trigger from accidentally being engaged. This safety feature DOES NOT
lock trigger in the on position.
12. This product is provided with a Ground Fault Circuit Interrupter built the power cord. If replacement of the plug or
cord is needed, return complete unit to the factory.
10
Al utilizar un aparato eléctrico siempre debe seguir ciertas precauciones básicas para asegurar una protección máxima y un rendimiento óptimo. Lea este manual antes de ensamblar y operar este aparato. Si no sigue las instrucciones podría provocar el riesgo de incendio, choque eléctrico o heridas personales.
9
1.
2.
3.
4.
5.
6.
7.
8.
9.
10.
11.
12.
13.
14.
15.
16.
17.
18.
Mango de Pistola Disparadora
Interruptor Conectado-Desconectado
Sostenedor de la manguera
Salida de Presión Alta
Entrada de agua
Manga de Presión Alta
Cerradura de seguridad
Pistola Disparadora
Extensión de Lanza
Vara Rociadora AltBaja
Conectador femenino tipo-enrosca
Aguja de limpieza
Entrada de Agua con Filtro
Tanque Químico Ι
Tanque Químico ΙΙ
Sostenedor
Caja de los accesorios
Tapón de tanque superior
ADVERTENCIA
1-1. !ADVERTENCIA DE SEGURIDAD!
E
S
P
A
Ñ
O
L
Cuando se usa este producto, las precauciones básicas siempre deben ser seguidas:
1. Lea todas las instrucciones antes de utilizar el producto.
2. Los jet altos de la presión pueden ser peligrosos si maltrata los sujetos. El jet no debe ser dirigido a personas,
animales, dispositivos eléctricos, ni la máquina misma.
3. Para reducir el riesgo de la herida, no opera la máquina cerca de niños. Mantenga área de operacion vacía y alejado de todas personas y animales.
4. Aprenda cómo parar la presión de la máquina y liberación rápida.Esté completamente familiarizado con los controles.
5. Permanezca Alerto- Mire lo que usted hace.
6. Lleve gafas de seguridad.
7. No use ácidos, solvents, o cualquier material inflammable en este producto. Estos productos pueden causar perjuicio físico al operador y daño irrevocable a la máquina.
8. No opere el producto cuando está cansado o bajo la influencia de alcohol o drogas.
9. No vaya demasiado lejos o esté en la superficie instable. Mantenga buena posición y balance en todo momento.
10. Para reducir el riesgo de electrocución, mantenga todas las conexiones secas y fuera de la tierra. No toque el
enchufe con las manos mojadas.
11. La llave de Seguridad de pistola IMPIDE el disparador engranarse accidentalmente. Este característica de
seguridad NO se traba el disparador en la posición.
12. Este producto está provisto del cordón eléctrico incorporado a un interruptor de Circuito de Falta de Tierra. Si el
cambio del enchufe o cordón se requiere, devuelve la unidad completa a la fábrica.
4
GROUNDING INSTRUCTIONS
E
N
G
L
I
S
H
This product must be grounded. If it should malfunction or breakdown, grounding provides a path of least resistance
for the electric current to reduce the risk of electric shock. This product is equipped with a cord having an equipment
grounding conductor and a grounding plug. The plug must be plugged into an appropriate outlet that is properly
installed and grounded in accordance with local codes and ordinances.
DANGER: Improper connection of the equipment grounding conductor can result in a risk of electrocution. Check with
a qualified electrician or service personel if you are in doubt as to wether the outlet is properly grounded. Do not modify the plug provided with the product - if it will not fit the outlet, have a proper outlet installed by a qualified electrician.
Do not use any type of adapter with this product.
GROUND FAULT CIRCUIT INTERRUPTER PROTECTION
This pressure washer is provided with a ground-fault circuit-interrupter (GFCI) built into the plug of the power supply
cord. This device provides additional protection from the risk of electric shock. Should replacement of the plug or cord
become necessary, use only identical replacement parts that include GFCI protection.
EXTENSION CORDS
Use of extension cords is NOT recommended unless plugged into a GFCI protected outlet. Use only 3-wire extension
cords that have 3-prong grounding-type plugs and 3-pole cord connectors that accept the plug from the product. Use
only extension cords that are intended for outdoor use. These extension cords are identified by a marking “Acceptable
for use with outdoor appliances; store indoors while not in use.” Use only extension cords having an electrical rating
not less than the rating of the product. Do not use damaged extension cords. Examine extension cord before using
and replace if damaged. Do not abuse extension cord and do not yank on any cord to disconnect. Keep cord away
from heat and sharp edges. Always disconnect the extension cord from the receptacle before diconnecting the product from the extension cord.
E
N
G
L
I
S
H
WARNING:
5. Not to use the unit below 40 degree F.
6. Units with broken of missing parts, or without protective housing or covers should NEVER be operated.
7. High pressure stream of water that this equipment produces can pierce skin and its underlying tissues, leading to
serious injury and possible amputation.
8. For household use. For indoor or outdoor use.
9. Always wear eye protection when you use this equipment or when you are in vicinity where the equipment is in
use.
10. Never move the machine by pulling on high pressure hose. Use the handle provided on the top of the unit.
11. Use a respirator or mask whenever there is a chance that vapors may be inhaled. Read all instructions with the
mask so you are certain the mask will provide the necessary protection against inhaling harmful vapors.
12. Keep the hose connected to machine and the spray gun while the system is pressurized. Disconnecting the hose
while the unit is pressurized is dangerous.
13. Hold the spray gun firmly in your hand before you start the unit. Failure to do so could result in an injury from a
whipping spray gun. Do not leave the spray gun unattended while the machine is running.
14. Cleaning area should have adequate slopes and drainage to reduce possibility of a fall due to slippery surfaces.
15. Keep water spray away from electric wiring or fatal electric shock may result.
1-3. WATER SUPPLY (COLD WATER ONLY)
1. Water hose must be at least 3/4” in diameter.
2. Flow rate of water supply must not fall below 1.45 GPM (gallons per minute).
3. Flow rate can be determined by running the water for one minute into an empty 5-gallon container.
4. The water supply temperature must not exceed 104˚F/60˚C.
5. Never use the pressure washer to draw in water contaminated with solvents, e.g. paint thinners, gasoline, oil, etc.
6. Always prevent debris from being drawn into the unit by using a clean water source.
WARNING
CAUTION
To reduce the risk of electrocution, keep all connections dry and off the ground. Do not touch plug with wet hands.
1-2. GENERAL SAFETY RULES
1. High pressure hose can develop leaks from wear, kinking, abuse, etc. Water spraying from a leak is capable of
injecting material into skin. Do not point the pressure washer spray at people or animals.
2. Locate this pressure washer in areas away from combustible materials, combustible fumes or dust.
3. Some chemicals or detergents may be harmful if inhaled or ingested, causing severe nausea, fainting or poisoning. The harmful elements may cause property damage or severe injury.
4. Do not allow children to operate the pressure washer at any time.
Risk of injury - Do not direct discharge stream at pesons.
Follow the maintenance instructions specified in the manual.
This machine has been designed for use with cleaning detergent supplied or recommended by the manufacturer. The
use of other cleaning detergents may affect the operation of the machine and void the warranty.
INSTRUCCIONES DE CONECTAR CON TIERRA
Este producto debe conectar con tierra. Si hay funcionamiento defectuoso o interrupción, la conexión con tierra
provee un camino de resistencia lo menos para el corriente eléctrico a fin de reducir el riesgo de choque electrico.
Este producto esta provisto de un cordón contando con un conductor del equipo conectado con tierra y un enchufe
conectado con tierra. El enchufe se debe entrar en una salida adecuada que es instalada exactamente y conectada
con tierra según los códigos y decretos locales.
DANGER: La conexión incorrecta del conductor de equipo conectando con tierra puede resultar en un riesgo de electrocución. Examine con el electricista o persona de servicio - si no fija bien la salida, obtenga una exacta salida instalada por el electricista autorizado. No use cualquier tipo de adaptador para este producto.
E
S
P
A
Ñ
O
L
PROTECCIÓN DE INTERRUPTOR DE CIRCUITO DE AVERÍA DE TIERRA
Este lavadora de presión es provista de un interruptor-circuito de averia de tierra (GFCI) incorpodado en el enchufe
del cordón eléctrico de alimentación. Este aparato provee la protección adicional del riesgo del choque eléctrico. Si
es necesario para cambiar del enchufe o el cordón, sólo use los repuestos idénticos que incluye la protección de
GFCI.
CORDÓN DE EXTENSION
El uso de cordones de extensión NO es recomiendado a menos que se enchufe en la salida protectora de GFCI. Solo
use los cordones de extensión de 3 alambres que tienen enchufes de tipo de 3-punta conectada con tierra y conectores de cordón de 3-polo que aceptan el enchufe del producto. Sólo use los cordones de extensión que son diseñados para el uso fuera de la casa. Estos cordones de extensión son identificados por una marca "Aceptados para
uso de los aparatos fuera de casa, almacena en la casa cuando no están en uso" Sólo use los cordones de extensión que tienen valor eléctricos no menos del valor del producto. No use cordones de extensión dañados. Examine
cordón de extensión antes de usarlo y cambiarlo si lo dañado. No abuse cordón de extensión y no tire cualquier cordon para desconectarlo. Mantenga el cordón fuera de calor y borde agudo. Siempre desconecte el cordón de extensión con el receptáculo antes de desconectar el producto con el cordón de extensión.
ADVERTENCIA
Para reducir el riesgo de electrocución, mantenga todas conexiones secas y fuera de la tierra. No toque enchufe con
las manos mojadas.
1-2. NORMAS DE SEGURIDAD GENERAL
1. Manga de presión alta puede desarrollar escapes de desgaste, roscado, abuso, etc. Agua rociando del escape
puede inyectar el material al piel. No haga la rociadora de lavadora de presión directa a la gente o los animales.
2. Coloque este lavadora de presión en las áreas fuera de materiales combustibles, humos o polvo de combustible.
3. Algunos químicos o detergentes pueden ser perjudicial si inhala o ingiere, causará seria nausea, perder
conocimiento o toxico. Los elementos perjudiciales pueden causar propiedad dañada o seriamente perjudicada.
4. No permita los niños a operar la lavadora de presión en cualquier momento.
5
E
S
P
A
Ñ
O
L
5. No utilize la unidad debajo de 40 grado F.
6. Las unidades con partes rotas o perdidas, o sin tapa o cubiertas, NUNCA se opera.
7. El vapor de presión alta de agua que este equipo produce puede penetrar en la piel y sus tejidos fundamentales,
causando la seria herida y posible amputación.
8. Adquiere el uso doméstico. Para uso en el interior o exterior de la casá.
9. Siempre lleve portector de ojos cuando Ud. usa este equipo o cuando Ud. está cerca de donde el equipo está
en uso.
10. Nunca mueve la máquina por medio de jaiar la manga de presión alta. Use la manga provista en la parte superior de la unidad.
11. Use un respirador o mascara siempre que es posible que inhalar los vapores. Lea todas las instrucciones con la
mascara de manera que Ud. está seguro de que la mascara va a proveer la protección necesaria de inhalar los
vapores perjudiciales.
12. Mantenga la mánga conectada con la maquina y la pistola de rociada cuando el sistema está a presión. El
desconectar la manga cuando la unidad está a presión es peligroso.
13. Mantenga la pistola de rociada firmemente en la mano antes de funcionar la unidad. No lo haga, es posible
causar una perjuicio de la pistola rociadora de derrota. No deje la pistola rociadora sin personal cuando la
máquina esta funcionando.
14. Área de limpieza debe tener declives y drenajes para reducir la posibilidad de la caída debido a las superficies
resbaladizas.
15. Mantenga la rocida de agua fuera de la instalación de alambres eléctricos o el choque eléctrico fatal puede resultar.
1-3. SUMINISTRO DE AGUA (AGUA FRÍO SÓLO)
1. La manga de agua debe ser 3/4" en diametro por lo menos.
2. Velocidad corriente de suministro de agua no debe caer bajo 1.45GPM (galones por minuto).
3. Velocidad corriete puede ser determinada por la corriente de agua por un minuto en un contenedor vacio de 5
galones.
4. La temperatura de suministro de agua no debe exceder de 104˚F/60˚C.
5. Nunca use la lavadora de presion para atraer el agua contaminado con solvents, por ejemplo el diluente de pintura, gasoline, aceite etc
6. Siempre impide escombros que se atraen en la unidad por la fuente de agua limpio.
ADVERTENCIA
PRECAUCION
Riesgo de herida - No descarque el vapor directa a la gente.
Siga las siguientes instrucciones espeficadas en el manual.
Este Máquina se ha diseñada para uso con detergente de limpio suministrado o recomendado por el fabricante. El
uso de otros detergentes de limpieza puede afectar la operación de la máquina y hacer la garantia invalida.
6
1-4. EXPLANATION OF NOTE, WARNING, and WARRANTY SYMBOL
1. A NOTE is used to convey additional information, or highlight a particular explanation, or to expand a step instruction.
2. A WARNING identifies a procedure which, if not undertaken or if improperly done, can result in a serious personal
injury or damage to the unit and/or both.
3.
(WARRANTY SYMBOL) serves notice that unless instructions or procedures are followed, any damage will
void the warranty and repairs will be at owner’s expense. Service other than user maintenance should be performed by a McCulloch Authorized Service Center. Damage or conditions caused by improper maintenance practices which render this product inoperable will void the manufacturer’s warranty.
4. FOR WARRANTY OR SERVICE contact the nearest McCulloch Authorized Service Center l at 1-800-521-8559
3- TECHNICAL & CONSUMER INFORMATION- INFORMACIÓN
TÉCNICA Y DEL CONSUMIDOR
E
N
G
L
I
S
H 1-5. INTERNATIONAL SYMBOLS
1. Read the User Manual (Figure 2-1).
2. Use of these personal safety items is highly recommended to reduce the risk of accidental injury (Figure 2-2).
Hose Hook Ι
Sostenedor de manguera
Hose Hook ΙΙ
Sostenedor de manguera
Holder
Sostenedor
SAVE THESE INSTRUCTIONS
ON
1. Una NOTA usada para comunicar información adicional, para destacar una explicación particular, o para
expander una instrucción específica.
2. Una ADVERTENCIA identifica un procedimiento que, si no se acomete o se realiza inadecuadamente, puede
provocar heridas personales y/o daños a la unidad.
E
S
P
A
Ñ
O
L
3. El
(SIMBOLO DE GARANTIA) sirve para notificar que por los menos las instrucciones o procedimientos
deben llevarse al cabo, cualiquier daño invalidará la garantía y los gastos de la reparaciones serán asumidos por
el dueño. Cualquier otro servicio, con excepción del mantenimiento del usuario, deberá ser realizado por un
Centro de Servicio Autorizado McCulloch. Los daños o condiciones causadas por practicas de mantenimiento
inadecuadas, las cuales hagan que el producto sea inoperable invalidarán la garantía del fabricante.
4. PARA LA GARANTIA O EL SERVICIO contacte al Centro de Servicio Autorizado McCulloch más cercano
Por favor llame 1-800-521-8559.
ON
OFF
B
3-1A
1.
1. Lea el manual del Usuario (Figura 2-1).
2. El uso de estos párrafos sobre seguridad personal es altamente recomendado para reducir el riesgo de heridas
accidentales (Figura 2-2).
2- INTERNATIONAL SYMBOLS -SIMBOLOS INTERNACIONALES
Hose Hook Ι & Hose Hook ΙΙ
(Fig. 3-1A & Fig. 3-1B)
Hose Hook Ι is designed for the placement of high pressure hoses; holder II for power cords.
1.
E
S
P
3-1B
Screw (B) in the Hose Hook Ι (A), Hose Hook ΙΙ (C) Separately to front and back shell, in torque of 3.0KGF*CM.
E
N
G
1-5. SIMBOLOS INTERNACIONALES
CONSERVE ESTAS INSTRUCCIONES
C
OFF
A
1-4. EXPLICACION DE NOTA, ADVERTENCIA Y SIMBOLO DE GARANTIA
Sostenedor de Mangera I y Sostenedor de Mangera II.
Atornillar (B) en el sostenedor de manguera I (A), el sostenedor de la manguera II (C) por separado al frente y
la cáscara trasera, en el esfuerzo de torsión de 3.0KGF*CM. (Figura. 3-1A & Figura. 3-1B)
Sostenedor de manguera se diseña para la colocación de las mangueras de alta presión; sostenedor I para cordon.
Use of these personal safety items is highly recommended to
reduce the risk of accidental injury.
El uso de estos articulos de seguridad personal es altamente
recomendado para reducir el riesgo de lesiones accidentales.
Read the User Manual.
Lea Manual de Usuario.
2-1
2-2
7
8
4- ASSEMBLY INSTRUCTIONS - INSTRUCCIONES DE ENSAMBLE
5- WORKING WITH DETERGENTS - TRABAJO CON LOS DETERGENTS
D
C
A
E
D
F
B
B
G
C
A
4-1A
4-1B
I
4-1C
5-1B
5-1A
5-1C
J
ON
G
F
E
OFF
H
4-1D
E
N
G
L
I
S
H
4-1E
CAUTION
ON
Water supply must be on and water discharge visible at nozzle before activating ON/OFF switch.
8. Turn on the machine by moving the switch to the ON position (J). (Fig. 4-1E). Your pressure cleaner is fitted with
Auto Start/Stop feature. This means the motor and pump will start only when the trigger lever is pressed and shut
off when it is released.
OFF
E
S
P
A
Ñ
O
L
•
RECOMENDACIONES DE SEGURIDAD
Por seguridad personal, se recomienda encarecidamente seguir las recomendaciones de seguridad cuando se
utilice el limpiador de agua de alta presión.
•
MONTAJE Y PUESTA EN MARCHA
1. Asegúrese de que el limpiador de presión está alejado al menos 6 metros (19 pies) de vapores explosivos y
materiales combustibles.
2. Inserte la prolongación de la lanza (A) en la pistola de activación (B). Gire la prolongación de la lanza (A) en el
sentido de las agujas del reloj hasta que apretada. (Figura 4-1A)
3. Una la manguera de alta presión (C) con la salida de alta presión (D). (Figura 4-1B)
4. Una el Conectador femenino screw-type (F) a la acometida de agua (E). (Figura 4-1C)
5. conecte el conectador femenino screw-type (F) con el conectador masculino ligado a la manguera (G) del jardín.
(Figura 4-1C)
6. Conecte la manguera de jardín a la toma de agua fría y abra el agua completamente. Inspeccione las conexiones por su hubiera fugas.
7. Enchufe el cable de alimentación a la toma de corriente eléctrica. Tire del disparador (I) para dejar que el agua
fluya y se elimine el aire atrapado. Espera a que salga un flujo constante de agua de la boquilla rociadora.
Asegúrese de que el bloqueo de seguridad (H) esté desactivado antes de presionar el disparador (I). (Figura 41D)
PRECAUCION
SUMINISTRO DE AGUA DEBE ESTAR ABIERTA Y LA DESCARGA DE AGUA VISIBLE EN LA BOQUILLA ANTES
DE ACTIVAR EL INTERRUPTOR DE ENCENDIDO Y APAGADO.
8. Encienda la máquina colocando el ínterruptor en la posición de encendido (ON) (J). (Figura 4-1E). El limpiador
de presión cuenta con la función de Arranque y parada automáticos. Esto significa que el motor y la bomba solamente se activarán cuando se presione la palanca del disparador y se desactivarán cuando dicha palanca se
suelte.
9
5-1E
5-1D
•
SAFETY RECOMMENDATIONS
In the interest of personal safety it is highly recommended when using the high pressure water cleaner.
•
ASSEMBLY AND START UP
1. Ensure pressure washer is at least 19 feet (6 meters) away from explosive vapors and combustible materials.
2. Insert the lance extension (A) into the trigger gun (B). Turn the lance extension (A) clockwise until tight. (Fig. 41A)
3. Connect the high pressure hose (C) to high pressure outlet (D). (Fig. 4-1B)
4. Attach the Screw-type female connector (F) to water inlet (E). (Fig. 4-1C)
5. Connect the screw-type female connector (F) to male connector (G), which is linked to garden hose. (Fig. 4-1C)
6. Connect garden hose to the cold water source and turn water on completely. Inspect connections for leakages.
7. Insert power cord into power outlet. Pull the trigger (I) to allow water to flow through and eliminate any trapped
air. Wait for steady flow of water to discharge from the spray nozzle. Ensure the safety lock (H) is released before
pressing trigger (I). (Fig. 4-1D)
5-1F
It is allowed for chemical tank ”Ι” and ”ΙΙ” to load different cleaning solutions.
1. Open the Upper tank cap (A). (Fig. 5-1A)
E 2. Refill directly cleaning (C) solution to chemical tanks (B). (Fig. 5-1B)
N NOTE: For every 7 gallons of water pumped 1 gallon of chemical/cleaning solution will be used.
G 3. Tighten properly the tank cap (D) after the refilling. (Fig. 5-1C)
4. Switch to postion1 (E) for the choice of chemical tank ”Ι”, postion2 for chemical tank ”ΙΙ”. (Fig. 5-1D)
5. Pull the spray nozzle (F) forward to adjust trigger gun in low pressure condition before the application of chemical tanks. (Fig. 5-1E & Fig. 5-1F)
ON
OFF
Se permite que el tanque químico ”Ι” y ”ΙΙ” cargue diversa soluciones de limpieza.
1. Habra el casquillo superior del tanque (A). (Figura. 5-1A)
2. Refilling que limpia directamente (C) la solución a los tanques químicos (B). (Figura. 5-1B)
E
NOTA: Para cada 7 galones de agua bombeó 1 galón de la solución chemical/limpiador será utilizado.
S 3. Tighten correctamente el casquillo del tanque (D) después de rellenar. (Figura. 5-1C)
P 4. Cambie posicion 1 (E) para la opción del tanque químico ”Ι”, postion2 para el tanque químico ”ΙΙ”. (Figura. 5-1D)
5. Jale el inyector de aerosol (F) adelante para ajustar el arma del disparador en la condición de la presión baja
antes del uso de tanques químicos. (Figura. 5-1E & Figura. 5-1F)
6- OPERATING INSTRUCTIONS - INSTRUCCIONES DE OPERACION
A
6-1A
•
WORKING WITH THE SPRAY PIPE
E The spray angle can be adjusted from 0˚ to 30˚ by twisting the vario - nozzle (A).(Fig. 6-1A)
N
G
For cleaning easily damaged surfaces (e.g. paint. Vehicle tires), hold the spray tube at a greater distance from surface.
CAUTION
•
TRABAJO CON TUBO ROCIADOR
E El ángulo de rociada se puede ajustar de 0˚ à 30˚ por medio de apretar el vario - inyector (A). (Figura. 6-1A)
S
P
Para limpiar fácilmente la superficie dañada (por ejemplo pintura. Llanta de vehiculo), mantenga el tubo rociador a
una distancia mas grande.
PRECAUCION
10
7- ASSEMBLY INSTRUCTIONS -INSTRUCCIONES DE ENSAMBLE
•
CLEANING AND MAINTENANCE
Before performing any work on the machine, ensure it is unplugged from the main electrical supply.
1. Close the water tap and operate the trigger to relieve pressure in the machine and hose.
.
2. Irregular or too high water pressure indicates clogging or calcium accumulation in the nozzle.
3. Switch off the machine immediately.
4. Unclog the spray nozzle with cleaning needle and clean the filter in the water inlet.
5. Always keep the machine clean. Clean on the underside of the appliance
from time to time.
A
WARNING
CAUTION
Any other servicing should be performed by an authorized sevice personnel.
E
N
.
G Disconnect power cord before filling chemical tank.
L 6. When the jet is too little to do cleaning job, the nozzle or filter may be
plugged.
I
Use cleaning needle (A) to clear the nozzle (B) & water inlet filter (C) when
S
they are plugged. (Fig. 7A & Fig .7B)
H
•
B
ust be fl
7-1A
C
ACCESSORIES
NOTE: Use only accessories and attachments specifically recommended by
manufacturer for use with this product. Accessories and spray pipe are connected with bayonet coupling. The seal on the plug-in bayonet coupling must
be undamaged.
ust be fl
•
STORAGE
1. Store indoors. Store unit above 32˚F (0˚C). Frozen water in pump will
cause permanent damage and void manufacturers warranty.
•
7-1B
LIMPIO Y MANTENIMIENTO
Antes de realizar cualquier trabajo con la máquina, asegure de que no sea enchufada a la alimentación principal.
1. Cierre el grifo del agua y utilice el disparador para quitar presión al aparato y a la manguera.
2. Una presión irregular o demasiado alta indica un atasco o acumulación de calcio en la boquilla.
3. Apague el aparato inmediatamente.
4. Desatasque la boquilla rociadora con una aguja de limpieza y limpie el filtro de la acometida de agua.
5. Mantenga siempre el aparato limpio. Limpie la parte inferior del aparato con cierta frecuencia.
E
S
P
A
Ñ
O
L
ADVERTENCIA
PRECAUCION
Cualquier otro servicio debe ser realizado por la personal de servicio autorizado.
Desconecta el cordón eléctrico antes de llenar el tanque químico. El tanque químico y linea de suministro deben ser
lavado con agua después del uso.
6. Si el chorro es demasiado pequeño y es necesario realizar tareas de limpieza, es posible que la boquilla o el filtro estén taponados.
Utilice una aguja de limpieza (A) para limpiar la boquilla (B) y el filtro de la acometida de agua (C) cuando estén
taponados. (Figura 7A & Figura 7B)
•
ACCESORIOS
NOTA: Sólo use los accesorios y dispositivos adjuntos especialmente recomendados por el fabricante para el uso
con este producto. Los accesorios y el tubo rociador son conectados con el acomplamiento de bayoneta. El sello en
el acomplamiento de bayoneta enchufado debe ser indemne.
•
ALMACENAJE
1. Almacena en la casa. Almacena la unidad en la temperatura superior a 32˚F(0˚C). Agua congelado en la bomba
causará el daño permanete y la garantía del fabricante inválida.
11
12
SERVICE SPARE PARTS LIST
SPECIFY MODEL NO. WHEN ORDERING PARTS
DATE
High Pressure Washer
STK
CODE
Parts No.
1
C
2
6/15/2009
11/22/2007
FHH20C
MODEL NO.
No.
REVISED DATE
V1
Description
Q
No.
STK
CODE
Parts No.
7022-140A04
SWITCH
1
25
C
7SVAB-08-20
SCREW
2
C
7068-H20C01
HANDLE
1
26
B
7059-H20C01
CORD GUARD
1
3
C
7017-H20C02
COVER
1
27
C
7043-140A01
CORD CLAMP
1
4
B
7012-H20C01
RUBBER PLUG
1
28
B
7129-H20C03
SINPHON III
1
5
C
7017-H20C01
COVER, SWITCH
1
29
C
7072-H20C01
HYDROPAULIC SEAT
1
6
C
7SLABB3.5-12
SCREW
6
30
B
7012-H20C02
RUBBER PLUG
2
7
C
6017-BQ0103
WHEEL COVER
2
31
B
7076-H20C01
O RING
1
8
C
6137-160A01
WHEEL
2
32
C
7072-H20C02
KNOB SEAT
1
9
C
7SLABB04-16
SCREW
6
33
C
7003-H20C01
HOUSING, FRONT
1
10
C
7PB-08-25
PIN
4
34
C
7WFZ-04-16
WASHER
2
Description
Q
11
C
7177-H20C01
WHEEL SHAFT
2
35
B
7014-H20C01
RUBBER PLUG
2
12
C
7014-170A01
RUBBER PAD
2
36
C
7134-H20C01
KNOB
1
13
C
7228-H20C01
MOTOR & HIGH PRESSURE PUMP ASS'Y
1
37
C
7SDABB04-10
SCREW
1
14
C
7003-H20C02
HOUSING, AFTER
1
38
C
7067-140A05
OUTLET CAP
1
15
C
7SLABB04-16
SCREW
2
39
B
7183-140A02
FILTER GAUZE
1
16
C
7161-H20C01
HOOK
2
40
C
7154-140A04
INLET CAP
1
17
C
7SLABB3.5-16
SCREW
7
41
C
7228-H20B01
WASH MANCHINE HAND ASS'Y
1
18
B
7004-H20C01
FRAME
4
42
C
7011-170A01
POWER CORD
1
19
C
7086-H20C01
CAP, WASHING JAR
2
43
C
7059-140A03
PROTECTOR
1
20
C
7066-H20C01
WASHING JAR I
1
44
C
7247-180A02
CIRCUIT-BREAKER
1
21
C
7066 H20C02
7066-H20C02
WASHING JAR II
1
45
C
7154 180A01
7154-180A01
CONNECTOR
1
22
B
7129-H20C01
SINPHON I
1
46
B
7076-180001
WASHER
2
23
B
7129-H20C02
SINPHON II
1
47
B
6197-160A02
CLEANING PROBE
1
24
C
7SLABB04-20
SCREW
6
48
C
7236-170A01
NUT
1
STK Codes are:
A - consumable parts
B - one year broken parts
C - three years broken parts
D - five years broken parts
E- Not easy broken parts
High Pressure Washer
PARTS LIST
FHH20C
No.
6/15/2009
Parts No.
Description
Q
P Code
1
7022-140A04
SWITCH
1
140
2
7068-H20C01
HANDLE
1
140
3
7017-H20C02
COVER
1
140
4
7012-H20C01
RUBBER PLUG
1
140
5
7017-H20C01
COVER, SWITCH
1
140
6
7SLABB3.5-12
SCREW
6
140
7
6017-BQ0103
WHEEL COVER
2
140
8
6137-160A01
WHEEL
2
140
9
7SLABB04-16
SCREW
6
140
10
7PB-08-25
PIN
4
140
11
7177-H20C01
WHEEL SHAFT
2
140
12
7014-170A01
RUBBER PAD
2
140
13
7228-H20C01
MOTOR & HIGH PRESSURE PUMP ASS'Y
1
140
13A
7200-H20014
WATER INLET
14
7003-H20C02
HOUSING, AFTER
1
140
140
15
7SLABB04-16
SCREW
2
140
16
7161-H20C01
HOOK
2
140
17
7SLABB3.5-16
SCREW
7
140
18
7004-H20C01
FRAME
4
140
19
7086-H20C01
CAP, WASHING JAR
2
140
20
7066-H20C01
WASHING JAR I
1
140
21
7066-H20C02
WASHING JAR II
1
140
22
7129-H20C01
SINPHON I
1
140
23
7129-H20C02
SINPHON II
1
140
24
7SLABB04-20
SCREW
6
140
25
7SVAB-08-20
SCREW
2
140
26
7059-H20C01
CORD GUARD
1
140
27
7043-140A01
CORD CLAMP
1
140
28
7129-H20C03
SINPHON III
1
140
29
7072-H20C01
HYDROPAULIC SEAT
1
140
30
7012-H20C02
RUBBER PLUG
2
140
31
7076-H20C01
O RING
1
140
32
7072-H20C02
KNOB SEAT
1
140
33
7003-H20C01
HOUSING, FRONT
1
140
34
7WFZ-04-16
WASHER
2
140
35
7014-H20C01
RUBBER PLUG
2
140
36
7134-H20C01
KNOB
1
140
37
7SDABB04-10
SCREW
1
140
38
7067-140A05
OUTLET CAP
1
140
39
7183-140A02
FILTER GAUZE
1
140
40
7154-140A04
INLET CAP
1
140
41
7228-H20B01
WASH MANCHINE HAND ASS'Y
1
140
41A
7196-H20B01
HOSE AND TRIGGER ASS'Y
1
140
41B
7200-140D55
WAND
1
140
41C
7200-140D54
NOZZLE
1
140
42
7011-170A01
POWER CORD
1
140
43
7059-140A03
PROTECTOR
1
140
44
7247-180A02
CIRCUIT-BREAKER
1
140
45
7154-180A01
CONNECTOR
1
140
46
7076-180001
WASHER
2
140
47
6197-160A02
CLEANING PROBE
1
140
48
7236-170A01
NUT
1
140