1
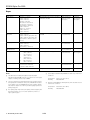
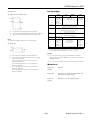
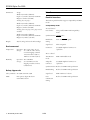
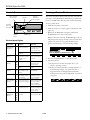
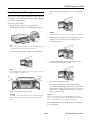
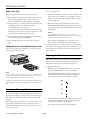
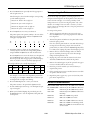
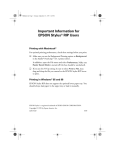
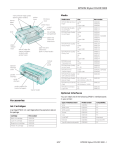
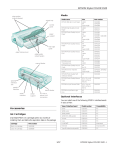
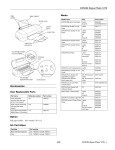
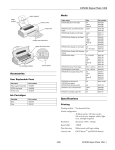
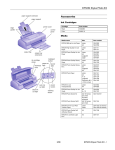
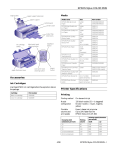
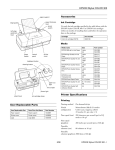
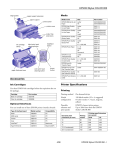
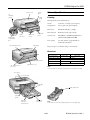
EPSON Stylus Pro 5000
printer cover
control
panel
ink
cartridge
clamps
edge
guide
Printer Specifications
Printing
Printing method On-demand ink jet
ink cartridge
compartment
door
media type
levers
paper size
levers
quick
reference
edge guide
rear manual feed slot
Nozzle
configuration
64 nozzles × 6 (black, cyan, magenta,
yellow, light cyan, light magenta)
Resolution
Maximum 1440 dpi × 720 dpi
Print direction
Bidirectional with logic seeking
Control code
ESC/P Raster,™ Adobe® PostScript® Level 3
when used with the RIP Station 5000
Line spacing
1/6 inch (default), programmable in
1/360-inch increments
Paper feed speed 79 milliseconds per 1/6-inch line
Electrical
Specification
Input voltage range
120V Model
99 to 132V
Rated frequency range
Rated current
Power consumption
rear manual feed
slot cover
198 to 264V
50 to 60 Hz
Input frequency range
parallel interface
220−240V Model
49.5 to 60.5 Hz
1.0A
0.5A
Approx. 32W (ISO/IEC 10561 Letter Pattern)
paper path cover
Note:
Check the label on the back of the printer for your printer’s voltage.
print head
front edge
guide
paper guide roller
left edge
guide
paper tray
extension
release levers
paper tray
extension
Note:
Some printers come with a paper guide roller in the paper tray.
11/98
EPSON Stylus Pro 5000 - 1
EPSON Stylus Pro 5000
Paper
Paper type
Size
Paper types
Thickness
Weight
Single sheets
Letter (8.5 × 11 inches)
A4 (210 × 297 mm)
A5 (148 × 210 mm)
Legal (8.5 × 14 inches)
Half Letter (5.5 × 8.5 inches)
Executive (7.5 × 10 inches)
Super A3/B (13 × 19 inches)
A3 (297 × 420 mm)
Ledger (11 × 17 inches)
B4 (257 × 364 mm)
B5 (182 × 257 mm)
Plain bond paper and special ink jet papers
distributed by EPSON
0.003 to 0.004 inch
(0.08 to 0.11 mm)
(plain paper)
17 to 24 lb
(64 to 90 g/m2)
(plain paper)
Transparencies and
glossy film
Letter (8.5 × 11 inches)
A4 (210 × 297 mm)
A6 (105 × 148 mm, glossy film only)
A3 (297 × 420 mm, glossy film only)
Super A3/B (13 × 19 inches, glossy
film only)
Transparencies and glossy film distributed
by EPSON
0.005 to 0.006 inch
(0.13 to 0.15 mm)
—
Glossy paper
Letter (8.5 × 11 inches)
A4 (210 × 297 mm)
A3 (297 × 420 mm)
Super A3/B (13 × 19 inches)
Glossy paper distributed by EPSON
0.0066 to 0.0070 inch
(0.17 to 0.18 mm)
—
Photo quality self
adhesive sheets
A4 (210 × 297 mm)
Self adhesive sheets distributed by EPSON
0.0079 inch
(0.2 mm) maximum
—
Envelopes
No. 10
Plain bond paper or air mail paper
0.006 to 0.017 inch
(0.16 to 0.43 mm)
12 to 20 lb
(45 to 75 g/m2)
DL
C5
C6
9.5 × 4.1 inches
(240 × 104 mm)
8.7 × 4.3 inches
(220 × 110 mm)
9 × 6.4 inches
(229 × 162 mm)
6.4 × 4.5 inches
(162 × 114 mm)
Ink jet (index) cards
A6 (105 × 148 mm)
5 × 8 inches (127 × 203 mm)
8 × 10 inches (203 × 254 mm)
Ink jet cards distributed by EPSON
0.0091 inch
(0.23 mm) maximum
50 lb (188 g/m2)
Back light film
A3 (297 × 420 mm)
Back light film distributed by EPSON
0.0051 to 0.0055 inch
(0.13 to 0.14 mm)
—
Notes:
❏
❏
❏
❏
The table above includes plain paper and special papers
manufactured by EPSON. However, you can also use other types
of paper, including card stock up to 200 lb.
Since the quality of any particular brand or type of paper may be
changed by the manufacturer at any time, EPSON cannot attest
to the quality of any non-EPSON brand or type of paper. Always
test samples of paper stock before purchasing large quantities or
printing large jobs.
Temperature:
Humidity:
❏
11/98
59 to 77 °F (15 to 25 °C)
40 to 60% RH
Printouts on EPSON Photo Quality Glossy Film should be stored
under these conditions:
Temperature:
Humidity:
Poor quality paper may reduce print quality and cause paper jams
and other problems. If you encounter problems, switch to a
higher grade of paper.
2 - EPSON Stylus Pro 5000
Special papers distributed by EPSON are usable only under these
conditions:
59 to 86 °F (15 to 30 °C)
20 to 60% RH
EPSON Stylus Pro 5000
Ink Cartridges
Printable areas
❏ Single sheets and ink jet cards
Specification
Print capacity*
A
BL
BR
C
A:
B:
C:
The minimum top margin is 0.12 inch (3.0 mm).
The minimum left and right margins are 0.12 inch (3.0 mm).
The minimum bottom margin is 0.55 inch (14.0 mm).
Note:
The maximum printable width is 12.7 inches (416 mm).
Cyan
(S020147)
3200 pages/
A4 (ISO/IEC
10561 Letter
Pattern at
360 dpi,
5% coverage)
BR
C
3000 pages
(A4, 360 dpi,
5% coverage each color)
Yellow
(S020122)
3200 pages
(A4, 360 dpi,
5% coverage)
2 years from production date, if unopened;
6 months if opened at 77 °F (25 °C)
Storage
temperature
Installed: –4 to 104 °F (–20 to 40 °C),
1 month at 104 °F (40 °C)
Uninstalled: –22 to 104 °F (–30 to 40 °C),
1 month at 104 °F (40 °C)
Transit
temperature
–22 to 140 °F (–30 to 60 °C)
1 month at 104 °F (40 °C)
120 hours at 140 °F (60 °C)
Freezing
temperature**
3.2 °F (–16 °C)
Dimensions
0.99 (W) × 5.5
(D) × 4.2 (H)
inches
25.1 (W) ×
139.6 (D) ×
105.3 (H) mm
Weight
A
Magenta
(S020143)
Cartridge life
❏ Envelopes
BL
Black
(S020118)
–0.4 °F (–18 °C)
1.4 (W) × 5.6 (D) ×
4.2 (H) inches
35.1 (W) × 140.9 (D) ×
105.3 (H) mm
0.99 (W) × 5.5
(D) × 4.2 (H)
inches
25.1 (W) ×
139.6 (D) ×
105.3 (H) mm
7.05 oz (200 g), approximate
* The print capacity may vary, depending on how often you run cleaning cycles.
** Ink thaws and is usable after approximately 3 hours at 77 °F (25 °C).
Caution:
A:
B:
C:
The minimum top margin is 0.12 inch (3.0 mm).
The minimum left and right margins for C5 envelopes
are 0.12 inch (3.0 mm).
The minimum left margin for other envelopes is
0.55 inch (14.0 mm).
The minimum right margin for other envelopes is
0.12 inch (3.0 mm).
The minimum bottom margin for C5 envelopes is
0.55 inch (14.0 mm).
The minimum bottom margin for other envelopes is
0.12 inch (3.0 mm).
❏
To ensure good results, use genuine EPSON ink cartridges.
Other products may cause damage to your printer not covered by
EPSON’s warranty.
❏
Don’t use an ink cartridge if the date on the package has expired.
Mechanical
Paper feed
method
Friction
Paper path
Paper tray, front and rear manual feed slots,
optional lower paper cassette
Paper tray
capacity
250 sheets of 17 lb (64 g/m2) paper
11/98
EPSON Stylus Pro 5000 - 3
EPSON Stylus Pro 5000
Dimensions
Storage
Width: 25.2 inches (640 mm)
Depth: 17.3 inches (439 mm) maximum
Height: 8.8 inches (224 mm)
Printing (A3 size paper)
Width: 25.2 inches (640 mm)
Depth: 27.7 inches (704 mm) maximum
Height: 8.8 inches (224 mm)
Weight
Interfaces
Parallel interface
The built-in parallel interface supports compatibility and ECP
modes
Compatibility mode
Forward channel
Printing (letter size paper, lower paper cassette
installed)
Data format:
Width: 25.2 inches (640 mm)
Depth: 21.4 inches (544 mm) maximum
Height: 12.5 inches (318 mm)
Synchronization: STROBE pulse
48.5 lb (22 kg) without the ink cartridges
8-bit parallel, IEEE-1284 compatibility
mode
and ACKNLG signals
Handshake
timing:
BUSY
Signal level:
TTL compatible
Connector:
57-30360 Amphenol connector or
equivalent
Environmental
Temperature
Humidity
Operation: 50 to 95 °F (10 to 35 °C)
–4 to 140 °F (–20 to 60 °C),
Storage:
stored in shipping container
1 month at 104 °F (40 °C)
120 hours at 140 °F (60 °C)
Operation: 20 to 80% RH
Storage:
5 to 85% RH (stored in
shipping container, without
condensation)
Reverse channel
Transmission
mode:
IEEE-1284 Nibble mode
Adaptable
connector:
57-30360 Amphenol connector or
equivalent
Synchronization: Refer to the IEEE-1284 specification
Safety Approvals
Handshaking:
Refer to the IEEE-1284 specification
Safety standards UL 1950, CSA C22.2 950
Signal level:
IEEE-1284 Level 1 device
EMC
Data
transmission
timing:
Refer to the IEEE-1284 specification
FCC part 15 subpart B class B
CSA C108.8 class B
4 - EPSON Stylus Pro 5000
11/98
EPSON Stylus Pro 5000
ECP mode
Transmission
mode:
IEEE-1284 ECP mode
Adaptable
connector:
57-30360 Amphenol connector or
equivalent
Accessories
Ink Cartridges
Use these EPSON ink cartridges before the expiration date on
the package.
Synchronization: Refer to the IEEE-1284 specification
Handshaking:
Signal level:
Data
transmission
timing:
Cartridge
Part number
Refer to the IEEE-1284 specification
Black ink cartridge
S020118
Cyan ink cartridge
S020147
IEEE-1284 Level 1 device
Magenta ink cartridge
S020143
Yellow ink cartridge
S020122
Refer to the IEEE-1284 specification
Media
Serial interface
Standard:
Media name
Size
Part number
EPSON Photo Quality
Ink Jet Paper
Letter
A4
Legal
Ledger
Super A3/B
S041062
S041061
S041067, S041048
S041070
S041069
EPSON Photo Quality
Glossy Paper
A4
Letter
Super A3/B
S041126
S041124
S041133
EPSON Photo Quality
Glossy Film
A4
Letter
A6
Ledger
Super A3/B
S041071
S041072
S041107
S041075
S041074
EPSON Ink Jet
Transparencies
A4
Letter
S041063
S041064
EPSON Photo Quality
Ink Jet Cards
A6
8 × 10
S041054
S041122
EPSON Photo Quality
Self Adhesive Sheets
A4
S041106
EPSON Ink Jet Back
Light Film
A3
S041131
Based on RS-423
Synchronization: Synchronous
Bit rate:
Approximately 1.8 Mbps
Handshaking:
X-ON/X-OFF, DTR protocol
Word format:
Data bit: 8 bits
Parity bit: None
Start bit: 1 bit
Stop bit: 1 bit
Connector:
8-pin mini-circular connector
Recommended
cable:
Apple System Peripheral-8 serial cable
(preferably Belkin brand)
11/98
EPSON Stylus Pro 5000 - 5
EPSON Stylus Pro 5000
Control Panel
black and cyan
ink out lights
Running a Printer Check
manual feed
tray light
magenta
and yellow
ink out lights
You can use the printer check to make sure that your printer is
operating correctly. Running the check before you connect the
printer to the RIP verifies that the printer itself is functioning.
To run a printer check:
standard
and lower
tray lights
1. Make sure the printer is turned off.
2. Make sure letter-size (or larger) paper is loaded in the main
paper tray.
3. Hold down the Reset button and press and hold the
P Operate button to turn on the printer.
Operate light
Operate
button
Release both buttons when the P Operate light comes on.
The printer prints one page showing a series of nozzle check
patterns, the version of your printer’s ROM, and the
printer’s default settings, as in the following example:
Control panel lights
Light status
Problem
Response
Standard or
optional paper
tray light on.
Paper out or
incorrectly loaded.
Load paper, or make
sure paper is loaded
correctly, in the
corresponding tray.
Paper tray not
installed.
Make sure tray is
correctly installed.
Manual feed slot is
selected in software,
but paper is not
loaded.
Insert paper in the
front or rear manual
feed slot.
Turn off the printer
and remove the
jammed paper.
[
Manual feed
light on.
Z
Paper lights
flashing.
Z
[
[
Paper jam.
Paper path cover is
open.
Close the paper path
cover.
Ink out light
flashing
\
Corresponding color
ink cartridge nearly
empty.
Obtain a replacement
ink cartridge.
Ink out light on.
H
Corresponding color
ink cartridge empty or
not installed.
Replace the ink
cartridge (or make
sure it’s installed).
Either or both
paper tray lights
flashing.
[
[
Paper size and/or print
mode settings don’t
match lever settings.
Make sure print
option settings match
the lever settings.
Press the Eject
button to force print.
Print head not
operating correctly.
Turn off the printer
and check inside for
pieces of paper or
foreign objects.
Maintenance
required.
Turn off the printer
and contact EPSON.
All lights
flashing.
Paper lights and
Operate light
flashing.
Z
[
[
4. Press the P Operate button to turn off the printer.
5. Check the printout.
❏ If the printout looks like the example above, your
printer is operating correctly.
❏ If the pattern has broken lines or missing segments, as
in the following example, your printer may have a
clogged ink nozzle or misaligned print head. Run a
cleaning cycle and/or print head alignment, as described
on page 10.
P
6 - EPSON Stylus Pro 5000
11/98
EPSON Stylus Pro 5000
4. Lift up the ink cartridge clamp for the corresponding ink
slot.
Installing the Ink Cartridges
Always use new ink cartridges. Reinstalling partially empty ink
cartridges prevents the ink counter from accurately indicating
the amount of ink remaining.
To install the ink cartridges:
1. Plug in the printer and turn it on by pressing the
P Operate button until the P Operate light comes on.
Warning:
To avoid injury, do not reach into the ink cartridge compartments.
5. Hold the ink cartridge with the arrow mark face-up and
pointing to the rear of the printer, and fully insert the
cartridge into the slot.
Note:
The first time you plug in the printer, the power supply may cycle
the fan and then turn off. This is normal operation.
2. Open the left and right ink cartridge compartment doors.
6. Close the clamp until it clicks into place. Repeat steps 3
through 6 for the other ink cartridges.
Note:
You can install the ink cartridges in any order; however, each slot
can only hold the specified ink color:
black
cyan
magenta
yellow
7. Close the ink compartment doors.
The printer begins charging the advanced ink delivery
system. The P Operate light flashes and the printer makes
various sounds. Charging takes about 5 minutes. Do not turn
off the printer or interrupt this important process or you’ll use
up more ink than necessary.
3. Open one of the ink cartridge packages.
Warning:
If ink gets on your hands, wash them thoroughly with soap and
water. If ink gets in your eyes, flush them immediately with
water.
Caution:
Never turn off the printer when the P Operate light is flashing.
However, if the light is still flashing after 15 minutes and the printer is
not moving or making noise, you may turn off the printer.
The P Operate light stops flashing when the ink charging
process is finished.
11/98
EPSON Stylus Pro 5000 - 7
EPSON Stylus Pro 5000
Replacing an Ink Cartridge
When one of the ink out lights on the printer’s control panel
flashes, the corresponding cartridge is low on ink. This is a
good time to make sure you have a replacement cartridge.
When the light stays on, the cartridge is empty and you need
to replace it. You’ll also see an error message on the RS 5000
control panel when one of your cartridges runs out of ink.
Caution:
To ensure high quality printing results, use genuine EPSON cartridges
and do not refill them. Other products may cause damage to your
printer not covered by EPSON’s warranty. Always leave the empty
cartridge installed in the printer until you are ready to replace it with a
new one.
Use only the following EPSON ink cartridges:
❏ Black: S020118
❏ Cyan: S020147
❏ Magenta: S020143
❏ Yellow: S020122
To order EPSON ink cartridges, contact your dealer or call
EPSON Accessories at (800) 873-7766 (U.S. only). In
Canada, please call (800) 873-7766 for dealer referral.
4. Make sure the replacement cartridge is the correct color,
then remove it from its package.
5. Insert the ink cartridge with the arrow mark face-up and the
arrow pointing toward the printer.
Warning:
To avoid injury, do not reach into the ink cartridge compartments.
6. Lower the clamp until it clicks into place.
7. Make sure the corresponding ink out light goes off.
If it remains on, the cartridge may not be installed correctly.
Remove the cartridge and reinsert it as described above.
8. Close the compartment door and resume printing.
Selecting a Paper Path
You can use the 250-sheet auto feed paper trays for the
substrates you print on most often. The front manual slot
gives you a convenient way to feed individual letter-size or
larger sheets. The rear manual slot provides a straight-through
paper path for substrates of all sizes and weights, up to 44
inches long.
The following illustrations show the paper paths available:
To replace an ink cartridge:
1. Make sure the printer is turned on. Check the control panel
lights to determine which cartridge needs to be replaced.
Standard paper tray:
2. Open the appropriate ink cartridge compartment door.
The compartment for the black and cyan cartridges is on
the left; the compartment for magenta and yellow is on the
right.
3. Lift up the clamp for the empty cartridge, then carefully
pull the cartridge straight out of the printer.
Optional lower paper tray:
Front manual feed slot:
Rear manual feed slot:
Warning:
If ink gets on your hands, wash them thoroughly with soap and
water. If ink gets in your eyes, flush them immediately with
water.
8 - EPSON Stylus Pro 5000
11/98
EPSON Stylus Pro 5000
The following table indicates the substrate sizes you can print
from the four paper paths:
The following table identifies the media type settings for
EPSON media and similar substrates:
Substrate sizes and paper paths
Media type lever settings
Standard
paper tray
Half letter/
A5 or less
×
Executive
(7.5 × 10 in.)
×
Letter/A4
Letter/A4 landscape
Legal
×
×
×
Optional
lower
paper tray
Front
manual
slot
Rear
manual
slot
×
×
×
×
×
×
×
×
×
×
×
×
Ledger/tabloid/A3/B
(11 × 17 in.)
×
×
×
×
Super A3/B
(13 × 19 in.)
×
×
×
×
Panoramic or
banner paper
longer than 19 in.
×
This will save you both time and money by making sure you
don’t accidently print with the wrong settings.
Plain Paper
Photo Quality Ink Jet Paper or
Card stock
Photo Quality Paper
Photo Quality Glossy Paper
Glossy Paper
Photo Quality Glossy Film
Glossy Film
Ink Jet Transparencies
Transparencies
360 dpi Ink Jet Paper
360dpi Paper
Use only if ink smears
Thick Paper
Use for unlisted substrates
Other
The following table identifies the paper size settings:
Paper size lever settings
You can use these trays for most sizes of paper up to 13 × 19
inches. The standard paper tray can handle all smaller sizes of
paper; however, the optional lower tray can’t handle paper
smaller than 7.5 × 10 inches (Executive size).
This allows your software to verify that the print option
settings for a project are correct for the substrate you’re using.
If the print option settings for a job don’t match the lever
settings, you’ll get an error message, and your job won’t print.
Media type lever setting
Plain paper
Note:
For any substrates not on this list, set the lever to Other.
Using the Standard and Optional
Paper Trays
When you load paper in either of the trays, you need to set the
paper size and media type levers to match the paper you’re
using, as described in the following section.
Substrate
Media size
Paper size lever setting
13 × 19 in.
Super A3/B
297 × 420 mm
A3
Ledger/tabloid/11 × 17 in.
LGR
Legal/11 × 14 in.
LGL
210 × 297 mm
A4
Letter/8.5 × 11 in.
LTR
No. 10/DL/C5/C6 envelopes
Envelope
Any other size
Other
To set the levers and use the cards:
1. Load paper or other substrate.
2. Set the media type and paper size levers according to the
guidelines in the tables above.
3. Find the paper size and media type cards that match the
substrate you loaded, open the clear plastic covers above the
levers, and insert the cards.
media type
Note:
You can disable verification by setting the levers to Other. However,
the purpose of paper size and media type (print mode) verification is
to help you avoid printing errors, and you should take advantage of
this help whenever possible.
paper size
Setting the Paper Tray Levers
For best printing results, you need to set the media type and
paper size levers correctly when you load paper. You should
also use the media type and paper size cards to identify the
substrate loaded in each tray. This helps all users to be aware
of what’s in the printer at a glance, and also prevents anyone
from inadvertently changing the lever positions.
levers
If you change substrates in one of the trays, be sure you
change the lever settings and cards. Store unused cards on the
sheet with adhesive windows.
11/98
EPSON Stylus Pro 5000 - 9
EPSON Stylus Pro 5000
Paper Tray Tips
To run a cleaning cycle:
Keep these tips in mind when you load paper in a tray:
1. Make sure the printer is on and the H ink out lights are off.
If any of the H ink out lights are on or flashing, you must
replace the corresponding ink cartridge(s) before you can
run a cleaning cycle.
❏ Place the printable side of the paper face-down in the tray.
If you’re using preprinted paper, such as letterhead or
forms, load it with the top edge leading into the printer.
❏ Load paper before you send your print job. If the paper runs
out during a print job, you can have the printer
automatically switch to the other tray.
2. Press the cleaning button and hold it for three seconds.
The P Operate light begins flashing, and the printer ejects
any paper in the paper path. The cleaning cycle takes about
three minutes.
To have the printer switch automatically, the paper size and
media type levers must be set the same for both trays, or the
levers must be set to Other on the lower tray.
Caution:
To avoid damaging the printer, never turn it off while the
P Operate light is flashing—unless the printer hasn’t moved or
made any noise for more than five minutes.
❏ If you’re using thick paper or if ink smears on the printout,
set the media type lever to Thick Paper.
❏ Press the Eject button if you need to remove a sheet of
paper.
Loading Paper in the Optional Lower Tray
Always pull the paper tray completely out of the lower paper
cassette before you insert paper.
3. After the light stops flashing, print a few lines or run a
printer check to confirm that the nozzles are clean.
If your print quality has not improved, repeat the steps above.
If you don’t notice any improvement after running four or five
cycles, check the print quality solutions in Chapter 5 of the
Printer Guide.
Aligning the Print Head
Before you use the printer, you should align the print head to
ensure accurate, clean printouts. Make sure the printer is
turned off, and it has paper in the standard paper tray.
To align the print head:
1. Hold down both the Reset and Eject buttons while you
press the P Operate button to turn on the printer.
Note:
If you use paper longer than letter size in the lower tray, pull out the
tray and cover extensions of the upper paper tray, so your printouts
will be supported when they come out of the printer.
The P Operate light and [ lower paper tray light start
flashing and the printer enters the print head alignment
mode. A pattern similar to the one below is printed:
To print on paper in the lower tray, make sure you select it (or
select Auto) in your print options before you send the print
job.
Running a Cleaning Cycle
If your printed image is unexpectedly light or faint or dots are
missing from the image, you may need to run a cleaning cycle.
This unclogs the print head nozzles so they can deliver ink
properly.
The cleaning cycle process uses ink, so you should run it only
if print quality declines. You can use the printer check to
determine if the cleaning cycle has been successful, or if you
need to run it again.
10 - EPSON Stylus Pro 5000
2. Check the printout and select the numbered pattern, from
#1 to #4, that is misaligned. (If more than one pattern is
misaligned you will need to repeat this step.)
For example, pattern #1 above requires alignment.
11/98
EPSON Stylus Pro 5000
3. Press the Reset button repeatedly until the appropriate H
ink out light comes on.
The following list shows the Ink Out lights corresponding
to each numbered pattern:
❏ Pattern #1: black H ink out light on
❏ Pattern #2: cyan H ink out light on
❏ Pattern #3: magenta H ink out light on
❏ Pattern #4: yellow H ink out light on
Transporting the Printer
If you need to ship your printer, you must prepare it for
transportation and repack it in the original box. You must also
remove the ink cartridges, to avoid the possibility of ink
leakage. However, if you are moving the printer only a short
distance, for example, from one table to another, you don’t
need to remove the cartridges. Be sure to keep the printer level
when you move it.
To transport the printer:
4. Press the Eject button to enter your selection.
The printer prints seven patterns, similar to the ones below.
The paper tray lights turn on and the P Operate and [
lower paper tray lights flash.
5. Determine which set of lines on the printed sheet is
vertically aligned, and select the corresponding number
using the Reset and Eject buttons and the table below.
Press the Eject button to move the selection to the right and
press the Reset button to move it to the left. Press the
buttons repeatedly until the appropriate H Ink Out light(s)
come on or flash to select the vertically aligned pattern.
1. Turn on the printer and remove any paper in the trays.
Press the Eject button to eject any paper that has been fed
into the printer.
2. Turn off the printer and make sure the print head is in the
home (far right) position.
If it’s not, turn the printer back on, wait until the head stops
moving and is in the home position, then turn off the
printer. After you turn it off, the P Operate light may flash
for a while. Don’t unplug the printer until the light goes off.
3. Remove all four of the ink cartridges and store them in
separate, resealable plastic bags. Close the ink cartridge
clamps and compartment covers.
4. Unplug the power cord from the electrical outlet; then
disconnect the RIP interface cable from the printer.
5. Remove the standard paper tray. If the optional lower paper
cassette is installed, remove the lower tray.
Ink out light indicators for vertically aligned pattern
#1
#2
#3
#4
#5
#6
#7
black
on
black
flashing
cyan
on
cyan
flashing
magenta
on
yellow
flashing
yellow
on
magenta
flashing
For example, to select the correct alignment pattern from
the sample, press the Eject or Reset button until the cyan
and magenta ink out lights start flashing.
6. Press the Cleaning button to enter your selection.
The printer returns to the print head alignment mode.
7. If other numbered patterns in step 1 are misaligned, repeat
steps 2 through 6.
8. When you’re finished aligning the print head, press the
P Operate button to save the alignment setting and turn
off the printer.
6. Insert the protective materials you removed when you
unpacked the printer.
7. If the optional paper cassette is installed, unscrew it and lift
the printer off of the cassette.
8. Repack the printer, paper trays, power cord, and any other
parts in the original boxes.
Related Documentation
TM-STYPRO5000
PL-STYPRO5000
CPD-6201
CPD-6202
10016180
10016194
10016187
10016208
11/98
EPSON Stylus Pro 5000 Service Manual
EPSON Stylus Pro 5000 Parts Price List
EPSON Stylus Pro 5000 Printer Guide
EPSON Stylus Pro 5000 Read This First
Roadmap
RIP Station 5000 Setup Guide
RIP Station 5000 User Guide
RIP Station 5000 Administrator Guide
RIP Station 5000 Color Printing Guide
RIP Station 5000 Server Installation and
Service Guide
EPSON Stylus Pro 5000 - 11