1
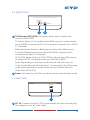
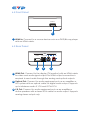
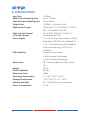
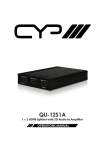
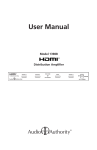
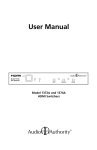
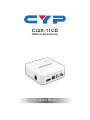
CLUX-11CD
HDMI Audio Extractor
Operation Manual
DISCLAIMERS
The information in this manual has been carefully checked and
is believed to be accurate. Cypress Technology assumes no
responsibility for any infringements of patents or other rights of third
parties which may result from its use.
Cypress Technology assumes no responsibility for any inaccuracies
that may be contained in this document. Cypress also makes no
commitment to update or to keep current the information contained
in this document.
Cypress Technology reserves the right to make improvements to this
document and/or product at any time and without notice.
COPYRIGHT NOTICE
No part of this document may be reproduced, transmitted,
transcribed, stored in a retrieval system, or any of its part translated
into any language or computer file, in any form or by any means—
electronic, mechanical, magnetic, optical, chemical, manual, or
otherwise—without express written permission and consent from
Cypress Technology.
© Copyright 2011 by Cypress Technology.
All Rights Reserved.
Version 1.1 August 2011
TRADEMARK ACKNOWLEDGMENTS
All products or service names mentioned in this document may be
trademarks of the companies with which they are associated.
SAFETY PRECAUTIONS
Please read all instructions before attempting to unpack, install or
operate this equipment and before connecting the power supply.
Please keep the following in mind as you unpack and install this
equipment:
•
Always follow basic safety precautions to reduce the risk of fire,
electrical shock and injury to persons.
•
To prevent fire or shock hazard, do not expose the unit to rain,
moisture or install this product near water.
•
Never spill liquid of any kind on or into this product.
•
Never push an object of any kind into this product through any
openings or empty slots in the unit, as you may damage parts
inside the unit.
•
Do not attach the power supply cabling to building surfaces.
•
Use only the supplied power supply unit (PSU). Do not use the PSU
if it is damaged.
•
Do not allow anything to rest on the power cabling or allow any
weight to be placed upon it or any person walk on it.
•
To protect the unit from overheating, do not block any vents or
openings in the unit housing that provide ventilation and allow for
sufficient space for air to circulate around the unit.
REVISION HISTORY
VERSION NO.
DATE DD/MM/YY SUMMARY OF CHANGE
VS1
06/11/12
First Release
VS2
27/12/12
Reword the feature and the
statements for audio EDID
CONTENTS
1. Introduction�������������������������������������������� 1
2. Applications������������������������������������������� 1
3. Package Contents�������������������������������� 1
4. System Requirements���������������������������� 1
5. Features�������������������������������������������������� 2
6. Operation Controls and Functions������� 3
6.1 Top Panel������������������������������������������3
6.2 Right Panel����������������������������������������4
6.3 Left Panel������������������������������������������4
6.4 Front Panel����������������������������������������5
6.5 Rear Panel�����������������������������������������5
7. Connection Diagram���������������������������� 6
8. Specifications���������������������������������������� 7
9. Acronyms����������������������������������������������� 8
1. INTRODUCTION
The HDMI Audio Extractor allows you to extract audio signals from your
HDMI source. When connecting to a TV or display you don’t always
get the best audio, or in the case of a PC monitor, no audio at all. So
with this Audio Extractor you can take your original HDMI audio signal
and convert it to digital optical or analog Stereo (L/R) audio. This
means that you can output your audio signal to external speakers or
extend your audio signal pathway.
2. APPLICATIONS
• Audio extraction for video only displays
• Extend your audio signal
• Audio extraction for non-HDMI AV receivers or wider audio systems
3. PACKAGE CONTENTS
• HDMI Audio Extractor
• 5 V/1.2 A Power Adaptor
• Operation Manual
4. SYSTEM REQUIREMENTS
HDMI equipped source device and display (TV/monitor) and/or
amplifier/active speakers with connection cables.
1
5. FEATURES
• Compliant with HDMI, HDCP 1.2 and DVI 1.0
• Supports HDMI audio sampling rates up to 192 kHz
• Supports Optical S/PDIF sampling rates up to 48 kHz
• Supports TMDS clock frequency rate 225 MHz
• Supports high-bit-rate (HBR) audio
• No HDMI output connection is required to receive audio at the
analog and optical outputs
• Maximum input and output HDMI cable length can run up to 15
meters at 1080p at 8-bit resolution
• Low power consumption
• Supports EDID management for audio formats, can switch among
built-in EDID (LPCM 2CH/Bitstream) and external EDID (TV)
• Supports 3D signal
2
6. OPERATION CONTROLS AND FUNCTIONS
6.1 Top Panel
Power
1
Link
2
HDMI Audio Extractor
1 Power LED: The Power LED will illuminate in blue when the unit is
connected to the power supply and switched on.
2 Link LED: The Link LED will illuminate in green when both the source
and the display are connected and have established a link. This
LED will also blink once while the power is turned on.
3
6.2 Right Panel
Bitstream
TV
2CH
LPCM
1
Power
2
1 TV/Bitstream/2CH LPCM: This switch allows users to select the
source's audio EDID.
TV Mode: Switch to TV mode for the HDMI source to output audio
per the EDID of connected TV or AV receiver, supports up to LPCM
7.1 channels.
Bitstream Mode: Switch to Bitstream mode for the HDMI source
to output Bitstream audio per the built-in EDID, supports up to
compressed audio 5.1 channels.
2CH LPCM Mode: Switch to 2CH LPCM mode for the HDMI source
to output LPCM 2 channels audio per the built-in EDID.
Note: Depending on the input audio format, the unit may not
output audio through all output port., For example, the L/R analog
output port will have no audio when the input audio format is
other than LPCM 2CH.
2 Power: Switches the unit ON or puts the device into standby mode.
6.3 Left Panel
DC 5V
1
1 DC 5V: Connect to the 5V DC power supply into the unit and plug
the adaptor to an AC wall outlet.
4
6.4 Front Panel
HDMI In
1
1 HDMI In: Connect to a source device such as a DVD/Blu-ray player
with an HDMI cable.
6.5 Rear Panel
HDMI
Out
Optical
1
2
L
R
3
1 HDMI Out: Connect to the display (TV/monitor) with an HDMI cable
for video and audio signal output. No HDMI output connection is
required to send audio through the analog and optical outputs.
2 Optical Out: Connect to audio equipment such as an amplifier or
Hi-Fi system with an optical cable for digital audio output. Supports
up to bitstream audio 5.1CH and LPCM 2CH.
3 L/R Out: Connect to audio equipment such as an amplifier or
active speakers with a stereo RCA cable for audio output. Supports
analog stereo output only.
5
7. CONNECTION DIAGRAM
DVD or Blu-ray Player
HDMI Input
HDMI In
HDMI Audio
Extractor
HDMI
Out
Optical
L
R
Analog Stereo Output
HDMI Output
Digital Audio
Output (Optical)
Display
Amplifier
6
8. SPECIFICATIONS
Input Port
1×HDMI
HDMI Audio Sampling Rate
Up to 192 kHz
Optical Audio Sampling Rate
Up to 48 kHz
Output Ports
1×HDMI, 1×Optical,1×L/R
HDMI Audio Format
LPCM 2/5.1/7.1CH, Dolby 5.1, DTS 5.1,
DD+, D-TrueHD & DTS-HD
Optical Audio Format
LPCM 2CH, Dolby 5.1 & DTS 5.1
L/R Audio Format
Analog Stereo 2CH
Power Supply
5 V/1 A linear power adaptor (US/EU
Standards, CE/FCC/UL Certified) Or
5 V/1.2 A switching power adaptor
(with universal plug, CE/FCC/UL
certified)
ESD Protection
Human body model:
± 8kV (air-gap discharge)
± 6kV (contact discharge)
Dimensions
90.7 mm (W)×85.8 mm (D)×34 mm
(H)
Weight
107 g
Chassis Material
Plastic
Silkscreen Color
White
Operating Temperature
0 ˚C~40 ˚C/32 ˚F~104 ˚F
Storage Temperature
−20 ˚C~60 ˚C/−4 ˚F~140˚F
Relative Humidity
20 ~ 90 % RH (non-condensing)
Power Consumption
2.1 W
7
9. ACRONYMS
ACRONYM
COMPLETE TERM
HDCP
High-bandwidth Digital Content Protection
HDMI
High-Definition Multimedia Interface
8
CYPRESS TECHNOLOGY CO., LTD
Home page: http://www.cypress.com.tw
20121106 MPM-CLUX11CD