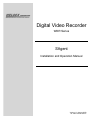
1
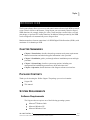
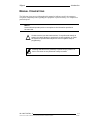
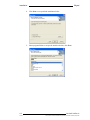
Digital Video Recorder WDR Series SAgent Installation and Operation Manual Version 1.2, August 2008 24-10437-38 Revision A Digital Video Recorder WDR Series SAgent Installation and Operation Manual Version 1.2, August 2008 24-10437-38 Revision A (714) 761-2100 www.weldex.com Copyright 2008 Weldex Corporation All Rights Reserved No part of this document may be reproduced without the prior permission of Weldex Corporation. Acknowledgment Company and product names published in this manual are trademarks or registered trademarks of their respective owners. If this document is translated from the original English version by Weldex Corporation, all reasonable endeavors will be used to ensure the accuracy of translation. Weldex Corporation shall not be liable for any translation errors contained herein or for incidental or consequential damages in connection with the furnishing or use of this translated material. Due to continuous development of our products, the information in this document is subject to change without notice. Weldex Corporation shall not be liable for errors contained herein or for incidental or consequential damages in connection with furnishing or use of this material. Contents of this publication may be preliminary and/or may be changed at any time without any obligation to notify anyone of such revision or change, and shall not be regarded as a warranty. Canadian Notice This Class A digital apparatus complies with Canadian ICES-003. Cet numérique de la classe A est conforme à la norme NMB-003 du Canada. Declaration of Conformity This product complies with the requirements of the European Council Electromagnetic Compatibility Directive 2004/108/EEC and the Low Voltage Directive 2006/95/EEC. This equipment must not be modified for any reason and it must be installed as stated in the Manufacturer’s instruction. If this shipment (or any part thereof) is supplied as second-hand equipment, equipment for sale outside the European Economic Area or as spare parts for either a single unit or system, it is not covered by the Directives. DISCLAIMER • While every effort has been made to ensure that the information contained in this guide is accurate and complete, no liability can be accepted for any errors or omissions. • Weldex Corporation reserves the right to change the specifications of the hardware and software described herein at any time without prior notice. • No part of this guide may be reproduced, transmitted, transcribed, stored in a retrieval system, or translated into any language in any form, by any means, without prior written permission of Weldex Corporation • Weldex Corporation makes no warranties for damages resulting from corrupted or lost data due to a mistaken operation or malfunction of the Digital Video Recorder, the software, the hard drives, personal computers, peripheral devices, or unapproved / unsupported devices. FCC NOTICE Digital Video Recorder, Model WDR-4012, Model WDR-9012, Model WDR-9024, Model WDR-1612, Model WDR-1624 This device complies with Part 15 of the FCC Rules. Operation is subject to the following two conditions: 1. This device may not cause harmful interference, and 2. This device must accept any interference received, including interference that may cause undesired operation. Note: This equipment has been tested and found to comply with the limits for Class A digital devices, pursuant to Part 15 of the FCC rules. These limits are designed to provide reasonable protection against harmful interference in a residential installation. This equipment generates, uses and can radiate radio frequency energy and, if not installed and used in accordance with the instructions, may cause harmful interference to radio communications. However, there is no guarantee that interference to radio or television reception, which can be determined by turning the equipment off and on, the user is encouraged to try to correct the interference by on or more of the following measures: • Reorient or relocate the receiving antenna. • Increase the separation between the equipment and receiver. • Connect the equipment into an on a circuit different from that to which the receiver is connected. • Consult the dealer or an experience radio/TV technician for help. The hard disk provided with the digital video recorder must be used with this equipment in order to comply with Class A limits in subpart B of Part 15 on FCC rules. Do not make any changes or modifications to the equipment unless otherwise specified in the manual. If such changes or modifications should be made, you could be required to stop operation of the equipment. TABLE OF CONTENTS Chapter 1: Introduction Chapter Summaries ................................................................................................................................. 1-1 Package Contents.................................................................................................................................... 1-1 System Requirements.............................................................................................................................. 1-1 Software Requirements.................................................................................................................... 1-1 Hardware Requirements .................................................................................................................. 1-2 Note on Other Manufacturer’s Documentation ........................................................................................ 1-2 Technical Support .................................................................................................................................... 1-2 Manual Conventions ................................................................................................................................ 1-3 Chapter 2: Installation Installing SAgent ...................................................................................................................................... 2-1 Logging In ................................................................................................................................................ 2-3 Chapter 3: System Setup Setting Up Options................................................................................................................................... 3-1 Network Configuration...................................................................................................................... 3-2 Options Field Definitions: Network Tab.................................................................................... 3-3 Video Play Options........................................................................................................................... 3-3 Options Field Definitions: Play Tab .......................................................................................... 3-4 Sensor Setup ................................................................................................................................... 3-5 Options Field Definitions: Sensor Tab...................................................................................... 3-5 Remote Event Setup........................................................................................................................ 3-6 Options Field Definitions: Remote Event Tab .......................................................................... 3-6 SAgent User Management............................................................................................................... 3-7 Options Field Definitions: User Management Tab ................................................................. 3-10 Data Storage Setup ....................................................................................................................... 3-11 Options Field Definitions: Storage Tab .................................................................................. 3-11 Establishing Connections....................................................................................................................... 3-12 Configuring Remote Sites .............................................................................................................. 3-13 Connecting to a Remote Site ......................................................................................................... 3-17 Site/File Open Field Definitions: Remote Tab ........................................................................ 3-21 Connecting to a Local Site ............................................................................................................. 3-21 24-10437-38 Rev. A This document contains confidential and proprietary information of Weldex Corporation v 9/10/08 Table of Contents SAgent Chapter 4: Operation Overview .................................................................................................................................................. 4-1 Site Menu................................................................................................................................................. 4-7 PTZ Menu ................................................................................................................................................ 4-8 Viewing System Log .............................................................................................................................. 4-10 Remote DVR Setup via SAgent ............................................................................................................. 4-10 vi 9/10/08 24-10437-38 Rev. A This document contains confidential and proprietary information of Weldex Corporation Chapter 1 INTRODUCTION The SAgent software allows you to access and control cameras from a single WDR system at a time via the LAN line or the Internet. Using SAgent you can remotely control a range of WDR functions, for example: display live video, search and play recorded video, save and print images, or perform PTZ control functions. In addition, alarms generated by the WDR can be configured to be automatically sent to SAgent client. Maximum number of remote connections is 36 WDR Digital Video Recorders (DVRs), with maximum of 16 channels per DVR. CHAPTER SUMMARIES + Chapter 1: Introduction, describes the package contents and system requirements. Manual conventions and technical support information is also provided. + Chapter 2: Installation, guides you through software installation process and login procedure. + Chapter 3: System Setup, describes system setup options, including user management and establishing connections to local and remote sites. + Chapter 4: Operation, details functions of the SAgent software user interface. PACKAGE CONTENTS Thank you for choosing the Weldex SAgent. The package you received contains: + SAgent CD + This manual SYSTEM REQUIREMENTS Software Requirements The SAgent software requires one of the following operating systems: + Microsoft® Windows 2000 + Microsoft Windows XP + Microsoft Windows Vista 24-10437-38 Rev. A This document contains confidential and proprietary information of Weldex Corporation 1-1 9/10/08 Introduction SAgent Hardware Requirements See the following table for minimum hardware requirements. Table 1-1: Minimum System Requirements Number of connections: Item 4 9 16 32 CPU Pentium-III 1.4GHz Pentium-IV 1.8GHz Pentium-IV 1.8GHz Pentium-IV 2.4GHz RAM 256MB 512MB 512MB 1GB VGA AGP Bus, 1024x768, 24bit color, 64MB graphic memory AGP Bus, 1024x768, 24bit color, 64MB graphic memory AGP Bus, 1024x768, 24bit color, 64MB graphic memory AGP Bus, 1024x768, 24bit color, 128MB graphic memory HDD 20MB free memory 20MB free memory 20MB free memory 20MB free memory NOTE ON OTHER MANUFACTURER ’S DOCUMENTATION Weldex Corporation does not duplicate documentation of other equipment manufacturers. When necessary, as in this installation procedure, Weldex Corporation provides documentation that supplements that of other manufacturers. When unpacking your equipment, keep all original manufacturer documentation for future reference. TECHNICAL SUPPORT Technical assistance is provided to Weldex Corporation authorized dealer representatives from 5 a.m. PST to 5 p.m. PST Monday through Friday. System users can get answers to operator questions by calling the local Weldex Corporation sales/service office. The authorized dealer representatives can also provide you with information on the maintenance contracts and the on-site field service. 1-2 9/10/08 24-10437-38 Rev. A This document contains confidential and proprietary information of Weldex Corporation. SAgent Introduction MANUAL CONVENTIONS The following items are used throughout this manual to indicate special circumstances, exceptions, important points regarding the equipment or personal safety, or to emphasize a particular point. NOTE Notes indicate important points or exceptions to the information provided in the main text. ! CAUTION Cautions remind you that certain actions, if not performed exactly as stated, can cause damage to equipment, security problems, or cause the system to operate incorrectly due to errors in system setup or programming. Warnings indicate that the possibility of personal injury exists if an action or actions are not performed exactly as stated. WARNING 24-10437-38 Rev. A This document contains confidential and proprietary information of Weldex Corporation 1-3 9/10/08 Introduction 1-4 9/10/08 SAgent 24-10437-38 Rev. A This document contains confidential and proprietary information of Weldex Corporation. Chapter 2 INSTALLATION This chapter guides you through software installation process and login procedure. INSTALLING SAGENT Before installing SAgent, log in to the computer as the system administrator. Is it recommended that you close all other applications before installing SAgent. To install SAgent: 1. Insert the SAgent CD. 2. Double-click the setup.exe file. 3. The InstallShield Wizard for SAgent starts. Click Next. 24-10437-38 Rev. A This document contains confidential and proprietary information of Weldex Corporation 2-1 9/10/08 Installation SAgent 4. Click Next to accept default installation folder. 5. Select program folders or accept the default selection; click Next. 2-2 9/10/08 24-10437-38 Rev. A This document contains confidential and proprietary information of Weldex Corporation. SAgent Installation 6. Click Finish to complete the installation. LOGGING IN The Administrator user account is already created but has no password assigned to it. When you start the program for the first time you will be asked to choose and confirm a password. These Administrator username and password are independent from the user accounts configured at the DVR and are only used for SAgent. To set Administrator’s password: 1. Double-click program icon located in the desktop. 2. Enter a password. This will be your password for future Administrator logins into SAgent. Click OK. 3. Confirm the new password and click OK. 24-10437-38 Rev. A This document contains confidential and proprietary information of Weldex Corporation 2-3 9/10/08 Installation SAgent 4. The SAgent software starts. Continue with Chapter 3: System Setup. In the future, you are only required to enter the password and the Confirm password window will not appear. 2-4 9/10/08 24-10437-38 Rev. A This document contains confidential and proprietary information of Weldex Corporation. Chapter 3 SYSTEM SETUP This chapter describes how to set up the SAgent software from the Options window. SETTING UP OPTIONS The Options window allows you to configure advanced application settings. To access and use the Options window: 1. Click the Setup Options button in the SAgent main user interface. 2. The Options window opens with the Network tab active. See the following sections for description of all tabs and their functionality. 24-10437-38 Rev. A This document contains confidential and proprietary information of Weldex Corporation 3-1 9/10/08 System Setup SAgent Network Configuration The DVR uses 4 sets of TCP/IP ports for network communication. See the following table for details. Function Default Value Data Transmission 7050-7055* Events 7056 DDNS 10000 WWW (Web Port) 80 * Only first port needs to be specified and the SAgent will use the subsequent 5 ports automatically. If default values are used, port 7050 is used for login, ports 7051 and 7052 are used for VOD (Video On Demand), ports 7053 and 7054 are used for live video, and port 7055 for time information. To configure network settings: 1. In the SAgent main user interface, click the Setup Options button. 2. The Options window opens with the Network tab active. Fill out the information and adjust settings as necessary. See “Options Field Definitions: Network Tab” on page 3-3 for details. This check box is displayed when you click the Advanced button. 3. Click OK to save the changes and close the window. 3-2 9/10/08 24-10437-38 Rev. A This document contains confidential and proprietary information of Weldex Corporation. SAgent System Setup Options Field Definitions: Network Tab Network Time-Out Network Time-Out – Specify the time period after which SAgent automatically disconnects from the DVR if there is no data transmission. Value range: 1 to 60 minutes. Default – Click this button to restore default values for all fields under the Network tab. Reconnection Time Interval – Specify the time period after which SAgent attempts to reconnect with the DVR after the “Unknown Error” or “Time-Out Error” message. The default value is 5 seconds. To disable reconnection attempts set this value to 0. Advanced – Click this button to display the Try Reconnecting Continuously for Network or Server Error check box. Try Reconnecting Continuously for Network or Server Error – Select this check box to enable continuous reconnection attempts. Buffering Time Buffering Time – Use this field to adjust buffering time for real time playback. When you increase buffering, the computer will retrieve more data from the DVR before it starts displaying the images. Event Port Event Port – This port is used for transmitting the event information from the DVR to be displayed in the SAgent Event List. The default value is 7056. This number must be set to the same value at the SAgent and at the DVR. Changes to this setting take effect after the SAgent application is closed and re-started. DDNS (DDNS Currently Not Supported) Server Address – Specify the IP address of DDNS server. TCP Port – Specify the TCP port number to be used for the DDNS service. The default value is 10000. The TCP port number used for DDNS at the DVR and SAgent must be the same. Video Play Options To configure video play options: 1. In the SAgent main user interface, click the Setup Options button. 24-10437-38 Rev. A This document contains confidential and proprietary information of Weldex Corporation 3-3 9/10/08 System Setup SAgent 2. The Options window opens. Click the Play tab. Fill out the information and adjust settings as necessary. See “Options Field Definitions: Play Tab” on page 3-4 for details. 3. Click OK to save the changes and close the window. Options Field Definitions: Play Tab Video Play Setting Use DirectDraw – Select this check box to enable DirectDraw (recommended). Changes to this setting take effect after the SAgent application is closed and re-started. DirectDraw, a part for Microsoft DirectX API application, is used to render graphics in applications where top performance is important. Keep the last frame on display at the end of video – Select this check box to display the last recorded frame at the end of playback. When disabled, the logo will be displayed at the end of the playback. Video Caption Font Size – Select the font size for video captions. Value range: 8 to 11 points. Default value: 11 points. Changes to this setting take effect after the SAgent application is closed and re-started. Audio Play Setting Disable Audio – Select this check box to disable the audio function. 3-4 9/10/08 24-10437-38 Rev. A This document contains confidential and proprietary information of Weldex Corporation. SAgent System Setup Sensor Setup To configure sensor options: 1. In the SAgent main user interface, click the Setup Options button. 2. The Options window opens. Click the Sensor tab. Fill out the information and adjust settings as necessary. See “Options Field Definitions: Sensor Tab” on page 3-5 for details. 3. Click OK to save the changes and close the window. Options Field Definitions: Sensor Tab Sound Effect Duration When Sensor is Activated – When this check box is selected, the alarm sound effect at SAgent will be activated once at the beginning of the sensor event. Until Any Key is Pressed or Mouse is Clicked – When this check box is selected, the alarm sound effect at SAgent will last for until a user presses a keyboard key or clicks a mouse. User Defined Time – Select to set sound alarm time at SAgent to a custom value. In the associated field specify duration time in seconds. Optional Use User-Defined Event Sound Effect (*.wav)– Select this check box to associate a sound effect with the sensor event alarm. Use the associated Browse button to search for the WAV file. 24-10437-38 Rev. A This document contains confidential and proprietary information of Weldex Corporation 3-5 9/10/08 System Setup SAgent Browse – Click to search for the WAV file to be used as alarm sound. Activate Sound Effect for Extra Alarms – Select this check box to enable sound effects for alarms other than Sensor type. Event Time Time setting – Indicates the start and the end time in HH:MM format, during which the sensor alarm can be generated. The default value is 00:00 to 00:00 which means 24 hours (continuous). Remote Event Setup To configure remote event notifications: 1. In the SAgent main user interface, click the Setup Options button. 2. The Options window opens. Click the Remote Event tab. Fill out the information and adjust settings as necessary. See “Options Field Definitions: Remote Event Tab” on page 3-6 for details. 3. Click OK to save the changes and close the window. Options Field Definitions: Remote Event Tab Receive Remote Event Receive Remote Event – Select to enable receiving information about events from the DVR. When this option is not selected, SAgent will not display the events on the Event List area. 3-6 9/10/08 24-10437-38 Rev. A This document contains confidential and proprietary information of Weldex Corporation. SAgent System Setup Automatically connect to sites where the event occurred – If selected, when sensor event occurs, image from the connected DVR will be automatically displayed at SAgent. In order for this feature to work you must first establish connection(s). See “Establishing Connections” on page 3-12 for details. Options Switch from full to normal screen mode when events occur – If selected, SAgent will automatically change the display from full screen mode to normal screen mode when an even occurs. This allows you to also view the Event List. Automatically switch to single screen mode when events occur – If selected, when a motion or sensor event occurs at a specific camera, image from that camera will display in 1-screen mode. SAgent User Management This user management is independent from the DVR's user management and is used to control access to the SAgent functions. There is a built-in Administrator account which cannot be deleted or modified. You can add, delete, and modify other SAgent user accounts, as well as export and import user settings to a DAU file. See “Options Field Definitions: User Management Tab” on page 3-10 for description on all items under the User Management tab. To add/remove SAgent user accounts: 1. In the SAgent main user interface, click the Setup Options button. 2. The Options window opens. Click the User Management tab. 24-10437-38 Rev. A This document contains confidential and proprietary information of Weldex Corporation 3-7 9/10/08 System Setup SAgent 3. Click Add. 4. The User Properties (New) window opens. Fill out the following information: + User ID – Specify SAgent user ID. + Description – Enter a descriptive name for the SAgent user. + Password – Enter SAgent user password. + Confirm Password – Confirm SAgent user password. + Supported Function – List of functions available to the SAgent user. Use the Add and Remove buttons to edit this list. + Unsupported Function – List of functions not available to the SAgent user. Use the Add and Remove buttons to edit this list. Click OK. 5. Verify that the new user account is displayed in the Options window. If you want to remove existing account, select it and click Remove. NOTE The Administrator account cannot be deleted. 6. Click OK to close the window. To edit SAgent user account: 1. In the SAgent main user interface, click the Setup Options button. 3-8 9/10/08 24-10437-38 Rev. A This document contains confidential and proprietary information of Weldex Corporation. SAgent System Setup 2. The Options window opens. Click the User Management tab. 3. Select the user account and click Properties. NOTE You cannot edit properties of the Administrator account. 4. The User Properties window opens. Make required changes and click OK. 24-10437-38 Rev. A This document contains confidential and proprietary information of Weldex Corporation 3-9 9/10/08 System Setup SAgent 5. If you have made changes other than change to User ID, you will be asked for permission to overwrite previous settings. Click Yes. 6. Click OK in the User Properties window. 7. Click OK in the Options window. To export/import SAgent user settings: 1. In the SAgent main user interface, click the Setup Options button. 2. The Options window opens. Click the User Management tab. 3. To export settings in DAU file format click Export. 4. In the Save As window browse for location and specify file name; click Save. 5. To import previously saved SAgent user settings, click Import. 6. In the Open window search for the DAU file and click Open. The settings will be imported in adherence to the following rules: + Accounts not present at SAgent but present in the DAU file will be added to SAgent + Accounts already present at SAgent, but sharing the same user name as the accounts in the DAU file, will be overridden with the DAU file. For example, if “Anna Brown” account is already defined at SAgent and has full rights, but the account in DAU file has only Live Monitoring rights, after importing the DAU file rights of this user will be limited to Live Monitoring only. 7. Click OK to save the changes and close the window. Options Field Definitions: User Management Tab Add – Click to add new SAgent user. This user management is independent from the DVR's user management and is used to control access to the SAgent functions. Remove – Click to remove an SAgent user. This user management is independent from the DVR's user management and is used to control access to the SAgent functions. Properties – Click to view/edit SAgent user rights and passwords. Import – Click to import previously saved SAgent user settings. Export – Click to export SAgent user settings to a DAU file. Current User – Displays information on the SAgent user currently logged in. 3-10 9/10/08 24-10437-38 Rev. A This document contains confidential and proprietary information of Weldex Corporation. SAgent System Setup Data Storage Setup This interface allows you to specify the HDD drive to be used when you download DVR files to the local computer. To configure data storage: 1. In the SAgent main user interface, click the Setup Options button. 2. The Options window opens. Click the Storage tab. Using the Select and Delete buttons choose the drive for video files. 3. Click OK to save the changes and close the window. Options Field Definitions: Storage Tab List Drive – List of available hard drives. Use the Select and Delete buttons to edit this list. Selected Drive – Displays the hard drive selected as the default location of the downloaded files. Use the Select and Delete buttons to edit this list. 24-10437-38 Rev. A 3-11 This document contains confidential and proprietary information of Weldex Corporation 9/10/08 System Setup SAgent ESTABLISHING CONNECTIONS The Site/File Open window allows you to define remote site(s) and establish remote connection with the DVR. The following types of connection are available: + Live Display - When connected, displays live video from the selected DVR. + Remote File Copy - Copies recording files from the DVR to the local computer. + Remote Playback (VOD) - Plays video that had been recorded at specified time and date. To access the SIte/File Open window: 1. Click the Connect button in the SAgent main user interface, or right-click the screen area and select Open Site from the pop-up menu. 2. The Site/File Open window opens with the Remote tab active. See the following sections for description on configuring and connecting to remote sites as well as connecting to a local site. 3-12 9/10/08 24-10437-38 Rev. A This document contains confidential and proprietary information of Weldex Corporation. SAgent System Setup Configuring Remote Sites Once a site has been defined added to the list, it is easily accessible for future connections. To define a remote site: 1. Open the Site/File Open window. 2. Under the Remote tab, click the Add button. 3. The Connection Properties (New) window opens. Fill out the following information: + Site Name - Enter a descriptive name for the site. (The name defined here does not have to match any other setting and does not impact the connection.) + Server IP - If not using DDNS, enter the IP address of the DVR. If using DDNS, enter the Site ID and the DVR ID separated by a point. For example if the DVR's Site ID is 00:18:9C and the DVR ID is 01:01:88, enter 00:18:9C.01:00:88. + User ID - Enter the user name as created at the DVR. + Password - Enter the user’s password as created at the DVR + Channel - Specify channels to be displayed. Enter channel numbers separated by coma and/or channel number range. For example, to select channels 1, 2, 3, 4, 5, and 10 enter 1-5, 10. 24-10437-38 Rev. A 3-13 This document contains confidential and proprietary information of Weldex Corporation 9/10/08 System Setup SAgent + DVR Port - Enter the TCP/IP port number as defined at the DVR. + Web Port - Enter the WWW port number as defined at the DVR. + Description - Enter a description for this connection, for example, “DVR at the main office.” Click OK. 4. Verify that the new connection is displayed in the The Site/File Open window. You can use the Remove and Modify buttons to delete or edit selected connection. 3-14 9/10/08 24-10437-38 Rev. A This document contains confidential and proprietary information of Weldex Corporation. SAgent System Setup 5. If you are removing a connection, click Yes to confirm. 6. Click OK to save your changes and close the window. To edit a remote site: 1. Open the Site/File Open window. 2. Under the Remote tab, click the Add button. 24-10437-38 Rev. A 3-15 This document contains confidential and proprietary information of Weldex Corporation 9/10/08 System Setup SAgent 3. The Connection Properties window opens. Make required changes and click OK. 4. Verify that the new connection is displayed in the The Site/File Open window. You can use the Remove and Modify buttons to delete or edit selected connection. 3-16 9/10/08 24-10437-38 Rev. A This document contains confidential and proprietary information of Weldex Corporation. SAgent System Setup 5. If you are removing a connection, click Yes to confirm. 6. Click OK to save your changes and close the window. Connecting to a Remote Site You can connect to a remote DVR to view live or stored video, or to copy video files to a local computer. The following types of connection are available: + Live Display - Plays live video from the selected DVR. + Remote File Copy - Copies recording files from the DVR to the local computer. + Remote Playback (VOD) - Plays video that had been recorded at specified time and date. To establish live remote connection: 1. Open the Site/File Open window. 2. Under the Remote tab, select the site to connect to and select the Live Display radio button. 24-10437-38 Rev. A 3-17 This document contains confidential and proprietary information of Weldex Corporation 9/10/08 System Setup SAgent 3. From the Search Channel drop-down menu select the camera number. 4. Click OK. Live video recording from the selected DVR and channel will display on the main screen. To download recording(s) from a remote DVR: 1. Open the Site/File Open window. 2. Under the Remote tab, select the site to connect to and select the Remote File Copy radio button. 3. From the Search Channel drop-down menu select the camera number. You can also choose the first entry on the list which specifies all channels selected for this connection. 4. In the Search Date field specify the date when the video file was created and click OK. 5. The File List window opens. The video files are available in 1-hour intervals. Select individual file(s) or use the Select All button. The Available Size of Selected Drive and Available Size of Selected Files fields provide you information with the space available and the size of files you have selected. 3-18 9/10/08 24-10437-38 Rev. A This document contains confidential and proprietary information of Weldex Corporation. SAgent System Setup 6. Use the Browse button to search for a location where you want the file(s) to be saved. 7. Click Copy. The SAgent will display the percentage of the download process on the main screen. When you download a video file from the DVR, default path and name for the WSF files are created as follows (example values): C:\DMSP\Simi Valley\20080626\11450000.wsf Name of the of the DVR site Date of the download in the following format:YYYYMMDD (year-month-day). For example: 20080626 indicates June 26, 2008. File name contains information about recording time and camera. The first six digits indicate the recording time in the following format: HHMMSS (hours-minutes-seconds). The last two digits indicate the camera number. Camera numbering in the file name starts with 00, therefore, camera 1 is numbered 00, camera 16 is numbered 15, etc. For example: 11450000 recording of camera 1 started at 11 hours, 45 minutes, and 0 seconds. 24-10437-38 Rev. A 3-19 This document contains confidential and proprietary information of Weldex Corporation 9/10/08 System Setup SAgent To play VOD (Video On Demand) from remote DVR: 1. Open the Site/File Open window. 2. Under the Remote tab, select the site to connect to and select the Remote Playback (VOD) radio button. 3. In the Search Date and Search Time fields specify when the video file was created. 4. Click OK. Selected file will playback on the main screen. To disconnect from a selected remote site: in the SAgent main user interface, or Click the Disconnect button right-click the screen area and select Close from the pop-up menu. To disconnect from all remote sites: Click the Disconnect All button in the SAgent main user interface, or right-click the screen area and select Close All Sites from the pop-up menu. 3-20 9/10/08 24-10437-38 Rev. A This document contains confidential and proprietary information of Weldex Corporation. SAgent System Setup Site/File Open Field Definitions: Remote Tab This section describes menu items available under the Remote tab. T – Displays connection type icon. Only one icon is currently available. Site – Displays the IP address of the DVR. Channel – Lists the channels to be displayed. ID – Displays the user ID used to connect to the DVR.This user belongs to the DVR database. Description – Displays the description specified when creating a connection. Add – Click to open the Connection Properties (New) window and define a new connection. Delete – Click to delete selected connection. Modify – Click to open the Connection Properties window and modify selected connection. Connection Type Live Display – Plays live video from the selected DVR. Remote File Copy – Copies recording files from the DVR to the local computer. Remote Playback (VOD) – Plays video that had been recorded at specified time and date. Connection Option Search Date – Use this field to specify date of the recording for Remote File Copy or Remote Playback (VOD) functions. Search Time – Use this field to specify time of the recording for Remote Playback (VOD) function. Search Channel – Use this field to specify channel number for the remote connection. This field is used for all connection types. Other OK – Click to save changes and close the window. Cancel – Click to close the window without saving changes. Connecting to a Local Site Connecting to a Local Site is used to playback a downloaded file or files that were backed-up from the DVR. 24-10437-38 Rev. A 3-21 This document contains confidential and proprietary information of Weldex Corporation 9/10/08 System Setup SAgent To connect to the local site and to create a playlist: 1. In the main screen click the Connect icon. 2. The Site/File Open window opens. Click the Local tab. 3. Click the Browse button. 4. In the Open window search for the WSF file, select it and click Open. 5. Click Add to add the file to the playlist. If you want to remove a selected file from the playlist, click the Remove button. 6. Click OK in the The Site/File Open window. Selected file will playback on the main screen. 3-22 9/10/08 24-10437-38 Rev. A This document contains confidential and proprietary information of Weldex Corporation. Chapter 4 OPERATION This chapter describes how to use the SAgent software. OVERVIEW The SAgent main screen is divided into the following main parts: + Main menu with 2 tabs: SITE and PTZ + Screen area which can be divided into up to 36 channels + Remaining area with interactive tools and information displays. These components of this area remain the same regardless of the Main menu selections. Screen area Window display options Main menu Multi-split screen modes Image options Connectivity and network options Remote setup System log Playback options System Information Events list Logo area 24-10437-38 Rev. A This document contains confidential and proprietary information of Weldex Corporation 4-1 9/10/08 Operation SAgent Screen Area Screen display – This area displays image(s) and video(s) from connected DVRs. When inactive, the area displays the logo. See “Multi-Split Screen Modes” below for more display information. Right-click on the screen area to display Pop-up Menu. See page 4-5 for details. Window Display Options Full screen – Click to display full-screen image. To return click the ESC button on the keyboard. Minimize – Click to minimize the window. Exit – Click to close the SAgent application. Multi-Split Screen Modes 1-screen mode – Click to change screen display to 1 channel mode. 4-screen mode – Click to change screen display to 4 channel mode. 9-screen mode – Click to change screen display to 9 channel mode. 16-screen mode – Click to change screen display to 16 channel mode. 36-screen mode – Click to change screen display to 36 channel mode. Image Options Zoom image – To zoom a screen in or out, click the Zoom image button and then click on the screen. Use left-click to zoom in and right-click to zoom out. You can also use the mouse wheel for zoom control. Save image – Click to save selected (paused) image. When you click this button, the Save As window opens. Paused image can be saved in the following formats: JPG, PNG, or BMP. Print image – Click to open the Print window from which you can print selected (paused) image. Video caption (toggle) – Click this toggle button to turn video caption on or off. See page 4-6 for information how to setup video caption options. 4-2 9/10/08 24-10437-38 Rev. A This document contains confidential and proprietary information of Weldex Corporation SAgent Operation Remote Setup Remote setup – Click this button to launch Internet Explorer and connect to the web server of the DVR. See “Remote DVR Setup via SAgent” on page 4-10 for details. System Log System log – Click this button to open the System Log window. See “Viewing System Log” on page 4-10 for details. Event List In order to use this feature, Event Server should be enabled and configured at the DVR (including the IP address of the computer running SAgent). SITE NAME – Displays of the IP address of the DVR site where the event occurred. EVENT – Displays information about the nature of the event. TIME – Displays time of the event. NOTE – This field is not currently used. Playback Options Recorded video can be searched in 1-hour intervals. Seek Fast rewind Go to beginning of recording Play* Fast forward One frame forward Speed Volume Go to end of recording Pause * Also available in live mode. 24-10437-38 Rev. A This document contains confidential and proprietary information of Weldex Corporation 4-3 9/10/08 Operation SAgent SEEK – The pointer on the seek sliding bar shows the present search position in file interval. Move the pointer on the slide bar to control the playback speed. SPEED – Use the slide bar to control the playback speed. VOLUME – Use the slide bar to control the volume. This feature is only available during live mode. Audio recording must be enabled at the DVR. Go to beginning of recording – Return to the first frame of the video recording of the current playback hour. Fast rewind – Click to rewind the video recording. Pause – Click to pause currently playing video recording. Paused images can be saved and/or printed. Play – Click to play video recording. This function is available in playback mode as well as in live mode. One frame forward – Click to display the video recording frame-by-frame. Fast forward – Click to forward the video recording. One frame forward: The image is displayed one by one when this button is pressed. Go to end of recording – Click to display the last frame of the video recording of the current playback hour. Since the recording are searched by 1-hour intervals, the last screen shown is 59 minutes 59 seconds. Connectivity and Network Options Connect – Click to access the Site/File Open window which allows you to configure and establish remote connection. See “Establishing Connections” on page 3-12 for details. Disconnect – Click to disconnect from the selected remote site. Disconnect All – Click to disconnect all remote sites. Setup Options – Click to open the Options window which allows you to configure network and system options. See “Viewing System Log” on page 4-10 for details. 4-4 9/10/08 24-10437-38 Rev. A This document contains confidential and proprietary information of Weldex Corporation SAgent Operation System Information HDD – Displays the amount of hard drive space used on the local computer. DATE / TIME – Displays current date and time. Screen Area Pop-up Menu This menu gives you quick access to SAgent functions. To access this menu, right-click on the screen area. Open Site – Click to access open a Site/File Open window. This menu item has the same functionality as the Connect button in the main user interface. See “Establishing Connections” on page 3-12 for more details. Retry Site – If a connection to a specific camera is lost, select Retry Site for SAgent to attempt to reconnect. Close – Click to disconnect from selected site. Close All Sites – Click to close disconnect from all remote sites. Full Screen – Click to display full-screen image. To return click the ESC button on the keyboard. Pause – Click to pause currently playing video recording. Paused images can be saved and/or printed. Play (Continue) – Click to play video recording. This function is available in playback mode as well as in live mode. 24-10437-38 Rev. A This document contains confidential and proprietary information of Weldex Corporation 4-5 9/10/08 Operation SAgent Audio Play – Toggles Audio Play feature on and off. To use this feature, Audio must be configured at the DVR. If multiple cameras have enabled audio, the sound will be combined, therefore it is recommended to enable audio at only one camera. Digital Zoom – Click to enable digital zoom. Left-click to zoom in ot right-click to zoom out. Save Still Image – Click to save selected (paused) image. When you click this button, the Save As window opens. Paused image can be saved in the following formats: JPG, PNG or BMP. Print – Click to open the Print window and print selected (paused) image. Recording – Click to save currently displaying video to your local computer. The default location is C:\DMSP and it can be changed from the Option>Storage menu. Caption On/Off – Select the information to be display in the screen area. The same kind of information will be displayed for all channels. The following captions are available: + Title - The name of the Site. + Channel - The name of the camera as specified at the DVR. + Time - Date and time of the video file being displayed. + Status - Specifies display mode (live, playback) as well as information on buffering and connection status. + All - Click to turn on all the available captions. Statistics – Shows the size of the file being displayed and transmission speed in kbps. Logo Area Logo area – This area displays Weldex Corporation logo. Click on this area to display additional software and system information. 4-6 9/10/08 24-10437-38 Rev. A This document contains confidential and proprietary information of Weldex Corporation SAgent Operation SITE MENU The Site menu displays the list of remote sites. List of connections VOD – Select this check box to enable Video On Demand (VOD) playback. Date – Select playback date. Time – Select playback time. Live Play / Playback Mode – Click to start the video.This button reads Live Play when VOD is not selected and Playback Mode when VOD is selected. List of connections – Displays currently defined remote connections. You can drag-and-drop items from this list to the screen area to open a connection. 24-10437-38 Rev. A This document contains confidential and proprietary information of Weldex Corporation 4-7 9/10/08 Operation SAgent PTZ MENU The PTZ menu allows you to control PTZ (pan, tilt, and zoom) cameras. Virtual joystick Virtual joystick – Use the arrows to change position of the camera. ZOOM – Press the + and - buttons to zoom in and out. FOCUS – Press the + and - buttons to focus in and out. Preset PRESET – Enter the name of the preset. Numeric buttons 1- 8 – Preset numbers. Set – Click to set a preset to selected position. Move – Click to activate the preset. Guard Tour Set – Click to open the Guard Tour window. Move – Click to activate the Guard Tour. To configure presets for a selected camera: 1. In the Preset field, enter preset name. 2. Use the Virtual joystick, Zoom, and Focus functions to adjust the camera position and settings. 3. Assign a number to the preset by selecting a numeric button. 4-8 9/10/08 24-10437-38 Rev. A This document contains confidential and proprietary information of Weldex Corporation SAgent Operation 4. Click the Set button associated with the presets. 5. Repeat steps 1 - 4 for all presets you want to define for this camera. 6. To verify preset function, click the corresponding numeric button and then click Move. To configure guard tour for a selected camera: 1. Click the Set button associated with Guard Tour. 2. Guard Tour Setting window opens. Select a preset and from the Preset list and time (in seconds) from the Delay Time list. 3. Click the right arrow button to add the selection to the Guard Tour list. The left arrow button allows you to remove unwanted items from the list after highlighting them. 4. Repeat steps 2 and 3 until the Guard Tour is defined. 5. The Guard Tour elements are displayed in the following format: PX(Y), where X is the number of the preset and Y is time in seconds. 6. Click the Test button to begin the Guard Tour. 7. Click Set to save the Guard Tour. 24-10437-38 Rev. A This document contains confidential and proprietary information of Weldex Corporation 4-9 9/10/08 Operation SAgent VIEWING SYSTEM LOG The System Log window allows you to search events generated by the DVR and view the recording from the time the event occurred. To open the System Log window: 1. Click the System log button in the SAgent main user interface. 2. The System Log window opens. 3. Use the Search Event drop-down list to select the date and click Refresh. 4. Use one of the Event Type radio buttons (All, System, Event, Setup, or Network) to select the type of events to be displayed. 5. Select an event and click the Connect button. The DVR will playback that specific event time. NOTE You can only playback Motion and Sensor events. 6. Click Close to close the System Log window. REMOTE DVR SETUP VIA SAGENT The Remote DVR Setup feature allows SAgent users to change non-system settings of the DVR. System settings such as date, time, firmware upgrade, HDD format, cannot be adjusted using the web interface. 4-10 9/10/08 24-10437-38 Rev. A This document contains confidential and proprietary information of Weldex Corporation SAgent Operation When you click the Remote Setup button, Internet Explorer application is launched. Internet Explorer the automatically connects to the built-in web-server of the DVR. This feature is available only to members of the of the ADMIN user group. To log in and use Remote DVR Setup: 1. Click the Remote Setup button in the SAgent main user interface. 2. In the Administrator Login window enter the ID and Password as defined at the DVR you want to access. NOTE Only users of the ADMIN group are allowed to use this feature. 3. The browser application is launched and Remote Setting window opens. The [SYSTEM] General page is displayed. 24-10437-38 Rev. A 4-11 This document contains confidential and proprietary information of Weldex Corporation 9/10/08 Operation SAgent 4. Use the browser interface to remotely change the settings. Refer to the WDR Series Software User Manual for information on the WDR setup. 5. Click Submit to submit the changes or Reset to return to original settings. 6. Close the window. To log out from Remote DVR Setup close the Internet Explorer application. 4-12 9/10/08 24-10437-38 Rev. A This document contains confidential and proprietary information of Weldex Corporation