1
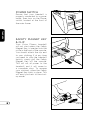
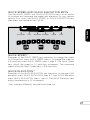
OWNER’S GUIDE GENERAL WARRANTY T10 Non-Folding Treadmill Congratulations on choosing a Vision Fitness® treadmill. You’ve taken an important step in developing and sustaining an exercise program! Your treadmill is a tremendously effective tool for achieving your personal fitness goals. Regular use of your treadmill can improve the quality of your life in so many ways… Here are just a few of the health benefits of aerobic exercise: • Weight loss • A healthier heart • Improved muscle tone • Increased daily energy levels • Reduced stress • Help in countering anxiety and depression • An improved self image The key to reaping these benefits is to develop the exercise habit. Your new treadmill will help you eliminate the obstacles that prevent you from getting in your exercise time. Snow and rain and darkness won’t interfere with your workout when you have your treadmill in the comfort of your home. This owner’s guide provides you with basic information on starting an exercise program. A more complete knowledge of your new treadmill will assist you in realizing your goal of a healthy lifestyle. Service to your treadmill should only be performed by your Vision Fitness retailer. Please contact your authorized Vision Fitness retailer should service be required. If a question or problem arises which cannot be handled by your Vision Fitness retailer, please contact us: Vision Fitness 1600 Landmark Drive Cottage Grove, WI 53527 Ph: 1.800.335.4348 www.visionfitness.com Table of Contents GENERAL SAFETY INSTRUCTIONS.............................................. 2 GROUNDING INSTRUCTIONS, POWER REQUIREMENTS........................................... 3 OTHER SAFETY TIPS..................................................... 4 POWER SWITCH & SAFETY KEY.......................... 8 QUICK SPEED & ELEVATION KEYS...................... 7 CONTACT HEART RATE.............................................. 8 GENERAL ASSEMBLY & PLACEMENT........................................ 5 TREADMILL OVERVIEW.............................................. 9 CONSOLE CONSOLE MOVING & LEVELING.................................................. 10 INTRODUCTION................................................................ 11 WARRANTY HOME WARRANTY........................................................ 16 WARRANTY CONSOLE DISPLAY....................................................... 12 IMPORTANT SAFETY INSTRUCTIONS This treadmill is intended for household use only. When using this treadmill, basic precautions should always be followed, including the following: Read all instructions before using this treadmill: DANGER: GENERAL TO REDUCE THE RISK OF ELECTRIC SHOCK: • Always unplug the treadmill from the electrical outlet immediately after using and before cleaning. WARNING: 2 TO REDUCE THE RISK OF BURNS, FIRE, ELECTRIC SHOCK, OR INJURY TO PERSONS: • Do not remove the treadmill motor covers or roller covers. Service should be performed only by an authorized Vision Fitness retailer. • Connect this treadmill to a properly grounded outlet only. See Grounding Instructions. • The treadmill should never be left unattended when plugged in. Unplug from outlet when not in use, and before putting on or taking off parts. • Do not operate under blanket or pillow. Excessive heating can occur and cause fire, electric shock, or injury to persons. • Close supervision is necessary when this treadmill is used by, on, or near children, invalids, or disabled persons. • Use this treadmill only for its intended use as described in this manual. Do not use attachments not recommended by the manufacturer. • Never operate this treadmill if it has a damaged cord or plug, if it is not working properly, if it has been dropped or damaged, or dropped into water. Return the treadmill to a service center for examination and repair. • Do not carry this treadmill by supply cord or use cord as a handle. • Keep the cord away from heated surfaces. • Never operate the treadmill with the air openings blocked. Keep the air openings free of lint, hair, and the like. • Never drop or insert any object into any opening. • Do not use outdoors. • Do not operate where aerosol (spray) products are being used or where oxygen is being administered. • To disconnect, turn all controls to the off position, then remove plug from outlet. • Never place the power cord under carpeting or place any object on top of the power cord, which may pinch and damage it. • Unplug your Vision Fitness treadmill before moving it. SAVE THESE INSTRUCTIONS GROUNDING INSTRUCTIONS This treadmill must be grounded. If it should malfunction or breakdown, grounding provides a path of least resistance for electric current to reduce the risk of electric shock. This treadmill is equipped with a cord having an equipment-grounding conductor and a grounding plug. The plug must be plugged into an appropriate outlet that is properly installed and grounded in accordance with all local codes and ordinances. GENERAL DANGER: Improper connection of the equipment-grounding conductor can result in a risk of electric shock. Check with a qualified electrician or serviceman if you are in doubt as to whether the treadmill is properly grounded. Do not modify the plug provided with the treadmill – if it will not fit the outlet, have a proper outlet installed by a qualified electrician. POWER REQUIREMENTS This treadmill is rated for more than 15 amperes and is for use on a circuit having a nominal rating of 120 volts and is factory-equipped with a specific electric cord and plug to permit connection to a proper electric circuit. Make sure that the treadmill is connected to an outlet having the same configuration as the plug. No adapters, extension cords, or surge protectors should be used with this product. If the treadmill must be reconnected for use on a different type of electric circuit, the reconnection should be made by qualified service personnel. Also, a GFI protected receptacle should not be used. It is recommended to use a 20 amp dedicated circuit. 3 OTHER SAFETY TIPS FOR YOUR VISION FITNESS TREADMILL CAUTION: RISK OF INJURY TO PERSONS To avoid injury, stand on the siderails before starting treadmill. Read Instruction Manual before using. GENERAL CAUTION: If you experience chest pains, nausea, dizziness or shortness of breath, stop exercising immediately and consult your physician before continuing. • Do not wear clothing that might catch on any part of the treadmill. • Read this Owner’s Guide before operating this treadmill. 4 ASSEMBLY Vision Fitness recommends this treadmill be assembled and delivered by qualified personnel. If you have elected to assemble this treadmill yourself, for your safety please read and follow each of the steps in the enclosed Assembly Guide. It is recommended, when possible, that assembly be performed by an authorized Vision Fitness retailer. If you have any questions regarding any part or function of your treadmill, contact your Vision Fitnes retailer. GENERAL PLACEMENT IN YOUR HOME It is important that you place your treadmill in a comfortable and inviting room. Your treadmill is designed to use minimal floor space. Many people will place their treadmills facing the TV or a picture window. If at all possible, avoid putting your treadmill in an unfinished basement. To make exercise a desirable daily activity for you, the treadmill should be in an attractive setting. NOTE: If you place your treadmill facing out from a wall, you should leave three feet between the wall and the treadmill to ensure safe operation. 5 Power SWITCH GENERAL Ensure that your treadmill is properly connected to a power outlet, then turn on the Power switch, located at the front of the main frame. SAFETY Magnet KEY & CLIP Your Vision Fitness treadmill will not start unless the Safety Magnet Key is inserted into the circle in the front of the console. You should attach the clip end to your clothing. If at any time you need to stop the treadmill quickly, simply pull the Safety Magnet Key off the console. This will cut all power to the treadmill, and it will come to a complete stop. To resume your workout, place the Safety Magnet Key back in place. This will send you back to the startup mode. 6 T10 QUICK Speed and quick elevation keys Use the QUICK SPEED and QUICK ELEVATION keys as an option to increase and decrease the speed and elevation to your desired setting. First press the QUICK SPEED or QUICK ELEVATION key, then press the numbered keys (0-9). HEART RATE TIME DISTANCE CALORIES SPEED GENERAL ELEVATION PACE Change Display Hold to Scan QUICK Speed* Examples of the QUICK SPEED key operation: to change the speed to 4.0 mph/kph, press QUICK SPEED, then 4. To change the speed to 4.5 mph/kph, press QUICK SPEED, then 4, then 5. The Quick Speed keys adjust the speed in 0.1 mph/kph increments. The maximum speed using the Quick Speed keys is 9.9 mph/kph. quick elevation* Start Press for Easy Start Examples of the QUICK ELEVATION key operation: to change to 6% elevation, press QUICK ELEVATION, then 6. To go to 10% elevation, press QUICK ELEVATION then 1,Stop then 0. The Quick Elevation keys adjust the elevation in 1% increments. Hold to Reset * May operate differently outside North America. 7 Contact Heart Rate Hand Pulse Heart Rate Sensors GENERAL The Contact Hand Pulse Sensors are included on this treadmill to monitor your heart rate. To use, grasp both of the sensors with a comfortable grip during your workout. The console will display your heart rate. Although your signal will be displayed immediately, it may take the system a few seconds to zero in on your actual heart rate. Start Press for Easy Start Stop Hold to Reset 8 GENERAL CONSOLE HANDLEBARS SIDE RAILS MOTOR COVER RUNNING BELT LEVELERS TRANSPORT WHEELS 9 MOVING YOUR VISION FITNESS TREADMILL Your Vision Fitness treadmill has a pair of transport wheels built into the front legs. To move, firmly grasp the back end of the frame, carefully lift and roll. CAUTION: GENERAL Our treadmills are well-built and heavy, weighing up to 300 pounds! Use care and additional help if necessary. LEVELING Your treadmill should be level for optimum use. Once you have placed your treadmill where you intend to use it, raise or lower one or both of the adjustable levelers located on the back of the treadmill frame. A carpenter’s level is recommended. If your treadmill is not level, the running belt may not track properly. Once you have leveled your treadmill, lock the levelers in place by tightening the nuts against the frame. 10 CONSOLE INTRODUCTION Simply press the START key to begin exercising, or you can select a workout time and enter your weight. T10 HEART RATE ELEVATION TIME DISTANCE CALORIES SPEED PACE Change Display Hold to Scan CONSOLE Start Press for Easy Start Stop Hold to Reset CHOOSING A TIME Use the number keys or either set of arrow keys to select a workout time. Press START to start the workout or ENTER to enter your weight. ENTERING YOUR WEIGHT After selecting your workout time, you may enter your weight. Use the number keys or either set of arrow keys to enter your weight. Press ENTER. By selecting your weight, the totals for calories will be adjusted according to your entered weight. If you are ready to begin exercising, press START. PAUSE Press STOP to pause during your workout. RESET Press and hold STOP to reset the treadmill. 11 CONSOLE DISPLAY SCAN FUNCTION To scan through the functions during your workout, press the ENTER key. To continuously scan, press and hold ENTER until the console double-beeps (about twoT10 seconds). The selected function is displayed when the function light is on above the word. HEART RATE CONSOLE ELEVATION TIME DISTANCE CALORIES SPEED PACE Change Display Hold to Scan ELEVATION Shown as a percentage of incline. This indicates how steeply inclined the running surface is to simulateStop walking/running on a hill. Start Press for Easy Start Hold to Reset TIME Shown as (Minutes:Seconds). View the Time elapsed in your workout. DISTANCE Shown as miles or kilometers. View Distance traveled during workout. CALORIES Shown as estimated accumulated Calories burned during workout. SPEED Shown as Miles/Hour or Kilometers/Hour. This Indicates how fast the running surface is moving to simulate outdoor walking/running. PACE Shown as time (Minutes:Seconds) required to travel one mile/ kilometer at current speed. 12 HEART RATE Shown as beats per minute (BPM). You can monitor your heart rate by gripping the hand pulse heart rate sensors. User Engineering Mode Your treadmill offers a User Engineering Mode that can access certain data and help to troubleshoot your treadmill. The User Engineering Mode is designed for you to access functions that will not affect important treadmill settings. To access this mode, please hold down the SPEED DOWN and ENTER keys while the treadmill is at the start-up mode. When in User mode, “USER” is displayed in the data window. Press ENTER. Use either set of arrow keys to access the available functions/data. Press ENTER to select the data/ function. To save data, hold down ENTER until the treadmill beeps. To exit, press STOP. CONSOLE UNITS P6 represents units, Metric or English. You can change this configuration for your treadmill. When you enter P6, the large window shows the model number and the small window shows the units. An even number represents English units (miles/mph), and an odd number represents Metric units (kilometers/kph). You can change the number using the SPEED arrow keys. Press and hold ENTER to save the data. Maximum Time P7 represents the maximum time the treadmill can be used (shown as minutes:seconds). Use the number keys or the SPEED arrow keys to change the time. To save the time, hold down ENTER until there are two beeps. Default Weight P8 represents the default weight. You can change this configuration for your treadmill. To modify the weight, use the number keys or press the SPEED arrow keys. To save the new default weight, hold down ENTER until there are two beeps Accumulated Time P9 represents accumulated time in hours. This information is for viewing only; the data cannot be modified. Accumulated Distance P10 represents accumulated distance, either in miles or kilometers. This information is for viewing only; the data cannot be modified. 13 USER ENGINEERING MODE (CONTINUED) PAUSE TIME P14 represents the pause time. The default pause time is five minutes. You can modify the pause time from 20 seconds to 10 minutes. You can modify this time by using the number keys or the SPEED arrow keys. Press and hold ENTER to save the new value. CONSOLE DEFAULT TIME P15 represents the program default time. You can modify this time by using the number keys or the SPEED or ELEVATION arrows. Press and hold ENTER to save the new value. 14 AUTO-CALIBRATION DO NOT STAND ON THE BELT WHEN PERFORMING THE AUTO CALIBRATION! “AUTO” appears in the data window for the auto-calibration function. To begin auto-calibration, press START. The treadmill will run through minimum and maximum speed and elevation. The autocalibration will take three to five minutes. When auto-calibration is complete, “End” will appear in the data window. The treadmill will reboot and return to the start-up screen. EXIT USER ENGINEERING MODE P16 represents exit mode. When you press ENTER to select the function, the console performs a reboot, returning to the start-up screen. CONSOLE 15 LIMITED HOME USE WARRANTY* Vision Fitness extends the following exclusive, limited warranty, which shall apply only to the use of the device in the home, for residential, non-commercial purposes only. Any other use of the device shall void this warranty. Vision fitness hereby extends the following limited warranties for the following components of the device, for the time period indicated: FRAME - LIFETIME Vision Fitness warrants the Frame against defects in workmanship and materials for the life of the product, so long as it remains in the possession of the original owner. MOTOR - LIFETIME Vision Fitness warrants the Motor against defects in workmanship and materials for the life of the Product, so long as the device remains in the possession of the original owner. WARRANTY ELECTRONICS & PARTS - FIVE YEARS Vision Fitness warrants the Electronic components and all original Parts (other than the Motor) against defects in workmanship and materials for a period of five years from the date of original purchase, so long as the device remains in the possession of the original owner. LABOR - TWO YEARS Vision Fitness shall cover the Labor cost for the repair of the device for a period of two years from the date of original purchase, so long as the device remains in the possession of the original owner. *Limited Home-Use Warranty valid only in North America. 16 EXCLUSIVE REMEDY The exclusive remedy for any of the above warranties shall be repair or replacement of defective Parts, or the supply of Labor to cure any defect, provided that Labor shall be limited to one year. All Labor shall be supplied by the local Retailer who sold the Product and the Product must be located within that Retailer’s service area. Products located outside the Retailer’s service area will not be covered by the Labor warranty. EXCLUSIONS AND LIMITATIONS WARRANTY This warranty applies only to the original owner and is not transferable. This warranty is expressly limited to the repair or replacement of a defective Frame, Electronic component, or defective Part and is the sole remedy of the warranty. The warranty does not cover normal wear and tear, improper assembly or maintenance, or installation of parts or accessories not originally intended or compatible with the Fitness Product as sold. The warranty does not cover failure to follow instructions and warnings in the Owner’s Guide or failure to provide reasonable and necessary maintenance. The warranty does not apply to damage or failure due to accident, abuse, corrosion, discoloration of paint or plastic, or neglect. Vision Fitness shall not be responsible for incidental or consequential damages. Parts and Electronic components reconditioned to As New Condition by Vision Fitness or its vendors may sometimes be supplied as warranty replacement parts and constitute fulfillment of warranty terms. Any warranty replacement parts shall be warranted for the remainder of the original warranty term. Vision fitness expressly disclaims all other warranties, express or implied, including but not limited to all warranties of fitness for a particular purpose or of merchantability. This warranty gives you specific legal rights and your rights may vary from state to state. WARRANTY REGISTRATION Your warranty card must be completed and sent to Vision Fitness before a warranty claim can be processed. You may also register via our website at www.visionfitness.com. Inside the enclosed warranty card you will find a customer survey. Your care in completing the survey will be of value to us in serving you in the future. Comments and suggestions are always welcome. We are certain you will enjoy your new treadmill. Thank you for selecting a Vision Fitness product. 17 T10 1600 Landmark Drive • Cottage Grove, WI 53527 toll free 800.335.4348 • fax 608.839.8731 www.visionfitness.com 2012 Vision Fitness. All Rights Reserved. REV 1.1