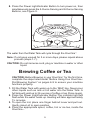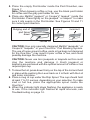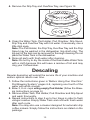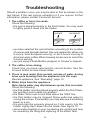
1
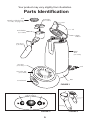
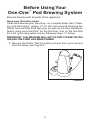
USE AND CARE GUIDE FOR
MODEL MES2B/W/R/K/MG,
MES2B/W/R/K/MGCAN
READ AND SAVE THESE INSTRUCTIONS
Pod Brewing System
IMPORTANT SAFEGUARDS
When using electrical appliances, basic safety precautions should
always be followed, including the following:
• Read all instructions.
• Do not touch hot surfaces. Use handles or knobs.
• To protect against fire, electric shock, do not place cord, plugs,
or appliance in water or other liquid.
• Close supervision is necessary when any appliance is used by
or near children.
• Unplug from outlet when not in use and before cleaning. Allow
to cool before putting on or taking off parts, and before cleaning
the appliance.
• Do not operate any appliance with a damaged cord or plug or after
the appliance malfunctions, or has been damaged in any manner.
Contact Consumer Service for examination, repair or adjustment.
• The use of accessory attachments not recommended by the
appliance manufacturer may result in fire, electric shock or injury
to persons.
• Do not use outdoors.
• Do not let cord hang over edge of table or counter, or touch hot
surfaces.
• Do not place on or near a hot gas or electric burner, or in a
heated oven.
• To disconnect, turn any control to “off,” then remove plug from
wall outlet.
• Do not use appliance for other than intended use.
• Be certain lid is securely in place before operating appliance.
• Scalding may occur if the lid is opened during the brewing cycles.
SAVE THESE INSTRUCTIONS
THIS PRODUCT IS FOR HOUSEHOLD USE ONLY.
2
ADDITIONAL IMPORTANT
SAFEGUARDS
WARNING: This appliance generates heat and escaping steam
during use. Use proper precautions to prevent the risk of burns,
fires, or other injury to persons or damage to property.
• All users of this appliance must read and understand this
Owner’s Manual before operating or cleaning this appliance.
• The cord to this appliance should be plugged into a 120V AC
electrical outlet only.
• Use water only in this appliance! Do not put any other liquids or
food products in this appliance. Do not mix or add anything to the
water placed in this appliance, except as instructed in the User
Maintenance Instructions to clean the appliance.
• DO NOT attempt to move an appliance containing hot liquids.
Allow appliance to cool completely before moving.
• Keep appliance at least 4 inches away from walls or other objects
during operation. Do not place any objects on top of appliance
while it is operating. Place the appliance on a surface that is
resistant to heat.
• If this appliance begins to malfunction during use, immediately
unplug the cord. Do not use or attempt to repair the malfunctioning appliance.
• If this appliance falls or accidentally becomes immersed in water
or any other liquid, unplug immediately. Do not reach into the
water! Do not use this appliance after it has fallen into or
has become immersed in water. Contact Consumer Service
for examination and repair.
• Do not leave this appliance unattended during use.
• Always use fresh, cool water in your coffee maker. Warm water
or other liquids, except as listed in cleaning section, may cause
damage to the appliance.
3
POLARIZED PLUG: This appliance has a polarized plug, (one
blade is wider than the other). To reduce the risk of electric shock,
this plug is intended to fit into a polarized outlet only one way. If
the plug does not fit fully in the outlet, reverse the plug. If it still does
not fit, contact a qualified electrician. Do not attempt to modify the
plug in any way.
SHORT CORD INSTRUCTIONS: A short power supply cord is provided to reduce the risk resulting from becoming entangled in or
tripping over a longer cord.
Do not use an extension cord with this product.
ELECTRIC POWER: If the electric circuit is overloaded with other
appliances, your appliance may not operate properly. It should be
operated on a separate electrical circuit from other appliances.
WARNING: TO REDUCE THE RISK OF FIRE OR ELECTRIC
SHOCK, DO NOT REMOVE THE BOTTOM COVER. NO USERSERVICEABLE PARTS INSIDE. REPAIR SHOULD BE DONE BY
AUTHORIZED SERVICE PERSONNEL ONLY.
CAUTION: To prevent Plasticizers from migrating from the finish of
the countertop or tabletop or other furniture, place NON-PLASTIC
coasters or placemats between the appliance and the finish of the
countertop or tabletop.
Failure to do so may cause the finish to darken, permanent
blemishes may occur or stains can appear.
4
Your product may vary slightly from illustration.
Parts Identification
Pod
(Samples included in box.
To order, see page 15.)
Pod Holder
(P/N 31001B)
Lever
Lid
Pod Chamber
(P/N 31002B)
Water
Diffuser
Drip Spout
(P/N 31003)
Water
Tank
(P/N 31005)
Drip Tray
(P/N 31007)
Cord
Over Flow Tray
(P/N 31008B)
Base
Control Panel
FIGURE 1
Tea Pod Holder
(P/N 31001G)
5-ounce Serving
Power Light/
Indicator Button
8-ounce Serving
Iced Tea Spout
(P/N 31095)
Hot Tea Spout
(P/N 31096)
FIGURE 2
5
FIGURE 3
Before Using Your
One:One™ Pod Brewing System
Become familiar with all parts of the appliance.
Keep your One:One clean
Clean and descale your One:One™ on a regular basis. See “Cleaning and Descaling”, pages 12-13. We recommend cleaning the
Water Tank and the Drip Spout(s) as well as the Pod Holder(s),
before using your One:One™ for the first time. Turn on the machine
for a full cycle using water only by following steps 1-7 below.
IMPORTANT: THE MACHINE WILL NOT FILTER COFFEE OR TEA
UNLESS THE PUMP HAS BEEN PRIMED.
1. Remove the Water Tank by pulling out and then up to remove
from the Base, see Figure 4.
FIGURE 4
6
2. Fill the Water Tank with fresh water up to the ‘Max’ line, and fit
back into the Base (down and in) until it “snaps” into place, see
Figure 5.
FIGURE 5
3. Lift Lid by pulling out on the Lever. Top will pop up. Push back so
Lid is in fully raised position, see Figure 6.
FIGURE 6
4. Place the appropriate spout, coffee, hot or ice tea, inside the
One:One™.
7
5. Make sure the Pod Holder is inside the Pod Chamber. Do not
place a tea or coffee pod in holder. See Figure 7. When brewing coffee or tea, use the black pod holder for coffee and the
grey pod holder for tea.
FIGURE 7
6. To close the Lid, press down firmly on the top of the Lid and
hold in place while pushing the Lever back so it is flush with the
Lid and locks into place, see Figure 8.
FIGURE 8
7. Place a cup or mug below the Drip Spout to collect the water.
8
8. Press the Power Light/Indicator Button to turn power on, then
simultaneously press the 5-Ounce Serving and 8-Ounce Serving
Buttons, see Figure 9.
FIGURE 9
The water from the Water Tank will cycle through the One:One™.
Note: If unit goes unused for 3 or more days, please repeat above
process (steps 1-7).
CAUTION: Do not immerse cord, plug or machine in water or other
liquid.
Brewing Coffee or Tea
CAUTION: Before Brewing in your One:One™ for the first time,
complete the steps listed under “Before Using Your One:One™
Pod Brewing System” on pages 6-9 to ensure your machine
functions properly.
1. Fill the Water Tank with water up to the ‘MAX’ line. Never pour
other liquids such as milk or hot water into the Water Tank. A
full tank will yield up to 24-ounces of coffee or tea (three mugs).
2. Press the Power Light/Indicator Button.The indicator light will
flash while the water heats up. Heating will take approximately
11/2 minutes.
3. To open the Lid, place one finger behind Lever and pull out.
Gently raise Lid to open position.
4. Place the appropriate spout, coffee, hot or ice tea, inside the
One:One™.
9
5. Place the empty Pod Holder inside the Pod Chamber, see
Figure 7.
Note: When brewing coffee or tea, use the black pod holder
for coffee and the grey pod holder for tea.
6. Place one Melitta® javapod™ or Cooper’s® teapod™ inside the
Pod Holder. Press lightly on the javapod™ or teapod™ to make
sure it sits evenly in the Pod Holder. See Figures 10 and 11
for correct pod insertion.
correct
Bulging end of
pod faces
down
FIGURE 10
incorrect
FIGURE 11
CAUTION: Use only specially designed Melitta® javapods™ or
Cooper’s® teapods™ in your One:One™ Pod Brewing System.
The use of loose ground coffee, pods or tea bags not designed
for the One:One™, may result in poor coffee or tea, and could
possibly damage the machine.
CAUTION: Never use torn javapods or teapods as this could
clog the machine and damage it. Each javapod or
teapod is pre-portioned with the optimal amount of coffee or tea
required per cup.
7. To close the Lid, press down firmly on the top of the Lid and hold
in place while pushing the Lever back so it is flush with the Lid
and locks into place.
8. Place a mug or cup under the Drip Spout. The cup should hold
at least 7 to 10 ounces, depending on your selection. To make
iced or hot tea, place the appropriate spout inside the
One:One™.
9. When the indicator light stops flashing, the appliance is ready
to use. If the indicator light flashes at rapid intervals, see
Troubleshooting on page 14.
10
10. Select the amount of coffee or tea you wish to brew: either a 5
ounce serving or an 8 ounce serving. When brewing tea, the 8
ounce serving is recommended.The machine will begin the brewing process. At the beginning of the brewing cycle, a small amount
of water is dispersed to saturate the pod to ensure full extraction. Following a pause, the machine will brew for about 50 seconds for coffee (or 35 seconds for tea).You can manually stop the
brewing process at any time by pressing the Power Button.
CAUTION: Dripping may occur between brewing cycles.
11. Dispose of the javapod or teapod after use by removing the Pod
Holder from the Pod Chamber and emptying it. Do not use a
pod more than once. Repeated use may cause the pod to burst
and result in weak and inferior coffee or tea.
Note: Regular rinsing of the Pod Holder will optimize the flavor of
the beverage.
You may leave your One:One™ on if you intend to brew another
cup of coffee or tea. The appliance will turn itself off automatically
after one hour.
Hot Tea and Iced Tea Drip Spout
Assemblies
To maximize the flexibility of your One:One™ Pod Brewing System
and to avoid residual flavor when alternating between coffee or hot
tea, you may wish to purchase an additional drip spout assembly.
Order on-line at www.1to1coffee.com or call toll free, 1-800-841-1628.
A shorter spout designed specifically for iced tea is included with
your Brewing System.
FIGURE 12
11
Helpful Hints for Brewing
Fresh Water
For optimal results, use fresh water daily. If you haven’t used your
machine for a few days, follow steps 1-7 in section “Before Using
Your One:One™ Pod Brewing System” pages 6-9.
Note: If Water Tank becomes dry for 3 or more days, revisit section
“Before Using Your One:One™ Pod Brewing System,” steps 1-7.
Javapods and Teapods
Remember to remove pods after use. If a pod is left inside the
machine for some time without having used the system, remove it
and see “Before Using Your One:One™ Pod Brewing System,” page
6, before attempting to brew coffee or tea.
Use only specially designed Melitta ® javapods ™ or Cooper’s ®
teapods™ in your One:One™ Pod Brewing System. The use of loose
ground coffee, pods or tea bags not designed for the One:One™,
may result in poor coffee or tea, and could possibly damage the
machine.
Never use torn javapods or teapods as this could clog the machine
and damage it. Each javapod or teapod is pre-portioned with the
optimal amount of coffee or tea required per cup.
Care and Cleaning
CAUTION: Do not immerse cord, plug or machine in water or other liquid.
1. Always unplug the appliance before cleaning.
2. Clean the outer surface of the unit and the Water Diffuser with a
damp cloth.
3. Remove and disassemble the Pod Holder, Pod Chamber and
Drip Spout. To seperate Pod Chamber
and Drip Spout, remove Drip Spout,
press Lever on the back side of the
Drip Spout, see Figure 13.
Lever
FIGURE 13
12
4. Remove the Drip Tray and Overflow Tray, see Figure 14.
FIGURE 14
5. Clean the Water Tank, Pod Holder, Pod Chamber, Drip Spout,
Drip Tray and Overflow Tray with hot water. If necessary, use a
little dish soap.
Note: The Pod Holder, the Drip Tray, Overflow Tray and the Drip
Spout may be washed in the dishwasher (top shelf only). The
top part of the tank can be removed for thorough cleaning. Do not
place the Water Tank in the dishwasher.
6. Rinse all parts with fresh water after cleaning.
Note: Do not try to dry the inside of the Removable Water Tank
with a cloth because this will leave a residue of lint and may
clog your Coffeemaker.
Descaling
Regular descaling will extend the service life of your machine and
ensure optimal results over time.
1. Follow the instructions given in “Before Using Your One:One™
Pod Brewing System,” pages 6-9, replacing one fourth of the
water with white vinegar.
2. Brew 3, 8 oz. cups using empty Pod Holder (follow the Brewing Instructions on page 9.)
3. Remove Water Tank, Pod Holder, Pod Chamber and Drip Spout
and wash thoroughly.
4. Repeat instructions in step 2 up to four times in order to flush
vinegar residue. Empty Water Tank and refill with fresh water
after each cycle.
Note: You may also use a cleaner designed for automatic drip
coffee makers. Simply follow the instructions as stated on the
package.
13
Troubleshooting
Should a problem occur, you may be able to find an answer in the
text below. If the text proves unhelpful or if you require further
information, please contact Consumer Service.
1. The coffee or tea is too weak.
Check the following:
• the pod is placed properly in the Pod Holder. You may need
to lightly press it down into the holder.
correct
incorrect
FIGURE 15
• you have selected the correct button according to the number
of ounces and strength desired. Use one javapod for either one
5-ounce, bold European serving, or an 8-ounce serving of
American style coffee. When brewing tea be sure to select the
8-ounce serving.
• you are using a fresh Melitta® javapod™ or Cooper’s® teapod™.
2. The coffee is too strong.
Check that you have selected the correct button. Use the
8-ounce button for less robust coffee.
3. There is less water than normal volume of water during
brew cycle brewing from the appliance into the cups.
Descale appliance. See “Descaling,” page 13.
4. Water drips from the appliance.
Note: Some water may drip between cycles, this is normal.
Check the following:
• the Pod Holder must be placed properly within the Pod Chamber and the Lever locked into position.
• the Water Tank must not be filled above the ‘MAX’ line.
• the Pod Holder may be clogged. Rinse under tap water to
unclog the screen. If necessary, you may also use a scrubbing
brush or a pin.
• the pod must be properly placed so it sits evenly into the
holder. Lightly tap it down into the holder. See Figure 10.
• some water droplets on your countertop are normal and may
be caused by the filling and replacing of the Water Tank.
14
5. The indicator light is flashing.
A flashing indicator light means the machine is heating. This
normally lasts for 11/2-2 minutes. If indicator light is flashing
rapidly (more than a second apart), see #6 below.
If the indicator light flashes continually for more than 4 minutes,
contact Consumer Service.
6. The indicator light keeps flashing at rapid intervals.
Check the following:
• the Water Tank must be inserted properly inside the appliance.
• there must be enough water in the Water Tank. Fill the Water
Tank to the “Max” fill line.
• the appliance may require cleaning. See “Before Using Your
One:One™ Pod Brewing System”, pages 6-9.
• room temperature must be above 40°F.
7. The Lid will not open.
Turn appliance off. Unplug appliance. Wait for appliance to cool
completely (about 30 minutes) and try opening Lid again. Clean
all removable parts (Drip Spout, Pod Holder, Pod Chamber) as
described on pages 12-13.
For any other problem please contact Consumer Service,
1-800-841-1628 or email us at [email protected].
To Order Melitta® Javapods™ or
Cooper’s® Teapods™
It’s easy to order pods. Just log onto our dedicated website,
www.1to1coffee.com, and order online.
To order by phone, call toll-free, 1-800-841-1628.
To ensure a steady supply of fresh javapods and teapods and to take
advantage of special promotions, join our One:One™ Continuity Club
(see registration materials included with this product).
Melitta® javapods™ and Cooper’s® teapods™ are also available at many
retail outlets that carry the Melitta® One:One™ Pod Brewing System
or Melitta® One:One™ Javapod Coffeemakers.
15
IMPORTANT NOTICE
If any parts are missing or defective,
DO NOT return this product.
Please call our Customer Service Department for assistance.
800-841-1628 Monday - Friday 9:00 am - 5:00 pm CST
Thank You
LIMITED ONE YEAR WARRANTY
Warranty: This Melitta® product is warranted by Salton, Inc. to be free from
defects in materials or workmanship for a period of (1) year from the original
purchase date. This product warranty covers only the original consumer purchaser of the product.
Warranty Coverage: This warranty is void if the product has been damaged by
accident in shipment, unreasonable use, misuse, neglect, improper service,
commercial use, repairs by unauthorized personnel, normal wear and tear,
improper assembly, installation or maintenance abuse or other causes not arising out of defects in materials or workmanship. This warranty is effective only if
the product is purchased and operated in the USA, and does not extend to
any unit which has been used in violation of written instructions furnished with
the product, or to units which have been altered or modified, or to damage to
products or parts thereof which have had the serial number removed, altered,
defaced or rendered illegible.
Implied Warranties: ANY IMPLIED WARRANTIES WHICH THE PURCHASER MAY HAVE ARE LIMITED IN DURATION TO ONE (1) YEAR FROM
THE DATE OF PURCHASE. Some states do not allow limitations on how long
an implied warranty lasts, so the above limitation may not apply to you.
Warranty Performance: During the above one-year warranty period, a product with a defect will be either repaired or replaced with a reconditioned comparable model (at our option) when the product is returned to the Repair Center,
or the purchase price refunded. The repaired or replacement product will be in
warranty for the balance of the one-year warranty period and an additional onemonth period. No charge will be made for such repair or replacement.
Service and Repair: Should the appliance malfunction, you should first call
toll-free 1-800-841-1628 between the hours of 9:00 am and 5:00 pm Central
Standard Time and ask for CONSUMER SERVICE stating that you are a consumer with a problem. Please refer to model number MES2B, MES2R, MES2W,
MES2K, MES2MG, MES2BCAN, MES2RCAN, MES2WCAN, MES2KCAN or MES2MGCAN
when you call.
In-Warranty Service (USA): For an appliance covered under the warranty
period, no charge is made for service or postage. Call for return authorization
1-800-841-1628.
16
Out-of-Warranty Service: A flat rate charge by model is made for out-of-warranty service. Include $12.00 (U.S.) for return shipping and handling. We will
notify you by mail of the amount of the charge for service and require you to
pay in advance for the repair or replacement.
For products purchased in the USA, but used in Canada: You may return
the product insured, packaged with sufficient protection, and postage and
insurance prepaid to the USA address listed below. Please note that all customs duty / brokerage fees, if any, must be paid by you and we will require you
to pay the cost of customs duty / brokerage fees to us in advance of our performing any service.
Risk During Shipment: We cannot assume responsibility for loss or damage during incoming shipment. For your protection, carefully package the
product for shipment and insure it with the carrier. Be sure to enclose the following items with your appliance: any accessories related to your problem,
your full return address and daytime phone number, a note describing the
problem you experienced, a copy of your sales receipt or other proof of purchase to determine warranty status. C.O.D. shipments cannot be accepted.
To return appliance, ship to:
Attn: Repair Center
Salton, Inc.
708 South Missouri Street
Macon, MO 63552
To contact us, please write to, call or email:
Salton, Inc.
P.O. Box 6916
Columbia, MO 65205-6916
1-800-841-1628
Email: [email protected]
Limitation of Remedies: No representative or person is authorized to
assume for Salton, Inc. any other liability in connection with the sale of our
products. There shall be no claims for defects or failure of performance or
product failure under any theory of tort, contract or commercial law including,
but not limited to negligence, gross negligence, strict liability, breach of warranty and breach of contract. Repair, replacement or refund shall be the sole
remedy of the purchaser under this warranty, and in no event shall Salton, Inc.
be liable for any incidental or consequential damages, losses or expenses.
Some states do not allow the exclusion or limitation of incidental or consequential damages, so the above limitation or exclusion may not apply to you.
Legal Rights: This warranty gives you specific legal rights, and you may also
have other rights which vary from state to state.
For more information on Salton products:
Visit our website: www.eSalton.com
© 2004 Salton, Inc.
All Rights Reserved
P/N 61468
Printed in China