1
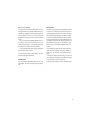
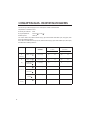
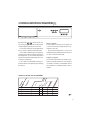
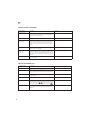
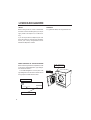
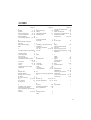
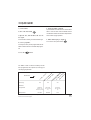
Use & Care Guide
Tumble Dryer
MAYTAG
MDE 9901
CONTENTS
READ FIRST
Page
1 Before tumble drying for the first time 3
2 Safety instructions
4
General, Installation, Safety, Interrupting a
programme, Transport/Winter storage,
Packing materials, Disposal
3 Child safety
7
5 Panel
8
6 LC display
8
INSTALLATION
See Installation Instructions
TUMBLE DRYING
12-15
Tumble drying, Instructions – step-by-step,
Automatic draining
9 Consumption values – pre-set drying
16
10 Making your own drying programmes 1 7 - 2 1
General, Available settings and options,
Available programmes, Create your own
drying programme, Interrupt input, Reset
programme, Menu system for altering preset programmes
2
Cleaning the lint filter, Draining the condensation water container, Cleaning the
outside of the dryer, Cleaning the fan, Cleaning the condenser
12 Trouble shooting
26-28
Dryer will not start, Overheating protection, No interior lighting, Drying takes too
long, Fault messages, Wrong language on
the display, Stop flashes in the display, Reset programme
MISCELLANEOUS
9-11
Spin-dried?, Washing instructions, Sorting
fabrics, Programmes, Options, Temperature, Drying time
programmes
23-25
PROBLEMS?
4 Parts of the tumble dryer
8 Tumble dry
Page
11 Care and cleaning
5
General, Child lock
7 Before tumble drying
CARE
13 Technical information
29
Technical data, Standard tests
14 Service and guarantee
30
15 Index
31
16 Quick guide
32
1 BEFORE TUMBLE DRYING THE FIRST TIME
READ THE OPERATING INSTRUCTIONS
NOTE
Please read through this Use and Care Guide
before attempting to use the machine, particularly Chapter 2, Safety instructions, and 3,
Children’s safety.
When you start the tumble dryer the first time,
or after a long period when it has not been in
use, you may hear a light rumbling noise. This is
quite normal and the sound will disappear after
a few drying operations.
DO NOT TUMBLE-DRY
Some fabrics are sensitive to tumble drying.
Check the Recommended washing marking on
the items concerned, and study Chapter 7, Before tumble drying.
For brief operating instructions; see Chapter 16, Quick guide.
3
2 SAFETY INSTRUCTIONS
GENERAL
sing the main switch,
• Study and save this Use and Care Guide for
future reference.
• Electrical installation, if required, must be
carried out by an authorized electrician.
• The machine may only be used for tumble
drying in accordance with this Use and Care
Guide.
• Repairs and maintenance which affect safety
or performance must be carried out by an authorized specialist.
• Damaged mains cables must only be replaced by an authorised professional.
• Sufficient ventilation is required to prevent
smoke from open fires or fumes from equipment burning other fuels being sucked into the
room.
door causing the drum to stop automatically.
The machine will “remember” where in the programme it was when stopped. If you wish to
continue the drying process, just close the door
INSTALLATION
See the accompanying installation instructions.
SAFETY
This machine may not be used for drying fabrics
that have been dry-cleaned at home, or which
can be suspected of containing residues of flammable fluids.
The tumble dryer is fitted with an overheating protection device, which switches the machine off in the event of excessive temperature.
A float valve switches the machine off if the
condensation water hose becomes clogged, or if
there is danger of water flowing over from the
container.
INTERRUPTING THE PROGRAMME
A drying programme can be interrupted by pres-
4
and press the
, or by opening the
-button and the machine
will start where it was interrupted.
You can also interrupt a programme by pressing
for three seconds. However, if you
stop the machine in this way it will forget where
it was in the programme and you will have to
select a programme to restart.
TRANSPORT/WINTER STORAGE
If the machine is to be transported or stored
during the winter, on unheated premises, ensure that the water container is drained.
PACKING MATERIAL
Sort the packing material for recycling according
to recommendations by the local authorities.
DISPOSAL
When the machine is no longer useful and is to
be scrapped it should be made unusable.
Get in touch with the refuse collection service or your local authorities for advice on how to
scrap the machine in a proper manner.
The machine is made and marked to facilitate
recycling.
CAUTION!
During the programme, the back of the tumble
dryer will get very hot. Leave the machine to
cool completely before touching the back.
3 CHILDREN’S SAFETY
GENERAL
To start a programme with locked
Do not allow children to play with the tumble
dryer.
The tumble dryer is fitted with a magnetic
catch, which allows the door to be opened from
the inside. The door is equipped with a switch,
which automatically stops the tumble dryer when
the door is opened. The machine will not start
automatically on closing the door (eg, if a child
should close the door from the inside).
button.
CHILD LOCK ON
By locking the
AND
and
Menu
Menu
Press the
button for three seconds and
the machine will start.
To change programme settings with Child
locked
Menu
Press the
button.
Menu
button for three seconds, after
that the Menu button works normally again. If
you do not press any button within two minutes, the Menu button will be locked again.
BUTTONS
buttons, you can
prevent that for example a child starts the machine or changes the settings by mistake.
Child lock On/Off
Turn the main power switch,
turn it on again.
Press the
the
P3
Enter
, off and then
button five times, then press
button five times. These ten times must
be completed within fifteen seconds.
Within three seconds after the last press on
the
P3
button, use the
buttons to
choose Child lock ON (the figure 3 will appear
at the bottom right in the display) or OFF (the
figure 0 will appear at the bottom right in the
display).
5
This page has been left blank for technical printing reasons.
6
4 PARTS OF THE TUMBLE DRYER
3
4
2
1
9
6
5
7
8
1. FLUFF-FILTER HOLDER
6. INTERIOR LIGHTING (ON THE INSIDE)
2. DATA PLATE
7. FAN (BEHIND THE LOWER COVER)
3. CONDENSATION WATER CONTAINER
8. CONDENSER (BEHIND THE LOWER
4. PANEL
5. OUTER DOOR
COVER)
9. LINT FILTER
7
5 PANEL
2
1
4
3
!$!-!3#/.$%.3%2#534/-4/5#(
5
6
7
8
9 10
1. INDICATOR LAMP ON/OFF
6. STOP BUTTON
2. MAIN POWER SWITCH
7. MENU BUTTON
3. PROGRAMME SELECTOR BUTTONS P4-P4
8. INDEX BACK/REDUCE TIME
4. DISPLAY
9. INDEX FORWARD/INCREASE TIME
5. START BUTTON
10. ENTER BUTTON
6. LC-DISPLAY
1
2
3
NOTE
9
8
The display will be extinguished if no buttons
are pressed within three minutes. The display
will be reinstated the next time any button is
pressed.
5. INDICATES THAT A PROGRAMME HAS
4
5
6
7
STARTED
6. INDICATES THAT A PROGRAMME HAS
BEEN COMPLETED
1. TEXT FIELD INDICATING PROGRAMME,
OPTIONS AND FAULT MESSAGES, ETC.
2. INDICATES THAT 3 IS SHOWING THE
SELECTED TIME FOR A TIMED DRY OR
AN AIR FLUFF PROGRAMME
3. SHOWS THE SELECTED TIME FOR TIMED
DRY PROGRAMMES
4. INDICATES THE SELECTED PROGRAMME
8
7. SEE 8 AND 9 BELOW
8. INDICATES THAT DELAYED START IS ON.
7 THEN INDICATES HOURS
REMAINING TO START
9. INDICATES THAT 7
IS DISPLAYING THE
PROGRAMME TIME REMAINING IN
HOURS AND MINUTES (ALTERNATING),
INCLUDING THE COOLING TIME.
7 BEFORE TUMBLE DRYING
Before you start tumble drying, here is some
advice that can be useful.
SPIN-DRIED?
Items that are to be tumble dried should first
be spin-dried, preferably at 800 revs per minute
or more. Better spin drying saves both energy
and drying time.
RECOMMENDED WASHING MARKING
Material suitable for tumble drying
The symbol above indicates that the material
can be tumble-dried. Cotton fabrics, towelling
and synthetic fibres are best suited to tumble
drying. Clothes and fabrics become softer and
fluffier when tumble-dried than when dried on
a line.
NOTE
Wear and tear of fabrics in a tumble dryer is
minimal. The lint caught in the lint filter consists of dust and fibre residue that has been formed when wearing the garments.
Material which should not be tumbledried
This symbol indicates that the material will not
withstand tumble-drying.
Certain materials will melt or become dangerously flammable if heated, while others will
loose their shape or shrink.
Do not tumble-dry...
• Materials that are marked “Do not dry close
to heat”.
• Items that have been dry-cleaned at home.
• Foam plastic.
• Glass-fibre materials
• Woollen items, because of the risk of felting.
SORTING FABRICS
Best results are obtained if all articles are of the
same material.
Close zip-fasteners, button up garments, tie
belts, and sort the fabrics and adapt the load
and the temperature as shown in the table below.
TYPE OF FABFIC
LOAD
White, coloured Cotton and
and synthetic
linen
1/1 (6.0 kg)
Normal
1/2 (3.0 kg)
Normal
Polyester/
cotton
Delicate and
mild
Acrylic, rayon, 1/2 (3.0 kg)
acetate etc.
TEMPERATURE
Low
Sort a suitable amount and type of fabric.
9
PROGRAMMES
Your choice of programme will depend on what
you wish to do with the fabrics after tumble
drying. The available programmes are Extra dry,
Dry, Normal dry, Iron dry, Timed dry and Air
fluff.
Extra dry
This programme is designed for washing that is
extremely difficult to dry, eg, jeans with very
thick seams.
NOTE
Knitted fabrics in particular are liable to shrink.
Use the Dry, Normal dry or Iron dry programme for these materials. Always stretch garments
out directly after drying.
When using a timed dry programme with
mixed washing it may happen that some of the
items will not be sufficiently dried. Such items
can suitably by dried by running the timed programme for a further 10 minutes or so.
Timed dry programmes automatically operates at temperature Low, but you can change it
yourself to Normal.
NOTE
When using a timed programme it is possible to
over-dry fabrics if you set too long a time. This
can cause fabrics to shrink or crease and feel
rough. Synthetic materials can also become charged with static electricity. Set a shorter time if
you tumble dry at temperature Normal.
Air fluff
Dry, Normal dry
These programmes turn off the heat when the
washing is dry, but not bone-dry.
The Dry programme turns off the heat a little later than Normal dry. Choose what you prefer by trial and error. Use these programmes
when you want dry fabrics.
Use the air fluff programme just to shake dust
out of garments, air them or soften them up.
To select Timed dry or Air fluff , see Chapter
10, Making own drying programmes.
OPTIONS
Cooling
Iron dry
This programme turns off the heat when the
washing is just damp enough for ironing or mangling.
You can choose between Normal cooling and
Quick cooling. Normal cooling lasts 20 minutes and Quick cooling lasts 5 minutes.
Buzzer
Timed dry
The programme length that you should choose
depends on what you wish to do with the fabrics after tumble drying. Dry different times
for different materials to find the right combination.
10
The machine offers you the possibility of hearing when the cooling period ends. Set the option Buzzer ON and it will sound for three
seconds when the programme is completed.
Anti-crease programme
DRYING TIME
Using the Anti-crease programme you can prevent garments from lying still and becoming unnecessarily creased at the end of tumble drying.
This is a helpful option if you cannot take out
garments promptly at the end of the tumbling
phase.
You can choose a programme duration of 1, 2
or 3 hours. The drum will then continue to
rotate intermittently, ie, three seconds every
minute for the number of hours chosen.
If you choose Buzzer ON, a signal will sound
each time the drum rotates.
The drying time may be influenced by a number
of factors, such as the size of the load, the program selected, the moisture content of the load,
the materials being washed, connection capacity and the ambient temperature and humidity.
Drying time remaining is calculated within four
minutes of the start of the drying program. The
estimated time is shown in the bottom righthand corner of the display, together with the –
symbol.
If the actual drying time is less than that calculated, the time display may jump ahead, e.g.
from 50 to 20 minutes, at the end of the program.
If the actual drying time is longer than that
calculated, the countdown will stop at the end
of the progam until the load is dry.
Please note that times include a cooling period.
To choose these options, see Chapter 10, Making own drying programmes.
TEMPERATURE
You can choose temperature Normal or Low,
see chapter 10, Making own drying programmes.
11
8 TUMBLE DRY
1
For tips and advice, see Chapter 8 – Before
tumble drying.
TUMBLE DRYING WITH EASY CONTROL
Easy tumble drying by pushing a few buttons
Your tumble dryer works like a radio with preset tuning. Instead of radio stations, however,
you select your preferred drying programme in
this case. We have preset the P1 - P4 buttons
with four common programmes.
Switch on the dryer and press the button for
your preferred programme. You then simply
press the Start button to start the programme.
NOTE
Empty the pockets. Coins, nails and similar
items can cause damage to the dryer.
2
3
4
TURN ON THE MAIN POWER SWITCH
OPEN THE DOOR, PUT IN THE WASHING
To alter the settings for
P1
-
AND CLOSE THE DOOR AGAIN
P4
You can create your own favourite programmes, if you wish. You can even preset Timed dry
and Air fluff programmes.
You can also adapt settings and options such
as temperature, buzzer, cooling and delayed
start to suit your particular needs.
Chapter 10 - Making your own drying programmes, tells you what to do to create a temporary or permanent drying programme. It also
includes a description of all the available programme types, options and other settings.
SORT FABRICS
See Chapter 7 for the recommended
quantity of washing – Before tumble dry-
ing.
SELECT A PROGRAMME [##]
The dryer has four pre-set programmes.
Press the button for the desired programme. The programmes are shown in the table
below.
Your choice of programme will depend on
what you wish to do with the fabrics after tumble drying. See also Chapter 7 – Before tumble
drying.
12
DE
LAY
ED
STA
RT
TEM
PER
ATU
RE
OP
An
TIO
tiNS
pro creas
gra e
mm
e
Buz
zer
g
olin
Co
PR
OG
RA
MM
E
PR
OG
RA
MM
EB
UT
TO
N
SETTINGS OF THE FOUR PRE-SET PROGRAMMES.
P1
EXTRA DRY
NORMAL
ON
ON, 1 h
NORMAL
0h
P2
DRY
NORMAL
ON
ON, 1 h
NORMAL
0h
P3
NORMAL DRY
NORMAL
ON
ON, 1 h
NORMAL
0h
P4
IRON DRY
NORMAL
ON
ON, 1 h
NORMAL
0h
5
START TUMBLE DRYING
Press the
button.
The text
at the lower edge of the
display indicates that the programme has started. The text field of the display shows the current stage of the programme while it is in progress.
NOTE
If the child lock is on, the
button must
be held down for 3 seconds in order for the
programme to start. See Chapter 3, Child safety, for details of how to switch the child lock on
and off.
Remaining drying time
The approximate remaining drying time is estimated within four minutes of the start of the
drying programme. Only the time for the Timed dry programme and Air fluff programme is
indicated for venting dryers.
The time is shown in hours and minutes (alternating) at the bottom right of the display
together with the
symbol. Note that the
time also includes cooling.
6
DRYING PROGRAMME ENDED
The text
on the bottom edge of the
display indicates that the programme has
ended.
If the Anti-crease option is activated, the
drum will rotate every minute for a certain period after cooling. The text [“Anti-crease”] is
indicated in the display during this period. The
programme can be stopped at any time by opening the door.
When the programme ends:
• Clean the lint filter after each drying operation, see below. An error message will be displayed if the lint filter needs to be cleaned.
• Empty the condensation water container.
WARNING!
If the lint filter becomes completely clogged
the overheat protection device may trigger. The
device must then be reset to enable the machine to be started, see Chapter 12, Trouble shooting.
DURING TUMBLE DRYING
Putting in more washing
Open the door and the drum will stop
automatically. To restart: Close the door and
press the
button.
Changing programme
Press the
button for three seconds. The
programme will then be zero set and you can
choose a new programme.
13
CLEANING THE LINT FILTER
1. Grasp the filter handle and pull towards you.
terrupted, see also Chapter 12, Trouble shooting, heading Fault indications.
NOTE
2. Pull the filter up out of the holder.
Do not pull out the condensation water container while the machine is running.
3. Open the filter and brush away
the lint with your hand.
HINT
4. Fold the filter together and
put it back in the filter holder.
The condensation water is soft, and is therefore
suitable for use in a steam iron. Strain the water
through a coffee paper filter before use.
If you want the water to be emptied automatically, see the Installation instructions.
2
The filter may
require cleaning if
lime scale deposits
are present; see
Chapter 10, Care
and Cleaning.
1
7
AFTER TUMBLE DRYING
Turn off the main switch
.
AUTOMATIC DRAINING
EMPTYING THE CONDENSATION WATER CONTAI-
See the Installation Instructions if you require
the water to be drained automatically.
NER
Empty the condensation water container after
each tumble drying.
Pull out the condensation water container,
empty the water and put the container back.
If the container becomes too full, the programme will be interrupted and an error message will be displayed in the text field. Empty the
container and press the
button and the
programme will continue from where it was in-
14
TEMPORARY PROGRAMME
If you wish to run a programme without altering the pre-set programmes P1 - P4 , you can
create a temporary programme; see Chapter 10
- Making your own drying programmes.
DELAYED START (1-24 HOURS)
If Delayed start is set to 5 hours, for example,
this means that the machine will start the programme 5 hours after you press the
button.
If you wish to delay the start of any programme temporarily, you should proceed as follows
before pressing the
button:
1. Select the programme, but do not press the
button.
2. Index forward with the Menu button until Delayed start appears in the display.
3. Index forward to the desired number of hours
with
.
4. Press the Enter button once. The selected programme appears in the display.
5. Press
to start the programme.
Delayed start is disconnected automatically
at the end of the programme.
15
9 CONSUMPTION VALUES - PRE-SET DRYING PROGRAMMES
The following conditions apply for the consumption values indicated below:
Temperature of intake air:20 ºC.
Humidity of intake air: 65 %.
Drying temperature:
Normal ( ), Low ( ).
Element power:
2500 W.
The cotton fabrics are, before tumble drying, spin-dried at 800 and 1600 rpm (long spin) with
MAYTAG washing machine.
Other fabrics (creasfree and acrylics) are, before tumble drying, spin-dried at 800 rpm (short spin)
with MAYTAG washing machine.
PROGRAMME
WASHING
AMOUNT OF
ENERGY CONSUMPTION
WASHING
( ca kWh)
800 rpm -
P1
PROGRAMME TIME
(ca minutes)
1600 rpm
800 rpm -
1600 rpm
Cotton, linen,
1/1 (6.0 kg)
4.5
-
3.7
115
-
95
P2
Cotton, linen,
1/1 (6.0 kg)
4.0
-
3.2
100
-
80
Dry
Crease free, poly-
1/2 (3.0kg)
1.8
---
45
Cotton, linen,
1/1 (6.0 kg)
3.8
2.9
90
Crease free, poly-
1/2 (3.0kg)
1.6
---
450
--
1/2 (3.0 kg)
2.1
---
75
---
1/1 (6.0 kg)
3.0
2.0
80
Extra dry
---
ester/cotton,
P3
Normal dry
-
-
70
ester/cotton,
Acrylics, rayon,
acetate,
P4
Iron dry
16
Cotton, linen,
-
-
505
10 MAKING OWN DRYING PROGRAMMES
We have preset P1 - P4 with the most common drying programmes; see the table below.
These programmes usually suit most users.
You can also create your own programmes to
suit you and your washing needs even better.
You can select a different type of programme,
for example a Timed dry programme and an Air
fluff programme, or you can alter settings and
options such as Buzzer, Temperature, Non-iron,
Cooling or Delayed start.
This Chapter includes tables containing information about all programme types, settings
and options.
Change programme
In this Chapter we tell you how to replace one
or other of the pre-set programmes with a programme of your own.
By storing the programme, it will then be
accessible simply by pressing a button every time
you wish to use the tumble dryer.
Temporary programme
You can also make a temporary change of programmes, settings and options. The change is
not stored in this case, but is deleted as soon as
the programme is completed and the door is
opened.
OP
An
TIO
tiNS
pro rease
gra
mm
e
TEM
PER
ATU
RE
ON
ON, 1 h
NORMAL
0h
NORMAL
ON
ON, 1 h
NORMAL
0h
P3
NORMAL DRY
NORMAL
ON
ON, 1 h
NORMAL
0h
P4
IRON DRY
NORMAL
ON
ON, 1 h
NORMAL
0h
olin
DE
LAY
ED
STA
RT
Buz
zer
NORMAL
DRY
g
EXTRA DRY
PR
OG
RA
MM
E
P1
P2
PR
OG
RA
BU
MM
TTO
E
N
Co
SETTINGS OF THE FOUR PRE-SET PROGRAMMES.
17
AVAILABLE SETTINGS AND OPTIONS
Setting/Option
Description
Programme types
Available programmes are described in a separate
table. Change of programme type resets all options and
settings to their original values.
Temperature, low/normal Drying temperature.
All programmes without Air fluffing.
Delayed start
(0-24 hours)
If you select a delayed start of five hours, for example, the
machine will start five hours after you pressed the start
button. The time remaining until the start is shown in the
display. The change to this option is not stored permanently.
Can be used with all programmes.
Buzzer On/Off
With Buzzer On, a 3-second buzzer signal will be heard
at the end of the programme.
Can be used with all programmes.
Crease-free
0-3 hours
(0-180 min)
The drum will rotate for 3 seconds per minute for the indicated period after the end of the drying programme. With
Buzzer On, a buzzer signal will be heard each time the
drum rotates. Can be interrupted at any time by opening
the door.
Can be used with all programmes.
Cooling, Normal/Short
Normal cooling continues for 20 minutes, and short cooling for 5 minutes..
All programmes without Air fluffing.
AVAILABLE PROGRAMME TYPES
18
Restrictions
Programme type
Description
Extra dry
Programme that gives the driest fabrics.
Dry
Shuts off the heat when the fabrics are dry, but without
being snuff-dry. Dry shuts off a little later than Normal dry.
Normal dry
Shuts off the heat when the fabrics are dry, but without
being snuff-dry.
Iron dry
Shuts off the heat when the fabrics are still slightly damp.
Timed dry
You decide the duration of the programme by using an
individual setting as described below. You can also change
the duration with the
buttons on each occasion
before you use the programme (before you press
.
Air fluff
A programme without drying heat, under which you select the duration of the programme (see Timed dry programme).
CREATE YOUR OWN DRYING PROGRAMME
1. Press one of the buttons P1 - P4 under
which you wish to store your programme. You
can select any button you like if you only want
to make a temporary programme.
2. Index forward with the Menu button to the
first setting or option that you wish to change.
If the child lock is activated, nothing will happen. Hold down the button for 3 seconds, and
then press as usual.
All the programme types, settings and options
are described in the table alongside.
Select
Program
Extra dry
<
Next
You can now use the programme without storing it (temporary programme). Press the
button to start the programme.
Store the programme
If you wish to store the programme for use
whenever you intend to use the tumble dryer,
press the Enter button before starting. The button selected by you originally (P1-P4) will appear at the bottom left of the display.
You can now select the programme by pressing the button chosen by you in Step 1.
NOTE
>
The Delayed start option is not stored permanently.
x change a setting, you should
3. If you wish to
index forward or back with the
buttons until the desired setting appears in the display.
Select
Program
Timed dry progr.
<
Next
>
IMPORTANT
If you store a programme by mistake, you can
reset it to its settings at the time of delivery; see
Reset programme later in this Chapter.
TIP
x
4. Then index further
with the Menu button to
the next setting/option, and change it in the
same way if required.
5. Index further and make changes in the same
way until the finished programme appears in
the display together with any options. The text
Stop will be displayed on the bottom line.
Timed dry
r
Normal cooling
Temperature low
Stop
Time
60
If you do not wish to index through all the
settings, you can terminate the input by pressing the Enter button ONCE. To store the programme, you must then press the Enter button
once more.
INTERRUPT INPUT
If you change your mind and wish to interrupt
the input sequence, you should switch off the
dryer with the main power switch
. When
you switch it on again, you can start from the
beginning or select one of the pre-set programmes as usual.
x
19
RESET PROGRAMME
If you wish to revert to the settings which a preset programme had at the time when the dryer
was supplied, you can reset the programme.
Proceed as follows:
1. Hold down the programme button (P1-P4)
for the programme that you wish to reset.
2. Press the Enter button once.
3. Release the programme button.
The programme for the button concerned
will now have reverted to its settings at the
time when the dryer was supplied.
20
MENU SYSTEM FOR CHANGING A PRESET PROGRAM
Select Program
Select
program to
be changed
Menu
Change with:
Enter
Menu
P1
-
P4
(For a temporary
change, select
any button).
Select Time
Change with:
Enter
Menu
Select Temperature
Change with:
Index to next
Enter
Menu
Select Delayed start
Exit from menu/
Save program
Select setting
Change with:
Enter
Menu
NOTE
Not all steps are shown for all program types.
Only permitted settings are shown in the display.
Select Buzzer
Change with:
Enter
Menu
You can change several settings/options
consecutively. Simply index forwards with
Menu
Then finish by continuing until the program is
Select Anti-crease
shown in the display, or press
Enter
Change with:
Enter
Menu
Select Cooling
Change with:
Menu
Enter
Program changed and
shown in the display,
but not stored in the
memory.
The program can now be started
with Start
The program will disappear the
next time P1 - P4 is pressed
or when the machine is switched
off.
Enter
The new program is
stored in the memory.
The program can now be
started with Start
The program can be used
each time you want to dry
21
This page has been left blank for technical printing reasons.
22
11 CARE AND CLEANING
CLEANING THE LINT FILTER
EMPTYING THE CONDENSATION WATER CONTAI-
Clean the lint filter after each tumble drying
operation.
If your water is very hard a deposit of lime
may be formed on the filter. Check when cleaning lint from the filter if there is any sign of
lime, if so wash the lint filter by hand to remove
any deposits.
NER
Empty the condensation water container after
each tumble drying.
Pull out the condensation water container,
empty the water and put
the container
back.
1. Grasp the filter handle
and pull towards you.
2. Pull the filter
up out of the holder.
If the container becomes too full, the programme will be interrupted and an error message will be displayed in the text field. Empty the
container and press the
2
1
button and the
programme will continue from where it was interrupted, see also Chapter 12, Trouble shooting, heading Error messages.
NOTE
Do not pull out the condensation water container while the machine is running.
CLEANING THE OUTSIDE OF THE MACHINE
3. Open the filter and remove fluff from all
sides of the filter by hand. Use a soft dry cloth
to remove any remaining fluff.
4. Replace the filter in the filter holder.
If limescale develops on the filter, rinse it in
water to remove the limescale.
Dry the filter thoroughly with a hand towel.
Use a mild detergent to clean the outside of the
machine. Do not use any solvents, they can damage the machine. Do not spray the machine
with water.
NOTE
Do not allow dust to accumulate round the
machine. Keep clean and cool around the tumble dryer. Dust, heat and moisture prolong the
drying time.
23
CLEANING THE FAN
The fan should be cleaned at least once a year.
If you have any household pets the fan must be
cleaned more often.
5. Take out the fan and clean it with a brush and
water.
1. Turn off the main power switch.
2. Remove the lower cover.
6. Put the fan back into place and screw on the
nut.
3. Remove the safety screw (1). Prise out the
four clips in the order shown and remove the
fan cover.
2
3
4
5
7. Refit the fan cover, making sure the clips
hold the cover in place. Don’t forget to fit the
safety screw.
1
4. Unscrew the nut while holding the fan.
8. Fit the lower cover back in place.
22
2
1
24
CLEANING THE CONDENSER
The condenser should be cleaned at least three
times a year. . If you have any household pets
the condenser must be cleaned more often.
1. Turn off the main power switch.
5. Refit the condenser, taking care to fit it the
right way up.
The top of
the condenser is marked
“upp”, “up” and
“oben”.
UPP
UP
OBEN
2. Remove the lower cover.
6. Fit the lower cover back in place.
3. Turn the two levers anticlockwise to open
the condenser cover.
22
2
1
4. Take the condenser out and rinse the condenser fins clean, eg, using a hand-held shower.
Do not poke
anything between the fins,
you might damage the condenser. Do not
use any sharp object when cleaning the fins.
NOTE
Do not attempt to clean the condenser in a
dishwasher.
25
12 TROUBLE SHOOTING
THE MACHINE WILL NOT START
Check that:
• The door is properly closed.
• The main switch is pressed in.
• You have correctly set the required programme or the required time in the timed dry programme.
• You have not choosen Delayed start.
• The electric plug, if any, is firmly inserted in
its socket.
• All fuses are intact. Switch two fuses over. It is
not always possible to see directly if a fuse has
blown.
• The overheating device has not triggered, see
below.
OVERHEATING PROTECTION
The dryer is designed with an overheat protection switch that will automatically turn the
machine off if the temperature gets too high.
The machine will not start until it has cooled
down sufficiently.
If the unit shuts down because of overheating,
check that the lint filter exhaust hose, vent duct,
and the condenser unit are free of lint. These
components need to be cleaned on a regular
basis. Additionally, the lint filter may need to
be cleaned with warm, soapy water and a soft
brush a few times a year to ensure the filter
screen is not blocked. Using dryer sheets (not
recommended) can also cause this problem.
Should the machine turn itself off because of
overheating, it will not be possible to restart
the unit until it has cooled down sufficiently.
This could possibly take up to thirty minutes.
26
To restart the unit once it has cooled down,
press the ”Start” button.
NOTE:
If your dryer overheats frequently, it may not be
vented properly or the room in which it is located may not have sufficient air circulation. Contact your installer to have these issues checked
out.
NO INTERIOR LIGHTING
Check that:
• The main switch is pressed in.
• The electric plug, if any, is firmly inserted in
its socket.
• All fuses are intact. Switch two fuses over. It is
not always possible to see directly if a fuse has
blown.
• The bulb is not burnt out. The lamp is located
at the top of the dryer just inside the door.
Screw off the plastic cover protecting the bulb
and screw out the bulb and replace it if it is
faulty.
EXCESSIVE DRYING TIME
Empty the water container and check that the
lint filter and the condenser are not clogged,
see Chapter 11, Care and Cleaning. Excessive
drying times can also be caused by the machine
being installed in a very confined space and by
the air in the room (which cools the machine)
becoming too warm. In this situation make sure
that ventilation is improved, eg, by opening
doors and/or windows.
FAULT INDICATIONS
WRONG LANGUAGE ON THE DISPLAY
Error messages appear in the display text field if
faults occur while a programme is in progress.
To exit the error messages after correcting the
fault as described below, switch the machine off
or change the programme.
The error messages that can be displayed are:
If the language on the display becomes altered
for any reason, it can be restored to the initial
language again.
The available languages are Eng (AUS),
Svenska, Dansk, Norsk, Suomi, Francais, Nederlands, Italiano, Espanol, Russia, Deutsch,
Eng (US).
Proceed as follows to change the language:
Maximum programme time. When the machine has run for its maximum time (three hours)
it will stop. Ensure first that all fuses for the
machine are intact. To exit the error message,
switch the machine off or open the outer door.
If this does not help, phone for service.
Over flow. Indicating that the condensation water container is overfilled. Empty the container
and restart. If the message is repeated it may be
because the lower water magazine is full, due to
the pump or hoses being clogged or malfunctioning. If condensation water is pumped out direct to the drain, check to ensure there are no
kinks or stoppage in the hose. If this does not
help, phone for service.
Turn the main power switch,
then turn it on again. Press the
times, then press the
P1
Enter
, of and
button five
button five times.
These ten times must be completed within fifteen seconds.
Within three seconds after pressing
P1
the
last time, step to the desired language using the
Sensor fault. Fault in the moisture sensor. This
error message can also appear if you should start
the dryer when it contains dry items or when it
is empty. To cancel the message, simply open
the dryer door. If this does not work, phone for
service.
Thermistor fault. Phone for service.
27
buttons.
RESET PROGRAMME
If you wish to revert to the settings which a preset programme had at the time when the dryer
was supplied, you can reset the programme.
Proceed as follows:
1. Hold down the programme button for the
programme that you wish to reset.
2. Press the Enter button once.
3. Release the programme button.
The programme for the button is now reset
to its settings when the dryer was supplied.
STOP FLASHES IN THE DISPLAY
Start Stop
The programme has stopped temporarily because the door has been opened, the main power switch has been turned off or the power
supply has been interrupted.
To restart: Press the
button.
To interrupt the programme completely:
Press the
button for three seconds.
28
13 TECHNICAL INFORMATION
TECHNICAL DATA
Height:
Width:
Depth:
Weight:
Drum volume:
Max drying capacity:
Speed:
Rated power:
Material: Cylinder and water container
Material: Outer cover
Positioning:
Drain
Interior light:
850 mm
595 mm
585 mm
47 kg
111 litre
6.0 kg
52 r/min
See data plate
Stainless steel
Hot-galvanized, powder-lacquered steel or
stainless steel
Washing tower or free-standing
2.0 polypropylene hose
10 W, plint E14.
STANDARD TESTS
Europe:
Drying performance:
Energy declaration:
Procedure for acoustic measurement:
EN 61 121 (95/ 13/ EEC).
Programme 3, (Normal dry), 6.0 kg, cotton,
temperature Normal.
EN 61 121 (95/ 13/ EEC).
Programme 3, (Normal dry), 6.0 kg, cotton,
temperature Normal.
IEC 704-2-6.
29
14 SERVICE AND GUARANTEE
SERVICE
GUARANTEE
Before calling for service, check to see whether
the faults is due to something that you can put
right yourself. See chapter 12, Trouble shooting.
If you do require service, telephone your local
MAYTAG retailer or the MAYTAG representative for your country. See guarantee card for
address and telephone number.
For guarantee details, see the guarantee card.
BEFORE CONTACTING THE SERVICE DEPARTMENT
Before contacting the Service Department, make
a note of the model designation, type designation and serial number.
The model designation is on the panel. The
type designation and the serial number are on
the type plate located inside the door.
Type number TDxx
TYPE:
xxx x xxxxxxx M xxxxxxxW
Serial number (12 digits)
30
Model designation
Type plate
16 INDEX
Chapter
A
Acetate
7,15
Acrylate
7,8,15
After tumble drying
8,15
Air fluff programme
7, 8, 10
Altering settings
10
Anti-crease programme 7,8,10
B
Before tumble drying the
first time
Before tumble drying
Belts
1
7
7
C
Change programme after starting
8
Children’s safety
3
Child safety start
3
Cold ironing
7
Coloured washing
7
Condensation water container
8,11,12
Condenser
11,12
Cooling
7,8,10
Cotton
7,15
Crease-free, see Anti-crease
programme
D
Delayed start
10
Delicate washing
7
Display, see LC Display
Disposal
2
Do not tumble dry
7
Dry
7,8,10,15
Dry cleaning
2,7
Drying time
7
E
Emergency stop, see Interrupting the programme
Error indications, see Fault indications
Extra dry
7,8,10,15
Chapter
F
Fault indications
Felting
Flammable material
Foamed plastic
12
7
2,7
7
G
Glass-fibre material
Guarantee
7
14
I
Installation, see Instructions for
installation
Interrupt programme
2, 8
Iron dry
7,8,10,15
Ironing
7
J
Jeans
K
Knitted fabrics
L
Language
LC Display
Linen
Lint filter
Low temperature
7
7
12
8
7,15
8,11
7,8,10
M
Making own drying programmes
10
N
Normal dry
Normal temperature
O
Options
Overheating protection
Own programmes
P
Packing material
Panel
7,8,10,15
7,8,10
7,10
2,12
10
Chapter
Parts of the tumble dryer
4
Polyester
7,15
Power consumption
9
Pre-set drying programme 8, 15
Programme position
8
Programmes
7,8,10,15
Q
Quick guide
R
Rayon
Recommended washing
marking
Remaining drying time
Reset pre-set programme
Restarting
S
Safety
Service
Signal
Sorting textiles
Spin-dried
Start
Synthetic fabrics
15
7,15
7
7
10,12
8
2
14
7,10
7
7
8,15
7
T
Technical data
13
Temperature
7,8,10
Temporary programme
10
Textile wear
7
Timed dry programme 7, 8, 10
Tumble dry
8,15
W
Wool
7
Z
Zip fastener
7
2
5
31
15 QUICK GUIDE
1. Sort the fabrics.
6. Drying programme completed.
2. Turn on the main switch
Open the door and take out the tumble-dried
fabrics. The lint filter must be cleaned and the
condensation water tank must be emptied after
each tumble drying operation.
.
3. Open the door, load the fabrics and close the
door again.
Close the door carefully, and avoid slamming it.
7. When tumble drying is completed.
Turn off the main power switch
4. Select a programme.
The dryer has four pre-set programmes; see the
table. Press the button for the desired programme.
5. Press the
button.
For details of how to use the Timed dry and Air
fluff programmes, see Chapter 10, Making your
own drying programmes.
WASHING
Load (kg)
n,
tto
o
Co
en
lin
6.0
c
et
- ta
ce sen
a
e
n
n, ur
ls)
to
yo rat ria
ot
c
a
e
e
r
/
t
p
r
,
a
cs em m
ste
yli , (t ive
ye
r
l
s
Po
Ac te
sit
3.0
3.0
SET THE:
Programme
Temperature
P1 to P4
P2 or P3
Dry or Normal
dry
Dry or Normal
dry
Normal
Normal
Low
Art. No. 80 800 42. Rev. 01. The right to make changes is reserved.
Printed on environment friendly paper.
P2 or P3
Extra dry, Dry
Normal dry, Iron dry
.