1
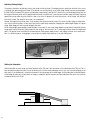
OFFICIAL WARWICK
BASS OWNER MANUAL
ENGLISH
OFFICIAL OWNER MANUAL FOR WARWICK BASSES
Congratulations on your purchase of a Warwick bass guitar! Warwick’s combination of state-of-the-art manufacturing technology with old-world craftsmanship truly yields one of the finest instruments available in the world today. As an owner of a new
Warwick bass, you probably have some questions regarding your instrument’s construction, electronics, and maintenance. This
owner’s manual has been designed to provide you with all the answers you may need to fully enjoy your new bass.
Welcome to the Warwick family!
Table of Contents
Features Common to Most Warwick Basses
6
The Woods of Warwick
8
The Pickups and Electronics
9
Model Specifics
Corvette Standard, passive
Corvette Standard, active
Corvette $$
Corvette ProLine
FNA Jazzman
Thumb Bass
Thumb Bolt-on
Streamer CT
Streamer LX BN
Streamer Jazzman
Streamer Stage I
Streamer Stage II
Dolphin Pro I
Dolphin SN™ TCS™
Infinity
Infinity SN™ TCS™
Katana
Katana Bolt-on
Vampyre SN
Vampyre LTD.
Buzzard Bass Bolt-on
Buzzard Bass LTD. J.E.
Stryker
Hellborg Signature Bass
Alien
10
10
10
10
10
11
11
11
12
12
12
12
12
13
13
13
13
14
14
14
14
15
15
15
15
15
Fine Tuning Your Warwick Bass
16
Body Care Instructions
19
5
Features Common to Most Warwick Basses
Although each model of Warwick bass is very unique, there are some features that are consistent throughout the entire line. By
understanding the benefits of these common elements, you will better understand your own bass.
Wenge and Ovangkol Necks
When people comment on the unique sound of Warwick basses, they invariably use the word “growl”. One reason our basses
have such a special sound is because of the wood used to make all of our necks. Wenge (pronounced either “win-gay” or “wengee”) is a very open-grained, dense wood that offers superior stability and outstanding tonal characteristics. Ovangkol has many
of the same tonal traits as wenge, but offers a unique cosmetic look in a closed grain, stable neck wood. The fingerboards are
almost always wenge unless the instrument is fretless, in which case Warwick uses ebony. We have heard countless stories from
Warwick players about how they have toured through various countries and climates without having to make significant adjustments to their necks. If you have previously owned a Warwick bass with a wenge or ovangkol neck with a wenge fingerboard, then
you know how special these woods are. If this is your first Warwick, then you are in for a pleasant surprise!
Bell Brass Frets
All Warwick fretted basses come with frets that are made from a special
silver/bronze alloy. This material is commonly known as “bell brass” because it is
the same material that the bell makers in Europe have been using for many years.
Bell brass is an extremely resonant metal that is perfectly suited for use as frets.
Warwick frets are perfect for musical use with one slight exception. Like any brass
product, these frets will tarnish. The tarnish doesn’t hurt anything, but if you want
to keep them shiny, steelwool and some elbow grease do a great job.
The Just-A-Nut
All Warwick basses come with either a brass Just-A-Nut I or the Wilferite Just-A-Nut II. Both nuts are fully adjustable for easy
playing in the first position. The Just-A-Nut II represents a major improvement in engineering over the Just-A-Nut I. This new
design allows you to make string height adjustments at the nut without taking the strings off. The two allen screws that are inset
on the top of the nut allow you to easily change the nut height. By turning the screws clockwise, you raise the nut. Turning the
screws counterclockwise will lower the nut. Now you can experiment with different string gauges without having to go through
the hassle or expense of shimming or filing your nut. (See photo below.)
Height
Adjusting
Allen
Screws
The Fully Adjustable Bridge:
Since every player is unique, basses need to be as flexible as possible to accommodate each bassist’s needs. The Warwick bridge
(see photo below) was designed to give you every possible adjustment, without sacrificing its durability and function. With a
simple turn of an allen wrench or phillips screw driver, you can change the overall bridge height, individual string height and contour, and set the individual string intonation. Warwick provides the proper 1.5 mm and 2.5mm wrenches for the allen screws with
every bass. The intonation screws require a fresh #1 phillips head screwdriver with a small shaft. What makes this bridge even
more unique is that you can easily change the string spacing of your Warwick bass! You can do this by loosening the allen set
screw that locks the saddle insert into the saddle. Once you have done that, you can then slide the insert back and forth in the
saddle. Be sure to lock the set screw down after you have found the desired string spacing to ensure that your adjustments you
have made stay put.
Saddle
Height
Adjustment
Bridge
Height
Adjustment
6
Bridge
Locking
Screw
Individual
String
Intonation
Adjustment
Saddle
Locking
Screw
The Tuning Machines
All Warwick basses come standard with high quality, precision tuning machines. These machines do not require any lubrication
or special maintenance to operate properly. The only thing you need to keep in mind when tuning a string is that these machines
work best when they are under tension. This means that when you are tuning to a pitch it is best to start below the desired pitch
and slowly tune up until you get to where you want to be. Never start from a higher pitch and loosen the tuner until you hit the
correct pitch. It will not hold its position as well unless it is set under tension.
The resistance of the machine heads can be adjusted with the screw through the wing.
Winding
Direction
Resistance
Adjustment
Screw
L o os
T igh
ten
en
Stringing the bass
Cut the string around 3 – 4 inches longer than the distance from the string anchor to the axle of the according machine head.
Put the end of the string into the center hole of the axle of the machine head and wind the string starting from the top to the bottom two turns. Put the ballend into the slot of the string anchor and bring the string to tune. Make sure to keep tension on the
string while you are tuning it up, so that the windings around the axle of the machine head stay tight.
The Truss Rod and Easy-Access Truss Rod Plate
When you need to make a truss rod adjustment, you should not have to mess
with a bunch of tiny screws. That is why all Warwick basses since 1996 come
with an easy-access truss rod plate. Located right above the Just-A-Nut, on the
headstock, the truss rod plate can be removed by inserting a 1/8” flat-head
screwdriver into the slot and gently popping off the cover. After you have made
your adjustments simply snap the cover plate back into place.
The Easy Access™ Electronics Compartment
If you turn your Warwick bass over and look at the back, you will see Easy Access™ Electronics Compartment. Following the same
design logic as the truss rod plate, the electronics cover can be removed without having to mess with tiny screws. You do not
even need a screwdriver to remove these plates. Just pull back each inset tab (using your fingernail or even a dime) and gently
lift out the plate. When you are done, the plate easily snaps back into place. Be careful not to break off the tabs on the cover.
7
The Woods of Warwick
Over the years, Warwick has built an unparalleled reputation for selecting exceptional tonewoods to make their basses with. Below
you will find a list of the different body woods that Warwick uses, as well as the models that they are used on.
Afzelia (Afzelia pachyloba, bipindensis, or africana):
Afzelia is a non-endangered African hardwood that is incredibly dense. Although it is a bit heavier than other woods, it makes for
a very punchy low end and very transient highs.
Models: Steamer Stage II, Dolphin SN™ TCS™
Bubinga (Guibourtia demeusei, pellegriniana, or tessmannii):
Bubinga is found in Equatorial Africa from southeast Nigeria, through Cameroon and Gabon, to the Congo region. It is a hardwood that is very lustrous and can be highly figured. Acoustically, bubinga is a very resonant wood that offers very clear lows and
well-defined upper mids and highs.
Models: Corvette Standard, Thumb Neck-Through
Ovangkol (Guiboourtia ehie):
Found in most of the same regions of Africa as bubinga, ovangkol is slightly heavier than bubinga yet still offers the same excellent acoustic properties. Its color is dark brown with deep yellow and black stripes. The grain is sometimes very nicely figured
with 3D, wavy effects. It also makes a wonderful neck wood.
Models: Thumb Bolt-on, Dolphin Pro I, Infinity
Maple/Flamed Maple (Acer, various):
Maple has been used as a body wood for electric basses for many years. It can be found in several regions of the world, with each
region producing a different quality of wood. Warwick takes great care in selecting only the finest maple, to ensure the great resonance and clarity that people demand from our basses.
Models: Corvette ProLine, Fortress One, Fortress Masterman, Streamer LX, Streamer Pro M, Streamer Stage I
Ash/Swamp Ash (Fraxinus, various):
Like maple, ash is a tried-and-true body wood, found in several areas of the world. Ash is the lightest body wood that Warwick
currently uses beside Carolena. Acoustically, it has wonderful mid-frequency response and a very warm low end.
Models: Fortress Flashback, Corvette Std., FNA, FNA Jazzman, Streamer Jazzman
Wenge (Millettia Laurentii):
Warwick pioneered the use of wenge as a neck and fingerboard wood. It is very strong, stable and dense. A wenge or ovangkol
neck with a wenge fingerboard is a prime ingredient in the “Warwick sound”. Wenge is a dark brown wood with blackish streaks.
It sometimes has a bleached appearance. It is open to medium grained, hard, dense, and heavy.
Mahogani (Meliaceae):
Mahogani is a red and brown hard wood, it has been used for a long time in the guitar manufacturing as a body wood. It can be
found in West Africa. Mahogani is acoustically a deep, warm sounding wood with harmonical high frequencies.
Zebrano
Zebrano is found in wide areas of Africa and is non endangered hardwood. Its color is dark with yellowish, light stripes. Its sound
is very powerful with a full low end, while the highs are clear and bright.
Model: Buzzard Ltd, Infinity SN™ TCS™
8
The Pickups and Electronics
One of the first things you need to do when you get your new Warwick bass is to learn what function each knob has, and what pick-ups and
onboard electronics your bass comes with. Below you will find a list of definitions for the basic controls that we use on our Warwick basses.
In the Model Specifics section, you will see a diagram showing the controls used on each model, along with a complete parts list and any
special notes.
General Definitions
Basic Volume Control: By rotating this control clockwise, you will increase the volume of your bass.
Push/Pull Volume Control: By rotating this control clockwise, you will increase the volume of your bass. By pulling on the
knob, you will activate or deactivate a secondary function (depending on the model of the bass).
Pickup Pan Control: This control allows you to pan between your neck pickup and your bridge pickup. The center detent of the
pan control means that you are getting full output from both pickups. By rotating the knob clockwise, you get more of the neck
pickup. By rotating the control counterclockwise you get more of the bridge pickup. When the knob is rotated fully one direction
or the other, you are only getting one of the two pickups.
Passive Tone Control: When this control is rotated fully clockwise, you will get the brightest tone from your bass. As you rotate the control counterclockwise, the tone will become less bright.
Stacked Tone Control: This stacked knob controls both the treble and the bass. The top knob boosts or cuts the treble and the
bottom knob boosts or cuts the bass. Rotating either control clockwise will boost the respective frequency, while rotating the control counterclockwise will cut the respective frequency.
Push/Pull Stacked Tone Control: This stacked knob controls both the treble and the bass. The top knob boosts or cuts the
treble and the bottom knob boosts or cuts the bass. Rotating either control clockwise will boost the respective frequency, while
rotating the control counterclockwise will cut the respective frequency. By pulling on the knob, you will activate or deactivate a
secondary function (depending on the model of the bass).
Stacked Pickup Pan/Volume Control: The top knob controls the volume of the bass. By rotating this control clockwise, you
will increase the volume of your bass. The bottom knob allows you to pan between your neck pickup and your bridge pickup. The
center detent of the pan control means that you are getting full output from both pickups. By rotating the knob clockwise, you get
more of the neck pickup. By rotating the control counterclockwise you get more of the bridge pickup. When the knob is rotated
fully one direction or the other, you are only getting one of the two pickups.
Push/Pull Stacked Pickup Pan/Volume Control: The top knob controls the volume of the bass. By rotating this control
clockwise, you will increase the volume of your bass. The bottom knob allows you to pan between your neck pickup and your
bridge pickup. The center detent of the pan control means that you are getting full output from both pickups. By rotating the knob
clockwise, you get more of the neck pickup. By rotating the control counterclockwise you get more of the bridge pickup. When
the knob is rotated fully one direction or the other, you are only getting one of the two pickups. By pulling on the knob, you will
activate or deactivate a secondary function (depending on the model of the bass).
Treble Tone Control: This tone control boosts or cuts the treble frequencies. The center detent is flat, while rotating the control clockwise will boost the treble and rotating the control counterclockwise will cut the treble. On the 2-band preamp, the crossover point is 2kHz. On the 3-band preamp, the crossover point is 8.5kHz.
Mid Tone Control: This tone control boosts or cuts the mid frequencies. The center detent is flat, while rotating the control
clockwise will boost the mids and rotating the control counterclockwise will cut the mids. On the 3-band preamp, the crossover
point is 800 Hz.
Bass Tone Control: This tone control boosts or cuts the bass frequencies. The center detent is flat, while rotating the control
clockwise will boost the bass and rotating the control counterclockwise will cut the bass. For both the 2-band and 3-band preamp, the crossover points are set at 100 Hz.
9
Model Specifics
Each of the following diagrams is viewed as if you are wearing the bass and you are looking down at the knobs and pickups.
Pickup
Pan Control
Tone Control
Bridge
Volume Control
Corvette Std. passive
1 Volume Control (Part #M85500 - 500K)
1 Pick-up Pan Control (Part #M86252 – 2 x 220K)
1 Tone Control (Part #M81500 – 500K Log)
Stacked Bass/Treble
Tone Control
Bridge
Push/Pull
Volume Control
Pickup
Pan Control
Corvette Std. Activ, Corvette ProLine
These Corvette basses come with an onboard active preamp.
Push/Pull Volume Control (Part #M84500 - 500K)*
Pick-up Pan Control (Part #M85252 – 25K with active pickups, Part # M86252
with passive pickups)
Stacked Tone Control (Part #M85110 – 2 X 100K)**
* By pulling on the volume knob, you will bypass the onboard active preamp, which effectively deactivates the tone controls.
**The top knob boosts or cuts the treble and the bottom knob boosts or cuts the bass.
Bass
Tone control
Push/Pull
Volume Control
Pickup
Treble
Pan Control Tone Control
**B
Bridge
**N
Corvette $$
All Corvette $$ basses come with an onboard active MEC 2-way circuit.
Push/Pull Volume (Part #M84500 500K)*
Pickup Pan Control (Part #M86252, 2x220K)
Treble Tone Control (Part #M85100 - 100K)
Mid Tone Control (Part #M86252, 2x220K)
Bass Tone Control (Part #M85100 - 100K)
* By pulling on the volume knob, you will bypass the onboard preamp.
** When the switch is in the up position the neck (N) / bridge (B) pick-up is humbucking and routed in series.
When the switch is in the middle position the neck (N) / bridge (B) pick-up is single coil and both routed as humcanceling with each other in single coil.
When the switch is in the down position the neck (N) / bridge (B) pick-up is humbucking and routed in parallel.
10
Bass
Tone Control
**
Bridge
Treble
Mid
Push/Pull Tone Control Tone Control
Volume/Pickup Pan
Stacked Control
FNA Jazzman
All FNA Jazzman basses come either with an onboard active MEC 3-way circuit,
or Seymour Duncan
Basslines preamp (upto 2001 or optional).
Push/Pull Volume/Pickup Pan Control (Part #M89252 -2 x 220K, 500K)*
Treble Tone Control (Part #M85100 - 100K)
Mid Tone Control (Part #M85100 - 100K)
Bass Tone Control (Part #M85100 - 100K)
* By pulling on the volume knob, you will bypass the onboard preamp (MEC)
* By pulling on the volume knob you will activate the slap contour EQ curve on the Seymour Duncan Basslines preamp. This curve will boost the bass frequencies and the
high fre-quencies, while slightly cutting the mid frequencies. Pulling the knob does not deactivate the active preamp (Seymour Duncan Basslines).
**When the switch is in the up position the bridge pick-up is humbucking and routed in series. When the switch is in the middle position the bridge pick-up is
single coil and routed as humcanceling with the neck pick-up. When the switch is in the down position the bridge pick-up is humbucking and routed in parallel.
Mid
Tone Control
Stacked Bass/Treble
Tone Control
Bridge
Stacked Push/Pull
Volume/Pickup
Pan Control
Thumb Bass
All Thumb basses come with an onboard active preamp.
Stacked Pick-up Pan/Volume Control (Part #M88552 - 500K, 2 X 25K)*
Stacked Tone Control (Part #M85110 – 2 X 100K)**
Mid Tone Control (Part #M85100 – 100K)
* By pulling on the volume knob, you will bypass the onboard active preamp, which effectively deactivates the tone controls.
**The top knob boosts or cuts the treble and the bottom knob boosts or cuts the bass.
Pickup
Pan Control
Stacked Bass/Treble
Tone Control
Bridge
Push/Pull
Volume Control
Thumb Bolt-on
All Thumb Bolt-on basses come with an onboard active preamp.
Push/Pull Volume Control (Part #M84500 - 500K)*
Pick-up Pan Control (Part #M85252 – 25K)
Stacked Tone Control (Part #M85110 – 2 X 100K)**
* By pulling on the volume knob, you will bypass the onboard active preamp, which effectively deactivates the tone controls.
**The top knob boosts or cuts the treble and the bottom knob boosts or cuts the bass.
11
Pickup
Pan Control
Bass
Tone Control
Treble
Tone Control
Bridge
Push/Pull
Volume Control
Streamer CT
All Streamer CT basses come with an onboard active preamp.
Push/Pull Volume Control (Part #M84500 - 500K)*
Pick-up Pan Control (Part #M85252 – 25K)
Treble Tone Control (Part #M85100 – 100K)
Bass Tone Control (Part #M85100 – 100K)
* By pulling on the volume knob, you will bypass the onboard active preamp, which effectively deactivates the tone controls.
Pickup
Pan Control
Bass
Tone Control
Treble
Tone Control
Bridge
Push/Pull
Volume Control
Streamer LX BN
All Streamer CT basses come with an onboard active preamp.
Push/Pull Volume Control (Part #M84500 - 500K)*
Pick-up Pan Control (Part #M85252 – 25K)
Treble Tone Control (Part #M85100 – 100K)
Bass Tone Control (Part #M85100 – 100K)
* By pulling on the volume knob, you will bypass the onboard active preamp, which effectively deactivates the tone controls.
Bass Tone Control
Stacked Push/Pull
Volume/Pickup
Pan Control
**
Bridge
Treble
Tone Control
Mid
Tone Control
Streamer Jazzman
All Streamer Jazzman basses come either with an onboard active MEC 3-way
circuit, or Seymour Duncan Basslines preamp (upto 2001 or optional).
Push/Pull Volume/Pickup Pan Control (Part #M89252 -2 x 220K, 500K)*
Treble Tone Control (Part #M85100 - 100K)
Mid Tone Control (Part #M85100 - 100K)
Bass Tone Control (Part #M85100 - 100K)
* By pulling on the volume knob, you will bypass the onboard preamp (MEC)
* By pulling on the volume knob you will activate the slap contour EQ curve on the Seymour Duncan Basslines preamp. This curve will boost the bass frequencies and the
high frequencies, while slightly cutting the mid frequencies. Pulling the knob does not deactivate the active preamp (Seymour Duncan Basslines).
**When the switch is in the up position the bridge pick-up is humbucking and routed in series. When the switch is in the middle position the bridge pick-up is single coil
and routed as humcanceling with the neck pick-up. When the switch is in the down position the bridge pick-up is humbucking and routed in parallel.
Stacked Push/Pull
Volume/Pickup
Pan Control
Bass
Tone Control
Bridge
Treble
Tone Control
Mid
Tone Control
Streamer Stage I and Streamer Stage II
All Streamer Stage I basses come with an onboard active preamp.
Push/Pull Volume/Pickup Pan Control (Part #M88552 - 500K, 2 X 25K)*
Treble Tone Control (Part #M85100 – 100K)
Mid Tone Control (Part #M85100 – 100K)
Bass Tone Control (Part #M85100 – 100K)
* By pulling on the volume knob, you will bypass the onboard active preamp, which effectively deactivates the tone controls.
12
Stacked Push/Pull
Bass/Treble
Tone Control
Bridge
Stacked Push/Pull
Volume/Pickup
Pan Control
Dolphin Pro I and Dolphin SN™ TCS™
All Dolphin Pro I basses come with an onboard active preamp.
Push/Pull Stacked Pick-up Pan/Volume Control (Part #M88552 - 500K, 2 X
25K)*
Push/Pull Stacked Tone Control (Part #M84110 – 2 X 100K)**
* By pulling on the volume knob, you will bypass the onboard active preamp, which effectively deactivates the tone controls.
**This stacked knob controls both the treble and the bass. The top knob boosts or cuts the treble and the bottom knob boosts or cuts the bass. Pulling the top switches
the Twinjazz pickup to single coil.
Mid
Tone Control
Stacked Bass/Treble
Tone Control
Bridge
Stacked Push/Pull
Volume/Pickup
Pan Control
Infinity
All Infinity basses come either with an onboard active MEC 3-way circuit, or Seymour Duncan Basslines preamp (upto 2001 or optional).
Push/Pull Volume/Pickup Pan Control (Part #M88552 -2 x 25K, 500K)*
Mid Tone Control (Part #M85100 - 100K)
Push/PullStacked Tone Control (Part #M84110 - 2 X 100K)**
* By pulling on the volume knob, you will bypass the onboard preamp (MEC)
* By pulling on the volume knob you will activate the slap contour EQ curve on the Seymour Duncan Basslines preamp. This curve will boost the bass frequencies and the
high frequencies, while slightly cutting the mid frequencies. Pulling the knob does not deactivate the active preamp (Seymour Duncan Basslines).
**The top knob boosts or cuts the treble and the bottom knob boosts or cuts the bass.By pulling the treble knob the Humbucker gets splitted.
Pickup
Pan Control
Stacked Push/Pull
Bass/Treble
Tone Control
Bridge
Push/Pull
Volume Control
Infinity SN™ TCS™
All Infinity SN™ TCS™ basses come with an onboard active MEC 2-way
circuit.
Push/Pull Volume Control (Part #M84500 - 500K)*
Pickup Pan Control (Part #M85252 - 25K)
Push/PullStacked Tone Control (Part #M84110 - 2 X 100K)**
* By pulling on the volume knob, you will bypass the onboard active preamp, which effectively deactivates the tone controls.
**The upper part boosts or cuts the treble, the lower part boosts or cuts the lows. By pulling the treble knob, the humbucker gets splitted.
13
Stacked Push/Pull
Volume/Pickup
Pan Control
Bass
Tone Control
Bridge
Treble
Tone Control
Mid
Tone Control
Katana Neckthrough
All Katana Neckthrough basses come with an onboard active preamp.
Push/Pull Volume/Pickup Pan Control (Part #M88552 - 500K, 2 X 25K)*
Treble Tone Control (Part #M85100 – 100K)
Mid Tone Control (Part #M85100 – 100K)
Bass Tone Control (Part #M85100 – 100K)
* By pulling on the volume knob, you will bypass the onboard active preamp, which effectively deactivates the tone controls.
Pickup
Pan Control
Bass
Tone Control
Treble
Tone Control
Bridge
Push/Pull
Volume Control
Katana Bolt-on
All Katana Bolt-on basses come with an onboard active preamp.
Push/Pull Volume Control (Part #M84500 - 500K)*
Pick-up Pan Control (Part #M85252 – 25K)
Treble Tone Control (Part #M85100 – 100K)
Bass Tone Control (Part #M85100 – 100K)
* By pulling on the volume knob, you will bypass the onboard active preamp, which effectively deactivates the tone controls.
Pickup
Pan Control
Bass
Tone Control
Treble
Tone Control
Bridge
Push/Pull
Volume Control
Vampyre SN
All Vampyre SN basses come with an onboard 2-way active preamp.
Push/Pull Volume Control (Part #M84500 - 500K)*
Pick-up Pan Control (Part #M85252 - 25K)
Treble Tone Control Push Pull (Part #M84100 - 100K)**
Bass Tone Control (Part #M85100 - 100K)
* By pulling on the volume knob, you will bypass the onboard active preamp, which effectively deactivates the tone controls.
** By pulling the treble knob the humbucker gets splitted.
Stacked Push/Pull
Volume/Pickup
Pan Control
Bass
Tone Control
Push/Pull
Bridge
Treble
Tone Control
Mid
Tone Control
Vampyre LTD.
All Vampyre LTD. basses come with an onboard 3-way active preamp.
Push/Pull Volume/Pickup Pan Control (Part #M88552 - 500K, 2 X 25K)*
Treble Tone Control (Part #M85100 - 100K)
Mid Tone Control (Part #M85100 - 100K)
Bass Tone Control Push/Pull (Part #M84100 - 100K)**
* By pulling on the volume knob, you will bypass the onboard active preamp, which effectively deactivates the tone controls.
**By pulling the treble knob the humbucker gets splitted.
14
Pickup
Pan Control
Stacked Bass/Treble
Tone Control
Bridge
Push/Pull
Volume Control
Buzzard Bass Bolt-on and Ltd. J.E.
All Buzzard basses come with an onboard 2-way active preamp.
Push/Pull Volume Control (Part #M84500 - 500K)*
Pick-up Pan Control (Part #M85252 – 25K)
Stacked Tone Control (Part #M85110 – 2 X 100K)
* By pulling on the volume knob, you will bypass the onboard active preamp, which effectively deactivates the tone controls.
Pickup
Pan Control
Mid
Tone Control
Bridge
Push/Pull
Volume
Control
Bass/Treble
Tone Control
Stryker
All Stryker basses come with an onboard active MEC 3-way circuit.
Push/Pull Volume (Part #M84500 500K)*
Pickup Pan Control (Part #M85252, 2x25K)
Push/Pull Mid Tone Control (Part #M84100 - 100K)**
Bass/Treble Tone Control (Part #M85110 - 100K)
* By pulling on the volume knob, you will bypass the onboard preamp.
** By pulling on the mid tone knob you shift the mid frequency from 400 Hz to 800 Hz
Hellborg Signature Bass
The passive MEC Soapbar singlecoil humcancelling pickup is
controlled by a single volume pot.
Volume (Part X 60080)
Electronic ( Part X 60078)
Bridge
Volume
Control
Alien
Notch Filter: This is a fixed level, variable-frequency filter for eliminating feedback or unwanted resonance. The affected frequency is variable from 40 to 500 Hz. The Notch filter is effectively off in the full counter-clockwise position.
Volume Control:Controls the overall gain of the Prefix Plus™. Goes from very quiet to very loud.
Bass Control: This is a boost/cut shelving tone control. The center detent yields a flat response.
Contour: This is a Wide-range semi-parametric filter. It is used to selectively shape the instrument´s tone.The Contour Level slider controls the amount of boost or cut applied to the
selected Contour Frequency. The center detent yields a flat response.The Contour Frequency
slider determines the frequency band that is boosted or cut by the Contour Level control. The
frequency is variable from 250 to 10 kHz.
Treble Control:This is a boost/cut shelving tone control. The center detent yields a flat response.
Brilliance Control: This is a resonant style boost/cut filter. When boosted, the Brilliance
control can add presence to your sound or brighten up dead strings.
Phase Switch: The Phase switch compensates for acoustic phase differences that often
occur between instrument and speaker. It can be used as a tone filter at low volume levels or
a feedback filter at high levels. The Phase switch can correct any electrical phase difference
between the Prefix™ system and an outboard instrument microphone. Flip the Phase switch
several times and use your ear to find the optimum setting. The best position for the Phase
switch may change, depending on the sound system and/or venue acoustics.
15
Fine Tuning Your Warwick Bass
Although every Warwick bass is meticulously set up prior to shipment, it will eventually become necessary to perform adjustments to your instrument to maintain optimum playability. Many factors can influence your instrument’s action, including temperature, humidity and changes in string gauges. It is very common for an instrument to need some degree of truss rod adjustment
following shipment to your dealer. No two players have exactly the same needs when it comes to how their bass is adjusted. You
can and should adjust your bass according to your own playing needs. The following tools are needed to complete your setup:
One 1.5mm hex key (included with bass)
One 2.5mm hex key (included with bass)
One 5.0mm trussrod tool (included with bass)
A slot screwdriver
One #1 Phillips screwdriver
One electronic tuner
The first step is to tune your strings to the desired pitches. An electronic tuner is highly recommended for this as to ensure the
accuracy of the truss rod adjustment. If the amount of string tension on your neck has just undergone a significant change, the
neck should be allowed to settle for at least 30 minutes before adjusting the truss rod. The longer it has to settle, the more you
increase your chances of getting your adjustments right the first time. Inspect your neck. Place your finger on the E (or B) string
in the first fret space and another finger on the 12th fret. Using your string as a straight edge, look at the gaps between the string
and the tops of the 4th through the 8th frets. Where the largest gap occurs will vary from bass to bass. If the largest gap is more
than about .020” or .5 mm, you will probably need to tighten your truss rod. If there is no gap at all, you will most likely need to
loosen it. Most people prefer to have their relief set somewhere in between these parameters. A common misconception is that a
neck should be perfectly straight for best results. This is simply not true. A bass neck should be very slightly concave as to allow
buzz-free action in the first few positions. A properly set up bass always has some relief in the neck.
Adjusting Your Truss Rod
All Warwick basses are fitted with a patented snap-fitting truss rod cover that can be easily removed using a slot screwdriver. It
is not necessary to loosen the strings during truss rod cover removal or replacement. The truss rod controls the amount of bow,
or relief in the neck by counteracting the string tension. Over the years, Warwick has used 3 types of truss rods, each of which
has its own requirements for an optimal setup. Please read the following to ascertain which truss rod your bass has been equipped with and how it should be adjusted. If you have no experience with truss rod adjustment, it is recommended it be taken to a
qualified dealer or repair person. Over adjustment in either direction can cause permanent damage to the instrument and may not
be covered under warranty. If you encounter any significant resistance while adjusting your truss rod, do not turn any further. The
only thing you need to remember when making a truss rod adjustment is that “a little goes a long way”. The safest way to make
an adjustment is to plug your bass into an electronic tuner and check the tuning after every eighth of a turn of the truss rod. If the
neck is being bowed back, the strings with go sharp. If the neck is being allowed to relax, then the strings will go flat. Be sure to
re-tune the strings and check the string height after every quarter turn, until you have achieved the desired neck set up. Warwick
Fixed Steel Truss Rod: As of July 1998, all Warwick basses are equipped with a steel-reinforced neck and 2-way fixed steel truss
rod. All bolt-on necks since February 1996 also employ this truss rod. The easiest way to tell if your bass has this truss rod design
is the presence of a volute, or small heel behind the nut. This truss rod can adjust the neck in either direction (push/pull) and
works as one would normally expect. If you are facing the 5mm Allen fitting, turn clockwise to flatten the neck, counterclockwise
to introduce more relief. This truss rod should be adjusted in 1/8-turn increments. Rotate 45 degrees in the desired direction and
let the neck stabilize. Full stabilization can take from hours to weeks after the tension on the neck is altered, but most of the effect
of 1/8 of a turn should manifest itself within an hour. If your neck has much more forward bow than you like, it may require a more
substantial amount of adjustment. Loosening your string tension can ease this process if more than 1/4 turn is required to
straighten your neck to your taste. Warwicks Removable 2-way Truss Rod: This truss rod appears in some bolt-on necks from
1992 through January 1996, and some neck-through models from 1992 through 1998. Adjustment should be made in the same
manner listed above, but in 1/4 turn increments. Because this truss rod is removable, a few have been installed or reinstalled
“upside down”, necessitating adjustments in the opposite directions of what would normally be expected. This had originally been
done to mimic the effects of the original left-handed threaded truss rod, as to not confuse owners of older models.
Original Removable Truss Rod: This can be found on models made in the 1980’s through some as late as 1998. The threads allow
tightening of this rod only to the left, which may seem somewhat
counterintuitive to some. If the adjustment nut comes off when turned clockwise, it is a sure sign that your bass has been fitted
with this type of truss rod. The effects of tightening this truss rod depend on whether it has been installed with the threaded side
up or down.
16
Adjusting the Just-A-Nut II
The nut should be adjusted by pressing the string on the 3rd fret and looking to the distance of the string to the 1st fret. This
should be on the G-str. just a very little, on the E-str .0 .5 to 0.7 mm. Do the fine adjustment as low as possible, that the open
string does not buzz. Also, a too low adjusted nut might cause a buzz between a fretted note and the nut. (This you might find between the 5th and 9th fret in case).
Set the individual string height at the nut so that the strings are as low as they can be without buzzing and rattling when you play
the string in your usual playing manner. Warwick’s new Just-A-Nut II allows adjustment without the removal of the strings. Simply
insert your 1.5mm Allen wrench into the fittings on the top of the nut and raise or lower as needed.
Basses equipped with the original brass Just-A-Nut I should be adjusted as follows: Loosen the string slightly, pull the string out
of its slot on the nut, then turn the Just-A-Nut screw to raise or lower the action as needed. Replace the string in the nut slot and
check the playability.
Adjusting the Bridge
Fine-tune the individual string heights to taste. This is done by loosening the set screw on the side of each saddle piece and raising or lowering the individual saddle piece by adjusting the two set screws from the top. Be sure to lock the saddles back in
place when you are finished. This is also how you make adjustments to the string spacing. A general setup lets the single height
of the strings follow the radius of the fingerboard.
The bridge height should be adjusted according to your individual needs. To raise your bridge, loosen the two locking screws in
the center of the bridge, then turn the height adjustment screws on the 4 corners until your desired height is reached. Tighten the
center locking screws down when you have finished. Lowering the bridge is done the opposite way, although it is not necessary
to loosen the locking screws first. Remember that the harder you hit the string, the higher you will need to set the action to prevent buzzes and rattles. Each instrument is set up in the factory to ensure that it can be played with minimum rattle and buzz in
every fret space when played at an average players’ mezzoforte, with the possible exception of some notes on the low strings above
the 12th fret. After your bridge height has been set, you may need to go back and adjust your truss rod (see the notes on setting
your truss rod). A factory setup measures approximately 2 mm between the bottom of the G string and the top of the 24th fret and
about 2.5 mm on the bass (B or E) side. Players with a lighter touch may be able to use a lower action, while those using a pick
may require a slightly higher action.
Raisen the bridge might cause, that the string touches the body, which holds the string saddle. This might cause rattling and string
breakage. In this case, we recommend you lower the bridge and raise the single saddles.
17
Adjusting Pickup Height
The pickups should be set relatively close to the strings for the best tone. The bridge pickup in particular should be set as close
as playing style and intonation will allow. (If the pickups are set ridiculously close to the strings and/or have very strong magnetic fields like the Corvette FNA’s pickup, the intonation can get wacky.) Start at 5/32” (4mm) or less on the bridge pickup, then set
the height of the neck pickup until it approximately balances in output level. If you play hard, and the strings are always slapping
against the pickups when you play, then this setup is too close. In general, the closer the pickup is to the strings, the fatter and
fuller it will sound. The signal to noise ratio is also optimized.
Second, the output of the pickup varies as the square of the distance from the string. This means that the string-to-string balance of a bass with the pickups set nice and close can be significantly affected by changing the saddle height slightly on a given
string. Sight along your bass from the bridge to the neck.
Do the string heights approximately follow the radius of the neck? Is one of the strings higher or lower than it should be? Uneven
string output can be the result! Some people like the strings to be level from E to G, some people like to follow the fingerboard
radius. The pickup can also be tilted as a balancing tactic. Many people lower the bass side slightly, but there are so many variables (i.e. cabinet response, string gauges, room response, playing style) that there is no right setting here.
Setting the Intonation
Set the intonation for each string so that the harmonic at the 12th fret is the same pitch as the fretted note at the 12th fret. This is
best done with an electronic tuner, but can be done by ear. Use the same fretting pressure as you use in normal playing for the
best results. If the fretted note is sharp to the harmonic, the string needs to be made longer. Use the individual screw adjustments
at the bridge to make each string shorter or longer as needed to get the harmonic and the fretted note the same. Use a phillips
screwdriver with a fresh #1 tip.
shorter
18
longer
Body Care Instructions
How best to care for your instrument
You have purchased a high-quality Warwick-Bass, which was manufactured under special conditions and lives up to the highest quality standards. In order to enjoy your instrument for a long time and to avoid damage to the sensitive wood, you should
follow a few simple rules. Never expose your instrument to extreme weather conditions like heat, direct sunlight, cold, dryness
or humidity. Should material defects occur after exposure to these elements, during use or storage, then Warwick will not be
held responsible.
Never use household cleaners to treat the surface of your instrument, as the chemical substances contained in those detergents
could cause irreparable damage to the surface. Furthermore, please avoid contact with wet clothing as especially light instruments could sustain minor discoloration.
Here is how you should care for your bass:
Natural Oil Finish
When you purchased your Warwick-Bass you also received a can of our special bees-wax. With new instruments, this surface
finisher should be applied with a soft cloth at least once a week. After first having used the bass, however, you should treat all
primary usage areas with the wax. Otherwise, changes in the color of the wood could occur on direct contact areas.
In order to avoid this, you should treat your new instrument frequently with the wax. This is especially the case in the beginning, as the wood and oil finish may become damaged and discolored.
After regular application of the wax a surface will build up that is similar to a polished wood floor. This layer seals and protects
the wood longer so that frequent waxing will become obsolete.
An exact number of advised applications cannot be given as this will depend on the frequency of use of the instrument. Apply
the wax using a soft cloth and let it soak in for about 2 to 3 minutes before polishing with a clean cloth. Avoid cleaning detergents as they contain too many chemical substances. Furthermore, the hardware should be cleaned with a dry clean cloth as
often as necessary.
Colored Oil Finish (Satin Lacquer-Finish)
All Colored Oil models are completely sealed by their satin lacquer-finish and therefore do not require any special treatment.
For the cleaning of the surface you should simply use a slightly damp cloth and clean the soiled areas applying light pressure.
A wax treatment is not advisable.
High Polish
Models with High Polish lacquer-finish should — ideally after each use — be freed from dust and dirt. Use a silicone-free
cloth. Fabrics containing silicone could permanently damage the lacquer-finish.
Should discoloration appear on the surface, or lose its shine, you can ‘freshen’ it up by using a special polish from your musicdealer. Please, always consult an expert before such treatment. You will receive the best advice from the store where you bought
your instrument.
Caring for your fret-board
The neck of the bass usually gets sufficient humidity through general use and touch by your hands. There is, however, a special
fret-oil, which can be applied on the back of the neck after each use (only with oil-finished necks!)
Once again, the frequency of the applications depends on how dry the wood is and how the ‘grip’ of the neck feels. The fretboard, however, should be cared for regularly with a suitable oil.
Make it a rule to use this oil in moderation. If the oil is not completely soaked in after a few days, then you have applied too
much.
And last but not least…
We hope you will have fun with your instrument and if you follow our care instructions you will be able to enjoy it for many
years to come. Should you have any further questions regarding the care of your bass, please contact us:
phone 0049 - 37422-555 0, fax: 0049 - 37422-555- 99 or use our e-mail address: [email protected].
19
This recycling logo informs the end user that it is
forbidden to throw away the product in the trash.
It has to be disposed of accordingly.
Weee-Nr.: DE93670540
Please see the new War wick Bass Forum on www. w a r wick.de
For support information please refer to support@war w i c k . d e
Visite por favor el nuevo forum War wick de bajo en www. w a r wick.de
Para soporte técnico e información, dirigirse por favor a support@war w i c k . d e
Por favor veja o novo Fórum de Baixos da War wick em HYPERLINK www. w a r wick.de
Para mais informações escreva para HYPERLINK support@war w i c k . d e
Visitare il nuovo Forum War wick Bass: www. w a r wick.de
Per supporto tecnico: support@war w i c k . d e
Veuillez consulter le nouveau forum sur les basses War wick à l'adresse www. w a r wick.de
Si vous avez besoin de plus d'informations contactez support@war w i c k . d e
Das neue War wick Bass Forum finden Sie auf www. w a r wick.de
Bei technischen Fragen wenden Sie sich bitte an support@war w i c k . d e
Nové Warwick Bass Forum najdete na webov˘ch stránkách: HYPERLINK "http://www.warwick.de www.warwick.de
Máte-li nûjaké technické dotazy, pi‰te na: [email protected]
Headquarters:
Branch China:
Branch UK:
Branch Switzerland:
Branch CZ:
Warwick GmbH&Co.Music Equipment KG • Gewerbepasrk 46 • 08258 Markneukirchen/Germany • E-Mail: [email protected]
Warwick Music Equipment (Shanghai) Ltd., Co.•Shanghai Waigaoqiao Free Trade Zone • Shanghai 200131/P.R.China • E-Mail: [email protected]
Warwick Music Equipment Trading (Manchester UK) Ltd. • 75 Bridge Street • Manchester M3 2RH / Great Britain • E-Mail: [email protected]
Warwick Music Equipment Trading (Zurich) GmbH • Kriesbachstrasse 30 • 8600 Dübendorf / Switzerland • E-Mail: [email protected]
Warwick Music Equipment Trading (Praha CZ) s.r.o. • Spálená 23/93 • 11000 Praha 1 / Czech Republic • E-Mail: [email protected]
V i s i t u s o n t h e W o r l d W i d e W e b : h t t p : / / w w w. w a r w i c k . d e