1
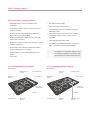
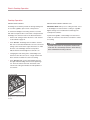
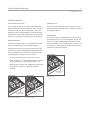
USE & CARE GUIDE
Electric Cooktops
Contents
Important Note
Wolf Electric Cooktops . . . . . . . . . . . . . . . . . . . . . . . . . 3
To ensure the safe and efficient use of Wolf equipment,
please take note of the following types of highlighted
information throughout this guide:
Safety Instructions . . . . . . . . . . . . . . . . . . . . . . . . . . . . 4
Electric Cooktop Features . . . . . . . . . . . . . . . . . . . . . . 6
Electric Cooktop Operation . . . . . . . . . . . . . . . . . . . . . 9
Electric Cooktop Care . . . . . . . . . . . . . . . . . . . . . . . . . 15
Troubleshooting Guide . . . . . . . . . . . . . . . . . . . . . . . . 17
Service Information . . . . . . . . . . . . . . . . . . . . . . . . . . . 18
Wolf Warranty . . . . . . . . . . . . . . . . . . . . . . . . . . . . . . . 19
Features and specifications are subject to change at any time
without notice. Visit our website, wolfappliance.com for the
most up-to-date information.
IMPORTANT NOTE: Throughout this guide, dimensions in
parentheses are millimeters unless otherwise specified.
IMPORTANT NOTE highlights information that is
especially important.
CAUTION signals a situation where minor injury or product
damage may occur if instructions are not followed.
WARNING states a hazard that may cause serious injury or
death if precautions are not followed.
Wolf Electric Cooktops
3
wolfappliance.com
Thank You
Your purchase of a Wolf electric cooktop attests to the
importance you place upon the quality and performance of
your cooking equipment. We understand this importance
and have designed and built your electric cooktop with
quality materials and workmanship to give you years of
dependable service.
We know you are eager to start cooking, but before you
do, please take some time to read this use & care guide.
Whether you are a beginning cook or an expert chef, it will
be to your benefit to familiarize yourself with the safety
practices, features, operation and care recommendations
of the Wolf electric cooktop.
Your Wolf electric cooktop is protected by a warranty that
is one of the finest in the industry. Take a moment to read
the warranty statement at the end of this guide and refer
to it should service become necessary.
IMPORTANT NOTE: Performance may be compromised if
the electrical supply is less than 240 volts. This excludes
model CT30E-208/S which was specifically engineered to
function with a 208-volt electrical supply.
Safety Instructions
4
IMPORTANT INSTRUCTIONS
IMPORTANT NOTE: Read all safety instructions before
using this appliance.
• Read this use & care guide carefully before using
GENERAL SAFETY REQUIREMENTS
• Wear proper apparel. Never let loose clothing or
your new cooktop to reduce the risk of fire, electric
shock or injury to persons.
other flammable materials come in contact with the
elements while in operation. Fabric may ignite and
result in personal injury.
• Ensure proper installation and servicing. This appli-
• Use only dry pot holders when removing pans from
ance must be properly installed and grounded by a
qualified technician. Have the installer show you the
location of the circuit breaker or fuse so that you
know where to turn off power.
• Warranty service must be performed by a Wolf
authorized service center.
• Before performing any service, disconnect the power
supply to the cooktop by switching off the circuit
breaker or removing the fuse.
the cooktop. Wet or damp pot holders on hot
surfaces may result in burns from steam. Do not let
pot holders touch hot heating elements.
• Select cookware of the proper size, material and
construction for the particular type of cooking being
done. This unit is equipped with heating elements
of different size. Refer to cookware selection on
page 16.
• Always turn pan handles inward so they do not
extend over adjacent work areas, heating elements
or edges of cooktop to reduce the risk of burns,
ignition of flammable materials and spillage due to
unintentional contact with pan. Do not turn handles
toward the room, where they may be bumped or
easily hit.
• Always use a setting of eight bars or less on the
bridge element when cooking on a griddle. Higher
settings are not needed and can damage the
cooktop and cookware. Refer to bridge-zone
element on page 12.
Safety Instructions
5
wolfappliance.com
IMPORTANT INSTRUCTIONS
GENERAL SAFETY REQUIREMENTS
• Never use your cooktop to warm or heat a room.
• When using the cooktop, do not touch the glass
surface directly above or adjacent to the heating
elements. The glass surface may become hot
enough to cause burns.
• Do not leave children alone or unattended in the area
where the cooktop is in use. Never allow children to
sit or stand on the appliance. Do not let children play
with the cooktop.
• Do not store items of interest to children above or at
the back of the cooktop, as they could climb on the
appliance to reach items and be injured.
• Do not repair or replace any part of the appliance
unless it is specifically recommended in literature
you received. All service should be referred to a Wolf
authorized service center.
• Do not use water on grease fires. Smother the flame
or use a dry chemical or foam-type extinguisher.
• Never leave the cooktop unattended when using
high heat settings. Boilovers and greasy spillovers
may smoke or ignite.
• Do not operate the cooktop if the glass-ceramic
surface is broken or severely pitted. Call a Wolf
authorized service center to repair the cooktop.
• Do not store flammable materials near hot compo-
nents or let grease or other flammable substances
accumulate on the cooktop.
• Do not clean the cooktop while it is still hot. If using
a damp sponge or cloth, wait until the cooktop has
cooled sufficiently to prevent steam burns. Also,
some cleaners give off noxious fumes when applied
to hot surfaces. Refer to care recommendations on
page 15.
• Do not use a griddle, open roaster or fish poacher
across two heating elements unless the bridge
element is turned on. This type of use without the
bridge element turned on could damage or crack the
glass. Refer to bridge-zone element on page 12.
• Do not block the cooling fan exhaust or intake vents.
The cooling fan automatically turns on to cool
internal parts. It may continue to run even after the
cooktop has been turned off.
Electric Cooktop Features
6
Framed Electric Cooktop Features
• Framed models with stainless steel trim.
• Hot-surface indicator light.
• Ceran glass-ceramic surface for scratch resistance
and easy cleaning.
• Universal off turns all elements off.
• Elements operate with high-frequency pulsation
technology for consistent heating.
• Heating elements with multiple zones to customize
heat for pans of all sizes.
• Bridge-zone element connects two elements to create
a larger cooking area (CT30E/S and CT36E/S).
• Wolf exclusive melt setting for gentle heat and true
simmer setting prevents scorching.
• Countdown timer with 1 to 99 minute range and
adjustable volume.
• Temperature limiter to ensure that safe operating
temperature of glass-ceramic surface is never
exceeded.
• CSA certified for US and Canada.
• Two and five year residential warranty—exclusions
apply—see warranty at the end of this guide.
• Illuminated touch controls with graduated control
lighting.
This appliance is certified by Star-K to meet
strict religious regulations in conjunction with
specific instructions found on www.star-k.org.
• Lock mode.
15" (381) FRAMED ELECTRIC COOKTOP
30" (762) FRAMED ELECTRIC COOKTOP
Model CT15E/S
Model CT30E/S
Illuminated touch
controls
Countdown timer
Triple-zone element
Countdown timer
Illuminated touch
controls
Bridge-zone
element
Universal off
HIGH
OFF
ON
SIM
OFF
T
MEL
HIGH
ON
2
ZONE
3
ZONE
H
HIG
OFF
SIM
ON
BRIDGE ON
OFF
H
HIG
SIM
O
CL
EA
R
OF
F
Universal off
SIM
H
HIG
ON
OFF NE 2
ZO NE 3
ZO
Hot-surface
indicator light
H
HIG
ON
OFF
LT
ME
OFF
R
CLEA
O
Lock key
Hot-surface
indicator light
Stainless steel
trim
Lock key
Stainless steel
trim
Triple-zone
element
Electric Cooktop Features
7
wolfappliance.com
Electric Cooktop Features
Maximum Element Power
Watts
15" (381) ELECTRIC COOKTOP
10" (254) Triple
6 1/2" (165) Single
900 / 1800 / 2500
1200
30" (762) ELECTRIC COOKTOP
10" (254) Triple
10" (254) Triple (CT30E-208/S)
(2) 8" (203) Single
6 1/2" (165) Single
Singles with Bridge—8" (203) x 17" (432)
900 / 1800 / 2500
900 / 1800 / 2300
1800
1200
4400
36" (914) ELECTRIC COOKTOP
12" (305) Triple
9" (229) Dual
(2) 8" (203) Single
6 1/2" (165) Single
Singles with Bridge—8" (203) x 17" (432)
1050 / 2200 / 2700
700 / 2200
1800
1200
4400
36" (914) FRAMED ELECTRIC COOKTOP
Model CT36E/S
Countdown timer
Triple-zone
element
Bridge-zone
element
Universal off
H
HIG
OFF
DGE
BRI
ON
OFF
E2
ZON
3
ON
OF
F
CL
EA
R
H
HIG
O
ON
ZO
NE
OFF
SIM
H
HIG
OFF
SIM
SIM
H
HIG
ON
MELT
H
HIG
OFF
ON
2
ZONE
SIM
Hot-surface
indicator light
Lock key
Stainless steel
trim
Dual-zone
element
Illuminated touch
controls
OPTIONAL ACCESSORIES
Optional accessories are available through your Wolf
dealer. To obtain local dealer information, visit the locator
section of our website, wolfappliance.com.
•
Filler strip (framed models).
•
Bracket supports for installation of two modules with
downdraft (model CT15E/S).
Electric Cooktop Features
8
Unframed Electric Cooktop Features
• Unframed models can be mounted flush with
countertop.
• Ceran glass-ceramic surface for scratch resistance
and easy cleaning.
• Elements operate with high-frequency pulsation
technology for consistent heating.
• Heating elements with multiple zones to customize
heat for pans of all sizes.
• Bridge-zone element connects two elements to create
a larger cooking area.
• Hot-surface indicator light.
• Universal off turns all elements off.
• Countdown timer with 1 to 99 minute range and
adjustable volume.
• Temperature limiter to ensure that safe operating
temperature of glass-ceramic surface is never
exceeded.
• CSA certified for US and Canada.
• Two and five year residential warranty—exclusions
apply—see warranty at the end of this guide.
• Wolf exclusive melt setting for gentle heat and true
simmer setting prevents scorching.
This appliance is certified by Star-K to meet
strict religious regulations in conjunction with
specific instructions found on www.star-k.org.
• Illuminated touch controls with graduated control
lighting.
• Lock mode.
30" (762) UNFRAMED ELECTRIC COOKTOP
36" (914) UNFRAMED ELECTRIC COOKTOP
Model CT30EU
Model CT36EU
Countdown timer
Illuminated touch
controls
Bridge-zone
element
Universal off
Countdown timer
Triple-zone
element
Bridge-zone
element
Universal off
HIGH
OFF
ON
SIM
HIGH
ON
2
ZONE
3
ZONE
H
HIG
H
HIG
OFF
SIM
H
HIG
OFF
OF
F
SIM
CL
EA
R
O
DGE
BRI
ON
OFF
H
HIG
ON
E2
ZON
SIM
H
HIG
OFF
ON
ZO
NE
H
HIG
OF
F
BRIDGE ON
OFF
CL
EA
R
ON
SIM
O
OFF
SIM
3
OFF
T
MEL
ON
MELT
H
HIG
ON
OFF
ZONE
2
SIM
Hot-surface
indicator light
Hot-surface
indicator light
Lock key
Unframed edge
Triple-zone
element
Lock key
Unframed edge
Dual-zone
element
Illuminated touch
controls
Electric Cooktop Operation
9
wolfappliance.com
Control Panel
Modes of Operation
The control panel of your electric cooktop is illuminated
for instant visual indication that one or more elements are
in use. The control panel features touch controls with
graduated control lighting. A power bar indicator in each
control will display the heat setting level for the element.
Refer to the illustration below.
LOCK MODE
Wolf electric cooktops operate by using high-frequency
pulsation, cycling the heating elements between zero
power and full power. As the heat is increased on the
control panel, the element will stay at full power for longer
periods and have shorter periods of zero power.
When using the dual-zone or triple-zone elements, all
sections of the element will cycle at the same rate. For
safety reasons, the outer elements cannot be turned on
independently from the center section.
Do not place hot cookware directly over the control
panel.
In lock mode, all touch pad operations on the control
panel are disabled and all heating elements are turned off.
A steady glowing light within the “key” symbol indicates
that the cooktop is locked. Refer to the illustration below.
• To lock the control panel, touch and hold the key
symbol for 3 seconds. Three chimes will sound and the
light within the key symbol will illuminate. The cooktop
is now in lock mode.
• To unlock the control panel, touch and hold the key
symbol for 3 seconds. Two chimes will sound and the
light within the key symbol will go out. The cooktop is
now in idle mode.
IMPORTANT NOTE: When the cooktop is powered up for
the first time or if there has been a power outage, the
cooktop will default to lock mode.
IDLE MODE
After unlocking the control panel as described in lock
mode, the cooktop enters the idle mode of operation.
Available touch pad operations include OFF ON for each
element, lock mode and timer functions.
H
HIG
OFF
SIM
H
HIG
OFF
SIM
H
HIG
OFF
ON
SIM
ON
OFF
SIM
ON
GE
BRID
ON
OFF
H
HIG
2
E
ZON
E3
ZON
OFF
H
HIG
AR
CLE
OFF
SIM
O
H
HIG
H
HIG
ON
H
GE
HIG
BRID
ON
OFF
SIM
SIM
ON
2
E
ZON
E3
ZON
OFF
AR
CLE
O
H
HIG
LT
ME
ON
OFF
E2
ZON
H
HIG
ON
OFF
2
ONE
Z
POWER BAR
INDICATOR
Control panel (CT36E/S
shown).
KEY SYMBOL
TOUCH PAD
Lock mode.
Electric Cooktop Operation
10
Cooktop Operation
INITIAL START-UP
SINGLE ELEMENT AND INNER ZONE
Before using your electric cooktop for the first time, clean
the glass-ceramic surface as recommended in the
cleaning section on page 15. The cooktop surface must
be free of any foreign substances, especially those that
could melt and permanently adhere to the glass-ceramic
surface.
To activate a heating element, touch the OFF ON touch
pad that corresponds to the element you wish to use. The
power bar indicator will begin to blink and show a halfpower status.
When the cooktop is powered up for the first time it will
default to lock mode. To unlock the control panel, touch
and hold the key symbol for 3 seconds.
IMPORTANT NOTE: A small amount of smoke and odor
may be noticed during the initial break-in period.
To complete the activation, touch one of the following
symbols or touch pads of the element control while the
power bar indicator is still blinking:
• Touch the + or – symbol to set the heat setting at
half-power output and complete the activation.
• Touch HIGH to set the element at the highest heat
setting and complete the activation.
• Touch SIM or MELT to set the element at the lowest
heat setting and complete the activation.
To change the heat setting—the element is activated and
the power bar indicator remains steadily lit:
• Touch the + or – symbol to change the heat setting
incrementally up or down.
• Touch HIGH to increase the setting directly to the
highest heat.
• Touch SIM or MELT to decrease the setting directly to
the lowest heat.
• Touch OFF ON to turn the element off.
H
HIG
OFF
SIM
H
HIG
OFF
SIM
H
HIG
OFF
ON
GE
BRID
ON
OFF
H
HIG
SIM
ON
H
HIG
ON
OFF
2
E
ZON
E3
ZON
SIM
H
HIG
OFF
AR
CLE
SIM
H
HIG
O
OFF
SIM
ON
GE
BRID
ON
OFF
H
HIG
2
AR
CLE
O
SIM
ON
ON
E
ZON
E3
ZON
SIM
H
HIG
LT
ME
H
HIG
ON
OFF
2
ONE
LT
ME
Z
ON
OFF
2
ONE
Z
+ AND –
SYMBOLS
OFF ON
TOUCH PAD
Element activation (CT36E/S
shown).
HIGH
TOUCH PAD
SIM
TOUCH PAD
Heat settings.
Electric Cooktop Operation
11
wolfappliance.com
Cooktop Operation
DUAL-ZONE ELEMENT
TRIPLE-ZONE ELEMENT
To activate the dual-zone heating element, touch the OFF
ON touch pad of the control that corresponds with the
dual-zone element. Refer to the illustration below.
To activate the triple-zone heating element, touch the
OFF ON touch pad of the control that corresponds with
the triple-zone element. Refer to the illustration below.
• Set the heat setting for the inner element zone as
described on the previous page.
• Set the heat setting for the inner element zone as
described on the previous page.
• Touch ZONE 2 and the outer element zone will be set
to the same heat setting as the inner zone. A light will
remain on under the ZONE 2 touch pad to indicate that
the outer element zone is on.
• Touch ZONE 2 and the middle element zone will be set
to the same heat setting as the inner zone. A light will
remain on under the ZONE 2 touch pad to indicate that
the middle element zone is on.
• Changing the heat setting to the entire dual-zone
element is the same as for a single element.
• Touch ZONE 3 and the outer element zone will be set
to the same heat setting as the inner and middle
zones. A light will remain on under the ZONE 3 touch
pad to indicate that the outer element zone is on.
• Touch ZONE 2 again to turn off the outer element zone.
The light under the ZONE 2 touch pad will go out.
• Changing the heat setting to the entire triple-zone
element is the same as for a single element.
If ZONE 3 is turned on directly, ZONE 2 will automatically
be turned on. Similarly, if all three zones are turned on,
turning off ZONE 2 will automatically turn off ZONE 3.
H
HIG
OFF
SIM
H
HIG
OFF
SIM
H
HIG
OFF
ON
GE
BRID
ON
OFF
H
HIG
SIM
ON
ON
2
E
ZON
E3
ZON
H
HIG
AR
CLE
OFF
SIM
O
H
HIG
OFF
SIM
SIM
H
HIG
H
HIG
LT
ME
SIM
ON
2
E
ZON
E3
ZON
ON
GE
BRID
ON
OFF
OFF
H
HIG
AR
CLE
O
ON
OFF
2
ONE
Z
H
HIG
ON
OFF
E2
ZON
DUAL-ZONE
ELEMENT CONTROL
Dual-zone element.
TRIPLE-ZONE
ELEMENT CONTROL
Triple-zone element.
When ZONE 3 is turned on, lights under the other two
zones will dim. This is normal.
Electric Cooktop Operation
12
Cooktop Operation
BRIDGE-ZONE ELEMENT
BRIDGE-ZONE ELEMENT GRIDDLE USE
The bridge-zone element provides an oblong heating area
for use with a griddle, open roaster or fish poacher.
IMPORTANT NOTE: Always use a setting of 8 bars or less
on the bridge-zone element when cooking on a griddle.
Higher settings are not needed and can damage the
cooktop and cookware.
To activate the bridge-zone heating element, touch the
OFF ON touch pad of either control that corresponds with
the bridge-zone element. Refer to the illustration below.
• Set the heat setting for either the front or rear element
as described on page 10.
• Touch BRIDGE. The bridge element and the element
that was not activated will both be set to the same heat
setting as the first element. Lights will remain on under
the front, rear and bridge element touch pads to
indicate that the entire bridge-zone element is on.
• Changing the heat setting of the entire bridge-zone
element is done the same as for a single element. All
three elements maintain the same heat setting.
• Touch BRIDGE again to turn off the bridge element.
The light under the bridge element touch pad will go
out. The front and rear elements will remain at the
current heat setting and will become independent of
one another.
H
HIG
OFF
SIM
H
HIG
OFF
SIM
H
HIG
OFF
SIM
ON
ON
GE
BRID
ON
OFF
ON
2
E
ZON
E3
ZON
OFF
H
HIG
AR
CLE
O
H
HIG
LT
ME
ON
OFF
2
ONE
Z
BRIDGE-ZONE
ELEMENT CONTROL
Bridge-zone element (CT36E/S
shown).
To preheat the griddle, set the bridge-zone element at
14 bars for 5 minutes, then turn the heat down to 8 bars
for cooking.
A griddle, open roaster or fish poacher should not be
used when the center bridge element is off or with any
other combination of heating elements.
Electric Cooktop Operation
13
wolfappliance.com
Cooktop Operation
HOT SURFACE INDICATOR
UNIVERSAL OFF
As a safety precaution, a hot-surface indicator light will
illuminate when the surface temperature of any one of the
heating elements rises above 150°F (65°C). “HOT” will
illuminate in the control panel display. It will remain illuminated until the entire surface temperature has lowered to a
safe level, even after the cooktop controls are turned off.
To turn off all heating elements at the same time, touch
the universal OFF touch pad on the control panel. Refer to
the illustration below.
TIMER OPERATION
The electric cooktop features a countdown timer located
in the control panel. Refer to the illustration below.
The timer may be set in one-minute increments up to 99
minutes. Once set, the remaining time will be illuminated
in the control panel as it counts down. The timer can be
used anytime the cooktop is not in lock mode.
COOLING FAN
The electric cooktop is equipped with a cooling fan that
automatically turns on to cool internal parts. The fan will
turn off once internal temperatures have been lowered.
During extended use, the cooling fan may continue to run
even after the cooktop has been turned off until internal
temperatures have been lowered.
• To turn on the timer, touch + on the timer control.
• Touch and hold + or – until the desired time is reached.
The timer will start 3 seconds after the time is set.
H
HIG
OFF
SIM
H
HIG
OFF
SIM
• When the timer reaches 0, an audible chime will sound.
The chime will continue to sound until CLEAR is
touched.
H
HIG
ON
GE
BRID
ON
OFF
ON
2
E
ZON
E3
ZON
OFF
H
HIG
SIM
AR
CLE
O
H
HIG
ON
OFF
2
ONE
Z
UNIVERSAL OFF
TOUCH PAD
Universal off.
H
HIG
OFF
SIM
OFF
SIM
H
HIG
SIM
H
HIG
ON
H
GE
HIG
BRID
ON
OFF
H
HIG
ON
OFF
2
E
ZON
E3
ZON
SIM
OFF
OFF
AR
CLE
O
SIM
H
HIG
H
HIG
ON
H
GE
HIG
BRID
ON
OFF
SIM
H
HIG
ON
2
E
ZON
E3
ZON
OFF
AR
CLE
O
H
HIG
ON
OFF
2
ONE
ON
OFF
2
ONE
Z
Z
HOT-SURFACE
INDICATOR LIGHT
Hot-surface indicator.
+ AND –
TOUCH PADS
CLEAR
TOUCH PAD
Timer control.
Electric Cooktop Operation
14
Cooktop Operation
SOUND ADJUSTMENT
The volume and frequency, or tone, of the touch controls
can be adjusted through the user option, activated
through the timer controls.
TEMPERATURE SETTING GUIDE
SETTING
USES
MELT
1 Bar
Melting, holding chocolate
Melting butter
Heating, holding delicate sauces
Warming foods
SIMMER
2–10 Bars
Melting large quantities
Simmering sauces
Steaming rice
BRIDGE-ZONE
8 Bars
Griddling French toast, pancakes
and bacon (griddle)
Heating gravy (open roaster)
Poaching fish (fish poacher)
• Adjust the volume and frequency using the + and –
touch pads. One touch equals one step up or down.
The power bar indicator of the triple-zone element will
display the volume or frequency level. (1 bar = low,
8 bars = medium and 16 bars = high.)
MEDIUM
10–12 Bars
Frying eggs
Heating milk, cream sauces and
soups, gravies and puddings
Panfrying
Simmering large quantities
Boiling vegetables in water
• As the volume or frequency is adjusted, the cooktop
will chime with each change. The chime will represent
the volume and frequency level currently displayed by
the power bar indicator.
MEDIUM HIGH
12–14 Bars
Sautéing
Browning
Braising
Quick frying
Fast boiling large quantities
HIGH
All Bars
Boiling water
Heating broth soups, stocks
Deep fat frying (to heat oil only)
• To activate the user option, the cooktop must be in idle
mode.
• Touch and hold CLEAR for 3 seconds to activate the
volume adjustment option. “Uol” will illuminate in the
control panel display.
• Touch and hold CLEAR for 5 seconds to activate the
frequency adjustment option. “FrE” will illuminate in the
control panel display.
• To exit the user option and return the cooktop to idle
mode, touch and hold CLEAR for more than 7 seconds.
If no touch pad is touched for 10 seconds, the level is
then stored and the cooktop returns to idle mode.
H
HIG
OFF
SIM
OFF
SIM
H
HIG
SIM
H
HIG
ON
H
GE
HIG
BRID
ON
OFF
ON
2
E
ZON
E3
ZON
OFF
AR
CLE
O
H
HIG
ON
OFF
2
ONE
Z
+ AND –
TOUCH PADS
CLEAR
TOUCH PAD
Sound adjustment.
Electric Cooktop Care
15
wolfappliance.com
Care Recommendations
•
Do not use the cooktop as a cutting board.
• Do not slide cookware with a rough bottom, such as
cast iron, across the glass-ceramic surface. If this
occurs, remove any marks with a nonabrasive cleaner.
• Do not allow any item that could melt to come in
contact with the glass-ceramic surface when it is hot.
If this occurs, use the razor blade scraper provided
with the cooktop to remove.
• Do not place food directly on the glass-ceramic
surface when it is hot.
• Do not operate the cooktop if the glass-ceramic
surface is broken. Contact a Wolf authorized service
center.
• Do not place a trivet, wok support ring or other metal
stand directly onto the cooktop surface.
• Do not apply chlorine bleach, ammonia or other strong
chemicals or cleaners to the cooktop surface.
• Do not wipe the cooktop surface with a cloth that may
leave a film of detergent; it will cause the cooktop to
discolor during the next heating cycle.
IMPORTANT NOTE: Do not place hot cookware near the
sealed outer edges of flush-mounted unframed cooktops.
This will cause damage to the silicone seal.
MAINTENANCE
The Wolf electric cooktop is a sealed system that does not
require internal maintenance. The cleaning and care
recommendations outline necessary maintenance for the
glass-ceramic surface. All other maintenance must be
performed by a Wolf authorized service center technician.
CLEANING
• Lock the cooktop before cleaning by touching and
holding the key symbol for 3 seconds.
• Clean the cooktop surface thoroughly before operating
for the first time and after each use.
• Wait until the cooktop surface is cool before cleaning.
It will be safe to clean if the hot-surface indicator light
is not illuminated.
• For best results, wipe up spills and spatters as they
occur and immediately after the cooktop has cooled.
If spills with a high sugar content are allowed to cook
on, they may permanently damage the glass-ceramic
surface. Use the razor blade scraper provided with the
cooktop to remove heavy or burned-on spills.
• Do not use abrasive cleaners or applicators; they will
permanently scratch cooktop surfaces.
• Use a spray degreaser to remove fingerprints and
greasy spatters.
• To clean the glass-ceramic surface, use a nonabrasive
cleaner like Elco Cooktop Cleaning Creme and apply
with a lightly dampened cloth. Remove any cleaning
residue from the surface and wipe with a dry cloth.
• To clean the stainless steel trim of framed models, use
a nonabrasive stainless steel cleaner and apply with a
soft lint-free cloth. Remove any cleaning residue from
the trim and wipe with a dry cloth.
Electric Cooktop Care
16
Cookware Selection
Cooktops with a glass-ceramic surface do not require
special cookware; however, cookware selection will affect
overall cooking efficiency. Use the following guidelines
when selecting cookware:
• Select cookware with a diameter that matches the
cooking zone. When a pan is placed on the heating
element, it should not extend beyond the ring around
the cooking zone. Cookware for the bridge-zone
element should match the cooking zone size as closely
as possible. Refer to the cookware selection guide.
• For best results, select medium- to heavy-gauge
metal cookware with a flat, smooth bottom and tightfitting lid.
• Select cookware made of materials with good heat
conductivity, such as aluminum and copper. These
metals are sometimes found “sandwiched” between
the inner and outer layers of the pan.
• Cast iron and especially glass cookware will be slower
to heat. Glass cookware should only be used as
recommended by the cookware manufacturer.
• Cover pans while cooking; covers improve cooking
efficiency. Water boils faster, using less energy, and the
kitchen stays cooler.
• Select high-sided (deep) pans rather than ones with
very wide bases and low sides. High sides will
minimize boilovers.
• Avoid pots and pans with uneven or rounded bottom
surfaces. Some specialty cookware such as woks,
pressure cookers, canning modules and deep fat fryers
must be carefully selected to meet the guidelines
above.
COOKWARE SELECTION GUIDE
ELEMENT
ZONE
DIAMETER
TRIPLE-ZONE
36" Cooktops
Inner
Middle
Outer
6" (152)
8" (203)
12" (305)
TRIPLE-ZONE
15" and 30" Cooktops
Inner
Middle
Outer
5" (127)
7" (178)
10" (254)
DUAL-ZONE
36" Cooktops
Inner
Outer
5" (127)
9" (229)
SINGLE-ZONE
30" and 36" Cooktops
8" (203)
SINGLE-ZONE
All Cooktops
6 1/2" (165)
BRIDGE-ZONE
30" and 36" Cooktops
8" (203) x 17" (432)
Troubleshooting Guide
17
wolfappliance.com
Troubleshooting
If your Wolf electric cooktop is not operating properly, use
the following troubleshooting guide before calling your
Wolf authorized service center. This guide will save you
time and trouble and may help you avoid the expense of a
service call.
Cooktop does not operate.
• Cooktop is in lock mode. Touch and hold the key
symbol for 3 seconds to unlock the control panel.
• Cooktop is in lock mode and displays an error code.
Errors may be cleared by pressing the clear touch pad.
If error reappears, contact Wolf customer service.
• Cooktop is in showroom mode (“Shr” appears in the
display). To exit showroom mode, the cooktop must be
locked by pressing and holding the key symbol for 5
seconds. After the cooktop is locked, press and hold
the melt touch pad for 5 to 7 seconds.
• Check the household fuse or circuit breaker to see if it
has been blown or tripped.
• No electricity is being supplied to the cooktop. Have
an electrician verify that the cooktop is connected to a
proper electrical circuit.
Heating elements do not heat properly.
• Electrical connection is loose. Have an electrician
tighten electrical connections.
• Cooktop is not connected to a proper electrical circuit.
Have an electrician verify that the proper voltage is
being supplied to the cooktop.
Food does not heat properly.
• Improper cookware is being used. Select proper
cookware as outlined in the cookware selection guide
on the previous page.
Heating elements cycle off when set at full power.
• If the temperature of the glass-ceramic surface
exceeds a safe operating level, temperature limiters will
temporarily shut off the element. This is a normal
function of the cooktop. The element will turn on when
the surface temperature has cooled sufficiently.
Service Information
18
Service Information
When requesting information, literature, replacement parts
or service, always refer to the model and serial number of
your electric cooktop. Both numbers are listed on the
product rating plate located on the underside of the
cooktop. Refer to the illustration below. Record the rating
plate information below for future reference.
BEFORE CALLING FOR SERVICE
Before calling your Wolf authorized service center, refer to
the troubleshooting guide on page 17. Check the household fuse or circuit breaker to see if it has been blown or
tripped and that the electrical connection to the appliance
has not been disconnected. A power outage may also
have caused a disruption in service.
Model Number:
Serial Number:
PRODUCT REGISTRATION
Installation Date:
Register your new Wolf product today so that we may
ensure your satisfaction. You may register by one of the
following options:
Wolf Authorized Service Center:
1) Mail in the completed Wolf product registration card.
Phone:
2) Register online at wolfappliance.com.
Wolf Dealer:
3) Register by phone by calling Wolf customer service at
800-222-7820.
Phone:
HIGH
OFF
ON
SIM
OFF
MELT
HIGH
ON
2
ZONE
3
ZONE
H
HIG
OFF
SIM
ON
GE
BRID
ON
OFF
SIM
H
HIG
The model and serial numbers of your appliance are
printed on the enclosed Wolf product registration card. If
you provide us with your e-mail address, we will send you
exciting new product updates and recipes as they become
available, along with information on special events.
RATING PLATE
Location of rating plate.
The information and images in this guide are the copyright property of Wolf Appliance, Inc. Neither this guide nor any information or images contained
herein may be copied or used in whole or in part without the express written permission of Wolf Appliance, Inc. ©Wolf Appliance, Inc. all rights reserved.
Wolf Appliance Products Limited Warranty
RESIDENTIAL USE ONLY
FULL TWO YEAR WARRANTY*
For two years from the date of original installation, your Wolf Appliance product warranty covers all parts and
labor to repair or replace any part of the product that proves to be defective in materials or workmanship. All
service provided by Wolf Appliance under the above warranty must be performed by a Wolf authorized service
center, unless otherwise specified by Wolf Appliance. Service will be provided in the home during normal
business hours.
LIMITED THIRD THROUGH FIFTH YEAR WARRANTY
From the third through fifth year from the date of original installation, Wolf Appliance will repair or replace the
following parts that prove to be defective in materials or workmanship: gas burners (excluding appearance),
electric heating elements, blower motors (ventilation hoods), electronic control boards, magnetron tubes and
induction generators. Labor to remove and replace defective parts is not covered. Wolf Appliance recommends
that you use a Wolf authorized service center to perform such service.
LIMITED LIFETIME WARRANTY
For the life of the product, Wolf Appliance will repair or replace any outdoor gas grill body or hood that rusts
through due to defective material or workmanship. Labor to remove and replace defective parts is not covered.
Wolf Appliance recommends that you use a Wolf authorized service center to perform such service.
TERMS APPLICABLE TO EACH WARRANTY
The warranty applies only to products installed for normal residential use. The warranty applies only to products
installed in any one of the fifty states of the United States, the District of Columbia or the ten provinces of
Canada. This warranty does not cover any parts or labor to correct any defect caused by negligence, accident
or improper use, maintenance, installation, service or repair.
THE REMEDIES DESCRIBED ABOVE FOR EACH WARRANTY ARE THE ONLY ONES THAT WOLF APPLIANCE,
INC. WILL PROVIDE, EITHER UNDER THIS WARRANTY OR UNDER ANY WARRANTY ARISING BY OPERATION
OF LAW. WOLF APPLIANCE, INC. WILL NOT BE RESPONSIBLE FOR ANY CONSEQUENTIAL OR INCIDENTAL
DAMAGES ARISING FROM THE BREACH OF THIS WARRANTY OR ANY OTHER WARRANTY, WHETHER
EXPRESS, IMPLIED OR STATUTORY.
Some states do not allow the exclusion or limitation of incidental or consequential damages, so the above
limitation or exclusion may not apply to you. This warranty gives you specific legal rights and you may also have
other legal rights that vary from state to state.
To receive parts and/or service and the name of the Wolf authorized service center nearest you, contact
Wolf Appliance, Inc., P. O. Box 44848, Madison, WI 53744; check the contact & support section of our website,
wolfappliance.com or call 800-332-9513.
*Stainless steel doors, panels, handles, product frames and interior surfaces are covered by a limited 60-day
parts and labor warranty for cosmetic defects.
WOLF APPLIANCE, INC.
P. O. BOX 44848 MADISON, WI 53744
808696 REV-B
4/ 2010
WOLFAPPLIANCE.COM
800.332.9513