1
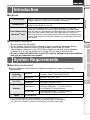
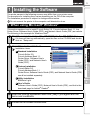
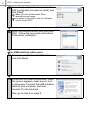
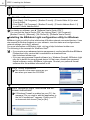
QL-580N QL-1060N Software installation guide English LB9161001 1 Introduction Introduction Lets you print labels from the connected Brother label printer when using P-touch Editor on your PC. The P-touch Address Book is a software program for creating a computer based address book and printing durable pre-sized labels. P-touch Address Book With this easy-to-use software, address labels and visitor name badges can quickly be created. Data from other applications (CSV files or (Windows® Only) Microsoft Outlook contact data) can also be imported. A predefined set of label layout styles are available. Additionally users may create their own layouts. CD-ROM Precautions • • • • Do not scratch the CD-ROM. Do not subject the CD-ROM to extremely high or extremely low temperatures. Do not put heavy objects on the CD-ROM or apply force to the CD-ROM. The software contained on the CD-ROM is meant for use with your purchased machine only. It may be installed on multiple PCs for use at an office, etc. • Do not connect the USB cable to your PC until the software has been installed and you are instructed to connect. System Requirements System Requirements Operating environment Before installation, check that your system configuration meets the following requirements. Hard Disk Windows®*1 Windows® XP/Windows Vista®/Windows® 7/ Windows Server® 2003/2008/2008 R2 Macintosh® Mac OS® X 10.3.9 - 10.6 Windows®*1 Disk space 70 MB or more*2 Macintosh ® STEP 2 RS-232C*3, Windows®*1 USB port (USB Spec. 1.1 or 2.0 protocol), 10/100 BASE-TX Wired Ethernet Macintosh® USB port (USB Spec. 1.1 or 2.0 protocol), 10/100 BASE-TX Wired Ethernet Interface Other Disk space 100 MB or more*2 1 CD-ROM drive *1 The computer should meet the Microsoft® recommendations for the OS. *2 Required available space when installing the software with all of the options. *3 The RS-232C interface is required when printing with ESC/P commands. Label Overview Operating System (OS) STEP For Windows® Printer Driver Installing the Software Makes it easy for anyone to create a wide variety of custom labels in complex layouts by using fonts, templates, and clip art. For Macintosh® P-touch Editor Introduction Features 2 • Microsoft, Windows Vista, Windows Server and Windows are either registered trademarks or trademarks of Microsoft Corp. in the United States and/or other countries. • Apple, Macintosh and Mac OS are trademarks of Apple Inc., registered in the United States and other countries. • The names of other software or products used in this document are trademarks or registered trademarks of the respective companies that developed them. 3 Installing the Software The printer names in the following screens may differ from your printer name. The procedure for installing them varies depending on the OS of the computer. The installation procedure is subject to change without notice. Do not connect the printer to the computer until directed to do so. 1. When using Microsoft® Windows® This section explains how to install P-touch Editor 5.0, P-touch Address Book 1.1, the Printer Driver, Software User's Guide (PDF), and Network User's Guide (PDF) as a whole. The following is the example for Windows Vista®. If it does not start up automatically, open the files on the CD-ROM and double click on "Setup.exe". STEP 1 Click "Standard Installation". 1 2 3 4 2 Custom Installation P-touch Editor 5.0, P-touch Address Book 1.1, Printer Driver, Software User's Guide (PDF), and Network User’s Guide (PDF) can all be installed separately. 3 Utility Installation BRAdmin Light. 4 User's Guide Software User's Guide (PDF), Network User's Guide (PDF), and link to the download page for Adobe® Reader®. 3 Read the licence agreement and click [Yes] if you agree with the terms and conditions. 4 Follow the on-screen instructions. For Windows® 1 Standard Installation P-touch Editor 5.0, P-touch Address Book 1.1, Printer Driver, Software User's Guide (PDF), and Network User's Guide (PDF). Installing the Software Installation items: For Macintosh® 2 Start the computer and put the CD-ROM into the CD-ROM drive. STEP 2 Label Overview 1 Introduction 1 Installing the Software 4 STEP 1 Installing the Software 5 Put a check mark in the box next to the Add-In programs you want to install, and click [Next]. Make sure that all Microsoft® Office applications are closed. For details of the Add-in, see the "Software User's Guide (PDF)". 6 Select the desired model, and then click [OK]. Follow the on-screen instructions of the driver installation. For USB interface cable users 7-1 Choose Local Printer with USB cable and click [Next]. 7-2 Follow the on-screen instructions. When this screen appears, make sure to turn on the power. Connect the USB interface cable to your computer, and then connect it to the machine. Now, go to step 8 on page 5. 5 For Network interface cable users 7-1 Choose Brother Peer-to-Peer Network Printer, and then click [Next]. Introduction Check that the machine is connected to the network by a LAN cable. 7-2 Choose Search the network for devices and choose from a list of discovered devices (Recommended). Or enter your machine’s IP address or its node name. Click [Next]. STEP Now, go to step 8 on page 5. For shared network printer users 7-1 Choose Network Shared Printer, and then click [Next]. Check that the machine is connected to the network by a LAN cable. Installing the Software 7-3 Choose your printer. For Windows® 1 For Macintosh® You can find your printer's IP address and the node name by printing out the Printer Settings Page, please refer to the Network User's Guide (PDF) for details. STEP 2 Contact your administrator if you do not know the location or the name of the printer in the network. 8 Click [Next]. • If you choose "Yes, display the page", you will go to the online user registration page before finishing the installation. (recommended) • If you choose "No, do not display the page", you will continue the installation. Label Overview 7-2 Choose your printer's queue, and then click [OK]. 6 STEP 1 Installing the Software 9 Click [Finish]. 10 Start the software. • Click [Start] - [All Programs] - [Brother P-touch] - [P-touch Editor 5.0] to start P-touch Editor. • Click [Start] - [All Programs] - [Brother P-touch] - [P-touch Address Book 1.1] to start P-touch Address Book. For details on software, see Î "Software User's Guide (PDF)". You can find the User's Guide (PDF) by clicking [Start] - [All Programs] [Brother P-touch] - [Manuals] - [QL-Series-N] - [Software User's Guide]. Installing the BRAdmin Light configuration utility for Windows BRAdmin Light is a utility for the initial setup of Brother network connected devices. It can also search for Brother products on your network, view the status and configure basic network settings, such as IP address. For more information on BRAdmin Light, visit us at http://solutions.brother.com The following is the example for Windows Vista®. • If you require more advanced printer management, use the latest Brother BRAdmin Professional utility version that is available as a download from http://solutions.brother.com • If you are using personal firewall software (e.g. Windows Firewall), BRAdmin Light may fail to detect the unconfigured device. In that case, disable your personal firewall software, and try BRAdmin Light again. Re-start your personal firewall software after the address information is set. 1 Click "Utility Installation". 2 Click "BRAdmin Light" and follow the onscreen instructions. This screen is the same screen as you see when you insert the CD-ROM. If Windows Firewall is enabled on your PC, the message "Do you wish to add this application to the list of exceptions?" appears. Check your PC environment and choose [Yes] or [No]. 7 Setting your IP address, Subnet Mask and Gateway using BRAdmin Light Click [Start] - [All Programs] - [Brother] [BRAdmin Light]. BRAdmin Light will search for new devices automatically. If you have a DHCP/BOOTP/RARP server in your network, you don’t have to do the following operation, as the print server will automatically obtain its IP address. 2 Introduction 1 Double-click the unconfigured device. The default password is "access." STEP The address information will be saved to the printer. For Windows® 4 For Macintosh® Choose STATIC for the Boot Method. Enter the IP Address, Subnet Mask and Gateway, and then click [OK]. STEP 2 Label Overview 3 Installing the Software 1 8 STEP 1 Installing the Software Installing the Software How to use the P-touch Editor Help (for Windows®) Start P-touch Editor Help The following is the example for Windows Vista®. The printer names in the following screens may differ from your printer name. Start from Start ( ) button To start P-touch Editor Help, click the Start ( ) button on the task bar, point to [All Programs]. Click [Brother P-touch] and [P-touch Editor 5.0 Help]. Start from New/Open dialog When you start the P-touch Editor 5.0 and the New/Open dialog box appears, click "Help - How To". If you select "Check for Updates" from the checkbox shown on the right, you can check if there is an update available for P-touch Editor from the web site. Start from P-touch Editor Click the Help menu and choose P-touch Editor Help. Professional Mode Start from Snap mode Right-click the mouse and choose P-touch Editor Help. Express Mode 9 2. When using Mac OS® • Until the installation of printer driver is completed, do not connect the machine to your Macintosh®. If it has been connected to it, pull out the USB interface cable/ Network interface cable from your Macintosh®. • When installing the machine, log in as the administrator. The following is the example for Mac OS® X 10.5.7. In the following steps, you will see QL-XXX. Read "XXX" as your printer name. The printer names in the following screens may differ from your purchased printer name. Start up your Macintosh®, and insert the CD-ROM into the CD-ROM drive. After the installation is completed and the screen shown right is displayed, click [Close]. The installation of the printer driver is completed. Next, install P-touch Editor 5.0. 4 Double click [P-touch Editor 5.0 Installer.mpkg] in [Mac OS X] folder. 5 When the installation is completed and the message "Click Restart to finish installing the software." is displayed, click [Restart]. The P-touch Editor 5.0 Installer starts up. Follow the on-screen instructions. The Macintosh® is restarted. The installation of software is completed. For Windows® 3 1 Installing the Software 2 Click [Mac OS X] folder and double click [QL-XXX Driver.pkg]. Follow the on-screen instructions. STEP For Macintosh® Double click the "QL_Series" (CD-ROM) icon. STEP 2 Label Overview 1 Introduction This section explains how to install P-touch Editor 5.0, Fonts, Auto Format Templates, Clip Art, and the printer driver. After installing the Printer Driver, it also explains how to configure it for the machine. 10 STEP 1 Installing the Software 6 After restarting the computer, connect the USB/LAN cable to the machine. As the caution label is covering the USB port of the machine, remove it and then connect the USB cable. 7 Connect the USB/LAN cable to the USB/LAN port of the Macintosh®. Press the ON/OFF button ( ) on the machine to turn on the power. When connecting the machine to the Macintosh® via a USB hub, it may not be connected correctly. At that time, connect the machine directly to the USB port of your Macintosh®. 8 (Mac OS® X 10.3.9 - 10.4.x) Double click the drive where Mac OS® X is installed, and click in order of [Applications] - [Utilities] - [Printer Setup Utility]. (Mac OS® X 10.5.x - 10.6) Click in order of [Apple menu] - [System Preferences], and click "Print & Fax". Then click . For USB interface cable users (Mac OS® X 10.3.9) Click [Add] and choose USB at the top of the screen. Choose QL-XXX from the list and click [Add] again to add the printer to the Printer Setup Utility. (Mac OS® X 10.4.x - 10.6) Click [Add]/ . Choose QL-XXX from the list and click [Add] to add the printer to the Printer Setup Utility/Print & Fax. 9 For Mac OS® X 10.4.x, click [Add] and add the printer with the BRPTUSB connection. (If you do so, an error dialog appears when an printing error occurs.) Set the appropriate printer name. Now, go to step 10. For Network interface cable users (Simple Network Configuration) 9-1 Click [Add]. (Mac OS® X 10.3.9) Make the selection shown right. (Mac OS® X 10.4.x - 10.6) Go to the next step. Introduction 11 9-2 Choose QL-XXX from the list and click [Add] again to add the printer to the Printer Setup Utility. (Mac OS® X 10.3.9) (Mac OS® X 10.4.x) STEP For Windows® For Macintosh® (Mac OS® X 10.5) Installing the Software 1 STEP 2 Label Overview Now, go to step 10. 12 STEP 1 Installing the Software For Network interface cable users (Manual Network Configuration) (Mac OS® X 10.3.9) Click [Add] and choose IP Printing at the top of the screen. Enter the IP address of the printer into the Printer Address box. Choose QL-XXX from the list and click [Add] again to add the printer to the Printer Setup Utility. 9 (Mac OS® X 10.4.x - 10.6) Click [Add] and choose IP Printer / IP at the top of the screen. Enter the IP address of the printer into the Address box. Choose QL-XXX from the list and click [Add] again to add the printer to the Printer Setup Utility. When specifying the Queue Name, use the value BRNxxxxxxxxxxxx where xxxxxxxxxxxx is the Ethernet address. 10 When the screen returns to the Printer List / Print & Fax screen, check that "QL-XXX" is added, and close the Printer List / Print & Fax screen. Now you can use the machine. For details on software, see the P-touch Editor Help. Installing the BRAdmin Light configuration utility for Mac® BRAdmin Light is a utility for the initial setup of Brother network connected devices. It can also search for Brother products on your network, view the status and configure basic network settings, such as IP address. For more information on BRAdmin Light, visit us at http://solutions.brother.com If you are using personal firewall software, BRAdmin Light may fail to detect the unconfigured device. In that case, disable your personal firewall software, try BRAdmin Light again. Re-start your personal firewall software after the address information is set. 1 Double click "BRAdmin Light.pkg" in the [Mac OS X] folder. The BRAdmin Light Installer starts up. Follow the on-screen instructions. 13 2 When the installation is completed and the message "The Software was successfully installed." is displayed, click [Close]. Setting your IP Address, Subnet Mask and Gateway using BRAdmin Light Click [Library] - [Printers] - [Brother] [P-touch Utilities] - [BRAdmin Light.jar]. Introduction The installation of BRAdmin Light is completed. 1 Choose STATIC for the Boot Method. Enter the IP Address, Subnet Mask and Gateway, and then click [OK]. 4 The address information will be saved to the printer. For Windows® 3 The default password is "access." Installing the Software Double-click the unconfigured device. 1 For Macintosh® 2 STEP STEP 2 Label Overview BRAdmin Light will search for new devices automatically. If you have a DHCP/BOOTP/RARP server in your network, you don't have to do the following operation, as the print server will automatically obtain its IP address. 14 STEP 1 Installing the Software Installing the Software How to use the P-touch Editor Help (Mac OS®) Start P-touch Editor Help The following is the example for Mac OS® X 10.4.9. The printer names in the following screens may differ from your printer name. Start from New/Open dialog In the New/Open dialog, click "Help - How To". Start from P-touch Editor To start the P-touch Editor Help, click the Help menu and choose "P-touch Editor Help". 15 Label Overview 1 Label Variety STEP For Windows® For Macintosh® Installing the Software 1 STEP 2 Label Overview Choose the type of label you want to create. Introduction Here are the sample labels that you can create with the Brother QL-570/580N. There is a variety of labels to choose from. 16 STEP 2 Label Overview 2 General Procedures This section describes the general procedure for creating labels. Connect to the PC Create the label data. 1 Enter text directly using P-touch Editor, or copy text from a Microsoft® Office application. Use P-touch Editor's variety of editing functions to format and decorate your label. • Enter text in P-touch Editor. • Copy text from Microsoft® Office. (for Windows®) For details on how to create the labels, see the Help. 2 Print the label. Print the label from the Brother QL printer. For details on how to print the labels, see the Help. Remove labels from the label output slot to prevent paper jams. Use the machine without connecting to the PC (QL-580N only) Create the label data and transfer it to the printer. (See the P-touch Transfer Manager chapter of the Software User's Guide (PDF).) 1 2 Use the P-touch Template command to print the transferred template. (For details of the P-touch Template function, see the manuals in the CD-ROM.) Label Overview STEP 2 For Windows® Installing the Software For Macintosh® Introduction 17 STEP 1