1
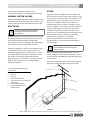
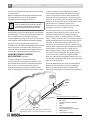
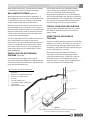
Installation and Maintenance Manual
6 720 220 047
Revised 03-11
TW Series
Water to Water
©Copyright 2011 Bosch, Inc All rights reserved
TW Series / Water to Water 3
Table of Contents
Table of Contents
Model Nomenclature..................................................................................... 3
Initial Inspection........................................................................................... 4
Installation.................................................................................................... 4
Electrical....................................................................................................... 5
Piping........................................................................................................... 5
Cooling Tower / Boiler Applications.............................................................. 6
Well Water Systems....................................................................................... 7
Earth Coupled Geothermal Systems............................................................. 7
Typical Load Side Applications...................................................................... 7
Water to Water Unit Controller...................................................................... 8
Modes Of Operation..................................................................................... 8
Unit Protection.............................................................................................. 9
User Adjustable Setting Chart..................................................................... 11
Setting Up The Controller........................................................................... 11
Initial Configuration.................................................................................... 12
System Check-Out...................................................................................... 13
Unit Start-Up............................................................................................... 13
Heat Recovery Package............................................................................... 14
Operating Pressures................................................................................... 16
Chiller Mode........................................................................................... 16
Boiler Mode............................................................................................ 16
Wiring Diagrams.......................................................................................... 17
Two Phase - Single Stage........................................................................ 17
Two Phase - Single Stage Solid State Unit Controller.............................. 18
Unit Check-Out........................................................................................... 19
Trouble Shooting......................................................................................... 20
Model Nomenclature
TW 060 - 3 CS C - F X X
MODEL:
TW=WATER TO WATER R-410A
NOT APPLICABLE
NOMINAL CAPACITY:
THOUSANDS OF BTUH - COOLING
VOLTAGE DESIGNATIONS:
WATER CONNECTION
LOCATION
1- 208-230/1/60
F-FRONT
CONTROL OPTIONS:
CS: WATER-TO-WATER UNIT NO CONTROLS
WATER COIL OPTIONS
US: WATER-TO-WATER UNIT MOUNTED CONTROLLER
C-COPPER
N-CUPRO-NICKEL
Revised 03-11
Subject to change without prior notice
6 720 220 047
4
TW Series / Water to Water
Initial Inspection
Be certain to inspect all cartons or crates on each
unit as received at the job site before signing the
freight bill. Verify that all items have been
received
Caution
and that there is no visible damage; note any
shortages or damage on all copies of the freight
bill. In the event of damage or shortage, remember
that the purchaser is responsible for filing the
Caution
necessary claims with the carrier. Concealed
damage not discovered until after removing the
units from the packaging must be reported to the
carrier within 24 hours of receipt.
General Description
The Water-to-Water series unit is a heat pump that
provides the best combination of performance and
efficiency available. Safety devices are built into
each unit to provide the maximum system
protection possible when the unit is properly
installed and maintained.
The Water-to-Water series units are Underwriters
Laboratories (UL) and (cUL) listed for safety. The
Water-to-Water series units are designed to operate
with entering source liquid temperature between
25° F and 110° F. (see specifications data sheets
for limits).
For well water applications, the minimum
source EWT is 50˚ F, with sufficient water flow
to prevent freezing. Antifreeze solution is
required for all closed loop applications.
Cooling Tower/Boiler and Earth Coupled (Geo
Thermal) applications should have sufficient
antifreeze solution to protect against extreme
conditions and equipment failure. Frozen water
coils are not covered under warranty.
Initial Inspection
components. Only trained and qualified personnel
should install, repair, or service the equipment.
Before performing service or maintenance
operations on the system, turn off main power
to the unit. Electrical shock could cause
personal injury or death.
TW Series R-410A refrigerant systems operate
at higher pressures than standard R-22
systems. Do not use R-22 service equipment or
components on R-410A equipment.
When working on equipment, always observe
precautions described in the literature, tags, and
labels attached to the unit. Follow all safety codes.
Wear safety glasses and work gloves. Use a
quenching cloth for brazing, and place a fire
extinguisher close to the work area.
Location
The unit should be centrally located with respect to
the distribution system. The unit should be
installed in an indoor area that allows easy removal
of the access panels, and has enough room for
service personnel to perform maintenance or
repair. Provide sufficient room to make fluid, and
electrical connections. These units are not
approved for outdoor installation; therefore, they
must be installed inside the conditioned structure.
Do not locate in areas that are subject to freezing.
Installation
The Water-to-Water series unit should be mounted
level on a vibration absorbing pad slightly larger
than the base to minimize vibration transmission to
the building structure. It is not necessary to anchor
the unit to the floor.
Moving and Storage
If the equipment is not needed for immediate
installation upon its arrival at the job site, it should
be left in its shipping carton and stored in a clean,
dry area. Units must only be stored or moved in the
normal upright position as indicated by the “UP”
arrows on each carton at all times.
Safety Considerations
Installation and servicing of this equipment can be
hazardous due to system pressure and electrical
6 720 220 047
VIBRATION PAD
FULL SIZE
If the unit is installed on a floor over a crawl space,
it should not rest on long, unsupported floor joists.
Vibrations may be created in the joists with the
crawl space acting as an amplifier box resulting in
undesirable noise. A drain pan is recommended
Subject to change without prior notice
Revised 03-11
Minimal System Volume
where water released during start-up or
maintenance could cause damage below the unit.
MINIMAL SYSTEM VOLUME
Bosch recommends that the total fluid volume in the
system be not less than 6 gallons per nominal ton of
cooling capacity on both the load and source sides.
ELECTRICAL
Always disconnect power to the unit before
servicing to prevent injury or death due to
electrical shock.
n
All field wiring must comply with local and national
fire, safety and electrical codes. Power to the unit
must be within the operating voltage range
indicated on the unit’s nameplate. On three phase
units, phases must be balanced within 2%.
Properly sized fuse or HACR circuit breakers must
be installed for branch circuit protection. See
equipment rating plate for maximum size. The unit
is supplied with an opening for attaching conduit.
Be certain to connect the ground lead to the
ground lug in the control box. Connect the power
leads as indicated on the unit wiring diagram
(Refer to Figure #6).
TW Series / Water to Water 5
PIPING
Supply and return piping must be as large as the
unit connections on the heat pump (larger on long
runs). Never use flexible hoses of a smaller inside
diameter than that of the water connections on
the unit. The Water-to-Water series units are
supplied with either a copper or optional cupronickel condenser. Should your well driller express
concern regarding the quality of the well water
available or should any known hazards exist in
your area, we recommend proper testing to assure
the well water quality is suitable for use with
water source equipment. In conditions
anticipating moderate scale formation or in
brackish water a cupro-nickel heat exchanger is
recommended.
Galvanized pipe or fittings are not recommended
for use with these units due to the possible
galvanic corrosion.
Both the supply and discharge water lines will
sweat if subject to low water temperature. These
lines should be insulated to prevent damage from
condensation.
All manual flow valves used in the system must be
ball valves. Globe and gate valves must not be
COOLING TOWER/BOILER APPLICATION
(SOURCE SIDE)
1.
BALL VALVES
2.
HOSE KITS
3.
P/T PLUGS
4.load side connections*
5.LOW VOLTAGE CONTROL CONNECTION*
6.vibrAtion pad
7.line voltage disconnect
8.SUPPLY AND RETURN LINES OF
CENTRAL SYSTEM
Figure #1
* NOTE: Water and electrical connection locations vary depending on model. Connect as required per unit labels.
Revised 03-11
Subject to change without prior notice
6 720 220 047
n
6
TW Series / Water to Water
used due to high pressure drop and poor throttling
characteristics.
Never exceed the recommended water flow rates.
Serious damage or erosion of the water to
refrigerant heat exchanger could occur.
Improper heat exchanger fluid flow due to piping,
valving or improper pump operation is hazardous
to the unit and constitutes abuse which will void
the heat exchanger and compressor warranty.
Always check carefully for water leaks and repair
appropriately. Units are equipped with female pipe
thread fittings. Consult the specification sheets for
sizes. Thread sealant should be used when
connecting water piping connections to the units to
insure against leaks and possible heat exchanger
fouling. Do not overtighten the connections.
Flexible hoses should be used between the unit and
the rigid system to avoid possible vibration. Ball
valves should be installed in the supply and return
lines for unit isolation and unit flow balancing.
COOLING TOWER / BOILER
APPLICATION (Figure #1)
To assure adequate cooling and heating
performance, the cooling tower and boiler fluid
loop temperature should be maintained between
50° F to 100° F. In the cooling mode, heat is
rejected from the unit into the condenser water
loop. A cooling tower provides evaporative cooling
Cooling Tower / Boiler Application
to the loop water; thus, maintaining a constant
supply temperature to the unit. When utilizing an
open cooling tower, chemical water treatment is
mandatory to ensure the water is free of corrosive
materials. A secondary heat exchanger (plate frame
between the unit and the open cooling tower) may
also be used. It is imperative that all air is
eliminated from the closed loop side of the heat
exchanger to prevent condenser fouling.
In the heating mode, heat is absorbed from the
condenser water loop to the unit. A boiler can be
utilized to maintain the loop within the proper
temperature range. In milder climates a “flooded
tower” concept is often used. This concept involves
adding make-up water to the cooling tower sump to
maintain the desired loop temperature. No unit
should be connected to the supply or return piping
until the water system has been completely cleaned
and flushed to remove any dirt, piping chips or
other foreign material. Supply and return hoses
should be connected together during this process
to ensure the entire system is properly flushed.
After the cleaning and flushing has taken place, the
unit may be connected to the water loop and should
have all valves wide open.
Pressure/temperature ports are recommended in
both the supply and return lines for system flow
balancing. Water flow can be accurately set by
measuring the refrigerant-to-water heat exchangers
WELL WATER APPLICATION (SOURCE SIDE)
1.
PRESSURE TANK
2.
BALL VALVES
3.
SOLENOID VALVE (SLOW CLOSING)
4.
HOSE KIT
5.
P/T KIT
Figure #2
6.
LOAD SIDE CONNECTIONS*
* NOTE: Water and electrical connection locations vary
depending on model. Connect as required per unit labels.
8.
VIBRATION PAD
9.
LINE VOLTAGE DISCONNECT
6 720 220 047
7.LOW voltage CONTROL CONNECTION*
Subject to change without prior notice
Revised 03-11
Well Water Systems
TW Series / Water to Water 7
water side pressure drop. See specification sheets
for water flow and pressure drop information.
WELL WATER SYSTEMS (Figure #2)
Water quantity should be plentiful, between 1.5
and 3.0 gpm per ton of cooling, and of good quality.
To avoid the possibility of freezing in the heating
mode, the well water should be above 50˚F.
Water pressure must always be maintained in the
heat exchanger by placing a water control valve on
the outlet of the water-to-water unit. A bladder type
expansion tank may be used to maintain pressure
on the system. All solenoid valves should be slow
closing to avoid water hammer.
The discharge water from the water-to-water unit is
not contaminated in any manner and can be
disposed of in various ways depending on the local
codes (i.e. discharge well, dry well, storm sewer,
drain field, stream, pond, etc.) Pilot operated or
slow closing valves are recommended to reduce
water hammering.
EARTH COUPLED GEOTHERMAL
SYSTEMS (Figure #3)
Closed loop and pond applications require
specialized design knowledge. No attempt at these
installations should be made unless the dealer has
received specialized training.
Utilizing the Ground Loop Pumping Package
(GLP), makes the installation easy. Anti-freeze
solutions are utilized when entering loop
temperatures drop below 50˚F or where piping
will be routed through areas subject to freezing. A
flow rate between 2.5 to 3.0 gpm per nominal ton
of cooling is recommended for this application.
See GLP Pump Curve for sizing information.
TYPICAL LOAD SIDE APPLICATIONS
There are many load side applications for which
the water-to-water heat pump/ liquid chiller is
ideally suited.
Some typical uses are as
follows
Hydronic baseboard heating, hydronic in-slab floor
heating, forced air fan coil heating or cooling, ice
and snow melting, heating potable water, (when
allowed by code) heating swimming pool and spa*,
process fluid heating or cooling.
When specifying load side fluid volume it is
important to consider the heat pump output
capacities and flow rates. Insufficient load side
fluid volume may cause unstable heat pump
operation (short cycling). Pressure/temperature
ports should be used to set flow rates.
EARTH COUPLED APPLICATION (SOURCE SIDE)
1.POLYBUTYLENE OR POLYETHELENE WITH
INSULATION
2.GROUND LOOP PUMPING PACKAGE (GLP)
3.
GROUND LOOP CONNECTION KIT
4.
P/T PLUGS
5.
LOAD SIDE CONNECTIONS*
6.LOW VOLTAGE CONTROL CONNECTION*
7.
VIBRATION PAD
8.
LINE VOLTAGE DISCONNECT
Figure #3
* NOTE: Water and electrical connection locations vary depending
on model. Connect as required per unit labels.
Revised 03-11
Subject to change without prior notice
6 720 220 047
8
TW Series / Water to Water
*A water-to-water series Heat Pump/Liquid Chiller
can be utilized for direct pool/spa heating without a
secondary heat exchanger. In this application
cupro-nickel heat exchangers must be used.
Automatic chemical feeders must never be installed
up stream of the unit. An external bypass should be
installed to avoid over-flowing the heat exchanger
to prevent coil erosion. The pool pH levels and
chemical balances must be maintained to avoid
possible heat exchanger damage.
Water to Water Unit Controller
(OPTIONAL)
Bosch’s water to water heat pump controller offers a
low cost, simple solution to the control of a water to
water heat pump unit. The control is configurable to
provide cooling only, heating only or auto change over
control strategies based on the application of the unit
in a given system.
Water to Water Unit Controller
• Brown out low voltage protection
All of the unit’s safeties are tied back into the
controller for system protection.
Unit Sensors
The unit controller is provided with two sensors:
Water Sensor: This sensor will control unit
operation in the cooling or heating mode based on
the water temperature on the load side. It may be
field mounted for example on the return water line
or in a water tank when provided with a field
supplied immersion well. The location will depend
on the specific requirements of the job.
Features:
Changeover Sensor: This sensor will put the unit in
either the heating or cooling mode depending on
the set point. It may be mounted in a location that
would be indicative if the unit should be in either
the heating or cooling mode, for example outdoors.
The sensor may be located up to 1000 feet from the
unit (additional field supplied wiring required).
• Selectable mode of operation. Cooling, Heating or
Auto Changeover.
Modes of Operation
• Adjustable temperature differential for heating
and cooling set point.
• Adjustable auto changeover set point with adjustable dead band setting.
• Intelligent auto reset of a fault condition avoids
nuisance hard lockouts.
• LED display of control temperature and set
points.
• ˚F or ˚C Display.
• 50\60 Hertz operation.
• Pump operation configurable for continuous or
cycling operation with the compressor.
• Compressor lead-lag operation on units with dual
compressors.
• Malfunction output and service LED can be set to
steady or pulsing to indicate fault condition.
• Color LED’s indication of mode of operation.
• Set point retention in non volatile memory in the
event of a power failure.
• Five minute delay on break or power interruption
for compressor short cycling protection.
6 720 220 047
The controller will memorize the last mode used
before power is removed and will run in that mode
after it is turned on. In all modes the control will
display temperature degree differential setting for five
seconds once it is powered and this setting may be
adjusted during this time. Thereafter the display will
switch to the monitored water temperature. When
switching from one mode to another the set point (the
decimal point is used to distinguish it from water
temperature) for the new mode is displayed for 5
seconds and then monitored water temperature.
During this time the set point may be adjusted.
Off Mode
In the OFF mode all outputs are disabled and mode
indication LED’s will be off.
The control will first display temperature
differential setting with the ability for the user to
adjust it and then will display “OFF” and finally
water temperature.
Heating Mode
When the unit is operated in the heating mode and
the controlled water temperature is below the set
point minus the differential setting, terminal Y1 will
close and the unit will operate (first stage
Subject to change without prior notice
Revised 03-11
TW Series / Water to Water 9
Cooling Mode
compressor in a two stage unit). When the set point
is satisfied the compressor is turned off.
In a two stage unit after the first stage activation if
the water temperature drops an additional two
degrees below the set point, the second stage
(terminal Y2) will be activated (if control is
configured for both compressors). Both stages will
be on until the set point is satisfied.
When the unit runs after power is applied or the
mode is changed from cooling to heating, if the
fluid temperature is below set point and doesn’t
change for 3 minutes, the second stage of heating
will be activated. This only applies for a two stage
machine.
There will be 5 minutes delay on break after the unit
cycles off on temperature, a power interruption or
because of a fault condition.
At any point in time the control will ignore a low
pressure switch condition for 120 seconds before
turning off the compressor.
Cooling mode
When the unit is operated in the cooling mode and
the leaving water temperature is above the
temperature set point plus the differential setting,
terminals Y1 will close (first stage compressor of a
two stage unit) and the unit will operate in the
cooling mode. When the set point is satisfied the
compressor is turned off. The reversing valve is
always activated when the unit is in the cooling
mode.
On two stage units, after first stage activation if
water temperature increases two degrees above
the set point, the second stage (terminal Y2) will be
activated (if control is configured for both
compressors). Both stages will remain on until the
set point is satisfied.
When the unit runs after power is applied or the
mode is changed from heating to cooling, if the
fluid temperature is above cooling point and
doesn’t change for 3 minutes, the second stage of
cooling will be activated. This only applies for a two
stage machine.
There will be 5 minutes delay on break after the unit
cycles off on temperature, a power interruption or
because of a fault condition.
Revised 03-11
Auto changeover mode
The controller’s auto changeover mode control
feature will switch from the heating mode to
cooling mode and vice versa based on the setting of
the change over sensor. There will be a dead-band
where the control will not call for either heat or
cool. The dead-band setting is adjustable in the
configuration mode. When the auto changeover
mode is selected the changeover set point will be
displayed for 5 seconds however this set point is
only adjustable when the controller is in the
configuration mode. Once the controller has
switched to either the heating or cooling mode,
pressing the Up or Down buttons will display the
set point for that particular mode.
When the reading from the changeover sensor is
above the changeover set point plus the dead-band
setting, the unit will operate in the cooling mode
and will maintain the cooling set point temperature.
While in the cooling mode the user can adjust the
cooling set point. Likewise when the changeover
sensor is below the changeover set point minus the
dead-band setting, the unit will switch to the
heating mode and will maintain the heating set
point temperature. While in the heating mode the
user can adjust the heating set point.
Once the reading from the sensor enters the
dead-band zone it will terminate the call for cooling
or heating even if the set points are not satisfied.
Mode switching will be HEAT – COOL – OFF in a
closed loop. If the changeover sensor is shorted
when the control is in Auto changeover mode then
the control will switch to the OFF mode. If no
sensor is connected the controller will indicate a
sensor error code.
Unit Protection
The unit controller will protect the unit against a
high or low pressure condition and brownout. To
avoid nuisance lockouts an intelligent reset
function is built into the controller to allow the unit
to restart one time in the event of a fault condition.
If a fault condition is initiated on any circuit the
corresponding compressor will be turned off and
the 5 minute delay on break time period timer is
initiated. After the delay expires the unit will
attempt to restart. If the fault condition still exists
Subject to change without prior notice
6 720 220 047
10 TW Series / Water to Water
or reoccurs within the next 60 minutes, the unit will
go into a hard lockout and requires a manual
lockout reset. During this period the fault LED will
indicate the cause of the fault.
A 120 second time delay is built into the low
pressure switch to avoid nuisance trips with low
fluid temperatures.
While in a soft lockout condition the display will
show the specific fault (for example LP1) and the
“service” LED will turn on according to the
malfunction mode. If the setting for malfunction
mode is “steady,” the service LED will turn and
remain on. If the setting is “pulse,” the service LED
will blink according to the blink code as follows:
Brownout Protection
The control will disable all outputs if the supply
voltage drops below 17 VAC. The outputs will be
enabled if the supply voltage rises and remains
above 17 VAC for the 5 minutes time delay. During
that time control will display “bro.”
Brownout Protection
Lead-lag
(NOT TO BE USED WITH TW UNITS)
The Controller has the capability to lead-lag
compressors on a dual compressor unit.
The lead-lag between the compressors is active
only when both compressors are in use (and the
compressor setting is “Du”).
When the setting for lead-lag is other than 00,
compressor setting is “Du” and one compressor
has locked out; control will switch the call to the
other compressor and stop the timing for lead-lag.
The lead lag setting remains in the memory.
If control has called for the second stage three
times in a row, and compressor setting is “Du”;
regardless of the lead-lag setting control will switch
the call to the other compressor. The lead-lag timer
is reset and the lead-lag setting still applies.
Pump Cycling
Manual lockout
Blink Code
Fault Condition
One blink
High pressure circuit 1
Two blinks
Low pressure circuit 1
Three blinks
High pressure circuit 2
Four blinks
Low pressure circuit 2
When ordered with the optional pump relay the
controller will cycle either the load, source or both
pumps with the compressor operation. Please see
the typical wiring diagram for details.
Operating Instructions
The unit or refrigeration circuit will go into a manual
lockout if the HPS or LPS opens (LPS open more
than 120 seconds each time) twice within one hour.
Please refer to Figure #4.
During manual lockout the compressor(s) is turned
off and locked out and the display will show the
fault (for example LP1) and the “service” LED
“malfunction” output will either be steady or blink
according to the malfunction mode as described
above.
The following parameters are displayed on the
screen:
If selection for compressor is “Du” (see
configuration) and one compressor has locked out,
the control will switch the call to the other
compressor. If compressor setting is “Si”, the
control shall not switch the call to the other
compressor.
To reset a unit after a hard lockout the user needs
to recycle power or switch the controller to the
OFF mode.
6 720 220 047
User Interface:
• Control fluid temperature when in normal mode
• Settings within the configuration mode
• Individual operating mode temperature set points
• Fault display
UP Button:
• Press once to display the current set point temperature.
• After current set point temperature is displayed,
pressing again will increment the set point 1
degree for every push. Pressing and holding the
Subject to change without prior notice
Revised 03-11
TW Series / Water to Water 11
LED Indicators
up button will increment the set point at a rate
of 4 degrees per second.
•When pressed with the down arrow for 5-seconds, the control will display the current temperature scale (Fahrenheit or Celsius).
•Used to change the settings for: temperature
scale, dead band, test mode, initial delay, compressor, pump, and malfunction settings.
DOWN Button:
Mode
Indication
CYC
Red LED to indicate that pump(s) are
selected for cycling operation
SERVICE
Red LED will turn steady on or blink to
indicate that a pressure switch has opened
USER ADJUSTABLE SETTINGS CHART
Setting
Temp Setting
Range
Default
40-120˚ F
Heating and
Cooling
•Press once to display the current set point
temperature.
Differential
•After current set point temperature is displayed,
pressing again will decrement the set point 1
degree for every push. Pressing and holding the
down button will decrement the set point at a
rate of 4 degrees per second
Temp Scale
F, C
F
Pump Mode
Con
(continuous),
Von
•When pressed with the up arrow for 5- seconds,
the control will display the current temperature
scale (Fahrenheit or Celsius).
•Used to change the settings for: temperature
scale, dead band, test mode, initial delay, compressor, pump, and malfunction settings.
Mode
1-10˚ F
1˚ F
Heat, Cool,
Off
Auto, Off
Cyc (cycle)
Dead Band
Auto Change
1-6˚ F
3˚ F
55-85˚ F
65˚ F
De (delay), or
De
Over
Test Mode
Nd (No delay)
Compressor
Si (Single),
Si
Du (Dual)
Lead Lag
0 - 14 Days
0
Malfunction
St (steady),
St
Pu (pulsing)
Setting up the controller
Figure #4
LED indicators
Mode
Indication
HEAT
Red LED to indicate that the control is in
the HEATING mode
COOL
Green LED to indicate that the control is in
the COOLING mode
AUTO
Yellow LED to indicate that the control is in
AUTO mode
CON
Red LED to indicate that pump(s) are
selected for continuous operation
Revised 03-11
On unit power up the LED display will show the
software version, temperature differential setting
with the ability for the user to change it for ten
seconds then will display “OFF” and then finally
will display the control temperature of the fluid
being measured (entering fluid, leaving fluid, tank,
etc.) The default setting of the differential is 1
degree F and can be adjusted from 1 – 10 degrees
F at start up.
The differential setting is the differential between
set point temperature and actual on\off temperature of the machine.
Subject to change without prior notice
6 720 220 047
12 TW Series / Water to Water
For example:
Initial Configuration
Cooling set point = 45˚F
a time out period while configuring. This will also
provide a record of the initial configuration settings.
Differential = 1˚F
First display field
The heat pump will cycle on in cooling at 46˚F. If a
two stage machine, stage 2 will come on at 48˚F or
2˚F degrees above set point and one degree differential. The unit will shut off at set point.
Temperature scale OC or OF. This is selectable by
using the up or down arrows. Once selected hit
“mode” key to advance.
Heating set point = 120˚F
Second display field
Differential = 1˚F
Stage one will come on at 119˚F and stage 2 will
come at 117˚F. Both stages will remain running
until set point is achieved. Stage 1 and stage 2 will
cycle on and off according to the lead\lag programmed interval.
Whenever there is a demand for heating and cooling and during the first stage of operation the
temperature isn’t changing, then the control will
activate the second stage after a three minute delay
from the first stage activation. This logic will apply
when the control is powered up, on a power interruption, when the mode function is set to OFF and
then back to either HEAT or COOL and when
switching from heating to cooling or vice versa in
the auto changeover mode.
Heating and cooling set points are adjusted by
selecting each mode on the key pad and then using
the up-down arrows to select the set point. Thus,
push cool mode button and use down arrow to
45˚F. Push heat mode button and use up arrow to
120˚F.
The controller can be set to control heating only,
cooling only, or auto change modes. The mode
button is pushed until the circular LED is lit next to
the chosen control mode.
Initial Configuration
After power up and the steps above are completed
the configuration default settings may be changed.
Holding down the up and down arrow buttons
simultaneously for 10 seconds will put the controller into the configuration mode. This mode will be
exited if no other commands are given within a 10
second period.
Please review all the following steps and enter the
values you want to set at each display field to avoid
6 720 220 047
Scale: ______________________
Pump operation: Continuous or cyclic. This is the
load or source or both pumps output relay. This
may be set to continuous pump or cyclic pump
mode to cycle with the compressor by using the up
or down arrows. Once selected hit “mode” key to
advance.
Mode:______________________
Third display field
Change over dead band setting: This is selectable
from 1 to 6 degrees. This is adjustable from 1-6
degrees by using the up or down arrows. The dead
band setting is only used in the auto change mode
and defines the band where the unit will not operate. This helps eliminate the possibilities of the unit
cycling from one mode to the other too quickly. For
example, on a heating\cooling residential application this could be set as wide as 6 degrees. On a
pool heater application this could be set as tight as
1 degree. Once selected hit the “mode” key to
advance.
Value:______________________
Fourth display field
Auto change over set point (S2). Adjustable from 55
to 85 degrees. Use up or down arrows to adjust. Hit
the “mode” key to advance. The auto changeover
sensor should be located in an area that will be
indicative of whether the unit should be in the
heating or cooling mode.
Value:______________________
Fifth display field
Test mode setting, (DE) delay or (ND) no delay: This
is utilized for testing the outputs of the controller
by eliminating the time delays. Use the up or down
arrows to select. The controller will automatically
revert to DE after one cycle to insure safety timings
are restored if installer\commissioner forgets to
Subject to change without prior notice
Revised 03-11
System Checkout
reset to DE. The ND setting could be selected at
start-up to avoid prolonged waiting periods during
commissioning.
Once selected hit the “mode” key to advance.
Setting:______________________
Sixth display field
Compressor setting, (Si) single or (Du) dual. Use
the up or down arrows to select. Hit the “mode” key
to advance. This is only applicable on multi stage
units. If set to Si on a dual circuit unit the second
stage will not come on. Must be set to “DU” for al
TW models.
Setting:______________________
Seventh display field
TW Series / Water to Water 13
• Check that the field wiring and the electrical
fusing are the correct size.
• Verify that the low voltage wiring between the
primary controller and the unit is correct.
• Verify that the water piping is complete and
correct.
• Check that the water flow is correct, adjust if
necessary.
• Verify that vibration isolation has been provided.
• Be certain that the unit is serviceable, and all
access panels are secured in place.
UNIT START-UP
1. Set the primary controller to the highest setting.
Lead\lag setting (dual compressor only). Set point
is 0 to 14 days on lead compressor rotation sequence. Use up or down arrows to select. Hit
“mode” key to advance. Must be set to “0” for all
TW models.
2. Set the primary controller system switch to
“COOL”. The reversing valve solenoid should
energize. The compressor should not run.
Setting:______________________
4. Verify the heat pump is operating in the cooling
mode.
Eighth display field
3. Reduce the primary controller setting approximately 5 degrees below return fluid temperature.
Malfunction output setting, (Pu) pulsed or (St)
standard constant on. This sets the malfunction
output relay to mimic the fault blink code that is
causing the safety lock-out. This can be used for
remote monitoring and remote trouble shooting.
Use the up or down arrows to select. Hit the
“mode” key to advance.
5. Check the cooling refrigerant pressures against
the values listed in Table #1.
Setting:______________________
8. Turn the primary controller to the lowest setting.
The controller is now configured and is fully
operational.
9. Set the primary controller switch to “HEAT”.
A copy of this configuration sheet should be left
with the home owner or building manager for their
records of initial control settings.
SYSTEM CHECKOUT
After completing the installation, and before
energizing the unit, the following system checks
should be made:
• Verify that the supply voltage to the unit is in
accordance with the nameplate ratings.
• Make sure that all electrical connections are tight
and secure.
Revised 03-11
6. Turn the primary controller system switch to the
“OFF” position. The unit should stop running
and the reversing valve should de-energize.
7. Leave the unit off for approximately (5) minutes
to allow for system equalization.
10. Increase the primary controller setting
approximately 5 degrees above the return fluid
temperature.
11. Verify the heat pump is operating in the heating
mode.
12. Check the heating refrigerant pressures against
the values listed in Table #2.
13. Set the primary controller to maintain the
desired return fluid temperature.
14. Check for vibrations, leaks, etc...
15. Instruct the owner on the unit and control
operation.
Subject to change without prior notice
6 720 220 047
n
14 TW Series / Water to Water
Heat Recovery Package
HEAT RECOVERY PACKAGE
TYPICAL CONNECTION PIPING
The Heat Recovery package is a factory mounted
option. It consists of a forced pumped unit that employs a circulating pump to move water through a
double wall/vented heat exchanger and returns the
heated water to the water tank. The water is heated by
superheated refrigerant discharge gas from the
compressor. This waste heat of the cooling mode
captured by the heat recovery increases the capacity
and efficiency of the heat pump unit. If the air temperature is uncomfortable coming from the air vents in the
heating mode the heat recovery may need to be turned
off. In the heating mode the heat recovery captures
heat that would normally be used for space heating.
WATER TANK PREPARATION:
If heat recovery unit is installed in an area where
freezing may occur, the unit must be drained
during winter months to prevent heat exchanger
damage. Heat exchanger ruptures that occur due
to freezing will void the heat recovery package
warranty along with the heat pump warranty.
1. Turn off electrical or fuel supply to the water heater.
2. Attach garden hose to water tank drain connection
and run other end of hose out doors or to an open
drain.
3. Close cold water inlet valve to water heater tank.
4. Drain tank by opening drain valve on the bottom
of the tank, then open pressure relief valve or
hot water faucet.
5. Once drained the tank should be flushed with
cold water until the water leaving the drain hose
is clear and free of sediment.
6. Close all valves and remove the drain hose.
7. Install HR water piping.
HR WATER PIPING:
All hot water piping should be a minimum of 3/8t
O.D. copper tube to a maximum distance of fifteen
(15) feet. For distances beyond fifteen feet but not
exceeding sixty (60) feet use 1/2” copper tube.
Separately insulate all exposed surface of both
connecting water lines with 3/8” wall closed cell
insulation. Install isolation valves on supply and
return to the heat recovery. (Figure #5)
Figure #5
6 720 220 047
Subject to change without prior notice
Revised 03-11
TW Series / Water to Water 15
Water Tank Refill
WATER TANK REFILL:
INITIAL START-UP:
1. Open the cold water supply to the tank.
2. Open a hot water faucet to vent air from the system
until water flows from the faucet, then close.
1. Make sure all valves in heat recovery water
piping system are open. NEVER OPERATE HR
PUMP DRY.
3. Depress the hot water tank pressure relief valve
handle to ensure there is no air remaining in the tank.
2. Turn on the heat pump. The HR pump should
not run if the compressor is not running.
4. Carefully inspect all plumbing for water leaks.
Correct as required.
3. Turn HR switch to the “ON” position. The pump
will operate if entering water temperature to HR
is below 120° F.
5. Purge all air from HR by depressing the schrader valve on the HR Unit. Allow all air to bleed out
until water appears at the valve.
6. Before restoring the power or fuel supply to the
water heater, adjust the temperature setting on
the tank thermostat(s) to ensure maximum
utilization of the heat available from the refrigeration system and conserve the most energy.
On tanks with both upper and lower elements
and thermostats, the lower element should be
turned down to 100° F, while the upper element
should be adjusted to 120° F. Depending upon
the specific needs of the customer, you may
need to adjust the upper element differently. On
tanks with a single thermostat lower the thermostat setting to 120° F or the “LOW” position.
4. The temperature difference between the water
entering and leaving the heat recovery should
be 5° to 15° F.
5. Allow the unit to operate for 20 to 30 minutes to
ensure it is functioning properly. The pump
should shut off when the water temperature
entering the heat recovery reaches 120°F.
7. After thermostat adjustments are completed,
replace access cover and restore electrical or
fuel supply to water heater.
Revised 03-11
Subject to change without prior notice
6 720 220 047
Operating Pressures
16 TW Series / Water to Water
CHILLER MODE
Table 1 - R410A Units - Full Load
Cooling Mode Operating Pressures (PSIG)
Entering Source Condenser Temperature °F
75 °F
Entering Fluid
Temp °F
85 °F
95 °F
Suction
Pressure
Discharge
Pressure
Suction Pressure
Discharge
Pressure
Suction Pressure
Discharge
Pressure
65
99-116
290-320
107-123
325-358
107-123
370-400
55
91-107
265-311
91-107
303-350
99-116
370-400
45
76-91
265-311
76-91
295-345
83-99
358-390
BOILER MODE
Table 2 - R410A Units - Full Load
Heating Mode Operating Pressures (PSIG)
Entering Load
Deg °F
70
90
110
Entering Source
Suction Pressure
Discharge Pressure
40
68-83
255-290
60
99-116
270-305
80
130-145
290-325
40
76-91
350-380
60
99-116
358-390
80
130-165
370-400
40
76-91
455-480
60
99-116
470-500
80
139-165
480-575
vNOTE: Ratings are based on water flow rates stated in specification sheets. 2.4 GPM/ton on evaporator
side and 10°F ∆ T on condensor side when in the chiller mode. Boiler mode conditions are 2.4 GPM/ton on
the source side and 10°F ∆ T on load side. The values are typical and may vary between models.
6 720 220 047
Subject to change without prior notice
Revised 03-11
Wiring Diagrams
TW Series / Water to Water 17
Figure #6 Typical Wiring Diagrams
Two Stage - Single Phase
Revised 03-11
Subject to change without prior notice
6 720 220 047
18 TW Series / Water to Water
Wiring Diagrams
Typical Wiring Diagrams
Two Stage - Single Phase Solid State Unit Controller
6 720 220 047
Subject to change without prior notice
Revised 03-11
TW Series / Water to Water 19
Unit Check-Out Sheet
Unit Check-out Sheet
Water to Water
Customer Data
Customer Name _________________________________________________
Date ___________________________________
Address _________________________________________________________
__________________________________________________________________
Phone ___________________________________________________________
Unit Number __________________________
Unit Nameplate Data
Unit Make _______________________________________________
Model Number __________________________________________
Serial Number_______________________________
Refrigerant Charge (oz)______________________
Compressor:
RLA ____________________ LRA _______________
Blower Motor: FLA (or NPA) ___________ HP ________________
Maximum Fuse Size (Amps) _________________
Minimum Circuit Ampacity (Amps) __________
Operating Conditions
Cooling Mode
Heating Mode
Entering / Leaving Air Temp
______________ / ______________ ______________ / ______________
Load Fluid Type:
_______________________________ ______________________________
Fluid Flow (gpm)
_______________________________ ______________________________
Fluid Side Pressure Drop
______________________________ ______________________________
Entering / Leaving Source Type
______________ / ______________ ______________ / ______________
Source Fluid Type
_______________________________ ______________________________
Fluid Flow (gpm)
______________________________ ______________________________
Fluid Side Pressure Drop
______________________________ ______________________________
Suction / Discharge Pressure (psig)
______________ / ______________ ______________ / ______________
Suction / Discharge Temp
______________ / ______________ ______________ / ______________
Suction Superheat
_______________________________ ______________________________
Entering TXV / Cap Tube Temp
_______________________________ ________________________________
Liquid Subcooling
_______________________________ ________________________________
Compressor Volts / Amps
______________ / ______________ ______________ / ______________
Bosch Group 601 NW 65th Court Fort Lauderdale, FL 33309
Phone: (954) 776-5471 Fax: (800) 776-5529
http://www.fhp-mfg.com
Revised 03-11
Subject to change without prior notice
6 720 220 047
20 TW Series / Water to Water
Troubleshooting
Troubleshooting
Problem
Possible Cause
Checks and Corrections
Compressor
does not
operate
Power Supply Off
Apply power, close disconnect
Blown Fuse
Replace fuse or reset circuit breaker. Check for correct fuses
Broken or loose
wires
Replace or tighten the wires. Check for loose or broken wires at compressor, capacitor, or contactor.
Voltage supply low
If voltage is below minimum voltage specified on unit data plate, contact
local power company.
Controller
Set controller to “COOL” and lowest temperature setting, the unit should
run in the cooling mode (reversing valve energized). Set unit to “HEAT”
and the highest temperature setting, the unit should run in the heating
mode. If the compressor does not run in all cases, the controller could
be miswired or faulty.To ensure miswired or faulty thermostat verify 24
volts is available on the unit section low voltage terminal strip between
“R” and “C”, “Y” and “C”, and “O” and “C”. Replace the controller if
defective.
Safety controls
Reset the controller to “OFF”. After a few minutes turn to “COOL” or
“HEAT”. If the compressor runs, unit was off on one of the safety controls. (See problem for possible causes)
Compressor
overload open
If the compressor is cool and the overload will not reset, replace compressor.
Compressor motor
grounded
Internal winding grounded to the compressor shell. Replace compressor. If compressor burnout, install suction filter dryer.
Compressor
windings open
After compressor has cooled, check continuity of the compressor
windings. If the windingsare open, replace the compressor.
Discharge pressure
too high
In “COOLING” mode: SOURCE COIL - Lack of or inadequate water flow.
Entering water temperature too warm. Scaled or plugged condenser.
Unit off on
high pressure
switch
Unit off on low
pressure
switch
In “HEATING” mode: LOAD COIL - Lack of or inadequate water flow.
Entering water temperature too warm. Scaled or plugged load coil.
Refrigerant charge
The unit is overcharged with refrigerant. Reclaim refrigerant, evacuate
and recharge with factory recommended charge.
High pressure
switch
Check for defective or improperly calibrated high pressure switch.
Suction pressure
too low
In “COOLING” mode: LOAD COIL - Lack of or inadequate fluid flow.
Entering water temperature too cold. Scaled or plugged load coil.
In “HEATING” mode: SOURCE COIL - Lack of or inadequate fluid flow.
Entering water temperature too cold. Scaled or plugged source coil.
Refrigerant charge
The unit is low on refrigerant. Check for refrigerant leak, repair, evacuate and recharge with factory recommended charge.
Low pressure
switch
Check for defective or improperly calibrated low-pressure switch.
6 720 220 047
Subject to change without prior notice
Revised 03-11
TW Series / Water to Water 21
Troubleshooting
Unit short
cycles
Insufficient
cooling or
heating
Revised 03-11
Unit oversized
Recalculate heating and or cooling loads.
Wiring and controls
Loose connections in the wiring or a defective compressor contactor.
Fluid Volume
Inadequate load side fluid volume.
Unit undersized
Recalculate heating and or cooling loads. If excessive, possibly adding
insulation and shading will rectify the problem. Unit may be short of
refrigerant.
Refrigerant charge
Unit may be short on refrigerant charge.
Compressor
Check for defective compressor. If discharge is too low and suction
pressure is too high, compressor is not pumping properly. Replace
compressor.
Reversing valve
Defective reversing valve creating bypass of refrigerant from discharge
to suction side of compressor. Replace reversing valve.
Operating pressures
Compare unit operating pressures to the pressure / temperature chart
for the unit.
TXV
Check TXV for possible restriction or defect. Replace if necessary
Moisture, noncondensables
The refrigerant system may be contaminated with moisture or noncondensables. Reclaim refrigerant, evacuate and recharge with factory
recommended charge. Note: a liquid line dryer may be required
Subject to change without prior notice
6 720 220 047
22 TW Series / Water to Water
Notes
6 720 220 047
Revised 03-11
Subject to change without prior notice
Notes
Revised 03-11
TW Series / Water to Water 23
Subject to change without prior notice
6 720 220 047
601 N.W. 65th Court, Ft. Lauderdale, FL 33309
Phone: 954-776-5471 | Fax: 954-776-5529
www.boschtaxcredit.com | www.fhp-mfg.com