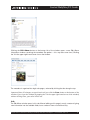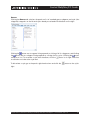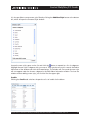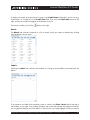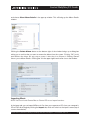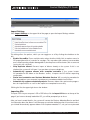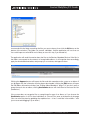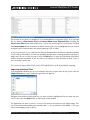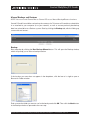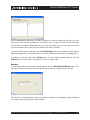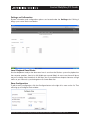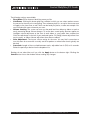
1
Control Web / Mac / PC
User Guide
Control Web/Mac/PC Guide
Meridian Sooloos Control Web/Mac/PC User Guide
TABLE OF CONTENTS
What is Control Web/PC/Mac?.....................................................................................................................3
Getting Started...................................................................................................................................................3
Playback Information and Controls.................................................................................................................4
Music Selection and Playlist Creation...........................................................................................................5
Editing Album Metadata....................................................................................................................................7
Deleting Albums............................................................................................................................................... 13
Importing Music............................................................................................................................................... 14
Exporting Music............................................................................................................................................... 19
Manual Backups and Restores.................................................................................................................... 23
Settings and Information................................................................................................................................ 26
Meridian Audio Ltd, Latham Road, Huntingdon, Cambridge PE 29 6YE , United Kingdom | www.meridian - audio.com
2
Control Web/Mac/PC Guide
What is Control Web/PC/Mac?
With Control Web, Control PC, and Control Mac you are able to operate your Sooloos system
from a computer on the same network.
With Control Web/PC/Mac, you can:
• Select albums, tracks, and playlists for playback in any zone
• Create, save, and delete playlists
• Edit album metadata
• Export albums to iTunes or any folder on your computer’s hard drive, including your phone or
mp3 player (Control PC/Mac only)
• Import music files and CDs (Control PC/Mac only)
• Perform manual backups from a Twinstore or Ensemble to a computer hard drive or manually
restore from a hard drive to a Twinstore or Ensemble (Control PC/Mac only)
• Configure zone options including crossfade and volume leveling
• Check system and library status
• Turn any computer into a local playback zone for all of your music
Although many of these features are available directly on the system, some, such as metadata
editing, are more convenient on a PC.
Some features, such as music export, backup, restore, and some import functions, are not available
in Control Web and require installation of Control PC/Mac.
Getting Started
The first step is to make sure your computer and the Sooloos system are connected to the same
network and that all Sooloos components are turned on.
Then open your Web browser and enter the IP address of your Source or Ensemble — for example,
http://192.168.1.6. (To find the correct address for your system, go to the Sooloos system’s Home
Page and tap the Information button).
Entering this IP address in the URL will access Control Web, the browser-based version of
Sooloos control, which works for all functions except music export and import. It supports Internet
Explorer, Safari, and Firefox, on Windows, Mac, and Linux operating systems.
Meridian Audio Ltd, Latham Road, Huntingdon, Cambridge PE 29 6YE , United Kingdom | www.meridian - audio.com
3
Control Web/Mac/PC Guide
If you need full functionality of import and export, then you must install Control PC or Control Mac
on either a Windows or Macintosh computer.
To install the full version of Control, access Control Web and then click the Import or Export
tab. Control Web will prompt you to download and install the version you need – either Control
PC for Windows-based computers or Control Mac for Apple Macintosh computers. Once you
have installed this application, you probably will find it more convenient than the browser-based
version, regardless of which functions you are using, as running it does not require looking up the
Source or Ensemble IP address, which may change from session to session. It is still essential
that the computer and the Sooloos system be connected to the same network router and that all
components of the Sooloos system be turned on, however.
Once Control PC is running, you will notice that Windows Explorer shows an S: drive on your
computer. On a Macintosh, you will find a “Sooloos” network volume on your desktop. This is a
virtual hard drive that gives access to all of the music, playlists, and tags on your Sooloos Store or
Ensemble, which your computer now sees as a networked external hard drive.
If Control Web, PC or Mac fails to run, the most likely reason is a network problem, since it must
communicate intensively with the Sooloos system in order to function.
If you are running the Control Web in your web browser, check to be sure you have entered the
correct IP address (which may not be the same as it was the last time you ran it). Also check cables.
If you find no obvious problems such as these, try shutting down everything on the network and
rebooting the router. Restart the Sooloos system and your computer, then launch Control again.
If the problem persists and your computer talks to the router via WiFi, try making an Ethernet
connection instead, since wired connections are more reliable. If you have an old router, or one
supplied by your internet service provider (ISP), replacing it with a new one may also help.
Playback Information and Controls
The top part of the screen remains the same in all modes, providing basic information about the
currently playing track (if any) and the current playlist, as well as standard playback controls.
Controls include, from left to right:
• Transport. Play, pause, or stop the currently selected track, or skip to the next or previous
track in the playlist.
• Track Time Slider. A graphical indicator of progress through the currently playing track, with
elapsed time displayed at the left and remaining time at the right. You can grab the time marker
with your mouse and scrub it forward or backward to resume playback at a different point.
Meridian Audio Ltd, Latham Road, Huntingdon, Cambridge PE 29 6YE , United Kingdom | www.meridian - audio.com
4
Control Web/Mac/PC Guide
•
•
•
Volume Control. You can click the +/− buttons to vary the analogue audio output for the
currently selected zone, from a maximum of 100 (full on) to a minimum of 0 (full off).
Mute. Clicking the mute button
toggles the audio output off or on.
Zone Selection. Choose the zone being controlled from the dropdown list at the top right.
(For more on zone configuration, see “Settings and Information,” page 26.) Multiple zones can
have separate playlists running simultaneously. Available zones include all those provided by
Controls, Sources or Ensembles in the system. Note: You will also have the option of “Local
Playback Zone.” Selecting this zone will route sound to the speakers of the computer you are
using to access the system.
Music Selection and Playlist Creation
The applications open in the Music tab, where you can choose music for playback in the current
zone (selected using the dropdown at the top right of the screen), create and save playlists for
future use, and edit previously saved playlists.
The bottom part of this screen comprises two panes. The top pane displays the tracks in the
current playlist, including the albums they come from, their lengths, and whether they have played
yet, together with controls for manipulating the list. The bottom pane is a browser for adding
music from your collection to the playlist. To change the relative sizes of the two panes, just grab
the separator (it has a small dot in the middle) with your mouse and slide it up or down.
Meridian Audio Ltd, Latham Road, Huntingdon, Cambridge PE 29 6YE , United Kingdom | www.meridian - audio.com
5
Control Web/Mac/PC Guide
Music Selection
Use the windows at the bottom of the screen to browse your collection and add music to the
playlist. Begin by clicking one of the six categories in the far-left window: Artists, Playlists,
Tags, Genres, Decades, or Recently Imported Albums. Your selection will expand to a new
set of options in the window to the right. (The playlists and tags categories will expand only if you
have previously created at least one Playlist or Tag.)
For example, if you click Artists, the second window will list a set of alphabetical ranges. Clicking
one of these opens a list of artists whose names start with a letter in that range (ignoring “The”
and “A”) in the third window. If you then click an artist, the open windows will shift to the left and
a fourth will open with a list of albums by that artist. Clicking an album will shift the open windows
to the left again to open a fifth with a list of songs on that album. (If you need to get back to a
now-hidden window, click the single left arrow
at the bottom left of the screen to scroll back
one window or the double left arrow
to jump all the way back to the first window.)
The Albums window displays a
button next to each entry. Clicking one of those buttons will
bring up a window with a list of playback options for you to select from.
The list presented when you click a
button will depend on the category you’re in. Tags, Genres,
and Decade offer different options than Albums and Songs for example.
Options offered may include:
• Show Album Details (Albums). Detailed information about the album. This window also
offers options to delete the album from the system (see “Deleting Albums,” page 13) or edit its
information (see “Editing Album Metadata,” page 7).
• Queue (Albums and Songs). Add to the end of the Playlist.
• Play Next (Albums and Songs). Insert in the Playlist after the current track.
• Play Now (Albums and Songs). Insert after the current track and begin playing immediately.
• Queue Album Picks (Albums). Add the album’s best tracks to the Playlist. (For more on
Album Picks, see “Editing Album Metadata,” page 7.)
Meridian Audio Ltd, Latham Road, Huntingdon, Cambridge PE 29 6YE , United Kingdom | www.meridian - audio.com
6
Control Web/Mac/PC Guide
•
•
•
•
•
•
Play Album Picks Next (Albums). Insert the album’s best tracks into the Playlist after the
current track.
Play Album Picks Now (Albums). Insert the album’s best tracks into the Playlist after the
current track and begin playing them immediately.
Replace Playlist (Playlists). Replace the current Playlist with the contents of the selected
Playlist.
Append to Playlist (Playlists). Add the contents of the selected Playlist to the end of the
current Playlist.
Delete (Playlists and Tags). Delete the Playlist or Tag. (This does not delete the music
associated with the Playlist or Tag from the system, only the listing.)
Swim (Tags, Genres, and Decades). Automatically choose and play music from albums
associated with the selected Tag, Genre, or Decade.
Working the Playlist
Along the bottom of the Playlist window in the middle of the screen are six control buttons:
• Shuffle. Clicking this button toggles Shuffle on or off. When it is on, the tracks in the Playlist
play in random order.
• Loop. Clicking this button toggles Looping on or off. When it is on, the Playlist will repeat
instead of stopping at the end. If you check both Loop and Shuffle, all songs in the Playlist will
play before it starts over (in a new order).
• Remove. Clicking this button pops up a menu with options for removing played tracks from
the Playlist or all tracks from the Playlist. If you have highlighted any tracks with your mouse,
you will also have an option to remove the selected tracks. (If a song is playing, you must stop
it before you can remove it.)
• Down/Up. Moves a highlighted track (or group of tracks) down or up in the Playlist.
• Deselect. Clears highlighting of any previously selected tracks.
You can jump directly to any track in the playlist by double-clicking it.
Editing Album Metadata
The system stores metadata for each album, normally downloaded from the Sooloos Metadata
Service. It contains a variety of information, including track titles, artist credits, genres, record
label, rating, and so forth. You can modify that data or enter your own.
The edit-metadata function launches from the Album Details window. Click the Play tab to enter
the music manager and use the browsing pane at the bottom of the screen to locate the album
you want to work on (see “Music Selection and Playlist Creation,” page 5). Then click the
button at the right of the album name and choose Show Album Details in the pop-up window
to bring up the Album Details window:
Meridian Audio Ltd, Latham Road, Huntingdon, Cambridge PE 29 6YE , United Kingdom | www.meridian - audio.com
7
Control Web/Mac/PC Guide
Clicking the Edit Album button at the bottom left of the window opens a new Edit Album
Information window containing the metadata. (Be patient — this may take some time.) Clicking
the X in the upper right-hand corner closes the window.
The metadata is organized into eight sub-pages, selected by clicking the tabs along the top.
Important Note: All changes are provisional until you click the Save button at the bottom of the
window. If you close the window (by tapping the X in the upper right-hand corner of the window)
without clicking Save, your edits will be lost.
Info
The Edit Album window opens in this tab. Manual editing on this page is mostly a matter of typing
new information into the available fields, but a number of items work distinctively:
Meridian Audio Ltd, Latham Road, Huntingdon, Cambridge PE 29 6YE , United Kingdom | www.meridian - audio.com
8
Control Web/Mac/PC Guide
•
•
•
•
Album Pick. A gold star to the right of the album name field indicates an Album Pick — a
favorite album that will be included in Focuses or Swims specifying Album Picks only. An
X indicates an album that will not normally be included unless it is specifically selected. A
dark star represents a middle ground — an album that is singled out neither for inclusion or
rejection. You can change this rating by clicking on the star or X to toggle through the three
options.
Rating. Click the + or − button at either end to adjust the album rating in half-star increments
from 0 to 5.
Multi-Disc Set. Important for keeping track of the contents of the individual discs in a multidisc set. The second disc of a three-disc set would be listed as “2 of 3,” for example.
Cover. You can delete the existing cover image by clicking the Clear Cover button. And you
can replace it by dragging or copying an image from your hard drive or Web browser into the
space.
Tracks
This page enables you to change information about the tracks on an album, including, left to
right, track numbers, track titles, and Track Pick ratings. (Track times are also listed but are
not alterable.) Remember that all changes are provisional until you click the Save button at the
bottom of the window to make them permanent. Tapping the X in the upper right corner closes
the window and cancels any unsaved changes.
To change a Track Pick rating, click on the symbol to the far right to toggle through the three
options: gold star (a favorite track that will be included in a playlist when you choose Track Picks
only), X (a track that will be excluded unless specifically chosen), or dark star (a track that will be
included when no restrictions are applied).
Review
This is a freeform text field that you can edit or rewrite. All changes are provisional until you click
the Save button at the bottom of the window to make them permanent. Tapping the X in the upper
right corner closes the window and cancels any unsaved changes.
Genres, Credits, and Moods
The information contained in the panels opened by these tabs is important for the Sooloos Focus
feature, which enables you to narrow the selection of music to be browsed or played according
to particular characteristics. As always in the Edit Album window, changes are provisional until
you click the Save button at the bottom to make them permanent; tapping the X in the upper right
corner closes the window and cancels any unsaved changes.
Meridian Audio Ltd, Latham Road, Huntingdon, Cambridge PE 29 6YE , United Kingdom | www.meridian - audio.com
9
Control Web/Mac/PC Guide
Genres
Clicking the Genres tab switches the panel to a list of standard genre, subgenre, and style (subsubgenre) categories on the left and styles already associated with the album on the right.
Clicking the button next to a genre listing expands to a listing of all its subgenres, and clicking
the button next to a subgenre listing expands to a listing of all its styles. (Clicking the button
collapses a list.) To associate a style with the album, click the
button to its right. Note that
associations must be at the style level.
To dissociate a style, go to the pane’s right-hand column and click the
right.
button to the style’s
Meridian Audio Ltd, Latham Road, Huntingdon, Cambridge PE 29 6YE , United Kingdom | www.meridian - audio.com
10
Control Web/Mac/PC Guide
It is also possible to create a new style. Start by clicking the Add New Style button at the bottom
left, which will open the Create a Style window.
Locate the new style’s genre on the list and click the button to expand to a list of subgenres.
Highlight the new style’s subgenre with your mouse. Then type the new style’s name in the field at
the bottom of the window and click the Create button. The window will close, and the new style
will now appear under the chosen subgenre in the Edit Album Information window. To close the
window without adding a new style, just click the X at the upper right.
Credits
Clicking the Credits tab switches the panel to a list of credits for the album.
Meridian Audio Ltd, Latham Road, Huntingdon, Cambridge PE 29 6YE , United Kingdom | www.meridian - audio.com
11
Control Web/Mac/PC Guide
To add a new credit, enter the person’s name in the Credit Name field and his or her role (e.g.,
“Lead Guitar” or “Producer”) in the Credit Role field. Then click the Add Credit button at the
right, and the new credit will appear at the bottom of the list.
To remove a credit, just click the
button to its right.
Moods
The Moods tab switches the panel to a list of moods, which you select or deselect by clicking
the checkboxes next to them.
Labels
Clicking the Labels tab switches the window to a listing of record labels associated with the
album.
To associate a new label with the album, enter its name in the Enter Labels field at the top of
the window. As you type, a list of labels already in the system that contain the sequence of letters
you’ve typed will pop up, and if the label is in that list you can simply highlight it with your mouse.
Meridian Audio Ltd, Latham Road, Huntingdon, Cambridge PE 29 6YE , United Kingdom | www.meridian - audio.com
12
Control Web/Mac/PC Guide
Save the label by clicking the Add button to the right, and it will appear at the bottom of the list.
(An album can have multiple labels associated with it.)
To dissociate a label, click the
button to its right.
All additions or deletions are provisional until you click the Save button at the bottom right. Clicking
the X in the top right-hand corner will close the window, canceling any unsaved changes.
Tags
Clicking the Tags tab switches to a window that lists available Tags and enables you to control
their association with the album, as well as to create new Tags. (A Tag is a user-created category
— “Dad’s Favorites”, for example, or “Party Music” — that can be a basis of a Focus.)
All changes are provisional until you click the Save button at the bottom of the window to make
them permanent. Tapping the X in the upper right corner closes the window and cancels any
unsaved changes.
Any Tag in the list already associated with the album will have a checkmark in the box to its left.
To associate or dissociate a Tag, just click the box next to it to toggle the checkmark on or off.
(When a Tag is no longer associated with any album in the Media Library, it will cease to exist and
disappear from the list altogether.)
You can also create a new Tag associated with the album by typing a unique name in the field
above the list and clicking the Add button to its right.
Deleting Albums
The Album Details page for each album offers the option of removing the album from the system.
(Note that there is no undo procedure for this function; once you confirm deletion, the only way to
get an album back is to reimport it.) Click the Play tab to enter the music manager and use the
browsing pane at the bottom of the screen to locate the album you want to delete (see “Music
Selection and Playlist Creation,” page 5). Then click the [image] at the right of the album name
Meridian Audio Ltd, Latham Road, Huntingdon, Cambridge PE 29 6YE , United Kingdom | www.meridian - audio.com
13
Control Web/Mac/PC Guide
and choose View Album Details in the pop-up window. This will bring up the Album Details
window.
Clicking the Delete Album button at the bottom right of the window brings up a dialog box
asking you to confirm that you want to remove the album from the system. Clicking “OK” at this
point deletes the album; the only way to recover it after that is to reimport it. Clicking “Cancel”
returns you to Album Details. Clicking the X in the upper right-hand corner closes the window.
Importing Music
NOTE: You must install Control Mac or Control PC to use import functions.
In the import tab, you can import MP3 music files from your computer or CDs from your computer’s
CD or DVD drive. Begin by clicking the Import tab, which will switch to the import screen (top of
screen shown below).
Meridian Audio Ltd, Latham Road, Huntingdon, Cambridge PE 29 6YE , United Kingdom | www.meridian - audio.com
14
Control Web/Mac/PC Guide
Import Settings
Click Import Settings, at the upper left of the page, to open the Import Settings window.
This dialog offers five options, which you can toggle on or off by clicking the checkbox to the
left:
• Enable SecureRip. Forces multiple retries when the drive initially fails to read an area of a
CD properly because of scratches or smudges. This may reduce the number of uncorrectable
errors when importing soiled or damaged discs, but the process will be slower. (We recommend
leaving this box checked.)
• Skip duplicate albums. Prevents import of albums already on the system. If this is not
checked, the system will still warn if you are about to import a duplicate.
• Automatically approve albums with complete metadata. If the system locates
full metadata for the album on the Sooloos servers, it imports the CD without requesting
confirmation.
• Prefer local metadata over Sooloos Metadata Service. Will use existing metadata for
files imported from your computer in preference to metadata available from Sooloos.
• Automatically remove completed projects. Removes album titles and transfer-progress
bars for imported CDs as soon as the imports are completed successfully.
Clicking the X at the upper right closes the window.
Importing CDs
To import a CD via your computer’s CD or DVD drive, click the Import CD button at the top of the
page. If you have not already loaded the CD, you will be prompted you to do so.
After you have inserted the disc, the system will contact the Sooloos Metadata Service and look
for information about the album. It will then pop up a window indicating what it found and, unless
you clicked “Automatically approve albums with complete metadata” in , ask you how to proceed.
Meridian Audio Ltd, Latham Road, Huntingdon, Cambridge PE 29 6YE , United Kingdom | www.meridian - audio.com
15
Control Web/Mac/PC Guide
Click the Approve button to import the CD and its metadata as-is, the Edit button to open the
Edit Album Information window (see “Editing Album Metadata,” page 7), or the Unalbumize
button to cancel the import. Once you’ve approved an import, a progress window will open.
The system starts extracting data from a CD in the background as soon as it recognizes it, so the
progress window may come up indicating some portion of the transfer is already complete. Each
CD you import displays as a separate transfer-progress bar, with its title at the top. Once you’ve
finished all imports for a session, click Clean Up List to clear all the bars. To remove an individual
transfer-progress bar while leaving the others, click the X at its top right.
Importing Folders
It is also easy to import music files already organized into folders (in an iTunes library, for example).
Click the Import Folder button, and a Browse for Folder window will pop up.
Meridian Audio Ltd, Latham Road, Huntingdon, Cambridge PE 29 6YE , United Kingdom | www.meridian - audio.com
16
Control Web/Mac/PC Guide
Locate and click the folder containing the files you want to import, then click the OK button at the
bottom of the window. (The folder can contain subfolders, and the application will sort that out.
You could import an entire MP3 music library at once this way if you wanted to.)
The application will send information about the files to the Sooloos Metadata Service. If the files in
the folders correspond to the contents of recognizable albums, it will organize them accordingly,
apply the downloaded metadata, and prompt you to evaluate, and approve them.
Clicking the Approve button will import the files and their metadata to the system as an album. If
you disagree with the information that has been downloaded, clicking the Edit button will open
the Edit Album Information window (see “Editing Album Metadata,” page 7). If you don’t want to
group the tracks into an album, clicking Unalbumize button will move them to the loose files bin
(see below.)
If the system does not recognize files as comprising all or part of an album, or if you choose the
Unalbumize option, it will list them individually in a Loose Files pane at the bottom of the page.
(You can resize the pane by grabbing the separator bar — it has a small dot in the middle — with
your mouse and dragging it up or down.)
Meridian Audio Ltd, Latham Road, Huntingdon, Cambridge PE 29 6YE , United Kingdom | www.meridian - audio.com
17
Control Web/Mac/PC Guide
The function of this pane is to enable you to assemble albums from groups of files. At its top right
are two buttons: Clear Loose Files and Create Album from Selected Files. Clicking the
Clear Loose Files button does exactly that — clears any remaining files from the pane. Clicking
the Create Album button assembles an album from any files you’ve highlighted with your mouse
and pops up the same window seen when importing a CD or folder.
In this case, however, it’s less likely that the Sooloos Metadata Service will have metadata available
for the newly created album. (If it did, you probably wouldn’t be assembling the album manually to
begin with.) So you usually will want to click the Edit button to open the Edit Album Information
window and enter metadata. At the very least, you’re going to want the album to have a title so
you can locate it easily later.
The system will import WAV, FLAC, AAC, AIFF and MP3 files up to 24-bit/96kHz sampling.
Importing Individual Files
If you download individual files on your computer and want to import them to the system, click the
Import Files button, and a file browsing window will pop up.
Navigate to the folder containing the files you want to import. Highlight the files you want with your
mouse, then click the Open button at the bottom of the window.
The application will then list them in a Loose Files pane at the bottom of the Import page. (You
can resize the pane by grabbing the separator bar — it has a small dot in the middle — with your
mouse and dragging it up or down.)
Meridian Audio Ltd, Latham Road, Huntingdon, Cambridge PE 29 6YE , United Kingdom | www.meridian - audio.com
18
Control Web/Mac/PC Guide
This pane enables you to assemble albums from groups of files, whether related or unrelated. At
its top right are two buttons: Clear Loose Files and Create Album from Selected Files.
Clicking the Clear Loose Files button does exactly that — clears any remaining files from the
pane. Clicking the Create Album button assembles an album from any files you’ve highlighted
with your mouse and sends information about it to the Sooloos Metadata Service. If the files
correspond to the contents of a recognizable album, Control:PC will download the associated
metadata and prompt you to import the files.
Click the Approve button to import the files and their metadata as an album, the Edit button
to open the Edit Album Information window (see “Editing Album Metadata,” page 7), or the
Unalbumize button to dissolve the album and re-list its contents in the Loose Files pane.
Since it’s relatively unlikely that an album created in this manner will correspond to a commercial
release, you usually will need to click the Edit button to open the Edit Album Information window
and enter metadata. At the very least, you’re going to want the album to have a title so you can
locate it easily later.
The system will import WAV, FLAC, AAC, and MP3 files up to 24-bit/192kHz sampling.
Exporting Music
NOTE: You must install Control Mac or Control PC to use export functions.
Control PC or Control Mac can export music from your Sooloos system to an iTunes Library, to
a folder on your computer’s hard drive, or to an MP3 player. (The exported files will be in 192kb/s MP3 format.) Begin by clicking on the Export tab, which will switch you to the music-export
screen.
Meridian Audio Ltd, Latham Road, Huntingdon, Cambridge PE 29 6YE , United Kingdom | www.meridian - audio.com
19
Control Web/Mac/PC Guide
Click the Export Music to iTunes Library button to export to iTunes or the Open Sooloos
Volume button to export to a folder or player.
Export to iTunes
You can export music to iTunes either as links or as files.
Exporting links requires no storage on your computer, but the music is accessible through iTunes
only when the Sooloos system is running.
Exporting the files themselves takes up space on your hard drive, but they are available in
iTunes regardless of whether the Sooloos system is on.
You choose the type of export as a preference in iTunes (not Control PC or Control Mac). Start
iTunes and select Preferences from the Edit menu. Then click the Advanced tab.
Meridian Audio Ltd, Latham Road, Huntingdon, Cambridge PE 29 6YE , United Kingdom | www.meridian - audio.com
20
Control Web/Mac/PC Guide
Check the box to the left of “Copy files to iTunes Music folder when adding to library” if you want
to physically transfer the files; uncheck the box if you want to export just links to the files on the
Sooloos system.
Note: Do not attempt to use iTunes while exporting music to it. If you have iTunes open,
make sure it is not in the iTunes Store, then minimize it before starting the export.
Begin the export by clicking the Export Music to iTunes Library button on the Sooloos export
page, which will open the iTunes Export window.
Use your mouse (click the appropriate radio button) to select whether you want to export all
the albums in your collection or only those associated with selected Focuses or Tags (all saved
Focuses and Tags are listed in the two panes directly below). If you choose the latter, you must
check the boxes next to the Focuses and Tags you want to include.
Meridian Audio Ltd, Latham Road, Huntingdon, Cambridge PE 29 6YE , United Kingdom | www.meridian - audio.com
21
Control Web/Mac/PC Guide
Once you’ve finished your selection, click the Run Export button at the window’s bottom right to
export the files. The window will close, and the export-progress bar will appear.
To cancel without exporting, click the Cancel button at the bottom of the window or the X in the
top right-hand corner. And if you want to remove previously exported music from the iTunes library,
click the Remove All Exported Music from iTunes button at the window’s bottom left.
Export to a Folder or Player
You can export music from the Sooloos system to a folder on your hard drive or to a portable
player/phone simply by copying the files from your Sooloos volume to the destination on your
computer. Begin by clicking the Open Sooloos Volume button on the Export page. This will open
a Finder window on a Macintosh, or a Windows Explorer window in the S: drive, which is how your
Sooloos Store appears to a PC.
Open the music folder and you’ll find four subfolders: Artists, Focuses, Playlists, and Tags. The
Artists folder contains subfolders for each artist represented in your Media Library, and each of
those contains album subfolders that hold the actual music files. The other three main folders
contain subfolders for your various saved Focuses, Playlists, and Tags, which in turn hold M3U
and PLS files associated with them.
Use your mouse to highlight the files you want to export and copy them to the target location or
device.
M3U files are standard playlist files used by most portable devices. Copying an M3U file to a
phone/player will prompt the copying of the audio files that accompany it.
PLS files are used by Zune players and will act as M3U files when accessed for a Zune.
Meridian Audio Ltd, Latham Road, Huntingdon, Cambridge PE 29 6YE , United Kingdom | www.meridian - audio.com
22
Control Web/Mac/PC Guide
Manual Backups and Restores
NOTE: You must install Control Mac or Control PC to use Manual Backup/Restore functions.
Control PC and Control Mac can back up the contents of a Twinstore or Ensemble to a hard drive
in or attached to your computer (or to your network), as well as restore previously backed-up
data from a hard drive to a Sooloos system. Start by clicking the Backup tab, which will bring up
screen with two buttons.
Backup
Start a backup by clicking the Run Backup Wizard button. This will open the Backup window,
which will prompt you to select a backup location.
If the location you want does not appear in the dropdown, click the box to its right to open a
Browse for Folder window.
Find or create the folder you want to use for the backup and click OK. Then click the Next button
in the Backup window to proceed to the next step.
Meridian Audio Ltd, Latham Road, Huntingdon, Cambridge PE 29 6YE , United Kingdom | www.meridian - audio.com
23
Control Web/Mac/PC Guide
Use the appropriate radio button to select whether you want to backup all the albums in your
collection or only those associated with selected Focuses or Tags (all saved Focuses and Tags
are listed in the two panes directly below). If you choose the latter, you must click with your mouse
to check the boxes next to the Focuses and Tags you want to include.
Once you’ve finished your selection, click the Run Backup button at the window’s bottom right to
begin copying the files. The window will close, and the backup will proceed in the background.
To go back to a previous step, click the Back button. To cancel before starting a backup, click the
Cancel button at the window’s lower left or the X at its upper right.
Restore
To restore all or part of your Sooloos Media Library, click the Run Restore Wizard button. This
will open the Restore window, which will prompt you to choose a backup to be restored.
If the location of the backup you want to use does not appear in the dropdown, click the button
to its right to open a Browse for Folder window.
Meridian Audio Ltd, Latham Road, Huntingdon, Cambridge PE 29 6YE , United Kingdom | www.meridian - audio.com
24
Control Web/Mac/PC Guide
Once you’ve found and selected the folder you want to restore from, click the Next button at the
bottom right of the Restore window. The window will then switch to a listing of items that can be
restored from the selected folder.
Each item will have a checkbox to the left of it. For those not present on the Sooloos system, the
box will already be checked. If there are any of those you don’t want to restore, click on their boxes
to uncheck them. You may also click unchecked boxes to include items not pre-selected, but this
will result in the backup files overwriting corresponding files already on the system (which you may
want to do if the files on the system are corrupt or incomplete for some reason).
Once you’ve finished choosing the items to be restored, click the Run Restore button at the
window’s bottom right. The window will close, and the restore-progress indicator will appear.
To go back to a previous step, click the Back button. To cancel before starting a restore, click the
Cancel button at the window’s lower left or the X at its upper right.
Meridian Audio Ltd, Latham Road, Huntingdon, Cambridge PE 29 6YE , United Kingdom | www.meridian - audio.com
25
Control Web/Mac/PC Guide
Settings and Information
System information and configuration options are located under the Settings tab. Clicking it
brings up a screen like the one below.
Local Playback Zone Bitrate
Use the dropdown to adjust the data rate of music sent from the Sooloos system for playback on
the computer speakers, from 64 to 192 kilobits per second (kbps). In most cases there will be no
reason to change from the default of 192 kbps, but if you experience dropouts because of high
traffic on your network, try ratcheting down to a lower data rate.
Zone Configuration
To edit a zone’s configuration, click the Configure button to the right of its name on the list. That
will bring up a Configure Zone window.
Meridian Audio Ltd, Latham Road, Huntingdon, Cambridge PE 29 6YE , United Kingdom | www.meridian - audio.com
26
Control Web/Mac/PC Guide
The following settings are available:
• Zone Name. Enter whatever identifying name you like.
• Link Zones. Clicking this button pops up a window in which you can select another zone as
the master for the one you’re configuring. Then whatever playlist is set up for the master zone
will apply to the slave zone as well, which can be handy for parties, to take one example. You
can link and unlink zones whenever you want.
• Volume Leveling. The system can even out the peak level from album to album or track to
track, preventing abrupt volume changes. To ensure best sound quality, Sooloos applies an
intelligent volume adjustment at the start of each album or song rather than compression.
Click the radio button to the left of your preferred option: Off, Song (volume adjustment from
track to track), or Album (volume adjustment from album to album).
• Gain Adjustment. The master volume setting for the zone. You may find it convenient to
turn this down for a zone with unusually sensitive speakers or where lower levels typically are
desired.
• Crossfade. Length of the crossfade between tracks, adjustable from 0 (Off) to 10 seconds.
Select the period you desire from the dropdown list.
Settings do not take effect until you click the Apply button at the bottom right. Clicking the
Cancel button closes the window without making any changes.
Meridian Audio Ltd, Latham Road, Huntingdon, Cambridge PE 29 6YE , United Kingdom | www.meridian - audio.com
27