1
Canon
SPEEDLITE
580EXII
I
I
I
INSTRUCTION MANUAL
MODE D'EMPLOI
MANUAL DE INSTRUCCIONES
Canon
SPEEDLITE
SBOEXII
I
Thank you for purchasing a Canon product.
The Canon Speedlite 580EX II is an EOS-dedicated, high-output flash
unit automatically compatible with E-TTL II, E-TTL, and TTL autoflash.
It can serve as an on-camera flash as well as a master unit or a slave
unit in a wireless, multiple-Speedlite system. It has the same dust- and
water-resistance as EOS-1 0 series cameras.
• Read this instruction manual while also referring to your
camera's instruction manual.
Before using the Speedlite, read this instruction manual and your camera's
instruction manual to familiarize yourself with the Speedlite operations.
• The basic operation is as easy as with normal AE shooting.
When the 580EX II is attached to an EOS camera, almost all automatic
exposure control for flash photography is handled by the camera.
It is almost the same as using the camera's built-in flash if it has one. You can
think of the 580EX II as a built-in, high-output flash, but attached externally.
• It becomes automatically compatible with the camera's flash
metering mode (E-TTL II, E-TTL, and TTL).
In accordance with the camera's flash control system, the Speedlite controls
the flash automatically in the respective flash metering mode:
1. E-TTL II autoflash (evaluative flash metering with preflash reading/lens
distance information)
2. E-TTL autoflash (evaluative flash metering with preflash reading)
3. TTL autoflash (off-the-film metering for real-time flash metering)
Regarding the camera's available flash metering modes, refer to the
"External Speed lite" specification in the "Specifications" of your
camera's instruction manual.
The camera instruction manual's chapter on flash photography will refer
to cameras having flash metering modes 1 or 2 as a Type-A camera
(compatible with E-TTL II or E-TTL). And cameras having flash
metering mode 3 (compatible with only TTL) are called Type-B
cameras.
* This instruction manual assumes that you are using the Speedlite
with a Type-A camera.
For Type-B cameras, see page 55.
2
Contents
II
II
111111 II
1
1 Getting Started and Basic Operation
2
7
Using Flash
13
3 Wireless Flash
33
4
47
Reference
Conventions Used in this Manual
• The < @ > symbol in the text refers to the Select Dial.
The < @ > symbol in the text refers to the Select/Set button.
symbol in the text refers to a Custom Function.
• The
• The operation procedures in this instruction manual assume that both
the camera and Speed lite's power switches are ON.
• Icons used in the text to indicate the respective buttons, dials, and
settings match the same icons found on the camera and Speedlite.
The (04 ) / (06) / (816) icons indicate that the respective function
remains in effect for 4 sec., 6 sec., or 16 sec. after you let go of the
button.
• Reference page numbers are indicated by (p.**) .
• ' This instruction manual uses the following alert symbols:
sm
__ : The Caution symbol indicates a warning to prevent shooting
problems.
[]] : The Note symbol gives supplemental information.
3
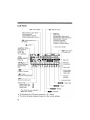
Nomenclature
r
Flash head/
Wireless
transmitter
Contact cover
Wireless sensor
External power
source socket
-----~r~:
(p.49)
~~~. ~
t ~__'y\l]
Mounting foot (p.9)
PC terminal
Contacts
Case
4
Bracket mounting
hole
Mini stand
Bounce angle
LCD panel
<MODE>-------Flash model
Slave setting button
(p.11, 22, 24/45, 46)
~~g/p~~';,7i11Uminationl
Custom Function setting \
button (p.6/27)
I
\
Ir=J
<~H/~>
High-speed sync
-J--:~:~~~1~:~::::::n
~
cover (p.8)
BOn r~ZOOM/+z. '---Battery compartment
0 0 ~ II irJ
lock lever (p.8)
PILOT
rJL <ZOOM/~>
-----+---,~ ~OF\O~
Pilot lamp/Test firing/
\ ~
6) rn~1
<PILOT>
Wireless slave pow~r
'J!l~
~)
~Ol"i(;~
ON button (p.10/38)
~ ==~
Flash exposure
confirmation lamp (p.11)
Mounting foot's
lock lever (p.9)
J
Lock-release button (p.9)
Dust- and water-resistant
adapter
[l]
-
'\ /'
---7
)1.
Zoom button/
Wireless selector/
Wireless set button
(p.20/36, 39,40,41,42,45)
... - - - - /
Power switch (p.10)
< OFF> : Power off
<ON> : Power on
< @ > Select Dial
* < (!) > Select/Set button
Asterisked buttons have functions which remain active for 8 sec. after you
press and let go of the button. The < :fr> illumination lasts for 12 sec.
5
LCD Panel
< (i!J > Manual zoom
<ISO> ISO speed
Manual flash output level
Flash exposure
compensation amount
FEB compensation amount
Aperture
FEB status
Stroboscopic flash count
Stroboscopic flash frequency
Manual flash 1/3-stop
increment indicator
Custom Function No.
Custom Function setting
<~>
High-speed sync
(FP flash)
<~>
FEB
Zoom focal length
<E/ETTL/TTL>l
Auto external
metering/
E-TTL (11)/
TTLautoflash
<EM>
Manual external
metering
< ~ > Auto zoom
for image size
rr ETlrL m-~:-(lj)--;';:IBBmm~~
I
I"~~..!..
L
I
n,
...!..'.a.
aal.aau.aa
,
I
JT~MlJLTI
3", ~
· .
CIII~"''Z.~
1234~
<M/MuLTI>
Manual flash/Multi
(Stroboscopic)
flash
Hz
".
8:§':~
S:1;-4:1~1-.-1:1~z;-:J:4• 1~8
I
Slave ID
Slave ID
• • -~I~1underscore
13 18 m
~~ 2.3 ~_7_~~) 30 ~O 60 f~
Flash ratio
~ ..0.5
- - -~~-'_'_ • • _
0.7 1 1.. 2 3 4 6 9
I
1
< C!D >
Custom Function
Flash range
scale/Flash
ratio scale
<~> Flash -------'
exposure compensation
Indicator
(meters)
<~>----------'
Second-curtain sync
Indicator (feet)
Firing mode - - - - - - - - - - '
Master flash ON: <~-.
Master flash OFF:
Slave flash :
~~
<z.-'
< ~ > Flash bounce indicator
(Blinks for 7 down)
<~>
<~>Slave
< o:m:mI > Master
< IDIII > Channel
• To illuminate the LCD panel, press the < :.t?:- > button .
• The items actually displayed depend on the current settings.
6
Flash ratio
Getting Started and
Basic Operation
Installing the Batteries
8
Attaching to the Camera......................................... 9
Turning on the Power Switch................................ 10
Fully Automatic Flash Shooting
11
Using E-TTL II and E-TTL Autoflash in the
Shooting Modes.................................................... 12
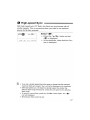
__ Cautions for firing continuous flashes
• To avoid overheating and degrading the flash
head, do not fire more than 20 continuous
flashes. After 20 continuous flashes, allow a rest
time of at least 10 min.
• If you fire more than 20 continuous flashes and
then fire more flashes in short intervals, the
inner overheating prevention function may be
activated to make the recycling time about 8 to
20 sec. If this occurs, allow a rest time of about
15 min. and the flash will then return to normal.
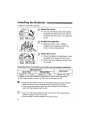
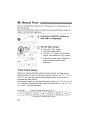
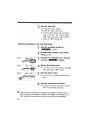
Installing the Batteries
Install four size-AA batteries.
Open the cover.
• Use your thumb to press the battery
compartment lock lever, then slide it
as shown by the arrow CD to open the
cover.
Install the batteries.
• Make sure the + and - battery
contacts are properly oriented as
shown in the compartment.
Close the cover.
• Close the battery compartment cover
and slide it as shown by the arrow.
~ When the cover clicks in place, it will
be locked.
Recycling Time and Flash Count (with size-AA alkaline batteries)
"
on new
• Quick flash enables a flash to be fired before flash-ready (p.1 0).
-- • Using size-AA batteries other than the alkaline type may cause improper
battery contact due to the irregular shape of the battery contacts.
• If you change the batteries after firing many flashes continuously, be
aware that the batteries might be hot.
[i]
8
Use a new set of four batteries of the same brand. When replacing the
batteries, replace all four at one time.
Size-AA Ni-MH or lithium batteries can also be used.
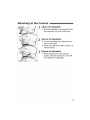
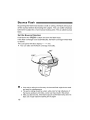
Attaching to the Camera
"I
Attach the Speedlite.
• Slip the Speed lite's mounting foot into
the camera's hot shoe all the way.
Secure the Speed lite.
• On the mounting foot, slide the lock
lever to the right.
..- When the lock lever clicks in place, it
will be locked.
Detach the Speed lite.
• While pressing the lock-release
button, slide the lock lever to the left
and detach the Speed lite.
9
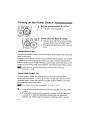
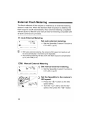
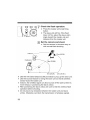
Turning on the Power Switch
\1
,II 11111 III 1111 111111111111111
Set the power switch to <ON>.
l'" The flash recycling starts.
Check that the flash is ready.
• The pilot lamp will first turn green (ready
for quick flash), then red (flash ready).
Pressing the pilot lamp will fire a test
flash.
About Quick Flash
Quick flash enables a flash to be fired before flash-ready, when the pilot
lamp is still green.
Although the Guide No. will be 1/6 to 1/2 that of the full output, quick flash
is effective for near subjects and when you want a shorter recycle time.
Set the drive mode to single shooting. Quick flash cannot be used in the
continuous shooting, FEB, manual flash, and stroboscopic flash modes.
[IliI
Quick flash can also be used during continuous flash shooting.
(C.Fn-06 ~ p.27)
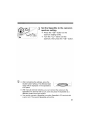
About Auto Power Off
To save battery power, the power will turn off automatically after a
certain period (approx. 1.5 min. to 15 min.) of idle use. To turn on the
Speedlite again, press the camera's shutter button halfway. Or press
the Speed lite's test firing button.
[IliI
[lJ •
Auto Power Off can also be disabled. (C.Fn-01 ~ p.27)
A test flash cannot be fired while the camera's operation timer 04 or 06
is active.
• The Speedlite's settings will be retained in memory even after the power
is turned off. To retain the Speedlite's settings after you replace the
batteries, turn off the power and replace the batteries within 1 minute.
10
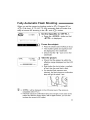
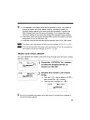
Fully Automatic Flash Shooting ••"\\\1\\"\1&\"."
When you set the camera's shooting mode to < P > (Program AE) or
< 0 > (Full Auto), E-TTL II/E-TTL fully automatic flash will make it as
easy as normal AE shooting in the < P > and < 0 > modes.
~
Set the Speedlite to <ETTL>.
Press the <MODE> button so that
<ETTL> is displayed.
Zoom 50mm
TT
:;0 5.:;
•
Focus the subject.
Press the shutter button halfway to focus.
The shutter speed and aperture will
be displayed in the viewfinder.
Check that the < ~ > icon is lit in the
viewfinder.
ETTL
Zoom 50mm
F- 5.6
-------
0.50.7 1 1.5 2
[i]
3
4
6
9
13 18 m
Take the picture.
Check that the subject is within the
effective range displayed on the LCD
panel.
Right before the shot is taken, a preflash
is fired, then the main flash is fired.
If a standard flash exposure was
obtained, the flash exposure confirmation
lamp will light for about 3 sec.
< ETTL > will be displayed on the LCD panel even if the camera is
compatible with E-TTL II.
e If the flash exposure confirmation lamp does not light, move closer to the
subject and take the picture again. With a digital camera, you can also
increase the camera's ISO speed.
11
Using E-TTL II and E-TTL Autoflash in the Shooting Modes
BI
Just set the camera's shooting mode to < Av > (aperture-priority AE),
<Tv> (shutter-priority AE), or <M> (manual) and you can use E-TTL 11/
E-TTL autoflash.
Tv
Select this mode when you want to set the shutter speed manually.
The camera will then automatically set the aperture matching the shutter
speed to obtain a standard exposure.
\\\ If the aperture display blinks, it means that the background exposure will
be underexposed or overexposed. Adjust the shutter speed until the
aperture display stops blinking.
Select this mode when you want to set the aperture manually.
The camera will then automatically set the shutter speed matching the
aperture to obtain a standard exposure.
If the background is dark like a night scene, a slow sync speed will be used
to obtain a standard exposure of both the main subject and background.
Standard exposure of the main subject is obtained with the flash, while a
standard exposure of the background is obtained with a slow shutter speed.
\\\ Since a slow shutter speed will be used for low-light scenes, using a
tripod is recommended.
\\\ If the shutter speed display blinks, it means that the background
exposure will be underexposed or overexposed. Adjust the aperture until
the shutter speed display stops blinking.
M
Select this mode if you want to set both the shutter speed and aperture
manually.
Standard exposure of the main subject is obtained with the flash. The
exposure of the background is obtained with the shutter speed and aperture
combination you set.
\\\ If you use the < DEP > or < A·DEP > shooting mode, the result will be the same as
using the <P> (Program AE) mode.
Flash Sync Speeds and Apertures Used
P
Tv
Av
Set automatically (1/60 sec. - 1/X sec.)
Automatic
Set manually (30 sec. - 1IX sec.)
Automatic
Set automatically (30 sec. - 1IX sec.)
Manual
M
Set manually (bulb, 30 sec. - 1IX sec.)
Manual
1/X sec. is the camera's maximum flash sync speed.
12
Using Flash
~
Flash Exposure Compensation
FEB
FE L: FE Lock........................................................
~ High-speed Sync.............................................
Bounce Flash.....
ZOOM: Setting the Flash Coverage and Using
the Wide Panel.....................................................
M: Manual Flash.................................................
MULTI: Stroboscopic Flash
r::I> Second-Curtain Sync
C.Fn: Setting Custom Functions
External Flash Metering........................................
Speedlite Control with the Camera's Menu
Screen
~
14
15
16
17
18
20
22
24
26
27
30
32
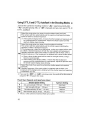
~ Flash Exposure Compensation
l. 1111 II
111I LII
In the same way as normal exposure compensation, you can set
exposure compensation for flash. The flash exposure compensation
amount can be set up to ±3 stops in 1/3-stop increments. (If the
camera's exposure compensation is in 1/2-stop increments, flash
exposure compensation will be in 1/2-stop increments.)
Select <~>.
Press the < @ > button so that < ~ >
is displayed.
The <~> icon and the flash
exposure compensation amount will
blink.
Set the flash exposure
compensation amount.
~,~ Turn the < @ > dial to set the amount.
~t
To cancel the flash exposure
compensation, set the amount to
"+0."
Press the < @ > button.
Flash exposure compensation will be
set.
[]] If flash exposure compensation has been set with both the Speedlite and
camera, the Speed lite's flash exposure compensation amount will override
the camera's.
lID
14
Setting the flash exposure compensation can be limited to only the <@>
dial. (C.Fn-13 ~ p.27)
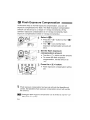
~
FEB
,1iI1I"1
i;;;11 11'11;;;11 lllii! 1'11,;;11
U'iliiU111
II 1I1111111~1
You can take three flash shots while automatically changing the flash
output for each shot up to ±3 stops in 1/3-stop increments (1/2-stop
increments if the camera enables only 1/2-stop increments). This is
called FEB (Flash Exposure Bracketing).
Select <~>.
Press the <@> button so that <~>
is displayed.
The < ~ > icon and bracketing
amount will blink.
Set the flash exposure bracketing
amount.
• Turn the < @ > dial to set the amount.
Press the <@> button.
FEB will be set.
III • After the three shots are taken, FEB will be cancelled automatically.
For FEB, set the camera's drive mode to single shooting. Be sure the
flash is ready before shooting .
• You can also combine FEB with flash exposure compensation and FE
lock.
[II'iI
You can prevent the FEB from being cancelled automatically after the
three shots are taken. (C.Fn-03 ~ p.27)
[II'iI
The FEB shooting sequence can be changed. (C.Fn-04 ~ p.27)
15
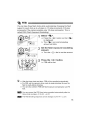
FEL:
FE Lock
III1III[
..
__
FE (flash exposure) lock locks the correct flash exposure setting for any
part of the scene.
With < ETTL > displayed on the LCD panel, you press the camera's
<FEL > button. If the camera does not have the <FEL > button, press the
<*> button.
Focus the subject.
Press the <FEL> button. (816)
Aim the subject at the center of the
viewfinder and press the <FEL >
button.
The Speed lite will fire a preflash and
the required flash output for the
subject is retained in memory.
"FEL" will be displayed in the
viewfinder for 0.5 sec.
Each time you press the <FEL>
button, a preflash will be fired and a
new flash exposure setting will be
locked.
o
16
If the subject is too far away and underexposure will result, the < ~ > icon
will blink in the viewfinder. Move closer to the subject and try the FE lock
again.
If <ETTL> is not displayed on the LCD panel, FE lock cannot be set.
If the subject is too small, FE lock might not be very effective.
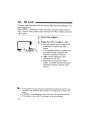
'I
High-speed Sync
With high-speed sync (FP flash), the flash can synchronize with all
shutter speeds. This is convenient when you want to use aperture
priority for fill-flash portraits.
ETT
~
Zoom SOmm
Select <~>.
Press the < ~H / ~ > button so that
<~> is displayed.
In the viewfinder, check that the < ~H >
icon is displayed.
[lJ
If you set a shutter speed that is the same or slower than the camera's
maximum flash sync speed, < ~H > will not be displayed in the viewfinder.
With high-speed sync, the faster the shutter speed, the shorter the
effective flash range will become. Check the LCD panel for the effective
flash range.
To return to normal flash, press the <~H/~> button again. The <eB>
icon will disappear.
Stroboscopic flash cannot be set.
17
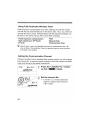
Bounce Flash
IIJI.llIlIIIlIll.1I111111111II11II11111111111111111• •111111111111111_1.'
By pointing the flash head toward a wall or ceiling, the flash will bounce
off the surface before illuminating the subject. This can soften shadows
behind the subject for a more natural-looking shot. This is called bounce
flash.
Set the Bounce Direction
Hold down the < PUSH> button and turn the flash head.
If the flash coverage is set automatically, the flash coverage will be fixed
to 50mm.
The LCD panel will also display < - - > mm .
., You can also set the flash coverage manually.
4) •
If the wall or ceiling is too far away, the bounced flash might be too weak
and result in underexposure.
The wall or ceiling should be a plain, white color for high reflectance. If
the bounce surface is not white, a color cast may result in the picture.
• After you take the shot, if the flash exposure confirmation lamp does not
light, use a larger aperture opening and try again.
18
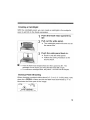
Creating a Catchlight
With the catchlight panel, you can create a catchlight in the subject's
eyes to add life to the facial expression.
'1',:
Point the flash head upward by
90°.
Pull out the wide panel.
.. The catch light panel will come out at
the same time.
Push the wide panel back in.
Push in only the wide panel.
Follow the same procedure as for
bounce flash.
0
Point the flash head straight ahead and then upward by 90 The
catch light will not work if you swing the flash head left or right.
For maximum catchlight effect, stay within 1.5 m/4.9 ft of the subject.
•
Closeup Flash Shooting
When shooting a subject within about 0.5 - 2 m (1.6 - 6.6 ft) away, hold
down the < PUSH> button and tilt the flash head downward by 7° to
illuminate the lower part of the image.
ETTL
--.-
Zoom 50mm
F- 5.6
... I ;'
----=:-.::-.!:':.~:l-!.:?~ 0.5 0.7 1 1.5
2*""3/
l'
\i \\,..... 13
18 m
19
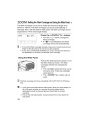
ZOO M :Setting the Flash Coverage and Using the Wide Panel
The flash coverage can be set to match the lens focal length from
24mm to 105mm. The flash coverage can be set automatically or
manually. Also, with the built-in wide panel, the flash coverage can be
expanded for 14mm wide-angle lenses.
ETTL
mJZoom 2'-1mm
Press the <ZOOM/~> button.
Turn the < @ > dial to change the
flash coverage.
If < 1m > is not displayed, the flash
coverage will be set automatically.
[l]
l~
If you set the flash coverage manually, make sure it covers the lens focal
length so that the picture will not have a dark periphery.
If you use a commercially-available sync cord to connect the camera to
the Speedlite's PC terminal, set the flash zoom manually.
Using the Wide Panel
Pull out the wide panel and place it over
the flash head as shown. The flash
coverage will then be extended for
14mm.
The catchlight panel will come out at
the same time. Push the catchlight
panel back in.
The <ZOOM/~> button will not
work.
[l]
The flash coverage will not be compatible with the EF15mm f/2.8 Fisheye
lens.
If you use bounce flash with the wide panel in place, the entire display on
the LCD panel will blink as a warning. Since the subject will be
illuminated by both the bounce flash and direct flash, it will look
unnatural.
Pull out the wide panel gently. Using excessive force may detach the
wide panel.
20
Auto Zoom for Image Size
EOS DIGITAL cameras have one of three image sizes. The lens'
effective focal length will differ depending on the camera's image size.
The Speed lite automatically recognizes the EOS DIGITAL camera's
image size and automatically sets the flash coverage for lens focal
lengths from 24mm to 105mm.
When the Speed lite is attached to a compatible camera, <§> will
appear on the Speed lite's LCD panel.
Zoom Sam
F- s.
ETTL
-------
0.50.7 1 1.5 2
3
4
6
9
§
13 18 m
Auto zoom can be disabled. (C.Fn-09
----j-
p.27)
21
M: Man uaI FIash
1\11111111111111111111IlI1III1IlI1IlI1III1IlI1I11I11IlI1I11I111111
You can set the flash output from 1/128 power to 1/1 full power in 1/3stop increments.
Use a hand-held flash meter to determine the required flash output to
obtain a correct flash exposure.
Zoom SDmm
til
1 Press the <MODE> button so
,
that
<M>
is displayed.
Set the flash output.
Press the < @ > button .
• ' The flash output blinks.
Turn the < ~ > dial to set the flash
output, then press the < @ > button.
Zoom SDmm
M
II y
Press the shutter button halfway to
see the effective flash range
displayed.
Flash Output Display
When you change the flash output during shooting, the table below
makes it easier to see how the stop changes such as 1/2 -0.3 ~ 1/2 ~
1/2 +0.3. You can see how the stop changes when you increase or
decrease the flash output.
For example, when you decrease the flash output to 1/2, 1/2 -0.3, or 1/2
-0.7, and then increase the flash output to more than 1/2, 1/2 +0.3, 1/2
+0.7, and 1/1 will be displayed.
<-- Figures for increased flash output
22
Metered Manual Flash Exposures
When the Speed lite is attached to an EOS-1 0 series camera, you can
set the flash level manually for closeup subjects.
Set the camera and Speed lite.
• Set the camera's shooting mode to < M > or < Av > .
• ' Set the Speed lite to manual flash.
Focus the subject.
• Focus manually.
Set up an 18% gray card.
Place the gray card at the subject's position.
• In the viewfinder, the entire spot metering circle at the center
should cover the gray card.
Press the <FEL> button. (816)
~,
The Speed lite will fire a preflash and the required flash output for
the subject is retained in memory.
On the right side of the viewfinder, the exposure level indicator
will show the flash exposure level for the correct flash exposure.
Set the flash exposure level.
Adjust the Speed lite's manual flash level and the
camera aperture so that the flash exposure level
aligns with the standard exposure index.
6 Take the picture.
• Remove the gray card and take the picture.
[.lJ
This feature works only with EX-series Speedlites with manual flash coupled
with an EOS-1D series camera.
23
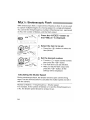
MULTI:
••
Stroboscopic FIash i~l.'l"'.lI'
l\II'.\• •'lliIIIl
With stroboscopic flash, a rapid series of flashes is fired. It can be used
to capture multiple images of a moving subject in a single photograph.
You can set the firing frequency (number of flashes per sec. expressed
as Hz), the number of flashes, and the flash output.
Zoom 3Smm
MULTI
1/128 - --
1Hz
Press the <MODE> button so
that <MULTI> is displayed.
Select the item to be set.
Press the < @ > button to select the
item (blinks).
Set the desired number.
Turn the < @ > dial to set the number,
then press the <~> button.
The next item to be set will blink.
After you set the flash output and
press the < @ > button, all the
settings will be displayed.
Calculating the Shutter Speed
During stroboscopic flash, the shutter remains open until the firing
stops. Use the formula below to calculate the shutter speed and set it
with the camera.
Number of flashes -7 Firing frequency =Shutter speed
For example, if the number of flashes is 10 and the firing frequency is
5 Hz, the shutter speed should be at least 2 sec.
24
-- To avoid overheating and deteriorating the flash head, do not use stroboscopic
flash more than 10 times in succession. After 10 times, allow the Speedlite to
rest for at least 15 min. If you try to use the stroboscopic flash more than 10
times in succession, the firing might stop automatically to protect the flash
head. If this happens, allow the Speedlite to rest for at least 15 min.
[i]
Stroboscopic flash is most effective with a highly reflective subject
against a dark background.
Using a tripod, a remote switch, and external power source is recommended.
A flash output of 1/1 or 1/2 cannot be set for stroboscopic flash.
Stroboscopic flash can be used with "bulb."
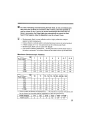
If the number of flashes is displayed as - ., the firing will continue until the shutter closes or
the battery is exhausted. The number of flashes will be limited as shown by the table below.
Maximum Stroboscopic Flashes
~.•
•fllash OutplJ
1/4
1/8
1/16
1/32
1/64
1/128
flashOlltPlI.
~
1/4
1/8
1/16
1/32
1/64
1/128
1
2
7
14
6
14
5
12
30
60
90
100
30
60
90
100
30
60
90
100
10
11
2
4
8
2
4
8
2
4
20
50
70
20
40
70
4
5
6-7
8-9
4
4
10
20
8
20
3
6
20
3
5
10
50
80
100
50
80
100
40
70
90
30
60
80
20-50 60 -199
8
2
4
8
2
4
8
2
4
8
20
40
60
18
35
50
16
30
40
12
20
40
If the number of flashes is displayed as - -, the maximum number of flashes will
be as shown by the table below regardless of the firing frequency.
Flash Output
Flash Count
25
~ Second-Curtain Sync ,11111111 11111111 II
I III II
With a slow shutter speed, you can create a light trail following the
subject. The flash fires right before the shutter closes.
ETTL
[]]
26
Zoom SOmm
Press the < ~H / ~ > button so that
<~> is displayed.
Second-curtain sync works well in the camera's "bulb" mode.
• To return to normal flash, press the <~H/~> button again. The <~>
icon will disappear.
With E-TTL II/E-TTL, two flashes will be fired even at slow shutter
speeds. The first flash is only the preflash, and not a malfunction.
• Stroboscopic flash cannot be set.
• Wireless flash cannot be set.
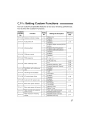
C.Fn: Setting Custom Functions 1"'\\'1.\'\\.'\\~\".'1\.'
You can customize Speed lite features to suit your shooting preferences.
You do this with Custom Functions.
Custom
Function
No.
Function
C.Fn-OO
Distance indicator display
C.Fn-01
Auto power off
Settings & Description
Reference
page
Meters (m)
Feet (ft)
Enabled
Disabled
p.10
Enabled (Depth-of-field preview
button)
C. Fn-02
Enabled (Test firing button)
Modeling flash
p.44
Enabled (with both buttons)
Disabled
C.Fn-03
FEB auto cancel
C.Fn-04
FEB sequence
Enabled
Disabled
o
o
C.Fn-05
Flash metering mode
C.Fn-06
Quickflash with continuous
shot
C.Fn-07
Test firing with autoflash
C.Fn-08
AF-assist beam firing
C.Fn-09
Auto zoom for sensor size
C.Fn-10
Slave auto power off timer
p.15
E-TTL II/E-TTL
p.12
TTL
p.55
External metering: Auto
p.30
External metering: Manual
p.30
Disabled
Enabled
p.10
1/32
Full output
Enabled
Disabled
Enabled
Disabled
p.49
p.21
60 minutes
10 minutes
Within 8 hours
C.Fn-11
Slave auto power off cancel
C.Fn-12
Flash recycle with external
power source
Flash and external power
C.Fn-13
Flash exposure metering
setting
Speedlite button and dial
p.39
Within 1 hour
External power source
Speedlite dial only
p.48
p.14
27
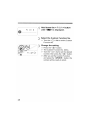
Fn []:
[]
Hold down the <:,C?:-JC.Fn> button
until <CIiD> is displayed.
Select the Custom Function No.
Turn the < @ > dial to set the Custom
Function No.
Change the setting.
€J
Press the <
> button.
The Custom Function No. blinks.
Turn the < @ > dial to set the desired
> button.
number, then press the <
After you set the Custom Function
and press the <MODE> button, the
camera will be ready to shoot.
€J
28
C.Fn-02-3: Convenient when you want to check the depth of field. (p.44)
C.Fn-12: If an external power source is used, the flash recycling is
powered concurrently by the internal batteries and external
power source. In this case, when the internal batteries
become exhausted first, shooting might not be possible. If 1
is set, the flash recycling will be powered only by the
external power source. The internal batteries will thereby
last longer. Note that even if you set it to 1, the Speed lite will
still require internal batteries for flash control.
C.Fn-05-1 is geared for EOS-series film cameras.
Do not set it if you have a, EOS DIGITAL camera or the EOS REBEL T2/
300X. If C.Fn-05-1 is set for such cameras, the flash control will not work
properly. The flash might not fire or it might fire only at full output.
With Type-A cameras, if C.fn-05-1 is set, wireless autoflash shooting will
not be possible.
If "AF-assist beam OFF" is set with the Speedlite or camera, the AFassist beam will not be emitted.
[l]
With Type-B cameras, even if C.Fn-05-0 is set, E-TTL IliE-TTL autoflash will
not work.
29
External Flash Metering
'"IRlln II
!I
The flash reflected off the subject is metered by an external metering
sensor in real time. When the standard flash exposure is attained, the
flash output is cutoff automatically. Auto external metering compatible
with the EOS-1 0 Mark III and manual external metering compatible with
all EOS cameras are provided.
E: Auto External
E
Metering
Set auto external metering.
Zoom 35mm
Set the Speedlite Custom Function to
C.Fn-05-2. (p.27)
F- 5.6
em
[lJ
With auto external metering, the camera's ISO speed and aperture will
be set automatically in real-time by the Speedlite.
Auto external metering will also work with flash exposure compensation
(p.14) and FEB (p.15).
EM:
E
M
em
Manual External Metering
ISO
:00
Zoom 35mm
F- 5.6
'\~~1
l"
Set manual external metering.
Set the Speedlite Custom Function to
C. Fn-05-3. (p.27)
Set the Speedlite to the camera's
ISO speed.
Press the < @ > button so the ISO
speed blinks.
Turn the <@> dial to set the ISO
speed, then press the < @ > button.
30
Set the Speedlite to the camera's
aperture setting.
Press the < @ > button so the
aperture setting blinks.
Turn the <@> dial to set the
aperture, then press the <@> button.
After completing the settings, press the
shutter button halfway. The effective flash
range will be displayed on the Speedlite's
LCD panel.
• With manual external metering, you can connect the camera to the
Speedlite's PC terminal with a sync cord and place the Speedlite at a
different position from the camera.
e You cannot connect a Speedlite to another Speedlite's PC terminal with
a sync cord. The second Speedlite will not fire.
31
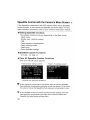
Speedlite Control with the Camera's Menu Screen
If the Speedlite is attached to an EOS camera which has a Speedlite
control function, it can control the Speedlite as shown below. For the
menu operation procedure, refer to your camera's instruction manual.
• Setting Speedlite functions
The settable functions will vary depending on the flash mode.
· Flash mode
· Shutter sync (1 st/2nd curtain)
·FEB
· Flash exposure compensation
· Flash metering mode
· Flash firing
· Clear Speedlite settings
• Speed lite Custom Functions
· C.Fn-OO - 13, Total 14
• Clear All Speedlite Custom Functions
Only C.Fn-OO will not be cleared.
Flash function settings screen*
Flash C. Fn settings screen*
* Screens from the EOS-1D Mark III.
U
III
32
If flash exposure compensation has already been set with the Speedlite,
flash exposure compensation cannot be set with the camera. To set it with
the camera, first set the Speedlite's flash exposure compensation to zero.
If any Speedlite Custom Functions and flash function settings other than
flash exposure compensation have been set by both the camera and
Speedlite, the latest setting will take effect.
Wireless Flash
About Wireless Flash
Wireless Settings..................................................
Fully Automatic Wireless Flash............................
Flash Ratio with E-TTL II
Setting the Flash Output for Each Slave..............
Setting Manual Flash and Stroboscopic Flash
with the Slave
34
36
37
41
45
46
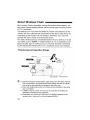
About Wireless Flash
.IIIIIIIIIIIIIIIIIU.IIIIIIUIIII_I. . . . . . . ._ .
With multiple Canon Speed lites having the wireless flash feature, you
can create various lighting effects with the same ease as using normal
E-TTL II autoflash.
The settings you input with the 580EX II (master unit) attached to the
camera are also automatically transmitted to the slave units which are
controlled by the master unit via wireless. Therefore, you need not
operate the slave unit(s) at all during the shoot.
The basic wireless set-up is illustrated below. All you need to do is set
the master unit to < ETTL > enable wireless E-TTL II autoflash (p.37).
Note that with Type-A cameras prior to the EOS-1 0 Mark II and EOS
ELAN 7NE/ELAN 7N/30V/33V, E-TTL autoflash will be used instead.
Positioning and Operation Range
8m (26.2ft.) 12m (39.4ft.)
III • Any flash exposure compensation, high-speed sync (FP flash), FE lock,
FEB, manual flash, and stroboscopic flash settings set with the master
unit will all be automatically transmitted to the slave units.
• Even with multiple slave units, all of them will be controlled in the same
way via wireless.
• A 580EX II set as a slave unit can also be controlled by wireless by
Speedlite Transmitter ST-E2 (optional).
• Hereinafter, the "master unit" will refer to a 580EX 1\ attached to the
camera, and a "slave unit" will be a wireless 580EX II.
34
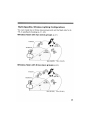
Multi-Speedlite, Wireless Lighting Configurations
You can create two or three slave groups and set the flash ratio for ETTL II autoflash shooting (p.41 - 45).
Wireless flash with two slave groups (p.41)
Indoors
~B
8m (26.2ft.) 12m (39.4ft.)
Wireless flash with three slave groups (p.43)
Indoors
~B
8m (26.2ft.) 12m (39.4ft.)
35
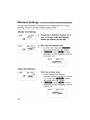
Wi reless 5 etti n9s
1.\\\'\'\"""'11'.'\"""\I\\\II\1\\I\""\ll1\"\""'\""IlIill1l
You can switch between normal flash and wireless flash. For normal
shooting, be sure to set the wireless setting to OFF.
Master Unit Setting
ETTL
-~
--'-1-"------
ETTL
mlZoom 2Ymm
,I,
... '\ I 1'-0
n-
-emmI£.I'"
_":.~
,. ; I , \ '
- -...- 1 - ' - - - - - -
Press the <ZOOM> button for 2
sec. or longer until the display
blinks as shown on the left.
Set it as the master unit.
Turn the < @ > dial until < '~jt''''I*' >
blinks, then press the < @ > button.
< '~it''''I*' > and < I & : . > will be
displayed, and the Speed lite is set as
the master unit.
ETTL
mlZoom 2Ymm
Slave Unit Setting
Set it as a slave unit.
Do the "Master Unit Setting"
procedure above. For step 2, turn the
<@> dial until <a"·"4_> blinks,
then press the < @ > button.
<a"·'9-> and <I&:.> will be
displayed, and the Speed lite is set as
a slave unit.
ETTL
36
mlZoom 2Ymm
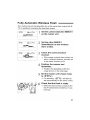
Fully Automatic Wireless Flash
This method has all the Speedlites fire at the same flash output with ETTL II autoflash controlling the total flash output.
ETTL
mJZoom
2'-1mm
Set the camera-attached 580EX II
as the master unit.
ETTL
mJZoom
2'-1mm
Set the other 580EX II
Speedlites(s) as the wireless
slave unit(s).
ETTL
mJZoom
2'-1mm
Check the communication
channel.
~~
~~A
If the master unit and slave unit(s) are
set to a different channel, set them all
to the same channel (p.40).
Position the camera and
Speedlites.
Position the Speed lites within the
range shown on the next page.
Set the master unit's flash mode
to <ETTL>.
For shooting, <ETTl> will also be
set automatically for the slave unit(s).
Check that the flash is ready.
When the slave unit(s) is ready to fire,
the AF-assist beam will blink at 1-sec.
intervals.
37
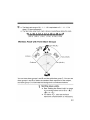
Check the flash operation .
• Press the master unit's test firing
button.
tl ' The slave unit will fire. If the flash
does not fire, adjust the slave unit's
angle toward the master unit and
distance from the master unit.
Set the camera and shoot.
.' Set the camera in the same way as
with normal flash shooting.
15m (49.2ft.)
8m (26.2ft.)
12m (39.4ft.)
• Use the mini stand (tripod socket provided) to prop up the slave unit.
\1\ Use the bounce feature to swing the slave unit so that its wireless
sensor faces the master unit.
,tt Indoors, the wireless signal can also bounce off the wall so there is
more leeway in positioning the slave unit(s).
• After positioning the slave unit(s), be sure to test the wireless flash
operation before shooting.
• Do not place any obstacles between the master unit and slave
unit(s). Obstacles can block the transmission of wireless signals.
38
[]] • The Speedlite's zoom setting will be set automatically to 24mm. It is possible to
change the master unit's zoom setting. However, note that the master unit
transmits wireless signals to the slave unit(s} with the preflash. Therefore, the
flash coverage must cover the slave unit's position. If you change the master
unit's zoom setting, be sure to test the wireless flash operation before shooting.
• If the slave unit's auto power off takes effect, press the master unit's test
firing button to turn on the slave unit.
A test flash cannot be fired while the camera's operation timer 04 or 06 is active.
[lID
[lID
The slave unit's auto power off time can be changed. (C.Fn-10 --+ p.27)
The time during which the slave unit's auto power off can be canceled by
the master unit can be changed. (C.Fn-11 --+ p.27)
Master Unit's Flash ON/OFF
You can disable the master unit from firing so that only the slave unit(s)
will fire a flash.
ETTL
,I,
m»Zoom
2lJ..mln,.
-0
-,.,?~~ermD" I
n"
'1
Press the <ZOOM/~> button
so that the display blinks as
shown on the left.
Disable the master unit's flash
firing.
'. Turn the <@> dial to select <[I FF>,
then press the < @ > button.
~" The icon will change to <
ETTl
[lJ
"z.-' >.
mJZoom 2Ymm
Even if you disable the master unit's flash firing, it will still fire a preflash to
transmit wireless signals.
39
Using Fully Automatic Wireless Flash
Flash exposure compensation and other settings set with the master
unit will also be automatically set in the slave units. Thus, you need not
operate the slave unit(s). Wireless flash with the following settings can
be done in the same way as with normal flash shooting.
· Flash exposure compensation
· High-speed sync (FP flash)
· FE lock
[i]
·FEB
. Manual flash
. Stroboscopic flash
With FE lock, if even one Speedlite will result in underexposure, the < ~ >
icon will blink in the viewfinder. Open the aperture more or move the slave
unit closer to the subject.
Setting the Communication Channel
If there is another Canon wireless flash system nearby, you can change
the channel No. to prevent signal confusion. Both the master and slave
units must be set to the same channel No.
ETTL
ImZoom 2Ymm
:='!!3'~{~
Press the <ZOOM/~> button
so that < - . > blinks.
_ _..z.._~}_I_\ " - - -
Set the channel No.
Turn the < @ > dial to select the
channel number, then press the
<@> button.
40
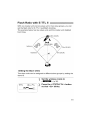
Flash Ratio with E-TTL II
With one master unit and one slave unit or two slave groups, you can
set the flash ratio for E- TTL II autoflash shooting.
The example below has two slave units and the master unit disabled
from firing.
Indoors
12m (39.4ft.)
Setting the Slave Units
Two slave units can be assigned to different slave groups by setting the
slave 10.
Set the wireless mode to
<a,'·S!4_>.
ETTL
ailZoom 2Ymm
(p.36)
Press the <ZOOM/~> button
so that <A> blinks.
41
Set the slave 10.
• Press the < @ > button.
~, Slave 10 <A> will be set.
• For the other slave unit, do steps 1
and 2, turn the < @> dial to select
< B >, then press the < @ > button.
• Slave 10 <B> will be set.
Setting the Master Unit and Shooting
1 Set the wireless mode to
<'''Jt'S,i4:W>.
(p.36)
Disable the master unit's flash
firing. (p.39)
Press the <ZOOM/~> button
so that <-il'SIC.M> blinks.
ETTL
(i!i)Zoom 2 ~lT'i'T1,.
ETTL
,0
n/"
IIICBII~~-
"z.I,
ETTL
~~I
(i!i)Zoom 2Ymm
Select the flash ratio.
• Turn the <@> dial to select <A: B>,
then press the < @ > button.
Set the flash ratio.
• Turn the < @ > dial to set the flash
ratio.
Set the camera and shoot.
• Set the camera in the same way as
with normal flash shooting.
[lJ
42
With the EOS ELAN II/ELAN II E/SO/SOE, EOS REBEL G/SOON, EOS IX,
EOS IX Lite/IX?, EOS REBEL 2000/300, and REBEL XS N/ REBEL G 11/
EOS 3000N/66, the flash ratio cannot be set with multiple Speedlites.
[l] •
The flash ratio range of 8: 1 - 1:1 - 1:8 is equivalent to 3: 1 - 1: 1 - 1:3 in
stops (1/2-stop increments).
• The flash ratio under the • mark is shown in parentheses below the scale.
-------------_......
8:1 • 4:1 • 2:1 • 1:1 • 1:2 • 1:4 • 1:8
(5.6:1)
(2.8:1)
(1.4:1) (1:1.4) (1:2.8) (1:5.6)
Wireless Flash with Three Slave Groups
Indoors
12m (39.4ft.)
You can have slave groups A and B and also add slave group C. You can use
slave groups A and B to obtain the standard flash exposure of the subject,
and slave group C to illuminate the background to eliminate shadows.
'1
Set the slave units.
•
See "Setting the Slave Units" on page
41 to set the slave unit's 10 to < A >,
•
<8>, or <C>.
For slave < C >, also set the flash
exposure compensation as necessary.
43
Set the master unit and shoot.
Follow "Setting the Master Unit and
Shooting" on page 42. In step 4,
select <A: B C>.
o
If < IIlmmJI A: B> is set, the slave unit in slave group < C> will not fire.
If you point the slave unit in slave group < C > toward the subject, the
subject will be overexposed.
Modeling Flash
If the camera has a depth-of-field preview button, pressing it will fire the
flash continuously for 1 sec. This is called the modeling flash.
It enables you to see the shadow effects on the subject and the lighting
balance. You can fire the modeling flash for both wireless and normal
flash shooting.
o Do not fire the modeling flash more than 10 consecutive times. If you
fire the modeling flash 10 consecutive times, allow the Speedlite to
rest for at least 10 min. to avoid overheating and deteriorating the flash
head.
~
The modeling flash cannot be fired with the EOS REBEL 2000/300 and
Type-B cameras (p.2).
About Slave Group Control
Slave group A
iii
10
44
=A
10
=A
10
=A
For example, if you have the slave 10 set
to < A > for three slave units, all three
slave units will be controlled as if they
were one Speed lite in slave group A.
Setting the Flash Output for Each Slave
With manual flash and multiple Speed lites, you can set a different flash
output for each slave unit.
All settings are done with the master unit.
(l!i)Zoom 2Ymm
1/:
K)
IBIII EmmI
Press the <MODE> button so
that <M> is displayed.
"Z.11
M
Press the <ZOOM/~> button
so that <-;1·'1(.-> blinks.
Select the flash ratio.
Turn the <@ > dial to select <A: B>
or <A: B: C>, then press the <@>
button.
Set the flash output.
Press the <@> button.
The slave 10 <8> will blink.
Turn the < @ > dial to set the flash
output for < 8 >, then press the < @ >
button.
The slave 10 <~> will blink. Turn the
< @ > dial to set the flash output for
< ~ >, then press the < @ > button.
The slave 10 <~> will blink. Turn the
< @ > dial to set the flash output for
<~>, then press the <@> button.
All the slave IDs will light.
45
Setting Manual Flash and Stroboscopic Flash with the Slave
11
Manual flash or stroboscopic flash can be set manually with the slave
unit. As with studio flash units, you can set the flash output individually
with the slave units for wireless or manual flash.
Manual Flash
IlaZoom 2Ymm
1/ 16
Z~~1EmII
,I;,
-,~,-
• Hold down the <MODE> button for 2
sec. or more.
~ <M> will blink.
• Set the manual flash output (p.22).
Stroboscopic Flash
IlaZoom 2Ymm
....
I
'"
-MUlTI'"
46
I
1/128
11:>."
.... z~ I,
15- 'lOHz
IEmII
• Hold down the <MOD E> button for
2 sec. or more.
.. <M> will blink.
• Press the <MODE> button again
and <MULTI> will blink.
• Set the stroboscopic flash (p.24).
Reference
580EX II System
Troubleshooting Guide.........................................
Specifications.......................................................
Using a Type-B Camera.......................................
48
50
52
55
o
®
.....-----------1
O)D
"'.. -~--- ..
8J1I1I/~1I/~
---'---:---'----1
8
I
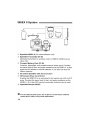
CD Speedlite 580EX II (On-camera/Master unit)
Speedlite Transmitter ST-E2
Dedicated transmitter for wireless control of 580EX 11/430EX set as
slave units.
Q) Compact Battery Pack CP-E4
Compact, lightweight, and portable external power pack. Provides
the same level of dust- and water-resistance as the 580EX II. It uses
eight size-AA alkaline or Ni-MH batteries. It can also use size-AA
lithium batteries.
® EX-series Speed lite with slave function
~ Off-Camera Shoe Cord OC-E3
Enables the 580EX II to be connected to the camera up to 60 cm/2 ft
away. Provides the same level of dust- and water-resistance as the
580EX II. All of the EOS camera's automatic functions can be used.
® Speed lite Bracket SB-E2
(l)
-- For the external power pack, use @ above. If a non-Canon, external
power pack is used, it may cause malfunction.
48
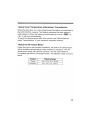
About Color Temperature Information Transmission
When the flash fires, the color temperature information is transmitted to
the EOS DIGITAL camera. This feature optimizes the flash picture's
white balance. When the camera's white balance is set to < m!i!l3 > or
< ~ >, it will work automatically.
To see if this feature works with your camera, see "White Balance"
under "Specifications" in your camera's instruction manual.
About the AF-Assist Beam
Under low-light or low-contrast conditions, the built-in AF-assist beam
will be emitted automatically to make it easier to autofocus. The AFassist beam works with all EOS cameras. The AF-assist beam is
compatible with 28mm and longer lenses. The effective range is shown
below.
Position
Effective Range
Center
0.6 - 10m / 2.0 - 32.8 ft.
Periphery
0.6 - 5 m / 2.0 - 16.4 ft.
49
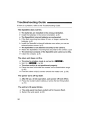
Troubleshooting Guide
II III I J
If there is a problem, refer to this Troubleshooting Guide.
The Speedlite does not fire.
• The batteries are installed in the wrong orientation .
.. Install the batteries in the correct orientation. (p.8)
• The Speedlite's internal batteries are exhausted.
~ If the flash recycling time takes 30 sec. or longer, replace the
batteries. (p.8)
~ Install the Speed lite's internal batteries even when you use an
external power source. (p.8)
The Speed lite is not attached securely to the camera.
• ' Attach the Speedlite's mounting foot securely to the camera. (p.9)
• The electrical contacts of the Speed lite and camera are dirty.
• Clean the contacts. (p.9)
The slave unit does not fire.
• The slave's wireless mode is not set to <a,'·S9_>.
~' Set it to <a,,·S!)_>. (p.36)
• The slave unit{s) is not positioned properly.
~ Place the slave unit within the master unit's transmission range.
(p.38)
.' Point the slave unit(s)'s sensor toward the master unit. (p.38)
The power turns off by itself.
• After 90 sec. of idle operation, auto power off took effect.
Press the shutter button halfway or press the test firing button.
(p.10)
The entire LCD panel blinks.
• The wide panel has been pulled out for bounce flash.
~' Retract the wide panel. (p.20)
50
Auto zoom does not work.
• The Speed lite is -not attached securely to the camera.
• ' Attach the Speed lite's mounting foot securely to the camera. (p.9)
The flash range scale bars blink.
• The flash head has been tilted down by 7°.
Change the bounce position. (p.19)
The periphery or bottom of the picture looks dark.
When you set the flash coverage manually, the setting was a higher
number than the lens focal length, resulting in a dark periphery.
• ', Set the flash coverage that is a lower number than the lens focal
length or set it to auto zoom. (p.20)
• If only the bottom of the picture looks dark, you were too
close to the subject.
• If the subject is closer than 2 m/6.6 ft, tilt the flash head downward
by 7° (bounce flash). (p.19)
The flash exposure is underexposed or overexposed.
• There was a highly reflective object (glass window, etc.) in the picture.
• ' Use FE lock. (p.16)
• The subject looks very dark or very bright.
Set flash exposure compensation. For a dark subject, set a
decreased flash exposure. And for a bright subject, set an
increased flash exposure. (p.14)
You used high-speed sync.
With high-speed sync, the effective flash range will be shorter. Make
sure the subject is within the effective flash range displayed. (p.17)
The picture is really blurred.
• The shooting mode was set to <Av>, and the sc~ne was dark.
Use a tripod or set the shooting mode to < P >. (p.12)
51
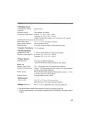
Specifications
-Type
Type:
Compatible cameras:
Guide No.:
Flash coverage:
On-camera, E-TTL II/E-TTL/TTL autoflash Speedlite
Type-A EOS cameras (E-TTL II/E-TTL autoflash)
Type-B EOS cameras (TTL autoflash)
58/190 (at 105mm focal length, ISO 100 in meters/feet)
24 - 105mm (14mm with wide panel)
· Auto zoom (Flash coverage set automatically to match the
lens focal length and image size)
· Manual zoom
· Swinging/tilting flash head (bounce flash)
Normal flash: 1.2 ms or shorter, Quick flash: 2.3 ms or shorter
Flash duration:
Color temperature
information transmission: Flash color temperature information transmitted to camera
when flash is fired
- Exposure Control
Exposure control system: E-TTL II/E-TTL/TTL autoflash, auto/manual external
metering, manual flash
Effective flash range:
Normal flash: Approx. 0.5 - 30 m I 1.6 - 98.4 ft.
(With EF50mm f/1.4 lens Quick flash: 0.5 - 7.5 m I 1.6 - 24.6 ft. (min), 0.5 - 21 m I 1.6 68.9 ft. (max)
at ISO 100)
High-speed sync: 0.5 - 15 m I 1.6 - 49.2 ft. (1/250 sec.)
Flash exposure
compensation:
Manual, FEB: ±3 stops in 1/3-stop increments (Manual and
FEB can be combined)
FE lock:
With <FEL> button or <*> button
High-speed sync:
Provided
Provided (1 - 199 Hz)
Stroboscopic flash:
Flash exposure
Pilot lamp lights
confirmation:
- Flash Recycling (with size-AA alkaline batteries)
Recycling timel
Flash-ready indicator:
52
Normal flash: Approx. 0.1 - 5 sec. I Red pilot lamp lights
Quick flash: Approx. 0.1 - 2.5 sec. I Green pilot lamp lights
• Wireless Flash
Transmission method:
Channels:
Wireless options:
Transmission range (Approx.):
Optical pulse
4
OFF, Master, and Slave
Indoors: 12 - 15 m /39.4 - 49.2 ft.,
Outdoors: 8 - 10m /26.2 - 32.8 ft.
Master unit reception angle: ±40° horizontal, ±30° vertical
Controllable slave groups: 3 (A, B, and C)
Flash ratio control:
1:8 - 1:1 - 8:1 in 1/2-stop increments
Slave-ready indicator:
AF-assist beam blinks
Modeling flash:
Fired with camera's depth-of-field preview button
• Custom Functions: 14 (32 settings)
• AF-Assist Beam
Linkable AF points:
1 - 45 AF points (28mm or longer focal length)
Effective range (Approx.): At center: 0.6 - 10m /2.0 - 32.8 ft.,
Periphery: 0.6 - 5 m /2.0 - 16.4 ft.
• Power Source
Internal power:
Battery life
(Approx. flash count):
Wireless transmissions:
Power saving:
External power:
Four size-AA alkaline batteries
* Size-AA Ni-MH and lithium batteries also usable
100 - 700 flashes (with size-AA alkaline batteries)
Approx. 1500 transmissions (With master unit firing disabled
and size-AA alkaline batteries)
Power off after certain period of idle operation (Approx. 1.5 min.
to 15 min.) (60 min. if set as slave)
Compact Battery Pack CP-E4
• Dimensions
(W x H x D):
• Weight (Approx.):
76 x 137 x 117 mm / 3.0 x 5.4 x 4.6 in.
(excluding dust- and water-resistant adapter)
405 g / 14.3 oz. (Speedlite only, excluding batteries)
All specifications above are based on Canon's testing standards.
Product specifications and external appearance are subject to change without
notice.
53
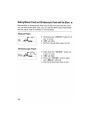
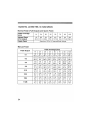
Guide No. (at ISO 100, in meters/feet)
Normal Flash (Full Output) and Quick Flash
Flash Coverage
(mm)
Normal Flash
(Full output)
14
24
28
15/
49.2
28/
91.9
30/
98.4
Quick Flash
35
50
36/
42/
118.1 137.8
70
50/
164
80
105
53/
58/
173.9 190.3
Same as 1/2 to 1/6 manual flash output
Manual Flash
Flash Output
54
Flash Coverage (rnrn)
14
24
28
35
50
70
15/
49.2
28/
91.9
30/
98.4
36/
118.1
42/
137.8
50/
164
53/
58/
173.9 190.3
10.6/
34.8
19.8/
65
21.2/
69.6
25.5/
83.7
29.7/
97.4
35.4/
116.1
37.5/
41/
123 134.5
7.5/
24.6
14/
45.9
15/
49.2
18/
59.1
21/
68.9
25/
82
26.5/
86.9
29/
95.1
5.3/
17.4
9.9/
32.5
10.6/
34.8
12.7/
41.7
14.8/
48.6
17.7/
58.1
18.7/
61.4
20.5/
67.3
3.8/
12.5
7/
23
7.5/
24.6
9/
29.5
10.5/
34.4
12.5/
41
13.3/
43.6
14.5/
47.6
2.7/
8.9
4.9/
16.1
5.3/
17.4
6.4/
21
7.4/
24.3
8.8/
28.9
9.4/
30.8
10.3/
33.8
1.9/
6.2
3.5/
11.5
3.8/
12.5
4.5/
14.8
5.3/
17.4
6.3/
20.7
6.6/
21.7
7.3/
24
1.3/
4.3
2.5/
8.2
2.7/
8.9
3.2/
10.5
3.7/
12.1
4.4/
14.4
4.7/
15.4
5.1/
16.7
80
105
Using a Type-B Camera
110111.111.11•.•
11.1111111. . . . . .I.II.IIII.U.1. ;
If you use the 580EX II with a Type-B camera (TTL autoflash camera),
note the available features and restrictions below.
When a Type-B camera is used with the 580EX II set to autoflash,
<TTL> will be displayed on the Speedlite's LCD panel. (With a Type-A
camera, <ETTL> will be displayed.)
Features Available with Type-B Cameras
· TTL autoflash
· Flash exposure compensation
· FEB
· Manual Flash
· Stroboscopic flash
· Second-curtain sync
· Manual external metering
· Wireless slave flash with manual flash
· Wireless slave flash with stroboscopic flash
Features not Available with Type-B Cameras
·
·
·
·
·
E-TTL II/E-TTL autoflash
FE lock
High-speed sync (FP flash)
Autoflash with wireless flash
Flash ratio set with wireless slave units
55
This device complies with Part 15 of the FCC Rules. Operation is subject to the
following two conditions: (1) This device may not cause harmful interference,
and (2) this device must accept any interference received, including
interference that may cause undesired operation.
Do not make any changes or modifications to the equipment unless otherwise
specified in the instructions. If such changes or modifications should be made,
you could be required to stop operation of the equipment.
This equipment has been tested and found to comply with the limits for a class
B digital device, pursuant to part 15 of the FCC Rules. These limits are
designed to provide reasonable protection against harmful interference in a
residential installation. This equipment generates, uses and can radiate radio
frequency energy and, if not installed and used in accordance with the
instructions, may cause harmful interference to radio communications.
However, there is no guarantee that interference will not occur in a particular
installation. If this equipment does cause harmful interference to radio or
television reception, which can be determined by turning the equipment off and
on, the user is encouraged to try to correct the interference by one or more of
the following measures:
Reorient or relocate the receiving antenna.
Increase the separation between the equipment and receiver.
Consult the dealer or an experienced radio/TV technician for help.
This Class B digital apparatus complies with Canadian ICES-003.
Cet appareil numerique de la c1asse Best conforme a la norme NMB-003 du
Canada.
56
The apparatus shall not be exposed to dripping or splashing.
Batteries shall not be exposed to excessive heat such as sunshine, fire or the
like.
Dry batteries shall not be subjected to charging.
C
This mark indicates that the product complies with Australia's EMC
regulations.
European Union (and EEA) only.
-
This symbol indicates that this product is not to be disposed of with
your household waste, according to the WEEE Directive (2002/96/
EC) and your national law. This product should be handed over to
a designated collection point, e.g., on an authorized one-for-one
basis when you buy a new similar product or to an authorized
collection site for recycling waste electrical and electronic
equipment (EEE). Improper handling of this type of waste could
have a possible negative impact on the environment and human
health due to potentially hazardous substances that are generally
associated with EEE. At the same time, your cooperation in the
correct disposal of this product will contribute to the effective usage
of natural resources. For more information about where you can
drop off your waste equipment for recycling, please contact your
local city office, waste authority, approved WEEE scheme or your
household waste disposal service. For more information regarding
return and recycling of WEEE products, please visit www.canoneurope.com/environment.
(EEA: Norway, Iceland and Liechtenstein)
57
Canon
This Instructions booklet is dated February 2007. For information on the
camera's compatibility with system accessories marketed after this date, contact
your nearest Canon Service Center.
Canon
CANON INC. 30-2, Shimomaruko 3-chome, Ohta-ku, Tokyo 146-8501, Japan
U.S.A. - - - - CANON U.S.A. INC.
One Canon Plaza, Lake Success, NY 11042-1198, U.S.A.
For all inquires concerning this product, call toll free in the U.S.
1-800-0K-CANON
CANADA - - - CANON CANADA INC. HEADQUARTERS
6390 Dixie Road, Mississauga, Ontario L5T 1P7, Canada
CANON CANADA INC. MONTREAL BRANCH
5990, C6te-de-Liesse, Montreal Quebec H4T 1V7, Canada
CANON CANADA INC. CALGARY OFFICE
2828, 16th Street, N.E. Calgary, Alberta T2E 7K7, Canada
For all inquiries concerning this product, call toll free in Canada
1-800-0K-CANON
EUROPE, - - - CANON EUROPA N.V.
Bovenkerkerweg 59-61, P.O. Box 2262, 1180 EG Amstelveen, The Netherlands
AFRICA &
MIDDLE EAST
CANON COMMUNICATION & IMAGE FRANCE S.A.S.
12 Rue de l'lndustrie 92414 Courbevoie Cedex, France
CANON UK LTD.
Wood hatch Reigate Surrey RH2 8BF, United Kingdom
CANON DEUTSCHLAND GmbH
Europark Fichtenhain A10, 47807 Krefeld, Germany
CANON ITALIA S.p.A.
Via Milano 8 1-20097 San Donato Milanese, Milano, Italy
CANON Schweiz AG
Geschaftsbereich Wiederverkauf, Industriestrasse 12, CH-8305 Dietlikon, Switzerland
CANON GMBH
Zetschegasse 11, A-1230 Wien, Austria
CANON Espana, S. A.
C/Joaqufn Costa, 41, 28002 Madrid, Spain
SEQUE Soc. Nac. de Equip., Lda.,
Praya da Alegria, 58, 2°, 1269-149 Lisboa, Portugal
CENTRAL & - - CANON LATIN AMERICA, INC.
SOUTH AMERICA 703 Waterford Way, Ste. 400 Miami, FL 33126, U.S.A.
ASIA
CANON (China) Co., Ltd.
15F Jinbao Building NO.89 Jinbao Street, Dongcheng District, Beijing 100005, China
CANON HONGKONG CO., LTD.
19/F., The Metropolis Tower, 10 Metropolis Drive, Hunghom, Kowloon, Hong Kong
CANON SINGAPORE PTE. LTD.
1 HarbourFront Avenue, #04-01 Keppel Bay Tower, Singapore 098632
CANON KOREA CONSUMER IMAGING INC.
Startower Bldg.17F,737,Yeoksam-Dong, Kangnam-Ku, Seoul, 135-984, Korea
OCEANIA - - - CANON AUSTRALIA PTY. LTD.
1 Thomas Holt Drive, North Ryde, N.S.W. 2113, Australia
CANON NEW ZEALAND LTD.
Akoranga Business Park, Akoranga Drive, Northcote, Auckland, New Zealand
JAPAN - - - - CANON MARKETING JAPAN INC.
16-6, Kohnan 2-chome, Minato-ku, Tokyo 108-8011, Japan
CT1-7768-000
© CANON INC. 2007
PRINTED IN JAPAN
IMPRIME AU JAPON
IMPRESO EN JAPON
Ca......ol8tl
~..
'..
CANON PHOTOGRAPHIC PRODUCTS
INTERNATIONAL SERVICE NETWORK
~1' .I/1J)<51E~if-t::::·A.
2ftMAl-';C;cl- ';c~l'.1
/~~o)~~ld:, "'Hc~l'.1 /i~~ffi~~DILLiD~11 L. LiDt) *90 IElltRi*~iI~ Ct~cCanon International Warranty
SystemO):;/itt')I/~-:7) i10)~~Id:, ftMAcn;clEt->~fij$'i-ct>, Ef)x-:7o)i1l-';d~~~DILLi*~~i~~~iD~11
L. LiDt) *90 i*~~i~~~S
~11IL~:Q~tild:, tt:'\g:.i*~iI~~~L.Ll'Cl-'o i*~~o)~~1J'i~l-'~tit->i*~iI~ILft&7'CJ6~, ftMAB1J'i~l-'~tild:~*~c:~t)*9o
· i~~~gILJ:-:JLId:, $~~~81JIL~1:>ZL.~11nlcJ:·~5g:., immJ:t)t>B~1J'i1J\1J\:Q~tit>®t)*9o
· ~tilL J: t) ~cl£~g~~~9 :Q~ti1J'i® t) *90
· 31):;Z HLfml- 'if-t::::':;ZW1BO)rD~l- 'tibttld:i§-@~O)i~~~DA"iDrD~l- 'tibttJ.jjl-'*90
Canon Photographic Product International Service Network
Service of your Canon product will be provided at any of the listed authorized service facilities. Warranty service of products with international Warranty certificate (with the
symbol ffi for Canon International Warranty System indicated above) will be provided at the listed service facilities marked ffi in areas other than the country or region
where the product was purchased. You must present your warranty certificate when requesting repairs during the warranty period. If no certificate is presented, or if the
warranty does not bear the place and date of purchase, you will be charged the cost of the repairs.
eSome types of repair may require that parts be ordered specially. In this event, the repairs may take longer than usual.
eThe contents of this document are subject to change without notice.
CANON mUfHJ1.lE ~~&~~
J'L 9J~ ~1{1'f.J fIM ij~ J¥! {¢j 1fI\fm)~ f~ft~ Calloll fin~F J~ tJtiJtnfJi *ft~ . . .(E ft.] ~;/~: J~ ft~ [f~ '~EX.f1i1. rx k:J. 9rft~ .f1i1.lt. mJf,l; i;~ 14' Ef) fJFi.Cft~ 91J;g ijlJi
*
1
tJilWf-1*iJE1 (1W:ff J:[fij)iJTt~ Calloll
1
f1fj~tJi.jWd:~H·jE#dft m!¥Jf,);i.C Ef») A~ Calloll f£fj~FJt!¥J{~liEij~*
;
~n"FH1/J~{¥iJF.1S. Exf¥Hlf;~dc~ft.]4~r"':8~A~ifflJ~if!lHWHH.
{l!3iJif,t ·tJH~Jlft~Jtj
rttj/-~ JfJ ;rtf' lIt A~ {~JItI liJ ~'J6' 3w tit hi! if ~ 4'={4' [*J ltt. .IlJfj~ffif ~!f5<' K ft~ {~JIIf Mill)
'(H~j..I1Jt'HrJ)rJ-J.
*
!'(!{V: t!p n~tJld~~-t*:ff
'~f~~:i!{~Flltl1't,
'f:E~ili/J~f~!¥J1*
iJE f;
•
• ~j:,{trf,J~HJifr'~!£H,t. ~J.~/F~1T$%
CANON WH(~HI~~~IH~~
R 91J 7, ~tf:B'~ H{oJijlltffi \'fl. {II. $fj~ t~ fe.~!¥J Calloll
[ifJ~f¥,wff(~1f
•
•
ftfj~@ J11 tJtf~nfHMt'~
LiIDJiJTtI'r CanoIl1tfj~~~{¥,m~U1Emft~m~c EB)
HMlIiJ,
f{rl,Ftf:j}J~i~~~. 9X:f~~.~~l:illtll1i~rfMl!¥JIYj)hf1l
~j/-t;JtUtlf~~!¥Jf~JIf\11Jfj~iJ6·3fitf~JIJ;fJ1I1f~1t·1>:k1t-r*JWfOifr.~rE:IF.J, ~g+7Hj~1ii
[);Iltt.,
ft~
.
11: 1I1nV¥ ~h ft~ ~~ *£&.f1i1. [.Po: ~~ frAS .f1i1.lMrfti t\HliHl' EB m~cA~ 71J ~ ijlJim ~ 11Lt!P ~tJt{~Im~:ff
Canoll fUj~J¥JtB'~f¥.mijlJim {H*.m<Mrrt1r*J, 'gjf~~~{~@J111if, --5E~t±H~fe.~B''1f¥~
f~3~H
·tJH~J1B'VH
IlJfm'r¥if~~Rft~{~J!j!M"~
(--- ) -
Country & Area Code
iii F:lf&ELill18i £I
CANON MARKETING JAPAN INC.
REGIONAL
HEADQUARTERS
Phone:
(81) 03-3455-9353
jiilijtUi,Ji','i',J'ffi;,t.i,$t16·;·i"i
HONG KONG
Ef)
INDONESIA
Ef)
KOREA
Ef)
MALAYSIA
Ef)
PHILIPPINES
Ef)
SINGAPORE
Ef)
TAIWAN
Ef)
THAILAND
Ef)
Canon HongKong Co. Ltd. - Domestic Sales Office
e Kowloon Depot:
18/F The Metropolis Tower, 10 Metropolis Drive Hunghom, Kowloon Hong Kong
e HongKong Depot:
10/F Beverly House, 93-107 Lockhart Rd, Wan Chai, Hong Kong
Pt. INTER-DELTA Tbk
JI. Gaya Motor Barat, Sunter II Jakarta 14330
Canon Korea Consumer Imaging Inc. Canon Support Center
2F Samwhan Artnubeau III, 209 Nonhyun 2 Dong, Kangnam-gu, Seoul
Canon Marketing (Malaysia) Sdn. Bhd.
Block D, Peremba Square, Saujana Resort, Section U2, 40150 Shah Alam,
Selangor Darul Ehsan Malaysia
Canon Marketing (Philippines) Inc.
Marvin Plaza Building. 2153 Don Chino Roces Ave. Makati City, Metro Manila
Canon Singapore Pte. Ltd.
1 HarbourFront Avenue #04-01 Keppel Bay Tower Singapore 098632
Rainbow Photo & Image Equipment Co. Ltd.
No. 20 Chiling Road, Taipei 10424. Taiwan
Canon Marketing (Thailand) Co.Ltd
10th Floor, Bangkok City Tower, 179/34-45 South Sathorn Road. Bangkok 10120
lil~lii#l·"'i'ti.~".i:t·'~tl#l·jl",
REGIONAL
CANON U.S.A., INC.
HEADQUARTERS
-For service center location, please visit our website or contact the phone number above.
Phone:
Fax:
Phone:
Fax:
Phone:
Fax:
Phone:
Fax:
Phone:
Fax:
(852) 2170-2888
(852) 2428-3963
(852) 2170-2888
(852) 2428-3963
(62) 021-651-1533
(62) 021-651-0472
(82) 02-2017-8600
(82) 02-2017-8796
(60) 03-7845-0055
(60) 03-7844-6044
Phone:
Fax:
Phone:
Fax:
Phone:
Fax:
Phone:
Fax:
(63) 02-812-6047
(63) 02-812-0067
(65) 6799-8888
(65) 6799-8882
(886) 02-2537-1172
(886) 02-2571-7171
(66) 02-344-9999
(66) 02-344-9910
Phone:
Phone:
CANON CANADA INC.,
1-800-828-4040
-Within US only
1-800-828-4040
-Within Canada only
-For service center location. please visit our website or contact the phone number above.
lij#l~
Phone:
1-305-260-7400
CANON MEXICANA, S.DE R.L. DE C.V.
Manuel Avila Camacho No. 138, PB Y pisos 15,16 Y 17 Col. Lornas de
Chapultepec Delegacion Miguel Hidalgo, C.P 11000 Mexico, D.F.
-For service center location, please contact the phone number above or send an e-mail to:
canonmx_soporte@cusa. canon. com
Phone:
Fax:
01-800-710-7168-Within Mexico only
(52) 052-494-905
(52) 052-494-944
AUSTRIA
BELGIUM
CANARY ISLANDS
DENMARK
FINLAND
FRANCE
GERMANY
GREECE
ICELAND
IRELAND
ITALY
LUXEMBOURG
THE NETHERLANDS
NORWAY
CANON EUROPA N. V
P.O. Box 2262, Bovenkerkerweg 59-61 1180 EG Amstelveen, The Netherlands
-For general Inquiry only. For repair, please contact one of service center listed below.
-Within Local oniy for non-Country & Area Code No.
Ef)
Ef)
Ef)
Ef)
Ef)
Ef)
Ef)
Ef)
Ef)
Ef)
Ef)
Ef)
Ef)
Ef)
Ef)
Canon Ges.m.b.H
Canon Belgium N.V. / S.A.
Chellsons S.A.
Chell sons S.A.
Canon Denmark
Canon Oy
Canon France Regional Competence Center
Canon Germany Regional Competence Center
Intersys SA
Beco ehf
Canon Ireland Ltd.
Canon Italy Regional Competence Center
Canon Luxembourg S.A.
Canon Nederland N.V
Canon Norge A1S
http://www.canon.at
http://www.canon.be
Islands 57, La Naval-Las Palmas
23, Irneldo Seris-Sta Cruz de Tenerife
http://www.canon.dk
http://www.canon.fi
http://www.canon.fr
http://www.canon.de
http://www.intersys.gr
Langholtsvegur 84. 104 Reykjavik
http://www.canon.ie
http://www.canon.it
http://www.canon.lu
http://www.canon.nl
http://www.canon.no
SLOVAKIA
CYPRUS
Ef)
Ef)
Ef)
Ef)
Ef)
Ef)
Ef)
Ef)
Ef)
Ef)
Ef)
Ef)
SEQUE S.A.
3A AUDIO VIDEO Servis
Canon Espana, S.A.
Canon Nordic Regional Competence Center
Canon Schweiz AG
Canon UK Regional Competence Center
Canon CZ S.R.O.
AWH service
Canon Polska SP.Z.O.O.
CSI Foto Video
Pro Laika
NT. Kakoyiannis/Paroutis Electronics Ltd.
PORTUGAL
SLOVENIA
SPAIN
SWEDEN
SWITZERLAND
UNITED KINGDOM
CZECH REP.
POLAND
Phone:
Fax:
(31) 020-545-8545
(31) 020-545-8211
Phone:
0810-081009
Phone:
070-300-012
Phone:
(34) 28-470008
Phone:
(34) 28-470008
Phone:
70-2055-15
Phone:
020-366-466
Phone:
0825-002-923
Phone:
0180-500-6022
Phone: (30) 0210-955-4000
Phone:
(354) 533-3411
Phone: (353) 01890-200-563
Phone:
848-800-519
Phone:
27-302-054
Phone:
0900-202-2915
Phone:
226-29321
Praca da Alegria. 58-2, 1269-149 Lisboa
http://www.3a-servis.si
Joaquin Costa, 41 • 28002 Madrid
http://www.canon.se
http://www.canon.ch
http://www.canon.co.uk
160 00 Praha 6
Milesovska 1, 130 00 Praha 3
http://www.canon.pl
ul. Zytnia 15, 01-014 Warszawa
Radlinskeho 26, 811 07 Bratislava
115 Omonias Avenue Paroutis Building.
3045 Limassol
127, South Sohrevardi Avenue
P.O. Box 11365/1167, Tehran
50 Anilevitch St, Tel Aviv 67060
PO. Box 1796. Jeddah 21441
Phone:
Phone:
Phone:
Phone:
Phone:
Phone:
Phone:
Phone:
Phone:
Phone:
Phone:
Phone:
P.O. Box 1782 Halfway House 1685
Johannesburg
Phone:
IRAN
Ef)
Aphomar Co. Ltd.
ISRAEL
SAUDI ARABIA
Ef)
Ef)
Karat Israel Ltd.
AIQuraishi Leisure Services
SOUTH AFRICA
Ef)
Canon South Africa.
REGIONAL
HEADQUARTERS
Ef)
CANON AUSTRALIA PTY. LTD.
Phone:
*For service center location, please contact the phone number above.
Fax:
Canon New Zealand Ltd.
Akoranga Business Park, Akoranga Drive Northcote. Auckland. New Zealand
Phone:
Phone:
Phone:
Phone:
(351) 021-3242830
(386) 01-5461000
(34) 091-5384500
08-7448620
0848-833-838
08-705-143723
(420) 02-25280-111
(420) 02-22721-525
(48) 022-572-30-00
(48) 022-862-41-38
(421) 02-5441-4880
(357) 25-384306
(357) 25-568274
(98) 021-8752442
(972) 03-6888525
(966) 02-6970779/
6970652
(27) 011-2667162
jiilillii.iii.'ii.iaffi;,i.i,hq.i"p:;"
NEW ZEALAND
Ef)
13-13-83-Within Australia only
(61) 02-9805-2555
(61) 02-9888-3314
(64) 09-489-0470
'~(·)~eMl~'~;::I~i;:j::l·b
-Service facilities listed below are not "International Warranty Members"
They do not accept any warranty repair but may assist you when the repair charge is acceptable.
ASIA
BRUNEI
CHINA
MYANMAR
PAKISTAN
SRI LANKA
NEPAL
jiili1thi.iXi.iXi.iaffi;,i.i,64';··illiii!1lUi
REGIONAL
HEADQUARTERS
Sistema Internacional de Servicio de Camaras Fotograficas Canon
EI servicio de su producto Canon sera proporcionado por cualquiera de las instalaciones de servicio autorizadas mencionadas en la lista. EI servicio de garantfa de los
productos con certificado de Garantfa Internacional (con el simbolo ffi del Sistema de Garantfa Internacional de Canon indicado arriba) sera proporcionado por las
instalaciones de servicio que figuran en la lista con la marca ffi, en otras areas distintas del pais 0 de la regi6n donde se adquiri6 el producto. Cualquier solicitud de
reparaci6n durante el periodo de garantfa se realizara al presentar el certificado de garantfa debidamente lIenado incluyendo ellugar y la fecha de compra, en caso de no
ser as! la reparaci6n sera con cargo al cliente.
e Algunos tipos de reparaciones podrian requerir un pedido especial de repuestos. En tal caso, las reparaciones podrian demorar mas de 10 habitual.
e Los contenidos de este documento se encuentran sujetos a cam bios sin previa aviso.
INDIA
nililJii.i'i.i'paffi;';.;';A.",h"i i
REGIONAL
HEADQUARTERS
Rete Di Assistenza Internazionale Per Fotocamere Canon
L'Assistenza del prodotto Canon acquistato sara fornita presso uno qualsiasi dei centri di assistenza autorizzati riportati nella lista.
L'assistenza in garanzia di prodotti con certificato di garanzia internazionale (con il simbolo ffi per il sistema di garanzia internazionale Canon sopra indicato) sara fornita
presso i centri di assistenza riportati nella lista contrassegnati da ffi in aree diverse dal paese 0 dalla regione in cui e state acquistato il prodotto. E necessario presentare il
certificato di garanzia di cui si e in possesso quando si rechiedono prestazioni di assistenza durante il periodo di validita della garanzia. Se non si presenta il certificato, 0
se la garanzia non reca Ie indicazioni del luogo e della data di acquisto, la riparazione sara a pagamento.
e Per alcuni tipi di riparazione pub essere necessario ordinare a parte i pezzi di ricambio. In questa caso, la riparazione richiedera piu tempo del normale.
e II contenuto di questa documento e soggetto a modifiche senza preavviso.
CAMBODIA
n;liIJi','i:,'XJ,J,q:;,i.i"m;;'hi"iY;'ffii;.i"i
•• ·'tj.~"i.)I •• :',!&I#I-j(",
REGIONAL
CANON LATIN AMERICA, INC.
HEADQUARTERS (Except Mexico)
-For service center location, please visit our website or contact the phone number above.
Reseau International des Services Canon Appareil-Photo
Votre appareil Canon pourra etre repare dans un des centres de service apres-vente agrees indiques dans la liste ci-dessous. II sera repare sous garantie contre presentation
du Certificat de Garantie (avec la marque ffi du Systeme de Garantie Internationale Canon) dans les centres de service apres-vente indiques par la marque ffi dans les pays
ou regions autres que celui ou Ie produil a ete achete. Vous devrez presenter votre certificat de garantie pour toute demande de reparation pendantla periode de validite de
la garantie. Toutefois, les reparations seront avos frais si vous ne presentez pas volre garantie ou si elle ne comporte ni I'adresse du revendeur ni la date d'achal du produit.
e Certaines reparations peuvent necessiter des commandes de pieces speciales. Dans ce cas, elles peuvent durer plus longtemps que prevu.
e Le contenu de ce document peut faire I'objet de modifications sans preavis.
nilill"·"'·"'·"it4%hffi·,i.i,';.i"i
fiilijtl",';',''',''ffi;,;··,·ffi;
REGIONAL
HEADQUARTERS
Weltweites Kundendienstnetz fUr Canon Kameras
Ihr Canon Produkt wird bei jeder der aufgelisteten autorisierten Kundendienststellen gewartet und repariert. Garantieleistungen fOr Produkte mil der Internationalen Garanliekarte
(gekennzeichnet mit dem Symbol (f) fOr das Internationale Canon Garantiesyslem) erhalten Sie in anderen Gebieten als dem Land oder der Region, wo das Produkt gekauft wurde,
bei den in der Liste mit (f) gekennzeichneten Kundendienststellen. Wenn Sie das Produkt wahrend der Garantiezeit zur Reparatur geben, mOssen Sie Ihre Garantiekarte vorlegen.
Wenn Sie keine Garantiekarte vorlegen oder wenn die Garantiekarte nicht den Ort und das Datum des Kaufs tragt, werden Ihnen die Kosten der Reparatur in Rechnung gestellt.
e E.inige Arten von Reparaturen k6nnen die Bestellung spezieller Teile erfordern. In diesem Fall kann die Reparatur langer als normal dauern.
e Anderungen des Inhalts dieses Dokuments sind ohne VorankOndigung vorbehalten.
INDONESIA
• Interhouse Company
NO.5 & 6, Bunut Jaya Complex, Simpang 574,
Krn 71/4, Jalan Tutong. Bandar Seri Begawan 2690, Brunei Darussalam
e Royal Cambodia Co., Ltd
6th Floor, Royal Group Building, 246 Preah Monivong Boulevard. Phnom Penh
• Canon(China)Co., Ltd.
15F Jinbao Building No. 89 Jinbao Street, Dongcheng District, Beijing 100005. China
• Canon India Pte. Ltd.
2nd Floor, Tower A & B Cyber Greens, DLF Phase III Gurgaon-122 002. Haryana. India
• Accel International Co., Ltd.
Level 6. FJV Commercial Centre, 422-426 Strand Road, Botataung, Township, Yangon
• Global Systems
39-C/1, Block-6, P.E.C.H.S Off: Shahrah-e- Faisal, behind Jason Trade Centre, Karachi 75400
e Homebase(Pvt.)Limited
NO.85 Braybrooke Place, Colombo 02, Sri Lanka
e Primax International Inc.
3rd Floor, Maitry Bhavan. New Road, Kathmandu, Nepal
e PT Datascrip
JI. Angkasa no 18 BD,Jakarta, Indonesia
Phone:
(673) 02-653001
Phone:
Fax:
Phone:
(855) 023-426414
(855) 023-426014
(86) 010-9517-7178
Phone:
Fax:
Phone:
Fax:
Phone:
Fax:
Phone:
Fax:
Phone:
Fax:
Phone:
Fax:
(91)-012-45160000
(91 )-012-45160011
(95) 01-202-092
(95) 01-202-079
(92) 021-438-9581
(92) 021-438-9589
(94) 01-12437797
(94) 01-12448980
(977) 01-422-4079
(977) 01-422-9358
(62) 021-424-4204
(62) 021-424-7017
EUROPE I MIDDLE EAST I AFRICA - - - - - - - - - - - - - - - - - - - - - - - - - - - - - - - - - (7) 095-258600
Kosmodamianskaya nab. 52. Building 3,
Phone:
CIS
e Canon Representative Office
5th Floor 113054 Moscow
Phone:
(36) 01-2668085
Somogy 1. Bela u. 10, 1085 Budapest
HUNGARY
• Camera Kft
(356) 448466
http://www.pcutajar.com.mt
Phone:
MALTA
• P. Cutajar
Phone:
(965) 2-44810315
PO. Box 974 Safat 13008
KUWAIT
• Naser Mohammed, AI Sayer Comm.Co.
Phone:
(968) 706153
eGENETCO
PO. Box 3139. Ruwi 112
OMAN
(971) 04-3534168
PO.Box 284 Dubai
Phone:
UAE
• Khoory Electronics
(961) 01-582-000
460 Corniche AI-Nahr, Beirut
Phone:
LEBANON
• Image System sal
http://www.canon.ee
Phone:
(372) 630-0530
ESTONIA
• AS KTK Overall
Phone:
(371) 720-4444
http://www.canon.lv
LATVIA
• Canon North-East Oy
(370) 8700-555-78
http://www.canon.lt
Phone:
LITHUANIA
• Canon North-East Oy
Complete this card at time of sale.
A remplir au moment de I'achat
(Camera)
(Appareil)
(CAMARAS)
(Camera)
(Appareil)
(CAMARAS)
(Camera)
(Appareil)
(CAMARAS)
(Camera)
(Appareil)
(CAMARAS)
INTERCHANGEABLE LENS
Objectif interchangeable
OBJETIVOS INTERCAMBIABLES
OWN
En possession
EN POSESI6N
PRINTED IN JAPAN
CT5-7728-004
PRESENT OWNERSHIP AND PRODUCTS INTERESTED IN
Articles dejA en possession au juges dignes d'interllt
Produetos en posesi6n y que Ie interesan
CAMERAS
Appareils
-photo
CAMARAS
L1ene esta tarjeta en el momento de la venta.
INTERESTED IN
Interesse par
INTERESADO EN
OWN
En possession
EN POSESI6N
D
D
OTHER ACCESSORIES
Autres accessoires
OTROS ACCESORIOS
OWN
En possession
EN POSESI6N
INTERESTED IN
Interesse par
INTERESADO EN
MODEL
Modele
MODELO
D
D
SF'EEDLITE
58~3E:i~
II
SERIAL NO.
No. de serle
N' DE SERlE
INTERESTED IN
Interesse par
INTERESADO EN
D
D
D
D
CUSTOMER
~
CliENTE
NAME
ADDRESS
D
D
D
D
Nom
Adresse
NOMBRE
DIRECCION
CITY/STATE
_
ZIP
PHONE
~\ILelt;g~~~~ADO---------------g~ci'I&~~6sTAL-
~~~
m
<. A"r#
_
i~t~~~~o
'·TE~>
~m~ CANON U.S.A., INC.
CANON U.K.RCC
CANON NEW ZEALAND LTD. CANON LATIN AMERICA, INC.
CANON CANADA., INC. CANON AUSTRALIA PTY LTD. CANON SALES CO. JAPAN
CANON MEXICANA
NAME
NOM
NOMBRE
MODEL
MODELE
MODELO
ADDRESS
ADRESSE
DIRECCION
BODY NO.
BOITIER NO
N" DE CUERPO
SPEEDLITE 580EX II
PURCHASE DATE
DATE D'ACHAT
FECHA DE COMPRA
CITY
VILLE
CIUDAD
THIS WARRANTY CARD AND YOUR BILL OF SALE MUST BE
PRESENTED FOR WARRANTY SERVICE.
PROVINCE
PROVINCIA
Call0ll
POSTAL CODE
CODE POSTAL
C6DIGO POSTAL
LIMITED WARRANTY
The Umited Warranty sel forth below Is given by CANON COMPANY listed below with respect to Canon Photographic Products purctlased in the United States. Canada, Australia, the United
Kingdom, New Zealand. Mexico or Japan.
This limited InternatiOnal Warranty is only effectJve upon presentation of the warranty card and prool 01 purchase.
This canon equipment is warrantee! against defective materials or wort<manship for one (1) year lrom the dale of original purchase and Is limited 10 repair, adjustment and/or replacement of
detective parts.
Equipment covered by IhIs Warranty win be repaired by canon Internalional Warranty Members located In the United States, canada, Australia the United Kingdom, New Zealand, Mexico and
Japan, WITHOUT CHARGE. (List of canon International Wamlnty Members included with the equipment.)
EqlJlPlTl8nt covered by this Warranty wi" be repaired by Canon International Warranty Members WITHOUT CHARGE. excepl for Insurance. transportation and handling charges. (see list of
canon International Warranty Members included with the equipment.)
When relurning equipmeollor warranty service, the shipping charges must be prepaid and the equipmenl should be shipped in its original carton or box, or an equivalent, property packed to
WIthstand the hazards of shipment and be lully Insured. A copy 01 this warranty card and proof 01 purchase should be enclosed, as well as a description of the problem, film samples, elC.
RepaIrs wII be made and the equipment will be returned, shipped al NO CHARGE within the country 01 repair.
This warranty ~ COV8fS defective materials or workmanship encountered In nannal use of the equipment and dOes not apply In the following cases:
(a) Loss or damage 10 the equipment due 10 abuse causing deterioration, mishandling, accident or failure 10 follow operating instructions.
(b) II equipmeot is defective es a result of leaking ballenas or liquid damage.
(c) Delec1ive materials or workmanship where the defect is due 10 the equipmeot having been serviced or modifl8d by other than Canon International Warranty Members or other autOOri.zed
service facilities around the wOOd.
(d) Mallunction resulting from the use 01 accessories, attachments, product supplies, parts or devk:es (including, without limitation, batteries, film, lenses, fiash attachments and other
acoessories) with Itus canon photographic equipment that do not cooforrn to Canon specifications.
(e) Damage resulting during shipment. (Claim must be presented and examined by the shipper.)
Equipment oov8fecl by this warranty may be repaired by Canon Inlernational Warranty Members located outside the United States, canada, Australia, the United Kingdom. New Zealand,
Mexico and Japan, WITHOUT CHARGE, except lor insurance, lransportation and handling charges. (Worldwide list 01 canon International Warranty Members included with equipment.)
CANON COMPANY EXCLUDES AlL REPRESENTATIONS, WARRANTIES, CONDITIONS OR LIABILITIES (WHETHER EXPRESS OR IMPLIED, INCLUDING MERCHANTABILITY AND
FITNESS FOR A PARTICULAR PURPOSE) IN RELATION TO THE EOUIPMENT. EXCEPT THOSE WHICH ARE SET FORTH ABOVE AND/OR EXCEPT TO THE EXTENT THAT ANY
SUCH EXCLUSION WOULD CONTRAVENE ANY STATUTE OR CAUSE THIS TERM TO BE VOID.
EXCEPT TO THE EXTENT THAT ANY SUCH EXCLUSION WOULD CONTRAVENE ANY STATUTE OR CAUSE THIS TERM TO BE VOID, CANON COMPANY EXCLUDES ALL LIABILITY
TO THE PURCHASER IN RESPECT OF ANY CLAIM (WHETHER CONTRACTUAL, TORTIOUS, STATUTORY OR OTHERWISE) FOR ANY GENERAL, SPECIAL, INCIDENTAL OR
CONSEQUENTIAL LOSS, DAMAGE, COST OR EXPENSE (INCLUDING, WITHOUT LIMITATION, ANY LOSS OF FILM) IN RELATION TO THE EQUIPMENT OR ANY SERVICES
SUPPLIED BY CANON COMPANY IN RELATION TO THE EQUIPMENT. THIS WARRANTY SHAll NOT EXTEND TO ANYONE OTHER THAN THE ORIGINAL PURCHASER OF THIS
EQUIPMENT OR THE PERSON FOR WHOM IT WAS PURCHASED AS A GIFT.
This WSlT8llty gives you specific legal rights. and you may also have other righls whtch vary fJom state to state, province 10 province and counlry 10 coontry.
KEEP THIS WARRANTY CARD. IT IS YOUR PERMANENT RECORD OF WARRANTY. IF LOST IT Will NOT BE RE-ISSUED.
·UrnIted Warranty means thai the contents of thiS warranty are limited to the above·mentlooed terms and conditions.
Call0ll
CETTE CARTE DE GARANTIE ET VOTRE PREUVE D·ACHAT DOIVENT
~TRE PRESENTES POUR RECEVOIR LE SERVICE SOUS GARANTIE.
DEALER'S NAME & ADDRESS
MARCHAND NOM & ADRESSE
NOMBRE Y DIRECCION DEL DISTRIBUIDOR
PRESENTE ESTA TARJETA DE GARANTIA Y LA BOLETA DE COMPRA
PARA PODER RECIBIR EL SERVICIO DE GARANTIA.
Call011
GARANTIE LIMITEE
La garantie intemationale deeme d-dessous est accord8e par fa societe CANON al'egard des produlls de photograpnie Canon acheles aux Etats-Unis, au Canada, 8f'l Australie, au RoyaumeUni. 8f'l Nouvelle Zelande. au Mexique ou au Japan.
La pnisente garantie intemationale n'est vallde que sur presentation de Ia carte de garantie el d'une preuve d'acha!.
Le pr{lsent equlpement Canon esl garanti contre Ies vk:es de maleriaux au de fabrlcalion pendant une periods de un (1) an compler de Ia date de I'achal initial. 51 I'equipemenl presente une
ch§fectuosile pendant Ia periOde de garantie, les pi(lCes defectueuses seronl r8par8eS, ~l8es et (ou) remplacees.
l'equipemenl sous garantie sera repare SANS FRAIS par les membres du reseau moodial de faumisseurs de service sous garantie Inlernationale de canon, qui soot situes aux Etats-Unis, au
canada, en Australie, au Royaume-Uni, en Nouvelle Zelande, au Mexique et au Japan. (La lisle des membres du resesu mondial de loumisseurs de S8rv1ce sous garantie lntemationale de
Canon accompagne 1'6Quipemenl.)
Si Ie produit esl reloume pour lIlre repare ou rempLace au titre de fa garantie, l'exp6diteur du produil doit payer d'avance las lrai! d'exp&dition. L'8qulpemeol doil litre envoys dans sa bolte
origlnale, au dans un embaltage equivalent, 61re assure pour sa valeur IntegraJe, et il doit lltre embBlle adequatement pour evlter les rlsques de dommages en coors de transport. l'equipement
doll lltre accompagne d'une copie de Ia pniseme carte de garantie, d'une preuve d"achal aJnsl que d"uns description du pr~me, d"OChanUllons de pellicule ou de loute autre preove de
ch§lectuositll. Les reparations seront effectuees et I'equipemenl sera retoume rexp8di!eur, SANS FAAIS, si radlesse de l'exp6diteur est dans Ie pave oil requipement a SiS rSpare.
La presente garantie ne couvre QUe Ies vices de matllriaux et de fabrication survenus dans Ie cadre d"une utilisation normale de I'equlpemen!. Elle ne s'appIlque pas dans Ies cas suivants'
a
a
<a)
(b)
(c)
(d)
(e)
a
perte de I'equipement ou dommage I'equipement en raison d'un usage abusif menant ala deterioration. d'une manipulation inappropriM. dun accident ou de tout delaut de suivre las
directivesd'utillsation:
dfIfectuosite altribuable une fuile au nlYeau des piles ou dommages dus une exposition a des substances Ilquldes;
vices de maler!aux ou de fabrication dus ala reparation ou ala modlflC8tion de 1'8qu!pemenl par un tiers, autre qu'un membre du reseau mondlal de loumisseurs de S8rvlce sous garantie
de canon, au aulre qu'un point de service autorisil au monde:
defam de fonctionnement decoulant de I'usage d'accessoires, de cornpI8menls, de loumitures, de pieces ou de disposltils (y compris, sans loulelois s'y Ilmil8f,1es piles, les pellicules, les
lenlilles, las lampes-8clairs el autres accessoires) qui sonl non conformss aux sp8cifications canon el qui soot utilisils avec eel equipement de photographie canon:
dommages subis en coors de transport (Toute r9damation dolt litre presentee el elC8mlnee par Ie transponeur.)
a
a
a
l'equlpement sous garantie paul litre repare SANS FRAIS par les membres du reseau morl(lial de laumisseurs de S8rv1ce sous garantie de CallOll qul ont une place d'affaires l'elCler1eur des
Etats-Unis, du canada, de l'Australia, du Royaume-Unl, de fa Nouvelle Z9lande, du Mex!que et du Japon, mais Ie pr0pri9talre de I'llqulpemern devra assumer les Irais d'assurance, de transport
el de manulention. (La liste des membres du reseau mondlal de faumisseurs de service sous garantie de canon accompagne I'equipement.)
LA SOCIETE:: CANON DE::CLARE QU'IL N'EXISTE, A l'EGARD DE CET EQUIPEMENT, AUCUNE AUTRE DE::CLARATION. GAAANTIE, COODITlON au OBLIGATION (EXPRESSE au
TACITE, Y COMPRIS TOUTE GARANTIE DE OUALITE MARCHANDE OU DE CONVENANCE A UN USAGE PARTICULIER) QUE LA GARANTIE E::NONCEE CI·DESSUS, A MaiNS
OU'UNE TELLE CLAUSE D'EXCLUSION N'ENFREGNE TOUTE LOI APPLICABLE au NE RENDE LA PRE::SENTE MODALrTE:: NULlE.
A MaiNS OU'UNE TElLE CLAUSE D'EXCLUSION N'ENFREIGNE TooTE lOI APPLICABLE OU NE RENDE LA PRESENTE MODALlTE:: NUlLE, LA SOCIETE:: CANON N'ASSUME
AUCUNE RESPONSABILlTE:: A L'E::GARD DE TooTE RECLAMATION (DE NATURE CONTRACTUElLE, DE::L1CTUELLE, LE::GALE
AUTRE) FONDEE SUR TOUTE PERTE (Y COMPRIS,
SANS TOUTEFOIS SY LIMITER, TOUTE PERTE DE PElLiCULE). TOUS OOMMAGES. TOUT COUT OU TOUS FRAIS DE NATURE GE::NE::RAlE, SPE::CIAlE, ACCESSOIRE OU
INDIRECTE TOUCHANT l'eQU1PEMENT OU SUR TOUT SERVICE DISPENSE:: PAR lA SOCIE::TE:: CANON A L'E::GARD DE L'E::OUIPEMENT. LA PRESENTE GARANTIE NE
S'APPLIQUERA A AUCUNE AUTRE PERSONNE QUE L'ACHETEUR INITlAl DE CET E::OUIPEMENT OU LA PERSQNNE QUI l'A RECU EN CADEAU.
La presente garantie vous confere des droits partlcutiers 8f'l vertu de fa Ioi. et Use peut que yous ayez d'autres droits QUi variant selon I'elat, Ia province 0I:l1e pays.
VEUILlEZ CONSERVER LA PRE::SENTE CARTE DE GARANTIE. ELLE CONSTITUE UNE PREUVE PERMANENTE DE LA GARANTIE APPLICABlE A VOTRE EQUIPEMENT ET NE SERA
PAS RE::EMISE EN CAS DE PERTE.
"La presenle garantle est qualiflee de limitee car son contenu est restreint aux modaJites et conditions deerites d-dessus.
au
GARANTIA L1MITADA
La garantla limltada estabIedda a contiouaci6n es otorgada por las empresas CANON COMPANY indicadas en la lista de abajo, para los produclos fotogrcUIcos canon comprados en los
Estados Unidos, Canada, Auslralia, Reino Unido, Nueva Zelanda, Mexico 0 Jap60.
Esta garantia inIemacional ~mitada sera electiva linicamenle conlra presenlad6n de Ia tarjeta de garantla y de una prueba fehaciente de Ia compra.
EI equJpo canon estA garantizado contra defectos de material 0 de mano de obra bajo uso normal por un periodo de un (1) ai\o a partir de Ia lecha de compra original y se encuentra Hmilado a
Ia reparad6n, ajoste 0 susllIUcI6n y/o reempla20 de las piezas defectuosas.
EI equipo cublefto pot esta garantla sem reparado pot los miembros de fa garantla inlemacional canon ubicados en los Estados Unidos, Canad<\. Australia. Reino Unido. Nueva Zelanda,
latIn America, M.blco YJap6n SIN CARGO AlGUNO. (La Msta de los mlembros de Ia garantla intemaclonal canon que acompal'la aI equipo).
EI equipo cubierto por esta garantls sen!. reparado por los mlembros de fa garanlla intemaciooal Canon, SIN CARGO AlGUNO, exeeplo para los gastos de seguro, lransporte y manejo.
(Vilase Ia Iista de lTIiembfos de fa garanl/a Intemaclonal Canon que acompafla al equlpo).
canon
Para poder recibir 91 serviclo de garantfa, usted debeni enviar el producto con tados los IIeles pagados de antemano en su caja de cartOn original 0 equivalente, debidamente empaquetado
para que pueda soponar los riesgos de transporte, y compIelameote asegurado. Sa debeni Incluir una copia de esta tarjeta de garantla y una prueba lehacieflte de fa compra, junto con una
descripci6n del problema, moeslras de peUCUlas, etc
Sa efectuaran las reparadones y e1llele de Ia devoIoci6n del equlpo
SIN CARGO de!1tro del pais de reparad6n.
Esta garantla cubre unicamente los defectos de material 0 de mano de obra bajo uso normal. y no sera apIicab1e en lOS siguientes casos:
(a) Perdidas 0 daflos al 8QUlPO causados por deterioro resultanle del abuso. mal uso, accidente, 0 lalta de atendOn a las inslrucciones de funclooamiento.
(b) oelectos del equlpo resultante de p&rdidas de electr61ito 0 de dai\os causados pot' el mismo.
(c) oelecto de malerial 0 de mano de obra cuando ef defecto.sea resultado de modilicad6n 0 reparad6n reaUzada pot' personal distinto de los miembros de Ia garantla intemacional Canon u
otros ceotros de servlcio autorizados dislribuldos por todo eI mundo.
(If) Failo de funcionamlento resultante de Ia utiWlaCl6o, junto con este equipo lotogoUico Canon, de accesorios, piezas de sujeci6n, consumibles del producto, repuestos 0 d4sp0sit/vos
(lI'lCluyendo, sin limitaci6n, pilas, pellculas, objetJvoS, aooesorios de !lash y otros accesorios) que no cumplan con las especificaclooes de canon.
(e) Daflos provocados durante el transporte. (EI red8mO debe ser preS8ntado a y examioado pol' Ia empresa de transporte).
sera
canon
ubicados fuera de Estados Unidos, canadA, AustraHa. Rero Unido, Nueva
EI equipo CUbierto por esta garantfa puede S8l' reparado pol' los miembros de Ia garantla Intemacional
Zelanda, Canon Latrn America, Mexico Y Jap6n SIN CARGO ALGUNO, exceplo para los gastos de seguro, lransporte y manejo. (La lista de los miembros de la garanlia intemacional canon
del mundo que acompafla al eqwpo).
CANON COMPANY EXCLUYE TOOAS LAS REPRESENTACIONES, GARANTIAS, CONDICIONES U OBUGACIONES (SEA EXPRESA 0 IMPLICITA, INCLUYENOO COMERCIABllIDAD E
IDONEIDAD PARA UN PAQPOSITO PARTICULAR) RELACIQNADAS CON El EOUIPO, EXCEPTO LO EXPRESAMENTE ESTABLECIDO EN El TEXTO PRECEDENTE YIO EXCEPTO
HASTA El GRADO EN QUE AlGUNA EXCLUSI6N PUEDA INFRINGIR AlGUN ESTATUTO 0 CAUSAR LA ANULACI6N DE ESTOS TE::RMINOS.
EXCEPTO HASTA EL GRADO EN QUE ALGUNA EXCLUSION PUEDA INFRINGIR ALGUN ESTATUTO 0 CAUSAR LA ANULACI6N DE ESTOS TE::RMINOS, CANON COMPANY NO
~E~L~ :~?~~ ~A5C~:g:~~~~~~~~I~t,~~I~~~~r ~~O~~~~E~~,!~~ ~E~~~~6'S~~~~~~g~~~~~~~~~~~~Ati~I~~~~~~~I~~~D~6A~T~:
PEUCULA) .RELACIONADOS CON El EQUIPO 0 CUALESOUIER SERVICIOS SUMINISTRADOS POR CANON COMPANY EN RELACI6N CON El EOUIPO. ESTA GARANTIA SE
CONCEDE UNICAMENTE PARA EL COMPRAOOR ORIGINAL DE ESTE EQUIPO 0 PARA QUIEN FUERA ADOUIRlDO COMO REGAlO.
~t~fo'r~IST~~~.;;.~:~=I~~~I~~,rA~=
~R~~~~~~8':,.~-rt~Nb~~~~~~~~~AaE~~deD~~~~~ncla,
odepals a pals.
"Garantla limitada significa que eI conlenido de esta garanlla se encuenlra Iimitado a los lerminos y condiciones mencionados m4s arriba.
canon Australia Ply. Ltd. 1 Thomas Holt Drive, North Ayde, Sydney N.S.W.2113, Auatralia
Canon Canada. Inc. 6390 Dixie Road, Mlssissa0Q8, Ontario. L5T 1P7 Canada
Canon New Zealand Ltd. Akoranga Business Park, Akoranga Drive. Northcote. Auckland, New Zealand
UK RCC. Unil130 Centennial Park Elstree Hill South, Borehamwood Etstree. Hefts. WOO 3SE, United Kingdom
Canon U.S.A.. Inc. One Canon Plaza Lake success, NY 11042 U.S.A.
Canon Mexicana S.DE R.LDE C.V. Blvd. Manuel Avila camacho No. 138 Col. lomas de Chapunepec C.P. 11000 MexIco D.F., MEXICO
Canon Latin America. Inc. Miami 703 Waterlord Way Suite 400, Miami, FL 33126 U.S.A.
Canon 8aJes Co. Japan 2-16-6, Kohnen, Minato-ku, Tokyo 108-8011, Japan
canon