1
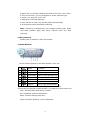
TONGSHI
WorldSpace Radio
User Manual
Please read this manual carefully and follow its instructions before using
Tongshi WorldSpace Radio (“Radio”).
Precautions:
♦
This Radio is designed to perform optimally when used with the genuine
Tongshi designated accessories (“Tongshi Accessories”).
non-Tongshi Accessories with this Radio.
You may use
However, Tongshi makes no
warranties concerning, and is not responsible for damages resulting from,
use of non Tongshi Accessories.
♦
While the power is on, the Radio’s internal or external wire should not be
unplugged or disconnected. This misuse may damage the Radio, antenna
or computer permanently.
♦
Never place the Radio in close proximity to electric motors or other
equipment generating strong magnetic fields that may cause malfunctions
or corrupt image data.
Trademark Acknowledgements:
♦
TONGSHI is a trademark of Xi’an Tongshi Data Corp. Limited.
♦
Xi’an Tongshi Technology Limited (“Xi’an Tongshi”) is authorized to use
TONGSHI as agreed.
♦
WorldSpace is a trademark of WorldSpace Corp.
WorldSpace as agreed.
♦
Xi’an Tongshi is authorized to use
♦
Other names and products not mentioned above may be registered
trademarks or trademarks of their respective companies.
♦
Copyright@2003 Xi’an Tongshi Technology Limited.
♦
All rights reserved.
Disclaimers:
♦
While every effort has been made to ensure that the information contained
in this manual is accurate and complete, no liability can be accepted for any
errors or omissions.
♦
Xi’an Tongshi reserves the right to change the specifications of the
hardware and software described herein at any time without prior notice.
♦
Any software not provided upon the sale of the Radio may be considered
additional accessories to be purchased from Xi’an Tongshi or third parties.
♦
No part of this manual may be reproduced, transmitted, transcribed, stored
in a retrieval system, or translated into any language in any form, by any
means, without the prior written permission of Xi’an Tongshi.
♦
Xi’an Tongshi makes no warranties for damages resulting from corrupted or
lost data due to a mistaken operation or malfunction of the Radio, Tongshi
1
Accessories, the software, personal computers, peripheral devices, or use
of non Tongshi Accessories.
♦
Xi’an Tongshi has no influence over the contents or services delivered by
the Radio and will not be responsible for the contents or services in any
respects.
♦
Please note that the Radios are intended for personal use and should never
be used in a manner that infringes upon or contravenes international or
domestic copyright laws and regulations.
♦
The Radio’s warranty is only effective in the country of sale.
If a problem
arises while the Radio is in use, please contact the dealer who sold you the
Radio.
CONTENT
Chapter One
1.
2.
3.
4.
5.
6.
7.
Preparing the Radio
Services ---------------------------------------------------------------------Product View and Technical Features ---------------------------------------Face ---------------------------------------------------------------------------Buttons ------------------------------------------------------------------------Connectors --------------------------------------------------------------------LCD Display -----------------------------------------------------------------Remote Control ----------------------------------------------------------------
Chapter Two
3
3
4
4
5
5
6
Radio Service Mode
1. Install Batteries ---------------------------------------------------------------- 6
2. Connect Antenna --------------------------------------------------------------- 7
3. Fix Antenna --------------------------------------------------------------------- 7
4. Setup Radio -------------------------------------------------------------------- 7
5. Play and Enjoy ----------------------------------------------------------------- 8
6. Advanced Setup ---------------------------------------------------------------- 8
Chapter Three
1.
2.
3.
4.
5.
6.
7.
Computer Service Mode
Preparing Computer ---------------------------------------------------------Install Software --------------------------------------------------------------Connect Radio with Computer ----------------------------------------------Install DAMB-R Driver -------------------------------------------------------Radio Services ---------------------------------------------------------------Data Services ----------------------------------------------------------------Setup Radio -------------------------------------------------------------------
10
10
12
12
12
16
16
Appendix A Service Website of Xi’an Tongshi Corp ---------------- 18
Appendix B Tongshi Accessories ---------------------------------------- 18
Appendix C Mobile Reception ------------------------------------------- 19
Appendix D Install DAMB-R Driver Manually ---------------------- 19
2
Appendix E Force to Reinstall DAMB-R Driver -------------------- 21
Appendix F Country-List for AsiaStarTM ----------------------------- 22
Appendix G Country-List for AfriStarTM ----------------------------- 23
Chapter One
Preparing the Radio
1. Services
The Radio, along with a hand-size satellite antenna, is able to receive
abundant satellite audio and data programs in most of the areas in Asia and
Africa via WorldSpace satellites (AsiaStar, AfriStar) under suitable satellite
signal reception conditions. Due to the strong reception technical capability,
the Radio may be equipped to enjoy the WorldSpace satellite services in
suitable mobile conditions.
WorldSpace Satellite Coverage Map:
2. Product View and Technical Features
3
Item
Spec
1
Band
WorldSpace band
2
RF frequency
1452-1492 MHz
3
Modulation
QPSK
4
Audio coding
MPEG 1, 2, 2.5 Layer 3
5
Inputs
WorldSpace Antenna
6
Outputs
Earphone
Line Out
USB 1.1 Interface
7
Display
LCD Display with EL backlight
8
Preset Channel
12 Programs
9
Tier of password
12 tiers
Power Source
2 AA Batteries
10
DC Adapter
USB
11
Power Consumption
Less than 1 Watt
12
Computer Services
DATA Receiving up to 128 Kbps
13
Dimensions
120mm*90mm*25mm
14
Weight
Approx: 168g (without batteries)
3. Face
1
Product’s name: WorldSpace Radio
2
Product’s type: DAMB-R
3
Earphone jack
4
Infrared reception window
5
LCD display
6
Power switch
4. Buttons
Five buttons placed on top of Radio. They are:
Sign
Buttons’
Operation
Functions
4
Names
Channel+
Click
Access all channels in upper direction
BAND
Press
Skip channels’ bands
Channel-
Click
Access all channels in lower direction
SCAN
Press
Enter scan mode
Program-
Click
Skip to previous prefixed program
Volume-
Press
Decrease volume
Program+
Click
Skip to next prefixed program
Volume+
Press
Increase volume
Ok
Click
Display status
Press
Store or erase program
5. Connectors
Four connectors placed in rear of Radio. They are:
Sign
Name
USB connector
1
Functions
Connect to Computer with USB
cable
2
Line out jack
Connect to sound system
3
DC-input
Power supply
connector
DC:6V, Peak Current:300mA
F-Type connector
Connect to WS ANT
4
Note: USB connector shall be used in computer service mode only.
6. LCD Display
In front of Radio, there is LCD display:
Display
Meaning
segments
1
Show satellite signal on/off.
If the sign appears, you can play Radio.
2
Receiving quality.
5
3
BC
Broadcast Channel.
4
Preset mode on/off.
It will appear when you skip programs.
5
6
Window, show character strings.
SC
Service component.
Showing battery status.
7
Only appear when batteries used.
8
Encrypted services
9
Mono/stereo
10
PTY
Program type
11
12…8
SC index
7. Remote Control
Twelve keys placed on face of Remote Control. They are:
Sign
Function
1
Mute
2
Power off switch
3
PRG+ / PRG-
Next/previous
program
4
VOL+ / VOL-
Adjust volume
5
1,2, … 6
Select program
Note: When the lithium battery CR 2025 is used up, please change it
according to up figure.
Warning: Put the lithium battery out of children’s reach.
Chapter Two
Radio Service Mode
In this mode, you can control Radio through buttons or keys.
1. Install Battery
6
There are 3 ways for Radio power supply: Battery, DC adapter (AC/DC adapter
or Car power adapter) and USB. Batteries will stop working when DC adapter
or USB used.
Put 2 AA batteries into battery box of Radio. Both “Ni-MH” and “Alkaline” are
usable.
2.Connect Antenna
Connect antenna cable with Radio F-Type connector.
3.Fix Antenna
In general, you only need to set up Antenna within line of sight of the
WorldSpace Satellite you want to receive the services from. For example, from
your location, AfriStar is at your Southwest direction, if you can make Antenna
face southwest without blockage of sky, you may receive its signal. After some
angle and direction adjustments, you will have a better reception.
For more precise and professional analysis, here is certain operation:
♦
Elevation angle and azimuth are related with user’s location.
♦
Please check the relevant angle information from Appendix F and G of this
manual.
♦
Adjust antenna orientation and make it face to WorldSpace Satellites.
For example, in Shanghai, you can find out values of Elevation angle and
Azimuth from Appendix F: Elevation angle=49 and Azimuth=-30. Then, put
antenna face to up sky (490) of southwest (-300).
Note: Approximate orientation is enough.
7
4.Setup Radio
You must do initial setup for the first usage. The setup can be done by
computer also. Please view chapter three, section 7.
1) Power On:
♦
Press
button to turn on Radio.
Press
button for 2 seconds, into scan mode.
2) Scan:
♦
Note: Press
♦
Press
,
or
select star and band manually.
scan and save all channels. Please wait about 2
minutes.
Note:
Press
cancels scan operation.
3) Preset Channels as Programs:
You can preset 12 favorite channels as programs. Remote control or
buttons can access these programs easily.
♦
Click
or
♦
Press
button for 2 seconds to get into preset menu.
button to select a channel.
or
Note: Click
button can skip digits from 1 to 12 in
preset menu.
♦
Click
♦
Repeat above steps till all 12 programs are preset.
button to save channel as present program.
Note: In preset mode (
sign appeared), Press
button for 2
button for 5 seconds can
seconds can delete the program or press
delete all programs.
5.Play and Enjoy
You can play and enjoy Radio by select channel or preset program. This
function can be achieved by the following operations:
Select a Channel:
♦
Click
or
button to skip channels.
Select Preset Program:
♦
Click
♦
Press PRG+/- key to skip programs or press digital number keys 1,
or
button to skip programs.
2, …6 by Remote control.
Note:
♦
Press
♦
Press and hold on
♦
Press
button for 2 seconds, Radio will skip to another band.
button or
or
button can adjust volumes.
key for 3 seconds can turn off Radio.
6. Advanced Setup
8
1) Access Radio ID and Setup Password:
appears on the LCD display. To
When turn into a pay channel,
receive it, you need to have a subscription agreement with the services
provider and get a set of password (22 or 25 digits number). This
function can be achieved by the following operations:
When the power is on,
and
button simultaneously to list ID of the Radio.
♦
Press
♦
Press
into password entry mode.
♦
Press
or
♦
Press
to skips to the next digit.
button to add or subtract the current digit.
aborts the password entry mode.
Note: Press
2) Setup ANT Type:
There are three types of WS ANT called LINEAR, CIRCULAR and CABLE.
You must setup up the correct ANT type used for Radio. If you don’t
know which ANT type used, please refer to the label stuck on ANT back.
Setup ANT type can be achieved by the following operations:
When the power is off,
button and hold it, then turn on Radio.
♦
Press
♦
Press
button to skip ANT type from Circular, Cable and Linear.
♦
Press
button to save present ANT type and return.
cancels ANT setup mode.
Note: Press
Warning: All programs in LIST will be cleared after ANT type changed.
3) Setup BATT Type:
There are two types of batteries for Radio, called Ni-MH and Alkaline. In
order to show batteries volume correctly, you must select the right type
of batteries. This setup can be achieved by the following operations:
When the power is off,
♦
Press
button and hold it, then turn on Radio.
♦
Press
button to skip BATT type from NiMH and Alka.
♦
Press
button to save present BATT type and return.
4) Setup Autopower Function:
If batteries are used and no key or button pressed for 12 minutes,
Radio will beep every 4 seconds for ten times. If no key or button are
pressed, Radio will be turned off automatically for power saving. This
function can be enabled or disabled by the following operations:
When the power is off,
♦
Press
button and power on the Radio.
♦
Press
button to skip Autopower from ON to OFF.
♦
Press
button to save and return.
9
Chapter Three
Computer Service Mode
In this mode, computer controls Radio. Buttons and keys are not operational.
1. Preparing Computer
The basic computer requirements are as follows:
♦
Computer: X86 PC, Pentium II 266 or higher.
♦
Operation system: Windows 98SE/Me/2000/XP.
♦
Monitor: multimedia monitor, 800*600, 256 colors or higher.
2. Install Software
Notice: Software installation operation should be done firstly. DAMB software
cannot work under Win95/WinNT4.
Put DAMB software CD into CD-ROM, do installation operation step by step as
follows:
♦
“Choose Setup Language” dialog box pops up, select a language from the
list, click “OK” to continue.
♦
“Welcome” dialog box pops up, click “Next” to continue.
♦
“Software License Agreement” dialog box pops up, click “Yes” to continue.
♦
“User Information” dialog box pops up, input correct information of Name,
Company. Don’t modify Serial item, it’s reserved for future. Click “Next” to
continue.
10
♦
“Choose Destination Location” dialog box pops up, select destination
folder and click “Next” to continue.
♦
“Select Program Folder” dialog box pops up, click “Next” to continue.
♦
“Setup Complete” dialog box pops up, select “ShutDown And PowerOff”
and
click “Finish” to finish installation. Computer will shut down
automatically.
Note: In Win2000/XP, if “Digital Signature Not Found” dialog box pops up,
click ”Yes” to continue.
3. Connect Radio with Computer
11
Notice: Connecting Radio with Computer must succeed the installation of
software.
♦ Make sure both computer and Radio power are off.
♦ Connect Antenna, Radio and Computer.
♦ Fix antenna. Refer to chapter two, section 3.
4.Install DAMB-R Driver
After software is properly installed and Radio connection is in order, start up
computer. Driver will be installed automatically.
Note: In Win2000/XP, when “Digital Signature Not Found” dialog box pops up,
click ”Yes” to continue. In Win98/Me, when “System Settings Change” dialog
box pops up, click “Yes” to continue.
5. Radio Service
MP3 player is software-based player used to play WS audio channel in
computer.
1) Run MP3 Player
Double click MP3 player icon in “WorldSpace Client Services” folder.
Then, MP3 player interface will be displayed.
Main Window
Play List Window
2) Scan Channel
You must scan channel when you first use MP3 player:
12
♦ Right click on the Main Window and select “Do scan” menu item.
♦ For the first time, you are prompted to select antenna type.
♦ “Scan now” pops up, click “Yes”.
♦ Waiting for scanning patiently.
♦ First channel in “Play List” will be played automatically.
♦ All channels will be listed after scanning.
Note: Scanning is needed when you change antenna type. Right
click Main Window again and select “Cancel scan” can stop
scanning.
3) Play Channel
Double click a channel in Play List window.
4) Main Window
Seven buttons placed in the Main Window. They are:
Sign
Name
Functions
1
Play
Play Channel
2
Stop
Stop playing
3
Show/Hide
Show or hide the Play List
4
Config
Select player skin*
5
Mute
Mute on or off
6
Volume
Volume control
7
Balance
Left or right track control
*Player Skin means shell or style of the interface.
Three items are placed in Main Window. The means of these items are:
Star: WS star name and carrier number.
BC: Broadcast Channel information.
Kbps: Present channel’s bit-rate.
Right click Main Window, a menu displayed.
13
There are ten items for selecting.
Item
1
Play directly
Function
Play channel using the MP3 decoder embedded in
the player
2
Use Winamp
Install Winamp first and run it to play channel.
3
Do scan
Scan channel
4
Set antenna type
Refer to the label stuck on ANT back and select
LINEAR, CIRCULAR or CABLE
5
Stay in task bar
MP3 player is shown in WINDOWS taskbar
6
Stay in tray
MP3 player icon is shown in tray at down right
corner of screen
7
Set language
When a channel is broadcasted in several
languages, select a preferential language from
the list for Player
8
Add Password
Input audio password *
9
Advanced Setup
Refresh Play List when BC changed
10
About
About MP3 player version information
* When receiving a pay channel,
appears on the left BC window. To receive
it, you need to have a subscription agreement with the services provider and
get a set of password (22 or 25 digits number). This function can be achieved
by the following operations:
OK: Save input password and exit.
Add: Add audio password.
Delete All: Delete all passwords.
Cancel: Exit dialog without saving.
5) Play List Window :
14
All scanned information is displayed in Play List window. There are
five columns in the list:
BCID: Broadcast Channel ID, such as EL1125
SC No.: Service Component number. No display if only one SC
within the BC
Service label: Name of BC provider, such as MAESTRO
Language: Language of the channel using, such as English
Type: Music type of the channel, such as Rock.
Light or gray means satellite signal on or off. If the icon is light,
you can enjoy the channel.
Receiving quality. More bars lighten, much better the
signal.
Right click a channel and a menu displayed. There are five items for
selecting.
Item
Function
1
Play
Play selected channel.
2
Hide list
Hide Play List Window. Click “Show/Hide play list” button
to show the window again
3
Search
Search matched channels*
4
Show all BCs
Show all the scanned channels in Play List.
5
Sort list
Sort list by BCID, service label, language or program
type. The list is arranged in ascending order.
* User can search some favorite channels according to selected language and
type. For example, select pop music in English.
15
6. Data Service
DAMB-R supports DMS, CLASS and TONGSHI DATACAST that used in
WorldSpace system now. Data service provider will provide manual of data
reception.
7. Setup Radio
DAMB-R Setup is application software used to setup Radio with computer.
Before read this section, you must know Radio functions and MP3 Player
described in this manual.
1) Run DAMB-R Setup
Double click
icon in “WorldSpace Client Services” folder.
Then, DAMB-R Setup interface displayed.
2) Buttons
There are 11 buttons for setup operation. They are:
Name
Functions
1
Password
Input password
2
Antenna Type
Setup antenna type
16
3
Battery Type
Setup battery type
4
Scan
Scan channel
5
Play
Play a selected channel
6
Startup-play
Set a channel as Startup play program which
will play automatically when Radio turn on.
7
Add
Add a selected channel as a program
8
Delete
Delete a selected program from Program List
9
Up
Move a selected program in upper direction
10
Down
Move a selected program in lower direction
11
Apply
Save parameters to Radio
3) Items
There are 7 items in the interface. The meaning of them is:
Name
Meaning or function
Hardware Type
Show Radio version
Hardware ID
Show Radio ID number
Carrier offset
Digital number use for technical support
Symbol Offset
Digital number use for technical support
Signal level
Indicates the signal lock status and quality
Startup Play
Show a program information setup
by startup-play button
Enable Power
off automatically.
Setup Radio with Autopower function
4) Setup Steps
♦
For first time, select antenna type.
♦
Scan channel.
♦
Select channels from Channel List and add to programs.
♦
Setup Battery type and others.
♦
Click “Apply” to finish setup.
5) Encryption status indicator
♦
Means the current playing SC is not encrypted or decrypted
successfully.
♦
Means the current playing SC cannot be decrypted.
17
Appendix A
Service Website of Tongshi Corp.
http://www.tongshi.com is our company service website. Some convenient
services are provided on the website, include:
1. Notification and bulletin.
2. Download the latest upgrade.
3. Software upgrade of the third party.
If you have any question, please contact us in E-mail: [email protected].
We shall answer you as soon as possible. Some advices, minds or suggestions
are all welcomed. Thanks.
Appendix B
Tongshi Accessories
Tongshi accessories include Magnetic stand, Car Power Adapter, AC/DC
Adapter, Cassette Adapter, Audio Line and Holder.
Accessories
1
Photos
Function and parameter
Magnetic
Use for Installation car antenna
Stand
2
Providing power in automobile
Car power
Input: DC 12/24V
Adapter
Output: DC 6V, 300mA, 3.5mm plug,
3
Frequency Range: 20Hz-20KHz
Music
Sensitivity: 113dB±5dB
earphone
Impedance: 32Ω±15﹪
Normal Input: 1mW
4
Cassette
Connecting to car stereo
Adapter
5
Audio Line
Connecting to sound system
6
Holder
Stuck to the place you want.
Put or remove Radio easily.
18
Appendix C
Mobile Reception
As excellent signal receiving capability, you can enjoy high quality audio in car,
in train, in ship or in airplane under most of the case.
Manual of mobile reception will be provided with Tongshi accessories.
Appendix D
Install DAMB-R Driver Manually
This method is for professionals only.
♦
If you connect DAMB-R with computer without install software, when
computer starts up, a new device will be found. A dialog box will pop up.
♦
“Add New Hardware Wizard” dialog box pops up, click “Next” to continue.
♦
Select “Automatic search for a better driver (Recommended)”, click “Next”
to continue.
♦
“Add New Hardware Wizard” dialog box pops up, select “Specify a location”
and clicks “Browse” or input CD-ROM disk root path “G:\” (G is supposed to
be letter of CD-ROM disk). Click “Next” to continue.
19
♦
“Add New Hardware Wizard” dialog box pops up, click “Next” to continue.
♦
“Add New Hardware Wizard” dialog box pops up, click “Finish” to finish
installation.
Note:
1) In process of installing, system will prompt need “Win98 System Disk” or
“DAMB Installation Disk”. Please insert that CD into CD-ROM.
2) In Win2000/XP, if “Digital Signature Not Found” dialog box pops up, click
“Yes” to continue.
20
Appendix E
Force to Reinstall DAMB-R Driver
This method is for professionals only.
If the driver was installed incorrectly, you can reinstall the driver step by step
as follows:
♦
Open “Control Panel” and double click “System” icon.
♦
In Win98/Me, “System Properties” dialog box will pop up. Select “Device
Manager” and select “Tongshi WorldSpace Radio (V1.0)” in Other devices or
Network adapters lists.
System Properties interface in Win98/Me:
♦
In Win2000/XP, “System Properties” dialog box pops up. Select “Hardware”
and click “Device Manager…”. “Device Manager ” window pops up, select
“Tongshi WorldSpace Radio (V1.0)” in Other devices or Network adapters
lists.
System Properties interface in Win2000/XP:
♦
In Win98/Me, click “Remove” button (In Win2000/XP, click right button will
pop up a menu, then click “Uninstall…”), “Confirm Device Removal” dialog
box pops up, click “OK” to remove the DAMB-R.
21
Please reboot your computer and install driver according to chapter Three,
section 4.
Appendix F
Country-List for AsiaStarTM
WorldSpace AsiaStarTM
“-”of azimuth express southwest
This country coverage list is valid only for an unobstructed line of
“+”of azimuth express southeast
side connection to the satellite.
Country
Azimuth
Elevation
Country
Azimuth
Elevation
Afghanistan
55
33
Kyrgyzstan
41
33
Christm.lsl. (Australia)
-177
78
Laos
3
68
Bahrain
72
24
Malaysia
-51
84
Bangladesh
33
58
(Kuala Lumpur)
46
85
Bhutan
30
54
(Kuching)
-74
84
Brunei
-65
78
Maldives
83
53
Burma
24
64
Mongolia
2
37
Cambodia
0
75
Nepal
39
50
China
3
51
North Korea
-32
38
(Yining)
32
34
Oman
73
31
(Chongqing)
-3
56
Pakistan
55
38
(Canton)
-20
61
Palau
-79
56
(Shanghai)
-30
49
Philippines
-58
66
India
52
52
Qatar
73
24
(Bombay)
62
47
Russian Federation
16
17
22
(Madras)
64
58
(Irkutsk)
1
30
(Kalkutta)
37
58
(Magadan)
-50
12
Indonesia
-100
76
(Chabarowsk)
-38
27
(Medan)
60
82
Saudi Arabia
77
20
(Jambi)
139
88
Singapore
43
88
(Jakarta)
-164
82
Somalia
87
24
(Surabaya)
-135
77
South Korea
-36
42
(Manado)
-86
67
Sri Lanka
74
60
Iran
66
25
Taiwan
-35
57
Japan
-48
36
Tajikistan
47
33
(Naha)
-43
50
Thailand
18
74
(Osaka)
-46
38
Turkmenistan
59
25
(Tokyo)
-50
35
United Arab.Emirates
71
28
(Sapporo)
-47
28
Uzbekistan
53
27
Kazakhstan
45
24
Vietnam
-4
71
Kuwait
73
20
Yemen
80
23
Appendix G
Country-List for AfriStarTM
WorldSpace AfriStarTM
“-”of azimuth express southwest
This country coverage list is valid only for an unobstructed line of
“+”of azimuth express southeast
side connection to the satellite.
Country
Azimuth
Elevation
Country
Azimuth
Elevation
Afghanistan
-60
29
Libya
7
58
Algeria
36
52
Madagascar
-125
53
Andorra
28
37
Malawi
-135
69
23
Angola
166
75
Mali
57
56
Armenia
-34
37
Malta
11
48
Azerbaijan
-38
36
Mauritania
61
47
Bahrain
-52
45
Mayotte (France)
-116
58
Benin
64
65
Mocambique
-141
63
Botswana
-172
64
Morocco
45
42
Burkina Faso
62
60
Namibia
170
64
Burundi
-111
79
Niger
34
66
Cameroon
56
78
Nigeria
56
71
Cape Verde
75
36
Oman
-64
43
Centr.African.Repub.
8
82
Pakistan
-66
28
Chad
8
72
Portugal
41
36
Comores
-116
60
Portugal (Azores)
61
24
Congo
102
83
Portugal (Madeira)
55
34
Corse (France)
17
40
Qatar
-54
45
Cyprus
-21
47
Rwanda
-103
79
Dem.Rep.of Congo
-136
86
Sao Tome and Princi.
89
73
Djibouti
-63
62
Sardegna (Italy)
18
42
Egypt
-19
57
Saudi Arabia
-49
51
Equatorial Guinea
82
77
Senegal
71
46
Eritrea
-52
62
Seychelles
-101
52
Ethiopia
-64
66
Sierra Leone
77
51
France
25
33
Socotra (Yemen)
-71
50
Gabon
93
79
Somalia
-79
59
Gambia
71
46
South Africa
-171
56
Georgia
-32
36
Spain
35
37
Ghana
71
63
Spain (lsl.Baleares)
28
40
Guinea
73
51
Spain (lsl.Canarias)
58
38
Guniea-Bissau
74
46
Sudan
-33
71
Iran
-51
38
Swaziland
-158
57
Iraq
-38
45
Syria
-29
45
Israel
-25
50
Tanzania
-115
72
Italy
13
40
Togo
68
65
Ivory Coast
75
58
Tunisia
20
48
Jemen
-62
54
Turkey
-22
43
Jordan
-28
50
Turkmenistan
-51
30
Kenya
-89
70
Uganda
-84
76
Kriti (Greece)
-6
49
Unit.Arab.Emirate
-59
44
Kuwait
-45
45
Vatican City
13
41
Lebanon
-26
47
Western Sahara
59
42
Lesotho
-166
55
Zambia
-154
72
Liberia
79
54
Zimbabwe
-155
65
24