1
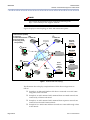
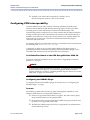
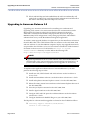
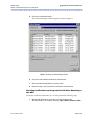
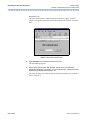
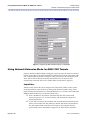
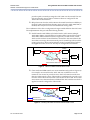
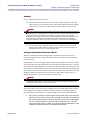
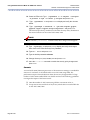
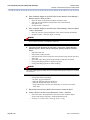
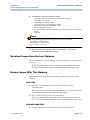
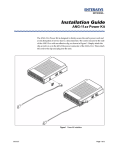
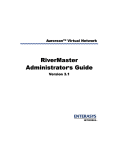
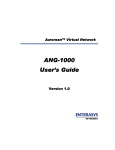
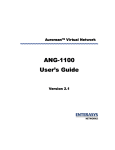
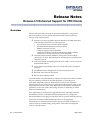
Release Notes
Release 3.5 Enhanced Support for VPN Clients
Overview
This document describes Aurorean System Software Release 3.5 support for
Microsoft Windows XP VPN clients and enhanced ANG-1100 connectivity.
Features of the release include:
! Remote access inter-operability between Windows XP/2000 clients and
Aurorean Network Gateways, with support for:
–
–
–
–
–
Layer 2 Tunnel Protocol (L2TP)/IPSec with IKE
PPP Extensible Authentication Protocol (EAP)
RADIUS extensions for EAP
Certificate support within IKE/IPSec
Certificate enrollment with Microsoft Windows 2000 Certificate
Authorities on the Aurorean Policy Server-3000/7000
! Network Extension Mode (NEM) for routing of the trusted subnet
connected to an ANG-1100 making those attached devices available to the
corporate network
! Peer to Peer Mode for tunneling between ANG-1100s to connect nodes on
both attached subnets
! Site to Site inter-operability with Cisco, Nortel and Nokia/Checkpoint
gateways
! RiverMaster tunnel configuration of L2TP and EAP protocols
! Resolved issues since the last release
! Known issues with this release
Aurorean Release 3.5 enhancements broaden the VPN options for clients, whether
they are operating on Windows XP/2000 platforms or connecting to an
ANG-1100/3000/7000. Network administrators and users are required to
perform some level of configuration to enable these enhancements, either on the
Command Line Interface to the ANG-3000/7000, the RiverMaster management
application, or the ANG-1100’s Web Config on-line tool, depending on which
options are implemented.
Also, administrators are required to upgrade their APS, ANG-3000/7000 and
RiverMaster software, install Microsoft Internet Explorer 5.5, configure the
Microsoft RADIUS server plugin on the APS, and set up L2TP and EAP protocols.
Instructions for network administrators and users to configure these
enhancements (or where directions can be found in associated documents), as
well as caveats to consider during configuration, are detailed in subsequent
sections of this document.
Rel. 3.5 Release Notes
Page 1 of 30
Overview
Release Notes
Release 3.5 Enhanced Support for VPN Clients
NOTE
All Aurorean documentation can be found at the following URL:
http://www.enterasys.com/support/manuals
Figure 1 displays a varied topology of ANG-1100 connection options.
1 - Microsoft inter-operability
2 - Client mode
5
3 - Network Extension Mode
ANG-1100
4 - Peer to Peer mode
5 - Third party gateway
inter-operability
1
4
ANG-1100
Microsoft
Certificate
Authority
Peer to Peer
mode tunnel
WIN XP
ANG-3000
MS-RADIUS
L2TP/IPSec
EAP
Router
2
ANG-1100
Client
mode
tunnel
NEM tunnel
3
Nortel,
Cisco, or
Nokia/
Checkpoint
router
APS-3000
RiverMaster
ANG-1100
Figure 1 Enhanced VPN Client Topology
The illustration above displays sample enhanced VPN client configurations as
follows:
! Example 1: An Microsoft Windows XP client is connected to an ANG-3000
using L2TP/IPSec and EAP.
! Example 2: An ANG-1100 and ANG-3000 and their associated networks are
connected by a Client mode tunnel.
! Example 3: An ANG-1100 and ANG-3000 and their respective networks are
connected via Network Extension Mode.
! Example 4: Two ANG-1100s and their networks are connected through a Peer
to Peer tunnel.
Page 2 of 30
Rel. 3.5 Release Notes
Release Notes
Release 3.5 Enhanced Support for VPN Clients
Configuring VPN Inter-operability
! Example 5: An ANG-1100 is connected to a Nortel, Cisco or
Nokia/Checkpoint router by a Peer to Peer tunnel.
Configuring VPN Inter-operability
Aurorean Release 3.5 provides seamless VPN inter-operability with Microsoft
Windows XP and Windows 2000 desktops featuring support for the L2TP/IPSec
tunneling protocol, EAP and Microsoft’s Certificate Authority (PKI). This
infrastructure permits a single user log on from a remote Win XP/2000 workstation
through a VPN tunnel to the Aurorean Network Gateway with authentication by a
RADIUS server (Microsoft’s IAS) to the Active Directory. The Aurorean Release 3.5
VPN works just as effectively with 2-factor authentication (SecurID), digital
certificates and smart cards.
To configure Windows XP/2000 clients for VPN, consult Microsoft documentation at
the following URL: www.microsoft.com/vpn.
Configuring an ANG server to connect with a Windows XP client consists of
performing certificate enrollment and adding a Microsoft RADIUS plugin on the
APS-3000/7000. Instructions are described later in this document.
Certificate Enrollment on the APS Using Windows 2000 CA
To perform certificate enrollment on your APS, refer to “Upgrading to Aurorean
Release 3.5” on page 4.
NOTE
To enroll in the Certificate Authority on the APS - if you have an Auorrean system
software release lower than 3.5 - you must first upgrade Windows Internet
Explorer to Release 5.5. Refer to “Installing Internet Explorer Version 5.5 on APS3000/7000” on page 5 for instructions.
Configuring the RADIUS Plugin
To configure the Microsoft RADIUS plugin on the APS, refer to “Configuring the
RADIUS Plugin” on page 3.
Caveats
The following combinations of protocol options that might be required by a nonWindows VPN client are not supported in Release 3.5:
! L2TP is not supported without IPSec encryption. The ANG security policy
drops all L2TP packets not encrypted by IPSec.
! Since L2TP must be encrypted with IPSec, MPPE (encryption protocol used
by PPTP), is not supported within L2TP.
! The PPP PAP authentication protocol is not supported. User authentication
must be MS-Chap or EAP.
Rel. 3.5 Release Notes
Page 3 of 30
Upgrading to Aurorean Release 3.5
Release Notes
Release 3.5 Enhanced Support for VPN Clients
! If EAP and MS-Chap are both enabled then the ANG unconditionally will
prefer EAP over MS-Chap. It will request EAP authentication and then allow
the client to alternately select MS-Chap if it so chooses.
Upgrading to Aurorean Release 3.5
Upgrading your Aurorean software involves installing new certificates and
upgrading to IE version 5.5 to ensure smooth and secure communications with a
Microsoft XP VPN client. Invoking the ipsecDefault command on the ANG3000/7000’s Command Line Interface will prepare that device for the proper
IKE/IPSec (PKI), L2TP configuration. Lastly, setting up L2TP, EAP, and RADIUS
authentication is easy via the RiverMaster management application.
As with any major upgrade, Release 3.5 requires that you first install new software on
the APS-3000/7000, a new LINUX kernel and new software on the ANG-3000/7000,
and new software on your RiverMaster computer. Step-by-step upgrade instructions
are provided in the Installation & Service Guide which is included in a PDF-formatted
document on the Aurorean 3.5 CD ROM in the Aurorean 3.5 System
Software/Manuals directory or on the Web at the following URL:
http://www.enterasys.com/support/manuals
NOTE
Upgrade requirements for IE v5.5, LINUX kernel, ANG, APS and RiverMaster
software apply only if you have Aurorean system software lower than Rel. 3.5. If
you have new Aurorean Rel. 3.5 equipment, these upgrades are unnecessary.
To implement the application enhancements of Aurorean Release 3.5 you must
perform the following steps in order:
! Install new APS, LINUX kernel and ANG software: see the Installation &
Service Guide
! Install new RiverMaster software: see the RiverMaster Administrator’s Guide
! Install and update to Internet Explorer version 5.5 on the APS-3000/7000
! Delete all existing trusted root certificates on the Internet Explorer browser of
the APS-3000/7000
! Issue the ipsecDefault command on the ANG-3000/7000
! Enroll a digital certificate on the APS-3000/7000
! Configure L2TP and EAP protocols with RiverMaster: see the RiverMaster
Administrator’s Guide
! Configure the Microsoft RADIUS Plugin on your APS-3000/7000
The filepaths for software module upgrades are located on the CD ROM as follows:
! 3rd Party Support Software/Linux/Kernel/
Linux-2.2.16-2.i386.rpm
Page 4 of 30
Rel. 3.5 Release Notes
Release Notes
Release 3.5 Enhanced Support for VPN Clients
Upgrading to Aurorean Release 3.5
! Aurorean_3.5.00-<build #>/Aurorean 3.5 System
Software/Network Gateway/rts-3.5.00-<build #>.i386.rpm
! Aurorean_3.5.00-<build #>/Aurorean 3.5 System
Software/Policy Server/setup.exe
! Aurorean_3.5.00-<build #>/Aurorean 3.5 System
Software/RiverMaster/setup.exe
Installing Internet Explorer Version 5.5 on APS-3000/7000
You can install Internet Explorer version 5.5 on your APS-3000/7000 from an
executable file stored on the Aurorean Release 3.5 CD ROM. To upgrade IE, perform
the following steps:
1. Insert the Aurorean Release 3.5 CD ROM in your APS CD ROM drive.
2. Go to the 3rd Party Support Software/Browsers/Ie55/I386
directory and double click on the Ie5setup.exe file.
3. Follow the IE prompts to install the program.
Deleting Trusted Root/Intermediate Certificates
To delete existing certificate authorities from your Internet Explorer, perform the
following steps:
1. Open a session of Internet Explorer on your ANG-3000/7000.
2. Click on the Tools main menu option.
3. In the pull-down screen, select Internet Options.
The Internet Options window appears as shown in Figure 2.
Rel. 3.5 Release Notes
Page 5 of 30
Upgrading to Aurorean Release 3.5
Release Notes
Release 3.5 Enhanced Support for VPN Clients
Figure 2 Windows IE Internet Options Window
4. Click on the Content tab.
Page 6 of 30
Rel. 3.5 Release Notes
Release Notes
Release 3.5 Enhanced Support for VPN Clients
Upgrading to Aurorean Release 3.5
5. Click on the Certificates button.
The Certificate Manager window appears as shown in Figure 3.
Figure 3 Windows IE Certificate Manager Window
6. Click on the Intermediate Certification Authorities tab.
7. Select all authorities displayed and remove them.
8. Repeat the step in the Trusted Root Certification Authorities tab.
Enrolling Certificates from Corporate Certification Authority on
the APS
To enroll in certification authorities on your APS, perform the following steps:
1. Start the VNC application by pointing your Web browser at the
APS-3000/7000. In the Location field, type: http://<APS IP address>:5800
Rel. 3.5 Release Notes
Page 7 of 30
Upgrading to Aurorean Release 3.5
Release Notes
Release 3.5 Enhanced Support for VPN Clients
and press ENTER.
The VNC Authentication window appears as shown in Figure 4. The IP
address you typed includes the port number (5800) with which to access the
APS.
Figure 4 Starting VNC Remote Control
2. Type welcome in the Password field and click OK.
The APS desktop appears.
3. On the APS, open another Web browser and point it at your Microsoft
Certification Authority. Type http://<your Microsoft Certification
Authority>/certsrv and press ENTER.
The Network Password window appears within the APS browser window as
shown in Figure 5.
Page 8 of 30
Rel. 3.5 Release Notes
Release Notes
Release 3.5 Enhanced Support for VPN Clients
Upgrading to Aurorean Release 3.5
Figure 5 Network Password Window
4. Enter your network User Name and Password. The Domain name should
already be entered. Press OK.
The Microsoft Certificate Services Welcome window appears as shown in
Figure 6.
Rel. 3.5 Release Notes
Page 9 of 30
Upgrading to Aurorean Release 3.5
Release Notes
Release 3.5 Enhanced Support for VPN Clients
Figure 6 Microsoft Certificate Services Welcome Window
5. Choose Request a Certificate and click Next.
The Advanced Certificate Requests window appears as shown in Figure 7.
Figure 7 Advanced Certificate Requests Window
Page 10 of 30
Rel. 3.5 Release Notes
Release Notes
Release 3.5 Enhanced Support for VPN Clients
Upgrading to Aurorean Release 3.5
6. Select Submit a certificate request to this CA using a form and press Next.
The Advanced Certificate Request window appears as shown in Figure 8.
Figure 8 Advanced Certificate Request Window
Rel. 3.5 Release Notes
Page 11 of 30
Upgrading to Aurorean Release 3.5
Release Notes
Release 3.5 Enhanced Support for VPN Clients
7. Make the following selections:
–
–
–
–
–
–
–
–
From the Certificate Template pull-down menu, choose User.
From the Key Options CSP pull-down menu, choose Microsoft Base
Cryptographic Provider v1.0.
For Key Usage, select Both.
For Key Size, enter 1024
Select Create new key set
Select Use local machine store
From the Additional Options pull-down menu, select SHA1 as the Hash
Algorithm.
Click Submit.
The Certificate Issued window appears as shown in Figure 9.
Figure 9 Certificate Issued Window
8. Click Install this certificate.
A window appears indicating the certificate was successfully issued.
9. Reboot the APS.
Invoke the Default Configuration on your ANG-3000/7000
A default IPSec configuration - the initial IPSec policy - is provided on the
ANG-3000/7000 that permits PPTP, IRPP, Firewall Traversal, and IKE/IPSec traffic
but drops all other packets. Be aware that issuing the ipsecDefault command
restores the IPSec configuration to the factory default setting.
CAUTION
This script first erases all IPSec configuration settings and then reloads it with the
factory default. Any configurations you added earlier are lost. As a precaution
against inadvertent use of the command, the script interactively prompts you to
confirm that you intend to erase and then restore the IPSec configuration.
Page 12 of 30
Rel. 3.5 Release Notes
Release Notes
Release 3.5 Enhanced Support for VPN Clients
Upgrading to Aurorean Release 3.5
To issue the ipsecDefault command, perform the following:
1. Log into the ANG-3000/7000 with the login and password netadmin (default)
and press ENTER.
2. At the command prompt, change directory to usr/indus/ipsec.
3. Type ipsecDefault and press ENTER.
4. Reboot the ANG-3000/7000.
Configuring L2TP and EAP
To configure L2TP and EAP protocols using the RiverMaster management program,
refer to the RiverMaster Administrator’s Guide.
Configuring the Microsoft RADIUS Plugin
To configure Microsoft RADIUS authentication, set the parameters as you would set
any authentication plugin parameter in RiverMaster (refer to Figure 10) including the
Server Address, Shared Secret, Authentication and Accounting Port number, Timeout,
Retry, IR Group Attribute, and Hash values.
NOTE
The IR Group Attrib field requires the Microsoft IAS RADIUS number.
CAUTION
You must checkmark the Default Plugin box.
For more detailed information, refer to the RiverMaster Administrator’s Guide.
Rel. 3.5 Release Notes
Page 13 of 30
Using Network Extension Mode for ANG-1100 Tunnels
Release Notes
Release 3.5 Enhanced Support for VPN Clients
Figure 10 Configuring the Microsoft RADIUS Plugin on RiverMaster
Using Network Extension Mode for ANG-1100 Tunnels
Network Extension Mode (NEM) is designed to open up network resources situated
behind ANG-1100s. Using the Command Line Interface (CLI) on the ANG-3000/7000,
you configure NEM to provide routing for nodes connected to the trusted port of an
ANG-1100 so that locally and remotely connected devices can discover and
communicate with each other across an IKE/IPSec tunnel (refer to Figure 1).
Capabilities
Tunnels on the ANG-1100 can be configured in Client mode, NEM, or Peer to Peer
mode (described in a later section) by setting radio buttons on Web Config. Client
mode provides the functionality of Aurorean Releases 3.1/3.2 on the ANG-1100 while
NEM modifies the behavior of a tunnel in these ways:
! NAT is disabled for that tunnel. All traffic from the ANG-1100 trusted
network is passed, as is, across the tunnel, with the benefit of improved
tunnel performance.
! A new IPSec Security Policy Database rule is automatically inserted into the
SPD to secure traffic from the subnet (by default 192.168.1.0/24) attached to
the ANG-1100 trusted network into the intranet. (The original rule that
secures traffic sent to the address assigned to the ANG-1100 is retained to
Page 14 of 30
Rel. 3.5 Release Notes
Release Notes
Release 3.5 Enhanced Support for VPN Clients
Using Network Extension Mode for ANG-1100 Tunnels
provide a path to remotely manage the ANG-1100 over the tunnel). The new
rule automatically secures data to whatever subnet is configured on the
ANG-1100's trusted interface.
! RIP packets sent from the ANG-1100 into the tunnel broadcast reachability to
the ANG-1100's trusted subnet. Routing protocols on the ANG-3000/7000, if
enabled, then relay those routes into the intranet routing fabric.
The combination of the above configuration changes enables NEM on the ANG-1100.
The implementation also provides the following features:
! Parallel tunnels with NEM may be built from the ANG-1100 to multiple
ANG-3000/7000s to provide failover if routing tables exported from central
ANG-3000/7000s are identical (refer to Figure 11). In other words, central
ANGs must have their trusted interfaces connected to the same network. Be
aware that, on average, about 60 seconds pass for tunnel keep-alives and the
routing protocols to detect and reconfigure around a tunnel failure. Refer to
the Application Note: Auto-Link Recovery for configuration information.
Primary
ANG-1100
ANG-7000
Router
Secondary
ANG-7000
Network Extension Mode tunnel
Figure 11 Failover on Network Extension Mode Tunnels
! Client mode and NEM tunnels can coexist simultaneously (refer to Figure 12).
For example, one tunnel from the ANG-1100 can use NEM to access an
intranet at one site and to provide access to the local trusted network from
that site. Other tunnels can use Client mode to simultaneously provide access
from the ANG-1100 trusted network to the intranet at other sites. Those other
sites cannot access the trusted network behind the ANG-1100 because NAT is
applied to tunnels configured in Client mode.
ANG-7000
ANG-1100
Router
INTERNET
Client Mode tunnel
Network Extension Mode tunnel
ANG-7000
Figure 12 Coexisting Client Mode and Network Extension Mode Tunnels
Rel. 3.5 Release Notes
Page 15 of 30
Using Network Extension Mode for ANG-1100 Tunnels
Release Notes
Release 3.5 Enhanced Support for VPN Clients
Caveats
If you configure NEM, be aware that:
! The subnet attached to the remote ANG-1100’s trusted interface is the only
subnet routed across the tunnel to the central ANG-3000/7000. Other subnets
connected via routers to the ANG-1100’s trusted interface are not routed.
NOTE
IP address space management is not automatic: the network administrator must
assure that each ANG-1100 using NEM has a unique subnet on its trusted
interface by setting the DHCP server enabled parameter and an IP address pool in
the LAN Setup window of the ANG-1100’s Web Config utility to distribute
unique IP addresses. Refer to the ANG-1100 User’s Guide for more information.
! An ANG-1100 may use NEM to tunnel to one site only. That site can have
multiple ANG-3000/7000s for failover but the ANG-1100 cannot export its
trusted network to two or more separate sites.
Configuring Network Extension Mode
All ANG-1100 internal tunnel configuration is automatic based on the choice of
Connection Mode choices - Client, Network Extension or Peer to Peer (described in
the next section).
Additionally, a user must configure the IP subnet of the trusted network with a subnet
provided by the network administrator who manages the IP address space of remote
ANG-1100 sites using NEM (refer to note above). Trusted subnets at those remote sites
are routed to a central intranet so they must have distinct IP addresses. By default, the
ANG-1100 uses 192.168.1.0/24 as the trusted network subnet but that address must be
changed (on the LAN Setup window of the ANG-1100’s Web Config utility) to a
unique subnet that is not in use elsewhere in the network.
NOTE
For detailed instructions on how to configure Network Extension Mode on an
ANG-1100, refer to the ANG-1100 User’s Guide.
The network administrator must also reconfigure the ANG-3000/7000 which includes
reserving a pool of unique IP addresses for ANG-1100 users and changing IPSec
policy. Perform the steps below to configure NEM on the central ANG-3000/7000:
1. Set up a pool of Class C virtual subnets on the central ANG to use as trusted
networks for ANG-1100 devices. In this example, all 192.168.0.0/16 networks
are reserved and distributed in blocks to the ANG-1100s. For example, assign
192.168.1.0/24 to Network A, 192.168.2.0/24 to Network B, etc., up to 255
remote sites (see Figure 13). Refer to "Configuring Subnet Parameters" in the
Installation & Service Guide for more detailed instructions.
Page 16 of 30
Rel. 3.5 Release Notes
Release Notes
Release 3.5 Enhanced Support for VPN Clients
Network A
192.168.1.0
Network B
192.168.2.0
Network C
192.168.3.0
Using Network Extension Mode for ANG-1100 Tunnels
ANG-1100
ANG-7000
Router
ANG-1100
ANG-7000
ANG-1100
Network Extension Mode tunnel
Figure 13 Multiple Network Extension Mode Tunnels
CAUTION
Be sure no central ANG-3000/7000 virtual subnet pools overlap with this range of
network addresses.
2. Telnet to the central ANG-3000/7000 (with the login and password netadmin)
to begin IPSec policy changes.
3. Change directory to /usr/indus/ipsec and press ENTER to access the CLI.
4. Create a set of security parameters for use with the IPSec tunnel. Type
./ipsecEsp -a -n ezipsec -e 3des -i hmac-sha and press ENTER.
The encryption and integrity algorithms used above should match the same
tunnel security parameters set in RiverMaster.
5. Type ./ipsecEsp -L and press ENTER to display and verify the security
parameters were added.
6. Create an IPSec proposal. Type ./ipsecProposal -a -n ezipsec -p
enabled -g modp768 -e ezipsec and press ENTER.
You may select another Modp number if required.
7. Type ./ipsecProposal -L and press ENTER to display and verify the
proposal was added.
8. Type ./ipsecSelector -a -n ezipsec -o 0.0.0.0/0 -r
192.168.0.0/16 and press ENTER.
This command creates an IPSec selector covering the entire pool of networks
for use by all ANG-1100 devices.
9. Type ./ipsecSelector -L and press ENTER to display and verify the
selector was added.
Rel. 3.5 Release Notes
Page 17 of 30
Using Network Extension Mode for ANG-1100 Tunnels
Release Notes
Release 3.5 Enhanced Support for VPN Clients
10. Create an IPSec rule. Type ./ipsecRule -a -n ezipsec -s ezipsec
-w process -b spd -e tunnel -p ezipsec and press ENTER.
11. Type ./ipsecRule -L and press ENTER to display and verify the rule was
added.
12. Type ./ipsecSpd -n external -r 'gre;ike;ezipsec;pptpIn;
pptpOut;irppIn;irppOut;https;l2tpIntout’ and press ENTER.
This adds the previously created rule to the IPSec Security Policy Database on
the external interface of the central ANG-3000/7000.
NOTE
If you issue the ipsecDefault command later, these changes will disappear.
13. Type ./ipsecSpd -L and press ENTER to display and verify the changes
were made to the IPSec Security Policy Database.
14. Type SU - root and press ENTER.
15. Type the default password welcome.
16. Change directory to /usr/indus/irc and press ENTER.
17. Issue the ircreboot command to enable the security policy changes and
press ENTER.
Caveats
A central ANG-3000/7000 using Aurorean 3.5 firmware must manage a considerable
amount of “overhead” for all tunnel traffic to an ANG-1100 using NEM. The
performance impact of tunnels between these devices may be appreciable if a large
number of ANG-1100s enable NEM. You should conform to the following guidelines
to mitigate the impact of this linear search:
! Limit the number of ANG-1100s using NEM to a maximum of 64, or,
! Group remote sites into blocks of 64 (or less) which share a common SPD rule
on the ANG-3000/7000.
Page 18 of 30
Rel. 3.5 Release Notes
Release Notes
Release 3.5 Enhanced Support for VPN Clients
Using Peer to Peer Tunnels
Using Peer to Peer Tunnels
Aurorean Release 3.5 introduces Peer to Peer tunnel mode, which is designed to
connect ANG-1100s in remote branch offices, giving a device on one remote network
access to a device on another remote network as well as connect to a central
ANG-3000/7000 or third-party VPN gateway (refer to Figure 14).
ANG-7000
ANG-1100
Router
Third-party
ANG-1100
Router
Client Mode tunnel
Figure 14 Peer to Peer Mode Tunnels
Configuration requirements are as follows:
! Configuring Peer to Peer tunnels requires setting preshared keys (passwords),
public IP addresses, and knowing both devices are on reachable networks.
! Peer to Peer tunnels use IKE Main Mode with Group 2 (1024-bit modulus),
3DES encryption, and either the SHA or MD5 hash functions. The identity of
each peer is implicitly the peer's IP address.
! Routing information is defined for each Peer to Peer tunnel. The network
administrator may enter up to 3 IP subnets (subnet and mask) which are
reachable via the remote security gateway. (Only one subnet is supported per
tunnel if both peers are ANG-1100 gateways).
! Peer to Peer mode tunnels can coexist with Client mode tunnels (refer to
Figure 15). For example, a set of ANG-1100s can be configured with a mesh of
Peer to Peer tunnels and each of those ANG-1100s can also be connected to a
central ANG-3000/7000 via a Client mode tunnel. Note that if the same
remote subnet is reachable by a Client mode and Peer to Peer tunnel, the
Client tunnel takes precedence.
ANG-1100
ANG-1100
Router
ANG-7000
ANG-1100
Client Mode tunnel
Peer to Peer Mode tunnel
Figure 15 Coexisting Peer to Peer Mode and Client Mode Tunnels
Rel. 3.5 Release Notes
Page 19 of 30
Using Peer to Peer Tunnels
Release Notes
Release 3.5 Enhanced Support for VPN Clients
! The Security Policy used by a Peer to Peer networking tunnel is identical to
that used by EZ-IPSec, the streamlined implementation of IPSec on the
ANG-1100. The encryption and integrity algorithms offered during Phase 2
security association construction, in order of preference, are:
–
–
–
–
–
–
–
–
Triple DES / SHA-1
Triple DES / MD5
ARCFOUR-128 / SHA-1
ARCFOUR-128 / MD5
Triple DES / NONE
DES / SHA-1
DES / MD5
DES / NONE
! Perfect Forward Secrecy is preferred (Modp768 - Group 1 is supported), but
not required, for all Phase 2 negotiations.
Configuring Peer to Peer Tunnels
To configure Peer to Peer mode between attached ANG-1100s, network
administrators need to configure each ANG-1100 with the following values:
! Up to three (reachable) IP addresses and Subnet Masks of the remote peers
that each ANG-1100 will connect to
! The public IP address (Gateway IP address) of the ANG-1100 at the opposite
end of the connection
! The pre-shared keys (Passwords) of the ANG-1100 at the opposite end of the
connection
For detailed instructions on how to configure Peer to Peer mode, refer to the
ANG-1100 User’s Guide.
Caveats
The following features are not supported:
! ANG-1100s connected to ANG-3000/7000s must use Client mode or NEM,
not Peer to Peer mode. At this time, ANG-1100s connect to ANG-3000/7000s
using EZ-IPSec with Client mode or NEM enabled.
! Failover from one Peer to Peer tunnel to another is not supported.
! Remote DNS and WINS name server IP addresses are not passed from one
VPN peer to another when using Peer to Peer tunnels. DNS and WINS must
be provided by the ISP, via another Client mode tunnel, by statically
configuring them on the PC, or setting up an external DHCP server.
! Dynamic routing information is not exchanged between peers connected by
Peer to Peer tunnels. All routing is defined statically in the tunnel
configuration.
! Routing information is not exchanged between Peer to Peer tunnels and
Client mode tunnels. Each ANG-1100 which requires central site access via an
ANG-3000/7000 must have its own Client mode tunnel. It may not access the
central site via another ANG-1100's Peer to Peer tunnel.
Page 20 of 30
Rel. 3.5 Release Notes
Release Notes
Release 3.5 Enhanced Support for VPN Clients
Inter-operability with Third-Party VPN Gateways
CAUTION
NEM tunnels can not be mixed with Peer to Peer tunnels.
! Remote peers must not have dynamically assigned IP addresses because preshared key authentication (if selected) uses IKE Main Mode. The security
policy database on each peer must also contain a fixed IP address of the
remote peer.
Inter-operability with Third-Party VPN Gateways
Connecting to a Cisco VPN 3005 Router
The instructions below are provided to configure a sample Peer to Peer tunnel
between a Cisco router and the ANG-1100. The following software revision was used:
Software Rev: Cisco System, Inc. / VPN 3000 Concentrator Series Version
2.5.2 (Rel) Aug 16 2000 11:41:47
Assuming you are working with an operational device, perform the following steps to
configure the Cisco device. Be aware that IP addresses displayed are sample
parameters.
1. Configure an IKE Proposal. Click to Configuration> System> Tunneling
Protocols> IPSec> IKE Proposals and press ADD.
2. Do the following:
–
–
–
–
–
–
–
–
–
–
Enter the Proposal name.
Select Preshared Keys as the Authentication Mode.
Select ESP/SHA/HMAC-160 as the Authentication Algorithm from the
pull-down menu.
Select 3DES-168 as the Encryption Algorithm from the pull-down menu.
Select Group 2 (1024-bits) as the Diffie-Hellman Group.
Select the following default values:
Lifetime Measurement of Time.
Data Lifetime of 10000.
Time Lifedata of 86400.
Click ADD.
3. Activate the IKE Proposal by clicking ACTIVATE.
4. Configure a Security Association. Click to Configuration> Policy
Management> Traffic Management> Security Association> Modify (or make
selections from the IKE Proposal screen).
Rel. 3.5 Release Notes
Page 21 of 30
Inter-operability with Third-Party VPN Gateways
5.
Release Notes
Release 3.5 Enhanced Support for VPN Clients
In the add Security Association window, enter the following values:
–
–
–
–
–
–
–
–
–
–
–
–
–
–
–
Enter an SA Name
Select From Rule (default) as the granularity of this SA.
Select ESP/SHA/HMAC-160 as the Authentication Algorithm from the
pull-down menu.
Select the Encryption Algorithm 3DES-168 from the pull-down menu.
Select Tunnel as the Encapsulation Mode.
Select Group 1 (768 bits) as the Perfect Forward Secrecy value.
Select the following values:
Lifetime Measurement of Time.
Data Lifetime of 10000.
Time Lifedata of 86400.
Enter 146.115.206.68 as the IKE Peer (the Public IP Address of the
ANG-1100).
Enter Main as the IKE Negotiaotion Mode.
Enter None for Digital Certificates (use Preshared Keys).
Use the IKE Proposal just created from the pull-down menu.
Click APPLY.
NOTE
When you configure the connection in the Configuration> System> Tunneling
Protocols> IPSec LAN-to-LAN window, the Concentration Series Manager
automatically creates a group with the Peer IP Address as the Group Name.
6. Create a IPSec LAN-to-LAN tunnel. Click to Configuration> System>
Tunneling Protocols> IPSec and enter the following values:
–
–
–
–
–
–
–
–
–
–
–
Enter the IPSEC Lan-to-Lan Configuration.
Select the Interface to put the LAN-to-Lan connection.
Enter the IP address of the remote peer for the LAN-to-LAN.
Select None (use Preshared Keys) as the Digital Cerificates.
Enter testing as the Preshared Key.
Select ESP/SHA/HMAC-160 for Authentication from the pull-down
menu.
Select 3DES-168 as the Encryption type.
Select 3DES-SHA-DH2 as the IKE Proposal.
Enter Trust LAN & Mask as the Local Network Information.
Enter Remote LAN & Mask as the Remote Network Information.
Click APPLY.
7. Save your changes to the Configuration File.
Configuring VPN Settings on the ANG-1100
To configure the ANG-1100 to connect with the Cisco 3005, enter the following values
in the VPN Setup window of the Web Config utility of the ANG-1100. For more
information on configuring the ANG-1100, refer to the ANG-1100 User’s Guide.
Enter the following values in the appropriate fields. Be aware that IP addresses
displayed are sample parameters.
Page 22 of 30
Rel. 3.5 Release Notes
Release Notes
Release 3.5 Enhanced Support for VPN Clients
Inter-operability with Third-Party VPN Gateways
! Enter Cisco_Peer in the VPN Connection Name field.
! Set the public IP address of the Cisco device. Type 146.115.206.35 in the
Gateway IP address field.
! Enter testing as a Password. This value must match the value configured for
the Cisco device.
! Select Peer to Peer Mode.
! Type 10.120.54.0/24 in the first Peer Subnet address and Mask fields. This
value must match the trusted subnet of the Cisco device.
! Checkmark Start network gateway now and click APPLY.
Connecting to the Nortel Contivity CES 600 Switch
The following instructions are provided to configure a Peer to Peer tunnel between a
Nortel Contivity Extranet Switch and the ANG-1100.
8. At the main menu, click to PROFILES> Networks.
–
–
–
Create a new profile: Trusted_lan which defines your internal network.
Enter a new subnet: 10.122.54.0/24.
Click ADD.
9. Add a Group.
–
–
–
Click to PROFILES > Branch Office > Add Group.
Enter the Group Name/BaseGroup of Peer2Peer.
Click OK.
10. Edit Group Peer2Peer.
–
–
–
–
–
Select Configure = Idle Time - Enter 00:00:00.
Click OK.
Select Configure IPSEC - Enable ESP-Triple DES w/SHA Disable Vendor
ID and Disable Perfect Forward Secrecy.
Click OK.
Click CLOSE.
11. Define a Branch Office Connection for the group just created.
–
–
–
–
–
–
–
–
Click to Define Branch Office Connection.
Enter Name & Group
Click OK.
Enter 146.115.206.35 as the Local Peer IP Address - Public IP address of
the CES.
Enter the Remote Peer Address.
Enter the Pre-shared Keys.
Click CONTINUE.
Click ENTER REMOTE.
12. Select Trusted LAN information - Static.
–
–
–
Rel. 3.5 Release Notes
Enter Remote 10.121.210.0/ MASK / State / Cost.
Click ON.
Select No NAT Translation selected from the pull-down menu.
Page 23 of 30
Inter-operability with Third-Party VPN Gateways
Release Notes
Release 3.5 Enhanced Support for VPN Clients
13. RIP is enabled by default. You may want to change this selection.
14. Click OK.
Configuring VPN Settings on the ANG-1100
To configure the ANG-1100 to connect with the Nortel 600, enter the following values
in the VPN Setup window of the Web Config utility of the ANG-1100. For more
information on configuring the ANG-1100, refer to the ANG-1100 User’s Guide.
Enter the following values in the appropriate fields. Be aware that IP addresses
displayed are sample parameters.
! Enter Nortel_Peer in the VPN Connection Name field.
! Set the public IP address of the Nortel device. Type 146.115.206.43 in the
Gateway IP address field.
! Enter testing as a Password. This value must match the value configured for
the CES.
! Select Peer to Peer Mode.
! Type 10.122.53.0/24 in the first Peer Subnet address and Mask fields. This
value must match the trusted subnet of the CES.
! Checkmark Start network gateway now and click APPLY.
PFS Configuration
Since the CES 600 performs Group 2 (1024-bit) Perfect Forward Secrecy only, and the
ANG-1100 supports Group 1 (768-bit) PFS only, you must perform the following steps
on the ANG-1100’s Web Config CLI to enable inter-operability between the devices:
1. Create an ipsecProposal for group 2. Type: ipsecProposal -a -n
pfs2on -p enable -g Mopd1024 -T 30 -D 35 -e
"esp1;esp2;esp5;esp7;esp8;esp9"
2. Modify the ipsecRule for the remote device (Check the value of the Gateway
for the correct rule.) Type: ipsecRule -n r0sn1 -p pfs2on
3. Reboot the ANG-1100.
IPSec Transform Configuration
Nortel limits the number of IPSec transforms it processes. To inter-operate the devices
with PFS disabled for Phase II SA, perform the following steps:
1. Modify the ipsecRule for the remote device to delete the PFS proposals from
the rule. Type: ipsecRule -n r0sn1 -p pfsoff
2. Reboot the ANG-1100.
NOTE
Once the CLI commands are issued, you will not be able to use VPN Setup on
Web Config to manage tunnels unless the ANG-1100 is reset.
Page 24 of 30
Rel. 3.5 Release Notes
Release Notes
Release 3.5 Enhanced Support for VPN Clients
Inter-operability with Third-Party VPN Gateways
Connecting to the Checkpoint 4.1 Firewall
This sample configuration demonstrates how to create an IPSec tunnel with preshared keys between two private networks: a private network inside the ANG-1102
(192.168.1.1) and a private network inside the Checkpoint (10.120.54.x).
Hardware and Software Versions
! Checkpoint 4.1 Firewall
! ANG-1102 - V3.5 - Build166
Perform the following steps to configure the ANG-1102 and Checkpoint 4.1 Firewall.
ANG-1102
1. Select VPN Setup.
2. Enter the name of the tunnel - (reference only).
3. Enter the External Interface Address for the Nokia (146.115.206.31) - Tunnel
End Point.
4. Enter the Preshared Key or password for the tunnel.
5. Select Peer-to-Peer Mode.
6. Enter the Private Network Address/ Mask for the Checkpoint device
(10.120.54.0/24).
7. Select to Startup.
8. Click to Save/Apple.
Checkpoint 4.1 Firewall
1.
Select Properties > Encryption and enter new values if necessary.
– Set the Checkpoint lifetimes to agree with the ANG1102 defaults. The IKE
lifetime is 86400 seconds =1440 minutes, IPSec lifetime = 28800 seconds).
2. Enter a Network Object for the Checkpoint Private Address. Select Manage >
Network objects > New (or Edit) > Network.
–
–
–
Enter the name of the Network Object (Reference Only).
Enter the Private Address/Mask of the Checkpoint network. This should
be same as the Private Address set on the ANG-1102.
Set the location = internal.
3. Enter a Network Object for the Checkpoint. Select Manage > Network objects
> Edit.
–
–
–
–
Rel. 3.5 Release Notes
Enter the Gateway Tunnel Endpoint of the Checkpoint (146.115.206.31).
Set the Location = Internal, Type = Gateway.
Select VPN-1 & Firewall -1 check box under Modules.
Select the Management Station Check Box.
Page 25 of 30
Inter-operability with Third-Party VPN Gateways
Release Notes
Release 3.5 Enhanced Support for VPN Clients
4. Enter a Network Object for the ANG-1102 Private Address. Select Manage >
Network objects > New (or Edit) >.
–
–
–
Enter the name of the Network Object (reference only).
Enter the Private Address/Mask of the ANG-1102 network.
(192.168.1.0/24).
Set the location = External.
5. Enter a Network Object for the ANG-1102. Select Manage > Network objects
> New > Workstation.
–
–
Enter the Gateway Tunnel Endpoint of the ANG-1102 (146.115.206.68)
Set the Location = External, Type = Gateway.
NOTE
Do not select the VPN-1/FireWall-1 check box.
6. Configure the IKE properties for the Phase I Connection. Select Manage >
Network objects > Edit to edit the Checkpoint gateway endpoint created in
Step 3.
–
–
–
–
–
–
Select the VPN tab.
Select Other, under Domain.
Select the inside of the Checkpoint network name (Step 2) from the dropdown list.
Select IKE under Encryption schemes defined and then click Edit.
Change the IKE properties to 3DES encryption.
Change the IKE properties to SHA1 hashing.
NOTE
The ANG-1102 supports 3DES/SHA1 and 3DES/MD5 & PFS Group 2 for a Phase
I connection.
–
Change the following settings:
- De-select Aggressive Mode.
- Select the Supports Subnets check box.
- Select the Pre-Shared Secret check box.
- Click Edit Secrets to set the pre-shared key to what was set on the
ANG-1102.
7. Repeat the Process for the ANG-1102 connection created in Step 5.
8. Create a Rule for the Source and Destination. Policy > Add Rule.
–
–
Page 26 of 30
Select the Source and Destination to be the Private Address objects
created with Step 2 and Step 4, make the Bidirectional).
Set Service = ANY, Action = Encrypt, Track = Long.
Rel. 3.5 Release Notes
Release Notes
Release 3.5 Enhanced Support for VPN Clients
9.
Resolved Issues from the Last Release
Configuration - the Phase II Security Action.
–
–
–
–
–
–
–
–
Click the Green Encrypt icon under the Action heading.
Select Edit to Configure.
Select IKE, and then click Edit.
Select Encryption + Data Integrity (ESP).
Set the the Encryption Algorithm = 3DES.
Set Date Integrity = SHA1.
Set Allowed Peer Gateway = External ANG-1102 Gateway (configured in
Step 4).
Click OK.
NOTE
The ANG-1102 supports the following values in Peer-to-Peer Mode.
- Encryption = 3DES & DES
- Data Integrity = SHA1 & MD5
- PFS = Group 1 or No PFS
10. After configuring the Checkpoint device, select Policy > Install on the
Checkpoint menu to enable the changes.
Resolved Issues from the Last Release
The following issues have been resolved since the 3.2 release of Aurorean system
software:
! IKE Site-to-Site tunnels will not authenticate with RADIUS. Bug # 3202.
! Unknown users have disappeared from the tunnel server. Bug # 3320.
Known Issues With This Release
The following issues were identified in previous releases of Aurorean system
software:
ANG-1100
! Web Config Fails to Bar More Than 1 ANG-1100 Tunnel to Same
ANG-3000/7000
Web Config does not enforce the functional limitation of one tunnel only from
an ANG-1100 to the same ANG-3000/7000. Bug # 3728.
! ANG-1100 Web Config Session Does Not Timeout
Web Config sessions on the ANG-1100 do not time out after running for 24
hours. The session should close after a default period of inactivity. Bug # 3271.
ANG/APS-3000/7000
! SecurID Authentication Not Verified for Native Clients Over EAP
Rel. 3.5 Release Notes
Page 27 of 30
Known Issues With This Release
Release Notes
Release 3.5 Enhanced Support for VPN Clients
It has not been verified that SecurID authentication operates for native clients
using EAP.
! IE v.6 Does Not Run with the ANG-3000/7000 Web Config
WebConfig on the ANG-3000/7000 does not display using Internet Explorer
v. 6 with Windows XP. Bug # 3328.
! PPTP Tunnels With MSCHAPv2 Fail Using Funk SBR RADIUS
Novell's PPTP connectoid fails to pass traffic when connected to an
ANG-3000/7000 even though MSCHAPv2 authentication succeeds when
Funk's Steel-Belted RADIUS (v2.27) server plugin is used.
You can work around this issue by using the irdomain plugin to build a
functioning PPTP tunnel (with your domain controller username and
password for authentication) or installing Funk’s Steel-Belted RADIUS v3.0.
Bug # 3650.
Aurorean Client
! Aurorean Client Does Not Start on Windows 95 System
After starting Aurorean Client and waiting for it to load on a Windows 95
system, an error message appears stating the Delivery subsystem did not
initialize in the specific timeout period. Increasing the Dwait value in the
Registry to 60 and 90 returned the same error. Bug # 1930.
RiverMaster
! RiverMaster Log Fails to Note Client Kit Building Error
When lack of disk space on the RiverMaster computer causes a new client kit
build to fail, a Packet Creation Failed message displays with an error number
but this error condition is not recorded in the log file. You should report the
error number to Customer Support. Bug # 2425.
! RiverMaster Missing Option to Set Tracing on the ANG
Setting tracing on the ANG Tunnel Management Service is not an option in
RiverMaster but you may do so with the CLI command ./irctrace. For more
information, refer to the Application Note: ANG Configuration Using the
Command Line Interface. Bug # 3452.
! L2TP Tunnels Not Included in Total User Count
RiverMaster does not include L2TP tunnels in its total user count of logged in
session on the main page although other tunnel types such as ezipsec and
IRPP are counted. You may run the ircTunnel command on the ANG’s CLI.
For more information, refer to the Application Note: ANG Configuration Using
the Command Line Interface. Bug # 3598.
! Floppy Configuration Tool Does Not Save ANG Configuration
Page 28 of 30
Rel. 3.5 Release Notes
Release Notes
Release 3.5 Enhanced Support for VPN Clients
Known Issues With This Release
Since IPSec default values were removed from the APS database, Floppy
Configuration does not run correctly. To set these defaults, you must run the
ipsecDefault script using the CLI on the remote ANG receiving the
configuration via a floppy disk.
CAUTION
This script first erases all IPSec configuration settings and then reloads it
with the factory default. Any configurations you added earlier are lost.
As a precaution against inadvertent use of the command, the script
interactively prompts you to confirm that you intend to erase and then
restore the initial IPSec configuration.
To issue the ipsecDefault command, perform the following:
1
Log into the ANG-3000/7000 with the login and password netadmin
(default) and press ENTER.
2
Load the floppy disk in the ANG-3000/7000’s floppy disk drive.
3
Reboot the ANG-3000/7000.
The ANG copies the configuration file to its hard drive.
4
At the command prompt, change directory to usr/indus/ipsec.
5
Type ipsecDefault and press ENTER.
6
Reboot the ANG-3000/7000.
Upon completing the reboot, the ANG will resume normal tunnel
operation.
For more information, refer to the Application Note: ANG Configuration Using
the Command Line Interface. Bug # 3671:
! EAP Authentication for PPTP Controlled in L2TP Window
The EAP authentication protocol is supported by PPTP and L2TP but is
controlled from the L2TP configuration tab on RiverMaster. The use of EAP in
PPTP is controlled by the EAP radio button under L2TP. Bug # 3675.
Rel. 3.5 Release Notes
Page 29 of 30
Contacting Enterasys Networks
Release Notes
Release 3.5 Enhanced Support for VPN Clients
Contacting Enterasys Networks
For general information on Enterasys Networks products, access the company’s
Web site at www.enterasys.com or write/call the company at:
Enterasys Networks
35 Industrial Way
Rochester, NH 03866
Phone: (877)-641-7400
To reach an Enterasys Networks Sales representative, call 1 (877) 641-7400, or send
E-mail to www.enterasys.com. Please include your name, title, company, and
phone number in all E-mail correspondence, and indicate which Enterasys
Networks products you wish to be contacted about.
For answers to technical questions about Aurorean system software, you can send
E-mail to [email protected]. Include your name, title, company, and phone
number in all correspondence. Enterasys Networks customer support personnel
are also available by calling 1 (800) 872-8440.
Enterasys Networks recommends that you have your copy of the applicable
documentation on hand when you call.
Aurorean ©2001 Enterasys Networks. All rights reserved. This publication contains information that is the property of
Enterasys Networks. Information in this publication is subject to change without notice. Enterasys Networks assumes
no responsibility for errors or omissions in this publication or for the use of this material.
RiverMaster software may not be copied, except as otherwise provided in your software license or as expressly
permitted in writing by Enterasys Networks.
The Enterasys Networks logo, Auto-Link Recovery, Prescriptive Diagnostics Engine, RiverMaster, Aurorean, and
TollSaver are trademarks of Enterasys Networks.
Microsoft, MS, and MS-DOS are registered trademarks and Windows, Windows 95, Windows 98, Windows NT,
Windows 2000 Professional and Windows Millennium are trademarks of Microsoft Corporation in the USA and other
countries.
Virtual Network Computing is a trademark of AT&T Laboratories Cambridge.
Other trademarks, trade names, and copyrights used in this publication belong to their respective owners.
Page 30 of 30
Rel. 3.5 Release Notes