1
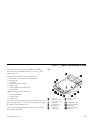
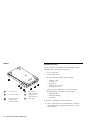
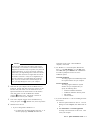
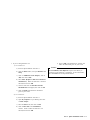
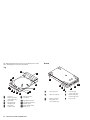
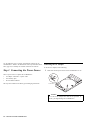
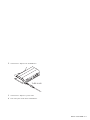
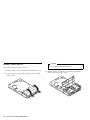
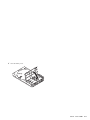
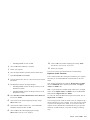
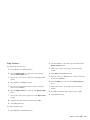
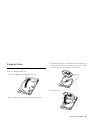
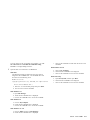
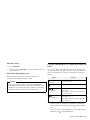
20X Max Portable CD-ROM Drive User's Guide OPTIONS by IBM Note: If you are using this product in the United States, Canada, or Puerto Rico, be sure to read the information under Appendix E, “Product Warranty and Notices” on page 3-16 before using this information and the product it supports. For all other countries, the warranty terms and conditions applicable in the country of purchase are available from IBM or your reseller. First Edition (October 1997) The following paragraph does not apply to the United Kingdom or any country where such provisions are inconsistent with local law: INTERNATIONAL BUSINESS MACHINES CORPORATION PROVIDES THIS PUBLICATION “AS IS” WITHOUT WARRANTY OF ANY KIND, EITHER EXPRESS OR IMPLIED, INCLUDING, BUT NOT LIMITED TO, THE IMPLIED WARRANTIES OF MERCHANTABILITY OR FITNESS FOR A PARTICULAR PURPOSE. Some states do not allow disclaimer of express or implied warranties in certain transactions, therefore, this statement may not apply to you. This publication could include technical inaccuracies or typographical errors. Changes are periodically made to the information herein; these changes will be incorporated in new editions of the publication. IBM may make improvements and/or changes in the product(s) and/or the program(s) described in this publication at any time. This publication was developed for products and services offered in the United States of America. IBM may not offer the products, services, or features discussed in this document in other countries, and the information is subject to change without notice. Consult your local IBM representative for information on the products, services, and features available in your area. Requests for technical information about IBM products should be made to your IBM reseller or IBM marketing representative. Copyright International Business Machines Corporation 1997. All rights reserved. Note to U.S. Government Users — Documentation related to restricted rights — Use, duplication or disclosure is subject to restrictions set forth in GSA ADP Schedule Contract with IBM Corp. Contents Safety: Read First About This Book . . . . . . . . . . . . . . . . . . . . . . . v . . . . . . . . . . . . . . . . . . . . . . . . vi Part 1: Quick Installation Guide Part 2: User's Guide . . . . . . . . . . . . . . . . . . . . . . . . . . . . . . . . . . . . . . . . . . . . . . . . . . . . . . . . 2-1 Installing the Drive . . . . . . Introduction . . . . . . . . . . External Connectors of the Drive Indicator Panel . . . . . . . . . Installation Requirements . . . Handling Instructions . . . . . . . . . . . . . . . . . . . . . . Step 1. Connecting the Power Source Connecting the AC Adapter . . . . . Installing the Ni-Cd Battery Pack . . Charging the Ni-Cd Battery Pack . . Installing Alkaline Batteries . . . . . Step 2. Connecting the Drive . . . . . . . . . . . . . . . . . . . . . . . . . . . . . . . . . . . . . . . . . . . . . . . . 1-1 . . . . . . . . . . . . . . . . . . . . . . . . . . . . . . . . . . . . . . . . . . . . . . . . . . . . . . . . . . . . . . . . . . . . . . . . . . . . . . 2-1 2-1 2-3 2-4 2-5 2-5 . . . . . . . . . . . . . . . . . . . . . . . . . . . . . . . . . . . . . . . . . . . . . . . . . . . . . . . . . . . . . . . 2-6 2-6 2-8 2-9 2-10 . . . . . . . . . . . . . . . . 2-12 Step 3. Installing the Device Driver . . . . . . . . . . . . DOS or Windows 3.11 . . . . . . . . . . . . . . . . . . . . 2-13 2-14 Copyright IBM Corp. 1997 Windows 95 . . . . . . . . . . . . . . . . . . . . . . . . . Windows NT . . . . . . . . . . . . . . . . . . . . . . . . OS/2 Warp . . . . . . . . . . . . . . . . . . . . . . . . . 2-15 2-18 2-19 Step 4. Completing the Installation . . . . . . . . . . . . 2-24 Using the Drive . . . . . . . . . . . . . . . . . . . . . . . Inserting and Removing the Disk . . . . . . . . . . . . . . Changing Modes . . . . . . . . . . . . . . . . . . . . . . . Mounting the Speakers (Stereo Model Only) . . . . . . . . . Using the CD-ROM Drive . . . . . . . . . . . . . . . . . . Using the CD-ROM Drive as an External CD Player . . . . Using the CD-ROM Drive as a Stand-Alone Audio CD Player Using Sound Functions (Stereo Model Only) . . . . . . . . . Maintaining the Drive . . . . . . . . . . . . . . . . . . . . 2-25 2-25 2-27 2-28 2-30 2-32 2-33 2-34 2-36 iii Part 3: Appendixes . . . . . . . . . . . . . . . . . . . . . . . . . . . . . . . . . . . . . . . . . . . . . . . . . . . . . . . . . 3-1 Appendix A. Safety Information . . . . . . . . . . . . . . 3-1 . . . . . . . . . . . . 3-11 . . . . . . . . . . . . . . . 3-13 Appendix B. Product Specifications Appendix C. Problem Solving Appendix D. Help and Service Information Step 1: Problem Solving . . . . . . . . . . Step 2: Preparing for the Call . . . . . . . . Step 3: Placing the Call to IBM . . . . . . . . . . . . . . . . . . . . . . . . . . . . . . . . . . . . . . . 3-14 3-14 3-14 3-15 Appendix E. Product Warranty and Notices Warranty . . . . . . . . . . . . . . . . . . Notices . . . . . . . . . . . . . . . . . . . Trademarks . . . . . . . . . . . . . . . . . Electronic Emission Notices . . . . . . . . . . . . . . . . . . . . . . . . . . . . . . . . . . . . . . . . . . . . . . . . 3-16 3-16 3-18 3-18 3-20 iv 20X Max Portable CD-ROM Drive Safety: Read First v About This Book This book describes how to install the 20X Max Portable CD-ROM Drive and how to use it. This book is divided into three parts: Part 1 contains abbreviated installation instructions in the following languages: English French Italian Part 2 contains: – – – – German Spanish Brazilian Portuguese Product description Illustrations of product features Detailed installation instructions Detailed instructions for use of the CD-ROM drive Part 3 contains: – – – – Product specifications Problem solving Help and service information Warranty, notices and trademarks Note: This option comes in two models: a basic model, and a stereo model which adds PCM/MIDI sound capability and has a set of stereo speakers. The two models cannot be interchanged. This book describes each model. Before continuing, check to see which model you have. vi 20X Max Portable CD-ROM Drive Part 1: Quick Installation Guide The following is an overview of the CD-ROM drive installation instructions. For more detailed instructions, go to “Part 2: User's Guide” on page 2-1. Top 14 1 In addition to this manual, the option package contains: Base model or stereo model of the CD-ROM drive PCMCIA card AC adapter Power cord for the AC adapter Interface cable Nickel-Cadmium (Ni-Cd) battery pack Option Diskette 13 12 2 11 3 10 Additional items for the stereo model only: 9 4 8 Left and right speakers 2 speaker cables 2 speaker clips If any item in the option package is missing or damaged, contact your place of purchase. Be sure to retain your proof of purchase; it might be required to receive warranty service. You can use the following illustrations to locate external connectors and controls on both models. Copyright IBM Corp. 1997 7 5 6 .1/ .2/ .3/ .4/ .5/ .6/ .7/ Disk cover Speaker jack (right) (stereo model only) Open button Line output jack Headphone jack Lock button Volume control .8/ Play/pause button .9/ Stop button .1ð/ .11/ .12/ .13/ .14/ Skip button (forward) Skip button (backward) Indicator panel Mode selection button Battery cover 1-1 Bottom Installing the Drive For your computer to be compatible with the 20X Max Portable CD-ROM Drive, it must include the following: 7 PC Card Type II slot 3.5-inch diskette drive One of the following operating systems installed: – – – – – 1 6 2 5 3 4 If you have DOS or Windows 3.11, you need one of the following PCMCIA card support software packages: .1/ Power input jack .5/ .2/ Game port connector .6/ .3/ .4/ Interface connector Microphone jack (stereo model only) .7/ Line input jack (stereo model only) Speaker jack (left) (stereo model only) Power switch – – – 20X Max Portable CD-ROM Drive IBM (PlayAtWill) Phoenix Technology SystemSoft To install the CD-ROM drive and its device drivers: 1 1-2 DOS 5.0 or later Windows 3.11 Windows 95 Windows NT 3.51 or 4.0 OS/2 Warp V3 or V4 Select a power source for the CD-ROM drive: AC adapter, Ni-Cd battery pack (rechargeable battery pack), or six AA alkaline batteries. Attention Be sure to insert and remove the interface cable and PC Card carefully. The connectors on the interface cable are designed to be inserted in only one position; they cannot be inserted upside down. If you try to insert the connectors upside down, you might damage them. Make sure that the pins on the cable connectors are aligned with the holes in the interface connectors. If they are not aligned and you force the connection, you might damage the connectors. Also, if you use excessive force when inserting the PC Card, you might damage the card or your computer. 2 Make sure that your computer and the CD-ROM drive are turned off. Squeeze both sides of the large connector on the interface cable, and connect it to the end of the PC Card. Squeeze both sides of the small connector on the interface cable, and connect it to the CD-ROM drive interface connector.3/ (Bottom view). Plug the PC Card into an available PC Card slot on your computer. 3 Turn on the computer and turn on the CD-ROM drive by moving the power switch.7/ (Bottom view) to the ON position. 4 Install the device drivers. a. If you are using DOS or Windows 3.11: 1) For DOS: Insert the Option Diskette into drive A. At the DOS prompt type a:\install, then follow the instructions on the screen. When installation completes, restart DOS. 2) For Windows 3.11: Insert the Option Diskette into drive A. Using File Manager, go to the File menu, select Run, then type a:\install on the command line. You will be prompted to choose one of two installation options. Automatic installation The setup program will automatically install the required software into your computer. Selective installation The setup program installs the required software into your computer after you specify the following items: Software installation destination Installation destination directory name IRQ number I/O base address 3) If you have Windows 3.11 and are installing the audio device driver: a) Insert the Option Diskette into drive A. Use File Manager to locate setup.exe, then double-click on it. b) Run Install Driver and Install Application according to the instructions on the screen. Then restart your computer. Part 1: Quick Installation Guide 1-3 b. If you are using Windows 95: Turn on the computer. Windows 95 recognizes a new drive and displays the New Hardware window. Click on OK and follow the instructions given in the dialog boxes. When the installation process completes, restart Windows 95. c. If you are using OS/2 Warp 3: 1) For the base model, insert the Option Diskette into drive A. On your desktop, double-click on the OS/2 System folder, then on System Setup, then on Device Driver Install. Click on Install and follow the instructions on the screen. When the installation process completes, shut down and restart OS/2. 2) For the stereo model: a) Verify that the IBM Multimedia Presentation Manager/2 (MMPM/2) is installed on your computer. b) Insert the Option Diskette into drive A. On your desktop, double-click on the OS/2 System folder, then on System Setup, then on Device Driver Install. Click on Install and follow the instructions. Shut down the system and restart OS/2. c) Insert the Option Diskette in drive A. Locate Drive A using your file manager. When you have done so, double-click on MINSTALL.EXE. Select 20X Max Portable CD-ROM Drive, click on Install, and follow the instructions. When the 1-4 20X Max Portable CD-ROM Drive installation process completes, shut down and restart OS/2. d. If you are using OS/2 Warp 4: 1) For the base model, insert the Option Diskette into drive A. On your desktop, double-click on the OS/2 System folder, then on System Setup, then on Install/Remove, then on Device Driver Install. Click on Install and follow the instructions on the screen. When the installation process completes, shut down and restart OS/2. 2) For the stereo model: a) Verify that the IBM Multimedia Presentation Manager/2 (MMPM/2) is installed on your computer. b) Insert the Option Diskette into drive A. On your desktop, double-click on the OS/2 System folder, then on System Setup, then on Install/Remove, then on Device Driver Install. Click on Install and follow the instructions. Shut down the system and restart OS/2. c) Insert the Option Diskette in drive A. Locate Drive A using your file manager. When you have done so, double-click on MINSTALL.EXE. Select 20X Max Portable CD-ROM Drive, click on Install, and follow the instructions. When the installation process completes, shut down and restart OS/2. e. If you are using Windows NT: e) Click on OK in the Install Driver window, and follow the instructions given on your screen. 1) For version 3.51: a) Insert the Option Diskette into drive A. b) Open the Main window, then open Windows NT Setup. Attention For Ni-Cd Battery Pack Disposal: Dispose of the battery as required by local ordinances or regulations. In the United States, call 1-800-IBM-4333 for disposal information. c) Click on Add/Remove SCSI Adapters, click on Add, then click on OK. d) Select Other (Requires a disk from a hardware manufacturer). Make sure that drive A has been selected; then click on OK. e) Check to make sure that 20X Max Portable CD-ROM Drive is displayed, then click on OK. f) Click on Install, then follow the instructions given on your screen. 2) For version 4.0: a) Insert the Option Diskette into drive A. b) Open My Computer on your desktop, then click on SCSI Adapter. c) Select the Driver tab, then click on Add. d) Click on Have disk in the Install Driver window. Check to make sure that drive A is selected, then click on OK. Part 1: Quick Installation Guide 1-5 Part 2: User's Guide Installing the Drive Introduction When used as a CD-ROM drive, the 20X Max Portable CD-ROM Drive can operate at up to either 10 times the speed of an audio CD player (power-saving mode), or 20 times the speed of an audio CD player (normal mode). You can use the CD-ROM drive connected to your computer, or as a portable audio CD player. The drive comes in two models: Base model The drive has three power source options: AC adapter, Nickel-Cadmium (Ni-Cd) battery pack, and alkaline batteries (available at stores). In addition to this manual, the option package contains: Base model or stereo model of the CD-ROM drive PCMCIA card AC adapter Power cord for the AC adapter Interface cable Nickel-Cadmium (Ni-Cd) battery pack Option Diskette The base model is a portable CD-ROM drive that does not include an audio device driver or speakers. To hear sound with the base model, you must supply your own headphones or external speakers, and your computer must have an audio device driver previously installed. Additional items for the stereo model only: Stereo model If any item in the option package is missing or damaged, contact your place of purchase. Be sure to retain your proof of purchase; it might be required to receive warranty service. The stereo model is a portable CD-ROM drive that includes an audio device driver, PCM/MIDI sound capability, and removable speakers. Left and right speakers 2 speaker cables 2 speaker clips The illustrations in this manual can be used to locate controls and external connectors on both models. Copyright IBM Corp. 1997 2-1 The following illustrations show the top and bottom views of the drive, identifying the connectors and controls. Bottom Top 14 1 13 7 12 2 1 6 11 9 7 5 6 .3/ .4/ .5/ .6/ .7/ 2-2 3 4 4 8 .1/ .2/ 5 3 10 2 Disk cover Speaker jack (right) (stereo model only) Open button Line output jack Headphone jack Lock button Volume control .8/ Play/pause button .9/ Stop button .1ð/ .11/ .12/ .13/ .14/ Skip button (forward) Skip button (backward) Indicator panel Mode selection button Battery cover 20X Max Portable CD-ROM Drive .1/ Power input jack .5/ .2/ Game port connector .6/ .3/ .4/ Interface connector Microphone jack (stereo model only) .7/ Line input jack (stereo model only) Speaker jack (left) (stereo model only) Power switch The following illustrations show the additional accessories which come with the stereo model. Accessories (Stereo Model Only) Removable speaker External Connectors of the Drive You can use the CD-ROM drive to read data CDs or play audio CDs. These functions are described in “Using the Drive” on page 2-25. The drive's external connectors (refer to the illustrations on page 2-2) allow you to: Stop Cable jack Speaker clip Send an audio signal to an external audio system using the line out jack.4/ (Top view). Connect headphones using the headphone jack.5/ (Top view). Connect a joystick or gamepad using the game port connector.2/ (Bottom view) to play games on the stereo model. Feed the audio signal into the drive using the line input jack.5/ (Bottom view) on the stereo model, so that you can: – Listen to the sound on the drive speakers. – Route the signal to the computer for recording digital audio files. Connect a microphone using the microphone jack.5/ (Bottom view) on the stereo model, so that you can: – Hear the sound through the speakers. – Route the audio signal to the computer for recording digital audio files. Route the audio signal or digital data from the drive to the computer through the interface connector.3/ (Bottom view). On the stereo model, the speakers do not operate when headphones are connected to the headphone jack.5/ (Top view). Part 2: User's Guide 2-3 Indicator Panel No. Use the indicator panel to determine the operational state of the CD-ROM drive. The following illustration shows the position of each indicator on the display panel when the indicator is active. The table shows the meaning of each indicator. 1 2 3 .5/ Indicator Description On Flashing The number of the track being played. The track being played is paused. High (normal mode) is indicated when the speed is up to 20 times that of an ordinary audio CD player. Low (power saving mode) is indicated when the speed is up to 10 times that of an ordinary audio CD player. 4 No. Indicator 5 Description .1/ On Flashing .2/ The battery is being charged. This indicator disappears when charging is completed. (For more information, see “Installing the Ni-Cd Battery Pack” on page 2-8.) .3/ The CD-ROM drive is in use. .4/ Power is on. 2-4 The battery is charged. The battery is low. 20X Max Portable CD-ROM Drive Installation Requirements Handling Instructions For your computer to be compatible with the 20X Max Portable CD-ROM Drive, it must include the following: Read these instructions to preserve and care for the CD-ROM drive: PC Card Type II slot 3.5-inch diskette drive One of the following operating systems installed: – – – – – DOS 5.0 or later Windows 3.11 Windows 95 Windows NT 3.51 or 4.0 OS/2 Warp V3 or V4 Use only the AC adapter in the options package with the drive. Only use the Ni-Cd battery pack that comes with the CD-ROM drive. Dispose of the battery as required by local ordinances or regulations. In the United States, call 1-800-IBM-4333 for disposal information. Do not hold the drive by the CD cover when the cover is open. Do not hold the drive by the speakers (stereo model only). Do not expose the drive to: – – – – – If you have DOS or Windows 3.11, you need one of the following PCMCIA card support software packages: – – – IBM (PlayAtWill) Phoenix Technology SystemSoft Note High temperature or direct sunlight Excessive dust Excessive vibration or sudden shock Abrupt changes in temperature (condensation might develop) High humidity (this might affect proper operation) Do not press hard on the cover or stack objects on the drive. Do not use a strong solution such as benzene or thinner to clean the drive. The solvent causes deformation or discoloration. The stereo model sound function might not be available on some computers. Part 2: User's Guide 2-5 Use the following steps to connect and install the software for the CD-ROM drive. Refer to the illustrations of the top and bottom of the drive (page 2-2) to identify the external connectors and controls. Step 1. Connecting the Power Source Connecting the AC Adapter To use the AC Adapter, do the following: 1 Make sure that the power switch of the CD-ROM drive is off. Select a power source to operate the CD-ROM drive: AC adapter connected to a power outlet Ni-Cd battery pack Six AA alkaline batteries This step also includes Ni-Cd battery pack recharging instructions. On Off Power Switch Attention Do not use an AC Adapter other than the one provided. If you do, you might damage the CD-ROM drive. 2-6 20X Max Portable CD-ROM Drive 2 Connect the AC Adapter to the CD-ROM drive. To DC IN 10V 3 Connect the AC Adapter to a power outlet. 4 Turn on the power switch of the CD-ROM drive. Part 2: User's Guide 2-7 Installing the Ni-Cd Battery Pack To use the battery pack, follow these steps: 1 Make sure that the power switch of the CD-ROM drive is off. 2 Open the battery cover by gently pushing the two protruding clips as shown. 3 Slide the battery pack into the drive. The positive end (+) of each battery has a protrusion. This end should be opposite the springs. 2-8 20X Max Portable CD-ROM Drive Attention Do not insert the battery pack into the CD-ROM drive with the polarity reversed. Install the battery pack with the label facing upward. To allow for later easy removal of the battery pack, extend the ribbon below the battery pack. To remove the battery pack, lift the ribbon. 4 The battery begins to charge, and the charging ( ) indicator on the indicator panel appears. After about 5 hours, the indicator disappears, and charging is complete. Close the battery cover. Note: If the battery charge becomes low soon after charging, try to discharge the battery completely and then fully recharge it. If the charge still becomes low in a short period, the battery needs to be replaced. Contact your place of purchase to get a new one. Charging the Ni-Cd Battery Pack If the battery pack charge is low, the battery ( To charge the battery pack, do the following: ) indicator flashes. 1 Make sure that the battery pack is installed in the CD-ROM drive. 2 Turn off the power switch. 3 Connect the AC Adapter to the CD-ROM drive and to a power outlet (see “Connecting the AC Adapter” on page 2-6). 4 Press the Play/Pause button. Part 2: User's Guide 2-9 Attention Installing Alkaline Batteries Do not combine new and used batteries. To use alkaline batteries, follow these steps: 1 Make sure that the power switch of the CD-ROM drive is off. 2 Open the battery cover by gently pushing the two protruding clips as shown. 2-10 20X Max Portable CD-ROM Drive 3 Install six alkaline AA batteries into the battery compartment with their polarities facing as shown. 4 Close the battery cover. Part 2: User's Guide 2-11 Attention Step 2. Connecting the Drive This section describes how to connect the CD-ROM drive to your computer. 1 Make sure that the power switches on the CD-ROM drive and your computer are turned off. 2 Squeeze both sides of the small connector on the interface cable, and connect it to the interface connector on the CD-ROM drive, as shown in the illustration. 3 Squeeze both sides of the large connector on the interface cable, and connect it to the connector on the PC Card, as shown in the illustration. E ID IA C M C P P C Interface connector rd a C PC Card Interface Cable 2-12 20X Max Portable CD-ROM Drive Be sure to insert and remove the interface cable and PC Card carefully. The connectors on the interface cable are designed to be inserted in only one position; they cannot be inserted upside down. If you try to insert the connectors upside down, you might damage them. Make sure that the pins on the cable connectors are aligned with the holes in the interface connectors. If they are not aligned and you force the connection, you might damage the connectors. Also, if you use excessive force when inserting the PC Card, you might damage the card or your computer. 4 Insert the PC Card into the PC Card slot on your computer. Operating system Refer to page DOS or Windows 3.11 2-14 Windows 95 2-15 Windows NT 2-18 OS/2 Warp 2-19 Note M C P IA C E ID C P a C rd If your laptop computer has only one PC Card slot and you need a PC Card slot to connect the diskette drive, create a subdirectory on the hard disk drive and copy the Option Diskette to it. You will then use the data in that subdirectory instead of using the Option Diskette in the following procedures. Attention Depending on your computer, the PC Card might need to be inserted face up or face down; do not apply unnecessary force during the connection. Step 3. Installing the Device Driver To operate the 20X Max Portable CD-ROM Drive with your computer, first install the device driver (or drivers) according to your operating system, as shown in the following table: Part 2: User's Guide 2-13 Automatic installation The setup program will automatically install the required software into your computer. DOS or Windows 3.11 Attention 1 Selective installation The setup program installs the required software into your computer after you specify the following items: Remove any other PC Cards from your computer. The device driver cannot be installed from a Windows MS-DOS prompt. You must exit Windows 3.11 before installing the device driver. Make sure the CD-ROM drive is correctly connected to the PC Card and that the PC Card is inserted into a PC Card slot on your computer. Turn on your computer and the CD-ROM drive. 2 Insert the Option Diskette into the diskette drive. 3 Type A:\INSTALL and press Enter. 4 You will be prompted by the setup program to select one of the following opton. Software installation destination Installation destination directory name IRQ number I/O base address When you have selected which installation you want, press Enter. 5 When the installation process is complete, restart your computer. You can now use the base model CD-ROM drive with DOS or Windows 3.11, or the stereo model with Windows 3.11. Installing the Audio Driver (Stereo Model Only) Note 2-14 20X Max Portable CD-ROM Drive Before installing the stereo model audio device driver, delete any other sound function previously installed under DOS or Windows. The stereo model sound functions do not work in DOS. The game port on the CD-ROM drive is incompatible with both DOS and Windows 3.11. To install the sound function of the stereo model, follow these steps : 1 Insert the Option Diskette into the diskette drive. 2 Open File Manager, select the diskette drive, and double click on the file SETUP.EXE. 3 Run Install Driver and Install Application according to the instructions on the screen. 4 When the installation is complete, restart your computer. Windows 95 This section contains installation instructions for the base model and the stereo model separately. Follow the instructions for your model. Attention Do not interrupt the system during installation. Close all other applications before installing the device driver. For more information on how to use the stereo model, see “Using Sound Functions (Stereo Model Only)” on page 2-34. Base Model Optional Device Driver Settings 1 Turn on your computer. You can specify the following options for use with the CD-ROM drive device driver: 2 After connecting the PC Card to the CD-ROM drive with the interface cable, turn on the power switch of the CD-ROM drive. Then insert the PC Card into the PC Card slot on your computer. 3 The New Hardware Found dialog box is displayed. Follow the instructions in the dialog box. 4 Insert the Option Diskette (provided) into the diskette drive. 5 Check that the diskette drive (for example, A:\) has been selected; click on OK. 6 You may get a message stating that the driver on your system is a newer version than the one on the Option Diskette. If this DEVICE=C:\CD2ðX\PCMCD2ðX.SYS /I:nn /P:nnn /D:aaaaaaaa /I:nn IRQ level. An IRQ number is assigned to the sound function (decimal). /P:nnn I/O base address. The sound function is mapped from this address (hexadecimal). /D:aaaaaaaa Device name. The name specified for the device should be the same as for the MSCDEX. Part 2: User's Guide 2-15 driver or joystick device driver already installed on your system, the setup program will recognize each device driver separately. If this happens, you will repeat steps 3, 4, and 5 until all the necessary drivers have been installed. If you have already installed a device driver for a joystick or sound card, this step may not apply to your system. occurs, the setup program will ask if you want to keep the device driver you have. Select Yes. 7 When the message Do you want to restart your computer now? appears, remove the Option Diskette and click on Yes. Your computer will automatically restart. You can now use the base model functions with Windows 95. 8 You may get a message stating that the driver on your system is a newer version than the one on the Option Diskette. If this occurs, the setup program will ask if you want to keep the device driver you have. Select Yes. 9 Windows 95 will prompt you to restart your computer after recognizing each individual device driver. When you see this prompt, remove the Option Diskette and click on Yes and your computer will automatically restart. Stereo Model 1 Turn on your computer. 2 After connecting the PC Card to the stereo model with the interface cable, turn on the CD-ROM drive. 3 Insert the PC Card into the PC Card slot on your computer. The New Hardware Found dialog box is displayed. Follow the instructions in the dialog box. 4 Insert the Option Diskette (provided) into the diskette drive. 5 Check that the diskette drive (for example, A:\) has been selected; click on OK. 6 When the message “Do you want to restart your computer now?” appears, remove the Option Diskette and click on Yes to restart your computer. 7 The stereo model has one device driver for the CD-ROM drive itself, one device driver for the audio function, and one for the joystick/gamepad function. If you do not have a sound device 2-16 20X Max Portable CD-ROM Drive You can now use the stereo model functions with Windows 95. Duplicate Sound Functions With Windows 95, other sound functions installed in your computer do not interfere with the stereo model sound function. If you have other sound functions but want to use the stereo model sound function, open Multimedia in the Control Panel, and specify the following: Playback Recording MIDI 20X Max Audio Driver 20X Max Audio Driver Internal ESS ESFM Synthesize Part 2: User's Guide 2-17 Windows NT 8 Check that 20X Max Portable CD-ROM Drive is displayed; click on OK. This section contains separate installation instructions for Windows NT Version 3.51 and Version 4.0. Read the explanation appropriate to your version. 9 Click on Install. Note Windows NT does not support the stereo sound function on the stereo model CD-ROM drive. 10 Click on Continue. 11 Click on Close. 12 Select Exit in the Options window and click on OK. 13 Click on Shutdown from the File menu in Program Manager. 14 Select Shutdown and Restart and click on OK. 15 Remove the Option Diskette from your computer and restart the system. Version 3.51 1 Check that your computer and your CD-ROM drive are connected correctly; turn on your computer and CD-ROM drive and start Windows NT 3.51. 2 Open Main; then click on Windows NT Setup. 3 Click on Add/Remove SCSI Adapters in the Options window. 4 Click on Add confirm Setup Message, and click on OK. 5 Select Other (Requires a disk from a hardware manufacturer) from the list of adapters. 6 Insert the Option Diskette (provided) into the diskette drive. 7 Check that the diskette drive (for example, A:\) has been selected; click on OK. 2-18 20X Max Portable CD-ROM Drive You can now use the CD-ROM drive functions with Windows NT 3.51. Version 4.0 OS/2 Warp 1 Check that your computer and your CD-ROM drive are connected correctly; turn on your computer and your CD-ROM drive and start Windows NT 4.0. 1 Check that the your computer and your CD-ROM drive are connected correctly, and turn on your computer and the CD-ROM drive. 2 Open My Computer in the desktop double-click on the SCSI Adapter icon in the Control Panel. 2 Insert the Option Diskette (provided) into the diskette drive. 3 Select the Driver tab; then click on the Add button. 3 Do one of the following, depending on your version: 4 Click on Have Disk in the Install Driver window. 5 Insert the Option Diskette (provided) into the diskette drive. 6 Check that the diskette drive (for example, A:\) has been selected; click on OK. 4 Click on Install. 7 Click on OK in the Install Driver window. 5 Continue installation according to the instructions on the screen. Click on Exit when installation is complete. 8 Check that the diskette drive (for example, A:\) has been selected and click on Continue. 6 Do one of the following, depending on your version: 9 When the message Do you want to restart your computer now? appears, remove the Option Diskette and click on Yes to restart your computer. You can now use the CD-ROM drive functions with Windows NT 4.0. 7 Warp Version 3: Open OS/2 System, System Setup, and Device Driver Install. Warp Version 4: Open OS/2 System, System Setup, Install/Remove, and Device Driver Install. Warp Version 3: Open OS/2 System, System Setup, and Selective Install. Warp Version 4: Open OS/2 System, System Setup, Install/Remove, and Selective Install. Check the CD-ROM drive field in the System Configuration window. Part 2: User's Guide 2-19 If the field contains None: For Warp Version 3: Select OTHER and go to step 9. For Warp Version 4: Select IDE CD-ROM and go to step 9. If the field does not contain None, go to step 8. 8 Installing the Audio Device Driver (Stereo Model Only) Note The sound function only works in the standard OS/2 environment; it does not work in WIN-OS/2. Close the System Configuration window. If the message Installation is not completed. Select Cancel to continue installing additional hardware or software. Otherwise, select OK appears, click on OK. To install the software for the stereo model sound function, complete the following steps: 1 Go to step 11. 9 Do one of the following, depending on your version: Warp Version 3: Open OS/2 System, System Setup, and Selective Install. Warp Version 4: Open OS/2 System, System Setup, Install/Remove, and Selective Install. Click on Install in the OS/2 Setup and Installation window. Continue installation according to the instructions on the screen. 10 If a message appears telling you to restart your system, click on OK. 11 Restart your computer. 2 You can now use the CD-ROM drive functions with OS/2 Warp. 3 Do one of the following, depending on your version: Warp Version 3: Click on OK in the System Configuration window. Warp Version 4: Click on Next in the System Configuration window and then in the System Configuration (cont.) window. Check Multimedia Software Support in the OS/2 Setup and Installation window. 2-20 20X Max Portable CD-ROM Drive For Warp Version 3: Click on Install. For Warp Version 4: Click on Next. 4 Click on OK when installation is complete. 5 Restart your computer. 6 Insert the Option Diskette (provided) into the diskette drive. 7 Open OS/2 System and then Drive. 8 Open the diskette drive (drive A or B) into which you inserted the diskette. 9 Run MINSTALL.EXE on the Option Diskette. 14 Click on OK in the window displaying the message MMPM2 multimedia installation successful. 15 Restart your computer. You can now use the stereo model functions with OS/2 Warp. For Warp Version 3: Select the Warp 3 directory on the MINSTALL window. For Warp Version 4: Select the Warp 4 directory on the MINSTALL window. Duplicate Sound Functions Even if sound functions have already been installed in your computer, with OS/2 you can install additional sound functions for the stereo model. If the existing sound functions include the Digital Audio and MIDI tabs in a Multimedia folder, install the stereo model with Digital Audio 2 and MIDI 2 tabs. Note: If you already have installed another audio device, you might need to use the Digital Audio 3 and MIDI 3 tabs in the Multimedia folder instead of Digital Audio 2 or MIDI 2. 10 Select 20X Max Portable CD-ROM Drive Stereo Model and then click on Install. To work with .WAV and MIDI files using the stereo model, click on Digital Audio 2 or MIDI 2. 11 Click on Yes on the window displaying message Change MMPM2-CONFIG.SYS. 12 Check that the number of devices is 1 on the Multimedia Installation window and click on OK. 13 You can assign specific sounds to system events, for example having a chime sound when you close a window. If you want to assign sounds to system events using the stereo model, or if you want to have the computer use the CD-ROM drive automatically when you open files with WAV or MID extensions, set up OS/2 according to following steps. Click on OK in the window displaying the message MMPM2-CONFIG.SYS has been changed. Part 2: User's Guide 2-21 Warp Version 3 2 Select the MIDI tab, and then remove the check mark from the Default Sequencer device. 3 Click on the right arrow at the bottom right corner of the dialog window. 4 Select MID in the Current extensions. 5 Move the cursor to the Next extension. Then press the Space bar and the click on Remove. 6 Select the MIDI 2 tab. Then check the Default Sequencer device. For Digital Audio (WAVE) setup: 1 Open Multimedia Setup in the Multimedia folder. 2 Select the Digital Audio tab, and then remove the check mark from the Default Waveaudio device. 3 Click on the right arrow at the bottom right corner of the dialog window. 4 Select WAV in the Current extensions. 5 Move the cursor to the New extension. Then press the Space bar and click or Remove. 7 Click on the right arrow at the bottom right corner of the dialog window. 6 Select the Digital Audio 2 tab. Then check the Default Waveaudio device. 8 Type MID at the New extension, and then click on Add. 7 Click on the right arrow at the bottom right corner of the dialog window. 9 Close Multimedia Setup. 8 Type WAV at the New extension, and then click on Add. 9 Close Multimedia Setup. For Sequencer (MIDI) setup: 1 2-22 Open Multimedia Setup in the Multimedia folder. 20X Max Portable CD-ROM Drive Warp Version 4 2 Select the MIDI tab. Then remove the check mark from the Default Sequencer device. 3 Click on the + mark at the top right corner of the dialog window. 4 Select MID in the Current extensions. 5 Move the cursor to the Next extension. Then press the Space bar and click on Remove. 6 Select the MIDI 2 tab. Then check the Default Sequencer device. For Digital Audio (WAVE) setup: 1 Run STPM.EXE in the MMOS2 directory. 2 Select the Digital Audio tab. Then remove the check mark from the Default Digital device. 3 Click on the + mark at the top right corner of the Digital Audio window. 4 Select WAV in the Current extensions. 5 Move the cursor to the New extension. Then press the Space bar and click on Remove. 7 Click on the + mark at the top right corner of the dialog window. 6 Select the Digital Audio 2 tab. Then check the Default Digital device. 8 Type MID at the New extension, and then click on Add. 7 Click on the + mark at the top right corner of the Digital Audio window. 9 Close Multimedia Setup. 8 Type WAV at the New extension, and then click on Add. 9 Close Multimedia Setup. For Sequencer (MIDI) setup: 1 Run STPM.EXE in the MMOS2 directory. Part 2: User's Guide 2-23 Optional Device Driver Settings Step 4. Completing the Installation The following options can be specified for the CD-ROM device driver: /P:nn I/O base address. The sound function is mapped from this address (hexadecimal). /EXIRQ:n The specified IRQ number is excluded. Another IRQ number is assigned to the sound function. /NOBEEP The device does not beep at insertion of the PC card. 2-24 20X Max Portable CD-ROM Drive Ensure that you have shut down and restarted the operating system so that you can use the drive. Following are some additional notes on the installation process: If you have two or more PC Card slots on your PC, you can use any slot for the CD-ROM drive. The drive letter assigned to the CD-ROM is independent from the PC Card slot number. If you are using the base model and you want to play a CD-ROM game using sound, your computer must have an installed sound function. You can use only one CD-ROM drive with your computer even if your computer has more than one PC Card slot. If you install another PC Card while you are using your CD-ROM drive, your CD-ROM drive might be disabled. Using the Drive 3 Insert the disk as shown. Be careful to hold the CD only by the outside or inside edges. Fit the disk to the center pivot. Firmly press the disk down until you hear it click into place. 4 Close the cover. Inserting and Removing the Disk To insert a CD-ROM or audio CD: 1 2 Press the Open button to release the CD cover. Lift the CD cover up until it snaps into the open position. Part 2: User's Guide 2-25 To remove a CD: 1 Press the Open button to open the disk cover. 3 Attention Do not touch the disk until it comes to a complete stop. 2 2-26 Lift the disk by its edge while pressing the pivot. 20X Max Portable CD-ROM Drive Close the cover. Switching to Power-Saving Mode Changing Modes You can switch between normal mode (up to 20 times the speed of an ordinary CD player) and power-saving mode (up to 10 times the speed of an ordinary CD player) with the Mode Selection button. The default mode (data transfer rate) varies with the type of power supply. Power Mode AC Adapter Normal mode (up to 20 times the speed of an ordinary CD player) Battery pack Alkaline batteries Power-saving mode (up to 10 times the speed of an ordinary CD player) 1 Press the Mode Selection button d M ). 2 Confirm that Lo is displayed in the indicator panel. Switching to Normal Mode 1 Press the Mode Selection button ( M ). 2 Confirm that Hi is displayed in the indicator panel. Note The two modes are for use only with data CDs; when you use audio CDs, the CD-ROM drive will automatically use power-saving mode and will run at the speed of an ordinary CD player. Attention Do not press the Mode Selection button when the in-use ( indicator is on. ) Note The data transfer rate might be slower than 20 times the speed of an ordinary CD player, depending on the system configuration. Part 2: User's Guide 2-27 Mounting the Speakers (Stereo Model Only) 2 Rotate the angle of each speaker as desired. With the removable speakers attached to the stereo model, you can listen to an audio CD or to PCM/MIDI sounds generated by your computer. You can either mount the speakers directly onto the CD-ROM drive, or you can mount them on the included clips, which you can use to attach the speakers to the sides of your portable computer. Mounting Directly on the Drive 1 Insert each speaker into its jack on the stereo model, as shown. Attention Do not lift the stereo model by the speakers. Doing so might damage the drive or the speakers. 2-28 20X Max Portable CD-ROM Drive Mounting on the Speaker Clips 1 2 Fasten each clip to its speaker with the screw. With a coin, tighten the screw firmly clockwise. Attach each speaker to a speaker clip, as shown below. Part 2: User's Guide 2-29 3 Connect the CD-ROM drive to the speakers with the speaker cables. Using the CD-ROM Drive Before using the unit as a CD-ROM drive, confirm the following: Has the required software been installed? (See page 2-13.) Is the power source connected? (See page 2-6.) Keep the following points in mind before using the CD-ROM drive: You can now clip the speakers to the sides of your laptop monitor, to enhance your enjoyment of the stereo sound. When removing the PC Card under Windows 95, open PC Card in My Computer and select IBM IDE PC Card, then click on the Stop button. Windows NT does not support hot plugging (inserting the PC Card while your computer is on). Turn on the CD-ROM drive only after it has been connected to your computer; then start Windows NT. Some configurations might not allow using a PC Card and a network card at the same time. Perform the following steps to connect the CD-ROM drive to your computer: 1 Turn on the computer. 2 Insert the PC Card into the PC Card slot of your computer while the CD-ROM drive is on. The 20X Max Portable CD-ROM Drive supports Plug and Play. Once you have can use the drive simply by connecting the CD-ROM drive to the PC Card and plugging in the PC Card. 2-30 20X Max Portable CD-ROM Drive You can remove the PC Card while your computer is on. Do not remove the PC Card while the CD-ROM is being accessed. You might damage the drive. 3 Open the disk cover and insert a CD-ROM disk. With DOS The following message is displayed, and a drive letter is assigned to the CD-ROM drive. The CD-ROM drive uses the letter D in the following cases: MSCDEX version 2.25 Copyright (C) Microsoft Corp. 1986-1995, All rights reserved. c. Click on the CD-ROM icon and check the access to the CD-ROM. With Windows NT 4.0 a. Click on My Computer. b. Check that the CD-ROM icon is displayed. c. Click on the CD-ROM icon to access the CD-ROM. With OS/2 Warp a. Open OS/2 System, and then open Drive. b. Check that the CD-ROM icon is displayed. c. Click on the CD-ROM icon to access the CD-ROM. Drive D:=Driver PCMCDðð1 unit ð a. Enter dir d: from the DOS prompt then press Enter. b. You can now access the CD-ROM. With Windows 3.11 a. Open File Manager. b. Check that the CD-ROM icon is displayed. c. Click on the CD-ROM icon to access the CD-ROM. With Windows 95 a. Click on My Computer. b. Check that the CD-ROM icon is displayed. c. Click on the CD-ROM icon to access the CD-ROM. With Windows NT 3.51 a. Open on Main and click on File Manager. b. Check that the CD-ROM icon is displayed. Part 2: User's Guide 2-31 Playing a Game (Windows 95 Only) 1 Check that the CD-ROM drive is off, and connect a joystick or gamepad to the game port connector. 2 Connect the interface cable to the PC Card and the CD-ROM drive (see page 2-12). Then turn on the CD-ROM drive. 3 Insert the PC Card into your computer (see page 2-13) and start your computer. 4 Open Control Panel in My Computer, double-click on the Joystick icon, select the type of your device, and run Calibrate and Test. Using the CD-ROM Drive as an External CD Player With Windows 3.11 or Windows NT 3.51 1. Select Accessories. 2. Select Media Player; then click on Device. 3. Select and start CD Audio. For more information, refer to the Windows manual. With Windows 95 or Windows NT 4.0 5 Insert the CD-ROM for a Windows 95-compatible (32-bit) game into the CD-ROM drive. Notes DOS games or Windows 95 MS-DOS (16-bit) games cannot be played in the CD-ROM drive. Some digital gamepads and joysticks cannot be used. 1. Click on Start. 2. Move the cursor in the following order to: Programs Accessories Multimedia Media Player 3. Open Media Player. 4. Click on Device. 5. Select and start CD Audio. For more information, refer to the Windows 95 or Windows NT manual. 2-32 20X Max Portable CD-ROM Drive With OS/2 Warp 1. Open Multimedia. 2. Select and start Compact Disk. For more information, refer to the OS/2 manual. With Other Operating Systems Using the CD-ROM Drive as a Stand-Alone Audio CD Player To use the CD-ROM drive to play an audio CD, use the buttons on the front of the drive. The table below gives the name of each button and the icon depicted on it, and gives a description of each button's function. Install the software, and then play the CD according to the requirements described in the software manual. Button Attention Play/Pause If you play an audio CD with the base model CD-ROM drive, sound will not be generated even if the drive is connected to your computer and your computer has built in speakers. You must use headphones to listen to audio CDs with the base model. Function Pressing once begins play; pressing twice pauses current track. Stops playing an audio CD. Stop Skip (forward) Skips to the beginning of the next track when pressed once. When pressed and held, will fast forward within the same audio track. Skip (backward) Returns to the beginning of the current track when pressed once. When pressed and held, will rewind within the same audio track. To play an audio CD through the CD-ROM drive connected to external speakers, use the line output jack ( ) of the CD-ROM drive. To hear an audio CD through headphones, insert the plug into the headphone jack ( ) of the CD-ROM drive. Part 2: User's Guide 2-33 Guard-Against-Dropout Function Slight shocks to a CD player can cause the audio track to hesitate. The 20X Max Portable CD-ROM Drive has a special function to reduce this kind of dropout. The CD-ROM drive reads ahead on audio CDs and keeps 2.8 seconds of the current track in memory. This reduces interruptions to playback that can occur if the CD-ROM drive is moved or bumped. Attention Do not set the CD-ROM drive near electronic equipment. Do not use the CD-ROM drive near electronic equipment such as televisions or stereo speakers. The CD-ROM drive processes a weak electric signal that might be affected by electromagnetic fields. Using Sound Functions (Stereo Model Only) This section provides simple examples of Windows 3.11 CD-ROM drive sound function applications. To use similar functions with OS/2 and Windows 95, refer to the user's guide provided with each application program. Confirm that the audio device driver has been installed (see page 2-14). If the audio device driver installed correctly, the Audio Application group is available. Mixing 1 From Audio Application, open Mixer and Volume Control. 2 Connect a microphone. In Mixer you can adjust the volume of the sound source to be mixed, and also adjust the volume balance between the right and left speakers. Use Media Player in Accessories to play .WAV and MIDI files. 3 2-34 20X Max Portable CD-ROM Drive Use Volume Control to adjust the master volume. Volume control Mixer Balance control 7 Select Save as and specify a file name. You can save the recording as a WAVE file. Audio Recorder Recording Control Input selection Master volume adjustment Mute button Balance control Volume adjustment You can also mix recordings from your CD with a live recording in digital. For further information, see “Digital Recording.” Digital Recording 1 Open Recording Control and Audio Recorder. 2 Select the sound source to be recorded from Recording Control. Then adjust the volume of the sound and the volume balance between the right and left speakers. 3 Press the Record button of Audio Recorder to start recording. 4 Press the Stop button to stop recording. 5 Press the Play button to play the recording. 6 Select File from the menu bar. Stop button Play button Record button Master volume adjustment Volume adjustment Recording monitor Part 2: User's Guide 2-35 Maintaining the Drive Use the following instructions to clean your drive and CDs: Cleaning the Surface of the CD-ROM Drive: Lightly wipe the CD-ROM drive with a dry soft cloth. If stains remain on the surface, use a damp cloth (soak cloth in a diluted mild detergent and squeeze it firmly). Do not use solvents such as thinner, alcohol, and benzene. They cause deformation and discoloration. Cleaning the Lens: If the lens is dirty, the CD-ROM drive might not operate correctly. Clean the lens with a CD lens cleaner (available at stores). Cleaning the CD: Clean the CD with a soft cloth from the center to the outside radially. If stains remain on the disk, clean it with a damp cloth (soak cloth in water and squeeze it firmly). Then, wipe the disk with a dry soft cloth. Do not use record cleaner or antistatic spray. 2-36 20X Max Portable CD-ROM Drive Part 3: Appendixes Appendix A. Safety Information name=d3qy9501depth=24p. Copyright IBM Corp. 1997 3-1 3-2 20X Max Portable CD-ROM Drive Part 3: Appendixes 3-3 3-4 20X Max Portable CD-ROM Drive Part 3: Appendixes 3-5 3-6 20X Max Portable CD-ROM Drive Part 3: Appendixes 3-7 3-8 20X Max Portable CD-ROM Drive Part 3: Appendixes 3-9 3-10 20X Max Portable CD-ROM Drive Appendix B. Product Specifications Basic Model Data transfer rate Basic Model Power supply Interface Type II PC Card (IDE) Buffer size Storage environment Error rate Outside dimensions (mm) Weight Access rate Guard-against-dropout function MPC3-compliant 512KB Temperature: 5 to 40°C Battery life Humidity: 8 to 80% Temperature: −20 to 60°C 95% Humidity: 5 to 10xE-12 or less (hardware failure) 10xE-9 or less (software error) 130.5 (width) × 203.5 (depth) × 32.5 (height) 420g Normal mode (up to 20 times the speed of an ordinary CD player) At inner radius of the disk: 1,300 KB/s, At outer radius of the disk: 3000 KB/s Power-saving mode (up to 10 times the speed of an ordinary CD player) At inner radius of the disk: 650 KB/s, At outer radius of the disk: 1500 KB/s 100-127V/200–240V AC Adapter (provided) Ni-Cd battery pack (provided) AA alkaline batteries (available in stores) MPC standard Operating environment Stereo Model Stereo Model 2.8 seconds Power-saving mode Ni-Cd: Approximately 1.8 hours Ni-Cd: Approximately 1.5 hours Alkaline: Approximately 2.3 hours Alkaline: Approximately 2.0 hours Normal mode 520g 150 msec (normal mode) Charging time Ni-Cd: Approximately 1.3 hours Ni-Cd: Approximately 1.1 hours Alkaline: Approximately 1.7 hours Alkaline: Approximately 1.5 hours Approximately 5 hours Part 3: Appendixes 3-11 Basic Model I/O terminal Game port Stereo Model PHONE OUT LINE OUT Game port PHONE OUT LINE OUT Game port MIC IN (Mono) LINE IN Speaker D-SUB 15-pin Quantizing bit count 16-bit, 8-bit Sampling frequency 11∼44.1 KHz S/N ratio 75 dB 1W+1W Speaker output Headphone output Line output 8 mW–8 mW 16Ω 0.85 Vrms Line input Input impedance 4 Vp-pmax 30 K–100 KΩ Mic input Input impedance 10–125 mVp-p 200–100KΩ 3-12 20X Max Portable CD-ROM Drive Appendix C. Problem Solving Problem Response No indicator appears when the power is turned on. The CD-ROM drive is not recognized on your computer. The CD-ROM fails to operate. Check if the AC Adapter is connected correctly. (See page 2-6.) Check if the batteries are inserted correctly. (See page 2-10.) Check if the battery pack is fully charged. (See page 2-8.) Check if the batteries are dead. Check if the required software is installed correctly. (See page 2-13.) Check if IRQ and I/O base address are available. Check if the interface card and cables are connected correctly. (See page 2-12.) Check that the card and cable connectors are not bent or broken. If they are, contact the IBM Support Center. Check if the disk is mounted properly. (See page 2-25.) Check if the disk cover is closed firmly. (See page 2-25.) Check if the audio CD can be played in the CD-ROM drive when the Play button on the front panel is pressed. Check if the correct drive letter is being used. (See page 2-31.) Problem Response No sound comes out of the speakers. Check if the headphones are connected. Check that the volume control is high enough. A CD can be played on the CD-ROM drive alone, but it cannot be played through your computer. Check if the required software is installed correctly. (See page 2-13.) Check if the headphones or speakers are connected correctly. (See page 2-33.) Sound volume to the headphones is too low. Check if the headphones have been connected to the headphone jack. No sound comes out. Check if the sound specifications of your computer are appropriate. (See page 2-33.) Refer to the operating system or software manuals for further information. The sound is strange, or data cannot be read. Clean the CD-ROM disk with a soft cloth starting from the center and moving to the outside radially. (Do not wipe in a circular motion.) Clean the CD-ROM drive lens with a camera lens blower or with a CD lens cleaner (available in stores). Part 3: Appendixes 3-13 Appendix D. Help and Service Information During the warranty period, you can get toll-free technical support 24 hours a day, 7 days a week, to answer any questions about your new IBM option. If you need warranty service, return or exchange is available. In addition, if your IBM option is installed in an IBM computer, you might be entitled to service at your location. Your technical support representative can help you determine the best alternative. Before calling, please prepare for your call by following these steps: Step 1: Problem Solving You might be able to solve the problem yourself. Before calling IBM, you might want to try some or all of the following troubleshooting procedures. 1. Disconnect the power cord from the computer and all attached devices. 2. Remove and reattach all option cables. 3. Remove and reseat the option. 4. Place the option in a different slot, if one is available. 5. If your option contains jumpers or switches, check that they are set as specified. 6. Reread any software instructions; be sure software settings are correct. 7. Inspect the option for damage, such as bent pins. 3-14 20X Max Portable CD-ROM Drive 8. Check the computer manual for instructions about the installation of upgrades. Look for a section about system setup or system configuration. Follow all procedures. 9. After completing these steps, reassemble the computer and connect the power cord. Step 2: Preparing for the Call To assist the technical support representative, have available as much of the following information as possible: 1. 2. 3. 4. Option name Option number Proof of purchase Computer manufacturer, model, serial number (if IBM), and manual 5. Exact wording of the error message (if any) 6. Description of the problem 7. Hardware and software configuration information for your system If possible, be at your computer. Your technical support representative might want to walk you through the problem during the call. Step 3: Placing the Call to IBM Technical support is available during the warranty period to answer any questions about your new IBM option. Response time will vary depending on the number and nature of calls received. Marketing, installation, and configuration support will be withdrawn from the PC Company HelpCenter 90 days after the option has been withdrawn from marketing. Online Technical Support IBM PC Company Web Page www.us.pc.ibm.com IBM PC Company BBS 1-919-517-0001 IBM PC Company Automated Fax System 1-800-426-3395 If you call 90 days or more after the date of withdrawal or after your warranty has expired, you might be charged a fee. For the support telephone number and support hours by country, refer to the following table or to the enclosed technical support insert. If the number is not provided, contact your IBM reseller or IBM marketing representative. Support 24 hours a day, 7 days a week Canada 1-800-565-3344 U.S.A. / Puerto Rico 1-800-772-2227 Additional Technical Support Resources Online technical support is available during the life of your product. Online assistance can be obtained through the IBM PC Company Automated Fax System, the PC Company Web page, and the PC Company Electronic Bulletin Board System. Part 3: Appendixes 3-15 Appendix E. Product Warranty and Notices Machine: 20X Max Portable CD-ROM Drive Warranty Period*: One Year *Contact your place of purchase for warranty service information. Warranty Production Status The following warranty information applies to products purchased in the United States, Canada, and Puerto Rico. The warranty terms and conditions applicable in the country of purchase are available from IBM or your reseller. The following warranty information applies to products purchased in the United States, Canada, and Puerto Rico. For warranty terms and conditions for products purchased in other countries, see the enclosed Warranty insert, or contact your IBM reseller or IBM marketing representative. International Business Machines Corporation Armonk, New York, 10504 Statement of Limited Warranty The warranties provided by IBM in this Statement of Limited Warranty apply only to Machines you originally purchase for your use, and not for resale, from IBM or your reseller. The term “Machine” means an IBM machine, its features, conversions, upgrades, elements, or accessories, or any combination of them. Unless IBM specifies otherwise, the following warranties apply only in the country where you acquire the Machine. If you have any questions, contact IBM or your reseller. Each Machine is manufactured from new parts, or new and used parts. In some cases, the Machine may not be new and may have been previously installed. Regardless of the Machine's production status, IBM's warranty terms apply. The IBM Warranty for Machines IBM warrants that each Machine 1) is free from defects in materials and workmanship and 2) conforms to IBM's Official Published Specifications. The warranty period for a Machine is a specified, fixed period commencing on its Date of Installation. The date on your receipt is the Date of Installation, unless IBM or your reseller informs you otherwise. During the warranty period IBM or your reseller, if authorized by IBM, will provide warranty service under the type of service designated for the Machine and will manage and install engineering changes that apply to the Machine. For IBM or your reseller to provide warranty service for a feature, conversion, or upgrade, IBM or your reseller may require that the Machine on which it is installed be 1) for certain Machines, the designated, serial-numbered Machine and 2) at an engineering-change level compatible with the feature, conversion, or upgrade. Many of these transactions involve the removal of parts and their return to IBM. You represent that all removed parts are genuine and unaltered. A part that replaces a removed part will assume the warranty service status of the replaced part. If a Machine does not function as warranted during the warranty period, IBM or your reseller will repair it or replace it with one that is at least functionally 3-16 20X Max Portable CD-ROM Drive equivalent, without charge. The replacement may not be new, but will be in good working order. If IBM or your reseller is unable to repair or replace the Machine, you may return it to your place of purchase and your money will be refunded. If you transfer a Machine to another user, warranty service is available to that user for the remainder of the warranty period. You should give your proof of purchase and this Statement to that user. However, for Machines which have a life-time warranty, this warranty is not transferable. a. follow the problem determination, problem analysis, and service request procedures that IBM or your reseller provide, b. secure all programs, data, and funds contained in a Machine, and c. inform IBM or your reseller of changes in a Machine's location. IBM is responsible for loss of, or damage to, your Machine while it is 1) in IBM's possession or 2) in transit in those cases where IBM is responsible for the transportation charges. Extent of Warranty Warranty Service To obtain warranty service for the Machine, you should contact your reseller or call IBM. In the United States, call IBM at 1-800-772-2227. In Canada, call IBM at 1-800-565-3344. You may be required to present proof of purchase. IBM or your reseller will provide certain types of repair and exchange service, either at your location or at IBM's or your reseller's service center, to restore a Machine to good working order. When a type of service involves the exchange of a Machine or part, the item IBM or your reseller replaces becomes its property and the replacement becomes yours. You represent that all removed items are genuine and unaltered. The replacement may not be new, but will be in good working order and at least functionally equivalent to the item replaced. The replacement assumes the warranty service status of the replaced item. Before IBM or your reseller exchanges a Machine or part, you agree to remove all features, parts, options, alterations, and attachments not under warranty service. You also agree to ensure that the Machine is free of any legal obligations or restrictions that prevent its exchange. You agree to: 1. obtain authorization from the owner to have IBM or your reseller service a Machine that you do not own; and 2. where applicable, before service is provided — IBM does not warrant uninterrupted or error-free operation of a Machine. The warranties may be voided by misuse, accident, modification, unsuitable physical or operating environment, improper maintenance by you, removal or alteration of Machine or parts identification labels, or failure caused by a product for which IBM is not responsible. THESE WARRANTIES REPLACE ALL OTHER WARRANTIES OR CONDITIONS, EXPRESS OR IMPLIED, INCLUDING, BUT NOT LIMITED TO, THE IMPLIED WARRANTIES OR CONDITIONS OF MERCHANTABILITY AND FITNESS FOR A PARTICULAR PURPOSE. THESE WARRANTIES GIVE YOU SPECIFIC LEGAL RIGHTS AND YOU MAY ALSO HAVE OTHER RIGHTS WHICH VARY FROM JURISDICTION TO JURISDICTION. SOME JURISDICTIONS DO NOT ALLOW THE EXCLUSION OR LIMITATION OF EXPRESS OR IMPLIED WARRANTIES, SO THE ABOVE EXCLUSION OR LIMITATION MAY NOT APPLY TO YOU. IN THAT EVENT SUCH WARRANTIES ARE LIMITED IN DURATION TO THE WARRANTY PERIOD. NO WARRANTIES APPLY AFTER THAT PERIOD. Limitation of Liability Part 3: Appendixes 3-17 Circumstances may arise where, because of a default on IBM's part or other liability you are entitled to recover damages from IBM. In each such instance, regardless of the basis on which you are entitled to claim damages from IBM (including fundamental breach, negligence, misrepresentation, or other contract or tort claim), IBM is liable only for: 1. damages for bodily injury (including death) and damage to real property and tangible personal property; and 2. the amount of any other actual direct damages or loss, up to the greater of U.S. $100,000 or the charges (if recurring, 12 months' charges apply) for the Machine that is the subject of the claim. UNDER NO CIRCUMSTANCES IS IBM LIABLE FOR ANY OF THE FOLLOWING: 1) THIRD-PARTY CLAIMS AGAINST YOU FOR LOSSES OR DAMAGES (OTHER THAN THOSE UNDER THE FIRST ITEM LISTED ABOVE); 2) LOSS OF, OR DAMAGE TO, YOUR RECORDS OR DATA; OR 3) SPECIAL, INCIDENTAL, OR INDIRECT DAMAGES OR FOR ANY ECONOMIC CONSEQUENTIAL DAMAGES (INCLUDING LOST PROFITS OR SAVINGS), EVEN IF IBM OR YOUR RESELLER IS INFORMED OF THEIR POSSIBILITY. SOME JURISDICTIONS DO NOT ALLOW THE EXCLUSION OR LIMITATION OF INCIDENTAL OR CONSEQUENTIAL DAMAGES, SO THE ABOVE EXCLUSION OR LIMITATION MAY NOT APPLY TO YOU. Notices References in this publication to IBM products, programs, or services do not imply that IBM intends to make these available in all countries in which IBM operates. Any reference to an IBM product, program, or service is not intended to state or imply that only that IBM product, program, or service may be used. Subject to IBM’s valid intellectual property or other legally protectable rights, any functionally equivalent product, program, or service may be used instead of the IBM product, program, or service. The evaluation and verification of operation in conjunction with other products, except those expressly designated by IBM, are the responsibility of the user. IBM may have patents or pending patent applications covering subject matter in this document. The furnishing of this document does not give you any license to these patents. You can send license inquiries, in writing, to: IBM Director of Licensing IBM Corporation 500 Columbus Avenue Thornwood, NY 10594 U.S.A. Trademarks The following terms are trademarks of the IBM Corporation in the United States or other countries or both: IBM OS/2 OS/2 Warp v3 OS/2 Warp v4 PlayAtWill 3-18 20X Max Portable CD-ROM Drive Multimedia Presentation Manager MMPM/2 The following terms are trademarks of other companies: Microsoft, Windows, Windows 3.11, Windows NT, and Windows 95 are trademarks or registered trademarks of Microsoft Corporation. Other company, product, and service names may be trademarks or service marks of others. Part 3: Appendixes 3-19 Electronic Emission Notices 20X Max Portable CD-ROM Drive Federal Communications Commission (FCC) Statement Note: This equipment has been tested and found to comply with the limits for a Class B digital device, pursuant to Part 15 of the FCC Rules. These limits are designed to provide reasonable protection against harmful interference in a residential installation. This equipment generates, uses, and can radiate radio frequency energy and, if not installed and used in accordance with the instructions, may cause harmful interference to radio communications. However, there is no guarantee that interference will not occur in a particular installation. If this equipment does cause harmful interference to radio or television reception, which can be determined by turning the equipment off and on, the user is encouraged to try to correct the interference by one or more of the following measures: Reorient or relocate the receiving antenna. Increase the separation between the equipment and receiver. Connect the equipment into an outlet on a circuit different from that to which the receiver is connected. Consult an IBM authorized dealer or service representative for help. Properly shielded and grounded cables and connectors must be used in order to meet FCC emission limits. Proper cables and connectors are available from IBM authorized dealers. IBM is not responsible for any radio or television interference caused by using other than recommended cables and connectors or by unauthorized changes or modifications to this equipment. Unauthorized changes or modifications could void the user's authority to operate the equipment. 3-20 20X Max Portable CD-ROM Drive This device complies with Part 15 of the FCC Rules. Operation is subject to the following two conditions: (1) this device may not cause harmful interference, and (2) this device must accept any interference received, including interference that may cause undesired operation. Responsible Party: International Business Machines Corporation Old Orchard Road Armonk, NY 10504 Telephone: 1-919-543-2193 Industry Canada Class B Emission Compliance Statement This Class B digital apparatus meets the requirements of the Canadian Interference-Causing Equipment Regulations. Avis de conformité à la réglementation d'Industrie Canada Cet appareil numérique de la classe B respecte toutes les exigences du Règlement sur le matériel brouilleur du Canada. European Union - Emission Directive This product is in conformity with the protection requirements of EU Council Directive 89/366/ECC on the approximation of the laws of the Member States relating to electromagnetic compatibility. IBM can not accept responsibility for any failure to satisfy the protection requirements resulting from a non-recommended modification of the product, including the fitting of non-IBM option cards. This product has been tested and found to comply with the limits for Class B Information Technology Equipment according to CISPR 22 / European Standard EN 55022. The limits for Class B equipment were derived for typical residential environments to provide reasonable protection against interference with licensed communication devices. Part 3: Appendixes 3-21 ( ) (VCCI) 3-22 20X Max Portable CD-ROM Drive IBM Part Number: 4304493 Printed in U.S.A. 43ð4493