1
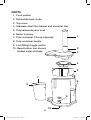
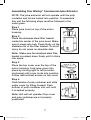
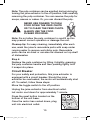
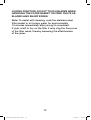
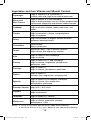
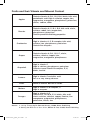
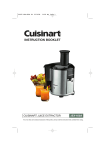
Juice Extractor
with Pulp Ejection
WJX50
For your safety and continued enjoyment of this product,
always read the instruction book carefully before using.
07wc30118_wjx50_ib.indd
1
9/24/07
9:47:50 AM
1
07wc30118_wjx50_ib.indd
2
9/24/07
9:47:50 AM
IMPORTANT SAFEGUARDS
When using electrical appliances, basic safety precautions
should always be followed, including the following:
1. READ ALL INSTRUCTIONS.
2. Always use the appliance on a dry, level surface.
3. Do not push produce into the feed chute with your
fingers. Always use the food pusher provided.
4. Do not touch the small cutting blades in the base of
the stainless steel filter basket.
5. Do not leave the juice extractor unattended when in
use. This appliance should not be used by or near
children or individuals with certain disabilities.
6. Always make sure the juice extractor is properly and
completely assembled before operating. The unit will
not turn on unless properly assembled.
7. Always disconnect the juice extractor from the
power outlet when not in use or when assembling.
8. Always make sure juice extractor cover is securely
in place before motor is turned on. Do not turn lid
while juicer is in operation. Be sure to turn switch to
off position after each use for your juicer. Make sure
the motor stops completely before disassembling.
9. Do not put your fingers or any other object into
the juicer opening while it is in operation. If food
becomes lodged in opening, use food pusher or
another piece of fruit or vegetable to push it down.
When this method is not possible turn the motor off
and disassemble juicer to remove the remaining food.
10. Do not operate any electrical appliance with a
damaged cord or plug or after the appliance has
malfunctioned or been damaged in any manner.
If damaged, immediately stop use and call Waring
Customer Service at (800) 269-6640 for examination,
adjustment or repair.
11. Do not let the cord hang over the edge of the table
or counter, or touch hot surfaces or become knotted.
2
07wc30118_wjx50_ib.indd
3
9/24/07
9:47:50 AM
12. Do not place this appliance on or near a hot gas or
electric burner, or where it could touch a heated oven.
13. Always turn appliance off at the power point and
remove cord from outlet
– if the appliance is left unattended
– if not in use
– before cleaning
– before putting on or taking off parts
– before moving the appliance.
14.For any maintenance other than cleaning call
(800) 269-6640.
15.This appliance has a 3-prong grounded plug.
To reduce the risk of electric shock, this plug is
intended to fit into a grounded outlet only one
way. If the plug does not fit, contact a qualified
electrician. Do not attempt to modify the plug in
any way.
16. To protect against risk of electrical shock do not put
motor, unit housing or power cord in water or other
liquid.
17. Avoid contact with moving parts.
18. The use of attachments not recommended or sold
by the manufacturer may cause fire, electric shock
or injury.
19. Do not use outdoors.
20. Do not use the appliance if the rotating sleeve is
damaged.
3
07wc30118_wjx50_ib.indd
4
9/24/07
9:47:50 AM
SAVE THESE INSTRUCTIONS
FOR COMMERCIAL USE ONLY
Grounding Instructions
This appliance must be grounded while in use to
protect the operator from electrical shock. The
appliance is equipped with a 3-conductor cord and
3-prong grounding-type plug to fit the proper
grounding-type receptacle. The appliance has a plug
that looks like the plug in drawing (1). An adapter, as in
drawing (2), should be used for connecting the appliance
plug to two-prong receptacles. The grounding tab which
extends from the adapter must be connected to a
permanent ground such as a properly grounded outlet
box as shown in drawing (3) using a metal screw.
Grounding METHOD
EXTENSION CORDS
Use only 3-wire extension cords which have 3-prong
grounding-type plugs and 3-pole cord connectors that
accept the plug from the appliance. Use only extension
cords which are intended for indoor use. Use only extension
cords having an electrical rating not less than the rating
of the appliance. Do not use damaged extension cords.
Examine extension cord before using and replace if
damaged. Do not abuse extension cord and do not yank
on any cord to disconnect. Keep cord away from heat
and sharp edges.
4
07wc30118_wjx50_ib.indd
5
9/24/07
9:47:50 AM
INTRODUCTION
Raw juices derived from fresh fruits and vegetables are
invaluable as an aid in maintaining a balanced diet. Raw
juice contains, in its most natural and complete form,
precious vitamins, minerals, bioflavonoids and enzymes.
Nutritional authorities claim that raw juice is food in one
of its most easily digestible forms.
The Waring™ Commercial Juice Extractor is the result
of intensive research and engineering efforts, and we
are sure you will be delighted with its performance.
5
07wc30118_wjx50_ib.indd
6
9/24/07
9:47:50 AM
Parts
1. Food pusher
2. Extra-wide feed chute
3. Top cover
4. Stainless steel filter basket and shredder disc
5. Polycarbonate juice bowl
6. Motor housing
1
7. Pulp container (10-cup capacity)
8. Pulp container handle
9. Lo/Off/High toggle switch
2
10. Reset button (not shown)
located under unit base
3
4
5
7
6
8
9
10
6
07wc30118_wjx50_ib.indd
7
9/24/07
9:47:51 AM
Assembling Your Waring™ Commercial Juice Extractor
NOTE: The juice extractor will not operate until the pulp
container and lid are locked into position. To assemble
this unit the following steps must be followed in the
order given.
Step 1
Place juice bowl on top of the motor
housing.
Step 2
Place the stainless steel filter basket
inside the center of the juice bowl. Make
sure it snaps into hub. Press firmly on the
stainless rim of the filter basket. To avoid
injury do not press on shredder disk.
Note: Make sure the stainless steel filter
basket is pushed down firmly until it clicks
into place.
Step 1 and 2
Step 3
Place the top cover over the top of the
motor housing. Lock juice cover into
place by turning right to left (counterclockwise) until cover locks into position.
Follow instructional arrows on top cover.
Step 4
Grab handle of pulp container and slide
under cover by tilting forward. Push
bottom of pulp container into unit until
it is seated properly.
Note: Unit will not operate if top cover
and pulp container are not properly
positioned.
Step 3
Step 4
7
07wc30118_wjx50_ib.indd
8
9/24/07
9:47:53 AM
Step 5
Slide the food pusher down the feed
chute by aligning the flat area of the food
pusher with the flat area of the feed chute.
Food pusher is marked with an arrow for
proper alignment. Continue to slide the
food pusher down the feed chute.
Disassembling Your
Waring™ Commercial Juice Extractor
Step 5
Step 1
Turn the Waring™ Commercial Juice Extractor toggle switch
to the OFF position. Remove the plug from the power outlet.
Step 2
Remove the pulp container by tilting it slightly to remove
from base.
Step 3
Remove the lid by twisting it left to right (clockwise) as far
as it will go to disengage; then lift up cover.
Step 4
Remove stainless steel filter basket and juice bowl at the
same time by holding onto the juice bowl spout and pulp
outer edge lip while putting pressure with your thumbs
on the top rim of housing and pulling gently in an upward
motion. For best cleaning results, we recommend
cleaning the filter basket with a cleaning brush.
THE STAINLESS STEEL FILTER BASKET
CONTAINS SMALL SHARP BLADES TO CUT
AND PROCESS FRUITS AND VEGETABLES.
DO NOT TOUCH BLADES WHEN HANDLING
THE FILTER BASKET.
8
07wc30118_wjx50_ib.indd
9
9/24/07
9:47:53 AM
OPERATION
Note: The juice extractor will not operate until the top
cover and pulp container are locked into position. See
page 7.
Step 1
Wash your fruit and vegetables for juicing.
Note: Most fruit and vegetables such as apples, carrots
and cucumbers will not need to be cut to size as they will
fit into the feed chute whole.
Step 2
Ensure that the juice extractor is correctly assembled
and that a juice collector cup is placed under the spout
while juicing.
Step 3
Plug the power cord into a power outlet. For softer fruits
and vegetables such as melons, spinach, pears, etc., use
the low setting. For harder fruits and vegetables such as
carrots, beets, cabbage, etc., use the high setting.
Place juice collecting container underneath spout. Toggle
to the low or to the high position depending on the fruit
or vegetable being processed. Toggle to the off position
when process is completed. Place juice collecting container underneath spout.
Step 4
With the motor running, place food down the feed chute.
Using the food pusher, gently guide food down the
chute. To extract maximum juice always push the food
pusher down slowly. Make sure flat area of food pusher
is aligned to flat area of feed chute. The food pusher is
marked with an arrow for proper alignment.
Step 5
Juice will flow into the juice collector container and the
separated pulp will accumulate in the pulp container.
9
07wc30118_wjx50_ib.indd
10
9/24/07
9:47:53 AM
Note: The pulp container can be emptied during juicing by
turning the juice extractor to the off position, then carefully
removing the pulp container. You can reserve the pulp for
soups, sauces or cakes. Or, you can discard the pulp.
NEVER USE FINGERS TO PUSH
FOOD DOWN THE FEED CHUTE
OR TO CLEAR THE FEED CHUTE.
ALWAYS USE THE FOOD
PUSHER PROVIDED.
Note: Do not allow the pulp container to overfill as this
may prevent correct operation or damage the unit.
Cleanup tip: For easy cleaning, immediately after each
use, wash the juicer’s removable parts with soap under
running water to remove wet sticky pulp. Removable
parts can be air dried or can also be cleaned on top shelf
of dishwasher.
Step 6
Replace the pulp container by tilting it slightly, grasping
the pulp container handle and then pushing lightly until
it snaps into place.
Circuit Breaker
For your safety and protection, this juice extractor is
equipped with a circuit breaker. Should the juice
extractor be overloaded, the motor will automatically shut
off. To restart, follow these steps:
Move the toggle switch to the off position.
Unplug the juice extractor from electrical outlet.
Let motor cool down for approximately 1 minute.
Press the reset button located on the
bottom of the unit base.
Once the motor has cooled down, plug
unit into electrical outlet.
10
07wc30118_wjx50_ib.indd
11
9/24/07
9:47:54 AM
Move toggle switch to either low or high to continue
juicing.
CARE AND CLEANING/
TROUBLESHOOTING GUIDE
For easy cleaning: Rinse removable parts with hot
soapy water immediately after each use to remove wet
pulp. Rinse with clean water. Allow parts to air dry or,
place removable parts on top shelf only of dishwasher.
Waring™ Commercial juice cover, juice bowl, pulp
container and filter basket are dishwasher safe
(top shelf only).
Wipe the motor base with a damp cloth.
A nylon washing brush is the most effective way to clean
the filter basket. Using the brush, hold the filter basket
under cold running water and brush from the outside of
the basket. Then clean the filter basket in warm soapy
water. Always treat the filter basket with care as it can
be easily damaged. We recommend using an Oxo
cleaning brush. NOTE: use caution when handling, as
shredder disc is very sharp.
®
Discoloration of the plastic may occur with strongly
colored fruit and vegetables. To help prevent this, wash
parts immediately after use.
If discoloration does occur the plastic parts can be
soaked in bleach and water. Using 1 tablespoon of
bleach to 1 quart of water, soak plastic parts for a
maximum of 5 minutes, then rinse thoroughly. Do not
soak the filter basket in bleach.
DO NOT IMMERSE THE MOTOR BASE IN WATER OR
ANY OTHER LIQUID.
THE CENTER OF THE FILTER BASKET AND FEED
CHUTE CONTAIN SMALL SHARP BLADES TO
PROCESS FRUIT AND VEGETABLES DURING THE
11
07wc30118_wjx50_ib.indd
12
9/24/07
9:47:54 AM
JUICING FUNCTION. DO NOT TOUCH BLADES WHEN
HANDLING THE FILTER BASKET OR FEED CHUTE AS
BLADES HAVE SHARP EDGES.
Note: To assist with cleaning, soak the stainless steel
filter basket in hot soapy water for approximately
10 minutes immediately after juicing is completed.
If pulp is left to dry on the filter it may clog the fine pores
of the filter mesh, thereby lessening the effectiveness
of the juicer.
12
07wc30118_wjx50_ib.indd
13
9/24/07
9:47:54 AM
POSSIBLE PROBLEM
SOLUTION
Machine will not work
when switched on
Make sure unit is plugged into
proper power supply source. Make
sure all parts are in the proper
working position. Press the red
reset button on bottom of unit.
Check your home circuit breaker or
fuse panel to make sure they are live.
Motor appears to stall
when juicing
Wet pulp can build up under the
cover if the juicing action is too
vigorous. Try slower juicing action
by pushing the food pusher down
more slowly.
Excess pulp builds
up in the filter basket
Stop the juicing process. Remove
the juicer cover and scrape off pulp.
Re-assemble and begin juicing again.
Try alternating (soft and hard)
vegetable and fruit varieties.
Pulp too wet
and insufficient
Change to low or high speed. Try a
slower juicing action. Remove mesh
filter basket and clean mesh walls
with a fine brush in a solution of
70% water and 30% bleach. This will
remove excess fiber buildup (from
fruit or vegetables) which could be
inhibiting the juice flow.
Juice leaks between the
rim of the juicer cover
and the juice bowl
Try a slower juicing action by
pushing the food pusher down
more slowly. Make sure unit is
clean before use.
Juice bowl – juice sprays
out from spout
Try a slower juicing action by
pushing the food pusher down
more slowly. Make sure juice cup
is in proper position.
13
07wc30118_wjx50_ib.indd
14
9/24/07
9:47:54 AM
Vegetables and their Vitamin and Mineral Content
High in vitamins A, B-1 (thiamine), C,
choline, folic acid; high in the mineral potassium
Asparagus
High in vitamins A, C, and chlorophyll
High in alkaline minerals such as calcium and potassium
Also contain vitamin B-6 and minerals choline and iron
High in vitamins B-6, C
High in minerals chlorine, iodine, potassium, and
sulfur
High in vitamins A, C
High in potassium, calcium, and phosphorus
High in carotenes
Beets and
Beet Greens
Cabbage
Carrots
Celery
High concentration of organic alkaline minerals
(balances blood pH levels)
Cucumbers
Good diuretic
Rich in potassium
Fennel
Similar to celery – high in alkaline minerals
High calcium and magnesium content
Kale
High in vitamin A and chlorophyll
High in calcium
Parsley
High in vitamins A, C, and chlorophyll
High in calcium, magnesium, phosphorous,
potassium, sulfur
Parsnips
High in vitamin C
High in chlorine, phosphorus, potassium
Radish
High in vitamin C
Contains iron, magnesium, and potassium
Spinach
High in vitamins A, B complex, chlorophyll
High in calcium, iron, magnesium,
phosphorous, potassium
Summer Squash
High in B-1, B-2, niacin
Peppers
High in vitamins A, C
High in potassium
Tomatoes
High in vitamins C, calcium
Watercress
High in vitamin C, chlorophyll
High in calcium, potassium, chlorine,
phosphorous, sulfur
Source: 1. Juicing Therapy by Dr. Bernard Jensen, 2000, Keats Publishing
2.Getting the Best Out of Your Juicer, William H. Lee, 1992, Keats Publishing
14
07wc30118_wjx50_ib.indd
15
9/24/07
9:47:54 AM
Fruits and their Vitamin and Mineral Content
Contain vitamins A, B-1, B-2, B-6, biotin, folic acid,
pantothenic acid. High in chlorine, copper, iron,
magnesium, manganese, phosphorous, potassium,
silicon, sodium, sulfur
Apples
Contain vitamins A, C, B-1, B-2, folic acid, niacin,
calcium, cobalt, iron, magnesium,
phosphorous, potassium
Contain powerful alkalizing properties
Cherries
Cranberries
High in vitamins A, C, B-complex, folic acid,
calcium, iron, phosphorous, potassium
Contain live enzymes
Contain vitamins A, B-1, B-2, C, niacin,
calcium, chlorine, copper, iron,
magnesium, manganese, phosphorous
Grapes
Grapefruit
High in vitamin C
High in calcium, phosphorous, potassium
Contains some Vitamin B-complex, E, K,
biotin, inositol
High in vitamin C and citric acid
Act as a very strong cleanser
Lemons
Limes
Same as lemons but not as acidic
Melons
High in vitamin A, B-complex, C
High in enzymes
Oranges
High in vitamin A, C
Contain B-1, B-2 B-6, E, K, biotin, folic acid,
niacin, calcium, chlorine, copper, fluorine, iron
manganese, magnesium, phosphorous,
potassium, silicon, zinc
Source: 1. Juicing Therapy by Dr. Bernard Jensen, ©2000, Keats Publishing
2.Getting the Best Out of Your Juicer, William H. Lee, ©1992, Keats Publishing
15
07wc30118_wjx50_ib.indd
16
9/24/07
9:47:54 AM
NOTES
16
07wc30118_wjx50_ib.indd
17
9/24/07
9:47:54 AM
NOTES
17
07wc30118_wjx50_ib.indd
18
9/24/07
9:47:55 AM
NOTES
18
07wc30118_wjx50_ib.indd
19
9/24/07
9:47:55 AM
©2007 Waring Commercial
314 Ella T. Grasso Avenue
Torrington, CT 06790
Waring™ Commercial is a registered trademark of Conair Corporation.
Any other trademarks or service marks of third parties referred to used
herein are the trademarks or service marks of their respective owners.
www.waringproducts.com
Printed in China
WJX50 IB
07WC30118
IB-7006A
07wc30118_wjx50_ib.indd
20
9/24/07
9:47:55 AM