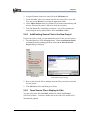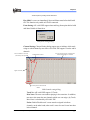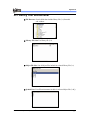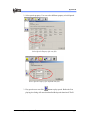
1
eSL/eAM Series (+eSLZ000) INTEGRATED DEVELOPMENT ENVIRONMENT USER’S GUIDE DOC. VERSION 1.8 (Applicable to eSL/eAM IDE Version 1.0 & later) ELAN MICROELECTRONICS CORP. Nov 2007 Trademark Acknowledgments: IBM is a registered trademark and PS/2 is a trademark of IBM Windows is a trademark of Microsoft Corporation ELAN and ELAN logo are trademarks of ELAN Microelectronics Corporation Copyright © 2006 by ELAN Microelectronics Corporation All Rights Reserved Printed in Taiwan The contents of this User’s Manual (publication) are subject to change without further notice. ELAN Microelectronics assumes no responsibility concerning the accuracy, adequacy, or completeness of this publication. ELAN Microelectronics makes no commitment to update, or to keep current the information and material contained in this publication. Such information and material may change to conform to each confirmed order. In no event shall ELAN Microelectronics be made responsible for any claims attributed to errors, omissions, or other inaccuracies in the information or material contained in this publication. ELAN Microelectronics shall not be liable for direct, indirect, special incidental, or consequential damages arising from the use of such information or material. The software (eSL/eAM IDE) described in this publication is furnished under a license or nondisclosure agreement, and may be used or copied only in accordance with the terms of such agreement. ELAN Microelectronics products are not intended for use in life support appliances, devices, or systems. Use of ELAN Microelectronics product in such applications is not supported and is prohibited. NO PART OF THIS PUBLICATION MAY BE REPRODUCED OR TRANSMITTED IN ANY FORM OR BY ANY MEANS WITHOUT THE EXPRESSED WRITTEN PERMISSION OF ELAN MICROELECTRONICS. ELAN MICROELECTRONICS CORPORATION Headquarters: Hong Kong: USA: No. 12, Innovation Road 1 Hsinchu Science Park Hsinchu, Taiwan 30077 Tel: +886 3 563-9977 Fax: +886 3 563-9966 http://www.emc.com.tw Elan (HK) Microelectronics Corporation, Ltd. Flat A, 19/F, World Tech Centre 95 How Ming Street, Kwun Tong Kowloon , HONG KONG Tel: +852 2723-3376 Fax: +852 2723-7780 [email protected] Elan Information Technology Group (USA) Europe: Shenzhen: Shanghai: Elan Microelectronics Corp. (Europe) Elan Microelectronics Shenzhen, Ltd. Elan Microelectronics Shanghai, Ltd. Siewerdtstrasse 105 8050 Zurich, SWITZERLAND Tel: +41 43 299-4060 Fax: +41 43 299-4079 http://www.elan-europe.com SSMEC Bldg., 3F, Gaoxin S. Ave. Shenzhen Hi-Tech Industrial Park Shenzhen, Guandong, CHINA Tel: +86 755 2601-0565 Fax: +86 755 2601-0500 23/Bldg. #115 Lane 572, Bibo Road Zhangjiang Hi-Tech Park Shanghai, CHINA Tel: +86 21 5080-3866 Fax: +86 21 5080-4600 1821 Saratoga Ave., Suite 250 Saratoga, CA 95070 USA Tel: +1 408 366-8225 Fax: +1 408 366-8220 Contents Contents 1 Introduction 1 1.1 Overview .....................................................................................................................1 1.2 Introduction to eSL/eAM IDE Program .....................................................................2 1.2.1 Tools under File View and Voice View Modes ..................................................2 1.2.1.1 File View Mode ....................................................................................2 1.2.1.2 Voice View Mode..................................................................................2 1.2.2 eSL/eAM IDE Main User Interface..................................................................3 1.2.2.1 The eSL/eAM IDE Sub-Windows .......................................................3 1.2.2.2 eSL/eAM IDE Menu Bar and its Commands ....................................10 1.2.2.3 Toolbar ................................................................................................34 1.2.2.4 Document Bar .....................................................................................35 1.2.2.5 Status Bar ............................................................................................35 Chapter 2 Getting Started with eSL/eAM IDE 37 2.1 Overview ...................................................................................................................37 2.2 Starting the eSL/eAM IDE Program .........................................................................37 2.3 Create a New Project .................................................................................................38 2.4 Add and Remove Source Files from/to Project .........................................................40 2.4.1 Create New Source File for the Project ...........................................................40 2.4.2 Add Existing Source Files to the New Project.................................................41 2.4.3 Open Source File or Display its Path...............................................................41 2.4.4 Deleting Source Files from Project..................................................................42 2.5 Add and Remove Voice Files from/to Project ...........................................................42 2.5.1 Add Exisitng Voice Files to the Project ...........................................................42 2.5.2 Encode Speech Files in the Project..................................................................44 2.5.3 Build Midi Files in the Project.........................................................................46 2.6 Edit a Source File From and Within Project..............................................................48 2.7 Build Project..............................................................................................................48 2.7.1 Compiler, Assemble and Link Files to Generate Binary File ..........................48 2.8 Debugging a Project ..................................................................................................49 2.8.1 Breakpoints Setup............................................................................................50 2.8.2 Debugging Tools ..............................................................................................51 eSL/eAM Series (+eSLZ000) IDE User’s Guide • iii Contents Appendix A Library Tool Introduction 53 A.1 Overview ...................................................................................................................53 A.2 Create New Library file.............................................................................................53 A.2.1 Create library file from eSL/eAM IDE...........................................................53 A.2.1.1 New Project.........................................................................................53 A.2.1.2 Add and Remove Source Files from/to Project ..................................55 A.2.1.3 Edit a Source File From and Within Project.......................................55 A.2.1.4 Build Project .......................................................................................55 A.2.2 Create Library File from Library Tool.............................................................56 A.3 Library Tool Sub-Window.........................................................................................57 A.4 Library Tool Buttons .................................................................................................58 B Play Midi & Speech Dialog Introduction 59 B.1 Overview ...................................................................................................................59 B.2 Connect ICEeSL........................................................................................................59 B.3 Build and Play Speech...............................................................................................60 B.4 Build and Play Midi...................................................................................................61 B.4.1 Change Different Midi Tone Library ..............................................................61 B.4.2 Build and Play Midi........................................................................................63 B.5 Get Information .........................................................................................................64 B.6 Playing Midi or Speech .............................................................................................64 C How to Use Hardware Breakpoint 65 C.1 Hardware Breakpoint Setup ......................................................................................65 C.1.1 PC Counter Break (Read/Write) .....................................................................65 C.1.2 RAM Break (Read/Write)...............................................................................67 C.1.3 I/O Break (Read/Write)...................................................................................68 C.1.4 Register Break (R0~R7) (Write Only)............................................................70 C.1.5 Logical Select .................................................................................................72 C.1.6 Loop Counter ..................................................................................................74 C.1.7 Run After Breakpoint Trigger .........................................................................79 C.1.8 Hardware Breakpoint Supported Instructions.................................................81 iv • eSL/eAM Series (+eSLZ000) IDE User’s Guide Contents D How to Use Self Test 83 D.1 IDE Tool Self Test Function Setting .........................................................................83 D.2 Self Test I/O Application Circuit .....................................................................84 D.3 Self Test Flow Chart ..................................................................................................85 E How to Create and Use External Voice Project 87 E.1 Create SPI Voice Project............................................................................................87 E.2 Add file into SPI Voice Project..................................................................................88 E.3 Other Settings ............................................................................................................91 E.1.1 Speech Project..................................................................................................91 E.1.2 Melody Project.................................................................................................92 eSL/eAM Series (+eSLZ000) IDE User’s Guide •v Contents Reference Manual Revision History Doc. Version Revision Description Date 1.0 Initial Version 2006/3/15 1.1 Add eAM serial chip and speech ADPCM coding type 2006/6/7 1.2 Add How to create and use SPI Project 2006/7/10 1.3 Add some note and ezwave icon and relate command 2006/7/20 1.4 Modify appendix D and modify assemble watch window content Update compiler option window 2006/8/15 1.5 Modify Customize Option Dialog content Add Speech Overview window section 2006/12/19 1.6 N/A 2007/4/16 1.7 Modify Speech Property Dialog content 2007/8/23 Modify Customize Dialog content Add speech coding type Type2-1, Type2-2 1.8 Remove Speech coding type Type2 Modify Speech Coding Type Setting dialog content 2007/11/19 EMF Download add SPI Flash Download information vi • eSL/eAM Series (+eSLZ000) IDE User’s Guide Chapter 1 Chapter 1 Introduction 1.1 Overview MIDI files (*.mid) Wav files (*.wav) User data (*.tbl, *.bin) Assembly module (*.asm) C module (*.c) Mask file Approve form file eSLIDE Download ICE eSL (Voice / Program Data File) eSL/eAM Integrated Development Environment eSL/eAM Series (+eSLZ000) IDE User’s Guide •1 Chapter 1 1.2 Introduction to eSL/eAM IDE Program The eSL/eAM IDE Program is a Windows-based program that is used among other things, to develop embedded programs for eSL/eAM series microcontrollers. The embedded program is developed by taking one or more source files in assembly language and translate them into object files that are linked to each other along with one or more libraries. The created executable program is then downloaded to ICEeSL for simulation, verification and debugging. 1.2.1 Tools under File View and Voice View Modes The eSL/eAM IDE Program is integrated with the following resourceful tools: 1.2.1.1 File View Mode Project Manager that create, save, open, and closes project. It also manipulates the existing project and source files that are part of the project Editor that provides editing functions for creating, viewing, and modifying source files. It supports find, replace, cut/copy/paste and multi-level undo/redo. Compiler that follow standard ANSI-C programming language framework. Assembler that supports file-include, macro, assemble arithmetic, block comment, conditional assemble, list, map file and multiple source linking. Source Level Debugger that provides source-level debugging function on target which is embedded on the ICEeSL (In Circuit Emulator). You can explore and analyze the status, register, and the memory contents of the eSL target with the eSL/eAM IDE. With its powerful features, like multiple breakpoints, real-time modification of register contents, and disassembly, the ICEeSL becomes the indispensable partner of eSL IDE in offering a perfect development environment for eSL series microcontrollers. See Section 1.2.2.1 for the further discussions of File View Mode functions. 1.2.1.2 Voice View Mode Project Manager that create, save, open, and closes project. It also manages and manipulates the existing MIDI files, speech files and user data files to support instrument playback function of the eSL series sound processors. Converter that converts MIDI files, speech files and other text/binary data into voice data files for downloading into your applications. Voice View Mode functions are further discussed in Section 1.2.2.1. 2• eSL/eAM Series (+eSLZ000) IDE User’s Guide Chapter 1 1.2.2 eSL/eAM IDE Main User Interface Editor Window Disassembly Window Special Register Window Menu Bar Tool Bar (Standard & Build) Document Bar Project Window (File or Voice View Mode) FileViews & VoiceViews Tabs ROM Status Window Output Window RAM Window Watch Window IO Window Call Stack Window eSL/eAM IDE Main Window Layout 1.2.2.1 The eSL/eAM IDE Sub-Windows Project Window The Project window under FileView Mode (File View Mode) tab holds the Source, Header, List and Map Project Filename (*.prj) Files. and Projec type Where: Source Files (*.asm,*.c) – are the source Target assembly and c files that are added into the Microcontroller current project. Header Files (*.*) – are the header files of source Object Files (*.obj) – are the object files that are added into the current project. Library Files (*.a) – are the library files that are added into the current project. FileView Mode List Files (*.lst) – are the list files of source files. Map Files (*.map) – are the file generated by the linker. eSL/eAM Series (+eSLZ000) IDE User’s Guide •3 Chapter 1 The root node of the Project window shows your current micro-controller, project filename, and *Project type (executable or library project) Project Type: Executable Project – are the project that can debug and download source data on simulator and ICEeSL Library Project – are the project that can’t debug and download source data on simulator and ICEeSL, but it can create a library file (*.a). Project Window (Voice View Mode - Internal) The Project window under VoiceView – Internal Mode tab holds the Files. Where: Target Microcontroller Speech Files (*.wav,*.mp3,*.wma) – are the speech files that are added into the current project. Midi Files (*.mid) – are the Midi files of source User Data (*.*) – are the user defined files of source files. The root node of the Project window shows your current microcontroller and project filename. VoiceView Mode Tab Selected 4• eSL/eAM Series (+eSLZ000) IDE User’s Guide Chapter 1 Project Window (Voice View Mode External) Project Filename (*.prj) Target Microcontroller The Project window under VoiceView – External Mode tab holds the Files. (only for SPI Voice Project) Where: Voice Files (*.wav,*.mp3,*.wma,*.mid, *.*) – are the speech, mid and user defined files that are added into the current project. The root node of the Project window shows your current microcontroller and project filename. VoiceView Mode Tab Selected The Project window under VoiceView Mode tab provides the Tone, Percussion, Speech Files, Midi Files, and User Data nodes that contain files for your utilization in developing voice projects, where: “Tone” Node – stores the musical instru- ments defined by your MIDI files. The Tone node contains two child nodes, “Auto” and “Manual.” Initially, “Auto” node is empty even if the MIDI files have been added into the voice project. Only after the Build or Rebuild All command is executed from the Project menu that the eSL/eAM IDE starts to automatically collect the instruments from MIDI file and display them under “Auto” node. On the other hand, you can manually add instruments into the voice project by clicking the Insert Tones into Projects… command from Project menu or clicking mouse left button at the “Manual” node under “Tone” node in this window and select the desired instruments from the resulting “Insert Tone” dialog. The selected instruments are then shown under the “Manual” node. eSL/eAM Series (+eSLZ000) IDE User’s Guide •5 Chapter 1 “Percussion” Node – contains the percussion instruments defined by your MIDI files. Like the Tone node above, the Percussion node also consisted of two child nodes, “Auto” and “Manual.” It is also initially empty regardless of the presence of MIDI files in the voice project. Only after clicking the Build or Rebuild All command from the Project menu that the eSL/eAM IDE starts to automatically collect the percussion instruments for MIDI files and display them under “Auto” node. Likewise, you can manually insert percussion instruments into the voice project by executing the Insert Percussion into Projects… command from Project menu or clicking mouse left button at the “Manual” node under “Percussion” node in this window and select the desired instrument from its “Insert Percussion” dialog. The selected instruments are then displayed under “Manual” node. “Speech Files” Node– hold and display the wave files of your choice. This is done by clicking the Insert Files to Projects… command from the Project menu or clicking mouse left button at the “Speech Files” node in this window. From the resulting “Insert File into Project” dialog, browse for “Speech File (*.wav,*.mp3,*.wma)” file folder and select the one you want to insert in the voice project. The selected Speech File will show under the “Speech Files“ node. NOTE 1. You need install microsoft media format 9 before convert into wma. 2. Recommend to install microsoft Media player 10,but it is not required “Midi Files” Node– hold and display the MIDI files of your choice. This is done by clicking the Insert Files to Projects… command from the Project menu or clicking mouse left button at the “MIDI Files” node in this window. From the resulting “Insert File into Project” dialog, browse for “Midi File (*.mid)” folder and select the one you want to insert in the voice project. The selected MIDI file will show under the “MIDI files “node. NOTE 1. The eSL/eAM IDE can only recognize the General MIDI Format 1 of the MMA specifications. Formats 0 and 2 are not supported. 2. Don’t use Asian text font e.g., Traditional Chinese, Japenese, and extra; as midi file name.. “User Data” Node– contains the data files (*.tbl and *.bin) required by your application. To insert data files, click the Insert Files to Project… command from the Project menu or clicking mouse left button at the “User Data” node in this window. From the resulting Insert File into Project dialog, browse for the text format “Text Data File (*.tbl)” folder and select the one you want to insert 6• eSL/eAM Series (+eSLZ000) IDE User’s Guide Chapter 1 in the voice project. If inserting binary data, browse for the “Binary Data Files (*.bin)” folder from the same dialog. Press the OK button in the dialog to apply selection. The selected data files will be shown under the User Data node. Editor Window Current file being edited The eSL/eAM IDE Editor is a multi- windowed editing tool for creating, viewing, and modifying source files. The eSL/eAM IDE Editor major features are – Colored syntax highlighting Unlimited file size Multiple files can be opened and displayed at the same time Insert and overstrike modes for editing Unlimited Undo/Redo Auto indentation Clipboard support with find and replace Drag and drop text manipulation Special Register Window The Special Register window provides the control register, a program counter, and general register (R0-R7). To update register values, click on the existing value and key in the new value. When value changes, it is shown in red NOTE 1 Only values from 0 to 9 or A to F are recognized when changing register in hexadecimal format. Likewise, only 0 & 1 are recognized when changing registers in binary format. 2. Modified registers are automatically downloaded to the hardware. To toggle between hex (0x) and binary (0b) register values, click right mouse button while pointing on the particular register value. eSL/eAM Series (+eSLZ000) IDE User’s Guide •7 Chapter 1 ROM Status Window The red and green area meets the used ROM size ROM Status window show how many Program ROM and Data Rom Size used by user’s source code and voice data. The red and green section meets the used size. RAM Window RAM window provides the updated contents of RAM in the same way as in updating the contents of the special registers. The address format (hex) is in left column.The RAM window allows user click right mouse button to pop-up a dump menu. The dump menu save total RAM data at *.ram file and locate at active project floder. Dump DRAM From Dialog 8• eSL/eAM Series (+eSLZ000) IDE User’s Guide Chapter 1 Dump RAM All: dump and save ram datas from address 0 to the last address. Dump RAM From: dump and save ram datas which the address range specified by user. Example: Start address = 0x100 Offset = 0x050 End address = 0x150 *meets you want dump ram data from RAM address 0x100, offset 0x50, end address is 0x150 and total count is 0x50. NOTE 1. Start address can’t over max address. 2. Start address + offset = end address can’t over max address 3. offset aloes meets total count IO Window When values are changed, they are shown in red IO window provides the updated contents of IO in the same way as in updating the contents of the special registers. The address format (hex) is in left column. Output Window The Output window displays messages indicating results of project compiling just performed, such as assembler, linker, trace log history, and debugging, including their respective error messages. The window consisted of three tab sub-windows, namely; Build, Debug, and Find in Files, where: eSL/eAM Series (+eSLZ000) IDE User’s Guide •9 Chapter 1 Build – displays assembler/linker related messages, trace logs, and error messages. Double click on the error message to link to the corresponding program text line in the Editor window where the source of error occurs. Debug – displays debugging related messages and their corresponding error messages. Find in Files – allows you to find a like string (selected from an active file) from other active or inactive files in your folder. Lines containing the like string will display on the Output window complete with its source filename and directory. 1.2.2.2 eSL/eAM IDE Menu Bar and its Commands File Menu New… Create a new project or source file Open… Open an existing document or project Close Close the active document or project Save Save current active document Save As Save current active document under new filename Save All Save all current active documents Open/Save/Close Open/Save/Close the active project Project Print Print the active document Preview Preview the printed format of the active document Setup Define printer settings Recent Files View the record of the recently closed file Recent Project View the record of the recently closed project Exit Exit from eSL/eAM IDE Program 10 • eSL/eAM Series (+eSLZ000) IDE User’s Guide Chapter 1 Edit Menu Undo Cancel the last edit action Redo Repeat the last edit action Cut/Copy/Paste Same as standard clipboard function Select All Select all contents of the active window Go to Line… Move cursor to the defined line number within the active window Find Find the defined strings in the active window Find in Files Find the defined strings in one or more files window Replace… Same as standard “find and replace” editing functions View Menu Toolbars View/hide Standard or Build toolbar Status Bar View/hide ICE modes, R/W flag, test file type (DOS/MAC/ UNIX), keyboard status, etc. Control Bar View/hide all captions for Captions Project, RAM, and Output windows Project View/hide Project window Special Register View/hide Special Register window IO View/hide IO Register window RAM Output Document Bar ROM Status View/hide RAM window View/hide Output window View/hide document Bar View/hide ROM Status window Trace Buffer View/hide Trace Buffer Debug Windows View/hide Debug Windows: 1.Call Stack Window 2.Watch Window 3.Disassembly Window Monitor Window View/Hide Monitor window eSL/eAM Series (+eSLZ000) IDE User’s Guide • 11 Chapter 1 Debugr Window: View/Hide Call Stack/Watch/Disassembly window Call Stack Window: The Call Stack window shows a list of all active Procedure Calls. Active procedure calls are the procedures in the application that were started but not completed. The Call Stack window helps you trace the operation of an application as it executes a series of nested procedures. For example, an event procedure can call a second procedure, which can call a third procedure — all before the event procedure that started this chain is completed. Such nested procedure calls can be difficult to follow and can complicate the debugging process. You can double click any expression in the Call Stack window and then IDE will show an arrow to pinpoint at the corresponding source code. Note Call Stack window only use at C Project Call Stack Window Show green arrow at corresponding source code 12 • eSL/eAM Series (+eSLZ000) IDE User’s Guide Chapter 1 Watch Window: The Watch window lets you view and modify program variables and lists the current function call nesting. The contents of the Watch Window are automatically updated whenever program execution stops. Note, watch window for asm project only can watch the symbols defined as .DW, .DS, .EQU, Level and RAM data. Note, EQU Symbol no address information, .DS symbol only shows the first address and data.For example: Å .DS Symbol RamReserve .DS 1 EquValue .EQU 10 Å .EQU Symbol RomReserve .DW 0x10 Å.DW Symbol POWERON: Å Label Symbol RAM data format: [ expression ]. The Expression only can full into decimal number, hexadecimal hexcital number and some EQU symbol,like: RAMADDRESS .EQU 50 [1] [0x1234] [RAMADDRESS] Watch Window for Asm Project eSL/eAM Series (+eSLZ000) IDE User’s Guide • 13 Chapter 1 Watch Window for C Project Disassembly Window: The Disassembly window shows your target program as assembly code. The highlighted instruction shown indicates the Active procedure. You also can select the Disassembly Window as the active window to debug your target program, but take note that eSL/eAM IDE does not allow user to set breakpoint in the Disassembly window. Disassembly Window 14 • eSL/eAM Series (+eSLZ000) IDE User’s Guide Chapter 1 Monitor Window: The Monitor window show data which get from IO[0x7D]. Before use this window, you must enable monitor data flag at [menu]Æ [Debug]Æ[Enable Monitor Data] and connect to ICEeSL. Note The limit of sample rate for monitor data is 8K (samples/per second) Monitor Window Zoom Selection Before Zoom Selection eSL/eAM Series (+eSLZ000) IDE User’s Guide After Zoom Seletion • 15 Chapter 1 Full Zoom-Out Before Full Zoom-Out After Full Zoom-Out Full Zoom-Iin Before Full Zoom-In After Full Zoom-In Zoom-Out Before Zoom-Out 16 • After Zoom-Out eSL/eAM Series (+eSLZ000) IDE User’s Guide Chapter 1 Zoom-In Before Zoom-In After Zoom-In Zoom Bar Before drag zoom bar After zooming in eSL/eAM Series (+eSLZ000) IDE User’s Guide After zooming out • 17 Chapter 1 Full Scale: Set all samples full scale Before Full Scale After Full Scale Discrete: Set all continuous samples discrete. Before Discrete After Discrete Period Align: Calculate frequency of waves. Monitor window will change wave band when the period change. Clear: Clear All Samples which show at monitor window. Save: Save all samples which user select (blue area), but if user doesn’t select save area, monitor window will save all samples. Flush buffer size bar: How many samples flush the monitor window. (Samples / per time) 18 • eSL/eAM Series (+eSLZ000) IDE User’s Guide Chapter 1 Project Menu New… Create a new project Open Open an existing project Save Save the active project together with all related data Close Close the active Project window Insert Files to Insert program source files Project… into project Insert Special Insert Special register into Register Special register window Insert Tones into Insert music tones into project Project… Insert Percussion Insert percussion into project into Project… Build Compile modified files only Rebuild All Compile all source files and all voice file regardless of their recent change status Rebuild Source Code Compile all source files regardless of their recent change status Debug Menu Toggle ICE/SW Switch to “ICE or Simulator” to debug program by simulator or ICE Toggle Machine Enable/Disable Get Machine Cycle Cycle count Enable Monitor Enable/Disable Monitor I/O Data Address Data Go Run program starting from the current program counter until breakpoints are hit Free Run Run program starting from the current program counter until Break Execution command (stop debugging) occurs Run to cursor Run program starting from the current program counter up to the location where the cursor is anchored (applies to ICE debug mode only) Reset Perform hardware reset (register contents are displayed with initial values) eSL/eAM Series (+eSLZ000) IDE User’s Guide • 19 Chapter 1 Step Into Execute instructions step-by -step (with register contents updated simultaneously). Note, in c project, step into always clear trace buffer. Step Over Execute instructions as in Step Into except for Call instruction, which is executed as in Go command above. Note, in c project, step over always clear trace buffer. Break Execution Stop running program without ICE reset (program will resume running from the location where it was last stopped) Exit Debugging Set debugger in normal (editable) mode and ICE reset is carried out (Debugger in debugging mode sets the Editor window to read only) Insert/Remove Breakpoint Set or reset a breakpoint Disable Breakpoint Disable a breakpoint Clear All Breakpoints Clear all active breakpoints Enable/Disable All Enable or Disable all breakpoints Breakpoints Breakpoint… Set ROM and Hardware breakpoint (under ROM and Hardware Breakpoint Setting dialog) Toggle ICE/SW: Switch to “ICE or Simulator” to debug program by simulator or ICE. The different between ICE and Simulator are: ICE Simulator Download Download PROM Enable Enable Download DROM Enable Disable Download SPI Enable Disable Debug function Step Into/Ouver Enable Enable Go/Go Cursor/Free Run Enable Enable Break/Stop/Reset Emable Enable Rom Break point Enable Enable Hardware Break point Enable Disable Get Machine Cycle Count Enable Enable Monitor Window Enable Disable Call Stack Window Enable Enable Watch Window Enable Enable Disassembly Window Enable Enable Other Play Midi/Speech Enable Disable Access DROM by instruction Enable Disable Self Test Enable Disable 20 • eSL/eAM Series (+eSLZ000) IDE User’s Guide Chapter 1 Toggle Machine Cycle: Enable/Disable Get Machine Cycle count. The valid range of machine cycle is form 0x00 to 0xFFFFFF (16777215). If machine cycle over this range, eSL/eAM IDE will show overflow message at output window. ROM Breakpoint Dialog: ROM breakpoint can set at any address of the Program ROM. At this Dialog, you can check all ROM breakpoints in project, remove one or remove all breakpoint. In addition, you can click checkbox to disable ROM breakpoint. ROM Breakpoint Dialog Hardware Breakpoints Dialog: The breakpoint mechanism has a unique breakpoint system that supports software and hardware breakpoint. The system has a limited number of hardware breakpoint and unlimited software breakpoint setting. The four domain and two set hardware breakpoints are available. In addition the breakpoint system supports logical condition (set1 OR set2 / set1 sequential to set2) and loop counter function (from 1 to 255) select and trace buffer pre-trigger from 0 to 2k. NOTE 1. Address, Data and Mask value are hexadecimal digits, others decimal digits. 2. .If you select logic “set1 sequential to set2”, SET1 and SET2 will be enabled. 3. .If Address, Data or Mask value is NULL or over range, IDE will show a warning message dialog to alert you. 4. .If you select DATA item, IDE will set ADDRESS enabled. In the same way, if you select MASK 5. Hardware Breakpoints is only enabled at Debugging mode. item, IDE will set ADDRESS and DATA enabled eSL/eAM Series (+eSLZ000) IDE User’s Guide • 21 Chapter 1 Hardware Breakpoints Dialog (please refer to Appendix C) Four Domain Logic Condition Pre-Trigger Loop Counter PC counter break (read/write) You can set an immobile PC value to trigger break. PC range from 0x0000 to 0x7FFF RAM break (read/write) The data memory breakpoints can be set to one of three modes; address break, address with data break, address with data mask break, in addition every mode support Data memory Read, Data memory Write or Data memory Read or Write. Data breakpoints will work in internal data memory. Data memory address from 0x000 to 0x1FFF for eSLZ000 platform, others 0x07FF Data memory data from 0x0000 to 0xFFFF Mask data from 0x0000 to 0xFFFF 22 • eSL/eAM Series (+eSLZ000) IDE User’s Guide Chapter 1 I/O break (read/write) The I/O breakpoints can be set to one of three modes; address break, address with data break, address with data mask break, in addition every mode support Data Read, Data Write, Data Read or Write. I/O address from 0x00 to 0x7F I/O data from 0x0000 to 0xFFFF Mask data from 0x0000 to 0xFFFF Register break (R0~R7) (write only) The register breakpoints can be set to one of three modes; address break, address with data break, address with data mask break, but in register domain only support address write, Data Write. Register address from 0x0 to 0x7 Register data from 0x0000 to 0xFFFF Mask data from 0x0000 to 0xFFFF Tool Menu Generate Mask File Generate a mask program file (*.msk) rom the project. Play MIDI/Speech Open Play Dialog. User can play midi and speech throw ICEeSL by this Dialog. Open EzWave Open eSL EzWave ICE Download Allow user download PROM,DROM, Boot Flash, SPI Flash data form current project builded or other selected binary data into ICEeSL EMF Download Allow user download Boot Flash, DROM Flash data and SPI data flash into EMF ICE Download PROM: Download Data to ICEeSL PROM DROM: Download and auto verify data to ICEeSL DROM Boot Flash: Download data to ICEeSL SPI Boot Flash SPI Data Flash: Download data to ICEeSL SPI Data Flash eSL/eAM Series (+eSLZ000) IDE User’s Guide • 23 Chapter 1 EMF Download Boot Flash: Download data to EMF Boot Flash DROM Flash: Download data to EMF DROM Flash SPI Data Flash: Download data to ICEeSL SPI Data Flash Play Midi and Speech Dialog (please refer to Appendix B) Tool Bar Output Bar Control Bar Status Bar Tool Bar: Open and build midi file (user must select form type fisrt) Open and build speech (user must select coding type first) Connect ICE Change Midi tone library (Instrument And Percussion) Load IDE support default Midi tone library file Info (output active Midi tone library file, builded midi and speech file) Exit 24 • eSL/eAM Series (+eSLZ000) IDE User’s Guide Chapter 1 Control Bar: Play midi or speech button Pause midi or speech playing button Stop midi or speech playing button Restart(Reset) playing button No Repeat playing midi or speech button Repeat playing midi or speech button Sound on button Sound off button Volume slider bar Output Bar: The Output bar displays messages indicating results of midi or speech compiling just performed, such as connection, midi or speech file information, and change *.inp (Instrument And Percussion) data, including their respective error messages. Status Bar: Show Status Connect Status: ICE Connected Disconnect Status: ICE Disconnect Play Status: Playing Midi or Speech file Pause Status: Pause Playing Midi or Speech file Stop Status: Stop Playing Midi or Speech file Setting Menu Project Setting Define compiler (assembler), linker, customize and directory option. Connect Setting Define printer port connection with ICE (default is 378H) Coding Type Setting Define speech coding type Stack Size Setting Define stack size IDE Setting… Tab… Define tab size for Editor & output windows Font…Define font for Editor & Output windows eSL/eAM Series (+eSLZ000) IDE User’s Guide • 25 Chapter 1 Project Setting: Define compiler (assembler), linker, customize and directory option. Compiler Option Dialog Support warning messages: Support warning message when compile or assemble project Support extra warning for several ANSI rules: Support extra warning message for several ANSI rules when compile C file. This option only work at C file. Optimization: Support debug information if select debug mode, opposite, Release mode doesn’t have debug information. For this reason, if you want to debug source code, you must select disable (debug mode) Linker Option Dialog Substitute short jump/call where possible: Support jump/call instruction optimization Support warning messages: Support warning message when link project 26 • eSL/eAM Series (+eSLZ000) IDE User’s Guide Chapter 1 Customize Option Dialog Auto download voice project data: eSL/eAM IDE will auto download voice data into DROM when user starts debugging source code. This option enable when eSL/eAM IDE connect ICEesL and only support executable project (i.e. only executable project can debug source code). Auto verify PROM data: eSL/eAM IDE will verify PROM when compile or assemble source code. Body Type: IDE allow user reset body type, when project opened. Power On Frequency: eSL/eAM IDE allow user reset Power On frequency when project opened. Frequency options are 8.192MHz, 12.288MHz, 16.384MHz, 18.022MHz and don’t care. System Applied Vlotage: IDE allow user selet the voltage for system.If user selects the option (4.5V), the frequency for eSL and eAM serial chip are 12.288MHz, 16.384MHz, 18.022MHz and don’t care. If user selects the option (3V), the frequency for eSL serial chip are 8.192MHz, 12.288MHz and don’t care, for eAM serial chip are 12.288MHz and don’t care. PORTC Applied Voltage: IDE allow user select the voltage of PORTC.If user selects the option (4.5V). The IDE prohibit the IO[0x64] read/write for total instruction and display the error in the output window. External DROM Format: IDE allow user selet the external data format type. Note, if external rom device is SPI Flash, must select BY BYTE Mode. Selftest PROM and DROM: Enable or disable selftest PROM and DROM. When user select disable, the eSL/eAM IDE will not fill dummy data (0xFF) to eSL/eAM Series (+eSLZ000) IDE User’s Guide • 27 Chapter 1 the maximum address and only fill the address which user used to binary file. User can select input, output and display pin. (please refer to Appendix D) Note This option only enable at ICE mode, no support at Simulator mode. Inp Source: User can indicate instrument and percussion library file through this brower. Available User RAM .DS Size: show how mamy RAMs can be used for user. Enable Record Option Function: When users enable record option, the record function will be activated. This option only support at eSL serial body. Enable Speed/Pitch Control Function: When users enable speed/pitch control, the speed/pitch control will be activated. Besides, when users enable speed/pitch control and record option function at the same time, real time pitch control function from the peripheral device (A/D converter) will be activated. This option only support at eSL serial body (eSL128SA, eSL256SA, eSL512SA, eSL128A, eSL256A, eSL512A, eSL032A) and enable when select speech/melody option 3. Enable Tempo Detection Function: When users enable tempo detection, tempo detection function from the peripheral device (A/D converter) will be activated. This option only support at eSL serial body (eSL128A, eSL256A, eSL512A, eSL032A) and enable when select speech/melody option 3. Enable Sound Location Function: When users enable sound location, the sound location function will be activated. This option only support at eSL serial body (eSL128A, eSL256A, eSL512A, eSL032A) and enable when select speech/melody option 3. Speech/Melody Channel Option: IDE support user three kinds of speech memory allocation option by different chip serial (eSL and eAM serial chip) selected by users. The more memory users can use, the more limit in using speech algorithm. The memory allocation is as follow: eSL Serial Chip: (1) 1 Channel (S2 or Melody only): Only support channel 2 can be used. The eSL/eAM IDE will reserve max usable RAM size for user. If users select this option, the memory which user can use is 1008 words (address 0~ address 1007). Speech algorithm type1, type2, type3, type4, type5 and type6 can be selected. 28 • eSL/eAM Series (+eSLZ000) IDE User’s Guide Chapter 1 (2) 2 Channel (Speed && Pitch control / Beat Tracking / Sound Location): Support 2 channels can be used. The eSL/eAM IDE will reserve mid usable RAM size for user. If users select this option, the memory which user can use is at last 30 words (address 0 ~ address 29). The speech algorithm can be used is the same as next Table of option (3). (3) 2 Channel (S1+S2 or S1+Melody [all type]): Support 2 channels can be used. The eSL/eAM IDE will reserve min usable RAM size for user. If users select this option, the memory which user can use is 307 words (address 0~ address 306). The speech algorithm can be used is listed at next table. Play 1channel speech Channel1 Channel2 type1, Support algorithm type1, type2, type2, type3, type3, type4, type4, type5, type5, type6, type6 16channel melody Play condition Play 2channel speech(at the same time) type1+type1, type1+type2, type1+type3, type1+type4, type1+type5, type2+type2, type2+type3, type2+type4, type2+type5, type3+type3, type3+type4, type3+type5, type4+type4, type4+type5, type5+type5, type5+type6 type6+type6 8channel melody+type1, 8channel melody+type2, 8channel melody+type3, 8channel melody+type4, 8channel melody+type5, 8channel melody+type6 eAM Serial Chip: (1) Melody Only: Only melody playing can be used. The eSL/eAM IDE will reserve max usable RAM size for user. If users select this option, the memory which user can use is 1051 words (address 0~ address 1050). eSL/eAM Series (+eSLZ000) IDE User’s Guide • 29 Chapter 1 (2) 2 Speech or Melody: It can support maximum 2 speeches or melody. The eSL/eAM IDE will reserve available RAM size for user. If users select this option, the memory which user can use is 783 words (address 0~ address 782). The speech algorithm can support type 5 and type 6. (3) more than 2 Speech or Melody: It can support maximum 4 speeches or melody. The eSL/eAM IDE will reserve available RAM size for user. If users select this option, the memory which user can use is 755 words (address 0~ address 754). The speech algorithm can support type 5 and type 6. Directory Option Dialog Directory Option Dialog: supports user specify directories to search for header files and libraries. Include files: Add the directory dir to the head of the list of directories to be searched for header files. This can be used to override a system header file, substituting your own version, since these directories are searched before the system header file directories. Library files: The linker searches a standard list of directories for the library, which is actually a file named library. The linker then uses these files as if it had been specified precisely by name. Connect Setting: Select which printer port is connected to ICEeSL. 30 • eSL/eAM Series (+eSLZ000) IDE User’s Guide Chapter 1 Connect Dialogue. Coding Type Setting: Select speech coding type. eSL032, eSL128, eSL256, eSL512, eSL128S, eSL256S and eSL512S include Type 3, Type 4, Type 5, Type 6, Recorder ADPCM, and Type MP3-Like. eSLZ000, eSL032A, eSL128A, eSL256A, eSL512A, eSL128SA, eSL256SA and eSL512SA include Type1, Type 2-1 Type 2-2, Type 3, Type 4, Type 5, Type6, Recorder ADPCM and Type MP3-Like. eAM096, eAM128, eAM192, eAM256, eAM384, eAM512, eAM096S, eAM128S, eAM192S, eAM256S, eAM384 and eAM512S: include Type5, eSL/eAM Series (+eSLZ000) IDE User’s Guide • 31 Chapter 1 Type6 coding type. Stack Pointer Setting: Define stack pointer address. Default address is the max available size address of different Chip. Window Menu New Window Open another window of the same file you are currently editing (for split window viewing) Cascade Arrange all open files in cascade formation Tile Arrange all open files editing in tile formation Close All Close all open files “1 hello.c” Indicates number of files and filenames of source file(s) currently active in the Editor window Windows… Display Dialog to manipulate source files currently active in the Editor windows Help Menu 32 • eSL/eAM Series (+eSLZ000) IDE User’s Guide Chapter 1 About ELAN See information on version of the IDE… current eSL/eAM IDE Program Pop-Up Menu Right Click edit document then IDE will pop-up this menu (The description of all items please refer to previous pages) 1.2.2.3 Toolbar 1 2 3 4 5 6 7 8 9 10 11 12 13 14 15 16 17 18 19 20 21 22 23 24 25 26 27 28 29 30 31 32 33 34 View/hide either Standard or Build toolbar, or both from View menu. The following are the designated function for each of the icons: Standard Tools Build/Other Tools Debugging Toolbar 1. Open file (Ctrl+O) 16. Download PROM data 20. Toggle ICE/SW 2. Save file (Ctrl+5) 17. Build(F7) 21. Free Run (Ctrl+F5) 3. Cut (Shift+Del) 18. Rebuild All(Ctrl+F7) 22. Go (F5) 4. Copy (Ctrl+C) 19. Rebuild Source Code 23. Run to Cursor (Ctrl+F10) 5. Paste (Ctrl+V) 24. Step Over (F10) 6. Undo (Alt+Backspace) 25. Step Into (F11) 7. Redo 26. Break Execution (F6) 8. Workspace 27. Exit Debugging (F8) 9. Output 28. Reset (F12) 10. ROM Status 29. Insert/Remove Breakpoint(F9) 11. Find (Ctrl+F) 30. Disable Breakpoint (Ctrl+F9) 12. Print (Ctrl+P) 31. Clear All Breakpoints 13. About 32. Enable/Disable All Breakpoint 14. Play Midi/Speech 33. Get Machine Cycle Count 15. Open EzWave 34. Show Disassembly window eSL/eAM Series (+eSLZ000) IDE User’s Guide • 33 Chapter 1 1.2.2.4 Document Bar The Document bar displays the buttons representing each of the active files in the Editor window. Click the button of the pertinent file that you wish to place in front of the Editor window to perform editing (function is similar with taskbar buttons under Windows). 1.2.2.5 Status Bar Keyboard mode Cursor position ICEeSL running indicator Text file OS format R/W flag While your project is being debugged with ICEeSL, an ICEeSL running indicator will show in the status bar. The Cursor position indicates the cursor location within the text Editor window. Text file OS format is DOS, MAC, or UNIX. R/W flag indicates the active file Read/Write status. If Read only, “Read” will display, otherwise the field is empty. Keyboard mode displays the status of following keyboard keys: Insert key – OVR is dimmed when overtype mode is off, highlighted when on Caps Lock key – CAP is dimmed when uppercase character mode is off, highlighted when on Num Lock key – NUM is dimmed when the numeric keypad calculator mode is off, highlighted when on Scroll Lock key – SCRL is dimmed when cursor control mode is off, highlighted when on. 34 • eSL/eAM Series (+eSLZ000) IDE User’s Guide Chapter 2 Chapter 2 Getting Started with eSL/eAM IDE 2.1 Overview This chapter provides a step-by-step description on How to create a new project under File View Mode How to add/remove existing source file in a project. How to build projects. How to debug an project. 2.2 Starting the eSL/eAM IDE Program To start eSL/eAM IDE Program, click on the eSL/eAM IDE icon from desktop or from Windows Start menu. When starting from the Start menu, click Programs, then look for eSL/eAM IDE group and click on eSL/eAM IDE icon. Once the program is started, the main window of the program displays. eSL/eAM IDE Program Main Window eSL/eAM Series (+eSLZ000) IDE User’s Guide • 35 Chapter 2 2.3 Create a New Project (about SPI project, please release reference Appendix E) To create a new project, you need to configure your project by following these steps: 1. From the Menu bar of the eSL/eAM IDE main window, click on File or Project menu and choose New command from the resulting Pull-down menu. 2. The New dialog (shown below) will then display. Browse Icon Select type “New” Dialog Showing Project Tab for Creating New Project 36 • eSL/eAM Series (+eSLZ000) IDE User’s Guide Chapter 2 3. Select Projects tab from dialog and assign a name for the new project in the Project Name box (suffix .prj will auto-append to the filename). Target Microcontroller Project Filename and Project Type 4. Locate the folder where you want to store the new project. You may use the Browse icon to find the appropriate folder. 5. Select the target microcontroller for your project from the Micro Controller list box. 6. Select the project type for your new project from the Type group box (default is Executable Project). Executable Project (*.bin): The project can download at ICEeSL, debugging. “Project (File View)” Window Library Project (*.a): The project only can build as a library code. The function of library file like the *.lib in VC++ 7. Click OK button after confirming all your choices and inputs. 8. IDE will create some header files for user’s project File Name Command For assembler project register.def Define all register symbol and address registerbit.def Define all register bit symbol and address registerExt.def Extern all register symbol vector.def Define .vector table peripheral.def Define peripheral macro and routine Interruptvector.def Define interrupt vector table For c project Interruptvector.h Define interruput vector function c_register.h Define all register symbol and address c_registerbit.h Define all register bit symbol and address eSL/eAM Series (+eSLZ000) IDE User’s Guide • 37 Chapter 2 The new project is created with the defined project name, microcontroller and project type you have selected displayed on top of the Project window. 2.4 Add and Remove Source Files from/to Project You can either insert existing source files into the new or existing project, or create new ones from within eSL/eAM IDE text Editor and automatically insert them into the new project. 2.4.1 Create New Source File for the Project If your source file is yet to be created, you can take advantage of the New dialog (by clicking New command from the File menu) to create your new source file filename and use the ESL/EAM IDE text editor to compose its content. 1. Click the Files tab of the NEW dialog and select the type of source file you want to create from the EMC Source File list box, i.e., *.asm (default) for assembly file; *.c for C Language file, and *.h for header file. New the first assembler file (*.asm), eSL/eAM IDE will include “vector.def”, “register.def”, “eSLMacro.def”, “Interruptvector.def” and eSL or eAM speech/melody macro define file (“eSLMSMacroDefine.def “or “eAMMSMacroDefine.def”), automatically. When new the first c file (*.c), eSL/eAM IDE will include “interruptvector.h”, and include “ecc_extend.h” for each new c file. NOTE 1. In asm project “eSLMSMacroDefine.def “ or “eAMMSMacroDefine.def” must be preceeded by “interruptvector.def” 2. In c project “ecc_extend.h” must be preceeded by “interruptvector.h” EMC Source Files Pre-assign a filename for the new source file Click to browse for appropriate folder “New” Dialog Showing File Tab for Creating a New Source File 38 • eSL/eAM Series (+eSLZ000) IDE User’s Guide Chapter 2 2. Assign a filename for the new source file in the File Name box. 3. Locate the folder where you want to store the new source file in your disk. You may use the Browse icon to find the appropriate folder. 4. Check Add to Project check box (default) if you want to automatically add the new file into your project. Otherwise clear the check box. 5. Click OK button after confirming your inputs. You will be prompted to start writing the newly defined source file in the Editor window. 2.4.2 Add Existing Source Files to the New Project If your source file is ready, you can immediately insert it into your new project. 1. From the Menu bar, click on Project menu. Choose Insert Files to Project command from the resulting pull-down menu and the Insert Files into Project dialog will display. “Project” Menu “Insert File into Project” Dialog 2. Browse and select the file or multiple select the files you wish to insert into the new project. 3. Click OK button after confirming your choice. 2.4.3 Open Source File or Display its Path You can open source file into Editor window for editing from Project (FileView) window. To do this, double click on the source file and the file is automatically opened. eSL/eAM Series (+eSLZ000) IDE User’s Guide • 39 Chapter 2 2.4.4 Deleting Source Files from Project From the Project window, select the file(s) you wish to delete. Then press the Delete key from your keyboard. “Project (File View)” Window 2.5 Add and Remove Voice Files from/to Project You can insert existing voice files into the new or existing project, inserted file will add to Voice View in Project Window. Voice files include speech files (*.wav), melody files (*.mid) or user define file (*.bin,*.tbl). 2.5.1 Add Existing Voice Files to the Project You can add voice file by next two methods. 1. 40 • From the Menu bar, click on Project menu. Choose Insert Files to Project command from the resulting pull-down menu and the Insert Files into Project dialog will display. You can select which type of file want to insert (speech file (*.wav), midi file (*.mid), user define file (*.bin,*.tbl)). Then the selected file will insert at corresponding node in the voice view window. eSL/eAM Series (+eSLZ000) IDE User’s Guide Chapter 2 “Project” Menu 2. “Insert File into Project” Dialog On the other hand, you can clicking mouse left button at the “Speech File”, “Midi File” and “User Data” node in voice view window. eSL/eAM IDE will pop-up one pop menu for you to select the desired file from the resulting “Insert Files” dialog. The same, the selected file will insert at corresponding node in the voice view window. Insert voice file by clicking mouse left buttom eSL/eAM Series (+eSLZ000) IDE User’s Guide • 41 Chapter 2 2.5.2 Encode Speech Files in the Project User can click mouse left buttom at indicate speech file and open “Speech property” dialog to select speech option to encode speech file. Select indicate speech file Set speech option by clicking mouse left buttom File Name, Sample Rate, Resolution and Bit Rate Coding Type Plus configure: Echo and Style Enable/ Disable Enhance function Mark number from 1 to 255 Define Flash On/Off Marker number when enable Beat Tracking Software and hardware play control panel play speech option (only enable at hardware playing) Speech Proterty Dialog Speech Property Dialog: This dialog let user set coding type, plus configure (echo and style) and mark numbers by indicate speech file. On the other hand, it also support play control panel and option (Filter On and output port) for user can immediately listen speech data status from PC or ICEeSL. 42 • eSL/eAM Series (+eSLZ000) IDE User’s Guide Chapter 2 File Info: about file full path, resolution, sample rate and Bit Rate.The Bit Rate will exchange between different coding type and different sample rate. Code Type: eSL/eAM IDE support Type1 ~Type6 coding type for eSLZ000, eSL032A, eSL128A, eSL256A and eSL512A, others, only support Type4, Type 5, Type 6. Default is Type 3 and bit rate is 12Kbps. Plus Configuration: include echo (from 0~5), style (hard, medium and soft) and enhance. Mark Number: set the max mark number for indicate speech file. Enable Beat Tracking: Enable this function, IDE will automatically add beat tracking flash on and flash off marker into wave. NOTE 1. Default flash On marker number is the maxinum number in marker number combobox 2. Defualt flash Off marker number is the the maxinum number - 1 in marker number combox 3. The beat tracking markers are accurate when wave sample rate is 8K Play Control Panel: eSL/eAM IDE allow user can immediately listening speech data status through select different code type, plus configuration, and playing option. You can listens speech from PC (software) or ICEeSL (hardware). Playing Option: include upsample and output port. These options are only enable at hardware connected status. Filter On used to make the wave sound smoothly. Output port includes three interfaces, DAC, PWM 32K and PWM 64K. Besides, using Speech Property Dialog, you also can select Overview all speech files option by R-Click mouse at Speech folder to select you want coding type, encho, type or mark number. Overview all sppech files eSL/eAM Series (+eSLZ000) IDE User’s Guide • 43 Chapter 2 Coding Type and Plus Configuration Speech files Search Conditions Hardware/Software Play Pad Speech Overview Dialog: In this dialog you can multi select files and set Coding type, Echo, Style and Mark Num at one time. You also can search files by different condition at Search Option section. After searching, all of fit speech files will be highlighted. 2.5.3 Build Midi Files in the Project User can click mouse left buttom at indicate midi file and eSL/eAM IDE will pop-up a pop menu for usert to set some midi properties before build midi data. NOTE Don’t use Asian text font as midi file name, like Traditional Chinese, Japenese, and extra. 44 • eSL/eAM Series (+eSLZ000) IDE User’s Guide Chapter 2 Set midi option by clicking mouse left buttom Play Midi: Let user can immediately listen midi data status before build midi file. This function only enable at ICEeSL connected. Form Setting: eSL/eAM IDE support short and long form option before build midi data. Default is Short form. Midi form setting dialog Channel Setting: Channel Setting dialog support user to indicate which track assign to which channel by max notes. eSL/eAM IDE support 32 tracks and 16 channels. Max note numbers in one track (can't modify, count by IDE) Enable/Disable Exclusive eSL serial chip only support 12 channels and eAM serial chip support 16 Channels support 32 Tracks show mouse point at which track and channel Midi channel setting dialog Track No.: eSL/eAM IDE support 32 Tracks Max Notes: The max note numbers playing in the same time. In addition, max notes also mean the max channels which user can assign. (by Track). Max Notes is calculated by eSL/eAM IDE. Exclu.: Enable/Disable track’s notes must be assigned in indicate channels, on the other hand, other track’s notes also can’t insert into these locked channel. eSL/eAM Series (+eSLZ000) IDE User’s Guide • 45 Chapter 2 NOTE One channel only can be assigned to one track Property: show midi file property. 2.6 Edit a Source File From and Within Project You can edit source files that are already inserted in the project. To do so, double click the source file you wish to edit from the Project window and the file will open in the Editor window of the eSL/eAM IDE Program Double click to open & edit file Source file opened for editing Editing Source File From and Within Project 2.7 Build Project With your source file(s) inserted into the project, you are now ready to compile your project. 2.7.1 Compiler, Assemble and Link Files to Generate Binary File With the source file(s) shown in the Project window – Click Rebuild All command to assemble and link all inserted files regardless of having been recently modified or not. Click Build command from the Project menu to assemble and link only those source files that were recently modified. eSL/eeAM IDE will assemble and link all source files to generate binary (*.bin) files using your project name as filename. The binary file is automatically saved in the same folder where your source files are located. Status of the assembly operation can be monitored from the Output window as shown below. 46 • eSL/eAM Series (+eSLZ000) IDE User’s Guide Chapter 2 Output Window Showing Successful Compile, Assemble & Link Compilation If error is detected during compilation, pertinent error message will also display in the Output window. Double click on the error message to link to the source of error from corresponding program text line in the Editor window. Output Window Showing Compiler, Assembler & Link Compilation Errors Modify source files to correct the errors and repeat Compiler assembler and link operations. 2.8 Debugging a Project With the source files deprived of its errors, you are now ready to debug the files. Be sure the ICEeSL is properly connected to your computer. Debugging commands are available from the Debug Menu as well as from the eSL/eAM IDE Program Toolbar. Toolbar for Debugging Commands eSL/eAM Series (+eSLZ000) IDE User’s Guide • 47 Chapter 2 2.8.1 Breakpoints Setup To assign a breakpoint, position cursor at any source line where a breakpoint is going to be set, and then press F9 key. Observe the line highlighted in red with a red footprint (dot ) indicator to its left. You can also click on the Insert/ Remove Breakpoint icon (hand shape) on the toolbar, or choose Breakpoint Footprint Breakpoint Active Source File with a Defined Breakpoint Insert/Remove Breakpoint command from the Debug menu to set the breakpoint. To disable breakpoint, position cursor at any source line where a breakpoint is enabled, and then press Ctrl+F9 key, then the line highlighted in red with a red footprint (dot) will exchange with a gray footprint (dot). You can also click on the Disable Breakpoint icon (hand shape) on the toolbar, or choose Disable Breakpoint command from the Debug menu to set the breakpoint. Disable Breakpoint Footprint Breakpoint Active Source File with a disable Breakpoint footprint Likewise, the defined breakpoint is cleared if F9 or the hand icon is clicked the second time with the cursor positioned on the defined breakpoint. To clear all existing breakpoint, click Clear All Breakpoints command from Debug menu or its icon from Toolbar. Note that this method of clearing a breakpoint will also remove the breakpoint footprint. Otherwise, to Disable or Enable all existing breakpoint, click Enable/Disable All Breakpoints command from Debug menu or its icon from Toolbar. Note that this method of disable or enable all breakpoints will also disable or enable all breakpoint footprints. 48 • eSL/eAM Series (+eSLZ000) IDE User’s Guide Chapter 2 2.8.2 Debugging Tools Start and perform debugging with the following commands from the Debug menu or their pertinent icons from Toolbar: ICE/SW – Switch Debugger mode between ICEeSL and Simulator F5 Ctrl+F5 F11 Go - Run program starting from the current program counter until breakpoints are hit and breakpoint address executed. Free Run - Run program starting from the current program counter until Break Execution command occurs. All defined breakpoints are ignored during free run. Step Into - Execute EZ parameter step-by-step (with register contents updated at the same time). Step Over – Same as Step Into command. F10 Run to Cursor - Run program starting from the cur rent program counter up to the location where the cursor is anchored (applies to ICE debug mode only). F6 Break Execution - Stop running program without ICE reset (program will resume running from the location where it was last stopped). F12 Reset - Perform hardware reset (register contents are displayed with initial values). ICEeSL will return to its initial condition. F8 Exit Debugging - Set Debug in normal (editable) mode and ICE reset is carried out (Debug in debugging mode sets the Editor window to read only) Machine Cycle - Enable or disable display of the instruction cycle count of executed instructions Disassembly Window – Show Disassembly Window. (Only enable at C project debugging mode) eSL/eAM Series (+eSLZ000) IDE User’s Guide • 49 Chapter 2 50 • eSL/eAM Series (+eSLZ000) IDE User’s Guide Appendix A Appendix A Library Tool Introduction A.1 Overview library file list (*.a) File Browser Library file name All obj file list in selected library file (*.a) insert obj file into selected library file remove object file which selected from list save selected object file as another objject file All function name list in selected obj file A.2 Create New Library file The eSL/eAM IDE support two methods to create library. A.2.1 Create library file from eSL/eAM IDE A.2.1.1 New Project To create a new project, you need to open eSL/eAM IDE and configure your project by following these steps: 1. From the Menu bar of the eSL/eAM IDE main window, click on File or Project menu and choose New command from the resulting Pull-down menu. eSL/eAM Series (+eSLZ000) IDE User’s Guide • 51 Appendix A 2. The New dialog (shown below) will then display. 3. Select Library Project from Project Type combo box. 4. Locate the folder where you want to store the new project. You may use the Browse icon to find the appropriate folder. 5. Select the target microcontroller for your project from the Macro Controller list box. 6. Select the project type for your new project from the Type group box (default is ASM). Project Type 7. Click OK button after confirming all your choices and inputs. The new project is created with the defined project name , microcontroller project type you have selected displayed on top of the Project window. (Executable or Library and Library project only has File view Select library project “New” Dialog Showing Project Tab for Creating New Project 52 • eSL/eAM Series (+eSLZ000) IDE User’s Guide Appendix A A.2.1.2 Add and Remove Source Files from/to Project Please reference Section 2.4 A.2.1.3 Edit a Source File From and Within Project Please reference Section 2.5 A.2.1.4 Build Project With your source file(s) inserted into the project, you are now ready to compile your project. With the source file(s) shown in the Project window – Click Rebuild All command to assemble and link all inserted files regardless of having been recently modified or not. Click Build command from the Project menu to assemble and link only those source files that were recently modified. eSL/eAM IDE will assemble and link all source files to generate binary (*.a) files using your project name as filename. The binary file is automatically saved in the same folder where your source files are located. Status of the assembly operation can be monitored from the Output window as shown below. Output Window Showing Successful Compile, Assemble & Link Compilation If error is detected during compilation, pertinent error message will also display in the Output window. Double click on the error message to link to the source of error from corresponding program text line in the Editor window. Output Window Showing Compiler, Assembler & Link Compilation Errors eSL/eAM Series (+eSLZ000) IDE User’s Guide • 53 Appendix A Modify source files to correct the errors and repeat Compiler assembler and link operations. NOTE 1. eSL/eAM IDE doesn’t support debugger in Library project 2. Library project only has File view 3. Library project can’t insert voice file. A.2.2 Create Library File from Library Tool User can create new library file form library tool by following these steps: 1. From the Menu bar of the tool main window, click on File menu and choose New library command from the resulting Pull-down menu. 2. The New Library dialog (shown below) will then display. 3. Locate the folder where you want to store the new file. You may use the Browse icon to find the appropriate folder 4. Click OK button after confirming all your choices and inputs. 54 • eSL/eAM Series (+eSLZ000) IDE User’s Guide Appendix A A.3 Library Tool Sub-Window File Browser: Search folder that include library file (*.a) from this sub-window. Library File List: List library file (*.a) Object File List: List all object files include in selected library file (*.a) Symbol List: List all function names include in selected object file (*.obj) eSL/eAM Series (+eSLZ000) IDE User’s Guide • 55 Appendix A A.4 Library Tool Buttons 56 • Add Add additional object file into selected library file. Remove Remove object files which selected form object file list window. Extract To Save highlighted object file as another object file. (shown following ) Close Close library tool. eSL/eAM Series (+eSLZ000) IDE User’s Guide Appendix B Appendix B Play Midi & Speech Dialog Introduction B.1 Overview Tool Bar Output Bar Control Bar Status Bar B.2 Connect ICEeSL This Application only allows user play midi and speech at ICEeSL, so user must check ICE connected first. User can check ICEeSL connection status throw output window, the square at the button right of dialog (Red: Disconnect, Green: Connected) and status bar. User can click button to connect ICEeSL. eSL/eAM Series (+eSLZ000) IDE User’s Guide • 57 Appendix B Output Window Status Bar and Square Disconnect status Output Window Status Bar and Square Connected status B.3 Build and Play Speech User can click button to build speech file. 1. Select Speech file (*.wav, *.mp3, *.wma) 58 • eSL/eAM Series (+eSLZ000) IDE User’s Guide Appendix B 2. Select speech property: User can select different property to build speech. Select Speech Property (for wav file) Select Speech Property (for mp3and wma file) 3. Play speech: user can click button to play speech. Before the first playing, the dialog will auto-download builded speech data into ICEeSL. eSL/eAM Series (+eSLZ000) IDE User’s Guide • 59 Appendix B B.4 Build and Play Midi B.4.1 Change Different Midi Tone Library What is midi tone library? The midi tone library is the file (*.inp) which collects different instrument or percussion data. User can create this file from EZWave (please refercnce EZwave Guide). How to download midi tone library? In this dialog, we support default midi tone library. Uuser can click button to download defult midi tone library as new active library. In addition, user also can click button to download different midi tone library as new active library. Load Default midi tone library as new active library 60 • eSL/eAM Series (+eSLZ000) IDE User’s Guide Appendix B Load Different midi tone library as new active library NOTE: 1. If user doesn’t change midi tone library, the default midi tone library will be set as activelibrary. 2. The active library is valid until user change midi tone library. B.4.2 Build and Play Midi User can click button to build midi file. 1. Select midi file (*.mid) 2. Select form type eSL/eAM Series (+eSLZ000) IDE User’s Guide • 61 Appendix B 3. Play midi: user can click button to play midi. Before the first playing, the dialog auto-download builded midi data into ICEeSL. B.5 Get Information User can click button to get new active midi tone library, active midi file and active speech file. 62 • eSL/eAM Series (+eSLZ000) IDE User’s Guide Appendix B B.6 Playing Midi or Speech Pause Stop Restart Repeat On/Off Play playing bar Sountd On/Off Volume Play midi or speech button Pause midi or speech playing button Stop midi or speech playing button Restart(Reset) playing button No Repeat playing midi or speech button Repeat playing midi or speech button Sound on button Sound off button Volume slider bar eSL/eAM Series (+eSLZ000) IDE User’s Guide • 63 Appendix B 64 • eSL/eAM Series (+eSLZ000) IDE User’s Guide Appendix C Appendix C How to Use Hardware Breakpoint C.1 Hardware Breakpoint Setup Four Domain Logical condition Pre-Trigger Loop Counter C.1.1 PC Counter Break (Read/Write) You can set an immobile PC value to trigger break. The PC break setting only support address break (read, write and read/write), data and mask can’t be set in dialog. PC range from 0x0000 to 0x7FFF eSL/eAM Series (+eSLZ000) IDE User’s Guide • 65 Appendix C For example: If user set PC break value as 0x008A, logical function as SET1 OR SET2, Loop counter as “1”, Run after breakpoint trigger as “0”. After this setting, the system will generate a breakpoint trigger at PC = 0x8A. 66 • eSL/eAM Series (+eSLZ000) IDE User’s Guide Appendix C C.1.2 RAM Break (Read/Write) The data memory breakpoints can be set to one of three modes; address break, address with data break, address with data mask break, in addition, every mode support Data memory Read, Data memory Write and Data memory Read or Write. Data memory address from 0x000 to 0x1FFF for eSLZ000 platform, others from 0x000 to 0x07FF Data memory data from 0x0000 to 0xFFFF Mask data from 0x0000 to 0xFFFF For example: If user set RAM break condition as address with data write. The RAM address as 0x50, data as “0x9ABC”, logical function as SET1 OR SET2, Loop counter as “1”, Run after breakpoint trigger as “0”. After this setting, the system will generate a breakpoint trigger at PC = 0x013E. eSL/eAM Series (+eSLZ000) IDE User’s Guide • 67 Appendix C C.1.3 I/O Break (Read/Write) The I/O breakpoints can be set to one of three modes; address break, address with data break, address with data mask break, in addition, every mode support Data Read, Data Write and Data Read or Write. I/O address from 0x00 to 0x7F I/O data from 0x0000 to 0xFFFF Mask data from 0x0000 to 0xFFFF 68 • eSL/eAM Series (+eSLZ000) IDE User’s Guide Appendix C For example: If user set IO break condition as address with data read with mask. The IO address as 0x07(PORTB), data as “0xFFC6”, mask as 0xFF00 (low byte don’t care), logical function as SET1 OR SET2, Loop counter as “1”, Run after breakpoint trigger as “0”. After this setting, the system will generate a breakpoint trigger at PC = 0x014B. eSL/eAM Series (+eSLZ000) IDE User’s Guide • 69 Appendix C C.1.4 Register Break (R0~R7) (Write Only) The register breakpoints can be set to one of three modes; address break, address with data break, address with data mask break, but in register domain only support address write, Data Write. Register address from 0x0 to 0x7 Register data from 0x0000 to 0xFFFF Mask data from 0x0000 to 0xFFFF 70 • eSL/eAM Series (+eSLZ000) IDE User’s Guide Appendix C For example: If user set register break condition as address with data read. The register address as 0x05(R5), data as “0xA5A5”, logical function as SET1 OR SET2, Loop counter as “1”, Run after breakpoint trigger as “0”. After this setting, the system will generate a breakpoint trigger at PC = 0x014F. eSL/eAM Series (+eSLZ000) IDE User’s Guide • 71 Appendix C C.1.5 Logical Select The H/W breakpoint mechanism supports two SET breakpoints, according to logical select menu, we can distinguish two kinds option for SET1 and SET2. Such as: 1. SET1 Æ SET2: this item means SET1 sequential to SET2. The SET1 condition must be trigger firstly then trigger SET2, the system will generate a breakpoint. 2. SET1 OR SET2: this item means both SET1 and SET2 can generate breakpoint. In other word, the SET1, SET2 are relationship of logical “OR”. 72 • eSL/eAM Series (+eSLZ000) IDE User’s Guide Appendix C For example: SET1ÆSET2 If user set SET1 break condition as RAM break that address with data writ. The RAM address as 0x55, data as “0x5678”. SET2 break condition as register break that address with data write. The address as 0x02 (R2), data as 0x5A5A, logical function as SET1 Æ SET2, Loop counter as “1”, Run after breakpoint trigger as “0”. After this setting, the system will generate a breakpoint trigger at PC = 0x014E. eSL/eAM Series (+eSLZ000) IDE User’s Guide • 73 Appendix C SET1 break condition trigger. SET2 break condition trigger. C.1.6 Loop Counter The loop counter can be setting from 1 to 255 (default set to 1). If user defines logical select is SET1 OR SET2, the SET1 break and SET2 break will be count together. When SET1 break and SET2 break count times equal user define count times, the system will generate a breakpoint trigger. If user define logical select is SET1 Æ SET2, the loop count will be increase one only at SET1ÆSET2 break condition trigger. 74 • eSL/eAM Series (+eSLZ000) IDE User’s Guide Appendix C Example 1: SET1 OR SET2 If user set SET1 break condition as RAM break that address with data writ. The RAM address as 0x55, data as “0x5678”. SET2 break condition as register break that address with data write. The address as 0x02 (R2), data as 0x5A5A, logical function as SET1 OR SET2, Loop counter as “3”, Run after breakpoint trigger as “0”. After this setting, the system will generate a breakpoint trigger at PC = 0x0142. eSL/eAM Series (+eSLZ000) IDE User’s Guide • 75 Appendix C SET1 break condition trigger. Counter=1 Counter=3 SET2 break condition trigger. System will generate breakpoint Counter=2 76 • eSL/eAM Series (+eSLZ000) IDE User’s Guide Appendix C Example 2: SET1ÆSET2 If user set SET1 break condition as RAM break that address with data writ. The RAM address as 0x55, data as “0x5678”. SET2 break condition as register break that address with data write. The address as 0x02 (R2), data as 0x5A5A, logical function as SET1 Æ SET2, Loop counter as “2”, Run after breakpoint trigger as “0”. After this setting, the system will generate a breakpoint trigger at PC = 0x014E. eSL/eAM Series (+eSLZ000) IDE User’s Guide • 77 Appendix C SET1 break condition trigger. SET2 break condition trigger. Counter=1 Counter=2 System will generate breakpoint 78 • eSL/eAM Series (+eSLZ000) IDE User’s Guide Appendix C C.1.7 Run After Breakpoint Trigger This item means the system will run how many instructions after break has trigger. The dialog can be fit instruction number from 0 to 2047. When break has trigger (whether SET1 condition occur firstly or SET2), the instructions counter will start. If SET1 has trigger and instructions number over than SET2, the SET2 break can’t be trigger. The same as SET2 has trigger and instructions number over than SET1, the SET1 break can’t be trigger. (Note: RPT instruction as one instruction number) For example: If user set SET1 break condition as RAM break that address read. The RAM address as 0x55, logical function as SET1 OR SET2, Loop counter as “1”, Run after breakpoint trigger as “6”. After this setting, the system will generate a breakpoint trigger at PC = 0x014E. eSL/eAM Series (+eSLZ000) IDE User’s Guide • 79 Appendix C SET1 break condition trigger. Run after breakpoint trigger number 6 instruction: NOP, R3=IO[PORTB], NOP R2.l=0x5a, R2.h=0x5a, R5=COM R2 80 • eSL/eAM Series (+eSLZ000) IDE User’s Guide Appendix C C.1.8 Hardware Breakpoint Supported Instructions 1. PC break: all instructions type can support, but RPT inner instruction not supported. 2. RAM break: all instruction type can support, but RPT inner instruction not supported. 3. I/O break: only support following instruction type: a) b) c) d) BS IO[address].b (address from 0x0 to 0xF) BC IO[address].b (address from 0x0 to 0xF) BTG IO[address].b (address from 0x0 to 0xF) Rd = IO[address] (address from 0x0 to 0x7F) e) IO[address] = Rs (address from 0x0 to 0x7F) f) PUSH IO[address] (address from 0x0 to 0x7F) g) POP IO[address] (address from 0x0 to 0x7F) NOTE RPT inner instruction not supported 4. Register break: only supports the following instructions: a) Rd = Rs operate Rt b) Rd = operate Rs c) Rd = Rs d) e) f) g) Rd = [Rs] Rd = RAM address Rd = #imm16 Rd = #imm8 h) i) j) k) [Rd++] = Rs [Rd--] = Rs [Rd++] = P[Rs++] [Rd--] = P[Rs--] l) POP Rd m) SWAP Rd NOTE RPT inner instruction not supported eSL/eAM Series (+eSLZ000) IDE User’s Guide • 81 Appendix C 82 • eSL/eAM Series (+eSLZ000) IDE User’s Guide Appendix D Appendix D How to Use Self Test D.1 IDE Tool Self Test Function Setting After opening an existing or new project, click the “Setting” menu and click “Project” From Project Setting Dialog, enable the “Enable self type” check box to allow IO port setting. eSL/eAM Series (+eSLZ000) IDE User’s Guide • 83 Appendix D Input Port select Output Port select Display Port select 84 • eSL/eAM Series (+eSLZ000) IDE User’s Guide Appendix D D.2 Self Test I/O Application Circuit When power is switched ON, output signal is initially “High” then turns to “Low”. At the same time, D1 is turned ON and enters into the self testing mode.When self testing is completed, output signal becomes “High” and D1 turns OFF. If checksum fails (Display = 1), D2 will then turns OFF. Otherwise, (checksum Ok), D2 is turn ON.. Vcc Self testing on TEST PB(0~15) D1 Switch S1 Input R1 Output Vcc PC(0~7) eSLZ000 Self test ok GOOD D2 PD(0~7) R2 Display Input pin can be anyone of PORTB(15~0) or PORTC(7~0) Output pin can be anyone of PORTB(15~0) , PORTC(7~0) or PORTD(7~0) Display pin can be anyone of PORTB(15~0) , PORTC(7~0) or PORTD(7~0) NOTE 1. Because the initial value of the PORTD is Low, D1 and D2 are turned ON after power on. 2. The I/O pin setting number should not be the same in input, output, and display. 3. When checksum is fails, the program jumps into the infinite loop eSL/eAM Series (+eSLZ000) IDE User’s Guide • 85 Appendix D D.3 Self Test Flow Chart Connected the delf test circuit Power ON Test LED(D1)ON GOOD LED(D2)OFF in Self testing mode Fail Check sum result ? OK Check sum Fail D1 OFF(Output) D2 OFF(Display) 86 • Check sum pass D1 OFF(Output) D2 ON(Display) eSL/eAM Series (+eSLZ000) IDE User’s Guide Appendix E Appendix E How to Create and Use External Voice Project E.1 Create SPI Voice Project Besides internal DROM, it could be played from external ROM or SPI flash. You could use External project to set related instrument and samples. There were some steps as followed.In External voice project: 1. Create a new External Voice project. 2. In the project option of setting, you could choose Chip Serial and ROM Size. If you would like to change instrument index, you must enable the option of modify instrument index. Then, you could change instrument index according to instrument index of your melody project. Users could select your designate INP_eSL.Yout also can change DROM data format by select External DROM Format option. NOTE SPI only supports Byte mode data. If you want download data into SPI flash, you must select By Byte mode at External DROM Format. eSL/eAM Series (+eSLZ000) IDE User’s Guide • 87 Appendix E E.2 Add file into SPI Voice Project Add your voice files (including speech, midi or user data files) in your order. The order of example is that “start1.wav”, “start2.wav”, and “newyear.mid” are 1, 2, and 3. 88 • eSL/eAM Series (+eSLZ000) IDE User’s Guide Appendix E You can set related speech option on speech property dialog. You could set related melody option, including form setting, channel setting, and property. eSL/eAM Series (+eSLZ000) IDE User’s Guide • 89 Appendix E When you build External project, if you enabled modify instrument index option, it opened modify instrument index dialog. You could modify instrument and percussion index according to your melody project. Finally, down data to external data flash 90 • eSL/eAM Series (+eSLZ000) IDE User’s Guide Appendix E E.3 Other Settings E.1.1 Speech Project If the coding type of speech was not selected in speech project, user must manually insert new coding type from coding type setting option. The SPI speech play setting would be completed. User could play speech from external SPI flash. eSL/eAM Series (+eSLZ000) IDE User’s Guide • 91 Appendix E E.1.2 Melody Project 1. First, users must know related instrument list, percussion instrument list. Tone file and percussion file would show out *.vlg file in SPI and melody project. Users must combine related tone instruments and percussion instruments in SPI and melody project. So users could insert new instruments, percussion instruments, tone files and percussion files in melody project. NOTE Instrument, percussion instrument, tone and percussion files are in *.vlg file of project. 92 • eSL/eAM Series (+eSLZ000) IDE User’s Guide Appendix E 2. If there were not related instrument or percussion instrument in melody project, you could insert manual instruments from manual dialog. User could insert desired instruments. eSL/eAM Series (+eSLZ000) IDE User’s Guide • 93 Appendix E 3. After inserted manual instrument or percussion instrument, user could select related wave samples. 4. Finally, you rebuilt melody project and run user’s melody project on ICE chip. 94 • eSL/eAM Series (+eSLZ000) IDE User’s Guide