1
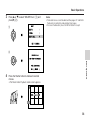
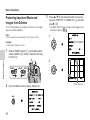
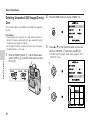
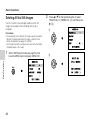
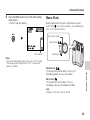
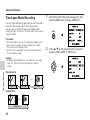
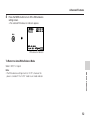
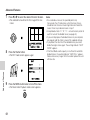
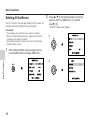
Basic Operations
2
Deleting All the Movies
Use this function if you no longer need any of the movies, for
example, after transfering them to your computer.
Precautions:
• Please protect your important movies against accidental
deletion. To delete protected movies, unprotect them before
the deletion (see pages 37 and 38).
• Do not open the battery compartment cover while the Digital
Recorder deletes movies.
1
<MENU1/2>
Basic Operations
• The EDIT mode screen appears.
<MENU2/2>
1
EDIT
PROTECT
C-PLAY
OFF
SLOW PLAY
DISPLAY
BACKLIGHT
FORMAT
BEEP
Set the Movie Playback mode (see page 29), then
press the MENU button to display <MENU 1/2>.
MENU
ON
EXIT [MENU]
EDIT
2
DELETE
OFF
DIVIDE
ON
DELETE ALL
NORMAL
EXIT [MENU]
35
Press ' or " on the Operation button to move the
pointer to “EDIT” in <MENU 2/2> (1) and then
press | (2).
EXIT [MENU]
Basic Operations
3
Press ' or " to select “DELETE ALL” (1) and
press | (2).
EDIT
1
DELETE
DIVIDE
DELETE ALL
Notes:
• Protected movies cannot be deleted. See pages 37 and 38 for
the details on protecting and unprotecting images.
• To cancel the deletion, press the MENU button in step 3.
EXIT [MENU]
2
DELETE ALL
MOTION PICTURES?
Basic Operations
YES [SHUTTER]
NO
4
[ MENU
]
Press the Shutter button to delete all recorded
movies.
• The Movie Index Playback mode screen appears.
NO FILE
36
Basic Operations
3
Protecting Important Movie and
Images from Deletion
This function protects your important movies or still images
against accidental deletion.
Note:
• You can perform this procedure in the Playback mode.
Press ' or " on the Operation button to move the
pointer to “PROTECT” in <MENU 2/2> (1) and then
press | (2).
• The Movie Index Playback mode screen appears with
the protect indicator “
”.
<MENU2/2>
1
Example:
• Protecting an important movie.
PROTECT
1
BEEP
Basic Operations
EDIT
Slide the POWER switch (1), set the Mode select
switch to MOVIE (2) and then rotate the lens body
to PLAY (3).
3
1
MOVIE
STILL
ON
EXIT [MENU]
2
PLAY
POWER
FORMAT
CAME
RA
2
OK[SHUTTER]
2
Press the MENU button to display <MENU 1/2>.
<MENU1/2>
MENU
C-PLAY
OFF
SLOW PLAY
OFF
DISPLAY
BACKLIGHT
ON
NORMAL
EXIT [MENU]
37
‰‰2
Protect indicator
Basic Operations
4
Press \ or | to move the frame to the desired movie.
6
Press the MENU button twice to end the protect
setting procedure.
• The Movie Index Playback mode screen appears.
MENU
5
To Cancel the Protect Setting
‰‰1
Press the Shutter button.
• The protect indicator “
” is lit on the desired movie.
Perform steps 2 through 4, and then press the Shutter
button. When the “
” indicator flashes, press the MENU
button.
• If you want to cancel another protection, press \ or | to
select the protected image and press the Shutter button.
OK[SHUTTER]
‰‰1
38
Basic Operations
Note:
• If you have recorded more than nine movies or still images,
there are other pages before and after the current page.
To go to the previous page, press '.
To go to the next page, press ".
Notes:
• If you protect a still image, perform steps 2 through 6 in the
Still Playback mode.
• To protect another movie, repeat the procedure in steps 4 and
5.
• Formatting a SmartMedia card (see page 64) deletes all
images on it, regardless of whether the images are protected
or not.
OK[SHUTTER]
Basic Operations
2
Still Playback
Using the LCD monitor, you can see the still images as soon
as you have finished the shooting.
1
Press \ or | on the Operation button to move the
frame to the desired image.
STILL mode indicator
Slide the Power switch (1), set the Mode select
switch to STILL (2) and then rotate the lens body to
PLAY (3).
• The still images will displayed in a thumbnail format
(reduced size images) by the Still Index Playback
mode.
3
PLAY
Basic Operations
MENU
OK[SHUTTER]
1‰‰-‰‰‰2
The number of a still image
Note:
• If you have recorded more than nine still images, there are
other pages before and after the current page.
To go to the previous page, press '.
To go to the next page, press ".
PLAY
CAMERA
CAME
RA
POWER
OK[SHUTTER]
1‰‰-‰‰‰1
1
MOVIE
2
STILL
3
Press the Shutter button to playback the selected still
image in the full size.
The number of a still image
NORMAL
1‰‰-‰‰‰1
1‰‰-‰‰‰2
OCT.27.2‰‰‰
1‰:31 AM
Notes:
• Pressing \ plays the previous image.
• Pressing | plays the next image.
39
Basic Operations
To Return to the Still Index Playback Mode
Press the MENU button and hold it until the Still Index
Playback mode screen appears.
MENU
Basic Operations
40
Basic Operations
Deleting Unwanted Still Image One by
One
2
Press the MENU button to display <MENU 1/2>.
<MENU1/2>
This function allows you to delete unwanted still image one
by one.
Precautions:
• Please protect your important still image against accidental
deletion. To delete a protected still image, unprotect it before
the deletion (see pages 37 and 38).
• Do not open the battery compartment cover while the Digital
Recorder deletes a still image.
Basic Operations
1
Slide the POWER switch (1), set the Mode select
switch to STILL (2) and then rotate the lens body to
PLAY (3).
3
AUTO PLAY
MENU
ON
DISPLAY
BACKLIGHT
NORMAL
DELETE
EXIT [MENU]
3
Press ' or " on the Operation button to move the
pointer to “DELETE” (1) and then press | (2).
• The Still Index Playback mode screen appears with a
“DELETE” frame.
<MENU1/2>
1
AUTO PLAY
POWER
1
MOVIE
STILL
ON
DISPLAY
PLAY
BACKLIGHT
CAME
RA
NORMAL
DELETE
2
EXIT [MENU]
2
DELETE
OK[SHUTTER]
41
1‰‰-‰‰‰2
Basic Operations
4
Press \ or | to move the frame to the unwanted still
image.
6
• The screen returns to the Still Index Playback mode
with a “DELETE” frame. If you want to delete another
still image, repeat the procedure from step 4 to 6.
DELETE
Press the Shutter button again to delete the selected
still image.
DELETE
OK[SHUTTER]
OK[SHUTTER]
7
1‰‰-‰‰‰2
Press the MENU button twice to display the Still
Index Playback mode screen.
Basic Operations
5
1‰‰-‰‰‰1
Note:
• If you have recorded more than nine still images, there are
other pages before and after the current page.
To go to the previous page, press '.
To go to the next page, press ".
Note:
• To cancel the deletion, press the MENU button in step 4.
Press the Shutter button.
DELETE?
YES [SHUTTER]
NO
[ MENU
]
42
Basic Operations
2
Deleting All the Still Images
Use this function if you no longer need any of the still
images, for example, after transfering them to your
computer.
Press ' or " on the Operation button to select
“DELETE ALL” in <MENU 2/2> (1) and then press
| (2).
<MENU2/2>
1
PROTECT
Precautions:
• Please protect your important still images against accidental
deletion. To delete protected still images, unprotect them
before the deletion (see pages 37 and 38).
• Do not open the battery compartment cover while the Digital
Recorder deletes still images.
DELETE ALL
1
Set the Still Playback mode (see page 39), then
press the MENU button to display <MENU 1/2>.
BEEP
2
Basic Operations
BACKLIGHT
ON
NORMAL
DELETE
EXIT [MENU]
43
DELETE ALL
STILL IMAGES?
AUTO PLAY
DISPLAY
ON
EXIT [MENU]
<MENU1/2>
MENU
FORMAT
YES [SHUTTER]
NO
[ MENU
]
Basic Operations
3
Press the Shutter button to delete all recorded still
images.
• The Still Index Playback mode screen appears.
NO FILE
Basic Operations
Notes:
• Protected still images cannot be deleted. See pages 37 and
38 for the details on protecting and unprotecting images.
• To cancel the deletion, press the MENU button in step 2.
44
Advanced Features
Resolution Setting
The picture quality and the recording time/the number of shots depend on the resolution mode. Select an appropriate mode
for your needs or the shooting conditions.
Precaution:
• The figures below are approximations only. The actual recordable time/the number of images stored in a SmartMedia card
cannot be specified precisely because the amount of memory required for storage of each image differs according to image
contents.
Movie Resolution Mode
Advanced Features
NORMAL: Recording with the standard picture quality.
LP:
Images in this mode is suitable for sending and
receiving across the Internet through analogue
telephone circuits. Its picture quality is lower
than that of the NORMAL mode.
FINE:
Recording with higher quality than that of the
NORMAL mode images, while the recordable time
is one-third long of that of the NORMAL mode.
S-FINE:
1/4 VGA:
Recording with higher quality than that of the
FINE mode, while the recordable time is about
half of that of the FINE mode.
Recording with the best quality of all. The
moving of subject in playback is not fluent
because the number of images recorded per
one second is about one-third of that of the
S-FINE mode.
Record time according to SmartMedia card capacity
Resolution mode
4 MB
Frame rate*
Transfer rate
(number of
(kbps) image/
images per sec.) sound
32 MB
16 MB
1/4VGA
10 min.
5 min.
2 min. 30 sec. 1 min. 15 sec.
S-FINE
10 min.
5 min.
2 min. 30 sec. 1 min. 15 sec.
FINE
20 min.
10 min.
5 min.
2 min. 30 sec.
NORMAL
60 min.
30 min.
15 min.
7 min. 30 sec.
5 to 10
64/16
2 hr. 17 min.
1 hr. 8 min.
34 min.
17 min.
1 to 2
28.8/16
LP
8 MB
Computer
output image
(dot)
320 × 240
2 to 5
5 to 15
384/32
160 ×120
5 to 12
192/24
384/32
* “Frame rate” is the number of the frames the Digital Recorder can record per second. It depends on the image of the movie.
45
Advanced Features
2
Still Image Resolution Mode
Press ' or " on the Operation button to move the
pointer to “REC. MODE” (1) and press \ or | to
select the desired mode (2).
NORMAL: Recording with standard picture quality.
FINE:
Recording with higher quality than that of the
NORMAL mode images, while the recordable
number is about half of that of the NORMAL
mode.
Resolution
mode
Record No. of shots according to
SmartMedia card capacity
32 MB
16 MB
8 MB
4 MB
FINE
288
144
72
36
NORMAL
576
288
144
72
<MENU1/2>
FINE
REC.MODE
2
Computer
output
image (dot)
ON
DISPLAY
OFF
BLC
BACKLIGHT
1
NORMAL
EXIT [MENU]
640 × 480
Movie
NORMAL
FINE
NORMAL
FINE
S-FINE
1/4VGA
LP
To Select a Resolution Mode
Note:
• You can perform this procedure in the Recording mode.
Set the Movie (or Still Image) Recording mode (see
page 23 or 26), press the MENU button to display
<MENU 1/2>.
3
Press the MENU button to turn off the menu.
• The indicator of the selected mode appears.
Resolution mode indicator
<MENU1/2>
REC.MODE
MENU
DISPLAY
BLC
BACKLIGHT
FINE
ON
OFF
EXIT [MENU]
FINE
LAP ‰:‰‰:‰‰
REM ‰:‰1:15
NORMAL
NORMAL
Advanced Features
1
Still
REM 17
OCT.27.2‰‰‰
1‰:31 AM
OCT.27.2‰‰‰
1‰:31 AM
Movie Recording mode
Still Image Recording mode
46
Advanced Features
2
Recording Backlit Subjects
When the subject is backlit, the image will be darkened in
the regular recording. The following procedure makes it
possible to brighten the subject and suppress the whitening
of the background to improve the image.
Press ' or " on the Operation button to move the
pointer to “BLC” (1) and then press | (2).
• The BLC (Backlight compensation) setting mode
screen appears.
1
<MENU1/2>
1
NORMAL
REC.MODE
Example:
• Setting during a movie recording.
ON
DISPLAY
OFF
BLC
During a movie recording (see page 23), press the
MENU button to display <MENU 1/2>.
BACKLIGHT
NORMAL
EXIT [MENU]
<MENU1/2>
MENU
REC.MODE
NORMAL
2
ON
BLC
OFF
DISPLAY
BACKLIGHT
NORMAL
EXIT [MENU]
Advanced Features
OFF
EXIT [MENU]
3
Press \ or | to select “ON”.
ON
EXIT [MENU]
47
Advanced Features
4
Press the MENU button to turn off the BLC setting
mode screen.
• The BLC indicator appears.
NORMAL
LAP ‰:‰‰:‰‰
REM ‰:‰3:45
Macro Shots
Slide the projection of the Focus (Macro/Normal) select
switch to the
mark, when a subject is at a short distance
(min. 4˝ (10 cm)) from the lens.
MENU
Focus select switch
Normal focus
OCT.27.2‰‰‰
1‰:31 AM
BLC indicator
Notes:
• To cancel the backlight compensation, press “OFF” in step 3.
• The compensation setting returns to “OFF”, whenever the
power is turned off.
Macro focus
Advanced Features
Normal focus
:
The focal distance will be about 24˝ (60 cm) to ∞.
Recording outdoors or a bust shot indoors
Macro focus
:
The focal distance will be about 4˝ (10 cm).
Recording a close-up shot outdoors or indoors
Note:
• Slide the switch until it stops at the end.
48
Advanced Features
1
Time-Lapse Movie Recording
Use the Time-Lapse Movie mode when you want to record a
extremely slow-moving subject. When playing back
normally, you can enjoy the movie which appear to be
moving 10 times, 40 times or 100 times faster than an actual
subject’s motion.
Precautions:
• We recommend that you use the supplied AC adapter as the
power source (see page 16) and a tripod for this function.
• This function cannot record sounds.
• Extremely short recording time may not be available for the
Time-Lapse Movie mode.
Advanced Features
Example:
• Recording a blooming flower in ×100 mode of the time-lapse
movie. The motion for 8-hour is played back in about 5
minutes.
Recording time
Set the Movie Recording mode (see page 23), then
press the MENU button to display <MENU 1/2>.
<MENU1/2>
REC.MODE
MENU
NORMAL
ON
DISPLAY
OFF
BLC
BACKLIGHT
NORMAL
EXIT [MENU]
2
Press ' or " on the Operation button to move the
pointer to “TIME LAPSE” in <MENU 2/2>.
<MENU2/2>
AUTO
W/B
TIME LAPSE
OFF
BEEP
ON
CLOCK SET
EXIT [MENU]
1 sec.
100 sec.
Playback time
about 5 min.
49
8 hr.
Advanced Features
3
Press \ or | to select the desired interval mode.
<MENU2/2>
5
Adjust the angle of the lens body to compose the
image on the LCD monitor, and then press the
shutter button to begin the recording.
AUTO
W/B
TIME LAPSE
X4‰
BEEP
ON
NORMAL
CLOCK SET
EXIT [MENU]
OFF
×10
×40
×100
OCT.27.2‰‰‰
1‰:32 AM
OFF : normal recording
×10 : 10× time-lapse recording
×40 : 40× time-lapse recording
×100 : 100× time-lapse recording
4
Press the MENU button.
LAP ‰:‰‰:‰‰
REM ‰:‰1:‰2
MENU
Notes:
• To stop the time-lapse movie recording while the operation
goes on, press the Shutter button again.
• The time-lapse movie setting will return to “OFF” whenever the
power is turned off.
• You can play back the time-lapse recording with the normal
procedure.
To Cancel the Time-Lapse Movie Recording
Perform steps 1 and 2, and then press \ or | to select
“OFF” for the item “TIME LAPSE”.
OCT.27.2‰‰‰
1‰:31 AM
Time-Lapse mode indicator
50
Advanced Features
• The Movie Recording mode screen appears with the
Time-Lapse mode indicator.
NORMAL
LAP ‰:‰‰:‰1
REM ‰:‰1:‰1
Advanced Features
Selecting the White Balance Mode
2
Recorded images will take on somewhat different colors
depending on the kind of light source. For recording in as
natural colors as possible, you can select from three
different white balance modes.
The “AUTO” mode constantly adjusts white balance
automatically allowing you to record in relatively natural
colors in most situations. Select the “OUTDOOR” mode for
outdoor recording or the “INDOOR” mode for indoor
recording to obtain more natural colors.
• The White balance mode screen appears.
1
<MENU2/2>
AUTO
W/B
TIME LAPSE
OFF
BEEP
ON
CLOCK SET
EXIT [MENU]
Example:
• Setting during a movie recording.
1
Press ' or " on the Operation button to move the
pointer to “W/B” in <MENU 2/2> (1) and then press
| (2).
2
During a movie recording (see page 23), press the
MENU button to display <MENU 1/2>.
WHITE BALANCE
AUTO
Advanced Features
<MENU1/2>
MENU
REC.MODE
DISPLAY
NORMAL
OFF
BLC
BACKLIGHT
EXIT [MENU]
ON
3
Press \ or | to select “OUTDOOR” or “INDOOR”.
NORMAL
EXIT [MENU]
WHITE BALANCE
OUTDOOR
EXIT [MENU]
OUTDOOR
51
INDOOR
AUTO
Advanced Features
4
Press the MENU button to turn off the White balance
setting screen.
• The selected White balance indicator appears.
NORMAL
LAP ‰:‰‰:‰‰
REM ‰:‰3:45
MENU
OCT.27.2‰‰‰
1‰:31 AM OUTDOOR
White balance indicator
To Return to Auto-White Balance Mode
Select “AUTO” in step 3.
Advanced Features
Note:
• The White balance setting returns to “AUTO”, whenever the
power is turned off. The “AUTO” mode has no mode indicator.
52
Advanced Features
Selecting the Iris Mode
When the amount of light that the lens receives is too much
or insufficient for recording, the Lighting indicator appears
on the LCD monitor.
or
Lighting indicator
Set the Iris select switch to the
with the lighting condition.
or
position to match
Advanced Features
• When no indicator appears, we recommend that you
normally set the Iris select switch to the
position.
• When the Lighting indicator “ ” appears, set the Iris
select switch to the
position. The
indicator means
too much light.
Iris select
switch
Set when it
is too bright
53
Set when it is in
normal conditions.
Notes:
• Make sure the iris select switch is not set in between the
and
positions.
• Under the dark or extremely bright lighting conditions, the
Lighting indicator may not disappear even if you switch the Iris
mode. This does not indicate malfunction.
•
on the LCD monitor indicates lack of light. In this case,
using a video light is recommended.
Advanced Features
Recording Yourself (Self Recording)
Rotate the lens body 180° so the LCD monitor faces the
same direction as the lens. This way you can record yourself
while watching yourself on the LCD monitor. Try recording
you and your friends together while holding the Digital
Recorder by hand or fixing it on a tripod.
Precautions:
• Do not rotate the lens body over the rotatable range.
• Do not rotate the lens body while the Self-timer is set.
1
2
Press the Shutter button to record the image on the
LCD monitor.
Note:
• Recording with the LCD monitor reversed slows down the
speed of the indicator’s appearance.
During a recording (see page 23 or 26), rotate the
lens body 180°.
• The LCD monitor screen displays a mirror image of
the subject.
Advanced Features
54
Advanced Features
2
Turning Off the Indicators
The following procedure allows you to turn off the indicators
on the LCD monitor.
Press ' or " to move the pointer to “DISPLAY”
(1) and then press \ or | to select “OFF” (2).
<MENU1/2>
1
REC.MODE
Note:
• You can perform this procedure in any mode.
OFF
BACKLIGHT
NORMAL
EXIT [MENU]
During a movie recording (see page 23), press the
MENU button to display <MENU 1/2>.
<MENU1/2>
2
<MENU1/2>
REC.MODE
MENU
REC.MODE
NORMAL
ON
BLC
BLC
OFF
BACKLIGHT
NORMAL
EXIT [MENU]
NORMAL
OFF
DISPLAY
DISPLAY
BACKLIGHT
Advanced Features
ON
BLC
Example:
• Setting during a movie recording.
1
NORMAL
DISPLAY
OFF
NORMAL
EXIT [MENU]
3
Press the MENU button to turn off the menu.
MENU
Notes:
• To display the indicators again, select “ON” in step 2 above.
• The following indicators do not disappear.
Mode indicators (“ ” “ ”)
Recording /Pause indicator (“
”“
”)
Time-Lapse mode indicator (“
”)
Zoom indicator and Volume indicator
In some conditions the Battery power indicator and the
warning indicators appear although the setting is “OFF”.
55
Advanced Features
2
To Turn the Beep Off
The following procedure lets you turn the beep off.
• The beep is turned off.
Note:
• You can perform this procedure in any mode.
<MENU2/2>
1
Example:
• Setting during a movie recording.
1
Press ' or " on the Operation button to move the
pointer to “BEEP” in <MENU 2/2> (1) and then
press \ or | to select “OFF” (2).
AUTO
W/B
During a movie recording (see page 23), press the
MENU button to display <MENU 1/2>.
TIME LAPSE
OFF
BEEP
ON
CLOCK SET
EXIT [MENU]
<MENU1/2>
MENU
REC.MODE
DISPLAY
NORMAL
2
ON
<MENU2/2>
OFF
BLC
BACKLIGHT
AUTO
W/B
NORMAL
EXIT [MENU]
TIME LAPSE
OFF
BEEP
OFF
Advanced Features
CLOCK SET
EXIT [MENU]
3
Press the MENU button to turn off the menu.
MENU
Note:
• To turn the beep on, select “ON” for the item “BEEP” in step 2.
56
Advanced Features
Plays back all the movies once in order of
recording.
REPEAT: Repeats the Continuous Playback.
ON:
Continuous Playback
This feature automatically plays back movies one after
another in the order that they were recorded.
Precaution:
• We recommend that you use the supplied AC adapter as the
power source for this function. See page 16.
3
Press the MENU button to turn off the menu.
• The Movie Index Playback mode screen appears.
1
Set the Movie Playback mode (see page 29), then
press the MENU button to display <MENU 1/2>.
MENU
<MENU1/2>
MENU
C-PLAY
OFF
SLOW PLAY
OFF
ON
DISPLAY
BACKLIGHT
NORMAL
Advanced Features
EXIT [MENU]
2
Press \ or | to select “ON”.
OK[SHUTTER]
Note:
• If you paused a playback before proceeding this procedure,
the operation in step 3 resumes the playback. To display the
Movie Index Playback mode screen in this case, press and
hold the MENU button for more than two seconds.
4
<MENU1/2>
‰‰1
Press ',",\ or | to select the desired movie to
start with.
C-PLAY
ON
SLOW PLAY
OFF
DISPLAY
ON
NORMAL
BACKLIGHT
EXIT [MENU]
ON
57
REPEAT
OFF
OK[SHUTTER]
‰‰3
Advanced Features
5
Press the Shutter button.
• The Playback starts with the selected movie and
continues in the recording order.
• After the Continuous Playback, the first scene of the
playback is displayed and pauses.
Continuous playback indicator
NORMAL
C-PLAY
‰‰3
‰:‰‰:‰5
Notes:
• You can skip or run the movie forwards or backwards (see
page 32) during Continuous Playback.
• The “ON” setting returns to “OFF” whenever the power is
turned off. The “REPEAT” setting, however, is retained.
To Cancel the Continuous Playback
Press the MENU button to display <MENU 1/2> and press \
or | to select “OFF” for the item “C-PLAY”.
OCT.27.2‰‰‰
1‰:31 AM
Advanced Features
• To pause, press the Shutter button. To resume
playback, press the Shutter again.
• To play back the previous movie, press \. A single
press starts the current movie from the beginning.
A double press plays the previous movie.
• To play back the next movie, press |.
58
Advanced Features
2
Dividing a Movie
You can divide a movie data. Use this function when you
want to cut unnecessary scene from a movie recorded at
random. Or divide a movie to sort it out into “chapters”.
• The EDIT mode screen appears.
1
Precaution:
• Movies should be long enough for division.
If not, the warning indicator “CAN’T DIVIDE” appears.
1
Press ' or " on the Operation button to move the
pointer to “EDIT” in <MENU 2/2> (1) and then
press | (2).
<MENU2/2>
EDIT
PROTECT
FORMAT
Set the Movie Playback mode (see page 29), then
press the MENU button to display <MENU 1/2>.
BEEP
ON
EXIT [MENU]
<MENU1/2>
MENU
C-PLAY
OFF
SLOW PLAY
OFF
DELETE
DISPLAY
ON
DIVIDE
DELETE ALL
BACKLIGHT
EDIT
NORMAL
EXIT [MENU]
Advanced Features
2
EXIT [MENU]
59
Advanced Features
3
Press ' or " to select “DIVIDE” (1) and then
press | (2).
5
• The EDIT Index mode screen appears with a “DIVIDE”
frame.
1
Press the Shutter button.
• The Digital Recorder plays back the selected movie.
‰:‰‰:‰5
DIVIDE
DELETE
DELETE ALL
OK
6
]
Press the Shutter button again at the desired scene
for division.
• Six sequential frames appear. They are the divisible
points of the scene.
DIVIDE
[SHUTTER]
EXIT [ MENU
EXIT [MENU]
OK[SHUTTER]
Press ',",\ or | to move the frame to the desired
movie.
Advanced Features
‰‰2
Note:
• To cancel the division, press the MENU button to return to the
“EDIT” mode screen.
4
DIVIDE
2
DIVIDE [SHUTTER]
CANCEL [ MENU
]
DIVIDE
OK[SHUTTER]
‰‰1
60
Advanced Features
7
Press \ or | to select the desired frame for division.
• The selected frame will be the first image of the new
movie.
DIVIDE [SHUTTER]
CANCEL [ MENU
8
]
Press the Shutter button.
• The EDIT mode screen appears again.
Advanced Features
EDIT
DELETE
DIVIDE
DELETE ALL
EXIT [MENU]
9
Press the MENU button twice to turn off the menu.
• The Movie Index Playback mode screen appears.
MENU
61
Notes:
• You can divide a movie at the specified points only.
For example, the LP mode movie, which has fewer frames,
should be more than one minute long for division. Select the
nearest frame to your desired scene in step 7.
• An alphabetical letter “A”, “B”, “C”... will automatically attach to
each file name of the divided movie (see page 65).
• If you want to playback the divided movies on your computer,
see page 66 and the online manual of the supplied software.
• If you protect the latter file of the divided movie, you cannot
divide the original movie again. The warning indicator “CAN’T
DIVIDE” appears.
• If the SmartMedia card’s capacity is insufficient to record the
divided movies, the warning indicator “CARD FULL” appears.
Delete unnecessary images from the card or replace the card
with new one.
Advanced Features
2
Auto Playback for Still Images
This function automatically plays back the still images every
five seconds in order of recording.
1
Press |.
• Playback starts in order of recording.
NORMAL
AUTO PLAY
1‰‰-‰‰‰1
Set the Still Playback mode (see page 39), then
press the MENU button to display <MENU 1/2>.
<MENU1/2>
MENU
AUTO PLAY
DISPLAY
BACKLIGHT
ON
NORMAL
DELETE
OCT.27.2‰‰‰
1‰:31 AM
• To pause, press the Shutter button. Pressing the
Shutter button again resumes the Auto playback.
Pause indicator
EXIT [MENU]
NORMAL
AUTO PLAY
1‰‰-‰‰‰3
OCT.27.2‰‰‰
1‰:31 AM • To cancel the Auto playback, press ', ", \ or |.
Note:
• The Auto play setting is canceled whenever the power is
turned off.
62
Advanced Features
Advanced Features
Darking the Backlight of the LCD
Monitor
2
Press ' or " on the Operation button to move the
pointer to “BACKLIGHT” (1) and then press | (2).
• The BACKLIGHT mode screen appears.
1
Darkening the backlight of the LCD monitor makes it
possible to conserve the power.
BACKLIGHT
Note:
• You can perform this procedure in any mode.
NORMAL
EXIT [MENU]
Example:
• Setting during a movie playback.
1
ON
DISPLAY
2
BACKLIGHT
Set the Movie Playback mode (see page 29), then
press the MENU button to display <MENU 1/2>.
NORMAL
<MENU1/2>
Advanced Features
MENU
EXIT [MENU]
C-PLAY
OFF
SLOW PLAY
OFF
DISPLAY
ON
BACKLIGHT
3
Press \ or | to select “P-SAVE”.
• The LCD monitor darkens.
NORMAL
EXIT [MENU]
BACKLIGHT
P-SAVE
EXIT [MENU]
4
Press the MENU button to turn off the backlight
setting screen.
• The Movie Index Playback mode screen appears.
63
Note:
• To return to “NORMAL”, select “NORMAL” in step 3.
Advanced Features
Formatting a SmartMedia Card
Example:
• Setting during a movie playback.
Formatting is necessary to the commercially available
SmartMedia (2 MB and 4 MB type) before its first use. The
supplied and commercially available SmartMedia (8 MB, 16
MB and 32 MB type) are already formatted so you can use it
as it is.
1
2
Reformat the card when :
• “READ ERROR” often appears while operating
any function.
• “NOT INITIALIZED” appears and you cannot use
the Digital Recorder.
• “FILE NO. FULL” appears and you cannot record
images.
Set the Movie Playback mode (see page 29), then
press the MENU button to display <MENU 1/2>.
MENU
<MENU1/2>
OFF
C-PLAY
3
Press ' or " on the Operation button to move the
pointer to “FORMAT” in <MENU 2/2> (1) and then
press | (2).
• The FORMAT mode screen appears.
1
<MENU2/2>
EDIT
PROTECT
FORMAT
Advanced Features
Precautions:
• USE THE DIGITAL RECORDER TO FORMAT A SMARTMEDIA
CARD. The Digital Recorder may not recognise the recorded
images on the card formatted by your computer.
• Formatting a SmartMedia card deletes all images on the card,
even if some or all of the images are protected. You should
always make backup copies of important images on other
media (e.g. floppy disks, computer hard disk).
• We recommend that you use the supplied AC adapter as the
power source for this function. See page 16.
• Do not open the battery compartment cover while the Digital
Recorder formats a SmartMedia card.
Notes:
• You cannot format a SmartMedia card which is physically
damaged. The warning indicator “CARD ERROR” appears.
• You can perform this procedure in the Movie and Still Playback
mode.
Load the SmartMedia (see page 17).
FORMAT ?
2
ALL DATA CLEARED
YES [SHUTTER]
NO
4
[ MENU
]
Press the Shutter button.
• The “NO FILE” warning indicator appears when the
formatting ends.
64
Importing Images into a Computer
Image Files in the SmartMedia Card
Importing Images into a Computer
The Digital Recorder creates folders on the SmartMedia card when formatting it. A recorded image is stored as a image file
with an automatically assigned file name. Movie image files are stored in the Dcmv folder and still image files in the Dcim
folder.
Dcmv ......................................... Movie image folder
Movs001.asf
Recorded in 1/4VGA mode.
Movf002.asf
Recorded in S-FINE mode.
Recorded in FINE mode.
Movl004.asf
Recorded in NORMAL mode.
Movm005a.asf
Recorded in LP mode.
Movm005b.asb
Created by dividing Movm005
file using the DIVIDE mode.
Movs007.asf
65
100sharp
Still image sub-folder
Serial number (100 to 999)
Movn003.asf
Movs006.asf
Dcim ............................................. Still image folder
Picf0001.jpg
Recorded in FINE mode.
Picf0002.jpg
Picn0003.jpg
Picf0004.jpg
Picn0005.jpg
Recorded in NORMAL
mode.
Importing Images into a Computer
A file name is made up of the following parts.
Movie image file
Still image file
Picf0001.jpg
Movs001.asf
Serial numbers : Assigned
automatically in order of recording.
For a file created by the DIVIDE mode,
an alphabetical letter follows.
Extension : Shows its file format.
.jpg ...... Created for still images recorded
by the Digital Recorder (in JPEG
file format).
Serial numbers : Assigned automatically
in order of recording.
Recording mode
f ........... Recorded in FINE mode.
n .......... Recorded in NORMAL mode.
Unchangeable header, “Pic” : Shows it is
a still image.
Recording mode
s .......... Recorded in 1/4VGA mode.
f ........... Recorded in S-FINE mode.
n .......... Recorded in FINE mode.
l ........... Recorded in NORMAL mode.
m ......... Recorded in LP mode.
Unchangeable header, “Mov” : Shows
it is a movie.
Note:
• Even if you delete one image (file) or more, the other files’ serial numbers do not change.
66
Importing Images into a Computer
Extension : Shows its file format.
.asf ...... Created for movies recorded by
the Digital Recorder (in ASF file
format).
.asb ..... Created by the DIVIDE mode.
To play back an image file
with this extension, convert it
to ASF format file. Please
refer to the online manual of
the supplied software for
details.
Importing Images into a Computer
Using a Floppy Disk Adapter
Importing Images into a Computer
Some computers require a commercially available floppy
disk adapter to read a SmartMedia card contents.
3
Insert a commercially available floppy disk adapter
into your computer’s 3.5˝ floppy disk drive slot.
Precaution:
• Also see the instructions that come with the floppy disk
adapter and the documentation attached to your computer for
the operations.
1
Remove the SmartMedia card from the Digital
Recorder (see page 17). Install the supplied driver
software for the floppy disk adapter on your
computer.
2
Insert the SmartMedia card into a floppy disk adapter
as shown below. Make sure to insert the correct end
of the card into the slot.
67
Notes:
• Note that you can write and delete images on the SmartMedia
card through a floppy disk adapter even if the write-protect
seal is attached on the card.
• Note that some of commercially available floppy disk adapters
are not compatible with a SmartMedia card of 16 MB or more.
Importing Images into a Computer
Using a PC Card Adapter
Some computers require a commercially available PC card
adapter to read a SmartMedia card contents.
3
Insert the PC card adapter into your computer’s PC
card slot.
To Remove the SmartMedia Card
Press the eject button on the PC card adapter to pull out the
SmartMedia card.
1
Remove the SmartMedia card from the Digital
Recorder (see page 17).
2
Insert the SmartMedia card into a PC card adapter
as shown below. Make sure to insert the correct end
of the card into the slot.
68
Importing Images into a Computer
Precautions:
• Note that some of commercially available PC card adapters
are not compatible with a SmartMedia card of 16 MB or more.
• Also see the instructions that come with the PC card adapter
and the documentation attached to your computer for the
operations.
• Remove the write-protect seal from the SmartMedia card
before inserting the card into the PC card adapter.
Importing Images into a Computer
Importing Images into a Computer
Transferring Image Data to Your
Computer
3
Load the SmartMedia card into a card slot of your
computer (see page 67 or page 68).
Use the supplied image transfer software, PixLab Integrated
Digital Media Software to transfer the images to your
computer. Refer to the operation manuals for your computer
and PixLab Integrated Digital Media Software for details of
installation and operations.
PC card adapter
Floppy disk adapter
4
Click the “PixLab Media Browser” icon to start up the
software.
5
Transfer the desired images to your computer
To Playback the Movies on Your Computer
1
Install the PixLab Integrated Digital Media Software
on your computer.
2
Turn on your computer, and start up Windows 95/98.
69
• To play back movies recorded by the Digital Recorder,
install the following softwares.
* Microsoft Windows Media Player (Ver.6.0 or later)
* A CODEC filter for movies and still images
• The both are not installed, install Windows Media Player and
PixLab Integrated Digital Media Software on the supplied
CD-ROM. Installing PixLab replaces a CODEC filter.
• When you send a movie file [ASF file format (see page 66)]
on E-mail, the addressee’s computer also requires the both
softwares above. If they are not installed, inform the
addressee that it can be obtain from the Microsoft’s
download site on Internet.
• Operating speed may slow down depending on computer
operating environment and processing capability.
References
Before Requesting Service
Before calling for service, please check the following troubleshooting table.
Symptom
Sudden power failure
Possible cause
Suggestion
• The specified batteries not loaded correctly. • Correctly load batteries (page 14).
• A formatted SmartMedia card not loaded
properly, or no card loaded.
• Load the SmartMedia card correctly (page 17).
• Dead batteries.
• Replace all four batteries with a set of new ones or
fully charged rechargeable batteries (page 14).
• (For using the supplied AC adapter) The
adapter not connected correctly, or wrong
AC adapter.
• Properly connect the adapter (page 16).
Use only the supplied AC adapter.
• The battery compartment cover not closed
securely.
• Make sure to close the cover.
References
Power source
No power
• Power is automatically turned off for saving • Slide the POWER switch again.
whenever you do not perform any operation
for about three minutes (Auto Power Off).
• Low battery power
• Replace all four batteries with a set of new ones or
fully charged rechargeable batteries (page 14).
• Use of manganese batteries
• Replace manganese batteries with alkaline, nickel
cadmium (Ni-Cd) rechargeable or nickel metal
hydride rechargeable batteries.
• The battery compartment cover not closed
securely.
• Make sure to close the cover.
70
References
Power source
Symptom
Power failure without
Battery power
indicator’s warning
Possible cause
• The Battery power indicator may not work
properly for nickel cadmium (Ni-Cd)
rechargeable batteries.
The CLOCK SET
• Occurs when turning on the Digital
Recorder without the built-in clock set.
mode screen appears.
• Set the date and time before the first use (page 18).
• Rotate the lens body toward CAMERA.
• Dead batteries.
• Replace the batteries with new ones or fully charged
rechargeable batteries (page 14).
• The MENU mode screen is displayed .
• Press the MENU button to turn off the menu.
• The SmartMedia card not loaded properly,
or no card loaded.
• Load the SmartMedia card correctly (page 17).
• Insufficient or full card capacity.
• Delete unnecessary images from the card (pages 33,
35, 41 and 43) or replace the card with new one
(page 17).
Cannot record soon
after pressing the
Shutter button.
• Self-timer mode is “ON”.
• Press the MENU button to cancel the Self-timer
recording.
Bright subject causes
vertical stripes.
• Occurs when recording subject with strong
contrast against background. Does not
indicate a malfunction.
Recording
References
———————
• The lens body mark aligned with PLAY .
Cannot record when
pressing the Shutter
button.
71
Suggestion
• Power is automatically turned off for saving • Slide the POWER switch again.
whenever you do not perform any operation
for about three minutes (Auto Power Off).
———————
References
Symptom
Playback
Cannot play back
Bad picture quality
Possible cause
• The lens body
PLAY .
mark not aligned with
Suggestion
• Rotate the lens body to align with PLAY .
• The Mode (MOVIE/STILL) select switch not
set securely.
• Securely set the Mode select switch (page 22).
• Dead batteries.
• Replace the batteries with new ones or fully charged
rechargeable batteries (page 14).
• The SmartMedia card not loaded properly,
or no card loaded.
• Correctly load the SmartMedia card (page 17).
• Occurs when recorded in the LP (Movie
• Change the resolution setting as you desired (see
Recording) or NORMAL (Still Recording)
pages 45 and 46).
mode which tends to lower quality to record
longer movie or larger number of still
images.
• Press ' on the operation button to turn the volume
up.
Cannot delete images. • The write-protect seal attached to the
SmartMedia card.
• Remove the write-protect seal (page 5).
Cannot format the
SmartMedia card.
• The images delete-protected.
• Unprotect the desired images (page 38).
• The write-protect seal attached to the
SmartMedia card.
• Remove the write-protect seal (page 5).
References
No sounds during the • The volume set in too low.
Movie playback mode.
Note:
• The Digital Recorder is equipped with a microprocessor. Its performance could be adversely affected by external electrical noise or
interference. If this should happen, turn off the power and disconnect the Digital Recorder from any power sources. Then reconnect
the power sources to resume operation.
72
References
Specifications
MPEG-4 Digital Recorer
References
Power requirement: DC 6 V
Power consumption: [Recording] 3.4 W
[Playback] 2.7 W
Record format/Image compression system: [Movie] MPEG-4/ASF
[Still]
JPEG base line conformance/JPEG (Exif 2.1)
Sound recording system: ADPCM, monaural, 8 kHz sampling
Pixel composition: [Movie] 160 × 120 pixels/320 × 240 pixels
[Still]
640 × 480 pixels (square dots)
Recording medium: SmartMedia card (SSFDC) (3.3 V) (2MB, 4MB, 8MB, 16MB, 32MB)
Photometry: TTL center-weighted average metering
Exposure control: Aperture-priority auto exposure
Pickup device: 1/4-inch square pixel color CCD image sensor (with approx. 350,000
pixels including optical black) progressive scanning
LCD Monitor: 1.8 inch color screen with approx. 61,000 pixels
Lens: Fixed focus with macro positon, F=3.4/8 f=3.8 mm
approx. 24˝ (60 cm) to ∞
Focus range: [Normal]
[Macro]
approx. 4˝ (10 cm)
White balance: Automatic tracking, manual switching (“OUTDOOR”/“INDOOR”)
Shutter speed: Auto variable
[Movie] 1/15 to 1/4000 second
[Still]
1/4 to 1/4000 second
Self-timer: 10 second
Microphone: Monaural nondirectivity
Speaker: φ20 mm 100 mW output (monaural)
Operating temprature: 0°C to +40°C (32°F to 104°F)
Storage temprature: –20°C to +60°C (–4°F to 140°F)
73
References
Operation humidity: 30% to 80% (with no dew formation)
Dimentions: 37/32˝ (W) × 317/32˝ (H)× 121/32˝ (D)
[81.4 mm (W) × 89.5 mm (H) × 42 mm (D)]
Weight: 0.33 lbs (148 g) [body only]/ 0.53 lb (240 g) [including a SmartMedia
card, four AA-size alkaline batteries and a hand strap]
AC Adapter (UADP-0243TAZZ)
AC 110-130 V/60 Hz
DC 6.0 V/700 mA
0˚C to +40˚C (32˚F to 104˚F)
–20°C to +60°C (–4°F to 140°F)
23/8˝ (W) × 33/8˝ (H) × 129/32˝ (D)
[60 mm (W) × 86 mm (H) × 49 mm (D)]
Weight (approx.): 1.08 lbs (490 g)
Power requirement:
DC output:
Operating temperature:
Storage temprature:
Dimensions (approx.):
Supplied SmartMedia™ Card
4MB
NAND flash EEP-ROM
3.3 V
0°C to +40°C (32˚F to 104˚F)
–20°C to +60°C (–4°F to 140°F)
References
Memory capacity:
Memory type:
Power requirement:
Operating temprature:
Storage temprature:
Specifications are subject to change without notice.
SERVICE INFORMATION (For the U.S.)
For the location of the nearest Sharp Authorized Service, or to obtain product literature, accessories, supplies or customer
assistance, please call 1-800-BE SHARP (1-800-237-4277) or visit SHARP’s web site (http://www.sharp-usa.com).
Operational Support
If you have read the operation manual but are still having difficulty using your unit, you can call a SHARP Representative
at: 630-378-3590
74
Guía de operación rápida en español
Instalación y remoción de las pilas
Para suministrar energía a la Grabadora Digital, use pilas
tamaño AA (alcalinas, pilas recargables de níquel-cadmio
(Ni-Cd) o pilas recargables de hidruro de níquel-metal).
4
Para cerrar la tapa del compartimiento de las pilas
(1), presione la tapa (2) y deslícela en la
dirección de la flecha (3) hasta escuchar un “clic”.
Precaución:
• No use distintos tipos de pilas conjuntamente.
1
Instalación de las pilas
1
Asegúrese de que la Grabadora Digital esté
apagada.
2
Deslice la tapa del compartimiento de las pilas (1)
en la dirección de la flecha (2) para abrirla.
2
3
Nota:
• Presione y deslice la tapa del compartimiento de las pilas
hasta que quede debidamente cerrada; de lo contrario, las
pilas abrirán la tapa.
Remoción de las pilas
Retire las pilas en el paso 3 antes descrito.
2
3
75
1
Instale las pilas, asegurándose de que sus polos
positivo ( ) y negativo ( ) queden como se indica
a continuación.
Tiempo máximo para grabación continua
La tabla de abajo indica el tiempo aproximado de duración de
las pilas cuando la Grabadora Digital graba continuamente
una película a temperatura normal (25°C (77°F)).
Tipo de pila
Tiempo de
grabación continua
Pilas alcalinas tamaño AA (pilas
incluidas)
60 min.
Pilas recargables de hidruro de
níquel-metal tamaño AA (1450
mAh)
100 min.
Guía de operación rápida en español
Instalación y remoción de una tarjeta
SmartMedia
4
Para cerrar la tapa del compartimiento de las pilas
(1), presione la tapa (2) y deslícela en la dirección
de la flecha (3) hasta escuchar un “clic”.
Esta Grabadora Digital utiliza una tarjeta SmartMedia para
la memoria. La tarjeta retendrá las imágenes grabadas
incluso si las pilas se agotan o si el suministro de energía se
interrumpe.
2
Instalación de una tarjeta SmartMedia
1
2
Asegúrese de que la Grabadora Digital esté
apagada.
Deslice la tapa del compartimiento de las pilas (1)
en la dirección de la flecha (2) para abrirla.
1
3
Nota:
• Presione y deslice la tapa del compartimiento de las pilas
hasta que quede debidamente cerrada; de lo contrario, las
pilas abrirán la tapa.
Remoción de la tarjeta SmartMedia
Retire la tarjeta SmartMedia en el paso 3 antes descrito.
2
3
1
Inserte la tarjeta SmartMedia en la dirección de la
flecha, y empújela hasta que tope.
• Asegúrese de que el área de contacto quede de cara
hacia arriba y de insertar en la ranura el extremo con
la esquina que tiene una muesca.
Notas:
• Tenga cuidado de no dejar caer las pilas al abrir la tapa del
compartimiento de las pilas.
• No utilice una tarjeta SmartMedia de 5 V. Use la tarjeta
SmartMedia proporcionada o una equivalente disponible en el
comercio, del tipo 3,3 V.
Área de contacto
Esquina muescada
76
Guía de operación rápida en español
2
Grabación de películas
Usted puede grabar objetos en movimiento con sonido.
Antes de iniciar la grabación, consulte las páginas 75 y 76
para preparar la Grabadora Digital.
Indicador de modo MOVIE (película)
NORMAL
Precaución:
• No intente grabar imágenes cuando la carga de las pilas sea
baja. Esto puede causar mal funcionamiento.
1
Deslice el interruptor POWER (encendido) (1),
ajuste el interruptor selector de modo a la posición
MOVIE (película) (2), y luego gire el cuerpo del
objetivo hacia CAMERA (cámara) (3).
Ajuste el ángulo del cuerpo del objetivo para
componer la imagen en el monitor LCD.
LAP ‰:‰‰:‰‰
REM ‰:‰1:15
OCT.27.2‰‰‰
1‰:31 AM
3
Presione el botón del obturador para iniciar la grabación.
Tiempo de grabación
3
NORMAL
LAP ‰:‰‰:‰1
REM ‰:‰1:14
PLAY
POWER
MOVIE
STILL
CAME
RA
1
2
Nota:
• Si el indicador de advertencia “NOT INITIALIZED” (no
designada por las iniciales) aparece, formatee la tarjeta
SmartMedia con la Grabadora Digital.
77
Tiempo restante
Notas:
• La Grabadora Digital selecciona automáticamente la velocidad
de obturación correcta según las condiciones de iluminación.
Tenga presente que una velocidad de obturación baja
seleccionada para condiciones de baja iluminación puede
producir imágenes ligeramente movidas. En este caso, la
imagen que aparece en el monitor LCD también es afectada.
• El uso de la Grabadora Digital con luces fluorescentes, lámparas
de mercurio o lámparas de vapor de sodio causa parpadeo en
las imágenes grabadas. Asimismo, algunas veces este tipo de
iluminación también puede afectar el tinte de las imágenes.
• El modo de grabación de películas viene ajustado de
fábrica a NORMAL. Si desea grabar películas con una
mejor calidad de imagen o por períodos prolongados,
cambie el ajuste de resolución seleccionando uno de los
cinco modos disponibles.
Guía de operación rápida en español
Cómo finalizar la grabación de una película
Vuelva a presionar el botón del obturador.
• El indicador de tiempo de grabación “LAP” volverá a
indicar 0:00:00.
NORMAL
LAP ‰:‰‰:‰‰
REM ‰:‰1:‰2
Desconexión automática
La Grabadora Digital se apaga automáticamente para
ahorrar la energía de las pilas cada vez que transcurren
aproximadamente tres minutos sin que usted realice una
operación. Para encender la grabadora, vuelva a deslizar el
interruptor POWER (encendido).
78
Guía de operación rápida en español
3
Grabación de imágenes estáticas
Usted puede grabar imágenes estáticas con un
procedimiento similar al de las cámaras que utilizan
película. Antes de iniciar la grabación, consulte las páginas
75 y 76 para preparar la Grabadora Digital.
Precaución:
• No intente grabar imágenes cuando la carga de las pilas sea
baja. Esto puede causar mal funcionamiento.
1
Deslice el interruptor POWER (encendido) (1),
ajuste el interruptor selector de modo a la posición
STILL (imagen estática) (2), y luego gire el cuerpo
del objetivo hacia CAMERA (cámara) (3).
3
PLAY
POWER
MOVIE
STILL
CAME
RA
1
2
2
Ajuste el ángulo del cuerpo del objetivo para
componer la imagen en el monitor LCD.
Indicador de modo STILL (imagen estática)
79
NORMAL
OCT.27.2‰‰‰
1‰:31 AM
REM 18
Presione el botón del obturador para iniciar la
grabación.
Número de cuántas quedan
NORMAL
OCT.27.2‰‰‰
1‰:31 AM
REM 17
Notas:
• Si el indicador de advertencia “NOT INITIALIZED” (no
designada por las iniciales) aparece, formatee la tarjeta
SmartMedia con la Grabadora Digital.
• La Grabadora Digital selecciona automáticamente la
velocidad de obturación correcta según las condiciones de
iluminación. Tenga presente que una velocidad de obturación
baja seleccionada para condiciones de baja iluminación
puede producir imágenes ligeramente movidas. En este caso,
la imagen que aparece en el monitor LCD también es
afectada.
• El uso de la Grabadora Digital con luces fluorescentes,
lámparas de mercurio o lámparas de vapor de sodio causa
parpadeo en las imágenes grabadas. Asimismo, algunas
veces este tipo de iluminación también puede afectar el tinte
de las imágenes.
• El modo de grabación de imágenes estáticas viene
ajustado de fábrica a NORMAL. Si desea grabar imágenes
estáticas con una mejor calidad de imagen, cambie el
modo a FINE (fino).
Guía de operación rápida en español
2
Reproducción de películas
El monitor LCD le permite reproducir lo que acaba de
grabar. Usted también puede escuchar el sonido a través
del altavoz incorporado.
1
Deslice el interruptor POWER (encendido) (1),
ajuste el interruptor selector de modo a la posición
MOVIE (película) (2), y luego gire el cuerpo del
objetivo hacia PLAY (reproducción) (3).
• Las primeras escenas de la película aparecerán en
formato de miniatura (imágenes de tamaño reducido)
en el modo de Reproducción de Índices de Película.
3
PLAY
PLAY
CAMERA
MENU
CAME
RA
OK[SHUTTER]
‰‰1
POWER
1
MOVIE
STILL
2
OK[SHUTTER]
‰‰5
Número de la película
Nota:
• Si ha grabado más de nueve películas, habrá otras páginas
antes y después de la página actual.
Para retroceder a la página anterior, presione '.
Para avanzar a la siguiente página, presione ".
3
Presione la parte \ o | del botón de operación para
cambiar de cuadro hasta encontrar la imagen
deseada.
Indicador de mode MOVIE (película)
Presione el botón del obturador para reproducir la
película seleccionada a tamaño natural.
Número de la película
NORMAL
OCT.27.2‰‰‰
1‰:31 AM
‰‰3
‰‰5
‰:‰‰:‰2
Tiempo de reproducción
transcurrido
80
Guía de operación rápida en español
Notas:
• Para volver a la primera escena de la película actual, presione
\ una vez. Si presiona \ dos veces, la película anterior
comenzará a ser reproducida. Si no hay ninguna película
anterior a la actual, la película que tenga el último número
comenzará a ser reproducida.
• Presione | para reproducir la siguiente película.
Si no hay ninguna película posterior a la actual, la película que
tenga el primer número comenzará a ser reproducida.
Reproducción de imágenes estáticas
Usando el monitor LCD, usted podrá ver las imágenes
estáticas tan pronto como termine de grabarlas.
1
Deslice el interruptor POWER (encendido) (1),
ajuste el interruptor selector de modo a la posición
STILL (imagen estática) (2), y luego gire el cuerpo
del objetivo hacia PLAY (reproducción) (3).
• Las imágenes estáticas aparecerán en formato de
miniatura (imágenes de tamaño reducido) en el modo
de Reproducción de Índices de Imágenes Estáticas.
Cómo hacer una pausa en la reproducción de una
película
Presione el botón del obturador. Para reanudar la
reproducción, vuelva a presionar el botón del obturador.
Indicador de pausa
3
PLAY
PLAY
NORMAL
‰‰5
‰:‰‰:1‰
CAMERA
MENU
OK[SHUTTER]
Cómo volver al modo de Reproducción de Índices
de Película
Presione el botón MENU (menú) y manténgalo presionado
hasta que aparezca la pantalla de modo de Reproducción
de Índices de Película.
81
RA
MENU
CAME
1‰‰-‰‰‰1
POWER
1
MOVIE
2
STILL
Guía de operación rápida en español
2
Presione la parte \ o | del botón de operación para
cambiar de cuadro hasta encontrar la imagen
deseada.
Indicador de mode STILL (imagen estática)
Cómo volver al modo de Reproducción de Índices
de Imágenes Estáticas
Presione el botón MENU (menú) y manténgalo presionado
hasta que aparezca la pantalla de modo de Reproducción
de Índices de Imágenes Estáticas.
MENU
OK[SHUTTER]
1‰‰-‰‰‰2
Número de la imagen estática
Nota:
• Si ha grabado más de nueve imágenes estáticas, habrá otras
páginas antes y después de la página actual.
Para retroceder a la página anterior, presione '.
Para avanzar a la siguiente página, presione ".
3
Presione el botón del obturador para reproducir la
imagen estática seleccionada a tamaño natural.
Número de la imagen estática
NORMAL
OCT.27.2‰‰‰
1‰:31 AM
1‰‰-‰‰‰1
1‰‰-‰‰‰2
Notas:
• Presione \ para reproducir la imagen anterior.
• Presione | para reproducir la siguiente imagen.
82
Valid for warranty service in the U.S. only
CONSUMER LIMITED WARRANTY
SHARP ELECTRONICS CORPORATION warrants to the first consumer purchaser that this Sharp brand product (the “Product”), when shipped in its original container,
will be free from defective workmanship and materials, and agrees that it will, at its option, either repair the defect or replace the defective Product or part thereof with a
new or remanufactured equivalent at no charge to the purchaser for parts or labor for the period(s) set forth below.
This warranty does not apply to any appearance items of the Product nor to the additional excluded item(s) set forth below nor to any Product the exterior of which has
been damaged or defaced, which has been subjected to improper voltage or other misuse, abnormal service or handling, or which has been altered or modified in
design or construction.
In order to enforce the rights under this limited warranty, the purchaser should follow the steps set forth below and provide proof of purchase to the servicer.
The limited warranty described herein is in addition to whatever implied warranties may be granted to purchasers by law. ALL IMPLIED WARRANTIES INCLUDING THE
WARRANTIES OF MERCHANTABILITY AND FITNESS FOR USE ARE LIMITED TO THE PERIOD(S) FROM THE DATE OF PURCHASE SET FORTH BELOW. Some states do
not allow limitations on how long an implied warranty lasts, so the above limitation may not apply to you.
Neither the sales personnel of the seller nor any other person is authorized to make any warranties other than those described herein, or to extend the duration of any
warranties beyond the time period described herein on behalf of Sharp.
The warranties described herein shall be the sole and exclusive warranties granted by Sharp and shall be the sole and exclusive remedy available to the purchaser.
Correction of defects, in the manner and for the period of time described herein, shall constitute complete fulfillment of all liabilities and responsibilities of Sharp to the
purchaser with respect to the Product, and shall constitute full satisfaction of all claims, whether based on contract, negligence, strict liability or otherwise. In no event
shall Sharp be liable, or in any way responsible, for any damages or defects in the Product which were caused by repairs or attempted repairs performed by anyone
other than an authorized servicer. Nor shall Sharp be liable or in any way responsible for any incidental or consequential economic or property damage. Some states do
not allow the exclusion of incidental or consequential damages, so the above exclusion may not apply to you.
THIS WARRANTY GIVES YOU SPECIFIC LEGAL RIGHTS. YOU MAY ALSO HAVE OTHER RIGHTS WHICH VARY FROM STATE TO STATE.
Model Specific Section
Your Product Model Number & Description:
VN-EZ1U MPEG-4 Digital Recorder including SmartMedia™, CD-ROM, VR-1FPN and AC Adapter
(Be sure to have this information available when you need service for your Product.)
Warranty Period for this Product:
One (1) year parts and ninety (90) days labor from date of purchase.
Additional Item(s) Excluded
from Warranty Coverage (if any):
What to do to Obtain Service:
Disk media supplied with this Product is warranted for replacement only and limited to ninety (90) days from date of
purchase. Non-rechargeable batteries are excluded from warranty coverage.
Call Sharp Electronics Corporation toll free at 1-800-BE-SHARP for instructions and the location of the nearest Servicer.
Proof of Purchase will be required.
TO OBTAIN SUPPLY, ACCESSORY OR PRODUCT INFORMATION, GO TO OUR WEBSITE AT www.sharp-usa.com OR CALL 1-800-BE-SHARP
SHARP ELECTRONICS CORPORATION
Sharp Plaza, Mahwah, New Jersey 07430-2135
SHARP CORPORATION
Osaka, Japan
Printed in Japan
TINSE0345TAZZ
T2210-A
9P06-JWM