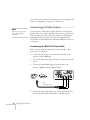
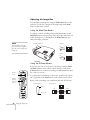
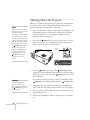
1
EPSON PowerLite 50c/70c
Multimedia Projector
®
®
User’sGuide
Important Safety Information
WARNING: Never look into the projector lens when the lamp is turned on; the bright light can damage your eyes.
Never let children look into the lens when it is on. Never open any cover on the projector, except the lamp and
filter covers. Dangerous electrical voltages inside the projector can severely injure you. Except as specifically
explained in this User’s Guide, do not attempt to service this product yourself. Refer all servicing to qualified service
personnel.
WARNING: The projector and its accessories come packaged in plastic bags. Keep plastic bags away from small
children to avoid any risk of suffocation.
Caution: When you replace the lamp, never touch the new lamp with your bare hands; the invisible residue left by
the oil on your hands may shorten the lamp life. Use a cloth or glove to handle the new lamp.
Copyright Notice
All rights reserved. No part of this publication may be reproduced, stored in a retrieval system, or transmitted in
any form or by any means, electronic, mechanical, photocopying, recording, or otherwise, without the prior
written permission of SEIKO EPSON CORPORATION. The information contained herein is designed only for
use with this EPSON product. EPSON is not responsible for any use of this information as applied to other
products.
Neither SEIKO EPSON CORPORATION nor its affiliates shall be liable to the purchaser of this product or third
parties for damages, losses, costs, or expenses incurred by purchaser or third parties as a result of: accident, misuse,
or abuse of this product or unauthorized modifications, repairs, or alterations to this product, or (excluding the
U.S.) failure to strictly comply with SEIKO EPSON CORPORATION’s operating and maintenance instructions.
SEIKO EPSON CORPORATION shall not be liable for any damages or problems arising from the use of any
options or any consumable products other than those designated as Original EPSON Products or EPSON
Approved Products by SEIKO EPSON CORPORATION.
EPSON is a registered trademark of SEIKO EPSON CORPORATION.
PowerLite and Presenters Club are registered trademarks; EPSON Store and SizeWise are trademarks; and
EPSON PrivateLine and Extra Care are service marks of Epson America, Inc.
General Notice: Other product names used herein are for identification purposes only and may be trademarks of
their respective owners. EPSON disclaims any and all rights in those marks.
Copyright © 2001 by Epson America, Inc.
ii
CPD-11578
01/01
Contents
Welcome
1Setting Up
the Projector
2Using the
Projector
Using Your Documentation . . . . . . . . . . . . . . . . . . . . . . . . . . 2
Reading This Manual Online. . . . . . . . . . . . . . . . . . . . . . 2
Getting More Information . . . . . . . . . . . . . . . . . . . . . . . . 3
Registration and Warranty . . . . . . . . . . . . . . . . . . . . . . . . . . . 4
Unpacking the Projector. . . . . . . . . . . . . . . . . . . . . . . . . . . . . 5
Additional Components. . . . . . . . . . . . . . . . . . . . . . . . . . 6
Optional Accessories . . . . . . . . . . . . . . . . . . . . . . . . . . . . 6
Positioning the Projector . . . . . . . . . . . . . . . . . . . . . . . . . . . . 7
Choosing Your Connections. . . . . . . . . . . . . . . . . . . . . . . . . . 9
Connecting to a Computer. . . . . . . . . . . . . . . . . . . . . . . . . . 10
Connecting to a PC Laptop . . . . . . . . . . . . . . . . . . . . . . 10
Connecting to a PC Desktop Computer . . . . . . . . . . . . 12
Connecting to a PowerBook . . . . . . . . . . . . . . . . . . . . . 14
Connecting to a Macintosh Desktop Computer. . . . . . . 16
Connecting to Video Sources . . . . . . . . . . . . . . . . . . . . . . . . 18
Connecting the RCA A/V Video Cable . . . . . . . . . . . . . 18
Connecting an S-Video Cable . . . . . . . . . . . . . . . . . . . . 19
Connecting a Component Video Cable . . . . . . . . . . . . . 19
Connecting to External Speakers or a PA System . . . . . . . . . 21
Turning On Your Equipment. . . . . . . . . . . . . . . . . . . . . . . . 23
What To Do If You See a Blank Screen . . . . . . . . . . . . . 25
Adjusting Your Image. . . . . . . . . . . . . . . . . . . . . . . . . . . . . . 27
Focusing Your Image . . . . . . . . . . . . . . . . . . . . . . . . . . . 27
Adjusting the Image Size . . . . . . . . . . . . . . . . . . . . . . . . 28
Adjusting the Image Height . . . . . . . . . . . . . . . . . . . . . . 29
Adjusting the Image Shape. . . . . . . . . . . . . . . . . . . . . . . 30
Adjusting the Image Quality . . . . . . . . . . . . . . . . . . . . . 30
Contents iii
Using the Remote Control . . . . . . . . . . . . . . . . . . . . . . . . . . 31
Installing the Remote Control Batteries . . . . . . . . . . . . . 31
Operating the Projector with the Remote Control . . . . . 32
Using the Remote Control as a Wireless Mouse . . . . . . 32
Controlling Audio and Video . . . . . . . . . . . . . . . . . . . . . . . . 33
Switching Between Picture Sources . . . . . . . . . . . . . . . . 33
Freezing the Picture . . . . . . . . . . . . . . . . . . . . . . . . . . . . 34
Turning Off the Picture and Sound . . . . . . . . . . . . . . . . 34
Adjusting Sound Volume. . . . . . . . . . . . . . . . . . . . . . . . 34
Highlighting Your Presentation . . . . . . . . . . . . . . . . . . . . . . 35
Using the Cursor/Stamp Arrow . . . . . . . . . . . . . . . . . . . 35
Drawing a Horizontal Bar . . . . . . . . . . . . . . . . . . . . . . . 35
Shutting Down the Projector . . . . . . . . . . . . . . . . . . . . . . . . 36
3theFine-Tuning
Projector
4and
Maintaining
Transporting
the Projector
5Problems
Solving
iv
Contents
Using the Menus . . . . . . . . . . . . . . . . . . . . . . . . . . . . . . . . . 37
Changing Menu Settings . . . . . . . . . . . . . . . . . . . . . . . . 38
Adjusting the Image . . . . . . . . . . . . . . . . . . . . . . . . . . . . . . . 39
Adjusting the Sound. . . . . . . . . . . . . . . . . . . . . . . . . . . . . . . 41
Customizing the Highlighting Tools . . . . . . . . . . . . . . . . . . 41
Customizing Projector Features . . . . . . . . . . . . . . . . . . . . . . 42
Viewing Projector Information. . . . . . . . . . . . . . . . . . . . . . . 43
Restoring the Default Settings . . . . . . . . . . . . . . . . . . . . . . . 44
Cleaning the Lens . . . . . . . . . . . . . . . . . . . . . . . . . . . . . . . . 46
Cleaning the Projector Case . . . . . . . . . . . . . . . . . . . . . . . . . 46
Cleaning the Air Intake Vent . . . . . . . . . . . . . . . . . . . . . . . . 47
Replacing the Lamp . . . . . . . . . . . . . . . . . . . . . . . . . . . . . . . 48
Transporting the Projector . . . . . . . . . . . . . . . . . . . . . . . . . . 50
Using the On-Screen Help . . . . . . . . . . . . . . . . . . . . . . . . . 51
Checking the Projector’s Lights . . . . . . . . . . . . . . . . . . . . . . 53
Image or Sound Problems . . . . . . . . . . . . . . . . . . . . . . . . . . 54
Problems with the Remote Control . . . . . . . . . . . . . . . . . . . 57
Where To Get Help . . . . . . . . . . . . . . . . . . . . . . . . . . . . . . . 58
6Specifications
Technical
7Notices
General . . . . . . . . . . . . . . . . . . . . . . . . . . . . . . . . . . . . . . . .
Projection Lamp . . . . . . . . . . . . . . . . . . . . . . . . . . . . . . . . .
Remote Control . . . . . . . . . . . . . . . . . . . . . . . . . . . . . . . . . .
Mouse Compatibility . . . . . . . . . . . . . . . . . . . . . . . . . . . . . .
Dimensions . . . . . . . . . . . . . . . . . . . . . . . . . . . . . . . . . . . . .
Electrical . . . . . . . . . . . . . . . . . . . . . . . . . . . . . . . . . . . . . . .
Environmental . . . . . . . . . . . . . . . . . . . . . . . . . . . . . . . . . . .
Safety . . . . . . . . . . . . . . . . . . . . . . . . . . . . . . . . . . . . . . . . . .
Computer Connector Pin Assignments . . . . . . . . . . . . . . . .
Compatible Video Formats . . . . . . . . . . . . . . . . . . . . . . . . .
59
60
60
60
60
60
60
61
61
62
Important Safety Instructions. . . . . . . . . . . . . . . . . . . . . . . .
Remote Control Information . . . . . . . . . . . . . . . . . . . . . . . .
Declaration of Conformity. . . . . . . . . . . . . . . . . . . . . . . . . .
FCC Compliance Statement . . . . . . . . . . . . . . . . . . . . . . . .
65
67
68
69
Index
Contents v
W
Welcome
Your EPSON® PowerLite® 50c or PowerLite 70c is a small,
lightweight, affordable projector offering powerful 3-LCD
performance and easy-to-use controls. Your projector weighs less than
7 pounds and displays full-color images at a resolution of up to
800 × 600 pixels (EPSON PowerLite 50c) or 1024 × 768 pixels
(EPSON PowerLite 70c).
Producing up to 700 ANSI lumens (EPSON PowerLite 70c) or
1000 ANSI lumens (EPSON PowerLite 50c), your projector creates
bright images that can be easily seen in rooms light enough to take
notes.
You can connect it simultaneously to two image sources: a computer
and a video device, such as a VCR, DVD player, laser disc player,
camcorder, or digital camera. You can also connect audio for each
image source.
You can operate your projector through a hand-held remote control,
with buttons for zooming in on your image, adjusting volume, and
accessing all the projector’s features. You can also use the remote
control as a wireless mouse, and run your presentation as you move
around the room.
EPSON’s SizeWise™ technology supports a range of computer
outputs, for a full-size image from just about any notebook PC or
PowerBook.® If you use a VCR or other video source, the projector
automatically senses the video format, so you can use it with
confidence no matter where in the world you travel.
The EPSON® PrivateLineSM Technical Support program will get you
help when you need it. A special 800 number and your own PIN will
connect you with a projector support specialist—fast.
Welcome 1
Using Your Documentation
To connect the projector to your laptop and get your presentation
running fast, see the Quick Setup sheet that came in your Owner’s Kit.
warning
caution
note
This book contains all the information you need to set up and use
your projector. Please follow these guidelines as you read through it:
■
Warnings must be followed carefully to avoid bodily injury.
■
Cautions must be observed to avoid damage to your equipment.
■
Notes contain important information about your projector.
Reading This Manual Online
Your EPSON PowerLite CD-ROM includes an electronic copy of
this manual. You may find it convenient to copy it onto your laptop’s
hard drive so it’s always with you—for example, when taking your
presentation on the road.
note
If you do not have Acrobat
Reader, you can install it
from the CD-ROM.
To view your electronic manual, you need to use Adobe® Acrobat®
Reader. Just insert the CD-ROM in your drive, select the
Install/View User’s Guide button and click Install User’s Guide or
View User’s Guide.
When you open the manual, you see this toolbar:
show navigation
pane
first page
previous page
last page
next page
You have several ways to navigate through the manual:
2
Welcome
■
Click in the table of contents on the left side of the screen to move
quickly to the topic of your choice.
■
Use the arrow buttons in the toolbar or on the vertical scroll bar
on the right side of the screen to move through the manual.
■
If you hold your mouse pointer over text and the hand changes to
an index finger, you can click to jump to a related topic.
For more information, see your Acrobat Reader online guide.
Getting More Information
Need more tips on giving presentations? How about quick steps for
setting up your projector? Here’s where you can look for help:
■
www.presentersonline.com
Includes a library of articles covering presentation tips, tricks, and
technology. The site provides templates, clip art and sound clips,
as well as Presenters Services to use on the road. Even more
resources and services are available if you register to join the
Presenters Club®—and it’s free.
■
Quick Setup sheet
Gives you all the instructions you need to get your projector set
up and connected to a laptop or PowerBook computer.
■
Owner’s Kit
Includes your Quick Setup sheet, warranty brochures, CD-ROMs,
and EPSON PrivateLine Support card. Store this User’s Guide in
the folder and keep the folder with your projector at all times.
■
Built-in help system
Provides assistance for common problems. Available from the
Help button on the projector or the remote control. See page 51
for details.
■
support.epson.com
Download FAQs and e-mail your questions to EPSON support.
■
CD-ROMs
note
Your Owner’s Kit includes the EPSON PowerLite CD-ROM that
lets you register electronically, and includes the electronic copy of
this book as well as a link to Presenters Online.
You don’t need to install any
software to use your projector.
Welcome 3
If you still need help after checking this User’s Guide and the sources
listed above, you can use the EPSON PrivateLine Support service to
get help fast. Call (800) 637-7661 and enter the PIN on the card in
your Owner’s Kit. Or take advantage of EPSON’s automated support
services 24 hours a day. See page 58 for more information.
Registration and Warranty
Your projector comes with a basic carry-in warranty as well as an
international warranty that let you project with confidence anywhere
in the world. For details, see the warranty brochures included in your
Owner’s Kit.
In addition, for customers who register their projector, EPSON offers
free Extra Care SM Road Service. In the unlikely event of an equipment
failure, you won’t have to wait for your unit to be repaired. Instead,
EPSON will ship you a replacement unit anywhere in the United
States or Canada, usually via overnight delivery. See the brochure in
your Owner’s Kit for details.
To register, simply insert the EPSON PowerLite CD-ROM that came
with your projector and select Register Online. Registering also lets
you receive special updates on new accessories, products, and services.
You can register through the Internet, by e-mail or 800-number
modem connection, or by printing out the form to fax or mail.
4
Welcome
1
Setting Up the Projector
This chapter tells you how to unpack your projector and set it up for a
presentation. The projector must be connected to a computer or a
video source such as a DVD player, VCR, camcorder, digital camera,
or other video device before it can project images.
To set up the projector, you need to:
■
Unpack and position the projector
■
Connect the projector to one or more input sources
Unpacking the Projector
Make sure you have all the parts shown:
remote control
projector with lens cover
note
You won’t need all these
components; your
configuration will determine
which ones you need.
PS/2 mouse
cable
batteries
USB mouse
cable
power cord
computer
cable
CD-ROM (not
needed to use
the projector)
A/V cable
Soft carrying case
Save all packaging in case you need to ship the projector. Always use
the original packaging (or the equivalent) when you need to send the
projector to another location. If you are moving the projector by
hand, use a carrying case (either an EPSON case or something similar,
such as a laptop case). See page 50 for transportation instructions.
Setting Up the Projector 5
Additional Components
Depending on how you use the projector, you may need these
additional components:
■
To receive an S-Video signal, you need an S-Video cable (usually
provided with your video device).
■
Older iMac™ systems may need a special adapter to provide a
VGA output port; see your computer dealer.
■
To project HDTV images, you’ll need an HDTV cable, available
from most electronics dealers.
■
To receive an audio signal, you’ll need a stereo mini-jack cable,
available from most electronics dealers.
Optional Accessories
To enhance your use of the projector, EPSON provides the following
optional accessories:
6
Setting Up the Projector
Product
Product number
Customized carrying cases:
ATA molded hard shell carrying case
ATA shipping case
Samsonite® wheeled soft case
Notebook/Projector soft shoulder bag
ELPKS36
ELPKS37
ELPKS35
ELPKS13
Replacement lamp
ELPLP13
Ceiling mount
ELPMB35
Projection screens:
50-inch portable screen
60-inch Insta Theatre screen
80-inch Insta Theatre screen
ELPSC06
ELPSC07
ELPSC08
Component video cable
ELPKC19
Macintosh adapter set
ELPAP01
Kensington security lock
ELPSL01
Presentation audio system
ELPPAS1
Wireless microphone system
ELPCVS1
You can purchase these accessories from your dealer, or by calling
EPSON at (800) 873-7766, or by visiting the EPSON Store™ at
www.epsonstore.com (U.S. sales only). In Canada, please call
(800) 873-7766 for dealer referral.
Positioning the Projector
The location in which you choose to set up your projector depends on
the size of the room and your presentation style.
■
Place the projector on a sturdy, level surface, within this distance
from the screen:
3.3 to 36 feet in Wide mode
3.9 to 43.2 feet in Tele mode
(see page 28 for more information on these modes)
■
Make sure there is plenty of space for ventilation around and
under the projector.
■
Make sure the projector is within 6 feet of a grounded electrical
outlet or extension cord, and within 5 feet of your computer
and/or video source.
■
Place the projector directly in front of the center of the screen,
facing it toward the screen squarely. Otherwise, your image will
not be square.
note
It’s best to position the screen
directly in front of the room.
If it’s placed diagonally in a
corner, it’s much more
difficult to aim the projector
at the screen correctly and get
a square image.
Most presenters find it convenient to place the screen in the front of
the room with the projector back near the front of the audience,
leaving ample room between the screen and projector to get a
good-sized image. Then the presenter can stand in front of the room,
facing the audience and control the equipment from there.
Setting Up the Projector 7
Use the figure below as a guideline to help you determine how far
from the screen to place the projector. Your image size may not exactly
match these sizes; its actual size depends on whether you have adjusted
the image size setting (using keystone correction or the Wide/Tele
button).
40 ft.
8 ft.
4 ft.
distance from the
screen
When projecting from a table, the ideal arrangement is to set the
projector flat on its surface with the base of the lens at about the level
of the bottom of the screen. This delivers the best-looking picture.
If you have to raise the projector by adjusting its feet (described on
page 29), you’ll need to square-up the sides of image by pressing the
Keystone button (see page 30).
If you’ll be projecting from overhead, you’ll get the best-looking
picture by mounting the projector upside-down, parallel to the
ceiling, with the bottom of the lens level with the top of the screen.
(You’ll also need to select ceiling projection mode in the projector’s
Advanced menu; see page 42.)
8
Setting Up the Projector
Choosing Your Connections
The connections you’ll need to make depend on the equipment you’re
using, whether your presentation includes sound, and whether you
plan to use the remote to run your presentation.
■
Connecting to a computer or laptop
For many presentations, the only connection you’ll need is
between your computer and the projector; see page 10.
■
Connecting to video sources
You can connect the projector to a DVD player, VCR,
camcorder, laser disc player, digital camera, or another type of
video source. You can even connect a video source and computer
at the same time and switch between the two; see page 18.
■
Using the remote control
You can use the remote control to switch between input sources,
zoom into your image, and control other projector features.
To use the remote control as a wireless mouse, you’ll need to
connect one of the projector mouse cables. Then you can click
through your presentation from up to 32 feet away. See page 31
for instructions on using the remote control.
■
Including sound in your presentation
If your presentation includes sound, you can connect an audio
cable to use the projector’s built-in speaker. See the instructions
for your input source in “Connecting to a Computer” on page 10
and/or “Connecting to Video Sources” on page 18.
If you need more volume, you can also connect the projector to
external speakers or a public address system; see page 21.
Setting Up the Projector 9
Connecting to a Computer
Follow the instructions in these sections for the type of computer you
need to connect:
■
“Connecting to a PC Laptop” below
■
“Connecting to a PC Desktop Computer” on page 12
■
“Connecting to a PowerBook” on page 14
■
“Connecting to a Macintosh Desktop Computer” on page 16
Connecting to a PC Laptop
To connect the projector to your laptop, notebook computer, or
hand-held device, you need to use the computer cable. If you’ll be
using the remote control as a wireless mouse, you need to connect a
mouse cable. If you’ll be using audio through the projector’s speakers,
you need to connect an audio cable (not included with the projector).
Connecting the Computer Cable
Before you start, turn off your laptop and the projector.
1. Connect one end of the computer cable to the projector’s
Computer port.
note
Laptop configurations vary.
See your manual if you’re not
familiar with the ports on
your laptop.
10
Setting Up the Projector
2. Connect the other end of the cable to your laptop’s video-out or
monitor port.
3. Tighten the screws on the connectors.
If you don’t need to make any other connections, you can plug in and
turn on your equipment; see page 21 for instructions.
Connecting the Mouse Cable
To use the remote control as a wireless mouse, you need to connect a
mouse cable: either the round PS/2 or the flat USB mouse cable.
1. Connect one end of the appropriate mouse cable to the PS/2
Mouse/Com port or the
USB Mouse port on the projector.
note
See page 32 for instructions
on using the remote control as
a wireless mouse.
You can use the USB port for
a mouse only on systems
configured originally with
Windows® 98 or 2000. If
you upgraded your system
from Windows 3.1 or 95, the
USB port may not work as a
mouse port.
2. Connect the other end to your laptop’s external mouse or USB
port.
3. If necessary, configure your laptop to work with an external
mouse.
If you don’t need to make any other connections, you can plug in and
turn on your equipment; see page 21 for instructions.
Connecting the Audio Cable
If you’ll be using audio through your projector’s speakers, you need to
connect a stereo, mini-jack audio cable (not included).
1. Connect one end of the audio cable to the Audio In port on the
projector.
note
If you need additional
volume (in a large
auditorium, for example),
you can also connect external
speakers or a public address
system to the projector. See
page 21 for instructions.
2. Connect the other end to the laptop’s headphone or audio out
jack.
Setting Up the Projector 11
If you don’t need to make any other connections, you can plug in and
turn on your equipment; see page 21 for instructions.
Connecting to a PC Desktop Computer
To connect the projector to your PC desktop computer, you need to
use the computer cable. If you’ll be using the remote control as a
wireless mouse, you need to connect a mouse cable. If you’ll be using
audio through the projector’s speakers, you need to connect an audio
cable (not included with the projector).
Connecting the Computer Cables
Before you start, turn off your projector and computer.
1. Disconnect the monitor cable from the monitor port on the back
of your computer.
2. Connect one end of the computer cable to the projector’s
Computer port.
3. Connect the other end of the computer cable to your computer’s
video (monitor) port.
4. Tighten the screws on the connectors.
If you don’t need to make any other connections, you can plug in and
turn on your equipment; see page 21 for instructions.
12
Setting Up the Projector
Connecting the Mouse Cable
To use the remote control as a wireless mouse, you need to connect a
mouse cable: either the round PS/2 or the flat USB mouse cable.
1. Connect one end of the appropriate mouse cable to the PS/2
Mouse/Com port or the
USB Mouse port on the projector.
note
See page 32 for instructions
on using the remote control as
a wireless mouse.
You can use the USB port for
a mouse only on systems
configured originally with
Windows 98 or 2000. If you
upgraded your system from
Windows 3.1 or 95, the USB
port may not work as a mouse
port.
2. Connect the other end to the mouse port on your computer.
3. Tighten the screws on the connectors.
If you don’t need to make any other connections, you can plug in and
turn on your equipment; see page 21 for instructions.
Connecting the Audio Cable
If you’ll be using audio through your projector’s speakers, you need to
connect a stereo, mini-jack audio cable (not included).
1. Connect one end of the audio cable to the Audio In port on the
projector.
note
If you need additional
volume (in a large
auditorium, for example),
you can also connect external
speakers or a public address
system; see page 21 for
instructions.
2. Connect the other end of the audio cable to the speaker or
audio out port on the computer’s sound card. If you don’t need to
make any other connections, you can plug in and turn on your
equipment; see page 21 for instructions.
Setting Up the Projector 13
Connecting to a PowerBook
You can connect your projector to most PowerBooks that support an
external monitor. To connect the projector to your PowerBook, you
need to use the computer cable. If you’ll be using the remote control
as a wireless mouse, you need to connect a mouse cable. If you’ll be
using audio through the projector’s speakers, you need to connect an
audio cable (not included with the projector).
Connecting the Computer Cable
Before you start, turn off your PowerBook and the projector.
1. Connect one end of the computer cable to the projector’s
Computer port.
2. Connect the other end to your PowerBook’s
monitor port.
3. Tighten the screws on the connectors.
If you don’t need to make any other connections, you can plug in and
turn on your equipment; see page 21 for instructions.
14
Setting Up the Projector
Connecting the Mouse Cable
To use the remote control as a wireless mouse, you need to connect
the USB mouse cable.
1. Connect one end of the USB mouse cable to the
Mouse port on the projector.
USB
note
Your Macintosh must be
using Macintosh OS 8.51 or
later for USB support.
See page 32 for instructions
on using the remote control as
a wireless mouse.
2. Connect the other end to the USB port on your PowerBook.
If you don’t need to make any other connections, you can plug in and
turn on your equipment; see page 21 for instructions.
Connecting the Audio Cable
If you’ll be using audio through your projector’s speakers, you’ll need
to connect a stereo, mini-jack audio cable (not included).
1. Connect one end of the audio cable to the Audio In port on the
projector.
note
If you need additional
volume (in a large
auditorium, for example),
you can also connect external
speakers or a public address
system; see page 21 for
instructions.
2. Connect the other end to the audio out port on your PowerBook.
If you don’t need to make any other connections, you can plug in and
turn on your equipment; see page 21 for instructions.
Setting Up the Projector 15
Connecting to a Macintosh Desktop Computer
To connect the projector to your desktop Macintosh, you need to use
the computer cable. If you’ll be using the remote control as a wireless
mouse, you need to connect a mouse cable. If you’ll be using audio
through the projector’s speakers, you need to connect an audio cable.
Connecting the Computer Cable
Before you start, turn off the projector and computer.
1. Disconnect the monitor cable from the video (monitor) port on
the back of the Macintosh.
2. Connect one end of the computer cable to the projector’s
Computer port.
3. Connect the other end of the computer cable the video (monitor)
port on the Macintosh.
4. Tighten the screws on the connectors.
If you don’t need to make any other connections, you can plug in and
turn on your equipment; see page 21 for instructions.
16
Setting Up the Projector
Connecting the Mouse Cable
To use the remote control as a wireless mouse, you need to connect
the USB mouse cable.
1. Connect one end of the USB mouse cable to the
Mouse port on the projector.
USB
note
Your Macintosh must be
using Macintosh OS 8.51 or
later for USB support.
See page 32 for instructions
on using the remote control as
a wireless mouse.
2. Connect the other end to the USB port on your Macintosh.
If you don’t need to make any other connections, you can plug in and
turn on your equipment; see page 21 for instructions.
Connecting the Audio Cable
If you’ll be using audio through your projector’s speakers, you’ll need
to connect a stereo, mini-jack audio cable (not included).
1. Connect one end of the audio cable to the Audio In port on the
projector.
note
If you need additional
volume (in a large
auditorium, for example),
you can also connect external
speakers or a public address
system; see page 21 for
instructions.
2. Connect the other end of the audio cable to the audio-out port on
your Macintosh.
Setting Up the Projector 17
If you don’t need to make any other connections, you can plug in and
turn on your equipment; see page 21 for instructions.
Connecting to Video Sources
note
You can’t use the projector
with a cable TV-style
F connector.
You can connect a DVD player, VCR, camcorder, laser disc player,
digital camera, or any other compatible video source to your projector.
You can connect one video source and a computer at the same time,
and easily switch between them. The projector supports HDTV,
NTSC, PAL, and SECAM formats, and automatically detects the one
you’re using.
Connecting the RCA A/V Video Cable
Before you start, make sure the projector and your VCR or other
video source are turned off.
1. Connect the yellow plug on one end of the A/V cable to the
projector’s yellow Video jack.
2. Connect the other yellow plug to the video-out jack on your video
source.
3. Connect the red and white plugs on the A/V cable to the
projector’s Audio L (white) and R (red) jacks.
RCA
audio/video cable
4. Connect the red and white plugs at the other end of the cable to
the corresponding audio output jacks on your video source.
18
Setting Up the Projector
Connecting an S-Video Cable
If your video source has an S-Video jack (as shown with an S-Video
plug to the right), you can use it to project a higher quality video
image. However, you’ll need an S-Video cable, which may be included
with your video source or may be purchased from an electronics or
video store.
1
2
3
4
Before you start, make sure the projector and your VCR or other
video source are turned off.
1. Insert one end of the S-Video cable into the projector’s S-Video
connector.
RCA
audio/video cable
S-Video cable
(not included)
2. Insert the other end into the S-Video output port of your video
source.
3. Connect the red and white plugs on the A/V cable to the
projector’s Audio L (white) and R (red) jacks.
4. Connect the red and white plugs at the other end of the cable to
the corresponding audio output jacks on your video source.
Connecting a Component Video Cable
You can connect a component video cable to project images from a
DVD player or HDTV video source. You’ll need the RCA A/V cable
(included with your projector) and a component video cable
(optional; available from EPSON as described on page 6).
Setting Up the Projector 19
Before you start, make sure the projector and your component video
source are turned off.
1. Connect the red and white plugs on the A/V cable to the
projector’s Audio L (white) and R (red) jacks.
component video cable
(not included)
RCA
audio/video cable
2. Connect the red and white plugs at the other end of the A/V cable
to the corresponding audio output jacks on your video source.
3. Connect the 15-pin connector on the component video cable to
the projector’s computer port.
4. Connect the green, blue, and red jacks on the other end of the
cable to these ports on your component video source:
■
Y (green)
■
Pb or Cb (blue)
■
Pr or Cr (red) port.
5. Select the correct settings for your component video source by
selecting the following in the projector’s Video menu (as
described on page 38):
20
Setting Up the Projector
■
If you connected the projector to a DVD player, select
YCbCr as the Input Signal setting.
■
If you connected an HDTV source or if your DVD player
supports YPbPr, select YPbPr as the Input Signal setting and
16:9 as the Aspect Ratio setting.
Connecting to External Speakers or a PA
System
The projector’s speaker is loud enough for most small- or medium-size
rooms. For large rooms or maximum volume, you can connect the
projector to external speakers or a public address (PA) system.
note
The projector’s internal
speaker is disabled when you
use an external audio system.
You’ll need an RCA-to-3.5mm stereo audio cable, which may be
included with your sound system or may be purchased from an
electronics store.
Before you start, make sure the projector and speakers or PA system
are turned off.
1. Connect the cable’s 3.5 mm stereo miniplug to the projector’s
Audio Out jack.
2. Connect the RCA plugs to the speaker or PA system. Insert the
cable’s red plug into the Audio R jack and the white plug into the
Audio L jack.
Setting Up the Projector 21
22
Setting Up the Projector
2
Using the Projector
Once you’ve connected the projector to your computer or other
equipment (as described in Chapter 1), you’re ready to turn on the
projector, adjust the image, and give your presentation. This chapter
covers the following:
■
Turning on the projector and other equipment
■
Adjusting your image
■
Using the remote control
■
Controlling audio and video
■
Highlighting your presentation
■
Shutting down the projector and other equipment
Turning On Your Equipment
Make sure your projector and other equipment are set up and
connected correctly, as described in Chapter 1. Then plug in and turn
on your equipment, as described below.
note
If you have more than one
source connected, you may
have to switch to the one you
want to use, as described on
page 25.
Follow these steps to plug in and turn on your equipment:
1. If you’re projecting video,
first plug in and turn on
your VCR, DVD player, or
other video source. (If
you’re projecting from a
computer, go to step 2.)
2. To turn on the projector,
first connect one end of the power cord to the projector’s power
inlet on its left side.
Using the Projector 23
3. Connect the other end to a grounded electrical outlet.
The Power light on the projector turns orange, indicating that
the projector is receiving power and is in sleep mode, but is not
yet turned on.
4. Remove the lens cap.
warning
Never look into the lens when
the lamp is on. This can
damage your eyes, and is
especially dangerous for
children.
Power button on top of the projector. (You can
5. Press the red
also turn on the projector using the remote control, but you must
turn on the remote control first; see page 31.)
Power light flashes green and then stays on. You see a
The
blue screen with the message No Signal displayed.
6. If you’re projecting images from a computer, turn on your
computer. In a few moments, you should see your computer
display projected. (If a projected image fails to appear, see the next
section for help.)
note
Windows only: If you see a
New Hardware Found
message saying that Windows
has found a plug-and-play
monitor, click Cancel.
24
Using the Projector
7. If you’re projecting video, press the Play button. (If a projected
image fails to appear, see the next section for help.)
Once you see your image, turn to page 27 for instructions on focusing
and making other image adjustments.
When you’re done with your presentation, shut down the projector as
described on page 36. Shutting down the projector correctly prevents
premature lamp failure and possible damage to the projector from
overheating.
What To Do If You See a Blank Screen
If you see a blank screen or a blue screen with the message No Signal
after turning on your computer or video source, do one of the
following:
■
Make sure the cables are connected correctly, as described in
Chapter 1.
■
Make sure the
lens cap is off.
■
If you’ve connected more than one input source, you may need to
press the Source button on top of the projector or the
Computer, Video, or S-Video button on the remote control to
select the source you want to use. (Allow a few seconds for the
projector to sync up after pressing the button.)
Power light is green and not flashing and the
Source button
Computer,
Video, and
S-Video
buttons
■
Try restarting your computer.
■
If you still don’t see an image and you’re using a PowerBook, see
page 26 for additional steps. If you’re using a PC laptop, see
page 27.
Using the Projector 25
If You’re Using a PowerBook . . .
You may need to set up your system to display on the projector screen
as well as the LCD screen. Follow these steps:
1. From the Apple menu, select Control Panels, then click
Monitors and Sound.
2. Click the Arrange icon.
Click here
Drag one monitor
icon on top of
the other
3. Drag one monitor icon on top of the other.
If this option isn’t available, you may need to select one of the
Simulscan resolution settings. Click the Monitor icon, then select a
Simulscan resolution as shown. (Allow a few seconds for the
projector to sync up after making the selection.)
Click here
Select a
Simulscan
resolution
26
Using the Projector
If You’re Using a PC Laptop . . .
■
Press the function key that lets you display on an external
monitor. It’s often labelled with an icon such as
but it may
be labelled CRT/LCD. You may have to hold down the Fn key
while pressing it. Check your laptop’s manual or online help for
details.
On most systems, the
or CRT/LCD key lets you toggle
between the LCD screen and the projector, or display on both at
the same time. Allow a few seconds for the projector to sync up
after pressing it.
■
Depending on your computer’s video card, you might need to use
the Display utility in the Control Panel to make sure that both the
LCD screen and external monitor port are enabled. See your
computer’s documentation or online help for details.
■
Check your computer’s video resolution and scan frequency to see
if they are supported, as listed on page 62. You may need to adjust
your computer’s resolution and scan frequency to match one of
the modes listed.
Adjusting Your Image
Once you see your image, you’ll need to make certain adjustments:
■
To focus your image, see below.
■
To resize or zoom into your image, see page 28.
■
To raise or lower the image, see page 29.
note
■
If the image isn’t square, see page 30.
■
If the projected image is flickering or “noisy,” see page 30.
If the image from your
computer is still out of focus,
you can increase the clarity by
pressing the Auto button on
the remote control. This
optimizes the projector’s
tracking, sync, and position
settings. (You can also adjust
these settings using the
projector menus; see
Chapter 3.)
Focusing Your Image
Rotate the focus ring to sharpen
the image.
focus
ring
Using the Projector 27
Adjusting the Image Size
You can adjust your image size using the Wide/Tele button on the
projector or zoom into a portion of the image using the E-Zoom
button on the remote control.
Using the Wide/Tele Button
To enlarge or reduce your image size in small increments, use the
Wide/Tele button on the projector. Press the T side of the button to
reduce the image size, or the W side of the Wide/Tele button to
enlarge the image to full size.
note
Wide/Tele button
Enlarge
You can always move the
projector closer to or farther
from the screen to adjust the
image size.
W
T
Reduce
W
T
Using the E-Zoom Button
Zoom in
or out
Adjust
position
of zoomed
portion
If you want to zoom in on a portion of the image, use the E-Zoom
and Enter buttons on the remote control. Press the + side of the
E-Zoom button to zoom into your image in small increments. Press
the – side to zoom out.
To position the zoomed image on the screen, press the top, bottom,
left, or right side of the Enter button on the remote control. (Press
Esc to return your image to its original size and turn off E-Zoom.)
E-Zoom button
+
Zoom in
–
Zoom out
Enter button
top
left
right
bottom
28
Using the Projector
Adjusting the Image Height
If your image is too low, you can raise it by extending the projector’s
feet.
1. Stand behind the projector. Pull up the blue foot release levers
and lift the front of the projector. This unlocks the feet.
caution
2. Raise or lower the front of the projector as necessary.
note
3. Once the image is positioned where you want it, release the levers
to lock the feet into position.
If the image shape is not
square after adjusting its
position, see the next section
for a solution.
4. To fine-tune the height, rotate the feet clockwise to raise the
projector and counterclockwise to lower it.
To avoid damaging the lens,
do not lift the projector by the
lens.
counterclockwise
to lower it
clockwise
to raise it
Using the Projector 29
Adjusting the Image Shape
If the projected image isn’t square or has a “keystone” shape, do one or
more of the following:
■
If your image looks like
or
, you’ve placed the
projector off to one side of the screen, at an angle. Move it directly
in front of the center of the screen, facing the screen squarely.
■
If your image looks like
or
, press the + or — side of
the Keystone button to correct the shape of the image. The
Keystone button corrects up to a 15° tilt. After correction, your
image will be slightly smaller.
Keystone button
note
If the image is noticeably
uneven after keystone
correction, reduce the
Sharpness setting using the
Video menu; see page 39 for
instructions.
You can also perform electronic keystone correction using the
projector’s Setting menu. See page 42 for instructions.
Adjusting the Image Quality
note
You can also increase
computer image clarity by
pressing the Auto button on
the remote control to optimize
the tracking, sync, and
position settings. Turn off
E-Zoom and A/VMute before
using the Auto button; see
page 28 and page 34.
30
Using the Projector
You may need to adjust the projector’s Tracking and Sync settings if
your computer image has any of these quality problems:
■
Flashing or blurry image
■
Vertical or horizontal stripes
■
Only a portion of the image is displayed
See Chapter 3 for instructions on adjusting these settings in the
projector’s Video menu.
Using the Remote Control
infrared receiver
for remote control
The remote control lets you access projector features from anywhere
in the room—up to 32 feet away. You must also be within a 30°
horizontal and a 15° vertical angle of the infrared receiver on the front
of the projector.
You can use the remote control to turn the projector on and off, zoom
the image, display the projector menus, and other uses.If you
connected a mouse cable to the projector, you can also use the remote
control as a wireless mouse to run your presentation. See page 32 for
instructions.
Installing the Remote Control Batteries
The remote control operates the projector and lets you access its setup
menus. You can also use it as a wireless mouse.
Follow these steps to install the
batteries:
1. Press the tab to release the battery
cover and lift it up to remove it.
2. Insert the two AA batteries
included with the projector
as shown.
3. Replace the battery cover.
note
You can aim the remote
control at your projection
screen and reflect the signal
back into the sensor on the
front of the projector, but this
shortens the operating
distance of the remote
control.
caution
When replacing batteries,
take the following
precautions:
■
Replace batteries as soon
as they run out.
■
Do not mix old and new
batteries.
■
If the batteries leak, wipe
away battery fluid with a
soft cloth. If fluid gets on
your hands, wash them
immediately.
■
Remove batteries if you
will not be using the
remote for a long period
of time.
Using the Projector 31
power
indicator
light
Operating the Projector with the Remote
Control
1. Push up the R/C switch on the side of the remote control to turn
it on.
2. Point the remote at the front of the projector or at the screen.
3. Press the button for the function you want to use. The light next
Power button on the remote control flashes briefly. (If
to the
it doesn’t flash, you may have inserted the batteries incorrectly or
need to change the batteries; see page 31 for instructions.)
R/C switch
The projector may not respond to remote control commands in these
conditions:
■
You are too far away or not within a 30° horizontal or 15° vertical
angle of the projector’s sensor
■
The R/C switch on the right side of the remote control is in the
OFF position (the remote control is turned off)
■
Batteries are weak
■
Bright ambient light, fluorescent light, or direct sunlight is
shining into the remote control sensor
■
Equipment emitting infrared energy (such as a radiant room
heater) is nearby and interfering with the sensor
note
Using the Remote Control as a Wireless Mouse
When you connect the mouse
cable, your computer mouse is
disabled and you can’t use
another external mouse with
your desktop. However, you
may still be able to use the
built-in mouse pointer on
your laptop.
Using the remote control as a wireless mouse gives you more
flexibility; you don’t need to stay near your computer or the projector
to run your presentation.
32
Using the Projector
To use the remote control as a mouse, you must first connect a mouse
cable between your computer and the projector. See Chapter 1 for
instructions.
Follow these instructions to use your remote control as a wireless
mouse:
■
Press edges
to move the
pointer
Aim the remote at the screen or at the receiver on the front of the
projector. To move the mouse pointer on the screen, press the
edges of the Enter button with your thumb, as you would to
move a trackball.
■
To click, press down on the center of the Enter button. To
double-click, press down twice on the Enter button.
■
To click and drag, press down on the Enter button and then tilt it
in the direction you want to drag.
■
To right-click, press the Esc button.
■
To change slides in a PowerPoint® presentation (in Slide Show
mode), press down on the Enter button.
Press center
to left-click
Press
here to
right-click
note
Controlling Audio and Video
While giving your presentation, you may want to switch between
picture sources, temporarily turn off or freeze the picture, or adjust the
volume.
If you swapped the mouse
button functions on your
computer mouse, the Enter
and Esc buttons on the
remote control also swap
functions.
Make sure you’ve first set up your projector and connected your audio
or video source as described in Chapter 1.
Switching Between Picture Sources
You can connect the projector simultaneously to one computer source
and one video source. Then you can use the buttons on the projector
or remote control to switch between them.
■
Press the Source button on the projector to switch between
computer, S-video, and composite video sources.
■
Press the Computer, Video, or S-Video button on the remote
control to select the source you want to use.
After you select a source, the screen goes dark for a moment before the
image appears.
Select
Computer,
Video, or
S-Video
Using the Projector 33
Freezing the Picture
You can use the remote control to freeze the current picture on the
screen.
Freeze
picture
Turn off
picture
and
sound
■
Press the Freeze button to freeze the current image on the screen.
The sound will continue.
■
Press the Freeze button again to re-start it.
Turning Off the Picture and Sound
You can use the A/VMute button on the remote control to turn off
the image and sound. This is lets you temporarily re-direct your
audience’s attention without the distraction of a bright screen.
■
To turn off the picture, press the A/VMute button. The screen
goes dark.
■
To turn the image back on, press the A/VMute button again.
You can change the color of the blank screen displayed while
A/VMute is on using the Setting menu; see page 38 for instructions.
Adjust
volume
Adjusting Sound Volume
Using the remote control, you can adjust the volume of your video or
computer sounds.
34
Using the Projector
■
To increase the volume, press on the right (+) side of the Volume
button.
■
To decrease the volume, press on the left (–) side of the Volume
button.
Highlighting Your Presentation
The projector’s highlighting tools let you emphasize areas on the
screen using the numbered buttons on the remote control. This is
useful for annotating your presentation slides or calling attention to
their most important points. These tools are available:
■
Arrow or cursor stamp (button 1)
■
Horizontal bar (button 2)
You can use the Effect menu to customize the highlighting tools. See
page 41 for instructions.
Horz.
bar
Cursor
stamp
Move
bar or
cursor
Using the Cursor/Stamp Arrow
You can use the cursor stamp tool as a pointer and place cursor stamps
anywhere on your screen.
1. To activate the cursor stamp, press the 1 button on the remote
control. A
icon appears on the screen.
2. Press the side of the Enter button to move the pointer wherever
you want it.
3. To “paste” the pointer on the screen, press down in the center of
the Enter button. You can then continue to move another pointer
around the screen and paste it wherever you want.
note
You can use the projector’s
Effect menu to select a
different cursor stamp shape
and size. See page 41 for
instructions.
4. To erase the pointers pasted on the screen, press the 3 button.
5. To cancel the cursor stamp feature, press the Esc button.
Drawing a Horizontal Bar
You can place a horizontal bar on the screen and move it up or down
to highlight your presentation points.
1. To activate the bar tool, press the 2 button on the remote control.
A magenta horizontal bar appears in the middle of the screen.
2. Press the top or bottom of the Enter button to move the bar up or
down the screen.
note
You can change the width
and color of the bar using the
projector’s Effect menu. See
page 41 for instructions.
3. To erase the bar from the screen, press the Esc button.
Using the Projector 35
Shutting Down the Projector
When you’ve finished using the projector, follow the recommended
procedure to shut it down. This extends the life of the lamp and
protects the projector from possible overheating.
note
If sleep mode is enabled and
the projector has not received
any input signals for
30 minutes, it automatically
turns off the projector lamp
and enters “sleep mode.” This
conserves electricity, cools the
projector, and extends the life
of the lamp. In sleep mode,
the Power light is orange.
If you are done using the
projector, unplug the power
cord. If you want to start
projecting again, press the
Power button on the
projector or the remote
control.
1. If you’ve connected a computer or laptop and it’s displaying only
through the projector, shut down the computer first; otherwise
you won’t be able to see your computer’s display if you try
turning it off after the projector.
Power button on top of the projector or on the
2. Press the red
remote control. You see a confirmation message. (If you don’t
want to turn it off, press any other button.)
Power
button
power off confirmation message
Power button again. The
Power light flashes
3. Press the
orange for a couple of minutes as the projector cools down. When
Power light stays on and
the projector has cooled, the orange
the fan shuts off.
caution
To avoid damaging the
projector or lamp, never
unplug the power cord when
the Power light is green or
flashing orange.
If you want to turn the projector on again, wait until the orange
Power light stops flashing. Then press the
Power button.
4. Replace the lens cap, retract the projector feet, and unplug the
power cord. Also turn off the remote control, if you were using it.
5. If you’re using a VCR or other video source, turn it off after you
turn off the projector.
6. Disconnect all equipment, and store the projector in a protective
case.
36
Using the Projector
3
Fine-Tuning the Projector
You can use the on-screen menus to adjust the image, sound, and
other features of your projector. This chapter covers the following
information:
■
Using the menus
■
Adjusting the image
■
Adjusting the sound
■
Customizing the highlighting tools
■
Customizing projector features
■
Viewing projector information
■
Restoring the default settings
Using the Menus
These on-screen menus let you adjust and customize the projector
features from the remote control:
■
Video controls the look and quality of the projected image (from
a computer or video source).
■
Audio adjusts the sound volume and tone.
■
Effect customizes the highlighting tools available on the remote
control.
■
Setting adjusts features such as the keystone setting, blank screen
color, message prompt, and sleep mode.
■
Advanced controls settings such as menu language, color
intensity, and rear or ceiling projection.
Fine-Tuning the Projector 37
■
About provides information about the current projector and
lamp settings, and lets you reset the lamp timer when you’ve
replaced the projector’s lamp.
■
Reset All restores the factory defaults to all the projector settings.
Changing Menu Settings
You use the Menu, Enter and Esc buttons on the remote control to
change menu settings.
1. To display the main menu, press the Menu button. The menus
are displayed on the left, and the options available for the current
menu are shown on the right.
Enter
button
Esc
button
Menu
button
2. Press the top or bottom of the Enter button to scroll up or down
through the menus and view the available options.
3. Press the center of the Enter button to select a menu. The
highlight moves to the first menu option for that menu.
4. Press the bottom or the top of the Enter button to scroll through
the options. Press the right or left side of the Enter button to
change the setting.
If you want to go back to the default settings on any menu, select
Reset, press Enter, select Yes, and then press Enter.
5. Press the Esc button to save your changes and go back to the
main menu.
6. Press the Menu button to exit the menu system.
The rest of this chapter describes the menu options.
38
Fine-Tuning the Projector
Adjusting the Image
You can make a variety of image adjustments with the Video menu.
The options available in the menu depend on which source is
connected to the projector: computer or video.
Computer or component video source menu
Video source menu
Video menu
Menu item
Description
Position
Moves the displayed image up, down, left, or right. Use the Enter button to move the
screen position in the corresponding direction.
Tracking*
Removes vertical lines from the computer image by matching the projector’s internal
clock to various computer graphic signals.
Sync*
Corrects fuzziness or screen flicker by synchronizing the projector with the computer’s
tracking signal. Always adjust the Tracking before adjusting the Sync.
Brightness
Lightens or darkens the overall image. Increase brightness to lighten an image, or
decrease it to darken the image. Press the right or left side of the Enter button to
adjust the setting and see the results.
Contrast
Adjusts the difference between light and dark areas. Increase the contrast to make
light areas lighter and dark areas darker. Decrease it to minimize the difference
between light and dark areas. Press the right or left side of the Enter button to adjust
the setting and see the results.
Color**
Adjusts the color depth of the video input source. Increase the color setting for more
intense color on the screen, and lower the setting for less intense color. Press the
right or left side of the Enter button to adjust the setting and see the results.
Tint**
Adjusts the tint of the video image colors. Increasing the Tint setting strengthens the
red tint. Decreasing it strengthens the green tint. Press the right or left side of the
Enter button to adjust the setting and see the results.
Fine-Tuning the Projector 39
Video menu
*
Menu item
Description
Sharpness
Adjusts the sharpness of the image. (If keystone correction adversely affects the
image, decrease the Sharpness setting.) Press the right or left side of the Enter button
to adjust the setting and see the results.
Gamma
Adjusts the vividness of image colors.
Choose Dynamic for distinctly contrasted images, such as charts.
Choose Normal to select medium contrast.
Choose Natural to weaken contrast for more naturally colored images, such as
photographs.
Input Signal*
Selects the input signal of your computer or component video equipment.
Choose RGB for computer images.
Choose YUV for component video images.
Choose YCbCr for DVD images.
Choose YPbPr for HDTV images.
Auto Setup*
Set to ON to have the projector automatically optimize the computer image for
projection.
Mode**
Selects the video image signal mode: Automatic or Manual. (For PAL 60 Hz mode, set
to Manual.)
Aspect
Ratio***
Selects the aspect ratio for YCbCr or YPbPr component video images.
Reset
Returns all Video menu settings to their factory defaults.
Available only when Computer is selected as the input source.
** Available only when Video is selected as the input source.
*** Available only when you’re projecting component video images.
40
Fine-Tuning the Projector
Adjusting the Sound
You can use the Audio menu to adjust the sound volume or quality.
Audio menu
*
Menu item
Description
Volume
Adjusts the sound volume level output from the projector. Press the right or left side
of the Enter button to adjust the setting.
Tone
Adjusts the sound quality by increasing or decreasing the treble. Press the right or left
side of the Enter button to adjust the setting.
Audio Input*
Selects the audio input source. Select Auto to automatically choose the current video
input source, or select Computer or Video exclusively.
Reset
Returns the Audio menu settings to their factory defaults.
For component video sources, select Video.
Customizing the Highlighting Tools
You can use the Effect menu to customize the highlighting tools, as
described on page 35, and set the cursor speed.
Effect menu
Menu item
Description
Cursor/Stamp
Selects the stamp you want to use as the cursor graphic and lets you enlarge it.
Horizontal Bar
Selects the color and width of the horizontal bar.
Cursor Speed
Adjusts the cursor speed to Low, Medium, or High.
Reset
Returns the Effect menu settings to their factory defaults.
Fine-Tuning the Projector 41
Customizing Projector Features
You can use the Setting menu and the Advanced menu to adjust a
variety of projector functions.
Setting menu
Menu item
Description
Keystone
Corrects a trapezoid-shaped, distorted image to a 4:3 ratio rectangle, adjusting up to a
±15° tilt. Press the right or left side of the Enter button to adjust the setting and see
the results.*
No-Signal/Msg
Specifies whether no screen, a black screen, or a blue screen is projected when no
video signals are received.
Prompt
Controls whether the projector displays a temporary message indicating the current
input source (Computer or Video).
A/V Mute
Controls whether the projector displays a blue or black screen when the A/VMute
button is pressed.
Sleep Mode
Enables or disables sleep mode, which turns off your projector’s lamp when it hasn’t
received any image signals for 30 minutes. Press the Power button on the projector
or the remote control to resume projection.
Reset
Returns the Setting menu options to their factory defaults.
* You can also use the Keystone button on the projector to adjust this setting. If the image is noticeably uneven,
reduce the Sharpness setting on the Video menu.
Advanced menu
Menu item
Description
Language
Selects the language the projector uses in the menus: English, French, German,
Italian, Spanish, Portuguese, Japanese, Chinese, or Korean.
Color Setting
Selects the color temperature and RGB (red, green, blue) settings of the image.
Increasing the color temperature creates cooler whites and decreasing it creates
warmer whites. Increasing the RGB intensity strengthens the colors and decreasing it
weakens the colors.
Rear Proj.
Mirrors the projected image on its left-right axis so it appears correctly when you’re
projecting from behind onto a transparent screen.
Ceiling
Flips the projected image on its top-bottom axis so it appears correctly when you
mount the projector upside-down from the ceiling.
Reset
Returns the Advanced menu settings to their factory defaults.
42
Fine-Tuning the Projector
Viewing Projector Information
note
The About menu lets you view information about the display settings
of your computer, your video signal mode, and the number of hours
the lamp has been used. The options available in the menu depend on
which source is connected to the projector: computer or video.
The life span of the projector
lamp is approximately 1500
hours. If the number shown
in the About menu is close to
1500, make sure you have a
spare lamp handy. See page 6
for part number and ordering
information.
Video source menu
Computer or component video source menu
About menu
*
Menu item
Description
Lamp
Displays the number of hours the current lamp has been used.
Reset lamp timer
Sets the cumulative lamp time to zero; use this when you’ve replaced the
projector lamp, as described on page 48.
Video Source
Displays the currently selected input source: Computer or Video.
Input Signal*
Displays the computer or component video input signal.
Frequency*
Displays the projector’s horizontal and vertical frequency.
Sync Polarity*
Displays the computer’s sync polarity.
Sync Mode*
Displays the computer’s sync mode.
Resolution*
Displays the resolution of the computer’s video output.
Refresh Rate*
Displays the refresh rate of the computer’s video output.
Video Signal**
Displays the input image signal mode.
Available only when Computer is selected as the input source.
** Available only when Video is selected as the input source.
Fine-Tuning the Projector 43
Restoring the Default Settings
The Reset All setting lets you return all the projector’s menu settings
to their initial factory defaults, except for the Lamp and Language
settings.
Select Reset All and press the Enter button on the remote control to
display the confirmation screen. Select Yes to reset all the default
settings or No to cancel.
44
Fine-Tuning the Projector
4
Maintaining and
Transporting the Projector
warning
Before you clean any part of
the projector, turn it off and
unplug the power cord. Never
open any cover on the
projector, except the lamp
cover. Dangerous electrical
voltages in the projector can
injure you severely. Do not
try to service this product
yourself, except as specifically
explained in this User’s
Guide. Refer all other
servicing to qualified service
personnel.
Your projector needs little maintenance. All you need to do on a
regular basis is keep the lens clean. Any dirt or smears on the lens will
show up on your projected image.
You also need to periodically clean the air intake vent on the side of
the projector. A clogged vent can block ventilation needed to cool the
projector and keep it from overheating.
The only parts you should replace are the lamp and air intake vent (if
necessary). If any other part needs replacing, contact your dealer or a
qualified service person.
This chapter covers the following:
■
Cleaning the lens
■
Cleaning the projector case
■
Cleaning the air intake vent
■
Replacing the lamp
■
Transporting the projector
Maintaining and Transporting the Projector 45
Cleaning the Lens
Clean the lens whenever you notice dirt or dust on the surface.
■
To remove dust, use a canister of compressed air to spray the lens
surface, or lightly wipe the lens surface with a soft, dry, lint-free
cloth.
■
To remove dirt or smears, use lens-cleaning paper. If necessary,
moisten a soft cloth with an alcohol-based cleaner and gently wipe
the lens surface.
Clean here
Cleaning the Projector Case
Before you clean the projector case, turn off the projector and unplug
the power cord.
46
■
To remove dirt or dust, wipe the outside with a soft, dry, lint-free
cloth.
■
To remove stubborn dirt or stains, clean the case using a soft cloth
moistened with water and a neutral detergent. Dry it using a
separate cloth.
■
Do not use alcohol, benzene, thinner, wax, or other chemicals.
These can damage the case.
Maintaining and Transporting the Projector
Cleaning the Air Intake Vent
Clean the air intake vent after every 100 hours of use, or if the
Error light on top of the projector turns red.
If the vent is not cleaned periodically, it can become clogged with
dust, preventing proper ventilation. This can cause overheating and
damage the projector. Follow these steps to clean the vent:
1. Turn off the projector, let it cool down, and unplug the power
cord.
2. Stand the projector on its back panel with the lens pointing
upward.
3. To clean the vent, EPSON recommends using a small vacuum
cleaner designed for computers and other office equipment. If you
don’t have one, use a dry, lint-free cloth.
If the dirt is difficult to remove, replace the air intake vent. You can
purchase the part from your dealer, or by calling EPSON at
(800) 873-7766, or by visiting the EPSON Store at
www.epsonstore.com (U. S. sales only). In Canada, please call
(800) 873-7766 for dealer referral.
Maintaining and Transporting the Projector 47
Replacing the Lamp
note
To view the number of hours
your lamp has been used,
check the About menu; see
page 38 for instructions.
The projection lamp typically lasts for about 1500 hours of use. It is
time to replace the lamp when:
■
The projected image gets darker or starts to deteriorate.
■
Error light on top of the projector is flashing red in
The
1-second intervals.
■
The LAMP REPLACE message appears on the screen when the
projector lamp comes on (after about 1500 hours of use). To
maintain projector brightness and image quality, replace the lamp
as soon as possible after you see the message.
To order a replacement lamp (part number ELPLP13), contact your
dealer or call EPSON at (800) 873-7766 or visit the EPSON Store at
www.epsonstore.com (U. S. sales only). In Canada, please call
(800) 873-7766 for dealer referral.
Follow these steps to replace the lamp:
1. Turn off the projector, let it cool down, and unplug the power
cord.
warning
Let the lamp cool before
replacing it. To avoid
premature lamp failure, do
not touch the glass portion of
the lamp assembly.
48
2. Allow the projector to continue cooling for at least one hour (if it
has been on).
3. Turn the projector upside-down to access the lamp compartment.
4. To remove the lamp cover, press on the two tabs and pull out the
cover.
Maintaining and Transporting the Projector
5. Use a screwdriver to loosen the two lamp cover screws; you can’t
remove the screws. Then pull out the lamp by the two notches.
6. Position the new lamp correctly, then gently insert it into the
projector. Press it into place and tighten the retaining screws.
7. Insert the lamp cover as shown and press it back into place.
caution
Make sure the lamp cover is
securely fastened; the
Error light flashes and
the projector lamp won’t turn
on if the cover is open.
8. Follow the instructions in Chapter 3 to access the projector’s
About menu and reset the lamp counter to zero.
Maintaining and Transporting the Projector 49
Transporting the Projector
note
EPSON shall not be liable
for any damage incurred
during transportation.
50
The projector contains many glass and precision parts. If you need to
transport it, please follow these packing guidelines to prevent
damaging the projector:
■
When shipping the projector for repairs, use the original
packaging material if possible. If you do not have the original
packaging, use equivalent materials, placing plenty of cushioning
around the projector.
■
When transporting the projector as freight or checked luggage,
first put it in a carrying case (such as an EPSON case), then pack
it in a firm box, using cushioning around the case.
■
When you’re hand-carrying the projector, be sure to use a
carrying case (such as an EPSON case).
Maintaining and Transporting the Projector
5
Solving Problems
This chapter helps you diagnose and solve problems with your
projector and provides technical support information for problems
you can’t solve yourself.
This chapter tells you how to:
■
Use the projector’s on-screen help system
■
Check the projector’s status using its lights
■
Solve image or sound problems
■
Solve remote control problems
If none of the suggestions here solve the problem, see “Where To Get
Help” on page 58.
Using the On-Screen Help
If you have a problem while setting up or using your projector, you
can get help by pressing the ? Help button on top of the projector or
the remote control.
Solving Problems 51
The following choices are available:
■
Help for the image
Tells you how to solve problems with a blank screen, blurry
images, brightness, colors, and image shape
■
Help for the sound
Provides help for problems with lack of audio
■
Language Selection
Lets you choose to display the help information and projector
menus in any of 8 different languages.
■
Return
Exits the help system.
Follow these steps to get help:
1. Press the ? Help button. You see the main help menu.
2. To select the help menu you want, press the bottom or top of the
Select (Keystone) button on the projector, or the bottom or top
of the Enter button on the remote control.
3. Press the Enter (Source) button on the projector or the center of
the Enter button on the remote control to select your help topic.
Depending on the topic, you may see another menu or a list of
solutions.
4. To exit the Help system, press the ? Help button on top of the
projector or the remote control.
If none of the Help menu choices solve your problem, see the
solutions in the rest of this chapter.
52
Solving Problems
Checking the Projector’s Lights
If your projector isn’t working correctly, first turn it off, wait for it to
cool, and unplug it. Then plug the power cord back in and turn on
the projector. If this doesn’t solve the problem, check the lights on top
of the projector. They alert you to problems with projector operations.
warning
Except as specifically
explained in this User’s
Guide, do not attempt to
service this product yourself.
Power light
Error light
Light
Status
Description and action
off
The projector is unplugged. Press the Power button to turn off the
projector, check that the power cable is connected securely at both ends,
then press the Power button again to turn on the projector.
orange
The projector is in sleep mode. You can unplug it to disconnect the power or
press the Power button to turn on the projector lamp.
flashing
green
The projector is warming up. Wait for the image to appear.
green
The projector is operating normally.
flashing
orange
The projector lamp is off and the projector is cooling down. Wait until the
light stops flashing and then press the Power button to turn on the
projector. (You can’t turn the projector on or unplug it when the light is
flashing orange.)
flashing red
at 1-second
intervals
The lamp cover is not closed securely or the lamp has burned out. Secure the
lamp cover or replace the lamp; see page 48 for instructions.
red
The projector is too hot. Turn it off and let it cool before using it. Also make
sure nothing is blocking the projector’s air intake vent. If it continues to
overheat, clean the air intake vent; see page 47 for instructions.
flashing
orange
The projector lamp has turned off automatically because the projector has
overheated. Let it cool for a few minutes, then turn it back on. Also make
sure nothing is blocking the projector’s air intake vent. If it continues to
overheat, clean the air intake vent; see page 47 for instructions.
flashing red
at 2-second
intervals
There is an internal problem with the projector. Unplug it from the electrical
outlet and contact EPSON for help.
Solving Problems 53
Image or Sound Problems
No image appears or the No Signal message is displayed.
■
Power light is green and not flashing and the
Check that the
Power light is orange, the projector is
lens cover is off. If the
Power button to wake it up.
in sleep mode; press the
■
Your computer’s screen saver may be on. Press a key on the
computer keyboard.
■
The A/VMute feature may be turned on. Press the A/VMute
button on the remote control to turn it off, if necessary.
■
Make sure the cables are connected correctly, as described in
Chapter 1.
■
Make sure the correct image source is selected. Press the Source
button on top of the projector if necessary.
■
Try restarting your computer. You may need to set the display to
appear on both the LCD screen and the projector, or to switch
between them. See page 25 and check your laptop documentation
for instructions.
The Not Supported message is displayed.
The current video signal is not compatible with your projector. See
page 62 for a list of compatible signals.
The image isn’t square, but a trapezoid (keystone) shape.
This is caused by the projector not facing the screen squarely or by
extending the projector’s legs to position the image. Position the
projector to face the screen squarely or press and hold the + or – side
of the Keystone button on top of the projector until the image is
squared-up.
54
Solving Problems
Only part of the computer image is displayed.
■
If the computer’s output resolution setting is higher than
800 × 600 for the (EPSON PowerLite 50c) or 1024 × 768 for the
(EPSON PowerLite 70c), the image is resized. If the computer
output is not compatible with this resizing, choose a different
display setting as follows:
Windows: In Windows 95/98/Me/2000, right-click on the
desktop, select Properties, click the Settings tab, and select the
resolution you want. In Windows 3.x, use Windows Setup in the
Main program group. See Windows help for more information.
PowerBook or Macintosh: Choose Control Panels under the
Apple menu and then choose Monitors. In the Monitors screen,
choose Options and select Macintosh Hi-Res Display or
another 800 × 600 (for the EPSON PowerLite 50c) or
1024 × 768 (for the EPSON PowerLite 70c) setting. For more
information, see your PowerBook documentation. For supported
display settings, see page 62.
■
You may need to modify existing presentation files if you created
them for a different resolution. See your software manual for
specific information.
The image or parts of it are blurred or out of focus.
■
Adjust the Brightness, Contrast, Sharpness, and/or Gamma
settings on the Video menu. If you’re viewing a computer image,
also try adjusting the Tracking and Sync settings. See page 39 for
instructions on using the menu.
When you change video settings, you should be able to see the
effect on the screen immediately. Feel free to experiment. You can
always select Reset to return to the factory default settings.
■
There may be dirt or smears on the lens. Clean the lens by gently
wiping it with an alcohol-based cleaner on a soft cloth. See
page 46 for more information.
■
Your video signal mode may not be detected automatically. Select
Manual and then choose the correct signal for the Mode setting
on the projector’s Video menu; see page 38 for instructions.
Solving Problems 55
The image vibrates, flickers, or has vertical lines.
■
Adjust the Tracking and Sync settings on the Video menu (or
through the projector’s Help system). It is best to project a full
screen containing black text on a white background (such as a
letter) when you adjust these settings. Hold down the button to
change the setting until your image looks correct. See page 39 for
instructions on using the Video menu.
■
Your video signal mode may not be able to be detected
automatically. Select Manual and then choose the correct signal
for the Mode setting on the projector’s Video menu; see page 38
for instructions.
The image quality is poor on a laptop computer.
The video signal may be split between the computer and the projector.
Try turning off the laptop LCD display. See your laptop manual or
on-screen help for instructions.
The colors of the image are not right.
56
Solving Problems
■
If you’re displaying video, adjust the Brightness, Contrast, Color,
Tint, and/or Gamma settings on the Video menu. See page 39 for
instructions.
■
If you’re displaying computer images, adjust the Brightness,
Contrast, and/or Gamma settings on the Video menu. See
page 39 for instructions. Also adjust the color temperature and
RGB settings using the Color Setting option on the Advanced
menu, as described on page 42. If necessary, you can also adjust
your computer display settings to correct the color balance.
■
Check the current lamp life and replace the lamp, if necessary. See
page 43 for instructions on checking the lamp usage using the
projector’s About menu and page 48 for instructions on replacing
the lamp.
There is no sound.
■
Press the right side of the Volume button on the remote control
to turn up the sound.
■
Press the A/VMute button on the remote control to make sure
this feature is not enabled.
■
Make sure the right source is selected. Press the Source button on
top of the projector to select the right source.
■
Make sure the volume on your computer or video source is not
turned all the way down or muted. See your Windows or
Macintosh online help for instructions. Also, make sure the cables
are connected correctly, as described in Chapter 1.
■
Make sure the correct Audio Input signal is selected on the
projector’s Audio menu; see page 41 for instructions.
Problems with the Remote Control
The projector doesn’t respond to remote control commands.
■
Make sure the remote control is turned on.
■
The remote control batteries may be low on power or inserted
incorrectly. Check or replace them following the instructions on
page 31.
■
Dim the room lights, turn off any fluorescent lights, and move the
projector away from direct sunlight. Strong lighting, especially
fluorescent lights, may affect the projector’s infrared receiver.
■
Turn off any nearby equipment that emits infrared energy, such
as a radiant room heater.
■
Make sure you are within 32 feet of the projector and within a 30°
horizontal or 15° vertical angle of the infrared receiver on the
front of the projector.
■
If you’re having trouble using the remote control as a wireless
mouse, make sure the mouse cable is securely connected to both
ends. See Chapter 1 for details.
R/C switch
Solving Problems 57
Where To Get Help
EPSON provides technical assistance through electronic support
services and automated telephone services 24 hours a day, as listed in
the following table:
Service
Access
World Wide Web
Technical Support
From the Internet, you can reach EPSON’s product support page at
http://support.epson.com. After selecting your product, you can view
frequently asked questions and answers, download product documentation,
and receive technical advice through e-mail.
Automated Telephone
Services
A variety of automated help services are available 24 hours a day, seven days
a week. To use these services, you must have a touch tone telephone and
call (800) 922-8911.
Presenters Online
Access tips, templates, and training for developing successful presentations
at http://www.presentersonline.com
To use the EPSON PrivateLine Support service, call (800) 637-7661
and enter the PIN on the EPSON PrivateLine Support card included
in your Owner’s Kit. This is the fastest way to speak to a live
representative, and it’s free. This service is available 6 AM to 6 PM,
Pacific Time, Monday through Friday, for the duration of your
warranty period.
note
You can purchase screens,
carrying cases, or other
accessories from EPSON by
calling (800) 873-7766; in
Canada, please call
(800) 873-7766 for dealer
referral. To purchase
accessories online or view
EPSON’s complete product
catalog, visit the EPSON
Store at www.epsonstore.com
(U.S. sales only). To see our
full line of multimedia
projectors, go to
www.epson.com/mul_proj.
58
Solving Problems
You may also speak to a projector support specialist by dialing one of
these numbers (toll or long distance charges may apply):
■
U.S.: (562) 276-4394, 6 AM to 6 PM, Pacific Time, Monday
through Friday
■
Canada: (905) 709-3839, 6 AM to 6 PM, Pacific Time, Monday
through Friday
Before you call, please have the following information ready:
■
Product name (EPSON PowerLite 50c or 70c)
■
Product serial number (located on the bottom of the projector)
■
Video source (computer, DVD player, etc.) and how it’s
connected
■
Description of the problem
6
Technical Specifications
General
Type of display
Poly-silicon Thin Film Transistor (TFT)
Size of liquid
crystal panels
Diagonal: 0.7 inch (17.8 mm)
Lens
F=1.5, f=26.3 mm
Focus adjustment
Manual
Zoom ratio
Digital 1.0 to 1.2, lens at maximum size,
100% to 83% (smallest)
Resolution
800 × 600 pixels (EPSON PowerLite 50c)
1024 × 768 pixels (EPSON PowerLite 70c)
Color reproduction
24 bit, 16.7 million colors
Brightness (ANSI)
1000 lumens (EPSON PowerLite 50c)
700 lumens (EPSON PowerLite 70c)
Image size (diagonal)
2.3 to 25 ft (0.7 to 7.6 m)
Projection distance
3.3 to 36 ft (1 to 11 m) in Wide mode
3.9 to 43.2 ft (1.2 to 13.1 m) in Tele mode
Projection methods
Front, rear, upside-down (ceiling mount)
Internal speaker system 1W monaural
Optical aspect ratio
Keystone correction
angle
Supported video
interface standards
4:3 (horizontal:vertical), adjustable to 16:9
for HDTV, NTSC, PAL, and SECAM
images
±15°
NTSC, NTSC4.43, PAL, PAL-M, PAL-N,
PAL60, SECAM
EPSON Control Code ESC/VP Level 5
Technical Specifications 59
Projection Lamp
Type
UHE (Ultra High Efficiency)
Power consumption
150 W
Lamp life
About 1500 hours
Part number
ELPLP13
Remote Control
Range
32.8 feet (10 meters)
Batteries
Alkaline AA (2)
Mouse Compatibility
Supports PS/2, USB, and ADB
Dimensions
Height
3.9 inches (99 mm)
Width
11.9 inches (304 mm)
Depth
9.1 inches (232 mm)
Weight
6.8 lb (3.1 kg)
Electrical
Rated frequency
50/60 Hz
Power supply
100 to 120 VAC, 2.4 A
200 to 240 VAC, 1.2 A
Power consumption
Operating: 220W
Standby: 12W
Environmental
Temperature
(non-condensing)
Humidity
(non-condensing)
60
Technical Specifications
Operating: 41 to 95° F (5 to 35° C),
Storage: 14 to 140° F (–10 to 60° C)
Operating: 20 to 80% RH
Storage: 10 to 90% RH
Safety
United States
FCC Part 15J Class B
UL1950 Rev. 3
Canada
DOC SOR/88-475
CSA C22.2 No. 950 Rev. 3
CE Marking
Directive 89/336/EEC
EN 55022 Class B
EN 50082-1
Directive 73/23/EEC
EN 60950
Computer Connector Pin Assignments
The Computer port is a female video RGB, 15-pin micro-D-style
connector.
Input pin
Computer connector signals
1
Red video
2
Green video
3
Blue video
4
GND
5
GND
6
Red video GND
7
Green video GND
8
Blue video GND
9
Reserve
10
Synchronous GND
11
GND
12
SDA
13
Horizontal sync/composite sync
14
Vertical sync
15
SCL
Technical Specifications 61
Compatible Video Formats
The projector supports the video formats listed below. To project computer
images, the computer’s video card must be set at a refresh rate (vertical
frequency) that’s compatible with the projector.
Frequency
Mode
Resolution
H
(KHz)
V
(Hz)
Pixel
(MHz)
EPSON
PowerLite 50c
EPSON
PowerLite 70c
PC (RGB) compatible modes
VGACGA
VGAEGA
640 x 400
640 x 350
31.46
31.46
70
70
25.175
25.175
800 x 500 *
800 x 437 *
1024 x 640 *
1024 x 560 *
VGA60
VGA72
VGA75
VGA85
640 x 480
640 x 480
640 x 480
640 x 480
31.469
37.861
37.5
48.269
59.94
72.809
75
85.008
25.175
31.5
31.5
36
800 x 600 *
800 x 600 *
800 x 600 *
800 x 600 *
1024 x 768 *
1024 x 768 *
1024 x 768 *
1024 x 768 *
VGA Text
VGA Text
720 x 350
720 x 400
31.469
31.469
70.087
70.087
28.322
28.322
800 x 444 *
800 x 388 *
1024 x 568 *
1024 x 497 *
SVGA56
SVGA60
SVGA72
SVGA75
SVGA85
800 x 600
800 x 600
800 x 600
800 x 600
800 x 600
35.156
37.879
48.077
46.875
53.674
56.25
60.317
72.188
75
85.061
36
40
50
49.5
56.25
800 x 600
800 x 600
800 x 600
800 x 600
800 x 600
1024 x 768 *
1024 x 768 *
1024 x 768 *
1024 x 768 *
1024 x 768 *
XGA43i
XGA60
XGA70
XGA75
XGA85
1024 x 768
1024 x 768
1024 x 768
1024 x 768
1024 x 768
35.522
48.363
56.476
60.023
68.677
86.958
60.004
70.069
75.029
84.997
44.9
65
75
78.75
94.5
800 x 600 *
800 x 600 *
800 x 600 *
800 x 600 *
800 x 600 *
1024 x 768
1024 x 768
1024 x 768
1024 x 768
1024 x 768
SXGA1-70
SXGA1-75
SXGA1-85
SXGA2-60
SXGA2-75
SXGA2-85
SXGA3-43i
SXGA3-60
SXGA3-75
SXGA3-85
1152 x 864
1152 x 864
1152 x 864
1280 x 960
1280 x 960
1280 x 960
1280 x 1024
1280 x 1024
1280 x 1024
1280 x 1024
63.851
67.5
77.094
60
75
85.938
46.433
63.981
79.976
91.146
70.012
75
84.999
60
75
85.002
86.871
60.02
75.025
85.024
94.5
108
121.5
108
126
148.5
78.75
108
135
157.5
—
—
—
—
—
—
—
—
—
—
1024 x 768 *
1024 x 768 *
1024 x 768 *
1024 x 768 *
1024 x 768 *
1024 x 768 *
960 x 768*
960 x 768*
960 x 768*
960 x 768*
MAC II 13
MAC16
MAC19-60
MAC19-75
MAC21
640 x 480
832 x 624
1024 x 768
1024 x 768
1152 x 870
35
49.725
48.193
60.241
68.682
66.67
74.55
59.28
74.93
75.062
30.24
57.28
64
80
100
800 x 600 *
800 x 600 *
800 x 600 *
800 x 600 *
800 x 600 *
1024 x 768 *
1024 x 768 *
1024 x 768
1024 x 768
1024 x 768 *
62
Technical Specifications
Frequency
Mode
Resolution
H
(KHz)
V
(Hz)
Pixel
(MHz)
EPSON
PowerLite 50c
EPSON
PowerLite 70c
PC (YUV) compatible modes
HDTV525I (D1) **
HDTV525P (D2) **
HDTV750P (D4) **
HDTV1125I (D3) **
HDTV1125I (D3) **
640 x 480
640 x 480
1280 x 720
1920 x 1080
1920 x 1080
15.734
31.469
45
33.75
31.25
59.94
59.94
60
60
50.04
13.5
27
74.25
74.25
74.25
800 x 600 *
800 x 600 *
800 x 450 *
800 x 450 *
800 x 450 *
1024 x 768 *
1024 x 768 *
1024 x 576 *
1024 x 576 *
1024 x 576 *
Video compatible modes
NTSC **
PAL **
SECAM **
640 x 480
720 x 540
720 x 540
15.734
15.625
15.625
60
50
50
—
—
—
800 x 600 *
800 x 600 *
800 x 600 *
1024 x 768 *
1024 x 768 *
1024 x 768 *
* Resize mode (all others native mode)
** Select 4:3 or 16: 9 mode as the Aspect Ratio setting in the Video menu; see page 40 for instructions.
Technical Specifications 63
64
Technical Specifications
7
Notices
This chapter includes safety instructions and other important
information about your EPSON PowerLite.
Important Safety Instructions
Follow these safety instructions when setting up and using the
projector:
■
Do not place the projector on an unstable cart, stand, or table.
■
Do not use the projector near water or sources of heat.
■
Use attachments only as recommended.
■
Use the type of power source indicated on the projector. If you are
not sure of the power available, consult your dealer or power
company.
■
Place the projector near a wall outlet where the plug can be easily
unplugged.
Placez le projecteur près d’une prise de contacte où la fiche peut être
débranchée facilement.
■
Insert the projector’s three-wire grounding-type plug into a
properly grounded outlet. If you have a two-prong outlet, contact
an electrician to replace it. Do not hold the plug with wet hands.
■
Take the following precautions for the plug. Failure to comply
with these precautions could result in sparks or fire: Do not insert
the plug into an outlet with dust present. Insert the plug firmly
into the outlet.
■
Do not overload wall outlets, extension cords, or integral
convenience receptacles. This can cause fire or electric shock.
Notices 65
66
Notices
■
Do not place the projector where the cord can be walked on. This
may result in fraying or damage to the plug.
■
Unplug the projector from the wall outlet before cleaning. Use a
damp cloth for cleaning. Do not use liquid or aerosol cleaners.
■
Do not block the slots and openings in the projector case. They
provide ventilation and prevent the projector from overheating.
Do not operate the projector on a sofa, rug, or other soft surface,
or in a closed-in cabinet unless proper ventilation is provided.
■
Never push objects of any kind through cabinet slots. Never spill
liquid of any kind into the projector.
■
Except as specifically explained in this User’s Guide, do not
attempt to service this product yourself. Refer all servicing to
qualified service personnel. Opening or removing covers may
expose you to dangerous voltages and other hazards.
■
Unplug the projector during lightning storms or when it will not
be used for extended periods.
■
Do not place the projector and remote control on top of
heat-producing equipment or in a hot location.
■
Unplug the projector from the wall outlet and refer servicing to
qualified service personnel under the following conditions: When
the power cord or plug is damaged or frayed. If liquid has been
spilled into the projector, or if it has been exposed to rain or
water. If it does not operate normally when you follow the
operating instructions, or if it exhibits a distinct change in
performance, indicating a need for service. If it has been dropped
or the housing has been damaged.
■
If you use the projector in a country other than where you
purchased it, use the correct power cable for that country.
Remote Control Information
You can operate the projector by remote control via a line-of-sight
infrared (IR) receiver at the front of the projector. The projector may
not respond to remote control commands under the following
conditions:
■
There is an object between the remote control IR emitter and the
IR receiver on the projector.
■
Ambient light is too bright.
■
Certain types of fluorescent lighting are used.
■
A strong light source shines into the IR receiver.
■
Other equipment that emits infrared energy, such as a radiant
room heater, is in the room.
These conditions commonly cause problems for most
infrared-controlled equipment. Try the following:
■
The remote control unit’s batteries may be low on power; replace
them.
■
Dim the ambient lighting and/or turn off any fluorescent lights.
■
Close any window coverings and/or move the projector out of
direct sunlight.
■
Turn off other equipment that emits infrared energy.
If the remote control still does not work properly, remember you can
always control your computer-based presentation directly from the
computer, even in an environment containing one of the conditions
listed above.
Notices 67
Declaration of Conformity
According to 47CFR, Part 2 and 15
Class B Personal Computers and Peripherals; and/or
CPU Boards and Power Supplies used with Class B
Personal Computers
We:
Located at:
Tel:
EPSON AMERICA, INC.
3840 Kilroy Airport Way
MS: 6-43
Long Beach, CA 90806-2469
(562) 290-5254
Declare under sole responsibility that the product identified herein,
complies with 47CFR Part 2 and 15 of the FCC rules as a Class B
digital device. Each product marketed, is identical to the
representative unit tested and found to be compliant with the
standards. Records maintained continue to reflect the equipment
being produced can be expected to be within the variation accepted,
due to quantity production and testing on a statistical basis as required
by 47CFR §2.909. Operation is subject to the following two
conditions: (1) this device may not cause harmful interference, and (2)
this device must accept any interference received, including
interference that may cause undesired operation.
Trade Name:
EPSON
Type of Product: LCD Projector
Model:
68
Notices
PowerLite 50c and PowerLite 70c
FCC Compliance Statement
For United States Users
This equipment has been tested and found to comply with the limits for a
Class B digital device, pursuant to Part 15 of the FCC Rules. These limits are
designed to provide reasonable protection against harmful interference in a
residential installation. This equipment generates, uses, and can radiate radio
frequency energy and, if not installed and used in accordance with the
instructions, may cause harmful interference to radio or television reception.
However, there is no guarantee that interference will not occur in a particular
installation. If this equipment does cause interference to radio and television
reception, which can be determined by turning the equipment off and on,
the user is encouraged to try to correct the interference by one or more of the
following measures:
■
Reorient or relocate the receiving antenna.
■
Increase the separation between the equipment and receiver.
■
Connect the equipment into an outlet on a circuit different from that to which
the receiver is connected.
■
Consult the dealer or an experienced radio/TV technician for help.
WARNING
The connection of a non-shielded equipment interface cable to this
equipment will invalidate the FCC Certification of this device and may cause
interference levels which exceed the limits established by the FCC for this
equipment. It is the responsibility of the user to obtain and use a shielded
equipment interface cable with this device. If this equipment has more than
one interface connector, do not leave cables connected to unused interfaces.
Changes or modifications not expressly approved by the manufacturer could
void the user’s authority to operate the equipment.
For Canadian Users
This Class B digital apparatus meets all requirements of the Canadian
Interference-Causing Equipment Regulations.
Cet appareil numérique de la classe B respecte toutes les exigences du Règlement
sur le materiel brouilleur du Canada.
Notices 69
70
Notices
Index
A
A/V cable, 18 to 20
A/V Mute screen color setting, 42
A/VMute button, 34, 54, 57
About menu, 43
Accessories, 6 to 7, 58
Adobe Acrobat Reader, 2 to 3
Advanced menu, 42
Air intake vent, cleaning, 47
Arrow tool, 35
Aspect Ratio setting, 40
Audio
adjusting tone, 41
adjusting volume, 34, 41
cable, 11, 13, 15, 17
cable, stereo, 21
menu, 41
problems, 57
Audio Out jack, 21
Auto button, 27, 30
Auto Setup setting, 40
Ceiling, hanging projector from, 6, 8, 42
Cleaning
air intake vent, 47
lens, 46
projector, 46
Color
problems, 56
setting, 39
Color temperature setting, 42
Component video, connecting, 19 to 20
Computer
button, 25, 33
cable, 10, 12, 14 to 16
connecting Macintosh desktop, 16 to 18
connecting PC desktop, 12 to 13
connecting PC laptop, 10 to 12
connecting PowerBook, 14 to 15
connector pin assignments, 61
Connections, choosing, 9
Contrast setting, 39
Cursor Speed setting, 41
Cursor/Stamp tool, 35, 41
B
D
Bar tool, 35, 41
Bass, adjusting sound, 41
Batteries, remote control, 31
Blank screen, 25 to 27
Blurry image, 30, 55
Brightness setting, 39
Declaration of Conformity, 68
Default settings, restoring, 44
Desktop PC, connecting, 12 to 13
Digital camera, connecting, 18 to 20
Dimensions, 60
Distance from projector to screen, 7 to 8
DVD player, connecting, 18 to 20
C
Cable
A/V, 18 to 20
audio, 11, 13, 15, 17
computer, 10, 12, 14 to 16
mouse, 11, 13, 15, 17
Camcorder, connecting, 18 to 20
Case, cleaning, 46
CE Marking, 61
E
Effect menu, 41
Electrical specifications, 60
E-mail support, 58
Enter button, 28, 33, 38
Environmental specifications, 60
Index 71
EPSON
accessories, 6 to 7, 58
PrivateLine Support, 1, 3 to 4, 58
Store, 7
technical support, 3 to 4, 58
Error light, 47 to 49, 53
Esc button, 28, 33, 35, 38
External speakers, connecting, 21
E-Zoom button, 28
F
FCC statement, 69
Focusing image, 27, 55
Foot release levers, 29
Freeze button, 34
G
Gamma setting, 40
H
HDTV, connecting, 18 to 20
Help button, 32, 51 to 52
Help system, using, 51 to 52
Help, EPSON see EPSON
Highlighting presentation, 35, 41
Horizontal bar tool, 35, 41
Humidity requirements, 60
I
Image
adjusting, 27 to 30, 39 to 40
blurry, 55
correcting shape, 54
focusing, 27, 55
height, adjusting, 29
help, 51 to 52
positioning, 29 to 30, 39
problems, 54 to 57
quality, 30
raising, 29
shape, adjusting, 30
size and distance from screen, 7 to 8
size range, 59
size, adjusting, 28
turning off, 34
zooming, 28
Input Signal setting, 40
Internet, 58
K
Keystone
button, 30, 54
setting, 42
L
Lamp
number of hours used, 43
replacing, 48 to 49
reset timer setting, 43
specifications, 60
Language setting, 42, 52
Laptop PC
connecting, 10 to 12
displaying on, 27
Laser disc player, connecting, 18 to 20
Lens cleaning, 46
Lights, status and warning, 53
Locating projector, 7 to 8
Lumens, 1, 59
72 Index
M
Macintosh
desktop, connecting, 16 to 18
mouse cable, 15, 17
PowerBook, connecting, 14 to 15
Manuals, 2 to 4
Menu button, 32, 38
Menus
About, 43
Advanced, 42
Audio, 41
Effect, 41
Reset All, 44
Setting, 42
using, 37 to 38
Video, 39 to 40
Mode setting, 40
Mouse cable, 11, 13, 15, 17
N
No Signal message, 25, 42, 54
Numbered buttons on remote control, 35
O
Options for the projector, 6 to 7
P
PA system, connecting, 21
Picture, see Image
Pin assignments, connector, 61
Positioning
image, 29 to 30, 39
projector, 7 to 8
Power
button, 24, 32, 36
consumption, 60
light, 24 to 25, 36, 53
management, 42
supply, 60
PowerBook
connecting, 14 to 15
displaying on, 26
Presenters Online, 3, 58
PrivateLine Support, 1, 3 to 4, 58
Problems, see Troubleshooting
Projector
choosing connections, 9
cleaning, 46
connecting to Macintosh desktop, 16 to 18
connecting to PC desktop, 12 to 13
connecting to PC laptop, 10 to 12
connecting to PowerBook, 14 to 15
connecting to video source, 18 to 20
distance from screen, 7 to 8
feet, 29
focusing, 27
hanging from the ceiling, 42
lamp specifications, 60
lights, 53
menu system, using, 37 to 38
options, 6 to 7
positioning, 7 to 8
positioning image, 39
problems, 53 to 57
shutting off, 36
software, 3
specifications, 59 to 63
status lights, 53
transporting, 50
turning on, 23 to 24
unpacking, 5
viewing information, 43
Prompt setting, 42
PS/2 mouse cable/port, 11, 13
R
Raising image, 29
RCA A/V cable, 18 to 20
Rear projection, 42
Registration, 4
Index 73
Remote control
connecting cable for wireless mouse, 11, 13,
15, 17
information, 67
installing batteries, 31
problems, 32, 57, 67
specifications, 60
turning on, 32
using, 31 to 33, 38
using as wireless mouse, 32 to 33
Replacing the lamp, 48 to 49
Reset All menu, 44
Reset Lamp Timer setting, 43
Resetting menu options, 38
Resizing
images, 28
problems, 55
Resolution
pixels, 1
PowerBook, selecting, 26
problems, 55
specifications, 59
S
Safety instructions, 45, 65 to 66
Screen, distance from projector, 7 to 8
Select button, 52
Setting menu, 42
Sharpness setting, 40
Shutting off projector, 36
SizeWise technology, 1
Sleep mode, 24, 36, 42
Software, 3
Sound
adjusting, 34, 41
help, 51 to 52
problems, 57
turning off, 34
Sound system, connecting, 21
Source, selecting, 25, 33
Speakers, connecting to, 21
74 Index
Specifications
dimensions, 60
electrical, 60
environmental, 60
general, 59
lamp, 60
remote control, 60
safety, 61
Stamp tool, 35, 41
Status lights, 53
Stereo audio cable, 21
Stopping action, 34
Support, 3 to 4, 58
S-Video, 6, 19, 25, 33
Sync, 30, 39, 55
T
Technical support, 3 to 4, 58
Temperature
requirements, 60
warning light, 53
Tint setting, 39
Tone setting, 41
Tracking, 30, 39, 55
Transporting the projector, 50
Trapezoid image, 54
Treble, adjusting sound, 41
Troubleshooting
color problems, 56
image and sound problems, 54 to 57
projector problems, 53 to 57
remote control problems, 57
Turning off projector, 36
Turning on projector, 23 to 24
U
Unpacking projector, 5
USB mouse cable/port, 11, 13, 15, 17
V
W
VCR, connecting, 18 to 20
Video
button, 25, 33
display settings, viewing, 43
menu, 39 to 40
problems, 54 to 57
source, connecting, 18 to 20
source, selecting, 25, 33
Volume
button, 34
setting, 41
Warning lights, 53
Warranty, 4
Wide/Tele button, 28
Wireless mouse, using remote control as,
32 to 33
World Wide Web, 58
Z
Zoom ratio, 59
Zooming image, 28
Index 75