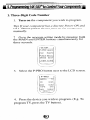
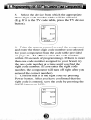
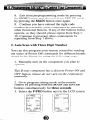
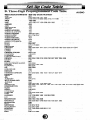
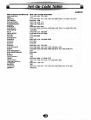
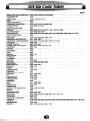
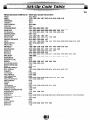
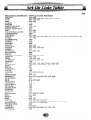
1
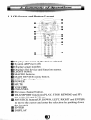
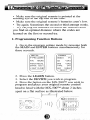
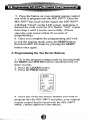
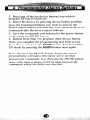
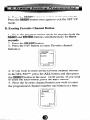
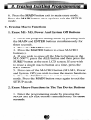
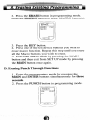
HomeTheaterMaster@
LCDScreen
Preprogrammedand Learning
RemoteControl
1, Introduction
............................................................................................
3
2. Batteries ..._........._..................................................................
4
A. Battery Installation
B. Battery Life
3. Summary of Operations ......._................................................
5
A. Description of Devices
B. Preprogrammed Codes
C. Learning from Other Remote Controls
D. Macro Operations
E. Favorite Channel Buttons
F. Punch Through Operations
G. Editing LCD Text
H. Cloning the MX-500TM
I. All Other Operations
J. LCD Screens and Button Layout
K. System Settings
4. Programming the Remote to Control Your
10
Components ....._.....................................................................
A. Preprogrammed Codes
1. Three-Digit Code Number
2. Auto Scan Method
B. Learning Method
1. Programming Function Buttons
2. Programming Ten Device Buttons
5. JJfbogramming Favorite Channels ..._...................................
18
6.
Programming
Macro
Buttons
..,....__........................................ 20
1. Ml - M3, Power and System Off Buttons
2. Ten Device Buttons
7. Programming Punch Through Operations ............‘...
23
8. Erasing
Existing
Programming ..,....._.................................
24
A. Erasing Learned Buttons
B. Erasing Favorite Channel Buttons
C. Erasing Macro Functions
1. Ml - M3, Power and System Off Buttons
2. Ten Device Buttons
D. Erasing Punch Through Functions
9. LCD Button Editing
................. .... ................................................. 28
A. Create or Edit Text on Function Buttons
B. Create or Edit Text on Device Buttons
C. Create or Edit Text on Favorite Channel Buttons
10. Recalling the Preprogrammed Three-Digit Code
Number . ....... .. . ..... .... .. .. .. ..... . ....... ..... ....... .. ....... .... .... ............. 31
31
11. Setting Back Light ._.....__,......,_.......................................,....
12. Cloning
MX-SO()TM
13. Adjustment
of LCD
32
contrast
33
14. Caution in Handling
LCD Screen .............. ... ... ............. 34
15. Low Battery Message
34
34
16. Memory Lock ..... ..__......._......................................................
17. Warranty
35
18. Specifications
19. Appendix
. ...... ......... ...... .................... ... ...... .... ...... ....... .. .... 35
36
A. List of Preprogrammed LCD Texts by Device
B. Three-Digit Preprogrammed Code Table
Congratulations! You have purchased one of the most
sophisticated remote control on the market. The MX500TM has been designed to provide a new standard in
remote control and infrared technology offering a very
powerful and flexible preprogrammed, learning, menudriven product.
With the MX-SOOTMyou have the option of programming
the unit for up to ten home entertainment and home
automation components by using either the preprogrammed
code library in the remote control, by teaching up to 530
commands into MX-500TM from your original remote
controls, or a combination of both methods.
The MX-500TM has many additional operating features to
add convenience and enjoyment to the operation of your
home entertainment system including the ability to create
your own descriptions of the component buttons on the
LCD, the ability to learn 530 commands from your original
remote controls, various macro operations program, 50
favorite channels buttons, and punch-through operations
for volume control, channel and transport buttons.
Setting up the MX-500 TM to operate your components is
easy and simple. Please follow the instructions in the
manual and retain the manual for future reference. In the
event the manual is lost or misplaced, a replacement copy
can be found at the Home Theater Master website:
httn://www.hometheatermaster.com
For any questions or comments about the MX-500TM, please
contact us at Universal Remote Control, Inc., 500
Mamaroneck Avenue, Harrison, NY 10528 at 914-835-4484
or e-mail us: [email protected] Regular customer service
hours are 9:00 AM to 6:00 PM EST, Monday - Friday.
A. Battery Installation
Before the remote control can be used, the supplied
batteries need to be installed. First, unsnap the battery
cover on the back of the unit and install the four AAA
batteries inside the battery compartment as shown. Make
sure the batteries line up with the (+) and (-) markings.
Improper installation could damage the remote control.
When you’re done, slide the battery cover back on. The
remote control starts up automatically and the default
device components will appear on the LCD.
B. Battery Life
Under normal operating conditions, the batteries
supplied with the remote control will last approximately
six months. If the batteries are running low, you will
notice reduced range from the remote control,
commands that are not sent properly, or are not sent at
all. You may also notice the backlighting of the LCD
screen and the button is diminished.
Should any of these occur, replace the batteries
immediately. To ensure proper performance of the unit,
only use new alkaline batteries.
The remote control will retain the commands and
settings in its memory even after the batteries are low or
become discharged. See Memory Lock on page 34.
Please replace the worn batteries with a fresh set as soon
as possible.
A. Description of Devices
The MX-5OOTMis designed to operateup to ten components
on the market including Audio Receivers, Cable and
Satellite Boxes, TV, DVD (LD),VCRl, VCR2, CD,
Tape and AUX. However, each of the device buttons
and corresponding functions can be changed to meet
your individual requirements. Almost any device that
uses infrared commands can be controlled by the MX500TM,including Home Automation, Personal
computers and more.
Tip) The auxiliary function could be used to operate
lighting controls or the second VCR could be changed
to operate a second TK
Each device button on the main screen contains two subpages of commands and you can change the name of any
LCD button using up to five alphabet characters and
numbers to customize the unit to fit your audio/video
components. Please refer to the LCD Button Editing on
page 28 for additional details.
B. Pre-programmed
Codes
The MX-5OOTMcomes with preprogrammed codes for
practically all the major audio and video equipment on
the market. You can set-up and operate all of your
components with the MX-500TM simply by punching in
the three-digit code number assigned to your brand of
component.
The code numbers for the various brands of components
are listed in the back of this instruction manual. Please
refer to the programming instructions shown on page 10
for details.
C. Learning From Other Remote Controls
The MX-500TM can learn codes from your original
remote controls. There are 26 LCD screens in the remote
control and all the functional buttons as well as ten
device buttons on the main menu screen can be taught.
In addition, there are 31 rubber buttons and a joystick
that can be taught for each of the ten devices. As a
whole, you can teach up to 530 new functions into the
remote control. Please refer to page 15 in the instruction
manual for details.
D. Macro Operations
The remote control is capable of sending out a series of
commands with one button press. Any function available
on your original remote control or in the pre-programmed
database can be added to a macro button to completely
automate what you would normally do by pushing
buttons one at a time. It can be as simple as “Turning on
your TV and Cable Box, turning the TV to the appropriate
channel for operation with the Cable Box and changing
the Cable Box channel to your favorite morning news
channel”. Or the macros can be configured to “Power On
your TV, DVD player and receiver, change to the
appropriate inputs and outputs, dim your lights and start
the movie playing”. It can be simple or as comprehensive
as you want it to be.
There are two types of macro buttons you can use for
macro operations:
Ml, M2, M3, Power and System Off Buttons
Each of these five buttons are designed to send out up
to 20 series of commands you program into the
buttons. Each one is commonly used to turn on and
turn off all of your A/V components with one button
press, but can be programmed with whatever macro
you desire.
Ten Device Buttons
There are ten device buttons and each of these device
buttons can send out up to 20 programmed commands
when pressed for more than two seconds. It is
typically used in sending out audio input codes so that
the audio receiver will make an automatic input switch
when you press the respective device button on the
remote control, but can be programmed with whatever
macro you desire.
E. Favorite Channel Buttons
You can create up to 50 favorite channel buttons in the
remote control by programming the most frequently
watched channel numbers into these buttons. Each of
these buttons can send out up to 10 commands.
Please refer to page 18 of the manual for programming
the Favorite Channel Programming.
F. Punch Through Operations
The MX-500TM can be setup to operate audio component
volume control buttons (VOLUME UP and DOWN and
MUTE) while all the other buttons control other
equipment. You can also set up the remote to operate
channel control and transport functions (PLAY, STOP,
REWIND, FAST FORWARD, SKIP-, SKIP+, PAUSE
and Record buttons) from VCR, DVD, LD, CD or any
other mode while all other buttons in the remote control
are controlling different components.
Please refer to page 23 in the manual for details.
G. Editing LCD Text
You can create your own text on each of the twenty-six
LCD screens.
Please refer to page 28 in the manual for details.
H. Cloning the MX-500TM
The MX-500TM is capable of sending and receiving all
the programmed codes, text on the LCD and operations
from one MX-500TM to another MX-500TM. Please refer
to page 32 in the manual for details.
I. All Other Operations
You can set the duration of the backlight on time and
LCD contrast. Please refer to page 33 and 35 in the
manual for details.
J. LCD Screen and Button Layout
(i) Displays the name of the device selected.
B System off(Power off)
0 Displays page number.
a Displays the device and function names.
@ LIGHT button.
m MACRO buttons.
0 MAIN DEVICE menu button.
@ LCD Page change button.
a POWER
0 MUTE
m VOLUME
0 CHANNEL
0 Previous channel button.
@ TRANSPORT functions(PLAY, STOP, REWIND and FF)
for VCR, CD and DVD etc.
m JOYSTICK button(UP, DOWN, LEFT, RIGHT and ENTER)
to move the cursor and enter the selection by pushing down
the joystick.
0 ENTER
m DISPLAY
K. System Settings
All programming is done by first entering the SYSTEM
SETTING mode in the remote control. Press both the
R buttons simultaneously for three
seconds to enter the SYSTEM SETTING mode.
Pressany of the ten buttons associatedwith the descriptions
written on the LCD. You can exit the Set Up mode by
simply pressing the
button.
You can program the MX-500TM to make it compatible
with your components by following
either the preprogrammed method instructions or by teaching it with
your original remote controls.
A. Using Pre-programmed
Codes
You can program the MX-500TM to make it compatible with
your components by using the pre-programmed method.
1. Three-Digit Code Number
1. Turn on the component you wish to program.
Tip) Zfyour component has a discrete Power ON and
OFF button, please do not yurn on the component
manually.
2. Go to the program setting mode by pressing both
MN and ALTAR buttons simultaneously for
three seconds.
3. Select the P-PRO button next to the LCD screen.
4. Press the device you wish to program. (E.g. To
program TV, press the TV button).
5. Select the device from which the appropriate
three-digit code number table will be selected.
(E.g. If it is the TV code table, press the TV device
button).
6. Point the remote control toward the component
and enter the three-digit code number you selected
for your component from the code table provided
on page 41 - 54. (Please enter the code number
within 20 seconds of programming). If there is more
than one code number assigned to your brand, try
the one code number at a time until you find the
right code number. (If you enter the right code
number, the component will turn off right after you
entered the correct number).
7. Confirm that it is the right code by pressing
Power button. After you have confirmed that the
right code is entered, save the code by pressing the
SAVE button on LCD.
8. Exit from preprogramming mode by pressing
button and then exit from SET UP mode
the
by pressing the
button once again.
9. Confirm yo
entered the right code
number that matches your component by pressing
other functional buttons. If any of the buttons fail to
operate, as they should, please repeat from Step 1.
10. Continue to program other components by
repeating from Step 1 above.
2. Auto Scan with Three Digit Number
You can also program your remote control by sending
out series of Power Off commands for different brands
stored in the library by using the following steps.
1. Manually turn on the component you plan to
operate.
Tip) If your component has a discrete Power ON and
OFF button, please do not yurn on the component
manually.
2. Go to program setting m
control by pressing both th
buttons simultaneously for three seconds.
3. Select the ~-~~~ button next to the LCD screen.
4. Press the device you wish to program.
(E.g. To program TV, press the TV button).
5. Select the device from which the scanned code
table will be selected. (E.g. If it is the TV code
table, press the TV device button).
6. Point the remote control toward the component
and press either the
button on the
0rD
LCD. (It will send out the series of Power codes
when the button is kept pressed and the,code
number that are being sent are shown on the LCD).
If the right code number is sent, the component will
turn off right after the code number is transmitted.
7. Release the UP or
pressing as soon as th
8. Confirm that it is the right code by pressing
Power button. After the confirmation that the
code is entered, save the code by pressing the
button on the LCD. Later you may want to try other
code numbers for your component to see which one
includes the most functions appropriatefor your device.
9. Exit from Preprogrammed mode by pressing the
AEN button and then exit from SET UP mode by
pressing the ~A~ button once again.
10. Confirm that you entered the right code number
that matches your component by pressing other
functional buttons. If any of the buttons do not
operate as they should, please repeat from Step 1.
11. Continue to program other components by
repeating from Step 1 above.
B. Learning From Other Remote Controls
You can program the MX-500TM to operate a component
by teaching the commands from your original remote
control to device buttons on the main screen menu, 20
buttons on 2 pages of the LCD per device, 31 rubber
buttons and the joystick located in the middle of the
remote control. The MX-5OOTMlearns these commands
by receiving infrared signals directly from your existing
remote controls. The MX-500TM receives these signals
through its learning eye, located at the top of the unit.
Apart from the PAGE, MAIN, FAV buttons and Ml - M3
buttons which cannot be taught, the MX-500TM has the
capability of learning up to 530 commands.
Tip) Commonly usedfunction buttons include the two
pages of sub-commands within each of the 10 devices,
channel up and down, volume up and down, menu,
guide, exit, info, O-9 and joystick.
Points to Remember
If the remote control fails to learn a function after the
first try:
Keep the remotesstableby placing them on a flat surface.
l
Make sure the original remote is pointed at the
learning eye at the top end of the case.
Make sure the original remote’s batteries aren’t low.
Try again. Sometimesthe secondor third attempt works.
Try varying the distance between the remotes until
you find an optimal distance where the codes are
learned on the first or second try.
l
l
l
l
1. Programming Function Buttons
1. Go to the program setting mode by pressing both
buttons simultaneously for
three seconds.
2. Press the LEA
3. Select the
ish to program.
4. Press the button on the MX-500TM you wish to
program and place your original remote control
head to head with the MX-5OOTMabout 2 inches
apart on a flat surface as illustrated below.
5. Press the button on your original remote control
you wish to program into the MX-500TM. Once the
MX-SOOTMhas received the signal, the MX-500TM
will flash “Good” on the LCD screen, indicating it
learned the code correctly. If it flashes “Fail”, repeat
from Step 4 until it learns successfully. (Please
enter the code signal within 20 seconds of
programming).
6. Once you complete the programming and wish
to exit the leaning mode, press the I%$
utton.
Exit from SET UP mode by pressing t
button once again.
2. Programming the Ten Device Buttons
1. Go to the program setting mode by pressing both
the
buttons simultaneously for
IN and
three seconds.
4. Press any of the ten device buttons you wish to
program into the MX-500rM and place your original
remote control head to head with the MX-500TM
about 2 inches apart on a flat surface.
5. Press the button on your original remote control
you wish to program into the MX-500TM. Once the
MX-500TM has received the signal, the MX-500TM
will flash “Good” on the LCD screen, indicating it
learned the code correctly. If it flashes “Fail”, repeat
from Step 4 until it learns successfully. (Please
enter the code signal within 20 seconds of
programming).
6. Once you complete the programming and wish
to exit the leaning mode, press the
Exit from SET UP mode by pressing the
button once again.
You can create and program up to 50 Favorite Channel
Buttons and each favorite channel button can send out up
to 10 commands with one button press.
1. Go to the pro,gram setting mode by pressing both the
R buttons simultaneously for three
and B
M
seconds.
2. Press the FAV Button on the LCD.
3. Press the appropriate device button from which the
channel number will be selected.
M!:ll...l1 E HE:l-F
4. Go to one of the five I+$ZDpages by pressing the
FAV(or PAGE) button. Press the button you will be
assigning to the favorite channel and enter the channel
number, power, Display and Enter commands you wish
to store in the FAVORITE channel button. You can store
up to 10 commands.
Tip) If you pressed a wrong channel numbel; please
move the cursor by using left or right button of the
joystick and then press the correct channel number:
5. Press the favorite channel button you selected in Step
4 again to store the channel you programmed.
6. Once you completed the programming and wish to
exit from the FAVORITE CHANNEL mode, press the
button. Exit from SET UP mode by pressing the
button once again.
Note: There are five pages of LCD screensfor favorite
channel programming. You move to other pages by
pressing the PAGE or FAV button.
There are two types of macro functions you can program
with the MX-500TM.
The Ml, M2 and M3, Power and System Off buttons
are designed to send out up to twenty commands
from each of the five hard buttons.
The ten device buttons on the Main menu can send
out up to twenty commands from each device button
when the device button is pressed for more than 1
second.
A. Programming Macro Functions to Ml- M3, Power
and System Off Buttons:
l
l
1.
an
o th’e programming mode by pressing the
TER button simultaneously for three set
button in programming mode.
3. Press one of the five-macro buttons.
Off in the programming mode.
functional buttons you wish to store in the
macro button you selected.(You can store up to 20
commands).
u programmed into the macro
5. Store the command
e:IUp button.
button by pressing the
6. Repeat from Step 3 to program other macro buttons.
ramming and wish to exit
7. Once you complete the
button. Exit from SET
from this mode, press the
button once again.
UP mode by pressing the
B. Programming
Buttons:
Macro Functions to the Ten Device
programming mode by pressing the
buttons simultaneously for three se
button in programming mode.
3. Press one of the ten device buttons you wish to
program for macro functions.
4. Select the device by pressing device button and then
press the functional buttons you wish to store in the
device macro button you selected. You can store up to 20
commands into the device macro buttons.
5. Save the comm.andsyou selected to the macro button
button.
by pressing the
6. Repeat from
to program other device button.
ing and wish to exit
Once you complete the prog
button. Exit from SET
from this mode, press the
utton once again.
UP mode by pressing the
Note: Pressing the PAUSE button during the macro
programming will add a time delay of 0.2 seconds
between the commands. E.g. Pressing the PAUSE button
twice will create a pause of 0.4 seconds between the
commands where the delay was inserted.
You can use the audio receiver volume control in a different
mode (E.g. Audio receiver Volume Up and Volume Down
and Mute in Satellite mode) using the volume punch
through feature. You can also have channel punch through
(Channel Up, Channel Down) as well as eight VCR or DVD
transport buttons, Play, Stop, Fast Forward, Rewind, Skip-,
Skip+, Pause and Record, to operate in another mode such
as in Satellite, Cable and Audio modes.
1. Enter the programming mode by pressing the MAIN
and ~~T~~ buttons simultaneously for three seconds.
2. Press the P~~~~ button in programming mode.
3. Press the VOI, button on the LCD for Volume Punch
Through, the PLAY for Transport Punch Through and
the CH for Channel Punch Through.
4. Select the device you wish to punch through to (1 st
device e.g. Satellite receiver).
5. Select the device you wish to punch through from
(2nd device e.g. Audio receiver).
6. Punch through is saved when the second device is
pressed.
7. Repeat from Step 3 to program Punch Through for
other devices.
8. Once you have completed the programming and wish
to exit from this mode, press the &INN button.
A. Erasing Learned Buttons
1. Go to the program setting mode by pressing both the
R buttons simultaneously for three
seconds.
2. Press the
button.
/
button to erase learned button(s).
3. Press the LEA
4. If you wish to erase all the learned functions in MX500TM,press the ALL button and then press the S
button at the next to the LCD screen. If you wish to erase
all the buttons in a single device or an individual button
in the device, press the ~~~~~~ button.
Tip) To erase the learnedfunction in the device button
i&e& press the PAGE button and then press the device
button (rr! VCR, Audio, etc.).
5. Press the device button (TV, VCR, Audio, etc.) to
erase the button(s) from the device.
6. Press the ALL button if you wish to erase all the
learned buttons in the device and press the SU
button at the
to the LCD screen.
7. Press the
if you wish to erase individual buttons
in that device one at a time. This will show all the
functions in the device. Press the button you wish to erase.
button to exit to main erase mode.
tton once again to exit the SET UP
mode.
B. Erasing Favorite Channel Button
1. Go to the program setting mode by pressing both the
buttons simultaneously for three
and
S.
button.
2. Press the
3. Press the FAV button to erase Favorite channel
button(s).
4. If you wish to erase all the favorite channel buttons
in the MX-500TM press the k&IL button and then press
button at the next LC
em. If you wish
button.
each button, press the
5. Press the favorite channel button you wish to erase
the programmed channel number one button at a time.
ERkSE
iiLL
KE’$’
:-I,
SELECT
E).(1T
button exit to main erase mode.
button once again to exit the SETUP
mode.
C. Erasing Macro Functions
1. Erase Ml- M3, Power And System Off Buttons
1. Go to the program setting mode by pressing both
R buttons simultaneously for
three seconds.
utton.
2. Press the
button to erase MACRO
3. Press the
button(s).
4. If you wish to erase all the Macro buttons in the
MX-500TM, press the ALL button and then press the
button at the next LCD screen. If you wish
a single macro button at a time, press the
REY button.
5. Press one of the MACRO button (Ml -M3, Power
and System Off) you wish to erasethe macro functions.
AIN button to exit to main erase
mode. Press the &I
button once again to exit the
SETUP mode.
2. Erase Macro Functions in The Ten Device Buttons
1. Enter the programming mode by pressing the
and ALAR buttons simultaneously for three
seconds.
2. Press
Press the
E button in programming mode.
button to erase MACRO button(s).
V button.
3. Press the
4. Press one of the ten device buttons you wish to
erase macro function. Repeat this step until you erase
all the Macro buttons you wish to erase.
5. Exit from Macro mode by pressing the
button and then exit from SET UP mode b
button once again.
the
D. Erasing Punch Through Functions
1. Enter the programming mode by pressing the
buttons simultaneously for three
CH button in programming mode.
3. Press the VQL button on the LCD for Volume
AY for Transport Punch
Punch Through,
r Channel Punch Through you
Through and the
wish to erase.
KX button you wish to erase punch
5. Press the same ~~~~C~ button once again.
6. Punch through is erased when the same device
button is pressed the second time.
7. Repeat from Step 3 to erase the Punch Through for
other devices.
from Punch Through mode by pressing the
button and then exit from SET UP mode by
button once again.
pressing the
A. To Create or Edit Text on Function
Buttons
and Device
1. Enter the programming mode by pressing the
simultaneously for three seconds.
utton in programming mode.
3. Press the device button you wish to write a text on
the LCD.
Tip) To edit the text on device button, press the ~~~~
button and then press oy2eof the ten device buttons, you
wish to edit.
4. Press the LCD button on which you wish to create
text. You can also go to the second page of LCD by
pressing the ~~~~ button.
5. The character to be changed will blink and you can
select the character using the number pad on the remote
control. The characters assigned to each number pad
button are shown below. It will be rotated to a different
character each time the same number pad is pressed.
Tip) You can move the cursor left or right using the
joystick. You can also erase a current character by
pressing cursor down of the joystick.
1.m1
2.-j
3.m
4.m
5-1
6. P Q R 6 7. S T U 7 S./vlwlxll
9.I~I~191blankI 0.101 ! I~ldl~l~l~l
II)WIM
/#I&I(I)I+I-I.I/I_I”I
6. Save the text you created by pressing the button you
were writing on again(the same function button you
selected in step 4).
7. Exit from Edit mode by pressing the ~~~ button
and then exit from SET UP mode by pressing the
button once again.
B. To Write a Text for Favorite Channel Buttons
1. Enter the programming mode by pressing the
simultaneously for three seconds.
utton in programming mode.
button and then press the favorite
channel button you wish to write a text. There are five
LCD pages of favorite channels. Select the page you
or PAGE button.
wish to write on by pressing the
4. The character to be changed on the button you
selected will blink and you can select the character
using the number pad button on the remote control. The
characters assigned to each number pad button are
shown below and it will be rotated to different character
each time the same number pad button is pressed again.
Tip) You can move the cursor left or right using the
joystick. You can also erase a current character by
pressing the cursor down of the joystick.
l.IA[BICI[
2.-I
3.IGIHrII3/
4.1
5-1
6. P Q R 6 7. S T U 7 8.m8(
9.[YI~191blankI 0.101 ! ()ldl~l~lBll~IHItiI
l#l&l(]
)1+1-l .1/l _I (‘1
5. Save the text you completed by pressing the same
favorite channel button you selected in Step 3 again.
button
6. Exit from Edit mode by pressing the
and then exit from SET UP mode by pressing the M
button once again.
1. Go to the programming mode by pressing the
and
R button simultaneously for three set
2. Press the
AL button in programming mode.
3. The LCD display will alternately flash device
names and the three-digit code number assigned to the
device for 10 seconds and then exit to main mode.
1.
o the programming mode by pressing the ~~~
an
T’BR button simultaneously for three seconds.
2. Press the LIGHT button in programming mode.
3. Using the number pad button, enter the desired back
light time (in seconds). It can go up to 99 seconds. Enter
the time by pressing the SAVE button on the LCD.
Tip) Pressing ON button will change it to OFF
eliminating the back light. Pressing the same button
again will restore the back light.
4. Exit from the Set Up mode by pressing the ~~~~
button.
Tip) To turn ofSthe back light manually, press the light
button while the back light is on.
1. Go to thie programming mode by pressing the ~~I~
and ALTAR button simultaneously for three seconds.
2. Press the ~L~~~ button in programming mode.
3. Press either the S D or R~~V button depending
upon the role of the remote
. If the MX-5OOTMis
to be copied from, press the
button. If it is to be
copied into, press the RECV button.
4. If you wish to clone the entire device, press the ALL
button. If you wish to clone only one device at a time,
press the ~~VI~~ button.
5. If you pressed the
button, it will show all
the devices. Press the device button you wish to clone.
6. Set the MX-500TM head to head with another MX500TMto be cloned from as shown below. The both units
should be in either cloning from or cloning to mode
based on the selection in Step 3.
7. Press the 5
button for the both units to execute.
It will take about 40 seconds to complete the cloning
and it will flash “GOOD” upon completion of cloning.
If it flashes “FAIL”, repeat from Step 2.
8. Exit from cloning mode by pressing t
button and then exit from SET UP mode
ng the
button once again.
and
button of joystick simultaneously
the LCD contrast darker and pressin
tton of joystick simultaneously will
contrast lighter.
Please note that the LCD screen is breakable glass. Please
exercise the following precautions when using the MX500TM.
Do not tap the LCD screen to activate devices. Use
the rubberbutton.
Keep the LCD screen dry. Wipe off any spills
immediately. The MX-500TM is not waterproof and
never immerse it in water.
Don’t expose the MX-500TM to extreme temperatures.
Keep it away from heat source.
Avoid dropping the remote control.
Clean the LCD screen with a soft cloth. Never use
abrasives or cleaning solutions.
l
l
l
l
l
If the batteries are running low, LCD displays “LOW
button or you
BATTERY” each time
R buttons simultaneously.
The MX-5OOTM has an internal memory lock system that
retains all the programs and learned functions for an
extended period in the event of battery loss.
The MX-500TM is covered against any manufacturer’s
defects or workmanship for a period of one year from the
date of purchase. The warranty does not cover the
following items:
Batteries.
Damage from misuse, neglect, or acts of nature.
Products which have been modified or incorporated
into other products.
Products purchased more than 16 months from
manufactured date.
Units purchased in “AS IS” condition or units
purchased as “Distressed Merchandise”.
l
l
l
l
l
Range : 40 ft - 60 ft, depending upon components.
Weight : 8 Oz (With batteries)
Size : 3.03” X 9.06” X 1.34”(H X W X D)
Batteries: Four AAA alkaline batteries.
A. List of Preprogrammed LCD Text by Device
AUDIO
SAT
VOL UP
VOL DN
CH UP
IVOLUP
/ VOL DN
1PRESET+
UP
nN
LEFT
RIGHT
SELECT
PLAY
STOP
REW
FF
I<<, MENU
>>I, GUIDE
1UP
I DN
LEFT
RIGHT
SELECT
REAR UP
REAR DN
CENTER DN
CENTER UP
MENUBurr
GUIDE/Center
I
PRE-CH
UP
DN
LEFT
RIGHT
SELECT
PLAY
3
4
PREV CH
UP
DN
LEFT
RIGHT
SELECT
13
I4
T-K:
TV
PRE-CH
UP
DN
LEFT
RIGHT
SELECT
PLAY
STOP
REW
FF
I<<, MENU
>>I, GUIDE
0, EXIT
II, INFO
1
2
7
8
DELET
VCR
PREV CH
UP
DN
LEFT
RIGHT
SELECT
MEMU
GUIDE
CANCEL
INFO
1
2
17
18
PRE-CH
UP
DN
LEFT
RIGHT
SELECT
PLAY
STOP
REW
FF
kc, MENU
>>I, GUIDE
0, EXIT
II, INFO
1
2
3
4
PREV CH
UP
DN
LEFT
RIGHT
SELECT
PLAY
STOP
REW
FF
I<<
>>I
RECORD
PAUSE
1
2
3
4
ND/LPD
CZABLE
_---.
VOL DN
CH
IJP
1VOL DN
ICHUP
-.
DN
LEFT
RIGHT
SELECT
PLAY
STOP
REW
FF
I<<, MENU
>>I, GUIDE
0, EXIT
II, INFO
1
6
7
DN
LEFT
RIGHT
SELECT
PLAY
STOP
REW
FF
MENU
GUIDE
EXIT
INFO
1
16
17
1
2
3
4
5
6
7
8
9
0
DISPLAY
ENTER
1
2
3
4
5
6
7
8
9
0
DISPLAY
ENTER
I
CD
UP
DN
LEFT
RIGHT
SELECT
PLAY
STOP
REW
FF
TAPE
SKIP SKIP +
RIGHT
SELECT
PLAY
STOP
REW
FF
ENTER
1
l
REW
FF
8
9
0
DISPLKY
ENTER
~.....-
18
(9
IO
1DiSPLAY
I,ENTER
I
Note : Because of the variety of
function names for
different components in
this mode, we list them
in A, B, C, D ......on the
LCD. Please write the
appropriate names that
apply to your components.
0007
225 16f
170 202
AtWA
AK.4
AMC
END
2t3211
188
126127128258281282
2%
149
067
099 098
047 Pf4 180 162
062 231
2% 027
008
174
2312332~153~~lt812122?277
216
~~9
129113051
126
101 f48
05%
PERSONAL CABLE
117
519 452
110030
012
151 156 150
SERVICE
TEECOM
OUNTRY
043 074
123
028035~?#5
103
TV
MTC
197004062101
TV
‘TaprK
TOSHIIM
WARDS
39 144 147
15
36 414 123
“.__._
w)40180260~043os3137150150013
03%
d6F~~~Y
JENSEN
N6
KE~W~D
LLOYO
SFARS
--. . .RP
“-------631
TOSHIBA
008Of3~209705907908Zfl213t
‘549 1:
010012~4079~5094
fO7
032
102
037
028 a32
092
015 a28
a71
037
a47
a12 Of3 020
034 051 063
059
011 071 074
052
a%
087 088 089
DVD
CD