1
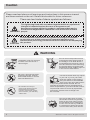
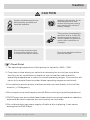
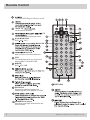
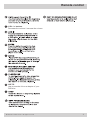
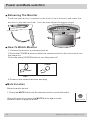
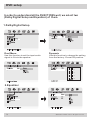
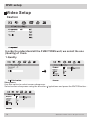
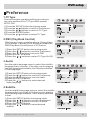
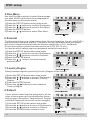
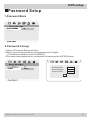
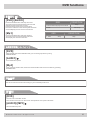
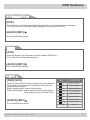
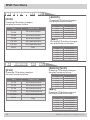
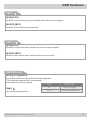
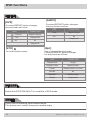
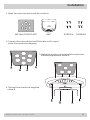
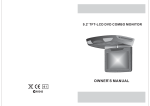
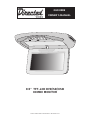
OHD 800B
OWNER’S MANUAL
POW ER
AV
MENU
8.5” TFT-LCD DVD/SD/USB
COMBO MONITOR
© 2007 DIRECTED ELECTRONICS. N83800B 02-07
Contents
Caution.................................................4
System overview..................................6
Remote control.................................... 8
Power and Mode selection................10
Releasing the monitor.....................10
How to watch the monitor................10
Mute function...................................10
AVC (DVD/AV1/AV2) Mode.............11
Picture Control...................................12
Contrast/brightness/color/FM..........12
DVD Setup...........................................13
Setup Menu....................................13
General Setup................................14
TV Display.......................................14
Angle mark......................................14
OSD lang........................................14
Captions..........................................15
Screen saver...................................15
Last memory....................................15
Audio Setup...................................15
Dolby Digital Setup.........................16
Equalizer.........................................16
Video Setup...................................18
Quality.............................................18
Preference.....................................21
TV type...........................................21
PBC................................................21
Audio...............................................21
Subtitle............................................21
Disc menu.......................................22
Parental..........................................22
Country region................................22
Default............................................22
Password setup............................23
© 2007 Directed Electronics. All rights reserved.
Password mode..............................23
Password change...........................23
DVD Functions....................................24
Eject................................................24
Vol...................................................24
Mute................................................24
Play or Pause...................................24
Audio...............................................24
Stop................................................25
Arrows.............................................25
Setup..............................................25
Menu...............................................25
Display............................................26
Number buttons..............................26
Subtitle............................................27
Title.................................................27
Slow................................................27
Fast reverse...................................28
Fast forward...................................28
Prev................................................29
Next................................................29
Repeat A-B......................................29
Repeat...........................................30
NTSC/PAL......................................30
Angle..............................................30
PBC................................................31
Zoom..............................................31
Goto................................................31
Connect diagram................................32
Installation..........................................33
Disc information.................................34
Troubleshooting.................................35
Specifications....................................36
Caution
3OHDVHUHDGDQGREVHUYHDOOZDUQLQJVDQGLQVWUXFWLRQVLQWKLVRZQHUVPDQXDO
DQGWKRVHPDUNHGRQWKHXQLW5HWDLQWKLVERRNOHWIRUIXWXUHUHIHUHQFH
7KHUHDUHWZRNLQGVRIDODUPV\PEROVDVIROORZV
7KHOLJKWHQLQJIODVKZLWKDUURZKHDGV\PEROZLWKLQDQHTXLODWHUDO
WULDQJOHLVLQWHQGHGWRDOHUWWKHXVHUWRWKHSUHVHQFHRI
GDQJHURXVYROWDJH ZLWKLQWKHSURGXFWVHQFORVXUHWKDWPD\EH
RIVXIILFLHQWPDJQLWXGHWRFRQVWLWXWHDULVNRIHOHFWULFVKRFNWR
:$51,1* SHRSOH
&$87,21
7KHH[FODPDWLRQSRLQWZLWKLQDQHTXLODWHUDOWULDQJOHLVLQWHQGHG
WRDOHUWWKHXVHUWRWKHSUHVHQFHRILPSRUWDQWRSHUDWLQJDQG
PDLQWHQDQFHVHUYLFLQJLQVWUXFWLRQVLQWKHOLWHUDWXUHDFFRPSDQ\LQJ
WKHSURGXFW
:$51,1*
3 2 : ( 5 $ 9 0(1 8
,QVWDOODWLRQRIDOO79PRQLWRUV
PXVWEHRXWRIWKHGULYHU¶V
ILHOGRIVLJKW
'RQRWWU\DQGVHUYLFHWKHVH
SURGXFWV\RXUVHOIVHHNDQ
DXWKRUL]HGGHDOHURUFRQWDFW
'LUHFWHG(OHFWURQLFV
%HFDUHIXOQRWWRGURSRU
DSSO\XQGHUSUHVVXUHWRWKH
IURQWSDQHORI\RXUYLGHR
PRQLWRU,IWKHVFUHHQFUDFNV
GXHWRPLVXVH\RXUZDUUDQW\
ZLOOEHYRLG
'RQRWPRXQWWKHSURGXFWZKHUH
LWZLOOREVWUXFWWKHGHSOR\PHQWRI
WKHDLUEDJRULQDQDUHDZKHUHLW
ZRXOGDIIHFWWKHYHKLFXODUFRQWURO
$OVREHFDUHIXOWRDYRLGPRXQWLQJ
WKHSURGXFWZKHUHLWFDQEHFRPH
KD]DUGRXVGXULQJVXGGHQVWRSVRU
LQWKHHYHQWRIDQDFFLGHQW
8VHH[WUDFDXWLRQZLWKDQ\OLTXLGV
LQ\RXUFDU,I\RXRU\RXUFKLOG
VSLOOVDQ\OLTXLGRQWKLVSURGXFW
SXOO\RXUYHKLFOHWRWKHURDGVLGH
DQGWXUQWKHNH\RIIWRGLVFRQQHFW
RUZLSHWKHSURGXFWVZLWKDWRZHO'RQRW
RSHUDWHWKHHTXLSPHQWXQWLODOOOLTXLGVKDYH
HLWKHUHYDSRUDWHGRU\RXKDYHKDGWKHPRQLWRU
LQVSHFWHGDWDVHUYLFHFHQWHUE\DTXDOLILHG
WHFKQLFLDQ6HYHUHKDUPRUGDQJHUFDQ
EHRFFXUUHG
8VHRQO\DGDPSFORWKWRFOHDQ
WKHVFUHHQDQGXVHRQO\SXULILHG
ZDWHURQWKHFORWK:ULQJRXWDOO
H[FHVVZDWHUSULRUWRZLSLQJWKH
VFUHHQ'RQRWXVHDQ\FOHDQHUV
RUFKHPLFDOVWRFOHDQWKHVFUHHQ
,QPRVWFDVHVDGU\FORWKZLOOGR
© 2007 Directed Electronics. All rights reserved.
Caution
&$87,21
4XDOLW\LQVWDOODWLRQVDUHEHVW
SHUIRUPHGE\TXDOLILHGDQG
FHUWLIOHGLQVWDOOHUV
:DWFKLQJWKHPRQLWRUIRUDQ
H[WHQGHGSHULRGRIWLPH
ZLWKRXWWKHHQJLQHUXQQLQJ
PD\GHSOHWHWKHYHKLFOH¶V
EDWWHU\FKDUJH
7KLVSURGXFWLVGHVLJQHGIRU
RSHUDWLRQZLWKD9ROW'&
QHJDWLYHJURXQGYHKLFOH,W
LVQRWVXLWDEOHIRURSHUDWLRQ
XQGHURWKHUFRQGLWLRQVRU
YROWDJHV
'RQRWFRYHURUEORFNYHQWV
,WPD\EHWKHRULJLQRIDILUH
RUUHFHLYHVDQHOHFWULFVKRFN
'RQRWSXWPDJQHWLFGHFLFHV
QHDUWKHPRQLWRU
&KHFN3RLQW
7KHRSHUDWLQJWHPSHUDWXUHRIWKLVSURGXFWLVOLPLWHGWR&a&
)URPWLPHWRWLPHZKHQ\RXUYHKLFOHLVH[WUHPHO\KRWRUFROG\RXPXVWDOORZ
WLPHIRU\RXUDLUFRQGLWLRQHURUKHDWHUWRFRRORUKHDWWKHYHKLFOHDQGIRU
RSHUDWLQJWHPSHUDWXUHVWRUHWXUQWRQRUPDORSHUDWLQJUDQJHV<RXUPRQLWRUZLOO
UHWXUQWRLWVQRUPDOIXQFWLRQVZKHQWKHVHRSHUDWLQJUDQJHVDUHDFKLHYHG
<RXURSWLPXPSLFWXUHTXDOLW\LVDFKLHYHGZKHQ\RXDUHGLUHFWO\LQIURQWRIWKH
PRQLWRUGHJUHHV
'RQRWRSHQFRYHUVDQGUHSDLU\RXUVHOI5HIHUVHUYLFLQJWRTXDOLILHGSHUVRQQHO
'9'3OD\HUVXVHDQLQYLVLEOHODVHUEHDPZKLFKFDQFDXVHKD]DUGRXVUDGLDWLRQ
H[SRVXUH%HVXUHWRRSHUDWHWKHXQLWFRUUHFWO\DVLQVWUXFWGH
'RQRWGLVFRQQHFWFDUSRZHUVXSSO\RIIZKLOHDGLVFLVSOD\LQJ,WFDQFDXVH
GDPDJHWRWKH'9'3OD\HU
© 2007 Directed Electronics. All rights reserved.
System overview
8QLW
/$03
32:(
79
5
087
$XW
02'
0HQ
',6
68%
7
7LWOH
3%&
5(7
851
92/
=22
0
5(3
92/
$%
$8'
(17(
67(
83
5
3
6/2
*27
:
02
2
,2
($7
1,7
$9&
0HQ
31
X
3/$
<
6(7
(
R
(
X
25
5HPRWH&RQWURO(\H
7KLVDOORZVWUDQVPLWWLQJRIWKH
UHPRWHFRQWURO V,5VLJQDOVIRU
FRQWUROOLQJDOOIXQFWLRQVRI\RXU
PRQLWRU
32:(5
$9
0(18
:LUHOHVV,QIUDUHG5HFHLYHU
<RXFDQKHDUWKHVRXQGRI
DXGLRE\XVLQJ
ZLUHOHVVLQIUDUHGKHDGSKRQH
© 2007 Directed Electronics. All rights reserved.
System overview
)81&7,21%XWWRQ
26'GLVSOD\EXWWRQ
32:(5%XWWRQ
'9'3/$<3$86(%XWWRQ
32:(5212))EXWWRQ
32:(5
$9
0(18
5220/$03%XWWRQ 02'(%XWWRQ
'9'79$9$9
92/$'-%XWWRQ
9ROXPHFRQWURODQG
DGMXVWEXWWRQIRUHDFKPHQX
(-(&7%XWWRQ
32:(5
$9
'LVFORDGLQJVORW
0(18
$8;,QSXW-DFN
5
$8',2 /
9,'(2
$9,13876
; &DXWLRQ
6',QSXW 86%,QSXW
'RQRWSXWPDJQHWLFGHYLFHV
QHDUWKHPRQLWRU
© 2007 Directed Electronics. All rights reserved.
Remote Control
5HPRWH&RQWUROOHU
7XUQVWKH'9'3OD\HU8QLWRQRURII
79
$XWR79
$XWRPDWLFVHDUFK
$XWR
79
8VHWRPRYHWRWKHGHVLUHGPHQX
$9& 021,725
'9'$9$9
$9&
0HQX
31
02'(
68%7
0HQX
」 021,725
021,725
087(
32:(5
7LWOH
',63/$<
3%&
5(7851
021,725
8VHWRPRYHWRWKHGHVLUHGPHQX
31
7KLVEXWWRQSHUPLWV\RXWRFKRRVH
DPRQJ0XOWL3$/DQG176&
02'(
'9'6'86%
6(783
5(3($7
$%
$8',2
92/
92/
=220
(17(5
*272
67(3
6/2:
5(7851
',63/$<
6KRZLQIRUPDWLRQRIHODSVHGRU
UHPDLQLQJWLPHRIDFKDSWHURUDWLWOH
180(5,&EXWWRQ
8VHZKHQPDNLQJDVHOHFWLRQRQWKH
PHQXVFUHHQ
© 2007 Directed Electronics. All rights reserved.
Remote control
92/EXWWRQ
'HFUHDVHWKHYROXPH,QFUHDVHWKHYROXPH
*272
8VHWRVHDUFKDWLWOHRUDFKDSWHURI\RXU
'9'GLVF
© 2007 Directed Electronics. All rights reserved.
Power and Mode selection
5HOHDVLQJ7KH0RQLWRU
3 X V KW K HR S H QE X W W R Q O R F D W H GR QW K HI U R Q WR I\ R X UV F U H H Q D Q GO R Z H UW K H
P R Q L W R UW RW K HG H V L U H GO H Y H O <R XF D QD O V RD G M X V WW K HV Z L Y H OD Q J O H
32:(5
$9
0(18
PUSH BUTTON
+RZ7R:DWFK0RQLWRU
&RQQHFWWKHPRQLWRUWRH[WHUQDOGHYLFHV
3UHVVWKH32:(5EXWWRQRQHLWKHUWKHUHPRWHFRQWURORUWKHXQLWRQFHWRWXUQ
WKHSRZHURQ
3UHVVWKHVDPH32:(5EXWWRQWRWXUQWKHSRZHURII
32:(5
32:(5
81,7
5(027(&21752//(5
3RZHURQWKHH[WHUQDOGHYLFHVDQGSOD\
0XWH)XQFWLRQ
0XWHWKHDXGLRVRXQG
3UHVVWKH087(EXWWRQRQWKHUHPRWHFRQWUROWRPXWHWKHDXGLR
087(
:KHQWKHPXWHLVRQSUHVVWKH087(EXWWRQDJDLQRQWKH
UHPRWHFRQWUROWRSOD\WKHDXGLR
10
5HPRWH&RQWUROOHU
© 2007 Directed Electronics. All rights reserved.
Power and Mode selection
AVC (DVD/AV1/AV2) Mode
1.Connect the external devices as shown in the picture on the right.
(Refer Connection Diagram).
CAMCORDER
GAME
AV Input (Av1)
AV Output
AV Input
(Av2)
R
AUDIO L
VIDEO
AV2 INPUTS
2.Turn the power ON the unit and external devices.
3.Select the DVD/AV1/AV2 mode by pressing the AVC button on the unit
or on the remote control.
4.Play the external device.
© 2007 Directed Electronics. All rights reserved.
11
Picture Control
&2175$67%5,*+71(66&2/25)0
6HOHFWWKHRQHRI&2175$67%5,*+71(66&2/25)0DQGFKDQJHWKHSLFWXUH
FRQGLWLRQDV\RXUWDVWH
%ULQJXSWKHRQVFUHHQIXQFWLRQPHQXE\SUHVVLQJ
WKH0(18EXWWRQRQWKHXQLWRUWKHUHPRWHFRQWURO
RIPRQLWRU
&2175$67
6HOHFWWKHGHVLUHGPHQXE\SUHVVLQJWKH0(18EXWWRQ
RQWKHXQLWRUWKHUHPRWHFRQWURORIPRQLWRU
%5,*+71(66
6HOHFWWKHGHVLUHGPHQXE\SUHVVLQJWKH0(18EXWWRQ
RQWKHXQLWRUWKHUHPRWHFRQWURORIPRQLWRU
&2/25
6HOHFWWKHGHVLUHGPHQXE\SUHVVLQJWKH0(18EXWWRQ
RQWKHXQLWRUWKHUHPRWHFRQWURORIPRQLWRU
)0
)0IXQFWLRQDGGHG0+]
6HOHFWWKHGHVLUHGPHQXE\SUHVVLQJWKH0(18EXWWRQ
RQWKHXQLWRUWKHUHPRWHFRQWURORIPRQLWRU
5HVHW
12
© 2007 Directed Electronics. All rights reserved.
DVD setup
Setup Menu-Main Page
An invalid button press.
When the SETUP button is pressed, the setup menu will display as shown below.
Select the menu category and modify according to individual preference.
1.Press the STOP button if the disc is playing.
2.Press the SETUP button to display setup menu.
General Setup Page
TV Display
Angle Mark
OSD Lang
Captions
Screen Saver
Last Memory
PS
On
ENG
On
On
On
Go To General Setup Page
2.Use the
ENTER
button to select and set desired setting and items.
3.Press the SETUP (A.MEMO) button again to turn off the setup menu.
© 2007 Directed Electronics. All rights reserved.
13
DVD setup
General Setup
1.TV Display
You can select a TV screen aspect ratio according to your TV.
If the TV on which the movie is player ーWIDE type, choose ーEIDE. If it is of
4:3 type, choose NORMAL/PS (Pan&Scan) or NORMAL/LB(Letter BOX).
Normal / PS 4:3 PAN SCAN
Choose this setting if you want the movie to fill the entire screen.
(This might mean that the left and right edges won t be seen)
Normal / LB 4:3 LET TERBO
Choose this setting if you want to see movie in their original aspect ratio.
(The movie might appear with black bars at the top and bottom of the screen.)
Wide 16:9 WIDE SCREEN
Choose this setting if your DVD Player is connected to a widescreen TV.
(This option is available only if the disc has a 16:9 display aspect ratio.)
Wide 16:9 Squeeze
Choose this setting if your DVD Player is connected to a widescreen TV.
(This option is available only if the disc has a 16:9 display aspect ratio.)
Caution
This option is available only when the disc has the function.
General Setup Page
TV Display
Angle Mark
OSD Lang
Captions
Screen Saver
Last Memory
PS
On
ENG
On
On
On
Normal/PS
Normal/LB
Wides
wide Squeeze
Set TV Display Mode
2.Angle Mark
You can set up so that the angle mark appears on
scenes.
On : When selected, the screen will be shown with
angle mark.
Off : When selected, no angle mark is shown on
the screen.
General Setup Page
TV Display
Angle Mark
OSD Lang
Captions
Screen Saver
Last Memory
PS
On
ENG
On
On
On
On
Off
Set Angle Mark
3.OSD Lang
Use this option to set the OSD language.
When selected, change to set the on-screen display
language.
General Setup Page
TV Display
Angle Mark
OSD Lang
Captions
Screen Saver
Last Memory
PS
On
ENG
On
On
On
English
ヨミホト
Set OSD Language
14
© 2007 Directed Electronics. All rights reserved.
DVD setup
4.Captions
Adjust caption selection.
On: Choose this setting to display captions.
Off: Choose this setting to close captions.
5.Screen Saver
The screen saver is useful to prevent your display
from becoming damaged. The screen saver picture
appears when you leave the DVD player in stop mode
for about two minutes.
6.Last Memory
Adjust last memory selection.
When start your car or turn on/off the DVD player,
search the last player scene.
When eject and close the disc, this function
is not working.
Audio Setup
Caution
General Setup Page
TV Display
Angle Mark
OSD Lang
Captions
Screen Saver
Last Memory
PS
On
ENG
On
On
On
On
Off
Closed Gaption
General Setup Page
TV Display
Angle Mark
OSD Lang
Captions
Screen Saver
Last Memory
PS
On
ENG
On
On
On
On
Off
Screen Saver
General Setup Page
TV Display
Angle Mark
OSD Lang
Captions
Screen Saver
Last Memory
PS
On
ENG
On
On
On
On
Off
Set Last Memory State
Genaral Setup Page
Speaker Setup
Spdif Setup
Dolby Digital Setup
Channel Delay
Equalier
3D Prosessing
HDCD
Go To Speaker Setup Setup
© 2007 Directed Electronics. All rights reserved.
15
DVD setup
,QRUGHUWRXQGHUVWDQGDOOWKH)81&7,216ZHOOZHVHOHFWWZR
'ROE\'LJLWDO6HWXSDQG(TXDOL]HURIWKHP
'ROE\'LJLWDO6HWXS
Genaral Setup Page
Dalby Digital Setup
Speaker Setup
Spdif Setup
Dolby Digital Setup
Channel Delay
Equalier
3D Prosessing
HDCD
Dual Mone
Dynamic
Go To Dolby Digital Setup
Dual Stereo Setup
'XDO0RQR
8VHWKLVIXQFWLRQWRVHWWKHLQSXWDXGLR
VLJQDOWRILWLQWRWKHVSHDNHU
Mix
Stereo
L-Mono
R-Mono
Mix-Mono
'\QDPLF
8VHWKLVIXQFWLRQWRFKDQJHWKHVHWWLQJ
IURPWKHIDFWRU\3UHVHW2IISRVLWLRQ
Dalby Digital Setup
Dalby Digital Setup
Dual Mone
Dynamic
Mix
Stereo
L-Mono
R-Mono
Mix-Mono
Dual Mono
Dynamic
Mix
FULL
3/4
1/2
1/4
OFF
Dual Stereo Setup
Set DRC Off
(TXDOL]HU
Genaral Setup Page
Equalizer Page
Speaker Setup
Spdif Setup
Dolby Digital Setup
Channel Delay
Equalier
3D Prosessing
HDCD
EQ Type
Bass Boost
Super Bass
Treble Boost
Go To Dolby Digital Setup
Select Equalizer Type
16
None
Off
Off
Off
None
Rock
Pop
Live
Dance
Techno
Classic
Soft
© 2007 Directed Electronics. All rights reserved.
DVD setup
EQ Type
This unit can product a 3D surround effect,using 3D
Surround Sound technology.
Choose the desired preset equalizer mode.
(None,Rock,Pop,Live,Dance,Techno,Classic,Soft)
Equalizer Page
EQ Type
Bass Boost
Super Bass
Treble Boost
None
Off
Off
Off
None
Rock
Pop
Live
Dance
Techno
Classic
Soft
Select Equalizer Type
Bass Boost
This Function is enhanced at low levels without
distorting other frequencies.
Equalizer Page
EQ Type
Bass Boost
Super Bass
Treble Boost
None
Off
Off
Off
On
Off
Boss Boost
Super Bass
This function is more enhanced at low levels without
distorting other frequencies.
Equalizer Page
EQ Type
Bass Boost
Super Bass
Treble Boost
None
Off
Off
Off
On
Off
Super Boost
Treble Boost
This function is enhanced at high levels without
distorting other frequencies.
Equalizer Page
EQ Type
Bass Boost
Super Bass
Treble Boost
None
Off
Off
Off
On
Off
Truble Boost
© 2007 Directed Electronics. All rights reserved.
17
DVD setup
Video Setup
Caution
Video Setup Page
Component
off
Off
TV Mode
YUV
Quality
RGB
VGA
Component
In order to understand all the FUNCTIONS well, we select the one
(Quality) of them.
1.Quality
Video Setup Page
Component
Video Quality Setup
off
Quality
Sharpness
Brightness
Contrast
Gamma
Hue
Saturation
Luma Delay
Go TO Video Setup Page
Sharpness
TV Mode
Sharpness
Use this option to select screen sharpness.
Select screen sharpness using the direction
/
Low
00
00
None
00
00
1T
High
Medium
Low
buttons and press the ENTER button..
Video Quality Setup
Sharpness
Brightness
Contrast
Gamma
Hue
Saturation
Luma Delay
Low
00
00
None
00
00
1T
High
Medium
Low
Sharpness
18
© 2007 Directed Electronics. All rights reserved.
DVD setup
Brightness
Use this option to select brightness.
Adjust overall screen brightness using the direction / buttons
and press the ENTER button.
Video Quality Setup
Sharpness
Brightness
Contrast
Gamma
Hue
Saturation
Luma Delay
Low
00
00
None
00
00
1T
Brightness
Brightness
0
Brightness
Contrast
Use this option to select screen contrast.
Select screen contrast using the direction / buttons and press the ENTER button.
Contrast adjusts the image quality by increasing or decreasing the ratio of bright
and dark screen section.
Video Quality Setup
Sharpness
Brightness
Contrast
Gamma
Hue
Saturation
Luma Delay
Low
00
00
None
00
00
1T
Contrast
© 2007 Directed Electronics. All rights reserved.
Contrast
0
Contrast
19
DVD setup
Gamma
Select screen gamma using the direction / buttona and press the ENTER button.
Gamma adjustment is to revive the dark screen section by raising the level of dark
section,while leaving the bright screen section unchanged.
Video Quality Setup
Sharpness
Brightness
Contrast
Gamma
Hue
Saturation
Luma Delay
Low
00
00
None
00
00
1T
High
Medium
Low
None
Gamma
Hue
Select screen hue level using the direction
/
buttons and press the ENTER button.
Video Quality Setup
Sharpness
Brightness
Contrast
Gamma
Hue
Saturation
Luma Delay
Low
00
00
None
00
00
1T
Hue
Hue
0
Hue
Saturation
Select screen saturation level using the direction
ENTER button.
/
buttons and press the
Video Quality Setup
Sharpness
Brightness
Contrast
Gamma
Hue
Saturation
Luma Delay
Low
00
00
None
00
00
1T
Saturation
Saturation
0
Saturation
Luma Delay
Select the Luma Delay menu and select the preferred video image quality.
Video Quality Setup
Sharpness
Brightness
Contrast
Gamma
Hue
Saturation
Luma Delay
Low
00
00
None
00
00
1T
00
1T
Luma Delay
20
© 2007 Directed Electronics. All rights reserved.
DVD setup
Preference
1.TV Type
Choose a proper operating setting according to
the color system of the TV Type-Multi system.
MTSC,PAL.
1)Press the SETUP button during stop mode.
2)Press the / buttons to move to Preference.
3)Press the / buttons to move to TV Type.
4)Press the ENTER button.
5)Press the / buttons to select TV Type.
Preference Page
TV Type
PBC
Audio
Subtitle
Disc Menu
Parental
Country Region
Default
PAL
On
ENG
PAL
Multi
NTSC
ENG
USA
Set TV Standard
2.PBC (Play Back Control)
This feature is only available when a (Super)Video
CD is loaded. It allows you to disable or enable the
PBC(Play Back Control)menu of VCD discs.
1)Press the SETUP button during stop mode.
2)Press the / buttons to move to Preference.
3)Press the / buttons to move to PBC.
4)Press the ENTER button.
5)Press the / buttons to select TV Type On/Off.
Preference Page
TV Type
PBC
Audio
Subtitle
Disc Menu
Parental
Country Region
Default
PAL
On
ENG
On
Off
ENG
USA
Set PBC State
3.Audio
Use the audio language menu to select the subtitle
language that you prefer. If the disc you are playing
has that language available,it will display subtitles
in that language.
1)Press the SETUP button during stop mode.
2)Press the / buttons to move to Preference.
3)Press the / buttons to move to Audio.
4)Press the ENTER button.
5)Press the / buttons to select desired
audio language.
Preference Page
TV Type
PBC
Audio
Subtitle
Disc Menu
Parental
Country Region
Default
PAL
On
ENG
ENG
USA
English
French
Spanish
Chinese
Japanese
Korean
Russian
Thai
Preferred Menu Language
4.Subtitle
Use the subtitle language menu to select the subtitle
language that you prefer.If the disc you are playing
has that language available. It will display subtitles
in that.
1)Press the SETUP button during stop mode.
2)Press the / buttons to move to Preference.
3)Press the / buttons to move to Subtitle.
4)Press the ENTER button.
5)Press the / buttons to select desired
subtitle.
Preference Page
TV Type
PBC
Audio
Subtitle
Disc Menu
Parental
Country Region
Default
PAL
On
ENG
ENG
USA
English
French
Spanish
Chinese
Japanese
Korean
Russian
Thai
Preferred Menu Language
© 2007 Directed Electronics. All rights reserved.
21
DVD setup
5.Disc Menu
Use the Disc Menu option to select the language
you want a DVD s disc menu to be displayed in
(not the same as the player menu)
1)Press the SETUP button during stop mode.
2)Press the / buttons to move to Preference.
3)Press the / buttons to move to Disc Menu.
4)Press the ENTER button.
5)Press the / buttons to select Disc Menu.
Preference Page
TV Type
PBC
Audio
Subtitle
Disc Menu
Parental
Country Region
Default
PAL
On
ENG
ENG
00
USA
English
French
Spanish
Chinese
Japanese
Korean
Russian
Thai
Preferred Menu Language
6.Parental
The Parental feature is a rating limit system, like movie ratings. It works with DVD s
that have been assigned a rating. This option lets you determine how your player
will react to discs that contain movies that are rated(in the U.S.A.,the Motion
Picture Association of America rates movies as G,PG,PG-13,etc.).
You decide which ratings require a password and which ones don t.
1)Press the SETUP button when stop mode.
2)Press the / buttons to move to Preference.
3)Press the / buttons to move to Parental.
4)Press the ENTER button.
5)Press the /
buttons to select desired
parental level.
7.Country Region
Preference Page
TV Type
PBC
Audio
Subtitle
Disc Menu
Parental
Country Region
Default
PAL
On
ENG
ENG
00
USA
1 KID SAF
2G
3 PG
4 PG 13
5 PGR
6R
7 Nc17
8 ADULT
Preferred Menu Language
Select parental region by pressing Country Region on the screen.
1)Press the SETUP button when stop mode.
2)Press the / buttons to move to Preference.
3)Press the / buttons to move to Country
Region.
4)Press the ENTER button.
5)Press the
/ buttons to select desired
Country Region.
8.Default
If user selects reset from the setup menu, all the
value of setup menu will be initialized by factory
setting value.(Exception: Parental level, Region
code and Password values will not be changed)
1)Press the SETUP button when stop mode.
2)Press the / buttons to move to Preference.
3)Press the / buttons to move to Default.
4)Press the ENTER button to select reset.
Preference Page
TV Type
PBC
Audio
Subtitle
Disc Menu
Parental
Country Region
Default
PAL
On
ENG
ENG
USA
China
France
Hongkong
Japan
Taiwan
GBR
USA
PG Country Region Gods
Preference Page
TV Type
PBC
Audio
Subtitle
Disc Menu
Parental
Country Region
Default
PAL
On
ENG
ENG
USA
Reset
Load Factory Setting
22
© 2007 Directed Electronics. All rights reserved.
DVD setup
Password Setup
1.Password Mode
Password Setup Page
Password Mode On
Password
On
Off
Password Mode
2.Password Change
1)Select Password Setup sub item.
2)Enter your old password,and new password in 6 digits.
(The default password code is 000000)
3)Re-enter new password for confirmation then press the ENTER button.
Password Setup Page
Password Mode On
Password
On
Change
Old Password
New Password
Confirm PWD
OK
Change Password
© 2007 Directed Electronics. All rights reserved.
23
DVD functions
EJECT
Pressing the EJECT button changes the play mode as the text to the right illustrates.
When you insert your DVD disc into the DVD player, LOADING” will appear
on the screen. Then the DVD disc is player automatically.
VOL+/VOLTo adjust the audio output level of the speaker from 0 to 20.
MUTE
Pressing of the MUTE button changes the
play mode.
PLAY OR PAUSE(
OSD
CONDITION
Mute
Mute
Mute off
Mute off
OSD
CONDITION
)
[DVD]/[AUDIO]/[MP3]
Use this button to select a particular scene or play the
disc. Most DVD discs will play automatically.
Play Disc
Pause
AUDIO
[DVD]
Change the audio output type.
(If the loaded disc supports available audio type.)
[VCD]/[AUDIO]
Changes the audio output type.
(If loaded disc supports available audio type.)
[Mp3]
An invalid button press.
24
OSD
CONDITION
1 / 2 : Ac3 2CH English
2 Channel
2 / 2 : Ac3 5.1CH English
5.1 Channel
OSD
CONDITION
Stereo
Stereo
Mono Left
Mono Left
Mono Right
Mono Right
Mix Mono
Mix Mono
© 2007 Directed Electronics. All rights reserved.
DVD functions
6723
>'9'@>$8',2@
3UHVVWKH6723EXWWRQDQGVWRSWKHPRYLH
$QGWKHQ3UHVVWKH3OD\3DXVHEXWWRQDQGZLOO
GLVSOD\WKHODVWVFHQHRIWKHPRYLH
3UHVVWKH6WRSEXWWRQWZRWLPHVDQGVWRS
WKHPRYLH$QGWKHQ3UHVVWKH3OD\3DXVHEXWWRQ
DQGZLOOGLVSOD\WKHILUVWVFHQHRIWKHPRYLH
26'
7LPH3UHVV3OD\.H\7R&RQWLQXH
7LPH
>0S@
3UHVVWKH6723EXWWRQDQGVWRSWKH'LVF
$QGWKHQ3UHVVWKH3OD\3DXVHEXWWRQDQG
ZLOOGLVSOD\WKHILUVWILOHRIWKH'LVF
&21',7,21
6WRS
'LVF6WRS
26'
&21',7,21
7LPH6WRS
6WRS
$552:6
>'9'@
:KHQGLVSOD\WKH'9'LQ=220PRGH\RXFDQFKDQJHSRVLWLRQE\XVLQJ
$552:EXWWRQ
>$8',2@
$QLQYDOLGEXWWRQSUHVV
>0S@
$IWHUSUHVVLQJ6723EXWWRQVHOHFWWKHGHVLUHGIROGHUDQGVHWWKHFRQGLWLRQE\SUHVVLQJ
(17(5EXWWRQ
6(783
8VHWRVHWYDULRXVIXQFWLRQVDFFRUGLQJWR\RXULQGLYLGXDOSUHIHUHQFH
0(18
>'9'@
7KHPHQXRID'9'GLVFYDULHV
7KHFRQWHQWRIWKHPHQXRQWKHVFUHHQLVGHSHQGHQWRQWKHSDUWLFXODU'9'
>$8',2@>03@
$QLQYDOLGEXWWRQSUHVV
© 2007 Directed Electronics. All rights reserved.
25
DVD functions
DISPLAY
[AUDIO]
[DVD]
Pressing button DISPLAY on the
remote control changes the play mode as
follows:
OSD
CONDITION
Pressing display button displays
information about the current CD on the
screen as follows:
OSD
CONDITION
Title Elapsed
Display the Title Elapsed
Single Elapsed
Display the single elapsed
Title Remain
Display the Title Remain
Single Remain
Display the single remain
Chapter Elapsed
Display the Chapter Elapsed
Total Elapsed
Display the total elapsed
Chapter Remain
Display the Chapter Remain
Total Remain
Display the total remain
Display Off
No sign
[Mp3]
[VCD]
Whenever press the button,title chapter
will be displayer as follows:
OSD
CONDITION
Single Elapsed
Display time
Single Remain
Left display time
Display Off
Your DVD player will display the counter
automatically when you play the Mp3 disc.
No sign
NUMBER BUTTONS
[DVD]
The 0 through 9 number buttons are used to enter the number of the track,the number
of the DVD chapter,time date,etc.
[AUDIO]
You can select a track by pressing the
corresponding number button.
[DVD]
You can select a track in the folder by
pressing the corresponding number button.
26
OSD
CONDITION
Select Track:__
OSD
__:__
Select track no
CONDITION
Select track no
© 2007 Directed Electronics. All rights reserved.
DVD functions
SUBTITLE(SUB-T)
[DVD]
This button is used to select the language for on-screen display message.
(This title menu is different,depending on the particular DVD.)
[AUDIO]/[MP3]
An invalid button press.
TITLE
[DVD]
Used to display the title menu of the loaded DVD disc.
(This function is disc-dependent.)
[AUDIO]/[MP3]
An invalid button press.
SLOW( )
[DVD]/[VCD]
Used to play a disc in slow forward or slow reverse.
This allows you to search forward three steps to
reverse three steps.
Slow forward play: press slow button.
Slow rewind play: press slow button and forward
button again.(not in work VCD)
[AUDIO]/[MP3]
An invalid button press.
© 2007 Directed Electronics. All rights reserved.
OSD
CONDITION
1/2
2X slow forward
1/4
4X slow forward
1/8
8X slow forward
1 / 16
16X slow forward
1/2
2X slow rewind
1/4
4X slow rewind
1/8
8X slow
Single
playrewind
1 / 16
Play
16X slow rewind
Play
27
DVD functions
FAST REVERSE SEARCHING( )
[AUDIO]
[DVD]
Pressing FR button changes
the play mode as follow:
OSD
CONDITION
FR 2X
2X rewind search
FR 4X
4X rewind search
FR 8X
8X rewind search
FR 16X
16X rewind search
FR 32X
32X rewind search
PLAY
Play
Pressing FR button changes
the play mode as follow:
OSD
CONDITION
FR 2X
2X rewind search
FR 4X
4X rewind search
FR 8X
8X rewind search
FR 16X
16X rewind search
FR 32X
32X rewind search
PLAY
Play
[Mp3]
Pressing FR button changes
the play mode as follows:
OSD
CONDITION
FR 2X
2X rewind search
FR 4X
4X rewind search
FR 8X
8X rewind search
FR 16X
16X rewind search
FR 32X
32X rewind search
PLAY
Play
FAST FORWORD SEARCHING( )
[AUDIO]/[VCD]
[DVD]
Pressing FR button changes
the play mode as follow:
OSD
28
CONDITION
FF 2X
2X forward search
FF 4X
4X forward search
FF 8X
8X forward search
FF 16X
16X forward search
FF 32X
32X forward search
PLAY
Play
Pressing FR button changes
the play mode as follow:
OSD
CONDITION
FF 2X
2X forward search
FF 4X
4X forward search
FF 8X
8X forward search
FF 16X
16X forward search
FF 32X
32X forwardsearch
PLAY
Play
[Mp3]
Pressing FR button changes
the play mode as follows:
OSD
CONDITION
FF 2X
2X forward search
FF 4X
4X forward search
FF 8X
8X forward search
FF 16X
16X forward search
FF 32X
32X forwardsearch
PLAY
Play
© 2007 Directed Electronics. All rights reserved.
DVD functions
PREV(
)
[DVD]/[VCD]
Used to move to the previous chapter from the current chapter.
[AUDIO]/[MP3]
Used to move to the previous track.
NEXT(
)
[DVD]/[VCD]
Used to move to the next chapter from the current chapter.
[AUDIO]/[MP3]
Used to move to the next track from the current track.
REPEAT(A-B)
[DVD]/[VCD]/[AUDIO]
Press this button to repeat the selected segment.
The selected segment will be repeated
automatically until canceled.
OSD
[Mp3]
An invalid button press.
© 2007 Directed Electronics. All rights reserved.
A
A
CONDITION
Start point of repeat
B
Ending point repeat function
29
DVD functions
REPEAT
[AUDIO]
[DVD]
Pressing REPEAT button changes
the play mode as follow:
OSD
Chapter
Title
All
Pressing REPEAT button changes
the play mode as follow:
CONDITION
Repeat chapter
OSD
CONDITION
Track
Repeat single
All
Repeat title
All
Repeat off
All
Repeat off
[VCD]
An invalid button press.
[Mp3]
Use to change the play mode.
Pressing REPEAT button changes
the play mode as follows:
OSD
CONDITION
Repeat One
Single
Repeat Folder
Repeat folder
Folder
Repeat folder one time
Shuffle
All
Random
Random play
Single
Single play
NTSC/PAL
Select the NTSC/PAL/MULTI in condition of DVD mode.
ANGLE
Select ON for watching other camera angle.
This button can t control the preset camera angle.
30
© 2007 Directed Electronics. All rights reserved.
DVD functions
3%&
>'9'@>$8',2@>03@
$QLQYDOLGEXWWRQSUHVV
>9&'@
<RXFDQWXUQWKH3%&3OD\%DFN&RQWUROIXQFWLRQRQRURIIE\SUHVVLQJWKLVEXWWRQ
:KHQ3%&LVORDGHGWKH3%&IXQFWLRQLVHQDEOHGDXWRPDWLFDOO\7KLVIXQFWLRQLV
VLPLODUDVVHOHFWLRQRI'9'WLWOHQRWDYDLODEOHZLWK0S
=220
>'9'@
26'
;
3UHVVLQJ=220EXWWRQFKDQJHV
WKHSOD\PRGHDVWKHWH[WWRWKHULJKWLOOXVWUDWHV
>9&'@>$8',2@>03@
$QLQYDOLGEXWWRQSUHVV
&21',7,21
;
=220;
=220;
;
=220;
=220;
=220;
=220;
2II
*272
:KHQ:DWFKLQJ'9'DYDLODEOHWRFRQWUROWKH0HQX
7LWOH
0RYHWRWKHGHVLUHGWLWOH
&KDSWHU
0RYHWRWKHGHVLUHGFKDSWHU
$XGLR
6HOHFWVWKHGHVLUHGDXGLRRXWSXW
6XEWLWOH
6HOHFWWKHGHVLUHGVXEWLWOH
0HQX
7LWOH
&KDSWHU
$XGLR
6XEWLWOH
$QJOH
:DWFKWKHGLIIHUHQWYLHZDQJOH
777LPH
7RWDOWLPH
&+7LPH
%LWUDWH
&+&KLQHVH
2))
7LWOH(ODSVHG
&KDSWHUWLPH
5HSHDW
6HWVWKHUHSHDWSOD\
7LPH'LVSOD\
:DWFKSOD\WLPH
© 2007 Directed Electronics. All rights reserved.
31
Connection diagram
*$0(
:KLWH$8',2/
5HG$8',25
<HOORZ9,'(2
:KLWH$8',2/
*$0(
5HG$8',25
<HOORZ9,'(2
&$0&25'(5
&$0&25'(5
$9,QSXW
$9
$&&
$9,QSXW
$9
<(//2:
:KLWH$8',2/
5HG$8',25
<HOORZ9,'(2
$03
021,725
32:(5
$9
0(18
92/
92/
$9
2XWSXW
79
32
)0$17(11$
© 2007 Directed Electronics. All rights reserved.
Installation
1.Open the color box and check the contents.
INSTALLATION PLATE
UNIT
SCREW A
SCREW B
2.Connect the external devices RCA cable or AV output.
(refer the connection diagram)
3.Match the position of installation bracket and
installation plate with screw A.
4.Tighten the unit with the supplied
screw B.
© 2007 Directed Electronics. All rights reserved.
33
Disc information
DVD features
DVD discs provide high-resolution images with high-quality sound and surround
sound effects. This DVD player can play not only DVD discs of various versions,but
also S-VCD, VCD,audio CD and Mp3 discs. Each disc plays only the information
saved on it, and some functions cannot be utilized.
Discs that cannot be played
DVD-RW,DVD-REM,CD-ROM,CD-EXTRA discs cannot be played on this unit. Also,
a CD or a CD-RW which was recorded on special software cannot be played.
Region code
Your DVD player is designed and manufactured to region management information
that is recorded on a DVD disc. Please check the region code.
1: North America
2: Japan
3: Korea and Southeast Asia
4: Australia, Mid & South America
5: Russia
6: China
Copyright protection
This product incorporates copyright protection technology that is protected by
methods claims of certain U.S. Patents and other intellectual property rights owned
by the Macrovision Corporation and other rights. Owner。ッs use of this copyright
protection technology must be authorized by the Macrovision Corporation,and is
intended for home and other limited viewing uses only unless otherwise authorized
by the Macrovision Corporation.
How to handle the disc
Don。ッt touch the shiny side of the disc (the side with the embedded information).
Don。ッt stick a label or a glue-based note on either side of the disc. Don。ッt use discs
that have glue or a damaged gluey label-it might result in damage to your DVD player.
Don。ッt put discs in the sunshine. Park your car in the shade.
How to handle the disc
Wipe softly with a wet cloth and then with a dry one.
Before playback, wipe the disc outward from the center with a clean cloth.
Do not use any type of solvent such as thinner, benzene,commercially-available
cleaners or antistatic spray.
To avoid damaging your DVD player, don。ッt use a scratched disc.
34
© 2007 Directed Electronics. All rights reserved.
Troubleshooting
Symptom
Items to Check
Actions to be Taken
Button does not work.
Is the power turned on?
Check the car battery capacity.
No sound
Is the audio which is connected with
the audio cable set to receive
the DVD signal output?
Select the correct input mode for the audio receiver.
Is audio cable is connected securely?
Is the monitor which is connected
with the audio cable turned on?
Is the digital audio output set
in the correct position?
Remote control does
not work properly.
Unable to receive TV
broadcasting.
Connect the audio cable into the jacks securely.
Turn on the monitor connected with the audio
cable.
Set the Digital Audio Output to the correct position,
and then turn on the DVD player again by pressing
the POWER button.
Is the remote contro facing
at the remote sensor?
Point the remote control to the remote sensor of the
product.
Is the distance too far?
Is there any obstacle in the middle?
Is the battery exhausted?
Remove the obstacle.
Is the antenna connected properly?
Check antenna connection.
Use the remote control within 5m.
Replace with new batteries.
Check point
When a disc is brought from a cold environment to a hot one,there may be steam on the
face of the disc,or water will appear on the pickup lens.It will be affected disc play.
1.Remove the disc from the DVD player.
2.Turn on the power and leave it on for an hour to vaporize the condensation.
3.You can operate the DVD player without any problems.
© 2007 Directed Electronics. All rights reserved.
35
Specifications
Power
DC 12V
Screen Format
16:9
Resolution Pixel
1440x234
Color System
N T S C / PA L A u t o S e l e c t
A/V Input
D V D - AV 1 - AV 2
A/V Output
1 EA
Dimension
10.6(L)X9.9(W)X2.0(H)inch
Note : This equipment has been tested and has been found to comply
with the limits for a Class A digital device, pursuant to part 15 of the
FCC Rules. These limits are designed to providereasonable protection
against harmful interference whenthe equipment is operated in a
commercial environment. This equipment generates, uses, and can
radiate radio frequency energy and , if not installed and used in
accordance with the instruction manual, may cause harmful interference
to radio communications. Operation of this equipment in a residential
area is likely to cause harmful interference in some case the user will be
required to correct the interference at his own expense.
36
© 2007 Directed Electronics. All rights reserved.
NON-TRANSFERABLE LIMITED CONSUMER WARRANTY
Directed Electronics herein “Directed” promises to the original purchaser that the automotive video monitor and/or source unit(s) (the Product), excluding accessories, purchased and installed from a Directed
authorized dealer within the ninety (90) days after purchase of the new vehicle, in which the Product is installed, is free from defects in materials or workmanship under normal use and conditions for a period of
three (3) years from date of purchase or the first 36,000 miles as registered on the new vehicle’s odometer
reading at time of delivery of the Product for warranty service, whichever occurs first. Product purchased
or installed more than ninety (90) days after the new vehicle is purchased are warranted for a period of
one (1) year from date of purchase of the Product.
Directed promises to the original purchaser that all video accessories will be free from defects in materials and workmanship under normal use and condition for a period of ninety (90) days after the date of
purchase. A sales receipt and/or warranty registration card is required to provide proof of date of purchase
of the Product or accessories. Should the Product be determined defective during the applicable warranty period, the Product will be repaired or replaced with a new or comparable reconditioned part(s),
at Directed’s option. To obtain warranty service, the Product must be returned to a Directed authorized
dealer along with proof of purchase and installation.
Note: This warranty does not cover labor costs for the removal and reinstallation of the Product. IN
ORDER FOR THIS WARRANTY TO BE VALID, YOUR PRODUCT MUST BE SHIPPED WITH PROOF OF
PURCHASE AND INSTALLATION BY AN AUTHORIZED DIRECTED DEALER. ALL PRODUCTS RECEIVED BY
DIRECTED FOR WARRANTY REPAIR WITHOUT PROOF OF PURCHASE AND DIRECTED DEALER INSTALLATION WILL BE DENIED.
This warranty is non-transferable and does not apply to any Product that has been modified or used in a
manner contrary to its intended purpose, and does not cover damage to the Product caused by installation
or removal of the Product. This warranty is VOID if the product has been damaged by accident or unreasonable use, negligence, acts of God, neglect, improper service or other causes not arising out of defect
in materials or construction. This warranty does not cover the elimination of externally generated static or
noise, or the correction of antenna problems or weak television reception, damage to tapes, video games,
software, camcorders, discs, speakers, accessories or vehicle electrical systems, cosmetic damage or
damage due to negligence, misuse, abuse, failure to follow operating instructions, accidental spills or
customer applied cleaners, damage due to environmental causes such as floods, airborne fallout, chemicals, salt, hail, windstorms, lightning or extreme temperatures, damage due to accidents, road hazards,
fire, theft, loss or vandalism, damage due to improper connection to equipment of another manufacturer,
modification of existing equipment, use of a faulty tape cartridge or cleaning of the VCR head, or Product
which has been opened or tampered with for any reason or which has been damaged due to alteration or
service performed by anyone other than Directed Electronics.
ALL WARRANTIES INCLUDING BUT NOT LIMITED TO EXPRESS WARRANTY, IMPLIED WARRANTY, WARRANTY OF MERCHANTABILITY, FITNESS FOR PARTICULAR PURPOSE, AND WARRANTY OF NON-INFRINGEMENT OF INTELLECTUAL PROPERTY ARE EXPRESSLY EXCLUDED TO THE MAXIMUM EXTENT ALLOWED BY LAW, AND DIRECTED NEITHER ASSUMES NOR AUTHORIZES ANY PERSON TO ASSUME FOR
IT ANY LIABILITY IN CONNECTION WITH THE SALE OF THE PRODUCT. DIRECTED HAS ABSOLUTELY NO
LIABILITY FOR ANY AND ALL ACTS OF THIRD PARTIES INCLUDING ITS LICENSED DEALERS OR INSTALLERS. IN NO EVENT WILL DIRECTED BE LIABLE FOR ANY INCIDENTAL, SPECIAL OR CONSEQUENTIAL
DAMAGES (INCLUDING LOSS OF PROFITS). BY PURCHASING THIS PRODUCT, THE CONSUMER AGREES
AND CONSENTS THAT ALL DISPUTES BETWEEN THE CONSUMER AND DIRECTED SHALL BE RESOLVED
IN ACCORDANCE WITH CALIFORNIA LAWS IN SAN DIEGO COUNTY, CALIFORNIA.
Some states do not allow limitation on how long an implied warranty lasts. In such states, the limitations
or exclusions of this Limited Warranty may not apply. Some states do not allow the exclusion or limitation
of incidental or consequential damages. In such states, the exclusion or limitation of this Limited Warranty may not apply to you. This Limited Warranty gives you specific legal rights, and you may have other
rights which vary from state to state.
N83800B 02-07