1
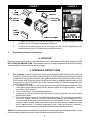
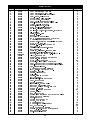
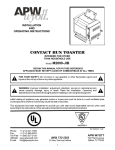
R INSTALLATION AND OPERATING INSTRUCTIONS CONTACT BUN TOASTER INTENDED FOR OTHER THAN HOUSEHOLD USE Model: M95-2-JIB RETAIN THIS MANUAL FOR FUTURE REFERENCE APPLIANCE MUST BE KEPT CLEAR OF COMBUSTIBLES AT ALL TIMES ! FOR YOUR SAFETY: Do not store or use gasoline or other flammable vapors and liquids in the vicinity of this or any other appliance. ! ! WARNING: Improper installation, adjustment, alteration, service or maintenance can cause property damage, injury or death. Read the Installation, Operating and Maintenance Instructions thoroughly before installing or servicing this equipment. ! Initial heating of appliance may generate smoke or fumes and must be done in a well ventilated area. Overexposure to smoke or fumes may cause nausea or dizziness. This equipment has been engineered to provide you with year-round dependable service when used according to the instructions in this manual and standard commercial kitchen practices. ANSI/NSF4 P/N 70200001 Phone: +1 (214) 421-7366 Fax: +1 (214) 565-0976 Toll Free: +1 (800) 527-2100 Website: www.apwwyott.com E-mail: [email protected] (800) 733-2203 24 Hour Service Hotline 1 3/06 APW WYOTT 729 Third Avenue Dallas, TX 75226 IMPORTANT FOR FUTURE REFERENCE Please complete this information and retain this manual for the life of the equipment. For Warranty Service and/or Parts, this information is required. Model Number Serial Number Date Purchased Notes: APW Wyott takes pride in the design and quality of our products. When used as intended and with proper care and maintenance, you will experience years of reliable operation from this equipment. To ensure best results, it is important that you read and follow the instructions in this manual carefully. Installation and start-up should be performed by a qualified installer who thoroughly read, understands and follows these instruction. If you have questions concerning the installation, operation, maintenance or service of this product, contact APW Wyott Foodservice Equipment Company’s “ Technical Service Department”. 2 TABLE OF CONTENTS SECTION ITEM PAGE 1 Safety Precautions 3 2 Important Safety Instructions 3 3 General Information 5 4 Installation Instructions 5 5 Location 6 6 Operation Instructions 6 7 Cleaning Instructions 7 8 Troubleshooting 8 9 Wiring Diagram 9 10 Parts List with Exploded View 10 11 Warranty 12 1. SAFETY PRECAUTIONS Before installing and operating this equipment be sure everyone involved in its operation are fully trained and are aware of all precautions. Accidents and problems can result by a failure to follow fundamental rules and precautions. The following words and symbols, found in this manual, alert you to hazards to the operator, service personnel or the equipment. The words are defined as follows: ! DANGER: This symbol warns of imminent hazard which will result in serious injury or death. ! WARNING: This symbol refers to a potential hazard or unsafe practice, which could result in ! CAUTION: This symbol refers to a potential hazard or unsafe practice, which may result in minor or ! NOTICE: This symbol refers to information that needs special attention or must be fully understood serious injury or death. moderate injury or product or property damage. even though not dangerous. ! ! ! ! 2. IMPORTANT SAFETY INSTRUCTIONS ! ! IMPORTANT: Read the following important safety instructions to avoid personal injury or death, and to avoid damage to the equipment or property. WARNING: APW Wyott toasters are designed, built, and sold for commercial use. If positioned where the general public can use them, make sure that all cautions, warnings, and operating instructions are clearly posted near each unit to insure proper operation, reducing the chance of ! ! personal injury and/or equipment damage. ! WARNING: Plug unit into a properly grounded electrical outlet of the correct voltage, size and plug configuration. If the plug and receptacle do not match, contact a qualified electrician to determine the proper voltage and size and install the proper electrical outlet. 3 ! ! ! ! ! ! ! WARNING: Unit is not waterproof. DO NOT submerge in water. Do not operate if it has been submerged in water. WARNING: To avoid any injury, turn the power switch off at the fuse disconnect switch/circuit breaker or unplug the unit from the power source and allow to cool completely before performing any maintenance or cleaning. WARNING: For safe and proper operation, the unit must be located a reasonable distance from combustible walls and materials. If safe distances are not maintained, discoloration or combustion could occur. WARNING: To avoid electrical shock or personal injury, do not steam clean or use excessive water on the unit. WARNING: If service is required on this unit, contact your authorized APW Wyott Service Agent, or contact the APW Wyott Service Department directly at (214) 421-7366 or (800) 527-2100; fax (214) 565-0976. WARNING: This product has no user serviceable parts. To avoid damage to the unit or injury to personnel, use only Authorized APW Wyott Service Agents and genuine APW Wyott Parts when service is required.. ! ! ! ! ! ! WARNING: Genuine APW Wyott Replacement Parts are specified to operate safely in the ! environments in which they are used. Some aftermarket or generic replacement parts do not have the characteristics that will allow them to operate safely in APW Wyott equipment. It is essential to use APW Wyott Replacement Parts when repairing APW Wyott equipment. Failure to use APW ! Wyott Replacement Parts may subject operators of the equipment to hazardous electrical voltage, resulting in electrical shock or burn. ! ! ! CAUTION: Some exterior surfaces on the unit will get hot. Use caution when touching these areas to avoid injury. CAUTION: Locate the unit at the proper counter height, in an area that is convenient for use. The location should be level to prevent the unit or its contents from accidentally falling, and strong enough to support the weight of the unit and food. ! ! CAUTION: The National Sanitation Foundation (NSF) requires that units over 36 (91 cm) in length or weighing more than 80 lbs. (36 kg) to be either sealed or raised on the installation surface. If this unit cannot be sealed at the point of use, 4 (10 cm) legs are included to allow for proper cleaning access below unit. ! ! CAUTION: Use only non-abrasive cleaners. Abrasive cleaners could scratch the finish of your unit, ! ! WARNING: Failure to provide clearances will cause unit failure and invalidate warranty claims ! NOTICE: Do not use toppings (butter, etc.) on product as product is inverted during normal marring its appearance and making it susceptible to dirt accumulation. (see installation instructions). operation. ! ! ! NOTICE: Operating toaster without legs invalidates any warranty claims. ! ! NOTICE: Neglecting to keep fan opening clean could result in toaster failure. ! 4 3. GENERAL INFORMATION Check the rating label for your model designation and electrical rating. The Rating Label is located on the bottom front of the control panel. Overall dimensions with feeder: 25 15/16” x 23 1/2” x 17 1/2” Electrical ratings: M952: 208VAC, 2780W, 13.4Amps, 60Hz or 240VAC, 2780W, 11.6Amps, 60Hz Cordset Configuration: 208/250V: NEMA 6-20P Plug, 4 foot, 3 wire grounded cord. If the supply cord is damaged, the manufacturer or an authorized service agent or a similarly qualified person must replace it to avoid a hazard or warranty. Shipping Weight: 97 lbs (44.1Kg) 4. INSTALLATION 1. 2. 3. 4. Examine carton for damage. The freight carrier has assumed responsibility for its safe transit and delivery. If equipment is received damaged, either apparent or concealed, a claim must be made with delivering carrier. A. Apparent damage or loss must be noted on the freight bill at the time of delivery. The carrier representative (Driver) must sign the freight bill. If this is not done, the carrier may refuse the claim. The carrier can supply the necessary forms. B. Concealed damage or loss if not apparent until after the toaster is removed from carton, a request for inspection must be made to the carrier within 15 days. The carrier should arrange an inspection. Be sure to save all contents and packaging material. Verify Parts After removing unit from the shipping carton, unwrap loose parts and remove any packing tape, plastic wrap and nylon tie-down. Verify the following parts: Item Packaging Qty Legs In plastic bag 4 Conveyor In individual carton 1 Instruction Manual Loose in carton 1 NOTE: PRIOR TO INITIAL START-UP, ALL REMOVABLE PARTS AND THE GRILL SURFACE SHOULD BE CLEANED WITH WARM SOAPY WATER TO REMOVE MANUFACTURING OILS, THEN RINSED AND DRIED THOROUGHLY. Apply oil (vegetable oil) to the conveyor chain after washing. (Bun oil can be used if it contains no animal fats, salts, or dairy products.) Assemble Legs Lay the toaster on its back and install the four adjustable legs into the threaded holes on the bottom of the toaster. Hand tighten the legs by gripping the steel shank and turning until it is seated firmly against the bottom of the toaster. Set the toaster upright on a flat surface. Unscrewing the lower, chrome insert of each leg levels the unit. Flats are provided to allow use of a wrench. “Precise” leveling is not required for proper operation. Conveyor Installation Remove the top and bottom control panels by lifting it straight up. (See Figure 1) Lift conveyor assembly 1 by using U shaped handles on each conveyor side bracket. Lower the conveyor into the two conveyor hanger brackets 2 above the grill plate on each side, so the four spacers on the sides of the conveyor rest on the bottom flange and the bottom spacers are against the adjustment screws. The conveyor hanger brackets 2 are factory adjusted. However, before reinstalling the front panels apply power to the unit and run the conveyor to insure proper gear engagement. If gears are not properly engaged adjust the conveyor by loosening the jam nuts on the conveyor hanger brackets and adjusting the screw (see Figure 2) to set the conveyor to the correct height. Re-tighten jam nuts after adjustment is complete. 5 FIGURE 1 FIGURE 2 M95-2-JIB ASSEMBLY Top Jam Nut Control Feeder Panel 1 Conveyor Conveyor Assembly Hanger 2 Screw Bottom Control Panel Main Power Switch JAM NUT & SCREW TO ADJUST CONVEYOR HEIGHT a. To adjust the conveyor up into the drive gear, turn the conveyor adjustment screw clockwise. Use a 7/16-end wrench to tighten the jam nut. b. To adjust the conveyor away from the drive gear, turn the conveyor adjustment screw counterclockwise. Use a 7/16-end wrench to tighten the jam nut. 5. Replace top and bottom control panels. 5. LOCATION Place the toaster on a flat surface. Locate the toaster near a wall receptacle of the proper configuration. DO NOT USE AN EXTENSION CORD. Plug the power cord into an outlet (receptacle) of the specified voltage on the rating label. Outlets must be properly grounded. 6. OPERATING INSTRUCTIONS 1. Wet operation. (using oil) Season the toaster grill by applying a light coating of oil to entire grill surface (Fry oil can be used). When toasting using oil, any high-quality cooking oil may be used with this toaster (do not use oils that contain dairy products such as butter). Allow the griddle to heat up for 20 minutes. After 20 minutes season the grill surface again by applying another coating of oil to the entire grill surface. Fill the Butter Pan 2/3 full of warmed cooking oil. The oil should spread evenly over the surface of the roller. a. Turn Main Power Switch on. Set Temperature Control knob to 450 degrees Fahrenheit. Allow Pilot Light to cycle at least two times (on/off). When the light is on, the grill is heating. Heat up time is about 15-20 minutes. b. Turn on motor switch. Conveyor should start to turn. c. Holding the bun half in the palm of the hand, slap the face (cut side) of the bun on the turning Butter Roller surface. d. Place bun halves on feeder cut side down (facing grill surface). Try several buns to determine the correct pressure and time to achieve the desired browning and temperature of bun. Using too little oil will cause the bun surface to be cool and uneven in color. It will also cause the bun to stick to the grill. Using too much oil will give the bun a yellow un-toasted look. Toast time is approximately 150 seconds depending on bun height and diameter. Increase or decrease the temperature setting to achieve desired brownness and temperature. NOTE: Should the temperature setting be changed, allow several cycles for the grill plate to adjust. Once the desired setting has been achieved, note the temperature and keep it set there. 6 7. CLEANING WARNING: Make sure the toaster is in the off position and has been off at least 15 -30 minutes. Do not attempt this cleaning procedure if the toaster components are too hot to touch. Never spray water on the toaster or controls. Damage to the toaster as well as injury could occur. Severe injury and burns may occur if you do not follow this instruction sheet. WARNING: Do not use a grill brick or grill screen to clean the griddle plate. Use of these products will scrape the plating off of the griddle surface causing buns to stick to the grill plate. DISASSEMBLY Turn off main power switch and conveyor switch. Disconnect the power supply cord from the wall outlet. The toaster will be hot when turned off. Allow the toaster to cool for at least 15-30 minutes before handling. USE CAUTION during disassembly and cleaning. Grasp the left side of the Butter Roller Shaft. Lift up and to the left to remove from drive assembly. Remove the Butter Pan. Remove the Top and Bottom Control Panels. NOTE: Do not use any chloride or chlorine-based products to clean or rinse toaster or toaster parts. Daily Parts Cleaning: The Butter Roller, Butter Pan, Feeder, and Top and Bottom Control Panels can be placed in a dishwasher or sink and washed with mild detergent and warm water. Daily Conveyor Cleaning: Conveyor may be hot and is heavy, use caution when lifting and removing. Remove conveyor assembly by simply pushing back on the top row of paddles on conveyor. Conveyor should loosen from gears and you should grab handles and pull upward. Pull out gently placing it in a sink with the drain stopped, or in a suitable container to soak over night. Conveyor can be placed in the sink or container while warm. Use caution when handling a hot conveyor. The soak solution is a mix of 10 parts hot water (120ºF or more) to 1 part (minimum) “INSIDE OUT” brand 3-IN-1. Fill the sink or suitable container with the solution, to completely cover the conveyor by approximately one inch. Allow the conveyor to soak in the solution overnight. Remove the conveyor from the solution. Use a stiff non-metal brush or plastic pad to remove residual bun oil. Insure the chains are clean and free from debris. Use a brush to remove any soil or debris remaining on the chain. Rinse conveyor with plain hot water and allow to drain. Lubricate both chains thoroughly with vegetable oil. Bun oil may be used if it contains no animal fats, salts or dairy products. Note: Chain Lubrication is critical to chain life. Oil the chain daily. Gently replace conveyor into toaster. Discard used soak solution. Clean and sanitize sink or container after over night use! Replace all removed toaster parts. Plug power supply cord into wall outlet. Turn main power switch on. Turn conveyor switch on. NOTE: The conveyor must stay clean to optimize speed and bun temperature. Daily Griddle Cleaning: Wet Operation: It is not necessary to completely remove residue, as long as the grill surface is smooth and free of burned on bread that may cause buns to stick. To remove baked-on-bread use the cleaning procedure below. Tools needed for cleaning: TM Scotch-Brite Quick Clean Small Appliance Cleaner No. 702 or Equivalent TM Scotch-Brite Multi-Purpose Pad Holder No. 405 or Equivalent TM Scotch-Brite Squeegee No. 410 or Equivalent TM Scotch-Brite Griddle Polishing Pad No. 46 or Scotch-Brite™ General Purpose Scrubbing Pad No. 9650 or Equivalent 7 Also needed: (Wet) terry towel Catch pan for food soil (Butter Pan can be used) Common kitchen scraper If Teflon sheet is installed remove it when Bun Grill Toaster is cool. Step 1. Set the toaster temperature to 350°F. Step 2. Scrape loose food particles with scraper into Butter Pan under grill plate. TM Step 3. Squeeze 1 to 2 ounces of Scotch-Brite Quick Clean Small Appliance Cleaner No. 702 or equivalent into measuring reservoir of bottle. Pour cleaner onto pad. Do not pour directly onto grill surface. TM Step 4. Scour using Scotch-Brite Multi-Purpose Pad Holder No. 405 or equivalent, and ScotchTM Brite Griddle Polishing Pad No. 46 (or 9650). (See Figure 3) TM Step 5. After scouring, squeegee the surface clean with the Scotch-Brite Squeegee No. 410 (See Figure 5) Step 6. Turn off Bun Grill Toaster and wipe surface with clean wet towel. If the surface is still hot, use TM the Scotch-Brite Multi-Purpose Pad Holder to move the towel over the surface. (See Figure 5) Step 7. Dry the grill thoroughly. Season the grill plate by applying a light coating of cooking oil to the grill plate. Allow the griddle to heat up for 20 minutes. After 20 minutes season the grill surface again by applying another coating of oil to the entire grill surface. Step 8. Rinse all cleaning tools with hot water. (See Figure 6) Step 9. Wipe down all external stainless steel surfaces with a damp cloth. FIGURE 3 FIGURE 4 FIGURE 5 Scour grill. Clean grill surface Wipe the grill with with squeegee clean wet towel. FIGURE 6 Rinse tools with water. RE-ASSEMBLY Before assembling the conveyor check the following: Fasteners on the Conveyor Assembly hardware should be tight with no signs of wear. Conveyor shaft gear and the Motor Shaft gear are tight. Hanger Bracket screws are tight and the brackets have not shifted during use. 8. TROUBLESHOOTING GUIDE Always ask and check the following: 1. Is the unit connected to a live power source of the proper voltage? 2. Check the circuit breaker. 3. Is power switch “ON” and pilot light glowing? 4. Check the rating label. Is the unit connected to the correct power source? If the above checks out, and you still have problems, call an APW Wyott authorized service agent. APW SERVICE HOT LINE: 1-800-733-2203. 8 CAUSE PROBLEM Buns will not toast SOLUTION Wrong temperature setting Increase temperature setting and allow two cycles to warm up. Excessive cupping of bun surface Verify bun cut to bun specification Check conveyor adjustment Buns are stale, use fresher buns. Excessive cupping of bun surface Buns may be stale. Try fresh buns. Conveyor pressure too light Adjust conveyor tension Doughy buns or excessive sugar and moisture, plus grill temperature too high. Reduce grill temperature Allow buns to age. Build up on Grill Surface Clean Grill per instructions No power No power at the wall receptacle Power cord disconnected Main switch Check circuit breaker or fuse Check plug at receptacle Check that switch is ON and operative Conveyor will not turn (Motor turns) Drive gears not engaged Check gear alignment and engagement Check screws and tighten if required Buns toast unevenly Buns stick to grill Gear set screws not tight 9. Wiring Diagram RTD Probe 39100 Lighted Rocker Switch 89408 16 208 Side Conveyor Motor 84120 16 16 15 17 Common Thermostat 39099 17 TOP 7 9 11 12 12 14 15 13 13 11 Pilot Light 84144 6 6 Terminal Block 89145 4 L1 6 L1 4 3 L2 3 L2 5 13 15 L1 1 L1 L2 4 7 17 10 1 2 5 10 11 17 14 8 7 11 14 5 9 7 10 10 7 Relay 70439098 Cordset 85640 1 L1 BROWN 2 L2 BLUE L2 8 8 3 7 17 8 Lighted Rocker Switch 89406 7 9 8 7 Element 84222 10. PARTS LIST w/EXPLODED VIEW EXPLODED VIEW 58 58 53 53 47 47 4 52 52 40 6 39 39 42 48 42 48 45 45 44 46 46 21 21 43 43 51 51 65 65 2 61 60 60 61 64 64 23 23 62 62 16 32 32 16 33 33 56 8 56 7 1 1 57 57 12 12 14 30 30 31 13 63 25 25 63 29 29 50 10 49 49 50 9 10 36 36 15 15 11 11 22 26 22 26 27 27 20 20 19 19 18 18 24 24 55 55 3 34 34 41 41 28 28 17 17 35 35 37 37 38 38 5 59 59 54 54 PARTS LIST ITEM PART NUMBER 1 2 3 4 5 6 7 8 9 10 11 12 13 14 15 16 17 18 19 20 21 22 23 24 25 26 27 28 29 30 31 32 33 34 35 36 37 38 39 40 41 42 43 44 45 46 47 48 49 50 51 52 53 54 55 56 57 58 59 60 61 62 63 64 65 84229 84217 84118 84220 84146 84213 83065 83061 89301 84164 85281 89408 89491 56530 85282 84155 84151 84120 89059 88993 89143 88923 89063 89145 89054 85640 89111 70439098 39099 88901 88705 88894 84127 84211 84212 87320 88947 88932 84222 39100 89120 84219 89061 84226 84121 84221 84227 84163 84232 89032 89039 84216 89026 88889 85033 85043 84145 84215 89071 89076 89060 84559 88995 88961 83733 DESCRIPTION QUANTITY ASSY WELD BASE WTB M 952 ASSY WELD PANEL, LEFT SIDE ASSY WELD RIGHT SIDE HOUSING ASSY. WELD, GRILL PLATE COVER RIGHT SIDE HOUSING PLATE COVER, LEFT SIDE ASSY. CHAIN HANGER LEFT SIDE ASSY. WELD HANGER ARM RIGHT SIDE LABEL, M-95 JIB CONTROL PANEL, CONTROL M-95 JIB FAN,COOLING,3" DIA, 208/230V SWITCH, LIGHTED ROCKER SWITCH,ROCK,DPST,20A 250VAC,BLK (TEXT) LIGHT PILOT Guard, 3.15 Sq. Fan BRACE, GRILL PLATE MOTOR MOUNTING MOTOR, 208/240 60HZ 1 RPM CONVEYOR WASHER #10 EXTERNAL LOCK SCREW 10-32X3/8 TRS HD PHILLIPS NYLK MS PLUG, HYCO # DP-187 SCREW, 8-32x1-3/4 SLT PAN MS SS NUT, HEX 8-32 TERMINAL BLOCK 300V-30AMPS NUT, KEPS 6-32 CORDSET, 14/3 600V .440 HSJO 620P BUSHING, STRAIN RELIEF SR-7W-2 RELAY,SLD ST 50A 280V OUT,90-280VAC IN T'STAT, FASTRON G6 SCREW 6/32 X 1/4 PAN HD M/S BLKZC KNOB 039-266 8A BLACK STUD PRESS THREADED S/ASS'Y, CHAIN WEIGHT CONVEYOR ASSY. WELD PLATE ATTACHMENT LEFT SIDE ASSY. WELD PLATE ATTACHMENT RIGHT SIDE LEG, 4" PLASTIC ADJ. WASHER FLAT PLATED 3/8" SAE BOLT, 3/8" - 16 HEX HEAD X 1 LG. ELEMENT, HEATING PROBE, THERMOSTAT CLIP, JIFFY PLATE, ELEMENT CLAMP NUT, HEX 10-24 INSULATION, ELEMENT COVER ASSY. BACK COVER COVER, ELEMENT INSULATION , COVER GRILL BRACKET REAR GRILL SEAL BRACKET, GRILL GUARD, M952 WTB SCREW, 10-32X3/8 SCREW, 8-32X5/16 PH PAN SS COVER, GRILL NUT, 10-24 PLATED SCREW #8 X 1/2 AB SMS PHL TRUSS LGM NI PLT GEAR, 13 TOOTH 3/8 BORE GEAR, 19 TOOTH COVER BOTTOM FRONT COVER, TOP FRONT WASHER, #10 FLAT WASHER, LOCK 1/4 INTERNAL NUT, FULL HEX 1/4-20 PLUG, HOLE HEYCO #DP687 SCREW, 10-32x.375 HEX WASHER HEAD NUT, HEX 10-24, GREEN ROD, FRONT AND TOP 11 1 1 1 1 1 1 1 1 1 1 1 1 1 1 1 2 1 1 6 12 3 4 4 1 2 1 1 1 1 2 1 10 1 1 1 4 3 3 1 1 2 1 31 1 1 1 1 1 1 3 13 1 4 6 1 1 1 1 15 10 10 1 2 3 1 11. APW WYOTT EQUIPMENT LIMITED WARRANTY APW Wyott Foodservice Equipment Company warrants it's equipment against defects in materials and workmanship, subject to the following conditions: This warranty applies to the original owner only and is not assignable. Should any product fail to function in its intended manner under normal use within the limits defined in this warranty, at the option of APW Wyott such product will be repaired or replaced by APW Wyott or its Authorized Service Agency. APW Wyott will only be responsible for charges incurred or service performed by its Authorized Service Agencies. The use of other than APW Wyott Authorized Service Agencies will void this warranty and APW Wyott will not be responsible for such work or any charges associated with same. The closest APW Wyott Authorized Service Agent must be used. This warranty covers products shipped into the 48 contiguous United States, Hawaii, metropolitan areas of Alaska and Canada. There will be no labor coverage for equipment located on any island not connected by roadway to the mainland. Warranty coverage on products used outside the 48 contiguous United States, Hawaii, and metropolitan areas of Alaska and Canada may vary. Contact the international APW Wyott distributor, dealer, or service agency for details. Time Period One year for parts and one year for labor, effective from the date of purchase by the original owner. The Authorized Service Agency may, at their option, require proof of purchase. Parts replaced under this warranty are warranted for the un-expired portion of the original product warranty only. Exceptions *Gas/Electric Cookline: Models GCB, GCRB, GF, GGM, GGT, CHP-H, EF, EG, EHP. Three (3) Year Warranty on all component parts, except switches and thermostats. (2 additional years on parts only. No labor on second or third year.) *Broiler Briquettes, Rock Grates, Cooking Grates, Burner Shields, Fireboxes: *Heat Strips: *Glass Windows, Doors, Seals, Rubber Seals, Light Bulbs: Models FD, FDL, FDD, FDDL. 90 Day Material Only. No Labor. Two (2) Year Warranty on element only. 90 Day Material Only. No labor second year. No Labor. In all cases, parts covered by extended warranty will be shipped FOB the factory after the first year. Portable Carry In Products Equipment weighing over 70 pounds or permanently installed will be serviced on-site as per the terms of this warranty. Equipment weighing 70 pounds or under, and which is not permanently installed, i.e. with cord and plug, is considered portable and is subject to the following warranty handling limitations. If portable equipment fails to operate in its intended manner on the first day of connection, or use, at APW Wyott's option or its Authorized Service Agency, it will be serviced on site or replaced. From day two through the conclusion of this warranty period, portable units must be taken to or sent prepaid to the APW Wyott Authorized Service Agency for in-warranty repairs. No mileage or travel charges are allowed on portable units after the first day of use. If the customer wants on-site service, they may receive same by paying the travel and mileage charges. Exceptions to this rule: (1) countertop warmers and cookers, which are covered under the Enhanced Warranty Program, and (2) toasters or rollergrills which have in store service. Exclusions The following conditions are not covered by warranty: *Equipment failure relating to improper installation, improper utility connection or supply and problems due to ventilation. *Equipment that has not been properly maintained, calibration of controls, adjustments, damage from improper cleaning and water damage to controls. *Equipment that has not been used in an appropriate manner, or has been subject to misuse or misapplication, neglect, abuse, accident, alteration, negligence, damage during transit, delivery or installation, fire, flood, riot or act of god. *Equipment that has the model number or serial number removed or altered. If the equipment has been changed, altered, modified or repaired by other than an Authorized Service Agency during or after the warranty period, then the manufacturer shall not be liable for any damages to any person or to any property, which may result from the use of the equipment thereafter. This warranty does not cover services performed at overtime or premium labor rates. Should service be required at times which normally involve overtime or premium labor rates, the owner shall be charged for the difference between normal service rates and such premium rates. APW Wyott does not assume any liability for extended delays in replacing or repairing any items beyond its control. In all cases, the use of other than APW Wyott Authorized OEM Replacement Parts will void this warranty. This equipment is intended for commercial use only. Warranty is void if equipment is installed in other than commercial application. Water Quality Requirements Water supply intended for a unit that has in excess of 3.0 grains of hardness per gallon (GPG) must be treated or softened before being used. Water containing over 3.0 GPG will decrease the efficiency and reduce the operation life of the unit. Note: Product failure caused by liming or sediment buildup is not covered under warranty. THE FOREGOING WARRANTY IS IN LIEU OF ANY AND ALL OTHER WARRANTIES EXPRESSED OR IMPLIED INCLUDING ANY IMPLIED WARRANTY OF MERCHANTABILITY OR FITNESS FOR PARTICULAR PURPOSES AND CONSTITUTES THE ENTIRE LIABILITY OF APW WYOTT. IN NO EVENT DOES THE LIMITED WARRANTY EXTEND BEYOND THE TERMS STATED HEREIN. 9/05 12