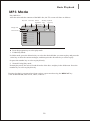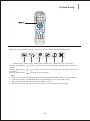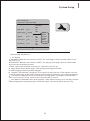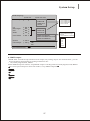
1
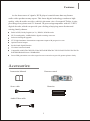
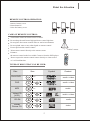
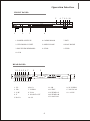
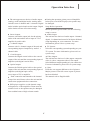
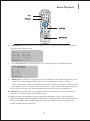
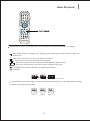
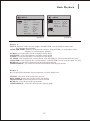
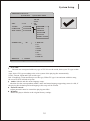
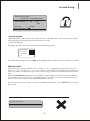
TM
Operation Manual
DVD-335
MPEG4
DVD PLAYER
DVD-335
OPEN/CLOSE
STOP
REV
F WD
L/R
CONTENTS
FEATURES...................................................................... .... 1
POINTS FOR ATTENTION.......................................... 2-3
OPERATION INTERFACE............................................ 4-8
BASIC PLAYBACK...................................................... 9-17
SYSTEM SETUP........................................................... 18-26
TROUBLE SHOOTING.................................................. 27
REGION CODE
.................................................... 28
ADDITIONAL INFORMATION..................................... 29
SERVICE + WARRANTY
................................... 29
Features
As the best source of signals, DVD player is much better than any former
audio-video product at any aspect. This latest digital technology condenses high
quality video & audio on a disc, which is the same size of a normal CD disc in size,
providing clear picture and 5.1 channel 3D processingcompatible with AC-3/DTS
digital decoder, which can provide you a feeling ofenjoying more distinct and
stirring family theatre.
Built-in DTS, Dolby Digital (AC-3), HDCD, PCM Decoder
Hi-Fi sound quality; 96kHz/24bit's digital to analog converter
Software intelligent upgrade
YUV high luminance chromatism component output with progressive scan
Optical/Coaxial output
Professional digital Karaoke
3D virtual surround sound
Compatible with DTS-CD/DVD-Video/DVD-R/W/HDCD/CVD/VCD/SVCD/DVCD/CD/CDR/W/MP3/Kodak Picture CD/MR.OKO
Latest fifth generation server has superior error-correction to provide greater picture clarity
Accessories:
Instruction Manual
Remote control
Batteries
Scart cable
Audio/Video cable
1
Point for Attention
Attention: To reduce the risk of fire and electric shock, do not expose this unit to rain
or moisture.
CAUTION
ATTENTION
RISK OF ELECTRIC SHOCK
DO NOT OPEN
RISQUE D ELECTROCUTION
NE PAS OUVRIR
CLASS 1 LASER
PRODUCT TO IEC 825
LASER KLASSE 1
NACH IEC 825
WARNING: SHOCK HAZARD-DO NOT OPEN
AVIS: RISQUE DE CHOC ELECTRIQUE-NE PAS OUVRIR
CAUTION:
To reduce the risk of fire and electrical shock, do not remove the cover of this unit. Please
refer all servicing difficulties to qualified technicians . This lightning flash arrow symbol
in a triangle, is intended to alert users to the presence of non-insulated high voltage
within the product`s enclosure that may be of sufficient magnitude to constitute a risk of
electric shock to person. The exclamation point symbol in a triangle is intended to alert
users to the presence of important operating and maintenance instructions in the literature
accomnying the unit.
CLASS1:
LASER PRODUCT - This marking indicates the presence of laser beams used in this
unit, and CLASS 1 refers to laser beams of the weaker class. There is no danger of
hazardous radiation outside this unit.
IMPORTANT NOTICE:
REFER SERVICING ONLY TO QUALIFIED SERVICE PERSONNEL
Read through this instruction manual before installation and use.
To disconnect the power cord, hold the plug instead of pulling on the cord.
Switch off the main power when the unit is not in use. (Disconnect the power plug
from the power outlet when you do not intend to use the unit for a prolonged period
of time.) Before moving the unit,remove the disc from the unit`s tray first.
Do not open the cover or touch any of the components inside the unit.
Do not operate or install the unit under direct sunlight or near objects that radiate
heat. This may lead to overheating of the unit.
Do not operate or install the unit in moist or humid conditions. This may affect the
pick-up of the unit.
IInstall the unit on a flat surface with good air circulation. Please ensure the
ventilation holes are not covered otherwise the unit will overheat and malfunction.
Wipe the panel and case with soft dry cloth only. Do not apply any kind of thinner,
alcohol or sprays when cleaning the unit.
2
Point for Attention
REMOTE CONTROL OPERATION:
1.remove battery cover
2.insert batteries
3.close the battery cover
CARE OF REMOTE CONTROL:
Aim remote control at remote sensor of DVD.
Do not drop the unit from a high position or cause high imct
Do not place the remote control in hot or moist environments
Do not splash water or any other liquid on remote control
Do not pull azrt the remote control
-3 0
+3 0
within 7 meters
Point remote control directly to the remote sensor
Distance:
the remote control works best within 7 metres from the DVD player
Do not expose the remote control sensor directly to a heat source
or it will malfunction
TYPES OF DISCS THAT CAN BE USED:
Disc
DivX DVD
Symbol
Size
Content
audio+video
12cm
DVD
12cm
MP3
12cm
Video-CD
(VCD)
12cm
CD-DA
12cm
8cm
audio
12cm
8cm
video
Kodak
Picture CD
audio+video
8cm
audio
audio+video
8cm
VIDEO CD
3
Operation Interface
FRONT PANEL:
6 7 8 9 10
5
DVD-335
OPEN/CLOSE
1
2
3
STOP
REV
F WD
L/R
4
1. POWER SWITCH
4. CABIN DOOR
7. REV
2. VFD DISPLAY UNIT
5. OPEN/CLOSE
8.PLAY/PAUSE
3. RECEIVER WINDOWS
6. STOP
9. FW D
10. L/R
REAR PANEL:
1 2 34 5 6 7
FL
FR
S.W.
Y
Pb/Cb
Pr/Cr
8
9
Video
TM
Model No:
DVD-335
VGA
SL
SR
CENT.
Stereo L
Stereo R
Coaxial
S-Video
Optical
TUV
Rheinland
Product safety
geprufte
sicherheeit
CAUTION
ATTENTION
RISK OF ELECTRIC SHOCK
DO NOT OPEN
RISQUE D ELECTROCUTION
CLASS 1 LASER
PRODUCT TO IEC 825
LASER KLASSE 1
NACH IEC 825
10 111213141516 17
1. FL
6.Pr/Cr
2. FR
7. VIDEO
3. S.W.
8. VGA
4. Y
9. SCART OUT
5.Pb/Cb
10. SL
100-240~/0.6A
47-63Hz
NE PAS OUVRIR
WARNING: SHOCK HAZARD-DO NOT OPEN
AVIS: RISQUE DE CHOC ELECTRIQUE-NE PAS OUVRIR
SCART out
18
11. SR
12.CENT.
13.STEREO L
14.STEREO R
15.COAXIAL
4
16.S-VIDEO
17.OPTICAL
18. AC IN
Operation Interface
REMOTE CONTROL:
20
1
2
3
4
5
6
7
8
21
22
23
24
25
26
9
27
10
28
29
30
11
12
13
14
15
16
17
18
19
31
32
33
34
35
36
5
1. POWER
2. OSD
3. P/I
4. P/N
5. PROGRAM
6. TITLE
7. MENU
8. SETUP
9. UP/LEFT/DOWN
10. PBC
11. REV
12. SOTP
13. FWD
14. AUDIO
15. 3D
16. L/R
17. A-B
18.MUTE
19. REPEAT
20. OPEN/CLOSE
21. NUMERIC(09
Numeric keys
)¡«
22. SEARCH
23. SUBTITLE
24. ANGLE
25. ENTER
26. RIGHT
27. RETURN
28. ZOOM
29. PLAY/PAUSE
30. PREW
31. NEXT
32. SLOW
33. KEY+
34. VOL35. VOL+
36. KEY-
Operation Interface
VIDEO SYSTEM CONNECTION:
TV/MONITOR
COMPONENT INPUT
TV/MONITOR STANDARD
VIDEO INPUT
FL
FR
S.W.
Y
Pb/Cb
Pr/Cr
Video
TM
Model No:
DVD-335
VGA
SL
SR
CENT.
Stereo L
Stereo R
Coaxial
S-Video
Optical
TUV
Rheinland
Product safety
geprufte
sicherheeit
CAUTION
ATTENTION
RISK OF ELECTRIC SHOCK
DO NOT OPEN
RISQUE D ELECTROCUTION
CLASS 1 LASER
PRODUCT TO IEC 825
LASER KLASSE 1
NACH IEC 825
100-240~/0.6A
47-63Hz
NE PAS OUVRIR
WARNING: SHOCK HAZARD-DO NOT OPEN
AVIS: RISQUE DE CHOC ELECTRIQUE-NE PAS OUVRIR
SCART out
SCART
TV/MONITOR
S-VIDEO INPUT
TV/MONITOR
SCART INPUT
The unit supports five choices of video
output: standard video, S-video, and Component
Y Cb Cr, Progressive Y Pb Pr.
to the component video output of the unit and to
the component video input of your TV or monitor.
Cart input of TV or monitor.
Composite video output:
Connect the AV cable (yellow) to the video output
(yellow) of the unit and to the video input of your
TV or monitor.
Progressive scan output:
Standard input port of progressive scan TV-set.
Note:
Select the type of video output in the menu
depending on the type of connection that is used.
To get a better picture effect, these free methods
can not be applied simultaneously. It may cause
interference.
S-video output:
Connect a S-video cable (not included ) to the Svideo output of the unit and to the S-video input
of your TV or monitor.
Component video output:
Connect a component video cable (Y,Pb/Cb,Pr/Cr)
6
Operation Interface
AUDIO SYSTEM CONNECTION:
FL
FR
S.W.
Y
Pb/Cb
Pr/Cr
Video
TM
Model No:
DVD-335
VGA
SL
SR
CENT.
Stereo L
Stereo R
Coaxial
S-Video
Optical
SCART out
TUV
Rheinland
Product safety
geprufte
sicherheeit
CAUTION
ATTENTION
RISK OF ELECTRIC SHOCK
DO NOT OPEN
RISQUE D ELECTROCUTION
CLASS 1 LASER
PRODUCT TO IEC 825
LASER KLASSE 1
NACH IEC 825
100-240~/0.6A
47-63Hz
NE PAS OUVRIR
WARNING: SHOCK HAZARD-DO NOT OPEN
AVIS: RISQUE DE CHOC ELECTRIQUE-NE PAS OUVRIR
AMPLIFIER INPUT
TV INPUT
AMPLIFIER INPUT
AMPLIFIER INPUT
7
Operation Interface
The unit supports two choices of audio output:
Analogy audio and digital audio. Analog audio
During the operation, please power off amplifier
before power on/off DVD player, the speaker may
includes stereo 2 channel and 5.1 channel. Digital
audio includes optical and coaxial output. Digital
audio obtains a better effect than analog.
be damaged.
Setup Before Operation:
Before operation, please make sure the following
setup is correct.
Stereo Output:
Connect with audio output jack for the mixing
audio of the unit and the stereo input of TV or
amplifier by audio cable.
Audio Output:
The unit has four choices of audio output: 2 channel,
digital, 5.1 channel and stereo PCM. Select different
setup depending on your connection. For more
information, please refer to system setup.
5.1 channel output:
TV System:
Select the corresponding system depending on your
Connect with 5.1 channel output of the unit and
corresponding input of amplifier by audio 5.1
channel cable.
TV system. For more information, please refer to
system setup.
Coaxial output:
Video Output:
The unit has four choices of video output: composite
video, S-video, component video,VGA output.
Select different setup depending on your connection.
For more information, please refer to system setup.
Connect the Digital coaxial cable to the coaxial
output of the unit and the corresponding input of
amplifier.(with digital coaxial inlet)
Optical output:
Connect the Toslink optical cable to the optical
output of the unit and the corresponding input of
amplifier.(with digital optics inlet).
stereo input of TV or amplifier.
Note:
DVD disc can support different scale of pictures.
Maybe picture is not full screen or part of picture
has been blocked.
The manual refer to English OSD.
Each connection must match to the internal
setup of the unit. Please refer to the unit and the
connection equipment before connection.
DVD player supplies a wide dynamic range
of frequencies so the amplifier volume must be
suitable levels or the speakers may be damaged
from sudden bursts of high volume sounds.
8
Basic Playback
POWER: Press this key to power on and off the unit while it is in the case of working .
OPEN/CLOSE: Press OPEN/CLOSE to open the tray, and then place the disc on it , press this
button again to close the tray. When finishing loading the disc , the TV screen will display the
disc type and the disc will be automatically played .(MP3 and JPEG disc can not be
automatically played)
RETURN:Press RETURN to return to the menu when playing the DVD disc. Press
RETURN to return to the menu and re-enter the menu-playing mode at the same time when
playing S-VCD,VCD2.0 disc.
PLAY/ENTER: press to play or confirm all kinds operation and selection.
MENU:In play DVD mode, press MENU key the first time back to submenu and press again
back to the main menu.
Displaying super VCD,VCD2.0 can playing menu. The disc can enter PBC menu automatically
when starting playback. And then press number key selecting your desired song, if cancel disc
playback, please press MENU key. TV screen indication:
PAUSE/PAUSE: In play mode, press this key to pause;
Every press next will move the picture one frame. Press "PLAY" again to resume normal play.
STOP:Press STOP one time, memorizing the stopped position. When the unit continues playing. It
will play from the stopped position. Press STOP the second time, the unit stops play and gives up the
memorized position.
9
Basic Playback
PREV/NEXT: When play DVD, SVCD, VCD, CD, MP3, press this key to play forward or
backwardspeedily. The class as bellows:
PRV/FWD: When play DVCD, VCD, CD, MP3, Press skipbackward to play last chapter.
To play DVD, press skipbackward to next chapter or title.press skipforward to next chapter or title.
2x*
4x*
8x*
16x*
32x*
2x*
4x*
8x*
16x*
32x*
TITLE: Press this button to return to the first title playback.
AUDIO: If the S-VCD,VCD,CD disc has multi channel, you can press this button to select the
sound from left vocal channel out or right vocal channel out or stereo out or downmix out .
Press this button to select your desired language when playing DVD,S-VCD which has multi-language.
SUBTITLE: refer to the contents on page D4 for details.
10
Basic Playback
PROGRAM:If the disc has over two chapter or title, you can press this button to setup the
playing order which you want.
PRGO TT- -/CH- - [TT- -(TITLE)CH- -(CHAPTER)]
01 TT:__ CH:__ 06 TT:__ CH:__
02 TT:__ CH:__ 07 TT:__ CH:__
03 TT:__ CH:__ 08 TT:__ CH:__
04 TT:__ CH:__ 09 TT:__ CH:__
05 TT:__ CH:__ 10 TT:__ CH:__
EXIT START BACK
Press PROGRAM key to indicate in TV screen when play super VCD,DVD,CD disc.
PROG:MENU 00-00
01 __ 06 00(MENU)
02 __ 07 __
03 __ 08 __
04 __ 09 __
05 __ 10 __
EXIT START BACK
REPEAT:Press this key to repeat some title, some chapter ,some track or the full disc. Press
repeat key when playing back DVD, the TV screen will show as follows: chapter
repeat--Title repeat--- Repeat off. When playing back cd, VCD1.1 and VCD, VCD 2.0 disc in
state of PBC off, the TV screen will show as follows: Track repeat--Full repeat--Repeat off.
Note: If power off or disc out, all the memorized position will giving up automatically.
ZOOM:Pressing this button, you can appreciate the zoom picture. Just only in the state of
zoom-in,you can move the picture by direction key.
P/I: Press this key repeatedly to convert among IS chromatism YCbCr, PS chromatism
YPbPr and PS RGB. When outputting in IS mode, no PS signals output; when outputting in PS
mode, no IP signals output. When outputting in IS mode, compound video frequency and
S-video terminal output all the time.
11
Basic Playback
On playing the VCD, SVCD and DVD, The introduction of detailed functions is as follows:
: Play. When the unit is stepping, slow, skipping, pause and stop, press this mark to resume the
normal play.
: Step. Every press next is to move the picture one frame.
: Slow. Press it to slow the speed of the normal play.
/
: Skip. Press skip-forward or skip-backward to different chapter or title.
/
: Fast. Press Fast-forward or Fast-backward to change the play rate.
: AUDIO. Refer to the AUDIO key for detailed information.
: Subtitle.
/
Subtitle1/3
Subtitle2/3
Subtitle3/3
Subtitle cancel
If the DVD disc has multi-angle, you can switch observation angle. Press the angle mark to change
as follows when playing multi-angle.
1/3
2/3
3/3
Angle1/3
Angle2/3
Angle3/3
12
Basic Playback
OSD
SEARCH
VOL:Volume: Press this key to adjust the output volume.
Press+
±
¡°±
¡ °ns20-,.erdt¡how
scapn
OSD:Press OSD to display the information referring to the disc on the TV screen.
playback DVD disc state
play super VCD,VCD2.0 in the state of closeing PBC
play super VCD,VCD2.0 in the state of opening PBC
SEARCH: The SEARCH key lets you open a menu (see pictures on the following page)
when playing DVD discs or VCD discs where you can easily search for
titels, chapters or tracks on the inserted disc. You can also adjust language and
subtitle settings and select the time display mode.
Finally you can see a bit rate counter at the bottom of the menu, showing you
the CPU load of the current playback activity.
13
Basic Playback
MENU
MENU
Title
Chapter Time
Audio
Subtitle
Angle
Title Time
Chapter
Repeat
Time Display
Bit rate
28 III
01/20
01/01
AC-3 5.1CH
CHINESE
1/4
0 06 58
0 06 58
OFF
Title time
VCD
Track
Disc Time
Track Time
Repeat
Time Display
01/16
1 16 28
0 03 58
OFF
Disc time
SVCD
Bit rate
Title time 0*03*28
28 III Disc time 0 03 28
(picture 1)
(picture 2)
Picture 1
TITLE: Number of the current chapter. With ENTER you can jumpt to other titles
by entering their number.
CHAPTER TIME: Number of the current chapter. With ENTER you can jump to other
chapters by entering their number.
AUDIO: select the audio tracks available on the DVD
SUBTITLE: select the subtitles available on the DVD
ANGLE: select the available view angles on the DVD
TT TIME: total length of the current track; with ENTER you can search within the track
CHAPTER: total length of the current chapter; with ENTER you can search within the CH
REPEAT: you can select from three different repeat modes
TIME DISPLAY: you can select from four different time display modes
Picture 2
Bei VCD/SVCD the menu shown in picture 2 will be displayed.
TRACK: selection of the track to be played
DISC TIME: Search for a point of time on the disc
TRACK TIME: Search for point of time in a track
REPEAT: select the desired repeat mode
TIME DISPLAY: select the desired time display mode
15
Basic Playback
MP3 Mode
Play MP3 disc:
After the unit reads the contents of the MP3 disc, the TV screen will show as follows:
Play time Track time Volume
Working Dynamic
modulation state
frequency
data rate
03 18 05 28
Playing track
Tracks of disc
192
058/158
-------------------------------------
Press the program key to select play mode.
1. Folder Play Mode
In folder mode, press the direction key to select the desired folder you want to play, and press the
select key to enter the current catalogue, and then press the direction key to select to play.
Or press the number key to select to play directly.
2. Normal Listing Play mode
Normal play mode, the unit will read all tracks of the disc, and play in the folder turn. Press the
number key to select to play directly.
During playback you can select from various repeat modes using the REPEAT key
such as RANDOM, SHUFFLE, DISC, DIR etc..
16
Basic Playback
JPEG Mode
Introduction Menu as follows:
Press the program key to change transform mode. The unit has 15 kinds of picture transform mode.
Working state
00 00 00 00
Playing track
Tracks of disc
058/158
JPEG
JPEG
JPEG
JPEG
JPEG
JPEG
-------------------------------------
Distinguishing rate
Picture preview
888 X 1200
Press the stop key to enter picture preview mode.
Press the
key to play last picture.
Press the
key to play next picture.
Press the play key to enter picture play mode.
Press the direction key
to move image up and down, and press direction key * *to move
image left and right.
to rotate picture 90 degree in reverse, and press the direction key *
*
Press the direction
The specific operation is the same as that of MP3.
to rotate picture 90 degree in sequence.
Press the zoom key to change to zoom in mode. Press the fast-forward key to zoom in picture, and
press the fast-backward key to zoom out picture.
Press the direction key to move and zoom in the center point.
1.Folder play mode
2.Normal listing play mode
3.Program play
Press the program key to select three kinds of play mode.
17
System Setup
When the unit is working, press the select key to enter setup menu (following picture):
General setup Audio setup Video setup Initial setup Password setup Quit setup
Press the direction key
to move cursor to the desired setup page, and press the select key to
confirm.
Press the direction key
to move cursor to the desired setup item, and press the select key
to confirm.
To return to last setup item.
Press the direction key
1.
2.
3.
4.
Note:
Move cursor to the relevant item, the menu showed at the bottom of the screen accordingly.
Some menu setup is related with other set up and status, if it is gray, cannot setup.
The setup can be memorized continue though power off.
When the unit stops playing and opens the tray, it can enter the initial setup page.
18
System Setup
General Setup Page
System state System state menu
TV Display
PS
Normal/PS
Normal/LB
Wide
ON
Angle Mark
ON
OSD Language
English
English
Captions
ON
ON
OFF
French
German
Spanish
Screen Saver
ON
ON
OFF
Italian
Portuguese
Last Memory
ON
ON
OFF
OFF
Press the direction key¡°
±
tuseu
n
op
rm
¡
General Setup introduction:
* TV Display
A.Normal/PS: When the unit connects with TV set, wide image is showed on the whole screen,
but a part is cut.
B.Normal/LB: When the unit connects with TV set, playing wide image, there are black bands
showed on the up and down screen.
C.Wide: Choose this when the unit connects with wide screen TV set.
Angle Mark: Select display angle, when playing multi-angle DVD disc.
OSD Language: Select operation language.
Captions: This function is ineffective if no caption record in the disc. If the caption is closed,
press the caption key on the remote control to open captions function to select captions language.
Screen Saver: When the unit is in stop mode, a moving picture will appear several minutes
later if screen saver is set on. Screen saver will protect the TV screen.
Last Memory: Remember the current playtime, if this function setup is on. It can play from the
memorized playtime when playing the current disc again. If powering off the unit gives up.
19
System Setup
Audio Setup Page:
Speaker Output Setup
SPDIF Output Setup
Equalizer Setup
3D Processing Setup
HDCD Setup
Karaoke Setup
Press the direction key ¡°
±
reto¡n
tuo
There are six subsidiary setup pages,
each function is as follows:
setup menu
Speaker Setup Page
Down Mix:
01 means LT/RI output
02 means Stereo output
03 means 5.1 channel
In LT/RT or stereo mode, the center speaker
and subwoofer on this page can not setup,
only can if 5.1 channel output.
System state System state menu
Down mix
STR
LT/RT
Stereo
Front Speaker
LRG
5.1Channel
Large
Small
Center Speaker
LRG
Large
Test Tone: in 5.1 channel mode, set
up this item in the case of opening disc tray
or stopping play.
Dialog: In LT/Stereo mode, set up this
item to adjust voice, within the range from
Small
OFF
Rear Speaker
LRG
Large
Small
OFF
Subwoofer
ON
Test Tone
ON
0 to 20.
Post DRC: When system power on,
ON
OFF
current increases slowly to the speaker, to
prevent the speaker from electrical shock.
Item on, the function is valid; item off, the
function is no use. When
automatic, system can setup automatically
on or off depending on the current.
ON
OFF
Dialog
Post DRC
00
AUTO
ON
OFF
AUTO
Press the direction key
±
¡°tu
iL
oad
rn
ef¡
setup menu
20
System Setup
SPDIF Setup Page
System state
SPDIF Output
System state menu
RW
SPDIF OFF
SPDIF RAW
SPDIF/PCM
Manual
CD
01 means SPDIF off
02 means SPDIF raw
03 means SPDIF/PCM
04 means manual
RW
Dolby Digital
RW
DTS
RW
SPDIF OFF
SPDIF RAW
MPEG
RW
SPDIF/PCM
PCM Channel
RW
SPDIF LEFT/RIGHT
SPDIF LEFT/RIGHT Surround
SPDIF CENTRE/BASS
Dynamic
OFF
LPCM Output
48K
01 means SPDIF left/right
02 means SPDIF left/right
Surround
03 means SPDIF center/bass
- - FULL
- - 3/4
48K
- - 1/2
96K
- - 1/4
- - OFF
Press the direction key¡°
±
tu
n
d
isareu
op
m
¡
SPDIF Output:
SPDIR OFF: turn off the optical and coaxial output, only analog output. If in manual mode, you can
choose different output mode according to different disc.
CD, Dolby Digital, DTS, MPEG:
When SPDIF output is manual, setup SPDIF output according with CD, Dolby digital, DTS, MPEG
discs.If no optical output on these four modes, set up SPDIF output to £
S
P
O
D
F
I¢F
£¢
L
C
M
O
P
utput:
Sutepdfirentm
odbetw
ne48K
H
tzo96H
K
cazordingiw
thdfirentuadiosgnolausr.ec
N
ot:em
sm
aeplifreacsnuopstort96K
iH
szgnlan,dm
yaldetobanorm
olausndfrom
ptilacor
ocxailadigtlaoutput.
D
ynm
ai:c
w
Ifhtcaingdynm
acisopleragm
eoviperogrm
am
retanighet,sltcethm
isodetorduth
ecveolum
,e
m
naetim
kepthleitlm
einutiE
ahigQ
hvel,thitusnacvoidrtoublingnieghbow
rsithout
dtertcaingvoulm
qeulaity.
21
System Setup
Equalizer Setup Page
EQ Type:
System state System state menu
EQ Type
None
None
Seven modes are available. SelectL
¡iveto±
°
1. Rock
get live music effect. When EQ type is off, the
2. Pop
sound of the disc will output directly. You can
3. Live
setup the other items to reach your requirement.
4. Dance
Bass Boost, Super Boost, Treble Boost
Setup bass boost, super boost and treble boost
5. Techno
6. Classic
7. Soft
Bass Boost
OFF
Super Bass
OFF
ON
Treble Boost
OFF
OFF
Press the direction ke¡°
setup menu
to assort with EQ type to reach a perfect status.
±
tn
u
d
iT
aro
e¡
u
3D Processing Setup Page:
System state System state menu
PRO LOGIC II
OFF
ON
OFF
AUTO
Reverb Mode
OFF
OFF
1. Concert
2. Living Room
3. Hall
4. Bathroom
5. Cave
6. Arena
7. Church
Channel Delay
PRO LOGIC II:
This setup is available only for two channel.
When it is setup and the down mix in speaker
setup is 5 channel, 5 channel will output. When
it is auto, the system selects mode according
to the disc automatically.
Reverb Mode:
This item setups reverb mode in 3D processing,
and there are 7 types available. e.g. when in
living room mode, the system speaks
reverberative effect in living room.
Channel Delay:
If you are not satisfied with the above reverb
modes, you can chose manual setup to get
Center Speaker
Subwoofer
Press
your desired sound effect. You can setup the
distance between center speaker, surround
speaker and subwoofer. Press the direction key
to select channel. Press the
direction key
To increase distance and
key to return to audio setup menu
to decrease distance.
22
System Setup
HDCD Setup Page
System State
Filter
44.1K
System State Menu
OFF
44.1K
88.2K
Press the direction key to return to audio setup menu
01 44.1K
02 88.2K
Filter:
This setup can change output sample rate when playing HDCD disc. Setup for 44.1 KHz, the system
can output all signals of the disc sample rate from 0 to 44.1KHz, the signal over 44.1HKz being
cut. Setup for 88.2Hkz, the system can output all signals of the disc sample rate from 0 to 88.2KHz,
the signal over 88.2KHz being cut. Setup for off, the system will output all signals without any limit.
23
System Setup
VIDEO SETUP
Video Setup Page
System State System State Menu
Sharpness
Low
Brightness
00
High
Medium
Low
Brightness
Contrast
00
Contrast
Gamma
None
High
Medium
Low
None
|||||||||||||||
||||||||||||||||
Hue
00
Hue
||||||||||||||||
Saturation
00
Saturation
||||||||||||||||
Luma Delay
1T
0T
1T
Press direction key
±
¡°enutm
srepo¡
Sharpness:
Setup this item to control the sharpness of image, available range as high -medium -low.
Brightness:
Setup this item to control the brightness of image, available range from -20 to +20.
Contrast:
Setup this item to control the contrast of image, available range from -16 to +16.
Gamma:
Setup this item to adjust the image, available range as high -medium -low -none.
Hue:
Setup this item to control the hue of image, available range from -9 to +9.
Saturation:
Setup this item to control the saturation of image, available range from -9to +9.
Luma Delay:
Setup this item to control the luma delay of image, available range from 0T to 1T.
The VIDEO Setup lets you also select between different signals for the video outputs.Since
these outputs offer signals permanently there are no special settings required. The P/I-key
on the remote control will also guide you through these settings everytime you press it. The
TV MODE function in the SETUP lets you activate the PROGRESSIVE SCAN Signals for
the VGA, SCART and COMPONENT VIDEO output. Before you select the P-SCAN mode,
please check with the user manual of your display system, whether it does support P-SCAN
signals.
24
System Setup
PREFERENCE PAGE:
System State
TY TYPE
PAL
PBC
AUDIO
SUBTITLE
DISC MENU
PAREENTAL
DEFAULT
Press direction
System State Menu
PAL
MULTI
NTSC
ON
ON
OFF
ENGLISH
ENGLISH
ENGLISH
FRENCH
ENGLISH
GERMAN
SPANLISH
ITALIAN
PORTUGUESE
08
1. KID SAF
2. G
3. PG
4. PG13
5. PGR
6. R
7. NC17
8. ADULT
RESET
to return to setup menu
TV TYPE:
The unit can correspond with erery type of TV all over the world, Select your TV type on this
item:
Auto: Select TV type according to the color system of the playing disc automatically.
NTSC: Taiwan, Japan and USA use this type.
PAL: HongKong, China and Europe use this type, When TV type is inconsistent with this setup,
the screen will be in black strip state.
Audio: Subtitle and disc menu language setup:
when the disc has correspondent subtitle, audio and menu language supporting, menu is valid, if
the playing disc defaults preferred language, this setup will be invalid.
Parental control:
Adjust parental control to control the playing rated disc.
Defaults:
Return the player defaults to the original factory settings.
25
System Setup
Password Setup Page
System State System State Menu
Password Mode
ON
ON
OFF
Password
Change
Press direction key¡° ±
tu
n
sreu
op
m
¡t
Password Mode:
When the mode is on, setup the age control directly; when the mode is off, setup the age control
only with password, using password to operate every time.
Password Change:
Setting up this item, the TV screen will show as following picture:
Old password
New password
Confirmation
OK
The initial password of the unit is 8806. After changing the password, press the select key to finish.
REGION CODE:
The preset region code of this device is either “1” or “2” depending on the sales area. For
Europe it is “2”, for USA it is “1”. If you which to watch DVDs from other regions than your
own, you need to change the region code of your player to match with the DVD you want to
play.
Open the PREFERENCE menu in your SETUP menu and press the numeric keys 1379 on
your remote control.(you need to press STOP twice if a disc is inserted, or open the tray of
the disc drive to be able to enter the PREFERENCE menu).
You can then select the region code from an additional window. Press SETUP key to finish
the setting.
Quit Setup Menu Page:
Move cursor to this item and press the select key to quit.
26
Trouble Shooting
SYMPTOM AND SOLUTION:
When having problem with the unit, please check this list for a possible solutionbefore asking
for service.
Symptom
Reason(s)
Solution (s)
No power
Do not connect power cord to the wall outlet
Connect them well
Do not set up TV in correct setting
Set up TV in correct mode
Do not connect video cable securely
Connect them well
Do not connect audio cable securely
Connect them well
Do not power the audio connection system on
Power it on
The audio output setting is not correct.
Set it in correct mode
Disc is dirty.
Clean the disc or try another one.
No picture
No sound
Distorted picture
Sometimes, the tiny distortion appears,
In fastforward or fastbackward mode
Itis normal condition.
Luminance unsteady
or picture with noise
Unable to play
Key no function
Circuitry influence
Connect DVD video player to TV directly
Do not load disc in
Place disc in
The disc loaded in can not play
Place readable disc in(check the disc type)
The disc is loaded upside down
Replace the disc with the label side up
Do not load disc in guide slot
Load the disc correctly
Disc dirty
Clean the disc
TV screen has menu
Press Setup turning off the menu.
Parental lock function
Unlock it or change the rating
Power wave or other abnormal
Switch on/off power or unplug/replug the
power cord.
phenomeno (such as static) disturbs
the normal condition.
Remote control
does not work
Point remote control at the remote
Do not point remote control at the remote
sensor directly.
Remote control is too far from DVD unit.
Batteries are exhausted.
27
sensor directly.
Operate remote control within 7 meters
Replace the batteries and insert in correct
polarities.
Additional Information
Care of disc:
Storage of disc:
Do not touch the signal surface.
Do not keep the disc in the direct sunlight,
near the heat source, in the dusty places or
moisture (kitchen, bathroom). Keep the disc
vertically in the disc storage case. Heavy
objects on the disc case will cause
deformation to the disc.
Do not add labels or adhesive tapes on the
Copyright Attention:
discs.
Copy, broadcast, play or rent the disc is
forbidden without legal permission.
TV System:
Cleaning of discs:
Please connect the unti to the TV compatible
with
PAL/NTSC.
About this manual
Finger prints or stains on the surface of the
disc will directly affect signal quality and
will result in poorer quality. Please use a soft
cloth and wipe in a radiating manner as illustrated.
This manual explains the basic specifications
of this unit. Some DVD disc may have special
requirement and the unit may not play such
discs. Please refer to the disc instruction.
If the surface of your disc is very dirty, wipe
the disc with a moist cloth. Finally use a dry
soft cloth to remove all the water stains.
Never use electrostatic prevention products
as well as solutions which contain benzene,
thinner or any other vaporizing substances,
as they may damage the disc surface.
Service & Warranty information
Under www.yamakawa.de you can find current service information in the Service&Support
section. In case of a defect you can consult your dealer / point of sale, or you can return the
product to the manufacturer. Doing so, you will need a RMA no. which you can only obtain
from the same section of the homepage. Print out the return delivery note and send the product
to the adress on the delivery note with the RMA no. being visible on the carton.
28
YAMAKAWA CONSUMER LIMITED WARRANTY
YAMAKAWAprovides a limited one-year warranty for this product against defects in material
and workmanship under normal use and service from the date of purchase by the original
purchaser from an authorized YAMAKAWA reseller.
No warranty for commercial use.
YAMAKAWA does not make any other warranties in respect to the product, either expressed or implied,
including no warranties of merchantability or fitness for a particular purpose,except as expressly provided in this
agreement. If any labor, repair or parts replacement is required because of accident, negligence, misuse, theft,
vandalism, fire, water or peril; or because of conditions outside of the manufacturers specifications, including
but not limited to, electrical power, temperature, humidity or dust; or by moving, repair relocation or alteration
not performed by YAMAKAWA or by any cause other than normal use, the warranty provided herein shall not
apply. This warranty applies only to the original purchaser.
YAMAKAWA SHALL NOT BE LIABLE FOR ANY SPECIAL, INCIDENTAL, OR CONSEQUENTIAL
DAMAGES OR FOR LOSS, DAMAGE OR EXPENSE DIRECTLY OR INDIRECTLY ARISING FROM
CUSTOMERS USE FO OR INABILITY TO USE THE EQUIPMENT EITHER SEPERATLY OR IN COMBINATION WITH OTHER EQUIPMENT, OR FOR PERSONAL INJURY OR LOSS OR DESTRUCTION OF
OTHER PROPERTY, OR FROM ANY OTHER CAUSE.
Upon notification as set forth on the reverse side of this card, YAMAKAWA or its authorized service centers shall
have the option to repair or replace any defective part of the product. Such service by YAMAKAWA shall be
customers’ sole and exclusive remedy. YAMAKAWA will bear the cost of warranty labor and materials for hardware maintenance, repair or replacement. Customer shall pay freight/transportation charges to YAMAKAWA or
its authorized service centers. Proper installation and setup are the sole responsibility of the customer.
IF SERVICE IS REQUIRED
If the product does not perform as warranted, call YAMAKAWA for available service options and the location of
your authorized service center, or email us at [email protected]
If it is necessary to return an item to YAMAKAWA the defective product should be securely packaged with
accessories in original boxes and insured for shipment. Owner agrees to insure and accept all liability for loss of or
damage to this product.
YOU MUST CALL TECHNICAL SUPPORT AT 800-81409614 FOR A RETURNAUTHORIZATION
NUMBER (RMA) AND SHIP-TO ADDRESS BEFORE SHIPPINGANY PRODUCT TO YAMAKAWA OR
ITS SERVICE CENTERS.
Please include a copy of your dated sales receipt, the product serial number, and a detailed description of the problem
your are experiencing. The product must be returned to YAMAKAWA within 2 weeks of receiving the RMA number.
YAMAKAWAwill make every effort to exchange or repair within 30 days of receipt.
This warranty is valid only in North America. Products taken Outside of North America are no longer eligible for
warranty service.
This warranty shall not be applicable to the extent that any Federal, State or Municipal law, which cannot be
preempted, prohibits any provision of this warranty. This warranty gives you specific legal rights, and you may also
have other rights, which vary from state to state.
PLEASE RECORD YOUR SERIAL NUMBER HERE
________________________________________________________________
YAMAKAWA
Toll Free Phone: 800-814-9614
www.yamakawausa.com
Email: [email protected]