1
PUMA
Portable Universal Media Archive
User Manual V 2.6
Including PUMABD
December 2011
Cypher Technology Ltd
Leatherhead, UK
cyphertechnology.com
1
Table of Contents
1 Table of Contents ....................................................................................................2
2 Description ..............................................................................................................4
3 Quick Start Guide ....................................................................................................6
3.1 Turning On..........................................................................................................6
3.2 Making Master and Working Copies of a Flash Card .........................................6
3.3 Turning Off..........................................................................................................6
4 Detailed Operation ..................................................................................................7
4.1 Setting up and Powering PUMA .........................................................................7
4.2 Turning Off (Viewing Display Software Revision and Serial Number) ................7
4.3 Making Evidential backup of Flash Card or USB stick........................................7
4.4 Menu System......................................................................................................8
4.4.1 To Select a Menu function ...........................................................................9
4.4.2 Make Working Copy (make simple file copy) ...............................................9
4.4.3 Make Video DVD .........................................................................................9
4.4.4 Make Encrypted Copy................................................................................10
4.4.5 To Decrypt Files on the Encrypted Disk .....................................................10
4.4.6 Make Master Copy .....................................................................................10
4.4.7 Make HD Master ........................................................................................10
4.4.8 Verify Master Copy against Flash Card......................................................11
4.4.9 Verify Multi-Disk Master Set.......................................................................11
4.4.10 Restore the Master Copy to a Flash Card..................................................11
4.4.11 Restore Multi-Disk Master Set ...................................................................11
4.4.12 Wipe Flash Card ........................................................................................11
4.4.13 Calculate the Checksum of the Flash Card................................................11
4.4.14 Format Flash card ......................................................................................12
4.4.15 Calculate the Checksum of the Master Disk Image ...................................12
4.4.16 Enable JPEG creation on Working Copies.................................................12
4.4.17 Set Disk Types...........................................................................................12
4.4.18 Software Installation Procedure .................................................................12
4.4.19 Adjust the Internal Time and Date..............................................................13
4.5 How is the Master Copy used?.........................................................................14
4.5.1 PUMA Master – The ultimate evidential exhibit.........................................14
4.5.2 Accessing the Full Image Master Copy with WinImage .............................14
Cypher Technology Ltd V2.6 (03) December 2011
2
4.5.3 ImageMaker – Combining Multiple Full Image Master Disks .....................15
4.5.4 Restore the Image Back to a Card.............................................................16
5 Technical Background...........................................................................................16
5.1 Master Copy (bit for bit copy)............................................................................16
5.1.1 Full Image Master ......................................................................................17
5.1.2 Compact Master.........................................................................................17
5.1.3 The Compact Master process ....................................................................17
5.1.4 Why archive the file system? .....................................................................18
5.1.5 Partition Table............................................................................................18
5.1.6 File allocation information ..........................................................................18
5.1.7 File un-deletion ..........................................................................................18
5.1.8 Historical file data.......................................................................................18
5.1.9 Media history and fragmentation................................................................19
5.2 Disk Verify Read...............................................................................................19
5.3 Working Copy (file copy)...................................................................................19
5.4 Card and Disk Checksum .................................................................................19
5.5 Flash Card Wipe (Erasing) ...............................................................................20
5.6 System Architecture .........................................................................................20
5.7 Transfer Times .................................................................................................20
5.7.1 Master Creation .........................................................................................20
5.7.2 Master Verify..............................................................................................21
5.7.3 Working Copy Creation ..............................................................................21
5.7.4 Flash Erasure.............................................................................................21
5.7.5 Transfer Time for a Complete Automated Master and Working Copy........21
5.8 RAW File handling............................................................................................21
6 Technical Support .................................................................................................22
6.1 System re-starting in the event of failure ..........................................................22
6.2 Contact .............................................................................................................22
6.3 Software Updates .............................................................................................22
7 Specifications ........................................................................................................23
8 Disclaimer .............................................................................................................23
9 Appendix ...............................................................................................................24
9.1 Supported MPEG-2 Formats for Conversion to DVD .......................................24
9.2 RAW Conversion - Supported Camera Types ..................................................24
Cypher Technology Ltd V2.6 (03) December 2011
3
2
Description
PUMA is a rugged and evidentially secure system for archiving USB and flash card data
to CDROM, DVD or BD(1) media. Its automated backup procedure make it simple to
use. It is aimed primarily at backing up flash based audio and video recorders and
digital cameras and includes a RAW to JPEG image converter. PUMA will back up any
type of file data and can be used to archive USB pen drives and other USB disk drives.
The main features are as follows:
•
Simple operation. Single, dedicated “Transfer” button initiates entire archive
sequence.
•
Rugged construction and no hard drive increases reliability and evidential
security.
•
Unique bit for bit copy of flash card provides ultimate evidential audit trail and
reduces possibility of legal challenges without increasing back-up size.
•
Three automated steps in transfer procedure: Transfer, data verify, and flash
media overwrite/erase/format.
•
Flash card, forensic wipe process ensures that deleted data cannot be recovered
and removes any viruses.
•
Fast transfer rates reduces back-up time. Up to four times faster than laptop for
transferring files. 20Mbyte /sec transfer rate.
•
Self contained unit with premium quality, full height DVD/CDROM R/W drive.
•
Re-mounts and verifies disk after writing to ensure maximum reliability of backup.
•
Supports wide range of BD-R(1), BD-R DL, DVD +/- R, +R/-R DL and CD -R
media.
•
Proprietary software tailored precisely to the needs of law enforcement and
evidence gathering. Closed nature of operating system increases evidential
security
• JPEG versions of RAW files generated on Working Copy. A list of supported
RAW camera formats is given in APPENDIX 1.
•
Can be powered from mains, vehicle power(2) or external batteries(2).
•
Supports all common flash media (see Specification).
New in Version 2.6
•
Blu-ray Disk support giving up to 50GB per disk
•
New Compact Master with directly accessible files and smaller size
•
Optional AES 256 encryption
•
Optional DVD authoring of suitable MPEG-2 files
Cypher Technology Ltd V2.6 (03) December 2011
4
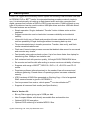
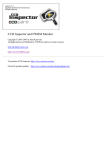
Fig 1. Front Panel
Fig 2. Rear Panel
Cypher Technology Ltd V2.6 (03) December 2011
5
3
3.1
Quick Start Guide
Turning On
1. Connect the supplied 12V 5A power supply (PSU) lead to rear panel power inlet and
screw up the connector. Connect the PSU to a mains supply using the supplied
cable.
2. Remove any flash card.
3. Switch on the Power Switch on the rear panel (switch up). The display panel will
light up and show “Press I/O”. The green front panel LED will flash.
4. Press the I/O (On/Off) switch below the green flashing LED. “On..” will be displayed
and the green LED will be on constantly.
5. After a few seconds, a growing line of dots will appear on the display and the system
will be ready for use after about 20 seconds.
3.2
Making Master and Working Copies of a Flash Card
1. Check that the displayed time and date are correct.
2. Insert the flash card into the appropriate front panel slot. The display will show the
card’s size and number of files. A USB stick may be plugged into one of the USB
sockets on the rear panel or front panel (M1.3 only).
3. Press the Disk button to eject the disk tray. Place a BD(1), DVD or CD in the tray.
4. Press the TRANSFER button to start the transfer.
a) A Master copy is produced first. This consists of the transfer of the data from the
card to the disk and a verification read pass. On successful completion the Master
disk will be ejected and the checksum of the flash card and disk will be shown. This
can be noted down for future reference. Where multiple disks are needed, follow the
on-screen instructions and note down the separate disk checksums as well as the
final checksum for the card and whole backup.
b) Remove the Master Copy disk and place a new disk on the tray. Press the lower
soft key marked “Continue” to proceed. The Working copy is now produced. On
successful completion the disk(s) will be automatically ejected.
c) The flash card may now be wiped and re-formatted. Press “N” when prompted if
this is NOT required.
The Transfer is complete.
Note: If further copies are required, do not wipe the card, and use the appropriate
functions available in the “Menu”. Press “Menu” soft key and the Up/Down cursor keys.
3.3
Turning Off
Press the I/O button below the green LED to shutdown. When “Switch Off” is displayed,
turn off the rear panel Power Switch.
Cypher Technology Ltd V2.6 (03) December 2011
6
4
4.1
Detailed Operation
Setting up and Powering PUMA
1. Connect the supplied 12V 5A power supply (PSU) lead to rear panel power inlet and
screw up the connector. Connect the PSU to a mains supply using the supplied
cable.
Using in a vehicle. PUMA requires a regulated 12V power supply. If PUMA is to be
used in a vehicle, please use the 12V stabiliser available from your supplier or
Cypher Technology Ltd.
2. Remove any flash card.
3. Switch on the Power Switch on the rear panel (switch up). The display panel will
light up and show “Press I/O”. The green front panel LED will flash.
4. Press the I/O (On/Off) switch below the green flashing LED. “On..” will be displayed
and the green LED will be on constantly.
5. After a few seconds, a growing line of dots will appear. This line will extend to the full
width of the screen and then “Wait” will be displayed. A few seconds after that the
PUMA program will start and the system is ready for use. The whole boot up
procedure, from switch on, takes about 24 seconds.
6. There are two formats for the Master disk. The default is Compact Master, which
reduces the size of the data for the Master to the size of the files. Alternatively, Full
Master may be selected where the Master size is the same size as the flash card.
This is configured in the Menu under “Set Disk Types”.
7. PUMA has an option to make a video DVD Working Copy, where there are MPEG2
files on the flash card. This is configured in the Menu under “Set Disk Types”.
8. When PUMA makes a Working File Copy of RAW image files, it can be configured to
create JPEG versions of these files for ease of viewing across a wide range of
platforms. Where this feature is required, it must be enabled from the menu. This is
done by selecting the “Enable JPEGs” function in the Menu (Section 4.4.16 ).
9. Check that the displayed time and date are correct. If not, use the “Adjust Time”
menu function to adjust the time and date (Section 4.4.19).
4.2
Turning Off (Viewing Display Software Revision and Serial Number)
Press the I/O button below the green LED to shutdown. Press {Y} to confirm. When
“Switch Off” is displayed, turn off the rear panel Power Switch.
If {N} is pressed the Software Revision and Serial Number (where appropriate) will be
displayed and PUMA will resume operation.
4.3
Making Evidential backup of Flash Card or USB stick
PUMA has an automated process for making an evidential archive of a flash storage
device. This process is initiated by pressing the [Transfer] key. The Transfer consists of
Cypher Technology Ltd V2.6 (03) December 2011
7
the sequence: Make Master, Verify Master, Make Working Copy, and then Wipe and
format the flash card.
1. Place the flash card in the appropriate slot. If a USB drive is to be archived, plug this
into either of the USB slots in the rear panel or the slot in the front panel (M1.3 only).
An extension lead may be required for bulky USB flash drives
2. Place a blank CD-R or DVD +/- R or BD-R(1) in the drive. The Master is generated
first. The size of the flash card is shown on the display when it is inserted. A CD will
hold 730Mbytes a standard DVD 4,700 Mbytes and a Blu-ray 25GB. Where the data
size is larger than the disk size, multiple disks will be produced. These disks will be
automatically numbered as Master Disk #1, Master Disk #2 etc. The Master Copy
has a log file which contains the time and date stamp of the backup as shown on the
display on the front of the machine as well as other meta data.
3. Press the Transfer button. The automated transfer and verify process begins.
During the transfer the whole of the card is scanned, not just the file data. The
display shows the % done and an estimate of time to go. (The “Cancel” soft key
allows the transfer to be aborted)
4. When complete, PUMA ejects the verified Master Disk and displays the 8 digit
Checksum. This should be noted down.
(Multiple disk transfer - If the data size is bigger than the disk size, further disks will be
requested. Each disk has its own checksum, which is displayed at the end of each disk
transfer. When all the data has been transferred, no new disks will be requested. Press
{Continue} and the checksum of the whole Master Image will be shown. This should also be
noted down. This final checksum is the same as the checksum produced for the card.)
If the process was not successful, the disk(s) will not be ejected and an error
message will be displayed and the user will be prompted to re-burn that disk.
5. PUMA then prompts for another blank disk to be inserted for the Working Copy.
If the size of the files on the flash card is bigger than the disk size, further disks will
be requested.
6. If the whole Transfer process completed successfully the user will be prompted to
wipe the Flash card:
Press {Y} to wipe flash card or {N} to proceed without wiping card. After the card is
wiped it is automatically partitioned and re-formatted with a FAT32 file system.
The Transfer process is now complete. A new flash card may be inserted.
4.4
Menu System
When the system powers up, or after a full Transfer has completed, the display shows
11:32:15 Wed Nov 10 2008
Insert card...
Menu>
or if a card is already inserted:
Card Size
3.89 GB
6 Files 69.2MB
Menu>
Pressing the {Menu} soft key enters the Menu system.
Cypher Technology Ltd V2.6 (03) December 2011
8
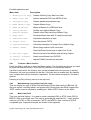
Possible operations are:
Menu Item
Description
1
Working File Copy
Creates Working Copy disk from flash
2
Make Video DVD
Authors standard DVD from MPEG-2 files
3
Encrypted Copy
Creates password protected copy
4
Make Master Copy
Creates Master Copy
5
Make HD Master
Makes a Master of a USB hard drive
6
Verify Master
Verifies card against Master Copy
7
Restore Master
Creates clone flash card from Master Copy
8
Wipe Card
Overwrites flash card with “0”s and formats card
9
Checksum Card
Calculates checksum of card
10 Format Card
Formats card as FAT32
11 Checksum Master
Calculates checksum of Image file on Master Copy
12 Enable JPEGs
Allows Jpeg creation to be controlled
Press Up/Down Arrow keys to select Yes Or No
13 Set Disk Types
Sets the format of the Master and Working Copies
14 Install Software
Install new software from DVD/CD
15 Adjust Time
Adjusts PUMA internal time and date
4.4.1
To Select a Menu function
Press the {Menu} soft key to enter the Menu system. The Up/down arrow keys are used
to select the desired function. Press the [Go] soft key to execute the function.
If a disk is required for the function, this can be inserted before the function is started.
Otherwise, the user is prompted for the disk. If the disk size is smaller than the transfer
size, multiple disks will be created or requested. On successful completion, the disk is
ejected.
Pressing the {Exit} soft key returns to the top level.
4.4.2
Make Working Copy (make simple file copy)
This is a simple file copy of all the files and folders on the flash card or USB stick. All
files are copied, including hidden and system files. Where there are RAW images files,
JPEG versions can be created by enabling the “Make JPEG” feature in the Menu.
4.4.3
Make Video DVD
This is an optional feature. It is used to make a standard PAL or NTSC video DVD of
MPEG-2 files on the flash card. The card is automatically searched for “*.mpg” and the
selection of NTSC or PAL is automatic. NOTE: the MPEG-2 files must be of a DVD
compatible type. Supported formats are shown in the Appendix.
Cypher Technology Ltd V2.6 (03) December 2011
9
4.4.4
Make Encrypted Copy
This is an optional feature. It is used to make an AES 256 encrypted and password
protected copy of the files on the flash card. PUMA will automatically generate a
pseudo-random high security 14 character password. It is highly recommended that
this be used for security reasons. Alternatively a password may be entered using the
cursor keys. The [<],[>] keys select the character and the [up],[down] keys select the
character. Press the {Use} softkey when the correct password is shown AND it has
been noted down.
4.4.5
To Decrypt Files on the Encrypted Disk
A Decrypter program is copied automatically to the encrypted disk. To access the
encrypted files, insert the disk into a Windows XP or later PC. The encrypted files can
be seen in the “Files” folder. These files can be copied in the normal way but cannot be
accessed until decrypted.
To decrypt, double click on the Decrypter icon in the top-level of the CD or DVD. Select
the file or files to be decrypted using the Decrypter browser. When the selection is
complete, click the Decrypt button. You will be prompted for the password and then to
select a destination folder into which to copy the decrypted files. If the password is
correct the files will be decrypted.
4.4.6
Make Master Copy
This function will create a Master disk copy. This will transfer all evidential data from the
flash card to a BD(1), DVD or CD. It will include files, deleted files and file metadata.
The type of Master (Compact or Full Master) is configured under “Set Disk Types” in the
Menu and the setting is retained through power down.
4.4.7
Make HD Master
This is an optional feature. This function creates a Master copy of a large hard disk on a
second, empty hard drive. It is designed for use with certain proprietary data storage
schemes.
All files are copied along with a log file that contains the MD5 hash codes of all the files
so that the transferred material can be verified for added protection. It does not scan
unused areas of the drive and therefore should normally only be used with these
proprietary data schemes that include their own detection of missing or deleted data.
Please ask Cypher Technology for suitable applications.
The HD Master can also be used where it is impractical to create a standard PUMA
Master and where, therefore, this could be regarded as “best practice”
First connect the empty backup drive to one of the USB ports on PUMA (in the top level
of the Menu). The display should show the size of the disk and 0 files. If it shows any
files or says “No file system” then the drive should be formatted using the Menu “Format
card” option. After the format, exit the Menu and check that the display is now showing
0 files.
Then press {Menu} and scroll down to “Make HD Master”. Connect the source evidential
drive and press and {Go}. The destination drive is automatically chosen as the empty
drive.
Cypher Technology Ltd V2.6 (03) December 2011
10
4.4.8
Verify Master Copy against Flash Card
This function will check that the contents of the inserted Master Disk are identical to the
inserted flash card.
Where a multi-disk set has been produced, any numbered disk may be checked
individually.
4.4.9
Verify Multi-Disk Master Set
To verify a Master disk set (i.e. all the disks in a multi-disk Master), the procedure is
different for a Full and Compact Master
Full Master: Insert Disk #1 first, then 2, 3, 4 etc.
Compact Master: Insert LAST disk first and then feed disks in reverse order. So if there
are 4 disks in the set, disk #4 first then 3, 2 and 1.
4.4.10
Restore the Master Copy to a Flash Card
This function will copy the contents of the inserted Master disk to the inserted flash card.
This flash card will become a precise clone of the original card. Where the card is bigger
than the original card, the excess data on the card will be zeroed.
Use a flash card that is the same size or bigger than the original.
When completed the checksum of the flash card (and the disk) is displayed. This card
is functionally identical to the original. It may be inserted back into the camera or may
be read on a computer and the images viewed or the files accessed.
4.4.11
Restore Multi-Disk Master Set
As above, use a flash card that is the same size or bigger than the original.
To restore a Master disk set (i.e. more than one disk for a particular flash card), the
procedure is different for a Full and Compact Master
Use a flash card that is the same size or bigger than the original.
Full Master: Insert Disk #1 first, then 2 a3, 4 etc.
Compact Master: Insert LAST disk first and then feed disks in reverse order. So if there
are 4 disks in the set, disk #4 first then 3, 2, 1.
4.4.12
Wipe Flash Card
This function will perform a forensic wipe of the flash card. No data will be recoverable
from the card after this operation (see below).
This function writes “0”s to the card. After the card is wiped, it is formatted as FAT32
and is ready for use.
4.4.13
Calculate the Checksum of the Flash Card
This function will generate a unique number from the contents of the flash card. This is
called a checksum (see below). This number provides a useful and secure identification
for the card and the Master Copy. The checksum of the card will be the same as the
checksum of the Master image file for that card or the same as the sum of the
checksums for the individual disks for a multi-disk set (modulo 32 bit).
Cypher Technology Ltd V2.6 (03) December 2011
11
4.4.14
Format Flash card
This function first overwrites the Master Boot Record of the card with binary “0”s thereby
removing any boot sector viruses. It then re-partitions the card with a single primary
partition of the maximum size and then formats this with a FAT32 file system. Note this
function does not wipe the data area of the card. The Wipe card function must be used
if this is required. See Section 4.4.12.
When complete “Formatted” is displayed.
4.4.15
Calculate the Checksum of the Master Disk Image
This function will generate a unique number from the contents of the inserted Master
disk. This is called a checksum (see below). This number provides a useful and secure
identification for the Master and the flash card.
Place the Master disk in the DVD drive and press the {Go} soft key to execute the
function. When complete the checksum is displayed.
Where a multi-disk back up set has been produced, the checksum of the whole set can
be found by starting with disk 1 in the set and following the on screen instructions.
4.4.16
Enable JPEG creation on Working Copies
This function will turn on the automatic creation of JPEG files on Working Copy disks.
This will slow down the creation of the Working Copy where RAW image files are
present.
Press the {Change} soft key to enable/disable the option.
Press the {Exit} soft key to return to the Menu.
4.4.17
Set Disk Types
This function sets the disk format for the Master and a Working Copies.
Master Type
There are two options; Full Image and Compact. “Full Image” is the original Master
format used up until V2.2. The “Compact” option produces Masters with directly
accessible files and is much smaller in size. This is the new recommended Master
format from V2.2. See section 4.5 for more information.
Working Type
The Working copy is normally a file copy of the flash card. If the DVD authoring option is
installed, the Working Copy can be configured to be a Video DVD instead.
Changing the Master and Working Disk Type
Press the {Change} soft key to toggle between different options.
Press the {Exit} soft key to return to the Menu.
4.4.18
Software Installation Procedure
This function installs new versions of the operating software. It is accessed from the
Menu as function 14. The procedure from a “cold” start is as follows:
Cypher Technology Ltd V2.6 (03) December 2011
12
1. Boot up PUMA.
2. Press the {Menu} soft key to enter the menu.
3. Press the [Down Arrow] key until “Install Software” appears.
Either:
Press the [Disk] button to eject tray.
Place an upgrade disk on the tray and press [Disk] button once more to load the disk.
The disk will take a few seconds to be recognised. Please wait.
Or:
Plug in a USB drive to the rear panel of the PUMA. This should have the install file and
the data files copied to the root directory of the drive as described in the download
instructions.
5. Press the {Go} soft key to start the software upgrade. The installation progress will be
shown on the screen. DO NOT SWITCH OFF DURING THIS PROCESS OR THE
SYSTEM MAY BE UNUSABLE.
6. When complete the system will display “Installation complete” or it will restart the new
version of the program.
7. Switch off and reboot.
8. Check the Version number (displayed at boot up) is the same as that labelled on the
Install CD or DVD.
4.4.19
Adjust the Internal Time and Date
This function allows the internal real-time clock to be adjusted. This clock is used to time
and date stamp the Master.
The time and date is displayed in the top line of the display. E.g.
Adjust Time display
15:03:21 Tue Jan
Sel <> Adj Up Dn
9 2007
Exit>
The hours number will flash and the [Up] and [Down] cursor keys can be used to adjust
the value. The [<] and [>] cursor keys can be used to select other fields. When the
correct time and date has been displayed, press the {Exit} soft key to exit back to the
Menu list.
Cypher Technology Ltd V2.6 (03) December 2011
13
4.5
4.5.1
How is the Master Copy used?
PUMA Master – The ultimate evidential exhibit
Copying Master digital evidence files from a flash card to a CD or DVD by
“dragging and dropping” on a PC will leave behind deleted files and other meta
data. Simple card copiers only copy the undeleted, un-hidden files. Both these
practises leave the Master exhibit open to costly legal challenge.
The PUMA Master contains all the data from the flash card on a write-once optical disk.
This includes the files, deleted files, the file system, partition information and all
historical file data. As such it provides the most secure, evidential backup and allows
the most complete evidential audit trail. It contains everything that was on the flash card
and as such can be used to generate a clone of the original card.
It has the advantage over the original flash card in that the data cannot be altered,
accidentally or otherwise. Simply inserting a flash card into a computer and opening a
file will change the data on the card and therefore the evidence. Vital date stamp
information can be changed.
Optical disks are also immune to static.
There are two possible formats for the Master. Full Image Master and Compact Master.
Both Master disks can be restored back to a card to access the files.
With a Compact Master the files can be accessed directly from the Master disk “Files”
folder. This will not be the case if the original card was corrupted.
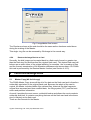
4.5.2
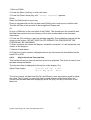
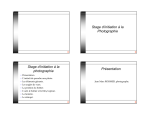
Accessing the Full Image Master Copy with WinImage
Firstly, the flash.img file on the Master Copy disk can be opened with a disk image
viewer program. Such a program is WinImage, a trial version of which may be
downloaded from: http://www.winimage.com/download.htm
Fig 3. Winimage screen display under Windows XP
Cypher Technology Ltd V2.6 (03) December 2011
14
The viewer programs allow the user to open the flash.img file as if they were opening a
disk in Windows explorer. Individual directories can be viewed and opened and their
files accessed or copied.
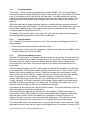
4.5.3
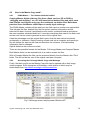
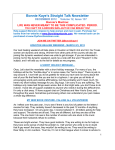
ImageMaker – Combining Multiple Full Image Master Disks
If the Full Image Master is split across several disks, the ImageMaker utility, on Master
Disk #1 must be run to combine the images on the different Master Disks into one file.
To run ImageMaker, place Master Disk #1 in the PC drive. Double click on the
ImageMaker icon and run the program.
Fig 4. ImageMaker screen display under Windows XP
Select the destination folder with the Browse tab and then click {Start} to start
conversion. When the first disk is complete, then load disk #2. Follow the on screen
instructions until all disks have been transferred. After each disk is completed the
following dialogue box is shown. After the last disk, press the {Finish} button to close the
image file.
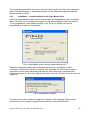
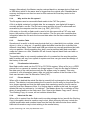
Fig 5. ImageMaker dialogue
The name of the new, combined image file is shown in the message window and is
generated from the original image file name and the current date and time.
Cypher Technology Ltd V2.6 (03) December 2011
15
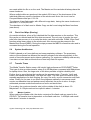
Fig 6. ImageMaker final screen
The Checksum shown at the end should be the same as the checksum noted down
during the making of the Master.
This single .img file can be accessed by WinImage in the normal way.
4.5.4
Restore the Image Back to a Card
Secondly, the disk image can be copied back to a flash card of equal or greater size
than the flash.img file (and therefore the original flash card). This copied flash card will
behave as an exact clone of the original allowing, for example, the un-erasing of files
and the forensic examination of file allocation addresses and access dates. On PUMA
this task is performed by the Restore Master function (see Section 4.4.10).
5
5.1
Technical Background
Master Copy (bit for bit copy)
The PUMA Master Copy stores all the all of the data on the flash card and is therefore
evidentially equivalent to the original flash card. Because the whole of the card is
copied, the Master includes hidden files, deleted files, historical file data fragments,
original time-accessed and time-modified data, the filing system (FAT), and the boot
sector and partition information.
As such it provides the most secure, evidential backup and allows the most complete
evidential audit trail. It contains everything that was on the flash card and is the same
size (in Kbytes) as the flash card.
There are two formats for the Master
Cypher Technology Ltd V2.6 (03) December 2011
16
5.1.1
Full Image Master
“Full Image”. This is the format originally used within PUMA. The Full Image Master
contains a single file called “flash.img” which is a bit for bit copy of the whole of the flash
card. It is the same size (in Kbytes) as the flash card. The flash.img file has its time
created, modified and accessed values set to the time of the start of the transfer. This
time is taken from the system time as displayed on the front panel of the machine at
start-up.
When the flash card is bigger than the disk size, multiple disks are needed and each
disk will contain part of the image. The first disk will contain a file called flash1.img , the
second disk, flash2.img etc. These part images may be combined to form a single,
complete image file (see Section 4.5.3 ).
The Master Copy can be used in two ways. On a PC with an Image Viewer program or
by restoring the image back to a flash card or USB disk.
5.1.2
Compact Master
The “Compact” format was introduced in V2.2 and has two advantages over the Full
Image Master:
•
Files may be accessed directly in the Files folder
•
Blank portions of the card are compacted: a wiped card, with only a few MBs of files
creates a Master of only a few MBs.
5.1.3
The Compact Master process
First the FAT file system on the flash card is analysed for any errors. If errors are found,
this is not a problem for the back-up and the user is not notified. It does mean that the
file data cannot be used to create the Master and the whole card is treated as the
unused portion of the card. Files are not copied to the Master as actual files but as
image data.
If the file system is good, the FAT can be used to calculate the location of the file data
on the flash card. The files are copied from the flash card into the “Files” folder on the
Master disk. Having copied all the files, PUMA then scans the unused portion of the
card (i.e.the area of the card not used by the files) and copies any meta data, deleted
files or file fragments to the Master. This data is stored in Image files named
Image_data0.dat, Image_data1.dat etc in the “AuxData” directory on the Master. An
“Image_data.xml” file is also created in the AuxData directory and this records where
the data in the files was stored on the flash card. This allows the original card to be
precisely cloned during the Restore or Checksum processes.
A checksum is produced at the end of the disk creation. This is the checksum of all the
data (files and any meta data) on that disk.
If the files and meta data are greater than the disk capacity, PUMA will prompt for
further disks. These The checksum of each intermediate disk is displayed after each
disk has been verified. When the Master set is complete, a further checksum is
displayed, which is the sum of the individual disk checksums. This checksum is the
same as the checksum of the flash card, as it is produced from the same data.
The Files folder may be accessed from a computer file browser in the usual way. Third
party data recovery tools can be used on the Image files to, for example, recover JPEG
Cypher Technology Ltd V2.6 (03) December 2011
17
images. Alternatively, the Master may be restored back to a storage device (flash card
or USB drive) which is the same size or bigger than the original card. Standard data
recovery techniques can then be used on this restored drive as they would on the
original card.
5.1.4
Why archive the file system?
The file system used on removable flash media is the FAT file system.
A file is a digital container for digital data. As an example, one digital still image is
normally stored in one file. The file has a name and this is how it is referenced and
accessed by the computer and the user (e.g. DSC_0001.JPG).
A file entry on the disk or flash card is used to link this name with a FAT entry and
hence, the position of the file data on the medium. The file entry also contains other
information about the file such the time and date when the file was created and last
modified.
5.1.5
Partition Table
Sometimes it is useful to divide one physical disk (e.g. a hard disk) into multiple, virtual
drives (c: drive, e: drive etc.). A partition table describes how the drive is divided into
different virtual disks. Flash cards and USB pen drives are normally partitioned but with
only one partition. Strictly speaking they don’t need a partition table and some flash
cards don’t have one. Also, Windows XP will format a wiped, blank flash card with no
partition table.
The partition table is not normally updated after it is created but the way the partition
table is written will vary from system to system and thus can give some knowledge of
the history of the card.
5.1.6
File allocation information
Most flash media cards use the FAT16 or FAT32 file system. When a file (e.g. a JPEG
picture file in a camera) is created, two things happen. Firstly the file data is written to
the data area of the card and secondly the file system entry is created. This entry
consists of a file information (name, date etc) and the location of the file data on the
flash card stored in the File Allocation Table (FAT).
5.1.7
File un-deletion
When a file is deleted the actual file data is normally left unchanged on the storage
device. The deletion involves marking the file name in the file entry to show that the file
is no longer required and that the data space that was being used by the file can be
used for new files. Because of this, if no further data is written to the card, the original
deleted file may be retrieved or “un-deleted”. The Master allows for un-deletion of files
where it was possible on the flash card. (See “How is the Master Copy used?” above).
The Working Copy, of course, will not contain deleted files.
5.1.8
Historical file data
When a file is copied from the flash card to another storage device (as with the Working
Copy) information about its creation may be lost. Most obviously this may include the
original modification and creation times from the flash file table but also more subtle
historical information may be lost relating to the media history.
Cypher Technology Ltd V2.6 (03) December 2011
18
5.1.9
Media history and fragmentation
When a file is created on a blank piece of media, the storage space is generally
allocated from the beginning of the data area as continuous or contiguous space. Once
several files have been created and then a few have been deleted “holes” appear on the
file data area where the old file data resided. These holes will eventually be overwritten
with new file data as new files are created, but because these new files may be of
different sizes to the old files, one new file may have its data spread across the card at
various locations. The more a flash card or drive is used, the more fragmented it
becomes. This gives valuable information about the use of the media and the time of
creation or modification of a file.
The Master Copy preserves all this information as it provides an exact snapshot
of the state of the card when the copy is taken and because it leaves all the card
data unchanged within the backup. The Master Copy is therefore the most
complete evidential backup.
5.2
Disk Verify Read
Most backup programs simply copy the data to the backup medium and assume it has
been written correctly and can be re-read. With optical disks this is particularly
dangerous. PUMA dramatically reduces the chance of producing unreadable disks by
performing a verify read of the disk after it has been written. The verify pass itself,
involves re-reading every data bit from the flash card and checking it against every bit
on the Master.
5.3
Working Copy (file copy)
The Working Copy is a full copy of the directory tree of the flash card or USB drive. This
means all files and directories are copied. Any file types can be copied. Hidden and
system files are copied.
For the files on the flash card to be recognised by PUMA, the card must be formatted
with a FAT file system.
The Working Copy disk uses an ISO9660 filing system and is recognised by most
computing platforms. The system also implements the Joliet extension to the ISO 9660
standard which allows for long file names.
Where RAW image files are detected, PUMA can automatically convert them to a JPEG
compressed image file with a compression ratio of about 7:1. The file has the same root
name as the original, so that dcn0005.nef becomes dcn0005nef.jpg. For most picture
content it will not be possible to readily observe any difference in quality between the
JPEG and RAW images. This feature is disabled by default, but can be enabled in the
Menu (see above).
A wide range of RAW file formats are supported and these are listed in the Appendix.
5.4
Card and Disk Checksum
PUMA produces a 32 bit checksum of the flash card and Master Copy file. The
checksum is a unique number derived from all the data on the card or from the whole
image file on the Master. As such the checksum will always change if any data changes
Cypher Technology Ltd V2.6 (03) December 2011
19
are made within the file or on the card. The Master and the card should always have the
same checksum.
Where multiple disks are produced, the modulo 32 bit sum of the checksums of the
individual disks are equal to checksum of the whole card. Note: this is not true for
Compact Master disks pre V 2.6.34.
The chance of two flash cards, with different image data, having the same checksum is
less than 1 in 4,000,000,000.
The checksum of a flash card or Master Copy can be found using the Menu functions
(see above).
5.5
Flash Card Wipe (Erasing)
As mentioned above, when a file is deleted the file data remains on the medium. This
file may be un-deleted and the file’s data recovered. The only way to render the card
safe from data recovery is to re-write the whole card with new data. PUMA “Wipe Card”
function writes binary zeros to the whole card. Also viruses may be present in the
Master Boot Record (MBR). During the wipe process the MBR is overwritten also and is
recreated during the format operation.
5.6
System Architecture
PUMA is based on a Linux platform and uses proprietary software. The proprietary
nature of the software has allowed the transfer process to be tailored precisely to the
needs of law enforcement and evidence gathering. For maximum reliability and security
it contains no hard disk and boots from a read-only flash file system.
5.7
Transfer Times
The Media Transfer Station uses a full height, high performance CD/DVD/BD(1)writer.
This type of drive provides transfer rates up to 20 Mbyte/sec compared with 8Mbyte/sec
for laptop drives. Also, the larger size of the drive provides a higher reliability disk.
Further time is saved during the transfer as the separate tasks (Transfer, Verify and
Erase) are started automatically, one after the other. The user does not have to open
separate applications for disk imaging, file copy, file verify, raw file conversion and flash
erase. Clearly for the user to run these five programs manually in sequence would
require considerable time and perhaps more important, be prone to error. A single,
automated process avoids these sources of error and saves time.
For reading, the maximum transfer rate (at the outside of the disk) is about 20
Mbytes/sec. A 4 Gbyte card can be copied in about 4 minutes.
5.7.1
Master Creation
When making the Master disk, the whole contents of the flash card are coped to the
CD/DVD. The transfer time is dependent on the flash card size. A 4GByte card would
take about 5 minutes to transfer.
Cypher Technology Ltd V2.6 (03) December 2011
20
5.7.2
Master Verify
This involves re-reading the flash card and comparing the data with the disk image. This
takes about 4 minutes for a 4 Gbyte card.
5.7.3
Working Copy Creation
This involves only copying the files themselves and the time taken will depend on the
amount of data contained in the files. A large RAW file of say 16 Mbytes would take
around 1 second to transfer.
Where a JPEG is created from the RAW file this will take from a few seconds to a few
tens of seconds per file depending on the size of the RAW file.
5.7.4
Flash Erasure
The erasing process involves writing a fixed binary pattern of data back to the flash
media so that the original data cannot be recovered or un-erased under any
circumstances. This wiping process therefore depends on the write speed of the
particular flash card. Write speeds are commonly up to about 10 Mbytes/s which gives
an erase time of about 6 minutes for a 4 Gbyte card.
5.7.5
Transfer Time for a Complete Automated Master and Working Copy
Example:
For a 4 Gbyte SD card with 6 x 16 Mbytes RAW files the transfer time would be:
Create Master
5 Mins
Master Verify
4 Mins
Create Working Copy
3 Mins (depends of RAW conversion speed)
Erase Flash
6 Mins(Depends of flash card type and brand)
Total
18 Minutes
5.8
RAW File handling
RAW to JPEG converter
The system incorporates a RAW image file format converter. This automatically detects
the type of RAW file present and converts it to a standard JPEG image file which is
added to the Working Copy along with the original RAW format file. The JPEG will
typically be about 1/7th the size of the RAW file, and so will not add greatly to storage
requirements. This software is maintained and new formats are supported as they arise.
The JPEG file will have the same root name as the RAW file. For example, if the RAW
image file is D94L0948.DCR the JPEG will be D94L0948DCR.JPG
The cameras currently supported by the converter are listed in the Appendix .
Cypher Technology Ltd V2.6 (03) December 2011
21
6
6.1
Technical Support
System re-starting in the event of failure
Every effort has been made to allow PUMA cope gracefully with various fault conditions.
It is possible, however, that the system will temporally lock-out. If the system does not
respond during use (please wait for 3 minutes during a transfer), then the system should
be powered down by switching off at the rear panel. Remove the flash card and re-start
the system. The disk can only be ejected once the system is ready for use. In an
emergency, when the system cannot be powered, the disk can be ejected by pushing
with a blunt rod through the disk eject hole in the front panel.
6.2
Contact
In case any technical or user assistance is required please contact your distributor or
Cypher Technology Limited,
5-7 Gravel Hill,
Leatherhead,
Surrey,
KT22 7HG
Tel +(44) 1372 375500
Fax +(44) 1372 378800
Email: [email protected]
http://www.cyphertechnology.com/
6.3
Software Updates
The system can be updated with new application software when necessary. This
software can be installed from CD or from a USB thumb drive. See section 4.4.18.
Updates can be downloaded from:
http://www.cyphertechnology.com/
Cypher Technology Ltd V2.6 (03) December 2011
22
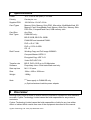
7
Specifications
Power
12 +- 0.4V dc 5A (max.) 1.5 A Idle.
Polarity
Centre pin +ve
Supplied PSU
100-240Vac 1.5A 47-63 Hz
Card Types
Memory Stick, Memory Stick PRO, Microdrive, MultiMediaCard, SD
Memory Card, SmartMedia Card, Memory Stick Duo, Memory Stick
PRO Duo, CompactFlash Card, USB memory stick
Card Size
Any Size
Disk Types
PUMA BD only :
BD-R 25GB, BD-R DL 50GB
PUMA BD and standard PUMA:
DVD +/-R 4.7 GB
DVD +/- R DL 8.5GB
CD –R
Disk Format
Working Copy and Full Image ISO9660
Compact Master UDF2.01
Encrypted Copy UDF 2.01
Video DVD UDF1.02
Transfer rate
BD-R, DVD +R/-R up to 20 Mbyte/sec
Software
Proprietary Linux. Solid state flash read only
Start-up time
M1.2 22 secs
Size:
190w x 100h x 202d mm
Weight
1.92Kg
Note:
(1)
Items apply to PUMA BD only
(2) Optional
8
external vehicle power adapter
Disclaimer
Although every effort is made to ensure that the information contained in this manual is
accurate, Cypher Technology Limited cannot be held responsible for any errors or
omissions.
Cypher Technology Limited cannot be held responsible or liable for any loss either
direct or indirect which results from use of the equipment described in this manual.
Cypher Technology Ltd V2.6 (03) December 2011
23
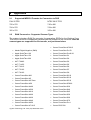
9
Appendix
9.1
Supported MPEG-2 Formats for Conversion to DVD
PAL 25 FPS
NTSC 29.97 FPS
720 x 576
720 x 480
704 x 576
704 x 480
352 x 576
352 x 480
9.2
RAW Conversion - Supported Camera Types
The system includes a RAW file converter for generating JPEGs for the Working Copy.
This is the current list of supported cameras and file formats for the converter. Note all
camera types are supported for file transfer, not just those below.
•
Canon PowerShot A720 IS
•
Adobe Digital Negative (DNG)
•
Canon PowerShot Pro70
•
Apple QuickTake 100
•
Canon PowerShot Pro90 IS
•
Apple QuickTake 150
•
Canon PowerShot G1
•
Apple QuickTake 200
•
Canon PowerShot G2
•
AVT F-080C
•
Canon PowerShot G3
•
AVT F-145C
•
Canon PowerShot G5
•
AVT F-201C
•
Canon PowerShot G6
•
AVT F-510C
•
Canon PowerShot G7
•
AVT F-810C
•
Canon PowerShot G9
•
Canon PowerShot 600
•
Canon PowerShot S2 IS
•
Canon PowerShot A5
•
Canon PowerShot S3 IS
•
Canon PowerShot A5 Zoom
•
Canon PowerShot S5 IS
•
Canon PowerShot A50
•
Canon PowerShot SD300
•
Canon PowerShot A460
•
Canon PowerShot S30
•
Canon PowerShot A530
•
Canon PowerShot S40
•
Canon PowerShot A610
•
Canon PowerShot S45
•
Canon PowerShot A620
•
Canon PowerShot S50
•
Canon PowerShot A630
•
Canon PowerShot S60
•
Canon PowerShot A640
•
Canon PowerShot S70
•
Canon PowerShot A650
•
Canon PowerShot Pro1
•
Canon PowerShot A710 IS
•
Canon EOS D30
Cypher Technology Ltd V2.6 (03) December 2011
24
•
Canon EOS D60
•
Contax N Digital
•
Canon EOS 5D
•
Creative PC-CAM 600
•
Canon EOS 10D
•
Epson R-D1
•
Canon EOS 20D
•
Foculus 531C
•
Canon EOS 30D
•
Fuji FinePix E550
•
Canon EOS 40D
•
Fuji FinePix E900
•
Canon EOS 50D
•
Fuji FinePix F700
•
Canon EOS 300D
•
Fuji FinePix F710
•
Canon EOS 350D
•
Fuji FinePix F800
•
Canon EOS 400D
•
Fuji FinePix F810
•
Canon EOS 450D
•
Fuji FinePix S2Pro
•
Canon EOS 1000D
•
Fuji FinePix S3Pro
•
Canon EOS D2000C
•
Fuji FinePix S5Pro
•
Canon EOS-1D
•
Fuji FinePix S20Pro
•
Canon EOS-1DS
•
Fuji FinePix S100FS
•
Canon EOS-1D Mark II
•
Fuji FinePix S5000
•
Canon EOS-1D Mark III
•
Fuji FinePix S5100/S5500
•
Canon EOS-1D Mark II N
•
Fuji FinePix S5200/S5600
•
Canon EOS-1Ds Mark II
•
Fuji FinePix S6000fd
•
Canon EOS-1Ds Mark III
•
Fuji FinePix S7000
•
Casio QV-2000UX
•
Fuji FinePix S9000/S9500
•
Casio QV-3000EX
•
Fuji FinePix S9100/S9600
•
Casio QV-3500EX
•
Fuji IS-1
•
Casio QV-4000
•
Hasselblad CFV
•
Casio QV-5700
•
Hasselblad H3D
•
Casio QV-R41
•
Imacon Ixpress 16-megapixel
•
Casio QV-R51
•
Imacon Ixpress 22-megapixel
•
Casio QV-R61
•
Imacon Ixpress 39-megapixel
•
Casio EX-S100
•
ISG 2020x1520
•
Casio EX-Z4
•
Kodak DC20
•
Casio EX-Z50
•
Kodak DC25
•
Casio EX-Z55
•
Kodak DC40
•
Casio Exlim Pro 505
•
Kodak DC50
•
Casio Exlim Pro 600
•
Kodak DC120
•
Casio Exlim Pro 700
•
Kodak DCS200
Cypher Technology Ltd V2.6 (03) December 2011
25
•
Kodak DCS315C
•
Leaf Aptus 65
•
Kodak DCS330C
•
Leaf Aptus 75
•
Kodak DCS420
•
Leaf Aptus 75S
•
Kodak DCS460
•
Leaf Cantare
•
Kodak DCS460A
•
Leaf CatchLight
•
Kodak DCS520C
•
Leaf CMost
•
Kodak DCS560C
•
Leaf DCB2
•
Kodak DCS620C
•
Leaf Valeo 6
•
Kodak DCS620X
•
Leaf Valeo 11
•
Kodak DCS660C
•
Leaf Valeo 17
•
Kodak DCS660M
•
Leaf Valeo 22
•
Kodak DCS720X
•
Leaf Volare
•
Kodak DCS760C
•
Leica Digilux 2
•
Kodak DCS760M
•
Leica Digilux 3
•
Kodak EOSDCS1
•
Leica D-LUX2
•
Kodak EOSDCS3B
•
Leica D-LUX3
•
Kodak NC2000F
•
Leica V-LUX1
•
Kodak ProBack
•
Logitech Fotoman Pixtura
•
Kodak PB645C
•
Mamiya ZD
•
Kodak PB645H
•
Micron 2010
•
Kodak PB645M
•
Minolta RD175
•
Kodak DCS Pro 14n
•
Minolta DiMAGE 5
•
Kodak DCS Pro 14nx
•
Minolta DiMAGE 7
•
Kodak DCS Pro SLR/c
•
Minolta DiMAGE 7i
•
Kodak DCS Pro SLR/n
•
Minolta DiMAGE 7Hi
•
Kodak C330
•
Minolta DiMAGE A1
•
Kodak C603
•
Minolta DiMAGE A2
•
Kodak P850
•
Minolta DiMAGE A200
•
Kodak P880
•
Minolta DiMAGE G400
•
Kodak KAI-0340
•
Minolta DiMAGE G500
•
Konica KD-400Z
•
Minolta DiMAGE G530
•
Konica KD-510Z
•
Minolta DiMAGE G600
•
Leaf Aptus 17
•
Minolta DiMAGE Z2
•
Leaf Aptus 22
•
Minolta Alpha/Dynax/Maxxum 5D
•
Leaf Aptus 54S
•
Minolta Alpha/Dynax/Maxxum 7D
Cypher Technology Ltd V2.6 (03) December 2011
26
•
Nikon D1
•
Nikon E5700
•
Nikon D1H
•
Nikon E8400
•
Nikon D1X
•
Nikon E8700
•
Nikon D2H
•
Nikon E8800
•
Nikon D2Hs
•
Nikon Coolpix P6000
•
Nikon D2X
•
Nikon Coolpix S6
•
Nikon D2Xs
•
Nokia N95
•
Nikon D3
•
Olympus C3030Z
•
Nikon D40
•
Olympus C5050Z
•
Nikon D40X
•
Olympus C5060WZ
•
Nikon D50
•
Olympus C7070WZ
•
Nikon D60
•
Olympus C70Z,C7000Z
•
Nikon D70
•
Olympus C740UZ
•
Nikon D70s
•
Olympus C770UZ
•
Nikon D80
•
Olympus C8080WZ
•
Nikon D90
•
Olympus E-1
•
Nikon D100
•
Olympus E-3
•
Nikon D200
•
Olympus E-10
•
Nikon D300
•
Olympus E-20
•
Nikon D700
•
Olympus E-300
•
Nikon E700
•
Olympus E-330
•
Nikon E800
•
Olympus E-400
•
Nikon E880
•
Olympus E-410
•
Nikon E900
•
Olympus E-420
•
Nikon E950
•
Olympus E-500
•
Nikon E990
•
Olympus E-510
•
Nikon E995
•
Olympus E-520
•
Nikon E2100
•
Olympus SP310
•
Nikon E2500
•
Olympus SP320
•
Nikon E3200
•
Olympus SP350
•
Nikon E3700
•
Olympus SP500UZ
•
Nikon E4300
•
Olympus SP510UZ
•
Nikon E4500
•
Olympus SP550UZ
•
Nikon E5000
•
Olympus SP560UZ
•
Nikon E5400
•
Panasonic DMC-FZ8
Cypher Technology Ltd V2.6 (03) December 2011
27
•
Panasonic DMC-FZ18
•
RoverShot 3320af
•
Panasonic DMC-FZ28
•
Samsung GX-1S
•
Panasonic DMC-FZ30
•
Samsung GX-10
•
Panasonic DMC-FZ50
•
Sarnoff 4096x5440
•
Panasonic DMC-L1
•
Sigma SD9
•
Panasonic DMC-L10
•
Sigma SD10
•
Panasonic DMC-LC1
•
Sigma SD14
•
Panasonic DMC-LX1
•
Sinar 3072x2048
•
Panasonic DMC-LX2
•
Sinar 4080x4080
•
Panasonic DMC-LX3
•
Sinar 4080x5440
•
Pentax *ist D
•
Sinar STI format
•
Pentax *ist DL
•
SMaL Ultra-Pocket 3
•
Pentax *ist DL2
•
SMaL Ultra-Pocket 4
•
Pentax *ist DS
•
SMaL Ultra-Pocket 5
•
Pentax *ist DS2
•
Sony DSC-F828
•
Pentax K10D
•
Sony DSC-R1
•
Pentax K20D
•
Sony DSC-V3
•
Pentax K100D
•
Sony DSLR-A100
•
Pentax K100D Super
•
Sony DSLR-A200
•
Pentax K200D
•
Sony DSLR-A300
•
Pentax Optio S
•
Sony DSLR-A350
•
Pentax Optio S4
•
Sony DSLR-A700
•
Pentax Optio 33WR
•
Sony DSLR-A900
•
Pentax Optio 750Z
•
Sony XCD-SX910CR
•
Phase One LightPhase
•
STV680 VGA
•
Phase One H 10
•
Phase One H 20
•
Phase One H 25
•
Phase One P 20
•
Phase One P 25
•
Phase One P 30
•
Phase One P 45
•
Pixelink A782
•
Polaroid x530
•
Rollei d530flex
Cypher Technology Ltd V2.6 (03) December 2011
28