1
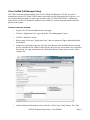
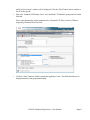
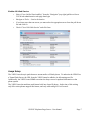
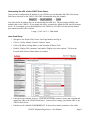
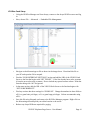
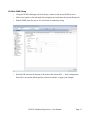
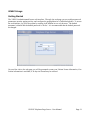
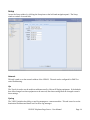
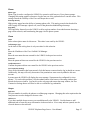
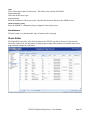
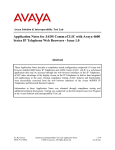
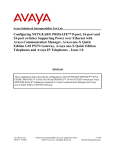
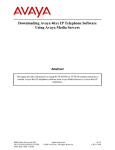
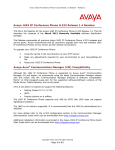
VE6023 Telephone Page Server
User Manual
Table of Contents
Overview...............................................................................................................................................4
System Requirements for Managed VoIP Products ..............................................................................4
Initial Setup...........................................................................................................................................4
Cisco Unified Call Manager Setup...................................................................................................5
Create a new user account............................................................................................................5
Enable AXL Web Service............................................................................................................7
Avaya Setup......................................................................................................................................7
Determining the URL of the VE6023 Push Server......................................................................8
Aura Push Setup...........................................................................................................................8
Aura SNMP Setup........................................................................................................................9
IP Office Push Setup..................................................................................................................10
IP Office SNMP Setup...............................................................................................................11
102B Setup..........................................................................................................................................12
VE6023 Usage.....................................................................................................................................13
Getting Started................................................................................................................................13
Setup...............................................................................................................................................14
Network......................................................................................................................................14
Vip..............................................................................................................................................14
Syslog.........................................................................................................................................14
Phone..........................................................................................................................................15
Phone Type............................................................................................................................15
Interrupt Priority....................................................................................................................15
Page Delay.............................................................................................................................15
Cisco..........................................................................................................................................15
Name.....................................................................................................................................15
Call Manager Type................................................................................................................15
IP...........................................................................................................................................15
User.......................................................................................................................................15
Password................................................................................................................................15
Confirm Password.................................................................................................................15
Test Connection Settings.......................................................................................................15
Avaya.........................................................................................................................................15
Push Port...............................................................................................................................15
Add Server.............................................................................................................................15
Name.....................................................................................................................................16
Avaya Server Type................................................................................................................16
Avaya Server IP.....................................................................................................................16
SNMP Community String.....................................................................................................16
Miscellaneous............................................................................................................................16
Phone Editor...................................................................................................................................16
Edit Phone Preferences..............................................................................................................17
Volume Adjustment (Cisco Phones only)..............................................................................17
Enable Page Interrupt............................................................................................................17
VE6023 Telephone Page Server - User Manual
Page 2
Scan Phones...............................................................................................................................17
Filters.........................................................................................................................................18
Address Pool Editor........................................................................................................................18
Attached Groups Editor..................................................................................................................18
Page Monitor..................................................................................................................................19
Stop Pages.............................................................................................................................19
Cleanup Phones.....................................................................................................................19
VE6023 Telephone Page Server - User Manual
Page 3
Overview
The VE6023 Telephone Page Server extends the functionality of an IP phone system allowing it to
integrate seamlessly with an overhead paging system. The VE6023 allows pages from other Valcom
devices to play on either Cisco or Avaya IP desk phones, essentially turning those phones in to
additional IP speakers.
System Requirements for Managed VoIP Products
•
Network Hardware Requirements:
◦ 10/100 Mbps Ethernet network
•
Bandwidth Requirements:
◦ 86 kbps per active One Way Page
◦ 172 kbps per active Two Way Call
•
TCP Requirements:
◦ Port 21 for FTP access
◦ Port 23 for Telnet access
◦ Port 80 for Web based access
•
UDP Requirements:
◦ 3 Bi-directional Ports (Factory default 4097, 4098, 4099)
•
Multicast Requirements:
◦ IGMPv3 enabled network
◦ 3 Multicast addresses (Factory default 239.1.1.2, 239.1.1.3, 239.1.1.4)
◦ Additional Multicast ports for paging (Factory default 239.1.1.10)
•
Other Suggested settings:
◦ Separate VLAN for optimal performance
◦ Valcom device for sourcing pages
Initial Setup
Before the VE6023 can discover the IP phones on the network, the phone system must be configured to
allow the VE6023 access. Follow the instructions for the appropriate phone server before configuring
the VE6023.
VE6023 Telephone Page Server - User Manual
Page 4
Cisco Unified Call Manager Setup
The VE6023 extends the functionality of the Cisco Unified Call Manager (CUCM). In order to
authenticate with the CUCM the VE6023 must be provided with the appropriate level of access. It is
the recommended procedure to create a new account on the CUCM for the VE6023. Additionally,
some services on the CUCM must be enabled for the VE6023 to retrieve important details about the
phones in the system.
Create a new user account
•
Login to the CUCM web administration web page
•
Click the “Application User” option from the “User Management” menu.
•
Click the “Add New” button.
•
Enter a name for the new “Application User” and set a password, digest credentials should
be left blank.
•
In the Device Information section, select all of the phones in the Available Devices list that
will be controlled by the VE6023, then click the down arrow to move them to the Controlled
Devices list. For large installations, the “Find More Phones” button may be used to find a
complete list.
•
In the Permissions Information section, click the “Add to User Group” button. The “Find
VE6023 Telephone Page Server - User Manual
Page 5
and List User Groups” window will be displayed. Click the “Find” button in that window to
list all of the groups.
•
Select the “Standard CCM Super Users” and “Standard CTI Enabled” groups and click Add
Selected.
Note: Some phones also require permission for “Standard CTI Allow Control of Phones
supporting Connected Xfer and conf”
•
Click the “Save” button to finish creating the Application User. The Roles should now be
displayed based on the group membership.
VE6023 Telephone Page Server - User Manual
Page 6
Enable AXL Web Service
•
Select “Cisco Unified Serviceability” from the “Navigation” (top-right) pull-down list on
CUCM web administration web page then login
•
Navigate to Tools → Service Activation
•
If you have more than one server you must select the appropriate server from the pull-down
list and click Go
•
Check “Cisco AXL Web Service” and click Save
Avaya Setup
The VE6023 uses Avaya's push feature to stream audio to IP desk phones. To authorize the VE6023 as
a Trusted Push Server, the URL from the VE6023 must be added to the 46xxsettings.txt file.
Additionally, the VE6023 uses SNMP to monitor the Avaya server for updated information on the
phone system.
The VE6023 uses the multicast push feature built into Avaya IP phones. At the time of this writing
only 96xx series phones support this feature, and only when using H.323 call control.
VE6023 Telephone Page Server - User Manual
Page 7
Determining the URL of the VE6023 Push Server
Once you have configured the IP address of your VE6023 you can determine the URL of the Avaya
Push Server that runs on the VE6023. This URL is determined using this formula:
http:// + IP_of_VE6023 + :8989
You must use the IP address that you set when using the 102B Tool. The port number (8989) is the
default value on the VE6023. If you change this value, you must also adjust the URL used in the steps
below. If, for example, you set the IP Address of the VE6023 to 192.168.1.100 and used the default
port number then the URL would be:
http://192.168.1.100:8989
Aura Push Setup
•
Navigate to the Avaya Utility Server User Page Interface and log in.
•
Click on “Utility Admin” from the “Utilities” menu.
•
Click on IP Phone Settings Editor on the left under IP Phone Tools.
•
Disable “Display File Comments” and enable “Display only active options.” Click on the
Proceed With Selected Values button to continue
•
Find the text box labeled TPSLIST. If the text box already contains a value, add a comma and
append the URL of the VE6023 Push Server. If the text box is empty, just add the URL of the
VE6023 Push Server.
•
Find the text box labeled SUBSCRIBELIST. If the text box already contains a value, add a
VE6023 Telephone Page Server - User Manual
Page 8
comma and append the URL of the VE6023 Push Server. If the text box is empty, just add the
URL of the VE6023 Push Server.
•
Find any text boxes labeled PUSHCAP. Change the numbers in these fields to all 1's to grant
basic privileges, or 2's to grant barge privileges. Valcom recommends using all 2's.
•
Click the “Save New settings File” button at the bottom of this page
•
Apply the new settings by clicking “Save 46xxsettings.txt File to this server”.
•
Log out and reboot the Avaya IP Phones required for paging.
Aura SNMP Setup
•
Navigate to the Avaya Aura Communication Manager web page and log in.
•
Click on “Server (Maintenance)” from the “Administration” menu.
•
Click on “Agent Status” on the under “Alarms” section.
•
Ensure that the Master Agent status is stopped. If it is active, stop it now.
•
Click on “SNMP Agents” on the “Alarms” section.
•
In the “IP Addresses for SNMP Access” select “Any IP address” or select “Following IP
Addresses”. If you selected the latter option, you must add the IP address of the VE6023 to the
list.
•
Set a community string for SNMP Version 1, and select enabled from the pull down menu, then
click submit. This community string will be needed by the VE6023.
•
Go back to “Agent Status” on the under “Alarms” section and start the agent.
VE6023 Telephone Page Server - User Manual
Page 9
IP Office Push Setup
•
Using the IP Office Manager tool from Avaya, connect to the Avaya IP Office server and log
in.
•
Next, choose File → Advanced → Embedded File Management.
•
Navigate to the 46xxsettings.txt file as shown in the image above. Download this file to
your PC and open the file in notepad.
•
Find the “PUSH INTERFACE SETTINGS” section and add the URL of the VE6023 Push
Server to the line that begins with “SET TPSLIST”. If the line already has a value, separate
it from the new value using a comma. Do not include any spaces between values. Note that
lines that being with “##” are ignored.
•
In the same section, add the URL of the VE6023 Push Server to the line that begins with
“SET SUBSCRIBELIST”.
•
Find any sections that have settings for “PUSHCAP”. Change the numbers in these fields to
all 1's to grant basic privileges, or 2's to grant barge privileges. Valcom recommends using
all 2's.
•
Save this file using Notepad, and return to the IP Office Manager program. Right click on
the 46xxsettings.txt and upload your edited version to the server.
•
Reboot any Avaya IP Phones required for paging.
VE6023 Telephone Page Server - User Manual
Page 10
IP Office SNMP Setup
•
Using the IP Office Manager tool from Avaya, connect to the Avaya IP Office server
•
Select your system on the left hand side navigation area, and select the System Events tab
•
Enable SNMP, leave the port at 161 and choose a community string
•
Press the OK button at the bottom of the screen, then choose File → Save Configuration.
Press OK to accept the default options on the next window to apply your changes.
VE6023 Telephone Page Server - User Manual
Page 11
102B Setup
The VE6023 extends a Valcom IP paging system to a phone system. As a result, a few additional
pieces of Valcom equipment are required before a page can be received from a phone. At a minimum, a
device that can source pages is needed. All the paging equipment must be programmed with Valcom's
VIP-102B IP Solutions Tool.
Before attempting to configure the Valcom devices, please ensure the network is configured to support
IP paging. The network should support broadcast and multicast traffic within local subnets and
multicast traffic among all subnets where Valcom IP devices are connected. If the network cannot be
configured to support these protocols, some features of the IP paging solution may not be available.
Please contact Valcom Technical Support for details.
After the endpoint devices are connected to an appropriately configured network, programming is
accomplished through the use of the VIP-102B IP Solutions Setup Tool. This software tool should be
installed on a Microsoft Windows based computer connected to the same network as the Valcom IP
devices.
The general procedure for programming Valcom IP devices involves the following steps:
•
Install the devices on the network.
•
Scan the network using the VIP-102B IP Solutions Tool to create an inventory of the available
devices.
•
Program the devices with IP addresses and other network information appropriate to the
physical network on which the devices are installed.
•
Rescan the network to allow the IP Solutions Tool to retrieve complete device configuration
information.
•
Configure the individual device settings within the IP Solutions Tool for each device on the
network with the specific settings necessary for the paging system being installed.
•
Upload the new configuration to each device from the IP Solutions Tool.
•
Restart the device to enable the new configuration settings.
For more information, refer to the VIP-102B IP Solutions Setup Tool Reference Manual.
VE6023 Telephone Page Server - User Manual
Page 12
VE6023 Usage
Getting Started
The VE6023 is administrated from a web interface. Through the web page you can configure network
parameters, monitor paging activity, and configure the paging behavior of individual phones. To access
the web interface, log in to the system by entering its IP address in to a web browser. The default
username is 'admin' and the default password is '4cc3ss'. It is recommended that the default password
be changed.
On your first visit to the web page you will be prompted to enter your Valcom license information, if no
license information is available, a 30 day trial license may be selected.
VE6023 Telephone Page Server - User Manual
Page 13
Setup
Access the Setup window by clicking the Setup item on the left-hand navigation panel. The Setup
window consists of several tabs.
Network
This tab is used to set the network address of the VE6023. The unit can be configured for DHCP or
static IP addressing.
Vip
The Vip tab is used to set the multicast addresses used by Valcom IP Paging equipment. If the defaults
have been changed on other equipment on the network, then these settings must be changed to match
those settings.
Syslog
The VE6023 includes the ability to send log messages to a remote machine. This tab is used to set the
destination IP address and detail level for those log messages.
VE6023 Telephone Page Server - User Manual
Page 14
Phone
Phone Type
Phone Type is used to configure the VE6023 for operation with Avaya or Cisco phone systems.
Changing this setting requires software to log the user out of the system before it can take effect. This
setting controls the visibility of the Cisco and Avaya tabs as well.
Interrupt Priority
High priority pages have the ability to interrupt phone calls. This setting controls the threshold at
which a page will interrupt a phone call, even if that phone has disabled Page Interrupt.
Page Delay
The Page Delay feature forces the VE6023 to delay a given number of seconds between detecting a
page on the network, and broadcasting that page over the phone system.
Cisco
Name
Select a descriptive name for this server. This value is not used by the VE6023.
Call Manager Type
At the time of this writing there is only one value for this selection.
IP
Enter the IP address of the Cisco Unified Call Manager.
User
Enter the user name that was created for the VE6023 in the previous section.
Password
Enter the password that was created for the VE6023 in the previous section.
Confirm Password
Confirm the password that was created for the VE6023 in the previous section.
Test Connection Settings
Once all the information has been entered, click this button to ensure that the log in details are correct.
Additionally, this step will verify that some of the permissions were correctly added to this user
account.
In some cases the VE6023 will display the error message “System must be configured for cisco
phones.” To resolve this problem, click the submit button at the button of the setup window then
refresh the browser window. Log back in to the web page and reenter the setup window, the Test
Connection Settings button will now be able to confirm the log credentials.
Avaya
Push Port
This port number is used by the phones to validate page requests. Changing this value requires that the
Avaya servers are also changed to the new value.
Add Server
If you have multiple Avaya servers you can add them all to the VE6023. Use this button to add
additional tabs to enter the server information in the area below. If too many tabs are opened, use the
close tab button on the tab itself.
VE6023 Telephone Page Server - User Manual
Page 15
Name
Select a descriptive name for this server. This value is not used by the VE6023.
Avaya Server Type
Select the Avaya server type.
Avaya Server IP
Enter the IP address of the avaya server. Specifically, the server that hosts the SNMP service.
SNMP Community String
Enter the SNMP V1 community string configured on the Avaya server.
Miscellaneous
This tab is used to set the automatic log out feature on the web page.
Phone Editor
The Phone Editor provides a list of all the phones the VE6023 was able to discover in the network.
From this window you can add phones to page groups, mange which phones are licensed, and control
page interrupt settings for each phone.
VE6023 Telephone Page Server - User Manual
Page 16
Edit Phone Preferences
To modify the settings for a phone select that phone in the Phone Editor and click the “Edit Selected”
button to the left, about the list of phones. Multiple phones can be selected by using the shift or control
keys. Alternatively, all the phones may be edited at once by using the Edit Selected pull down menu.
Volume Adjustment (Cisco Phones only)
Use this setting to set the volume preference for individual phones. This volume preference is
combined with the volume setting used by the page source. Avaya phones do not allow for volume
selection.
Enable Page Interrupt
If this setting is enabled, all pages will interrupt phone conversations.
For Cisco phones the page audio is mixed with phone call audio. The remote party will not hear the
page, but the remote party is still able to hear the local party. If the paged phone is using the handset
the audio will play over the hand set and not from the loudspeaker.
If this not checked, then only pages with a high priority will interrupt phone calls. See the section on
Interrupt Priority for more information.
Scan Phones
In rare situations the information in the Phone Editor can become out of date. Clicking the “Scan
Phones” button will cause the VE6023 to refresh its data with the phones and phone servers. This
operation usually takes a few seconds. On Avaya systems this button may only be used once durring
any 60 second window, as a result the button will temporarily disable itself once clicked.
Phones may not be deleted from the phone editor. If a phone is no longer in the system that phone may
be hidden. Using the Scan Phones pull down menu, phones may be hidden or unhidden.
VE6023 Telephone Page Server - User Manual
Page 17
Filters
In large installations it may be more convenient to search for a specific group of phones. This can be
done in the phone editor by simply typing some text in the text box directly below each of the column
names and pressing enter. If a certain filter is used frequently, it can be saved and retrieved using the
“Select Filter” pull down menu.
Address Pool Editor
The VE6023 streams audio to the IP phones using multicast. By default, the multicast address
239.1.1.10 is the only address used. This can be changed using the Address Pool editor. By default,
only a single address is in this pool. To support multiple simultaneous pages, several address should be
added to the pool.
Attached Groups Editor
The VE6023 detects a when a page has started and beings setting up the IP Phones. During this setup
time, the page audio is buffered. As a result, if Valcom speakers and IP Phones are both playing the
same page they may be out of sync. To solve this problem the VE6023 can source the audio to both IP
Phones and Valcom Speakers and ensure they stay synchronized. This is done via the Group
Attachment Editor.
VE6023 Telephone Page Server - User Manual
Page 18
Page Monitor
The VE6023 keeps a record of the 50 most recent pages that involved phones. From the page monitor
you can confirm that a page is playing, or that a page completed successfully. The “Verified
Connections” column keeps a record of how many phones were involved in a page, and how many
phones were successfully contacted.
Stop Pages
In extremely rare events, a page will be left in the active state after the page source has stopped sending
audio. If this happens, select the run away page in the page monitor and click the “Stop Page(s)”
button.
Cleanup Phones
In extremely rare events a phone will be left in the active state after the VE6023 has terminated the
page. Use the “Cleanup Phones” button to send a stop page message to all the phones on the system.
This will terminate any pages in progress.
VE6023 Telephone Page Server - User Manual
Page 19