1
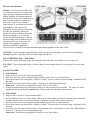
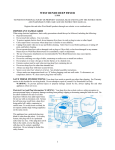
WEST BEND
CLASSIC ELECTRONIC TOASTER
2-SLICE OR 4-SLICE
TO PREVENT PERSONAL INJURY OR PROPERTY DAMAGE,
READ AND FOLLOW THE INSTRUCTIONS AND WARNINGS
IN THIS CARE AND USE INSTRUCTION MANUAL.
Register this and other West Bend® products through our website:
www.westbend.com
IMPORTANT SAFEGUARDS
When using electrical appliances, basic safety precautions should always be followed including the following:
Read all instructions before using.
Do not touch hot surfaces. Use handles or knobs.
To protect against electrical shock do not immerse cord, plug or other non-removable parts of this toaster in water
or other liquid.
• Close supervision is necessary when any appliance is used by or near children.
• Unplug from outlet when not in use and before cleaning. Allow to cool before cleaning or taking off parts.
• Do not operate any appliance with a damaged cord or plug, or if the appliance malfunctions, or has been damaged
in any manner. Return appliance to The West Bend Company for examination, repair, and or adjustment.
• The use of accessory attachments not recommended by The West Bend Company may cause injuries.
• Do not use outdoors.
• Do not let cord hang over the edge of table, counter, or surface area, or touch hot surfaces.
• Do not place on, over or near a hot gas or electric burner or in a heated oven.
• Do not use appliance for other than intended use.
• Oversized foods or metal utensils must not be inserted in toaster as they may cause fire or risk of electrical shock.
• A fire may occur if the toaster is covered or touching flammable material, including curtains, draperies, walls and
the like, when in operation.
• Do not leave appliance unattended when in use.
• Do not attempt to dislodge food when toaster is plugged in.
• Be certain appliance is OFF before inserting or removing plug from wall outlet.
• Failure to clean crumb tray may result in fire hazard.
• Do not clean with metal scouring pads. Pieces can break off the pad and touch electrical parts, creating a shock
hazard.
•
•
•
SAVE THESE INSTRUCTIONS
Your toaster needs no special care other than cleaning. If servicing becomes necessary, return appliance to The West
Bend Company. See Warranty section in this booklet for service details. Do not attempt to repair it yourself.
For household use only.
WARNING: To prevent personal injury or property damage caused by fire, always unplug this and other appliances
when not in use.
SPECIAL NOTE: This booklet contains instructions for 2-slice and 4-slice toaster models. Be sure to follow the
correct care and use instructions for the model you have.
Electric Cord Statement
Caution: Your Toaster has a short cord
as a safety precaution to prevent personal
injury or property damage resulting from
pulling, tripping, or becoming entangled
with the cord. Do not allow children to be
near or use this appliance without close
adult supervision. If you must use a
longer cordset, or an extension cord when
using appliance, the cord must be
arranged so it will not drape or hang over
the edge of a countertop, tabletop or
surface area where it can be pulled on by
children or tripped over. To prevent
electric shock, personal injury or fire, the
electrical rating of the extension cord you
use must be the same or more than the
wattage of the appliance (wattage is
marked on underside of appliance).
To avoid circuit overload, do not operate another high wattage appliance on the same circuit.
CAUTION: To prevent burns or personal injury, always use protective hot pads or oven mitts when touching or
handling hot toaster. Appliance surfaces are hot during and after use.
CLEAN BEFORE USING – Both Models
Wipe outside of taster with damp soapy cloth, then dry with a soft cloth. Your toaster is now ready to use.
CAUTION: To prevent personal injury or electric shock, do not immerse toaster, its cord or plug in water or other
liquid.
TO USE TOASTER
• 2-Slice Method
1. Plug cord into a 120 volt AC electrical outlet ONLY.
2. Place up to two slices of bread, bagels, English muffins, pastry slices, etc, into bread slots.
3. Select desired toast color setting from 1 (light) to 6 (dark). You may wish to start with setting 3 (medium) for the
first time.
4. Press toast lever down until it locks in place. Toasting cycle will automatically begin.
Please note: Toaster must be plugged in for toaster lever to lock in place.
5. Toast will automatically pop up and toaster will turn off when selected color is reached. The toast cycle can be
stopped any time by pressing the cancel button. Unplug cord from wall outlet when not in use.
•
1.
2.
3.
4.
5.
4-Slice Model
Plug cord into 120 volt AC electrical outlet ONLY.
Set slice knob to desired 2 or 4 slice setting. When set at 2 slice setting, use only the front two slots as indicated
on toaster and the toast lever closest to the slots as indicated on toaster lever closest to the slots.
Place up to four slices of bread, bagels, English muffins, pastry slices, etc, into bread slots.
Select desired toast color setting from 1 (light) to 6 (dark). You may wish to start with setting 3 (medium) for the
first time.
Press toast lever down until it locks in place. When toasting 4 slices, push front lever down first, followed by the
back lever. Toasting cycle will automatically begin.
Please note: Toaster must be plugged in for toaster lever to lock in place.
6. Toast will automatically pop up and toaster will turn off when selected color is reached. The toast cycle can be
stopped any time by pressing the cancel button. Unplug cord from wall outlet when not in use.
USING FROZEN AND REHEAT SETTINGS – Both Models
The frozen setting on your toaster automatically lengthens the toasting time for frozen foods. To use this setting,
simply follow the basic instructions above, but after pressing toast lever(s) down, press frozen button. Light in
bottom will glow when activated. Frozen setting can only be activated after the toast lever(s) are pushed down.
The reheat setting will warm toasted foods that have become cold without additional toasting. Simply place cold
toasted food in toast slots, press toast lever(s) down and then press reheat button. Light in button will glow when
activated. Reheating takes about 30 seconds and food will pop up when warmed. Reheat setting can only be
activated after the toast lever(s) are pushed down.
IMPORTANT TOASTING TIPS
• If food becomes lodged inside toaster, unplug cord from wall outlet and allow toaster to cool completely. Turn
toaster upside down and shake to dislodge.
WARNING: To prevent personal injury, electric shock or property damage, NEVER INSERT METAL FORK
OR OTHER METAL OBJECTS INTO TOASTING SLOTS.
CAUTION: To prevent personal injury or electric shock, do not place anything in toaster to remove food while
toaster is plugged in. Always unplug toaster and allow to cool before removing food.
• Frostings and fillings can catch fire. Avoid toasting foods with frostings or fillings that may run or that are
made with open fillings.
• Clean crumb tray frequently.
• Do not toast buttered foods. Melted butter can cause fire. Butter foods only after toasting is complete.
• Toasting can be stopped at any time by pressing the cancel button.
• When toasting smaller foods such as mini bagels, lift toast lever up after toasting for easier removal.
• Remove any protective wrapping from food before toasting.
• Only toast foods that fit comfortably in toaster slots. Do not toast oversized foods in toaster.
• Unplug toaster if fire or smoke is observed.
CLEANING – Both Models
Always unplug cord from electrical outlet and allow toaster to cool before cleaning.
CAUTION: To prevent personal injury or electric shock, do not immerse toaster, its cord or plug in water or other
liquid.
1. Slide crumb tray out from under toaster, empty and wipe clean with damp cloth if necessary. Replace crumb tray.
Clean crumb tray regularly. Do not allow breadcrumbs to accumulate in bottom of toaster.
2. Wipe outside surfaces of toaster with a damp soapy cloth and polish with a dry cloth. Do not use any abrasive
scouring pads or cleansers on toaster surfaces as scratching will occur. To clean inside of toaster, turn upside
down over sink and shake crumbs free.
3. Wrap cord around clips on underside of toaster for storage if desired.
90 DAY WARRANTY
Your West Bend® Warranty covers failures in materials and workmanship of this Toaster for 90 days from the date of
original purchase. Any failed part of the Toaster will be repaired or replaced without charge.
This warranty gives you specific legal rights and you may also have other rights, which may vary from state to state.
This warranty does not cover alleged damage caused by misuse, abuse, accidents or alterations to the Toaster.
If you think the Toaster has failed or requires services within the warranty period, please carefully package and return
the Toaster prepaid and insured with a description of the difficulty to:
The West Bend Company
Attn: Housewares Customer Service Department
1100 Schmidt Road
West Bend, WI 53090-1961
(262) 334-6949
NOT VALID IN MEXICO
Please ensure that you enclose the sales slip or proof of date of purchase in order to assure warranty coverage.
This booklet contains important and helpful information on your new product. Please file it for handy reference to
instructions for proper use and care, warranty and service information.
L5483
©The West Bend Company