1
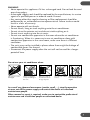
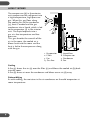
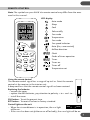
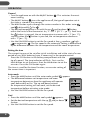
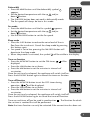
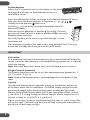
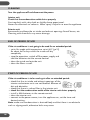
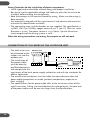
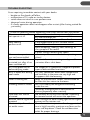
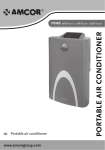
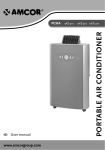
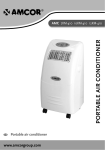
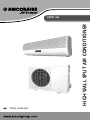
HIGH WALL SPLIT AIR CONDITIONER
AHW 162
User manual
THANK YOU
Thank you for choosing this innovative Amcor air conditioner. We suggest
that you keep this manual in a safe place for future reference. It describes the
many benefits and advanced features this unique product has to offer. Before
you use your new air conditioner you should carefully read these instructions
to maximise this product’s performance and the proper operation.
The appearance of the unit that you purchased may differ from the one
described in the manual. This does not affect its proper operation and usage.
For over 50 years Amcor has specialised in complete indoor environmental
control, manufacturing and marketing; dehumidifiers, portable air
conditioners, coolers, air purifiers, ionizers and aroma therapy scent
diffusers. These world class products incorporate the latest technological
developments.
SAFETY INSTRUCTIONS
IMPORTANT!
• The inside unit is designed for indoor operation only.
• Rating: This unit must be connected to a 115 V / 60 Hz earthed outlet.
• The installation must be in accordance with regulations of the state where
the unit is used.
If you are in any doubt about the electrical installation, have it checked and if
necessary modified by a qualified electrician.
• The air conditioner is safe. However, as with other electrical appliances,
use it with care. The appliance is not intended for use by young children or
infirm persons without supervision.
• Young children should be supervised to ensure that they do not play with
the appliance (remote control).
• Do not clean the air conditioner by spraying it or immersing it in water.
• Do not insert any object into the opening of the air conditioner.
• Disconnect it from the mains before cleaning the unit or any of its
components.
• Never connect the unit to an electrical outlet using an extension cord. If an
outlet is not available, one should be installed by a licensed electrician.
2
WARNING
• Never operate this appliance if it has a damaged cord. Do not lead the cord
over sharp edges.
• A damaged supply cord should be replaced by the manufacturer, its service
agent or a qualified person in order to avoid a hazard.
• Any service other than regular cleaning or filter replacement should be
performed by an authorized service representative. Failure to do so could
result in a loss of warranty.
• Never operate with wet hands.
• Do not attach, hang or stack anything onto the air conditioner.
• Do not sit on the exterior unit and do not stack anything on it.
• Do not insert anything into the air vents.
• Do not use combustion apparatus in the room where the air conditioner
is functioning. When it is necessary to use air conditioner along with
combustion apparatus in the same room, make sure there is sufficient
ventilation.
• The units may not be installed in places where there might be leakage of
combustible gases: fire hazard.
• Disconnect the power supply when the unit will not be used for a longer
period of time.
Do not use your air conditioner when:
The power cord is
damaged.
There is a change
of liquids falling on
the unit.
There is a risk of
interference from
foreign objects.
It is close to a heat
source.
This air conditioner
is not made for DIY
repair.
In case of any abnormal occurrence (smoke, smell, ...), stop the operation
at once, cut off the power supply and contact the dealer or authorized
maintenance people.
When removal or repair is required, make sure to contact the professional
maintenance and installation people or authorized dealer.
3
HOW IT WORKS
The compressor (6) in the exterior
unit compresses the refrigerant into
a high-temperature, high-pressure
gas. When this gas flows along
the cooling fins of the condenser
(7), heat is exuded and the gas
condenses into a liquid, which is led
to the evaporator (1) in the interior
unit. The liquid expands into a
gas at a low temperature and low
pressure.
This gas absorbs the warmth of the
air in the room, the cooled air is
blown back into the room and the
heat is led to the compressor along
with the gas.
1
a
2
3
4
c
b
6
7
5
d
8
1. Evaporator
2. Filter
3. Fan
4. Gas line
5. Liquid line
6. Compressor
7. Condenser
8. Fan
Cooling
A fan (3) draws the air (a) over the filter (2) and blows the cooled air (b) back
into the room.
A fan (8) draws air over the condenser and blows warm air (d) away.
Dehumidifying
As with cooling, the moisture in the air condenses on the cold evaporator at
room temperature.
4
REMOTE CONTROL
Note: The symbols on your AHW 162 remote control may differ from the ones
used in this manual.
LCD display:
Auto mode
Sleep
Cool
Dehumidify
Fan mode
Temperature
Fan mode
Fan speed indicator
Auto (fan, vane control)
Airflow direction
Clock
Order of timer operation
Timer
Timer on
Timer off
Temperature set
Using the remote control
The remote control signal has a range of up to 8 m. Point the remote
control at the receiver in the interior unit.
A beep confirms that the remote control signal has been received.
Replacing the batteries
• remove the cover.
• replace the AAA batteries, pay attention to polarity: + to + and - to -.
• install the cover.
CLK button - To set the present time.
RST button - To reset all values to factory standard.
Control lights on the unit
RUN
TIMER
• When the air conditioner is in operation, the RUN light
will be on.
• If the TIMER has been set (either on or off or both), the TIMER light will be on.
5
OPERATION
General
• Turn the appliance on with the ON/OFF button . This activates the most
recent setting.
turns the appliance off; the type of operation set at
• The ON/OFF button
that time is stored in the memory.
• The MODE button cycles through the various modes in this order: auto
,
cool , dehumidify , fan .
• The desired temperature is set with the up
and/or down -button,
within the limits of the thermostat: 64 °F – 86 °F (18 °C – 30 °C). Each time
the -button is pressed, the set temperature increases with 1 °F (or 1 °C);
similarly when the -button is pressed, the set temperature decreases
with 1 °F (or 1 °C).
• Use the FAN SPEED button to set the fan speed at low: , medium: , high:
or automatic: . The fan speed in the automatic setting is determined
by the difference between the set temperature and the room temperature.
Setting the time
The current time must be set after initial installation and at the start of a new
period of use. With batteries (new, if necessary) in the remote control:
Press the CLK-button in the battery compartment with the
tip of a pencil. The time indicator will flash. First use the
HOUR button to set the hours, then the MIN button to set the
minutes. Press the CLK-button again.
The time is used for the timer function, so accurate setting of
the current time is important.
Auto mode
1. Press the MODE button until the auto mode symbol
appears.
2. The difference between set temperature and room
temperature determines how the appliance will operate:
cool, dehumidify or fan. The up and down buttons
for temperature setting will not work, set the desired
temperature before activating auto mode.
3. Use the FAN SPEED button to set the fan speed.
Cool
1. Press the MODE button until the cool symbol appears.
2. Set the desired temperature with the up
and/or down
-button.
3. Use the FAN SPEED button to set the fan speed.
6
Dehumidify
1. Press the MODE button until the dehumidify symbol
appears.
2. Set the desired temperature with the up
and/or
down -button.
3. The FAN SPEED button does not work in dehumidify mode.
The fan speed will always be low in this mode.
Fan mode
1. Press the MODE button until the fan symbol appears.
2. Set the desired temperature with the up
and/or
down -button.
3. Use the FAN SPEED button to set the fan speed.
Sleep mode
1. Press the SLEEP button to reduce the noise level of the air
flow from the inside unit. Cancel the sleep mode by pressing
this button again.
2. Fan speed is set to low, pressing the FAN SPEED button will
deactivate the sleep mode.
3. When sleep mode is activated, the symbol will be visible in the display.
Timer on function
1. Press the AUTOSTART button to set the ON-timer,
will be
displayed.
2. Press the HOUR button to set hours.
3. Press the MIN button to set the minutes in intervals of
10 minutes.
Once the set time has elapsed, the appliance will switch itself on.
Press the AUTOSTART button again to cancel the timer on function.
Timer off function
1. Press the AUTOSTOP button to set the OFF-timer during
operation,
will be displayed.
2. Press the HOUR button to set hours.
3. Press the MIN button to set the minutes in intervals of
10 minutes.
Once the set time has elapsed, the appliance will switch itself off.
Press the AUTOSTOP button again to cancel the timer off function.
Timer on and timer off can be used in combination . The function for which
the set time is reached first will be performed.
Note: the timer function can only be activated if the current time has been set.
7
Air flow direction
Adjust the fins (vertical vanes) in the indoor unit by hand
to change the left-right air flow direction so that it is
comfortable to you.
Press the VANE CONTROL button to change the horizontal direction of the air
flow, the vanes take these positions in sequence:
.
Usually the auto position
works fine.
Positions (1) and (2) are recommended for cool and
dehumidify mode.
After one hour of operation in position (4) or (5), the vane
position will revert to level in order to prevent condensed water
dropping down the vanes.
Manually handling of the vanes may cause damage, use the
remote control.
Do not expose anybody to the cool air for a long period of time. This may
discomfort the body which may be harmful to the health.
IMPORTANT
Auto restart
As a protective measure of the compressor, the air conditioner will automatic
restart 3 minutes after electricity is restored following a power cut. If in doubt,
check the settings.
Note: After shut down you have to wait 3 minutes before you can restart.
Range of internal thermostat
The internal thermostat can be set at a desired temperature between 64 °F
(18 °C) and 86 °F (30 °C).
Note: whether the desired value is achieved depends on conditions in the
room.
Capacity
The required cooling capacity depends greatly on the location and/or use
of the room where the air conditioner is installed. Strong sunlight and the
presence of people, lights or equipment create an additional heat load.
Normal living spaces require about 35 BTU per square feet of floor surface
(~100 W/m2). In strong sunlight or if other sources of heat are present, this
may be as much as 125 BTU/ft2.h (~350 W/m2).
Tip: on warm days, let the air conditioner cool the room as much as possible
during the night. Cold walls and furniture will help to keep the room pleasant
during use. Avoid strong sunlight.
8
Emergency start
In the event of a problem or missing remote control, the air
conditioner can be operated using the emergency button
under the panel in the interior unit. Open the front panel
and press the button to switch on (in the mode last set) or
to switch off.
FILTERS
Turn the appliance off and disconnect the power.
B
A
A
To open: at the A recesses, pull the
front part up. The front part will stay
horizontal (turn up 60 °).
C
B
To close: press the front part down at
the sides at B and in the middle at C.
Make sure it is properly closed (click).
1. Hold the front part open (or put it in horizontal position) and remove the
filter(s).
2. A dirty filter reduces the capacity. Clean the filter gently, use a vacuum
cleaner to remove dirt. If the dust filter is very dirty, it may be washed in
lukewarm water with a very small amount of neutral detergent. Rinse well
and allow to dry completely (not in direct sunlight or near a source of heat).
3. Keep the grid panel open and reinstall the filter(s). Press the panel shut; a
click indicates it is closed properly.
4. Reconnect the power and turn the air conditioner on.
9
CLEANING
Turn the appliance off and disconnect the power.
Interior unit
Check that the condensation outlet drains properly.
Dust regularly with a dry cloth or slightly damp paper towel.
Never use chemicals or solvents. Never spray a liquid in or over the appliance.
Exterior unit
Remove dirt and keep the air intake and exhaust openings free of leaves, etc.
Cleaning with chemicals may cause damage.
END OF PERIOD OF USE
If the air conditioner is not going to be used for an extended period:
• set in fan mode with temperature set at 86°F (30°C)
for about half a day so that the inside will dry
completely
• stop the operation, switch off the power supply and
take the batteries out the remote control
• clean the inside and outside unit
• clean the filters as well.
START OF PERIOD OF USE
If the air conditioner is to be used again after an extended period:
• check that the air intake and exhaust openings of the
interior and exterior units are not blocked. Remove all
dirt and obstacles.
• check that there is a clean filter in the interior unit.
• check that the condensation outlet of the interior unit drains properly.
• install 2 AAA batteries in the remote control.
• clean the interior unit.
• connect to the power source, turn the appliance on, set the time and
desired setting.
Note: make sure condensation is drained freely and that there is no obstacle
such as algae growth, otherwise leaks may occur.
10
INSTALLATION GUIDELINES
Which Air Conditioner is best suited for your room?
Many windows
Much sunshine
(conservatory)
Size of the room
(floor area)
125 BTU
/f
t 2.h
115 ft2
225 ft2
Less windows
Less sunshine
400 ft2
35 B
TU
/ft 2
.h
575 ft2
Cooling capacity
BTU/h
8000
11000
14000
17000
20000
The most suitable air conditioner depends on the surface area, sun location, window area,
presence of heat sources (lamps, appliances, number of people etc.). Take this into account!
Rule of thumb, in average sunshine conditions and no presence of other heat sources: 35 BTU/h
per square foot (thus 12000 BTU/h (3.5 kW) cooling capacity suits a ~345 ft2 (~35 m2) room).
Attention:
Make sure to have the professional after-sales service
person of our company or the authorized dealer to install
the units.
• The units may not be installed in places where there
might be leakage of combustible gases: fire hazard.
• Make sure that an earth leakage circuit breaker is installed.
• Check whether the connection of wires between indoor and outdoor unit is
not loose.
• Make sure that the air conditioner is properly earthed.
• Check the supporting structures for proper strength to carry the weight
plus a safety margin.
11
Point of attention for the installation of electric components
• HACR type breaker should be utilized along with proper installation.
• Be sure to use the applicable voltage and cables or wires for the unit to be
installed, before making the connections.
• Read the prompts at the terminal board for wiring. Make sure the wiring is
done correctly.
• Pay attention to the poles of the signal terminal and connect the terminals
to match the identification numbers.
• The connecting wires and the breaker are not supplied. The specification is
14 AWG, VW-1 (or THHW), copper core and 194 °F (90 °C). Their set screw
diameter is 4 mm. The power source is 115 V, 60Hz, 1 phase. Minimum
circuit ampacity of the wiring system is 20 A.
When the wiring connections are wrong, the compressor will not work.
CONNECTION OF THE WIRES OF THE OUTDOOR UNIT
• The earth wire must Outdoor unit
be connected to the 1 2 3 L1 N1 L N
indoor unit and the
outdoor unit.
Breaker
• The installation of
N
the power cables
1 2 3 L1 N1
L
Power
must be done by
Indoor unit
Source
Switch
qualified electricians
and comply with the
regulations of the local power supply authorities and with the standards for
electric appliances.
• The environment conditions must be taken into consideration when the
power cable connections are made (ambient temperature, exposure to
heat, sunlight).
• The specifications for the power cable refer to the minimum values of the
metal core wires. Taking into consideration the voltage losses, the core wire
of the power cable must be one size larger than the specifications.
12
TROUBLE SHOOTING
Cases requiring immediate contact with your dealer:
• breaker or fuse breaks off often.
• malfunction of TV, radio or similar devices.
• switch does not result in sure performance
• abnormal noise during operation.
• if a faulty operation does not disappear after restart (after having waited for
3 minutes).
Check the following before requesting after sales service from your dealer:
The air conditioner does Is the unit connected to a power supply?
not operate at all.
Has the time been set?
Is there a power failure or a blown fuse?
Poor cooling
Is the temperature set at a suitable value?
performance.
Are the filters clean?
Open window(s), door(s), heat source(s) or
many people in the room?
Is direct sunlight entering the room?
The room temperature
Is the temperature set outside the operating
can not be controlled.
values?
The unit can not be
To protect the unit, restarting is only possible
restarted just after it has 3 minutes after a shut down.
been switched off.
Air is not blown out in
The indoor fan is sometimes stopped to prevent
dehumidifying mode.
vapor of dehumidified moisture.
Mist is blown out during This may sometimes occur when temperature
cool mode.
and humidity in the room are very high and
disappears with the lowering.
Odor is coming out.
Room air may contains smells, accumulated on
the filter this can return to the room.
Cracking sound is heard. This is caused by the refrigerant circulating
inside the unit.
Caused by the expansion or contraction of
plastics (especially after a restart).
Operation can not be
The memory of the unit was cleared. Operating
restarted.
the remote control will restart the operation.
Remote control signal not Direct sunlight or other strong light on the signal
received.
receiver on the interior unit.
Moisture drips from the When the unit is in operation for a long period of
air outlet vanes.
time in high humidity, moisture may form on the
vanes and drip down. Check the condensation
outlet for proper drainage.
13
RATING LABELS
INDOOR
UNIT
OUTDOOR
UNIT
AHW 162
See barcode
115 V 60 Hz 1 Ph
AHW 162
See barcode
115 V 60 Hz 1 Ph
Model
Serial number
Power supply
Model
Serial number
Power supply
1.01 kW
3.5 kW
12000 BTU/h
13.1 BTU/h W
IP 20
Cooling capacity
SEER
Protection class
R410A
64-86 oF
18-30 oC
660 m3/h
23000 cu.ft/h
Refrigerant
Thermostatic range
Airflow
up to 33 L/day
70 pts/day
~39 - 45 dB(A)
14 kg / 31 lb
Dehumification
Noise level
Weight net
Caution:
1. Do not cover the air discharge openings.
2. Avoid risk of electric shock:
disconnect before servicing.
3. Use only on a single outlet.
4. Wait 3 minutes after power has been
switched off before restarting.
5. Moving parts inside:
do not operate when the cover is removed.
6. A damaged power supply cord must be
replaced with a new one obtained from
the manufacturer and may not be repaired.
VERIFIED
Energy
Performance
Rendement
Énergetique
SEER 13
3.5 kW
12000 BTU/h
Cooling capacity
233041
20 A
9.5 A
1.3 / 3 MPa
188/436 PSIG
13.1 BTU/h W
Pressure range
Suction/Discharge
SEER
R410A
2.54 lb
1150 g
50-104 oF
10-40 oC
Refrigerant
Refrigerant load
Operating range
IP 24
~55 dB(A)
48 kg / 105 lb
Protection class
Noise level
Weight net
Caution:
1. Do not cover the air discharge openings.
2. Avoid risk of electric shock:
disconnect before servicing.
3. Use only on a single outlet.
4. Wait 3 minutes after power cut before restarting.
5. Moving parts inside:
do not operate when the cover is removed.
6. A damaged power supply cord must be replaced
with a new one obtained from the manufacturer
and may not be repaired.
7. Specification of the connecting wires: 14 AWG,
VW-1 (or THHW), copper core and 90 °C.
VERIFIED
Energy
Performance
Rendement
Énergetique
SEER 13
VÉRIFIÉ
SA 12793
VÉRIFIÉ
www.amcorgroup.com
Made in P.R.C.
14 A
Minimum
Maximum
Rated power circuit amperage Rated current current protection
cat# 913136060
Carlstadt, New Yersey 07072
233041
Made in P.R.C.
SA 12793
cat# 913136070
www.amcorgroup.com
Carlstadt, New Yersey 07072
Data provided is subject to modifications and is not legally binding.
14
NOTES
15
Hong Kong
Amcor Ltd
Suite 2007, Tower 6, The Gateway,
Harbour City, 9 Canton Road,
Tsim Sha Tsui, Kowloon,
Hong Kong
Tel: +852 2997 6865
Fax: +852 2997 6091
Email: [email protected]
United Kingdom
Amcor Ltd
9 Ryan Drive, West Cross Centre,
Great West Road, Brentford,
Middlesex, TW8 9ER,
United Kingdom
Tel: +44 20 8560 4141
Fax: +44 20 8232 88141
Email: [email protected]
USA
Amcor Inc.
685A Gotham Parkway, Carlstadt,
New Yersey 07072,
United States of America
Tel: +1 201 460 8100
Fax: +1 201 460 9481
Email: [email protected]
The Netherlands
Amcor B.V.
Anton Philipsweg 9-11,
1422 AL Uithoorn,
The Netherlands
Tel: +31 297 560 079
Fax: +31 297 523 062
Email: [email protected]
Israel
Amcor International Ltd
3 Sapir Street, Herzelia Pituach,
46733, Israel
Tel: +972 9 951 5351
Fax: +972 9 958 5650
Email: [email protected]
Singapore
Amcor Investments (Singapore) Pte Ltd
545 Orchard Road,
#13-02, Far East Shopping Centre,
Singapore 238882
Tel: +65 6297 9881
Fax: +65 6297 8891
Email: [email protected]
China
Shan Xia Industrial Development Zone,
Heng Li Town, Dongguan City,
Guangdong Province, China
Plant One - Amcor (China) Ltd
Tel: +86 769 8372 1090
Fax: +86 769 8372 1790
Email: [email protected]
Plant Two - Amcor Appliances Ltd
Tel: +86 769 8372 1970
Fax: +86 769 8372 1790
Email: [email protected]
VERIFIED
Energy
Performance
Rendement
Énergetique
SEER 13
VÉRIFIÉ
233041
SA 12793