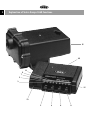
1
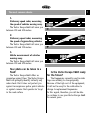
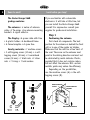
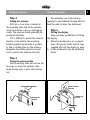
Manual - Vector Europa 966R.
2
Explanation of Vectra Europa 966R functions.
14
15
10
1
11
9
7
5
3
12
13
2
4
6
8
Introduction
Dear motorist,
By selecting the Vector Europa 966R
you have made the best choice.
In collaboration with the manufacturer
BelTronics, Target Automotive has made
the Vector Europa 966R suitable for the
most common types of European radar
speed-checking equipment. The Vector
Europa 966R is the most advanced radar
speed detector for European roads.
We have taken great care in compiling
this manual. Nevertheless there may
possibly be something we have overlooked.
We welcome any comments or suggestions
you may wish to send us via your supplier.
3
Contents
Explanation of functions
2
Introduction
3
Operation of the Vector
Europa 966R
4
General information
6
The most common checks
6
Down to work!
8
Look before you leap
8
Fitting the antenna
9
Fitting the display
9
Warranty and service
11
Checklist
11
Technical specifications
Vector Europa
12
Yours sincerely,
Target Automotive
Nieuwegracht 10-11, 3763 LB Soest,
Netherlands.
Tel: 0031 (0)35 - 603 53 55.
Fax: 0031 (0)35 - 602 08 32.
4
Operation of the Vector Europa 966R.
1. Display. (1)
Can be fitted virtually invisibly in any car.
2. Power/Volume button. (P/V)
Press briefly to switch your Vector
Europa 966R on or off. The self-test will
take place automatically and the standard
setting will be 34 gigahertz. See 'led 34'.
By holding P/V (2) pressed in you can
adjust the volume with leds (12).
3. 34 GHz. (3)
Lights up green when the Vector
Europa 966R is active. When detection
occurs the 34 GHz led will flash.
Initially the 34 GHz frequency is the
standardsetting. This setting will detect
commonly used speed-checking equipment
on motorways.
5. 13 GHz switch. (6)
This switch activates the 13 GHz
frequency. The green led (7) will light up
when this frequency has been activated.
When detection occurs the 13 GHz led (7)
will flash.
6. High switch. (HI)
This is used to increase the reception
sensitivity of the 13 GHz frequency.
The HI led (9) will light up to confirm
operation. The Vector Europa 966R only
gives anaudible alarm on detection of 13
GHz signals if the signal strength is greater
than two leds (12). This standard setting
avoids false alarms. You can increase
sensitivity for the 13 GHz frequency using
the HI-switch.
7. External port.
4. 24 GHz switch. (4)
This switch activates the 24 GHz
frequency. The green led (5) will light up
when this frequency has been activated.
On detection the 24 GHz led (5) will
flash. This frequency is used not only on
motorways but also on secondary roads.
Your supplier will be able to explain all
the expansion possibilities for your Vector
Europa 966R.
Operation of the Vector Europa 966R.
8. Laser Led. (L)
The red led (11) lights up when any
optional equipment fitted transmits signals
via the external port.
9. Signal strength. (12)
These red leds light up one by one to
indicate the strength (distance) of the
radar source.
In the case of laser detection only the first
and last leds light up (alternately).
10. Audio Alarm Speaker. (13)
Gives different audible warning signals
for the various frequencies (13, 24 or 34
GHz) or laser check. You will soon learn to
recognise these frequencies by glancing to
check which leds are illuminated.
You can adjust the volume of the audible
signals with button P/V. The first time
you 'hold the button in' the signal will get
louder. For a softer signal, release button
P/V briefly and then press and hold it in
again. The signal strength corresponds with
the four leds (12).
11. Antenna. (14)
This contains the electronics with
which the radar signals are received. For
fitting refer to the installation instructions.
5
12. Antenna opening. (15)
See installation instructions
Automatic self-test and memory
of Vector Europa 966R.
When P/V is pressed the Vector Europa
966R immediately performs a self-test.
This test causes the 34-GHz led and the
signal-strength leds (12) to light up.
The operation of all warning signals (13)
for 13, 24 or 34 GHz and laser is checked.
The Vector Europa 966R's power circuit is
also checked.
For your convenience the Vector Europa
966R automatically remembers your
settings when it is switched off.
The ESP (Enhanced Signal
Processing) chip.
Your Vector Europa 966R is equipped
with an ESP chip. This prevents frequent
false alarms and/or the unit being affected
by your GSM phone.
6
General information.
The Vector Europa 966R is perfectly
tuned for the European situation.
Please note: In France and Belgium the use
of radar-detection equipment is prohibited
and can attract a substantial fine.
The advantage of the Vector Europa 966R
is that it can be installed virtually invisibly
(in contrast to windscreen-mounted
detection equipment). It is therefore
unlikely that you will be 'caught' unawares.
However, you may choose to leave your
Vector Europa 966R at home when travelling abroad.
In most European countries the use of
radar-detection is not prohibited. Like your
radio, a detector is an ordinary receiver.
The most common checks.
You are probably familiar with
them:
a. Checks using static boxes (often in a
concealed position next to the road)
b. Or using stationary vehicles or trailers
c. Or using hidden equipment mounted
in a post.
Often, if you exceed the maximum
speed limit, you are also photographed
and stopped immediately.
On European motorways the standard
equipment used is 34 and 24 GHz.
In a few cases older equipment is still used,
which operates on 9.41, 9.9 or 13.450 GHz.
Such equipment is no longer in production
and will therefore disappear completely in
due course.
The most common checks.
7
1.
Stationary speed radar, measuring
the speed of vehicles moving away.
The Vector Europa 966R will warn you
between 200 and 300 metres.
2.
Stationary speed radar, measuring
the speed of approaching vehicles.
The Vector Europa 966R will warn you
between 300 and 700 metres.
3.
Mobile measurement of vehicles
moving away.
The Vector Europa 966R will warn you
between 200 and 300 metres.
Your photo can be taken in a
flash!
The Vector Europa 966R offers no
guarantee against fines. The Vector Europa
966R will promptly identify virtually any
radar check. But it does not protect you
against inconspicuous police patrol vehicles
or against cameras that operate via 'loops'
in the road surface.
Is the Vector Europa 966R ready
for the future?
The frequencies currently used in radar
traps are unlikely to change quickly.
Because of the high cost of the equipment,
it will not be easy for the authorities to
change to replacement frequencies.
In this regard, therefore, you will be able
to continue to use your Vector Europa 966R
for several years.
8
Down to work!
The Vector Europa 966R
package contains:
The antenna • 4 metres of antenna
cable • 3 Tie-wraps • An antenna-mounting
bracket • A signal reflector.
Look before you leap!
If you are familiar with automobile
electronics: it will take a little time, but
you can install the Vector Europa 966R
yourself. For anyone else: consult your
supplier for professional installation.
Step 1
The Display • A power cable with fuse
• A plastic holder • A dashboard frame
• A frame template • A spare fuse.
Sundry materials • 7 machine screws
• 2 self-tapping screws (10 mm) • 4 selftapping screws (18 mm) • 2 round-head
screws (18 mm) • 7 black nuts • 2 silver
nuts • 7 O-rings • 7 lock washers.
Positioning the antenna.
First check all components. The best
position for the antenna is behind the front
grill or in one of the spoiler air intakes.
Make sure that the unit has a free 'view' of
the road. The arrow on the antenna must
point in the driving direction and must not
be obstructed by metal obstacles. Plastic,
provided that it does not contain carbon,
will not affect the antenna. N.B.: certain
metallic paints may reduce the efficiency.
Depending on the possibilities,
use the machine screws (A) or the selftapping screws (B).
BEVESTIGINGSPLAAT
BEVESTIGINGSBEUGEL
ONCOMING TRAFFIC
Fitting the antenna.
Fitting the display.
Step 2
Fitting the antenna.
Drill two or four holes as desired in
the mounting plate and fit the antenna
using the machine screws or self-tapping
screws. The antenna should preferably be
positioned vertically.
If it is difficult to mount the antenna
directly on the vehicle, the mounting
bracket supplied should make it possible
to find a suitable place for the antenna.
Remember the driving direction (arrow)
and to position the antenna vertically.
9
Use preferably one of the existing
openings in the bulkhead through which to
feed the cable to below the dashboard.
Step 4
Fitting the display.
There are three possibilities for fitting
the display:
a. Below the dashboard or in a compartment. The plastic holder and the tape
supplied will hold the display in place.
b. In the dashboard using the dashboard
frame
Step 3
Fixing the antenna cable.
Find an existing cable run and use the
tie-wraps to secure the antenna cable.
Avoid moving parts or parts that become
hot.
BEVESTIGINGSBEUGEL
ONCOMING
TRAFFIC
BEVESTIGINGS
BEUGEL
REFLECTIEPLAAT
ONCOMING
TRAFFIC
10
Fitting the display.
c.
With the optional slide. When you leave
your car you can then take the display
with you easily. As already mentioned:
In France and Belgium the Vector Europa
966R is prohibited. If you use the slide,
it is easy to remove the unit quickly.
easily when you leave your vehicle.
It also offers significant advantages when
travelling in countries in which radar
detectors are not permitted.
Fitting is self-explanatory.
Step 5
a. Below the dashboard or in a
compartment
Fix the plastic holder using 2 small
holes (2.5mm) and the self-tapping screws.
The display fits into the slots in the holder.
Fitting is even simpler if you use the doublesided tape supplied: stick the tape at the
point at which you want to position the
display. Then stick the display to the tape
and you're ready. Make sure that there is
enough space at the back for the antenna
cable.
b. In the dashboard with the
dashboard frame.
Find a flat area on your dashboard. Use
the frame sticker as a template to drill the
holes and to saw out the section into which
the display will then fit exactly. Secure the
frame with the self-tapping screws. When
cutting out the section be sure not to damage any wiring behind the dashboard. Insert
the antenna cable before fitting the display.
c. With the optional slide.
We prefer use of the slide. This then
means that the display can be removed
Inserting the antenna cable into the
display.
Insert the antenna cable connectors
into the back of the black 5-pole plug on
the supply cable.
Pay attention to the colour codes. Click
the black plug into the back of the display.
Step 6
Connecting earth and power supply.
The black (earth) wire must be connected to the chassis. The red (12V) wire must
be connected to the 12V power circuit.
Make sure that you connect to a
switched power circuit (power off when the
ignition key is removed).
No contact!
If for some reason there is no longer
contact between the antenna and the
display, an audible warning will sound once
a second.
Warranty and service.
Warranty
Checklist.
Checklist.
Complete your warranty card and send
it in, together with a copy of your purchase
receipt.
The display bleeps every second.
There is no contact between antenna
and display. Repair the connection.
Target Automotive guarantees the correct operation of the Vector Europa 966R.
No sound or too soft.
Hold the P/V button in for longer.
The four red leds (12) indicate the volume.
Provided that:
a. You are the first owner and have sent us
the warranty card plus purchase receipt
b. The unit has not been incorrectly used
or damaged in an accident and that no
work has been performed on the Vector
Europa 966R other than as described in
this manual, and that the serial number
has not be removed or altered.
Service.
a. If you are uncertain whether the unit is
operating correctly, first run through
the checklist on this page.
b. If the problem persists, you may call
Target Automotive for advice on
0031 (0)35 603 53 55.
c. In the case of serious problems your
supplier will arrange for your Vector
Europa 966R to be returned and/or will
carry out repairs.
Does not respond to certain types of
radar.
Select the 24 GHz (5) and/or 13 GHz
frequencies (7).
Frequent false alarms on the 13 GHz
frequency.
Switch off the HI switch (9).
11
12
Technical specifications Vector Europa 966R.
Receiver:
Double Conversion Compheterodyne(r)
Frequencies:
13.45 en 24.125 GHz are selectable.
The 34.3 GHz frequency is the standard
(default) setting.
Antenna:
Die-cast horn with integrated transition to
Microstrip Mixer.
Power supply:
13.8 V DC Nominal
Consumption:
12 V, 100mA - 220mA
Dimensions:
Antenna lxwxh 98x80x45mm
Display lxwxh 58x71x17mm
Weight:
Antenna 200g
Display 45g
Temperature range:
-10ºC - +65ºC