1
Operating
Model
Guide
Numbers
J Warranty
I C27V22
if
© Copyright
2002,
Zenith
Electronics
I C32V22
I C3GV22
I HDTV Monitors
t
Corporation
Z
e
n
ith
@
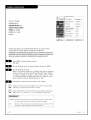
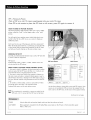
RECORDYOUR MODEL NUMBER/
The model and serial number of your
Entertainment Machine TM are Located on the
back of the TV cabinet.
For your future conve-
nience, we suggest that you record these numbers here:
Mode[ No.
Serial No.
WARNING:
TO REDUCETHE RISK OF ELECTRICSHOCK DO NOT REMOVECOVER(OR BACK). NO USERSERVICEABLEPARTSINSIDE.
REFERSERVICING TO QUALIFIED SERVICEPERSONNEL.
The Lightning flash with arrowhead symboL, within
uninsuLated "dangerous voltage" within
an equilateral
triangle,
is intended
to alert the user to the presence of
the product's enclosure that may be of sufficient
magnitude to constitute
a risk of
electric shock to persons.
The exctamation
point within
maintenance (servicing)
an equilateral
instructions
triangle
in the literature
is intended
to alert the user to the presence of important
operating
accompanying the appliance.
WARNING:
TO PREVENTFIRE OR SHOCK HAZARDS, DO NOT EXPOSETHIS PRODUCTTO RAIN OR MOISTURE.
POWER CORD POLARIZATION:
CAUTION:Toprevent electric shock, match wide blade of plug to wide slot, fully insert.
ATTENTION: P
correspondante
NOTETO CABLE/TV
de La prise et pousser jusqu'au fond.
INSTALLER:
This reminder is provided to call the cable TV system instaLter's attention
to ArticLe 820-40 of the National ELectric Code
(U.S.A.). The code provides guidelines for proper grounding and, in particular, specifies that the cable ground shaLLbe
connected to the grounding system of the building, as close to the point of the cable entry as practicaL.
REGULATORY INFORMATION:
This equipment
has been tested and found to comply with the timits for a CLassB digital
of the FCCRuLes. These Limits are designed to provide reasonable protection
equipment is operated in a residential
instaLLation. This equipment
device, pursuant to Part 15
against harmful interference
when the
generates, uses and can radiate radio frequency
energy and, if not instaLLed and used in accordance with the instruction manuaL, may cause harmful interference to radio
communications. However, there is no guarantee that interference wiLL not occur in a particular instaLLation. If this
equipment
does cause harmful interference
the equipment
measures:
to radio or television
reception,
which can be determined by turning
off and on, the user is encouraged to try to correct the interference
by one or more of the foLLowing
• Reorient or relocate the receiving antenna.
• Increase the separation between the equipment and receiver.
• Connect the equipment into an outlet on a circuit different from that to which the receiver is connected.
• ConsuLt the dealer or an experienced radio/TV technician
for help.
CAUTION:
Do not attempt
Unauthorized
to modify this product in any way without
modification
could void the user's authority
written
authorization
from Zenith ELectronics Corporation.
to operate this product.
COMPLIANCE:
The responsible
party for this product's compliance
Zenith ELectronics Corporation,
is:
2000 MilLbrook Drive, LincoLnshire, IL 60069, USA • Phone: 1-847-941-8000.
and
Important
safeguards for you and your new product
Your product has been manufactured and tested with your safety in mind. However, improper use can resutt in potent]at
etectr]ca[ shock or fire hazards. To avoid defeating the safeguards that have been bu]tt into your new product, ptease read
and observe the fottowing safety points when ]nstatting and using your new product, and save them for future reference.
Observing the s]mpte precautions discussed in this operating
ation that are buitt into your new product.
This product compties with art appticabte
1. Read
shoutd be read
Instructions
shoutd be fottowed.
Instructions
The safety and operating
future reference.
instructions
shoutd be retained for
Warnings
Att warnings on the product and in the operating instructions shoutd be adhered to.
5. Cleaning
and
Moisture
Do not use this product near water forexampte, near a bath
tub, wash bowt, kitchen sink, or taundry tub, in a wet basement, or near a swimming poor.
7. Accessories,
Carts, and Stands
Do not ptace this product on a st]ppery or t]tted surface, or
on an unstabte cart, stand, tripod, bracket, or table. The
product may stide or fatt, causing serious injury to a chitd
or adutt, and serious damage to the product. Use onty with
a cart, stand, tripod, bracket, or tabte recommended by the
manufacturer, or son with the product. Any mounting of
the product shoutd fottow the manufacturer's instructions,
and shoutd use a mounting accessory recommended by the
manufacturer.
8. Transporting
Product
A product and cart combination shoutd be moved with care.
Quick stops, excessive force, and uneven surfaces may
cause the product and cart combination
to overturn.
Ventilation
Stots and openings in the cabinet are provided for
ventitation and to ensure retiabte operation of the product
and to protect it from overheating, and these openings
must not be btocked or covered. The openings shoutd never
be btocked by ptacing the product on a bed, sofa, rug, or
other simitar surface. This product shoutd not be ptaced in
a buitt-in instattation such as a bookcase or rack untess
proper vent]ration is provided or the manufacturer's
tions have been adhered to.
11.
Unptug this product from the watt outtet before ctean]ng.
Do not use tiquid cteaners or aerosot cteaners. Use a damp
ctoth for cteaning.
6. Water
and those of the Canadian Standards Assodation.
Do not use attachments not recommended by the product
manufacturer as they may cause hazards.
10.
Art operating and use instructions
3. Retain
and safe oper-
g. Attachments
Art the safety and operating instructions
before the product is operated.
4. Heed
U.S. Federat safety requffements,
Instructions
2. Follow
guide can hetp you get many years of enjoyment
Power
Sources
This product shoutd be operated onty from the type of
power source indicated on the marking tabet. If you are not
sure of the type of power suppty to your home,
consutt your product dearer or tocat power company. For
products intended to operate from battery power, or other
sources, refer to the operating instructions.
12.
Power
Cord
Polarization
This product is equipped with a potarized atternating - current power ptug (a ptug having one btade wider than the
other). This ptug witt fit into the power outtet onty one
way. This is a safety feature. If you are unabte to insert the
ptug furry into the outtet, try reversing the ptug. If the
ptug shoutd stitt fair to fit, contact your etectdcian to
reptace your obsotete outtet. Do not defeat the safety purpose of the potadzed ptug.
13.
Power
Cord
Protection
Power-suppty cords shoutd be routed so that they are not
tikety to be watked on or pinched by items ptaced upon or
against them, paying particutar attention to cords at ptugs,
convenience receptactes, and the point where they exit
from the product.
(Continued
PORTABLE
206-3706 2-WR-POLZ
instruc-
on next page)
CART WARNING
PAGE
3
(Continued from previous page)
_Outckmll_n_en
short-out parts that coutd resutt in a fire or etectric
Never spit[ [iquid of any kind on the product.
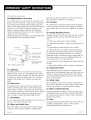
na Grounding
If an outside antenna or cabte system is connected to the
product, be sure the antenna or cabte system is grounded so
as to provide some protection against vottage surges and
buitt-up static charges. Articte 810 of the Nationa[ Etectrica[
Code (U.S.A.), ANSI/NFPA 70 provides information with
regard to proper grounding of the mast and supporting
structure, grounding of the read-in wire to an antenna discharge unit, size of grounding co
antenna-discharge unit, connection to grounding etectrodes,
and requirements for the grounding etectrode.
19. Servicing
Do not attempt to service this product yoursetf as opening
or removing covers may expose you to dangerous vottage or
other hazards. Refer art servicing to quatified service personnet.
20.
Damage
Requiring
b. If tiquid
product.
Antenna
Grounding Conductor
(NEC Section 810-21)
Antenna Clamps
Discharge
Ground
Unit
Power Service Grounding
Electrode System (NEC
Art 250, Part H)
ELectricaL Code
has been exposed
e. If the product
damaged.
to rain or water.
has been dropped
or the cabinet
exhibits
change
21. Replacement
For added protection for this product (receiver) during a
tightning storm, or when it is teft unattended and unused
for tong periods of time, unptug it from the watt outlet and
disconnect the antenna or cabte system. This witt prevent
damage to the product due to tightning and power-fine
surges.
16. Power Lines
An outside antenna system shoutd not be tocated in the
vicinity of overhead power tines or other etectric tight or
power circuits, or where it can fatt into such power tines or
circuits. When instatting an outside antenna system, extreme
care shoutd be taken to keep from touching such power
tines or circuits as contact with them might be fatat.
17. OverLoading
Do not overload watt outlets and extension cords as this can
resutt in a risk of fire or etectric shock.
and Liquid
have fatten into the
d. If the product does not operate normatty by fottowing
the operating instructions.
Adjust onty those controts that
are covered by the operating instructions
as an improper
adjustment
of other controts may resutt in damage and witt
often require extensive work by a quatified technician
to
restore the product to its normat operation.
f. If the product
15. Lightning
18. Object
or objects
Lead in Wire
(NEC Section 810-20)
NEC - National
cord or ptug is damaged.
has been spirted,
c. If the product
Clamp
Service
Unptug this product from the watt outlet and refer servicing
to quatified service personnet under the fottowing conditions:
a. If the power-suppty
Ground
shock.
Entry
a distinct
has been
in performance.
Parts
When reptacement parts are required, be sure the service
technician has used reptacement parts specified by the manufacturer or have the same characteristics as the originat
part. Unauthorized substitutions may resutt in fire, etectric
shock, or other hazards.
22. Safety Check
Upon comptetion
of any service or repairs to this product,
ask the service technician
to perform safety checks to determine that the product is in proper operating condition.
23. Wall or Ceiling
Mounting
The product shoutd be mounted to a watt or ceiting onty as
recommended by the manufacturer. The product may stide or
fair, causing serious injury to a chitd or adutt, and serious
damage to the product.
24. Heat
The product shoutd be situated away from heat sources such
as radiators, heat registers, stoves, or other products
(inctuding
amptifiers)
that produce heat.
Never push objects of any kind into this product through
openings as they may touch dangerous vottage points or
PA GE
4
s-wi,_Rev:_/00
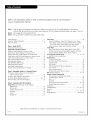
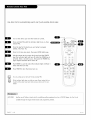
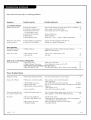
Refer to the information
below to hook up external
on your Entertainment
equipment
and set up the features
Machine
Step 1. Hook up externat equipment and antenna or cabte service wires to the TV. Instatt batteries in the remote
control After at[ connections have been made, ptug your TV into standard househotd power, see pages 7 thru 14.
Step 2. Go to page 18 to EZ program the TV.
Step 3. Set up at! other TV options see pages [isted betow.
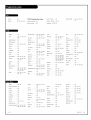
Safety Warnings
................................
2
Important Safety Information
....................
Tab[e of Contents ...............................
3 - 4
5
Video
Menu
Contrast,
.................................
Brightness,
29
Co!or, Tint, Sharpness, Co!or Temp:
(Coo!, Warm), EZ Picture:
(Custom, Normal
....
Movie, Digital
Pres, Video Game, Sports, Night Time, Weak Signa!).
Step 1. Hook Up TV
Connection Pane! Overview
Equipment
Connection
Antenna, Insta[[
........................
6
Bass, Treble, Balance, Audio Mode: (Stereo,
Options
batteries
in remote contro!
..............
Cable Service, Instat! batteries in remote contro[
..........
Antenna with VCR, Insta!! batteries in remote contro!
.......
Cab!e Service with VCR, Insta!!
S-VHS VCR, Install
batteries
batteries
in remote
DVD Component
Video Hookup
High-Definition
Hookup
Video Sub Menu, Aspect Ratio and other settings
Audio Menu .................................
in remote contro!
contro!
...........
.....................
..........................
7
8
g
. . . 10
11
17
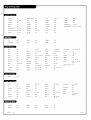
XDS Disptay
.........................
2. Reception
Setup
and Channel.
On-Screen Menu Operation
with Remote
On-Screen Menus/Disptays
Overview
...............
...............
Other Functions and On-Screen Disptays
...............
18
19
20 - 21
22
the
Captions (Caption/Text)
........................
Troub!eshooting
G!ossary ....................................
Notes ...............................
26
27
Background
2B
.............
Zenith Warranty
.........................
.........................
45
46
47
48
Product Brand Codes
25
42
43 - 44
.................................
Remote Modes Key Functions
Maintenance
.................................
39
40
41
..............
Amplifier Vo!ume Override ......................
Aux 1 -2 -3
...............................
23
24
Language .................................
Source
..................................
...............................
.......................
Set up remote to operate other devices
Programming
l"V's Features
Setup Menu (Start with page 18, EZ Program)
Add/De!/Surf
...............................
EZ Crock Set ...............................
38
...........
PIP (Picture-in-Picture)
......................
Remote Contro[ Programming
AutoFind
Step 3. Customize
36
37
...............................
EZ Demo (On-screen menus overview)
Search
EZ Program: Se!ect Cabte service or Air Antenna
and run channet search ........................
35
.................
PIP Menu (Setup PIP picture appearance)
Source Sense ..............................
Source Hookup Options
Step
32 - 33 - 34
Special Menu
EZ Timer: On/Off Timer Functions
Channe! Labe!s .............................
16
Mono, SAP),
News, Music, Theater).
EZ Timer: S!eep Timer
Front Pane! Contro[s/Inputs
..............
(Custom, Norma[, Stadium,
30
31
Speakers, EZ Sound:
Lock (Parental Control Menu) ...............
Restricts viewer programming.
13
14
15
Remote Control Key Functions in TV mode
EZ SoundRite,
12
High-Definition/RGB
Hookup .......................
Audio/Video Signa! Output ........................
.......................
EZ Bass Front Surround,
......
.............
....................
49 - 50
51
52
53 - 54 - 55
56
57 - 58 - 59
Back Cover
Note: Design and specifications are subject to change without prior notice.
2o_-3594
PA G E 5
To hook up source equipment,
see be{ow and a{so
f
refer to the Tab{e of Contents on page 5, shows
pages to go to for equipment hookup options. Also,
see the front connections
pane[ source's hookup
options on page 16.
After you have finished hooking up your source
equipment,
go to page 18 and use
EZ Program to search for and find
at{ the avai{ab{e channe{s in
_,
your
area.
--
TV Back
.....................
.....
....
....
....
.............................................
.............
"
HDIN --
DVDIN "V'IDEOI -- VIDEOB ' "MONITOR"
y_<_
_
,N
IN
OUTPUT
S-VIDEO 1 S-VIDEO 2
VIDEO
ANTENNA
CABLE
VIDEO
VIDEO
_i
_
_o:o
R
R
R
R
IoXo
l
Io:O
Useto hookupyour
or cable
antenna
See pages
system.
7, 8, g, lO, ll,
AUDIO
_<_0_
ANTENNA/CABLE
AUDIO
L_
_
AUDIO
-_j_7
L_))
---------
HD-RGB///_INPUT
,GB Format: HDTV Set top Box 1920 x 1080i
/
/
/
/
/
/
H g, I N
Connect progressivescan or high-defi,
n,ition
component video equipment here.
Progressive
Scan DVD_o
EDTV Set top Box, 48@
HDTV Set top Box, i080i
/
I
/
/
/
DVD
IN
Connect a standard component
video equipment or DVD player here.
DVD P{ayer, 480i
SDTV Set top Box, 480i
6
_
AUDIO
/(_
--_
Connect HO-RGB here.
RGB Format: EDTV Set top Box 640 x 480p
PAGE
L_
_
''--_'
AUDEO
L(_
/
/
/
/
l/
V
VIDEO I IN VIDEO 2 IN
connect
yourAudio/Video
or
equipment to these
jacks.
See pages g, lO 11
Seepages9, io11.
VIDEO / R - L AUDIO OUT
Use these outputjacks
to connect
external
audio/video
equipment.
See page 15.
ao6-38o8
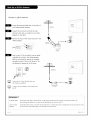
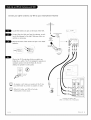
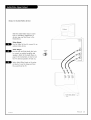
Connect an off-air
antenna
Typical
Locate the Antenna/CabLe jack on the back of
your Entertainment
TV Back
Antenna
Machine.
Connect the wire that runs from the waLL
directly to this jack, according to one of the
diagrams to the right.
D
Remove the back of the remote and put in two
"AAA" batteries.
mlg
___
_
ANTENN_
Remote
iiiBac,
ofii
300/75 ohm
Adapter
PLug in your TV. Do not plug it into an outlet
controLLed by a switch. Your Entertainment
Machine is designed to operate on standard
household current, 120-voLt 60 Hertz AC. Do
not attempt
to operate it on DC power.
_
_
p
p
p
Antenna
60 Hz
120 \/A(_
ANTENNA
CABLE
V
If you have a 75 ohm RF cable, then you
don't need any adapters!
RF Coaxial
A 300 to 75 ohm adapter is not included with
the TV.
75 OHM RFCABLE
Wire
(75ohrn)
The wire that comes from an off-air antenna or cane sewice provider. Each end looks like a hex shaped nut with a wire
sticking through the middle, and it screws onto the threaded jack on the back of your TV.
300 TO 75 OHN
A small device that connects a two-wire 300 ohm antenna to a 75 ohm RFjack. They are usua[_ about an inch long with two screws
ADAPTER
on one end and a round opening with a wire sticking out on the other end.
2o6-_4
PA G E 7
Connect cable service to your Entertainment
Locate the Antenna/Cable
back of the TV.
Machine
jack on the
Connect the cable service wire that runs
iiii,iiiiil,TyRica
from the wall or cable box directly to this
jack, according to one of the diagrams to
the right.
Wall Jack
Remove the back of the remote and put in
two "AAA" batteries.
ANTENNA
CABLE
Cable TV
Coaxial
"_
Back
ofii
Round Wire
(75ohm)
Remote
\
i
Hug in the TV. Do not plug it into an outlet controlled by a switch. Your TV is
designed to operate on standard househow current, 120-volt 60 Hertz AC. Do
not attempt
to operate it on DC power.
Cable TV
Typical
Wall Jack
60 Hz
20 VA(
_
Z
Typical
TV Back
If you're using a cable box, leave the TV on
channel 3 or 4 and use your cable box to
k
change channels.
ANTENNA
CABLE
If you're
using a cable box, EZ Program might
onty ffind the channel
your cable service
is on
(usually channel 3 or 4). Don't worry, that's all
you need/
PA G E 8
RF Coaxial
Wire
(75ohm)
2o6-34s0-o
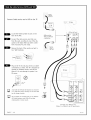
Connect your off-air
antenna
and VCR to your Entertainment
Locate the Antenna In jack on the back of the VCR.
Machine
BCR
Ba_k
|
|
RF Coaxial Round Wire
.Connect the wire that runs from the antenna, accordmg to the diagram to the right. Make any other connections as necessary.
,
(75ohm)
i","
_pica[
Antennas:
VCRBack AV Pane[ _
Rat or
Round Wi_
Remove the back of the remote and put in two "AAA"
batteries.
I1_
Out
Audio
Vide
..............................
Oa , _....
\
---_ Remote_
300/75 ohm
Adapter
Hug in the TV. Do not plug it into an outlet controtted by a switch. The TV is designed to operate
standard current, 120-volt 60 Hertz AC. Do not
attempt to operate it on DE power.
on
60 Hz
120 VAC
_
IN
B VIDEO i_ S-VIDEO 2 [
[_
No adapters or A/V cables are included with the TV.See
your Zenith dealer to purchase any adapters or cables.
Without A/V cables, most VCRswill not play
videocassettes in stereo sound.
'0 ©I
-_1.,_1 _1
VIDEO
ANTENNA
CABLE
_D_T_m_
I
VIDEO
AUDIO
[
I
VIDEO [
AUDIO
I
Connect)'our VCRto the
Video i or Video 2 set of input jacl<s
20S-3_04
PA G E 9
?_
Typical
CabLeTV
_)
WalL 3ack
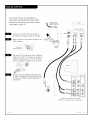
Connect Cable service and a VCR to the TV
:
VCR Back
_Alr_i,,
Cabte Box
_|_out _°_I_
VCRBack AV Pane[
Locate the Antenna/CabLe In jack on the
back of the VCR.
CabLeservice
with or without
a cable box
Connect the cable service wire that runs
_In
output
Ib_ ,_
[_L]
switch 34
from the waLL, according to one of the diagrams to the right. Make any other connections necessary for your setup.
Remove the back of the remote and put in
two "AAA" batteries.
.......................
Oa --, iiii
---u Remote
Hug in the TV. Do not ptug it into an outtet
controtted by a switch. The TV is designed to
operate on standard current, 120-vo[t 60
Hertz AC. Do not attempt to operate it on
TV Back
DC power.
J
*VIDEO I "_'VIDEO
IN
2 .-MONITOR
IN
OUTPUT
60 Hz
120 VAC
_
S-VIDEO 11 S-VIDEO 2
@ @
VIDEO
[_
Tuneboth
the television
to channel
3
or 4 (cable the
boxVCRand
output channel)
and use
the cable
box to change channels.
NoA/V cables are included with your TV.Without
A/V cable hookups, most VCRswill not play
videocassettesin stereo sound.
VIDEO
VIDEO
ANTENNA
CABLE
_)
AUDIO
--,..,..,...,..,..
Connect your VCRto the
Video 1 or Video 2 set of input jacks
PAGE
10
_o6-3594
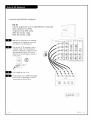
Your Zenith
TV may be connected
Super-VHS VCR through
to a
the S-Video Input
located on the front
or rear source connec-
tion panels on your
TV
i
...............................
VCR Back
From Antenna or
Cable Service With
i•-]
Hook up your S-VHS VCR to your Zenith TV
according to the diagram shown at the right,
Fiat Wire_
Remove the back of the remote and put in two
"AAA" batteries.
300/75 ohm
Adapter
//
•
x::xx:xxc:::x:%i
;
Hug in your TV. Do not plug it into a switched
outlet. Your Zenith TV is designed to operate on
standard household current, 120-volt 60 Hertz
AC. Do not attempt
to operate it on DC power.
TVBack
60 Hz
120 VA_
;
2
J
On the remote, press SOURCErepeatedly until
"S-Video" is displayed. Or use the Source menu
to choose the S-Video input the equipment is
connected to.
• VIDEO I
IN
S-VIDEO I
ANTENNA
-@
@
• VIDEO
_ -MONITORI
IN
OUTPUT ]
S-VIDEO 2
VIDEO
VIDEO 1
CABLE
AUDIO
AUDN
.L@
_
NONO
Connect your S-Video VCRto the
S-Video i or S-Video 2 set of input jacks
]
Connecting
gVg
component
video DVD equipment
IN
Connect a standard component
video equipment or DVD player to DVD IN.
DVD Player, 480i
SDTV Set top Box, 480i
TVBack
i
i
;>
i
B
Make the connections as indicated. (Appearance
of components may vary from those in the illustrations.)
Hug in your TV. Do not plug it into a switched
outlet. Your Entertainment Machine is designed
to operate on standard household current, 120volt 60 Hertz A¢. Do not attempt to operate it on
DC power.
VIDEO 1""
IN
S VIDEO i
@
VIDEO
AUDIO
NONO
VIDEO ?-rMONITOR'
IN
OUTPHI
S-VIDEO 2
VIDEO
AUDIO
VIDEO
AUDIO
MONO
60 Hz
120 VA(
_
B
Press POWERto turn TV on.
B
On the remote, press SOURCErepeatedly until
"DVD" is displayed. Or use the Source menu to
choose DVD.
Component video jacks ore sometimes labeled with CR, CB,
or PB, PR. In this case, connect B to B and the R to R.
The "Y"]ack
is usually labeled "Y", connect Y to Y.
DVD
Hayer With
Component
Video
PAG
E 1 2
i_ii :
_o6-3594
Connecting
HI)
high-dejfinition
equipment
IN
Connect progressive scan or high-definition
video equipment to HD IN.
Progressive Scan DVD, 480p
EDTV Set top Box, 480p
HDTV Set top Box, i080i
I
Make the HD connections
component
TV Back
as indicated.
(Appearance of components may vary
from those in the illustrations.)
llI
Hug in your TV. Do not ptug it into a
switched outtet. Your Entertainment
Machine is designed to operate on standard househotd current, 120-vott 60
Hertz AC. Do not attempt to operate it
on DC power.
60 Hz
120 VA_
I
I
Press POWERto turn TV on.
On the remote, press SOURCE
repeatedly
unti[ "HD-In" is disptayed. Or use the
Source menu to choose HD-In.
HD OUT
s VDEOOUT
VIDEO
R AUDIO
L NIONO
Set Top Box with
Component Video
:_]]i_:
Connecting
High-dejffnition
HD-R6B
R6B output
equipment
INPUT
Connect HD-RGB equipment here.
RGB Format: EDTV Set top Box 640 x 480p
RGB Format: HDTV Set top Box 1920 x 1080i
Make the RGB connections
Y
TVBack
as indicated,
(Appearance of components may vary
from those in the illustrations,)
Hug in your TV. Do not ptug it into a
switched outlet. Your Entertainment
Machine is designed to operate on standard househotd current, 120-vott 60
Hertz AC. Do not attempt to operate it
on DC power.
HD IN
Pr@
60 Hz
120 VA_
Press POWERto turn TV on,
On the remote, press SOURCErepeatedty
untit "HD-RGB In" is disptayed. Or use
the Source menu to choose HD-RGB In.
i
I I
........
PAGE
14
i
HD-RGBOutput
2o_,-s504
Output
to Audio/Video
devices
TV Back
Make the Audio/Video Output connections as indicated.
(Appearance
of
devices may vary from those in the
ittustrations.)
-MONITOR
OUTPUT
Video Output
Use the Video Out jack to connect
external video device.
to an
VIDEO
Audio Output
Use the Left and Right Audio Out jacks
to connect an externat amptifier and
ANTENNA
CABLE
speakers. (Refer to the Audio Menu on
page 31 for instructions
on how to turn
the TV's internat speakers off and on.)
AUDIO
Select Audio/Video Input on the externat device to see the image and hear
the sound from the TV.
iii
VIDEO_
IN
R_]_
IN
_i
_,I40NO
IN
0
]
206_3594_A
Audio/VideoDevil# ....... :
PA G E
1 5
Using the front panel to operate the TV's basic features
and to make temporary connections
_ypica[ TV
Front Pane[
B
Menu Operation
@
©©©
Press MENU to ptace menus on-screen.
S-video
video
Use Channe[ Up/Down to setect menu option.
_Use
_
L-audio-R
Votume Left/Right
to adjust menu option.
Left/Right Audio
Used for stereo
Use MENU to remove menus from screen.
sound from externat equipment.
S-Video / Video
TV Operation
Connects the video signals from
external equipment.
B
Press POWERto turn TV on and off.
_
Use the CHANNEL Up/Down buttons to setect the next
higher/tower channe[ number
D
Use the VOLUME Up/Down buttons to adjust the sound
[eve[ [ouder or quieter to your preference.
Typical Front Pane[ Controls
menu , channe[•
volume
C[[]C[[]
_
power
r--q
T_I
PAGE
16
2u_,-_5_4
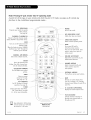
Note: Pressing TV puts remote into TV operating
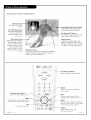
A quick list of the keys on your remote
functions
in the 6 additional
PRG
and
programmable
what
mode
they
do in TV mode,
see page
44 for remote
key
modes...
(PROGRAM)
POWER
Programs your remote to operate
Turns TV On or Off.
other products.
See page 45.
LED INDICATOR
Selects AM/PM in CLock/Timer menus.
CABLE/VCR/AUX/TV
SeLects
remoteoperating
mode.
SURF
Turns on and off custom
channel
seLection
When Surf mode is active,
Up/Down
channels
you've
MUTE
mode.
Turns sound Off and On
CHANNEL
keys "Surf" through
LIGHT
Lights when keys are pressed.
FLASHBK
(FLASHBACK)
Return to the Last channel viewed.
while the picture remains.
the
Press once to quiet sound, press
again to mute, press again to
restore sound.
selected.
CHANNEL (UP/DOWN)
SeLectnext avaiLabLechanneL.
:_::'::: .............
VOLUME
LEFT/RIGHT
Adjusts the sound LeveLson your
Entertainment Machine.
ENTER
Shows the ChanneL/Time
NUMBER
display. Press after channel numbers for instant selection.
LEFT/RIGHT
ARROWS
KEYPAD
SeLects channels directly and
enters numeric values for
some options.
........... --..
The Left/Rightarrows adjust
options.
UP/DOWN
QUIT
.......
........... "¢;;;.......
Removes on-screen display from
view. If no display is on, switches
Surround sound feature On and Off on
For PIP (Picture-in-Picture)
operation.
arrows selectoptions.
"",,..
menus forTV mode.
See pages 20 - 21.
PIP FEATURES
ARROWS
The Up/Down
MENU
Shows on-screen
some TVs.
See page 36.
TIMER
""4 ..........
DispLays the SLeep Timer Menu.
CC (CLOSED
Displays the
See "Timer Setup" on pages
35 - 36 for more information.
CAPTIONING)
closed
caption
menu.
TV/VCR-SOURCE
Switches between watching
[_
2o6-_04
Keys dedicated to VCRj:unctions
wilt stilt operate your VCR white
the remote is in TV mode.
remote
control
part
through
your antenna/cabLe,
through
your VCR.
TV
or
number
MBR3457CT
(124-233-05)
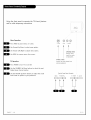
PA G E i 7
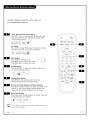
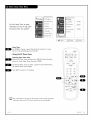
EZ Program
Use EZ Program to automatically
V CabLe TV
Add/Det/Surf
jfind and store in the
Air Antenna
EZdock
T1/'s memory, all the channels in your area
Captions
Caption/Text
Select:
CABLE TV, If you subscribe
Language
to a cable service.
AIR ANTENNA, If you receive over-the-air
Source Menu
programs.
Background
_,V
Move
_
Next
_
Back
I
Press MENU, (if not selected, use the Up/Down arrow to choose
Setup Menu,) then press ENTER,
©
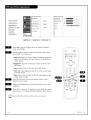
Using the Up or Down arrow on the remote control
Program on your screen, then press ENTER,
B
select EZ
Using the Up or Down arrow, select either CabLe TV or Air Antenna,
on your screen,
Press ENTERto begin the channel search,
B
When the channel search is complete, press MENU repeatedly until
art menus are removed, or press QUIT,
EZ Program jfinds channels being received by the TV tuner.
[_
Cable wilt not work unless you subscribe to a cable service.
to
Air Antenna
The device receiving the program signal sent over-the-air.
CabLeTV
Your EZProgramselection, if you subscribe to a cable service.
PA G E i 8
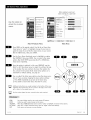
2o_,-_5_
When selected, words and
values change to a gold color
Brig htness
50 1_
so J_
[
i
EZClock
CoLor
so
l
Captions
Tint
G
Caption/Text
Sharpness
SO i_
Language
CoLor Temp
Source Menu
Advanced
Background
EZ Picture
EZ Program
Contrast
Use the remote to
Add/Det/Surf
access the on-screen
menus
[ AT Move
_
Next
_llll_llllllllmllllllllmJ
_
Bad< l
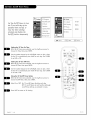
Video Menu
Main TV Features Menu
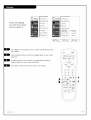
Press MENU on the remote control Use the Up or Down directiona[ arrow to "setect" or hightight (change the text color to
gold) the name of one of the five main menus on your screen
tike the VIDEO menu, then press ENTER.
B
Use the Up or Down directiona[ arrow to hightight an option
tike CONTRAST,then press ENTER. You can setect other menu
options tike COLORTEMP by pressing the UP or DOWN directiona[ arrow repeatedly.
ENTER
Once the option is selected, in this case CONTRAST,use the
RIGHT or LEFTdirectional arrow to adjust the setting; the targer the number the more contrast, the lower the number, the
less contrast in the picture. Note: Some menu options use a
checkmark to indicate setting, see page 19.
You can adjust the other menu options using the above procedure or if you are done changing the menu option settings:
a. Press MENU repeatedly to go back to the main menu.
b. Press QUIT to remove the menus from the TV screen.
Additional instructions
are usually included on the bottom
indicating which remote keys to use to move to the right,
left, or return to the original menu, etc.
Use the number
keypad
to enter
numerical
MENU
On-screen
ENTER
Action key used to make changes
UP/DOWN
Menu UP or DOWN directional
LEFT/RIGHT
QUIT
Menu LEFT or RIGHT directional
displays
values
used to set up and operate
Exits menus and removes
of the menu
move to the
tl DO
when required.
TV features.
on the menus.
arrows used to "seLect"
arrows used
on-screen
displays.
to "adjust"
or highlight
and choose
some menu settings.
menu options.
R
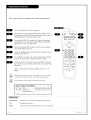
]
Descriptions
of the menus and displays
Using MENU, the Up/Down arrows, and the ENTER key and the other keys indicated
the remote, the user can access the menus and displays described below.
on
ON-SCREEN MENUS
EZ Program
Add/De[/Surf
¢ CaNe TV
SETUP
Air Antenna
18
Sets the TV up and adjusts the basic features.
EZCrock
EZ Program
18
Automatically finds and stores active channets you
tune to by using Channel Up/Down.
Captions
Caption/Text
Language
Add/Det/Surf
23
Choose which channets wit[ appear when using Channet
Up/Down. Adds favorite channets to Surf channe[ fist.
Source Menu
Background
EZ Crock
24
Sets the TV's dock.
Contrast
Brightness
Color
Tin t
5o r_
5o [_
5o r_
G
5O [_
l
l
1
HmHHmum_I R
l
Sharpness
Captions
25
Turns dosed captioning On, Off, or set it to come on
when the tetevision sound is muted.
Caption/Text
25
Chooses a captioning
or text option.
Language
26
Chooses the [anguage you want the on-screen menus to
appearin.
Color Temp
Advanced
EZ Picture
Source Menu
27
Setects which picture and sound wit[ appear on your TV.
[
[
Bass
11 [_
Treble
4o [_
Balance
L 2 ImmmumB[ummmummBI
R
I
!
Background
28
Adds or removes menu background for better readabitity.
VI DEO
29 - 30
Audio Node
Adjusts the picture appearance to your preference.
EZBass
Your options are:
Front Surr
Contrast, Brightness, Cotor, Tint, Sharpness, Cotor
EZSoundrite
Temperature, Advanced (Aspect Ratio etc.),
Speakers
EZSound
AUDIO
EZ Picture.
31
Customizes the sound to suit your room and taste.
Your options are:
Bass, Trebte, Batance, Audio Mode, EZ Bass, Front
Surround, EZ Soundrite,
PAG
E 20
Speakers, EZ Sound.
2o6-3_94
Aux Sources
NPAA
V Unbtocked
Btocked
Age Brock
Content Btk
Cdn, Ratings
LOCK
32 - 33 - 34
Set Hours
Arrows parents to brock programming based on the program's content rating or the A/V source for up to 99
hours, with the use of a password.
SPECIAL
Set Password
Lock On/Off
35 - 42
Goes beyond basics and customizes your Entertainment
Machine's features.
EZ Timer
Your options are:
EZ Timer
35 - 36
• Steep Timer, Sets a time that the TV witt automaticatty
turn itsetf off, one time.
• Atarm, Sets the time the TV witt turn on and off auto-
CH. Labets
TO SET
XDS Disptay
PRESS
PIP Nenu
maticatty each day.
Source Sense
Channel. Labets
EZ Demo
37
ENTER
Tittes the channets with their network names (ABC, CBS,
HBO, etc.).
XDS Disptay
38
On/Off. If avaitabte, shows program information when a
new channet is tuned to, or ENTERis pressed.
PIP Menu
39
Adjusts the PIP inset image appearance.
Source Sense
40
ON/Off. Controts how the Sources appear on the menu.
EZ Demo
42
On/Off, Demonstrates the on-screen menus that controt
the TV's setup and operationa[ features.
Channet/Time disptay shown
with PIP on.
OTHER ON-SCREEN DISPLAYS (See pages indicated.)
• Surf's Up
22
• No Surfing
22
• Mute
22
•
•
•
•
Votume Disptay
Channet/Time
Steep Timer
Captions/Text
22
21
22
21
Off[]
OnCaptions
EZ Mute
Closed Captions
menu display.
2o6-_4
PA G E 2 i
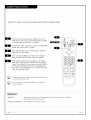
On-screen displays reveal the current status of
your Entertainment
D
Machine
"Surf" Channels Mode Active Display
Press SURF to turn on Surf channels tuning mode; onE}/
channels specified as Surf channels wit[ appear when
using Channel Up/Down.
Surf's
Up!_[ _
No Surfing
Press SURF to display "No Surfing!" and return to normal
channel tuning mode, using Channel Up/Down.
No Surfing
B
B
Mute
Press
Press
Press
Display
MUTE to quiet the sound.
MUTE again to remove the sound.
MUTE again to restore the sound.
Volume Display
Press the VOLUME +/- key on the remote control to see
the sound [eve[ status display.
[I@>) 18E_
Vo 1 ume
]
Channel/Time Display
Press ENTER on the remote control to view the
Channel/Time/incoming
audio signal display.
Remove On-Screen Displays and Menus Instantly
Press QUIT to remove displays and menus and return to TV
viewing, or wait a few moments and the displays and
menus wilt automatically disappear from the screen.
B
Steep Timer Display
Steep Timer Status Display. Appears one minute before the
IV automatically turns itself off.
:(:
ssssP TZHSR ]
0:I0
E
"Surf" Channels are typically your favorite
to and watch frequently.
PA G E 2 2
channels that you tune
2o_,_s59_
;FTI
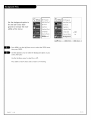
EZ Program
Customize your channel
not found
selection
list: Add Channels
by EZ Program, Delete channels you don't
watch, Create a favorite
channels
list to "Surf"
- -
Add/De{/Surt
Ch 2 CBS
EZ Clock
Deleted
Captions
Added
with Surf on, only those channels speciJ_ed as Surf
Caption/Text
channels will appear when using Channel Up/Down
Language
,/Surf
Addrce Menu
Background
LAY
Move
_
Next
@
Back
I
Use the NUMBER keypad to go to the Channel you want to
Delete, or include in the Surf channel list.
B
Press MENU, use the Up/Down arrow to select the
then press ENTER.
B
Use the Up/Down arrow to highlight
then press ENTER.
the Add/Det/Surf
option,
Use the Up/Down arrow to pick ADDED, DELETED, or SURF;
move the checkmark next to the option, then press ENTER.
Use MENU to go back to the SETUP menu. Press QUIT to
remove menu when finished or go to another channel you
want to add or delete by using the NUMBER keypad to select
it and repeat from Step 3.
I]: you've deleted a channel,
it isn't gone ]:or good. Just select it using
the NUMBER keypad on the remote, or add it later.
"Surf"
ADDED
channels
are also automatically
"Added. "
Includes new channels to the channel list that you'll scroll through
when using Channel Up/Down.
DELETED Removes channels that you don't watch from the channel list you'[[
scroll through
SURF
using Channel Up/Down.
Adds your favorite
channets to the Surf channel tist. Press SURF,
channets you specify as Surf channels wi[[ be the only ones to
appear when you use Channel Up/Down.
off, (No Surfin!!)
2o6-_s_4
IP
manll
Press SURF to turn Surf
and return TV to normal channe[ selection mode.
PA G E 2 3
In the Setup menu with the EZ
ENTERto go to the EZ Crock Menu.
Use the Select UP or DOWN arrows, the Adjust LEFT or RIGHT
arrows, and the NUMBER keypad to set the dock menu options.
As indicated on the menu, use FLASHBK to set AM or PM.
©
EZ Clock Menu Options
Press QUIT to return to TV viewing.
option hightig_ :ed, pres
iiiiiiiiiiiiiiiiiiiiiiiiiiiiiiiiiiiiiiiiiiiiiiiiiiiiiiiiiiiiiiiiiiiiiiiiiiii_
....
iiiiiiiiiiiiiiiiiiiiiiiiiiiiiiiiiiiiiiiiiiiiiiiiiiiiiiiiiiiiiiiiiiiiiiiiiii_!_i!
_!I_'_
PA G E 2 4
_o_,-_e_
EZ Program
v' Caption
1
Turn on Closed
Add/Det/Surf
Caption 2
Captioning
EZClock
Caption 3
Captions
Caption 4
Caption/Text
Text !
Language
Text 2
Source Menu
Text 3
Background
Text 4
or
fi_::tON'd21/_
N_tltlbmenu,
_e
a Closed
Captions or Text
option
! AT
Move
_
Next
_
Back
[
Caption/Text at[ows your Entertainment Machine to receive various
dosed caption and text options provided by broadcasters.
Availability and functionality
of Caption!Text is determined only by the
broadcaster and may not be available on a given program. Standard captions are usually on Caption1, standard text is usually on Text 1.
B
Press MENU, use the Up/Down arrow to
then press
Use the Up/Down
D
arrow to choose Captions, then press ENTER.
Use the Up/Down arrow to
Note: If you selected either On or EZ Mute, then use the Up/Down
arrows to choose an option from the Caption/Text menu: Caption
1, Caption 2, Caption 3, Caption 4, Text 1, Text 2, Text 3, or Text
4; so that the option wi[[ appear when the TV is muted or a program is tuned to that has Closed Captions or Text.
D
Press QUIT to remove menu and return to TV viewing.
Captions come
captioning
in handy
is available
when the television
is on mute.
Standard
closed
using the Caption 1 option.
Not all programming has closed captioning or text available; even though
Captions 1, 2, 3, 4, and Text 1, 2, 3, 4 are available to broadcasters.
CAPTIONS
TEXT
2os-_
the
portionof
thethat
program
the hearingimpaired.
The audio
term for
the words
scroll provided
across theforbottom
of the TV screen;
Theterm for the wordsthat appearin
a large
usually
blackframeandalmostcoverthe
PA G E 2 5
Choose the language
you want the on-screen
menus to appear in
EZ Program
EZProgram
Add/De[/Surf
Add/Det/Surf
EZClock
EZClock
Captions
Captions
Caption/Text
Caption/Text
Language
Language
Source Menu
Source Menu
Spanish
Background
Background
French
! @'_" Move
B
_
,/EngLish
Next
_
Back
I
Press MENU, use the Up/Down arrow to select the SETUP menu, then
press ENTER.
!
D
B
o
Use the Up/Down arrow to select the Language option on your screen,
then press
Use the Up/Down arrow to choose any of the fottowing
Engtish, Spanish or French, then press ENTER.
options:
Press QUIT to remove menu and to return to TV viewing.
PA G E 2 6
2o_,-_4
Choose the picture
and sound you want to see and hear for the main screen and PIP inset
Using SOURCE to Choose Viewing Sources
Press SOURCErepeatedty to scrott through the avaitabte sources:
Antenna, Video i, Video 2, F Video, DVD, HD, HD-RGB, (Note: See
page 40 for source sensing options,)
Setecting Sources with the Menus
Press MENU to show the menus
Use the Up/Down
press ENTER.
arrow to setect the SETUP MENU option,
then
Use the Up/Down arrow to setect the Source Menu, then press
ENTER. (Use MENU to go backward as needed.)
Use the Up/Down arrow to move the checkmark and setect Antenna,
or one of the other avaitabte sources, then press ENTER.
After you have setected viewing sources for the Main picture and
PIP inset, press QUIT to remove menus and return to TV viewing.
Set the background option
On and add a blue background
ability
to
to increase the readof the menus
EZ Program
EZ Program
Add/De[/Surf
Add/Del/Surf
EZ Clock
EZ Clock
Captions
Captions
Caption/Text
Caption/Text
Language
Language
Source Menu
Source Menu
BN_:E_r:ou
nd
Background
[ AY
Move
_
Next
,/Off
On
_
Back
]
Press MENU, use the Up/Down arrow to setect the SETUP menu,
then press ENTER.
Use the Up/Down arrow to select the Background option on your
screen, then press
Use the Up/Down arrow to setect On or Off.
Press QUIT to remove menu and to return to TV viewing.
PA G E 2 8
2o_,-_59_
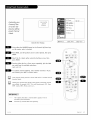
Use the Video menu
to customize
picture
the
appearance
50 I_
so F_
l
I
EZ Program
Contrast
Add/Det/Surf
Brig htness
EZ CLock
Color
Captions
Tint
50 I_
l
G ImmHmlBUummHmmHI
R
Caption/Text
Sharpness
5o [_
Language
Color Temp
Source Menu
Advanced
Background
EZ Picture
[ AV
Move
_
Next
_
[
Back
l
Press MENU, use the Up/Down arrow to select the Video menu,
then press ENTER.
Using the Up/Down arrow on the remote control
Contrast (or another option
B
Using the Left/Right
preference.
choose
on your screen), then press ENTER.
arrow, change the Contrast [eve[ to your
Press QUIT, to return to TV viewing, or press MENU and repeat
from step two to set the other menu options. Your options are:
• Contrast: Adjusts the [eve[ of difference between white and
black in the TV picture. The more contrast, the brighter the
picture appears.
• Brightness: Increases or decreases amount of white in the TV
picture.
• CoLor: Adjusts levels of at[ colors in the TV picture.
• Tint: Adjusts the relative amounts of red and green colors in
your picture.
• Sharpness: Raises or towers the definition of the picture. The
tower the [eve[, the softer the image wit[ appear.
• CoLor Temp: Adjusts levels of at[ colors in the TV picture;
or Warm.
Coot
• Advanced Video Menu Options: See next page.
• EZ Picture: Choose either Custom, Normal Movie, Digital
Video Game, Sports, Night Time, or Weak Signal
Custom: Allows you to adjust the picture the way you want.
Normal: Resets the options to their original settings.
Other options adjust the picture to the source's image.
[_
Choose the NORMAL option in EZ Picture to quickly reset the Video Menu
options to their original pre-set volues, or use your own settings with
CUSTOM.
Usethe PIP menu to set your preferencesfor the PIP inset picture.
206-3504
PAGE
29
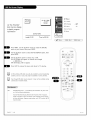
Contrast
Use the Video
Brightness
menu to
CoLor
customize
Tint
5o I_
s
the picture
Sharpness
5o I_
appearance
CoLorTemp
to your
Advanced
preference
EZPicture
I AT
Move
_
Next
Z-View
5o [_
so [_
_
AspectRatio4Normal
16:9
WideScreen
Sack
]
B
With the Video menu option
setected, press ENTER,
B
Use the Up/Down arrow to select Advanced, then press ENTER,
Your options are:
©
<Po%
• Z-View: Can be turned on and off to change the appearance of
the picture to your preference,
• Aspect Ratio: Selects the proper picture proportion
the source's image; Norma[, 16:9, WideScreen,
D
to match
Using the Up/Down arrow, choose Aspect Ratio on the menu (or
choose another option), then press ENTER,
Using the Up/Down arrow, change the Aspect Ratio to the
correct video proportion: Norma[, 16:9, or WideScreen,
Press QUIT, to return to TV viewing, or press MENU and repeat
from step two to set the other menu options,
NORMAL
Standard 4 x 3 almost square-Like picture proportion
used for
most TV formats.
16X9
Wider than normal picture format used for HD sources that
produce a more movie theater-Like image.
WIDESCREEN
PAGE
30
Picture zoom-like
effect to flit screen.
2o_,-_5o4
Adjust the sound to
your preference
and
set up the audio .features
EZ Program
_ass
11
I
Add/DeL/Surf
TrebLe
40
j
EZ CLock
Balance
L 20 Illllllll_mlllllllllllllmllmlll
Audio Mode
Captions
EZ Bass
Caption/Text
Front Surr
Language
EZSoundrite
Source Menu
Speakers
EZSound
Background
I AV
Move
_
Next
@
Back
I
Press MENU, use the Up/Down arrow to select the Audio menu,
then press ENTER.
Using the Up/Down arrow on the remote controL, highlight the
audio option you want to change, then press ENTER. Choose from:
• Bass: Increases/decreases tower-end sounds.
• Treble: Increases/decreases higher-end sounds.
• Balance: ALLowsyou to put the sound more to the Left or right
channeL.
• Audio Mode: Choose from Stereo sound, Mono sound, or 2nd
Audio/SAP.
• EZ Bass: Turns the bass booster function on or off.
• Front Surround: Turns front surround sound on or off.
• EZ SoundRite: Turns the uniform volume Level on or off.
• Speakers: Turns the TV speakers on or off.
• EZ Sound: Use one of the five factory audio presets: NormaL,
Stadium, News, Music, Theater, or your own "Custom" settings.
Use the Left/Right
arrow to adjust or change the selected option.
Use the Up/Down arrow to select another audio option
it or press QUIT to return to TV viewing.
Not all programming
STEREO
SOUND
MONOSOUND
2nd Audio/SAP
2o6-_4
and adjust
is broadcast in stereo sound or has 2nd Audio SAP.
Stereo (stereophonic) sound refers to audio that's
divided into right and [eft sides.
Mono (monaural) sound is one channel of sound. For
more than one speaker,a[[ the speakersplay the
same audio.
Second audio program provided by some
broadcasters; usually a different language.
PA G E 3 i
If used, this optional
Note:
feature
can "block"
Lock, also known and referred
Mode. To block Computer inputs,
puter inputs
undesirable
programming
to in the text as Parental
from
appearing
on the TK.
Control, is not available
use the block AUX SOURCESoption
in Computer
in the Lock menu in TV Mode; com-
will not be available.
Lock/Parentat
Controt offers the user a wide variety of options and settings that restrict or "brock" the programming
that
can appear on the TV. Parentat controt arrows the user the capabitity of defining which program rating they consider
acceptabte,
to the younger or more sensitive viewer. It can be preset and turned either on or off by the user who specifies
the secret 4-number code, the password. The number of hours btocked are specified. Generat audience and chitdren viewer
btocks shoutd both be programmed into the TV's memory. Viewer ratings are specified for both TV and the motion picture
industry; both rating systems shoutd be used, for comptete coverage. The ratings are based mainty on chitdren's ages.
Overview
T_ui_slm_eao_l_l_eadova_raO_r_og_Otial[_r@o_ap_e__W_s
) choose a rating for NIPAA, from the setections betow AND choose ratings from the TV Parentat Guidetines Rating System on the next page, using the Age Brock
option for Generat Audiences, and for Chitdren. In addition to those, you may wish to add additionat restrictions
from the
Content Brock menu. See the Parentat Controt menu, and submenus exampte on the next two pages.
Things to Consider before Setting Up Lock (Parental Control)
• Determine which rating you consider acceptabte to the viewer. (For exampte, if you choose TV-PG, art more restrictive
ratings witt be automaticatty btocked; the viewer witt not be abte to see: TV-PG, TV-14, or TV-NIArated programming.)
• Do you want to brock the auxitiary video source entirety? (Btocks the signat sent by the equipment,
such as a VCR, connected to the TV Audio/Video input jacks; in the Aux. Brock option.) Or reave unbtocked, then choose attowabte ratings.
• Brock program "Content" based on indiv
Scenes, or Fantasy Viotence Scenes; in the Content Btk option.
• How many hours do you want
Parentat
Controt to be active?
You can set the Hours option
for up to 99 hours.
• Setect a secret password; in the Set Password option. Use the number keys on the remote. Don't forget the password,
is the onty way you can access the Parentat Controt menu and change rating setections,
or turn Parentat Controt off.
• Do you want Parentat
Controt to be active
YOU can set different
Parental
Control viewing
tions for general audiences and for children
be active at the same time.
Simply specifying one content
wiU not automatically
grams from appearing.
PA G E 3 2
art the time?
it
If not, you can turn it on or off; with the Lock On/Off option.
restric-
Even if you choose to leave the Aux inputs unblocked,
- - both con
ratings you specify will automatically
the
restrict the program-
ming that appears from the video sources.
block such as Sex Scenes,
block another content
in the pro-
[_
YOU cannot disable Parental Control by disconnecting
the TV
from power. Block hours will automatically reset to the original block time setting speci_ed if power is disconnected.
2o_,_so_
After you have read the
preceding page, follow
instructions
below to set
up and activate
Lock
EZProgram
Aux Sources
Add/DeC/Surf
MPAA
EZClock
Age Block
Captions
Content B[k
Caption/Text
Cdn, Ratings
Language
Set Hours
Source Menu
Set Password
Background
Lock On/Off
[ AT
As shown above, with the Lock menu on-screen,
Up/Down
arrow to highlight
an option
Move
_
¢ Unbtocked
Blocked
Next
_
Back
[
use the
like Content
Btk,
then press ENTER.
B
Use the Up/Down/Left/Right
or set the rating
Number -Keypad
arrows to select and adjust
for an option.
For Sex Scenes for exam-
pie, use the "From TV-PG" setting.
(_
<
!_!_
_Enter
(See the Mini Glossary,
Ratings Charts on this and the previous
page for rating
Menu I
definitions.)
D
After you have selected
options
and adjusted
the Lock menu
to your preference:
- Set the hours you want Lock (Parental
- Set a 4-number
Control)
active.
password.
- Set the Lock On/Off
option
to either
Up/Down
Left/Rig ht
Arrows
on or off.
Note: No Rating means the broadcast does not inc[ude rating information. You can choose to b[ock broadcasts without rating data,
MOTION PICTURE ASSOCIATION OF AMERICA (MPAA)
G
General Audiences
Content not offensive
PG
Parental Guidance
Content is such that
PG-13
Suggested
Parental Guidance
Suggested
RATING SYSTEM
to most viewers.
parents may not want their
Program is inappropriate
for preteens, with
than a PG rated program.
children
a greater
to view the program.
degree of offensive
R
Restricted
viewing
Not for children
under age 17. Strong elements of: sex and/or
NC-17
X
Restricted Viewing
Hard Core Films
Not for children
under age 17 under any circumstances.
Note: Zenith Electronics
discretion is advised.
2os-_4
Corporation
material
violence.
Strong sexual content.
Same as NC-17 rating.
is not liable for any program
content
that
appears
when
using this rating system;
as always,
user
PA G E 3 3
Lock menus with various restriction
options
are shown below
/Unb{ocked
ALIXSources •
Add/Dd/Surf
NPAA
G
Age Block
Captions
PG
PG-I3
Content B[k -
R
Caption/Text
Cdn, Ratings
Language
NC-I7
X
Set Hours-
JUnNocked
TV-Y
TV-Y7
Set Password
Background
Move
TV-G
TV-MA
Nnb[ocked
Source Menu
_/Unbtocked
TV-PG
1V-14
EZ Program
EZClock
I _T
GENERAL
CHILDREN--
I
Lock On/Off-
<E_b_ER_
Next
@
Back
DIALOG
_
v/Unblooked
SEX SCENES
TV-/4
VIOLENCE
F VIOLENCE NO RATING
LANGUAGE1
TV-PG
TV-PG
i
J
TV-14
Unb[od<ed
TV-MA
1
TV-Y7
'/UnNocked
_/UnbLocked
Blocked
TO SET
PRESS
_'ON
OFF
oo Hours
ENTER CODE:
ENTER
{Cdn.Engtish)
(Cdn.Frendl)
Children
8+
Genera[
PG
14+
18+
Pour"[ours
8+
13+
16+
18+
TV PARENTAL GUIDELINE RATING SYSTEM
TV-G
Genera[ Audience
Considered suitable
TV-PG
Parental Guidance Suggested
Unsuitable
for younger
children,
TV-14
Parents Strongly
Unsuitable
for children
under 14, may contain:
TV-NA
Mature Audience Only
CHILDREN
Cautioned
Adults
for at[ audiences;
only, may contain:
ch[tdren
may contain:
Strong Dialog,
may watch unattended.
Suggestive
Dialog, Bad Language, Sex, and Violence Scenes.
Strong Dialog,
Bad Language, Sex, and Violence Scenes.
Bad Language, Sex, and Violence Scenes.
S CLASSIFICATIONS
TV-Y
Children
Considered su[tab[e
for a[[ ch[[dren
TV-Y7
Children 7 and over
Considered suitable
for children
PA G E 3 4
under 7 years old.
over 7, may contain
Fantasy Violence Scenes.
_o6-_4
EZ Timer
Add/Det/Surf
CH, Labets
TO SET
XDS Disptay
PRESS
EZCrock
Set the Sleep Timer to automatically
EZ Program
turn the TV off, after
the preset time has expired
Captions
PIP Menu
Caption/Text
Source Sense
Language
EZ Demo
ENTER
Source Menu
Background
F AV
Move
_
Next
_
Back
I
Steep Timer
Use TIMER to choose a preset time from 10 minutes to 4 hours
for the TV to automaticatty turn itsetf off,
0
Using the EZ Timer Menu
Setecting Steep Timer Menu
With the EZ Timer menu setected, press ENTER, Use the Up/Down
arrows to choose Steep Timer, then press ENTER.
Use the Up/Down arrows to setect a preset TV turn-off
the options tisted, press ENTER,
time from
Press QUIT to return to TV viewing,
One minute
letting
2os-_4
before
TV turnoff,
you know that
the Sleep Timer on-screen
display will appear
the 11/will turn itselff off in the time specified.
PA G E 3 5
Set the On/Oj_ timers to turn
the TV on each day at the
speciySed time and off, or
have the timer settings
retained and disable the
On/OJF function
EZ Program
EZ Timer
Add/Det/Surf
€H. LabeLs
TO SET
EZCLock
XDS DispLay
PRESS
Captions
PIP Menu
Caption/Text
Source Sense
Language
EZ Demo
ENTER
Source Menu
temporarily
Background
Next
Setting the TV Turn On Time
With the EZ Timer menu selected, use the Up/Down arrows to
choose On Time, then press ENTER.
Use the number keypad or the Left/Right arrows to pick a time
for the TV to automaticaLLy turn itself on each day. Use FLSHBK
to set AM or PM.
Setting the TV Turn Off Time
With the EZ Timer menu selected, use the Up/Down arrows to
choose OffTime, then press ENTER.
Use the number keypad or the Left/Right arrows to pick a time
for the TV to automaticaLLy turn itself off each day. Use FLSHBK
to set AM or PM.
Using the TV On/Off Timer Option
With the EZ Timer menu selected, use the Up/Down arrows to
choose On/Off Timer, then press ENTER.
SeLect On of Off
On: TV on/off
timers function
each day.
Off: TV on/off timers do not function although
on/off time settings are retained in menu.
B
Press QUIT to return to TV viewing.
_
Back
]
EZ Timer
Customize your
CH 23 ....
CH 32-UPN
2:45 PM
(:H. Labels
STEREO
XDS Display
Channel/Time
on-screen dis-
PIP Menu
play by adding
Source Sense
preset Channel
Labels
EZ Demo
Next
Channel/Time
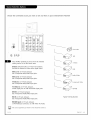
Using either the NUMBER keypad or the Channel Up/Down
on the remote, select a channel
B
Back
]
keys
PressMENU,use the Up/Down arrow to select Special, then press
ENTER.
Select the Ch. Labels option
press ENTER.
_
Display
using the Up/Down
©
arrow, then
Pressing either the Up or Down arrow repeatedly, pick the [abe[
you want from the available selections;
such asA&E.
To continue channel Labeling, select another channel or if you
are finished, press QUIT to remove menu,
[_
Some channels already
broadcast signal.
provide a channel
label which is included
with the
Labeling the channels helps identify which familiar nationwide channels
are available. For example, A & E - Arts and EnteRainment, CAIN- News,
ESPN - Sports, HBO - Movies, and so on...
The 4 dashes witt allow a channel
provided by the broadcaster.
NONE
2os-_s_4
label to appear; if one is
Prevents any channel Label from appearing.
PA G E 3 7
f
EZ Timer
IRating:
i
Ch 25 - PBS
7:15PM
Stereo
TV14
I
CH, Labels
XDS Display
Let the Extended
PIP Nenu
Data Service display
in-depth program
information
On
Source Sense
EZ Demo
Next
Ell
,/Off
Back
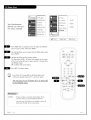
Press NENU, use the Up/Down arrow to select the SPECIAL
menu on your screen, then press ENTER,
Use the Up/Down arrow to select the XDS DISPLAYoption, then
press ENTER,
©
Use the Up/Down arrow to choose: On, or Off.
On: XDS Display witt appear as channels are changed
or ENTERis pr
Off: XDS Display wilt not appear,
Press QUIT to remove the menu and return to TV viewing,
At this printing,
stations;
XDS data may only be provided
and as a result,
may only be available
by some broadcasting
on some
channels.
Even though XDS data may be present, it may not be available during
commercial or network breaks.
Extended Data Service - - If provided by the broadcaster, may show some
or a[[ of the following information:
Channe_Time/Audio dispta_ Network tabetif present. Tit_ of program.
Length of program in hours and minutes. _me remaining on the program
in hours and minutes. ProgBm content rating, and if PIP is active, the PIP
channe[number.
PAGE
38
20_,-_5o4
EZ Timer
Set the PIP
CH. Labets
TO SET
inset picture
XDS Display
PRESS
appearance
options to your
PIP Menu
Source Sens
personal
5o [_
[
Color
5o
5o
]
I
Tint
G
Con[gas[
Brightness
ENTER
Immmmmmmmmmmmm_mmmmmmmmmm
R
Size
EZDemo
viewing
preferences
! AV
Move
_
Next
@
Back
I
Press MENU. Use the Up/Down arrow to select the SPECIAL
menu, press ENTER.
Use the Up/Down arrow to select the PIP Menu option,
press ENTER.Your options are:
then
©
* Contrast: Adjusts the [eve[ of difference between white and
black in the TV picture, The more contrast, the brighter the
picture appears,
• Brightness:
PIP picture.
Increases or decreases amount of white in the
• Cotor: Adjusts levels of a[[ colors in the PIP picture.
• Tint: Adjust the relative amounts of the cotor red and green
in the PIP picture,
• Size: Chooses the size that the PIP inset wit[ appear on the
screen: Small or Large,
D
Using the Up/Down arrow on the remote centre[, choose
Contrast on your screen,
Using the Left/Right
preference.
arrow, change the contrast [eve[ to your
Press QUIT, to return to TV viewing, or press MENU and repeat
from step two to set other PIP inset appearance menu options,
See the PIP section for Picture-in-Picture
2o6-_4
setup and operation.
PA G E 3 9
:NTFP
Press MENU, then press
Use the Up/Down arrow to setect the SPECIAL menu, then
press ENTER.
Use the Up/Down arrow to setect SOURCESENSE,then
press ENTER.
Use Up/Down
to setect On or Off.
Press QUIT to remove menus and return to TV viewing.
PAGE
40
206-3594
Choose the connected
--
source you want to see and hear on your Entertainment
H_IN
_
,_VDIN
VIgE01
VIDEO ]
Machine
_I)EO 2 "I-MONITOR 1
IN
OUTPUT I
VIDEO 2
@
VIDEO
ANTENNA
CABLE
@ R@I
t_L_°JJ I
-------___
AUDIO
AUDIO
_
AUDIO
_
NONO
@
Camcorder
@@@
S Vfdeo
Video
L Audio
R
[_
Press SOURCErepeatedty to choose from the avaitabte
viewing sources or use the Source menu.
Antenna: Antenna/Cabte on TV back near Jackpack,
Over-the-Air Antenna or Cabte service signa[ source.
__
VCR
_
S-Video
Q
DVD
_
Audio/Video
_
Component Video
_
HD-RGB
Video I In: on TV back Jackpack,
Set of Composite Audio/Video Input jacks.
Video 2 In: on TV back Jackpack,
Set of Composite Audio/Video Input jacks.
F Video In: on TV front Jackpack,
Set of Composite Audio/Video Input jacks.
F S-Video In: on TV front Jackpack,
S-Video Input jack use with front Audio Input jacks.
DVD IN: on TVback Jackpack,
Set of ComponentAudio/Video Input jacks.
HD IN: on TV back Jackpack,
Set of ComponentAudio/Video Input jacks.
Typical
Viewing
Sources
HD-RGB Input: on TV back Jackpack,
15 Pin RGBInput connector, use with HD-In R-L Audio.
The source equiprnent you intend to view should be turned on.
2o6-_4
PA G E 4 i
Your Entertainment
Machine can show you
the menus available
EZ Program
EZTimer
Add/Det/Surf
CH. Labets
TOSET
EZCtock
XDS Disptay
PRESS
Captions
PIP Menu
Caption/Text
Source Sense
Language
EZ Demo
ENTER
Source Menu
Background
Next
B
_
Back
Press MENU and use Up/Down arrow to setect the SPECIAL
menu on your screen, then press ENTER.
B
Use the Up/Down arrow to setect the EZ DEMO option,
press ENTER.
then
Use the Up/Down arrow to choose either:
On, then press ENTER. EZ Demo witt continue to run (even
_ the TV is turned off and on again) untit it is turned off in
the SPECIAL menu.
Off; EZ Demo witt not be active.
D
Press QUIT to remove menu.
Even _ the TV is turned off, the EZ Demo feature will
continue to operate when the TV is turned on again.
The only way to turn EZ Demo o]_f is to select 0]_,
in the SPECIAL menu.
EZ DEMO
Feature provides an automatic
demonstration
on-screen menus on your Entertainment
View and [earn what features are available
Demo cycles through
PAGE
42
of the
Machine.
to you as EZ
the on-screen menus.
2o_,-_504
PIP = Picture-In-Picture
Think of PIP as a mini ll/ screen superimposed
onto your main TV screen
Press PIP on the remote to place the PIP inset on the screen, press PIP again to remove it
YOUR
PICTURE-IN-PICTURE
FEATURE
The Picture-In-Picture
(PIP) function aLLows you to put a smaLLer
picture, caLLed the "inset," on the bigger screen, or the "main"
picture.
You wiLL need to have another
source, (audio/video
device con-
nected to the TV) Like a VCR; to use as a source to display
additional
an
picture.
Don't want to miss any of the big game, but hate commercials?
When the broadcaster
to the channel
and Surf your favorite
WORKING
breaks for a commercial,
just
tune the VCR
with the game being broadcast for the PIP inset,
WITH
channels on the main picture screen.
PIP
Just Like your Entertainment
Machine's main screen, PIP will need
a source to take its image from.
PIP Sources
PIP Inset
Antenna/CabLe,
Picture
Main Picture
Video 1, Video 2, F Video. S-Video sources can
also be used for the PIP picture.
EZ Program
SOME TYPICAL
PIP/MAIN
SCREEN
1. You want to watch a videotape,
VIEWING
SETUPS
watch the VCR and TV, swapping
between the two.
2. You want to watch your favorite
Live program on Antenna
the main screen and when a commercial
the PIP inset;
which has a videotape
Surf your favorite
inset.
on
break appears, swap to
in the VCR ready to play, or
Antenna/Cable
source on the main picture screen.
Captions
PRESS
Caption/fext
ENTER
,/Video
2
F Video
DVD
Language
HD
Source Menu
HD-RGB
Background
channels using the Antenna source for the PIP
3. To monitor an infant asleep, connect a camcorder to F Video
for the PIP source and watch a TV channel from the
TO SET
EZ CLock
movie or game. Set the PIP source to Video i, or 2 and you can
Video i
PIP Source
Add/Dei/Su rf
but keep scanning for another
Antenna
Main Source
[ &V
Move
@
Next
_
Back
]
Use the Source Menu to choose Main screen and PIP sources. Some
sources are not available for PIP and cannot be swapped from the
main screen to the PIP inset. See the Source menu page for details.
_
If no equipment is connected to a source you select for the
PIP inset, or if it is turned o]_, the PIP inset will be black.
Continued on next page.
TUNER
A device that
A/V SOURCE
Other equipment connected to the TV Audio/Video
Video 1, Video 2 etc.
2o6-3_4
picks up broadcast signals and turns them into picture and sound.
source inputs on the TV back or front connections
paneL;
PA G E 4 3
Using Picture-in-Picture
(PIP) features
PIP Inset
Press PIP to turn PIP on
and off.
Move PIP Around Screen
Channel/Time/Audio
Source Display
Press ENTER to show display. Shows
source for: Main picture, and PIP.
Press Right/Left/Up/Down
arrows to move the PIP
inset to the other corners
of the screen.
Flip Main and PIP Sources
Press SWAP to switch the Main picture
source with the PIP inset source.
Main Screen Picture
PIP Inset
Source
With PIP off, press FREEZto
place the Main screen picture in the PIP inset and
In PIP channel tuning mode, press
SOURCE to change the source for the
PIP inset to Antenna, Video 1, Video 2,
"freeze"
or F Video.
the image - turning
PIP on. (,4 good way to
freeze the image so you can
write down phone numbers
etc.)
(Or, use the Setup
Menu.)
Main Picture Source
In Main picture channel tuning mode, press SOURCEto
change the source to Antenna, Video 1, Video 2, or
F Video. (Or, use the Setup Menu.)
FLASHBK (Flashback)
Returns to the last channel viewed.
ENTER
Shows Channet/Tinle
Main screen.
Up/Down/Left/Right
Move PIP inset around
Ar
screen.
Turns
Chooses sound source. (With
Channe!/Time
Display on-screen.)
picture and
and sound.
PIP on and
PIP
off.
FREEZ
--
PIP On: Freezes image in PIP inset.
PIP Off: Freezes Main screen picture
in PIP inset and turns PIP on.
SOURCE
Chooses Main screen
PIP picture
PAGE
44
on
QUIT
SWAP
Switches
Main screen
sound with PIP picture
Display
and
sources.
200-3594-0
Set up your remote to operate other brand name devices
Turn on the device you want to program.
On the chart on page 49/50, find the type of device you're
programming, and then find the brand name. Make a note of
the three-number code, you'll need it soon.
Press and how PRG. It's recessed so it doesn't get pushed
accidentally. Use a smart, blunt object. When the indicator
tight turns on, you can release PRG.
Push the key name with the type of device you're programming (VCR, CABLE, AUX, TV).
Using the NUMBER keypad, enter the three-number
found on page 49/50.
code you
PressENTERto save the code. (The indicator tight wilt flash
3 times, then turn off to indicate the code is valid.)
Point the remote at the device and push POWER.It should
turn off. If not, try the other codes listed and continue from
step three.
Note: To reset remote to factory settings,
Step 5.
enter 9-1-1, in
Programming your Zenith remote may allow you to use one remote
to work up to 7 different
devices, ij: aU modes are programmed.
Not aU devices wilt work with your Zenith remote control.
Mode / Product Compatibitity
TV VCR CATV
TVs VCRs Cable Boxes,
Satellite Receivers
AUX (AUX+t, AUX+2, AUX+3)
ALLproducts on pp 49 - 50
PROGRAMMING
Procedureto set up remote to operate other equipment.
PRG
Programming mode key.
DEVICE
Infra-red remote control[able electronic accessoryequipment.
2o6-_4
PA G E 4 5
Control the volume on your home audio system without
changing
modes
Find the code that operates your amplifier. Test it to
make sure it's the correct one by following the procedure
in "Programming Your Remote", on page 45.
Program your audio system into one of the available
modes: Aux, Aux+l, Aux+2, or Aux+3.
AUX
Pressand how PRGon your remote until the indicator
tight stays lit, then release.
D
Press 4-9-9; then ENTER on the remote. The indicator
tight will flash three times the code was accepted.
Audio system volume/mute now appears in all modes.
Note: You can also program CaNe Box Volume and Mute
control (if available) into your cane box mode (CABLE or
AUX mode) by repeating the steps for programming on
the previous page but entering 3-9-9, instead of a brand
code, then pressing ENTER.
To put everything back to normal, reprogram the mode ]:ram Step
3 with the original brand code.
I]:you can't ffind the code ]:or your ampl_'er,
use the Auto Find
]:eature on page 48.
AMPLIFIER
Audio device which sends sound to speakers, tike an Audio Tuner, Receiver, or Amptifier.
See Audio Tuners/Amp list on page 50.
CABLE BOX VOLUME/MUTE
PA G E 4 6
Some cane boxes have volume controLs.
2o_,-_s_4-o
Control up to seven different
devices with your remote
Refer to the chart on page 49/50 to find the type and brand
name of the device you're programming.
Press and how PRGuntil the indicator
release PRG.
tight turns on, then
Press AUX and the i on the NUMBER keypad at the same
time (for AUX +1).
Using the NUMBER keypad, enter the three-number
the device you've selected.
code for
Press ENTERto save the code.
With the device turned on, point the remote at it and press
POWER.It should turn off.
Repeat the steps for AUX+2, and AUX+3.
Programming your Zenith remote may allow you to use one remote to
work up to 7 different
products or devices.
Some devices may not work with your Zenith remote control.
AUX
Auxiliary equipment.
Can be any equipment
which does not have a dedicated
key on your remote like Cable or VCR.
Typically a second VCR, stereo system, audio tape deck, etc.
2o6-B5_4
PA G E 4 7
Use Auto Find to automatically
search and try all possible
brand codes
Turn on the device you want the remote to controL.
Press and how PRG until the indicator
release PRG.
tight turns on, then
Pressthe key for the device you are trying to program
(CABLE,VCR,AUX, TV).
Press 0-0-0 (zero-zero-zero),
then press ENTER right away.
Aim the remote at the correct device and push the POWER
key (The indicator tight wilt turn off white the POWERkey is
pressed). ALLow a second to pass, then push the POWERkey
again. Repeat until the device turns off.
Push ENTERto save the code (The indicator
times and then turn off),
tight wilt flash 3
Press POWERto turn the device back on.
You con quickly get out o/ Auto Find by pressing PR6.
If the indicator
light stays
ing off, all the codes
trolled.
AUTO FIND
on while you press Power instead
have been tried ond your device
Another way of finding
off turn-
can't be con-
a brand code for controtting
auxitiary equipment
avaitabte through the regutar remote brand code programming
PAGE
48
such as a VCR, DVD prayer, etc. that is not
method.
2o_,-_504
Liv_
Daewoo
Zenith
.......
149
........
Admiral
101
.......
TV/VCR
121 149
152
261
Akai ..........
292
Combination
718
TV/VCR ....
Adventura TV/VCR, 154
Goldstar
Daewoo TV/VCR.,
Symphonic
General
717
Funai
Codes
Electric
148
,,
216
220
266
701
702
725
262
263
282
Orion
TV/VCR..
154
153
Zenith
.........
250
Sears .........
719
Panasonic
......
251
259
714
715
716
708
727
256
726
Goldstar
.......
253
Pentax
Bell & HoweU ....
247
Harmon
Kardon,,,
296
Philco .........
275
Broksonic
221
Hitachi
........
257
270
273
292
Pioneer
.......
210
282
705
706
707
708
Portland
.......
246
727
268
726
ProScan
.......
216
260
......
Candle
........
250
255
729
727
Canon .........
J,C,
704
Penny ......
Jensen
Capeheart
......
........
........
292
........
..........
224
292
727
.........
212
225
299
258
726
268
Quasar
........
,,,
259
Kenwood
Daewoo
.......
244
703
Daytron
.......
246
266
246
729
725
248
727
.......
254
Nagnavox
......
268
DBX ..........
292
....
282
726
259
219
249
232
723
724
275
297
268
292
.........
.......
........
Teac ..........
268
Teknika
........
272
Toshiba
........
213
295
265
727
228
240
249
260
266
282
286
283
287
284
288
285
708
710
711
725
212
213
265
Nemorex
.......
212
298
297
730
726
727
Realistic
.......
213
274
726
727
290
297
224
225
229
730
220
268
203
293
221
721
243
722
730
731
732
250
729
.........
211
265
Allegro
........
358
Allegro
A-B Switch
361
Archer
........
325
212
274
213
325
Citizen
325
......
277
278
279
Saisho .........
722
280
296
297
730
Salora .........
297
216
730
219
249
291
Samsung
.......
,,
Victor
.........
726
Video
Concepts,,,
726
XR730
Research
1000
......
727
243
Yamaha
........
726
Zenith
........
201
Sanyo
NEC ..........
362
Ham[in
........
267
268
269
292
709
726
Kale Vision
326
Nacom
379
Magnavox
Garrard ........
325
NSC ..........
Gemini
........
305
General
Electric,
302
366
303
345
Scott
.....
........
......
General Instrument
331 338
304
307
308
309
310
318
360
363
335
321
..........
304
305 306
307
Panasonic
308
309 310
318
Philips
709
........
212
247
294
243
290
729
352
354
355
315
343
.........
........
RCA ..........
341
Regency
.......
329
Samsung
.......
326
Scientific
327
334
335
339
368
726
Te[eview
Texscan
......
........
311
332
313
320
325
327
342
347
Atlanta
.........
316
364
Tocom
.......
326
.......
339
356
371
317
318
346
Unika
325
348
362
325
358
362
354
355
350
........
.........
335
Universal
323
Vid Tech .......
340
Video
349
326
336
337
......
Way ......
Viewstar
369
370
Oak
292
365
Signal
, , 367
230
289
325
........
Everquest .......
.......
281
Pioneer
.........
220
........
727
247
Jerrold
Century ........
Ward
276
Sansui
3asco
........
......
Montgomery
Nu[tiTech
2o6-3_4
730
216
Tatung
266
242
267
730
.......
Comtronic
261
2000,,,
Sylvania
216
.......
Mitsubishi
Fisher
265
726
E[ectrochrome
Emerson
213
Signature
Sony
726
275
Narantz
NGA ..........
212
Sharp .........
Vector
RCA ..........
Curtis Mathes
211
725
Radio Shack .....
Craig
152 153 154
713
728
JVC
Citizen
700
245
.......
,,
150
172
274
Go Video
Dynamics
,,,
TV/VCR 154
720
Audio
TV/VCR
172
.......
327
SL Marx ........
326
Zenith
HT-2000,
, , 353
Sprucer
313
Zenith
PM ......
374
........
Standard
Comp,
Stargate
.......
372
, , 335
326
379
PA G E 4 9
Alphastar
.......
516
Chaparral
.......
501
Cheyenne .......
502
Macom
Dishnet
515
Magnavox
503
Phillips
Drake
........
.........
Genera[ Electric.
Hughes Network
JVC
502
..........
........
......
........
..
514
RCA ..........
510
Toshiba
........
509
518
Realistic
506
Uniden
........
522
314
Sierra I ........
502
United
........
344
521
Sierra II
.......
502
Zenith
Drake .....
521
Sierra III .......
502
Zenith
Satellite
Sony ..........
511
STSI ..........
507
.......
517
, , 510
517
PrimeStar .......
513
Genera[ Instrument
504
505
ProScan ........
510
Hitachi
519
520
RCA DSS .......
373
STS3 ..........
508
965
Pioneer
963
Toshiba ........
961
964
Sony ..........
962
Zenith .........
960
JVC
........
..........
Hitsubushi
......
........
517
,,
512
312
330
328
351
378
500
..'_,_ [,Im]I_!_
ADC ..........
940
JVC ..........
ADO ..........
939
Kenwood
Aiwa ..........
938
Luxman
Akai ..........
937
Nagnavo×
Denon
935
Narantz
........
......
........
......
........
949
954
441
931
948
930
421
422
929
947
433
434
Phillips
........
421
433
434
Soundesign
Pioneer
........
431
435
944
Sylvania
Quasar
........
432
Teac
.....
.......
.........
461
901
419
Radio Shack .....
431
441
Technics
RCA ..........
437
943
Toshiba
........
915
439
Yahama ........
414
941
942
Zenith
460
461
498
Dynatech
.......
953
NCS ..........
928
Sanyo .........
438
Emerson
.......
952
Nitsubishi
......
927
Sears
936
Nakamichi
......
925
926
923
924
946
Sherwood
920
921
922
Sony ..........
431
432
945
913
.........
........
902
433
418
.......
498
432
901
902
Fisher .........
438
933
951
GE ...........
932
Onkyo
460
Optimus
950
Panasonic
Sharp
.........
441
442
Zenith
Go[dstar
Hitachi
.......
........
........
.......
......
......
420
934
Sony ..........
452
Citizen
914
Marantz ........
903
Pioneer ........
470
916
Memorex
485
Proton
........
910
904
Quasar
........
912
........
GE ...........
Go[dstar
.......
460
474
.......
Nad ..........
443
485
444
........
919
Nakamichi
908
Onkyo
......
493
907
Soundesign
Techniques
RCA ..........
909
Sharp .........
483
Victor
JVC
..........
........
471
906
917
Luxman
Echostar
Hughes
PAGE
.......
........
.......
........
50
484
Optimus
467
Panasonic
.......
......
905
Sherwood
912
Sony ..........
......
900
486
491
805
Phflips ........
802
Sony ..........
801
803
RCA ..........
804
Zenith
800
.........
489
492
.....
......
........
.........
461
902
498
901
460
461
498
901
902
912
915
908
918
Zenith
Kenwood
415
445
Toshiba
Hitachi
CD Recorder
449
........
490
2o_,-_504
A complete
list of key functions
TV Mode
Z
VCR Mode
Cab|e Mode
AUX Mode
TV On/Off
VCR On/Off
CabLe Box On/Off
AUX W/DISC
SeLects CabLe
SeLects CabLe
SeLects CabLe
SeLects CabLe
VCR
SeLects VCR
SeLects VCR
SeLects VCR
SeLects VCR
AUX
SeLects Aux
SeLects AUX
SeLects Aux
SeLects AUX
TV
SeLects TV
SeLects TV
SeLects TV
SeLects TV
SURF
Surf On/Off
VCR AM/PM
CABLE FC Fay Ch
AUX Audio
TV FLashback
VCR FLashback
CabLe FLashback
AUX Frame/Time
TV Mute
TV Mute
TV Mute
TV Mute
KEY NAME
POWER
CABLE
ELASHBK
MUTE
CHANNEL
UP
TV Channel Up
VCR Channel Up
CabLe Channel
Up
AUX Skip >>
CHANNEL
DN
TV Channel Dn
VCR Channel Dn
CabLe Channel
Dn
AUX Skip <<
TVVo[ume
TVVo[umeUp
TVVo[umeUp
TVVo[umeUp
TV VoLume Dn
TV VoLume Dn
TV VoLume Dn
TV VoLume Dn
1
TV DigitI
VCR Digit I
CabLe DigitI
AUX DigitI
2
TV Digit2
VCR Digit2
CabLe Digit2
AUX Digit2
3
TV Digit 3
VCR Digit
3
Cabte Digit 3
AUX Digit
3
4
TV Digit 4
VCR Digit
4
Cabte Digit 4
AUX Digit
4
5
TV Digit 5
VCR Digit
5
Cabte Digit 5
AUX Digit
5
6
TV Digit 6
VCR Digit
6
CabLe Digit 6
AUX Digit
6
7
TV Digit 7
VCR Digit
7
Cable Digit 7
AUX Digit
7
8
TV Digit8
VCR Digit8
CabLe Digit8
AUX Digit8
9
TV Digit9
VCR Digit9
CabLe Digit9
AUX Digit9
0
TV Digit 0
VCR Digit
Cab[e Digit 0
AUX Digit
ENTER
TV Enter
VCR Enter
Cab[e Enter
Aux Display
MENU
TV Menu
VCR Menu
CabLe Menu
AUX Program
TV SeLect Up
TV Setect Dn
VCR SeLect Up
VCR Setect Dn
Cabte Up Arrow
Cabte Dn Arrow
AUX Part
AUX Random
TV Adjust
VCR Adjust
VOLUME
VOLUME
(RIGHT)
(LEFT)
UP ARROW
DOWN ARROW
LEFT ARROW
RIGHT
AUX x3 FAST <
CabLe Right Arrow
AUX x3 FAST >
TV Sum Sound
VCR Quit
CabLe Quit
AUX CLear
TV PIP
VCR+
Day Up
AUX Repeat-Side
TV PIP Swap
VCR Channel Map
Day Down
AUX Repeat-A-B
TV PIP Freeze
VCR Search
CabLe Pg Up
AUX Repeat-Chap
TV C[osed Captions
VCR Memory
CabLe Pg Down
AUX Memory
TV Timer
VCR Timer
Cabte Timer
AUX StiLL
TV Sources
TV Tuner or VCR Tuner
CabLe Info
AUX W/Disc
RECORD
PAUSE
VCR Record
VCR Pause
VCR Record
VCR Pause
CabLe Buy
CabLe Guide
AUX Edit
AUX Pause
REWIND
VCR Rewind
VCR Rewind
VCR Rewind
AUX Scan <<
VCR PLay
VCR PLay
VCR PLay
AUX PLay
VCR Stop
VCR Fast Forward
VCR Stop
VCR Fast Forward
VCR Stop
VCR Fast Forward
AUX Stop/Eject
AUX Scan >>
FREEZ
CC
TIMER
TV/VCR/SOURCE
PLAY
STOP
FFWD
Some of the ]:unctions
shown
above
Left
O
CabLe Left Arrow
SWAP
Left
0
VCR Adjust Right
PIP
[_
Up
TV Adjust Right
ARROW
QUIT
206-_4
for your remote control
may not be available
on your
equipment.
PA G E 5 i
Routine TV cabinet
and screen cleaning
Careful and regular cleaning can extend the the useful service life of the TV. Be sure to turn the power off and pull out
the plug before you begin any cleaning.
1. Here's a great way to keep the dust off the screen for a while. Wet a soft cloth in a mixture
and a little
of lukewarm water
fabric softener or dish washing detergent. Wring the cloth until it's almost dry, and then use it to
wipe the screen.
2. Make sure the excess water is off the screen, and then let it air-dry before turning
1. Use a soft cloth with a mild soap solution to wipe the cabinet.
the TV on.
(Don't use any harsh, industrial
strength variety
of cleaner.)
2. Rinse the cloth and wipe the cabinet again.
3. Let the cabinet air-dry before turning
the TV on.
Use a quality wood cleaner and polish. This will protect the TV from dirt and dust, as welt as keep the cabinet
looking new.
If you leave your TV dormant (Off) for a long time (such as a vacation), it's a good idea to unplug the power cord
to protect against possible damage from lightning or power surges. If you use an off-air antenna, you may also
want to disconnect it from the back of your TV before leaving.
If you unplug the T[/, you may have to reset the clock using the Clock Set menu described earlier. See
page 24.
PAGE
52
2o_,-_5o4
Some quick and easy tips to resolving problems
Symptoms
Possible Cause(s)
Possible Solution(s)
Power
No Power.
• AC Power Cord not connected.
• Local power failure?
-Connect power cord. Try a different household
-Contact power company for information.
• Source turned
-Turn Source equipment
No Source image.
off.
• Source not selected.
Picture Reception
Poor or no picture.
• TV station
problems.
-Try a different
• Check for disturbing
17
on.
property.
source.
The following
too close to TV.
-If possible
Machine
Poor or no color.
Picture wobbles
or drifts.
17
channel.
-Check Video menu option
may cause
16/17
29
settings.
image problems
Electrical appliances,
powerfful lights,
portable phones; medical equipment;
• Appliance
7- 14
outlet.
-Use SOURCE to choose desired picture and sound source.
• Video menu not adjusted
Local interference.
See page(s)
increase
• Sub-standard
broadcast.
-Try a different
• Sub-standard
cable signal.
-Notify
• CAW wire not connected
or loose.
the distance
and the offending
or distortion:
cars, trucks; computers
or
VCR to close to TV, etc.
between
appliance.
your
Or shut
Entertainment
one of them
off.
channel.
16/17
cable company of reception
-Nake or tighten
problem.
connection.
8/10
• Local interference.
-Try different
• Scrambled CATV channel.
-Tune to unscrambled
• Cable wire not connected.
-Connect
cane to Antenna/Cable.
• Cable service interrupted.
-Contact
cable service.
• Antenna set, not Cable (CATV).
-SeLect CabLe in EZ Program menu.
18
Images in picture distorted.
• Wrong aspect ratio.
-Use RATIO to change picture proportion.
30
Poor or no sound.
• Audio muted.
-Press NUTE or VOL (VoLume) + key to increase sound level.
17
• Broadcast problem.
-Tune to a different
TV turns On.
• On-Timer turned TV On.
-Cancel On-Timer and/or
TV turns Off.
• SLeep Timer turned
-Turn TV back on.
No CATV reception.
• Off-Timer turned
No Closed Captions or Text.
• Not available
TV Off.
TV off.
on show.
channel. Turn off interfering
Captions appear when
sound is muted.
-Check local TV listings
Lock (Parental Control)
Protected by Lock
Problems
• Viewing is restricted
appears on screen.
• Don't know password.
channel
-Pick a Closed Caption
• EZ Mute selected.
16/17
8/10
channel.
turn TV off.
36
35
-Cancel Off-Timer and/or
-Try a different
on.
16/17
channeL.
turn TV off.
36
to see if available
_&e&_¢e_ri_o_tle#tibnani_uo_k
• Not turned
appliance.
menu
on broadcast.
to Off.
with Closed Captions
or Text option
or Text.
and turn Captions
16/17
on.
-Set Captions option to off.
by Lock.
25
25
-Key-in password and turn Lock On/Off (Restrictions)
Set indiv
-Set Lock On/Off option to Off in Lock menu.
-Tune to channel without Lock "Content" restrictions.
off.
32/33/34
Continued on next page.
2os-_4
PA G E 5 3
Some quick and easy tips to resolving problems
Symptoms
Using Remote Contro[
Remote does not work.
Remote does not operate
Possibte Cause(s)
Possible Solution(s)
• Wrong mode selected.
• Not aimed at remote sensor.
• Remote too far from TV or
-Press correct mode key to change mode (TV for TV operation.)
-Point remote at Front Control PaneL.
-Move remote closer to TV or darken room.
too much Light in room.
• IR path to TV interrupted.
• Weak batteries.
-Remove obstructions.
• Wrong battery
-Check that
polarity.
Page(s)
-RepLace batteries.
7
"+" and "-" match in battery
• Product Mode not programmed.
• Product not IR controLLed.
-Program for other
accessory product.
Menu Operation
Menu options can't be
* Software Lock-up.
-UnpLug power cord for 5 minutes
changed or selected.
• "Off" selected on menu.
• CLock not set.
or sets
equipment:
compartment.
7
VCR, AUX, etc.
-Remote only controls IR equipment.
to unlock software.
7
(Reset clock if necessary.)
Timers do not work.
CLock is set,
17
16
itself,
CLock time is wrong.
to Wrong
-Choose "On" to make timer(s)
-Set clock.
work.
36
24
Time
• Wrong Time Zone.
-Reset to your time zone.
24
• DayLight Savings Time wrong.
-If not observed in your area, set to Off.
24
_ulim_ d_m_n_b_i_msm
d u_onal_t_L_q
uil_i_ei_tcl_elo m_hBa lLy.
24
• Auto Clock doesn't work.
-Turn Auto CLock option "Off" in menu, set clock manuaLLy.
24
Image Looks wrong.
• Wrong Video Menu Aspect Ratio.
-Use correct aspect ratio for source's image.
30
Snowy or Poor Picture
• Wrong Ant. connection/Location.
-Move antenna, check connection/Location.
-Check cable input.
-Set TV/VCR button on your VCR correctly.
9/10/11
-Are you Ln TV or cable tuning mode, and should be in the other?
-Make sure
Picture
Viewing
Problems
• TV/VCR button set wrong.
• Wrong tuning mode.
• Wrong output
channels selected.
• Loose connection.
same channel (3 or 4).
-Check that at[ connections
9/10/11
are tight.
Picture has a big black box
on it, but the sound is O.K.
• Caption/Text mode turned on.
-The CC (closed caption) option may be in Text 1, 2, 3, or 4 mode.
-Select Caption 1, or OFF in the Caption/Text menu.
25
No picture.
• AC power not plugged Ln?
• AC power outlet doesn't work.
-PLug AC power cord in.
7
-Check that your AC power outlet works. (Test it by ptugging in
something else or try another outlet.)
-Make sure brightness controls are set properly.
29
-Try another channeL.
16/17
• Menu options set wrong.
• Broadcast problem.
PAGE
54
2o_,-_5o+
Symptoms
Possib|e
Sound/Audio
Probtems
Nomlat picture but no
sound.
HD/DVD
•
•
•
•
•
•
Cause(s)
Possibte
Check volume [evets.
Try another channet.
A/V canes incorrectty connected.
Audio Out cables instat[ed wrong.
Speakers turned off.
No SAP signal
Sotution(s)
Page(s)
-Make sure the TV sound
-The problem may be the
-Instatt the Audio canes
-Instatt external amplifier
-Turn speakers on in the
-If the Audio Node is set
have an SAP program.
is not muted.
broadcast, not your TV.
correctly.
canes correctty.
Audio menu.
to SAP, the channel may not
17
16/17
Probtems
Picture looks wrong.
• Wrong Video menu Aspect Ratio.
-Use correct aspect ratio for source's image.
30
No picture or sound.
• Wrong source selected on TV.
-Setect correct source equipment.
17
• Source equipment
-Turn source equipment
No HD-RGB sound.
turned
off.
on.
• Tape or Disk not praying.
-Press "PLAY" on source equipment.
• Wires incorrectty
-Instatt
• Audio canes
connected.
not connected
-Connect
wires correctty
on TV and equipment.
RGB audio to HD-In R-L Audio.
7 - 14
14
to HD-In R-L Audio.
2o6-_4
PA G E 5 5
A list of dejSnitions
75 OHM RF CABLE
for some
of the
The wire that comes
wire sticking
from an off-air
through
300 TO 75 OHM
ADAPTER
A smaLL device
A/V
Audio/Video
CABLES
words found
DEVICE
antenna
or cable service
the middle. It screws onto the threaded
that
connects
a two-wire
300
ohm
provider. The end looks Like a hex-shaped
cables.
Three cables
bunched
playback
antenna
together--right
to a 75 ohm RFjack.
audio
of videocassettes
nut with a
jack on the back of the TV.
They are usuaLLy about an inch Long with two screws on one end and a round opening
the other end.
A/V cables are used for stereo
A/V devices.
A/V
in this guide
(red),
Left audio
and for higher
quality
with a wire sticking out on
(white),
picture
and video (yeLLow).
and sound
from other
Any devicethat producesvideo or sound (VCR,DVD, cablebox, or television).
ADDED
Letsyou add new channelsto channelscan [ist
thatyou'LLscroLL
through.
AMPLIFIER
An electronic
devicethatamplifiessound from a television,
CD player,VCR, DVD or otherA/V equipment.
ANTENNA
The physical receiver
of television
signals sent over the air. A [arge metal
piece of equipment
does not always have
to be visible for your home to be using an antenna.
DELETED
Lets you remove
EZ PROGRAM
Auto Program
(channel
search)
automaticaLLy
INPUT
Refers to the jack that
receives
a signal from a TV, VCR or other
JACK
An input
MONO SOUND
Mono (monauraL) sound
OUTPUT
Refers to the jack that
2ND AUDIO
Second Audio Programming
PROGRAMMING/SAP
Choosing
SIGNAL
Picture
and sound
Stereo
(Stereophonic)
STEREO
SOUND
TUNER
PAGE
or output
from the channel
connection
on the
is one channel
scan List that you'LL scroLL through.
finds the channels
avaiLabLe in your area.
A/V device.
back of a TV, VCR, or other
A/V device.
of sound. With more than one speaker,
aLLthe speakers
play the same audio.
sends a signal out of a VCR, DVD, or other A/V device.
(SAP) is another,
separate,
audio channel
SAP often refers to Listening to audio in another
Device that
56
channels
traveling
through
avaiLabLe with some programming.
Language, such as Spanish
a cable, or over the air, to your television
sound refers to audio that's
picks up the signal and turns it into
or French.
screen.
divided into right and teft sides.
picture and sound.
2o_,-_5_4
2o_,-_4
PA G E
5 7
_o_-3594
PAGE 5 9
zenith
Zenith wilt repair or replace your product, at Zenith's option, if it proves to be defective in material or workmanship
under normal use, during the warranty period listed below from the date of original consumer purchase. This warranty is available only to the original, end user purchaser of the product and effective only when used in the
United States, excluding U.S. Territories. Zenith is not responsible for deinsta[[ation or reinsta[[ation of unit.
WARRANTY PERIOD:
HOW SERVICE IS HANDLED:
Labor:
gO Days from date of purchase.
Parts:
One Year from the date of purchase.
Picture tube two years.
In-Home service: lth_a_crei_y_ur
proof of warranty.
bitt of sate for
Please call 1-877-gZenith
(1-877-993-6484)
to locate your nearest Zenith Authorized Service
Center. Repair parts or a replacement may be new or
remanufactured. Please see below for further information.
THIS WARRANTY IS IN LIEU OF ANY OTHER WARRANTY, EXPRESSEDOR IMPLIED, INCLUDING WITHOUT LIMITATION, ANY WARRANTY OF MERCHANTABILITY OR FITNESS FOR A PARTICULAR PURPOSE. TO THE EXTENT ANY
IMPLIED WARRANTY IS REQUIRED BY LAW, IT IS LIMITED IN DURATION TO THE EXPRESSEDWARRANTY PERIOD
ABOVE. ZENITH WILL NOT BE LIABLE FOR ANY INCIDENTAL, CONSEQUENTIAL, INDIRECT, SPECIAL OR PUNITIVE
DAMAGES OF ANY NATURE, EVEN IF ADVISED OF THE POSSIBILITY OF SUCH DAMAGES, INCLUDING WITHOUT
LIMITATION LOST PROFITS, LOST OR CORRUPTED PROGRAMMING OR DATA, OR ANY OTHER DAMAGE WHETHER
BASED IN CONTRACT,TORT OR OTHERWISE. Some states do not allow the exclusion or limitation of incidental or
consequential damages or limitations on how tong an implied warranty lasts, so the above exclusion or limitation
may not apply to you. This warranty gives you specific legal rights and you may also have other rights that vary
from state to state.
THIS LIMITED WARRANTY DOES NOT APPLY:
• To damages or operating problems that result from shipping, installation, adjustment of user controls, calibration,
maintenance or failure to maintain, or separate system components.
• To damages or operating problems that result from normal wear and tear, misuse, abuse, operation outside environmental specifications or contrary to the requirements and precautions in the Operating Guide, accident, tightening strikes or other natural causes, modification or alteration, incorrect electrical current or voltage, signal reception or input, computer software, or institutional
or commercial use.
Therefore, you pay for the cost of repair or replacement
under these circumstances.
CUSTOMER ASSISTANCE NUMBERS:
To prove warr
Retain your dated sates receipt to prove date of purchase. Legible copy of your sates receipt must be submitted
the time warranty service is provided.
at
To obtain where-to-buy,
nearest Authorized Service Center, product assistance or customer assistance:
Cart 1-877-gZenith (1-877-993-6484)
(Mon.- Fri. 7:00 AM to 8:00 PM and Sat. 8:00 AM to 5:00 PM CST)
Please select the appropriate option from the menu.
WARR-DV
_/0_
© Copyright 2002 Zenith Electronics Corporation
206-3808
Issue*