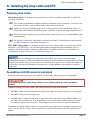
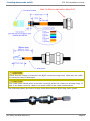
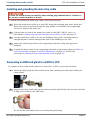
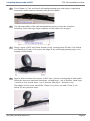
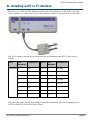
1
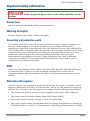
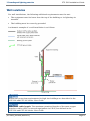
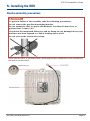
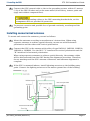
Cambium
PTP 500
Installation Guide
Accuracy
While reasonable efforts have been made to assure the accuracy of this document,
Cambium Networks assumes no liability resulting from any inaccuracies or omissions in
this document, or from use of the information obtained herein. Cambium reserves the
right to make changes to any products described herein to improve reliability, function,
or design, and reserves the right to revise this document and to make changes from
time to time in content hereof with no obligation to notify any person of revisions or
changes. Cambium does not assume any liability arising out of the application or use of
any product, software, or circuit described herein; neither does it convey license under
its patent rights or the rights of others. It is possible that this publication may contain
references to, or information about Cambium products (machines and programs),
programming, or services that are not announced in your country. Such references or
information must not be construed to mean that Cambium intends to announce such
Cambium products, programming, or services in your country.
Copyrights
This document, Cambium products, and 3rd Party software products described in this
document may include or describe copyrighted Cambium and other 3rd Party supplied
computer programs stored in semiconductor memories or other media. Laws in the
United States and other countries preserve for Cambium, its licensors, and other 3rd
Party supplied software certain exclusive rights for copyrighted material, including the
exclusive right to copy, reproduce in any form, distribute and make derivative works of
the copyrighted material. Accordingly, any copyrighted material of Cambium, its
licensors, or the 3rd Party software supplied material contained in the Cambium
products described in this document may not be copied, reproduced, reverse
engineered, distributed, merged or modified in any manner without the express written
permission of Cambium. Furthermore, the purchase of Cambium products shall not be
deemed to grant either directly or by implication, estoppel, or otherwise, any license
under the copyrights, patents or patent applications of Cambium or other 3rd Party
supplied software, except for the normal non-exclusive, royalty free license to use that
arises by operation of law in the sale of a product.
Restrictions
Software and documentation are copyrighted materials. Making unauthorized copies is
prohibited by law. No part of the software or documentation may be reproduced,
transmitted, transcribed, stored in a retrieval system, or translated into any language
or computer language, in any form or by any means, without prior written permission of
Cambium.
License Agreements
The software described in this document is the property of Cambium and its licensors.
It is furnished by express license agreement only and may be used only in accordance
with the terms of such an agreement.
High Risk Materials
Components, units, or 3rd Party products used in the product described herein are NOT
fault-tolerant and are NOT designed, manufactured, or intended for use as on-line
control equipment in the following hazardous environments requiring fail-safe controls:
the operation of Nuclear Facilities, Aircraft Navigation or Aircraft Communication
Systems, Air Traffic Control, Life Support, or Weapons Systems (High Risk Activities).
Cambium and its supplier(s) specifically disclaim any expressed or implied warranty of
fitness for such High Risk Activities.
© 2012 - 2013 Cambium Networks Limited. All Rights Reserved.
phn-2508_005v000 (Mar 2013)
PTP 500 Installation Guide
Contents
About this guide ............................................................................................................... 1
Important safety information ........................................................................................... 2
1. Inventory ...................................................................................................................... 4
PTP 500 kit ....................................................................................................................................... 4
Other standard components ............................................................................................................ 5
Connectorized ODU additional components ................................................................................... 7
E1 or T1 additional components...................................................................................................... 7
2. Interface description .................................................................................................... 8
ODU interfaces ................................................................................................................................ 8
Connectorized ODU antenna interfaces .......................................................................................... 8
PIDU interfaces ................................................................................................................................ 9
3. Grounding and lightning protection ............................................................................ 10
Lightning protection zones ............................................................................................................ 10
General protection requirements .................................................................................................. 11
Mast or tower installation ............................................................................................................. 12
Wall installation ............................................................................................................................. 13
4. Preparing for installation ............................................................................................ 14
Safety precautions before installation .......................................................................................... 14
Preparing personnel ...................................................................................................................... 14
Preparing inventory ....................................................................................................................... 14
Preparing tools............................................................................................................................... 14
5. Installing the ODU ...................................................................................................... 15
Checks and safety precautions ...................................................................................................... 15
Selecting a position for the ODU (connectorized) ........................................................................ 16
Mounting the ODU ......................................................................................................................... 16
Installing connectorized antennas ................................................................................................ 17
6. Installing the drop cable and LPU ............................................................................... 19
Preparing drop cables ................................................................................................................... 19
Assembling an RJ45 connector and gland..................................................................................... 19
Installing and grounding the main drop cable .............................................................................. 21
Connecting an RJ45 and gland to an ODU or LPU ....................................................................... 21
Making a drop cable ground point ................................................................................................ 23
Installing and grounding at building entry ................................................................................... 25
7. Installing the PIDU ..................................................................................................... 26
Mounting the PIDU ........................................................................................................................ 26
Connecting the PIDU to the ODU cable ........................................................................................ 26
Preparing the PIDU to LAN cable ................................................................................................. 27
8. Installing an E1 or T1 interface .................................................................................. 28
License keys and regulatory information ........................................................................ 29
phn-2508_005v000 (Mar 2013)
Page i
PTP 500 Installation Guide
About this guide
This guide describes the tasks that must be performed to install the site equipment for
PTP 500 Series links. The users of this guide will require expertise in outdoor radio
equipment installation.
Related documents
PTP 500 and PTP 300 Series User Guide
PTP-SYNC Installation Guide
Version information
The following shows the issue status of this document.
Document issue
Date of issue
Remarks
004v000
Feb 2013
Second issue
005v000
Mar 2013
Second issue (revised)
Contacting Cambium Networks
Support website:
http://www.cambiumnetworks.com/support
Main website:
http://www.cambiumnetworks.com
Sales enquiries:
[email protected]
Support enquiries:
[email protected]
Telephone number list:
http://www.cambiumnetworks.com/contact.php
Address:
Cambium Networks Limited,
Linhay Business Park,
Eastern Road,
Ashburton,
Devon, UK,
TQ13 7UP
phn-2508_005v000 (Mar 2013)
Page 1
PTP 500 Installation Guide
Important safety information
To prevent loss of life or physical injury, observe the safety guidelines in this
section.
Power lines
Exercise extreme care when working near power lines.
Working at heights
Exercise extreme care when working at heights.
Grounding and protective earth
The Outdoor Unit (ODU) must be properly grounded to protect against lightning. It is
the user’s responsibility to install the equipment in accordance with national
regulations. In the USA, follow Section 810 of the National Electric Code, ANSI/NFPA
No.70-1984 (USA). In Canada, follow Section 54 of the Canadian Electrical Code. These
codes describe correct installation procedures for grounding the outdoor unit, mast,
lead-in wire and discharge unit, size of grounding conductors and connection
requirements for grounding electrodes. Other regulations may apply in different
countries and therefore it is recommended that installation of the outdoor unit be
contracted to a professional installer.
PIDU
Always use the Cambium Power Indoor Unit Plus (PIDU Plus PTP 300/500/600 Series)
to power the ODU. Failure to use the Cambium supplied PIDU could result in
equipment damage and will invalidate the safety certification and may cause a safety
hazard.
Alternative DC supplies
If an AC supply is not required or an additional back up DC supply is required, the DC
supply is connected to the PIDU DC IN terminals. This is the only method of supplying
external DC to the ODU. The DC supply must comply with the following requirements:
•
The voltage and polarity is correct and is applied to the correct PIDU terminals.
•
The power source is rated as Safety Extra Low Voltage (SELV).
•
The power source is rated to supply at least 1A continuously.
•
The power source cannot provide more than the Energy Hazard Limit as defined by
IEC/EN/UL60950-1, Clause 2.5, Limited Power (The Energy Hazard Limit is 240VA).
phn-2508_005v000 (Mar 2013)
Page 2
Important safety information
PTP 500 Installation Guide
Powering down before servicing
Always power down and unplug the equipment before servicing.
Lightning protection unit (LPU)
Do not remove the LPU printed circuit board when the LPU is connected to the power
supply, as high voltages are present.
Drop cable tester
The drop cable tester must NEVER be used at the ODU end connected to power from
the PIDU. It must only be used at the bottom of the mast with a multimeter. This is
because the PIDU voltage exceeds the limit allowed in some countries for safe handling
in wet conditions and therefore may create a safety hazard.
Primary disconnect device
The main power supply is the primary disconnect device.
External cables
Safety may be compromised if outdoor rated cables are not used for connections that
will be exposed to the outdoor environment.
Grounding PTP-SYNC
In order to meet the safety requirements for deployment in Australia and New Zealand
(AS/NZS 60950-1), the PTP-SYNC unit, if deployed, must be grounded to a Protective
Ground in accordance with Local Electrical Regulations.
RF exposure near the antenna
Strong radio frequency (RF) fields will be present close to the antenna when the
transmitter is on. Always turn off the power to the ODU before undertaking
maintenance activities in front of the antenna.
Minimum separation distances
Install the ODUs so as to provide and maintain the minimum separation distances from
all persons. For minimum separation distances, see the PTP 500 and PTP 300 Series
User Guide.
Waste of your Electronic & Electric Equipment (WEEE)
For instructions, refer to http://www.cambiumnetworks.com/doc.php
phn-2508_005v000 (Mar 2013)
Page 3
PTP 500 Installation Guide
1. Inventory
PTP 500 kit
For kit variant part numbers, see the PTP 500 and PTP 300 Series User Guide.
Item
Notes
Outdoor unit (ODU)
ODUs may be Integrated (as illustrated)
or Connectorized.
End Complete kit contains one ODU with
grounding cable.
Link Complete kit contains two ODUs
with grounding cables.
Powered indoor unit (PIDU)
End Complete kit contains one PIDU unit.
Link Complete kit contains two PIDU
units.
Mounting bracket assembly
End Complete kit contains one bracket.
Link Complete kit contains two brackets.
Choice of mains leads (US, UK and EU)
End Complete kit contains one US, one
UK and one EU lead.
Link Complete kit contains two US, two
UK and two EU leads.
Cable gland
End Complete kit contains one gland.
Link Complete kit contains two glands.
phn-2508_005v000 (Mar 2013)
Page 4
1. Inventory
PTP 500 Installation Guide
Other standard components
In addition to PTP 500 kits, standard installations require the following components:
Item
Notes
Outdoor drop cable
Superior Essex BBDGe cable is supplied
by Cambium with the following lengths
and part numbers (other lengths are
available from Superior Essex):
Always use Cat5e cable that is gelfilled and shielded with copper-plated
steel. Alternative types of drop cable
are not supported by Cambium.
RJ45 connectors
The specified connectors and crimp
tool are specific to Superior Essex
BBDGe cable (they may not work with
other types of cable).
Cable glands
“1000 ft Reel Outdoor Copper Clad
CAT5E”. Cambium part number WB3175.
“328 ft (100 m) Reel Outdoor Copper
Clad CAT5E”. Cambium part number
WB3176.
“Tyco/AMP, Mod Plug RJ45, 100 pk”.
Cambium part number WB3177.
“Tyco/AMP Crimp Tool”. Cambium part
number WB3211.
For protecting the drop cable entry
points. Glands are included in the ODU
and LPU kits, but additional glands may
be purchased from Cambium if required.
“PTP SER EMC CABLE GLAND
(GROUNDING) Quantity 10”. Cambium,
part number WB1811.
Cable hoisting grip
For hoisting the drop cable up to the
ODU without damaging the gland or RJ45
plug.
Not supplied by Cambium.
Cable grounding kits
One kit is required per drop cable
grounding point.
“Cable Grounding Kits For 1/4" And 3/8"
Cable”. Cambium part number
01010419001.
Kit contents: grounding cable, selfamalgamating tape, PVC tape, tie-wraps,
bolts, washers and nuts.
phn-2508_005v000 (Mar 2013)
Page 5
1. Inventory
PTP 500 Installation Guide
Item
Notes
Lightning Protection Unit (LPU) kits
Two kits are required per standard link.
“LPU End Kit PTP 250/300/500”.
Cambium part number WB2978.
Kit contents: one LPU, one grounding
cable, nuts, bolts and two cable glands.
Indoor Cat5e cable
The connected network equipment
must feature screened RJ45 connectors
and must be connected to ground,
otherwise the PIDU will not be
grounded.
Drop cable tester
phn-2508_005v000 (Mar 2013)
To connect the PIDU to network
equipment, use screened cable that
meets this specification:
•
Screening: Must be either foil screen
(FTP) or braided screen (STP) cable.
•
Connectors: Must use screened RJ45
connectors with metal shells at both
ends.
•
Electrical connection: There must
be a continuous electrical connection
between both screened connectors.
An optional item for testing the
resistances between the RJ45 pins of the
drop cable. Order from the support
website (see Contacting Cambium
Networks on page 1).
Page 6
1. Inventory
PTP 500 Installation Guide
Connectorized ODU additional components
Item
Notes
Antenna
One required per link end (or two per link end for
spatial diversity). Not supplied by Cambium.
Approved antennas are listed in the PTP 500 and
PTP 300 Series User Guide.
RF cable
For connecting the ODU to the antenna. May be
cable of type LMR100, LMR200, LMR300, LMR400
or LMR600. LMR400 is supplied by Cambium:
“50 Ohm Braided Coaxial Cable - 75 meter”.
Cambium part number 30010194001.
“50 Ohm Braided Coaxial Cable - 500 meter”.
Cambium part number 30010195001.
N type male connectors
For connecting the RF cables to the ODU. Two
connectors are required per ODU. Use weatherproof
connectors, preferably ones that are supplied with
adhesive lined heat shrink sleeves that are fitted
over the cable/connector interface.
“RF CONNECTOR,N,MALE,STRAIGHT FOR CNT400 CABLE”. Cambium part number 09010091001.
Self-amalgamating and PVC tape
To weatherproof the RF connectors.
Cable grounding kits
One kit is required per antenna cable grounding
point.
“Cable Grounding Kits For 1/4" And 3/8" Cable”.
Cambium part number 01010419001.
Lightning arrestor
For protecting the antenna cable at building entry,
when the ODU is mounted indoors. One required per
antenna cable. For example: Polyphaser LSXL-ME or
LSXL.
E1 or T1 additional components
Item
Notes
PTP 300/500 Series E1/T1 Splitter
“PTP 300/500 Series E1/T1 Splitter (per end)”.
Cambium part number WB3476.
E1 or T1 network cable
Purchase separately.
phn-2508_005v000 (Mar 2013)
Page 7
PTP 500 Installation Guide
2. Interface description
ODU interfaces
The ODU has the following interfaces:
Interface
Function
Ground studs
For grounding the ODU to the supporting structure. The ground cable
(supplied with the ODU) may be connected to either ground stud.
BNC
connector
For using a digital voltmeter (DVM) to help with the antenna
alignment process.
PIDU+
For connecting to power supply and network via the PIDU.
Connectorized ODU antenna interfaces
The connectorized ODU also has interfaces to connect to an external antenna via an
N type connector with cable of type LMR100, LMR200, LMR300, LMR400 or LMR600.
The “V” interface is for vertical polarization and the “H” interface is for horizontal
polarization.
phn-2508_005v000 (Mar 2013)
Page 8
2. Interface description
PTP 500 Installation Guide
PIDU interfaces
The PIDU has the following interfaces:
Interface
Function
100-240 V ac
47-63Hz 1.8A
Mains power input.
DC In
Alternative DC power supply input.
DC Out
DC power output to a second PIDU, to provide power supply
redundancy. For more information, refer to the PTP 500 and
PTP 300 Series User Guide.
ODU
RJ45 socket for connecting CAT5e cable to ODU.
LAN
RJ45 socket for connecting CAT5e cable to network.
Recovery
Used to recover the unit from configuration errors or software
image corruption.
The PIDU indicator LEDs have the following states:
Indicator
State
Description
Power
(green)
Off
No power.
On
PIDU is receiving power.
Blink
There is a short circuit in the ODU-PIDU cable.
Off
No Ethernet traffic.
Blink ten times
Correct start up sequence has occurred.
Blink randomly
Normal Ethernet traffic.
Blink irregularly
The ODU has booted in recovery mode.
Ethernet
(yellow)
phn-2508_005v000 (Mar 2013)
Page 9
PTP 500 Installation Guide
3. Grounding and lightning protection
Electro-magnetic discharge (lightning) damage is not covered under warranty.
The recommendations in this document and in the PTP 500 and PTP 300
Series User Guide , when followed correctly, give the user the best protection
from the harmful effects of EMD. However 100% protection is neither implied
nor possible.
Lightning protection zones
The rolling sphere method is used to determine where it is safe to mount equipment.
An imaginary sphere, typically 50 meters in radius, is rolled over the structure. Where
the sphere rests against the ground and a strike termination device (such as a finial or
ground bar), all the space under the sphere is considered to be in the zone of protection
(Zone B). Similarly, where the sphere rests on two finials, the space under the sphere is
considered to be in the zone of protection.
Assess locations on masts, towers and buildings to determine if the location is in Zone A
or Zone B:
•
Zone A: In this zone a direct lightning strike is possible. Do not mount equipment in
this zone.
•
Zone B: In this zone, direct EMD (lightning) effects are still possible, but mounting
in this zone significantly reduces the possibility of a direct strike. Mount equipment
in this zone.
Never mount equipment in Zone A. Mounting in Zone A may put equipment,
structures and life at risk.
phn-2508_005v000 (Mar 2013)
Page 10
3. Grounding and lightning protection
PTP 500 Installation Guide
General protection requirements
Apply the practices and procedures detailed in the relevant national standards to all
new site build activities. The following requirements are described in greater detail in
the PTP 500 and PTP 300 Series User Guide.
Basic requirements
The following basic protection requirements must be met:
•
The equipment (ODU) must be in Zone B.
•
The ODU must be grounded to the supporting structure.
•
A lightning protection unit (LPU) must be installed within 600 mm (24 in) of the
point at which the drop cable enters the building or equipment room.
•
The drop cable must be bonded to the supporting structure in order to prevent
lightning creating a potential between the structure and cable, which could cause
arcing, resulting in fire risk and damage to equipment.
•
The drop cable shield must be grounded at the building entry point.
•
The drop cable must not be laid alongside a lightning air terminal.
•
All grounding cables must be minimum size of 10 mm2 csa (8AWG), preferably
16 mm2 csa (6AWG), or 25 mm2 csa (4AWG).
Grounding cable requirements
When routing, fastening and connecting grounding cables, the following requirements
must be met:
•
Grounding conductors must be run as short, straight and smooth as possible, with
bends and curves kept to a minimum.
•
Grounding cables must not be installed with drip loops.
•
All bends must have a minimum radius of 203 mm (8 in) and a minimum angle of
90°. A diagonal run is preferable to a bend, even though it does not follow the
contour or run parallel to the supporting structure.
•
All bends, curves and connections must be routed towards the grounding electrode
system, ground rod, or ground bar.
•
Grounding conductors must be securely fastened.
•
Braided grounding conductors must not be used.
•
Approved bonding techniques must be used for the connection of dissimilar metals.
phn-2508_005v000 (Mar 2013)
Page 11
3. Grounding and lightning protection
PTP 500 Installation Guide
Mast or tower installation
For mast or tower installations, the following additional requirements must be met:
•
The equipment must be lower than the top of the tower or its lightning air terminal.
•
The metal tower or mast must be correctly grounded.
•
A grounding kit must be installed at the first point of contact between the drop cable
and the tower, near the top.
•
A grounding kit must be installed at the bottom of the tower, near the vertical to
horizontal transition point, bonded to the tower or its ground bar (TGB).
•
If the tower is greater than 61 m (200 ft) in height, an additional grounding kit must
be installed at the tower midpoint and as necessary to reduce the distance between
ground kits to 61 m (200 ft) or less.
•
In high lightning prone geographical areas, additional ground kits should be
installed at spacing between 15 to 22 m (50 to 75 ft). This is especially important on
towers taller than 45 m (150 ft).
A schematic example of a mast or tower installation is as follows:
phn-2508_005v000 (Mar 2013)
Page 12
3. Grounding and lightning protection
PTP 500 Installation Guide
Wall installation
For wall installations, the following additional requirements must be met:
•
The equipment must be lower than the top of the building or its lightning air
terminal.
•
The building must be correctly grounded.
A schematic example of a wall installation is as follows:
Additional protection requirements for high rise buildings are described in the
PTP 500 and PTP 300 Series User Guide.
Maximum cable length: The maximum permitted lengths of the main copper
interface cables (ODU to network equipment via PIDU) are defined in the
PTP 500 and PTP 300 Series User Guide.
phn-2508_005v000 (Mar 2013)
Page 13
PTP 500 Installation Guide
4. Preparing for installation
Safety precautions before installation
All national and local safety standards must be followed while developing a site,
installing equipment, or performing maintenance.
Ensure that personnel are not exposed to unsafe levels of RF energy. The units
start to radiate as soon as they are powered up. Respect the safety standards
defined in the PTP 500 and PTP 300 Series User Guide .
Never work in front of the antenna when the ODU is powered.
Before connecting or disconnecting the drop cable from the PIDU or ODU,
always power down the PIDU.
The installation must meet the requirements in 3 Grounding and lightning protection.
Preparing personnel
In no event shall Cambium Networks be liable for any injury to any persons or any
damage caused during the installation of the Cambium PTP 500. Ensure that only
qualified personnel undertake the installation of a PTP 500 Series link. Ensure that all
safety precautions can be observed.
Preparing inventory
Perform the following inventory checks:
•
Check that an installation report is available, based on the principles described in
the PTP 500 and PTP 300 Series User Guide.
•
Check that the correct components are available, as described in 1 Inventory.
Preparing tools
Check that following specific tools are available, in addition to general tools:
•
13 mm wrench and 22 mm wrench for use with the glands.
•
RJ45 crimp tool (it must be the correct tool for the type of RJ45 being used).
•
Personal Computer (PC) with 100 BaseT Ethernet.
•
Web browser (for example Internet Explorer 7, Internet Explorer 8, Firefox 3 or
Firefox 3.5).
•
Ethernet patch cables.
phn-2508_005v000 (Mar 2013)
Page 14
PTP 500 Installation Guide
5. Installing the ODU
Checks and safety precautions
To prevent failure of the assembly, take the following precautions:
Do not remove the pre-fitted mounting bracket.
Do not mount the ODU on poles with diameter less than 50 mm (2 in) or
greater than 75 mm (3 in).
Check that the integrated lifting eye and its fixing are not damaged in any way
and have not been exposed to a shock loading due to a fall.
Do not reverse the rear bracket strap:
.
Check that the ODU is pre-fitted with a mounting bracket (designed to ease installation)
and with a ground cable:
phn-2508_005v000 (Mar 2013)
Page 15
5. Installing the ODU
PTP 500 Installation Guide
Selecting a position for the ODU (connectorized)
Mount a connectorized ODU in a position that gives it maximum protection from the
elements, allows easy access to the cables, and allows antenna cable lengths to be
minimized. If separate antennas are being deployed, it is not necessary to mount the
ODU at the mid-point between the antennas.
Mounting the ODU
To mount the ODU, proceed as follows:
1
Attach the ODU bracket strap to the pole using M8 x 40 mm or M8 x 70 mm
bolts, M8 flat washers and M8 coil washers. Tighten to ensure the assembly
grips, but can be adjusted on the pole.
2
Use the integrated lifting eye to hoist the ODU up to the bracket, observing the
safety precautions listed in Checks and safety precautions on page 15.
3
Offer the ODU (with pre-fitted mounting bracket) to the bracket strap and affix
using the captive M8 bolt. Tighten to ensure the assembly grips, but can be
adjusted on the pole.
4
Adjust the elevation and azimuth of the unit to achieve an approximate visual
alignment (does not apply to connectorized ODUs). Tighten all three bracket
bolts to the required torque settings of 14 Nm (11 lb ft).
Do not over-tighten the bolts, as this may lead to failure of the assembly.
phn-2508_005v000 (Mar 2013)
Page 16
5. Installing the ODU
5
PTP 500 Installation Guide
Connect the ODU ground cable to the to the grounding system, within 0.3 meters
(1 ft) of the ODU bracket and on the same metal (if necessary, remove paint and
apply anti-oxidant compound first).
Do not attach grounding cables to the ODU mounting bracket bolts, as this
arrangement will not provide full protection.
6
To prevent corrosion and possible loss of ground continuity, weatherproof the
grounding point.
Installing connectorized antennas
To mount and connect the antennas, proceed as follows:
1
Mount the antenna according to manufacturer’s instructions. When using
separate antennas to achieve spatial diversity, mount one with Horizontal
polarization and the other with Vertical polarization.
2
Connect the ODU to the antenna with cables of type LMR100, LMR200, LMR300,
LMR400 or LMR600. Use the ODU “V” interface for vertical polarization and the
“H” interface for horizontal polarization.
When using separate antennas to achieve spatial diversity, the antenna cables
will be disconnected from the ODU during the alignment procedure. Therefore,
do not weatherproof the ODU antenna connectors until antenna alignment is
complete.
3
If the ODU is mounted indoors, install lightning arrestors at the building entry
point. Connect the lighting arrestors to the master ground bar of the building.
phn-2508_005v000 (Mar 2013)
Page 17
5. Installing the ODU
PTP 500 Installation Guide
4
When dressing the antenna cables, form drip loops near the lower ends. These
ensure that water is not constantly channeled towards the connectors.
5
If the ODU is mounted outdoors, weatherproof the N type connectors fitted to the
ODU using self-amalgamating tape under a layer of PVC tape. Weatherproof the
antenna joints in the same way (unless the antenna manufacturer specifies a
different method).
To prevent water ingress, always use crimped N-type connectors at the ODU
and antenna.
6
Ground the antenna cables to the supporting structure at the correct points.
They should be grounded within 0.3 meters (1 ft) of the ODU and antennas using
the using the Cambium grounding kit (part number 01010419001).
A mast or tower may require additional grounding points, as specified in Mast or
tower installation on page 12.
7
Dress the antenna cables and attach them to the supporting structure using site
approved methods.
Ensure that no undue strain is placed on the ODU or antenna connectors.
Ensure that the cables do not flap in the wind, as flapping cables are prone to
damage and induce unwanted vibrations in the supporting structure.
phn-2508_005v000 (Mar 2013)
Page 18
PTP 500 Installation Guide
6. Installing the drop cable and LPU
Preparing drop cables
Main drop cable: To prepare a long section of cable to connect the ODU to the LPU,
proceed as follows:
1
Cut off the approximate length required (allowing a bit of surplus), or leave it on
the drum so that it can be unwound as the cable is hoisted.
2
Slide one or more hoisting grips onto to the top end of the main drop cable. To
determine the number of hoisting grips required, consult the grip manufacturer.
3
Secure the hoisting grip to the cable using a special tool, as recommended by the
manufacturer.
4
Fit an RJ45 connector and gland to the top end only, as described in Assembling
an RJ45 connector and gland on page 19.
LPU-PIDU drop cable: To prepare a short section of drop cable to connect the LPU to
the PIDU (or PTP-SYNC): cut off the approximate length required (allowing a bit of
surplus), then fit an RJ45 connector and gland to the LPU end only, as described in
Assembling an RJ45 connector and gland on page 19.
Hoisting grips are designed for hoisting cable safely up a tower and providing
permanent support so that mechanical connection to an antenna can be made. A clamp
is placed over the grip and secured to the cable with a special tool. When the cable is
in position and the grip handle is fastened to a tower member, the hoist line can be
removed.
Assembling an RJ45 connector and gland
Perform this task to prepare the outdoor Cat5e cable with connectors and glands.
The metal screen of the drop cable is very sharp and may cause personal
injury.
When preparing the drop cable, take the following safety precautions:
•
ALWAYS wear cut resistant gloves (check the label to ensure they are cut resistant).
•
ALWAYS wear protective eyewear.
•
ALWAYS use a rotary blade tool to strip the cable (DO NOT use a bladed knife). To
use the rotary blade tool, fit it around the outer cable sheath and rotate the cutter
around the cable once or twice. The stripped outer section can then be removed.
Assemble the drop cable as shown. The gland is only required for outdoor connections,
that is, at the ODU or LPU. The connection to the PIDU requires the RJ45 plug but no
gland:
phn-2508_005v000 (Mar 2013)
Page 19
6. Installing the drop cable and LPU
PTP 500 Installation Guide
Check that the crimp tool matches the RJ45 connector being used, otherwise the cable
or connector may be damaged.
The cable inner sheath must be located correctly under the connector housing tang. If
this is not done correctly, there is no strain relief on the cable terminations.
The following shows the end of a drop cable fitted with an RJ45 plug and a gland:
phn-2508_005v000 (Mar 2013)
Page 20
6. Installing the drop cable and LPU
PTP 500 Installation Guide
Installing and grounding the main drop cable
Follow all instructions provided by the hoisting grip manufacturer. Failure to
do so may result in injury or death.
To install and ground the main drop cable, proceed as follows:
1
Hoist the main drop cable up to the ODU using the hoisting grip and a hoist line.
When the cable is in position and the grip handle is fastened to the supporting
structure, remove the hoist line.
2
Connect the top end of the main drop cable to the ODU (PIDU+ port), as
described in Connecting an RJ45 and gland to an ODU or LPU on page 21.
3
Lay the main drop cable as far as the building entry point, ensuring there is
enough length to extend through the wall of the building to the LPU.
4
Attach the main drop cable to the supporting structure using site approved
methods.
5
Ground the drop cable to the supporting structure at the points shown in Mast or
tower installation on page 12 or Wall installation on page 13. Follow the
procedure in Making a drop cable ground point on page 23.
Connecting an RJ45 and gland to an ODU or LPU
To connect a drop cable with a gland to a unit (LPU or ODU), proceed as follows:
1
Insert the RJ45 plug into the socket in the unit, making sure that the locking tab
snaps home.
2
Support the drop cable and gently hand screw the gland body into the unit until the
O ring seal is flush to the unit body.
Do not fit the back shell prior to securing the gland body.
phn-2508_005v000 (Mar 2013)
Page 21
6. Installing the drop cable and LPU
PTP 500 Installation Guide
3
Once the gland is fully hand screwed into the unit, tighten it with a spanner to
torque 10 Nm (7.4 ftlbs).
4
When the gland body has been fitted, tighten the gland back shell.
Do not over-tighten the gland back shell, as the internal seal and structure may
be damaged. The following example shows correctly tightened and overtightened gland back shells:
phn-2508_005v000 (Mar 2013)
Page 22
6. Installing the drop cable and LPU
PTP 500 Installation Guide
Making a drop cable ground point
To ground the drop cable to a metal structure using the Cambium grounding kit (part
number 01010419001), proceed as follows:
1
Remove 60 mm (2.5 in) of the drop cable outer sheath.
2
Cut 38mm (1.5 in) of rubber tape (self amalgamating) and fit to the ground cable
lug. Wrap the tape completely around the lug and cable.
3
Fold the ground wire strap around the drop cable screen and fit cable ties.
4
Tighten the cable ties with pliers.
Cut the surplus from the cable ties.
phn-2508_005v000 (Mar 2013)
Page 23
6. Installing the drop cable and LPU
PTP 500 Installation Guide
5
Cut a 38mm (1.5 in) section of self-amalgamating tape and wrap it completely
around the joint between the drop and ground cables.
6
Use the remainder of the self-amalgamating tape to wrap the complete
assembly. Press the tape edges together so that there are no gaps.
7
Wrap a layer of PVC tape from bottom to top, starting from 25 mm (1 in) below
and finishing 25 mm (1 in) above the edge of the self-amalgamating tape, over
lapping at half width.
8
Repeat with a further four layers of PVC tape, always overlapping at half width.
Wrap the layers in alternate directions: second layer - top to bottom; third layer
- bottom to top; fourth layer - top to bottom; fifth layer - bottom to top.
The edges of each layer should be 25mm (1 in) above (A) and 25 mm (1 in)
below (B) the previous layer.
phn-2508_005v000 (Mar 2013)
Page 24
6. Installing the drop cable and LPU
9
10
PTP 500 Installation Guide
Prepare the metal grounding point of the supporting structure to provide a good
electrical contact with the grounding cable clamp. Remove paint, grease or dirt,
if present. Apply anti-oxidant compound liberally between the two metals.
Clamp the bottom lug of the grounding cable to the supporting structure using
site approved methods.
Use a two-hole lug secured with fasteners in both holes. This provides better
protection than a single-hole lug.
Installing and grounding at building entry
To run the drop cable into the building, proceed as follows:
1
Make an entry point into the building and run the main drop cable into the
building.
2
Ground the drop cable to the external ground bar outside the building entry
point, as described in Making a drop cable ground point on page 23.
3
Install the LPU inside the building, not more than 600 mm (24 in) from the
building entry point. Mount the LPU with cable glands facing downwards.
4
Ground the LPU to the master ground bar.
5
Cut any surplus length from the bottom end of the main drop cable and fit an
RJ45 connector and gland, as described in Assembling an RJ45 connector and
gland on page 19.
6
Connect the main drop cable to the LPU, as described in Connecting an RJ45 and
gland to an ODU or LPU on page 21.
7
Connect the LPU-PIDU drop cable to the other port of the LPU, as described in
Connecting an RJ45 and gland to an ODU or LPU on page 21.
8
Run the LPU-PIDU drop cable to the location of the PIDU (or PTP-SYNC).
phn-2508_005v000 (Mar 2013)
Page 25
PTP 500 Installation Guide
7. Installing the PIDU
Mounting the PIDU
Mount the PIDU on a wall or other suitable mounting surface, at a height that protects
it from flooding or rising damp. Ensure that the Recovery switch can be accessed when
mounting the unit.
The PIDU is not waterproof and should be mounted away from sources of moisture. If
mounted outdoors, the unit should be mounted in a moisture proof enclosure,
preferably ventilated.
Connecting the PIDU to the ODU cable
Plugging other equipment into the ODU RJ45 socket may damage the equipment due
to the non-standard techniques employed to inject DC power into the 100BaseT
connection between the PIDU and the ODU. Plugging the ODU into other equipment
may damage the ODU and/or the other equipment.
Do not dress the PIDU cables too tightly, as this may make the connections unreliable.
The connected network equipment must feature screened RJ45 connectors and must
be connected to ground, otherwise the PIDU will not be grounded.
To connect the PIDU to the cable from the ODU, proceed as follows:
1
Form a drip loop on the PIDU end of the LPU-PIDU drop cable. The drip loop
ensures that any moisture that runs down the cable into the cabinet or enclosure
cannot enter the PIDU.
This should be done first in order to avoid straining the RJ45 connector.
2
Fit an RJ45 connector (but no gland) to the PIDU end of the LPU-PIDU drop
cable.
3
Undo the retaining screw and hinge back the cover.
phn-2508_005v000 (Mar 2013)
Page 26
7. Installing the PIDU
4
PTP 500 Installation Guide
Plug in the cable from the LPU (or PTP-SYNC if installed), ensuring that it snaps
home.
Depending upon the type of PIDU, the cover may hinge either vertically or
horizontally.
5
Replace the cover and secure with the retaining screw.
Preparing the PIDU to LAN cable
Prepare the Cat5e cable that will connect the PIDU to the network equipment. This
cable must meet the following requirements:
•
Use either foil screen (FTP) or braided screen (STP) cable.
•
Use screened RJ45 connectors with metal shells at both ends.
•
Ensure there is a continuous electrical connection between both screened
connectors.
The PIDU is not normally connected to the network equipment until antenna alignment
is complete. See the PTP 500 and PTP 300 Series User Guide.
phn-2508_005v000 (Mar 2013)
Page 27
PTP 500 Installation Guide
8. Installing an E1 or T1 interface
The E1 or T1 cable and the Ethernet cable share the LAN port of the PIDU. Use the
E1/T1 Splitter to connect the E1/T1 and Ethernet cables to the LAN port of the PIDU:
The E1/T1 splitter output pin connections for the Ethernet and E1/T1 ports are as
follows:
Port
Pin
Connection
Number
Port
Pin
Connection
Number
Ethernet 1
Rx1
E1/T1 1
2
Rx2
2
3
Tx1
3
Rx Ring
Rx Tip
4
4
Tx Ring
5
5
Tx Tip
6
Tx2
6
7
7
8
8
Test the telecoms links by performing loopback connection tests as described in the
PTP 500 and PTP 300 Series User Guide.
phn-2508_005v000 (Mar 2013)
Page 28
PTP 500 Installation Guide
License keys and regulatory information
phn-2508_005v000 (Mar 2013)
Page 29