1
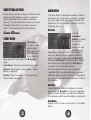
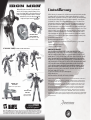
For safe use of this product, carefully read the following section of this manual and the Precautions section of
the instruction manual supplied with the PSP® (PlayStation ® Portable) system before use. Retain both this
software manual and the instruction manual for future reference.
WARNING: PHOTOSENSITIVITY/EPILEPSY/SEIZURES
!VERYSMALLPERCENTAGEOFINDIVIDUALSMAYEXPERIENCEEPILEPTICSEIZURESORBLACKOUTSWHENEXPOSEDTOCERTAIN
LIGHTPATTERNSORFLASHINGLIGHTS%XPOSURETOCERTAINPATTERNSORBACKGROUNDSONASCREENORWHENPLAYINGVIDEO
GAMESMAYTRIGGEREPILEPTICSEIZURESORBLACKOUTSINTHESEINDIVIDUALS4HESECONDITIONSMAYTRIGGERPREVIOUSLY
undetected epileptic symptoms or seizures in persons who have no history of prior seizures or epilepsy. If you,
or anyone in your family, has an epileptic condition or has had seizures of any kind, consult your physician
BEFOREPLAYING)--%$)!4%,9$)3#/.4).5%USEANDCONSULTYOURPHYSICIANBEFORERESUMINGGAMEPLAYIFYOU
ORYOURCHILDEXPERIENCEANYOFTHEFOLLOWINGHEALTHPROBLEMSORSYMPTOMS
s DIZZINESS
s disorientation
s ALTEREDVISION
s SEIZURES
s EYEORMUSCLETWITCHES
s ANYinvoluntary movement or convulsion
s LOSSOFAWARENESS
RESUME
GAMEPLAY ONLY ON APPROVAL OF YOUR PHYSICIAN.
__________________________________________________________________________________
Use and handling of video games to reduce the likelihood of a seizure
s 5SEINAWELLLITAREAANDKEEPASAFEDISTANCEFROMTHESCREEN
s !VOIDPROLONGEDUSEOFTHE030®SYSTEM4AKEAMINUTEBREAKDURINGEACHHOUROFPLAY
s
!VOIDPLAYINGWHENYOUARETIREDORNEEDSLEEP
__________________________________________________________________________________
3TOPUSINGTHESYSTEMIMMEDIATELYIFYOUEXPERIENCEANYOFTHEFOLLOWINGSYMPTOMSLIGHTHEADEDNESSNAUSEA
or a sensation similar to motion sickness; discomfort or pain in the eyes, ears, hands, arms, or any other part of
the body. If the condition persists, consult a doctor.
__________________________________________________________________________________
Do not use while driving or walking. Do not use in airplanes or medical facilities where use is prohibited or
restricted. Set the PSP® system’s wireless network feature to off when using the PSP® system on trains or in
other crowded locations. If used near persons with pacemakers, the signal from the PSP® system’s wireless
network feature could interfere with the proper operation of the pacemaker.
Use and handling of UMD™
s4HISDISCIS030® (PlayStation®Portable) format software and is intended for use with the PSP® system only. If
THEDISCISUSEDWITHOTHERDEVICESDAMAGETOTHEDISCORTOTHEDEVICEMAYRESULTs4HISDISCISCOMPATIBLEFOR
use with the PSP ®SYSTEMMARKEDWITH&/23!,%!.$53%).53/.,9s$EPENDINGONTHESOFTWAREA
Memory Stick Duo™ or Memory Stick PRO Duo™ (both sold separately) may be required. Refer to the software
MANUALFORFULLDETAILSs)FPAUSEDIMAGESAREDISPLAYEDONTHESCREENFORANEXTENDEDPERIODOFTIMEAFAINT
image may be left PERMANENTLYONTHESCREENs$ONOTLEAVETHEDISCINDIRECTSUNLIGHTNEARAHEATSOURCEIN
ACAROROTHERPLACESSUBJECTTOHIGHHEATANDHUMIDITYs$ONOTTOUCHTHEOPENINGONTHEREAROFTHEDISC
(recording surface of the disc; see drawing). Also, do not allow dust, sand, foreign objects or other types of dirt
TOGETONTHEDISCs$ONOTBLOCKTHEOPENINGWITHPAPERORTAPE!LSODONOT
WRITEONTHEDISCs)FTHEOPENINGAREADOESGETDIRTYWIPEGENTLYWITHASOFT
CLOTHs4OCLEANTHEDISCWIPETHEEXTERIORSURFACEGENTLYWITHASOFTCLOTHs$O
not use solvents such as benzine, commercially-available cleaners not intended
for CDs, or anti-static spray intended for vinyl LPs as these may damage the disc.
s$ONOTUSECRACKEDORDEFORMEDDISCSORDISCSTHATHAVEBEENREPAIREDWITH
ADHESIVESASTHESEMAYCAUSECONSOLEDAMAGEORMALFUNCTIONs3#%WILLNOTBE
Recording surface
held liable for damage resulting from the misuse of discs.
Thank you for purchasing Iron Man™. Please
note that this software is designed for use with
the PSP® (PlayStation®Portable) system. Be
sure to read this software manual thoroughly
before you start playing.
Contents
Getting Started................................... 2
Controls............................................. 3
Introduction........................................ 4
Advanced Controls............................... 5
Game Menus...................................... 6
Net
BSD and Loading.............................. 9
Saving
4HE COMMUNICATIONS FUNCTION OF THIS PRODUCT INCLUDES SOFTWARE DEVELOPED BY THE
Heads Up Display............................... 10
.ET"3$ &OUNDATION )NC AND ITS CONTRIBUTORS &OR A COMPLETE LIST OF CONTRIBUTORS PLEASE
SEEHTTPWWWSCEICOJPPSPLICENSEPSPNETTXT
Iron Man Suit.................................... 11
Weapons.......................................... 14
Limited
Warranty.
.............................
17of Sony Computer
“PlayStation”,
“PS” Family
logo, and “PSP”.are
registered trademarks and “UMD” is a trademark
Entertainment Inc. “Memory Stick Duo” and “Memory Stick PRO Duo” are trademarks of Sony Corporation.
Ejecting the disc
Press the right side of the disc until it is in the position shown in the
DRAWINGANDTHENREMOVEIT)FEXCESSFORCEISAPPLIEDTHISMAYRESULTIN
damage to the disc.
Storing the disc
Insert the bottom side of the disc and then press on the top side until it
clicks into place. If the disc is not stored properly, this may result in
damage to the disc. Store the disc in its case when not in use and keep in
a place out of the reach of children. If the disc is left out this may result in
warping or other damage to the disc.
1
ULUS 10347
Getting Started
Controls
Right side view
PSP® (PlayStation®Portable) system configuration
L button
LCD screen
R button
Directional
buttons
buttons
buttons
POWER/HOLD switch
Front view
Disc cover
DC OUT connectors
MEMORY
STICK
DUO™
access
indicator
WLAN
access
indicator
IR port
USB
connector
OPEN latch
Set up your PSP® (PlayStation®Portable) system according to the
instructions in the manual supplied with the system. Turn the system
on. The power indicator lights up in green and the home menu is
displayed. Press the OPEN latch to open the disc cover. INSERT
the Iron Man™ disc with the label facing away from the system, slide
until fully inserted and close the disc cover. From the PSP® system’s
home menu, select the Game icon and then the UMD icon.
A thumbnail for the software is displayed. Select the thumbnail and
press the k button of the PSP® system to start the software. Follow
the on-screen instructions and refer to this manual for information
on using the software.
POWER
indicator
HOLD
indicator
Volume
Right speaker
START button
SELECT button
Sound button
Display button
Analog stick
Strap holder
Left speaker
HOME button
S button
Look down
F button
Look left
D button
Look up
A button
Look right
analog stick
Move
n button
Flight controls
b button
Fire weapon
NOTICE: Do not eject a UMD™ while it is playing.
directional button up / down
Weapon select
Memory Stick Duo™
directional button left / right
Power Distribution
START
Pause Menu
Warning! Keep Memory Stick Duo media out of reach of small children, as the
media could be swallowed by accident.
To save game settings and progress, insert a Memory Stick Duo into
the memory stick slot of your PSP® system. You can load saved game
data from the same memory stick or any Memory Stick Duo containing
previously saved games.
2
3
Introduction
Advanced Controls
Tony Stark had it all: a genius mind, fame, and
even a multinational corporation. But his life
would soon change forever. During a routine
weapons test in the Middle East, power-hungry
militants led a violent ambush against Tony and
claimed him as their prisoner. Armed with Stark
Industries weaponry, Tony’s new foes demanded
he construct a new ultimate weapon for them.
Instead, with the help of fellow captive Yinsen,
Tony built his own ultimate weapon – a powerful
suit of armor that served as the key to his
heroic escape.
Movement
After returning home, Tony’s near-death
experience drastically altered his outlook on
life. The attack against Tony – with his own
creations, no less – inspired him to cease
production of all Stark Industries weapons,
despite the protests of longtime family friend
and mentor Obadiah Stane. And that wasn’t
all. Aided by his charming assistant, Pepper
Potts, and equipped with a new suit even more
advanced than the one used in his escape, Tony
took it upon himself to destroy all Stark weapons
in enemy hands – personally. He became more
than a man. He became Iron Man.
Use the analog stick for directional movement.
Hover / Flight
Press and hold the
N button and you
will gain altitude.
Release to hover at
your current height.
Tap the N button to fall straight to the
ground. But don’t worry, you take no damage
from falling — although any enemy units near
the spot where you land will suffer Iron Man’s
Floor Punch attack. While hovering, use the
analog stick to move.
Double-tap and hold the N button to ignite
your afterburners and fly forward at great
speed. Use the analog stick to turn while flying.
Combat
To target an enemy,
move the analog stick
until the targeting
reticle changes to
indicate you are aiming
at a valid target.
Press the directional buttons up or down to
cycle through available weapons. Press the
B button to fire your currently selected
weapon.
Tap the B button when close to enemies to
launch a melee attack.
4
5
Contextual Actions
Some tasks, such as reviving Iron Man’s heart,
require specific actions in order to perform.
When faced with one of these “contextual
actions,” you will receive an on-screen prompt
indicating the buttons you need to press in
order to successfully perform this action.
Game Menus
Start Menu
New Game:
To start a new
game, select
Easy, Normal or
Hard difficulty,
then, select a
save game slot and press the S button to
begin.
Load Game: Select a previously saved game.
Options: Adjust game settings (see Options
Menu on page 8).
Credits: View the names of the people who
helped make this game.
Main Menu
The Main Menu is displayed between missions,
and allows you to view your progress, upgrade
your suit, save, load, view bonus content and
advance to the next mission. Choose from the
following options:
Missions
Use the
directional
buttons to select
an unlocked
mission. A
description and
objectives are
displayed on the right side of the screen. To
view your stats from a completed mission,
select the mission and press the D button.
Press the S button to continue. Next, select
an unlocked suit and press the S button to
continue to the Upgrades screen.
At the Upgrades Screen, you may select
upgrades that you unlocked playing previous
missions. Once you have chosen the upgrades
you want to use, select Start Mission to launch
the mission.
Upgrades
Select Repulsor, Ballistic, Explosive or Armor
and press the S button to view the upgrades
that you have unlocked, as well as a research
tree showing additional unlockable components.
Save Game
Select a slot to save to and return to the Main
Menu.
6
7
Options
Change game settings. See Options Menu
below.
Bonus
View unlocked bonus material, including concept
art, interviews and more.
Options Menu
Control Settings: Use the directional buttons
to adjust the following control settings:
•Invert Camera – Select Yes to reverse
vertical camera.
•Invert Flight – Select Yes to reverse vertical
movement while using afterburners.
•Camera Sensitivity – Move slider bar to
adjust how quickly the camera moves.
Video: Adjust screen brightness and turn
subtitles ON/OFF.
Mission Complete Screen
At the end of each successful mission, this
screen displays information about how well you
played. This includes statistics, such as time of
completion and total enemies killed along with
additional notifications. Press the S button to
continue to the Main Menu.
Saving and Loading
When you start a new game, you must choose
a save slot. Your progress is automatically
saved here following the completion of each
mission.
To Load a saved game, choose Load Game from
the Main Menu.
Audio: Adjust volume for music and sound
effects/dialog.
Pause Menu
Press START while playing to open the Pause
Menu, which contains the following options:
Objectives: View objectives for current mission.
Options: Adjust game settings.
Continue: Resume playing current mission.
Restart: Start the mission over again.
Quit: Quit to the Main Menu. Your unsaved
progress will be lost.
8
9
Heads Up Display
1
3
4
2
1. Power Distribution/Health: You can
concentrate your suit’s energy on specific
functions by using the directional buttons. See
Power Distribution on page 12 for more
information.
2. Backup Power Cells: Indicates the number
of backup power cells you have. If you lose all of
your Health, your suit must be rebooted, which
may require a backup power cell. If you lose
all of your Health and do not have any backup
power cells left, you fail the mission.
3. Weapon: Indicates your currently selected
weapon. You can change your weapon by
pressing the directional buttons up or down.
Weapon ammo and Technological Advancement
Points are indicated beneath the weapon name.
4. Targeting Reticle: Indicates where you are
aiming. Different weapons display different
targeting reticles.The reticle will change color
when on a target:
• Blue – No target
• Yellow – Destructible object/non-hostile target
• Red – Hostile target
10
Iron Man Suit
Without your Iron
Man suit, you
are just another
genius billionaire.
This amazing
device features
the finest in Stark Technologies’ weapons,
shielding and mobility gear, and allows you to fly,
punch holes in tanks, fire missiles and more.
The suit does an exceptional job of absorbing
and delivering extreme punishment. However,
it requires substantial power, in the form of
backup power cells, in order to function.
The suit automatically repairs damage at a
steady rate. If you sustain damage too quickly,
the suit will shut down and you will attempt
to revive Iron Man manually through a series
of contextual actions (see Contextual Actions
on page 6). If you fail, the suit will crash and
require rebooting before you can continue.
Rebooting requires the use of one of your
backup power cells, which are indicated at
the bottom of the screen below the Power
Distribution Gauges. If you lose all of your Health
and you have no more backup power cells, you
fail the mission.
The suit is equipped with an array of powerful
weapons, all with advantages and disadvantages
given a particular situation. For more
information, see Weapons on page 14.
11
Power Distribution
You can concentrate your suit’s energy on
specific functions by pressing the directional
buttons right and left. Select Armor to reduce
the damage you take and increase the damage
you deal with melee attacks. Select Weapons
to switch the repulsors to the Unibeam. Select
Propulsion to increase the speed of the suit’s
afterburners. Select Even to redistribute suit
energy equally among all functions.
Upgrades
Ballistic
Gatling Gun Upgrade: Increases the
damage dealt by your suit’s Gatling Gun.
There are four upgrade levels.
ulse Rifle Upgrade: Increases the
P
damage dealt by your suit’s Pulse Rifle.
There are four upgrade levels. The Pulse
Rifle is unlocked after the Gatling Gun is
upgraded to a certain point.
Explosive
Rocket Pack Upgrade: Increases the
damage dealt by your suit’s Rockets.
There are four upgrade levels.
Between missions, you can obtain upgrades
based on your equipment usage. These
upgrades enhance various suit components. To
upgrade a component, select Energy, Ballistic,
Explosive or Suit and press the S button. Then
highlight the upgrade you wish to use and press
the S button to select it; all locked upgrades
will appear grayed out until you have unlocked
them.
Repulsor
Repulsor Beam Upgrade: Increases the
damage dealt by your suit’s Repulsor
Beam. There are four upgrade levels.
nibeam Upgrade: Increases the
U
damage dealt by your suit’s Unibeam
cannon. There are four upgrade levels.
The Unibeam is upgraded after you have
upgraded the Repulsor Beam.
issile Launcher Upgrade: Increases
M
the damage dealt by your suit’s Missile
Launcher. There are four upgrade levels.
The level two upgrade includes an Auto
Targeting System. The Missile Launcher
is unlocked after the Rocket Pack is
upgraded to a certain point.
Armor
Floor Punch: Gives you access to the
Floor Punch melee attack.
Power Stomp: Gives you access to the
Power Stomp melee attack.
Electro Punch: Gives you access to the
Electro Punch melee attack.
NanoTech Knitters: Increases the
regeneration rate of the Armor subsystem.
12
13
Repulsor Floor Punch: Gives you access
to the Repulsor Floor Punch melee
attack.
Turbo Boost: Increases the speed of
your afterburners.
Kamikaze: Gives you access to the
Kamikaze attack, which deals great
damage to your target at the cost of
some damage to you.
Anti-Missile System: Allows you to
target and destroy incoming enemy
missiles.
Weapons
Unibeam
The Unibeam is your deadliest implementation
of the Repulsor technology, and it is able to
take out most enemies at long range. Firing the
Unibeam drains you of most of your weapon
energy, however it also has significant recoil and
requires that you remain stationary in order to
fire it. The Unibeam takes longer to recharge
than any other weapon.
Gatling Gun
This rapid-fire weapon holds plenty of ammo and
is great for sweeping land-based units.
Pulse Rifle
To cycle through and select a weapon, press the
directional button up or down. To fire, press
the B button. Note that you can only equip
three weapons per mission.
A gun that fires an electrified bullet, which is
capable of dealing more damage than a regular
Gatling Gun.
Flamethrower
This long-range, high-powered weapon fires a
single devastating rocket.
The Mark I suit, which is available only in the
first mission, features a deadly flamethrower.
Melee Attack
Tap the B button when close to an enemy to
perform a melee attack. This attack is effective
against all opponents, including tanks and other
vehicles.
Rockets
Missile Launcher
This multi-shot weapon fires a volley of deadly
missiles. Press and hold the B button to lock
onto multiple targets and release to fire.
Repulsor Beam
Although not as powerful as the Unibeam or
Missile Launcher, the Repulsor Beam is quick to
fire and doesn’t use much energy.
14
15
When billionaire inventor Tony Stark puts
on his suit of super-powerful armor, he becomes Iron Man! Able to fly faster than a jet
plane, and equipped with repulsor blasters
and missiles, he’s the most powerful,
high-tech super hero in the world!
IRON MAN™ MASK &
REPULSOR GAUNTLET
Put on the armor of the
invincible Iron Man!
6” IRON MAN™ FIGURES OTHER FIGURES AVAILABLE.
IRON MAN™
MARK III
IRON MAN™
MARK I
IRON
MONGER™
Limited Warranty
SEGA of America, Inc. warrants to the original consumer purchaser that the game disc
or cartridge shall be free from defects in material and workmanship for a period of
90-days from the original date of purchase. If a defect covered by this limited warranty
occurs during this 90-day warranty period, the defective game disc or cartridge will
be replaced free of charge. This limited warranty does not apply if the defects have
been caused by negligence, accident, unreasonable use, modification, tampering, or
any other causes not related to defective materials or manufacturing workmanship.
This limited warranty does not apply to used software or to software acquired through
private transactions between individuals or purchased from online auction sites. Please
retain the original, or a photocopy, of your dated sales receipt to establish the date of
purchase for in-warranty replacement. For replacement, return the product, with its
original packaging and receipt, to the retailer from which the software was originally
purchased. In the event that you cannot obtain a replacement from the retailer, please
contact SEGA to obtain support.
Obtaining technical support/service
To receive additional support, including troubleshooting assistance, please contact
SEGA at:
• Website: www.sega.com/support
• Telephone: 1-800-USA-SEGA
LIMITATIONS ON WARRANTY
ANY APPLICABLE IMPLIED WARRANTIES, INCLUDING WARRANTIES OF
MERCHANTABILITY AND FITNESS FOR A PARTICULAR PURPOSE, ARE HEREBY
LIMITED TO 90 DAYS FROM THE DATE OF PURCHASE AND ARE SUBJECT TO THE
CONDITIONS SET FORTH HEREIN. IN NO EVENT SHALL SEGA OF AMERICA, INC. BE
LIABLE FOR CONSEQUENTIAL OR INCIDENTAL DAMAGES RESULTING FROM THE
BREACH OF ANY EXPRESS OR IMPLIED WARRANTIES. THE PROVISIONS OF THIS
LIMITED WARRANTY ARE VALID IN THE UNITED STATES AND CANADA ONLY. SOME
STATES DO NOT ALLOW LIMITATIONS ON HOW LONG AN IMPLIED WARRANTY
LASTS, OR EXCLUSION OF CONSEQUENTIAL OR INCIDENTAL DAMAGES, SO THE
ABOVE LIMITATION OR EXCLUSION MAY NOT APPLY TO YOU. THIS WARRANTY
PROVIDES YOU WITH SPECIFIC LEGAL RIGHTS. YOU MAY HAVE OTHER RIGHTS
THAT VARY FROM STATE TO STATE.
To register this product, please go to www.sega.com
SEGA of America, Inc.
650 Townsend Street, Suite 650, San Francisco, CA 94103
©SEGA. All rights reserved. SEGA is registered in the U.S. Patent and Trademark Office. SEGA and the
SEGA logo are either registered trademarks or trademarks of SEGA Corporation. Iron Man, the Movie
© 2008 MVL Film Finance LLC. Marvel, Iron Man, all character names and their distinctive likenesses:
TM & © 2008 Marvel Entertainment, Inc. and its subsidiaries. All Rights Reserved. Super Hero(es) is
a co-owned registered trademark. IRON MAN uses Havok®. ©Copyright 1999-2008 Havok.com Inc.
(and its Licensors). All Rights Reserved. See www.havok.com for details. Scaleform GFx provided
by Scaleform Corporation. “PlayStation”, “PS” Family logo, and “PSP” are registered trademarks
and “UMD” is a trademark of Sony Computer Entertainment Inc. “Memory Stick Duo” and “Memory
Stick PRO Duo” are trademarks of Sony Corporation. “IRON MAN” (Iommi, Osbourne, Butler, Ward)
performed by Black Sabbath. Licensed courtesy of Downlane Limited. ©1970 Courtesy of ESSEX MUSIC
INTERNATIONAL INC the Richmond organization. All Rights Reserved. International Copyright Secured.
Used By Permission.
IRON MAN™ N.R.F.
425 BLASTER
Rapid fire 10 repulsor darts!
12”
REPULSOR-POWER
IRON MAN™
Motion activated
lights and sounds!
VISIT
www.hasbro.com/ironman
EACH SOLD SEPARATELY. Product and colors may vary. Poses may require additional hand support. Iron Man, the
Movie © 2008 MVL Film Finance LLC. Marvel, Iron Man, all character names and their distinctive likenesses: TM &
© 2008 Marvel Entertainment, Inc. and its subsidiaries. All Rights Reserved. Super Hero(es) is a co-owned registered trademark. ®* and/or TM* & © 2007 Hasbro. All Rights Reserved. TM and ® denote U.S. Trademarks.
16
17