1
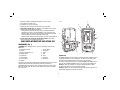
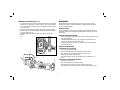
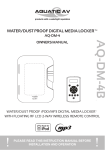
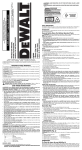
INSTRUCTION MANUAL
DE0892-XE
LASER DETECTOR
WARNING! Read all safety warnings and all instructions Failure to follow
the warnings and instructions may result in electric shock, fire and/or serious
injury.
Definitions: Safety Guidelines
The definitions below describe the level of severity for each signal
word. Please read the manual and pay attention to these symbols.
DANGER: Indicates an imminently hazardous situation which, if
not avoided, will result in death or serious injury.
WARNING: Indicates a potentially hazardous situation which, if not
avoided, could result in death or serious injury.
CAUTION: Indicates a potentially hazardous situation which, if not
avoided, may result in minor or moderate injury.
NOTICE: Indicates a practice not related to personal injury which, if
not avoided, may result in property damage.
Read all of this manual carefully before operating the attachment. Also refer to the
manual of any power tool that will be used with this attachment.
SAVE THESE INSTRUCTIONS
GENERAL WARNINGS
1. Keep work area clean.
Cluttered areas and benches can cause accidents.
2. Keep children away.
Do not let children come into contact with the tool or extension cord. Supervision
is required for inexperienced users.
3. Use appropriate tool.
The intended use is described in this instruction manual. Do not force small tools
or attachments to do the job of a heavy-duty tool. The tool will do the job better
and safer at the rate for which it was intended.
WARNING: The use of any accessory or attachment or performance of any
operation with this tool, other than those recommended in this instruction manual may
present a risk of personal injury.
4. The laser detector may not function properly in the presence of some high
frequency fields.
IF YOU HAVE ANY QUESTIONS OR COMMENTS ABOUT THIS OR ANY DEWALT TOOL,
CALL US AT: 1800 444 224 (Aust) or 0800 339 258 (NZ).
Technical Data
Voltage
Battery size
Operating range (radius)
Weight
V
m
g
DE0892
9
6LR61
50
380
IMPORTANT SAFETY INSTRUCTIONS FOR BATTERIES
SAFETY INSTRUCTIONS
WARNING: Batteries can explode, or leak, and can cause injury or fire. To reduce
this risk:
• Carefully follow all instructions and warnings on the battery label and package.
• Always insert batteries correctly with regard to polarity (+ and –), marked on the
battery and the equipment.
• Do not short battery terminals.
• Do not charge batteries.
• Do not mix old and new batteries. Replace all of them at the same time with new
batteries of the same brand and type.
Always observe the safety regulations applicable in your country to reduce the risk of
fire, electric shock and personal injury. Read the following safety instructions before
attempting to operate this product. Keep these instructions in a safe place.
WARNING: To reduce the risk of injury, user must read the instruction manual.
1
•
•
•
•
•
Remove dead batteries immediately and dispose of per local codes.
Do not dispose of batteries in fire.
Keep batteries out of reach of children.
Remove batteries if the device will not be used for several months.
Young children and the infirm. This appliance is not intended for use by young
children or infirm persons without supervision.
– This appliance is not intended for use by persons (including children) with
reduced physical, sensory or mental capabilities, or lack of experience and
knowledge, unless they have been given supervision or instruction concerning
use of the appliance by a person responsible for their safety.
– Children should be supervised to ensure that they do not play with the appliance.
• Air vents often cover moving parts and should be avoided. Loose clothes,
jewelry or long hair can be caught in moving parts.
FIG. 1
H
B
A
I
N
D
SAVE THESE INSTRUCTIONS FOR FUTURE USE
L
COMPONENTS (Fig. 1)
WARNING: Never modify this tool or any part of it. Damage or personal injury
could result.
A. LCD display window
I. Sensor window
B. Speaker
J. Clamp latch
C. Battery compartment cover
K. Tracks
D. Marking notches
L. Rail
E. Power button
M. Latch
F. Volume button
N. Latch hole
G. Accuracy button
O. Clamp knob
H. Magnets
C
F
E
G
INTENDED USE
The DEWALT Digital Laser Detector helps in locating a laser beam emitted by the laser
in bright light conditions or over long distances. The detector can be used in both
indoor and outdoor situations where it is difficult to see the laser beam.
The detector is designed exclusively for use with the DW088-XE and DW089-XE line
laser and other compatible DEWALT line lasers. It is not for use with rotating lasers.
DO NOT use under wet conditions or in presence of flammable liquids or gases.
The digital laser detector is a professional laser accessory.
DO NOT let children come into contact with the attachment and laser. Supervision is
required when inexperienced operators use this laser.
The detector gives both visual signals through the LCD display window (A) and audio
signals through the speaker (B) to indicate the location of the laser beam.
The DEWALT Digital Laser Detector can be used with or without the detector clamp.
When used with the clamp, the detector can be positioned on a grade rod, leveling
pole, stud or post.
2
ASSEMBLY AND ADJUSTMENTS
OPERATION
Instructions for Use
WARNING: Refer to the manual of the tool to be used with this attachment.
Batteries (Fig. 1)
WARNING:
• Always observe the safety instructions and applicable regulations.
• Before first use, remove and discard the protective tape from the screens.
The digital laser detector is powered by a 9-volt battery. To install the battery
provided, lift up on the battery compartment cover (C). Place the 9-volt battery in the
compartment, aligning the battery as shown on the embossed icon.
Detector Operation (Fig. 1)
Detector Controls (fig. 1)
1. Set up and position the laser.
2. Turn the detector on by pressing the power button (E).
3. Position the detector so that the sensor window (I) is facing the laser beam.
Move the detector up or down within the approximate area of the beam, until you
have centred the detector. For information about the display window indicators
and the audible signal indicators, refer to the table titled Indicators.
The detector is controlled by the power button (E) and the volume button (F).
When the power button is pushed once, the detector is turned on. The top of the
sensor window shows the ON icon and the volume icon.
The DEWALT Digital Laser Detector also has an auto shut-off feature. If a laser beam
does not strike the beam detection window, or if no buttons are pressed, the detector
will shut itself off in about 5 minutes.
To turn off the audible signal push the button again; the volume icon will disappear.
The detector powers up in the narrow accuracy setting (icon appears in the lower left
corner). Press the accuracy button (G) once to change to wide accuracy setting (icon
now appears in the lower right corner).
INDICATORS
audible
signals
Accuracy
On
Grade
Slightly
Below Grade
Below
Grade
fast
beep
fast
beep
steady
tone
slow
beep
slow
beep
display
icons
The detector provides two accuracy settings, wide and narrow. In the wide setting,
the detector provides a larger tolerance for indicating that the detector is “on grade.”
In the narrow setting, this tolerance is reduced for more accurate indication of “on
grade.”
For the most accurate results, start the work using the wide setting and finish in the
narrow setting.
Above
Grade
Slightly
Above
Grade
Magnets
The magnets (H) allow the detector to be mounted to the metal tracks during the
installation of a suspended ceiling.
4. Use the marking notches (D) to accurately mark the position of the laser beam.
3
Mounting on a Grade Rod (Fig. 1, 2)
MAINTENANCE
Your attachment has been designed to operate over a long period of time with a
minimum of maintenance. Continuous satisfactory operation depends upon proper
tool care and regular cleaning.
1. To secure your detector to a grade rod, first attach the detector to the clamp by
pushing in on the clamp latch (J). Slide the tracks (K) on the clamp around the
rail (L) on the detector until the latch (M) on the clamp pops into the latch hole
(N) on the detector.
2. Open the jaws of the clamp by turning the clamp knob (O) counterclockwise.
3. Position the detector at the height needed and turn the clamp knob clockwise to
secure the clamp on the rod.
4. To make adjustments in height, slightly loosen the clamp, reposition and
retighten.
Detector Service
Except for batteries, there are no user serviceable parts in the Digital Laser Detector.
Do not disassemble the unit. Unauthorised tampering with the laser detector will void
all warranties.
Detector Cleaning and Storage
• Dirt and grease may be removed from the exterior of the detector using a cloth or
soft, non-metallic brush.
• The DEWALT digital laser detector is rain resistant but not immersible. Do not
pour water on the unit or submerge it under water.
• The best storage place is one that is cool and dry—away from direct sunlight
and excess heat or cold.
FIG. 2
Detector Troubleshooting
THE DETECTOR WILL NOT TURN ON
• Press and release the power button.
• Check to see that the battery is in place and in the proper position.
• If the detector is very cold, allow it to warm up in a heated area.
• Replace the 9-volt battery. Turn the unit on.
• If the detector still does not turn on, take the detector to a DEWALT service
centre.
THE DETECTOR’S SPEAKER MAKES NO SOUND
• Ensure that the detector is on.
• Press the volume button. It will toggle on and off.
• Ensure that the laser is turned on and that it is emitting a laser beam.
• If the detector is still not making any sound, take it to a DEWALT service centre.
M
J
K
O
4
THE DETECTOR DOES NOT RESPOND TO THE BEAM FROM ANOTHER LASER UNIT
• The DEWALT Digital Laser Detector has been designed to work only with the
DW088 and the DW089 and certain other compatible line lasers.
THE DETECTOR GIVES OFF A TONE BUT THE LCD DISPLAY WINDOW DOES NOT
FUNCTION
• If the detector is very cold, allow it to warm up in a heated area.
• If the LCD display window is still not functioning, take the detector to a DEWALT
service centre.
BRIGHT LIGHT SHINING ON DETECTOR CAUSES CONTINUOUS “ON-GRADE”
SIGNAL
• In the presence of very intense ambient light, the detector may give a false or
erratic indication of level.
• Reposition the detector out of the intense light or shade the sensor window (i) to
resume normal operation.
Accessories
WARNING: Since accessories, other than those offered by DEWALT, have not been
tested with this product, use of such accessories with this tool could be hazardous.
To reduce the risk of injury, only DEWALT recommended accessories should be used
with this product.
Recommended accessories for use with your tool are available at extra cost from
your local service center. If you need any assistance in locating any accessory, please
contact Stanley Black & Decker, 82 Taryn Drive, Epping, VIC 3076 Australia or call
1800 444 224 or (NZ) 0800 339 258.
Batteries
When disposing batteries, think of the protection of the environment. Check with your
local authorities for an environmentally safe way of battery disposal.
5
Stanley Black & Decker
82 Taryn Drive, Epping, VIC 3076 Australia • 1800 444 224 (Aust) or 0800 339 258 (NZ)
www.dewalt.com.au • www.dewalt.co.nz
(FEB12)
Part No. N163481
DE0892-XE
Copyright © 2012 DEWALT
The following are trademarks for one or more DEWALT power tools: the yellow and black color scheme; the “D” shaped air intake grill; the array of pyramids on the handgrip;
the kit box configuration; and the array of lozenge-shaped humps on the surface of the tool.