1
DLP® PROJECTOR
MODEL
EIP-5000
EIP-5000L
SETUP MANUAL
Setting up the Screen .......................................... 2
Screen Size and Projection Distance ................ 3
Connecting Pin Assignments .......................... 10
RS-232C Specifications and Commands ........ 12
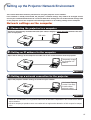
Setting up the Projector Network Environment ... 17
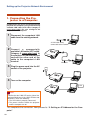
1. Connecting the Projector to a Computer .......... 18
2. Setting an IP Address for the Computer .......... 19
3. Setting up a Network Connection for the Projector ... 21
Controlling the Projector via LAN .................... 23
Controlling the Projector Using Internet Explorer
(Version 5.0 or later) ................................... 23
Confirming the Projector Status (Status) ............. 24
Controlling the Projector (Control) ....................... 24
Setting and Adjusting the Projector
(Settings & Adjustments) ............................ 25
Setting the Security (Network – Security) ............ 25
Making General Settings for the Network
(Network – General) ................................... 26
Setting for Sending E-mail when an Error Occurs
(Mail – Originator Settings) ........................ 26
Setting Error Items and Destination Addresses
to which E-mail is to be Sent when an
Error Occurs (Mail – Recipient Settings) ... 27
Setting Error Items and the URL that are to be
Displayed when an Error Occurs (Service &
Support – Access URL) ............................... 27
Setting the Projector Using RS-232C or Telnet ... 28
When Connecting Using RS-232C ....................... 28
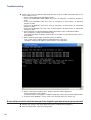
When Connecting Using Telnet ............................ 29
SETUP MENU (Main Menu) ................................. 30
ADVANCED SETUP MENU ................................. 30
Controlling the Projector Using RS-232C or Telnet ... 31
View Setting Detail List ([V]View All Setting) ....... 31
Set Items ............................................................... 31
Save Settings and Quit ([S]Save & Quit) ............. 32
Quit without Saving Settings ([Q]Quit Unchanged) ... 32
IP Address Setting ([1]IP Address) ...................... 33
Subnet Mask Setting ([2]Subnet Mask) ............... 33
Default Gateway Setting ([3]Default Gateway) .... 33
User Name Setting ([4]User Name) ..................... 33
Password Setting ([5]Password) .......................... 34
RS-232C Baud Rate Setting
([6]RS-232C Baud Rate) ............................ 34
Projector Name Setting ([7]Projector Name) ....... 34
DHCP Client Setting ([8]DHCP Client) ................. 34
Disconnecting All Connections
([D]Disconnect All) ..................................... 35
Entering ADVANCED SETUP MENU
([A]Advanced Setup) .................................. 35
Setting Auto Logout Time
(ADVANCED[1]Auto Logout Time) ............. 35
Data Port Setting (ADVANCED[2]Data Port) ....... 35
Carrying out Network Ping Test
(ADVANCED[5]Network Ping Test) ............ 36
Setting of Accept IP Address (ADVANCED
[6]Accept IP Addr(1) – [8]Accept IP Addr(3)) .... 36
Accepting All IP Addresses
(ADVANCED[9]Accept All IP Addr) ............ 36
Setting of Search Port
(ADVANCED[0]Search Port) ...................... 37
Return to Default Settings
(ADVANCED[!]Restore Default Setting) ..... 37
Return to Main Menu
(ADVANCED[Q]Return to Main Menu) ....... 37
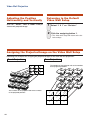
Stack Projection ................................................. 38
Setting up the Stack Projection ............................ 39
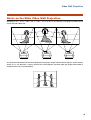
Video Wall Projection ........................................ 41
Setting up the Video Wall Projection Basic ......... 42
Adjusting the Position Horizontally and Vertically ... 44
Returning to the Default Video Wall Setup ........... 44
Assigning the Projected Image on the
Video Wall Setup ........................................ 44
Notes on the Wide Video Wall Projection ............. 45
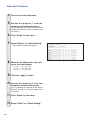
Setting up the Video Wall Projection Application .. 46
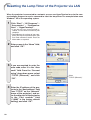
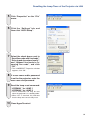
Resetting the Lamp Timer of the Projector via LAN .. 50
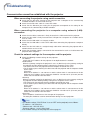
Troubleshooting ................................................. 52
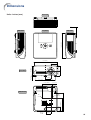
Dimensions ........................................................ 55
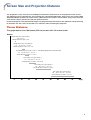
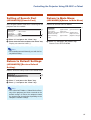
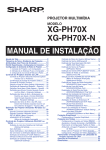
Setting up the Screen
For optimal image quality, position the projector perpendicular to the screen with the projector’s feet flat
and level. Doing so will eliminate the need for Keystone correction and provide the best image quality.
Note
• The projector lens should be centered in the middle of the screen. If the horizontal line passing through the
lens center is not perpendicular to the screen, the image will be distorted, making viewing difficult.
• For an optimal image, position the screen so that it is not in direct sunlight or room light. Light falling directly
on the screen washes out the colors, making viewing difficult. Close the curtains and dim the lights when
setting up the screen in a sunny or bright room.
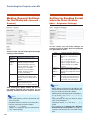
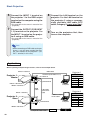
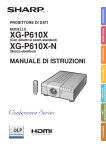
Standard Setup (Front Projection)
■ Place the projector at the required distance from
the screen according to the desired picture size.
Example of standard setup
Screen size : 100 inch (254 cm) STRETCH Mode : 16:9 (When the standard zoom lens attached)
Side View
• The distance from the screen
Screen
H1 : –24 33/64"
(–62.3 cm)
Lens center
Lower lens shift
position
(High mount setup)
Lens center
H2
8 11/64" (20.8 cm)
Upper lens shift
position
(Desktop setup)
to the projector may vary
depending on the size of the
screen.
• The default setting can be used,
when placing the projector in front
of the screen. If the projected image is reversed, readjust the setting to “Front” in the “PRJ Mode”
menu. (See page 84 on the
owner’s manual of the projector.)
Top View
Lens center
W : 13 5/16 "
(33.2 cm)
Screen
Leftmost lens shift
position
Center of screen
Lens center
Rightmost lens shift
position
2
• Place the projector so that an
imaginary horizontal line that
passes through the center of the
lens is perpendicular to the
screen.
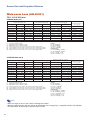
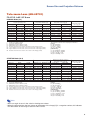
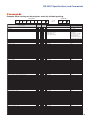
Screen Size and Projection Distance
The projection screen size varies according to the distance from the lens of the projector to the screen.
The optional lenses from EIKI are also available for specialized application. Please see your nearest EIKI
Authorized Dealer to details on all the lenses. (Refer to the lens owner’s manual when using a lens.) Also, be
sure to have service personnel install the optional lenses.
Install the projector so that projected images are projected onto the screen at the optimum size by referring
to the table. Use the values in the table as a reference when installing the projector.
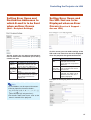
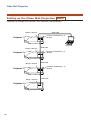
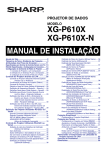
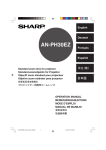
Throw Distance
The graph below is for 100 inches (254 cm) screen with 4:3 normal mode.
Screen
Fixed wide lens (AH-45201)
5' 4" (1.6 m)
Throw distance ratio 1:0.8
Wide-zoom lens (AH-45301)
10' – 12' (3.0 m – 3.7 m)
Throw distance ratio 1:1.5–1.8
Standard zoom lens (AH-51401 : Standard equipment with EIP-5000)
12' – 14' 8" (3.7 m – 4.5 m)
Throw distance ratio 1:1.8–2.2
Tele-zoom lens (AH-45501)
15' – 20' (4.6 m – 6.1 m)
Throw distance ratio 1:2.25–3.00
Tele-zoom lens (AH-45601)
20' – 30' (6.1 m – 9.1 m)
Throw distance ratio 1:3.0–4.5
Tele-zoom lens (AH-45701)
30' – 46' 8" (9.1 m – 14.2 m)
Throw distance ratio 1:4.5–7.0
5
10
15
20
25
30
35
40
45
50 (ft)
3
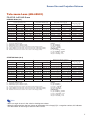
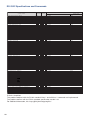
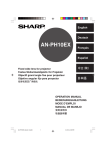
Screen Size and Projection Distance
Standard Zoom Lens (AH-51401: Standard equipment with EIP-5000)
F1.8-F2.0, f=25.6-31.3 mm
NORMAL Mode (4:3)
Picture (Screen) size
Diag. [ χ ]
Width
500"(1270 cm) 1016 cm (400")
300" (762 cm) 610 cm (240”)
250" (635 cm) 508 cm (200")
200" (508 cm) 406 cm (160")
150" (381 cm) 305 cm (120")
100" (254 cm) 203 cm (80")
84" (213 cm) 171 cm (67")
80" (203 cm) 163 cm (64")
72" (183 cm) 146 cm (58")
70" (178 cm) 142 cm (56")
60" (152 cm) 122 cm (48")
40" (102 cm)
81 cm (32")
χ:
L:
L1:
L2:
H:
H1:
H2:
W:
Height
762 cm (300")
457 cm (180")
381 cm (150")
305 cm (120")
229 cm (90")
152 cm (60")
128 cm (50")
122 cm (48")
110 cm (43")
107 cm (42")
91 cm (36")
61 cm (24")
Projection distance [L]
Minimum [L1] Maximum [L2]
18.3 m (60' 0") 22.4 m (73' 4")
11.0 m (36' 0") 13.4 m (44' 0")
9.1 m (30' 0") 11.2 m (36' 8")
7.3 m (24' 0")
8.9 m (29' 4")
5.5 m (18' 0")
6.7 m (22' 0")
3.7 m (12' 0")
4.5 m (14' 8")
3.1 m (10' 1")
3.8 m (12' 4")
2.9 m (9' 7")
3.6 m (11' 9")
2.6 m (8' 8")
3.2 m (10' 7")
2.6 m (8' 5")
3.1 m (10' 3")
2.2 m (7' 2")
2.7 m (8'10")
1.5 m (4'10")
1.8 m (5'10")
Picture size (diag.) (in/cm)
Projection distance (m/ft)
Minimum projection distance (m/ft)
Maximum projection distance (m/ft)
Distance from the lens center to the bottom of the image (cm/in)
Lower distance from the lens center to the bottom of the image (cm/in)
Upper distance from the lens center to the bottom of the image (cm/in)
Distance from the lens center to the center of the image (cm/in)
Distance from the lens center to
the bottom of the image [H]
Lower [H1]
–381.0 cm
(–150")
–228.6 cm
(–90")
–190.5 cm
(–75")
–152.4 cm
(–60")
–114.3 cm
(–45")
–76.2 cm
(–30")
–64.0 cm (–25 13/64")
–61.0 cm
(–24")
–54.9 cm (–21 19/32")
–53.3 cm
(–21")
–45.7 cm
(–18")
–30.5 cm
(–12")
Upper [H2]
0 cm
(0")
0 cm
(0")
0 cm
(0")
0 cm
(0")
0 cm
(0")
0 cm
(0")
0 cm
(0")
0 cm
(0")
0 cm
(0")
0 cm
(0")
0 cm
(0")
0 cm
(0")
Distance from the lens
center to the center of
the image [W]
±152.4 cm
±91.4 cm
±76.2 cm
±61.0 cm
±45.7 cm
±30.5 cm
±25.6 cm
±24.4 cm
±21.9 cm
±21.3 cm
±18.3 cm
±12.2 cm
(60")
(36")
(30")
(24")
(18")
(12")
(10 5/64")
(9 19/32")
(8 41/64")
(8 13/32")
(7 13/64")
(4 51/64")
The formula for picture size and projection distance
[m/cm]
L1 (m) = 0.03658χ
L2 (m) = 0.0447χ
H1 (cm) = –0.762χ
W (cm) = ±0.3048χ
[Feet/inches]
L1 (ft) = 0.03658χ / 0.3048
L2 (ft) = 0.0447χ / 0.3048
H1 (in) = –0.762χ / 2.54
W (in) = ±0.3048χ / 2.54
STRETCH Mode (16:9)
Picture (Screen) size
Diag. [ χ ]
450" (1143 cm)
300" (762 cm)
250" (635 cm)
225" (572 cm)
200" (508 cm)
150" (381 cm)
133" (338 cm)
106" (269 cm)
100" (254 cm)
92" (234 cm)
84" (213 cm)
72" (183 cm)
60" (152 cm)
40" (102 cm)
χ:
L:
L1:
L2:
H:
H1:
H2:
W:
Width
996 cm (392")
664 cm (261")
553 cm (218")
498 cm (196")
443 cm (174")
332 cm (131")
294 cm (116")
235 cm (92")
221 cm (87")
204 cm (80")
186 cm (73")
159 cm (63")
133 cm (52")
89 cm (35")
Height
560 cm (221")
374 cm (147")
311 cm (123")
280 cm (110")
249 cm (98")
187 cm (74")
166 cm (65")
132 cm (52")
125 cm (49")
115 cm (45")
105 cm (41")
90 cm (35")
75 cm (29")
50 cm (20")
Projection distance [L]
Minimum [L1]
17.9 m (58'10")
12.0 m (39' 3")
10.0 m (32' 8")
9.0 m (29' 5")
8.0 m (26' 2")
6.0 m (19' 7")
5.3 m (17' 5")
4.2 m (13'10")
4.0 m (13' 1")
3.7 m (12' 0")
3.3 m (11' 0")
2.9 m (9' 5")
2.4 m (7'10")
1.6 m (5' 3")
Maximum [L2]
21.9 m (71'11")
14.6 m (47'11")
12.2 m (39'11")
11.0 m (35'11")
9.7 m (31'11")
7.3 m (24' 0")
6.5 m (21' 3")
5.2 m (16'11")
4.9 m (16' 0")
4.5 m (14' 8")
4.1 m (13' 5")
3.5 m (11' 6")
2.9 m (9' 7")
1.9 m (6' 5")
Picture size (diag.) (in/cm)
Projection distance (m/ft)
Minimum projection distance (m/ft)
Maximum projection distance (m/ft)
Distance from the lens center to the bottom of the image (cm/in)
Lower distance from the lens center to the bottom of the image (cm/in)
Upper distance from the lens center to the bottom of the image (cm/in)
Distance from the lens center to the center of the image (cm/in)
Note
Distance from the lens center to
the bottom of the image [H]
Lower [H1]
–280.2 cm (–110 5/16")
–186.8 cm (–73 17/32")
–155.7 cm (–61 9/32")
–140.1 cm (–55 5/32")
–124.5 cm (–49 1/32")
–93.4 cm (–36 49/64")
–82.8 cm (–32 39/64")
–66.0 cm (–25 63/64")
–62.3 cm (–24 33/64")
–57.3 cm (–22 35/64")
–52.3 cm (–20 19/32")
–44.8 cm (–17 21/32")
–37.4 cm (–14 45/64")
–24.9 cm (–9 13/16")
Upper
93.4 cm
62.3 cm
51.9 cm
46.7 cm
41.5 cm
31.1 cm
27.6 cm
22.0 cm
20.8 cm
19.1 cm
17.4 cm
14.9 cm
12.5 cm
8.3 cm
[H2]
(36 49/64")
(24 33/64")
(20 27/64")
(18 25/64")
(16 11/32")
(12 1/4")
(10 7/8")
(8 21/32")
(8 11/64")
(7 33/64")
(6 55/64")
(5 57/64")
(4 29/32")
(3 17/64")
Distance from the lens
center to the center of
the image [W]
±149.4 cm
±99.6 cm
±83.0 cm
±74.7 cm
±66.4 cm
±49.8 cm
±44.2 cm
±35.2 cm
±33.2 cm
±30.6 cm
±27.9 cm
±23.9 cm
±19.9 cm
±13.3 cm
(58 53/64")
(39 7/32")
(32 11/16")
(29 27/64")
(26 9/64")
(19 39/64")
(17 25/64")
(13 55/64")
(13 5/64")
(12 1/32")
(10 63/64")
(9 13/32")
(7 27/32")
(5 15/64")
The formula for picture size and projection distance
[m/cm]
L1 (m) = 0.03985χ
L2 (m) = 0.0487χ
H1 (cm) = –0.62263χ
H2 (cm) = 0.20754χ
W (cm) = ±0.33207χ
[Feet/inches]
L1 (ft) = 0.03985χ / 0.3048
L2 (ft) = 0.0487χ / 0.3048
H1 (in) = –0.62263χ / 2.54
H2 (in) = 0.20754χ / 2.54
W (in) = ±0.33207χ / 2.54
• Allow a margin of error in the value in the diagrams above.
• When the distance from the lens center to the bottom of the image [H] is a negative number, this indicates
that the bottom of the image is below the lens center.
4
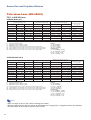
Screen Size and Projection Distance
Fixed Wide Lens (AH-45201)
F2.5, f=11.6 mm
NORMAL Mode (4:3)
Picture (Screen) size
Diag. [ c ]
150'' (381 cm)
100'' (254 cm)
84'' (213 cm)
80'' (203 cm)
c:
L:
H:
H1:
H2:
W:
Width
305 cm (120'')
203 cm (80'')
171 cm (67'')
163 cm (64'')
Height
229 cm (90'')
152 cm (60'')
128 cm (50'')
122 cm (48'')
Distance from the lens center to
the bottom of the image [H]
Projection distance
2.4 m
1.6 m
1.4 m
1.3 m
[L]
(8'
(5'
(4'
(4'
0")
4")
6")
3")
Lower [H1]
–114.3 cm
(–45")
–76.2 cm
(–30")
–64.0 cm (–25 13/64")
–61.0 cm
(–24")
Picture size (diag.) (in/cm)
Projection distance (m/ft)
Distance from the lens center to the bottom of the image (cm/in)
Lower distance from the lens center to the bottom of the image (cm/in)
Upper distance from the lens center to the bottom of the image (cm/in)
Distance from the lens center to the center of the image (cm/in)
Upper [H2]
–73.2 cm (–28 51/64")
–48.8 cm (–19 13/64")
–41.0 cm (–16 1/8")
–39.0 cm (–15 23/64")
Distance from the lens
center to the center of the
image [W]
±33.5 cm
±22.4 cm
±18.8 cm
±17.9 cm
(13
(8
(7
(7
13/64")
51/64")
25/64")
3/64")
The formula for picture size and projection distance
[m/cm]
L (m) = 0.01626c
H1 (cm) = –0.762c
H2 (cm) = –0.48768c
W (cm) = ±0.22352c
[Feet/inches]
L (ft) = 0.01626c / 0.3048
H1 (in) = –0.762c / 2.54
H2 (in) = –0.48768c / 2.54
W (in) = ±0.22352c / 2.54
STRETCH Mode (16:9)
Picture (Screen) size
Diag. [ c ]
133'' (338 cm)
106'' (269 cm)
100'' (254 cm)
92'' (234 cm)
84'' (213 cm)
72'' (183 cm)
c:
L:
H:
H1:
H2:
W:
Width
294 cm (116'')
235 cm (92'')
221 cm (87'')
204 cm (80'')
186 cm (73'')
159 cm (63'')
Height
166 cm (65'')
132 cm (52'')
125 cm (49'')
115 cm (45'')
105 cm (41'')
90 cm (35'')
Distance from the lens center to
the bottom of the image [H]
Projection distance
2.4 m
1.9 m
1.8 m
1.6 m
1.5 m
1.3 m
[L]
(7' 9")
(6' 2")
(5' 10")
(5' 4")
(4' 11")
(4' 2")
Lower [H1]
–82.8 cm (–32 39/64")
–66.0 cm (–25 63/64")
–62.3 cm (–24 33/64")
–57.3 cm (–22 35/64")
–52.3 cm (–20 19/32")
–44.8 cm (–17 21/32")
Picture size (diag.) (in/cm)
Projection distance (m/ft)
Distance from the lens center to the bottom of the image (cm/in)
Lower distance from the lens center to the bottom of the image (cm/in)
Upper distance from the lens center to the bottom of the image (cm/in)
Distance from the lens center to the center of the image (cm/in)
Upper [H2]
–43.1 cm (–16 61/64")
–34.3 cm (–13 33/64")
–32.4 cm (–12 3/4")
–29.8 cm (–11 47/64")
–27.2 cm (–10 45/64")
–23.3 cm (–9 11/64")
Distance from the lens
center to the center of the
image [W]
±32.4 cm
±25.8 cm
±24.4 cm
±22.4 cm
±20.5 cm
±17.5 cm
(12
(10
(9
(8
(8
(6
3/4")
5/32")
19/32")
53/64")
3/64")
29/32")
The formula for picture size and projection distance
[m/cm]
L (m) = 0.01771c
H1 (cm) = –0.62263c
H2 (cm) = –0.32377c
W (cm) = ±0.24352c
[Feet/inches]
L (ft) = 0.01771c / 0.3048
H1 (in) = –0.62263c / 2.54
H2 (in) = –0.32377c / 2.54
W (in) = ±0.24352c / 2.54
Note
∑ Allow a margin of error in the value in the diagrams above.
∑ When the distance from the lens center to the bottom of the image [H] is a negative number, this indicates
that the bottom of the image is below the lens center.
5
Screen Size and Projection Distance
Wide-zoom Lens (AH-45301)
F2.5, f=21.2-25.8 mm
NORMAL Mode (4:3)
Picture (Screen) size
Diag. [ χ ]
250" (635 cm)
200" (508 cm)
150" (381 cm)
100" (254 cm)
84" (213 cm)
80" (203 cm)
72" (183 cm)
70" (178 cm)
60" (152 cm)
χ:
L:
L1:
L2:
H:
H1:
H2:
W:
Width
508 cm (200")
406 cm (160")
305 cm (120")
203 cm (80")
171 cm (67")
163 cm (64")
146 cm (58")
142 cm (56")
122 cm (48")
Height
381 cm (150")
305 cm (120")
229 cm (90")
152 cm (60")
128 cm (50")
122 cm (48")
110 cm (43")
107 cm (42")
91 cm (36")
Projection distance [L]
Minimum [L1]
7.6 m (25' 0")
6.1 m (20' 0")
4.6 m (15' 0")
3.0 m (10' 0")
2.6 m (8' 5")
2.4 m (8' 0")
2.2 m (7' 2")
2.1 m (7' 0")
1.8 m (6' 0")
Maximum
9.1 m (30'
7.3 m (24'
5.5 m (18'
3.7 m (12'
3.1 m (10'
2.9 m (9'
2.6 m (8'
2.6 m (8'
2.2 m (7'
Distance from the lens center to
the bottom of the image [H]
[L2]
Lower [H1]
0") –190.5 cm
(–75")
0") –152.4 cm
(–60")
0") –114.3 cm
(–45")
0")
–76.2 cm
(–30")
1")
–64.0 cm (–25 13/64")
7")
–61.0 cm
(–24")
8")
–54.9 cm (–21 19/32")
5")
–53.3 cm
(–21")
2")
–45.7 cm
(–18")
Picture size (diag.) (in/cm)
Projection distance (m/ft)
Minimum projection distance (m/ft)
Maximum projection distance (m/ft)
Distance from the lens center to the bottom of the image (cm/in)
Lower distance from the lens center to the bottom of the image (cm/in)
Upper distance from the lens center to the bottom of the image (cm/in)
Distance from the lens center to the center of the image (cm/in)
Upper [H2]
0 cm
(0")
0 cm
(0")
0 cm
(0")
0 cm
(0")
0 cm
(0")
0 cm
(0")
0 cm
(0")
0 cm
(0")
0 cm
(0")
Distance from the lens
center to the center of
the image [W]
±76.2 cm
±61.0 cm
±45.7 cm
±30.5 cm
±25.6 cm
±24.4 cm
±21.9 cm
±21.3 cm
±18.3 cm
(30")
(24")
(18")
(12")
(10 5/64")
(9 19/32")
(8 41/64")
(8 13/32")
(7 13/64")
The formula for picture size and projection distance
[m/cm]
L1 (m) = 0.03048χ
L2 (m) = 0.03658χ
H1 (cm) = –0.762χ
W (cm) = ±0.3048χ
[Feet/inches]
L1 (ft) = 0.03048χ / 0.3048
L2 (ft) = 0.03658χ / 0.3048
H1 (in) = –0.762χ / 2.54
W (in) = ±0.3048χ / 2.54
STRETCH Mode (16:9)
Picture (Screen) size
Diag. [ χ ]
225" (572 cm)
200" (508 cm)
150" (381 cm)
133" (338 cm)
106" (269 cm)
100" (254 cm)
92" (234 cm)
84" (213 cm)
72" (183 cm)
60" (152 cm)
χ:
L:
L1:
L2:
H:
H1:
H2:
W:
Width
498 cm (196")
443 cm (174")
332 cm (131")
294 cm (116")
235 cm (92")
221 cm (87")
204 cm (80")
186 cm (73")
159 cm (63")
133 cm (52")
Height
280 cm (110")
249 cm (98")
187 cm (74")
166 cm (65")
132 cm (52")
125 cm (49")
115 cm (45")
105 cm (41")
90 cm (35")
75 cm (29")
Projection distance [L]
Distance from the lens center to
the bottom of the image [H]
Minimum [L1] Maximum [L2]
Lower [H1]
7.5 m (24' 6") 9.0 m (29' 5") –140.1 cm (–55 5/32")
6.6 m (21' 9") 8.0 m (26' 2") –124.5 cm (–49 1/32")
5.0 m (16' 4") 6.0 m (19' 7")
–93.4 cm (–36 49/64")
4.4 m (14' 6") 5.3 m (17' 5")
–82.8 cm (–32 39/64")
3.5 m (11' 7") 4.2 m (13'10")
–66.0 cm (–25 63/64")
3.3 m (10'11") 4.0 m (13' 1")
–62.3 cm (–24 33/64")
3.1 m (10' 0") 3.7 m (12' 0")
–57.3 cm (–22 35/64")
2.8 m (9' 2") 3.3 m (11' 0")
–52.3 cm (–20 19/32")
2.4 m (7'10") 2.9 m (9' 5")
–44.8 cm (–17 21/32")
2.0 m (6' 6") 2.4 m (7'10")
–37.4 cm (–14 45/64")
Picture size (diag.) (in/cm)
Projection distance (m/ft)
Minimum projection distance (m/ft)
Maximum projection distance (m/ft)
Distance from the lens center to the bottom of the image (cm/in)
Lower distance from the lens center to the bottom of the image (cm/in)
Upper distance from the lens center to the bottom of the image (cm/in)
Distance from the lens center to the center of the image (cm/in)
Upper
46.7 cm
41.5 cm
31.1 cm
27.6 cm
22.0 cm
20.8 cm
19.1 cm
17.4 cm
14.9 cm
12.5 cm
[H2]
(18 25/64")
(16 11/32")
(12 1/4")
(10 7/8")
(8 21/32")
(8 11/64")
(7 33/64")
(6 55/64")
(5 57/64")
(4 29/32")
Distance from the lens
center to the center of
the image [W]
±74.7 cm
±66.4 cm
±49.8 cm
±44.2 cm
±35.2 cm
±33.2 cm
±30.6 cm
±27.9 cm
±23.9 cm
±19.9 cm
(29 27/64")
(26 9/64")
(19 39/64")
(17 25/64")
(13 55/64")
(13 5/64")
(12 1/32")
(10 63/64")
(9 13/32")
(7 27/32")
The formula for picture size and projection distance
[m/cm]
L1 (m) = 0.03321χ
L2 (m) = 0.03985χ
H1 (cm) = –0.62263χ
H2 (cm) = 0.20754χ
W (cm) = ±0.33207χ
[Feet/inches]
L1 (ft) = 0.03321χ / 0.3048
L2 (ft) = 0.03985χ / 0.3048
H1 (in) = –0.62263χ / 2.54
H2 (in) = 0.20754χ / 2.54
W (in) = ±0.33207χ / 2.54
Note
• Allow a margin of error in the value in the diagrams above.
• When the distance from the lens center to the bottom of the image [H] is a negative number, this indicates
that the bottom of the image is below the lens center.
6
Screen Size and Projection Distance
Tele-zoom Lens (AH-45501)
F2.4-F2.5, f=31.9-42.5 mm
NORMAL Mode (4:3)
Picture (Screen) size
Diag. [ χ ]
250" (635 cm)
200" (508 cm)
150" (381 cm)
100" (254 cm)
84" (213 cm)
80" (203 cm)
72" (183 cm)
70" (178 cm)
60" (152 cm)
χ:
L:
L1:
L2:
H:
H1:
H2:
W:
Width
508 cm (200")
406 cm (160")
305 cm (120")
203 cm (80")
171 cm (67")
163 cm (64")
146 cm (58")
142 cm (56")
122 cm (48")
Height
381 cm (150")
305 cm (120")
229 cm (90")
152 cm (60")
128 cm (50")
122 cm (48")
110 cm (43")
107 cm (42")
91 cm (36")
Projection distance [L]
Distance from the lens center to
the bottom of the image [H]
Minimum [L1] Maximum [L2]
Lower [H1]
11.4 m (37' 6") 15.2 m (50' 0") –190.5 cm
(–75")
9.1 m (30' 0") 12.2 m (40' 0") –152.4 cm
(–60")
6.9 m (22' 6")
9.1 m (30' 0") –114.3 cm
(–45")
4.6 m (15' 0")
6.1 m (20' 0")
–76.2 cm
(–30")
3.8 m (12' 7")
5.1 m (16'10")
–64.0 cm (–25 13/64")
3.7 m (12' 0")
4.9 m (16' 0")
–61.0 cm
(–24")
3.3 m (10'10")
4.4 m (14' 5")
–54.9 cm (–21 19/32")
3.2 m (10' 6")
4.3 m (14' 0")
–53.3 cm
(–21")
2.7 m (9' 0")
3.7 m (12' 0")
–45.7 cm
(–18")
Picture size (diag.) (in/cm)
Projection distance (m/ft)
Minimum projection distance (m/ft)
Maximum projection distance (m/ft)
Distance from the lens center to the bottom of the image (cm/in)
Lower distance from the lens center to the bottom of the image (cm/in)
Upper distance from the lens center to the bottom of the image (cm/in)
Distance from the lens center to the center of the image (cm/in)
Upper [H2]
0 cm
(0")
0 cm
(0")
0 cm
(0")
0 cm
(0")
0 cm
(0")
0 cm
(0")
0 cm
(0")
0 cm
(0")
0 cm
(0")
Distance from the lens
center to the center of
the image [W]
±76.2 cm
±61.0 cm
±45.7 cm
±30.5 cm
±25.6 cm
±24.4 cm
±21.9 cm
±21.3 cm
±18.3 cm
(30")
(24")
(18")
(12")
(10 5/64")
(9 19/32")
(8 41/64")
(8 13/32")
(7 13/64")
The formula for picture size and projection distance
[m/cm]
L1 (m) = 0.04572χ
L2 (m) = 0.06096χ
H1 (cm) = –0.762χ
W (cm) = ±0.3048χ
[Feet/inches]
L1 (ft) = 0.04572χ / 0.3048
L2 (ft) = 0.06096χ / 0.3048
H1 (in) = –0.762χ / 2.54
W (in) = ±0.3048χ / 2.54
STRETCH Mode (16:9)
Picture (Screen) size
Diag. [ χ ]
225" (572 cm)
200" (508 cm)
150" (381 cm)
133" (338 cm)
106" (269 cm)
100" (254 cm)
92" (234 cm)
84" (213 cm)
72" (183 cm)
60" (152 cm)
χ:
L:
L1:
L2:
H:
H1:
H2:
W:
Width
498 cm (196")
443 cm (174")
332 cm (131")
294 cm (116")
235 cm (92")
221 cm (87")
204 cm (80")
186 cm (73")
159 cm (63")
133 cm (52")
Height
280 cm (110")
249 cm (98")
187 cm (74")
166 cm (65")
132 cm (52")
125 cm (49")
115 cm (45")
105 cm (41")
90 cm (35")
75 cm (29")
Projection distance [L]
Minimum [L1]
11.2 m (36' 9")
10.0 m (32' 8")
7.5 m (24' 6")
6.6 m (21' 9")
5.3 m (17' 4")
5.0 m (16' 4")
4.6 m (15' 0")
4.2 m (13' 9")
3.6 m (11' 9")
3.0 m (9'10")
Distance from the lens center to
the bottom of the image [H]
Maximum [L2]
Lower [H1]
14.9 m (49' 0") –140.1 cm (–55 5/32")
13.3 m (43' 7") –124.5 cm (–49 1/32")
10.0 m (32' 8")
–93.4 cm (–36 49/64")
8.8 m (29' 0")
–82.8 cm (–32 39/64")
7.0 m (23' 1")
–66.0 cm (–25 63/64")
6.6 m (21' 9")
–62.3 cm (–24 33/64")
6.1 m (20' 1")
–57.3 cm (–22 35/64")
5.6 m (18' 4")
–52.3 cm (–20 19/32")
4.8 m (15' 8")
–44.8 cm (–17 21/32")
4.0 m (13' 1")
–37.4 cm (–14 45/64")
Picture size (diag.) (in/cm)
Projection distance (m/ft)
Minimum projection distance (m/ft)
Maximum projection distance (m/ft)
Distance from the lens center to the bottom of the image (cm/in)
Lower distance from the lens center to the bottom of the image (cm/in)
Upper distance from the lens center to the bottom of the image (cm/in)
Distance from the lens center to the center of the image (cm/in)
Upper
46.7 cm
41.5 cm
31.1 cm
27.6 cm
22.0 cm
20.8 cm
19.1 cm
17.4 cm
14.9 cm
12.5 cm
[H2]
(18 25/64")
(16 11/32")
(12 1/4")
(10 7/8")
(8 21/32")
(8 11/64")
(7 33/64")
(6 55/64")
(5 57/64")
(4 29/32")
Distance from the lens
center to the center of
the image [W]
±74.7 cm
±66.4 cm
±49.8 cm
±44.2 cm
±35.2 cm
±33.2 cm
±30.6 cm
±27.9 cm
±23.9 cm
±19.9 cm
(29 27/64")
(26 9/64")
(19 39/64")
(17 25/64")
(13 55/64")
(13 5/64")
(12 1/32")
(10 63/64")
(9 13/32")
(7 27/32")
The formula for picture size and projection distance
[m/cm]
L1 (m) = 0.04981χ
L2 (m) = 0.06641χ
H1 (cm) = –0.62263χ
H2 (cm) = 0.20754χ
W (cm) = ±0.33207χ
[Feet/inches]
L1 (ft) = 0.04981χ / 0.3048
L2 (ft) = 0.06641χ / 0.3048
H1 (in) = –0.62263χ / 2.54
H2 (in) = 0.20754χ / 2.54
W (in) = ±0.33207χ / 2.54
Note
• Allow a margin of error in the value in the diagrams above.
• When the distance from the lens center to the bottom of the image [H] is a negative number, this indicates
that the bottom of the image is below the lens center.
7
Screen Size and Projection Distance
Tele-zoom Lens (AH-45601)
F2.5, f=40.8-62.8 mm
NORMAL Mode (4:3)
Picture (Screen) size
Diag. [ χ ]
250" (635 cm)
200" (508 cm)
150" (381 cm)
100" (254 cm)
84" (213 cm)
80" (203 cm)
72" (183 cm)
70" (178 cm)
60" (152 cm)
χ:
L:
L1:
L2:
H:
H1:
H2:
W:
Width
508 cm (200")
406 cm (160")
305 cm (120")
203 cm (80")
171 cm (67")
163 cm (64")
146 cm (58")
142 cm (56")
122 cm (48")
Height
381 cm (150")
305 cm (120")
229 cm (90")
152 cm (60")
128 cm (50")
122 cm (48")
110 cm (43")
107 cm (42")
91 cm (36")
Projection distance [L]
Distance from the lens center to
the bottom of the image [H]
Minimum [L1] Maximum [L2]
Lower [H1]
15.2 m (50' 0") 22.9 m (75' 0") –190.5 cm
(–75")
12.2 m (40' 0") 18.3 m (60' 0") –152.4 cm
(–60")
9.1 m (30' 0") 13.7 m (45' 0") –114.3 cm
(–45")
6.1 m (20' 0")
9.1 m (30' 0")
–76.2 cm
(–30")
5.1 m (16'10")
7.7 m (25' 2")
–64.0 cm (–25 13/64")
4.9 m (16' 0")
7.3 m (24' 0")
–61.0 cm
(–24")
4.4 m (14' 5")
6.6 m (21' 7")
–54.9 cm (–21 19/32")
4.3 m (14' 0")
6.4 m (21' 0")
–53.3 cm
(–21")
3.7 m (12' 0")
5.5 m (18' 0")
–45.7 cm
(–18")
Picture size (diag.) (in/cm)
Projection distance (m/ft)
Minimum projection distance (m/ft)
Maximum projection distance (m/ft)
Distance from the lens center to the bottom of the image (cm/in)
Lower distance from the lens center to the bottom of the image (cm/in)
Upper distance from the lens center to the bottom of the image (cm/in)
Distance from the lens center to the center of the image (cm/in)
Upper [H2]
0 cm
(0")
0 cm
(0")
0 cm
(0")
0 cm
(0")
0 cm
(0")
0 cm
(0")
0 cm
(0")
0 cm
(0")
0 cm
(0")
Distance from the lens
center to the center of
the image [W]
±76.2 cm
±61.0 cm
±45.7 cm
±30.5 cm
±25.6 cm
±24.4 cm
±21.9 cm
±21.3 cm
±18.3 cm
(30")
(24")
(18")
(12")
(10 5/64")
(9 19/32")
(8 41/64")
(8 13/32")
(7 13/64")
The formula for picture size and projection distance
[m/cm]
L1 (m) = 0.06096χ
L2 (m) = 0.09144χ
H1 (cm) = –0.762χ
W (cm) = ±0.3048χ
[Feet/inches]
L1 (ft) = 0.06096χ / 0.3048
L2 (ft) = 0.09144χ / 0.3048
H1 (in) = –0.762χ / 2.54
W (in) = ±0.3048χ / 2.54
STRETCH Mode (16:9)
Picture (Screen) size
Diag. [ χ ]
225" (572 cm)
200" (508 cm)
150" (381 cm)
133" (338 cm)
106" (269 cm)
100" (254 cm)
92" (234 cm)
84" (213 cm)
72" (183 cm)
60" (152 cm)
χ:
L:
L1:
L2:
H:
H1:
H2:
W:
Width
498 cm (196")
443 cm (174")
332 cm (131")
294 cm (116")
235 cm (92")
221 cm (87")
204 cm (80")
186 cm (73")
159 cm (63")
133 cm (52")
Height
280 cm (110")
249 cm (98")
187 cm (74")
166 cm (65")
132 cm (52")
125 cm (49")
115 cm (45")
105 cm (41")
90 cm (35")
75 cm (29")
Projection distance [L]
Minimum [L1]
14.9 m (49' 0")
13.3 m (43' 7")
10.0 m (32' 8")
8.8 m (29' 0")
7.0 m (23' 1")
6.6 m (21' 9")
6.1 m (20' 1")
5.6 m (18' 4")
4.8 m (15' 8")
4.0 m (13' 1")
Distance from the lens center to
the bottom of the image [H]
Maximum [L2]
Lower [H1]
22.4 m (73' 6") –140.1 cm (–55 5/32")
19.9 m (65' 4") –124.5 cm (–49 1/32")
14.9 m (49' 0")
–93.4 cm (–36 49/64")
13.2 m (43' 6")
–82.8 cm (–32 39/64")
10.6 m (34' 8")
–66.0 cm (–25 63/64")
10.0 m (32' 8")
–62.3 cm (–24 33/64")
9.2 m (30' 1")
–57.3 cm (–22 35/64")
8.4 m (27' 5")
–52.3 cm (–20 19/32")
7.2 m (23' 6")
–44.8 cm (–17 21/32")
6.0 m (19' 7")
–37.4 cm (–14 45/64")
Picture size (diag.) (in/cm)
Projection distance (m/ft)
Minimum projection distance (m/ft)
Maximum projection distance (m/ft)
Distance from the lens center to the bottom of the image (cm/in)
Lower distance from the lens center to the bottom of the image (cm/in)
Upper distance from the lens center to the bottom of the image (cm/in)
Distance from the lens center to the center of the image (cm/in)
Upper
46.7 cm
41.5 cm
31.1 cm
27.6 cm
22.0 cm
20.8 cm
19.1 cm
17.4 cm
14.9 cm
12.5 cm
[H2]
(18 25/64")
(16 11/32")
(12 1/4")
(10 7/8")
(8 21/32")
(8 11/64")
(7 33/64")
(6 55/64")
(5 57/64")
(4 29/32")
Distance from the lens
center to the center of
the image [W]
±74.7 cm
±66.4 cm
±49.8 cm
±44.2 cm
±35.2 cm
±33.2 cm
±30.6 cm
±27.9 cm
±23.9 cm
±19.9 cm
(29 27/64")
(26 9/64")
(19 39/64")
(17 25/64")
(13 55/64")
(13 5/64")
(12 1/32")
(10 63/64")
(9 13/32")
(7 27/32")
The formula for picture size and projection distance
[m/cm]
L1 (m) = 0.06641χ
L2 (m) = 0.09962χ
H1 (cm) = –0.62263χ
H2 (cm) = 0.20754χ
W (cm) = ±0.33207χ
[Feet/inches]
L1 (ft) = 0.06641χ / 0.3048
L2 (ft) = 0.09962χ / 0.3048
H1 (in) = –0.62263χ / 2.54
H2 (in) = 0.20754χ / 2.54
W (in) = ±0.33207χ / 2.54
Note
• Allow a margin of error in the value in the diagrams above.
• When the distance from the lens center to the bottom of the image [H] is a negative number, this indicates
that the bottom of the image is below the lens center.
8
Screen Size and Projection Distance
Tele-zoom Lens (AH-45701)
F2.4-F2.5, f=62.1-97.8 mm
NORMAL Mode (4:3)
Picture (Screen) size
Diag. [ χ ]
250" (635 cm)
200" (508 cm)
150" (381 cm)
100" (254 cm)
84" (213 cm)
80" (203 cm)
72" (183 cm)
70" (178 cm)
60" (152 cm)
χ:
L:
L1:
L2:
H:
H1:
H2:
W:
Width
508 cm (200")
406 cm (160")
305 cm (120")
203 cm (80")
171 cm (67")
163 cm (64")
146 cm (58")
142 cm (56")
122 cm (48")
Height
381 cm (150")
305 cm (120")
229 cm (90")
152 cm (60")
128 cm (50")
122 cm (48")
110 cm (43")
107 cm (42")
91 cm (36")
Projection distance [L]
Minimum [L1]
22.9 m (75' 0")
18.3 m (60' 0")
13.7 m (45' 0")
9.1 m (30' 0")
7.7 m (25' 2")
7.3 m (24' 0")
6.6 m (21' 7")
6.4 m (21' 0")
5.5 m (18' 0")
Distance from the lens center to
the bottom of the image [H]
Maximum [L2]
Lower [H1]
35.6 m (116' 8") –190.5 cm
(–75")
28.4 m (93' 4") –152.4 cm
(–60")
21.3 m (70' 0") –114.3 cm
(–45")
14.2 m (46' 8")
–76.2 cm
(–30")
11.9 m (39' 2")
–64.0 cm (–25 13/64")
11.4 m (37' 4")
–61.0 cm
(–24")
10.2 m (33' 7")
–54.9 cm (–21 19/32")
10.0 m (32' 8")
–53.3 cm
(–21")
8.5 m (28' 0")
–45.7 cm
(–18")
Picture size (diag.) (in/cm)
Projection distance (m/ft)
Minimum projection distance (m/ft)
Maximum projection distance (m/ft)
Distance from the lens center to the bottom of the image (cm/in)
Lower distance from the lens center to the bottom of the image (cm/in)
Upper distance from the lens center to the bottom of the image (cm/in)
Distance from the lens center to the center of the image (cm/in)
Upper [H2]
0 cm
(0")
0 cm
(0")
0 cm
(0")
0 cm
(0")
0 cm
(0")
0 cm
(0")
0 cm
(0")
0 cm
(0")
0 cm
(0")
Distance from the lens
center to the center of
the image [W]
±76.2 cm
±61.0 cm
±45.7 cm
±30.5 cm
±25.6 cm
±24.4 cm
±21.9 cm
±21.3 cm
±18.3 cm
(30")
(24")
(18")
(12")
(10 5/64")
(9 19/32")
(8 41/64")
(8 13/32")
(7 13/64")
The formula for picture size and projection distance
[m/cm]
L1 (m) = 0.09144χ
L2 (m) = 0.14224χ
H1 (cm) = –0.762χ
W (cm) = ±0.3048χ
[Feet/inches]
L1 (ft) = 0.09144χ / 0.3048
L2 (ft) = 0.14224χ / 0.3048
H1 (in) = –0.762χ / 2.54
W (in) = ±0.3048χ / 2.54
STRETCH Mode (16:9)
Picture (Screen) size
Diag. [ χ ]
225" (572 cm)
200" (508 cm)
150" (381 cm)
133" (338 cm)
106" (269 cm)
100" (254 cm)
92" (234 cm)
84" (213 cm)
72" (183 cm)
60" (152 cm)
χ:
L:
L1:
L2:
H:
H1:
H2:
W:
Width
498 cm (196")
443 cm (174")
332 cm (131")
294 cm (116")
235 cm (92")
221 cm (87")
204 cm (80")
186 cm (73")
159 cm (63")
133 cm (52")
Height
280 cm (110")
249 cm (98")
187 cm (74")
166 cm (65")
132 cm (52")
125 cm (49")
115 cm (45")
105 cm (41")
90 cm (35")
75 cm (29")
Projection distance [L]
Minimum [L1]
22.4 m (73' 6")
19.9 m (65' 4")
14.9 m (49' 0")
13.2 m (43' 6")
10.6 m (34' 8")
10.0 m (32' 8")
9.2 m (30' 1")
8.4 m (27' 5")
7.2 m (23' 6")
6.0 m (19' 7")
Distance from the lens center to
the bottom of the image [H]
Maximum [L2]
Lower [H1]
34.9 m (114' 5") –140.1 cm (–55 5/32")
31.0 m (101' 8") –124.5 cm (–49 1/32")
23.2 m (76' 3")
–93.4 cm (–36 49/64")
20.6 m (67' 7")
–82.8 cm (–32 39/64")
16.4 m (53'11")
–66.0 cm (–25 63/64")
15.5 m (50'10")
–62.3 cm (–24 33/64")
14.3 m (46' 9")
–57.3 cm (–22 35/64")
13.0 m (42' 8")
–52.3 cm (–20 19/32")
11.2 m (36' 7")
–44.8 cm (–17 21/32")
9.3 m (30' 6")
–37.4 cm (–14 45/64")
Picture size (diag.) (in/cm)
Projection distance (m/ft)
Minimum projection distance (m/ft)
Maximum projection distance (m/ft)
Distance from the lens center to the bottom of the image (cm/in)
Lower distance from the lens center to the bottom of the image (cm/in)
Upper distance from the lens center to the bottom of the image (cm/in)
Distance from the lens center to the center of the image (cm/in)
Upper
46.7 cm
41.5 cm
31.1 cm
27.6 cm
22.0 cm
20.8 cm
19.1 cm
17.4 cm
14.9 cm
12.5 cm
[H2]
(18 25/64")
(16 11/32")
(12 1/4")
(10 7/8")
(8 21/32")
(8 11/64")
(7 33/64")
(6 55/64")
(5 57/64")
(4 29/32")
Distance from the lens
center to the center of
the image [W]
±74.7 cm
±66.4 cm
±49.8 cm
±44.2 cm
±35.2 cm
±33.2 cm
±30.6 cm
±27.9 cm
±23.9 cm
±19.9 cm
(29 27/64")
(26 9/64")
(19 39/64")
(17 25/64")
(13 55/64")
(13 5/64")
(12 1/32")
(10 63/64")
(9 13/32")
(7 27/32")
The formula for picture size and projection distance
[m/cm]
L1 (m) = 0.09962χ
L2 (m) = 0.15497χ
H1 (cm) = –0.62263χ
H2 (cm) = 0.20754χ
W (cm) = ±0.33207χ
[Feet/inches]
L1 (ft) = 0.09962χ / 0.3048
L2 (ft) = 0.15497χ / 0.3048
H1 (in) = –0.62263χ / 2.54
H2 (in) = 0.20754χ / 2.54
W (in) = ±0.33207χ / 2.54
Note
• Allow a margin of error in the value in the diagrams above.
• When the distance from the lens center to the bottom of the image [H] is a negative number, this indicates
that the bottom of the image is below the lens center.
9
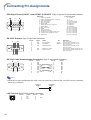
Connecting Pin Assignments
RGB Signal Terminal (INPUT 1 and OUTPUT (FOR INPUT 1, 2)): 15-pin mini D-sub female connector
10
5
6
1
15
11
Component Input
1. PR (CR)
2. Y
3. PB (CB)
4. Not connected
5. Not connected
6. Earth (PR)
7. Earth (Y)
8. Earth (PB)
9. Not connected
10. Not connected
11. Not connected
12. Not connected
13. Not connected
14. Not connected
15. Not connected
RGB Input
1. Video input (red)
2. Video input (green/sync on green)
3. Video input (blue)
4. Not connected
5. Not connected
6. Earth (red)
7. Earth (green/sync on green)
8. Earth (blue)
9. Not connected
10. GND
11. Not connected
12. Bi-directional data
13. Horizontal sync signal: TTL level
14. Vertical sync signal: TTL level
15. Data clock
RS-232C Terminal: 9-pin D-sub male connector
1
6
Pin No.
1
2
3
4
5
6
7
8
9
5
Signal
Name
I/O
RD
SD
Receive Data
Send Data
Input
Output
SG
Signal Ground
RS
CS
Request to Send
Clear to Send
Reference
Not connected
Connected to internal circuit
Connected to internal circuit
Not connected
Connected to internal circuit
Not connected
Connected to CS in internal circuit
Connected to RS in internal circuit
Not connected
9
RS-232C Cable Recommended Connection: 9-pin D-sub female connector
5
9
Pin No.
1
2
3
4
5
6
7
8
9
1
6
Signal
CD
RD
SD
ER
SG
DR
RS
CS
CI
Pin No.
1
2
3
4
5
6
7
8
9
Signal
CD
RD
SD
ER
SG
DR
RS
CS
CI
Note
• Depending on the controlling device used, it may be necessary to connect Pin 4 and Pin 6 on the controlling
device (e.g. computer).
Projector
Pin No.
4
5
6
LAN Terminal: 8-pin RJ-45 modular connector
8...1
10
Pin No.
1
2
3
4
Signal
TX+
TX–
RX+
Pin No.
5
6
7
8
Signal
RX–
Computer
Pin No.
4
5
6
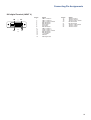
Connecting Pin Assignments
DVI digital Terminal (INPUT 3)
24
17
8
16
1
9
Pin No.
1
2
3
4
5
6
7
8
9
10
11
12
13
14
15
16
Signal
T.M.D.S. Data 2–
T.M.D.S. Data 2+
T.M.D.S. Data 2 Shield
Not connected
Not connected
DDC Clock
DDC Data
Not connected
T.M.D.S. Data 1–
T.M.D.S. Data 1+
T.M.D.S. Data 1 Shield
Not connected
Not connected
+5 V Power
Ground
Hot Plug Detect
Pin No.
17
18
19
20
21
22
23
24
Signal
T.M.D.S. Data 0–
T.M.D.S. Data 0+
T.M.D.S. Data 0 Shield
Not connected
Not connected
T.M.D.S. Clock Shield
T.M.D.S. Clock+
T.M.D.S. Clock–
11
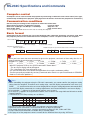
RS-232C Specifications and Commands
Computer control
A computer can be used to control the projector by connecting an RS-232C serial control cable (cross type,
commercially available) to the projector. (See page 35 on the owner’s manual of the projector for connection.)
Communication conditions
Set the serial port settings of the computer to match that of the table.
Signal format: Conforms to RS-232C standard.
Parity bit: None
Baud rate*: 9,600 bps / 38,400 bps / 115,200 bps
Stop bit: 1 bit
Data length: 8 bits
Flow control: None
*Set the projector’s baud rate to the same rate as used by the computer.
Basic format
Commands from the computer are sent in the following order: command, parameter, and return code. After
the projector processes the command from the computer, it sends a response code to the computer.
Command format
C1
C2
C3 C4
P1
P2
P3
Command 4-digit
Response code format
Normal response
O
K
P4
Return code (0DH)
Parameter 4-digit
Problem response (communication error or incorrect command)
E
Return code (0DH)
R
R
Return code (0DH)
Info
∑ When you have more than one command to give to the projector, send each of them only after the response code for the previous one is received.
∑ “POWR????” “TABN _ _ _ 1” “TLPS _ _ _ 1” “TLPS _ _ _ 2” “TPOW _ _ _ 1” “TLPN _ _ _ 1” “TLTT _ _ _ 1”
“TLTT _ _ _ 2” “TLTL _ _ _ 1” “TLTL _ _ _ 2” “TNAM _ _ _ 1” “MNRD _ _ _ 1” “SNRD _ _ _ 1” “PJN0 _ _ _ 1”
- When the projector receives the special commands shown above :
* The on-screen display will not disappear.
* The “Auto Power Off” timer will not be reset.
- The special commands are available for applications that require continuous polling.
(Do not repeatedly or periodically send any commands other than these special commands in STANDBY
mode as it will cause problems.)
Note
∑ When controlling the projector using the RS-232C commands, you cannot confirm the projector setting
values from the computer. To confirm each setting value, send the display command for each menu (e.g.
RARE _ _ _ 0), and then refer to the on-screen display. When using the setting/adjustment commands other
than the menu display commands, the settings/adjustments are executed without the on-screen display.
∑ If an underbar (_) appears in the parameter column, enter a space.
∑ If an asterisk (*) appears in the parameter column, enter a value in the range indicated in brackets under
Control Contents.
*1 Parameters of CLR Temp settings are as follows.
CLR Temp
4500K
5500K
6500K
7500K
*2
*3
*4
*5
*6
12
_
_
_
_
Parameter
0
4
0
5
0
6
0
7
5
5
5
5
CLR Temp
8500K
9300K
10500K
_
_
_
Parameter
0
8
5
0
9
3
1
0
5
Because the RS-232C function stops, the projector send no response code.
Serial No. Check command is used to read out the 12 digits of serial No..
For setting the projector name, send the commands in order of PJN1, PJN2 and PJN3.
Lamp Timer Reset command is available only in standby mode.
See page 91 of the projector’s owner’s manual for the initialized items by using “All Reset”.
RS-232C Specifications and Commands
Commands
Example: When turning on the projector, make the following setting.
Computer
P
O
W
R
_
_
_
Projector
→
←
1
O
K
Return
Control Contents
Command
Parameter
Power on
Power Off
Power On
Power Status
Projector Condition
P
P
P
T
O
O
O
A
W
W
W
B
R
R
R
N
_
_
?
_
_
_
?
_
_
_
?
_
0
1
?
1
OK or ERR
OK
1
0:Normal,
1:Temp High,
8:Lamp Life 5% or less,
16:Lamp Burnt-out,
32:Lamp Ignition Failure
Lamp 1 Status
Lamp 2 Status
Lamp Power Status
Lamp Quantity
Volume (0 - 60)
Mute Off
Mute On
Lens Focus (-255 - +255)
Lens Zoom (-255 - +255)
Vertical Lens Shift (Compatible with old command)
Vertical Lens Shift (-800 - +800)
Horizontal Lens Shift (-800 - +800)
Vertical Keystone (Compatible with old command)
Vertical Keystone (-60 - +60)
Horizontal Keystone (-60 - +60)
Image Resizing(-30 - +30)
Black Screen Off
Black Screen On
INPUT 1 (RGB1)
INPUT 2 (RGB2)
INPUT 3 (RGB3)
INPUT RGB Check
INPUT 4 (Video1)
INPUT 5 (Video2)
INPUT Video Check
INPUT Mode Check
INPUT Check
Freeze Off
Freeze On
Auto Sync Start
INPUT 1 Resize : Normal
INPUT 1 Resize : Stretch
INPUT 1 Resize : Dot By Dot (Computer) / Border (Video)
INPUT 1 Resize : Smart Stretch (Video only)
INPUT 1 Resize : Full
INPUT 1 Resize : Border (Computer)
INPUT 2 Resize : Normal
INPUT 2 Resize : Stretch
INPUT 2 Resize : Dot By Dot (Computer) / Border (Video)
INPUT 2 Resize : Smart Stretch (Video only)
INPUT 2 Resize : Full
INPUT 2 Resize : Border (Computer)
INPUT 3 Resize : Normal
INPUT 3 Resize : Stretch
INPUT 3 Resize : Dot By Dot (Computer) / Border (Video)
INPUT 3 Resize : Smart Stretch (Video only)
INPUT 3 Resize : Full
INPUT 3 Resize : Border (Computer)
INPUT 4 Resize : Normal
INPUT 4 Resize : Stretch
INPUT 4 Resize : Border
INPUT 4 Resize : Smart Stretch
INPUT 5 Resize : Normal
INPUT 5 Resize : Stretch
INPUT 5 Resize : Border
INPUT 5 Resize : Smart Stretch
INPUT 1 Picture Mode : Standard
INPUT 1 Picture Mode : Presentation
INPUT 1 Picture Mode : Cinema
INPUT 1 Picture Mode : Custom
INPUT 1 Contrast (-30 - +30)
INPUT 1 Bright (-30 - +30)
INPUT 1 Color (-30 - +30)
INPUT 1 Tint (-30 - +30)
INPUT 1 Red (-30 - +30)
INPUT 1 Green (-30 - +30)
INPUT 1 Blue (-30 - +30)
INPUT 1 Sharp (-30 - +30)
INPUT 1 CLR Temp *1
INPUT 1 Bright Boost (0 - 10)
T
T
T
T
V
M
M
L
L
L
L
L
K
K
K
I
I
I
I
I
I
I
I
I
I
I
I
F
F
A
R
R
R
R
R
R
R
R
R
R
R
R
R
R
R
R
R
R
R
R
R
R
R
R
R
R
R
R
R
R
R
R
R
R
R
R
R
R
R
R
L
L
P
L
O
U
U
N
N
N
N
N
E
E
E
M
M
M
R
R
R
R
V
V
V
M
C
R
R
D
A
A
A
A
A
A
B
B
B
B
B
B
C
C
C
C
C
C
A
A
A
A
B
B
B
B
A
A
A
A
A
A
A
A
A
A
A
A
A
A
P
P
O
P
L
T
T
F
Z
S
U
L
Y
Y
Y
R
B
B
G
G
G
G
E
E
E
O
H
E
E
J
S
S
S
S
S
S
S
S
S
S
S
S
S
S
S
S
S
S
S
S
S
S
S
S
S
S
P
P
P
P
P
B
C
T
R
G
B
S
C
W
S
S
W
N
A
E
E
O
O
H
D
R
S
V
H
S
K
K
B
B
B
B
D
D
D
D
K
Z
Z
S
R
R
R
R
R
R
R
R
R
R
R
R
R
R
R
R
R
R
V
V
V
V
V
V
V
V
S
S
S
S
I
R
O
I
D
N
E
H
T
E
_
_
_
_
_
_
_
_
_
_
_
_
_
_
_
_
_
_
_
_
_
?
_
_
?
?
?
_
_
_
_
_
_
_
_
_
_
_
_
_
_
_
_
_
_
_
_
_
_
_
_
_
_
_
_
_
_
_
_
_
_
_
_
_
_
_
_
_
_
_
_
_
_
_
_
_
_
*
*
*
*
*
*
*
*
*
_
_
_
_
_
?
_
_
?
?
?
_
_
_
_
_
_
_
_
_
_
_
_
_
_
_
_
_
_
_
_
_
_
_
_
_
_
_
_
_
_
_
_
_
*
*
*
*
*
*
*
*
*
_
_
_
_
_
*
_
_
*
*
*
*
*
*
*
*
*
_
_
_
_
_
?
_
_
?
?
?
_
_
_
_
_
_
_
_
_
_
_
_
_
_
_
_
_
_
_
_
_
_
_
_
_
_
_
_
_
1
1
1
1
*
*
*
*
*
*
*
*
*
*
1
2
1
1
*
0
1
*
*
*
*
*
*
*
*
*
0
1
1
2
3
?
1
2
?
?
?
0
1
1
1
2
3
4
5
6
1
2
3
4
5
6
1
2
3
4
5
6
1
2
3
4
1
2
3
4
0
1
2
3
*
*
*
*
*
*
*
*
*
*
0:Off, 1:On, 2:Retry, 3:Waiting, 4:Lamp Error
0:Off, 1:On, 2:Retry, 3:Waiting, 4:Lamp Error
1:On, 2:Cooling
2
OK or ERR
OK or ERR
OK or ERR
OK
OK
OK or ERR
OK or ERR
OK or ERR
OK or ERR
OK or ERR
OK or ERR
OK or ERR
OK or ERR
OK or ERR
OK or ERR
OK or ERR
OK or ERR
1:RGB1(INPUT1), 2:RGB2(INPUT2), 3:RGB3(INPUT3)
OK or ERR
OK or ERR
1:Video1(INPUT4), 2:Video2(INPUT5)
1:RGB, 2:Video
1:INPUT1, 2:INPUT2, 3:INPUT3, 4:INPUT4, 5:INPUT5
OK or ERR
OK or ERR
OK or ERR
OK or ERR
OK or ERR
OK or ERR
OK or ERR
OK or ERR
OK or ERR
OK or ERR
OK or ERR
OK or ERR
OK or ERR
OK or ERR
OK or ERR
OK or ERR
OK or ERR
OK or ERR
OK or ERR
OK or ERR
OK or ERR
OK or ERR
OK or ERR
OK or ERR
OK or ERR
OK or ERR
OK or ERR
OK or ERR
OK or ERR
OK or ERR
OK or ERR
OK or ERR
OK or ERR
OK or ERR
OK or ERR
OK or ERR
OK or ERR
OK or ERR
OK or ERR
OK or ERR
OK or ERR
OK or ERR
OK or ERR
Standby mode
(or 40-second startup time)
OK
OK or ERR
0
0:Normal,
1:Temp High,
2:Fan Error,
4:Intake Vent Cover Open,
8:Lamp Life 5% or less,
16:Lamp Burnt-out,
32:Lamp Ignition Failure,
64:Temp Abnormally High
0:Off, 4:Lamp Error
0:Off, 4:Lamp Error
0:Standby
ERR
ERR
ERR
ERR
ERR
ERR
ERR
ERR
ERR
ERR
ERR
ERR
ERR
ERR
ERR
ERR
ERR
ERR
ERR
ERR
ERR
ERR
ERR
ERR
ERR
ERR
ERR
ERR
ERR
ERR
ERR
ERR
ERR
ERR
ERR
ERR
ERR
ERR
ERR
ERR
ERR
ERR
ERR
ERR
ERR
ERR
ERR
ERR
ERR
ERR
ERR
ERR
ERR
ERR
ERR
ERR
ERR
ERR
ERR
ERR
ERR
ERR
ERR
ERR
ERR
ERR
13
RS-232C Specifications and Commands
Return
Control Contents
INPUT 1 Progressive : 2D
INPUT 1 Progressive : 3D
INPUT 1 Progressive : Film Mode
INPUT 1 DNR : Off
INPUT 1 DNR : Level 1
INPUT 1 DNR : Level 2
INPUT 1 DNR : Level 3
INPUT 1 Adjustment Reset
INPUT 1 Signal Type : Auto
INPUT 1 Signal Type : RGB
INPUT 1 Signal Type : Component
INPUT 1 Display (Status display)
INPUT 2 Picture Mode : Standard
INPUT 2 Picture Mode : Presentation
INPUT 2 Picture Mode : Cinema
INPUT 2 Picture Mode : Custom
INPUT 2 Contrast (-30 - +30)
INPUT 2 Bright (-30 - +30)
INPUT 2 Color (-30 - +30)
INPUT 2 Tint (-30 - +30)
INPUT 2 Red (-30 - +30)
INPUT 2 Green (-30 - +30)
INPUT 2 Blue (-30 - +30)
INPUT 2 Sharp (-30 - +30)
INPUT 2 CLR Temp *1
INPUT 2 Bright Boost (0 - 10)
INPUT 2 Progressive : 2D
INPUT 2 Progressive : 3D
INPUT 2 Progressive : Film Mode
INPUT 2 DNR : Off
INPUT 2 DNR : Level 1
INPUT 2 DNR : Level 2
INPUT 2 DNR : Level 3
INPUT 2 Adjustment Reset
INPUT 2 Signal Type : Auto
INPUT 2 Signal Type : RGB
INPUT 2 Signal Type : Component
INPUT 2 Display (Status display)
INPUT 3 Picture Mode : Standard
INPUT 3 Picture Mode : Presentation
INPUT 3 Picture Mode : Cinema
INPUT 3 Picture Mode : Custom
INPUT 3 Contrast (-30 - +30)
INPUT 3 Bright (-30 - +30)
INPUT 3 Color (-30 - +30)
INPUT 3 Tint (-30 - +30)
INPUT 3 Red (-30 - +30)
INPUT 3 Green (-30 - +30)
INPUT 3 Blue (-30 - +30)
INPUT 3 Sharp (-30 - +30)
INPUT 3 CLR Temp *1
INPUT 3 Bright Boost (0 - 10)
INPUT 3 DNR : Off
INPUT 3 DNR : Level 1
INPUT 3 DNR : Level 2
INPUT 3 DNR : Level 3
INPUT 3 Adjustment Reset
INPUT 3 Signal Type : D. PC RGB
INPUT 3 Signal Type : D. PC Component
INPUT 3 Signal Type : D. Video RGB
INPUT 3 Signal Type : D. Video Component
INPUT 3 Display (Status display)
INPUT 4 Picture Mode : Standard
INPUT 4 Picture Mode : Presentation
INPUT 4 Picture Mode : Cinema
INPUT 4 Picture Mode : Custom
INPUT 4 Contrast (-30 - +30)
INPUT 4 Bright (-30 - +30)
INPUT 4 Color (-30 - +30)
INPUT 4 Tint (-30 - +30)
INPUT 4 Red (-30 - +30)
INPUT 4 Green (-30 - +30)
INPUT 4 Blue (-30 - +30)
INPUT 4 Sharp (-30 - +30)
INPUT 4 CLR Temp *1
INPUT 4 Bright Boost (0 - 10)
INPUT 4 Progressive : 2D
INPUT 4 Progressive : 3D
INPUT 4 Progressive : Film Mode
INPUT 4 DNR : Off
INPUT 4 DNR : Level 1
INPUT 4 DNR : Level 2
INPUT 4 DNR : Level 3
INPUT 4 Adjustment Reset
INPUT 4 Display (Status display)
INPUT 5 Picture Mode : Standard
INPUT 5 Picture Mode : Presentation
INPUT 5 Picture Mode : Cinema
INPUT 5 Picture Mode : Custom
INPUT 5 Contrast (-30 - +30)
INPUT 5 Bright (-30 - +30)
14
Command
R
R
R
R
R
R
R
R
I
I
I
R
R
R
R
R
R
R
R
R
R
R
R
R
R
R
R
R
R
R
R
R
R
R
I
I
I
R
R
R
R
R
R
R
R
R
R
R
R
R
R
R
R
R
R
R
R
I
I
I
I
R
V
V
V
V
V
V
V
V
V
V
V
V
V
V
V
V
V
V
V
V
V
V
V
V
V
V
V
V
V
A
A
A
A
A
A
A
A
A
A
A
A
B
B
B
B
B
B
B
B
B
B
B
B
B
B
B
B
B
B
B
B
B
B
B
B
B
B
C
C
C
C
C
C
C
C
C
C
C
C
C
C
C
C
C
C
C
C
C
C
C
C
A
A
A
A
A
A
A
A
A
A
A
A
A
A
A
A
A
A
A
A
A
A
A
B
B
B
B
B
B
I
I
I
N
N
N
N
R
S
S
S
R
P
P
P
P
P
B
C
T
R
G
B
S
C
W
I
I
I
N
N
N
N
R
S
S
S
R
P
P
P
P
P
B
C
T
R
G
B
S
C
W
N
N
N
N
R
S
S
S
S
R
P
P
P
P
P
B
C
T
R
G
B
S
C
W
I
I
I
N
N
N
N
R
R
P
P
P
P
P
B
P
P
P
R
R
R
R
E
I
I
I
E
S
S
S
S
I
R
O
I
D
N
E
H
T
E
P
P
P
R
R
R
R
E
I
I
I
E
S
S
S
S
I
R
O
I
D
N
E
H
T
E
R
R
R
R
E
I
I
I
I
E
S
S
S
S
I
R
O
I
D
N
E
H
T
E
P
P
P
R
R
R
R
E
E
S
S
S
S
I
R
Parameter
_
_
_
_
_
_
_
_
_
_
_
_
_
_
_
_
_
_
_
_
_
_
_
_
_
_
_
_
_
_
_
_
_
_
_
_
_
_
_
_
_
_
_
_
_
_
_
_
_
_
_
_
_
_
_
_
_
_
_
_
_
_
_
_
_
_
_
_
_
_
_
_
_
_
_
_
_
_
_
_
_
_
_
_
_
_
_
_
_
_
_
_
_
_
_
_
_
_
_
_
_
_
_
_
_
_
_
*
*
*
*
*
*
*
*
*
_
_
_
_
_
_
_
_
_
_
_
_
_
_
_
_
_
*
*
*
*
*
*
*
*
*
_
_
_
_
_
_
_
_
_
_
_
_
_
_
_
*
*
*
*
*
*
*
*
*
_
_
_
_
_
_
_
_
_
_
_
_
_
_
*
*
_
_
_
_
_
_
_
_
_
_
_
_
1
1
1
1
*
*
*
*
*
*
*
*
*
*
_
_
_
_
_
_
_
_
_
_
_
_
1
1
1
1
*
*
*
*
*
*
*
*
*
*
_
_
_
_
_
_
_
_
_
_
1
1
1
1
*
*
*
*
*
*
*
*
*
*
_
_
_
_
_
_
_
_
_
1
1
1
1
*
*
0
1
2
0
1
2
3
1
0
1
2
0
0
1
2
3
*
*
*
*
*
*
*
*
*
*
0
1
2
0
1
2
3
1
0
1
2
0
0
1
2
3
*
*
*
*
*
*
*
*
*
*
0
1
2
3
1
3
4
5
6
0
0
1
2
3
*
*
*
*
*
*
*
*
*
*
0
1
2
0
1
2
3
1
0
0
1
2
3
*
*
Power on
OK or ERR
OK or ERR
OK or ERR
OK or ERR
OK or ERR
OK or ERR
OK or ERR
OK or ERR
OK or ERR
OK or ERR
OK or ERR
OK or ERR
OK or ERR
OK or ERR
OK or ERR
OK or ERR
OK or ERR
OK or ERR
OK or ERR
OK or ERR
OK or ERR
OK or ERR
OK or ERR
OK or ERR
OK or ERR
OK or ERR
OK or ERR
OK or ERR
OK or ERR
OK or ERR
OK or ERR
OK or ERR
OK or ERR
OK or ERR
OK or ERR
OK or ERR
OK or ERR
OK or ERR
OK or ERR
OK or ERR
OK or ERR
OK or ERR
OK or ERR
OK or ERR
OK or ERR
OK or ERR
OK or ERR
OK or ERR
OK or ERR
OK or ERR
OK or ERR
OK or ERR
OK or ERR
OK or ERR
OK or ERR
OK or ERR
OK or ERR
OK or ERR
OK or ERR
OK or ERR
OK or ERR
OK or ERR
OK or ERR
OK or ERR
OK or ERR
OK or ERR
OK or ERR
OK or ERR
OK or ERR
OK or ERR
OK or ERR
OK or ERR
OK or ERR
OK or ERR
OK or ERR
OK or ERR
OK or ERR
OK or ERR
OK or ERR
OK or ERR
OK or ERR
OK or ERR
OK or ERR
OK or ERR
OK or ERR
OK or ERR
OK or ERR
OK or ERR
OK or ERR
OK or ERR
OK or ERR
Standby mode
(or 40-second startup time)
ERR
ERR
ERR
ERR
ERR
ERR
ERR
ERR
ERR
ERR
ERR
ERR
ERR
ERR
ERR
ERR
ERR
ERR
ERR
ERR
ERR
ERR
ERR
ERR
ERR
ERR
ERR
ERR
ERR
ERR
ERR
ERR
ERR
ERR
ERR
ERR
ERR
ERR
ERR
ERR
ERR
ERR
ERR
ERR
ERR
ERR
ERR
ERR
ERR
ERR
ERR
ERR
ERR
ERR
ERR
ERR
ERR
ERR
ERR
ERR
ERR
ERR
ERR
ERR
ERR
ERR
ERR
ERR
ERR
ERR
ERR
ERR
ERR
ERR
ERR
ERR
ERR
ERR
ERR
ERR
ERR
ERR
ERR
ERR
ERR
ERR
ERR
ERR
ERR
ERR
ERR
RS-232C Specifications and Commands
Return
Control Contents
INPUT 5 Color (-30 - +30)
INPUT 5 Tint (-30 - +30)
INPUT 5 Red (-30 - +30)
INPUT 5 Green (-30 - +30)
INPUT 5 Blue (-30 - +30)
INPUT 5 Sharp (-30 - +30)
INPUT 5 CLR Temp *1
INPUT 5 Bright Boost (0 - 10)
INPUT 5 Progressive : 2D
INPUT 5 Progressive : 3D
INPUT 5 Progressive : Film Mode
INPUT 5 DNR : Off
INPUT 5 DNR : Level 1
INPUT 5 DNR : Level 2
INPUT 5 DNR : Level 3
INPUT 5 Adjustment Reset
INPUT 5 Display (Status display)
INPUT 1 C.M.S. Adjustment : Standard
INPUT 1 C.M.S. Adjustment : sRGB
INPUT 1 C.M.S. Adjustment : Custom1
INPUT 1 C.M.S. Adjustment : Custom2
INPUT 1 C.M.S. Adjustment : Custom3
INPUT 2 C.M.S. Adjustment : Standard
INPUT 2 C.M.S. Adjustment : sRGB
INPUT 2 C.M.S. Adjustment : Custom1
INPUT 2 C.M.S. Adjustment : Custom2
INPUT 2 C.M.S. Adjustment : Custom3
INPUT 3 C.M.S. Adjustment : Standard
INPUT 3 C.M.S. Adjustment : sRGB
INPUT 3 C.M.S. Adjustment : Custom1
INPUT 3 C.M.S. Adjustment : Custom2
INPUT 3 C.M.S. Adjustment : Custom3
INPUT 4 C.M.S. Adjustment : Standard
INPUT 4 C.M.S. Adjustment : Custom1
INPUT 4 C.M.S. Adjustment : Custom2
INPUT 4 C.M.S. Adjustment : Custom3
INPUT 5 C.M.S. Adjustment : Standard
INPUT 5 C.M.S. Adjustment : Custom1
INPUT 5 C.M.S. Adjustment : Custom2
INPUT 5 C.M.S. Adjustment : Custom3
Target : Red
Target : Yellow
Target : Green
Target : Cyan
Target : Blue
Target : Magenta
Lightness (-30 - +30)
Chroma (-30 - +30)
Hue (-30 - +30)
Reset (This Color)
Reset (All Colors)
Clock (-150 - +150)
Phase (-30 - +30)
H-Position (-150 - +150)
V-Position (-60 - +60)
Fine Sync Display (Status display)
Fine Sync Adjustment Reset
Save Setting (1 - 7)
Select Setting (1 - 7)
RGB Horizontal Frequency Check
RGB Vertical Frequency Check
Auto Sync : Off
Auto Sync : Normal
Auto Sync : High Speed
Auto Sync Display : Off
Auto Sync Display : On
Balance (-30 - +30)
Treble (-30 - +30)
Bass (-30 - +30)
Audio Display (Status display)
Audio Adjustment Reset
Audio Out : FAO
Audio Out : VAO
Speaker : Off
Speaker : On
Pict in Pict : Bottom Right
Pict in Pict : Bottom Left
Pict in Pict : Upper Right
Pict in Pict : Upper Left
Pict in Pict : Off
Digital Shift (-96 - +96)
OSD Display : Normal
OSD Display : Level A
OSD Display : Level B
Black Screen Display : Off
Black Screen Display : On
Video System Selection : AUTO
Video System Selection : PAL
Video System Selection : SECAM
Video System Selection : NTSC4.43
Video System Selection : NTSC3.58
Command
V
V
V
V
V
V
V
V
V
V
V
V
V
V
V
V
V
C
C
C
C
C
C
C
C
C
C
C
C
C
C
C
C
C
C
C
C
C
C
C
C
C
C
C
C
C
C
C
C
C
C
I
I
I
I
I
I
M
M
T
T
A
A
A
I
I
A
A
A
A
A
A
A
A
A
P
P
P
P
P
L
I
I
I
I
I
M
M
M
M
M
B
B
B
B
B
B
B
B
B
B
B
B
B
B
B
B
B
S
S
S
S
S
S
S
S
S
S
S
S
S
S
S
S
S
S
S
S
S
S
S
M
M
M
M
M
M
M
M
M
M
M
N
N
A
A
A
A
E
E
F
F
A
A
A
M
M
A
A
A
A
A
O
O
S
S
I
I
I
I
I
N
M
M
M
M
M
E
E
E
E
E
C
T
R
G
B
S
C
W
I
I
I
N
N
N
N
R
R
R
R
R
R
R
R
R
R
R
R
R
R
R
R
R
V
V
V
V
V
V
V
V
T
T
T
T
T
T
S
S
S
R
R
C
P
H
V
R
R
M
M
R
R
D
D
D
A
A
B
T
B
R
R
U
U
P
P
N
N
N
N
N
D
D
D
D
B
B
S
S
S
S
S
O
I
D
N
E
H
T
E
P
P
P
R
R
R
R
E
E
A
A
A
A
A
B
B
B
B
B
C
C
C
C
C
A
A
A
A
B
B
B
B
G
G
G
G
G
G
L
C
H
E
E
L
H
P
P
E
E
S
L
Q
Q
J
J
J
S
S
L
E
A
E
E
T
T
K
K
P
P
P
P
P
S
I
I
I
O
O
Y
Y
Y
Y
Y
Parameter
_
_
_
_
_
_
_
_
_
_
_
_
_
_
_
_
_
_
_
_
_
_
_
_
_
_
_
_
_
_
_
_
_
_
_
_
_
_
_
_
_
_
_
_
_
_
_
_
_
_
_
*
_
*
_
_
_
_
_
_
_
_
_
_
_
_
_
_
_
_
_
_
_
_
_
_
_
_
_
_
_
_
_
_
_
_
_
_
_
_
_
*
*
*
*
*
*
*
_
_
_
_
_
_
_
_
_
_
_
_
_
_
_
_
_
_
_
_
_
_
_
_
_
_
_
_
_
_
_
_
_
_
_
_
_
_
_
_
_
_
_
_
*
*
*
*
_
_
_
_
_
_
_
_
_
_
_
*
*
*
_
_
_
_
_
_
_
_
_
_
_
*
_
_
_
_
_
_
_
_
_
_
*
*
*
*
*
*
*
*
_
_
_
_
_
_
_
_
_
0
0
1
1
1
0
0
1
1
1
0
0
1
1
1
0
1
1
1
0
1
1
1
_
_
_
_
_
_
*
*
*
_
_
*
*
*
*
_
_
_
_
_
_
_
_
_
_
_
*
*
*
_
_
_
_
_
_
1
1
1
1
_
*
_
_
_
_
_
_
_
_
_
_
*
*
*
*
*
*
*
*
0
1
2
0
1
2
3
1
0
0
1
1
2
3
0
1
1
2
3
0
1
1
2
3
0
1
2
3
0
1
2
3
1
2
3
4
5
6
*
*
*
1
2
*
*
*
*
0
1
*
*
1
2
0
1
2
0
1
*
*
*
0
1
1
2
0
1
1
2
3
4
0
*
1
2
0
0
1
1
2
3
4
5
Power on
OK or ERR
OK or ERR
OK or ERR
OK or ERR
OK or ERR
OK or ERR
OK or ERR
OK or ERR
OK or ERR
OK or ERR
OK or ERR
OK or ERR
OK or ERR
OK or ERR
OK or ERR
OK or ERR
OK or ERR
OK or ERR
OK or ERR
OK or ERR
OK or ERR
OK or ERR
OK or ERR
OK or ERR
OK or ERR
OK or ERR
OK or ERR
OK or ERR
OK or ERR
OK or ERR
OK or ERR
OK or ERR
OK or ERR
OK or ERR
OK or ERR
OK or ERR
OK or ERR
OK or ERR
OK or ERR
OK or ERR
OK or ERR
OK or ERR
OK or ERR
OK or ERR
OK or ERR
OK or ERR
OK or ERR
OK or ERR
OK or ERR
OK or ERR
OK or ERR
OK or ERR
OK or ERR
OK or ERR
OK or ERR
OK or ERR
OK or ERR
OK or ERR
OK or ERR
kHz (***.* or _)
Hz (***.* or _)
OK or ERR
OK or ERR
OK or ERR
OK or ERR
OK or ERR
OK or ERR
OK or ERR
OK or ERR
OK or ERR
OK or ERR
OK or ERR
OK or ERR
OK or ERR
OK or ERR
OK or ERR
OK or ERR
OK or ERR
OK or ERR
OK or ERR
OK or ERR
OK or ERR
OK or ERR
OK or ERR
OK or ERR
OK or ERR
OK or ERR
OK or ERR
OK or ERR
OK or ERR
OK or ERR
Standby mode
(or 40-second startup time)
ERR
ERR
ERR
ERR
ERR
ERR
ERR
ERR
ERR
ERR
ERR
ERR
ERR
ERR
ERR
ERR
ERR
ERR
ERR
ERR
ERR
ERR
ERR
ERR
ERR
ERR
ERR
ERR
ERR
ERR
ERR
ERR
ERR
ERR
ERR
ERR
ERR
ERR
ERR
ERR
ERR
ERR
ERR
ERR
ERR
ERR
ERR
ERR
ERR
ERR
ERR
ERR
ERR
ERR
ERR
ERR
ERR
ERR
ERR
ERR
ERR
ERR
ERR
ERR
ERR
ERR
ERR
ERR
ERR
ERR
ERR
ERR
ERR
ERR
ERR
ERR
ERR
ERR
ERR
ERR
ERR
ERR
ERR
ERR
ERR
ERR
ERR
ERR
ERR
ERR
ERR
15
RS-232C Specifications and Commands
Return
Control Contents
Video System Selection : PAL-M
Video System Selection : PAL-N
Background Selection : Logo
Background Selection : Custom
Background Selection : Blue
Background Selection : None
Startup Image Selection : Logo
Startup Image Selection : Custom
Startup Image Selection : None
Eco Mode : Standard
Eco Mode : Eco
Auto Search : Off
Auto Search : On
Auto Power Off : Disable
Auto Power Off : Enable
Lamp 1 Usage Time (Hour)
Lamp 2 Usage Time (Hour)
Lamp 1 Life (Percentage)
Lamp 2 Life (Percentage)
Lamp Mode : Both Lamps
Lamp Mode : Lamp 1 Only
Lamp Mode : Lamp 2 Only
Lamp Mode : Equal Use
PRJ Mode : Reverse Off
PRJ Mode : Reverse On
PRJ Mode : Invert Off
PRJ Mode : Invert On
Stack Setting : Normal
Stack Setting : Master
Stack Setting : Slave
Keylock Level : Normal
Keylock Level : Level A
Keylock Level : Level B
Set Inputs : INPUT 1 No Use
Set Inputs : INPUT 1 Use
Set Inputs : INPUT 2 No Use
Set Inputs : INPUT 2 Use
Set Inputs : INPUT 3 No Use
Set Inputs : INPUT 3 Use
Set Inputs : INPUT 4 No Use
Set Inputs : INPUT 4 Use
Set Inputs : INPUT 5 No Use
Set Inputs : INPUT 5 Use
Fan Mode : Normal
Fan Mode : High
Direct Power On : Off (Disable)
Direct Power On : On (Enable)
Monitor Out : Disable
Monitor Out : Enable
LAN/RS232C : Disable
LAN/RS232C : Enable
Language Selection : ENGLISH
Language Selection : DEUTSCH
Language Selection : ESPAÑOL
Language Selection : NEDERLANDS
Language Selection : FRANÇAIS
Language Selection : ITALIANO
Language Selection : SVENSKA
Language Selection :
Language Selection : PORTUGUÊS
Language Selection :
Language Selection :
Model Name Check
Model Name Check 2
Serial No. Check *3
Projector Name Setting 1 (First four characters) *4
Projector Name Setting 2 (Middle four characters) *4
Projector Name Setting 3 (Last four characters) *4
Projector Name Check
Lamp1 Lamp Timer Reset *5
Lamp2 Lamp Timer Reset *5
All Reset *6
Command
M
M
I
I
I
I
I
I
I
T
T
I
I
A
A
T
T
T
T
L
L
L
L
I
I
I
I
S
S
S
K
K
K
R
R
R
R
R
R
V
V
V
V
H
H
D
D
M
M
L
L
M
M
M
M
M
M
M
M
M
M
M
T
M
S
P
P
P
P
L
L
A
E
E
M
M
M
M
M
M
M
H
H
N
N
P
P
L
L
L
L
P
P
P
P
M
M
M
M
T
T
T
E
E
E
A
A
B
B
C
C
A
A
B
B
L
L
P
P
O
O
N
N
E
E
E
E
E
E
E
E
E
E
E
N
N
N
J
J
J
J
P
P
L
S
S
B
B
B
B
S
S
S
M
M
S
S
O
O
T
T
T
T
M
M
M
M
R
R
I
I
A
A
A
Y
Y
Y
S
S
S
S
S
S
S
S
S
S
M
M
O
O
U
U
R
R
L
L
L
L
L
L
L
L
L
L
L
A
R
R
N
N
N
N
R
R
R
Y
Y
G
G
G
G
I
I
I
D
D
E
E
W
W
T
T
L
L
D
D
D
D
E
E
N
N
K
K
K
L
L
L
I
I
I
I
I
I
I
I
I
I
D
D
W
W
T
T
S
S
A
A
A
A
A
A
A
A
A
A
A
M
D
D
1
2
3
0
E
E
E
Parameter
_
_
_
_
_
_
_
_
_
_
_
_
_
_
_
_
_
_
_
_
_
_
_
_
_
_
_
_
_
_
_
_
_
_
_
_
_
_
_
_
_
_
_
_
_
_
_
_
_
_
_
_
_
_
_
_
_
_
_
_
_
_
_
_
_
*
*
*
_
0
0
_
_
_
_
_
_
_
_
_
_
_
_
_
_
_
_
_
_
_
_
_
_
_
_
_
_
_
_
_
_
_
_
_
_
_
_
_
_
_
_
_
_
_
_
_
_
_
_
_
_
_
_
_
_
_
_
_
_
_
_
_
_
_
_
_
_
*
*
*
_
0
0
_
_
_
_
_
_
_
_
_
_
_
_
_
_
_
_
_
_
_
_
_
_
_
_
_
_
_
_
_
_
_
_
_
_
_
_
_
_
_
_
_
_
_
_
_
_
_
_
_
_
_
_
_
_
_
_
_
_
_
_
_
1
1
_
_
_
*
*
*
_
0
0
_
6
7
1
2
3
4
1
2
3
0
1
0
1
0
1
1
2
1
2
0
1
2
3
0
1
0
1
0
1
2
0
1
2
0
1
0
1
0
1
0
1
0
1
0
1
0
1
0
1
0
1
1
2
3
4
5
6
7
8
9
0
1
1
1
1
*
*
*
1
1
2
1
Power on
OK or ERR
OK or ERR
OK or ERR
OK or ERR
OK or ERR
OK or ERR
OK or ERR
OK or ERR
OK or ERR
OK or ERR
OK or ERR
OK or ERR
OK or ERR
OK or ERR
OK or ERR
0 - 9999 (Integer)
0 - 9999 (Integer)
0% - 100% (Integer)
0% - 100% (Integer)
OK or ERR
OK or ERR
OK or ERR
OK or ERR
OK or ERR
OK or ERR
OK or ERR
OK or ERR
OK or ERR
OK or ERR
OK or ERR
OK or ERR
OK or ERR
OK or ERR
OK or ERR
OK or ERR
OK or ERR
OK or ERR
OK or ERR
OK or ERR
OK or ERR
OK or ERR
OK or ERR
OK or ERR
OK or ERR
OK or ERR
OK or ERR
OK or ERR
OK or ERR
OK or ERR
OK or ERR
OK or ERR
OK or ERR
OK or ERR
OK or ERR
OK or ERR
OK or ERR
OK or ERR
OK or ERR
OK or ERR
OK or ERR
OK or ERR
OK or ERR
EIP-5000
EIP-5000
Serial No.
OK or ERR
OK or ERR
OK or ERR
Projector Name
ERR
ERR
OK or ERR
Standby mode
(or 40-second startup time)
ERR
ERR
ERR
ERR
ERR
ERR
ERR
ERR
ERR
ERR
ERR
ERR
ERR
ERR
ERR
ERR
ERR
ERR
ERR
ERR
ERR
ERR
ERR
ERR
ERR
ERR
ERR
ERR
ERR
ERR
ERR
ERR
ERR
ERR
ERR
ERR
ERR
ERR
ERR
ERR
ERR
ERR
ERR
*2
ERR
ERR
ERR
ERR
ERR
ERR
ERR
ERR
ERR
ERR
ERR
OK or ERR
OK or ERR
ERR
PJLinkTM Compliant:
This product conforms with the PJLink standard Class 1 and all Class 1 commands are implemented.
This product confirms with the PJLink standard specification version 1.00.
For additional information, visit “http://pjlink.jbmia.or.jp/english/”.
16
Setting up the Projector Network Environment
This section describes the basic procedure for using the projector via the network.
If the network is already constructed, the projector’s network settings may need to be changed. Please
consult your network administrator for assistance with these settings.You can make network settings both
on the projector and on the computer. The following procedure is for making settings on the computer.
Network settings on the computer
1. Connecting the projector to a computer
Connect a commercially available LAN cable (UTP cable, Category 5, cross-over type) between the computer and projector.
LAN cable
Page 18
2. Setting an IP address for the computer
Adjust the IP settings of the computer to enable one-to-one communications with the projector.
Temporarily change
the computer’s IP
address.
Pages 19, 20
3. Setting up a network connection for the projector
Adjust the projector network settings to conform to your network.
Use Internet Explorer
(version 5.0 or later)
to make various
projector settings.
Pages 21, 22
• Microsoft® and Windows® are registered trademarks of Microsoft Corporation in the United States and/or
other countries.
• All other company or product names are trademarks or registered trademarks of their respective companies.
17
Setting up the Projector Network Environment
1. Connecting the Projector to a Computer
Establishing a one-to-one connection from the
projector to a computer. Using a commercially
available LAN cable (UTP cable, Category 5,
cross-over type) you can configure the
projector via the computer.
1
Disconnect the computer’s LAN
cable from the existing network.
A LAN cable being
connected to the network
2
Connect a commercially
available LAN cable (UTP cable,
Category 5, cross-over type) to
the projector’s LAN terminal and
connect the other end of the
cable to the computer’s LAN
terminal.
LAN cable
3
Plug the power cord into the AC
socket of the projector.
4
Turn on the computer.
ON
Info
Confirm that the LINK LED on the side of the
projector illuminates. If the LINK LED does not
illuminate, check the following :
• The LAN cable is properly connected.
• The power switches of both the projector
and the computer are on.
This completes the connection. Now proceed to “2. Setting an IP Address for the Computer”.
18
Setting up the Projector Network Environment
2. Setting an IP Address
for the Computer
The following describes how to make settings
in Windows ® XP (Professional or Home
Edition).
1
Log on the network using the
administrator’s account for the
computer.
2
Click “start”, and click “Control
Panel”.
2
1
3
Click “Network and Internet Connections”, and click “Network
Connections” in the new window.
1
• This manual uses examples to explain
the operations in Category View. If you
are using Classic View, double-click
“Network Connections”.
2
4
Right-click “Local Area Connection” and select “Properties”
from the menu.
1
2
19
Setting up the Projector Network Environment
5
Click “Internet Protocol (TCP/IP)”,
and click the “Properties” button.
1
2
6
Confirm or change an IP address
for the setup computer.
1 Confirm and note the current IP address, Subnet mask and Default
gateway.
Make sure to note the current IP address, Subnet mask and Default gateway as you will be required to reset
them later.
2 Set temporarily as follows :
IP address : 192.168.150.3
Subnet mask : 255.255.255.0
Default gateway : (Do not input any
values.)
Note
• The default settings (“DHCP Client” is set to
“OFF” on the projector) are as follows:
IP address : 192.168.150.2
Subnet mask : 255.255.255.0
Default gateway : 0.0.0.0
7
After setting, click the “OK” button,
and then restart the computer.
After confirming or setting, proceed to “3. Setting up Network Connection for the Projector”.
20
Setting up the Projector Network Environment
3. Setting up a Network
Connection for the
Projector
Settings for such items as the projector’s IP
address and subnet mask are compatible with
the existing network.
Set each item on the projector as follows. (See
page 89 of the projector owner’s manual for
setting.)
DHCP Client : OFF
IP Address : 192.168.150.002
Subnet Mask : 255.255.255.000
1
Start Internet Explorer (version
5.0 or later) on the computer, and
enter “http://192.168.150.2/” in
“Address”, and then press the
“Enter” key.
2
If a user name and a password
have not yet been set, just click
the “OK” button.
• If a user name and a password have
been set, input the user name and the
password, and click the “OK” button.
• If the user name or password is entered
incorrectly three times, an error message will be displayed.
3
When the screen as shown on
the right appears, click “TCP/IP”.
21
Setting up the Projector Network Environment
4
The TCP/IP setting screen appears, ready for network settings
for the projector.
Items
Setting example / Remarks
DHCP
Select “ON” or “OFF” to determine
Client
whether to use DHCP Client.
IP Address You can set this item when “DHCP
Client” is set to “OFF”.
Factory default setting: 192.168.150.2
Enter an IP address appropriate
for the network.
You can set this item when “DHCP
Subnet
Mask
Client” is set to “OFF”.
Factory default setting: 255.255.255.0
Set the subnet mask to the same
as that of the computer and
equipment on the network.
Default
You can set this item when “DHCP
Gateway
Client” is set to “OFF”.
Factory default setting: 0.0.0.0
* When not in use, set to “0.0.0.0”.
DNS
Factory default setting: 0.0.0.0
Server
* When not in use, set to “0.0.0.0”.
Note
• Confirm the existing network’s segment (IP
address group) to avoid setting an IP address that duplicates the IP addresses of
other network equipment or computers. If
“192.168.150.2” is not used in the network
having an IP address of “192.168.150.XXX”,
you don’t have to change the projector IP
address.
• For details about each setting, consult your
network administrator.
•
•
•
•
22
5
Click the “Apply” button.
6
The set values appear. Confirm
that the values are set properly,
and then click the “Confirm” button.
Close the browser.
This completes the network settings.
After setting items, wait for 10 seconds and then re-access.
Change the IP address of the setting computer back to its original address, which you have noted down in
Step 6-1 on page 20, and then connect the computer and the projector to the network.
Controlling the Projector via LAN
After connecting the projector to your network, enter the projector IP address in “Address”
on Internet Explorer (version 5.0 or later) using a computer on the network to start a setup
screen that will enable control of the projector via the network.
Controlling the Projector
Using Internet Explorer
(Version 5.0 or later)
Complete connections to external equipment
before starting the operation. (See pages 2436 on the owner’s manual of the projector.)
Complete the AC cord connection. (See page
37 on the owner’s manual of the projector)
Note
• When connecting the projector to the LAN, use a
commercially available LAN cable (UTP cable,
Category 5, cross-over type). When connecting
the projector to a hub, use a straight-through cable.
1
Start Internet Explorer (version 5.0
or later) on the computer.
2
Enter “http://” followed by the
projector IP address set by the
procedure on page 22 followed
by “/” in “Address”, and then
press the “Enter” key.
• The default setting (“DHCP Client” is set to
“OFF” on the projector) for IP address is
“192.168.150.2”. If you did not change the IP
address in “3. Setting up a Network Connection for the Projector” (pages 21-22),
enter “http://192.168.150.2/”.
3
A screen for controlling the projector appears, ready for performing various status conditions, control, and settings.
23
Controlling the Projector via LAN
Confirming the Projector
Status (Status)
Controlling the Projector
(Control)
On this screen, you can perform projector control. You can control the following items :
On this screen, you can confirm the projector
status. You can confirm the following items :
•
•
•
•
•
•
•
•
•
•
MAC Address
Power
Condition
Lamp Timer 1
Lamp Timer 2
Lamp Life 1
Lamp Life 2
Input
Signal Info
Serial Number
Note
• If you click the “Refresh” button before the
screen is displayed completely, an error
message (“Server Busy Error”) will be displayed. Wait for a moment and then operate again.
• For details about each item, refer to the
owner’s manual of the projector.
24
•
•
•
•
•
Power
Input Select
Volume
Mute (Audio)
Black Screen
Note
• If you click the “Refresh” button before the
screen is displayed completely, an error message (“Server Busy Error”) will be displayed.
Wait for a moment and then operate again.
• You cannot operate this page while the projector is warming up.
• While the projector is in standby mode, you
can only control “Power ON”.
• For details about each item, refer to the
owner’s manual of the projector.
Controlling the Projector via LAN
Setting and Adjusting the
Projector (Settings & Adjustments)
Setting the Security
(Network – Security)
Example: “Picture” screen display for INPUT 1
On these screens, you can make projector
settings or adjustments. You can set or adjust
the following items :
•
•
•
•
•
•
•
•
•
•
•
•
•
•
•
•
•
•
•
•
•
•
•
•
•
•
•
•
•
•
•
•
Picture Mode
CLR Temp
Bright Boost
Progressive
C.M.S. Adjustment
DNR
Signal Type
Auto Sync
Auto Sync Disp
Audio Out
Internal Speaker
Resize
OSD Display
Video System (INPUT 4/5)
Background
Startup Image
Eco Mode
Auto Search
Auto Power Off
Password
Lamp Mode
Projection Mode
Keylock Level
Set Inputs
Fan Mode
Direct Power On
RS-232C Speed
Monitor Out (Standby)
Video Wall (See page 41.)
Stack Setting (See page 38.)
All Reset
OSD Language
Note
• If you click the “Refresh” button before the
screen is displayed completely, an error message (“Server Busy Error”) will be displayed.
Wait for a moment and then operate again.
• You cannot operate this page while the projector is warming up.
• While the projector is in standby mode, you
can only control “Power ON”.
• For details about each item, refer to the
owner’s manual of the projector.
On this screen, you can make settings relating to security.
Items
Description
User Name Setting of user name for
security protection.
Password Setting of password for
security protection.
Accept IP It is possible to set up to three
Address
IP addresses allowing connection to the projector.
All IP
No limits are set to IP addresses
Addresses connecting to the projector.
From only For security improvement, only an
specific IP IP address set by “Address 1-3”
addresses can be connected to the projector.
After clicking the “Apply” button, the set values appear. Confirm that the values are set
properly, and then click the “Confirm” button.
Note
• After setting items, wait for 10 seconds and
then re-access.
• User Name and Password can be up to 8
characters.
• You can input the characters below :
a-z, A-Z, 0-9, -, _
• To cancel User Name and Password, enter
nothing and then press “Apply” button.
25
Controlling the Projector via LAN
Making General Settings
for the Network (Network –
Setting for Sending E-mail
when an Error Occurs
General)
(Mail – Originator Settings)
On this screen, you can make settings for
sending e-mail to report when the projector
has generated an error.
On this screen, you can make general settings
relating to the network.
Items
Projector
Name
Auto
Logout
Time
Data Port
Search
Port
Description
Setting the projector name.
Setting the time interval in
which the projector will be
automatically disconnected
from the network in units of a
minute (from 1 to 65535
minutes). If the set value is
made 0, the Auto Logout
function is disabled.
Setting the TCP port number
used when exchanging a data
with the projector (from 1025 to
65535).
Setting the port number used
when searching for the
projector (from 1025 to 65535).
After clicking the “Apply” button, the set values appear. Confirm that the values are set
properly, and then click the “Confirm” button.
Note
• After setting items, wait for 10 seconds and
then re-access.
• Projector Name can be up to 12 characters.
• You can input the characters below :
A-Z, 0-9, -, _, (, ), space
(When “a-z” are input, they are converted to
“A-Z” automatically.)
26
Items
SMTP
Server
Originator
E-mail
Address
Originator
Name
Setting example / Remarks
Setting an SMTP server
address for e-mail transmission.
e.g.1 : 192.168.150.253
e.g.2 : smtp123.eiki.com
* When using a domain name,
make settings for the DNS
server.
Setting the projector’s e-mail
address. The e-mail address set
here becomes Originator E-mail
Address.
Setting the sender’s name.
The name set here appears in
the “Originator Name” column
of the body of the message.
Note
• SMTP Server, Originator E-mail Address and
Originator Name can be up to 64 characters.
• You can input the characters below:
SMTP Server and Originator E-mail Address :
a-z, A-Z, 0-9, !, #, $, %, &, *, +, -, /, =, ?, ^, {,
|, }, ~, _, ’, ., @, `
(You can input “@” only one time for “Originator E-mail Address”.)
Originator Name : a-z, A-Z, 0-9, -, _, (, ),
space
• If the settings of “3. Setting up a Network
Connection for the Projector” on pages 21
and 22 are incorrectly set, e-mail will not be
sent.
Controlling the Projector via LAN
Setting Error Items and
Destination Addresses to
which E-mail is to be Sent
when an Error Occurs
Setting Error Items and
the URL that are to be
Displayed when an Error
Occurs (Service & Support –
(Mail – Recipient Settings)
Access URL)
On this screen, you can input e-mail destinations to which error notification (error items)
e-mails are sent.
Items
E-mail
Address
Description
Set addresses to which error
notification e-mail is sent. You
can set up to five addresses.
Error Mail Error e-mail is sent on the error
(Lamp, Temp, items checked in their check
Fan, Cover) boxes.
Test
Send test e-mail. This allows
you to confirm that the settings
for e-mail transmission are
properly set.
On this screen, you can make settings of the
URL and error items that are to be displayed
when the projector has generated an error.
Items
Access
URL
Description
Set the URL that is to be
displayed when an error
occurs. You can set up to five
addresses.
Condition The URL is displayed when an
(Always, Lamp, error checked in their check
Temp, Fan, Cover) boxes occurs.
Test
The set URL site is testdisplayed. This allows you to
confirm that the URL site is
properly displayed.
Example of the display when an error occurs
Note
∑ E-mail Address can be up to 64 characters.
∑ You can input the characters below :
a-z, A-Z, 0-9, !, #, $, %, &, *, +, -, /, =, ?, ^, {, |,
}, ~, _, ’, ., @, `
(You can input “@” only one time.)
∑ For details about error items, refer to the
owner’s manual of the projector.
27
Setting the Projector Using RS-232C or Telnet
Connect the projector to a computer using RS-232C or Telnet, and open the SETUP MENU on
the computer to carry out various settings for the projector.
7
When Connecting Using
RS-232C
1
2
Launch general purpose terminal
emulator.
• If a password has not yet been set, just press
the “Enter” key.
8
Input “setup” and press the “Enter”
key.
• SETUP MENU will be displayed.
Input settings for the RS-232C port
of the terminal emulator as follows.
Baud Rate
Data Length
Parity Bit
Stop Bit
Flow Control
: 9600 bps*
: 8 bit
: None
: 1 bit
: None
* This is the factory default setting. If the value
of Baud Rate for the projector has been
changed, set Baud Rate here according to
the changed value on the projector.
3
Input “PJS11234” and press the
“Enter” key.
4
“OK” is displayed. Input “PJS25678”
and press the “Enter” key within 10
seconds.
5
“OK” is displayed. Press the “Enter” key.
6
“User Name:” is displayed. Input the
user name and press the “Enter”
key.
• If a user name has not yet been set, just
press the “Enter” key.
28
“Password:” is displayed. Input the
password and press the “Enter” key.
▼SETUP MENU
---------------------------------SETUP MENU-------------------------------[1]IP Address
[2]Subnet Mask
[3]Default Gateway
[4]User Name
[5]Password
[6]RS-232C Baud Rate [7]Projector Name [8]DHCP Client
[A]Advanced Setup
[D]Disconnect All
[V]View All Setting
[S]Save & Quit
[Q]Quit Unchanged
setup>
Note
• User name and password are not set in the factory default settings.
• If the user name or password is entered incorrectly three times, SETUP MENU will be quit.
Setting the Projector Using RS-232C or Telnet
▼SETUP MENU
When Connecting Using
Telnet
1
Click “start” from the Windows® desktop and select “Run”.
---------------------------------SETUP MENU-------------------------------[1]IP Address
[2]Subnet Mask
[3]Default Gateway
[4]User Name
[5]Password
[6]RS-232C Baud Rate [7]Projector Name [8]DHCP Client
[A]Advanced Setup
[D]Disconnect All
[V]View All Setting
[S]Save & Quit
[Q]Quit Unchanged
setup>
Note
2
Enter “telnet 192.168.150.2” in the text
box that opens up. (If the IP address
of the projector is 192.168.150.2.)
3
Click the “OK” button.
4
“User Name:” is displayed. Input the
user name and press the “Enter”
key.
∑ If the IP address has been changed, be sure to
enter the new IP address in step 2.
∑ User name and password are not set in the factory default settings.
∑ If the user name or password is entered incorrectly three times in steps 4 or 5, SETUP MENU
will be quit.
∑ If a user name has not yet been set, just
press the “Enter” key.
5
“Password:” is displayed. Input the
password and press the “Enter” key.
∑ If a password has not yet been set, just press
the “Enter” key.
6
Input “setup” and press the “Enter”
key.
∑ SETUP MENU will be displayed.
29
Setting the Projector Using RS-232C or Telnet
SETUP MENU
(Main Menu)
▼SETUP MENU
---------------------------------SETUP MENU-------------------------------[1]IP Address
[2]Subnet Mask
[3]Default Gateway
[4]User Name
[5]Password
[6]RS-232C Baud Rate [7]Projector Name [8]DHCP Client
[A]Advanced Setup
[D]Disconnect All
[V]View All Setting
[S]Save & Quit
[Q]Quit Unchanged
▼ADVANCED SETUP MENU
******************** ADVANCED SETUP MENU ***********************
[1]Auto Logout Time [2]Data Port
[5]Network Ping Test
[6]Accept IP Addr(1) [7]Accept IP Addr(2) [8]Accept IP Addr(3)
[9]Accept All IP Addr [0]Search Port
[!]Restore Default Setting
[Q]Return to Main Menu
setup>
[1]IP Address (Factory default setting : 192.168.150.2)
IP address settings. (Page 33)
[2]Subnet Mask (Factory default setting :
255.255.255.0)
Subnet mask settings. (Page 33)
[3]Default Gateway (Factory default setting : Not
Used)
Default gateway settings. (Page 33)
[4]User Name (Factory default setting : Not Required)
Setting of user name for security protection. (Page 33)
[5]Password (Factory default setting : Not Required)
Setting of password for security protection. (Page 34)
[6]RS-232C Baud Rate (Factory default setting :
9600 bps)
Baud rate settings for the RS-232C terminals. (Page
34)
[7]Projector Name
It is possible to assign a projector name. (Page 34)
[8]DHCP Client
DHCP Client settings. (Page 34)
[A]Advanced Setup
Enters ADVANCED SETUP MENU. (Page 35)
[D]Disconnect All
Disconnect all connections. (Page 35)
[V] View All Setting
Displays all setting values. (Page 31)
Can also be used with ADVANCED SETUP MENU.
[S] Save & Quit
Save set values and quit menu. (Page 32)
[Q]Quit Unchanged
Quit menu without saving setting values. (Page 32)
Note
• The default settings (“DHCP Client” is set to
“OFF” on the projector) are as follows:
IP address : 192.168.150.2
Subnet mask : 255.255.255.0
Default gateway : 0.0.0.0
30
ADVANCED SETUP MENU
advanced>
[1]Auto Logout Time (Factory default setting : 5 minutes)
Setting of time until automatic disconnection of network connection. (Page 35)
[2]Data Port (Factory default setting : 10002)
Setting the TCP port number used when exchanging data. (Page 35)
[5]Network Ping Test
It is possible to confirm that a network connection
between the projector and a computer etc. is working normally. (Page 36)
[6]Accept IP Addr(1)
[7]Accept IP Addr(2)
[8]Accept IP Addr(3)
[9]Accept All IP Addr (Factory default setting : Accept All)
For improved security, it is possible to set up to three
IP addresses allowing connection to the projector.
Set IP addresses can be cancelled using [9] Accept
All IP Addr. (Page 36)
[0] Search Port (Factory default setting : 9300)
Setting the port number used when searching for
the projector. (Page 37)
[!] Restore Default Setting
Restores all setting values that can be set using the
menu to the default state. (Page 37)
[Q]Return to Main Menu
Return to the main SETUP MENU. (Page 37)
Controlling the Projector Using RS-232C or Telnet
Enter number or symbol of item to be selected on the SETUP MENU. When setting, input the
details to be set. Setting is carried out one item at a time, and saved at the end.
View Setting Detail List
Set Items
([V]View All Setting)
Example: When setting IP Address (change from
192.168.150.2 to 192.168.150.3)
▼SETUP MENU
▼SETUP MENU
---------------------------------SETUP MENU-------------------------------[1]IP Address
[2]Subnet Mask
[3]Default Gateway
[4]User Name
[5]Password
[6]RS-232C Baud Rate [7]Projector Name [8]DHCP Client
[A]Advanced Setup
[D]Disconnect All
[V]View All Setting
[S]Save & Quit
[Q]Quit Unchanged
setup>v
Model Name
: XX-XXXX
Projector Name
: XX-XXXX
MAC Address
: 00:0B:2C:01:14:00
DHCP Client
: Off
IP Address
: 192.168.150.2
Subnet Mask
: 255.255.255.0
Default Gateway
: Not Used
RS-232 Baud Rate : 9600 bps
Password
: Not Required
**********(Advanced Status)**********
Data Port
: 10002
Accept IP Address : Accept All
Auto Logout Time : 5 minutes
Search Port
: 9300
1 Enter “v” and press the “Enter” key.
Display all setting values(*).
1
*
---------------------------------SETUP MENU-------------------------------[1]IP Address
[2]Subnet Mask
[3]Default Gateway
[4]User Name
[5]Password
[6]RS-232C Baud Rate [7]Projector Name [8]DHCP Client
[A]Advanced Setup
[D]Disconnect All
[V]View All Setting
[S]Save & Quit
[Q]Quit Unchanged
setup>1
IP Address
: 192.168.150.2
Please Enter
: 192.168.150.3
(change)
—> 192.168.150.3
---------------------------------SETUP MENU-------------------------------[1]IP Address
[2]Subnet Mask
[3]Default Gateway
[4]User Name
[5]Password
[6]RS-232C Baud Rate [7]Projector Name [8]DHCP Client
[A]Advanced Setup
[D]Disconnect All
[V]View All Setting
[S]Save & Quit
[Q]Quit Unchanged
1
*1
2
*2
setup>v
Model Name
: XX-XXXX
Projector Name
: XX-XXXX
MAC Address
: 00:0B:2C:01:14:00
DHCP Client
: Off
IP Address
: 192.168.150.3
Subnet Mask
: 255.255.255.0
Default Gateway
: Not Used
RS-232C Baud Rate : 9600 bps
Password
: Not Required
**********(Advanced Status)**********
Data Port
: 10002
Accept IP Address : Accept All
Auto Logout Time : 5 minutes
Search Port
: 9300
3
*3
1 Enter “1” (number of item to be set), and press
the “Enter” key.
Display current IP address (*1).
2 Enter IP address to be set and press the “Enter” key.
Display IP address after change (*2).
3 Enter “v” and press the “Enter” key to verify
setting detail list.
IP address is being changed (*3).
Note
∑ Verification of setting detail list can be omitted.
∑ Setting details are not effective until they have
been saved. (Page 32)
∑ If an invalid number is entered, an error message
(“Parameter Error!”) will be displayed.
31
Controlling the Projector Using RS-232C or Telnet
Save Settings and Quit
([S]Save & Quit)
Quit without Saving Settings ([Q]Quit Unchanged)
Save set values and quit menu.
Quit menu without saving setting values.
▼SETUP MENU
▼SETUP MENU
---------------------------------SETUP MENU-------------------------------[1]IP Address
[2]Subnet Mask
[3]Default Gateway
[4]User Name
[5]Password
[6]RS-232C Baud Rate [7]Projector Name [8]DHCP Client
[A]Advanced Setup
[D]Disconnect All
[V]View All Setting
[S]Save & Quit
[Q]Quit Unchanged
---------------------------------SETUP MENU-------------------------------[1]IP Address
[2]Subnet Mask [3]Default Gateway
[4]User Name
[5]Password
[6]RS-232C Baud Rate [7]Projector Name [8]DHCP Client
[A]Advanced Setup
[D]Disconnect All
[V]View All Setting
[S]Save & Quit
[Q]Quit Unchanged
setup>s
All Connection will be disconnect.
Continue(y/n)? y
Apply New setting...Done.
1 Enter “s” and press the “Enter” key.
2 Enter “y” and press the “Enter” key.
32
1
2
setup>q
Quit Without Saving(y/n)? y
Setting Unchanged.
1 Enter “q” and press the “Enter” key.
2 Enter “y” and press the “Enter” key.
1
2
Controlling the Projector Using RS-232C or Telnet
The setting procedure for each item will be explained. For the basic procedure, please refer
to “Set Items” on page 31.
IP Address Setting
Default Gateway Setting
([1]IP Address)
([3]Default Gateway)
Setting of IP address.
Setting default gateway.
setup>1
IP Address
Please Enter
(change)
—>
1
:192.168.150.2
:192.168.150.3
192.168.150.3
2
*
1 Enter “1” and press the “Enter” key.
2 Enter numerical value to be set and press the
“Enter” key.
Display IP address after change (*).
setup>3
note: “0.0.0.0” means “Using no default gateway.”
Gateway Address :0.0.0.0
Please Enter
:192.168.150.1
(change)
—> 192.168.150.1
1
2
*
1 Enter “3” and press the “Enter” key.
2 Enter numerical value to be set and press the
“Enter” key.
Display gateway address after change (*).
Note
Subnet Mask Setting
• If the values for IP Address, Subnet Mask or Gateway of the projector have been changed via Telnet,
the computer cannot be connected to the projector
depending on the computer’s network settings.
([2]Subnet Mask)
Setting subnet mask.
setup>2
Subnet Mask
Please Enter
(change)
—>
1
:255.255.255.0
:255.0.0.0
255.0.0.0
2
*
1 Enter “2” and press the “Enter” key.
2 Enter numerical value to be set and press the
“Enter” key.
Display subnet mask after change (*).
User Name Setting
([4]User Name)
Carrying out security protection using user name.
setup>4
User Name
:
Please Enter
: XX-XXXX
(change)
—> XX-XXXX
1
2
*
1 Enter “4” and press the “Enter” key.
2 Enter user name and press the “Enter” key.
Display set user name (*).
Note
• User name can be up to 8 characters.
• You can input the characters below :
a-z, A-Z, 0-9, -, _
• In the default state, user name is not set.
33
Controlling the Projector Using RS-232C or Telnet
Password Setting
Projector Name Setting
([5]Password)
([7]Projector Name)
Carrying out security protection using password.
It is possible to assign a projector name.
setup>5
Password
:
Please Enter
: eiki5000
(change)
—> eiki5000
1
2
*
1 Enter “5” and press the “Enter” key.
2 Enter password and press the “Enter” key.
Display set password (*).
Note
Setting of baud rate for RS-232C (COMPUTER and
PROJECTOR) terminals.
1
1 Enter “7” and press the “Enter” key.
2 Enter projector name.
Display set projector name (*).
DHCP Client Setting
([8]DHCP Client)
Setting DHCP Client to “On” or “Off”.
2
*
1 Enter “6” and press the “Enter” key.
2 Select and enter the number 0, 1 or 2 and
press the “Enter” key.
Display set baud rate (*).
Note
• Set the projector’s baud rate to the same rate as
that used by the computer.
34
2
*
• Projector name can be up to 12 characters.
• You can input the characters below :
A-Z, 0-9, -, _, (, ), space
(When “a-z” are input, they are converted to “A-Z”
automatically.)
• It is the same as the name which can be confirmed or set, using RS-232C commands “PJN0”,
“PJN1”, “PJN2” and “PJN3”.
RS-232C Baud Rate Setting ([6]RS-232C Baud Rate)
note: It sets both RS-232C (COMPUTER) and RS-232C (PROJECTOR).
0 ... 9600 bps
1 ... 38400 bps
2 ... 115200 bps
Baud Rate Select[0-2] :2
RS-232C Baud Rate : 115200 bps
1
: XX-XXXX
: MY XX-XXXX
MY XX-XXXX
Note
• Password can be up to 8 characters.
• You can input the characters below :
a-z, A-Z, 0-9, -, _
• In the default state, the password is not set.
setup>6
setup>7
Projector Name
Please Enter
(change)
—>
Example: When setting DHCP Client to “On”
setup>8
note: It sets DHCP Client.
0 ... Off
1 ... On
DHCP Select[0-1] : 1
DHCP Client : On
Success get data from DHCP server.
] : [00:0B:2C:01:14:00]
[MAC Address
] : [192.168.150.2]
[IP Address
] : [255.255.255.0]
[Subnet Mask
[Default Gateway ] : [0.0.0.0]
[DHCP IP Address] : [192.168.150.1]
1 Enter “8” and press the “Enter” key.
2 Enter “1” and press the “Enter” key.
Display the obtained values (*).
1
2
*
Controlling the Projector Using RS-232C or Telnet
Disconnecting All Connections ([D]Disconnect All)
Setting Auto Logout Time
It is possible to disconnect all the TCP/IP connections currently recognized by the projector. Even if
the COM Redirect port is fixed in the Busy status
due to a problem, it is possible to force the Ready
status back by carrying out this disconnection.
If there is no input after a fixed time, the projector
automatically disconnects network connection using
the Auto Logout function. It is possible to set the time
until the projector is automatically disconnected in
units of a minute (from 1 to 65535 minutes).
setup>d
Disconnect All Connections(y/n)?y
Now Disconnecting...
1
2
1 Enter “d” and press the “Enter” key.
2 Enter “y” and press the “Enter” key.
(ADVANCED[1]Auto Logout Time)
advanced>1
Valid range
: 0 to 65535 (minute)
note: if you enter “0”, auto logout function will be disable.
Auto Logout Time : 5
Please Enter
:15
(change)
—> 15
1
2
*
1 Enter “1” and press the “Enter” key.
2 Enter numerical value and press the “Enter” key.
Display set numerical value (*).
Note
• If Disconnect All is performed, the connection to
the projector via network will be forcibly disconnected.
Note
• If the set value is made 0, the Auto Logout function is disabled.
• If an invalid number is entered, an error message
(“Parameter Error!”) will be displayed and the
screen returns to the ADVANCED SETUP MENU.
Entering ADVANCED
SETUP MENU
Data Port Setting
(ADVANCED[2]Data Port)
([A]Advanced Setup)
Setting of TCP port number. It is possible to set in
the range of 1025 to 65535.
Enters ADVANCED SETUP MENU.
setup>a
******************** ADVANCED SETUP MENU ***********************
[1]Auto Logout Time [2]Data Port
[5]Network Ping Test
[6]Accept IP Addr(1) [7]Accept IP Addr(2) [8]Accept IP Addr(3)
[9]Accept All IP Addr [0]Search Port
[!]Restore Default Setting
[Q]Return to Main Menu
advanced>
1 Enter “a” and press the “Enter” key.
1
advanced>2
Valid range
Data Port
Please Enter
(change)
1
:1025 to 65535
:10002
:10005
—> 10005
2
*
1 Enter “2” and press the “Enter” key.
2 Enter numerical value and press the “Enter” key.
Display set numerical value (*).
Note
• Set according to need. Normally, use with the
factory default setting.
35
Controlling the Projector Using RS-232C or Telnet
Carrying out Network Ping
Test
Setting of Accept IP Address (ADVANCED[6]Accept IP
(ADVANCED[5]Network Ping Test)
Addr(1) - [8]Accept IP Addr(3))
It is possible to confirm that a network connection
between the projector and a computer etc. is working normally.
It is possible to improve security of the projector by
allowing connection from only a prescribed IP address. It is possible to set up to three IP addresses
allowing connection to the projector.
advanced>5
Ping dest IP addr :192.168.150.1
Please Enter
:192.168.150.152
(change)
—> 192.168.150.152
32 bytes from 192.168.150.152: icmp_seq = 1, time = 0 ms
32 bytes from 192.168.150.152: icmp_seq = 2, time = 0 ms
32 bytes from 192.168.150.152: icmp_seq = 3, time = 0 ms
32 bytes from 192.168.150.152: icmp_seq = 4, time = 0 ms
1
2
*1
*2
1 Enter “5” and press the “Enter” key.
2 Enter IP address of device to be tested and
press the “Enter” key.
Display entered IP address (*1).
Display test result (*2).
Note
∑ If the “Enter” key is pressed without entering an
IP address, the Ping destination IP address used
previously is entered.
∑ If there is a fault with the connection, “Error: No
answer” is displayed after a 5 second retry. In this
case, please confirm the settings for the projector
and the computer, and contact your network administrator.
1
advanced>6
Accept IP Addr(1) : 0.0.0.0
Please Enter
: 192.168.150.152
(change)
—> 192.168.150.152
2
*
1 Enter “6”, “7” or “8” and press the “Enter” key.
2 Enter numerical value and press the “Enter” key.
Display set numerical value (*).
Note
∑ To invalidate the Accept IP Addr being currently
set, enter “0.0.0.0”.
∑ If there is one or more Accept IP Addr being set,
no connections are allowed from IP addresses
that are not yet set. They can be cancelled using
[9]Accept All IP Addr.
Accepting All IP Addresses
(ADVANCED[9]Accept All IP Addr)
Removes IP addresses set with “Accept IP Addr”.
advanced>9
Accept All IP Addresses(y/n)? y
1
2
1 Enter “9” and press the “Enter” key.
2 Enter “y” and press the “Enter” key.
Note
∑ At the point in time where “y” was entered, the
numerical values for Accept IP Addr(1)-(3) are
reset to “0.0.0.0”.
∑ If “n” is entered, setting is not altered.
36
Controlling the Projector Using RS-232C or Telnet
Setting of Search Port
Return to Main Menu
(ADVANCED[0]Search Port)
(ADVANCED[Q]Return to Main Menu)
Sets the port number used when searching for the
projector from the network.
Returns to the main SETUP MENU.
1
advanced>0
Please Enter Port Number for Search from Computer.
Valid range
: 1025 to 65535
Search Port
: 9300
Please Enter
: 9301
(change)
—> 9301
2
*
advanced>q
---------------------------------SETUP MENU-------------------------------[1]IP Address
[2]Subnet Mask
[3]Default Gateway
[4]User Name
[5]Password
[6]RS-232C Baud Rate [7]Projector Name [8]DHCP Client
[A]Advanced Setup
[D]Disconnect All
[V]View All Setting
[S]Save & Quit
[Q]Quit Unchanged
1
setup>
1 Enter “0” and press the “Enter” key.
2 Enter numerical value and press the “Enter” key.
Display set numerical value (*).
1 Enter “q” and press the “Enter” key.
Returns to the SETUP MENU.
Note
• Set according to need. Normally, use with the factory default setting.
Return to Default Settings
(ADVANCED[!]Restore Default
Setting)
Returns all menu setting values to the default state.
advanced>!
Restore All Setting to Default(y/n)? y
— User Setting Initialized —
1
2
1 Enter “!” and press the “Enter” key.
2 Enter “y” and press the “Enter” key.
Note
• If the values for IP Address, Subnet Mask or Gateway of the projector have been returned to the
default settings via Telnet, the computer cannot
be connected to the projector depending on the
computer’s network settings.
37
Stack Projection
The stack projection allows you to increase the brightness of an image by stacking two
projectors and projecting same image simultaneously.
Info
• To set up the stack projection, assign a projector as the master and the other projector as the slave and
connect the projectors with commercially available LAN cables (UTP cable, Category 5, cross-over type).
In this way, you can control the both projectors with one remote control.
• The buttons below can control both the master and the slave at one time.
• STANDBY-ON button
• AUTO SYNC button
• BLACK SCREEN button
• RESIZE button
• INPUT 1 - 5 buttons
• PICTURE MODE button
• MUTE button
• BREAK TIMER button
• VOLUME buttons
• FREEZE button
• In normal operation, the projector set as the slave cannot be controlled by the remote control.
Only while the remote control is connected to the projector with a ø3.5 mm minijack cable (commercially
available), the projector set as the slave can be controlled by the remote control.
• Even while the projector is set as the slave, the buttons on the projector can be used.
38
Stack Projection
Setting up the Stack Projection
Basic
This part shows an example for setting up the stack projection of a computer image with two projectors.
RGB cable
OUTPUT (FOR INPUT 1, 2)
terminal
Projector 1: Master
LAN terminal
INPUT 1 terminal
RGB
cable
LAN cable
(cross-over type)
Computer
Projector 2: Slave
LAN terminal
INPUT 1 terminal
1
Set the “Stack Setting” of the projector 1 to “Master”.
4
(See page 84 on the owner’s manual of the
projector.)
2
3
Select inputs as specified in the
table below.
(See page 86 on the owner’s manual of the
projector.)
Set the “Stack Setting” of the projector 2 to “Slave”.
Projector 1
Master
Slave
(See page 84 on the owner’s manual of the
projector.)
Set Inputs
INPUT1 ON
INPUT2 OFF
INPUT3 OFF
INPUT4 OFF
INPUT5 OFF
Set Inputs
INPUT1 ON
INPUT2 OFF
INPUT3 OFF
INPUT4 OFF
INPUT5 OFF
Perform “Pair Stack” of the both
projectors.
(See page 85 on the owner’s manual of the
projector.)
5
Projector 2
Turn off the both projectors.
39
Stack Projection
6
Connect the INPUT 1 terminal on
the projector 1 to the RGB output
terminal on the computer using the
RGB cable.
8
Connect the LAN terminal on the
projector 1 to the LAN terminal on
the projector 2 using a commercially available LAN cable (UTP
cable, Category 5, cross-over type).
9
Turn on the projectors first, then
turn on the computer.
(See page 27 on the owner’s manual of the
projector.)
7
Connect the OUTPUT (FOR INPUT
1, 2) terminal on the projector 1 to
the INPUT 1 terminal on the projector 2 using an RGB cable.
(See page 36 on the owner’s manual of the
projector.)
Note
• When connecting an RGB cable to the projector 2, use the input terminal that has
the same number as the projector 1. (INPUT 1 terminal, in this case)
Application
When inputting multiple image sources, refer to the example below.
RGB cable
INPUT 1 terminal
Projector 1
OUTPUT (FOR INPUT 1, 2)
terminal
Projector 1:
Master
Master
LAN terminal
INPUT 2 terminals
INPUT 4 terminal
Computer
RGB
cable
INPUT 1 terminal
LAN cable
(cross-over
type)
Projector 2
Slave
5 BNC to 15-pin
D-sub cable
Projector 2:
Slave
LAN terminal
Computer
INPUT 4 terminal
Composite video cable
40
Set Inputs
INPUT1 ON
INPUT2 ON
INPUT3 OFF
INPUT4 ON
INPUT5 OFF
Distributor
Video equipment
Set Inputs
INPUT1 ON
INPUT2 OFF
INPUT3 OFF
INPUT4 ON
INPUT5 OFF
Video Wall Projection
Usually, a costly image-processing device is required to set up a video wall projection.
This projector has built-in video wall capability that doesn’t require additional equipment.
Hub
Info
• Before setting up the video wall projection, install Internet Explorer (version 5.0 or later).
• Video wall is not compatible with resolutions higher than SXGA.
• Image quality may deteriorate when picture signals are input through multiple projectors with an RGB
cable or an RCA cable in a daisy chain connection.
41
Video Wall Projection
Setting up the Video Wall Projection Basic
Following is an example of how to build a 2 X 2 video wall using 4 projectors.
RGB cable
INPUT 1 terminal
OUTPUT (FOR INPUT 1, 2)
terminal
Projector 1
Computer
RGB cable
INPUT 1 terminal
OUTPUT (FOR INPUT 1, 2)
terminal
Projector 2
RGB cable
INPUT 1 terminal
OUTPUT (FOR INPUT 1, 2)
terminal
Projector 3
RGB cable
INPUT 1 terminal
Projector 4
42
Video Wall Projection
1
Access one of the four projectors
via Internet Explorer.
4
(See “Controlling the Projector Using Internet
Explorer (Version 5.0 or later)” (page 23) for
the details.)
Click the assigning button for the
desired position.
• The projector will be assigned to the part of
the video wall.
Note
2
• For more details on the assigned position
and the actual position of the projector, see
“Assigning the Projected Image on the
Video Wall Setup” (page 44).
Click “Video Wall” on the menu.
• “Video Wall” display will appear.
3
Select “2 X 2” on “Division”.
5
Repeat the same procedure from
the step 1 to 4 for the other three
projectors.
That completes the video wall setup. When
the same image signal is input to all the
projectors, the video wall projection starts.
1
2
3
4
1 Selects a position for each projector. (the assigning buttons)
2 Selects a number of positions where the video wall is divided.
3 Displays the current status for the video wall setup.
4 Adjusts the position of the projected image horizontally and vertically.
43
Video Wall Projection
Adjusting the Position
Horizontally and Vertically
Returning to the Default
Video Wall Setup
Click “UP”, “DOWN”, “LEFT” or “RIGHT” to the position of the projected image.
1
Select “1 X 1” on “Division”.
2
Click the assigning button 1.
• The video wall setup will return to the default settings.
Assigning the Projected Image on the Video Wall Setup
Followings are examples for assigning the projected images for the front and rear projections.
Front Projection
1
4
7
2
5
8
Rear Projection
1
2
3
4
5
6
7
8
9
1
2
3
4
5
6
7
8
9
3
6
9
The numbers of the projector refer to the numbers
of the projected positions.
44
The numbers of the projector refer to the numbers
of the projected positions.
1
2
3
4
5
6
7
8
9
Video Wall Projection
Notes on the Wide Video Wall Projection
Selecting “2 X 1”, “3 X 1”, “4 X1”, “5 X 1”, “6 X 1”, “7 X 1” or “8 X 1” on “Division” (see page 43) allows you to
create the wide video wall.
To create the wide video wall with three projectors lining up in single file from left to right (as shown above),
select “3 X 1” on “Division”, select a position for each projector, and then input the image which width is
compressed at 1/3 (as shown below).
45
Video Wall Projection
Setting up the Video Wall Projection Application
Using “Stack Setting” and “Set Inputs” functions together allows you to control the video wall with one
remote control.
This part shows an example of a connecting procedure for inputting the video signals to the video wall
based on the example in the previous section.
RGB cable
INPUT 1 terminal
Projector 1:
Master
OUTPUT (FOR INPUT 1, 2)
terminal
5 BNC to 15-pin D-sub cable
LAN terminal
INPUT 2 terminals
INPUT 4 terminal
INPUT 1 terminal
Computer
RGB cable
OUTPUT (FOR INPUT 1, 2)
terminal
Projector 2:
Slave
LAN terminal
INPUT 4 terminal
INPUT 1 terminal
RGB cable
OUTPUT (FOR INPUT 1, 2)
terminal
Hub
Projector 3:
Slave
LAN terminal
INPUT 4 terminal
Computer
LAN cable
(straight-through type)
RGB cable
INPUT 1 terminal
Projector 4:
Slave
LAN terminal
INPUT 4 terminal
Distributor
Video equipment
Composite video cable
46
Video Wall Projection
■
Preparation
• Follow the procedure below after setting up the basic connection.
• When “User Name” and “Password” have been set to the projector, reset them before the stack projection
setup. To set “User Name” and “Password”, use the same user name and password for both of the
master and slave projectors. (See page 25.)
• Set “Data Port” with the same number for both of the master and slave projectors. (See page 26.)
Info
• Do not use network software or equipment while it is accessing the projector via the port of the same
number used for the master or slave projector, otherwise you cannot properly control multiple projectors
with one remote control.
1
Change the TCP/IP settings for the
computer as shown below.
Note
• The TCP/IP settings shown are examples
to make connections following the diagram.
• When using other equipment in the same
network, be careful about the IP address
overlap or other network settings.
• Consult your network administrator for assistance with the network settings.
(See “Setting an IP Address for the Computer”
on page 19 for the details.)
• IP address
: 192.168.150.2
• Subnet mask
: 255.255.255.0
• Default gateway : (Do not input any values.)
2
Change the TCP/IP settings for
each projector as shown below.
(See “Setting up a Network Connection for the
Projector” on page 21 for the details.)
• IP address Projector 1 : 192.168.150.3
Projector 2 : 192.168.150.4
Projector 3 : 192.168.150.5
Projector 4 : 192.168.150.6
• Subnet mask
: 255.255.255.0
• Default gateway
: 0.0.0.0
3
Connect the computer and the projectors as shown below.
Projector 1:
Master
LAN terminal
Computer
Projector 2:
Slave
LAN cable
LAN terminal
Projector 3:
Slave
Hub
LAN terminal
LAN cable
(straight-through type)
Projector 4:
Slave
LAN terminal
47
Video Wall Projection
4
Turn on all of the projectors.
5
Access the projector 1 from the
computer via Internet Explorer.
(See “Controlling the Projector Using Internet
Explorer (Version 5.0 or later)” on page 23 for
the details.)
6
Click “Stack” on the menu.
7
Select “Master” on “Stack Setting”.
• “Slave Address” display will appear.
8
Make the IP address for each projector as shown below.
• Slave 1 : 192.168.150.4
• Slave 2 : 192.168.150.5
• Slave 3 : 192.168.150.6
9
Click the “Apply” button.
10
Access the projector 2 from the
computer via Internet Explorer.
(See “Controlling the Projector Using Internet
Explorer (Version 5.0 or later)” on page 23 for
the details.)
48
11
Click “Stack” on the menu.
12
Select “Slave” on “Stack Setting”.
Video Wall Projection
13
Repeat the same procedure from
the step 10 to 12 for the projector 3
and 4.
14
Select inputs as specified in the
table on the right.
Projector 1
(See page 86 on the owner’s manual of the
projector.)
Master
Slave
Set Inputs
INPUT1 ON
INPUT2 ON
INPUT3 OFF
INPUT4 ON
INPUT5 OFF
Set Inputs
INPUT1 ON
INPUT2 OFF
INPUT3 OFF
INPUT4 ON
INPUT5 OFF
Note
• Set input terminals you will use to “ON”.
Set input terminals you will not use to
“OFF”.
15
Turn off all of the projectors.
16
Make connections following the
diagram shown on page 46.
17
Turn on the projectors first, then
turn on the computers and the
video equipment.
Projector 2-4
Note
• Image quality may deteriorate when picture signals are input through multiple projectors with
an RGB cable or an RCA cable in a daisy chain
connection.
49
Resetting the Lamp Timer of the Projector via LAN
When the projector is connected to a network, you can use HyperTerminal or a similar communications program to send a command to reset the lamp timer. The example below uses
Windows® XP as the operating system.
1
Click “Start” – “All Programs” –
“Accessories” – “Communications” – “HyperTerminal”.
• If you do not have HyperTerminal installed, see the owner’s manual of your
computer.
• Depending on the settings of your computer, you may be required to enter your
area code and other details. Enter the
information as required.
2
Enter a name in the “Name” field,
and click “OK”.
3
If you are required to enter the
area code, enter it in the “Area
code” field. From the “Connect
using” drop-down menu, select
“TCP/IP (Winsock)”, and click
“OK”.
4
50
Enter the IP address of the projector in the “Host address” field
(see “TCP/IP” on the “Network”
menu of the projector), and enter the data port of the projector
in the “Port number” field
(“10002” is the factory default
setting), and click “OK”.
Select
“TCP/IP (Winsock)”
Resetting the Lamp Timer of the Projector via LAN
5
Click “Properties” on the “File”
menu.
6
Click the “Settings” tab, and
then click “ASCII Setup”.
7
Select the check boxes next to
“Send line ends with line feeds”,
“Echo typed characters locally”,
and “Append line feeds to incoming line ends”, and click
“OK”.
• The LAMPRESET Properties window
appears, click “OK”.
8
If a user name and/or password
is set for the projector, enter the
user name and password.
9
Send the lamp reset command.
“LPRE0001” for LAMP 1
“LPRE0002” for LAMP 2
• These commands can only be sent
when the projector is in standby mode.
• When “OK” is received, this indicates
that the lamp was successfully reset.
10
Close HyperTerminal.
51
Troubleshooting
Communication cannot be established with the projector
When connecting the projector using serial-connection
\ Check that the RS-232C terminal of the projector and a computer or the commercially
available controller are connected correctly.
\ Check that the RS-232C cable is a cross-over cable.
\ Check that the RS-232C port setting for the projector corresponds to the setting for the
computer or the commercially available controller.
When connecting the projector to a computer using network (LAN)connection
\ Check that the cable’s connector is firmly inserted in the LAN terminal of the projector.
\ Check that the cable is firmly inserted into a LAN port for a computer or a network device
such as a hub.
\ Check that the LAN cable is a Category 5 cable.
\ Check that the LAN cable is a cross-over cable when connecting the projector to a computer
directly.
\ Check that the LAN cable is a straight-through cable when connecting the projector with a
network device such as a hub.
\ Check that the power supply is turned on for the network device such as a hub between the
projector and a computer.
Check the network settings for the computer and the projector
\ Check the following network settings for the projector.
∑ IP Address
Check that the IP address for the projector is not duplicated on the network.
∑ Subnet Mask
When the gateway setting for the projector is “0.0.0.0” (Not Used), or the gateway setting for
the projector and the default gateway setting for the computer are the same:
∑ The subnet masks for the projector and the computer should be the same.
∑ The IP address parts shown by the subnet mask for the projector and the computer should
be the same.
(Example)
When the IP address is “192.168.150.2” and the subnet mask is “255.255.255.0” for the
projector, the IP address for the computer should be “192.168.150.X” (X=3-254) and the
subnet mask should be “255.255.255.0”.
∑ Gateway
When the gateway setting for the projector is “0.0.0.0” (Not Used), or the gateway setting for
the projector and the default gateway setting for the computer are the same:
∑ The subnets for the projector and the computer should be the same.
∑ The IP address parts shown by the subnet mask for the projector and the computer should
be the same.
(Example)
When the IP address is “192.168.150.2” and the subnet mask is “255.255.255.0” for the
projector, the IP address for the computer should be “192.168.150.X” (X=3-254) and the
subnet mask should be “255.255.255.0”.
∑ Data Port
Other computers should not use the data port of the projector.
The data port should be used for communication during the stack projection.
Note
∑ The default settings (“DHCP Client” is set to “OFF” on the projector) are as follows:
IP address : 192.168.150.2
Subnet mask : 255.255.255.0
Gateway address : 0.0.0.0 (Not Used)
∑ For network settings for the projector, refer to page 21.
52
Troubleshooting
\ Take the following steps for checking the network settings for the computer.
1. Open a command prompt (MS-DOS Prompt).
• In the case of Windows® 98 or 98SE: click “start” ➔ “Programs” ➔ “MS-DOS Prompt” in
order.
• In the case of Windows® Me: click “start” ➔ “Programs” ➔ “Accessories” ➔ “MS-DOS
Prompt” in order.
• In the case of Windows® 2000: click “start” ➔ “Programs” ➔ “Accessories” ➔ “Command
Prompt” in order.
• In the case of Windows® XP: click “start” ➔ “All Programs” ➔ “Accessories” ➔ “Command
Prompt” in order.
2. After launching the command prompt (MS-DOS Prompt), enter the command “ipconfig”,
and press the “Enter” key.
Note
• Communication may not be established even after carrying out the network settings
for the computer. In such cases, restart your computer.
C:\>ipconfig
Note
• Usage examples of ipconfig
C:\>ipconfig /? displays how to use “ipconfig.exe”.
C:\>ipconfig
displays the set IP address, subnet mask and default gateway.
C:\>ipconfig /all displays all the setting information related to TCP/IP.
3. To return to the Windows® screen, enter “exit” and press the “Enter” key.
53
Troubleshooting
\ Check if the “TCP/IP” protocol is operating correctly using the “PING” command. Also, check
if an IP address is set.
1. Open a command prompt (MS-DOS Prompt).
• In the case of Windows® 98 or 98SE: click “start” ➔ “Programs” ➔ “MS-DOS Prompt” in
order.
• In the case of Windows® Me: click “start” ➔ “Programs” ➔ “Accessories” ➔ “MS-DOS
Prompt” in order.
• In the case of Windows® 2000: click “start” ➔ “Programs” ➔ “Accessories” ➔ “Command
Prompt” in order.
• In the case of Windows® XP: click “start” ➔ “All Programs” ➔ “Accessories” ➔ “Command
Prompt” in order.
2. After launching the command prompt (MS-DOS Prompt) enter a command “PING”.
Entry example C:\>Ping XXX.XXX.XXX.XXX
“XXX.XXX.XXX.XXX” should be entered with an IP address to be connected to, such as
the projector.
3. When connecting normally, the display will be as follows.
(The screen may be slightly different depending on the OS type.)
<Example> when the IP address connected to is “192.168.150.2”
4. When a command cannot be sent, “Request time out” will be displayed.
Check the network setting again.
If communication can still not be established properly, contact your network administrator.
5. To return to the Windows® screen, enter “exit” and then press the “Enter” key.
A connection cannot be made because you have forgotten your user name or your password.
\ Initialize the settings. (See page 91 on the owner’s manual of the projector.)
\ After the initialization, carry out setting again.
54
Dimensions
Units: inches (mm)
Rear View
49/64
Top View
Side View
18 35/64 (471)
Side View
(19.1)
16 5/32 (410)
7 3/32 (180)
31/64
(12.1)
Front View
3 23/32 (94.3) 3 55/64 (97.8)
4 11/32 (110.1)
3 3/4 (94.9)
7 1/16
(179)
7 1/16 (179)
5 47/64 (145.5)
45/64
(17.5)
Bottom View
(243.9)
9
39/64
3 23/64 (85)
M4
13 5/8 (346)
M4
M4
3 3/64
(77.27)
55
Dimensions
Projector and Lens Dimensions
[When AH-45201 is installed]
[When AH-45501 is installed]
Unit : inches (mm)
3 17/32
(89.31)
Unit : inches (mm)
18 35/64 (471)
18 35/64 (471)
11/64
Lower position
3 1/4
(82.16)
Lower position
(3.99)
Move
out
11/64
(4.0)
3 1/4
(82.16)
Move
out
11/64
(4.2)
13 1/8 (333)
Mount base position
13 1/8 (333)
Mount base position
[When AH-45301 is installed]
[When AH-45601 is installed]
Unit : inches (mm)
1 21/64
(33.51)
Unit : inches (mm)
18 35/64 (471)
18 35/64 (471)
11/32
3 1/4
(82.16)
Lower position
(8.49)
Move
out
Lower position
3/64
3 1/4
(82.16)
Move
out
1
/16
(1.2)
(1.0)
13 1/8 (333)
Mount base position
13 1/8 (333)
Mount base position
[When AH-51401 is installed]
[When AH-45701 is installed]
Unit : inches (mm)
Move out
1/16 (1.5)
Unit : inches (mm)
(471)
18 35/64 (471)
17 (431.7)
7/64
LENS HOOD
LENS TRIM
Lower position
3 1/4
(82.16)
Lower position
(2.71)
Move
out
5/32
(3.6)
3 1/4
(82.16)
18 35/64
13 1/8 (333)
Mount base position
56
13 1/8 (333)
Mount base position