1
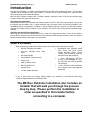
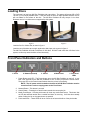
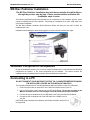
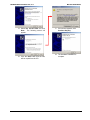
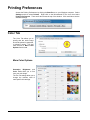
MX Disc Publisher
For Microsoft Windows® 7, Vista, and XP
Users Manual
Microboards Technology LLC
Version 2.1
2
• Introduction
MICROBOARDS TECHNOLOGY, LLC
MX Disc Publisher
TABLE OF CONTENTS
Introduction ....................................................................................................................................................... 5
What’s Included ............................................................................................................................................... 5
System Requirements ..................................................................................................................................... 6
Assembly and Installation................................................................................................................................ 6
Assembly Instructions...................................................................................................................................... 6
Installing Ink Cartridges and Print Heads ........................................................................................................ 7
Supported Ink Cartridges ............................................................................................................................. 7
Loading / Replacing Ink Cartridges.............................................................................................................. 7
Installing / Replacing Printheads ................................................................................................................. 7
Loading Discs .................................................................................................................................................. 8
Front Panel Indicators and Buttons ................................................................................................................. 8
MX Disc Publisher Installation......................................................................................................................... 9
Windows Component Prerequisites ................................................................................................................ 9
Connecting to a PC ......................................................................................................................................... 9
Windows 7 and Vista Hardware Installation .................................................................................................. 10
Windows XP Hardware Installation ............................................................................................................... 10
Printing Preferences ....................................................................................................................................... 12
Color Tab....................................................................................................................................................... 12
Advanced Color Settings ........................................................................................................................... 12
Advanced Tab ............................................................................................................................................... 13
Mask Settings Tab......................................................................................................................................... 13
Utility Tab....................................................................................................................................................... 14
Features Tab ................................................................................................................................................. 14
Printing Recommendations........................................................................................................................ 14
About Tab ...................................................................................................................................................... 14
The Microboards Printer Toolbox ................................................................................................................. 15
Print Test Page.............................................................................................................................................. 15
Align the Printheads ...................................................................................................................................... 15
Clean the Printheads ..................................................................................................................................... 16
Printhead Maintenance .............................................................................................................................. 16
Ink Level ........................................................................................................................................................ 16
Pen Health..................................................................................................................................................... 17
Using SureThing Disc Labeler....................................................................................................................... 17
Creating New Labels.................................................................................................................................. 17
Printing Labels ........................................................................................................................................... 17
The MX Disc Publisher Software ................................................................................................................... 18
Software Re-Installation ................................................................................................................................. 18
Disc Publishing Software Re-Installation....................................................................................................... 18
PF Pro Series Toolbox Re-Installation .......................................................................................................... 19
SureThing Labeler Software Re-Installation.................................................................................................. 20
Troubleshooting.............................................................................................................................................. 21
Printer not printing ......................................................................................................................................... 21
Disc Loading error ......................................................................................................................................... 21
Low Ink indication .......................................................................................................................................... 21
Out of Ink ....................................................................................................................................................... 21
Gaps or Overlap in Ink Coverage.................................................................................................................. 22
“No Printers Connected” Message ................................................................................................................ 22
Supported Formats ......................................................................................................................................... 22
Specifications.................................................................................................................................................. 23
Technical Support........................................................................................................................................... 23
3
4
• Introduction
MICROBOARDS TECHNOLOGY, LLC
MX Disc Publisher
Introduction
The MX Disc Publisher is a robust automated inkjet CD and DVD disc publishing solution. The MX Disc
Publisher Series includes the MX-1 and the MX-2. The MX-1 has a single recording drive, while the MX-2
has 2 recording drives for added throughput.
Both MX Disc Publisher models have a 100-disc capacity, making the task of burning and printing large
numbers of discs fast, easy and hands-free.
Fully Integrated Automation
Microboards combined their patented auto-loading system with HP's new inkjet printer engine to give users
the highest output possible, both in image resolution and print speed. Since the MX Disc Publisher is an
autoloading system, no calibration of robotics or manual feeding of discs is required. The MX Disc Publisher
connects by a single USB 2.0 interface to your computer, and comes with burning software and label design
software.
Flexibility and Speed for Any Application
While the MX Disc Publisher was designed to fill a need in the high-volume arena, it also has the ability to
print at 4800 x 1200 dpi on both DVD and CD media. With the included design software, users can enjoy its
benefits whether making a few discs or a few hundred.
What’s Included
When unpacking your MX Disc Publisher system, the following items should be included:
•
MX Disc Publisher print system
•
MX Disc Publisher Quick Start
Guide
•
MX Unpack Guide
•
Users Manual (This document)
•
Power Cord
•
USB 2.0 Printer Cable
•
Blank Printable CD’s
•
Input Bin rods
•
100 disc output assembly
•
Microboards Disc Publisher Install
CDs, 32-bit and 64-bit (Discs
include Windows drivers, Printer
Toolbox, Disc Publishing software,
and SureThing Label software).
•
1 each: Microboards PFP-HCCYAN, PFP-HC-MAGENTA, PFPHC-YELLOW, and PFP-HC-BLACK
Ink cartridges
•
1 each: CG316A (Yellow and Black)
and C9382A (Cyan and Magenta)
printheads
If any of these items are missing, please contact your distributor or Microboards Technology
Technical Support department at 952-556-1639.
The MX Disc Publisher installation disc includes an
Installer that will walk you through the process
step by step. Please perform the installation in
order as specified in the Installer before
connecting to a computer.
5
System Requirements
The Microboards MX Disc Publisher has the following minimum requirements and compatibilities:
Supported Operating Systems
Windows 7, Vista or XP with SP2. 32-bit or 64-bit.
Processor
Pentium 4 (or equivalent) CPU, running at 3.0 GHz or faster.
System Memory
Minimum 1 GB of system memory.
Hard Drive Space
Approximately 180MB of free space is required on the system hard drive for the applications and
drivers.
A separate internal 7200 RPM hard drive is recommended for storing your data. Using the same
hard drive as the operating system can cause the system to perform slowly.
USB Connection
USB 2.0 is required.
Assembly and Installation
Assembly Instructions
MX Disc Publisher Assembly
Remove the MX Disc Publisher system from the shipping box and confirm you received all of the
items.
Place the MX Disc Publisher on a stable, flat surface. You will need room both in front and behind
the system, as discs will be accessed from both locations.
Install the 2 long input bin posts above the input hopper, with the wide post to the right (shipped
installed).
Install the output bin:
•
•
•
•
Align the two holes in the output bin with the holes on the Front of the printer (numbers 1 and 2).
Secure the output bin with the two thumb screws.
The output bin should now be securely in place.
Next, slide in the 100 disc output spindle into place.
The Output Bin is designed to hang over the front edge
of your work surface.
1
6
2
MICROBOARDS TECHNOLOGY, LLC
MX DISC PUBLISHER
Installing Ink Cartridges and Print Heads
Supported Ink Cartridges
The MX Disc Publisher uses 3 color and 1 black ink cartridges. The part numbers for these
cartridges are PFP-HC-CYAN, PFP-HC-MAGENTA, PFP-HC-YELLOW, and PFP-HC-BLACK. If
other cartridges are installed, the MX Disc Publisher will not function. These cartridges are available
from any Microboards reseller.
Refill kits or non-Microboards ink cartridges are not recommended for use in the MX Disc
Publisher system. Use of non-Microboards cartridges will cause the printer to fail. Use of
refilled cartridges may cause the MX Disc Publisher to fail.
Loading / Replacing Ink Cartridges
Cartridges can be changed while the MX Disc Publisher is on, but it should never be turned on
without an ink cartridge in place. An LED will light above any cartridge that needs to be replaced.
•
Lower the ink door.
•
If replacing an empty ink cartridge, remove the color
that needs changing by pulling straight out.
•
Remove each new print cartridge to be installed from
its packaging.
•
Slide the correct ink cartridge into the correct slot with
the arrows pointing down, as shown to the right.
•
Raise the ink door and latch it back into place. The
printer will be ready after the ink cartridges pressurize
and the Media Feed button LED goes out.
Installing / Replacing Printheads
The 2 Printheads are not installed when you receive the MX Disc Publisher, and must be installed
prior to using the printer. The printhead models are CG316A (yellow and black) and C9382A (cyan
and magenta).
1. Raise the top Printhead Access Door.
2. If you are setting up the MX Disc Publisher for the first time, remove
any packaging materials from around the printhead carriage.
3. If you are replacing printheads and the printhead carriage is not
parked all the way to the left, turn on the MX Disc Publisher. With the
Printhead Access Door opened, press and hold the Media Feed
button until the carriage moves to the left and locks into position.
4. Lift the cradle latch. If you are replacing the currently installed
printheads, remove the printheads by lifting the blue handle of each
and gently pulling up on each handle.
5. Remove the printheads from the packaging.
6. Gently shake each printhead 6 times prior to removing the orange
protective caps. Save the caps! If you remove the printheads from
the MX Disc Publisher, they should be recapped to avoid clogging the
printheads and ink valves.
7. Gently press the printheads into the cradle, installing the correct
printhead in the correct slot. DO NOT FORCE THE PRINTHEADS
INTO PLACE.
8. Lower the cradle latch carefully.
9. Lower the top Printhead door. The printhead carriage will return to
the right and will be primed by the printer if the power is on.
7
Step 4
Step 7
Loading Discs
The next step is to load your MX Disc Publisher with output discs. The system will accept CD or DVD
120 mm (12 cm) inkjet printable discs. If the disc does not have an inkjet printable surface, the ink
will not adhere to the surface of the disc. The MX Disc Publisher will only accept 12 cm discs.
Business card or 8 cm discs are not supported by this system.
Figure 1
Figure 2
Load the first 5 or 6 discs flat, as seen in figure 1.
Load the rest of the discs at an angle, against the wide input rod, as seen in figure 2.
The MX Disc Publisher will hold a maximum of 100 discs. DO NOT load more than 100 discs in the
system, as this may cause the discs to feed incorrectly.
Front Panel Indicators and Buttons
1. Power
2. Network (unused)
3. Cancel
4. Media Feed
5. Print head
LEDs
1. Power Button and LED – The Power button turns the MX Disc Publisher on and off. It may
take a few seconds for the MX Disc Publisher to turn on after you press the Power button.
The green LED on the Power button flashes when the printer is processing.
NOTE: The AC power switch located on the back of the MX Disc Publisher must be
turned on first in order to supply power to the Front Panel.
2. Network Button - This button is unused.
3. Cancel Button – Pressing the Cancel button cancels the current print job.
4. Media Feed Button – Pressing this button will clear any media feed issues. This button has
an LED that will flash amber when a media feed issue is occurring. It will also show steady
amber if either the ink or the upper doors are opened.
5. Print Head LEDs – These LEDs will be on if there is an issue with either of the print heads.
8
MICROBOARDS TECHNOLOGY, LLC
MX DISC PUBLISHER
MX Disc Publisher Installation
The MX Disc Publisher installation disc includes an Installer that will walk you
through the process step by step. Please use the Installer and follow the
installation steps in order.
The following installation sections are intended only as a reference for the installation process, not as
a guide to installing the MX Disc Publisher. Performing the installation out of order could result in an
unsuccessful installation.
The MX Disc Publisher Installation Quick Reference Guide will show you the order in which the
installation will occur.
Installation should always be done when logged in as a user with full Administrator rights.
Windows Component Prerequisites
During the installation process, your PC will be checked to determine if 2 required Microsoft Windows
components are present. If not, these components will be installed. You cannot continue the
installation without installing these necessary Microsoft Windows components.
Connecting to a PC
DO NOT CONNECT YOUR MX PRINT FACTORY TO A COMPUTER BEFORE RUNNING
THE INSTALLER LOCATED ON THE INSTALLATION DISC!!
The connection between the PC and the Microboards MX Disc Publisher is with one USB cable.
1. Confirm that the power is turned OFF on the MX Disc Publisher and on your PC.
2. Plug in the AC power cord to the back of the MX Disc Publisher. Do not turn on power to the
MX Disc Publisher until all 4 ink cartridges and both printheads have been installed.
3. Connect the square shaped end of the USB cable to the back of the MX Disc Publisher.
4. Connect the flat, rectangular end of the USB cable into a USB 2.0 port in
your PC.
USB Cable length exceeding 6 feet between the MX Disc Publisher and the PC is
not supported!
9
Windows 7 and Vista Hardware Installation
The Microboards MX Disc Publisher Installer should always be run when logged in as user with full
Administrator rights. This is required for the driver pre-installation to be successful. Once the MX is
plugged into the PC via the USB connection, the hardware will automatically be found and installed
on your PC.
During the driver pre-installation, you may need to verify that you would like to install the drivers.
If the Installer is run by a user without full Administrator rights, or you do not verify that the drivers
should be installed, the hardware will need to be installed using the Hardware Wizard. Please follow
the directions below.
Windows XP Hardware Installation
If you are installing the hardware while running the MX Disc Publisher installer, this process will occur
automatically. The Windows Found New Hardware Wizard will appear during any hardware
installation when not using the Installer. Please follow all directions in the order in which they appear.
Insert the Microboards MX Disc Publisher CD into a drive in your computer. Follow the instructions
provided by the installer. Connect the MX Disc Publisher to the PC only when you are prompted to.
The operating system will next display the following windows:
1.
Select No, not this time and click
Next. The following screen will appear:
2. Click the Next button and the files will
be copied from the CD.
10
3. Click Continue Anyway if this
message should appear.
4. Click Finish for the next step to
appear.
MICROBOARDS TECHNOLOGY, LLC
5. Select No, not this time and click
Next. The following screen will
appear:
6. Click the Next button and the files
will be copied from the CD.
11
MX DISC PUBLISHER
7. If this screen appears, click
Continue Anyway.
8. The Hardware installation is
complete.
Printing Preferences
Access the Printing Preferences by clicking the Start Button on your Windows computer. Select
Settings and then select Printers. Right click on the Microboards PF-Pro icon, then select
Printing Preferences. There are 6 tabs across the top of the window. Click each tab to see the
available settings.
Color Tab
The Color Tab allows you to
specify that the entire image
should be printed in grayscale,
or printed in sepia. You also
have access to More Color
Options from this tab.
More Color Options
Saturation, Brightness and
Color Tone allow you to fine
tune your print image.
The four ink settings allow you to
change the volumes used of
each specific ink cartridge.
12
MICROBOARDS TECHNOLOGY, LLC
MX DISC PUBLISHER
Advanced Tab
The Advanced Tab allows you
to Enable Maximum dpi
setting, adjust the amount of
ink placed on the disc using
the Ink Volume setting, and
adjust the Dry Time of the
disc.
Enabling the maximum dpi will
result in longer times to
process your print image,
reducing throughput.
To change the Ink Volume or Dry Time, click the drop-down box and select Change. A window will
open with a setting bar for the option selected.
Changing the Ink Volume will affect how quickly you
need to replace your ink cartridges, but also affects
the quality of the printed output.
Changing the Dry Time can increase or decrease
your throughput, but if the Dry Time is set too low,
you risk the possibility that the last disc printed will
not have dried before the next disc is placed on top
of it in the output bin.
The default settings are the recommended settings
and should be used unless absolutely necessary. If
you choose to increase the Ink Volume, you should
also increase the Dry Time.
Diameter Settings Tab
The Diameter Settings tab allows
you to change the size of the print
image to accommodate the variety
of printable surface area available
on media.
The Outer and Inner Diameters
will change the size of the area to
be printed. To avoid excessive ink
buildup, these values should never
be set so that the MX Disc
Publisher is printing off the media.
The Parameter Unit should remain
on the 0.1mm setting for maximum
precision.
You can also select one of the preset Mask Types to change the diameter settings.
13
Alignment Tab
The Alignment tab allows you to change the printer alignment settings.
The Resolution setting should
always be set at .1mm for best
results.
Alignment values will move the print
image on the disc.
Increasing the Top alignment value
will move the print image down on
the disc, while decreasing it will
move the image up on the disc.
Increasing the Left alignment value
will move the print image to the right
on the disc, while decreasing it will
move the image left.
Print Quality Tab
The Print Quality tab controls the print resolution.
Print Quality
• Best
• Normal
Print Modes
• Draft
• Text and Graphics
• Photo
Printing Recommendations
Draft mode is extremely fast, but should only be used for minimal text and no graphics. As this is
draft quality, there may be some gaps or overlap in the output.
Text and Graphics mode is used for printing mainly text information and small, simple graphics.
Photo Mode should be used when printing complex graphics or on the entire disc; a quality setting of
Best is always recommended for any Photo Mode printing.
Draft - Normal
Text & Graphics - Normal
Text & Graphics - Best
Photo - Best
About Tab
The About tab provides you with contact information for the worldwide Microboards offices.
14
MICROBOARDS TECHNOLOGY, LLC
MX DISC PUBLISHER
The Microboards Printer
Toolbox
Toolbox Icon in Tool Tray
To access the Microboards Toolbox, click
located in the tool tray on the lower right
Select the Microboards PF-Pro and click the
a particular maintenance function of the
selected printer.
the toolbox icon
of your desktop.
buttons to access
Toolbox for the
Print Test Page
To confirm the computer is communicating with the MX Disc Publisher, print a Test Page. This can
be done with one of the inkjet printable CD’s included with your MX Disc Publisher, or an inkjet
compatible disc you may already have. To print the Test Page:
• Click the Print Test Page button from the main Toolbox window.
• Place the inkjet printable media into the input hopper.
• Click Print Test Disc.
• A disc will be dropped onto the belts and then printed.
• Once printing is complete, the disc will be ejected into the output hopper.
Align the Printheads
Printhead alignment should be performed when a new
printhead is installed. If you experience a decrease in
print quality with an installed printhead, you may need
to perform this service.
• Click the Align the Printheads button from the
main Toolbox window to show the Align the
Printheads window, as seen to the right.
• Load 4 pieces of blank, unprinted media into
the input hopper.
•
•
•
•
15
Click the Align button, and 2 discs will load to the belts
and be printed.
Use these discs to select the patterns that are best
aligned in the next window, as shown to the right. All 8
entries must be made.
After selecting the patterns with the best alignment, click
OK.
The printhead alignment discs will print again. The best
aligned patterns should have moved closer to the center
(they do not need to be in the center, only closer to the
center than the original set of discs). If so, click Cancel.
If not, enter the values from the second set of discs and
click OK; you will need to load 2 more blank discs.
Clean the Printheads
The printheads may require cleaning if the
printed images show streaks of color. This
may occur if the MX has been idle for an
extended period of time.
•
Click the Clean the Printheads button
on the main Toolbox window.
•
Load a blank piece
input hopper before
button. The media
the belts and be
cleaning image.
of media into the
clicking the Clean
will load down to
printed with the
Running this process more than once may be required if the quality does not improve after cleaning
one time.
Printhead Maintenance
If, after several cleaning attempts, the printed images continue to show streaks of color, you may
need to manually clean the printheads. Follow the procedure below exactly to clean the printheads.
Not following these steps could result in damaged printheads.
1. Remove the printheads from the carriage (please see
Installing/Replacing Printheads, page 7).
2. Use ionized water to lightly dampen a lint-free cloth
3. Place the cloth on a level surface
4. Holding the printhead with the bottom of the printhead resting
lightly on the cloth, gently pull the printhead towards you
along the direction of the long axis of the printhead, as shown
to the right.
DO NOT MOVE THE PRINTHEAD FROM SIDE-TO-SIDE,
AS THIS COULD MIX THE INK COLORS IN THE
PRINTHEAD!
5. If the printhead does not leave two solid lines of color, one for
each color in the printhead, move the printhead to a clean
area on the cloth and repeat step 4.
6. Carefully replace the printhead into the MX Disc Publisher
once the heads have been cleaned.
If you do not follow the above procedure exactly, you could damage your printheads!
Ink Level
Click the Ink Level button on the main Toolbox window.
The Ink Level of each cartridge can be checked using this
button.
Please note that this is an estimate of the current ink levels
only.
16
MICROBOARDS TECHNOLOGY, LLC
MX DISC PUBLISHER
Pen Health
If you suspect that the printheads are not functioning correctly due to print quality issues, the Pen
Health function can be used to determine the health of the 2 printheads. Each test will require one
unprinted disc.
The pattern to the right will be
printed out in both of the colors of
the printhead being tested;
magenta and cyan will be on one
test, yellow and black on one
disc.
If the print results are
similar to that shown, or with a
few breaks in the print that are no
wider than the space between
the vertical lines, the pen health
is still good.
If, however, any of the lines look
as they do in the lower image,
with multiple gaps in the
horizontal lines that are wider
than the distance between the vertical lines, the printheads may need to be cleaned (see page 16).
Run the Pen Health a second time; if the print quality has not improved, the printheads may need to
be replaced.
Using SureThing Disc Labeler
SureThing Disc Labeler is included with the MX Disc Publisher and will be installed during the PF-Pro
Installation. For more information on using SureThing, please refer to the SureThing Help menu.
Creating New Labels
Any label you create in SureThing must use the Microboards template to print correctly.
1. To create a new label, either click New Project in the Action window on the left, or select New
from the File menu.
2. Click the Select Label button on the lower
left corner of the dialog to view the
available label templates if the dialog does
not appear as shown to the right.
3. Highlight CD/DVD Printers in the Media
Type column.
4. Highlight Microboards in the center
Manufacturer column.
5. Select from the options listed in the Label
Type column.
We recommend that you use the 17mm inner hole template to ensure that your image will
fully cover the printable surface on both hub printable and non-hub printable media,
adjusting the Diameter Settings when changing between media types (see page 14).
6. Click OK to begin designing the label.
Printing Labels
Select Print from the File menu while the label you want to print is open. Be sure that
you have selected the Microboards PF-Pro and that CD/DVD Printer is selected in
the Print Using field before clicking the Print button.
If you are printing more than one copy of a label, enter in the number you wish to print before clicking
the Print button.
17
The MX Disc Publisher Software
Your MX Disc Publisher will use Microboards PrintWrite as the Disc Publishing software. If your PC
has Windows XP (Service Pack 2 minimum required) or Windows Vista as the Operating System,
PrintWrite will be installed as the default disc publishing software.
All printing and burning must be done using PrintWrite.
Microboards PrintWrite
PrintWrite is not supported on any PC running Windows 2000 as the Operating System.
The first time you launch PrintWrite, you will be asked to confirm the configuration of the MX Disc
Publisher system. This only needs to be done the first time the software is used, or if there is a
change to your hardware.
Please refer to the Microboards PrintWrite User’s Manual for more information on configuring and
operating PrintWrite.
Software Re-Installation
The information in this section will only apply to a manual re-installation of the individual software
packages. If you have not yet installed the MX Disc Publisher using the Installer, it is recommended
that you do so. Installing the MX Disc Publisher in an incorrect order could result in an unsuccessful
installation.
Disc Publishing Software Re-Installation
PrintWrite is not supported on any PC running Windows 2000 as the Operating System.
There are 3 methods of reinstalling the Disc Publishing software should the need arise:
A. (Recommended) Insert the Microboards MX Disc Publisher Installation CD into the CD/DVD
ROM drive on your computer and select the Repair option when the installer starts. Click the
Disc Publishing Software button to reinstall PrintWrite Disc Publishing software. Clicking
the Install All Applications button will reinstall the PrintWrite Disc Publishing software,
SureThing, and the Toolbox.
Using this method of reinstallation will automatically reinstall the correct software for
your Operating System.
Follow the prompts to install the PrintWrite Disc Publishing software.
B. The PrintWrite Disc Publisher installer is also located on the Installation CD. To manually
reinstall PrintWrite, browse to the Applications\PrintWrite directory on the Installation CD
and run setup.exe.
C. The PrintWrite Disc Publisher software installer was also added to your hard drive in the
event that you need to reinstall but do not have access to the Installation CD. Browse to the
C:\Program Files\Microboards\MX Installer\Applications directory on your hard drive and
double-click setup.exe to reinstall PrintWrite.
18
MICROBOARDS TECHNOLOGY, LLC
MX DISC PUBLISHER
PF Pro Series Toolbox Re-Installation
The Microboards PF Pro Series Toolbox will be installed automatically during the initial installation of
the MX Disc Publisher from the Installation CD. The Toolbox installation is hidden at that time, but
the successful installation of the Toolbox can be verified by the presence of the Toolbox icon in the
tool tray in the lower right corner of your Windows desktop.
1. Load the MX Disc Publisher Installation CD.
2. Select the Repair option when the installer starts.
Toolbox Icon in Tool Tray
Note: If you have removed the MX Disc
Publisher Installation by selecting the
Remove option in the installer or by using
the entry in the Add or Remove Programs
window, the installation will run completely
without the Repair option.
3. Click the Microboards PF Pro Series Toolbox button to re-install the Toolbox or the Install
Both Applications button to reinstall both SureThing Disc Labeler and the Toolbox.
4. Once the re-installation is complete, the toolbox will be started automatically, minimizing into
the tool tray.
19
SureThing Labeler Software Re-Installation
There are 3 methods of reinstalling SureThing should the need arise:
A. (Recommended) Insert the Microboards MX Disc Publisher Installation CD into the CD/DVD
ROM drive on your computer and select the Repair option when the installer starts. Click the
SureThing Disc Labeler button to reinstall SureThing. Clicking the Install All Applications
button will reinstall the Disc Publishing software, SureThing, and the Toolbox.
Follow these steps once the SureThing installer launches:
1. Click Next to continue.
2. Once the User License screen
appears, select I Accept and click
the Next button.
4. Click Next to add a shortcut in the
Start Menu.
5. Choose to add an icon to your
desktop and/or a folder in the Start
Menu. Once selected, click Next.
6. Click Install to begin copying the
files.
3. If you wish to change the default
Install directory, it can be done here.
Click Next when completed.
7. Remove the check to launch
SureThing at this time, then click
Finish.
B. Alternately, you can open the Applications directory on the Installation CD and run
SureThing.exe to install SureThing manually. Follow the on-screen instructions as shown in
steps 1-7 above.
C. The SureThing installer was also added to your hard drive in the event that you need to
reinstall but do not have access to the Installation CD. Run SureThing.exe in the
C:\Program Files\Microboards\MX Installer\Applications directory on your hard drive.
Follow the on-screen instructions as shown in steps 1-7 above.
20
MICROBOARDS TECHNOLOGY, LLC
MX DISC PUBLISHER
Troubleshooting
Printer not printing
1. Confirm the MX Disc Publisher is plugged into a power source and is turned on. The
ON/OFF switch is located at the back of the unit, above the power cable connector.
2. Confirm the green LED on the power button is lit on the front panel, as shown below. If AC
power is on and the green LED is off, press the power button and wait for several seconds. If
the LED still does not come on, contact Microboards Technical Support.
Power LED
3. Confirm the MX Disc Publisher is connected to the computer, with a USB cable. This can be
checked by clicking on Start, going to Settings and selecting Printers. Confirm the printer is
listed and is active. If the icon is not active, make sure the Use Printer Offline is not selected
or paused. Also check to make sure the correct printer port is selected.
Disc Loading error
1. If a disc is not loaded correctly, an error message will be displayed on your PC. Check to see
if there are any discs on the belt. Remove any discs that are left on the belt.
2. Lift the cover and check for any discs on the front deck of the MX Disc Publisher. Remove
any discs found on the belts. Close the cover.
3. Next, reload the input bin and click the OK button on the error message to continue. The
system will load the next disc and continue printing the remaining discs for that job.
Low Ink indication
The Microboards Toolbox will provide you with a warning when any of the ink cartridges are running
low. The warning will tell you which cartridge is running low.
It is strongly recommended that you replace the cartridge before the ink level reaches 0%.
Continuing to run the MX Disc Publisher with an empty cartridge may damage the printer.
If you notice poor ink quality or a missing color in your prints at any time, replace the ink cartridge.
Out of Ink
If you do not change the cartridge when the Low Ink warnings first appear, you will become unable to
print after the ink cartridge shows 0%. Printing will be halted to avoid damaging the printheads or
printer.
The Out of Ink message will
appear when the ink levels
have been at 0% for a time. At
that point, you have the option
of changing the cartridge and
continuing, or cancelling the
job.
You will not be able to print if the empty cartridge is not replaced once the Out of Ink message
appears.
21
Gaps or Overlap in Ink Coverage
There are 2 possible causes:
1. If the gaps or overlaps are widely spaced, you may be printing in Draft Mode. Change Mode
to Text & Graphics or Photo. See page 12 for details.
2. The printheads need to be realigned. Please refer to page 15 for details.
“No Printers Connected” Message
The Microboards Printer Toolbox did not detect a connected printer
when the PC was started. Verify that the MX Disc Publisher is
connected and that the printer is powered on.
After verifying the connection and the printer power, you should
restart the Toolbox, as it monitors the printer’s ink levels and door
status.
A shortcut to the PF Pro Toolbox was placed in the Microboards
directory of the Start Menu during installation. The Toolbox will start,
but will automatically minimize to the tooltray. Double-click the
Toolbox icon in the tooltray to access the Toolbox.
Supported Formats
Recording format
CD
DVD
CD
Recording capacity (nominal)
Applicable media
22
DVD
CD
DVD
CD-ROM Mode 1, CD-ROM XA Mode 2 (form 1, form 2),
Photo CD, CD-DA (Audio CD), CD-Extra, CD-R, CD-RW
DVD-ROM, DVD-+R/RW/DL, DVD-VIDEO
700MB
4.7GB for General DVD
8.3GB for Dual Layer
CD-R, CD-RW
DVD-+R, DVD-+RW, DVD-+R DL
MICROBOARDS TECHNOLOGY, LLC
MX DISC PUBLISHER
Specifications
DVD Recorder Drive:
Power Supply:
Weight:
Connectivity:
Warranty:
Media Types:
DVD-+R/RW/DL CD-R/RW Recorder
Auto Detect AC Power: 90VAC – 240VAC, 47Hz – 63Hz
MX-1: 58 lbs; MX-2: 63 lbs.
USB 2.0 required
One Year Limited Warranty
Printable-surface 120mm CD-R/RW or DVD+-R/RW/DL
Printer:
Print Technology: HP Inkjet
Print Quality, Black: 600 x 600 dpi
Print Quality, Color: up to 4800 x 1200 optimized dpi
Print Speed: Depends upon percentage of coverage and print mode selected
•
Approx. 45 seconds for 100% full-color coverage, Photo Normal Mode
•
Approx. 20 seconds for 100% full-color coverage, Text & Graphics Best Mode
•
Approx. 12 seconds for 20% coverage Text & Graphics Normal Mode
•
Approx. 6 seconds for 100% full coverage Draft Normal Mode
Maximum Print Width: 4.72” (120mm)
Ink Cartridges: Microboards PFP-HC-CYAN, PFP-HC-MAGENTA, PFP-HC-YELLOW, and
PFP-HC-BLACK
Label Editing Software: SureThing™ First Edition Software for Windows included
Technical Support
For technical questions or support issues, contact Microboards Technology technical support:
United States
PH: 952-556-1639
FAX: 952-556-1628
[email protected]
www.microboards.com
Europe
PH: +44 (0) 845 230 7800
www.microboards.co.uk
Japan
PH: 03-3561-2266
www.microboards.co.jp
Please have the Model and Serial Number of your MX Disc Publisher available when contacting
Technical Support.
The modified optical recorder being used in this device has been recertified to IEC/EN 60825-1 and found to comply with the limits
of a class 1 laser product.
Any unauthorized modification to this equipment may result in the revocation by the FCC of the user’s authority to
operate this equipment.
NOTE: This equipment has been tested and found to comply with the limits for a Class B digital device, pursuant to Part 15 of the
FCC Rules. These limits are designed to provide reasonable protection against harmful interference in a residential installation. This
equipment generates, uses, and can radiate radio frequency energy and, if not installed and used in accordance with the instructions,
may cause harmful interference to radio communications. However, there is no guarantee that interference will not occur in a
particular installation. If this equipment does cause harmful interference to radio or television reception, which can be determined by
turning the equipment off and on, the user is encouraged to try to correct the interference by one or more of the following measures:
•
•
•
•
Reorient or relocate the receiving antenna
Increase the separation between the equipment and antenna
Connect the equipment into an outlet on a circuit different than that to which the receiver is connected
Consult the dealer or an experienced radio/TV technician for help
This product is in conformity with the EMC Directive (89/336/EEC) through compliance with the following European standards: EN 55022,
EN 55024. The CE mark has been affixed in accordance with the CE Marking Directive 93/68/EEC.
Canadian Department of Communications (DOC) Statement
This Class B digital apparatus complies with the Canadian ICES-003 Issue 4:2004. Cet appareil numerique de la classe B est conforme a la
norme NMB-003 du Canade.
23
24