1
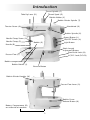
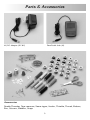
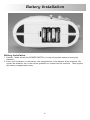
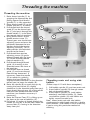
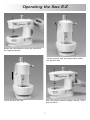
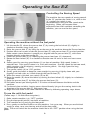
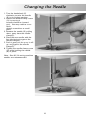
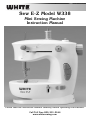
Sew E-Z Model W338
Mini Sewing Machine
Instruction Manual
Please read the instruction manual carefully before operating the machine.
Call Toll Free 800-331-3164
1
www.whitesewing.com
Introduction
Thread Spindle (C)
Take Up Lever (D)
Thread Spool (E)
Bobbin Holder (V)
Bobbin Winder Spindle (T)
Handwheel (K)
Tension Screw (Q)
Bobbin Spindle (U)
Speed Button (L)
ON/OFF Switch (A)
Needle Clamp Screw (O)
Needle Clamp (P)
Needle (R)
Light Button
Bobbin (S)
Stitch Length
Adjustment Button
Foot Pedal Jack (M)
Presser Foot (F)
AC/DC Jack (DC 6V)
Bobbin compartment (I)
Bobbin Holder (J)
Reverse Button
Bobbin Winder Handler (W)
Presser Foot Lever (G)
Bobbin Cover
Release Button (H)
Battery Compartment (B)
on underside of machine
2
Parts & Accessories
Foot Pedal Jack (M)
AC/DC Adapter (DC 6V)
Accessories
Needle Threader, Tape measure, Seam ripper, Needles, Thimble, Thread, Buttons,
Pins, Scissors, Bobbins, Snaps
3
Battery Installation
Battery Installation
1. Caution: Make certain the POWER SWITCH is in the off position before inserting the
batteries.
2. Insert (4)AA batteries in the battery slot compartment in the bottom of the machine. Be
certain the batteries are in the correct polarities as marked on the machine. Then replace
the battery compartment cover.
4
Threading the machine
Threading the machine
1. Raise thread spindle (C) by
grasping the exposed top and
pulling upward until thread
spindle (C) is fully extended.
2. Place thread spool (E) on the
thread spindle (C) as shown.
2
3. Pull thread from the thread
spool (E) on the thread spindle (C) and put it through the
thread holder (1) in the direction toward front of machine.
4. Bring thread across to the
4
thread tension screw (2).
Thread goes over the tension
adjusting screw and must be
positioned between the two
washers behind the tension
5
adjusting screw(Q). This is
what provides the lockstitch
tension to the thread.
5. Pull thread from tension
6
adjusting screw (Q) guide
through thread take up lever
(D) in the direction toward
front of machine (3).
6. Pull thread through thread
guide (4) inserting in the
direction toward the front of
the machine.
7. Pull thread down to thread
guide (5) and insert thread
from the top downward. If
necessary, lower the needle
(R) to reach this guide by
turning the hand wheel (K)
slightly counter-clockwise (in the direction
toward you) to lower the needle (R).
8. Raise the needle (R) to reach the eye by
turning the hand wheel (K) slightly
clockwise (in the direction away from you).
Insert thread through eye (6) of the needle
from the front toward the back of the
machine (use threader accessory if
necessary).
9. Raise the Presser Foot (F) by lifting up on
the lever at the rear of machine (G).
10.Pull about 10 inches of thread through the
needle (R) and lay it on the deck under the
presser foot (F) running in the direction
away from you.
5
1
3
Threading main unit using side
bobbin
(Follow steps 4-10 with these exceptions.)
1. Pull bobbin spindle (U) out from main unit.
2. Insert bobbin spindle (U) through center
hole of threaded bobbin.
3. Insert bobbin spindle (U) (with bobbin
attached) into bobbin holder (V). Make
sure bobbin spindle (U) with bobbin are
tightly secured to main unit.
Note: thread main unit with side bobbin
simultaneously with thread spool for a double
stitch method. Side bobbin is to be used only
if you’re using this particular method of
stitching.
Bobbin Winding and Insertion
Winding the bobbin
You can wind your own bobbins
with thread from spools you
purchase separately to have a
virtually unlimited thread color
selection. Match your fabrics
or contrast with the thread
shades of your choice.
1. Always remove the bobbin
(S) from the bobbin case on
the machine before you
wind a new bobbin.
2. Place the thread spool (E) on the thread spindle (C).
3. Press down the bobbin winder handler (W), the bobbin winder (T) will be lifted up.
4. Take an empty bobbin. Pull the thread down from the thread (E) through the clamper (I)
and thread the loose end through the small hole the bobbin to allow the small hole on the
bobbin rim from the outside.
5. Leaving the loose end on the outside of the bobbin, wind the thread several turns around the
INSIDE of the bobbin.
6. Place the bobbin on the bobbin winder spindle; making certain that the thread is winding
onto the bobbin in a counter-clockwise direction. Adjust the bobbin to allow the small hole
on the bobbin rim to line up with the spring on the bobbin winder spindle.
7. Press down the “ON” switch, the machine will start to wind the bobbin.
8. When the bobbin is full, switch off the machine. Insert the bobbin into bobbin case.
9. Lift up the bobbin winder handler.
Bottom bobbin placement
1. Press the release button (H) on the rear of the machine
to pop up the cover of the bobbin compartment (I).
2. Remove cover by lifting up where it has popped up at
rear.
3. Place the bobbin with thread of your choice in the
bobbin holder (J) leaving about 5 inches of thread
extended out from the bobbin holder (J).
4. Lower presser foot (F).
5. Turn hand wheel (K) counter-clockwise (toward you).
Needle (R) will go down,
picking up the bobbin thread. Turn handwheel (K) until
needle (R) has descended completely and then come
up again to its highest raised point. Stop when needle
(R) starts to go down again.
6. Raise the presser foot (F) and bring the spool thread
around to the front. Pull the two threads toward the rear
(away from you) and lay them under the presser foot
(F).
7. Snap the bobbin compartment (I) cover down and into
place.
Note: Both the top and bobbin thread must be threaded
correctly or the machine will not stitch properly.
The machine may have come pre-threaded from the factory. Look at this threading carefully before removing
it to replace the thread or bobbin with different thread. Then follow the preceding instructions to rethread.
6
Operating the Sew E-Z
Rotate the handwheel to bring the needle to
the highest position.
Lift the presser foot and place fabric under
the presser foot.
Press the power switch to begin sewing. Don’t
pull the fabric.
Lower the presser foot.
7
Operating the Sew E-Z
Controlling the Sewing Speed
The machine has two speeds of sewing control.
In the “H” position the switch is in, while in the
“L” position the switch is out.
We recommend using the slow speed at the
beginning. When you become more
experienced and feel confident controlling the
machine, you can use the fast speed.
Operating the machine without the foot pedal
1. Lift the needle (R) above the presser foot (F) by turning the had wheel (K) slightly in
clockwise direction (away from you.)
2. Raise the presser foot (F) by lifting up on the rear at the machine above the Presser foot bar.
3. Position fabric to be sewn under the presser foot (F) with presser foot (F) in raised position.
Make certain seam direction is toward you, aligned with the presser foot (F), with seam
location directly under the needle (R).
4. Lower the presser foot (F) by releasing the presser foot lever (G) downward.
5. Rotate the hand wheel (K) in a clockwise direction two full turns to lock and start seam.
Stop.
6. Select speed by pressing speed button (L) on face of machine. High speed, button is
extended out. Low speed, button is in, flush with machine. Use low speed for intricate work,
which requires a lot of stopping, starting and turning fabric. Use high speed for long
uninterrupted seams.
7. Turn power switch (A) to “ON” position.
8. Gently guide the fabric to keep the seam straight by pressing it lightly down with your
fingertips on both sides as it feeds through the presser foot (F).
9. When the seam is finished, turn switch (A) to off.
10.Raise the needle (R) above the fabric by turning the hand wheel (K) slightly in a clockwise
direction.
11.Raise the presser foot (F) by lifting the presser foot lever (G).
12.Pull fabric toward you leaving about 5-10 inches of thread between the fabric and the
machine.
13.Cut thread close to fabric, leaving excess thread loosely lying on the sewing deck in the
direction of the presser foot (F) and toward you.
14.Begin the next seam in the same manner as above by following operating steps above.
To use the with foot pedal
(Follow steps 1-14 with these exceptions)
1.
2.
3.
4.
Make certain machine is in “OFF” position.
Plug the foot pedal jack(M) into back of machine.
Turn machine on by pressing the foot pedal.
Press gently on the foot Pedal to run the machine. Let up to stop. When you are finished
sewing a seam, ease your foot up and off of the foot pedal.
Note: The on-off switch on the machine should be in the “OFF” position when using the foot
pedal.
8
Operating the Sew E-Z
Adjusting thread tension
Tension for maximum performance has been
set and adjusted at the factory. However, if
you should find that stitches are too loose, or
too tight, you can adjust the stitch.
1. Loosen stitch by turning the tension screw
(Q) counter-clockwise.
2. Tighten the stitch by turning tension screw
(Q) clockwise. Sewing heavier fabric may
require loosening the stitch. Very light
fabric may require tightening the stitch.
3. Bobbin tension cannot be adjusted.
Stitch length adjustment
You can use the stitch length adjustment
button control to change the stitch length in
sewing.
1. Push the button to the left in order to get
the longest stitch length. This is
recommended for normal sewing.
2. By turning the button towards the right
hand side, the stitch length will be reduced.
3. When the button is set to the middle point,
the stich length will become zero,
therefore, the fabric will not move forward.
Reverse sewing
Push and hold the lever down to sew in
reverse.
Sewing Sleeves
The machine designed to allow you to sew
sleeves easier.
1. Lift up the presser foot (F) and position the
sleeve under the needle. Put the bobbin
part of the sleeve in the gap between the
platform and the base.
2. Lower the presser foot and follow the step
5-13 in the section of operating the
machine on the previous page. Now you
can sew the sleeve easily.
9
Changing the Needle
1. Turn the handwheel (K)
clockwise to raise the needle
(R) to its highest position.
2. Loosen the needle clamp screw
(O) by turning it
counter-clockwise (toward
you). You may need to use a
short
slotted screwdriver or small
pliers.
3. Remove the needle (R) pulling
down, away from the needle
clamp(P).
4. Place the new needle with the
flat side facing in against the
needle clamp(P).
5. Push it gently as far up as it will
go, and against the needle
clamp(P).
6. Tighten the needle clamp screw
(O) while holding the needle
(R) in place.
Note: Size 90/14 sewing machine
needles are recommended.
10
Precautions
Set the POWER switch to OFF and don’t touch the switch when inserting batteries or plugging
in or replacing the needle.
Keep the unit away from children. If operated by a child, an adult shall watch the operation.
Set the switch to OFF after usage and remove the batteries or pull off the plug.
Don’t mix old batteries with new ones.
Don’t dismantle or rebuild the unit.
Don’t switch on when fabric has not been put on the unit even though top and bottom threads
are ready.
Troubleshooting
1. The sewing machine does not run when the power switch is pressed.
•Batteries are inserted incorrectly. Insert the batteries again using the diagram provided
inside the battery compartment.
•Batteries are exhausted. Replace with new batteries.
•Make sure the Adapter (6V,1.2A) and foot controller are connected in the corrected in the
right position (-)----(----(+)
2. The sewing machine runs, but does not form stitches.
•Incorrectly threaded machine. Thread machine again.
•Needle is incorrectly threaded. Make sure thread is threaded from left to right.
•Needle is not properly inserted.
•Batteries are installed incorrectly. Check the diagram in the battery compartment and
re-install.
•Caution: To remove fabric after sewing, first turn the handwheel to raise the needle to the
highest position. Lift the presser foot and remove the fabric. This will avoid bending the
needle.
3. The machine runs slowly.
•Used batteries and new batteries are used together. Replace with new batteries.
•Use only AA(#3, 1.5V) batteries.
4. The sewing machine stops sewing.
•Very heavy fabric or too many layers of fabric will force the sewing machine to stop.
•Thread is tangle in the lower bobbin. Stop the machine. Cut the tangled threads to clear it
from the machine. Re-thread both the bobbin and the needle.
•Poor quality stitching: refer to “Adjusting Thread Tension” on page 9.
•When new batteries are installed, the sewing machine should work for approximately 2
hours under normal sewing conditions. Remember that heavy fabric requires more power, so
it will reduce the running time of the batteries.
11
©2006 VSM Sewing Inc. White is a registered trademark. All rights reserved.
12