1
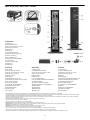
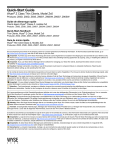
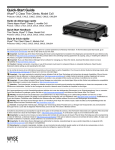
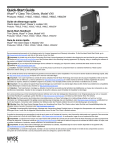
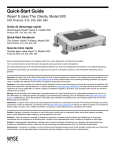
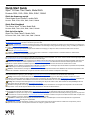
Quick-Start Guide
Wyse® R Class Thin Clients, Model Rx0L
Products: R00L, R10L, R50L, R90L, R90L7, R90LW
Guide de démarrage rapide
Clients légers Wyse® Classe R, modèle Rx0L
Produits : R00L, R10L, R50L, R90L, R90L7, R90LW
Quick-Start-Handbuch
Thin Clients, Wyse® R Class, Modell Rx0L
Produkte: R00L, R10L, R50L, R90L, R90L7, R90LW
Guía de inicio rápido
Wyse® Thin Client Clase R, Modelo Rx0L
Productos: R00L, R10L, R50L, R90L, R90L7, R90LW
See accompanying documents in the shipping carton for License Agreement and Warranty information. To find the latest Quick-Start Guide, go to
http://www.wyse.com/manuals and click on the name of your thin client.
Important: A printed copy of the Wyse Technology End User License Agreement is included in the shipping box and provided for your reference only.
The license at http://www.wyse.com/license as of the purchase date is the controlling licensing agreement. By copying, using, or installing the software or
the product, you agree to be bound by those terms.
Important: If you use Wyse Device Manager Server software for managing your Wyse thin clients, download the latest version to ensure
compatibility at http://commerce.wyse.com.
Caution: Improper connection, mounting, or use of this product could result in component failure or undesired interference. Read Caution
Statements before setting up and operating the thin client.
Voir le contrat de licence et les informations de garantie se trouvant dans le carton d'expédition. Pour trouver le dernier Guide de démarrage rapide, allez
sur http://www.wyse.com/manuals et cliquez sur le nom de votre client léger.
Important : Une copie imprimée du contrat de licence utilisateur final de Wyse Technology est incluse dans le paquet d’expédition. Elle est fournie
uniquement à titre de référence. La licence présente sur http://www.wyse.com/license à la date d’achat du terminal constitue l’agrément de Licence
applicable. En copiant, utilisant ou installant le logiciel ou le produit, vous acceptez d’être soumis aux termes et conditions de ce contrat.
Important : Si vous utilisez le logiciel Wyse Device Manager pour administrer vos clients légers Wyse et afin d'éviter tout problème de compatibilité,
veuillez télécharger la version la plus récente sur http://commerce.wyse.com.
Attention : Tout branchement, montage ou utilisation incorrect de ce produit pourrait entraîner des défaillances au niveau des composants ou des
interférences indésirables. Veuillez lire les consignes de sécurité ci-dessous avant d’installer et d’exploiter le client léger.
Die Lizenzvereinbarung und die Garantieinformationen befinden sich unter den beiliegenden Dokumenten in der Originalverpackung. Um zur neuesten
Quick-Start-Handbuch zu gelangen, gehen Sie bitte zu http://www.wyse.com/manuals und klicken auf den Namen Ihres Thin Clients.
Wichtig: Die Druckversion des Endbenutzer-Lizenzabkommens von Wyse Technology ist im Lieferumfang enthalten und wird nur zu Ihrer
Information zur Verfügung gestellt. Die gültige Lizenzvereinbarung ist diejenige, die zum Kaufdatum unter http://www.wyse.com/license veröffentlicht ist.
Durch das Kopieren, Verwenden oder Installieren der Software oder des Produkts erklären Sie sich mit den Bedingungen einverstanden.
Wichtig: Wenn Sie Wyse Device Manager Server zur Verwaltung Ihrer Wyse Thin Clients nutzen, laden Sie bitte aus Kompatibilitätsgründen die
aktuellste Version herunter. Download unter http://commerce.wyse.com.
Vorsicht: Unsachgemäße Verbindungen, Montage oder Verwendung dieses Produkts kann zu Versagen der Komponenten und unerwünschten
Störungen führen. Lesen Sie die folgenden Warnhinweise, bevor Sie den Thin Client in Betrieb nehmen.
Consulte los documentos que acompañan la caja de envío para ver el Contrato de Licencia y otra información relacionada con la garantía. Para encontrar
la última version de la Guía de Inicio Rápido vaya a, http://www.wyse.com/manuals. A continuación, haga clic en el nombre del thin client.
Importante: La caja de envío incluye una copia impresa del Contrato de Licencia para el Usuario Final de Wyse Tecnology que sólo se proporciona
a modo de referencia. La licencia incluida en http://www.wyse.com/license el día que se realice la compra es el contrato de licencia válido. Al copiar, usar
o instalar el software o el producto, acepta adherirse a las condiciones del contrato.
Importante: Si utiliza Wyse Device Manager para administrar los clientes, necesitará bajar la nueva versión disponible en el siguiente URL:
http://commerce.wyse.com para asegurar compatibilidad.
Advertencia: La conexión inapropiada, montaje o el uso incorrecto de este producto puede resultar en la falla de los componentes y/o de la
corrupción de la memoria flash. Lea las precauciones antes de configurar y operar el thin client.
R00L, R10L, R50L, R90L, R90L7, R90LW
Components
1 Serial port (2)
2 PS/2-type keyboard port
3 DVI-I #1 port (1x DVI-D or 1x VGA)
4 DVI-D #2 port (1x DVI-D)
5 Microphone in
6 USB port (4)1
7 +19V Power adapter input
8 Wireless antenna port (optional)2
9 PS/2-type mouse port
10 Line out/Speaker out3
11 Network port, 10/100/1000BaseT
12 Lock receptacle
13 Power on/off button/light
14 Activity light
15 USB port (2)1
Connexion
Verbindung
Conexión
1 Port série (2)
2 Port pour clavier de type PS/2
3 Port DVI-I No 1 (1x DVI-D ou 1x VGA)
4 Port DVI-D No 2 (1x DVI-D)
5 Entrée microphone
6 Port USB (4)1
7 Entrée adaptateur secteur +19V
8 Port antenne pour réseau sans fil (en option)2
9 Port souris de type PS/2
10 Line Out / Sortie Audio3
11 Port réseau, 10/100/1000BaseT
12 Emplacement pour le verrou
13 Bouton Marche/Arrêt
14 Voyant d'activité
15 Port USB (2)1
1 Serieller Port (2)
2 Schnittstelle für PS/2-Tastatur
3 DVI-I Port #1 (1x DVI-D oder 1x VGA)
4 DVI-D Port #2 (1x DVI-D)
5 Mikrofoneingang
6 USB-Port (4)1
7 +19 V Leistungsaufnahme
8 Port für Wireless-Antenne (optional erhältlich)2
9 PS/2 Mausanschluss
10 Line Out / Lautsprecherausgang3
11 Netzwerk-Anschluss, 10/100/1000Base-T
12 Sperranschluss
13 Einschaltknopf
14 Betriebsleuchte
15 USB-Port (2)1
1 Puerto serie (2)
2 Puerto de teclado tipo PS/2
3 Puerto DVI-I #1 (1x DVI-D o 1x VGA)
4 Puerto DVI-D #2 (1x DVI-D)
5 Micrófono
6 Puerto USB (4)1
7 Conexión para cable de alimentación de +19V
8 Puerto de antena inalámbrica (opcional)2
9 Puerto para ratón del tipo PS/2
10 Line out/salida de audio3
11 Conexión de red, 10/100/1000Base-T
12 Bloqueo
13 Botón de encendido/apagado
14 Indicador de actividad
15 Puerto USB (2)1
1 Not
all USB devices are supported; check with Wyse or your Wyse representative to find out if a particular device is supported on your thin client.
Certains périphériques USB ne sont pas supportés; merci de vérifier auprès de Wyse ou d'un représentant si le matériel que vous souhaitez utiliser est supporté par votre client léger Wyse.
Nicht alle USB Geräte werden unterstützt. Bei der Überprüfung der Unterstützen Geräte ist Wyse Ihnen gerne behilflich.
No todos los dispositivos son USB compatibles; póngase en contacto con Wyse o su representante de Wyse para averiguar si su dispositivo es compatible con su modelo de cliente ligero.
2 Wireless option not available in all localities.
Des restrictions liées à l'utilisation de l'option réseau sans fil peuvent s'appliquer dans certains pays.
Die Wireless Option ist nicht in allen Ländern verfügbar.
La opción Inalámbrica no está disponibles en todas las localidades
3 Warning: Listening to audio at high volume levels for extended durations can damage your hearing.
Avertissement : Une écoute prolongée de musique ou autre contenu audio à un niveau sonore trop élevé peut provoquer de graves problèmes auditifs.
Warnung: Hohe Lautstärken können auf Dauer das Gehör schädigen.
Advertencia: Escuchar audio con volumen alto por largos periodos puede causar daños en su oído.
4 Supplied for U.S.A.; in other locales, check package contents or contact your Wyse reseller.
Fourni pour les Etats-Unis ; pour les autres pays, vérifiez le contenu du carton d'expédition ou contactez votre revendeur Wyse.
Wird in den U.S.A. mitgeliefert. In anderen Ländern: Überprüfen Sie das Paket und wenden Sie sich ggf. an Ihren Wyse-Händler.
Suministrado para EE.UU.; en el caso de otras configuraciones regionales, revise el contenido del paquete o póngase en contacto con su distribuidor de Wyse.
2
Power Sources
Thin Client Installation
• For regulatory compliance use only the power adapter that comes with
Read Caution Statements before setting up and operating the thin client.
your device or a Wyse-approved equivalent. For proper replacement
compare the labels on both device and power adapter to ensure that
their voltages match.
Warning: Use of any other power adapter may damage your
device or the power adapter. The damage caused by an improper power
adapter is not covered by warranty.
Connect
Refer to the figures and proceed as follows:
1. Place the thin client on a desk, or use a Wyse-approved mounting
accessory kit.
• Accidental loss of power can damage the thin client. Avoid connecting it
2. Make all desired connections (video display and keyboard with mouse
are required). Connection to a 10/100/1000BaseT Ethernet network is
required unless an optional WiFi network adapter is used for wireless
connection to a network. Additional connections of peripheral devices
may be made to the other ports.
•
3. Connect the power adapter to the thin client power input before
connecting to a 100-240V AC, 50-60 Hz electrical outlet, and then
press the power button to apply power. When the initialization
sequence is complete, the amber activity light changes to green.
•
Configure
•
R10L, R50L, R90L, R90L7, R90LW - After turning on, the thin client
initially goes through several boot sequence procedures before the
operating system loads. Information about setting up your server
environment is available in the thin client’s documentation.
Battery
The thin client contains an internal button cell battery replaceable by Wyse
or one of our Authorized Service Centers. For service, visit
http://www.wyse.com/serviceandsupport/service/service.asp.
R00L - WSM software is required; no other configuration is needed.
Information about setting up your server environment is available in the
WSM documentation.
Warning: There is a risk of explosion if the battery is replaced by an
incorrect type. Always dispose of used batteries according to the
instructions accompanying the battery.
Default User Names and Passwords1 (case sensitive)
Wyse
ThinOS™
Wyse® Enhanced
SUSE Linux
Enterprise
Microsoft®
Windows® XP
Embedded2
Microsoft® Windows®
Embedded Standard
20092 / 72
Administrator
User Name
Password
—
—
admin
admin
Administrator
Administrator
administrator
Wyse#123
User
User Name
Password
—
—
thinuser
thinuser
User
User
user
Wyse#123
Warning: Perchlorate Materials - Special Handling May Be Required
under California Code of Regulations, title 22. (Only required within the
U.S.A.)
Need more information?
Wyse Reference Guides - User, Administrator, and related
documentation is available at:
http://www.wyse.com/manuals
1Not
applicable for R00L.
administrators, log off User desktop while holding down the Shift key until the logon box
appears.
2For
Wyse-Approved Mounting Accessory Kits - Information about
approved mounting accessory kit options is available at:
http://www.wyse.com/products/accessories/mounting.asp
Caution Statements
Wyse Service and Support - Latest software images are available at:
http://www.wyse.com/support
Improper connection, mounting, or use of this product could result in
component failure or undesired interference. Read the following caution
statements before setting up and operating the thin client.
Wyse Device Manager - Information about Wyse remote management
software is available at:
http://www.wyse.com/products/software/devicemanager
Setup
• Do not connect to AC power until all other connections (including the
•
Wyse WSM - Information about Wyse WSM software is available at:
http://www.wyse.com/products/software/wsm
power adapter) are made. Connecting or disconnecting components or
equipment on the back panel when the thin client is receiving AC power
can cause power surges and damage the device.
Do not force a connector into its socket. If any undue resistance is
encountered, ensure that the connector is correctly oriented to the
receptacle.
Wyse and the Environment - Information about Wyse compliance with
RoHS and with the Waste Electrical and Electronic Equipment (WEEE) is
available at:
http://www.wyse.com/green
Wyse and E-Recycling - Information about recycling unwanted Wyse
product within the United States is available at:
http://www.wyse.com/about/environmental/erecycling
Venting and Care
• Mount the thin client only as shown or in accordance with the
•
•
to any power outlet which can be accidentally switched off. Do not hard
reset the thin client by holding down the power button during normal
operation.
When turning off the thin client, be sure to perform a complete shutdown
(via the user interface or a light press on the power button). Do not
disconnect the AC power cord, DC power cord, or shut off power at a
circuit breaker (including power strips), etc., to turn off the device.
Surge protectors for electrical devices are recommended in areas of
lightning. However, when lightning is occurring, your equipment should
be properly shut down and unplugged from AC power until the storm
has passed.
Be very careful to not interrupt power while the thin client is downloading
a software update.
instructions provided with Wyse-approved mounting accessory kits.
Improper orientation could inhibit the dissipation of heat from the device
and damage it.
Allow sufficient space around the thin client for ventilation; do not place
the device in any enclosure that restricts airflow around the device; do
not place any objects on the device or block the vent outlets. Find
environmental operating specifications in the thin client’s datasheet
located at:
http://www.wyse.com/products
For wireless usage and requirements, refer to the regulatory notices in
the thin client’s documentation.
Wyse Warranty Registration - Wyse’s warranty registration* process is
available at:
http://www.wyse.com/serviceandsupport/register.asp
*The standard warranty is three years from the date of purchase.
3
Installation du Client léger
environnementales du produit figurent dans sa fiche technique, sur le
site Web de Wyse: http://fr.wyse.com/products
Pour les conditions d'utilisation du réseau sans fil, reportez-vous à la
documentation en ligne du client léger.
Lire attentivement les consignes de sécurité avant d'installer et de mettre
en fonctionnement le client léger.
•
Connexion
• Pour la conformité règlementaire, utilisez uniquement l'adaptateur
Sources d'alimentation
secteur livré avec l'appareil ou un modèle équivalent approuvé par
Wyse. En cas de remplacement, comparez les indications figurant sur
l'appareil et sur l'adaptateur secteur et assurez-vous que les tensions
coïncident.
Avertissement: l'utilisation de tout autre adaptateur secteur peut
endommager l'appareil comme l'adaptateur. Les dommages entraînés
par un adaptateur secteur inadéquat ne sont pas couverts par la
garantie.
Reportez-vous aux figures et procédez comme suit :
1. Placez le client léger sur le bureau (en utilisant le pied fourni), ou
fixez-le avec un kit de montage approuvé par Wyse.
2. Procédez aux connexions nécessaires (écran d'affichage et clavier
avec souris). La connexion à un réseau Ethernet 10/100/1000BaseT
est nécessaire sauf si un adaptateur réseau sans fil optionnel est
utilisé pour se connecter au réseau. Des périphériques
supplémentaires peuvent être connectés sur les autres ports.
• Pour prévenir les pertes de tension accidentelles qui pourraient
3. Connectez le boîtier l'alimentation au client léger avant de le
raccorder à une prise de courant (100-240 V AC; 50-60 Hz). Appuyez
ensuite sur le bouton marche/arrêt du client léger pour l’allumer. A la
fin de la séquence d'initialisation, le voyant d'activité ambre devient
vert.
•
Configuration
R10L, R50L, R90L, R90L7, R90LW - Après la mise sous tension, le client
léger exécute plusieurs séquences de démarrage avant que le système
d'exploitation ne soit chargé. Pour plus d’informations sur la manière de
configurer votre environnement serveur, reportez-vous à la documentation
en ligne du client léger.
•
•
R00L - Le logiciel WSM est nécessaire ; aucune autre configuration n'est
exigée. Les informations sur l'installation de l'environnement serveur sont
disponibles dans la documentation de WSM.
Batterie
1
Les clients légers sont équipés d'une pile-bouton interne qui ne doit être
remplacée que par Wyse ou l’un de ses Centres de Maintenance Agréés.
Pour obtenir l’assistance Wyse, merci de consulter
http://fr.wyse.com/serviceandsupport/service/service.asp.
Noms Utilisateurs et Mots de Passe par défaut (respecter la casse)
Wyse®
Enhanced
SUSE Linux
Enterprise
Microsoft®
Windows® XP
Embedded2
Microsoft® Windows®
Embedded Standard
20092 / 72
—
—
admin
admin
Administrator
Administrator
administrator
Wyse#123
—
—
thinuser
thinuser
User
User
user
Wyse#123
Wyse
ThinOS™
Administrateur
Nom d’utilisateur
Mot de Passe
Utilisateur
Nom d’utilisateur
Mot de Passe
endommager le client léger, évitez de le connecter à toute prise secteur
qui peut être accidentellement mise hors tension ou d’effectuer une
réinitialisation matérielle du client léger en maintenant appuyé le bouton
d’allumage.
L’arrêt du client léger doit être complet : il doit se faire via l’interface
utilisateur ou en appuyant légèrement sur le bouton d’alimentation. Il est
déconseillé d’utiliser les moyens comme ceux-ci pour arrêter le
système : débrancher le cordon d’alimentation secteur ou arrêter le
disjoncteur (y compris le blocs multiprises).
Les parasurtenseurs pour appareils électriques sont recommandés
dans les zones d’orage. Cependant, pendant les orages, il est
recommandé d’arrêter complètement votre système et de le mettre hors
tension, le temps que l’orage passe.
Veillez à ne pas arrêter l’alimentation pendant que le client léger
télécharge une mise à jour de logiciel.
Avertissement : Il existe un risque d'explosion si la pile n’est pas
correctement remplacée. Lors du remplacement, utilisez uniquement celle
recommandée par le fabriquant du matériel. Ne jetez pas la batterie
usagée avec les dechets ménagers, se reporter aux instructions
accompagnant la batterie.
Avertissement : Matériau composé de Perchlorate – Une
Manutention spéciale peut être exigée en vertu du code de réglementation
de Californie, titre 22. (Seulement requis aux
États-Unis.)
1Non
applicable au R00L.
vous connecter en tant qu'administrateur, fermez la session utilisateur tout en maintenant
la touche Maj enfoncée jusqu'à ce que la boîte de dialogue de connexion s'affiche.
2Pour
Attentions
Tout branchement, montage ou utilisation incorrect de ce produit pourrait
entraîner des défaillances au niveau des composants ou des
interférences indésirables. Veuillez lire les consignes de sécurité cidessous avant d’installer et d’exploiter le client léger.
Besoin de plus d’informations ?
Wyse Guides de Référence - Les documentations utilisateur et
administrateur se trouvent à : http://www.wyse.com/manuals
Kits d’accessoires de montage approuvés par Wyse Des informations sur les différents kits d’accessoires de montage
approuvés par Wyse sont disponibles à :
http://fr.wyse.com/products/accessories/mounting.asp
Installation
• Ne connectez pas le système au courant alternatif (CA) avant d'avoir
•
effectué toutes les autres connexions, y compris l'adaptateur secteur.
Connecter ou déconnecter des composants ou unités au panneau
arrière pendant que le client léger est sous tension peut provoquer des
surtensions et endommager le système.
Ne forcez pas un connecteur dans son port. Si vous sentez une
résistance quelconque, vérifiez que le connecteur est correctement
orienté.
Services et Support Wyse - Les dernières images logicielles sont
disponibles à : http://www.wyse.com/support
Wyse Device Manager - Les informations relatives au logiciel
d'administration à distance de Wyse sont disponible à :
http://fr.wyse.com/products/software/devicemanager
Wyse WSM - Les informations relatives au logiciel Wyse WSM sont
disponibles à : http://fr.wyse.com/products/software/wsm/index.asp
Aération et Précautions
• Montez le client léger seulement selon les instructions fournies pour le
•
Wyse et l'environnement - Les informations sur la gestion par Wyse des
déchets d'équipements électriques et électroniques (DEEE) et la
conformité RoHS sont disponibles à : http://fr.wyse.com/green
kit d’accessoires de montage approuvé par Wyse. L’orientation
incorrecte pourrait empêcher la dissipation de la chaleur par le système
et l’endommager.
Laissez suffisamment d’espace autour du client léger pour la ventilation;
ne placez pas le système dans un endroit fermé car cela réduit la
circulation de l’air autour de lui ; ne placez aucun objet sur le système et
n’obstruez pas les orifices de ventilation. Les spécifications
Enregistrement de la garantie de Wyse - L’enregistrement de la
garantie* de Wyse peut se faire à :
http:/fr.wyse.com/serviceandsupport/register.asp
*La garantie standard est de trois années à compter de la date de l’achat.
4
Thin Client Installation
•
Bitte lesen Sie die Warnhinweise, bevor Sie den Thin Client in Betrieb
nehmen.
Umgebungsspezifikationen des Produkts finden Sie im Datenblatt des
Produkts auf der Wyse Website unter: http://de.wyse.com/products
Zur Verwendung von drahtlosen Verbindungen und die technischen
Anforderungen konsultieren Sie die Vorschriften in der Dokumentation
des Thin Client.
Stromquellen
Verbindung
• Verwenden Sie zum ständigen Gebrauch nur den mit Ihrem Gerät
Sehen Sie sich die folgenden Zeichnungen an, und gehen Sie wie folgt
vor:
gelieferten Adapter oder ein von Wyse anerkanntes Äquivalent. Für
einen sachgemäßen Austausch vergleichen Sie die Etikette auf beiden
Geräten, um sich zu vergewissern, dass ihre Spannungen
übereinstimmen.
Warnung: Die Verwendung irgendeines anderen Adapters könnte
Ihr Gerät oder den Adapter zerstören. Der durch einen unpassenden
Adapter verursachte Schaden fällt nicht unter die Garantie.
1. Platzieren Sie den Thin Client auf dem Schreibtisch oder verwenden
Sie einen von Wyse Technology genehmigten Montagesatz.
2. Schließen Sie alle notwendigen Verbindungen her (VGA-, Maus-,
Tastatur-Kabel). Für eine Verbindung zu einem 10/100/1000 BaseT
Ethernet Netzwerk muß ein Netzwerkkabel oder ein optionaler WiFi
Netzwerkadapter angeschlossen werden. Weitere Peripheriegeräte
können an weiteren Anschlüssen angeschlossen werden.
• Vermeiden Sie zur Verhinderung von plötzlichem Stromverlust, was den
3. Verbinden Sie das Netzteil mit einem 100-240 V AC, 50-60 Hz
Wechselstromanschluss und betätigen Sie den EIN/AUS-Schalter.
Sobald die Initialisierungssequenz abgeschlossen ist, wechselt die
Farbe der Betriebsleuchte von gelb in grün.
•
Konfigurieren
•
R10L, R50L, R90L, R90L7, R90LW - Nach dem Einschalten durchläuft
der Thin Client zunächst mehrere Boot-Sequenzprozesse, bevor das
Betriebssystem geladen wird. Informationen zur Einrichtung der ServerUmgebung finden Sie in der Dokumentation des Thin Client.
R00L - Für den Betrieb ist die Software WSM erforderlich; eine weiter
gehende Konfiguration ist nicht notwendig. Hineise zur Einrichtung und
Konfiguration der Server-Umgebung entnehmen Sie bitte der
Dokumentation zum WSM.
Vorgegebene Usernamen und Passwörter
Microsoft®
Windows® XP
Embedded2
Microsoft® Windows®
Embedded Standard
20092 / 72
Administrator
Administrator
administrator
Wyse#123
User
Username
Passwort
User
User
user
Wyse#123
thinuser
thinuser
Batterie
1
(Groß- und Kleinschreibung beachten!)
Wyse® Enhanced
SUSE Linux
Wyse
™
ThinOS
Enterprise
Administrator
Username
—
admin
Passwort
—
admin
—
—
•
Thin Client beschädigen könnte, den Anschluss an eine Netzsteckdose,
die versehentlich ausgeschaltet werden kann, sowie auch das plötzliche
Abschalten des Thin Client mit Hilfe des EIN/AUS-Schalters.
Überzeugen Sie sich, dass der Thin Client zum Abschalten vollständig
heruntergefahren wird (mit Hilfe der Benutzeroberfläche oder durch
leichten Druck auf den EIN/ AUS-Schalter). Lösen Sie zum Abschalten
des Geräts nicht das Netzkabel, unterbrechen Sie den Stromkreis nicht
an der Sicherung oder einer schaltbaren Mehrfachsteckdose, etc.
In gewittergefährdeten Gebieten wird die Verwendung eines
Überspannungsschutzes für elektrische Geräte empfohlen. Im Fall
eines Gewitters sollten Ihre Geräte jedoch trotzdem korrekt
heruntergefahren und die Verbindung zum Netz getrennt werden, bis
das Gewitter vorüber ist.
Unterbrechen Sie keinesfalls die Stromversorgung, während der Thin
Client ein Software-Update lädt.
Ihr Thin Client hat eine interne Knopfzellen-Batterie, die lediglich durch
Wyse oder eines seiner authorisierten Service Center ersetzt werden darf.
Mehr Infos zum Thema Service finden Sie unter
http://www.wyse.de/serviceandsupport.
Warnung: Es besteht Explosiongefahr, falls eine Batterie des
falschen Typs eingesetzt wird. Entsorgen Sie gebrauchte Batterien immer
entsprechend den Gebrauchsanweisungen des Batterieherstellers.
Warnung: Perchlorates Material - Spezielle Handhabung gemäß der
Regeln des California Code of Regulations, Titel 22. (Nur erforderlich in
den U.S.A.)
1Gilt
nicht für R00L.
Administratoren: Melden Sie sich von Ihrer Benutzeroberfläche ab, während Sie die ShiftTaste gedrückt halten, bis die Log-on-Box erscheint.
2Für
Sie benötigen weitere Informationen?
Wyse Reference Guides - Dokumentation für Benutzer und Verwalter
finden Sie unter:
http://www.wyse.com/manuals
Warnung
Unsachgemäße Verbindungen, Montage oder Verwendung dieses
Produkts kann zu Versagen der Komponenten und unerwünschten
Störungen führen. Lesen Sie die folgenden Warnhinweise, bevor Sie den
Thin Client in Betrieb nehmen.
Von Wyse genehmigte Montagesätze - Informationen über genehmigte
Montagesatzoptionen finden Sie unter:
http:/de.wyse.com/products/accessories/mounting.asp
Aufstellen
Wyse Service- und Support - Neueste Software finden Sie unter:
http://www.wyse.com/support
• Schließen Sie das Produkt erst dann an das Stromnetz an, wenn alle
•
anderen Verbindungen, einschließlich der Verbindung zum Netzadapter,
hergestellt sind. Das Herstellen oder Lösen von Komponenten- oder
Geräteverbindungen bei bereits hergestellter Netzverbindung kann zu
Überspannung und Schäden am Gerät führen.
Wenden Sie bei der Verbindung eines Steckers keine Gewalt an. Sollten
Sie einen unerwarteten Widerstand spüren, überzeugen Sie sich, dass
der Stecker korrekt in der Buchse ausgerichtet ist.
Wyse Device Manager - Informationen zur Wyse Device Manager
Management Software finden Sie unter:
http://de.wyse.com/products/software/devicemanager
Wyse WSM - Informationen zur Wyse WSM Software finden Sie unter:
http://de.wyse.com/products/software/wsm
Wyse und die Umwelt - Informationen zur Einhaltung der RoHS- und
WEEE-Vorschriften durch Wyse finden Sie unter:
http://de.wyse.com/green
Belüftung und Pflege
• Montieren Sie den Thin Client nur wie gezeigt, bzw. in Übereinstimmung
•
Wyse Garantie-Registrierung - Zugang zur Wyse Garantieregistrierung*
erhalten Sie unter:
http://www.wyse.com/serviceandsupport/register.asp
mit den Anweisungen, die in der von Wyse genehmigten Montagesatz
angegeben werden. Inkorrekte Ausrichtung kann die Wärmeableitung
vom Gerät behindern und es beschädigen.
Um den Thin Client muss genügend Raum zur Belüftung vorhanden
sein. Stellen Sie das Gerät in keine Umgebung, die die Luftbewegung
um das Gerät herum behindert. Platzieren Sie keine Objekte auf dem
Gerät und blockieren Sie die Lüftungsöffnungen nicht. Die
*Der Standard-Garantiezeitraum beträgt drei Jahre nach Erwerb.
5
Instalación del Thin Client
•
Lea las notificaciones de precaución antes de ajustar y operar el thin
client.
Fuentes de alimentación
Conexión
• Para observar las normas establecidas, use solamente el adaptador de
Vea las figuras y prosiga de la siguiente manera:
corriente que viene junto con su dispositivo, o un equivalente aprobado
por Wyse. Para reemplazar correctamente, compare las etiquetas en su
dispositivo y en el adaptador de corriente, para ver si sus voltajes
coinciden.
Advertencia: El uso de cualquier otro adaptador de corriente
puede dañar su dispositivo o el adaptador de corriente. Los daños
causados por un adaptador de corriente incorrecto no estan cubiertos
por la garantía.
1. Coloque el thin client en un escritorio, o utilice un kit de accesorios de
montaje aprobado por Wyse.
2. Realice todas las conexiones necesarias (se necesita la pantalla de
vídeo, así como el ratón y el teclado). Se necesita la conexión a una
red Ethernet BaseT 10/100/1000, a no ser que se utilice un adaptador
de red opcional WiFi para la conexión inalámbrica a una red. Se
pueden realizar conexiones adicionales de dispositivos periféricos a
otros puertos.
• Para impedir las pérdidas de energía accidentales que pueden dañar el
3. Conecte el adaptador de alimentación al thin client antes de
conectarlo a un receptáculo de 100-240V CA, 50-60 Hz, luego
presione el botón de encendido para encender el dispositivo. Cuando
la secuencia de inicialización termine, la luz de actividad ámbar
cambiará de color a verde.
•
•
Configuración
R10L, R50L, R90L, R90L7, R90LW - Después del encendido automático,
el thin client realiza varios procedimientos de secuencia de inicio antes
que se cargue el sistema operativo. Para obtener información sobre la
configuración del entorno de servidor, consulte la documentación de thin
client.
•
Los clientes ligeros contienen una batería interna de tipo botón sólo
reemplazable por Wyse o por un Centro de Servicio Autorizado por Wyse.
Para reciviir servicio, visite
http://www.wyse.com/serviceandsupport/service/service.asp.
Usuarios y Contraseñas Implícitas1 (Respetando mayúsculas y minúsculas)
Wyse
ThinOS™
Wyse® Enhanced
SUSE Linux
Enterprise
Microsoft®
Windows® XP
Embedded2
Microsoft®
Windows®
Embedded
Standard 20092 / 72
Administrador
Nom del Usuario
Contrasña
—
—
admin
admin
Administrator
Administrator
administrator
Wyse#123
Usuario
Nom del Usuario
Contrasña
—
—
thinuser
thinuser
User
User
user
Wyse#123
Advertencia: Se presentará riesgo de explosión si la batería es
reemplazada por otra de un tipo incorrecto. Siempre deseche las baterías
usadas según las instrucciones que acompañan la nueva batería.
Advertencia: Materiales de Perclorato – Es posible que el Código de
Regulaciones del Estado de California requiera un manejo especial de
estos materiales (Sólo se requiere dentro de los EEUU.)
¿Necesita más información?
1No
aplicable en el R00L.
administradores: Cerrar la sesión del Escritorio del Usuario manteniendo pulsada la tecla
Mayús/Shift hasta que aparezca la ventana de inicio de sesión.
2Para
Guías de referencia de Wyse - El usuario, el administrador y la
documentación relacionada están disponibles en:
http://www.wyse.com/manuals
Advertencias
Kits de accesorios de montaje aprobados por Wyse La información sobre las opciones del kit de accesorios de montaje
aprobados por Wyse se encuentra disponibles en:
http://www.wyse.com/products/accessories/mounting.asp
La conexión inapropiada, montaje o el uso incorrecto de este producto
puede resultar en la falla de los componentes o interferencia indeseada.
Lea las precauciones antes de configurar y operar el thin client.
Servicio y asistencia de Wyse - Las imágenes del software se
encuentran disponibles en:
http://www.wyse.com/support
Instalación
• No conecte la alimentación de CA hasta que haya realizado todas las
demás conexiones, incluida la del adaptador de alimentación. Si
conecta o desconecta los componentes o equipos del panel trasero
cuando thin client esté recibiendo alimentación de CA, puede
producirse sobretensiones transitorias de energía y dañar el dispositivo.
No fuerce ningún conector al introducirlo en su enchufe. Si nota
resistencia no habitual, asegúrese de que el conector esté
correctamente orientado en el receptáculo.
Wyse Device Manager - La información sobre la administración remota
de clientes:
http://www.wyse.com/products/software/devicemanager
Wyse WSM - La información sobre Wyse WSM software se encuentra
disponible en:
http://www.wyse.com/products/software/wsm
Ventilación y Cuidado
Wyse y el entorno - Dispone de información sobre la compatibilidad de
Wyse con RoHS y con Waste Electrical and Electronic Equipment
(WEEE) en:
http://www.wyse.com/green
• Monte el thin client de acuerdo con las instrucciones que se
•
thin client, evite la conexión a cualquier toma de corriente que pueda
desconectarse de manera accidental. Evite el inicio y de manera brusca
no pulse el botón de encendido durante el funcionamiento normal.
Al apagar el thin client, asegúrese de realizar un apagado completo
(mediante la interfaz del usuario o presionando ligeramente el botón de
encendido). No desconecte el cable de alimentación de CA ni apague la
alimentación de corriente, etc. para apagar el dispositivo.
Se recomienda usar protectores contra sobre tensiones en las áreas
propensas a rayos y relámpagos. Sin embargo, cuando se produzcan
rayos y relámpagos, su equipo debe estar correctamente apagado y
desconectado de la alimentación de CA hasta que pase la tormenta.
Tenga mucho cuidado de no interrumpir la alimentación mientras el thin
client esté descargando una actualización del software.
Batería
R00L - Se necesita el software WSM; no se necesita ninguna otra
configuración. Dispone de información sobre cómo configurar su entorno
de servidor en la documentación de WSM.
•
del producto en el sitio Web de Wyse, en la dirección:
http://www.wyse.com/products
Para obtener información sobre el uso y los reglamentarios del
dispositvo inalámbrico, consulte los informes reglamentarios en la
documentación de thin client.
proporcionan con los kits montaje vertical aprobados de Wyse. La
orientación no correcta puede impedir la disipación del calor del
dispositivo y ello puede dañar el dispositivo.
Deje suficiente espacio alrededor de thin client para que se ventile; no
coloque el dispositivo en ningún recinto cerrado que impida la
circulación del aire alrededor del mismo; no coloque ningún objeto en el
dispositivo ni bloquee los orificios de ventilación. Las especificaciones
medioambientales del producto están disponibles en la hoja de datos
Registro de la garantía de Wyse - El proceso de registro de la garantía
de Wyse* se encuentra disponible en:
http://www.wyse.com/serviceandsupport/register.asp
*La garantía estándar es de tres años a partir de la fecha de la compra.
6
Notes / Notas
7
Wyse Technology Inc.
3471 North First Street
San Jose, CA 95134-1801 U.S.A.
883909-01L Rev. F
October 2010
Printed in U.S.A.
©2010 Wyse Technology Inc. All rights reserved. This product and/or associated software are
protected by copyright international treaties, and various patents, including the following U.S.
patents: 6,836,885 and 5,918,039.
©2010 Wyse Technology Inc. Tous droits réservés. Ce produit et/ou logiciel associé sont protégés
par la législation relative aux droits d’auteurs, certains traités internationaux et divers brevets, dont
les brevets U.S. 6 836 885 et 5 918 039.
Printed on 50% post-consumer recycled paper
Imprimé sur du papier constitué de 50 % de papier recyclé
Gedruckt auf 50% Recyclingpapier
Impreso en Papel Reciclado post consumidor de 50%
©2010 Wyse Technology Inc. Alle Rechte vorbehalten. Dieses Produkt und/oder die damit
assoziierte Software sind durch das Urheberrecht, internationale Verträge und verschiedene
Patente geschützt, einschließlich folgender US-Patente: 6,836,885 und 5,918,039.
©2010 Wyse Technology Inc. Reservados todos los derechos. Este producto y/o software
asociado están protegidos por derechos de autor, tratados internacionales y diversas patentes,
incluidas las siguientes patentes en los EE.UU.: 6,836,885 y 5,918,039.