1
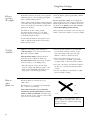
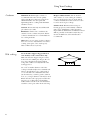
Owner’s
Manual
36″ Stainless Steel
Gas Cooktop
ZGU375LS
ZGU375NS
Consumer Information
Gas Cooktop
Introduction
Your new Monogram cooktop makes an eloquent statement of style, convenience and kitchen
planning flexibility. Whether you chose it for its purity of design, assiduous attention to detail—
or for both of these reasons—you’ll find that your Monogram cooktop’s superior blend of form
and function will delight you for years to come.
Your Monogram cooktop was designed to provide the flexibility to blend in with your kitchen
cabinetry. Its sleek design can be beautifully integrated into the kitchen.
The information on the following pages will help you operate and maintain your cooktop properly.
Contents
Care and Cleaning
Burner Caps . . . . . . . . . . . . . . . . . . . . . . . . 15
Burner Grates . . . . . . . . . . . . . . . . . . . . . . . 15
Burner Sub-assemblies . . . . . . . . . . . . . . . . .14
Control Knobs . . . . . . . . . . . . . . . . . . . . . . . 13
Sealed Burner Assemblies . . . . . . . . . . . . . . 13
Stainless Steel Surfaces . . . . . . . . . . . . . . . . 13
Consumer Services
Before You Call for Service . . . . . . . . . . . . . 16
Important Phone Numbers . . . . . . . . . . . . . 17
Model and Serial Number . . . . . . . . . . . . . . . 4
Product Registration . . . . . . . . . . . . . . . .19, 20
Safety Instructions . . . . . . . . . . . . . . . 2, 3, 5–8
Warranty . . . . . . . . . . . . . . . . . . . . . . . . . . . 18
Using Your Cooktop
Cookware . . . . . . . . . . . . . . . . . . . . . . . . . . .12
Dual-Flame Burners . . . . . . . . . . . . . . . . . . .11
Electric Ignition . . . . . . . . . . . . . . . . . . . . . .10
Features . . . . . . . . . . . . . . . . . . . . . . . . . . . . . 9
Flame Size . . . . . . . . . . . . . . . . . . . . . . . . . . 10
LP Gas . . . . . . . . . . . . . . . . . . . . . . . . . . . . . .9
Optional Griddle Accessory . . . . . . . . . . . . . .9
Wok Cooking . . . . . . . . . . . . . . . . . . . . . . . .12
WARNING: If the information in this manual
is not followed exactly, a fire or explosion may result
causing property damage, personal injury or death.
— Do not store or use gasoline or other flammable vapors
and liquids in the vicinity of this or any other appliance.
— WHAT TO DO IF YOU SMELL GAS
• Do not try to light any appliance.
• Do not touch any electrical switch; do not use any phone
in your building.
• Immediately call your gas supplier from a neighbor’s
phone. Follow the gas supplier’s instructions.
• If you cannot reach your gas supplier, call the fire
department.
— Installation and service must be performed by a qualified
installer, service agency or the gas supplier.
2
AVERTISSEMENT :
Si les informations de
ce manuel ne sont pas suivies à la lettre, un incendie ou
une explosion peut résulter et causer des dommages
matériels, des blessures ou la mort.
— Ne stockez pas ou n’utilisez pas de l’essence ou d’autres
vapeurs ou liquides inflammables à proximité de cet
appareil électrique ou de tout autre.
— QUE
FAIRE SI VOUS SENTEZ
DU GAZ
• N’essayez pas d’allumer un appareil quelconque.
• Ne touchez aux interrupteurs électriques ; n’utilisez
pas les téléphones de votre immeuble.
• Appelez immédiatement votre fournisseur de gaz à
partir du téléphone d’un voisin. Suivez les instructions
du fournisseur de gaz.
• Si vous ne pouvez pas contacter votre fournisseur
de gaz, appelez les pompiers.
— L’installation et l’entretien doivent être effectués par
un installateur qualifié, une agence d’entretien ou le
fournisseur du gaz.
3
Consumer Information
Gas Cooktop
Before
using your
cooktop
Read this manual carefully. It is intended to
help you operate and maintain your new
cooktop properly.
Keep it handy for answers to your questions.
If you don’t understand something or need
more help, call:
GE Answer Center®
800.626.2000
24 hours a day, 7 days a week
OR
Visit our Website at: monogram.com
Write
down the
model &
serial
numbers
You’ll find them on a label located on the
underside of the cooktop.
Before sending in this card, please write these
numbers here:
These numbers are also on the Consumer
Product Ownership Registration Card
included in this manual.
Model Number
Serial Number
Use these numbers in any correspondence or
service calls concerning your cooktop.
If you
received a
damaged
cooktop
Immediately contact the dealer (or builder)
that sold you the cooktop.
Save time
& money
Before you request service, check the “Before
you call for service” section in the back of this
manual.
It lists causes of minor operating problems that
you can correct yourself.
If you
need
service
To obtain service, see the Consumer Services
page in the back of this manual.
NEXT, if you are still not pleased, write all the
details—including your phone number—to:
We’re proud of our service and want you to be
pleased. If for some reason you are not happy
with the service you receive, here are some
steps to follow for further help.
FIRST, contact the people who serviced your
appliance. Explain why you are not pleased.
In most cases, this will solve the problem.
4
Manager, Customer Relations
GE Appliances
Appliance Park
Louisville, KY 40225
IMPORTANT SAFETY INSTRUCTIONS
SAFETY PRECAUTIONS
IMPORTANT SAFETY
NOTICE:
• The California Safe Drinking Water and Toxic
Enforcement Act requires the Governor of
California to publish a list of substances
known to the state to cause cancer, birth
defects or other reproductive harm,
and requires businesses to warn customers
of potential exposure to such substances.
• Gas appliances can cause minor exposure to
four of these substances, namely benzene,
carbon monoxide, formaldehyde and soot,
caused primarily by the incomplete
combustion of natural gas or LP fuels.
Properly adjusted burners, indicated by
a bluish rather than a yellow flame, will
minimize incomplete combustion. Exposure
to these substances can be minimized further
by venting with an open window or using the
ventilation fan.
• When you get your cooktop, have the installer
show you the location of the gas shut-off valve
and how to shut it off if necessary.
• Have your cooktop installed and properly
grounded by a qualified installer, in
accordance with the installation instructions.
Any adjustment and service should be
performed only by qualified gas range
installers or service technicians.
• Plug your cooktop into a 120-volt grounded
outlet only. Do not remove the round
grounding prong from the plug. If in doubt
about the grounding of the home electrical
system, it is your personal responsibility
and obligation to have an ungrounded
outlet replaced with a properly-grounded
3-prong outlet in accordance with the
National Electrical Code. Do not use an
extension cord with this appliance.
• Be sure all packing materials are removed
from the cooktop before operating it,
to prevent fire or smoke damage should
the packing material ignite.
• Be sure your cooktop is correctly adjusted
by a qualified service technician or installer
for the type of gas (natural or LP) which is
to be used.
• Do not attempt to repair or replace any
part of your cooktop unless it is specifically
recommended in this manual. All other
servicing should be referred to a qualified
technician.
• Do not leave children alone or unattended
where a cooktop is hot or in operation.
They could be seriously burned.
CAUTION:
Items of interest to
children should not be stored in cabinets
above a cooktop—children climbing on the
cooktop to reach items could be seriously
injured.
• Clean the cooktop with caution. If a wet
sponge or cloth is used to wipe spills on a
hot cooktop, be careful to avoid steam burns.
• Do not clean the cooktop with flammable or
volatile cleaning fluids.
• Do not clean the cooktop when the appliance
is in use.
• Avoid scratching the cooktop with sharp
instruments, or with rings and other jewelry.
• Let the burner grates and other surfaces cool
before touching them or leaving them where
children can reach them.
• Never use the cooktop as a cutting board.
• Never wear loose-fitting or hanging garments
while using the appliance. Be careful when
reaching for items stored in cabinets over the
cooktop. Flammable material could be ignited
if brought in contact with flame or hot
surfaces and may cause severe burns.
• For your safety, never use your appliance for
warming or heating the room.
• Do not use water on grease fires. Never pick
up a flaming pan. Turn the controls off.
Smother a flaming pan on a surface burner
by covering the pan completely with a
well-fitting lid, cookie sheet or flat tray. Use
a multi-purpose dry chemical or foam-type
fire extinguisher.
Flaming grease outside a pan can be put
out by covering it with baking soda or, if
available, by using a multi-purpose dry
chemical or foam-type fire extinguisher.
• Do not store flammable materials near the
cooktop. Do not store or use gasoline or
other flammable vapors and liquids in the
vicinity of this or any other appliance.
• Do not let cooking grease or other flammable
materials accumulate on or near the cooktop.
• Never leave surface burners unattended at
high flame settings. Boilovers cause smoking
and greasy spillovers that may catch on fire.
• Adjust surface burner flame size so it does
not extend beyond the edge of the cookware.
Excessive flame is hazardous.
5
•
IMPORTANT SAFETY INSTRUCTIONS
• Use only dry pot holders—moist or damp pot
holders on hot surfaces may result in burns
from steam. Do not let pot holders come near
open flames when lifting cookware. Do not
use a towel or other bulky cloth in place of
a pot holder.
• To minimize the possibility of burns, ignition
of flammable materials and spillage, turn
cookware handles toward the side or center
of the cooktop without extending over
adjacent burner or vent area.
• Always turn the surface burners to off before
removing the cookware.
• Foods for frying should be as dry as possible.
Frost on frozen foods or moisture on fresh
foods can cause hot fat to bubble up and over
the sides of the pan.
• Use least possible amount of fat for effective
shallow or deep fat frying. Filling the pan
too full of fat can cause spillovers when food
is added.
• Carefully watch foods being fried at high
flame setting.
• If a combination of oils or fats will be used
in frying, stir together before heating, or as
fats melt slowly.
• Always heat fat slowly, and watch as it heats.
• Use a deep fat thermometer whenever
possible to prevent overheating fat beyond
the smoking point.
• Use proper pan size—avoid pans that are
unstable or easily tipped. Select cookware
having flat bottoms large enough to properly
contain food and avoid boilovers and
spillovers, and large enough to cover burner
grate. This will both save cleaning time and
prevent hazardous accumulations of food,
since heavy spattering or spillovers left on
cooktop can ignite. Use pans with handles
that can be easily grasped and remain cool.
• Keep all plastics away from burners.
• To avoid the possibility of a burn, always be
certain that the controls for all burners are at
the off position and all grates are cool before
attempting to remove a grate.
• If the cooktop is located near a window,
do not use long curtains which could blow
over the burners and create a fire hazard.
• If you smell gas, turn off the gas to the
cooktop and call a qualified service technician.
Never use an open flame to locate a leak.
• Do not cover or block the area around the
cooktop knobs. This area must be kept
clear for proper ventilation and burner
performance.
• Cook meat and poultry thoroughly—meat to
at least an INTERNAL temperature of 160°F.
and poultry to at least an INTERNAL
temperature of 180°F. Cooking to these
temperatures usually protects against
foodborne illness.
• When using a wok on the cooking surface,
always use the provided metal ring which
is placed over the center burner grate to
support the wok.
SAVE THESE INSTRUCTIONS
6
INSTRUCTIONS DE SÉCURITÉ IMPORTANTES
PRÉCAUTIONS DE SÉCURITÉ
AVIS IMPORTANT DE
SÉCURITÉ :
• La loi de l’état de Californie sur l’eau potable
sécurisée et l’application des lois sur les
produits toxiques exige que le Gouverneur de
Californie publie une liste de substances qui,
selon les connaissances de l'état, causent le
cancer, les maladies congénitales ou autre
lésion reproductive, et exige que les
entreprises avertissent leurs clients de leur
exposition potentielle à de telles substances.
• Les appareils à gaz peuvent causer une
exposition mineure à quatre de ces
substances, soit le benzène, le monoxyde de
carbone, le formaldéhyde et la suie, surtout
à cause de la combustion incomplète du gaz
naturel ou des carburants PL.
Des brûleurs correctement ajustés, ce qui est
indiqué par des flammes bleuâtres plutôt que
jaunes, réduiront au minimum la combustion
incomplète. L’exposition à ces substances
peut être réduite davantage en aérant avec
une fenêtre ouverte ou en utilisant le
ventilateur d’aération.
• Lorsque vous recevez votre cuisinière,
demandez à l’installateur de vous montrer
l’emplacement de la soupape d’arrêt et la
façon de la fermer en cas de besoin.
• Demandez à un installateur qualifié d’installer
et de mettre à la terre correctement votre
cuisinière, conformément aux instructions
d’installation. Tout ajustement ou entretien
doit être effectué seulement par des
installateurs de cuisinière à gaz qualifiés
ou des techniciens de service.
• Branchez votre cuisinière seulement sur une
prise de 120 volts mise à la terre. Ne retirez
pas la broche ronde de mise à la terre de la
prise. En cas de doute concernant la mise à la
terre du système électrique de la résidence,
vous assumez la responsabilité et l’obligation
personnelles de faire remplacer toute prise
non mise à la terre par une prise à trois
broches correctement mise à la terre
conformément au Code national de
l’électricité. N’utilisez pas de rallonge de
câble avec cet appareil.
• Assurez-vous que tous les matériaux
d’emballage sont retirés de la cuisinière avant
de la mettre en marche, pour empêcher les
dommages d’incendie et de fumée au cas où
le matériau d’emballage s’enflammerait.
• Assurez-vous que la cuisinière est ajustée
correctement par un technicien de service ou
un installateur qualifié en fonction du type de
gaz (naturel ou PL) qui sera utilisé.
• N’essayez pas de réparer ou de remplacer
toute pièce de la cuisinière sauf si cela est
spécifiquement recommandé dans ce manuel.
Toutes les autres actions de service doivent
être référées à un technicien qualifié.
• Ne laissez pas les enfants seuls ou non
surveillés lorsqu’une cuisinière est chaude
ou en marche. Ils pourraient être brûlés
grièvement.
•
ATTENTION : Les articles
suscitant l’intérêt des enfants ne doivent pas
être rangés dans les armoires au-dessus de la
cuisinière–les enfants grimpant sur la
cuisinière pour saisir ces articles pourraient
être grièvement blessés.
• Nettoyez la cuisinière avec précaution. Si une
éponge ou un chiffon mouillé est utilisé pour
essuyer les renversements sur une cuisinière
chaude, faites attention d'éviter les brûlures
causées par la vapeur.
• Ne nettoyez pas la cuisinière avec des
nettoyants inflammables ou volatils.
• Ne nettoyez pas la cuisinière lorsqu’elle est
en marche.
• Evitez de rayer la cuisinière avec des
instruments pointus ou avec des bagues
ou d’autres bijoux.
• Laissez refroidir les grilles des brûleurs et les
autres surfaces avant de les toucher ou de les
laisser là où les enfants peuvent les atteindre.
• N’utilisez jamais la cuisinière comme planche
à découper.
• Ne portez jamais de vêtements lâches ou
amples lorsque vous utilisez cet appareil.
Faites attention pour saisir des articles rangés
dans les armoires au-dessus de la cuisinière.
La matière inflammable peut s’enflammer
si elle entre en contact avec les flammes ou
les surfaces chaudes et peut causer des
brûlures graves.
• Pour votre sécurité, n’utilisez jamais votre
appareil pour chauffer ou réchauffer la pièce.
7
INSTRUCTIONS DE SÉCURITÉ IMPORTANTES
• N’utilisez pas de l’eau sur les incendies de
graisse. Ne saisissez jamais une poêle
enflammée. Arrêtez les contrôles. Etouffez les
flammes d’une poêle placées sur un brûleur
de surface en la recouvrant entièrement d’un
couvercle bien ajusté, d’un plateau à gâteau
ou d’un plateau plat. Utilisez un extincteur à
produit chimique sec multi-usages ou du type
à mousse.
Le graisse enflammée à l’extérieur d’une
poêle peut être éteinte en la couvrant de
bicarbonate de soude ou, s’il est disponible,
en utilisant un extincteur à produit chimique
sec multi-usages ou du type à mousse.
• Ne stockez pas de matière inflammable près
de la cuisinière. Ne stockez pas et n’utilisez
pas d’essence ou d’autres vapeurs ou liquides
inflammables à proximité de cet appareil ou
de tout autre.
• Ne laissez pas la graisse de cuisson ou autre
matière inflammable s'accumuler sur ou près
de la cuisinière.
• Ne laissez jamais les brûleurs de surface sans
surveillance lorsqu’ils sont réglés pour des
flammes hautes. Les débordements excessifs
causent de la fumée et des renversements
graisseux qui pourraient s’enflammer.
• Ajustez la taille des flammes des brûleurs de
surface pour qu’elles ne dépassent pas du
bord du conteneur. Les flammes excessives
sont dangereuses.
• Utilisez seulement des gants secs pour saisir
les plats—les gants humides ou mouillés placés
sur des surfaces chaudes peuvent causer des
brûlures dues à la vapeur. Ne mettez pas les
gants près des flammes vives pour soulever
les plats. N’utilisez pas de serviette ou autre
chiffon encombrant au lieu des gants de plat.
• Pour réduire au minimum la possibilité
de brûlures, d’inflammation de matière
inflammable et de renversement, tournez les
poignées des plats vers le côté ou le centre
de la cuisinière, sans les placer au-dessus d’un
brûleur adjacent ou une zone d’aération.
• Arrêtez toujours les brûleurs de surface avant
de retirer les plats.
• Les aliments à frire doivent être aussi secs
que possible. Le gel des aliments congelés ou
l’humidité des aliments frais peut causer le
bouillonnement des matières grasses chaudes
et leur déversement sur le côté de la poêle.
• Utiliser la quantité de graisse la plus faible
possible pour la friture à la poêle ou à la
friteuse. Si l’ustensile est trop rempli de
graisse, celle-ci peut déborder lorsque les
aliments sont ajoutés.
8
• Observez avec soin les aliments frits sur
flammes hautes.
• Si un mélange d’huile et de matières grasses
va être utilisé pour la friture, mélangez avant
le chauffage ou à mesure que les matières
grasses fondent lentement.
• Réchauffez toujours lentement les matières
grasses et observez leur réchauffement.
• Utilisez un thermomètre de friteuse lorsque
cela est possible possible pour empêcher de
surchauffer les matières grasses au-delà de
leur point de fumée.
• Utiliser des poêles de taille appropriée—
évitez les poêles qui sont instables ou qui
peuvent basculer facilement. Sélectionnez
des ustensiles de cuisine avec des fonds
plats, suffisamment grands pour pouvoir
correctement contenir les aliments et éviter
les débordements et les déversements, et
suffisamment grands pour recouvrir les grilles
des brûleurs. Cela réduira le temps de nettoyage
et empêchera les accumulations dangereuses
d’aliments, étant donné que les éclaboussures
ou les déversements importants laissés sur la
cuisinière peuvent s’enflammer. Utilisez des
poêles avec des poignées qui peuvent être
facilement saisies et qui restent froides.
• Eloignez tous les matériaux en plastique
des brûleurs.
• Pour éviter les risques de brûlures, assurez-vous
toujours que les contrôles des brûleurs sont à la
position d’arrêt et toutes les grilles sont froides
avant d’essayer de retirer une grille.
• Si la cuisinière est située près d’une fenêtre,
n’utilisez pas de longs rideaux qui pourraient
être projetés au-dessus des brûleurs et
constituer un risque d’incendie.
• Si vous sentez du gaz, coupez l’arrivée du gaz
à la cuisinière et appelez un technicien de
service qualifié. N’utilisez jamais de flamme
vive pour rechercher les fuites.
• Ne couvrez pas et ne bloquez pas la zone
autour des boutons de la cuisinière. Cette
zone doit rester dégagée pour assurer une
bonne ventilation et une bonne performance
des brûleurs.
• Cuisez la viande et la volaille complètement—
la viande à une température INTERNE d’au
moins 160°F, et la volaille à une température
INTERNE d’au moins 180°F. La cuisson à ces
températures protège en général contre les
maladies causées par les aliments contaminés.
• Lorsque vous utilisez un wok sur la surface de
cuisson, utilisez toujours l’anneau métallique
fourni qui est placé sur la grille du brûleur
central pour supporter le wok.
CONSERVEZ CES INSTRUCTIONS
Features of Your Cooktop
Gas Cooktop
Design
information
2
5
1
1
(Not all features
are on all models.
Appearance may vary.)
1
3
4
1
6
Feature Index
Page
1
Dual-Flame Spillproof Burners—High Output
10, 11, 13, 14
2
Dual-Flame Spillproof Burner—Maximum Output
10, 11, 13, 14
3
Tactile-touch Control Knobs (One For Each Surface Burner)
13
4
Burner “ON” Indicator Lamps (One On Each Control Knob)
10
5
Interlocking Grates
6
Wok Ring Accessory (Supplied On Some Models)
Optional
griddle
accessory
A dual griddle is available that can be placed over
the two right or left burners on your cooktop.
Contact your local distributor or GE at
800.626.2002 and order part number ZX375GRD.
LP Gas
Cooktop model ZGU375NS is shipped from
the factory set to operate only with Natural Gas.
If you wish to use Liquefied Petroleum Gas, you
must have cooktop model ZGU375LS.
10, 15
12
9
Using Your Cooktop
Gas Cooktop
Electric
ignition
& relight
Your surface burners are lit by electric ignition,
eliminating the need for standing pilot lights
with constantly burning flames.
All five igniters make clicking sounds and spark
even when only a single burner is being turned
on. Do not touch any of the burners when the
igniters are clicking.
The burners on this cooktop relight
automatically if the flame goes out. This
helps prevent the inconvenience of having
to manually relight a burner.
All of the burner igniters spark while a burner
is relighting.
In case of a power outage, you can light the
surface burners on your cooktop with a match.
Hold a lighted match to the burner, then turn
the knob to the HIGH position. Use extreme
caution when lighting burners this way.
Surface burners in use when an electrical power
failure occurs will continue to operate normally.
Occasionally, the burners may spark if excess
wind or draft blows the flame away from the
burner’s flame sensor.
To light
a burner
Push the control knob down and turn it
counterclockwise to the desired position from
HI to LO or simmer (SIM).
After the burner ignites, turn the knob in
either direction to adjust the flame size.
To turn a burner off, turn the knob clockwise,
as far as it will go, to the OFF position.
• All of the burners can be used for both
general cooking and simmering. The center
burner is the maximum output burner for
larger pans or fast boiling operations.
How to
select
flame size
• Be sure the burners and grates are cool
before you place your hand, a pot holder,
cleaning cloths or other materials on them.
• For your convenience, the indicator lamp in
the bezel for each knob verifies the burner
is “ON”.
• Be sure you turn the control knob to “OFF”
when you finish cooking.
Watch the flame, not the knob, as you
reduce heat.
The flame size on a gas burner should match
the cookware you are using.
FOR SAFE HANDLING OF COOKWARE,
NEVER LET THE FLAME EXTEND UP THE
SIDES OF THE COOKWARE. Any flame larger
than the bottom of the cookware is wasted and
only serves to heat the handle.
10
• Do not operate a burner for an extended
period of time without cookware on the
grate. The finish on the grate may chip
without cookware to absorb the heat.
NOTE: The center maximum output
burner has an extra large flame. Use 10″
or larger diameter cookware when using
high heat settings.
Dual-flame
burners
All five burners on your cooktop have two
rows of flames. These dual-flame burners
have a simmer (lower) flame and a main
(upper) flame.
When a burner is turned on, the simmer flame
will always light and stay on.
Simmering: The simmer (SIM) setting will use
only the lower flames. Use simmer (SIM) to
melt chocolate, hold delicate sauces or for
other foods requiring low simmer heat.
Simmer Flame
Simmer Burner
When holding some foods at serving
temperature (such as mashed potatoes), it
may be best to use the LO flame setting for
a few minutes before turning the knob to
simmer (SIM).
Main Flame
Primary Cooking: Settings from LO to HI will
use both rows of flames. Use LO to HI for all
purpose cooking.
Simmer Flame
Main Burner
11
Using Your Cooktop
Gas Cooktop
Cookware
Aluminum: Medium-weight cookware is
recommended because it heats quickly
and evenly. Most foods brown evenly in an
aluminum skillet. Use saucepans with
tight-fitting lids for cooking with minimum
amounts of water.
Cast Iron: If heated slowly, most skillets will
give satisfactory results.
Enamelware: Under some conditions, the
enamel of some cookware may melt. Follow
cookware manufacturer’s recommendations
for cooking methods.
Glass: There are two types of glass cookware–
those for oven use only and those for surface
cooking (saucepans, coffee and teapots).
Glass conducts heat very slowly.
Wok cooking
Use woks with a support ring (provided on
some models) on the center burner only.
Make sure that the support ring is securely
locked onto the center grate fingers. Do not
try to use round bottomed woks without
a ring. You could be seriously burned if the
wok tipped over.
Use a 12″ or smaller diameter wok if the
cooktop is installed adjacent to standard wall
surfaces. If wall surfaces are constructed of
or covered with non-combustible materials
(such as masonry, ceramics, granite, stainless
steel, etc.) a larger diameter wok may be used.
Ensure that the wok is properly nested in the
ring prior to cooking. The wok should be
stable and the bottom of the wok should not
touch the center grate when in the wok ring.
12
Heatproof Glass-Ceramic: Can be used for
either surface or oven cooking. It conducts
heat very slowly and cools very slowly. Check
cookware manufacturer’s directions to be sure
it can be used on gas cooktops.
Stainless Steel: This metal alone has poor
heating properties, and is usually combined
with copper, aluminum or other metals for
improved heat distribution. Combination metal
skillets generally work satisfactorily if they are
used at medium heat as the manufacturer
recommends.
Care and Cleaning
Gas Cooktop
General
information
Proper care and cleaning are important
so your cooktop will give you efficient and
satisfactory service. Follow these directions
carefully in caring for it.
Some cooktop models are provided
with cleaners. Follow the instructions
on the containers.
Before cleaning any part of your cooktop,
be sure all burners are off and cool.
DISCONNECT ELECTRICAL POWER TO
THE COOKTOP at the fuse box or circuit
breaker panel, or pull the cooktop power plug,
located beneath the cooktop and inside
the cabinets.
Stainless
steel
surfaces
Do not use a steel wool pad; it will scratch
the surface.
To clean the stainless steel surface, use warm
sudsy water, a stainless steel cleaner such as
Kleen King®, or an all-purpose liquid or spray
cleaner. Always scrub in the direction of the
grain. Rinse thoroughly with a sponge or cloth
and clean water. Dry with a soft, clean cloth.
After cleaning, use a stainless steel polish, such
as Stainless Steel Magic®, Revere Copper and
Stainless Steel Cleaner® or Wenol All Purpose
Metal Polish®. Follow the product instructions
for cleaning the stainless steel surface.
On some models, samples of special cleaners
have been supplied with your cooktop. Use the
Stainless Steel Brightener when stainless steel
is exposed to high heat and has a yellow
appearance. The Stainless Steel Cleaner is for
other cleaning. Follow the product instructions
for proper cleaning methods. If you need an
additional supply, you can purchase them by
calling 800.626.2002.
Control
knobs
The control knobs may be removed for
cleaning.
To remove knob, pull it straight up.
The knobs have a tactile grip surface, but no
special cleaning is required.
Wash the knobs in soap and water but do not
soak. Avoid getting water down into the knob
stem holes.
Replace the knobs after cleaning.
NOTE: The knob stem is “D” shaped. Replace
the flat side of the knob onto the flat side of
the stem.
Sealed
burner
assemblies
Turn all controls OFF before removing the
burner parts.
The burner grates, burner caps and burner ring
sub-assemblies can be lifted off, making them
easy to clean.
CAUTION: DO NOT OPERATE THE
BURNER WITHOUT ALL BURNER PARTS
IN PLACE.
Electrode
The electrode of
the spark igniter is
behind each burner.
When one burner is
turned to “ON” to
light, all the burners
spark. Do not
attempt to disassemble or clean around
any burner while another burner is on.
An electric shock may result, which could
cause you to knock over hot cookware.
13
Care and Cleaning
Gas Cooktop
Burner
sub-assemblies
NOTE: Before removing the burner parts,
remember their size and location. Replace
them in the same location after cleaning for
proper burner operation.
For proper ignition, make sure the small holes in
the burner rings are kept open. A sewing needle
or wire twist-tie works well to unclog them.
The slits in the burner heads of your cooktop
must be kept clean at all times for an even,
unhampered flame.
Slits
Holes
Use a sewing needle,
twist-tie and/or toothbrush
to unclog the small holes
and slits in the burner heads
and burner rings.
Maximum
Output
High
Output
High
Output
High
Output
High
Output
Front of Cooktop
You should clean the surface burners routinely,
especially after bad spillovers, which could clog
these openings.
Burner Cap
To remove burned-on food, soak the burner
heads and rings in a solution of mild liquid
detergent and hot water for 20–30 minutes.
For more stubborn stains, use a toothbrush.
Burner Head
(Brass)
Burner Ring
Locking Nut
with Chamfer
Clean the burner bases in place on the cooktop.
To remove the burner parts:
Locator Pins
(Side View)
1. Lift off the burner cap and burner head.
2. Remove the burner ring locking nut using
a 11⁄16″ socket wrench, crescent wrench or
channel-lock pliers.
3. Lift off the burner ring. Do not remove
the burner bases.
Burner Ring
(Aluminum)
Locator Pin
Electrode
Burner Base
Pin
Slot
Before putting the burner parts back, shake out
excess water and then dry them thoroughly by
setting them in a warm oven for 30 minutes.
NOTE: Locator pin fits
into burner base pin slot.
Maximum Output Center Burner
Replace the burner parts. Make sure that the
rings, heads and caps are replaced in the
correct location. There are four medium sets
and one large set of rings, heads and caps.
Burner Cap
To replace the burner parts:
Burner Head
(Brass)
Make sure all parts are for the correct burner,
are in the correct location and are firmly seated.
1. Align the locator pin on the burner ring
into the labeled hole in the burner base.
Seat in place and push toward the electrode
to set gap properly.
To aid reassembly, each
brass Burner Head is
marked with a clock face.
Replace the Burner Head
with the arrow pointing
to the rear of the cooktop
(12 o’clock position).
14
2. Replace the burner ring locking nut and
hand-tighten. Using the wrench or pliers,
turn the nut 1/4 turn to secure it in place.
3. Align the two locator pins in the burner head
into the holes in the burner ring. Seat in place.
NOTE: Make sure the burner head pins
completely engage in the burner ring holes
and that burner head is level.
4. Replace the burner caps.
Burner Ring
Locking Nut
with Chamfer
Locator Pins
(Side View)
Burner Ring
(Aluminum)
Locator Pin
Electrode
Burner Base
Pin
Slot
NOTE: Locator pin fits
into burner base pin slot.
High Output Burners
Burner caps
Do not use a steel wool pad; it will scratch
the surface.
Large Cap
Lift off when cool. Wash burner caps in hot, soapy
water and rinse with clean water. You may scour
with a plastic scouring pad to remove burned-on
food particles.
Dry them in a warm oven or with a cloth—don’t
reassemble them wet. Replace the burner caps.
Medium
Cap
Medium
Cap
Medium
Cap
Medium
Cap
Make sure that caps are replaced on the correct
size burner. There are four medium sets and one
large set of rings, heads and caps.
Burner
grates
Cast-iron burner grates should be washed
regularly and especially after spillovers.
Wash them in hot, soapy water and rinse
with clean water. Dry the grates with a cloth—
don’t put them back on the cooktop wet.
When replacing the grates, be sure they’re
positioned securely over the burners.
To get rid of burned-on food, place the
grates in a covered container or plastic bag.
Add 1/4 cup ammonia and let them soak
for 30 minutes. Wash, rinse well and dry.
The grates may also be cleaned in a dishwasher.
Although they are durable, the grates will
gradually lose their shine, regardless of the
best care you can give them. This is due to
their continual exposure to high temperatures.
Do not operate a burner for an extended
period of time without cookware on the grate.
The finish on the grate may chip without
cookware to absorb the heat.
Arc
Front of Cooktop
Arc
Locking
Rails
After cleaning, replace the two side grates with
their locking rails toward the center. Replace
the center grate so that a continuous “arc” is
formed with the center ribs of all three grates.
Make sure the rails on the center grate are
locked over the rails on the side grates and that
all grates are stable and level.
Rubber Grate Feet
For stability, your cooktop has two rubber feet
on each leg of the burner grates. If any of these
rubber feet should become damaged or lost,
replace it with one of the extra rubber feet
supplied with your cooktop.
Arc
15
Before You Call For Service
Gas Cooktop
Questions?
Before you
call for
service…
PROBLEM
POSSIBLE CAUSE
BURNERS DO NOT
LIGHT OR SPARK
RANDOMLY
• Make sure electrical plug is plugged into a live power outlet.
• Gas not turned on.
• Burner parts not replaced correctly.
• Holes in the simmer rings or slits in the burner rings may be clogged.
• Clogged orifice or wet due to spillage or burners not dry after cleaning.
• Rubber discs below knobs are not pushed down through the bezel
to the valve.
BURNERS HAVE
YELLOW OR
YELLOW-TIPPED
FLAMES
• Burner parts not replaced correctly.
A. Yellow flames: Call for
service.
B. Yellow tips on outer cones:
Normal for LP gas.
C. Soft blue flames: Normal
for natural gas.
• If burner flames look like (A), call for service. Normal burner flames
should look like (B) or (C), depending on the type of gas.
16
BURNER FLAMES
VERY LARGE
OR YELLOW
• If cooktop is connected to LP gas, contact the person who installed
your cooktop or made the conversion.
BURNER CONTROL
KNOB WILL NOT
TURN
• When the knob is at the OFF position, it must be pushed in before
it can be turned, and it can only be turned in a counterclockwise
direction. Similarly, when the knob is in the LOW or HIGH positions,
it must also be pushed in to change flame settings.
Consumer Services
With the purchase of your new Monogram appliance, receive the
assurance that if you ever need information or assistance from GE,
we’ll be there. All you have to do is call-–toll-free!
GE Answer
Center®
800.626.2000
Whatever your question about any Monogram major appliance, GE Answer Center®
information service is available to help. Your call—and your question—will be answered
promptly and courteously. And you can call any time. GE Answer Center® service is
open 24 hours a day, 7 days a week.
OR
Visit our Website at: monogram.com
In-Home Repair
Service
800.444.1845
For Customers
With Special
Needs…
800.626.2000
Service Contracts
800.626.2224
A GE consumer service professional will provide expert repair service, scheduled at a time
that’s convenient for you. Many GE Consumer Service company-operated locations offer
you service today or tomorrow, or at your convenience (7:00 a.m. to 7:00 p.m. weekdays,
9:00 a.m. to 2:00 p.m. Saturdays). Our factory-trained technicians know your appliance inside
and out—so most repairs can be handled in just one visit.
GE offers, free of charge, a brochure to assist in planning a barrier-free
kitchen for persons with limited mobility.
Consumers with impaired hearing or speech who have access to
a TDD or a conventional teletypewriter may call 800.TDD.GEAC
(800.833.4322) to request information or service.
You can have the secure feeling that GE Consumer Service will still be there after your
warranty expires. Purchase a GE contract while your warranty is still in effect and you’ll
receive a substantial discount. With a multiple-year contract, you’re assured of future
service at today’s prices.
Parts and
Accessories
Individuals qualified to service their own appliances can have parts or accessories sent directly
to their home. The GE parts system provides access to over 47,000 parts…and all GE Genuine
Renewal Parts are fully warranted. VISA, MasterCard and Discover cards are accepted.
800.626.2002
User maintenance instructions contained in this manual cover procedures intended to be
performed by any user. Other servicing generally should be referred to qualified service
personnel. Caution must be exercised, since improper servicing may cause unsafe operation.
17
WARRANTY
YOUR MONOGRAM COOKTOP WARRANTY
Staple sales slip or cancelled check here. Proof of original
purchase date is needed to obtain service under warranty.
WHAT IS
COVERED
FULL ONE-YEAR WARRANTY
For one year from date of original purchase, we will provide, free of charge, parts and
service labor in your home to repair or replace any part of the cooktop that fails because
of a manufacturing defect.
This warranty is extended to the original purchaser and any succeeding owner for products
purchased for ordinary home use in the 48 mainland states, Hawaii and Washington, D.C.
In Alaska the warranty is the same except that it is LIMITED because you must pay to ship
the product to the service shop or for the service technician’s travel costs to your home.
All warranty service will be provided by our Factory Service Centers or by our authorized
Customer Care® servicers during normal working hours.
Should your appliance need service, during warranty period or beyond, call 800.444.1845.
WHAT IS NOT
COVERED
• Service trips to your home to teach you how
to use the product.
• Replacement of house fuses or resetting of
circuit breakers.
• Damage to the product caused by accident,
fire, floods or acts of God.
• Failure of the product if it is used for
other than its intended purpose or used
commercially.
• Improper installation, delivery or
maintenance.
If you have an installation problem, contact
your dealer or installer. You are responsible
for providing adequate electrical, gas,
exhausting and other connecting facilities
as described in the Installation Instructions
provided with the product.
• Incidental or consequential damage caused
by possible defects with this appliance.
• Damage caused after delivery.
Some states do not allow the exclusion or limitation of incidental or consequential damages,
so the above limitation or exclusion may not apply to you. This warranty gives you specific legal
rights, and you may also have other rights which vary from state to state.
To know what your legal rights are in your state, consult your local or state consumer affairs
office or your state’s Attorney General.
Warrantor: General Electric Company, Louisville, KY 40225
18
Important Mail Today
Consumer Product
Ownership Registration
GE Appliances
Place
1st Class
Letter
Stamp
Here
General Electric Company
Warranty Registration Department
P.O. Box 32150
Louisville, KY 40232-2150
19
Consumer Product Ownership Registration
Dear Customer:
Thank you for purchasing our product and thank you for placing your confidence in us. We are proud
to have you as a customer!
✄
Follow these three steps to protect your new appliance investment:
1 2 3
Complete and mail
your Consumer
Product Ownership
Registration today.
Have the peace of mind
of knowing we can
contact you in the
unlikely event of a
safety modification.
After completing this
registration, write your
model and serial numbers
in this manual. You will
need this information
should you require service.
The service number in the
USA: 800.444.1845. In
Canada: 1.888.880.3030.
Read your Owner’s
Manual carefully.
It will help you
operate your new
appliance properly.
Important: To ensure that your product is registered, mail the separate product registration card.
If the separate product registration card is missing, fold and mail the form below. No envelope is needed.
FOLD HERE
Consumer Product Ownership Registration
Product
Gas Cooktop
nt
orta
ImpMail
ay!
Tod
✄
Mr. Ms. Model
Serial
Mrs. Miss First
Name
Last
Name
Street
Address
Apt. #
City
State
Date Placed
In Use
Month
monogram.com
Day
Phone
Number
Year
✄
TAPE CLOSED
164D4290P369
49-80217
11167 A
07-03 JR
Printed in the United States
Zip
Code