1
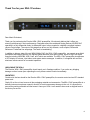
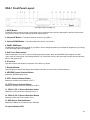
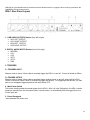
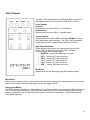
2
TABLE OF CONTENTS
Safety Precautions
5
NEC (National Electrical Code) Standards
7
A Note for the Cable Television (CATV) Installer
7
Antenna Grounding Outside the House
Thank You for Your XDA-1 Purchase
8
Unpacking the XDA-1
8
Inventory
8
Emotiva XDA-1 Differential Reference DAC
High Quality 192khz DAC with USB Audio Interface
9
XDA-1 Front Panel Layout
10
XDA-1 Rear Panel Layout
11
XDA-1 Remote
12
Changing the Battery
12
Connecting To Audio Source Units
13
Trigger Connections
13
Troubleshooting Guide
14
No Sound (from one or more full range speakers)
14
No Sound from the AES/EBU Input
14
No Sound from the USB Input
14
No Sound from the Optical Input
14
No Audio from the Coax input
14
Remote Not Working
14
Remotely Connected External Amplifier(s) Do Not Turn Off with USP-1
15
"Hum" Noises
15
3
Other Probable Cause of Noise
15
XDA-1 Technical Specifications
16
Emotiva Disclosure
17
Limited Warranty
18
Front Panel Diagram (Full Page)
19
Back Panel Diagram (Full Page)
20
4
SAFETY PRECAUTIONS
Read this User's Guide thoroughly before attempting to install and configure the XDA-1 DAC. All the safety and
operation instructions should be read before any operation of the component(s) begin. After successful
installation and configuration of the XDA-1 DAC, be sure to retain this manual in a safe place for any future
reference needs.
All warnings on the XDA-1 DAC preamplifier and in these operating instructions should be followed. Safety is a
key component to a long lasting and trouble free installation. The vast majority of the subsequent safety
precautions involve simple common sense. If you are not comfortable with the installation of audio/video
entertainment equipment, it will be to your benefit to seek the services of a qualified installation professional.
The Emotiva XDA-1 DAC preamplifier should NEVER be used near water such as a bathtub, washbowl,
kitchen sink, laundry tub, in a wet basement or near a swimming pool etc.
The Emotiva XDA-1 DAC preamplifier should be situated so that its location or installation position does not
interfere with proper ventilation.
The Emotiva XDA-1 DAC preamplifier should not be situated on a bed, sofa, rug or similar surface that may
block any ventilation openings; or placed in a built-in installation such as a bookcase, cabinet, or closed
equipment rack that may impeded the flow of air through ventilation openings. If installed in a closed
equipment rack for custom installations, be sure to add forced air ventilation so that it has adequate air
circulation.
The Emotiva XDA-1 DAC preamplifier should be situated away from heat sources such as radiators, or any
other devices which produce heat.
The Emotiva XDA-1 DAC preamplifier should be connected to a power supply only of the type described in
this User's Guide and what is labeled on the Emotiva XDA-1 DAC Preamplifier component. Power supply
cords should be routed to that they are not in high foot traffic areas or pinched by item placed upon or against
them, paying particular attention to cords at the wall plugs, convenience receptacles, and the point where they
connect into the Emotiva XDA-1 DAC. The power cord for the Emotiva XDA-1 DAC preamplifier should be
unplugged from the outlet when unused for a long period of time.
When it's time for cleaning the Emotiva XDA-1 DAC preamplifier, it should be cleaned only as recommended in
this User's Guide Never spray liquids directly into the component's vent openings. Care should be taken so
that small objects do not fall into the inside of the Emotiva XDA-1 DAC preamplifier.
The following situations require that your Emotiva XDA-1 DAC Preamplifier be serviced only by qualified
service personnel;
1.
2.
3.
4.
The power-supply cord or the plug has been damaged; or
Objects have fallen, or liquid has spilled into the component; or
The XDA-1 DAC preamplifier has been exposed to rain; or
The XDA-1 DAC preamplifier does not appear to operate normally or exhibits a marked change in
performance; or
5. The XDA-1 DAC preamplifier has been dropped, or its enclosure or chassis is damaged.
The user should not attempt to service the XDA-1 DAC preamplifier beyond the means described in this User's
Guide. All other servicing should be referred to Emotiva.
5
To prevent electric shock, do not use this polarized plug with an extension cord, receptacle or other outlet
unless the blades can be fully inserted to prevent blade exposure.
Grounding or Polarization - Precautions should be taken so that the grounding or polarization means of the
component is not defeated.
For questions regarding service, please contact:
Emotiva Audio Corporation
131 Southeast Parkway Court
Franklin, TN 37064
Tel - (615) 790-6754 | (877) EMO-TECH | Fax - (615) 791-6287
www.emotiva.com
WARNING - TO REDUCE RISK OF FIRE OR ELECTRIC SHOCK, DO NOT EXPOSE THIS APPLIANCE TO
RAIN OR MOISTURE.
CAUTION - TO PREVENT ELECTRIC SHOCK, MATCH WIDE BLADE OF PLUG TO WIDE SLOT, FULLY
INSERT.
6
NEC (National Electrical Code) Standards
A Note for the Cable Television (CATV) Installer
This reminder is to call the CATV system installer's attention to Article 820-40 of the NEC that provides
guidelines for proper grounding and in particular, specifies that the cable ground shall be connected to the
grounding system of the building as close to the point of cable entry as practical.
Antenna Grounding Outside the House
If an outside antenna is connected to the receiver, be sure the antenna system is grounded so as to provide
some protection against voltage surges and built-up static charges. Article 810 of the National Electrical Code,
ANSI/NFPA 70, provides information with regard to proper grounding of the lead-in wire to an antennadischarge unit, connection to grounding electrodes, and requirements for the grounding electrode.
Cable TV Coaxial Cable, Satellite Dish Cables and Television Antennas should be grounded BEFORE the
point of entry into the house.
Always observe proper antenna or satellite dish grounding techniques. When lightning strikes there is always
the possibility that your antenna or dish (mounted high on the roof) can become a conduit for lightning and
electrically damage any equipment to which it is connected. Additionally, proper grounding offers safety to the
people using the audio/video system in the event of an electrical problem.
7
Thank You for your XDA-1 Purchase
Dear Music Enthusiast,
Thank you for purchasing the Emotiva XDA-1 DAC preamplifier. We sincerely believe that it offers you
stunning achievement in sonic performance. Designed around the acclaimed Analog Devices AD1955 DAC
operating in a fully differential mode, its differential output is then coupled to a digitally controlled, lossless
volume control stage. The output of this stage then drives our fully discrete, cross coupled, Differential
Reference™ balanced line amp stage. The result is breathtaking.
In addition to being a state of the art 24Bit/192kHz DAC, the XDA-1 DAC preamplifier can operate as a digital
preamplifier and source selector in a digitally based reference level audio system. Inputs for up to six digital
sources including AES/EBU, USB, Coax, and Toslink are available. The XDA-1 DAC preamplifier incorporates
a VFD display for volume, input select, and system status messages. In addition, it is supplied with a milled
aluminum remote control for convenient operation.
UNPACKING THE XDA-1
The Emotiva XDA-1 DAC preamplifier should reach you in flawless condition. If you notice any shipping
damage or other issues upon unpacking the unit, please contact Emotiva immediately.
INVENTORY
Contained in the box should be the Emotiva XDA-1 DAC preamplifier, the remote control and an IEC standard
power cord.
Gently lift out the unit and remove all the packaging material and accessories. TheXDA-1 DAC preamplifier is a
delicate instrument so please unpack it carefully to avoid unnecessary damage to the unit. It is important to
save all the packing materials and the boxes in case your XDA-1 ever needs to be moved or shipped back to
the factory for service.
8
Emotiva XDA-1 DIFFERENTIAL REFERENCE DAC
Audiophile 24 bit/192 kHz DAC preamplifier with USB Audio interface Features
•
Two coaxial inputs
•
Two optical inputs
•
One USB Audio interface input
•
One AES/EBU input
•
Full remote control operation
•
Gold plated discrete RCA connectors for unbalanced stereo audio output
•
XLR connectors for Balanced Analog stereo Audio output
•
Illuminated input indicators (Halo Backlit)
•
5-12V trigger input
•
12V trigger output
•
IEC power inlet, 120/230 VAC auto configurable
9
XDA-1 Front Panel Layout
(for larger image, see page 21)
1. MUTE Button
The MUTE button mutes the sound .Press it down once to mute the sound, press it down again to and the sound returns
to its previous volume and the display window will display “MUTE”
2. Volume UP Button: This button raises the volume of your XDA-1
3. Volume DOWN Button: This button lowers the volume of your XDA-1
4. PANEL DIM Button
The DIM button dims the display lights on your XDA-1.It has 5 settings that allow you to adjust the brightness to your liking
or turn the display lights off completely.
5. Soft Touch Power switch
This turns the XDA-1 on or off. It is a non–latching momentary button. When pushed EMOTIVA will appear next with
XDA-1 then the volume level in the display Window. The unit will then return to the previously set input and volume levels
before it was powered off.
6. IR receiver
Point the remote at this window for operation of the XDA-1 by remote.
7. Display Window
This multi-purpose window will display all necessary information such as volume, selected input etc.
8. AES/EBU Source Selection Button
Selects the AES/EBU input source.
9. OPT1 Source Selection Button
Selects the optical input connected to OPT.1.
10. OPT2 Source Selection Button
Selects the optical input source connected to OPT.2.
11. COAX 1 (CO. 1) Source Selection button
Selects the coax input source connected to CO .1.
12. COAX 2 (CO. 2) Source Selection Button
Selects the input source connected to CO.2.
13. USB Source Selection Button
Selects the USB source connected to the USB input.
14. Input Indicator LEDs
10
LEDs above each selectable button illuminate when the labeled function is engaged. When receiving commands, the
COM/RECV LED illuminates as well.
XDA-1 Rear Panel Layout
(for larger image, see page 22)
1. LINE AUDIO OUTPUTS Section (from left to right)
• XLR LEFT OUTPUT
• XLR RIGHT OUTPUT
• RCA LEFT OUTPUT
• RCA RIGHT OUTPUT
2. DIGITAL AUDIO INPUTS Section (from left to right)
• AES/EBU
• CO.1
• CO.2
• OPT.1
• OPT.2
• USB.
3. TRIGGERS
3.1 TRIGGERS INPUT
Allows a mono to mono 3.5mm cable to remotely trigger the XDA-1 on and off. Current is limited to 500ma
3.2 TRIGGER OUTPUT
Allows a mono to mono 3.5mm cable to remotely trigger another device on and off, along with the XDA-1.
Current is limited to 500mA, which is sufficient to trigger two devices. For triggering more devices, you may
want to use a separate triggering device, like the Emotiva ET-3.
4. Main Power Switch
This rocker switch provides the master power for the XDA-1. After it is in the ON position, the XDA-1 can be
turned on manually from the front panel switch, remote control, or automatically with the trigger input via a
3.5mm input jack.
5. Power Receptacle
Uses standard IEC power cord.
11
XDA-1 Remote
The XDA-1 DAC preamplifier has a dedicated remote control that
offers discrete buttons for most of the critical XDA-1 controls.
Power Buttons
ON Button
Discrete button to turn the XDA-1 on as indicated
STANDBY Button
Discrete button to put the XDA-1 in standby mode
Volume Controls
Applies continuous increase (UP) or decrease (DOWN) in volume
levels while buttons are held down. The XDA-1 DAC preamplifier
volume knob moves in correspondence with these controls.
Input Selection Buttons
These discrete buttons select the various source inputs of the
XDA-1. LED’s on the front panel of the XDA-1 will light in
correspondence with the selected input
• AES/EBU – selects AES/EBU input as source.
• OPT1 – selects OPT1 input as source.
• OPT2 – selects OPT2 input as source.
• CO.1 – selects CO.1 input as source.
• CO.2 – selects CO.2 input as source.
• USB - selects USB input as source
Dim Button
Discrete button to dim the display lights and Window Display.
Mute Button
Discrete button mutes the sound .Press it down once to mute the sound, press it down again to and the sound
returns to its previous volume and the display window will display “MUTE”
Changing the Battery
The XDA-1 remote is powered by 2 AAA batteries. To add fresh batteries, you must remove the 6 screws (use
a no. 2 flat tip Phillips screwdriver), remove the aluminum back cover, exchange the batteries and orient the
negative and positive ends as indicated by the images in the battery compartment. Emotiva recommends
using alkaline batteries.
12
Connecting Audio Source Units
The XDA-1 DAC preamplifier can connect to up to six different audio devices, using standard XLR connector
for the AES/EBU input, Standard RCA analog connectors for coaxial inputs, toslink connectors for optical
inputs and USB type B to A connector for USB input .
AES/EBU
Connects to an AES/EBU source using the standard XLR connectors
OPTICAL (OPT1 & OPT2)
Connects to an optical S/PDIF source using standard optical type connectors.
COAXIAL (CO.1 &CO.2)
Connects to a S/PDIF source using the standard RCA type connectors
USB
Connects to a USB audio interface using the standard USB type B to A connector.
After the connection is made the operating system detects it as a new hardware device.
Modern operation systems like Windows XP, Vista, Windows 7, Mac OS and Linux detect the
hardware directly and install the correct USB audio automatically.
Audio Applications
Under Windows XP, Windows Vista and Windows 7 the XDA-1 can be selected as an audio output device
under Control Panel > Hardware and Sound> Sound.
Under Mac OS X, you can select and configure the XDA-1 via the MIDI Setup application that can be found in
your application folder.
The XDA-1DAC preamplifier is a playback device and can replace your on board Soundcard fully for all stereo
playback functions.
Connecting To Amplifiers and Speakers
When connecting to amplifiers and speakers, make sure to use the properly labeled left channel, right
channel and subwoofer connections.
Check to make sure that you have connected the proper cables in the proper sequence:
1. DIFFERENTIAL OUTPUT
Left and right channel XDA-1 line balanced outputs into either the left and right balanced inputs of
your amplifier or preamp.
2. UNBALANCED OUTPUT
Left and right channel XDA-1 line RCA outputs into either the left and right balanced inputs of your
amplifier or preamp.
Also use high quality, 100% shielded, oxygen free copper cables.
Trigger Connections
5-12VDC trigger input and output are used to remotely trigger the XDA-1 or a connected device on and off.
Please ensure that the total of the loads connected to this trigger do not exceed 500mA.
13
Troubleshooting Guide
The Emotiva XDA-1 DAC preamplifier is expertly designed and built to provide years of trouble-free
performance. Most problems that occur can usually be solved by checking your connections or making sure
that the audio components connected to the XDA-1 are on and fully operational. The following information will
help you deal with common problems you may experience during initial use of your unit. If problems persist,
contact Emotiva’s service department for assistance.
No Sound (from one or more full range speakers)
•
Speaker cables may have come undone from the amplifier. Turn off your system and check the
speaker cables, and tighten the binding posts.
•
Audio output cables that connect XDA-1 to the amplifier(s) may not have a good connection. Turn off
your system and check all audio cable connections.
•
An audio cable may have an internal break. Switch cable with a different channel to see if the problem
migrates to a different channel or stays in the affected channel(s).
•
The correct input is not currently selected.
•
The mute switch is on.
•
Switch to a different source and see if Audio is present
No Sound from the AES/EBU Input
•
Make sure that the AES/EBU cable is not damaged.
•
Make sure that the AES/EBU source is outputting sound properly
•
Make sure that the XDA-1’s AES/EBU input is selected.
No Sound from the USB Input
•
Make sure that the USB cable is not damaged.
•
Make sure that the XDA drivers are properly installed.
•
Make sure that the XDA-1 is selected as the output device in your PC.
No Sound from the Optical Input
•
Make sure that the OPTICAL cables are not damaged.
•
Make sure that the source device is working properly and outputting Audio. Properly
•
Switch to a different Optical input to make sure there is Audio present.
No Audio from the Coax input
•
Make sure that the coax cable is not damaged.
•
Make sure that the source device is working properly and outputting Audio. Properly
•
Switch to a different coax input to make sure there is Audio present.
Remote Control Not Working
•
Make sure the AAA batteries are not dead or installed incorrectly.
•
Make sure that the XDA-1 front panel receiver window is not obstructed.
14
Remotely Connected External Amplifier(s) Do Not Turn Off with XDA-1
Check the following:
•
Make sure the 1/8” plug is connected between the XDA-1 trigger output and the amplifier(s) trigger
input(s).
•
Make sure the total consumption of the connected devices do not exceed 500mA
•
If you have spliced the plug to one or more amplifier turn on inputs, remember the center pin is positive
and the outer shield is negative. This output is 5 to 12VDC.
“Hum” Noises
•
This problem is more than likely caused by a “ground loop” in your system, rather than a fault in the
XDA-1. Follow these steps to isolate the main cause of the hum; there may even be more than one.
Remember to turn off all components in your system (including the XDA-1) before disconnecting or
connecting any cables.
Disconnect the following items in order, and check each time if the hum has gone away:
•
Disconnect all cables which come from outside the room, such as cable TV, satellite TV, or roof top
antennas. Make sure that they are disconnected where they first enter the room, so they are making no
connection to the XDA-1, the TV, or any other component. If the hum is caused by the cable TV line,
you will need a “ground loop isolator.” This is an inexpensive device fitted in-line with the coaxial cable
feed. Contact your cable company or your Emotiva Dealer for assistance.
•
Disconnect any component which has a grounded power cord.
•
If the hum persists, disconnect all the source components one at a time from the back of the XDA-1
until you identify the problem. (Ground loop isolators are available for audio lines and video. Ask
Emotiva for assistance)
•
Try moving the speaker cables away from any power cords. Try just one speaker, connecting it to
different channels and see if an amplifier channel is bad.
•
If you are still having a problem, remember that Emotiva’s technical support staff will assist you.
15
XDA-1 Technical Specifications
•
•
•
•
•
•
•
•
•
•
•
•
•
•
•
•
Signal-to-Noise Ratio: > 105dB (A-Weighted)
Frequency Response: 5Hz - 48kHz
THD+N: 0.001%
Ground Floor Noise Level: < 15uV
Nominal Output Voltage: 1V RMS
Peak Output Voltage: > 12VRMS (balanced)
Sample Rate: All standard resolutions are supported up to 192kHz
Bit Depth: Standard bit depths up to 24Bit are supported at clock frequencies up to 192kHz
Inputs: 2 Optical TOSLINK, 2 COAX Digital, 1 AES/EBU, 1 USB
Outputs: 2 RCA (Unbalanced), 2 XLR (Balanced)
Internal Volume Control: Digitally controlled in increments of 0.5db
Remote Control: Milled Aluminum Full Function Remote Control
I/V conversion: Burr Brown OPA-2134
D/A conversion: high performance, multibit Sigma-Delta Burr Brown AD1955
Data Directed Scrambling with high jitter immunity, and an 8x Oversampling Digital Filter
Fully Discrete Differential Reference™ Output Stage with fully independent balanced and
unbalanced drive stages
Dimensions:
17" wide x 2.25" high (1.75" with no feet) x 14" deep
16
Licensing and Trademark Disclosures
Emotiva Disclosure
© Copyright 2010 Emotiva Audio Corporation
All Rights Reserved. Emotiva reserves the right to make improvements to its products at any time.
Therefore, the specifications of the product and the specific details of this manual are subject to
change at any time.
17
Limited Warranty
Emotiva is proud to design and manufacture quality products for the home audio and home theater enthusiast.
Your XDA-1 Stereo Preamplifier has been crafted to perform flawlessly for many years. As a result of this
quality and craftsmanship, Emotiva offers the following warranty to owners of the XDA-1.
Emotiva Audio warrants the XDA-1 to be free of defects in materials and workmanship for a period of FIVE
YEARS from the original date of purchase. The following items are excluded from, or will void this warranty:
1) Damage to the XDA-1 DAC preamplifiercaused during shipment and handling.
2) Damage to the XDA-1 DAC preamplifier caused by accident, misuse, or abusive operation contrary to
the instructions specified within this manual.
3) XDA-1 DAC preamplifier units that have had the serial numbers defaced, modified, or removed.
4) Damage to the XDA-1 DAC preamplifier resulting from a modification of, or attempted repair by any
person or company not authorized by Emotiva.
5) Any XDA-1 DAC preamplifier unit purchased from a non-authorized dealer.
6) Emotiva does not assume liability for loss of use, or damage to, associated or connected equipment.
Service Assistance for the USP-1
Please note that BEFORE sending your XDA-1 in for repair, you MUST call Emotiva and obtain a returned
material authorization (RMA) number. Before contacting Emotiva to begin the return process, please have as
detailed a description of the problem(s) you are experiencing and the conditions under which the problem(s)
occur. Additionally, please be sure to check the troubleshooting guide in this manual to rule out the possibility
of something simple you may have overlooked. Please remember, this is a complicated product and most
instances of perceived product failure are the result of improper set up or operation. Emotiva and its dealers
will help you ascertain whether you have an operational problem or product defect.
Once you have obtained the RMA number, you must print this clearly on the outside of the box so it will be
possible to determine from whom the XDA-1 came once it arrives at Emotiva. Parcels arriving without an RMA
number will be refused and returned freight collect.
Please send your repairs with RMA number to:
Emotiva Audio Corporation
Attn: Customer Service
131 Southeast Parkway Court
Franklin, TN 37064
Reference - (Put your RMA number in this spot)
18
19
20
21
22