1
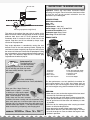
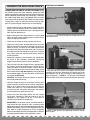
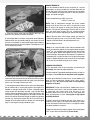
™
WARNING:
• Never attempt to swim after a stalled R/C boat.
• Never operate your R/C boat while standing in the water.
• Never operate your R/C boat in the presence of swimmers.
• Always use a Personal Flotation Device (PFD) when boarding and operating your retrieval craft, i.e. Jon
boat or duck boat. NOTE: Because of the sharp running hardware included with this R/C boat, we do not
recommend a rubber blow up raft.
• R/C boat running hardware is very sharp. Be very careful when working on and around the metal parts.
• While the motor is running pay close attention to the propeller. Do not come in contact with the propeller at
any time the engine is running or serious injury will result.
• AquaCraft products are to be used by ages 14 and over.
CAUTION: The performance of this R/C boat is not for the faint of heart! Out of the box speeds
can reach 40 MPH. Your full attention must be maintained while operating this product.
aquacraftmodels.com
ITEMS INCLUDED
WARRANTY
STANDARD REPAIR SERVICE
After the 90-day warranty has run out, you can still have your
Miss Vegas Deuce repaired for a service fee by the experts
at AquaCraft.To speed up the repair process, please follow
these four simple steps:
AquaCraft will warrant your Miss Vegas Deuce hull for 90 days
after the purchase from defects in materials or workmanship of
original manufacture. AquaCraft, at their option, will repair or
replace at no charge, the incorrectly made part. This warranty
does not cover damage caused by crash, abuse, misuse,
alteration or accident. To return your boat for repairs you need
to provide proof of purchase. Your store receipt or product
invoice will suffice. IN NO EVENT SHALL THE PURCHASER
BE ENTITLED TO ANY INCIDENTAL, SPECIAL, INDIRECT
OR CONSEQUENTIAL DAMAGES, WHETHER RESULTING
FROM THE USE, MISUSE OR INABILITY TO USE THE
PRODUCT OR FROM DEFECTS IN THE PRODUCT. This
warranty gives you specific legal rights and you may also have
other rights, which vary from state to state. (Outside USA and
Canada, contact local importer for warranty information.)
Important Note: For standard repair service you must specify
whether you wish the charges to be billed COD or if you wish
to be notified of the charges so you can send a check.
1. Please return the ENTIRE system, boat and radio.
2. Make sure batteries are removed from the transmitter.
3. Send written instructions which include a list of all items
returned, a THOROUGH explanation of the problem or
problems of the service needed. Be sure to include your
return address and daytime phone number. If you have
access to e-mail please provide us with your e-mail
address to help speed communication.
Hobby Services
3002 N. Apollo Drive, Suite 1
Champaign, Illinois 61822
Attn: Service Department
Phone: (217) 398-0007
9:00 am - 5:00 pm Central Time M-F
E-mail: [email protected]
4. Send to the address at left.
2
ITEMS NEEDED TO COMPLETE
YOUR MISS VEGAS DEUCE
INTRODUCTION
Thank you for purchasing the AquaCraft™ Miss Vegas™
Deuce! We want the time you spend with your new R/C boat
to be fun and successful, so please fully read the manual. If
for any reason you think this R/C model is not for you, return
it to your local hobby dealer immediately. Your hobby dealer
cannot accept returns on any model after final assembly or
after your boat has been operated.
• HCAP2520 Hot Shot™ 2 Glow starter
• ODOP3130 30% Nitromethane model boat fuel (1 quart)
• DTXP0125 Kwik-Pit™ 250 fuel bottle
• 8 “AA” batteries (FUGP7316 – 16 pack)
OPTIONAL ITEMS
It is a good idea to assemble a useful collection of tools and
accessories to bring along anytime you head out to the pond.
Here are some items you will want to keep handy.
SAFETY PRECAUTIONS
• Never, ever, attempt to swim after a stalled R/C boat.
Do not get in the water for any reason to retrieve your
boat. To aid you in retrieving a stalled R/C boat, set up a
fishing reel with a tennis ball tied to the end of the line.
Or better yet, get yourself a small boat so you can row
out and pick up your R/C boat. Remember to use a PFD
any time you enter your retrieval craft.
• AquaCraft products are to be used by ages 14 and over.
• Do not touch the propeller anytime the motor is spinning.
Pay equally close attention to items such as loose clothing,
shirtsleeves, ties, scarves, long hair or anything that may
become entangled in the spinning prop. If your fingers,
hands, etc. come in contact with the spinning propeller, you
may be severely injured.
• The speed and mass of this boat can inflict property damage
and severe personal injury if a collision occurs. Never run this
boat in the presence of swimmers or where the possibility of
collision with people or property exists.
• This boat is controlled by radio signals, which are susceptible
to possible interference.
• If your Miss Vegas Deuce should happen to stall, water
currents will slowly carry it to shore. The bad news is that
the boat could be carried to the opposite shore. When
surveying areas to run your model, keep variables in
mind such as wind direction, size of the lake, etc. It is not
advisable to run R/C boats on any free-flowing bodies of
water such as creeks or rivers.
• #2 Phillips screwdriver (HCAR1024)
• Hobbico® heavy-duty diagonal cutter 7" (HCAR0627)
• Metric and standard hex drivers
• Adjustable wrench
• Needle-nose pliers (HCAR0625)
• After Run engine oil (HCAP3000)
• Glow plugs
• Fuel tubing (GPMQ4131)
• Hook & loop material (GPMQ4480)
• Hobby knife (HCAR0109)
• AquaCraft Speed Grease™ cable lubricant (AQUB9500) or
Marine-grade grease (for lubricating the flexible drive cable)
• Zip-ties
• Extra “AA” batteries
• Thread-locking compound
• CA glue and debonder
BELT STARTING SYSTEM
If you would like to update your Miss Vegas Deuce Super
Tigre® engine to belt start, here is a list of the components
you will need:
• SUPG2052 – SuperTigre® Standard Back Plate .18 Marine
• AQUB9531 – AquaCraft™ 17" Starting Belt
• HCAP3200 – Hobbico TorqMaster™ 90 Deluxe 12V Starter
• HCAP0800 – Hobbico TorqMaster LC 12V 7Amp Battery
OTHER USEFUL ITEMS
TO HAVE ON HAND
MANUAL SPECIFICATION AND
DESCRIPTION CHANGES
• Paper towels
• Spray-on glass cleaner
• Sunglasses
• Sun block
• Waders or rubber boots
• Cooler with plenty of ice and soda
• Folding table
• Lawn chairs
• First-aid kit
• EZ-up or canopy for shelter
All pictures, descriptions, and specifications found in this
instruction manual are subject to change without notice.
AquaCraft maintains no responsibility for inadvertent errors
in this manual.
3
INSTALLATION OF RECEIVER BATTERIES
FINAL ASSEMBLY
Carefully remove your Miss Vegas Deuce from the box and
place it atop the pre-built boat stand. Remove all remaining
components from the box. You may wish to keep the
box in order to more easily transport and store your
Miss Vegas Deuce.
Decals have been provided for your Miss Vegas Deuce.
Simply cut them out, peel, and stick! See the photos on
the box for recommended decal placement.
TRANSMITTER ASSEMBLY
1. Locate the cowl locks on the rear hatch cover and slide
them forward.
1. Slide off the battery door on the bottom of the transmitter.
Install four fresh “AA” batteries into the bottom of the transmitter
in the configuration molded into the battery holder. Re-install
the battery door onto the bottom of the transmitter.
2. Lift the rear of the canopy and slide it forward to access
the interior of the hull.
1. Power Light
2. On/Off Switch
3. Steering Trim
4. Throttle Trim
5. Throttle Reverse
6. Steering Rate
7. Steering Reverse
2. Turn the transmitter on using the switch on the front. The
red LED should light up. If the LED does not light up, turn the
transmitter off and check to make sure that the batteries are
installed properly. If you see a flashing LED, the batteries are
low and need to be replaced.
4
3. Remove the two 2 x 12mm screws that secure the radio
box lid and gently lift the lid from the battery box.
7. Replace the canopy by first sliding it over the “nose” of the
boat and then lowering the rear section to meet the hull. Secure
it by sliding the two cowl locks toward the rear of the boat.
4. Install four fresh “AA” batteries in the battery holder. Be
sure to follow the polarity configuration molded into the
battery holder.
5. Plug the battery box connector into the ON/OFF switch
connector. Do not force them together; they are designed
to fit together only one way.
6. Replace the radio box lid and secure it with the two
2 x 12mm screws.
5
PROPELLER DEPTH
TRIM ADJUSTMENTS FOR THE
MISS VEGAS DEUCE
Here are some of the important factors that affect the
performance of a hydroplane.
PROPELLERS
The FRP (Fiber-Reinforced Plastic) prop that comes with your
Miss Vegas Deuce is about the best overall prop for daily
running. If your prop has a ding or chip in a blade, you need
to replace it with a new one before you run the boat again.
Prop depth set high
Prop depth set low
If you want to step it up and try your hand at even more
performance, try a metal prop. AquaCraft makes a
36x55mm (AQUB9700) beryllium copper/titanium version
that will work very well on your Miss Vegas Deuce. Please
heed any warning labels that come with the prop. Take your
time sharpening and balancing the prop using a good prop
balancer (AQUB9575) and lots of elbow grease. Please
do not run any metal prop without first sharpening and
balancing it. Failure to do so will not only slow the boat down
but possibly break driveline parts. Also note that the metal
props can place more load on your engine and driveline,
possibly shortening the life of your hardware.
The depth of the prop is a key factor in establishing the ride
attitude of a hydroplane. Lowering the prop depth will raise
the back of the boat, resulting in a “bow down” ride attitude.
A “bow down” ride increases the amount of sponson whetted
surface pinning the boat on the water and reducing top end
speed. Raising the prop depth will lower the back of the boat,
creating a “bow up” ride attitude. A “bow up” condition may
increase speed but will decrease stability. This may cause
the boat to “blow over” (backward flip) or “spin out” in a turn.
ADJUSTING DEPTH AND ANGLE OF THE PROPELLER
Like any high performance car, airplane, or boat, optimal
outcomes in cornering and speed require “fine tuning” the
variables listed below.
PROPELLER ANGLE
Adjustment of prop depth and angle is accomplished by
loosening the 4 x 10mm cap head screw on the strut bracket.
Draw a line on the strut blade with a waterproof marker where
it meets the strut bracket. This will provide a reference point
when making adjustments. It is important to loosen the flexible
drive cable from the engine coupler to prevent creating a bind
in the driveshaft at the rear of the strut housing.
The Miss Vegas Deuce is best suited for operation on calm
water. Wind creates waves which present challenges to
running a hydroplane. An increase in wind will create choppy
water conditions, allowing the possibility of “blowing” the boat
off when running into the wind.
Positive angle (prop angles up)
With extensive testing, we at AquaCraft have found
setting the FRP Y535 prop depth at 27mm [1-1/16"]
below the transom provides optimum performance.
27mm [1-1/16"] is to the C/L (centerline) of the prop
shaft. Negative 1° to 2° prop thrust is also essential.
Negative angle (prop angles down)
6
SUPERTIGRE .18 MARINE ENGINE
Important: Please fully read these instructions before
operating your engine. These instructions have been written
so that you may get the greatest satisfaction from the
operation of your new engine.
SPECIFICATIONS:
ABC Piston and Sleeve
Bore: .662"
Stroke: .535"
Displacement: .184ci (3cc)
Power Output: 1.35 hp @ 28,000 RPM
Crankshaft Thread Size: 5mm
Carburetor type: Rotary Barrel
Glow Plug: #4 Hot SUPG1201
Neutral (prop points straight back)
This refers to the angle of the prop shaft in relation to the
bottom of the hull. When cutting through the water, the prop
produces both thrust and lift. Thrust generates forward
movement while lift causes the back of the boat to rise
upward. Prop thrust and lift are affected by shape, angle,
and size of the prop blades.
ENGINE PARTS:
4
2
Prop angle adjustment is controlled by moving the strut
forward or back in the strut mounting bracket. Pushing the
strut forward creates “negative” prop angle and will increase
the amount of lift because it increases the prop depth. Pulling
the strut blade back in the mounting bracket creates “positive”
prop angle. This decreases depth and lift. A “neutral” prop
angle reduces the effect of prop lift.
6
5
3
Performance Tip!
The GrimRacer turn fin
(available separately)
ately)
is designed specifically for .18-size hydros.
dros.
This fin will help your hydro turn faster
with more stability both left, right and in
n
the straights.
g
8
™
1
1. Crankshaft
2. Carburetor
3. Crankcase
4. Water Jacket
5. Super Start System
Bore
6. High Speed Needle (HSN)
7. Low Speed Needle (LSN)
8. Idle Stop Screw
9. Throttle Arm
10. Fuel Inlet Nipple
For best performance use fuel specifically formulated for
nitro marine engines. 30% to 50% nitro content fuels are
best suited for your marine engine. Please avoid operating
your marine engine using fuels formulated for R/C car use.
Give your Miss Vegas Deuce an
added burst of speed — as easily
as bolting on a high-quality copperberyllium-titanium GrimRacer metal
prop! Racer-designed and USAmade, these are the most accurately
l castt metal
t l props
available. Ultra-clean casting and true center-bore hubs
place each prop near its balance point right out of the
package. You can fine-tune them using less effort than
stainless steel props require — and they hold their shape
better for balancing, sharpening, and changing pitch.
Type
9
7
Blue F
Finish (AQUB9516),
Polish Aluminum Finish (AQUB9515).
Polished
Diameter/Pitch
10
WARNING:
• Never free rev your marine nitro engine with the boat out of
the water. You could damage the engine.
• As a rule of thumb, you have about 2 minutes of out-of-thewater operation before your engine starts to overheat. It is
best to get the boat into the water and underway as soon
as possible.
• Watch out for the moving prop when carrying your boat!
Never run while handling the boat.
• Never operate the engine without proper water cooling.
• Never “bench break-in” your new marine engine. It is best
to install the engine in a boat and break the engine in with
the boat in operation.
Octura Equiv.
AQUB9700 36mmx55mm 2-Blade 1/8 in Y535
7
STARTING YOUR ENGINE:
RUNNING THE MISS VEGAS DEUCE
PLEASE TAKE THE TIME TO DO THE FOLLOWING. Using
the provided 12mm and 14mm wrenches, loosen the cable
coupler and slide the cable out the back of the boat. Make sure
there is adequate grease on the shaft (see page 11). Reinstall
the cable leaving about 3mm [1/8"] between the back of the
strut and the front of the drive dog. Tighten the cable coupler
making sure it is tight. To check that you have the shaft tight,
place a rag over the prop and pull firmly on the shaft/prop.
•
Avoid running the boat in cold weather. The hull and other
plastic parts can become brittle at low temperatures. In
addition, grease and oil become thick, causing premature
wear and poor performance.
•
Before running your Miss Vegas Deuce, it is also a good
idea to check the water-cooling system to make sure all
tubes are properly connected.
•
Check over all screws to make sure they are secure.
•
Check the radio system. Standing behind the boat with
both the transmitter and receiver powered up, rotate the
wheel to the left. The back of the rudder should move
towards the left. Move the wheel to the right. The back of
the rudder should move towards the right. If this is not the
case, simply move the steering servo reverse switch to
the other position.
•
Squeeze the trigger on the transmitter; this should open
the throat of the carburetor. Conversely, moving the
trigger forward should close the throat completely.
•
Total run time of the Miss Vegas Deuce is approximately
5-7 minutes (assuming you begin with a full tank of fuel).
When you notice an increase in power, it means the fuel
tank is nearly empty and it’s time to head for shore. As the
boat reaches shore, stop the engine by pushing forward
on the throttle trigger; turn off the receiver, and finally the
transmitter (in that order).
•
CAUTION: The engine will be hot! Allow it to cool for a
few minutes before restarting.
•
Your Miss Vegas Deuce may occasionally take on small
amounts of water, especially when running in rough water.
Keep a roll of paper towels handy and dry out the hull
interior after every run. If you notice excessive amounts
of water in the hull, remove the drain plug in the transom
to conveniently drain water from the hull.
•
Always store your Miss Vegas Deuce with the canopy/
hatch cover removed to allow the interior to dry out
completely. If you neglect to do this, it may result in
corrosion of the electronic components.
•
IMPORTANT: If, for whatever reason, your boat takes on a
large amount of water, swamps or sinks, causing the radio
equipment to get wet, you must do the following immediately:
Remove the battery pack and radio equipment from the
boat. Allow all of the components to air dry completely
before reassembling. Reinstall the components and check
for proper operation before running the boat in water.
1. Install the starter wand into the hex shaped area on the
front of the starter.
2. Plug the end of the starter cord adapter with the plastic
connector into the hand held starter unit. Attach the starter
cord adapter’s clips to your 12V battery, Red to positive (+)
Black to negative (—). NOTE: A 7.2V sport pack (DTXP4605
EZ Start Power Pack) may also be used to power the starter.
3. Attach a glow igniter to the glow plug located on the top
of the engine.
8
ENGINE BREAK IN:
It can be somewhat difficult to tune and break in a marine
glow engine, as tuning and break-in are best done with the
boat on the water. Take your time and do not hurry the break
in. If you operate the engine too lean in the early break-in
stages, you could damage it.
Factory needle settings: HSN: 4 turns out
LSN: 2-1/2 turns out
NOTE: Due to atmosphere changes the factory needle
setting could be too rich or too lean. It is important to note
that as long as the engine is running rich during the initial
break-in, it is safe from any damage. If you live near or at sea
level, you might want to open (turn out, counterclockwise)
the HSN 1/2 turn before attempting to operate the engine.
4. Place the starter wand into the engine’s drive cup, and
press the start button to activate the starter.
• Run 1: Run the boat at the richest setting your boat will
continue to operate at for a full tank of fuel. Caution: The
engine will be hot! Allow it to cool before each run.
5. If the engine does start within 10 seconds do the following.
Double-check that the needle settings are correct. Be sure
the carb is not closed. Try starting the engine again. Keep an
eye on the fuel line to see if the engine is drawing fuel, if not,
it may need to be primed.
• Run 2: Repeat run one.
• Runs 3 – 6: Lean the HSN 1/16 to 1/8 turn between each
run. If you notice the engine start to sag the closer you get to
the 6th run, you are getting the engine too lean. Do not over
lean the engine. Richen the engine back up 1/8 turn and
finish breaking in the engine at that setting. It is important to
remember that it might not take 6 runs to get to the proper
break-in needle setting, but you still want to run the engine
for at least 6 runs before trying to tune it further.
LAUNCH PROCEDURE
1. Turn the power “ON” to the transmitter and receiver (in
that order) and check for proper operation.
2. Start the engine. The propeller will begin spinning as soon as
the engine is started. Be sure to stay clear of the propeller.
6. If the engine needs to be primed, place a finger over the
carb throat and activate the starter. Watch the fuel line. When
the fuel reaches the engine’s fuel inlet nipple, take your finger
off the carb. The engine should now start.
3. Gently place the boat in water that is at least 203mm [8"]
deep and free of obstacles (weeds, rocks, sticks, ducks,
muskrats, etc.). Be sure to stay clear of the spinning
propeller at all times.
7. If the engine becomes difficult to turn over it may be flooded.
Do not continue to try starting the engine if you suspect it is
flooded as damage could result. To clear a flooded engine
simply remove the glow plug and hold a rag or paper towel
over the glow plug opening. Use the hand held starter in the
same way as starting the engine. As the engine rotates the
excess fuel will be forced out though the glow plug opening
into the rag, clearing the engine. Do this as many times as
needed. Once the excess fuel has cleared, re-install the glow
plug. Try the engine starting procedure again.
IMPORTANT: Unlike full-scale boats, model boats race in
a clockwise circuit and it is the nature of model race boats
to make right turns more easily than left turns. If you
absolutely have to turn left, do so at very slow speed and
allow yourself plenty of room. Turning left at high speed
could flip the boat!
4. Slowly advance the throttle and note if the boat has a
tendency to turn right or left. Adjust the steering trim knob
on your transmitter until the boat runs in a straight line when
the steering wheel is at neutral.
5. When finished running, stop the engine and turn the power
“OFF” to your boat and transmitter (in that order).
9
GET TO KNOW THE SOUNDS AND SIGHTS OF YOUR
NITRO MARINE ENGINE:
• Rich needle setting means less than maximum RPM. The
engine will operate with a break in the exhaust note. Also
take note that when rich, your engine is going to use more
fuel than normal and you’re going to end up with a lot of oil
and smoke coming out of the exhaust pipe.
WAYS TO ENSURE A LONG LIFE FOR YOUR ENGINE:
• Keep your engine clean. Dirt will act as insulation on an
engine. It will not be able to shed heat as easily.
If the engine RPM speeds up as the boat goes around the
corner, your engine is likely rich. It is also a good idea to
look at the glow plug element after the first few runs. If it
looks new and shiny, your engine is running rich. It is also
a good idea to change the glow plug after the first 5 runs or
so. As your engine is breaking in, microscopic particles from
inside the engine are coming loose and washing out with
the extra oil from exhaust. As the particles pass through the
engine some of them attach to the element, reducing the
coil’s ability to light properly.
• Lean needle setting means lots of RPM followed by
lean sags in the exhaust note. Fuel consumption will be
minimized and you will not see much oil or smoke exit the
exhaust pipe. If the engine RPM drops off in the corner,
your engine is likely running too lean. Again, it’s a good
idea to inspect the glow plug element. A lean engine run
will show a plug with a distorted coil, broken coil, or missing
coil. It’s also important to note that a lean needle setting will
minimize the dependability of the engine. TIP: Most of the
time if the engine quits during a run, the engine was lean.
If you suspect your engine is running lean, bring the boat to
shore as soon as possible and richen the HSN.
•
Do not over-lean your engine.
•
Do not overheat the engine. This goes along with keeping
it clean and not over-leaning the engine.
•
Make sure that you use a fuel from a reputable
manufacturer that is labeled as model engine fuel.
•
Avoid using old fuels in the engine. At the end of the day, run
all of the fuel out of the engine, use after run oil and work it
into the engine by rotating it a few times using the starter.
•
Store your engine someplace where it will not be subjected
to extreme temperature changes.
REPAIRS AND WARRANTY SERVICE:
SuperTigre warrants its marine glow engines to be free from
defects and workmanship for a period or 90 days from the
date of purchase. During that time SuperTigre will repair or
replace, at our option, any product that does not meet these
standards. You will be required to provide proof of purchase
date (receipt or invoice).
• The perfect needle setting means good RPM and a clean,
clear sound. You’ll see some light oil and smoke from the
exhaust pipe and a tanned, slightly dull but not distorted
glow plug element. TIP: At the risk of a slower operating
boat, it is best to err on the rich side of the needle setting.
Your engine will last a lot longer and provide you with
winning performance race after race.
GLOW PLUGS:
The glow plug that comes with the engine (SUPG1201) is
your best bet for a replacement plug. However, if you would
like to experiment with different plugs, there are a few basic
guidelines to follow:
If, during the 90 day period, your SuperTigre engine shows
defects caused by abuse, misuse, or accident, it will be
repaired or replaced, at our option, at a service charge not
greater than 50% of the current retail list price. Be sure to
include your daytime telephone number in case we need to
contact you about your repair.
Under no circumstances will the purchaser be entitled to
consequential or incidental damages. This warranty gives
you specific legal rights, and you may also have other rights,
which vary from state to state. If you attempt to disassemble
or repair the unit yourself, it may void the warranty.
For service on your SuperTigre product, either in or out of
warranty, send post paid and insured to:
• You want to tune your engine to the hottest plug you can
and not burn the plug element out. This will provide you with
the most speed and coolest operation.
Hobby Services
3002 N. Apollo Dr., Suite 1, Champaign, IL 61822
Phone: 217.398.0007
www.hobbyservices.com
• Hotter plugs advance the timing in the engine and should
be used with lower nitro fuels. Be warned this can cause
pre-detonation.
• Colder plugs retard the timing in the engine and are typically
used with higher nitro fuels.
10
MAINTENANCE
When you are through operating your boat for the day, be
sure to perform these basic maintenance procedures. This
will prolong the life of the Miss Vegas Deuce and help to
ensure trouble-free running.
ENGINE MAINTENANCE
Drain the tank of any remaining fuel. Add some after-run oil
to the engine to protect the internal parts. We recommend
removing the glow plug, opening the carburetor all the way,
and placing 10–12 drops of after-run oil down the barrel of the
carburetor. Place a rag over the glow plug hole and turn the
engine over with the starter. Repeat this step at least one more
time to make sure the inside of the engine is fully coated.
3. Gently pull the driveshaft out and wipe off any old grease.
HULL MAINTENANCE
Remove the hatch cover. Open the radio box. Soak up any
excess water with a paper towel. Remove the driveshaft and
wipe away as much grease as you can. Spray the driveshaft
down with WD-40 and place it in a plastic bag until you
are ready to operate the boat again (See the Driveshaft
Maintenance section below). Wipe down the entire boat
with spray-on cleaner and a paper towel.
DRIVESHAFT MAINTENANCE
IT IS CRUCIAL that you remove the flexible driveshaft and
lubricate it with AquaCraft Speed Grease cable lubricant
(AQUB9500) or some type of heavy-duty marine grade
cable grease at the beginning of each daily session and
again every 2-3 tanks. This exercise will require a 12mm and
14mm wrench.
4. Apply AquaCraft Speed Grease cable lubricant
(AQUB9500) or heavy-duty marine grade cable grease to
the driveshaft and reinsert it into the stuffing box. Slowly
rotate the driveshaft while gently pushing it back into place.
Be sure to leave about a 3mm [1/8"] gap minimum between
the drive dog and the stuffing box as shown.
1. Remove the canopy.
5. Use the 14mm wrench to hold the flywheel steady while
tightening the collet assembly with the 12mm wrench as
shown. Make sure there is still a 3mm [1/8"] gap between
the drive dog and the stuffing box.
2. Use the 14mm wrench to hold the flywheel nut in place
while loosening the collet assembly with the 12mm wrench
as shown.
11
SUPERTIGRE .18 MARINE REPLACEMENT PARTS
ENGINE
# Part #
1 SUPG5651
2 SUPG4050
3 SUPG4480
4 SUPG5000
5 SUPG4051
6 SUPG2180
7 SUPG6353
8 SUPG3388
9 SUPG3387
10 SUPG5095
11 SUPG5099
12 SUPG2520
13 SUPG5061
14 SUPG5464
15 SUPG5466
16 SUPG2615
17 SUPG2360
18 SUPG3110
19 SUPG1750
Description
Head Bolt (4)
Water Jacket Upper
Head Gasket
Cooling Head Nipples (2)
Water Jacket Lower
Head Button
Head Shims (2)
Piston and Sleeve Rod Assembly
Piston and Sleeve
Piston Pin
Piston Pin Retainer (2)
Connecting Rod
Carburetor O-Ring (2)
Ball Bearing Front
Ball Bearing Rear
Crankcase
Carburetor Pinch Bolt
Crankshaft
Complete Carburetor
CARBURETOR
20 SUPG4881
21 SUPG4840
22 SUPG5021
23 SUPG6351
24 SUPG4476
25 SUPG6350
26 SUPG4900
27 SUPG5652
28 SUPG4710
29 SUPG6202
30 SUPG2440
31 SUPG4202
32 SUPG4220
33 SUPG6355
34 SUPG6050
35 SUPG6058
Needle Valve Assembly
High Speed Needle
High Speed Needle Valve O-Ring
Upper Needle Valve Washer
Fuel Nipple
Lower Needle Valve Washer (1)
Low Speed Needle Valve
Idle Stop Screw
Idle Screw Spring
Carburetor Main Body
Throttle Spring
Carburetor Rotor
Rotary Boot Cover
Throttle Arm Washer
Throttle Arm
Throttle Arm Nut
STARTER ASSEMBLY
# Part #
Description
36 SUPG2050 Adaptor Assembly Complete Rear
37 SUPG5420 Starting Pressure Spring
38 SUPG5880 Starting Pin
39 SUPG5870 Starting Shaft
40 SUPG5020 Back Plate O-Ring
41 SUPG2051 Back Plate
42 SUPG5650 Back Plate Adaptor Screw Set (4)
43 SUPG5060 Start Shaft O-Ring
44 SUPG4430 One-Way Bearing
45 AQUP0002 Super Start Back Plate Set
46 DTXP6044 SS Connecting Joint & Pin
47 DTXP6043 SS Pinion
48 DTXP6053 SS Spur Gear
49 DTXP6042 SS Washer
50 DTXP6041 SS Screw Set
OPTIONAL ITEMS
SUPG2052 Standard Back Plate
SUPG1201 #4 Hot Plug
SUPG6003 Tuned Pipe System Q-18
12
ORDERING REPLACEMENT PARTS
RACING
To order replacement parts for the AquaCraft Miss Vegas
Deuce use the order numbers in the replacement parts list
that follows. Replacement parts can be purchased from your
local hobby shop or by mail order. If you need assistance
locating a dealer to purchase parts, visit www.hobbico.com
and click on “Where to buy”. If you are missing parts, contact
Hobbico Product Support at:
Although it is very enjoyable to go out and run the Miss
Vegas Deuce by yourself, the real fun and excitement of
R/C boating is experienced when you get involved in racing.
Racing against other boats is much different than running
your boat alone. The following suggestions will provide
helpful strategies when racing a model boat.
A good set-up for running alone may not be the best for
racing conditions. Race water conditions create challenges
different from running alone. Five or six boats racing against
one another will create rough water conditions on the race
course and to successfully compete in racing situations, it
may be necessary to “tighten” the ride characteristics.
Phone: 217-398-8970
Fax: 217-398-7721
E-mail: [email protected]
AQUB6219 .... Fiberglass Cowl w/Cowl Locks Installed
AQUB9211 .... Rear wing w/Mounting Bolts (Horiz & Vert)
AQUB6903 .... Flip-top Fuel Tank (180CC)
AQUB7868 .... .150 Flex Cable w/Drive Dog
AQUB6221 .... Drive Dog w/Prop Nut
AQUB6220 .... Slide Cowl Locks (2)
AQUB7870 .... .150 Engine Cable Coupler
AQUB6597 .... ISO Engine Mount .18 Miss Vegas Deuce
AQUB6222 .... Stuffing Tube-Nylon Liner
AQUB8607 .... Radio Box w/Servo Tray & Lid
AQUB7803 .... Servo Linkages w/Connectors
AQUB6700 .... Flywheel w/Engine Collet
AQUB7766 .... Y535 Injection Molded Propeller
AQUB8711 .... Aluminum Rudder w/Bracket & Screws
AQUB8712 .... Rudder Control Arm
AQUB8805 .... Strut Assembly w/Mounting Bracket & Bolts
AQUB6304 .... Decal Sheet
AQUB7104 .... Boat Stand w/Carrying Handles
AQUB9213 .... Cooling Coil
AQUB9521 .... Rubber Switch Boot
AQUB7884 .... Prop Shaft Strut Bushing
AQUB8850 .... SS Turn Fin w/Bracket
AQUB9503 .... GrimRacer Radio Box Water Seal Boots
AQUG6002 .... Tuned Pipe Silicone Extension (Black)
SUPG0718 .... SuperTigre® .18 Marine Engine
SUPG4666 .... Exhaust Gasket w/Screws & Lock Washers
SUPG4664 .... Exhaust Manifold (Header)
SUPG4665 .... Silicone Header Coupler & Stinger Spacer
SUPG6004 .... Tuned Pipe w/Pressure Nipple
TACJ0245 ...... Tactic™ 2.4GHz 2-Ch Tx/Rx
TACJ0241 ...... Tactic 2.4GHz 2-Channel Transmitter
TACL0324 ...... Tactic 2.4GHz 3-Channel Receiver
FUTM0031..... Futaba® S3003 Standard Servo
AQUP0001 .... AquaCraft™ Super Starter Handle
DTXP6071 ..... Starter Shaft w/O-Ring for Handle
Wakes caused by other boats can upset the balance and
ride characteristics of even a well trimmed model boat. When
running down the straight-aways, don’t follow in another
boat’s wake. Wakes generated by other boats while entering
and negotiating a corner are especially dangerous.
Racing other boats through a corner presents possibly the
greatest challenge. The first corner after the start of a race can
be especially challenging. The boat entering the corner first has
the task of holding its position (often called “holding your lane”)
through the corner and following boats must then attempt to
hold their lanes. Changing lanes and crossing a wake to gain
position in a turn can have disastrous results. Executing a good
start in the inside lane is one key to successful racing.
Avoid beating yourself. In any type of racing, there are some
situations you can control and other situations that you
cannot control. The ability to set the needle-valve on the
engine so it runs the entire race without stopping, checking
the linkages, fasteners, fuel tubing, amount of fuel, glow
plug, and radio system are conditions/situations that can be
dealt with prior to the start of a race. During the race, making
a good start and driving defensively are controllable actions.
By focusing on tasks and actions that can be controlled,
successful racing outcomes can be achieved.
Another good source for information regarding all aspects of
model boat operation is:
http://www.intlwaters.com/
OPTIONAL PARTS & ACCESSORIES
AQUB9500 .... GrimRacer Speed Grease Cable Lube
AQUB9504 .... GrimRacer Receiver Waterproof Balloon
AQUB9506 .... GrimRacer Hull Rubber Drain Plug
AQUB9509 .... GrimRacer Radio Box Foam
AQUB9514 .... GrimRacer Radio Box Tape
AQUB9515 .... GrimRacer 15/18 Hydro Turn Fin Polished
AQUB9516 .... GrimRacer 15/18 Hydro Turn Fin Blue
AQUB9539 .... Hydro Turn Fin 2mm CNC Black
AQUB9575 .... GrimRacer Metal Prop Balancer
AQUB9700 .... GrimRacer 36x55 Metal Prop
13
NATIONAL MODEL BOATING
ORGANIZATIONS
The length of the races can be determined by a set number of
laps around the buoys (for example, the first boat to complete
five (5) laps is the winner); or by time (for example, whoever
is leading at the end of two (2) minutes is the winner).
There are two national model boating organizations in the
United States and Canada:
IMPBA or International Model Power Boat Association
www.impba.net
NAMBA or North American Model Boat Association
www.namba.com
THE WAITING GAME
If your Miss Vegas Deuce should happen to stall or capsize,
water currents will slowly carry it to shore. The bad news is
that the boat could be carried to the opposite shore. Keep
variables like wind direction and size of the lake in mind
when surveying areas to run your boat.
Each of these organizations has its own rule book governing
model boat racing, sanctioned events, and recognized
records. Organized model boat racing is offered at both
regional and national levels. Location of clubs, race dates and
locations, membership applications, and other information
can be obtained through their respective websites.
It is not advisable to run R/C boats on any free-flowing
bodies of water such as creeks or rivers.
HELPFUL TIP
Of course, racing does not have to be an organized and
sanctioned competition to be fun. Small informal races can be
very exciting without the stress that comes with formal events.
Use a fishing rod with at least 12 lb. line and a tennis ball tied
to the end to retrieve a stalled or capsized model boat.
Here are some suggestions for setting up a simple racecourse
for boats:
GOOD LUCK AND GREAT BOATING!
™
Precision Prop Balancer
• Make 2 to 4 simple and inexpensive “marker buoys” with
empty milk jugs, string, and heavy objects for anchors,
similar to the above sketch.
•
To maximize performance — and minimize damage to
on-board electronics and parts —balance your props with
the GrimRacer Precision Prop Balancer. It’s easy to use.
Three thumb screws provide perfect level adjustment, and
a precise bubble level is built into the one-piece extruded
aluminum base. The balancer includes balancing shafts for
1/8" (3.2 mm), 3/16" (4.8 mm) and 1/4" (6.4 mm) bore prop
hubs. Propeller not included. AQUB9575
For “oval racing” place the buoys similar to the above
sketch. Note: The above pattern is not based on any
sort of official standards; therefore, you may set up
racecourses any way you choose. Smaller courses
provide more action and excitement.
14
™
Assemble a competition-class wood
tunnel hull in just 6-8 hours!
Hull Length: 28 in (711 mm)
Beam: 11 in (280 mm)
Height: 5.25 in (130 mm)
Ready-to-Run Weight: 4 lb (1814 g)
Requires: 2+ channel radio with one high-torque
standard servo and one mini servo,
.21 cu in (3.5 cc) outboard engine
The kit form of this Mike “Grimracer” Zaborowski design took the first of its 10 titles at the 2000 IMPBA Internats. Now, you can
enjoy the same title-taking performance (and top-drawer construction features) in an ARR. The built-up wood sponsons and
wood-over-foam center hull section are both warp-resistant, and finished in a high-gloss clearcoat. GrimRacer performance
hardware (from stainless steel pull-pull cables to the cowl thumbscrews) is evident throughout, and the fuel tank (which
holds 8 fl. oz.) was “Grim” designed specifically for .21 tunnel hulls. Wanna make racing against you a “grim” prospect for
your competitors? Then get yours now! AQUB0006
GrimRacer™ Speed Grease™ Cable Lube
This waterproof blue lubricant — with specially formulated,
“non sling” properties — reduces friction and wear on the
cable and direct drive systems in electric and nitro boats.
AQUB9500
GrimRacer™ Pro Radio Box Tape
Like champion racer Michael “Grimracer”
Zaborowski, use this 3/4" wide, clear
electrical 3M tape to seal your boat’s
radio box water-tight. AQUB9514
15
COPYRIGHT © 2009
AQUB34**MNL v1.0