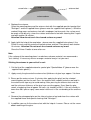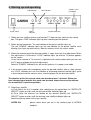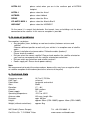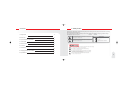
1
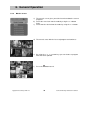
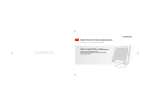
CSA-1300P/1400P
Automatic, auto-adjusting Satellite antenna
Instruction Manual
Vers. 1.5
Thank you for purchasing our product.
Please read this instruction manual carefully before mounting
and operating this antenna!
Please write down the serial number of this antenna.
In case of questions please inform us of this number:
Ser.-Nr.: _________________________________
The Camos CSA-1300P/1400P enables reception of the major European satellites like
ASTRA1, ASTRA2, HOTBIRD, SIRIUS, ATLANTIK BIRD 3 and HISPASAT.
If you want to watch TV or access the Internet via satellite, here’s the equipment you need.
The sat-dome is compact in size, light in weight, reliable in operation and incredibly easy
to operate and install: there are just two cables to run. So the system’s simplicity and
neatness makes it an attractive alternative to conventional dish systems.
1. Standard accessory
- Sat-Antenna CSA-1300P/1400P
- Control box incl. power cable
- 1 HQ coax cable (10m) with F-plug on both ends
- 1 HQ coax cable (1m, white)
- 1 Gel protection cap for F-plug
2. Installing your antenna
We basically recommend installing the CSA-1300P/1400P with the help
of your professional dealer/workshop!
Please pay attention that installing the antenna increases the height of your vehicle!
Important!
Please absolutely keep to each individual point of mounting instruction!
General:
Please take care of a suitable workplace, a garage or hall is better than a place outside.
The ambient temperature during sticking the antenna should lie within a temperature
between +5°C to max.+25°C. If you work outside avoid direct sunlight!
Always keep to the instructions dealing with chemical products.
Take care of necessary hygienic working conditions.
Preparation:
1. Assure that the roof of your vehicle is able to carry the antenna. If you are not sure
please fix a metal plate (Alu, approx. 2mm thickness) onto the roof. Please also ask the
vehicle's manufacturer.
2. Please check completeness of parts.
3. Put the antenna on the selected mounting place on the car roof and adjust if
necessary. The mounting place must be even and no other roof constructions may
cover the reception area of the antenna.
Mark the outline of antenna feet with a suitable pen.
In case of problems (e.g. the roof is not even but has a curved form instead) please call
our hotline to arrange further steps.
screw hole
antenna foot
antenna dome
4. Replace the antenna.
Clean the mounting place and the antenna feet with the supplied special cleaning fluid
"Reiniger1" and the supplied fleece (please wear the supplied Latex gloves!). Grind the
marked fixing areas and antenna feet with sandpaper (not too much, the surface must
be rough a little bit only), clean the surface and antenna feet with cleaning fluid 1 again
and wait another 10 minutes.
Attention! Now do not touch the cleaned surface any more!
5. Apply (with the help of the wool wiper - please wear the supplied Latex gloves!) the
Primer 2 evenly and thin onto the cleaned surface and feet. Then please wait another
10 minutes. Attention! Do not touch the cleaned surfaces any more!
Close the Primer 2 bottle at once after use.
Note:
If the surface of the mounting place is made from unknown material, we recommend a
"test sticking". If necessary we can arrange a material analysis at your cost.
Sticking the antenna to your vehicle's roof:
1. Cut the tip of the supplied cartouche special glue "Spezialkleber 3" (please wear the
supplied Latex gloves!).
2. Apply evenly the glue onto the antenna feet (thickness of glue layer approx. 3 to 4mm
3. Please put the antenna (max. 5 minutes after applying the glue!) on the selected
mounting place on the car roof. Press the antenna feet smoothly onto the roof and fix
the antenna with tape e.g. to avoid moving. After pressing the antenna feet onto the
roof the minimum thickness of the glue layer must be approx. 2mm. Now the glue
needs a hardening time of approx. 48 hours (air humidity of 50%). If the air humidity is
lower than 50% please spray some water into the air in the surrounding of the antenna
feet.
4. Remove the outcropped glue on the sides of antenna feet and clean the surface with
the supplied fleece and special cleaning fluid "Reiniger1".
5. In addition you can fix the antenna feet with the help of 4 screws. Please set the screw
after hardening of the glue.
3. Connections
Do not mount the Control box and your satellite receiver in the area of the vehicle's
airbags! Lay the cables carefully to avoid short circuit! Pay attention to existing
cables!
1. Connect the antenna by plugging the long white cable into antenna and control box.
2. Put the gel cap over the antenna socket.
Gel cap
3. Connect the power cable (red/black) to the control box and power source (car battery
e.g.). Positive terminal (+) = red colour
Negative terminal (+) = black colour
Receiver socket
Antenna socket (F)
12 V DC OUT
RS-232
Control box (rearview)
Power socket
4. Install your satellite receiver (CAMOS SVR-200 e.g.) according to it's user manual
and connect it to the control box via the short white coax cable.
Control box
Coax antenna
cable (white)
Satellite receiver
Monitor
(CAMOS CM-1510D e.g.)
4. Starting up and operating
LNB indicator
On/off switch
Power
indicator
Lock indicator
Satellite select
pushbutton
Satellite indicators
1. Switch on your satellite receiver and monitor/TV. Now you can switch on the control
box. The green "LNB" indicator lights up after switching on the receiver.
2. Switch on the control box. The red indicator of the preset satellite lights up.
The red "POWER" indicator lights up, the red indicator of the preset satellite starts
blinking, then lights up continuously. Now the antenna starts the search mode.
3. When the antenna found the desired satellite, it stops and starts fine adjustment. When
fine adjustment is finished the "LOCK" indicator lights up and the TV picture appears
on the screen.
(If you have selected a TV channel in high band with vertical polarisation you can see
the TV picture already during fine adjustment)
Now the "POWER" indicator turns off and the antenna is in power save mode.
4. If the antenna does not immediately catch the desired satellite, after a short moment
the "LOCK" indicator turns off, the indicator of the(wrong) catched satellite lights up for
a short moment and the antenna starts searching again for the desired satellite.
The duration of the first search mode can be around max. 3 minutes. When you
have changed your location this mode can be much shorter because the antenna
has memorized it's previous position.
5. Selecting a satellite
a) Push within the first 3 seconds after switching on the control box the "SATELLITE
SELECT" button as often until the desired satellite indicator lights up.
b) Push (after the antenna has locked on the desired satellite) the "SATELLITE
SELECT" button as often until the desired, new satellite indicator lights up.
Now the antenna moves to the new satellite.
ASTRA 2-N
please select when you are in the northern part of ASTRA2
footprint.
ASTRA 2-S
please select when you are in the southern part of ASTRA2
footprint.
ASTRA 1
please select for Astra 1
HOTBIRD
please select Hotbird
SIRIUS
please select for Sirius
ATLANTIC BIRD 3
please select for Atlantic Bird 3
HISPASAT
please select for HISPASAT
On the move it is normal that obstacles like tunnels, trees or buildings cut the direct
connection to the satellite. In this case no reception is possible.
5. In case of problems
No reception / no picture:
• Any obstacles (trees, buildings or roof constructions) between antenna and
satellite?
Choose a different position or wait until your vehicle is in reception area of satellite
again.
• Correct installation of antenna cables? Defective cables (broken)?
Please check the cables!
• Did you select the correct satellite? Please check weather the satellite selected on
your receiver corresponds with the satellite selected on control box.
• Did you switch on control box and satellite receiver?
• Power supply ok? Please check power cable(s).
Note:
We recommend not to paint the antenna dome, because this may have a negative effect
on satellite reception and the dome (due to the solvents of the paint)
6. Technical Data
Frequency range:
LNB-Type:
Polarisation:
Gain:
Elevation:
Azimuth:
Power supply:
Operating temperature:
Antenna cable
Diameter:
Height:
Weight (without control box):
10,7 to 12,75 GHz
universal
horizontal and vertical
33dBi
17° - 60°
360° endless
12 - 24V
-22°C to +55°C
HQ coax, length 10m
appr. 69,5cm
approx. 30cm (CSA-1300P)/ approx. 40cm (CSA-1400P)
approx. 9kg
IMC GmbH (Camos Europe)
Carl-Zeiss-Str. 7 / D-22946 Trittau
Tel +49 4154 8083 - 0
www.camos-multimedia.com
Digital SAT-Receiver
blackbox CI
USER’S MANUAL
Copyright Homecast Europe GmbH V1.6
1
Technische Änderungen und Irrtümer vorbehalten
Contents
1
Before Starting
1.1
1.2
1.3
2
Controls and Functions
2.1
2.2
2.3
3
How to connect the Receiver ............................................................................................. 11
Menu-Overview
4.1
4.2
4.3
5
Front Panel .......................................................................................................................... 8
Rear Panel ........................................................................................................................... 9
Remote Control.................................................................................................................. 10
Connect Receiver
3.1
4
Warnings, Cautions and Notes ............................................................................................ 4
Recycling ............................................................................................................................. 7
Accessories ......................................................................................................................... 7
Menu Instruction ................................................................................................................ 12
Menu Help ......................................................................................................................... 12
Menu Structure .................................................................................................................. 13
Menu Operation
5.1
5.2
First Installation.................................................................................................................. 14
Installation ......................................................................................................................... 16
5.2.1
5.2.2
5.2.3
5.2.4
5.3
Option ................................................................................................................................ 22
5.3.1
5.3.2
5.3.3
5.3.4
5.3.5
5.4
Dish....................................................................................................... 16
Auto Scan ............................................................................................. 19
Manual Scan ......................................................................................... 20
Transponder Edit .................................................................................. 22
TV-Output ............................................................................................. 22
Language .............................................................................................. 23
Time Setting ......................................................................................... 23
Parental Control .................................................................................... 24
OSD Display ......................................................................................... 25
Channel ............................................................................................................................. 25
5.4.1 Sorting .................................................................................................. 25
5.4.2 Timer Setting ........................................................................................ 26
5.4.2 Delete ................................................................................................... 27
5.5
Advanced........................................................................................................................... 27
5.5.1 Reset Factroy Default ........................................................................... 27
5.5.2 Softwareupdate via Satellit ................................................................... 28
5.5.3 Software Upload ................................................................................... 29
5.6
Status (Receiver) ............................................................................................................... 29
5.6.1 Information ............................................................................................ 29
5.6.2 CI-Slot .................................................................................................. 29
Copyright Homecast Europe GmbH V1.6
2
Technische Änderungen und Irrtümer vorbehalten
Contents
6
Viewing General Operation
6.1
6.2
6.3
Banner Information ............................................................................................................ 30
TV & Radio Changing ........................................................................................................ 31
TV or Radio Channel Lists ................................................................................................. 31
6.3.1
6.3.2
6.3.3
6.3.4
6.3.5
6.3.6
6.4
Program View ....................................................................................... 32
Delete Mode ......................................................................................... 33
Move Mode ........................................................................................... 33
Rename Mode ...................................................................................... 34
Lock Mode ............................................................................................ 35
Group Mode .......................................................................................... 35
Option ................................................................................................................................ 36
6.4.1 Audio Language ................................................................................... 36
6.4.2 Teletext ................................................................................................. 36
6.4.3 Subtitle .................................................................................................. 36
6.5
A/V+ ................................................................................................................................... 37
6.5.1
6.5.2
6.5.3
6.5.4
6.6
6.7
6.8
7
Audio Mode .......................................................................................... 37
Video Mode .......................................................................................... 37
Zoom..................................................................................................... 37
Mosaic Display ..................................................................................... 38
Favorites' List..................................................................................................................... 39
A-Z Sorting ........................................................................................................................ 39
EPG ................................................................................................................................... 40
General Information
7.1
7.2
7.3
7.2
Features ............................................................................................................................ 41
Technical Data ................................................................................................................... 42
Glossary ............................................................................................................................ 42
How to solve malfunctions ................................................................................................. 43
Copyright Homecast Europe GmbH V1.6
3
Technische Änderungen und Irrtümer vorbehalten
1. Before Starting
Read this manual carefully and make sure you understand the provided instructions. For your safety,
check what the result each action will be.
1.1 Warnings, Cautions and Notes
Throughout the whole manual, pay special attention to the following marks that indicate
hazardous situations.
Caution
Indicates a situation which, if not avoided, could damage the
equipment or apparatus.
Warnings
Indicates a hazardous situation which, if not avoided, could result in
serious injury.
Information
Indicates additional information tot he user to make the user aware of
possible problems and information of any importance to help the user
to understand, to use and to maintain the installation.
Copyright Homecast Europe GmbH V1.6
4
Technische Änderungen und Irrtümer vorbehalten
1. Before Starting
This digital satellite receiver has been manufactured to comply with international safety
standards. Please read the following safety precautions carefully.
Safety Instructions and Precautions
Avoid placing heavy things and blocking ventilation passage.
(Passage blocking can cause fire)
Avoid scrubbing the surface with Benzene or Volatile gasoline.
Color can be damaged.
Leave the power and the antenna off for the long absence or during
thunder storm.
Avoid dropping and damaging Remote Control Unit.
If there is smoke or burning smell, turn off & un-plug the set
immediately. Contact your local repair center for advice.
Avoid place the set on slippery and slant surface.
Copyright Homecast Europe GmbH V1.6
5
Technische Änderungen und Irrtümer vorbehalten
1. Before Starting
Keep away from the water
Clear of the dust. Dust or Metallic particles inside the set can cause
fire and electric shock.
Avoid dissembling and assembling. Do not open the set.
Do not snatch the cable to plug out.
Keep the distance from Magnetic items and Audio
Speaker. .
Place the set with the good ventilation and away from
the direct sunlight and humidity.
Avoid the temperature over 30° C and below 5° C
Copyright Homecast Europe GmbH V1.6
6
Technische Änderungen und Irrtümer vorbehalten
1. Before Starting
1.2 Recycling
Units which are furnished with this icon are not allowed to normal bin.
Batteries are also not allowed to normal bin.
1.3 Accessories
- Operating Instruction (this Manual)
- Batteries (2x Typ AAA 1,5V)
- SCART to CHINCH adapter
- Remote Control
- AC/DC Adapter 230VAC
- Car-Adapter 12VDC
- Remote Eye
Copyright Homecast Europe GmbH V1.6
7
Technische Änderungen und Irrtümer vorbehalten
2. Controls and Functions
2.1 Front Panel
1
5
2
6
3
7
4
8
9
10
1. Stand-By
indicates stand-by mode
2. Card IN
indicates inserted CI-card
3. LED-Display
displays channel and/or time
4. IR-Sensor
receives signal of the remote control
5. POWER key
to switch on or off
6. MENU / OK
key to enter menu mode and confirms operation
7. EXIT key
leaves the menu mode / exits any operation
8. ◄ ► Keys
volume control or navigates in menu mode
9. ▲ ▼Keys
switches channels up and down or navigates in menu mode
10. CI-Slot
to insert your CI-module
Copyright Homecast Europe GmbH V1.6
8
Technische Änderungen und Irrtümer vorbehalten
2. Controls and Functions
2.2 Rear Panel
1
3
4
2
5
6
7
8
1. DISH IN
to connect the lead of your dish
2. AUDIO (L/R)
connect to your stereo amplifier
3. IR-Sensor
plug in the external IR remote eye
4. LOOP OUT
to connect such as additional analog receiver
5. S/PDIF
digital (optical) audio out
6. TV SCART
to connect the TV-set / monitor
7. RS-232C
to connect with the computer for software update
8. DC-in
to connect 12V or 24V power source
Copyright Homecast Europe GmbH V1.6
9
Technische Änderungen und Irrtümer vorbehalten
2. Controls and Functions
2.3 Remote Control
1. POWER:
turns the receiver on or off
2. TV/STB:
switches between TV and SAT mode
3. Menu:
display the main menu of the receiver and come out from
inner level to viewing mode (exit all)
1
4. EPG:
starts the TV/Radio channel guide.
3
5. TV/Rad:
switches between TV and Radio mode
6
6. / :
moves up down in menu mode
7. P+/-:
change channels up and down
8. V+/-:
increase or decrease volume level
9. OK:
confirms the choices and / or selections of the highlighted
menu item. While watching TV or listening to radio
press OK for the channel list
4
select the options for Audio teletext and subtitles.
11. :
go back step or exit from the menu of receiver or switch
to the previous channel.
12. Fav:
opens the favourites list.
13. A/V+:
select the video- and the audio mode
14. INFO:
shows program and EPG information.
15. A-Z.
sort the channels in alphabetical order.
16. Keypad:
they can be used to select channels directly or as an
alphabetic search key in the sorted Channel lists
17. TXT:
starts the Videotext feature
18. Mute:
turns the sound on / off
10
5
6
7
8
10. Opt:
Copyright Homecast Europe GmbH V1.6
2
8
9
10
7
12
11
13
14
15
16
17
18
Technische Änderungen und Irrtümer vorbehalten
3. Connect Receiver
3.1 How to connect the receiver
Connection of receiver and TV-unit
Connect the TV set by using a fully featured SCART cable to the “TV-Scart” socket of your
receiver.
Connection of receiver and Sat antenna
Connect the satellite antenna cable tot he DISH IN socket
Connection of receiver and hi-fi system
If you want to use your HiFi-System for audio output, connect the „AUDIO OUT“ by using a
RCA-cable to your HiFi-System.
3.2 Connecting the Receiver to an optical A/V Receiver .
Connect the S/PDIF out of your Receiver by using a fiber optic cable to the A/V receiver.
To enable the AC3 sound activate the main menu and choose
Option > TV-OUT > AC3
= On
To select the optional sound track use the red button Opt > Menu Audio and select with the
up/down arrows.
3.3 Connecting the Receiver with your power source
Connect the power supply tot he Receiver and the wall outlet, or use the cigar plug adaptor to
run the receiver with 12/24V.
Copyright Homecast Europe GmbH V1.6
11
Technische Änderungen und Irrtümer vorbehalten
4. Menu Overview
4.1 Menu Instruction
Main menu
Sub menu
-
Press the Menu button to display the menu.
-
You can select the Sub menu using /// button. The selected Sub menu becomes
highlighted.
-
When you have selected the Sub menu you want, press the (OK) button.
-
When you want to return tot he previous menu, press the
-
When you want to return tot he live screen, press the Menu button.
button.
4.2 Menu Help
In the menu, short information is displayed at the bottom of the screen.
Using /button.
Using /button
OK
Confirm with (OK) button
Using Opt, A/V+, Fav.button
Using
Copyright Homecast Europe GmbH V1.6
12
button to return
Technische Änderungen und Irrtümer vorbehalten
4. Menu Overview
4.3 Menu-structure
Installation
- Dish:
-
Auto Scan:
Select the dish and LNB Settings for channel search.
Search the channel oft he selected satellite automatically without inputting the
special parameters.
-
Manual Scan: Search the channel manually with user’s supplied parameters.
-
Transponder: Delete, edit and add satellite or transponder parameters.
Option
- TV-Output:
Select the video or audio output
-
Language:
Select the Display language, audio language and subtitle language
-
Time Setting:
Setting current time.
-
Parental Control: Change the password and select the censorship classification.
-
OSD Display:
Channel
- Sorting:
Setting OSD Display time and transparency.
Choose the Channel sort type, such as by Transponder, Network, CAS.
-
Reservation:
Reserving channels at your desired time.
-
Delete:
Delete the channels such as satellite, CAS name, etc.
Advanced
- Reset Factory Default: Restore the Receiver tot he default values
-
OTA: Upgrade the receiver into the latest software version
-
Channel Upload: Transfer the channels from receiver to receiver or PC.
-
Software Upload: Transfer the software from receiver to receiver or PC.
Status:
- Information: Check the version of satellite receiver
Copyright Homecast Europe GmbH V1.6
13
Technische Änderungen und Irrtümer vorbehalten
5. Menu Operation
5.1 First Installation
You can install the receiver using the menu item „First Installation” for your convenience. This menu item
allows you to set your receiver using simple procedure.
a) Select the desired language using the /button.
b) Press the (OK) button to confirm and go tot he next
step.
a) Select the desired channel using the /button.
b) Press the (OK) button to confirm.
In step 2 you have the alternative between Astra 1, Hotbird, Astra 1 + Hotbird Default
channels. Else if you select Scan Others, you can choose other satellite and go to the next
step.
a) Wählen Sie den gewünschten Satelliten mit den
Tasten /.
b) Drücken Sie die Taste (OK) zur Bestätigung und
um mit dem nächsten Schritt fortzufahren.
Copyright Homecast Europe GmbH V1.6
14
Technische Änderungen und Irrtümer vorbehalten
5. Menu Operation
a) Select LNB Type using the /button.
b) Press the (OK) button to confirm and go tot he next
step.
a) If you use a DiSEqC 1.0 switch, select DiSEqC
option using the /button.
b) Press the (OK) button to confirm and go tot he next
step.
a) After all settings are done, press (OK) button to
start scanning.
If you want to know more detail description about each
procedure, please refer tot he following installation in
part 5.2
Previous step button: If you want to go tot he previous step, press the “Opt” button and
than you can reset options.
Cancel and Exit button: If you want to skip “First Installation” press the “Exit” button.
Copyright Homecast Europe GmbH V1.6
15
Technische Änderungen und Irrtümer vorbehalten
5. Menu Operation
5.2 Installation
5.2.1 Dish
a) Press the Menu button to display the main menu.
b) Press the (OK) button on the sub menu. The
password pop-up window appears. All sub menus
such as Dish, Auto Scan, Manual Scan and
Transponder Edit on the Installation are locked by
password. The default password is „0000“.
a) Use the / button, you can move upwards and
downwards in this mode.
b) In any item, such as Dish, Satellite, Transponder etc.
if you want to check the detail view, use the /
button
a) Press the /button, the right screen shows the
pre-selected 32 satellite lists.
b) Select the desired satellite and press (OK) button.
Then change the satellite column will be by the
desired Satellite name.
If you can’t find teh desired satellite, select any
satellite and press the (OK) button.
Copyright Homecast Europe GmbH V1.6
16
Technische Änderungen und Irrtümer vorbehalten
5. Menu Operation
a) Press the / button to watch the satellite in the
pre-programmed list. Press “OK“ button to replace
the current satellite with the selected satellite.
a) Press the /button, the right screen shows the
transponder lists.
b) Press the (OK) button to select other transponder. If
you select one oft he alternative satellite names, the
transponder list is changed automatically according
tot he selected satellite name.
a) Select one oft he LNB Power types using/button.
You can select LNB Power value as 13/18V normally
or if the distance between antenna and receiver is
further than 60m, you can select LNB Power value as
14/19V.
a) Select the LNB Type value.
If you have selected User Single or User Dual, enter
LNB frequency value directly, and press (OK) button.
If you select LNB Type value as 9750/10600,
9750/10750 or User Dual, 22 kHz value is fixed to auto
mode, in other case you can select a value depending
on usage of 22kHz tone switch box.
Copyright Homecast Europe GmbH V1.6
17
Technische Änderungen und Irrtümer vorbehalten
5. Menu Operation
a) Select Switch Type if used.
b) If you use DiSEqC 1.0 switch, select DiSEqC on the
Switch Type.
c) Select one oft he DiSEqC inputs from the Option.
a) Select Switch Type.
b) If you use a DiSEqC 1.1 switch, select SMATV on the
Switch Type.
c) Enter a value with the numeric key (950-2150).
.
a) Select Switch Type.
b) If you use a DiSEqC 1.2 motor, select „Motor“ on the
Switch Type.
c) Change position of your Motor through the Option.
DiSEqC 1.2 –„ Options“:
- „Move West-East“:Press the / button to move the motor.
- „Store Position“: Press the “OK” button to save the current position.
- „Go to Position“: Press the “OK” button to move the motor to the stored position
- „Go to Reference“: Press the “OK” button to move the motor tot he 0 position.
- „Set West Limit“: Press the “OK” button to fix West Limit.
- „Set East Limit“: Press the “OK” button to fix East Limit.
- „Enable Limit“: Press the “OK” button to change the limit.
(Set West Limit & Set East Limit can be available with Disable Limit status).
Copyright Homecast Europe GmbH V1.6
18
Technische Änderungen und Irrtümer vorbehalten
5. Manu Operation
a) Select Switch Type.
b) If you use an USALS motor, select from the Switch
Type using the / button.
c) Change position on your USALS motor through the
Option.
„Go to Position“: Press the (OK) button to move the motor tot he position calculated by the
longitude and latitude.
a) „Go to“ allows you to go tot he Auto Scan or Manual
Scand Mode directly.
b) Select „Auto Scan“ or „Manual Scan“ and press the
“OK” button.
5.2.2 Auto Scan
You can search the channels offered by the satellite for which your antenna has been configured.
a) Select the satellite for scanning using / button and
press the “OK” button.
b) The check mark indicates which satellite has been
marked for scanning.
c) Press the /button, select scan potion using /
button and press the “OK” button.
d) If you want to scan the satellite move to „Start
Scan“ and press “OK” button.
Copyright Homecast Europe GmbH V1.6
19
Technische Änderungen und Irrtümer vorbehalten
5. Menu Operation
a)
b)
c)
d)
e)
Select Free+CAS or CAS using the ///button.
Press the Opt, CAS Pop-up window will appear.
Select the kind of CAS using the /button.
Press the “OK” button.
If you want to scan the satellite, move to „Start
Scan“ and press “OK” button.
a) The left window shows TV channels and the right
window shows Radio channels during the scanning
process. White channel names are new channels
downloaded to your receiver. Black channel names
are already existing channels.
a) If you press the “OK” button when scanning for
channels, pop-up window appears.
b) When you complete scanning for channels, a similar
pop-up menu appears.
c) If you want to save the updated channels, select
‚YES‘.
5.2.3 Manual Scan
a) Change to the specific values you want to scan.
b) Press the “OK” button to start the manual scan.
Copyright Homecast Europe GmbH V1.6
20
Technische Änderungen und Irrtümer vorbehalten
5. Menu Operation
Dish:
Frequency:
Polarity:
Symbol Rate:
Code-Rate:
Scan Mode:
The target satellite for the manual scan..
The frequency oft he transponder you want to find manually..
The polarity oft he transponder you want to find.
The Symbol Rate of the transponder you want to find.
The code rate oft he transponder you want to find.
In the Free Channel mode, the receiver scans all channels without
scrambled service.
Service Type:
The selection of TV, Radio and TV & Radio
Network Search: When enable, the receiver searches for more transponders using the
network index table.
PID-Search:
Search using Auto PID, Manual Dec and Manual Hex.
a) When selecting Manual Dec option, a pop-up menu
appears.
b) Enter the value of Video PID, Audio PID and PCR PID
with numeric keys.
c) Press the (OK) button to look for PIDs and press the
button to close the window.
a) When selecting the Manual Hex option, a pop-up
menu appears.
b) Enter the value of Video PID, Audio PID and PCR PID
with pop-up keypad.
c) Press
on the pop-up keypad to save PIDs or
press the
button to make the pop-up menu
disappeared.
Copyright Homecast Europe GmbH V1.6
21
Technische Änderungen und Irrtümer vorbehalten
5. Menu Operation
5.2.4 Transponder edit
a) Press the Opt button to select the satellite in the left
screen or the transponder in the right screen.
b) Select one of Delete, Edit or Add from the pop-up
window. (The satellite and transponder cannot be
deleted it the channels of the selected satellite have
already been Downloaded).
c) If you press the (OK) button, the current changing
state will be saved and exit.
5.3 Option
5.3.1 TV-Output
a) Select the TV output options using the
/// button.
b) If you press (OK) button, the changed state will
be saved and exit.
TV Type:
SCART:
TV-Screen:
RF CH N°:
AC3:
Copyright Homecast Europe GmbH V1.6
22
Select your TV Type (PAL, NTSC,
PAL/NTCS)
Select your TV Type (RGB,YUV,
CVBS=FBAS).
Select the screen format of your TV
(4:3, 4:3 Letter Box, 16:9).
Set the Channel to display the audio
and video signal on your TV. If you
select channel 38 at this menu, the
satellite service will be displayed at
channel 38 on your TV.
RF Out Mode: RF Output Mode PAL
(PAL B/G, PAL D/K, PAL I among
PAL standards)
If you set it tot he enable mode, you
can listen to Dolby-digital audio
through AC-3 decoder.
Technische Änderungen und Irrtümer vorbehalten
5. Menu Operation
5.3.2 Language
a) Select the language options using the /
button.
b) Press the (OK) button to change the selected
language.
Display:
Audio 1-2:
Subtitle 1-2:
Change the language used in the
OSD and Menus
Change the language that you listen
to audio in.
Change the language that you
watch the subtitle in.
5.3.3 Time Setting
a) Setting current time using the ///
button
b) If you press the (OK) button, current changing
state will be saved.
Time Mode:
TDT:
USER:
TDT, USER
Receive the time from satellite
Set the time directly by user
Offset:
Set the time difference between
GMT and the local time
Sommerzeit:
Automatische Umschaltung auf
Sommerzeit.
Day Light saving: DLS will work only in case of
‚Enable‘ mode
Start day:
Day light saving start day.
End day:
Day light saving end day.
Copyright Homecast Europe GmbH V1.6
23
Technische Änderungen und Irrtümer vorbehalten
5. Menu Operation
5.3.4 Parental Control
a) If you want to change the password (0 0 0 0),
press the /button, following message
requiring new password will be displayed.
b) Change the password into new one by numeric
button
c) To ensure your change, you are supposed to
input a password once more.
d) Select your desired rating level using the /
button.
e) Press (OK) button to save and exit. Rating
mode allows you to block channel according to
the age level you have set.
View All:
All channels can be watched
7:
Channels are blocked under the age of 7
12:
Channels are blocked under the age of 12
15:
Channels are blocked under the age of 15
18 :
Channels are blocked under the age of 18
You have to enter password (0 0 0 0) to watch the channels which is blocked by the age level.
Copyright Homecast Europe GmbH V1.6
24
Technische Änderungen und Irrtümer vorbehalten
5. Menu Operation
5.3.5 OSD Display
a) Select the options using the /// button.
b) If you press the (OK) button, current changing
state will be saved and exit.
Banner display time:
Banner will disappear after setting time passed
Screen Saver:
Screen Saver is a function to protect your TV in
case Radio status or in Menu (Disable, 5, 10, 20,
30, 60, 120 Minutes)
OSD Mixweight:
Select the OSD transparent type (Low, Middle,
High)
Teletext Mixweight:
Select the Teletext transparent type (Low, Middle,
High)
5.4 Channel
5.4.1 Sorting
a) Select Sort Type using the /button.
b) If you press the (OK) button, current changing state
will be saved and exit
Transponder:
Netzwork:
CAS:
Channels are sorted into transponder order
Channels are sorted into service provider order
Channels are sorted into Scramble channels and Free Channels order
Copyright Homecast Europe GmbH V1.6
25
Technische Änderungen und Irrtümer vorbehalten
5. Menu Operation
5.4.2 Timer-Settings
How to adjust the timer for recording on VRC. For recording the TV programs you can use the
timer-function. Up to 8 programs can be pre-adjusted.
a) Open the EPG by using EPG key and choose
the desired program by pressing the
///arrow keys
b) Press red OPT key to confirm.
a) Additional options, such as changing the
pre-programmed starting time, can be adjusted.
b) Press the OK button to save and exit.
CAUTION:
Please note that this is the duration of
recording, it is not the switch-off time.
Copyright Homecast Europe GmbH V1.6
26
Technische Änderungen und Irrtümer vorbehalten
5. Menu Operation
: Just one time action (after action was done, event will be deleted on the list)
: Action execution in weekday
: Action execution in weekend
: Action execution weekly
:Action execution daily
: TV channel
: Radio channel
5.4.2 Delete
You can delete channels. You can select not only Mode
such as Channel, Satellite and CAS, but also Option
such as TV, Radio etc.
a) Select the Mode and Option you want to
delete channels using the ///
button
b) Press the (OK) button to delete and exit.
5.5 Advanced
5.5.1 Reset Factory Default
a) If you want to change the set into the default
values, press (OK) button. The following
confirmation window will appear.
b) If you select „YES“, the system will be reset tot
he primitive state like new receiver.
Copyright Homecast Europe GmbH V1.6
27
Technische Änderungen und Irrtümer vorbehalten
5. Menu Operation
5.5.2 Software update via Satellite (OTA)
You can upgrade the latest software. The receiver
checks whether the new S/W is released when you
view channels or select this OTA menu.
If the new version is detected, the receiver will be
rebooted automatically and the download screen will
appear.
Remark: On the way of downloading, if the following
message would appear, contact the manufacturer of
receiver for errors.
If any S/W can not be found, this following message will
appear.
Copyright Homecast Europe GmbH V1.6
28
Technische Änderungen und Irrtümer vorbehalten
5. Menu Operation
5.5.3 Software Upload
a) Connect the receiver with another receiver of
PC through RS-232.
b) For the target receiver, turn the AC Power off,
then turn on again.
c) You can watch the transfer status of software.
5.6 Status (Receiver)
5.6.1 Information
a) You can watch the system information such as
Model ID, Hardware version, Software version
und Loader version.
5.6.2
CI Slot (Common Interface)
You can see not only Free To-Air services, but
also scrambled services, using the Conditional
Access Modules (CAM).
Copyright Homecast Europe GmbH V1.6
29
Technische Änderungen und Irrtümer vorbehalten
6. General Operation
6.1 Banner Information
Teletext
Audio
Subtitle Language Lock PayTV Dolby
Parental
Control
Detailed Event Information
Channel Number and
Name
Current Time
Current Event
Name
Event Progress Bar
Signal Strength Bar
Signal Quality Bar
TV or Radio
a) Whenever you press the INFO button, the
banner information window appears for a few
seconds.
a) If you press the INFO button again on the
banner, the detail EPG window appears.
b) If you press the
button, information and EPG
window will disappear.
c) Press the P+/- button and then you can change
the channel.
d) If „“ exists on the banner, press / button
to watch the next EPG.
Copyright Homecast Europe GmbH V1.6
30
Technische Änderungen und Irrtümer vorbehalten
6. General Operation
6.2 TV & Radio changing
While watching TV or listening to Radio, you can change the mode using the TV/Rad button.
6.3 TV or Radio Channel Lists
Programmliste
Selection Screen
Channel Name
Information about the membership of
the favorite-lists
Status der Fav.-Listen
Kanaldaten
Anbietername
View
Delete
Move
Rename
Lock
Group
Copyright Homecast Europe GmbH V1.6
Detailed Programm Information
31
Technische Änderungen und Irrtümer vorbehalten
6. General Operation
6.3.1 Program – „View“
a) To open the program list please use OK or A-Z
(sorted channels) button.
b) Use the / buttons to move the cursor.
c) Press OK button to choose the desired channel.
d) The INFO button shows you detailed
information about the current event.
e) Please use the keypad 1-9 of your remote
control to choose the desired channel directly.
f) Press the
button for exit.
a) If you wish an alphabetic order, you have to sort
your program list firstly. To do this please press
the A-Z button.
b) Please press one of the numeric keys to open a
keypad for the alphabetic entry.
c) Please use the numeric keys (1-9) and the
/ / buttons to enter the letters.
d) Press the OK button to confirm.
Copyright Homecast Europe GmbH V1.6
32
Technische Änderungen und Irrtümer vorbehalten
6. General Operation
6.3.2 Program – „Delete“
a) Use the / button to select the Delete Icon.
b) Select the channel you want to delete with the /button and
confirm with the OK button.
button to save the adjustment and to exit.
c) Press the
6.3.3 Program – „Move“
a) Use the / button to select the Move Icon.
b) Select the channel you want to place on another position and
confirm with the OK button.
c) Choose the new position with the / button.
d) To finish the sorting please press the OK button.
e) Press the
button for save and exit.
Copyright Homecast Europe GmbH V1.6
33
Technische Änderungen und Irrtümer vorbehalten
6. General Operation
6.3.6 Programs /Favorites‘ List – „Rename“
a) Please close all menus and press the OK button to
open the program list.
b) Use the / button to select the Rename Icon.
c) Select the channel you want to rename and press
OK button. A small window appears.
d) The letters can be select by pressing the
/// buttons and by confirming with OK
button.
e) As soon as renamed the channel please press the
button and the OK button finally.
button to exit.
Press the
f)
The favorites lists can be specified as well.
a) Select the desired favorites list.
b) Use the / button to select the Rename Icon
and press OK button. A small window appears.
c) Please continue as stated above under point c).
insert a blank between two letters
delete letters
select between upper and lower case
save and exit
exit menu.
Copyright Homecast Europe GmbH V1.6
34
Technische Änderungen und Irrtümer vorbehalten
6. General Operation
6.3.5 Program – „Lock“
a) Please close all menus and press the OK button to
open the program list
b) Use the / button to select the Lock Icon.
c) Select the channel you want to lock and press OK
button. The following advice will appears:
d) „Please insert keyword“ (factory setting 0 0 0 0). To
back up please press OK button again.
e) Press the
button to save and exit.
6.3.6 Favorites list – „Setup Groups“
You can setup up to 8 lists. Every list can contain up to 100 programs.
a) Please close all menus and press the OK button to
open the program list
b) Use the / button to select the Group Icon.
c) Select the program you want to displace in the
favorites list and press the OK button. A small
window with the groups of favorites appears.
d) Select the desired favorites list with the
/ button and confirm by pressing OK .
button to save and exit.
e) Press
Copyright Homecast Europe GmbH V1.6
35
Technische Änderungen und Irrtümer vorbehalten
6. General Operation
6.4 Option
Press the OPT button to open the Option-Menu. Here you have the option between “audio”, “teletext”
and “subtitle”. To select please use the /button.
6.4.1 Audio-Language
a) Select „Audio“ by using the /button.
b) Use the / button to select the desired audio-language.
c) Press OK button to confirm the selection.
6.4.2 Teletext
a) Select „teletext“ by using / button.
b) Press OK button to start teletext.
c) You can start the teletext by using the TEXT button of your
remote control alternatively.
6.4.3 Subtitle
a)
b)
c)
d)
Copyright Homecast Europe GmbH V1.6
Select „Subtitle“ by using the / button.
Use the / button to select the desired language.
Press OK button.
If a subtitle is not available, the adjoining advice will appear.
36
Technische Änderungen und Irrtümer vorbehalten
6. General Operation
6.5 A/V +
Press A/V+ to start the Audio/Video menu.
6.5.1
Audio-Mode
a) Select the audio mode by using the / button.
b) Use the / button to choose the desired option: STEREO,
LEFT, RIGHT and JOINT (Joint Stereo).
c) Press OK button to confirm.
button for save and exit.
d) Press
6.5.2
Video-Mode
a)
b)
c)
d)
6.5.3
Select the video mode by using the / button.
Use the / button to choose the aspect ratio.
Press OK button to confirm.
button for save and exit.
Press
Zoom function
a)
b)
c)
d)
Select the mosaic mode by using the / button.
Use the / button to select the zoom size.
Press OK button to confirm.
You will get a picture in picture which informs
you about the current zoom status and
position. The zoom ratio will be selected by
pressing the OK button, the position by using
the /, /button.
e) The zoom mode will be finalized by pressing
the
button.
Copyright Homecast Europe GmbH V1.6
37
Technische Änderungen und Irrtümer vorbehalten
6. General Operation
6.5.4
Mosaic Screen
a) The mosaic screen gives you a brief overview about the current
programs.
b) Select the menu item mosaic mode by using the/button
firstly.
c) Select now the desired mosaic mode by using the /button.
d) The mosaic starts with the last used program and continues.
e) By using the/, /arrow keys you can choose a program
what has to be updated.
f)
Copyright Homecast Europe GmbH V1.6
Press the
button to exit.
38
Technische Änderungen und Irrtümer vorbehalten
6. General Operation
6.6 Favorites List
a) By using the Fav button you can start the applied favorites’ lists.
b) Use the / arrow keys for selection or the ALL button for the
complete list.
c) Press OK button to confirm.
.
a) The functions within lists will be as same as in the complete list.
b) You can resort and rename them up to your desires.
.
6.6 A-Z Sorting
a) Press A-Z button to get an alphabetically sorted list.
b) When using this function you will always get the complete list
even if a favorites‘ list had been activated before.
c) Press the A-Z button for back up the sorting.
.
Copyright Homecast Europe GmbH V1.6
39
Technische Änderungen und Irrtümer vorbehalten
6. General Operation
6.8 EPG (Electronic Program Guide)
Press the EPG button to start the electronic program guide. und den elektronischen Programmführer zu
starten. The showing information will be provide by the local television station.
Title of the broadcast
Time bar
a) Choose your program by using the
/// arrow keys.
b) After finalize your selection press OK.
a) For detailed information press the INFO button.
b) Press the
button to exit.
Copyright Homecast Europe GmbH V1.6
40
Technische Änderungen und Irrtümer vorbehalten
7. General Information
7.1 Features
! One CI-Slot
! 4000 Program Storage Capacity
! Electronic Program Guide EPG
! Fast Teletext
! 8 Favorits‘ Program lists
! DiSEqC Version 1.0, 1.2 and USALS compatible
! One-Cable-Solution
! Software-Update via Satellite and RS-232 connection
! 1 Scart-Connection
! multilingual OSD menu
! Blindscan search all channels received from your antenna
! External infrared eye with 3 meter length
! Power supply 12/24VDC
Copyright Homecast Europe GmbH V1.6
41
Technische Änderungen und Irrtümer vorbehalten
7. General Information
7.2 Technical Data
A. HF-Bereich
SAT-ZF-Frequency
RF Input Signal Level
RF Impedance
Demodulation
HF-Modulator
950 MHz to 2150 MHz
-25 to -65 dBm
75 Ohm
QPSK
K 21 – K 69
B. Video
Video-Decoding
Video-Data Rate
MPEG-2
1,5 – 15 Mbit/s
C. Audio
Audio-Decoding
Sampling Rate
Audio Mode
MPEG-1/2, Layer 1/2
32 / 44,1 / 48 kHz
Stereo, Co-Channel, Joint Stereo, Mono
D. Stromversorgung
Supply Voltage
Power Consumption
Power Consumption Stand-by
LNB Supply Voltage
LNB Power Consumption
Control Signals
90 V – 240 V or 12 to 24VDC
25 W
<7W
13 / 18 V ; 14 / 19V
0,5 A max.
22 kHz, 0,6 Vss, Tone Burst
DiSEqC 1.2
USALS
E. Connections
Scart
Optical Audio Output
Video-Output
Audio-Output
RS-232 Interface
2 (TV + VCR)
1 (AC 3 – audio data stream)
1 (RCA)
L + R (RCA)
1 (D-Sub)
F. Weight / Dimensions
Weight
Dimensions (WxHxD)
0,8 Kg without accessories
23,5 x 4,5 x 19 (cm)
Copyright Homecast Europe GmbH V1.6
42
Technische Änderungen und Irrtümer vorbehalten
7. General Information
7.3 Glossary
CAS
Conditional Access System
CI
Common Interface
DiSEqC
Digital Satellite Equipment Control
EPG
Electronic Program Guide
FEC
Forward Error Correction
FTA
Free to Air
LNB
Low Noise Blockconverter,
MPEG
Moving Picture Experts Group
PID
Packet Identification
PIN-Code
Personal Identification Number
Copyright Homecast Europe GmbH V1.6
43
Technische Änderungen und Irrtümer vorbehalten
7. General Information
7.4 How to solve malfuntions
There may be various reasons for the abnormal operation oft he receiver. Check the receiver as stated
bellow:
Problem
Cause
Measure
The display is nothing
showing
The power cable is not connected
Please check the power cable
No picture or sound
Wrong connection of the audio/video
outputs.
Please check the connection
and pay attention to the input
and output circuit.
The antenna is not adjusted
adequately.
Please check the adjustment
as well as the signal strength.
Bad video quality
„Mosaic effect“
The antenna is not adjusted
adequately, the signal is weakly.
Please check the adjustment.
No sound
The mute-key is activated.
Deactivate the mute function
Remote control doesn’t
work
There are no batteries inside. The
batteries are weakly.
Please check the batteries.
Bad video quality
Only a few programs are
able to be saved.
The LNB supply voltage ist o weak.
Please change the LNB supply
voltage under the menu item
„ANTENNA“ as follows:
14/19 V.
Please contact the hotline of
Homecast: The factory setting
is 0 0 0 0
You forgot the Parental
Control Code
Copyright Homecast Europe GmbH V1.6
44
Technische Änderungen und Irrtümer vorbehalten
INSTRUCTION MANUAL
17” DIGITAL TFT LCD COLOR MONITOR
CM-1710D/TM-1710D (Option)
Thank you for choosing this product.
Please read this instruction manual carefully before
operating this product.
1. Safety Rules
Contents
1. Safety Rules
3
2. Before Use
8
Please read the “Safety Rules” carefully before using this product. Following of the safety rules prevents users from any damage
related with the misuse of this product.
It is very important that users follow these safety rules. We state “Caution” and “Warning” to clarify any potential for damage
associated with misuse of the product.
Warning
3. Special Features of the product
10
4. Terms of part
11
5. Remote Control
12
6. Functions
14
7. Connections
26
8. Changing Remote Control Battery
28
9. Specifications
29
Caution
May cause bodily harm or even death if users ignore
warnings in the safety rules.
About signs
“Precautions”
“Do not”
May cause bodily harm or even death if users ignore
cautions in the safety rules.
“Follow directions carefully”
Warning
Place the product where it doesn’t prevent the driver from driving.
--- The driver’s view of sight should not be blocked.
Do not watch or operate the product while driving.
--- This may cause a major accident.
Do not place the product near the passenger-side airbag.
--- Airbags may not operate properly or may cause personal damage
and accident when accidentally opening.
Do not get product wet and operate with wet hands.
--- This may cause electric shock.
3
Do not use in bathtub. Do not pull the plug with wet hands.
---This may cause electric shock.
Do not use unapproved power voltage.
---This may cause fire or electric shock.
Caution
Do not use unapproved Cigarette Lighter Adapter.
--- This may cause fire ,electric shock and/or malfunction.
Do not put the product in a place where sudden temperature increase occurs such as the vehicle’s dashboard.
Do not damage or bend electric cord. Do not place heavy objects on electric cord.
---This may cause fire from electric sparks.
Do not use damaged electric cord.
Do not place the product where high temperature and/or the direct ray of the sun occurs.
--- This may cause fire, electric shock and/or malfunction.
--- This may cause fire and/or electric shock.
Do not put the product in an unstable place where the product may be exposed to shock and/or impact.
Do not put pins or needles into the product or electric cord of product.
--- The product may fall and be damaged.
--- If this happens, stop the product operation immediately. Continuous use may cause fire, electric shock and/or malfunction.
Do not place any containers with water or any small metal objects on top of the product or nearby it.
--- Unplug the product when water or metal comes in contact with the product. Continuous use may cause fire,
electric shock and/or malfunction.
Stop using the product immediately when you drop it or damage
the outside shell.
--- Continuous use may cause fire, electric shock and/or malfunction.
Do not place electric cord near a heating product.
--- The cord surface may melt and cause fire and/or electric shock.
Do not press or drop LCD panel.
--- You should not give any shock on LCD panel because it may cause damage.
Always clean the cigarette lighter socket before using product.
--- Bad connection may cause fire.
Be careful when thunder and lighting occurs.
Clean electric socket area often.
--- There is a danger of electric shock.
--- Dust in the area may cause fire.
Do not use non-specified double socket and extended car battery cord.
Keep electric cord properly positioned.
--- This may cause excess heat and/or fire.
--- An improperly positioned electric cord may cause fire or electric shock when metal material is in contact with the power source.
Do not attempt to open, disassemble or repair the product by any person except an authorized service dealer.
4
--- This may cause electric shock and/or malfunction. You should request an authorized service dealer for any inspection and
repair of the product.
5
Unplug the product and remove cords when moving.
--- It may damage cords and cause fire and/or electric shock.
The car engine should be running when you use the product in a car.
---Without the engine running, you may have excessive discharge of the car battery.
Do not pull the cord line when you unplug it.
---Damaged cords may cause fire and/or electric shock.
If you find any strange occurrences or malfunction in the product or any foreign
substance gets into the product, please contact the authorized retailer where you
purchased the product.
Hold the plug when you unplug the product. Put a battery in the remote control properly with +, - signs as directed
in this manual.
--- Improper use of batteries may cause fire and/or damage.
Unplug the product when you don't use it for a long period of time.
---Insulation may cause electric shock, electric leak and/or fire.
Unplug the product when you clean or care for it.
---Not unplugging product may cause electric shock.
Do not watch Monitor for a long period of time.
---This may damage your eyesight.
= Do not use the product in the following locations.
---This may cause malfunction.
= In direct rays of the sun and near heating products
= High in humidity and with bad ventilation
= Dusty or oily locations
= Low temperatures
= Unstable environment
When you transport the product, remove all cords and do not give any shock.
---This may cause a malfunction.
Do not place volatile materials such as insecticides on the product. The product should not come in contact with rubber
or vinyl for a long period of time.
---The surface of the product may change and paint may peel off.
6
7
2. Before Use
Precautions (when you use the product in a car)
=To safely use the product, please read the user’s manual carefully before use.
=Connect all lines as directed in the product connection map in the manual.
=Do not touch the LCD panel.
=Use the product at the temperature range of 0OC ~ 50OC .
=Screen may be a little dark when the product is operated in low temperature areas. Screen will be shown normal
luminosity after a few minutes.
=The driver should not use the product while he/she is driving.
=Quality of pictures on screen may vary depending on the radio field strength in different locations.
You should use video equipment where you experience weak radio field strength.
=Follow traffic laws when you use the Navigation Route System.
=Be cautious of humidity and shock when you use the product in a car.
=Do not disassemble and modify the product in any way. This may cause fire and/or electric shock.
=When you install the product in a car, do not set a volume level too loud for others to hear outside.
=When you install the product in a car and watch TV, the car engine should be running as there might occur excessive
discharge of the car battery.
=The product should not be placed on the dashboard or near engine
=Cover the product when exposed to direct rays of the sun for a long period of time.
(You should keep the product at a temperature range of -20℃ ~ 60℃.)
=Any liquid leaking into product may cause malfunction.
8
9
3. Special Features of the Product
4. Terms of part
= Applied high resolution and low reflection DIGITAL TFT LCD (1280 x 1024)
= All electronic control functions
①
= Convenient Graphic OSD
= All functions are displayed on screen (OSD function)
= System auto recognition function(PAL/ NTSC/ AUTO)
= PC auto adjustment
= 7 Languages display
(Italian, Korean, Japanese, English, German, French, Spanish)
= MODE selection function(DSUB ANALOG, DVI DIGITAL, AV, S-VIDEO,TV)
= One-touch Dimmer(Remote control)
= 4W speaker built-in
= STAND BY Function
MENU
SELECT
②
③
④
⑤
⑥
⑦
① REMOTE SENSOR WINDOW
Sensor for receiving signal from
the remote control.
② S/BY LED
Displays STAND BY and ON/OFF
③ POWER
Power ON/OFF button
④ MENU
Selects menu and changes function
⑤ SELECT
DSUB ANALOG / DVI DIGITAL / AV
/ S-VIDEO/TV selection button.
⑥ ▼▲
Button to select Menu and Mode
⑦ ◀▶
Button to Control level of sound
= Low Power consumption
10
11
5. Remote Control
①
③
TV/AV
POWER
②
④
⑥
⑤
CH
RECALL
SLEEP
⑧
MENU
⑦
VOL
AUTO
PIC
CH
PICTURE
SETUP
⑩
SOUND
⑫
⑪
1
2
3
4
5
6
7
8
9
⑬
0
A.MEMO.
⑭
12
Power ON/OFF Key
⑫ SOUND
Sound selection button
② TV/AV
Select TV, external video, s-video, DVI, D-sub analog
⑬ 0~9KEY
Changes CHANNEL by selecting numbers directly (only TM-1710D)
③ RECALL
Displays present status and volume level
⑭ A.MEMO.
Quick channel scan and channel store (only TM-1710D)
④ SLEEP
Reserves time for sleep in 10 minute increments (0 ~120 min.)
⑮ CH.SET
Changes the memorized channel (only TM-1710D)
⑤ MENU
Selects menu and changes function
⑥ ◀▶VOL
Controls Volume and changes MENU level
⑦ ▼▲CH
Selects channel and moves to MENU
⑧ AUTO PIC
Selects DYNAMIC, NORMAL, MILD, USER for PICTURE
⑨ MUTE
For muting sound
Returns to the previous sound level when you push again
⑩ SETUP
Setup selection button
⑪ PICTURE
Picture selection button
VOL
MUTE
⑨
① POWER
CH.SET
⑮
13
6. Functions
※(
), it means a remote control button.
3 MENU (MENU)
1 POWER (POWER)
AV/ S-VIDEO
=POWER ON/OFF KEY
① Push POWER(POWER) button. POWER is on.
PICTURE(PICTURE)
② Push POWER (POWER) button again. POWER is OFF.
2 SELECT(TV/AV)
=It is function to change external video signals to DSUB ANALOG/ DVI/ VIDEO/ S-VIDEO/ TV
DSUB ANALOG/ DVI DIGITAL/ AV/ S-VIDEO/ TV
55
CONTRAST
40
SHARPNESS
14
※ With VOL ▶, go to SUB MENU. After adjusting in SUB MENU,
press MENU to exit.
COLOR TINT
COLOR TONE
DSUB ANALOG/ DVI DIGITAL/ AV1/ AV2/ TV
SYSTEM
※ Adjust it with CH ▲▼
60
AUTO
NTSC
PAL
DSUB ANALOG
DSUB ANALOG
① BRIGHTNESS
Adjust the brightness of video without affecting RGB’s brightness.
DVI DIGITAL
DVI DIGITAL
② CONTRAST
Adjust the contrast of video without affecting RGB’s contrast.
AV1
③ SHARPNESS
Adjust the sharpness of video image.
④ COLOR TINT
Change the richness of color.
⑤ COLOR TONE
Change the tone of color.
⑥ SYSTEM
Change broadcast system NTSC, PAL, AUTO
AV
S-VIDEO
14
BRIGHTNESS
AV2
※Press
MENU
MENU button to go to the Main menu.
15
SETUP(SETUP)
SOUND(SOUND)
▶ ENGLISH
LANGUAGE
OSD TIME
10
TRANSLUCENT
14
※ With VOL ▶, go to SUB MENU. After adjusting in SUB MENU,
press MENU to exit.
MUTE
OSD H POS.
OSD V POS.
FACTORY RESET
VOLUME
10
TREBLE
50
BASS
50
OFF
① LANGUAGE
Change language English, France, German , Spanish , Italian, Japanese, Korean.
① MUTE
Mute the sound temporarily. Mute is released when you change channel and adjust volume.
② OSD TIME
The number of seconds that the OSD will remain visible before disappearing.
② VOLUME
Adjust the sound volume.
③ TRANSLUCENT
Change the opaqueness of the background of the OSD.
③ TREBLE
Emphasize high frequency audio.
④ OSD H POS.
Move the OSD Window to the horizontal direction.
④ BASS
Emphasize low frequency audio.
⑤ OSD V POS.
Move the OSD Window to the vertical direction.
⑥ FACTORY RESET
A factory default reset will clear all of OSD information.
※Press
16
※ With VOL ▶, go to SUB MENU. After adjusting in SUB MENU,
press MENU to exit.
OFF
MENU
MENU button to go to the Main menu.
※Press
MENU
MENU button to go to the Main menu.
17
TV Mode (only TM-1710D)
CH
PICTURE(PICTURE)
TV
※ With VOL ▶, go to SUB MENU. After adjusting in SUB MENU,
press MENU to exit.
TYPE
CHANNEL
① BRIGHTNESS
Adjust the brightness of video.
② CONTRAST
Adjust the contrast of video.
③ SHARPNESS
Adjust the sharpness of video.
COLOR TINT
④ COLOR TINT
Change the richness of color.
COLOR TONE
⑤ COLOR TONE
Change the tone of color.
BRIGHTNESS
CONTRAST
ADD/DELETG
ADD
SHARPNESS
FINE TUNE
+0
AUTO SEARCH
TV REGION
14
OFF
GERMANY / B/G
① SYSTEM
TV signal selection.
② CHANNEL
Channel selection.
③ ADD/DELETION
Deleting/Adding the selected channel.
④ FINE TUNE
Channel fine tuning.
⑤ AUTO SEARCH
Automatic channel scan.
⑥ TV REGION
NTSC: USA, JAPAN, KOREA
※ With VOL ▶, go to SUB MENU. After adjusting in SUB MENU,
press MENU to exit.
※Press
MENU
MENU button to go to the Main menu.
PAL: EUROPE
※Press
18
MENU
MENU button to go to the Main menu .
19
PC (ANALOG)
COLOR
PICTURE
BRIGHTNESS
75
※ With VOL ▶, go to SUB MENU. After adjusting in SUB MENU,
press MENU to exit.
The tone of color can be changed from red-dish white to bluish white.
The individual color components are also user customizable.
CONTRAST
H POSITION
USER
50
※ With VOL ▶, go to SUB MENU. After adjusting in SUB MENU,
press MENU to exit.
V POSITION
PHASE
PIXEL FREQ.
RED
14
GREEN
100
BLUE
20
① BRIGHTNESS
Adjust the brightness of video without affecting RGB s brightness.
② CONTRAST
Adjust the contrast of video without affecting RGB s contrast.
① 9300K Change color temperature : Red 45 Green 43 Blue 50
③ H POSITION
Adjust the horizontal position of the image.
②7300K Change color temperature : Red 50 Green 47 Blue 47
④ V POSITION
Adjust the vertical position of the image.
③6500K Change color temperature : Red 50 Green 47 Blue 47
⑤ PHASE
Remove the noises. When phase value is wrong, the image has vertical lines especially in 1 dot on and off.
④USER User customizable. (RED, GREEN, BLUE)
⑥ PIXEL FREQ.
Adjust the sampling frequency of DSUB analog signal.
※Press
MENU
MENU button to go to the Main menu.
※Press
MENU
MENU button to go to the Main menu.
21
DISPLAY MODES
PC (DVI)
For the display modes listed below, the screen image has been optimized during manufacture.
PICTURE
BRIGHTNESS
75
※ With VOL ▶, go to SUB MENU. After adjusting in SUB MENU,
press MENU to exit.
Mode
CONTRAST
H POSITION
VGA
Resolution
Horizontal
Frequency(KHz)
Vertical
Frequency(Hz)
Pixel Clock
Frequency(MHz)
Sync Polarity
(H/V)
720 x 400
31.469
70.087
28.322
-/+
640 x 480
31.469
59.940
25.175
-/-
640 x 480
37.500
75.000
31.500
-/-
800 x 600
37.880
60.300
40.000
+/+
800 x 600
46.875
75.000
49.500
+/+
1024 x 768
48.363
60.004
65.000
-/-
1024 x 768
60.023
75.029
78.750
+/+
1280 x 1024
63.981
60.02
108.000
+/+
1280 x 1024
79.976
75.025
135.000
+/+
V POSITION
PHASE
PIXEL FREQ.
SVGA
① BRIGHTNESS
Adjust the brightness of video without affecting RGB s brightness.
XGA
※Press
MENU
MENU button to go to the Main menu.
SXGA
22
23
4 RECALL
Displays present status and volume level.
5 AUTO PIC
TV channel scan and memory.
6 SLEEP
Sleep timer(0/10/20/30/60/90/120)
7 TV/CATV
Select TV, external video, s-video, DVI, D-sub analog.
10 OSD MESSAGE
OUT OF RANGE
NO SIGNAL
8 MUTE
① The screen shows this when signal is out of range.
② The screen shows this when there is no signal.
It is a function of Mute control.
When you push MUTE button, OSD display this image.
This image can be toggle.
9 CH.SET
CHECK CABLE
③ The screen shows this when the signal cable is not connected.
ex) when the memorized board PR2 moves PR4, press CH.SET button, number 4 and then MENU button.
PR ___
24
PR 4
25
7. Connections
Backside , monitor stand detached
(without monitor stand / distance between each mounting hole 75mm)
CM-1710D/TM-1710D
① ANT IN
Ant in for TM-1710D
② PC-AUDIO IN
Audio input DSUB ANALOG,
DVI DIGITAL mode
③ DVI IN
DVI DIGITAL input
④ DSUB IN
DSUB ANALOG input
⑤ MULTI CONNECTOR
DC12V, AV, S-VIDEO, AUDIO input
⑥ DC IN 12V
DC 12V Input
PC
AC/DC SMPS
12V, 5A (option)
PC-AUDIO
① ② ③ ④ ⑤⑥
DVI
~
Option
D-SUB
(Not Supplied)
REMOTE OUT
RED (DC INPUT)
S-VIDEO
YELLOW (VIDEO 2)
YELLOW (VIDEO 1)
AUDIO IN 1 (L/R)
AUDIO OUTPUT (L/R)
S-AUDIO/AUDIO IN 2(L/R)
26
27
8. Changing Remote Control Battery
9. Specifications
CM-1710D/TM-1710D
1. Slide and open the battery cover.
SPECIFICATION
ITEM
LCD PANEL
SIZE
43.18cm (17.0 INCH)
MAKER
SAMSUNG(LTM170EU-L11 & L21)
NUMBER OF PIXELS
1280 X 1024
0.264(H) X 0.264(V)mm
PIXEL PITCH
2. Insert new batteries and ensure that the
polarities are correct when inserting.
BRIGHTNESS
300cd/㎡
CONTRAST RATIO
500 : 1
VIEW ANGLE CR≥5
75˚ / 75˚ / 75˚ / 60˚(L/R/U/D)
DISPLAY COLOR
16.2M
VIDEO
DIGITAL SIGNAL (DVI)
ANALOG R.G.B 0.7Vp-p, TTL SEPARATE (DSUB)
INPUT SIGNAL
COMPOSITE VIDEO (VHS, SVHS)
3. Slide and close the battery cover.
S-VIDEO
TV (NTSC or PAL, OPTION)
FREQUENCY
28
AUDIO
STEREO
390mVrms L/R INPUT
HORIZONTAL
VERTICAL
30~80KHz(AUTOMATIC)
56~75 Hz(AUTOMATIC)
29
MEMO
SPECIFICATION
ITEM
POWER, MENU, SELECT, ▼▲, ◀▶
S/BY LED, REMOTE SENSOR WINDOW
USER CONTROLS
OSD DISPLAY LANGUAGES
POWER SUPPLY
VOLTAGE
CONSUMPTION
7 LANGUAGES
DC 12V
36WATT
SOUND SIGNAL
DIMENSION ( W X H X D )
OPERATING TEMPERATURE
STORAGE TEMPERATURE
WEIGHT
2WATT STEREO
422(W) X 371(H) X 38.5(D)mm
0 oC~ + 50 oC
o
o
-20 C~ + 60 C
4.8Kg
ACCESSORIES
REMOTE CONTROL (WITH BATTERY) --------------------1
MONITOR CABLE ------------------------------------------------1
CHANGE CABLE ( OPTION)
VESA STAND ( OPTION)
AC/DC POWER ADAPTER (OPTION)
OPTION
30
TV TUNER (NTSC USA/JAPAN/KOREA, PAL 3MULTI/4MULTI)
Printed in KOREA