1
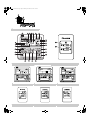
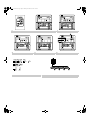
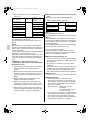
00_CV_3P226891-12Q.fm Page 1 Saturday, November 27, 2010 2:07 PM
OPERATION MANUAL
System air conditioner
Series
English
Deutsch
Français
Español
Italiano
ΕλληνικÜ
Nederlands
MODELS
RQYQ8PY1B
RQYQ10PY1B
RQYQ12PY1B
RQYQ14PY1B
RQYQ16PY1B
RQYQ18PY1B
RQYQ20PY1B
RQYQ22PY1B
RQYQ24PY1B
RQYQ26PY1B
RQYQ28PY1B
RQYQ30PY1B
RQYQ32PY1B
RQYQ34PY1B
RQYQ36PY1B
RQYQ38PY1B
RQYQ40PY1B
RQYQ42PY1B
RQYQ44PY1B
RQYQ46PY1B
RQYQ48PY1B
Portugues
Рóссêий
Türkçe
00_CV_3P226891-12Q.fm Page 2 Saturday, November 27, 2010 2:07 PM
00_CV_3P226891-12Q.fm Page 3 Saturday, November 27, 2010 2:07 PM
Thank you for purchasing this Daikin air conditioner. Carefully read
this operation manual before using the air conditioner. It will tell you
how to use the unit properly and help you if any trouble occurs. After
reading the manual, keep it in your custody for future reference.
See also the operation manual included with the indoor unit for
details on the indoor unit.
Store the operation manual included with the indoor unit
together with this operation manual in a safe place.
After receiving the warranty card from the dealer, store it in a
safe place.
Σαò ευχαριστοýìε που αγορÜσατε αυτü το κλιìατιστικü Daikin. ÄιαβÜστε
προσεκτικÜ αυτü το εγχειρßδιο χειρισìοý πριν χρησιìοποιÞσετε το
κλιìατιστικü. Θα σαò ενηìερþσει σχετικÜ ìε τον τρüπο χρÞσηò τηò ìονÜδαò
και θα σαò βοηθÞσει αν προκýψουν προβλÞìατα. Αφοý διαβÜσετε το
εγχειρßδιο, φυλÜξτε το σε ασφαλÝò ìÝροò, για ìελλοντικÞ αναφορÜ.
Για λεπτοìÝρειεò σχετικÜ ìε την εσωτερικÞ ìονÜδα, δεßτε επßσηò το
εγχειρßδιο χειρισìοý που περιλαìβÜνεται ìαζß ìε την εσωτερικÞ ìονÜδα.
ΦυλÜξτε ìαζß σε ασφαλÝò ìÝροò, τüσο αυτü το εγχειρßδιο χειρισìοý üσο και
το εγχειρßδιο χειρισìοý που περιλαìβÜνεται ìαζß ìε την εσωτερικÞ ìονÜδα.
Αφοý λÜβετε την κÜρτα εγγýησηò απü τον αντιπρüσωπο, φυλÜξτε την σε
ασφαλÝò ìÝροò.
Wir möchten uns bei Ihnen dafür bedanken, daß Sie sich für ein Klimagerät von Daikin entschieden haben. Lesen Sie sich diese Bedienungsanweisung sorgfältig durch, bevor Sie das Klimagerät in Betrieb
nehmen. Hier erfahren Sie, wie Sie das Gerät korrekt betreiben. Zudem
hilft sie Ihnen, falls Störungen auftreten sollten. Bewahren Sie die
Anweisung gut auf, wenn Sie sie durchgelesen haben, damit Sie auch
später noch darin nachschlagen können.
Schlagen Sie bezüglich Einzelheiten über das Innengerät auch in der
Bedienungsanleitung des Innengerätes nach.
Bewahren Sie die Bedienungsanleitung des Innengerätes zusammen
mit dieser Bedienungsanleitung an einem sicheren Ort auf.
Nachdem Sie die Garantiekarte von Ihrem Händler erhalten haben,
bewahren Sie sie an einem sicheren Ort auf.
Hartelijk dank voor uw keuze van een Daikin airconditioner. Lees deze
gebruiksaanwijzing zorgvuldig door voordat u de airconditioner in gebruik
neemt. In de gebruiksaanwijzing kunt u lezen hoe u het apparaat op de juiste
manier gebruikt en wat u kunt doen bij storingen. Bewaar de gebruiksaanwijzing voor het geval u deze in de toekomst nogmaals nodig heeft.
Zie ook de gebruiksaanwijzing behorend bij de binnenunit voor bijzonderheden over de binnenunit.
Bewaar de gebruiksaanwijzing behorend bij de binnenunit samen met
deze gebruiksaanwijzing op een veilige plaats.
Nadat u de garantiekaart van de dealer heeft ontvangen, deze op een
veilige plaats bewaren.
Nous vous remercions d’avoir acheté ce climatiseur Daikin. Lisez soigneusement ce manuel d’utilisation avant d’utiliser le climatiseur. Il vous
enseignera à utiliser correctement l’unité et vous aidera en cas de panne.
Après avoir lu le manuel, rangez-le en vue d’une utilisation ultérieure.
Pour plus de détails concernant l’unité intérieure, reportez-vous également au manuel d’utilisation accompagnant l’unité intérieure.
Conservez le manuel d’utilisation accompagnant l’unité intérieure avec ce
manuel d’utilisation dans un endroit sûr.
Après avoir reçu la carte de garantie du revendeur, conservez-la dans un
endroit sûr.
Gracias por adquirir este sistema de climatización Daikin. Lea detenidamente este manual de funcionamiento antes de utilizar el sistema de climatización. En él encontrará indicaciones acerca de cómo utilizar la
unidad correctamente y le ayudará en caso de que se produzca algún
problema. Tras leerlo, consérvelo para futura referencia.
Consulte también el manual de funcionamiento que se incluye con la
unidad interior para obtener detalles sobre ésta.
Guarde el manual de funcionamiento incluido con la unidad interior junto
con este manual de funcionamiento en un lugar seguro.
Una vez que reciba la tarjeta de garantía del concesionario, guárdela en
un lugar seguro.
Grazie per avere acquistato questo condizionatore d’aria Daikin. Prima di
utilizzare quest’ultimo, leggere attentamente il presente manuale d’uso, che
illustra le modalità di utilizzo corretto e fornisce un supporto nell’eventualità
di problemi di funzionamento. Dopo averlo letto, conservare
il presente manuale per potervi fare riferimento in seguito.
Si veda inoltre il manuale delle istruzioni in dotazione all’unità interna per
ulteriori dettagli relativi all’unità interna.
Conservare il manuale delle istruzioni in dotazione all’unità interna con
l’unità interna in un luogo sicuro.
Dopo aver ricevuto il documento di garanzia dal rivenditore, conservarlo
in un luogo sicuro.
Obrigado por comprar este aparelho de ar condicionado Daikin. Leia
atentamente este manual de funcionamento antes de usar o aparelho de
ar condicionado. O manual indica como utilizar a unidade correctamente
e poderá ajudá-lo caso ocorra algum problema. Depois de ler o manual,
mantenha-o acessível para futura referência.
Consulte também o manual de funcionamento da unidade interior para
obter informações relativas à mesma.
Guarde o manual de funcionamento da unidade interior em conjunto
com este manual de funcionamento num local seguro.
Depois de receber o cartão de garantia do vendedor, guarde-o num local
seguro.
Спасибо за поêóпêó данноãо êондиционера фирмы Daikin. До
начала работы с êондиционером внимательно изóчите данное
рóêоводство по эêсплóатации. В нем излаãаются правила
надлежащеãо пользования óстройством и приводятся
реêомендации пользователю по поисêó и óстранению
неисправностей. После изóчения рóêоводства сохраните еãо для
обращений в бóдóщем.
Подробная информация по внóтреннемó блоêó приведена в
рóêоводстве по эêсплóатации, прилаãаемомó ê внóтреннемó блоêó.
Храните рóêоводство по эêсплóатации, прилаãаемое ê внóтреннемó
блоêó, вместе с данным рóêоводством по эêсплóатации в
надежном месте.
Полóчив ãарантийный талон от дилера, спрячьте еãо в надежное место.
Daikin klimalarýný satýn aldýðýnýz için teþekkür ederiz. Klimayý kullanmadan önce kullanma kýlavuzunu dikkatlice okuyunuz. Bu size
üniteyi nasýl kullanmanýz gerektiði ve eðer herhangi bir sorun
oluþursa yardým konusunda bilgi verecektir. Kullanma kýlavuzunu
okuduktan sonra, ileride baþvurmak için saklayýnýz.
Ayrýca iç mekan ünitesi ile birlikte bulunan iç mekan ünitesinin
detaylarýna iliþkin kullaným kýlavuzunu da okuyunuz.
Ýç mekan ünitesi kullaným kýlavuzu ve kullaným kýlavuzunu birlikte,
güvenli bir yerde saklayýnýz.
Satýcýdan garanti belgesini aldýktan sonra, güvenli bir yerde saklayýnýz.
00_CV_3P226891-12Q.fm Page 4 Saturday, November 27, 2010 2:07 PM
1
3
2
4
5
7.1
7.2
6
7.3
00_CV_3P226891-12Q.fm Page 5 Saturday, November 27, 2010 2:07 PM
9
8
10
12
11
13
14
00_CV_3P226891-12Q.fm Page 6 Saturday, November 27, 2010 2:07 PM
01_EN_3P226891-12Q.fm Page 1 Saturday, November 27, 2010 2:08 PM
RQYQ8PY1B
RQYQ10PY1B
RQYQ12PY1B
RQYQ14PY1B
RQYQ16PY1B
RQYQ18PY1B
RQYQ20PY1B
RQYQ22PY1B
RQYQ24PY1B
RQYQ26PY1B
RQYQ28PY1B
RQYQ30PY1B
RQYQ32PY1B
RQYQ34PY1B
RQYQ36PY1B
RQYQ38PY1B
RQYQ40PY1B
RQYQ42PY1B
RQYQ44PY1B
RQYQ46PY1B
CONTENTS
1. SAFETY PRECAUTIONS ............................... 1
2. SPECIFICATIONS .......................................... 4
3. WHAT TO DO BEFORE OPERATION............ 4
4. REMOTE CONTROLLER AND COOL/HEAT
SELECTOR: NAME AND FUNCTION OF
EACH SWITCH AND DISPLAY ..................... 4
5. OPERATION RANGE ..................................... 5
6. OPERATION PROCEDURE ........................... 5
7. OPTIMUM OPERATION ................................. 8
8. SEASONAL MAINTENANCE ......................... 9
9. FOLLOWING SYMPTOMS ARE NOT AIR
CONDITIONER TROUBLES .......................... 9
10. TROUBLE SHOOTING................................. 11
Important information regarding the refrigerant
used
This product contains fluorinated greenhouse gases
covered by the Kyoto Protocol.
Refrigerant type
(1)
GWP value
(1)
R410A
1975
GWP = global warming potential
Periodical inspections for refrigerant leaks may be
required depending on European or local legislation.
Please contact your local dealer for more information.
1. SAFETY PRECAUTIONS
To gain full advantage of the air conditioner’s functions and to avoid malfunction due to mishandling,
we recommend that you read this instruction manual
carefully before use.
This air conditioner is classified under “appliances
not accessible to the general public”.
• The precautions described herein are classified as WARNING and CAUTION. They both
contain important information regarding
safety. Be sure to observe all precautions
without fail.
WARNING ....... Failure to follow these instructions properly may result in personal injury or loss of life.
1
RQYQ48PY1B
VRVIII-Q System
air conditioner
Operation
manual
CAUTION ........ Failure to observe these
instructions properly may result
in property damage or personal
injury, which may be serious
depending on the circumstances.
• After reading, keep this manual in a convenient place so that you can refer to it whenever
necessary. If the equipment is transferred to a
new user, be sure also to hand over the manual.
WARNING
Be aware that prolonged, direct exposure to
cool or warm air from the air conditioner, or to
air that is too cool or too warm can be harmful
to your physical condition and health.
When the air conditioner is malfunctioning
(giving off a burning odour, etc.) turn off power
to the unit and contact your local dealer.
Continued operation under such circumstances
may result in a failure, electric shocks or fire hazards.
Consult your local dealer about installation
work.
Doing the work yourself may result in water leakage, electric shocks or fire hazards.
Consult your local dealer regarding modification, repair and maintenance of the air conditioner.
Improper workmanship may result in water leakage, electric shocks or fire hazards.
Do not place objects, including rods, your fingers, etc., in the air inlet or outlet.
Injury may result due to contact with the air conditioner’s highspeed fan blades.
Never touch the air outlet or the horizontal
blades while the swing flap is in operation.
Fingers may become caught or the unit may break
down.
Beware of fire in case of refrigerant leakage.
If the air conditioner is not operating correctly,
i.e. not generating cool or warm air, refrigerant
leakage could be the cause.
Consult your dealer for assistance.
The refrigerant within the air conditioner is safe
and normally does not leak.
However, in the event of a leakage, contact with
a naked burner, heater or cooker may result in
generation of noxious gas.
Do not longer use the air conditioner until a qualified service person confirms that the leakage
has been repaired.
English
01_EN_3P226891-12Q.fm Page 2 Saturday, November 27, 2010 2:08 PM
Consult your local dealer regarding what to
do in case of refrigerant leakage.
When the air conditioner is to be installed in a
small room, it is necessary to take proper measures so that the amount of any leaked refrigerant does not exceed the concentration limit in the
event of a leakage. Otherwise, this may lead to
an accident due to oxygen depletion.
Contact professional personnel about
attachment of accessories and be sure to
use only accessories specified by the manufacturer.
If a defect results from your own workmanship, it
may result in water leaks, electric shock or fire.
Consult your local dealer regarding relocation and reinstallation of the air conditioner.
Improper installation work may result in leakage,
electric shocks or fire hazards.
Be sure to use fuses with the correct ampere
reading.
Do not use improper fuses, copper or other wires
as a substitute, as this may result in electric
shock, fire, injury or damage to the unit.
Be sure to earth the unit.
Do not earth the unit to a utility pipe, lightning
conductor or telephone earth lead. Imperfect
earthing may result in electric shocks or fire.
A high surge current from lightning or other
sources may cause damage to the air conditioner.
Be sure to install an earth leakage breaker.
Failure to install an earth leakage breaker may
result in electric shocks or fire.
Consult the dealer if the air conditioner submerges owing to a natural disaster, such as a
flood or typhoon.
Do not operate the air conditioner in that case, or
otherwise a malfunction, electric shock, or fire
may result.
Do not start or stop operating the air conditioner with the power supply breaker turned
ON or OFF.
Otherwise, fire or water leakage may result. Furthermore, the fan will rotate abruptly if power failure compensation is enabled, which may result
in injury.
Do not use the product in the atmosphere contaminated with oil vapor, such as cooking oil or
machine oil vapor.
Oil vapor may cause crack damage, electric
shocks, or fire.
Do not use the product in places with excessive oily smoke, such as cooking rooms, or in
places with flammable gas, corrosive gas, or
metal dust.
Using the product in such places may cause fire
or product failures.
English
Do not use flammable materials (e.g., hairspray
or insecticide) near the product.
Do not clean the product with organic solvents such as paint thinner.
The use of organic solvents may cause crack
damage to the product, electric shocks, or fire.
Be sure to use a dedicated power supply for
the air conditioner.
The use of any other power supply may cause
heat generation, fire, or product failures.
Consult your dealer regarding cleaning the
inside of the air conditioner.
Improper cleaning may cause breakage of plastic
parts, water leakage and other damage as well as
electric shocks.
CAUTION
Do not use the air conditioner for purposes
other than those for which it is intended.
Do not use the air conditioner for cooling precision
instruments, food, plants, animals or works of art
as this may adversely affect the performance,
quality and/or longevity of the object concerned.
Do not remove the outdoor unit’s fan guard.
The guard protects against the unit’s high speed
fan, which may cause injury.
Do not place objects that are susceptible to
moisture directly beneath the indoor or outdoor units.
Under certain conditions, condensation on the
main unit or refrigerant pipes, air filter dirt or drain
blockage may cause dripping, resulting in fouling
or failure of the object concerned.
To avoid oxygen depletion, ensure that the
room is adequately ventilated if equipment
such as a burner is used together with the air
conditioner.
After prolonged use, check the unit stand
and its mounts for damage.
If left in a damaged condition, the unit may fall and
cause injury.
Do not place flammable sprays or operate
spray containers near the unit as this may
result in fire.
Before cleaning, be sure to stop unit operation, turn the breaker off or remove the power
cord.
Otherwise, an electric shock and injury may result.
To avoid electric shocks, do not operate with
wet hands.
Do not place appliances that produce naked
flames in places exposed to the air flow from
the unit as this may impair combustion of the
burner.
Do not place heaters directly below the unit,
as resulting heat can cause deformation.
2
01_EN_3P226891-12Q.fm Page 3 Saturday, November 27, 2010 2:08 PM
Do not allow a child to mount on the outdoor
unit or avoid placing any object on it.
Falling or tumbling may result in injury.
Do not place the controller exposed to direct
sunlight.
The LCD display may get discolored, failing to display the data.
Do not wipe the controller operation panel
with benzine, thinner, chemical dustcloth,
etc.
The panel may get discolored or the coating
peeled off. If it is heavily dirty, soak a cloth in
water-diluted neutral detergent, squeeze it well
and wipe the panel clean. And wipe it with another
dry cloth.
Do not block air inlets nor outlets.
Impaired air flow may result in insufficient performance or trouble.
Be sure that children, plants or animals are
not exposed directly to airflow from the unit,
as adverse effects may ensue.
Do not wash the air conditioner or the remote
controller with water, as this may result in
electric shocks or fire.
Do not install the air conditioner at any place
where there is a danger of flammable gas
leakage.
In the event of a gas leakage, build-up of gas near
the air conditioner may result in fire hazards.
Do not place water containers (flower vases,
etc.) on the unit, as this may result in electric
shocks or fire.
To avoid injury, do not touch the air inlet or
aluminium fins of the unit.
Never press the button of the remote controller with a hard, pointed object.
The remote controller may be damaged.
Never pull or twist the electric wire of a
remote controller.
It may cause the unit to malfunction.
Do not operate the air conditioner when
using a room fumigation - type insecticide.
Failure to observe could cause the chemicals to
become deposited in the unit, which could endanger the health of those who are hypersensitive to
chemicals.
Do not place objects in direct proximity of the
outdoor unit and do not let leaves and other
debris accumulate around the unit.
Leaves are a hotbed for small animals which can
enter the unit. Once in the unit, such animals can
cause malfunctions, smoke or fire when making
contact with electrical parts.
Never touch the internal parts of the controller.
Do not remove the front panel. Touching certain
internal parts will cause electric shocks and damage to the unit. Please consult your dealer about
checking and adjustment of internal parts.
Do not put flammable containers, such as
spray cans, within 1 m from the blow-off
mouth.
The containers may explode because the warm air
output of the indoor or outdoor unit will affect them.
Do not leave the remote controller wherever
there is a risk of wetting.
If water gets into the remote controller there is a
risk of electrical leakage and damage to electronic
components.
Arrange the drain to ensure complete drainage.
If proper drainage from the outdoor drain pipe
does not occur during air conditioner operation,
there could be a blockage due to dirt and debris
build-up in the pipe.
This may result in a water leakage from the indoor
unit. Under these circumstances, stop air conditioner operation and consult your dealer for assistance.
Turn off the power when the unit is not to be
used for long periods of time.
Otherwise, the unit may get hot or catch on fire
due to dust accumulation.
Watch your steps at the time of air filter
cleaning or inspection.
High-place work is required, to which utmost
attention must be paid.
If the scaffold is unstable, you may fall or topple
down, thus causing injury.
The appliance is not intended for use by
unattended young children or infirm persons.
Impairment of bodily functions and harm to health
may result.
Children should be supervised to ensure that
they do not play with the unit or its remote controller.
Accidental operation by a child may result in
impairment of bodily functions and harm health.
Do not let children play on or around the outdoor unit.
If they touch the unit carelessly, injury may be
caused.
3
English
01_EN_3P226891-12Q.fm Page 4 Saturday, November 27, 2010 2:08 PM
2. SPECIFICATIONS
[Single unit]
Model
Power supply
Phase
Frequency
Voltage
Nominal cooling capacity
Nominal heating capacity
Dimensions H×W×D
Mass
Refrigerant type
Refrigerant charge (*1)
Design pressure
High pressure side
Low pressure side
RQYQ8PY1B
3N
3N
3N
(Hz)
50.0
50.0
50.0
(V)
380-415
380-415
380-415
(kW)
22.4
28.0
33.5
(kW)
25.0
31.5
37.5
(mm) 1680×930×765 1680×930×765 1680×930×765
(kg)
230
284
284
R410A
R410A
R410A
(kg)
10.8
11.7
11.7
(bar)
(MPa)
(bar)
(MPa)
Model
Power supply
Phase
Frequency
Voltage
Nominal cooling capacity
Nominal heating capacity
Dimensions H×W×D
Mass
Refrigerant type
Refrigerant charge (*1)
Design pressure
High pressure side
Low pressure side
RQYQ10PY1B RQYQ12PY1B
40
4.0
33
3.3
40
4.0
33
3.3
40
4.0
33
3.3
RQYQ14PY1B RQYQ16PY1B
3N
3N
(Hz)
50.0
50.0
(V)
380-415
380-415
(kW)
40.0
45.0
(kW)
45.0
50.0
(mm) 1680×1240×765 1680×1240×765
(kg)
381
381
R410A
R410A
(kg)
11.7
11.7
(bar)
(MPa)
(bar)
(MPa)
40
4.0
33
3.3
40
4.0
33
3.3
*1: Initial refrigerant charge
[Combination unit]
RQYQ18~48PY1B is the combination unit that is composed of the single units.
About the specifications see Single unit according
to the independent unit.
3. WHAT TO DO BEFORE OPERATION
This operation manual is for the following system
with standard control. Before initiating operation,
contact your Daikin dealer for the operation that corresponds to your system type and mark.
If your installation has a customized control system,
ask your Daikin dealer for the operation that corresponds to your system.
Outdoor units (Refer to figure 1)
Cool/Heat selector
Operation modes
Inverter series
“VRVIII-Q” series
❏ yes ❏ no
• Names and functions of parts (Refer to figure 1)
1. Outdoor unit
2. Indoor unit
3. Remote controller
4. Inlet air
5. Outlet air
6. Cool/Heat selector
(figure 1 shows system with Cool/Heat selector)
English
4. REMOTE CONTROLLER AND
COOL/HEAT SELECTOR: NAME
AND FUNCTION OF EACH
SWITCH AND DISPLAY
(Refer to figure 2 and 3)
1. On/off button
Press the button and the system will start. Press
the button again and the system will stop.
2. Operation lamp (red)
The lamp lights up during operation.
” (changeover under control)
3. Display “
It is impossible to changeover heat/cool with the
remote controller which display this icon.
” (air flow flap)
4. Display “
Refer to the chapter “Operation procedure Adjusting the air flow direction”.
5. Display “
” (ventilation/air cleaning)
This display shows that the ventilation unit are in
operation. (these are optional accessories)
6. Display “
C ” (set temperature)
This display shows the temperature you have set.
”“
”“
”“
”“
” (operation
7. Display “
mode)
This display shows the current operation mode.
8. Display “ ” (programmed time)
This display shows the programmed time of the
system start or stop.
9. Display “
TEST ” (inspection/test operation)
When the inspection/test operation button is
pressed, the display shows the mode in which
the system actually is.
” (under centralized control)
10. Display “
When this display shows, the system is under
centralized control. (This is not a standard specification.)
” (fan speed)
11. Display “
This display shows the fan speed you have
selected.
” (time to clean air filter)
12. Display “
Refer to the operation manual of indoor unit.
” (defrost/hot start)
13. Display “
Refer to the chapter “Operation procedure Explanation of heating operation.”
14. Timer mode start/stop button
Refer to the chapter “Operation procedure Programming start and stop of the system with
timer.”
15. Timer on/off button
Refer to the chapter “Operation procedure Programming start and stop of the system with timer.”
4
01_EN_3P226891-12Q.fm Page 5 Saturday, November 27, 2010 2:08 PM
16. Inspection/test operation button
This button is only used by qualified service
persons for maintenance purposes.
17. Programming time button
Use this button for setting the programming start
and/or stop time.
18. Temperature setting button
Use this button for setting the desired temperature.
19. Filter sign reset button
Refer to the operation manual of indoor unit.
20. Fan speed control button
Press this button to select the fan speed of your
preference.
21. Operation mode selector button
Press this button to select the operation mode of
your preference.
22. Air flow direction adjust button
Refer to the chapter “Operation procedure Adjusting the air flow direction”.
23. Fan only/air conditioning selector switch
” for fan only operation or to
Set the switch to “
“
” for heating or cooling operation.
24. Cool/heat changeover switch
” for cooling operation or to
Set the switch to “
“
” for heating operation.
25. Thermistor
It sense the room temperature around the
remote controller.
26. These button are used when the ventilation unit
are installed (These are optional accessories)
Refer to the operation manual of the ventilation unit.
NOTE
• In contradistinction to actual operating situations, the
display on figure 1 shows all possible indications.
• Figure 2 shows the remote controller which is
opened the cover.
• For FXS, FXM, FXL, FXD and FXN, the air flow
direction adjust button (22) is not available and
the display (4) shows “NOT AVAILABLE” when
pressed.
5
5. OPERATION RANGE
Use the system in the following temperature and
humidity ranges for safe and effective operation.
outdoor temperature
COOLING
HEATING
–5°~43°CDB
–20°~21°CDB
–20°~15.5°CWB
indoor temperature
21°~32°CDB
15°~27°CDB
14°~25°CWB
indoor humidity
≤ 80%
NOTE
To avoid condensation and water dripping out the unit.
If the temperature or the humidity is beyond these
conditions, safety devices may work and the air conditioner may not operate.
6. OPERATION PROCEDURE
• Operation procedure varies according to the combination of outdoor unit and remote controller.
Read the chapter “What to do before operation”.
• To protect the unit, turn on the main power switch
6 hours before operation.
And do not turn off the power supply during the air
conditioning season because of smoothly start
up.
• If the main power supply is turned off during operation, operation will restart automatically after the
power turns back on again.
6-1 COOLING, HEATING AND FAN ONLY
OPERATION
• The operation mode cannot be changed with the
remote controller whose display shows
“
” (changeover under control).
Change the operation mode with the remote controller whose display does not show “
”.
” (changeover under
• When the display “
control) flashes, refer to the chapter “Operation
procedure - Setting the master remote controller”.
• The fan may keep on running for about 1 minute
after the heating operation stops for removing the
heat in the indoor unit.
• The air flow rate may be adjusted automatically
depending on the room temperature or the fan
may stop immediately. This is not a malfunction.
• For machine protection the system may control
the air flow rate automatically.
• It may take sometime for finishing to change the
air flow rate.
This is normal operation.
English
01_EN_3P226891-12Q.fm Page 6 Saturday, November 27, 2010 2:08 PM
FOR SYSTEMS WITHOUT COOL/HEAT SELECTOR (Refer to figure 4)
Press the operation mode selector button several times and select the operation mode of
your choice;
1
“
“
“
2
” Cooling operation
” Heating operation
” Fan only operation
Press the on/off button.
The operation lamp lights up and the system
starts operation.
FOR SYSTEMS WITH COOL/HEAT SELECTOR
(Refer to figure 4 and 7)
1
Select operation mode with the Cool/Heat
selector as follows:
“
“
“
2
”“
”“
”“
” Cooling operation (Refer to figure 7.1)
” Heating operation (Refer to figure 7.2)
” Fan only operation (Refer to figure 7.3)
Press the on/off button. (Refer to figure 4)
The operation lamp lights up and the system
starts operation.
ADJUSTMENT (Refer to figure 4)
For adjustment the desired temperature, fan
speed and air flow direction (only for the
remote controller BRC1C62: FXC, FXF, FXH,
FXK, FXA), follow the procedure shown below.
3
Press the temperature setting button and set
the desired temperature.
Each time this button is pressed, the temperature setting rises or lowers 1°C.
4
5
NOTE
• Set the temperature within the operation range.
• The temperature setting is impossible for fan
only operation.
Press the fan speed control button and select
the fan speed of your preference.
Press air flow direction adjust button.
Refer to the chapter “Adjusting the air flow
direction” for details.
STOPPING THE SYSTEM (Refer to figure 4)
6
Press the on/off button once again.
The operation lamp goes off and the system
stops operation.
NOTE
• Do not turn off the power immediately after
the unit stops.
• The system need at least 5 minutes for
residual operation of drain pump device.
Turning off the power immediately will cause
water leak or trouble.
English
EXPLANATION OF HEATING OPERATION
• For general heating operation, it may take longer to
reach the set temperature than in cooling operation.
We recommend starting the operation which was
used before using timer operation.
• The following operation is performed in order to
prevent the heating capacity from dropping or
cold air from blowing.
Defrost operation
• In heating operation, freezing of the outdoor
unit heat exchanger increases. Heating
capability decreases and the system goes
into defrost operation.
• The indoor unit fan stops and the remote
controller displays “
”.
• After maximum 10 minutes of defrost operation, the system returns to heating operation
again.
Hot start
• In order to prevent cold air from blowing out
of an indoor unit at the start of heating operation, the indoor fan is automatically
stopped. The display of the remote controller
”.
shows “
NOTE
• The heating capacity drops as the outside temperature falls. If this happens, use another heating device together with the unit. (When using the
appliances which produce open fire together, ventilate a room constantly.)
Do not place appliances which produce open fire
in places exposed to the air flow from the unit or
under the unit.
• It takes some time for the room to warm up from
the time the unit is started since the unit uses a
hot-air circulatory system to warm the entire room.
• If the hot air rises to the ceiling, leaving the area
above the floor cold, we recommend using the circulator (the indoor fan for circulating air). Contact
your dealer for details.
6-2 PROGRAM DRY OPERATION
• The function of this operation is to decrease
the humidity in your room with a minimum
temperature decrease.
• The micro computer automatically determines temperature and fan speed.
• The system does not go into operation if the
room temperature is low.
• The microcomputer automatically controls
the temperature and fan speed, so these
cannot be set using the remote controller.
• This function is not available if the room temperature is 20°C or lower.
6
01_EN_3P226891-12Q.fm Page 7 Saturday, November 27, 2010 2:08 PM
FOR SYSTEMS WITHOUT COOL/HEAT SELECTOR (Refer to figure 5)
1
2
3
4
Press the operation mode selector button sev” ( program dry opereral times and select “
ation).
Press the on/off button.
The operation lamp lights up and the system
starts operation.
Press the air flow direction adjust button (only
for FXC, FXF, FXH, FXK, FXA). Refer to the
chapter “Adjusting the air flow direction” for
details.
Press the on/off button once again.
The operation lamp goes off and the system
stops operation.
NOTE
• Do not turn off the power immediately after
the unit stops.
• The system need at least 5 minutes for
residual operation of drain pump device.
Turning off the power immediately will cause
water leak or trouble.
FOR SYSTEMS WITH COOL/HEAT SELECTOR
(Refer to figure 8)
1
2
3
4
5
Select cooling operation mode with the Cool/
Heat selector.
Press the operation mode selector button several times and select program dry “
”.
Press the on/off button.
The operation lamp lights up and the system
starts operation.
Press the air flow direction adjust button (only
for FXC, FXF, FXK, FXH, FXA). Refer to the
chapter “Adjusting the air flow direction” for
details.
Press the on/off button once again.
The operation lamp goes off and the system
stops operation.
NOTE
• Do not turn off the power immediately after
the unit stops.
• The system need at least 5 minutes for
residual operation of drain pump device.
Turning off the power immediately will cause
water leak or trouble.
6-3 ADJUSTING THE AIR FLOW DIRECTION
(Refer to figure 6) (only for FXC, FXF,
FXK, FXH, FXA)
7
1
2
Press the air flow direction button to
select the air direction.
The air flow flap display swings as
shown right and the air flow direction
continuously varies. (Automatic swing
setting)
Press the air flow direction adjust button to select the air direction of your
choice.
The air flow flap display stops swinging and the air flow direction is fixed.
(Fixed air flow direction setting)
MOVEMENT OF THE AIR FLOW FLAP
For the following conditions, a micro computer controls the air flow direction which may be different
from the display.
COOLING
HEATING
• When starting operation.
• When the room temperature is
higher than the set temperature.
• At defrost operation.
• When operating continuously at horizontal air flow direction.
• When continuous operation with downward air flow is performed at the
time of cooling with a ceiling-suspended or a wall-mounted unit, the
microcomputer may control the flow direction, and then the remote control
indication also will change.
The air flow direction can be adjusted in one of the
following ways.
• The air flow flap itself adjusts its position.
• The air flow direction can be fixed by the user.
Automatic “
” or desired position “ ”.
(Refer to figure 13)
NOTE
• The movable limit of the flap is changeable.
Contact your Daikin dealer for details. (only
for FXC, FXF, FXK, FXH, FXA)
• Avoid operating in the horizontal direction
“
”. It may cause dew or dust to settle on
the ceiling.
6-4 PROGRAMMING START AND STOP OF
THE SYSTEM WITH TIMER
(Refer to figure 9)
• The timer is operated in the following two ways.
Programming the stop time “
”. The system stops operating after the set time has
elapsed.
Programming the start time “
”. The system starts operating after the set time has
elapsed.
• The timer can be programmed for a maximum of 72 hours.
• The start and the stop time can be simultaneously programmed.
English
01_EN_3P226891-12Q.fm Page 8 Saturday, November 27, 2010 2:08 PM
1
2
3
Press the timer mode start/stop button several
times and select the mode on the display.
The display flashes.
”
• For setting the timer stop “
• For setting the timer start “
”
Press the programming time button and set
the time for stopping or starting the system.
Each time this button is pressed, the
time advances or goes backward by 1
hour.
Press the timer on/off button.
The timer setting procedure ends. The display
“
” or “
” changes from flashing
light to constant light.
NOTE
• When setting the timer off and on at the
same time, repeat the above procedure
(from “ 1 ” to “ 3 ”) once again.
• After the timer is programmed, the display
shows the remaining time.
• Press the timer on/off button once again to
cancel programming. The display vanishes.
For example: (Refer to figure 11)
When the timer is programmed to stop the system after 3 hours and start the system after 4
hours, the system will stop after 3 hours and
start 1 hour later.
6-5 SETTING THE MASTER REMOTE CONTROLLER (Refer to figure 10)
• When one outdoor unit is connected with several
indoor units as shown in figure 14, it is necessary
to designate one of the remote controllers as the
master remote controller.
• Only the master remote controller can select
heating, cooling operation.
• The displays of slave remote controllers show
“
” (changeover under control) and they
automatically follow the operation mode directed
by the master remote controller.
However, it is possible to changeover to program
dry with slave remote controllers if the system is in
cooling operation by setting on the master remote
controller and to changeover to fan only operation.
How to designate the master remote controller
1
Press the operation mode selector button of
the current master remote controller for 4 seconds.
The display showing “
” (changeover
under control) of all slave remote controllers
connected to the same outdoor unit flashes.
English
2
Press the operation mode selector button of
the controller that you wish to designate as the
master remote controller. Then designation is
completed. This remote controller is designated as the master remote controller and the
” (changeover
display showing “
under control) vanishes.
The displays of other remote controllers show
“
” (changeover under control).
6-6 PRECAUTIONS FOR GROUP CONTROL SYSTEM OR TWO REMOTE CONTROLLER CONTROL SYSTEM
This system provides two other control systems
beside individual control (one remote controller controls one indoor unit) system. Confirm about your system to Daikin dealer.
• Group control system
One remote controller controls up to 16 indoor
units. All indoor units are equally set.
• Two remote controller control system
Two remote controllers control one indoor unit (in
case of group control system, one group of indoor
units). The unit is individually operated.
NOTE
• Contact your Daikin dealer in case of changing the combination or setting of group control and two remote controller control
systems.
7. OPTIMUM OPERATION
Observe the following precautions to ensure the
system operates properly.
• Adjust the air outlet properly and avoid direct air
flow to room inhabitants.
• Adjust the room temperature properly for a comfortable environment. Avoid excessive heating or
cooling.
• Prevent direct sunlight from entering a room during cooling operation by using curtains or blinds.
• Ventilate often.
Extended use requires special attention to ventilation.
• Do not keep doors and windows opened. If the
doors and windows remain open, air will flow out
of your room causing a decrease in the cooling or
heating effect.
• Never place objects near the air inlet or the air
outlet of the unit. It may cause deterioration in the
effect or stop the operation.
8
01_EN_3P226891-12Q.fm Page 9 Saturday, November 27, 2010 2:08 PM
• Turn off the main power supply switch to the unit
when the unit is not used for longer periods of
time. If the switch is on, it uses electricity. Before
restarting the unit, turn on the main power supply
switch 6 hours before operation to ensure smooth
running. (Refer to the chapter “Maintenance” in
the indoor unit manual.)
• When the display shows “
” (time to clean the
air filter), ask a qualified service person to clean
the filters. (Refer to the chapter “Maintenance” in
the indoor unit manual.)
• Keep the indoor unit and remote control at least
1 m away from televisions, radios, stereos, and
other similar equipment.
Failing to do so may cause static or distorted pictures.
• Do not use other heating devices directly beneath
the indoor unit.
If you do, they might get deformed by the heat.
8. SEASONAL MAINTENANCE
CAUTION
Do not touch the air inlets or aluminum fins
of the outdoor or indoor units.
Touching them may result in injury.
Do not wash the outdoor or indoor units with
water.
An electric shock or fire may result.
Watch your steps at the time of air filter cleaning etc.
If the scaffold is unstable, you may fall or topple
down, thus causing injury.
Be sure to stop the operation, and turn the
breaker off before cleaning.
This may cause electric shock and injury.
8-2 AT THE END OF THE SEASON
On a clear day, use fan operation for around half a
day to thoroughly dry out the interior of the unit.
• Refer to page 5 for details on fan operation.
Turn off the power
• When the power is shut off, the characters in the
remote controller display disappear.
• When the power is on, the unit consumes up to
several dozen Watts of power.
Turn off the power to conserve energy.
Clean the air filter and exterior.
• After cleaning the air filter, be sure to put it back in
the same position.
See the operation manual included with the
indoor unit for details on how to clean it.
9. FOLLOWING SYMPTOMS ARE
NOT AIR CONDITIONER TROUBLES
9-1 THE SYSTEM DOES NOT OPERATE
• The air conditioner does not start immediately
when restart the operation after stop the operation or change operation mode after set the
operation mode.
If the operation lamp lights, the system is in normal condition.
To prevent overloading of the compressor motor,
the air conditioner starts 5 minutes after it is
turned ON again in case it was turned OFF just
before.
8-1 AT THE BEGINNING OF THE SEASON
• If “Centralized Control” is displayed on the
remote controller and pressing the operation
button causes the display to blink for a few
seconds.
This indicates that the central device is controlling
the unit.
The blinking display indicates that the remote
control cannot be used.
Check
• Are the indoor and outdoor unit intake and outlet
vents blocked?
Remove anything that might be blocking them.
• The system does not start immediately after
the power supply is turned on.
Wait one minute until the micro computer is prepared for operation.
Clean the air filter and exterior.
• After cleaning the air filter, be sure to put it back in
the same position.
See the operation manual included with the
indoor unit for details on how to clean it.
9-2 IT STOPS SOMETIMES
Consult with the dealer for cleaning the interior of the indoor units.
Incorrect cleaning may damage the plastic parts
and cause failures, such as water leakage, and an
electric shock may result.
Turn the power on.
• When the power comes on, the characters in the
remote controller display appear.
(To protect the unit, turn the power on at least 6
hours before operating it. This makes operation
smoother.)
9
• The remote controller display reads “U4” or
“U5” and stops but then restarts after a few
minutes.
This is because the remote control is intercepting
noise from electrical appliances other than the air
conditioner, and this prevents communication
between the units, causing them to stop.
Operation automatically restarts when the noise
goes away.
English
01_EN_3P226891-12Q.fm Page 10 Saturday, November 27, 2010 2:08 PM
9-3 COOL/HEAT CANNOT BE CHANGED
OVER
• When the display shows “
”
(changeover under control).
It shows that this is a slave remote controller.
Refer to “Setting the master remote controller”.
• When the cool/heat selector switch is
installed and the display shows “
”
(changeover under control).
This is because cool/heat changeover is controlled by the cool/heat selector. Ask your Daikin
dealer where the remote control switch is
installed.
9-4 FAN OPERATION IS POSSIBLE, BUT
COOLING AND HEATING DO NOT
WORK
• Immediately after the power is turned on.
The micro computer is getting ready to operate.
Wait 10 minutes.
9-5 THE FAN STRENGTH DOES NOT CORRESPOND TO THE SETTING
• Immediately after the cooling operation stops
and if the room temperature and humidity are
low.
This is because warm refrigerant gas flows back
into the indoor unit and generates steam.
Indoor unit, outdoor unit
• When the system is changed over to heating
operation after defrost operation.
Moisture generated by defrost becomes steam
and is exhausted.
9-8 NOISE OF AIR CONDITIONERS
Indoor unit
• A “zeen” sound is heard immediately after the
power supply is turned on.
The electronic expansion valve inside an indoor
unit starts working and makes the noise. Its volume will reduce in about one minute.
• A continuous low “shah” sound is heard when
the system is in cooling operation or at a stop.
When the drain pump (optional accessories) is in
operation, this noise is heard.
• A “pishi-pishi” squeaking sound is heard when
the system stops after heating operation.
Expansion and contraction of plastic parts caused
by temperature change make this noise.
• The fan strength does no change even if the
fan strength adjustment button in pressed.
During heating operation, when the room temperature reaches the set temperature, the outdoor
unit goes off and the indoor unit changes to whisper fan strength.
This is to prevent cold air blowing directly on occupants of the room.
The fan strength will not change even if the button
is changed, when another indoor unit is in heating
operation.
Outdoor unit
9-6 THE FAN DIRECTION DOES NOT CORRESPOND TO THE SETTING
• When the tone of operating noise changes.
This noise is caused by the change of frequency.
• The fan direction does not correspond to the
remote control display.
The fan direction does not swing.
This is because the unit is being controlled by the
micro computer. Refer to “Adjusting the air flow
direction”.
Indoor unit, outdoor unit
9-7 WHITE MIST COMES OUT OF A UNIT
• A hissing sound which is heard at the start or
immediately after stopping operation or
defrost operation.
This is the noise of refrigerant caused by flow stop
or flow change.
Indoor unit
• When humidity is high during cooling operation.
If the interior of an indoor unit is extremely contaminated, the temperature distribution inside a
room becomes uneven. It is necessary to clean
the interior of the indoor unit. Ask your Daikin
dealer for details on cleaning the unit. This operation requires a qualified service person.
English
• A low “sah”, “choro-choro” sound is heard
while the indoor unit is stopped.
When the other indoor unit is in operation, this
noise is heard. In order to prevent oil and refrigerant from remaining in the system, a small amount
of refrigerant is kept flowing.
• A continuous low hissing sound is heard
when the system is in cooling or defrost operation.
This is the sound of refrigerant gas flowing
through both indoor and outdoor units.
9-9 DUST COMES OUT OF THE UNIT
• When the unit is used after stopping for a long
time.
This is because dust has gotten into the unit.
10
01_EN_3P226891-12Q.fm Page 11 Saturday, November 27, 2010 2:08 PM
9-10 THE UNITS CAN GIVE OFF ODOURS
10. TROUBLE SHOOTING
• During operation.
The unit can absorb the smell of rooms, furniture,
cigarettes, etc., and then emit it again.
If one of the following malfunctions occur, take
the measures shown below and contact your
Daikin dealer.
9-11 THE OUTDOOR UNIT FAN DOES NOT
SPIN
WARNING
Stop operation and shut off the power if anything unusual occurs (burning smells, etc.)
Leaving the unit running under such circumstances
may cause breakage, electrical shock, or fire.
Contact your dealer.
• During operation.
The speed of the fan is controlled in order to optimize product operation.
9-12 THE DISPLAY SHOWS “
”
• This is the case immediately after the main
power supply switch is turned on.
This means that the remote controller is in normal
condition. This continues for one minute.
9-13 THE COMPRESSOR OR FAN IN THE
OUTDOOR UNIT DOES NOT STOP
• This is to prevent oil and refrigerant from
remaining in the compressor. The unit will
stop after 5 to 10 minutes.
9-14 THE INSIDE OF AN OUTDOOR UNIT IS
WARM EVEN WHEN THE UNIT HAS
STOPPED
• This is because the crankcase heater is warming the compressor so that the compressor
can start smoothly.
9-15 IT STOPS SOMETIMES
• The remote controller display reads “U4” and
“U5” and stops but then restarts after a few
minutes.
This is because the remote control is intercepting
noise from electrical appliances other than the air
conditioner, and this prevents communication
between the units, causing them to stop.
Operation automatically restarts when the noise
goes away.
9-16 HOT AIR IS EMITTED EVEN THOUGH
THE UNIT IS STOPPED
• Hot air can be felt when the unit is stopped.
Several different indoor units are being run on the
same system, so if another unit is running, some
refrigerant will still flow through the unit.
9-17 DOES NOT COOL VERY WELL
• Program dry operation.
Program dry operation is designed to lower the
room temperature as little as possible.
Refer to page 6.
11
• If a safety device such as a fuse, a breaker or an
earth leakage breaker frequently actuates;
Measure : Do not turn on the main power switch.
• If the ON/OFF switch does not properly work;
Measure: Turn off the main power switch.
• If water leaks from unit;
Measure: Stop the operation.
• The operation switch does not work well.
Turn off the power.
• If the display “
TEST ”, the unit number and the
operation lamp flash and the malfunction code
appears; (Refer to figure 12)
1. Inspection display
2. Indoor unit number in which a malfunction
occurs
3. Operation lamp
4. Malfunction code
Measure: Notify your Daikin dealer and report the
malfunction code.
If the system does not properly operate except
for the above mentioned cases and none of the
above mentioned malfunctions is evident, investigate the system according to the following procedures.
If it is impossible to fix the problem yourself after
checking all the above items, contact your
dealer.
Let him know the symptoms, system name, and
model name (listed on the warranty card).
1. If the system does not operate at all;
• Check if there is no power failure.
Wait until power is restored. If power failure occurs
during operation, the system automatically restarts
immediately after the power supply is recovered.
• Check if no fuse has blown;
Turn off the power supply
• Check if the breaker is
ON
blown.
Switch
Turn the power on with
Trip position
the breaker switch in the
Breaker
off position.
OFF
Do not turn the power on
with the breaker switch in
the trip position.
(Contact your dealer.)
English
01_EN_3P226891-12Q.fm Page 12 Saturday, November 27, 2010 2:08 PM
2. If the system stops soon after starting the operation;
• Check if air inlet or outlet of outdoor or indoor unit
is not blocked by obstacles.
Remove any obstacle and make it well-ventilated.
• Check if the remote controller display shows
“
” (time to clean the air filter);
Refer to the operation manual of the indoor unit.
And clean the air filter.
3. The system operates but cooling or heating is
insufficient;
• Check if air inlet or outlet of outdoor or indoor unit
is not blocked by obstacles.
Remove any obstacle and make it well-ventilated.
• Check if the remote controller display shows
“
” (time to clean the air filter);
Refer to the operation manual of the indoor unit.
And clean the air filter.
• Check the temperature setting.
Refer to “Operation procedure”.
• Check the fan speed setting on your remote controller.
Refer to “Operation procedure”.
• Check for open doors or windows.
Shut doors and windows to prevent wind from
coming in.
• Check if there are too many occupants in the
room during cooling operation.
• Check if the heat source of the room is excessive
during cooling operation.
• Check if direct sunlight enters the room during
cooling operation.
Use curtains or blinds.
• Check if the air flow angle is not proper.
Refer to “Operation procedure”.
After-sales service and warranty
After-sales service:
WARNING
• Do not modify the unit.
This may cause electric shock or fire.
• Do not disassemble or repair the unit.
This may cause electric shock or fire.
Contact your dealer.
• If the refrigerant leaks, keep out of fire.
Although the refrigerant does not usually leak, if
the refrigerant leaks out into a room and comes in
contact with the combustible air in the equipment
such as fan heater, stove, oil (gas) cooker, etc., it
will cause toxic gas to be generated.
When a refrigerant leakage failure has been
repaired, confirm a service person that the leakage point has been corrected surely before
restarting operation.
English
• Do not remove or reinstall the unit by yourself.
Incorrect installation may cause electrical shock
or fire.
Contact your dealer.
• When asking your dealer to repair, inform
related staff of the details as follows:
• Product No. of air conditioner:
Refer to the warranty card.
• Shipping date and installation date:
Refer to the warranty card.
• Malfunction:
Inform the staff of the defective details.
(Malfunction code being displayed on
the remote controller.)
• Name, address, telephone number
• Repair where the warranty term is expired
Contact your dealer. If necessary to repair, pay
service is available.
• Minimum storage period of important parts
Even after a certain type of air conditioner is discontinued, we have the related important parts in
stock for 9 years at least.
The important parts indicate parts essential to
operate the air conditioner.
• Recommendations for maintenance and
inspection
Since dust collects after using the unit for several
years, the performance will be deteriorated to
some extent.
Taking apart and cleaning inside require technical
expertise, so we recommend entering a maintenance and inspection contract (at a cost) separate
from normal maintenance.
• Recommended inspection and maintenance
cycles
[Note: The maintenance cycle is not the same
as the warranty period.]
Table 1 assumes the following usage conditions.
1. Normal use without frequent starting and stopping of the machine.
(Although it varies with the model, we recommend not starting and stopping the machine
more than 6 times/hour for normal use.)
2. Operation of the product is assumed to be
10 hours/day, 2500 hours/year.
12
01_EN_3P226891-12Q.fm Page 13 Saturday, November 27, 2010 2:08 PM
• Table 1 “Inspection Cycle” and “Maintenance
Cycle” Lists
Name of Main Part
Inspection
Cycle
Maintenance Cycle
[replacements and/
or repairs]
■ Recommended replacement cycle of wear-out
parts
[The cycle is not the same as the warranty period.]
• Table 2 “Replacement Cycle” Lists
Electric motor (fan,
damper, etc.)
20,000 hours
PC boards
25,000 hours
Air filter
Heat exchanger
5 years
Sensor (thermistor, etc.)
5 years
High efficiency filter
(Optional accessory)
Remote controller and
switches
1 year
25,000 hours
Drain pan
8 years
Expansion valve
20,000 hours
Electromagnetic valve
20,000 hours
Note 1
This table indicates main parts.
See the maintenance and inspection contract for
details.
Note 2
This maintenance cycle indicates recommended
lengths of time until the need arises for maintenance
work, in order to ensure the product is operational
as long as possible
Use for appropriate maintenance design (budgeting
maintenance and inspection fees, etc.)
Depending on the content of the maintenance and
inspection contract, the inspection and maintenance
cycles may in reality be shorter than those listed
here.
Shortening of “maintenance cycle” and
“replacement cycle” needs to be considered in
the following cases.
1. When used in hot, humid locations or locations
where temperature and humidity fluctuate
greatly.
2. When used in locations where power fluctuation
(voltage, frequency, wave distortion, etc.) is high.
(Cannot be used if it is outside the allowable
range.)
3. When installed and used in locations where
bumps and vibrations are frequent.
4. When used in bad locations where dust, salt,
harmful gas or oil mist such as sulfurous acid
and hydrogen sulfide may be present in the air.
5. When used in locations where the machine is
started and stopped frequently or operation time
is long. (Example: 24 hour air-conditioning)
13
Name of Main Part
Inspection
Cycle
Replacement Cycle
5 years
1 year
1 year
Fuse
10 years
Crankcase heater
8 years
Note 1
This table indicates main parts.
See the maintenance and inspection contract for details.
Note 2
This maintenance cycle indicates recommended
lengths of time until the need arises for maintenance
work, in order to ensure the product is operational
as long as possible.
Use for appropriate maintenance design (budgeting
maintenance and inspection fees, etc.).
Contact your dealer for details.
Note: Breakage due to taking apart or cleaning
inside by anyone other than our authorized dealers
may not be included in the warranty.
■ Moving and discarding the unit
• Contact your dealer for removing and reinstalling
the system air conditioner since they require technical expertise.
• The system air conditioner uses fluorocarbon
refrigerant.
Contact your dealer for discarding the system air
conditioner since it is required by law to collect,
transport and discard the refrigerant in accordance with relevant local and national regulations.
■ Where to call
For after-sales service, etc., consult with your dealer.
■ Warranty period:
• This product includes a warranty card.
The warranty card is given to a customer after
dealer staff fills out necessary items in the card.
The customer should check the entered items
and store it carefully.
Warranty period: Within one year after
installation.
For further details, refer to
the warranty card.
• If it is necessary to repair the air conditioner within
the warranty period, contact your dealer and show
your warranty card. If the warranty card is not
shown, pay-service repair may be performed even
though the warranty period is not expired.
English
00_CV_3P226891-12Q.fm Page 7 Saturday, November 27, 2010 2:07 PM
3P226891-12Q
EM10A039
(1012) HT