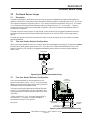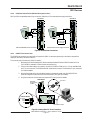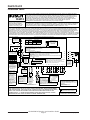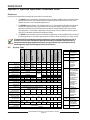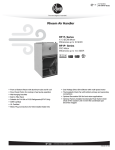
1
Control Panels D6412/D4412 Operation and Installation Guide D6412/D4412 Contents Contents 1.0 1.1 1.2 1.3 1.3.1 1.3.2 1.4 1.4.1 1.4.2 2.0 2.1 2.2 2.3 2.3.1 2.3.2 2.3.3 2.3.4 2.3.5 2.3.6 2.3.7 2.3.8 2.3.9 2.3.10 2.3.11 2.3.12 3.0 3.1 3.2 3.3 3.4 3.4.1 3.4.2 3.5 3.5.1 3.5.2 3.5.3 3.5.4 3.5.5 3.5.6 3.5.7 3.6 3.7 3.8 4.0 4.1 4.1.1 4.1.2 4.2 4.2.2 4.2.3 Introduction ............................................................................................................................................................................................. 7 Organization ........................................................................................................................................................................... 7 Other Literature Referenced ............................................................................................................................................. 8 Documentation Conventions ............................................................................................................................................. 8 Type Styles Used in this Guide ......................................................................................................................................... 8 Tips, Important Notes, Cautions, and Warnings ........................................................................................................... 8 FCC Notice ............................................................................................................................................................................ 9 Part 15 ..................................................................................................................................................................................... 9 Part 68 ..................................................................................................................................................................................... 9 Overview ................................................................................................................................................................................................. 10 Specifications ...................................................................................................................................................................... 10 SIA Control Panel Standard ............................................................................................................................................ 12 Standard Features .............................................................................................................................................................. 12 Points ..................................................................................................................................................................................... 12 Areas and Accounts ........................................................................................................................................................... 12 Communicator ..................................................................................................................................................................... 12 Command Centers ............................................................................................................................................................. 13 Keyswitch .............................................................................................................................................................................. 13 Alarm Event Memory .......................................................................................................................................................... 13 Event Log .............................................................................................................................................................................. 13 EMI/Lightning Transient Protection ............................................................................................................................... 13 Programming ........................................................................................................................................................................ 13 Other Features .................................................................................................................................................................... 13 Control Panel Assembly .................................................................................................................................................... 14 Listings and Approvals ....................................................................................................................................................... 14 Installation ............................................................................................................................................................................................. 15 Before You Begin ................................................................................................................................................................ 15 Enclosure Options .............................................................................................................................................................. 15 Premises Wiring .................................................................................................................................................................. 15 Installing the Assembly ...................................................................................................................................................... 16 Connecting Earth Ground ................................................................................................................................................ 16 Closing the Installer Switch ............................................................................................................................................. 16 Finishing the Installation ................................................................................................................................................... 17 Earth Ground and Installer Switch ................................................................................................................................. 17 Charge the Battery as You Finish ................................................................................................................................... 17 Install and Wire Detection Devices ............................................................................................................................... 17 Install Modules ..................................................................................................................................................................... 17 Make the Telephone Connections .................................................................................................................................. 17 Connect the On-Board Points and Command Centers ........................................................................................... 17 Power Up ............................................................................................................................................................................... 18 Programming the Panel ..................................................................................................................................................... 18 Check for Fire Alarm Verification .................................................................................................................................... 18 Testing the System ............................................................................................................................................................. 18 Power Supply ...................................................................................................................................................................................... 19 Primary Power ...................................................................................................................................................................... 19 Primary (AC) Power Circuit .............................................................................................................................................. 19 Installing the Transformer .................................................................................................................................................. 19 Secondary Power ................................................................................................................................................................ 19 Installing the Battery .......................................................................................................................................................... 19 Replacement ........................................................................................................................................................................ 19 D6412/D4412 Operation and Installation Guide 45349E Page 2 © 2003 Bosch Security Systems D6412/D4412 Contents 4.2.4 4.2.5 4.2.6 4.2.7 4.3 5.0 5.1 5.2 5.2.1 5.2.2 5.2.3 5.3 5.3.1 5.4 5.4.1 5.5 6.0 6.1 6.2 6.3 6.4 6.5 6.6 6.7 6.8 6.9 6.10 6.10.1 7.0 7.1 7.2 7.3 7.4 7.5 7.6 7.7 8.0 8.1 8.2 8.2.1 8.2.2 8.2.3 8.2.4 8.2.5 8.2.6 8.2.7 8.2.8 9.0 10.0 10.1 10.2 10.2.1 Battery Supervision ............................................................................................................................................................ 19 Battery Charging Circuit - Float Charge ...................................................................................................................... 20 Battery Discharge/Recharge Schedule ........................................................................................................................ 20 System Status LED ............................................................................................................................................................ 20 External Power Supply ...................................................................................................................................................... 20 Power Outputs ................................................................................................................................................................................... 21 Circuit Protection ................................................................................................................................................................ 21 Available Power ................................................................................................................................................................... 21 Auxiliary Power ..................................................................................................................................................................... 21 Installer’s Keypad Connector ........................................................................................................................................... 21 Alarm Power ......................................................................................................................................................................... 21 Continuous Power Output ................................................................................................................................................ 21 Continuous Current Draw ................................................................................................................................................. 21 Alarm Power ......................................................................................................................................................................... 21 Available Power ................................................................................................................................................................... 21 Output Programming ......................................................................................................................................................... 22 Telephone Connections .................................................................................................................................................................. 23 Registration ......................................................................................................................................................................... 23 Notification .......................................................................................................................................................................... 23 Location ................................................................................................................................................................................ 23 Phone Cord Connection .................................................................................................................................................. 23 System Status LED (Red) ............................................................................................................................................... 23 Dialing Format ..................................................................................................................................................................... 23 Phone Line Fault ................................................................................................................................................................ 24 Called Party Disconnect .................................................................................................................................................. 24 Communication Failure .................................................................................................................................................... 24 Ground Start ....................................................................................................................................................................... 24 Program PO1 for Ground Start ...................................................................................................................................... 24 On-Board Sensor Loops .............................................................................................................................................................. 27 Description ........................................................................................................................................................................... 27 Two-wire Smoke Detector Configuration ..................................................................................................................... 27 Four-wire Smoke Detector Configuration .................................................................................................................... 27 Sensor Loop 1 Configuration ......................................................................................................................................... 28 Single Point Configuration (Points 2 to 8) ................................................................................................................. 28 Doubled Point Configuration .......................................................................................................................................... 29 Sensor Loop Response Time .......................................................................................................................................... 29 Off-Board Sensor Loops .............................................................................................................................................................. 31 SDI Point Expanders .......................................................................................................................................................... 31 DX2010 Point Expander Module ................................................................................................................................... 33 DX2010 Overview .............................................................................................................................................................. 33 DX2010 Installation ............................................................................................................................................................ 33 DX2010 to Panel SDI Bus Connections ...................................................................................................................... 34 DX2010 Auxiliary Output Connections ......................................................................................................................... 36 DX2010 Tamper Input Connections .............................................................................................................................. 36 DX2010 Sensor Loop (Point) Connections ................................................................................................................. 36 DX2010 Address Programming ....................................................................................................................................... 37 DX2010 Status LED .......................................................................................................................................................... 38 On-Board Outputs ........................................................................................................................................................................... 39 Off-Board Outputs ........................................................................................................................................................................... 41 Overview ............................................................................................................................................................................... 41 DX3010 Octo-Output Module ........................................................................................................................................ 41 Overview ............................................................................................................................................................................... 41 D6412/D4412 Operation and Installation Guide © 2003 Bosch Security Systems Page 3 45349E D6412/D4412 Contents 10.2.2 10.2.3 10.2.4 10.2.5 10.2.6 11.0 11.1 11.2 11.2.1 11.2.2 11.3 11.4 11.4.1 11.4.2 11.4.3 11.4.4 12.0 12.1 12.2 12.3 12.3.1 12.3.2 12.3.3 12.3.4 12.3.5 12.3.6 13.0 13.1 13.2 13.2.1 13.2.2 13.3 13.3.1 13.3.2 13.3.3 13.3.4 13.3.5 13.3.6 13.3.7 13.3.8 13.3.9 13.3.10 13.3.11 14.0 15.0 16.0 16.1 16.1.1 16.1.2 16.1.3 16.1.4 16.1.5 Configuring the DX3010 Octo-Output Module .......................................................................................................... 41 Relay Outputs ...................................................................................................................................................................... 41 Installation ............................................................................................................................................................................. 42 DX3010 to D6412/D4412 SDI Bus Wiring Connections ....................................................................................... 42 Address Programming ........................................................................................................................................................ 44 Arming Devices ................................................................................................................................................................................... 45 Description ........................................................................................................................................................................... 45 Command Centers ............................................................................................................................................................ 45 Assigning the Command Center an Address .............................................................................................................. 45 Command Center Installation .......................................................................................................................................... 46 D268/D269, D279 Independent Zone Control ......................................................................................................... 47 Keyswitch .............................................................................................................................................................................. 47 Keyswitch Description ....................................................................................................................................................... 47 Keyswitch Programming .................................................................................................................................................... 47 Keyswitch Installation ........................................................................................................................................................ 48 Keyswitch Operation .......................................................................................................................................................... 48 SDI Devices .......................................................................................................................................................................................... 49 Description ........................................................................................................................................................................... 49 Installation ............................................................................................................................................................................ 49 DX4010 RS-232 Serial Interface Module .................................................................................................................. 50 DX4010 Installation ............................................................................................................................................................ 50 DX4010 to D6412/D4412 SDI Bus Wiring Connections ....................................................................................... 51 RAM IV Direct Connection ............................................................................................................................................... 51 Configuration Jumpers ....................................................................................................................................................... 52 Supervision ........................................................................................................................................................................... 52 DX4010 Module’s DB9 Connector ................................................................................................................................ 52 Installer’s Keypad and Installer Mode .................................................................................................................................... 53 Installer’s Keypad Connector .......................................................................................................................................... 53 Entering the Installer Mode ............................................................................................................................................. 53 Installer’s Passcode ............................................................................................................................................................ 53 Service Start/Service End Reports ................................................................................................................................ 54 Installer’s Menu .................................................................................................................................................................. 54 Press [1] for Bell Test ......................................................................................................................................................... 54 Press [2] for Strobe Test ................................................................................................................................................... 54 Press [3] for Battery Test .................................................................................................................................................. 54 Press [4] for Test Report ................................................................................................................................................... 54 Press [5] for Point Status ................................................................................................................................................. 54 Press [6] for Output Test .................................................................................................................................................. 55 Press [7] for RF Menu ....................................................................................................................................................... 55 Press [8] for Keypad Program ......................................................................................................................................... 56 Press [9] Program Key ....................................................................................................................................................... 57 Exiting the Installer’s Menu .............................................................................................................................................. 58 Press [0] Call for Service Details ................................................................................................................................... 58 Installation Label ................................................................................................................................................................................ 59 Terminal Quick Reference ............................................................................................................................................................. 61 Troubleshooting ................................................................................................................................................................................. 63 Introduction .......................................................................................................................................................................... 63 Arming Issues ....................................................................................................................................................................... 63 Point Issues .......................................................................................................................................................................... 63 Command Center Issues .................................................................................................................................................. 64 Programming Issues ........................................................................................................................................................... 64 Miscellaneous Issues ......................................................................................................................................................... 64 D6412/D4412 Operation and Installation Guide 45349E Page 4 © 2003 Bosch Security Systems D6412/D4412 Contents Appendix A: Approved Applications Compliance Guide ............................................................................................................... 65 A-1 Listings and Approvals ...................................................................................................................................................... 65 A-2 System Chart ...................................................................................................................................................................... 66 A-3 System Wiring Diagrams, Issue A ................................................................................................................................. 67 A-4 Current Rating Chart for Standby Battery Calculations ......................................................................................... 68 A-5 Standby Battery Requirements ...................................................................................................................................... 68 A-6 Standby Battery Calculation for NFPA 72 Fire Alarm Applications ..................................................................... 68 Appendix B: SDI Address Chart ................................................................................................................................................................. 69 Tables Table 1: D6412/D4412 Installation Guide Organization ........................................................................................................... 7 Table 2: Other Literature Referenced ............................................................................................................................................. 8 Table 3: Compatible Command Centers ...................................................................................................................................... 13 Table 4: System Status LED Description .................................................................................................................................... 20 Table 5: On-Board Sensor Loops .................................................................................................................................................. 28 Table 6: Point Scan Time/Pulse Count Time Selections ........................................................................................................ 29 Table 7: Point Expansion Mapping ................................................................................................................................................. 31 Table 8: DX2010 Wire Lengths ...................................................................................................................................................... 34 Table 9: DX2010 Address 106 ....................................................................................................................................................... 37 Table 10: DX2010 Address 107 (for D6412 only) ..................................................................................................................... 37 Table 11: DX2010 Address Settings ............................................................................................................................................. 38 Table 12: DX2010 Address Jumper Settings .............................................................................................................................. 38 Table 13: DX3010 Wire Lengths .................................................................................................................................................... 42 Table 14: DX3010 Address Settings ............................................................................................................................................. 44 Table 15: DX3010 Address Jumper Settings .............................................................................................................................. 44 Table 16: Command Center Address Assignments DIP Switch Settings ........................................................................... 45 Table 17: Command Center Wire Lengths .................................................................................................................................. 46 Table 18: DX4010 Address Settings ............................................................................................................................................. 52 D6412/D4412 Operation and Installation Guide © 2003 Bosch Security Systems Page 5 45349E D6412/D4412 Figures Figures Figure 1: System Configuration ...................................................................................................................................................... 10 Figure 2: Enclosure Mounting ......................................................................................................................................................... 16 Figure 3: Installer Switch .................................................................................................................................................................. 16 Figure 4: System Status LED ......................................................................................................................................................... 20 Figure 5: On-Board Outputs ........................................................................................................................................................... 22 Figure 6: RJ31X/RJ38X Wiring ...................................................................................................................................................... 23 Figure 7: Ground Start ...................................................................................................................................................................... 25 Figure 8: Typical Two-Wire Smoke Detector Wiring ................................................................................................................. 27 Figure 9: Typical Four-Wire Smoke Detector Wiring ................................................................................................................ 27 Figure 10: Sensor Loop 1 Wiring ................................................................................................................................................... 28 Figure 11: Single Point Sensor Loop Wiring .............................................................................................................................. 28 Figure 12: On-Board Doubled Point Sensor Loop Wiring ....................................................................................................... 29 Figure 13: Installing the DX2010 in D203 Enclosure .............................................................................................................. 33 Figure 14: Installing the DX2010 in the Panel Enclosure ....................................................................................................... 33 Figure 15: Optional Enclosure Mounting Locations for the DX2010 ................................................................................... 34 Figure 16: Wiring the DX2010 to the D6412/D4412 .............................................................................................................. 35 Figure 17: Wiring the DX2010 for External Power Supply ...................................................................................................... 35 Figure 18: Auxiliary Output Connections ..................................................................................................................................... 36 Figure 19: DX2010 Tamper Input Wiring ..................................................................................................................................... 36 Figure 20: DX2010 Sensor Loop Wiring, Single Loop Configuration ................................................................................. 37 Figure 21: DX2010 Sensor Loop Wiring, Doubled Loop Configuration .............................................................................. 37 Figure 22: DX2010 DIP Switch Configuration ........................................................................................................................... 38 Figure 23: DX2010 Status LED ..................................................................................................................................................... 38 Figure 24: PO1 Wiring ..................................................................................................................................................................... 39 Figure 25: PO2-PO4 Wiring ........................................................................................................................................................... 39 Figure 26: DX3010 - Control Panel Enclosure Side Mounting ............................................................................................. 42 Figure 27: Installing the DX3010 in a Remote Enclosure ....................................................................................................... 42 Figure 28: Wiring the DX3010 to the D6412/D4412 .............................................................................................................. 43 Figure 29: Wiring for External Power Supply .............................................................................................................................. 43 Figure 30: DX3010 Address DIP Switches ................................................................................................................................. 44 Figure 31: Command Center DIP Switch Orientation ............................................................................................................. 45 Figure 32: Wiring Command Centers to the D6412/D4412 ................................................................................................. 46 Figure 33: External Power for Command Centers ..................................................................................................................... 47 Figure 34: Keyswitches ..................................................................................................................................................................... 48 Figure 35: SDI Device Wiring ......................................................................................................................................................... 49 Figure 36: External Power for SDI Devices ................................................................................................................................. 50 Figure 37: DX4010 RS-232 Serial Interface Module .............................................................................................................. 50 Figure 38: DX4010 Power Connections ...................................................................................................................................... 51 Figure 39: Creating a RAM IV Direct Connection .................................................................................................................... 51 Figure 40: DX4010 P2/P3 Jumper Pin Settings ........................................................................................................................ 52 Figure 41: DX4010 DIP Switch Orientation ............................................................................................................................... 52 Figure 42: DX4010 D89 Connector Layout ............................................................................................................................... 52 Figure 43: Installer’s Keypad ........................................................................................................................................................... 53 Figure 44: Installer Switch ............................................................................................................................................................... 54 Figure 45: Adding RF ID Codes Menu Display .......................................................................................................................... 55 Figure 46: RF ID Code Display ...................................................................................................................................................... 55 Figure 47: Test RF Devices Display ............................................................................................................................................... 55 Figure 48: RF Device Test Status Display ................................................................................................................................... 55 Figure 49: RF ID Code Display ...................................................................................................................................................... 56 Figure 50: PK32 to D6412/D4412 Connections ...................................................................................................................... 57 D6412/D4412 Operation and Installation Guide 45349E Page 6 © 2003 Bosch Security Systems D6412/D4412 Introduction 1.0 Introduction This guide addresses the installation of the D6412 and D4412 Control Panel only, and should not be used for any other panel. 1.1 Organization This guide is divided into 16 sections with seven appendices. Table 1 contains a summary of each section. Section 1.0 2.0 3.0 4.0 5.0 6.0 7.0 8.0 9.0 10.0 11.0 12.0 13.0 14.0 15.0 16.0 Appendices Description Introduction - This section. Overview - Overview of the D6412/D4412 Control Panel, including operational specifications, standard and new features. Installation - Basic installation instructions, including everything needed to power up the panel and ready for programming. Power Supply - Information about the primary and secondary power sources and instructions for correcting problems with them. Power Outputs - Information about the available powered outputs, including the alarm output and built-in siren driver. Telephone Connections - Information about connecting the phone line. On-Board Sensor Loops - Information about the eight on-board sensor loops available on the D6412/D4412. Off-Board Sensor Loops - Information about available off-board sensor loops, including detailed instructions for connecting the DX2010 Point Expansion Module. On-Board Outputs - Information about the four on-board programmable outputs. Off-Board Outputs - Information about available off-board programmable outputs, including detailed instructions for connecting the DX3010 OctoOutput Module. Arming Devices - Information about command centers, keyswitches, and independent zone controls. SDI Devices - Descriptions and installation instructions for various optional modules that connect to the D6412/D4412’s data terminals (SDI bus). Installer’s Keypad and Installer Mode - Information for using an Installer’s Keypad and the Installer’s Mode. Installation Label - Copy of the installation label found inside the D6412/D4412 terminal. Terminal Quick Reference - Chart providing a short description of each D6412/D4412 terminal. Troubleshooting - Potential solutions to a variety of commonly encountered problems. A: Approved Applications and Compliance Guide B: SDI Address Chart Table 1: D6412/D4412 Installation Guide Organization D6412/D4412 Operation and Installation Guide © 2003 Bosch Security Systems Page 7 45349E D6412/D4412 Introduction 1.2 Other Literature Referenced Throughout this guide, references are made to other documentation. Review the documents in the table below for a complete description of the panel. Part numbers are included for ordering purposes. Document Name D6412/D4412 Program Entry Guide D6412 Program Record Sheet D4412 Program Record Sheet D6412/D4412 TSN: Smoke Detector Compatibility User's Guide for LED Command Centers User's Guide for Text Command Centers D6412 Firmware Release Notes D4412 Firmware Release Notes DX2010 Installation Guide DX3010 Installation Guide DX4010 Installation Guide Part Number 45351 45350 50485 46928 46840 46841 46929 50482 49533 49529 49539 Table 2: Other Literature Referenced 1.3 Documentation Conventions These conventions are intended to call out important features, items, notes, cautions, and warnings that the reader should be aware of in reading this document. 1.3.1 Type Styles Used in this Guide To help identify important items in the text, the following type styles are used: 1.3.2 Bold text Usually indicates selections that you may use while programming your panel. It may also indicate an important fact that should be noted. Bold italicized Used to denote notes, cautions, and/or warnings. Italicized text Refers the user to another part of the guide or to another document entirely. Courier text Indicates what may appear on the command center/keypad or in a report received at the central station receiver. [Text in brackets] Indicates to the user that a specific key should be pressed. Example: Press [Cmd] to exit this feature. Tips, Important Notes, Cautions, and Warnings Throughout this document, helpful tips, important notes, cautions and warnings are presented for the reader to keep in mind. These appear different from the rest of the text as follows; Important Notes - should be heeded for successful operation and programming. Also, tips and shortcuts may be included here. Caution - These caution the operator that physical damage to the panel and/or optional equipment may occur. Warning - These warn of the possibility of physical damage to the operator and/or equipment. D6412/D4412 Operation and Installation Guide 45349E Page 8 © 2003 Bosch Security Systems D6412/D4412 Introduction 1.4 FCC Notice 1.4.1 Part 15 This equipment has been tested and found to comply with the limits for a Class B digital device, pursuant to Part 15 of the FCC rules. These limits are designed to provide reasonable protection against harmful interference when the equipment is operated in a commercial environment. This equipment generates, uses, and can radiate radio frequency energy and, if not installed and used in accordance with this instruction guide, may cause harmful interference to radio communications. Operation of this equipment in a residential area is likely to cause harmful interference, in which case the user is required to correct the interference at his own expense. 1.4.2 Part 68 This equipment complies with Part 68 of FCC rules. A label contains, among other information, the FCC registration number and ringer equivalence number (REN). If requested, this information must be provided to the telephone company. The Bosch Security Systems D6412/D4412 Control Panel is registered for connection to the public telephone network using an RJ38X or RJ31X jack. The ringer equivalence number (REN) is used to determine the number of devices that may be connected to the telephone line. Excessive RENs on the telephone line may result in the devices not ringing in response to an incoming call. In most, but not all areas, the sum of the RENs should not exceed five (5). To ascertain of the number of devices that may be connected to the line, as determined by the RENs, contact the telephone company to determine the maximum REN for the calling area. If the D6412/D4412 Control Panel causes harm to the telephone network, the telephone company notifies you in advance. If advance notice isn’t practical, the telephone company notifies the customer as soon as possible. Also, you are advised of your right to file a complaint with the FCC if you believe it is necessary. The telephone company may make changes in its facilities, equipment, operations, or procedures that could affect the operation of the equipment. If this happens, the telephone company provides advance notice so you can make the necessary modifications for maintaining uninterrupted service. If trouble is experienced with the D6412/D4412 Control Panel, please contact Bosch Security Systems Customer Service for repair and/or warranty information. If the trouble is causing harm to the telephone network, the telephone company may request that you remove the equipment from the network until the problem is resolved. User repairs must not be made, and doing so voids the user’s warranty. This equipment cannot be used on public coin service provided by the telephone company. Connection to Party Line service is subject to state tariffs. (Contact your state public utilities commission for information.) FCC Registration Number: ESVMUL-46531-AL-E Ringer Equivalence: 0.1B Service Center in USA: National Repair Center 130 Perinton Parkway Fairport, NY 14450-9199 USA (800) 289-0096 ext. 4220 D6412/D4412 Operation and Installation Guide © 2003 Bosch Security Systems Page 9 45349E D6412/D4412 Overview 2.0 Overview RF3224 Premises RF Receiver (up to 4 RF keypads and 32 keyfobs) DX3010 Octo-Output Module DX2010 Point Expansion Module Control Panel DX4010 Serial Interface Module (for connection of serial printer or other RS-232 device). 8 On-Board Sensor Loops 4 On-Board Outputs Use command centers and/or keyswitches to arm the panel by area. Each area can have its own account number or areas can be grouped together with a common account number. Points of protection are assigned to areas. D8132 Modules provide additional power for command centers and other powered devices. DX3020 Module Provides control for X-10 modules. Figure 1: System Configuration 2.1 Specifications Voltage Input Primary: Secondary: 18 VAC 22 VA class 2 plug-in transformer CX4010 (D1825) 12 VDC, 7 Ah sealed lead acid rechargeable battery or 12 VDC, 18 Ah sealed lead acid rechargeable battery. Current Requirements 100 mA Panel: See Appendix : Approved Applications Compliance Guide for the current requirements of other system components. Power Outputs Continuous: Up to 600 mA maximum at 11.5 VDC to 12.4 VDC (continuous supply) total for all devices and outputs for non UL applications. Note: Up to 400 mA at 11.5 VDC to 12.4 VDC for UL Listed burglary applications, 120 mA for Fire and Combined Burglary/Fire (continuous supply) total for all devices and outputs. 400 mA for Fire and combined Fire/Burglary; 1500 mA for UL Burglary; 1850 mA for other Alarm (not investigated by UL). Applies to all four outputs combined. See the Outputs section of the Power: D6412/D4412 Program Entry Guide (P/N: 45351). Battery Discharge/Recharge Schedule Discharge • AC Off: Command centers indicate trouble. AC Fail Report sent as programmed. Cycle: • 13.8 VDC: Charging Float Level. • 12.1 VDC: Low Battery trouble at command centers.Low Battery Report as programmed. • 10.2 VDC: Panel shuts down as voltage falls below 10.2 VDC. Recharge • AC On: Panel restarts, battery charging begins, AC Restoral Report sent as programmed, AC Cycle: trouble clears from command centers. • 13.0 VDC: Battery Restoral Reports sent, battery trouble clears from command centers. • 3.8 VDC: Battery float charged. D6412/D4412 Operation and Installation Guide 45349E Page 10 © 2003 Bosch Security Systems D6412/D4412 Overview Minimum Operating Voltage SDI Bus (Data) Telephone Connections Environmental Arming Stations Compatible Enclosures Compatible Accessories Control Panel Configurations 10.2 VDC 12 VDC nominal. 305 m (1000 ft.) of 22 AWG (0.8 mm) cable. RJ31X or RJ38X jack can be interfaced with panel Temperature: 0°C to +50°C (+32° to +122°F) Relative Humidity: 5% to 85% at +30°C (+86°F ) non-condensing D625 VF Text Command Center • D623 LCD Text Command Center • D621 LED Command Center • Keyswitch • D2203 Universal Enclosure (included with panel), D8103 Universal Enclosure, D8109 Fire Enclosure, D8108A Attack Resistant Enclosure. Note: When ordering a compatible enclosure, order the D6412M (includes the mounting skirt and the D6412LC) or the D4412M (includes the mounting skirt and the D4412LC). In addition, order the CX4010 transformer. D621 LED Command Center • D623 Text Command Center, LCD Display • D625 Text Command Center, Vacuum Fluorescent Display • DX2010 (D9528) Point Expansion Module • DX3010 (D9529) Octo-Output Module • DX3020 (X7410I) Module (not investigated by UL) • DX4010 (D9533) Serial Output Module (not investigated by UL) • DX8010 Telephone Command Module (not investigated by UL) • DS RF3224 Premises RF Receiver • DS RF3332/3334 Keyfob (not investigated by UL) • DS RF3341 Keypad (not investigated by UL) • Programming Key (PK32) • D6412 - Complete control panel assembly in the D2203 Universal Enclosure. A CX4010 • Transformer is supplied. D6412LT - Complete control panel assembly in the D2203 Universal Enclosure. A CX4010 • Transformer must be ordered separately. D6412LC - Complete control panel assembly without an enclosure or transformer. A • CX4010 Transformer must be ordered separately. D6412M - Complete control panel assembly with a mounting skirt for the compatible • enclosure. A CX4010 Transformer must be ordered separately. See Compatible Enclosures in this table for compatible enclosure alternatives. D4412 - Complete control panel assembly in the D2203 Universal Enclosure. A CX4010 • Transformer is supplied. D4412LT - Complete control panel assembly in the D2203 Universal Enclosure. A CX4010 • Transformer must be ordered separately. D4412LC - Complete control panel assembly without an enclosure or transformer. A • CX4010 Transformer must be ordered separately. D4412M - Complete control panel assembly with a mounting skirt for the compatible • enclosure. A CX4010 Transformer must be ordered separately. See Compatible Enclosures in this table for compatible enclosure alternatives. D6412/D4412 Operation and Installation Guide © 2003 Bosch Security Systems Page 11 45349E D6412/D4412 Overview 2.2 SIA Control Panel Standard The D6412/D4412 utilizes features within the SIA Control Panel Standard, Features for False Alarm Reduction, SIA CP-01-1994.02 (R2000.01). SIA features are noted in the D6412/D4412 Program Entry Guide (P/N: 45351). The standard is available through: Security Industry Association (SIA) 635 Slaters Lane, Suite 110 Alexandria, Virginia 22314 You can e-mail requests for standards to: [email protected]. 2.3 Standard Features 2.3.1 Points The Bosch Security Systems D6412 Control Panel provides up to 40 separate points of protection (24 for the D4412 panel). Point programming parameters determine the panel’s response to open and shorted conditions on the point’s sensor loop. Points are programmed individually with several options to customize the protection to your installation. There are eight sensor loops available on the panel (for on-board points). Off-board point locations can be standard wired sensor loops (DX2010 Point Expander) or premises RF transmitters (premises RF receiver is required). The 40 points of protection for the D6412 (24 points for the D4412) can be located on any combination of wired and RF locations. 2.3.2 Areas and Accounts The system supports up to four separate areas for the D6412 and up to two separate areas for the D4412. You can assign all points to a single area or spread them out over a maximum of two or four areas, model dependent. You arm and disarm the panel by are. You can arm and disarm several areas with one function. You can also assign a passcode an authority level that allows a user to arm an area from a remote command center in another area. Assigning each area its own account number creates four (D6412) or two (D4412) separate accounts in one panel. Assigning the same account number to different areas groups them together in a single account. Area options include: exit tone and delay, separate fire and burglary outputs, and auto opening and closing skeds. Area 1 can be programmed as a common area. A “First to Open, Last to Close” arming feature is available. 2.3.3 Communicator The panel uses a built-in digital communicator to send reports to the receiver. It transmits reports in either Modem IIIa², Contact ID, or Pager format. Only the following central station receivers support the panel’s Modem IIIa² format: • D6600 with CPU v01.01.03 (or higher) • D6500 with D6511 MPU v1.05 (or higher) The D6500 with D6510 MPU does not support the panel’s Modem IIIa2 Format. IMPORTANT The panel connects to an RJ31X jack for phone line seizure. Connection to the RJ31X complies with FCC regulations for using the public telephone network. You can program the panel to route reports to one of two routing destinations. The system has routing capabilities that allow you to direct groups of system event reports and individual point reports to two different routing destinations. The reports can be routed to either destination, both destinations, or to Destination 2 only on failure of Destination 1. Each routing destination can be programmed with two phone numbers. Check panel communications at least once annually (from panel to central station) to verify the panel is communicating properly in the selected reporting format. IMPORTANT D6412/D4412 Operation and Installation Guide 45349E Page 12 © 2003 Bosch Security Systems D6412/D4412 Overview 2.3.4 Command Centers You can connect a maximum of eight, fully-supervised command centers to the system. The available power affects the total number of command centers you can connect without providing an auxiliary power supply. The panel transmits a Serial Device Trouble Report, SDI MISSING in the Modem IIIa² format or Sys Peripheral Trouble in the Contact ID format, if it loses communication with a command center. Table 3 shows the command centers compatible with the panel. Refer to Command Center in the D6412/D4412 Program Entry Guide (P/N: 45351) for complete details on programming command center options. Model D621 D623 D625 Display 16-Point LED Two lines of 16 characters, LCD Two lines of 16 characters, vacuum fluorescent Table 3: Compatible Command Centers 2.3.5 Keyswitch You can arm and disarm any of the available areas with maintained or momentary closure devices such as keyswitches. Point programming determines loop responses and which area a keyswitch controls. Sub-control units (D279) can arm and disarm individual points. 2.3.6 Alarm Event Memory The system uses alarm event memory to store alarm events for each area. You can view the area alarm events at a command center assigned to the area. The panel clears the area’s alarm event memory and starts storing new alarm events when you turn the area on. 2.3.7 Event Log The system stores 254 events from all areas in its event log. All events can be stored even if the panel does not send a report for them. You can view the log at a text command center (the D623 for example), print it locally using the DX4010 Serial Interface Module and a serial printer, or upload it to the Remote Account Manager (RAM IV). See Appendix B in the D6412/D4412 Program Entry Guide (P/N: 45351) for a listing of log events and how to view them. 2.3.8 EMI/Lightning Transient Protection The panel maintains Bosch Security Systems high level of quality and field dependability. Its design significantly reduces electromagnetic interference and malfunction generally caused by lightning. 2.3.9 Programming Use either a text keypad or the Remote Account Manager (RAM IV) to program the panel. Refer to the D6412/D4412 Program Entry Guide (P/N: 45351) for programming options. 2.3.10 Other Features The panel has many programmable features. A short list of some of the features follows. • Supervision of AC (primary power), battery (secondary power), SDI bus devices (keypads, point expanders, programmable output modules, alternate communication modules, etc.), central processing unit (CPU), and the telephone line (voltage only). • Automatic system test reports • Remote access for programming, diagnostics, and log uploads using the Remote Account Manager (RAM IV) • Fire Alarm Verification • Up to twenty (D6412) or twelve (D4412) Programmable Outputs, including a supervised siren driver • Skeds (scheduled events) Complete details on all the features can be found in the D6412/D4412 Program Entry Guide (P/N: 45351). D6412/D4412 Operation and Installation Guide © 2003 Bosch Security Systems Page 13 45349E D6412/D4412 Overview 2.3.11 Control Panel Assembly The Bosch Security Systems control panel is shipped from the factory pre-assembled. You should receive the following parts with your panel. Literature Package D6412 Control Panel D4412 Control Panel D6412/D4412 Installation Guide (P/N: 45349)* D6412 Program Record Sheet (P/N: 45350)* D6412/D4412 Program Entry Guide (P/N: 45351)* D6412 Release Notes (P/N: 46929) D6412/D4412 TSN: Smoke Detector Compatibility (P/N: 46928)* D6412 Specifications Sheet (P/N: 48392)* D6412/D4412 Installation Guide (P/N: 45349)* D4412 Program Record Sheet (P/N: 50485)* D6412/D4412 Program Entry Guide (P/N: 45351)* D4412 Release Notes (P/N: 50482) D6412/D4412 TSN: Smoke Detector Compatibility (P/N: 46928)* * This literature is available in a separate literature package for dealers. Assembly • Printed Circuit Board (PCB) • CX4010 transformer (order separately when ordering the D6412LC, D4412LC, D6412LT, D4412LT, D6412M, or D4412M) • Two mounting clips • Two #6 x 3/4 in. screws • Eight 2.2 kΩ EOL resistors (eight-pack [P/N: 47819], single resistor [P/N: 25944B]) • Eight 3.65 kΩ point-doubling EOL resistors (eight-pack [P/N: 47821], single resistor [P/N: 38130B]) • One 2.21 kΩ fire EOL resistor (P/N: 25899) • Two 14 in., 18 AWG (1.2 mm), color-coded battery leads • Three PCB support standoffs (P/N: 30503B) Ordered Separately Order the following to complete a basic eight-point installation. • Command center (or keyswitch) • D118 Speaker (for PO2 in supervised configuration) D118 not investigated by UL. • D126 Battery • D164 Phone Cord Configured packages are also available. Please consult your Bosch Security Systems Product Catalog. 2.3.12 Listings and Approvals F ire U n d erw riters L ab o rato rie s H o u seh o ld F ire W a rn in g U L 9 8 5 CSFM A p p ro ved b y th e C alifo rn ia S tate F ire M a rsh al fo r C o n tro l U n its (H o u se h o ld ) B u rg la ry U n d erw riters L ab o rato rie s - U L 1 0 2 3 H o u se h o ld - U L 3 6 5 P o lice C o n n ect - U L 6 0 9 L o cal - U L 1 0 7 6 P ro p rietary - U L 6 0 9 C en tral S tatio n - U L 6 0 9 D ig ital A la rm D6412/D4412 Operation and Installation Guide 45349E Page 14 © 2003 Bosch Security Systems D6412/D4412 Installation 3.0 Installation 3.1 Before You Begin This section contains a general installation procedure. It refers to other sections of the guide for detailed instructions. Bosch Security Systems recommends you review this guide and the D6412/D4412 Program Entry Guide (P/N: 45351) before you begin installation to determine the hardware and wiring requirements for the features you want to use. As you read through this guide, have the following documents at hand: • D6412 Program Record Sheet (P/N: 45350) or D4412 Program Record Sheet (P/N: 50485) • User’s Guide (Text Command Center [P/N: 46841]; LED Command Center - 46840). A condensed version of the User’s Guide is found in the D6412/D4412 Program Entry Guide (P/N: 45351). • Installation guide for each command center model you intend to install. Before you begin installing the panel, you should be familiar with keypad programming or the Remote Account Manager (RAM IV). 3.2 Enclosure Options The D2203 Enclosure is supplied with the standard D6412/D4412 Control Panel. To mount the D6412 in one of the Bosch Security Systems enclosures listed below, order the D6412M version (order the D4412M version for the D4412). • D8103 Universal Enclosure (gray) • D8109 Fire Enclosure (red) • D8108A Attack Resistant Enclosure (gray) The “M” version substitutes a D2202 Mounting Skirt for the D2203 enclosure allowing installation in the other enclosures. “M” does not include a transformer. Order a CX4010 separately. Refer to Appendix A: Approved Applications Compliance Guide to determine if your application requires a specific enclosure. Mount the enclosure in the desired location. 3.3 Premises Wiring Run the necessary wiring throughout the premises and route the wires into the enclosure. IMPORTANT Electro Magnetic Interference (EMI) may cause problems. EMI may occur if you install the system or run system wires near the following: • Computer network system • Electrical lines, fluorescent fixtures or telephone cabling • Ham radio transmitter site • Heavy machinery and motors • High voltage electrical equipment or transformers • PBX telephone system • Public service (police, fire departments, etc.) using radio communications • Radio station transmitter site or other broadcast station equipment • Welding shop If you think that EMI may be a problem, use shielded cable. The drain wire for the shielded cable must have continuity from the earth ground terminal on the panel to the end of the wire run. If continuity is not maintained, the shielded cable may aggravate potential noise problems rather than eliminate them. Connecting the drain wire to ground at any place other than the earth ground terminal may also produce problems. If you cut the drain wire to install devices, be certain to splice it together. Carefully solder and tape all splices. D6412/D4412 Operation and Installation Guide © 2003 Bosch Security Systems Page 15 45349E D6412/D4412 Installation 3.4 Installing the Assembly 1. Place the panel mounting clips on the appropriate standoff in the enclosure (see Figure 2). 2. Slide the panel into the slots at the top of the enclosure and then secure it with the two screws provided (see Figure 2). 3. Connect earth ground to the panel before making any other connections (see Section 3.4.1 Connecting Earth Ground). D6412/D4412 PCB Location Mounting Slots Install the PCB support standoffs here (P/N: 30503B) D6412/D4412 BOARD TERMINALS Corner of D6412/D4412 PCB Mounting Clip Enclosure Standoff = Mounting Clip Assembly Figure 2: Enclosure Mounting 3.4.1 Connecting Earth Ground To help prevent damage from electrostatic charges or other transient electrical surges, connect the system to earth ground before making any other connections. A grounding rod or cold water pipe are recommended earth ground references. Do not use telephone or electrical ground for the earth ground connection. Use 14 to 16 AWG (1.8 mm to 1.5 mm) wire when making the connection. Use only the earth ground terminal. Do not connect any other panel terminals to earth ground. 3.4.2 Closing the Installer Switch Closing the Installer Switch disables the panel (see Figure 3). System reporting is disabled and the system cannot be armed. A system trouble shows at all keypads. INSTALLER SWITCH NORMAL (OPEN) JP1 AUXILIARY INSTALLER SWITCH LOCKED (CLOSED) Installer Figure 3: Installer Switch D6412/D4412 Operation and Installation Guide 45349E Page 16 © 2003 Bosch Security Systems D6412/D4412 Installation Opening the Installer Switch from the closed position resets the panel. The panel resets all its timers, counters, indexes, and buffers. Any points that restore after a reset is performed do not generate Restoral Reports. Leaving the Installer Switch in the closed position lets you power up the panel and charge the battery as you install the detection devices and command centers. 3.5 Finishing the Installation 3.5.1 Earth Ground and Installer Switch First, make the earth ground connection and close the Installer Switch if you have not already done so. To reduce the occurrence of false alarms upon toggling of the Installer Switch, the panel ignores all point faults while the devices stabilize during the setup process. The panel’s start-up process takes approximately 60 sec. to complete. It occurs at power-up and when the panel resets (Installer Switch OPEN). See Section 3.5.7 Power Up and Section 13.3.10 Exiting the Installer’s Menu for more information. During this period, a screen showing the panel model number (D6412 or D4412), firmware revision number, and a “Please Wait...” message appears for approximately 10 seconds. D6412 Please Wait... 3.5.2 Rev X.XX Charge the Battery as You Finish Connect the battery and then the transformer so that the panel can charge the battery as you finish the installation. See Section 4.0 Power Supply for instructions. Self-Diagnostics at Power Up and Reset: The system performs a series of self-diagnostic tests of its hardware, software, and program at power up and at reset. They take about 60 sec. to complete. Command centers may display “System Fault” and sound during the power up and reset interval. If the panel fails any of the tests, a system trouble message appears at the command centers. Touch the Earth Ground Terminal First: To discharge any static charge you may be carrying, always touch the panel’s earth ground terminal before beginning work on the panel. 3.5.3 Install and Wire Detection Devices Install and wire detection devices and command centers at their locations throughout the premises. Do not make the connections at the panel end of the wiring yet. Section 7.0 On-Board Sensor Loops contains instructions for wiring the on-board point locations to detection devices. Section 11.0 Arming Devices contains instructions for wiring the command centers. Instructions for wiring the off-board point locations are found in the instructions packaged with the point expansion devices. 3.5.4 Install Modules 1. Power Down First: Power down the unit by unplugging the transformer and disconnecting the battery. Bosch Security Systems recommends powering down the unit when installing modules or when making wiring connections to the panel. 2. Install and wire any modules required for your installation as described in the module’s installation instructions. Instructions for the DX2010 Point Expansion Module and the DX3010 Output Expansion Module are included in this guide. See Section 8.0 Off-Board Sensor Loops for DX2010 instructions and Section 10.0 Off-Board Outputs for DX3010 instructions. 3.5.5 Make the Telephone Connections If you are connecting the panel to a ground start phone system, you need to install a D133/D134 Relay. See Section 6.0 Telephone Connections for complete instructions. 3.5.6 Connect the On-Board Points and Command Centers Connect the on-board points and command center wiring to the system. See Section 7.0 On-Board Sensor Loops and Section 11.0 Arming Devices for instructions. D6412/D4412 Operation and Installation Guide © 2003 Bosch Security Systems Page 17 45349E D6412/D4412 Installation 3.5.7 Power Up Reconnect the battery and then plug in the transformer. Leave the Installer Switch in the CLOSED position for now. (See Figure 3). The following sequence of events occurs: 1. “System Fault” appears on the text command center(s) and all command centers emit a single tone for approximately 10 seconds. 2. A screen showing the panel model number (D6412 or D4412), firmware revision number and a “Please Wait...” message appears for approximately 10 seconds. 3. “Trouble! Press Cmd 4 to View” appears. Press the [CMD] and [4] keys. A new message appears: Date/Time lost! Press 5 to set.” Press the [5] key to enter the Date/Time window and set accordingly. To reduce the occurrence of false alarms upon panel power-up (or restoration of power after a complete loss of primary and secondary power), the panel ignores all point faults for approximately 60 sec. while the devices stabilize. This process is part of the panel’s start-up process, and it occurs at power-up. This 60-sec. period begins when the “Please Wait...” screen appears. The “Trouble! Press Cmd 4 to View” message reappears, indicating that the Installer Switch is closed. To return the system to normal (disarmed, no fault/trouble conditions), open the Installer Switch (unless you are ready to program the panel). D6412 Please Wait... 3.6 Rev X.XX Programming the Panel If you have not created a program for the panel, review the D6412/D4412 Program Entry Guide (P/N: 45351). Make certain you have all the required accessory modules installed for the features you want to use. Note: The Installer Switch must be in the closed position to program the panel from a keypad. You can enter your custom program at a text keypad, or send it to the panel from the Remote Account Manager (RAM IV). There is a connector provided on the panel for quick connection of an installer’s keypad to the system for programming. See Section 13.0 Installer’s Keypad and Installer Mode for complete instructions for the installer keypad. After you finish programming, move the Installer Switch to the open position. If the unit is programmed for reporting, the panel transmits a Reboot Report to the receiver. 3.7 Check for Fire Alarm Verification You must check the Alarm Verification Box in the lower left corner of the label if you programmed Point 1 for Fire with Verification. See Point Index in the D6412/D4412 Program Entry Guide (P/N: 45351). Refer to Section 14.0 Installation Label for the location of the Alarm Verification Box on each installation label. 3.8 Testing the System After finishing the installation and programming of the panel, make a complete functional test of the system. Test the panel and all devices for proper operation. Test after you first program the panel and after any subsequent programming session. Walk Test: Use the Walk Test (Cmd 44) or the point test available in the Installer Mode to perform a complete test of the panel. See Section 13.0 Installer’s Keypad and Installer Mode. If you test a device and the panel does not respond, there may be a problem with the device, wiring, a module setting, or programming for the point. Clear After Test: To clear the event memory and report buffer, momentarily close the Installer Switch. Events stored in the panel’s event log are not cleared. D6412/D4412 Operation and Installation Guide 45349E Page 18 © 2003 Bosch Security Systems D6412/D4412 Power Supply 4.0 Power Supply 4.1 Primary Power 4.1.1 Primary (AC) Power Circuit An 18 VAC, 22 VA internally fused transformer (Bosch Security Systems CX4010) is the primary power source. The AC power circuit provides 700 mA of rectified AC power. The panel reserves 100 mA of this power for internal operations, leaving 600 mA for powered devices. Transient suppressors and spark gaps protect the circuit from power surges. This protection relies on the panel’s earth ground connection. Make sure you connect the earth ground terminal to a proper ground. See Section 3.4.1 Connecting Earth Ground. The system indicates an AC power failure when the power at the terminals marked “18 VAC” is interrupted. Power must be missing for 120 sec. before the panel acknowledges the failure. Power must be maintained at those terminals for 120 sec. before the panel acknowledges the restoral of power. 4.1.2 Installing the Transformer Shorting the terminals for prolonged periods of time may cause permanent damage. Connect the transformer to the panel terminals before plugging it into the power source. CAUTION Bosch Security Systems recommends that you always connect the battery first and then plug in the transformer. See Section 4.2.2 Installing the Battery for more information. IMPORTANT Use 18 AWG (1.2 mm) (minimum) wire to connect the transformer to the panel. Wire length should be kept as short as possible. The maximum length is 15.2 m (50 feet). AC wiring can induce both noise and low level voltage into adjacent wiring. Route phone and sensor loop wiring away from any AC conductors, including the transformer wire. Route data wiring away from AC and phone wiring. Only plug the transformer into an unswitched, 120 VAC, 60 Hz power outlet. Secure the transformer to the outlet with the screw provided. 4.2 Secondary Power 4.2.2 Installing the Battery Place the battery upright in the base of the enclosure. Locate the red and black leads supplied in the literature pack. Push one connector on the black battery lead to panel’s “Batt-” connector, and then push the lead’s other connector to the negative (-) side of the battery. Push one connector on the red battery lead to panel’s ‘Batt+’ connector, and then push the lead’s other connector to the positive (+) side of the battery. High Current Arcs Possible: The positive (red) battery lead and the panel’s “Batt+” connector can create high current arcs if shorted to terminals or the enclosure. Use caution when working with the positive lead and the panel’s “Batt +.” Always disconnect the positive (red) lead from the battery before removing it from the panel. 4.2.3 Replacement Bosch Security Systems recommends battery replacement every three to five years under normal use. Exceeding the maximum output ratings, or installing the transformer in an outlet that is routinely switched off, causes heavy discharges. Routine heavy discharges can lead to premature battery failure. Record the date of installation directly on the battery. 4.2.4 Battery Supervision When the battery drops to 12.1 VDC, the panel (if programmed for power supervision) transmits a Battery Low Report. If the battery is missing or shorted and the panel is programmed for power supervision, it transmits a Battery Missing Report. When battery voltage returns to 13.0 VDC, the panel (if programmed for power supervision) transmits a Battery Restoral Report. D6412/D4412 Operation and Installation Guide © 2003 Bosch Security Systems Page 19 45349E D6412/D4412 Power Supply Investigate low battery reports immediately: If primary (AC) power is off and the discharge continues, the panel becomes inoperative when the battery voltage drops below 10.2 VDC. CAUTION 4.2.5 Battery Charging Circuit - Float Charge The float voltage for the battery charging circuit is 13.5 VDC to 13.9 VDC at a maximum current of 1.4 A. 4.2.6 Battery Discharge/Recharge Schedule Discharge Cycle • AC Off: Command centers indicate trouble. AC Fail Report sent as programmed. • 13.8 VDC: Charging float level • 12.1 VDC: Low battery trouble at command centers. Low Battery Report as programmed. • 10.2 VDC: Panel shuts down as voltage falls below 10.2 VDC Recharge Cycle • AC On: Panel restarts, battery charging begins, AC Restoral Report sent as programmed, AC trouble clears from command centers. • 13.0 VDC: Battery restoral reports sent, battery trouble clears from command centers • 13.8 VDC: Battery float charged. 4.2.7 System Status LED The System Status LED shows system status, including power supply status as described in Table 4. See Figure 4 for the location of the LED on the panel. System Status System Normal Battery Missing AC Missing Phone Ringing Phone Line Seized (panel using phone line) Shut Down (system voltage below 10.2 VDC) LED Display On for 50 ms; Off for 1 sec. Off for 200 ms; On for 1 sec. Off for 200 ms; On for 200 ms Off for 200 ms; On for 1 sec. Flickers for 1 sec. as each ring is detected. On solid. Off for 200 ms; On for 200 ms Off for 200 ms; On for 200 ms Off for 200 ms; On for 1 sec. Table 4: System Status LED Description 4.3 External Power Supply System Status LED The external power supply (not supplied) is not intended to provide power to indicating devices for burglary and fire applications. • Burglary Applications use a UL603 Listed burglar alarm power supply with an operating voltage range of 11.8 VDC to 12.4 VDC for Bank Safe/Vault applications (72 hrs. of standby battery required). • Fire Applications use a UL1481 Listed power supply operating voltage range of 11.8 VDC to 12.4 VDC for fire applications. Com L-2 L-3 Figure 4: System Status LED D6412/D4412 Operation and Installation Guide 45349E Page 20 © 2003 Bosch Security Systems D6412/D4412 Power Outputs 5.0 Power Outputs 5.1 Circuit Protection Three self-resetting thermal circuit breakers protect the panel from short circuits on both the continuous and programmable power outputs. If the panel is programmed for power supervision and a short is sustained on one of the power outputs, the panel transmits a Battery Low or Battery Missing Report. One breaker protects Auxiliary Power and the Installer’s Keypad Connector; a short on one disrupts power to the other. One breaker protects the Alarm Power Output (Alrm + Terminal) and one breaker protects the battery. 5.2 Available Power 5.2.1 Auxiliary Power Use the auxiliary power terminals to power devices requiring continuous power. See Section 14.0 Installation Label and Section 15.0 Terminal Quick Reference for the location and description of these terminals. 5.2.2 Installer’s Keypad Connector Use this connector to connect an installer’s keypad to the panel for programming and diagnostics. 5.2.3 Alarm Power Provides positive 12 VDC for Programmable Output 2 (PO2 ) when it is configured as a siren driver and Programmable Output 1 (PO1) when it is configured as the alarm output. 5.3 Continuous Power Output 5.3.1 Continuous Current Draw The continuous current draw for powered devices connected to the Aux Power terminals, Installer’s Keypad Connector, and Outputs PO1 to Programmable Output 4 (PO4 ), when programmed for continuous output, are restricted as follows: • 120 mA for Fire and Combined Fire/Burglary systems • 400 mA for UL Burglary systems • 600 mA for other applications (not investigated by UL) 5.4 Alarm Power 5.4.1 Available Power The system combines the 600 mA of primary power produced by the power supply with the secondary power source (the battery) to produce a total of 1.5 A of alarm power at 11.5 VDC to 12.4 VDC. Alarm power is available at the Alrm + terminal. The panel uses PO1 through PO4 to activate Alarm power (see Section 5.5 Output Programming). Fire systems are prohibited from using the battery for determining alarm power. Use the Fire System Power Formula below to calculate the current available for fire and combined fire/burglary systems. IMPORTANT Fire System Power Formula To calculate the current available at the Alrm + terminal for fire and combined fire/burglary systems: 1. Add together the current draws for all devices connected to the Aux terminals and the Installer’s Keypad Connector. This total is the total current required for the Normal Standby Condition (NSC). 2. The current available for NSC is 600 mA. Subtract the NSC current required calculated in Step 1 from the NSC current available, 600 mA. The difference is the Alarm Current available the Alrm + terminal (480 mA maximum). Formula format: 600 mA – NSC current required (Step 1) = Alarm Current available (480 mA maximum) Refer to A-4: Current Rating Chart for Standby Battery Calculations for module/accessory current requirements. D6412/D4412 Operation and Installation Guide © 2003 Bosch Security Systems Page 21 45349E D6412/D4412 Power Outputs 5.5 Output Programming Programmable Output 2 (PO2) can be configured as a supervised siren driver. See Global Output Configuration in the D6412/ D4412 Program Entry Guide (P/N: 45351) for programming instructions. When programmed as a siren driver, PO2 draws power from the Alrm + terminal. When connected to a 4 Ω horn/speaker, PO2 draws 380 mA of power. When connected to an 8 Ω horn/speaker, it draws 330 mA of power. Use the appropriate current draw in your total alarm power calculation. • Programmable Output 1 (PO1): PO1 terminals can be configured as an alarm power output. JP2-PO1 Jumper must be closed. The default configuration for Programmable Output 1 makes it a dry contact, normally open relay. The PO1 Jumper is open. See Figure 5 for jumper location. • Programmable Output 2 (PO2): Output PO2 can be used with Alarm+ as a supervised siren driver. Connect an approved 4 or 8 Ω siren. Alternatively, PO2 can sink up to 500 mA 12 VDC. For larger loads, use a Bosch Security Systems D133 Relay Module or Bosch Security Systems D134 Dual Relay Module. • Programmable Outputs 3 and 4 (PO3 and PO4): Outputs PO3 and PO4 can be configured for Alarm Output. These outputs can sink up to 500 mA 12 VDC each. For larger loads, use a Bosch Security Systems D133 Relay Module or Bosch Security Systems D134 Dual Relay Module. Power restricted for fire and combined fire/burglary systems: Use the Fire System Power Formula in Section 5.4.1 Available Power to calculate the current available for fire and combined fire/burglary systems. Unexpected Output at PO1 to PO4: If these outputs do not provide the alarm output you expect: • Check the programming for Programmable Outputs in the Outputs section of the D6412/D4412 Program Entry Guide (P/N: 45351). • Check the Point Index Configuration section of the D6412/D4412 Program Entry Guide to verify the points you are activating are programmed for alarm output. If Programmable Output 2 is configured as a supervised siren driver (in combination with the Alrm + terminal), you must connect a 4 Ω or 8 Ω siren/speaker to PO2 to clear the siren/speaker supervision trouble. IMPORTANT PO 1 Jumper JP2-PO1 Select R Y G B Alrm + A PO1 B + L-1 - Programmable Outputs 1-4 Figure 5: On-Board Outputs D6412/D4412 Operation and Installation Guide 45349E Page 22 © 2003 Bosch Security Systems D6412/D4412 Telephone Connections 6.0 Telephone Connections 6.1 Registration The Bosch Security Systems D6412/D4412 Control Panel is registered with the Federal Communication Commission (FCC) under Part 68 for connection to the public telephone system using an RJ31X or RJ38X jack installed by your local phone company. 6.2 Notification Do not connect registered equipment to party lines or coin-operated telephones. You must notify the local telephone company and supply them with the following information before connecting the panel to the telephone network. • Line to which you are connecting the panel • Make (Bosch Security Systems), model (D6412 or D4412), and serial number of the panel • FCC registration number: ESVMUL-46531-AL-E • Ringer equivalence for the panel: 0.1 B 6.3 Location To prevent jamming of signals, wire the RJ31X jack or RJ38X jack to support line seizure as shown in Figure 6. Install the jack on the street side of the phone switch, wired ahead of any PBX equipment. Line seizure temporarily interrupts normal phone usage while the communicator transmits data. After installation, confirm that the panel seizes the line, acquires dial tone, reports correctly to the receiver, and releases the phone line to the in-house phone system. Outside Telco (PSTN) Outside Telco (PSTN) R1 T1 T R Bar Short removed on Telco Connector Block insertion - positions 1&4 and 5&8. 1 2 3 4 5 6 7 8 R1 R T R1 T1 T R Premises Telephone 1 2 3 4 5 6 7 8 Strap RJ31X Jack Telco Connector Block Bar Short removed on Telco Connector Block insertion - positions 1&4 and 5&8. T1 Premises Telephone 1 2 3 4 5 6 7 8 1 2 3 4 5 6 7 8 R1 To Control Panel R T RJ38X Jack Telco Connector Block T1 To Control Panel RJ31X Jack Connections RJ38X Jack Connections Figure 6: RJ31X/RJ38X Wiring 6.4 Phone Cord Connection Connect the flying leads of a D164 Telephone Cord to the telephone terminals labeled R, R1, T1, and T. The terminals are located on the right side of the panel. Connect the other end of the cord to the RJ31X jack or RJ38X jack. 6.5 System Status LED (Red) The System Status LED shows system status, including phone status as described in Table 4. Figure 4 shows the location of the LED on the panel. 6.6 Dialing Format You can program the system to use DTMF or pulse dialing. See DTMF/Pulse Dialing in the D6412/D4412 Program Entry Guide (P/N: 45351). D6412/D4412 Operation and Installation Guide © 2003 Bosch Security Systems Page 23 45349E D6412/D4412 Telephone Connections 6.7 Phone Line Fault The panel has a circuit that tests the phone line for voltage. Normal voltage on a telephone line is approximately 48 VDC (24 VDC for some phone systems). The phone line monitor senses trouble when voltage drops low enough (between 1 V and 3 V). If the panel senses trouble, it starts a phone line trouble timer that continues to run as long as the panel senses trouble. It resets to zero when the panel senses a normal line. If the timer reaches 40 sec., it begins a phone line trouble response. Programming determines what the response is. See Phone Line Fault Response Options in the D6412/D4412 Program Entry Guide (P/N: 45351). Bad line may test OK: The telephone line test circuit uses the voltage level to test the status of the phone line. In some instances, a given telephone line may be out of service without affecting the voltage on the line. The phone line monitor can not recognize this trouble condition. 6.8 Called Party Disconnect Telephone companies provide “called party disconnect” to allow the called party to terminate a call. The called party must go on-hook (hang up) for a fixed interval before a dial tone is available for a new call. This interval varies with telephone company equipment. The panel provides “called party disconnect” by adding a 35 sec. on hook interval to the dial tone detect function. If the panel does not detect a dial tone in 7 sec., it puts the phone line on hook for 35 sec. to activate “called party disconnect,” goes off hook and begins a seven-second dial tone detect. If no dial tone is detected, the panel dials the number anyway. Each time the number is dialed, the panel records this as an attempt. 6.9 Communication Failure The panel routes reports to two routing destinations, each of which can be programmed with two phone numbers. See Appendix A: Routing Dialing Tables in the D6412/D4412 Program Entry Guide (P/N: 45351). Numbers in [ ] are the numbers assigned to panel events. For more panel event information, see Appendix B in the D6412/D4412 Program Entry Guide. The Routing Dialing tables show the circumstances when Communication Failure Events are created. When a Comm Fail occurs, the D6412/D4412 responds as follows: 1. 2. 3. 4. 5. 6. 7. 8. 6.10 Clear (dump) the initiating report and any pending reports from the dialer buffer for the destination where the Comm Fail Event occurred. Create a Comm Fail [69] Report or Alt Comm Comm Fail [70] Report that includes the Destination Number (1 or 2). Modem IIIa² Reports report the destination number as a Route Group (RG). The Alternate Comm Fail Report is used when an alternate communications path is used (e.g., SAFECOM). Comm Fail, Comm Restoral [71], and Alternate Comm Restore [72] Reports follow the System Status Reports routing. If the Comm Fail occurred on Destination 1 and System Status Reports routing is set to Destination 2 or set to Destination 2 on Destination 1 fail, then send Comm Fail Report. If the Comm Fail occurred on Destination 1 and System Status Reports routing is set to Destination 1 then send a Comm Restore Report with the next report for destination 1. If the Comm Fail occurred on Destination 2 and System Status Reports routing is set to Destination 1, then send Comm Fail Report. If the Comm Fail occurred on Destination 2 and System Status Reports routing is set to Destination 2 then send a Comm Restore Report with the next report for destination 2. If a Comm Fail Report is sent successfully to the other destination, a Comm Restore Event should be sent when there is a successful communication on the failed destination. Ground Start Some telephone systems require a momentary ground input to initiate a dial tone. To interface with a ground start system, you must wire PO1 as shown in Figure 7. PO1 Jumper must be open. 6.10.1 Program PO1 for Ground Start See Outputs of the D6412/D4412 Program Entry Guide (P/N: 45351) for programming instructions. PO2, PO3, and PO4 can be used to interface with a ground start system using a D133 Relay Module or a D134 Dual Relay Module. The PO1 jumper is not used when interfacing PO2, PO3, or PO4 to a D133 or D134. See Figure 7 for details. D6412/D4412 Operation and Installation Guide 45349E Page 24 © 2003 Bosch Security Systems D6412/D4412 Telephone Connections You must connect a proper earth ground reference to the earth ground terminal. IMPORTANT Ground start not for use in Fire or combined Fire/Burglary applications. You can not use ground start telephone systems for Fire or combined Fire/Burglary applications. PO 1 Configuration for Ground Start JP1 AUXILIARY Installer R R1 PO 1 Jumper Open JP2-PO1 Select T1 R Y G B T Alrm + A PO1 B + L-1 - Com L-2 L-3 Com L-4 L-5 Com L-6 L-7 Com L-8 PO 2, 3, 4 Configuration using a D133/D134 for Ground Start JP1 AUXILIARY Installer R R1 JP2-PO1 Select T1 R Y G B T Alrm + A PO1 B + L-1 - Com L-2 L-3 Com L-4 L-5 Com L-6 L-7 Com L-8 D133/D134 Figure 7: Ground Start D6412/D4412 Operation and Installation Guide © 2003 Bosch Security Systems Page 25 45349E D6412/D4412 Telephone Connections Notes: D6412/D4412 Operation and Installation Guide 45349E Page 26 © 2003 Bosch Security Systems D6412/D4412 On-Board Sensor Loops 7.0 On-Board Sensor Loops 7.1 Description The panel provides eight on-board sensor loops, each of which functions independently and does not interfere with the operation of the others. On-board sensor loops can be set to the default single point configuration with a 2.2 kΩ End of Line (EOL) resistor, a single point configuration with 1 kΩ EOL resistor, a single point configuration with a 3.65 kΩ EOL resistor, or in a doubled point configuration that utilizes two resistors per sensor loop, one 2.2 kΩ, and one 3.65 kΩ. The panel monitors two points per sensor loop in the doubled configuration, making 15 on-board points available See Section 7.6 Doubled Point Configuration. The panel monitors the sensor loops for normal, shorted, or open conditions. Point programming determines how the panel responds to those conditions. See the D6412/D4412 Program Entry Guide (P/N: 45351) for point programming options. The panel ignores sensor loops (both on-board and off-board) for 60 sec. after power up to ensure that any connected devices have stabilized. 7.2 Two-wire Smoke Detector Configuration Sensor Loop 1 can be used as a fire point for connection of two-wire smoke detectors (see Figure 8). This sensor loop cannot be used for point doubling and must terminate a 2.21 kΩ EOL resistor (P/N: 25899). See the D6412/D4412 TSN: Smoke Detector Compatibility (P/N: 46928) for compatible smoke detectors and the maximum number of devices allowed on Sensor Loop 1. D6412/D4412 L-1 + L-1 - 2.21 K EOL Resistor Figure 8: Typical Two-Wire Smoke Detector Wiring 7.3 Four-wire Smoke Detector Configuration Remove Jumper Plug from JP2 A four-wire smoke detector can be connected to any of the panel’s on-board sensor loops (L-1 to L-8). A four-wire smoke detector requires the use of a relay module to interrupt power to the detector in order for the detector to reset. The output controlling the relay must be configured as Output Function 1, 13 (Fire Verification). For more information, refer to the Outputs section of the D6412/D4412 Program Entry Guide (P/N 45351). If Sensor Loops 2 to 8 (L-2 to L-8) are used, make positive (+) connections to L-X + (where X = Loop #) and negative (-) connections to the loop’s “COM” terminal. JP2-PO1 Select R Y G B Alrm + PO1 B + L-1 - Aux (-) D285/D285TH w/ D292 Base See Figure 9. A Aux (+) D275 EOL Module Smoke Detector 2.21 K EOL Resistor EOL Relay Figure 9: Typical Four-Wire Smoke Detector Wiring D6412/D4412 Operation and Installation Guide © 2003 Bosch Security Systems Page 27 45349E D6412/D4412 On-Board Sensor Loops 7.4 Sensor Loop 1 Configuration Sensor Loop 1 (see Figure 10) can be used for applications other than a fire point. This sensor loop cannot be used for point doubling and must be terminated with a 2.21 kΩ EOL resistor (P/N: 25899). Loop resistance limits the number of Normally-Open and/or Normally-Closed detection devices each sensor loop can supervise. The total resistance for wire length and contacts, minus the EOL resistor, must not exceed 100 Ω. 100 Ω MAXIMUM L1 + 2.21 K Ω EOL Resistor (P/N: 25899) - COMBINATION: NORMALLY OPEN CONTACTS AND NORMALLY CLOSED CONTACTS Figure 10: Sensor Loop 1 Wiring 7.5 Single Point Configuration (Points 2 to 8) When wiring the on-board sensor loops in the single point configuration, install the resistor with the appropriate value (2.2 kΩ and 3.65 kΩ are provided) at the far end of the sensor loop to provide a reference for supervision. You can connect dry contact sensing devices in series (normally-closed) and/or in parallel (normally-open) to any of these loops (see Figure 11). 100 Ω MAXIMUM L2 to L8 POINT INPUT TERMINAL 2.2 KΩ COMMON NORMALLY OPEN CONTACTS EOL Resistor P/N: 47819 POINT INPUT TERMINAL COMMON COMBINATION: NORMALLY OPEN CONTACTS AND NORMALLY CLOSED CONTACTS Figure 11: Single Point Sensor Loop Wiring The number of normally-open and/or normally-closed detection devices each sensor loop can supervise is limited only by the resistance on the loop. The total resistance for wire length and contacts, minus the EOL, must not exceed 100 Ω. You can determine the condition of the on-board sensor loops in the default configuration (single point, 2.2 kΩ EOL resistor) by measuring the voltage across the point input terminal and one of the common terminals. The sensor loops must be connected and the 2.2 kΩ EOL resistor in place. Table 5 shows the on-board sensor loops for D6412/D4412 Loops 2 through 8. EOL Resistor 2.21 K 3.65 K 1.0 K Open Loop Greater than 7.7 VDC Greater than 9.1 VDC Greater than 5.0 VDC Normal Loop Greater than 6.3 VDC, less than 7.3 VDC Greater than 7.7 VDC, less than 8.6 VDC Greater than 3.8 VDC, less than 4.7 VDC Shorted Loop Less than 6.0 VDC Less than 7.3 VDC Less than 3.5 VDC Table 5: On-Board Sensor Loops D6412/D4412 Operation and Installation Guide 45349E Page 28 © 2003 Bosch Security Systems D6412/D4412 On-Board Sensor Loops 7.6 Doubled Point Configuration When wiring the on-board sensor loops in the doubled point configuration, install the resistors of the appropriate value (2.2 kΩ and 3.65 kΩ) as shown in Figure 12. (Point doubling not available for Sensor Loop 1) Common L-2 to L-8 Onboard Locations 10 to 16 Onboard Locations 2 to 8 Open for alarm otherwise Normally Closed Open for alarm otherwise Normally Closed Each loop is monitored as a separate point. 2.2 KΩ 3.65 KΩ Figure 12: On-Board Doubled Point Sensor Loop Wiring 7.7 Sensor Loop Response Time The panel scans both on and off-board sensor loops per Point Index programming. See Point Index Configuration in the D6412/D4412 Program Entry Guide (P/N: 45351). The panel scans sensor loops for ‘pulses’ (electrically off normal events). The Point Index determines the Pulse Count and Pulse Count Time for each sensor loop. If the panel sees enough pulses within an interval defined by the Pulse Count Time to reach the Pulse Count, it puts the sensor loop in a faulted condition. The panel scans the sensor loops at one of two scan rates as shown in Table 6. Pulse Count Time Selections for 50 ms Pulse Count Time Selections for 160 ms Point Scan Time (on-board points only) Point Scan Time (off-board points only) Selection Actual Pulse Count Time Selection Actual Pulse Count Time 0 1 2 3 4 5 6 7 0.5 sec. 1 sec. 2 sec. 3 sec. 4 sec. 5 sec. 10 sec. 15 sec. 8 9 10 11 12 13 14 15 20 sec. 30 sec. 40 sec. 50 sec. 60 sec. 90 sec. 120 sec. 200 sec. Table 6: Point Scan Time/Pulse Count Time Selections The scan rates for off-board sensor loops are determined by the point expansion modules they are associated with. The panel scans modules with off-board points at the 150 ms scan rate. Increasing the Pulse Count and Pulse Count Time may cause missed alarms. If you increase the Pulse Count and Pulse Count Time, detection devices may go into alarm and reset without exceeding the Pulse Count or Pulse Count Time. Bosch Security Systems recommends using the default settings for Pulse Count and Pulse Count Time. D6412/D4412 Operation and Installation Guide © 2003 Bosch Security Systems Page 29 45349E D6412/D4412 On-Board Sensor Loops Notes: D6412/D4412 Operation and Installation Guide 45349E Page 30 © 2003 Bosch Security Systems D6412/D4412 Off-Board Sensor Loops 8.0 Off-Board Sensor Loops 8.1 SDI Point Expanders You can expand the number of points on the panel by connecting modules to the panel’s SDI (data) Bus. Use the DX2010 Point Expansion module to add wired points. Use a compatible Premises RF Receiver to add wireless points. Table 7 shows how point expansion devices map to the panel’s point locations. See the Locations section in the D6412/D4412 Program Entry Guide (P/N: 45351) for a description of the relationship between locations and points. The panel ignores sensor loops (both On-Board and Off-Board) for 60 sec. after power up to ensure that any connected devices have stabilized. Location Parameters These columns show the default Nibble programming for each Location parameter. All four parameters must be used to configure a location. Device Parameter Selections These columns show the selections for the ‘Device’ parameter that tells the panel where to find the sensor loop (or transmitter) status for each location. The cells in these columns tell you which loop to use on each device and which EOL resistor value to used on each loop. Location # Device (default) Pt. Index (default) Area (default) Point # (default) 1 On-board 2 D9628 1 Nibble 0706 (1) Nibble 0707 (1) Nibble 0708 (1) Nibble 07090710 (0-1) 2.2 KΩ only 2 Nibble 0711 (1) Nibble: 0712 (11) Nibble: 0713 (1) Nibble: 07140715 (0-2) 3 Nibble 0716 (1) Nibble 0717 (11) Nibble 0718 (1) 4 Nibble 0721 (1) Nibble 0722 (13) 5 Nibble 0726 (1) 6 3 DX2010, doubled 4 RF Receiver 1 5 RF Receiver 2 SDI Addr 101 Loop 1, 2.2 KΩ SDI Addr 50 Transmitter 1 SDI Addr 51 Transmitter 1 3.65 KΩ when doubled w/ 10 SDI Addr 101 Loop 2, 2.2 KΩ SDI Addr 50 Transmitter 2 SDI Addr 51 Transmitter 2 Nibble 07190720 (0-3) 3.65 KΩ when doubled w/ 11 SDI Addr 101 Loop 3, 2.2 KΩ SDI Addr 50 Transmitter 3 SDI Addr 51 Transmitter 3 Nibble 0723 (1) Nibble 07240725 (0-4) 3.65 KΩ when doubled w/ 12 SDI Addr 101 Loop 4, 2.2 KΩ SDI Addr 50 Transmitter 4 SDI Addr 51 Transmitter 4 Nibble 0727 (13) Nibble 0728 (1) Nibble 07290730 (0-5) 3.65 KΩ when doubled w/ 13 SDI Addr 101 Loop 5, 2.2 KΩ SDI Addr 50 Transmitter 5 SDI Addr 51 Transmitter 5 Nibble 0731 (1) Nibble 0732 (14) Nibble 0733 (1) Nibble 07340735 (0-6) 3.65 KΩ when doubled w/ 14 SDI Addr 101 Loop 6, 2.2 KΩ SDI Addr 50 Transmitter 6 SDI Addr 51 Transmitter 6 7 Nibble 0736 (1) Nibble 0737 (14) Nibble 0738 (1) Nibble 07390740 (0-7) 3.65 KΩ when doubled w/ 15 SDI Addr 101 Loop 7, 2.2 KΩ SDI Addr 50 Transmitter 7 SDI Addr 51 Transmitter 7 8 Nibble 0741 (1) Nibble 0742 (4) Nibble 0743 (1) Nibble 07440745 (0-8) 3.65 KΩ when doubled w/ 16 SDI Addr 101 Loop 8, 2.2 KΩ SDI Addr 50 Transmitter 8 SDI Addr 51 Transmitter 8 9 Nibble 0746 (0) Nibble 0747 (0) Nibble 0748 (1) Nibble 07490750 (0-9) Not available as double pt. SDI Addr 102 Loop 1, 2.2 KΩ SDI Addr 106 Loop 1, 3.65 KΩ SDI Addr 50 Transmitter 9 SDI Addr 51 Transmitter 9 10 Nibble 0751 (0) Nibble 0752 (0) Nibble 0753 (1) Nibble 07540755 (1-0) Doubled w/ 2, 2.2 kΩ SDI Addr 102 Loop 2, 2.2 KΩ SDI Addr 106 Loop 2, 3.65 KΩ SDI Addr 50 Transmitter 10 SDI Addr 51 Transmitter 10 11 Nibble 0756 (0) Nibble 0757 (0) Nibble 0758 (1) Nibble 07590760 (1-1) Doubled w/ 3, 2.2 KΩ SDI Addr 102 Loop 3, 2.2 KΩ SDI Addr 106 Loop 3, 3.65 KΩ SDI Addr 50 Transmitter 11 SDI Addr 51 Transmitter 11 12 Nibble 0761 (0) Nibble 0762 (0) Nibble 0763 (1) Nibble 07640765 (1-2) Doubled w/ 4, 2.2 KΩ SDI Addr 102 Loop 4, 2.2 KΩ SDI Addr 106 Loop 4, 3.65 KΩ SDI Addr 50 Transmitter 12 SDI Addr 51 Transmitter 12 13 Nibble 0766 (0) Nibble 0767 (0) Nibble 0768 (1) Nibble 07690770 (1-3) Doubled w/ 5, 2.2 KΩ SDI Addr 102 Loop 5, 2.2 KΩ SDI Addr 106 Loop 5, 3.65 KΩ SDI Addr 50 Transmitter 13 SDI Addr 51 Transmitter 13 14 Nibble 0771 (0) Nibble 0772 (0) Nibble 0773 (1) Nibble 07740775 (1-4) Doubled w/ 6, 2.2 KΩ SDI Addr 102 Loop 6, 2.2 KΩ SDI Addr 106 Loop 6, 3.65 KΩ SDI Addr 50 Transmitter 14 SDI Addr 51 Transmitter 14 15 Nibble 0776 (0) Nibble 0777 (0) Nibble 0778 (1) Nibble 07790780 (1-5) Doubled w/ 7, 2.2 KΩ SDI Addr 102 Loop 7, 2.2 KΩ SDI Addr 106 Loop 7, 3.65 KΩ SDI Addr 50 Transmitter 15 SDI Addr 51 Transmitter 15 16 Nibble 0781 (0) Nibble 0782 (0) Nibble 0783 (1) Nibble 07840785 (1-6) Doubled w/ 8, 2.2 KΩ SDI Addr 102 Loop 8, 2.2 KΩ SDI Addr 106 Loop 8, 3.65 KΩ SDI Addr 50 Transmitter 16 SDI Addr 51 Transmitter 16 17 Nibble 0786 (0) Nibble 0787 (0) Nibble 0788 (1) Nibble 07890790 (1-7) SDI Addr 103 Loop 1, 2.2 KΩ SDI Addr 106 Loop 1, 2.2 KΩ SDI Addr 50 Transmitter 17 SDI Addr 51 Transmitter 17 18 Nibble 0791 (0) Nibble 0792 (0) Nibble 0793 (1) Nibble 07940795 (1-8) SDI Addr 103 Loop 2, 2.2 KΩ SDI Addr 106 Loop 2, 2.2 KΩ SDI Addr 50 Transmitter 18 SDI Addr 51 Transmitter 18 19 Nibble 0796 (0) Nibble 0797 (0) Nibble 0798 (1) Nibble 07990800 (1-9) SDI Addr 103 Loop 3, 2.2 KΩ SDI Addr 106 Loop 3, 2.2 KΩ SDI Addr 50 Transmitter 19 SDI Addr 51 Transmitter 19 Table 7: Point Expansion Mapping D6412/D4412 Operation and Installation Guide © 2003 Bosch Security Systems Page 31 45349E D6412/D4412 D6412 Only Off-Board Sensor Loops Location # Device (default) Pt. Index (default) Area (default) Point # (default) 2 D9628 3 DX2010, doubled 4 RF Receiver 1 5 RF Receiver 2 20 Nibble 0801 (0) Nibble 0802 (0) Nibble 0803 (1) Nibble 0804-0805 (2-0) SDI Addr 103 Loop 4, 2.2 KΩ SDI Addr 103 Loop 5, 2.2 KΩ SDI Addr 103 Loop 6, 2.2 KΩ SDI Addr 103 Loop 7, 2.2 KΩ SDI Addr 103 Loop 8, 2.2 KΩ SDI Addr 106 Loop 4, 2.2 KΩ SDI Addr 106 Loop 5, 2.2 KΩ SDI Addr 106 Loop 6, 2.2 KΩ SDI Addr 106 Loop 7, 2.2 KΩ SDI Addr 106 Loop 8, 2.2 KΩ SDI Addr 50 Transmitter 20 SDI Addr 51 Transmitter 20 21 Nibble 0806 (0) Nibble: 0807 (0) Nibble: 0808 (1) Nibble: 0809-0810 (2-1) SDI Addr 50 Transmitter 21 SDI Addr 51 Transmitter 21 22 Nibble 0811 (0) Nibble 0812 (0) Nibble 8013 (1) Nibble 0814-0815 (2-2) SDI Addr 50 Transmitter 22 SDI Addr 51 Transmitter 22 23 Nibble 0816 (0) Nibble 0817 (0) Nibble 0818 (1) Nibble 0819-0820 (2-3) SDI Addr 50 Transmitter 23 SDI Addr 51 Transmitter 23 24 Nibble 0821 (0) Nibble 0822 (0) Nibble 0823 (1) Nibble 0824-0825 (2-4) SDI Addr 50 Transmitter 24 SDI Addr 51 Transmitter 24 25 Nibble 0826 (0) Nibble 0827 (0) Nibble 0828 (1) Nibble 0829-0830 (2-5) SDI Addr 104 Loop 1, 2.2 kΩ SDI Addr 104 Loop 2, 2.2 kΩ? SDI Addr 104 Loop 3, 2.2 KΩ SDI Addr 104 Loop 4, 2.2 KΩ SDI Addr 104 Loop 5, 2.2 KΩ SDI Addr 104 Loop 6, 2.2 KΩ SDI Addr 104 Loop 7, 2.2 KΩ SDI Addr 104 Loop 8, 2.2 KΩ SDI Addr 107 Loop 1, 3.65 kΩ SDI Addr 107 Loop 2, 3.65 kΩ SDI Addr 107 Loop 3, 3.65 KΩ SDI Addr 107 Loop 4, 3.65 KΩ SDI Addr 107 Loop 5, 3.65 KΩ SDI Addr 107 Loop 6, 3.65 KΩ SDI Addr 107 Loop 7, 3.65 KΩ SDI Addr 107 Loop 8, 3.65 KΩ SDI Addr 50 Transmitter 25 SDI Addr 51 Transmitter 25 26 Nibble 0831 (0) Nibble 0832 (0) Nibble 0833 (1) Nibble 0834-0835 (2-6) SDI Addr 50 Transmitter 26 SDI Addr 51 Transmitter 26 27 Nibble 0836 (0) Nibble 0837 (0) Nibble 0838 (1) Nibble 0839-0840 (2-7) SDI Addr 50 Transmitter 27 SDI Addr 51 Transmitter 27 28 Nibble 0841 (0) Nibble 0842 (0) Nibble 0843 (1) Nibble 0844-0845 (2-8) SDI Addr 50 Transmitter 28 SDI Addr 51 Transmitter 28 29 Nibble 0846 (0) Nibble 0847 (0) Nibble 0848 (1) Nibble 0849-0850 (2-9) SDI Addr 50 Transmitter 29 SDI Addr 51 Transmitter 29 30 Nibble 0851 (0) Nibble 0852 (0) Nibble 0853 (1) Nibble 0851-0852 (3-0) SDI Addr 50 Transmitter 30 SDI Addr 51 Transmitter 30 31 Nibble 0856 (0) Nibble 0857 (0) Nibble 0858 (1) Nibble 0859-0860 (3-1) SDI Addr 50 Transmitter 31 SDI Addr 51 Transmitter 31 32 Nibble 0861 (0) Nibble 0862 (0) Nibble 0863 (1) Nibble 0864-0865 (3-2) SDI Addr 50 Transmitter 32 SDI Addr 51 Transmitter 32 33 Nibble 0866 (0) Nibble 0867 (0) Nibble 0868 (1) Nibble 0869-0870 (3-3) SDI Addr 107 Loop 1, 2.2 KΩ SDI Addr 107 Loop 2, 2.2 KΩ SDI Addr 107 Loop 3, 2.2 KΩ SDI Addr 107 Loop 4, 2.2 KΩ SDI Addr 107 Loop 5, 2.2 kΩ SDI Addr 107 Loop 6, 2.2 kΩ SDI Addr 50 Transmitter 33 SDI Addr 51 Transmitter 33 SDI Addr 50 Transmitter 34 SDI Addr 51 Transmitter 34 SDI Addr 50 Transmitter 35 SDI Addr 51 Transmitter 35 SDI Addr 50 Transmitter 36 SDI Addr 51 Transmitter 36 SDI Addr 50 Transmitter 37 SDI Addr 51 Transmitter 37 Nibble 0894-0895 (3-8) SDI Addr 105 Loop 1, 2.2 KΩ SDI Addr 105 Loop 2, 2.2 KΩ SDI Addr 105 Loop 3, 2.2 KΩ SDI Addr 105 Loop 4, 2.2 KΩ SDI Addr 105 Loop 5, 2.2 KΩ SDI Addr 105 Loop 6, 2.2 KΩ 34 Nibble 0871 (0) Nibble 0872 (0) Nibble 0873 (1) Nibble 0874-0875 (3-4) 35 Nibble 0876 (0) Nibble 0877 (0) Nibble 0878 (1) Nibble 0879-0880 (3-5) 36 Nibble 0881 (0) Nibble 0882 (0) Nibble 0883 (1) Nibble 0884-0885 (3-6) 37 Nibble 0886 (0) Nibble 0887 (0) Nibble 0888 (1) Nibble 0889-0890 (3-7) 38 Nibble 0891 (0) Nibble 0892 (0) Nibble 0893 (1) SDI Addr 50 Transmitter 38 SDI Addr 51 Transmitter 38 39 Nibble 0896 (0) Nibble 0897 (0) Nibble 0898 (1) Nibble 0899-0900 (3-9) SDI Addr 105 Loop 7, 2.2 KΩ SDI Addr 107 Loop 7, 2.2 kΩ SDI Addr 50 Transmitter 39 SDI Addr 51 Transmitter 39 40 Nibble 0901 (0) Nibble 0902 (0) Nibble 0903 (1) Nibble 0904-0905 (0) SDI Addr 105 Loop 8, 2.2 KΩ SDI Addr 107 Loop 8, 2.2 kΩ SDI Addr 50 Transmitter 40 SDI Addr 51 Transmitter 40 1 Onboard Table 7 (cont’d): Point Expansion Mapping D6412/D4412 Operation and Installation Guide 45349E Page 32 © 2003 Bosch Security Systems D6412/D4412 Off-Board Sensor Loops 8.2 DX2010 Point Expander Module 8.2.1 DX2010 Overview You can connect up to five DX2010 Point Expander Modules to the D6412 (three to the D4412). In the single point configuration, each DX2010 adds eight points to the system. In the doubled point configuration, each DX2010 adds 16 points to the system. Table 7 shows how the DX2010 Point Expander sensor loops are assigned to point locations. • Current Draw without Aux Output Terminals: 35 mA Standby • Current Draw with Aux Output Terminals: 135 mA maximum with connected accessories Review the Section 5.0 Power Outputs to be sure you provide enough power for the Point Expander Modules and any other powered devices you connect to the panel. Refer to the DX2010 Installation Guide (P/N: 46413) for complete installation, addressing and operating instructions. 8.2.2 DX2010 Installation Failure to follow the mounting instructions in this guide may result in damage to the module. The DX2010 contains static-sensitive components and must be handled with care. Follow antistatic procedures when handling the modules. The DX2010 Module can be mounted in a D203 Enclosure. Mount the module in the enclosure as shown in Figure 13. Install the module in the D203 housing You can also install the DX2010 board in the control panel’s enclosure. The D2203 enclosure can hold up to five DX2010 modules (see Figures 14 and 15). Figure 13: Installing the DX2010 in D203 Enclosure D6412/D4412 PCB JP1 AUXILIARY Installer R R1 JP2-PO1 Select T1 R Y G B T Alrm + Enclosure Wall DX2010 Terminals A PO1 B + L-1 - Com L-2 L-3 Com L-4 L-5 Com L-6 L-7 Com L-8 DX2010 Side Mounting Locations Mounting Hardware (supplied w/DX2010) Figure 14: Installing the DX2010 in the Panel Enclosure D6412/D4412 Operation and Installation Guide © 2003 Bosch Security Systems Page 33 45349E D6412/D4412 Off-Board Sensor Loops The DX2010 can also be mounted to the back wall of the control panel enclosure. See Figure 15. D6412/D4412 PCB JP1 AUXILIARY Installer R R1 JP2-PO1 Select T1 R Y G B T Alrm + A PO1 B + L-1 - Com L-2 L-3 Com L-4 L-5 Com L-6 DX2010 DX2010 Terminals Terminals L-7 Com Corner of DX2010 PCB L-8 Mounting Clip Enclosure Standoff = Mounting Clip Assembly Optional mounting locations for DX2010 inside control panel enclosure Figure 15: Optional Enclosure Mounting Locations for the DX2010 8.2.3 DX2010 to Panel SDI Bus Connections Connect the panel’s Data and Aux Power terminals to the DX2010 Module as shown in Figure 16. Refer to Table 8 for the SDI bus wiring length requirements. Panel to DX2010 DX2010 AUX Output NOT Used Panel to DX2010 DX2010 AUX supplying 100 mA 22 AWG (0.8 mm) 305 m (1000 ft.)* 18 AWG (1.2 mm) 610 m (2000 ft.)* 30 m (100 ft.)** 76 m (250 ft.)** * Wire length may be restricted by panel limitations. See the Installation Guide for more information. ** If the DX2010 is powered directly by an external auxiliary power supply (Figure 18), use the wire lengths specified in the first row. Table 8: DX2010 Wire Lengths The wire lengths shown in Table 8 must be shared by all devices connected to the terminals. Do not use twisted pair or shielded cable. Do not share cable with the keypad lines. The maximum distance may be limited to 76 m (250 ft.) if the Aux Output is used. See Section 8.2.4 DX2010 Auxiliary Output Connections. IMPORTANT D6412/D4412 Operation and Installation Guide 45349E Page 34 © 2003 Bosch Security Systems D6412/D4412 Off-Board Sensors Loops DX2010 +OUT- TMPR R B G D6412/D4412 Y 1 COM Green (Data) Yellow (Data) Black (-) Red (+) R Y G B Figure 16: Wiring the DX2010 to the D6412/D4412 If you need to power the DX2010 with an external 12 VDC power supply, wire it as shown in Figure 17. See Section 4.3 External Power Supply for external power supply restrictions. DX2010 +OUT- TMPR R B G D6412/D4412 Y 1 COM Green (Data) Yellow (Data) Black (-) Red (+) + - External 12 VDC Power Supply R Y G B Figure 17: Wiring the DX2010 for External Power Supply D6412/D4412 Operation and Installation Guide © 2003 Bosch Security Systems Page 35 45349E D6412/D4412 Off-Board Sensors Loops 8.2.4 DX2010 Auxiliary Output Connections The DX2010 has the capacity to provide 12 VDC at up to 100 mA from the Auxiliary Output (-) OUT (+) terminals to power external devices such as motion detectors. See Figure 18. IMPORTANT IMPORTANT When using the DX2010’s auxiliary output, the maximum distance between the D6412/D4412 and the DX2010 must be limited to 76 m (250 ft.) when using #18 AWG (1.2 mm) wire, or 30 m (100 ft.) when using #22 AWG (0.8 mm) wire. The maximum distance from the DX2010 Output terminals and the remotely powered devices (PIRs, smoke detectors, etc.) must be limited to 15 m (50 ft.) for #22 AWG (0.8 mm) or 30 m (100 ft.) for #18 AWG (1.2 mm) wire. If the DX2010’s Aux Output (“+Out-” terminals) is used as an auxiliary power source, the DX2010’s “R” and “B” wires must be home-run to either the panel or to an auxiliary power supply. Do not use a daisy-chain wire configuration. See Figure 18. If the DX2010 module is powered by an external 12 VDC power supply, the output terminals can supply power for up to 138 m (450 ft.) from the DX2010 to the remotely powered devices. 8.2.5 DX2010 DX2010 Tamper Input Connections Each DX2010 Module provides an input for tamper devices. The tamper input is in addition to the point sensor loops. Supervising an enclosure tamper does not consume a point. A fault on the tamper input is reported as a tamper event for the SDI address the DX2010 is set to. +OUT- TMPR R B G Y 1 COM Panel or auxillary power supply (-) Motion Detectors, Photobeams, etc. The tamper output may monitor external Normally Closed (N/C) tamper switches when wired as shown in Figure 19. The tamper circuit must be closed to provide proper DX2010 tamper supervision to the control panel. Do not use an EOL resistor. (+) Figure 18: Auxiliary Output Connections The DX2010 also provides an on-board tamper switch for use if the DX2010 is installed inside the AE20 plastic enclosure. The cover tamper spring is supplied with the DX2010. The on-board tamper switch cannot be used if the DX2010 is mounted inside the panel’s enclosure (wire the tamper input as shown in Figure 19 if installed in the control panel’s enclosure). If neither the tamper input or the on-board tamper switch is used, a wire jumper must be placed as shown in Figure 19. Use either the tamper input or the on-board tamper switch. Both cannot be used simultaneously. DX2010 On-board tamper switch +OUT- TMPR R B G DX2010 On-board tamper switch Y 1 COM Tamper Input Wiring +OUT- TMPR R B G Y 1 COM Wire Jumper Location Figure 19: DX2010 Tamper Input Wiring 8.2.6 DX2010 Sensor Loop (Point) Connections The DX2010 supports both Normally Open and Normally Closed contacts in the standard sensor loop configuration. It supports Normally Closed contacts in the doubled sensor loop configuration. The DX2010 is not designed for use with two-wire smoke detectors. D6412/D4412 Operation and Installation Guide 45349E Page 36 © 2003 Bosch Security Systems D6412/D4412 Off-Board Sensors Loops 8.2.6.1 DX2010 Standard Sensor Loop Wiring The single loop configuration for DX2010 standard sensor loop wiring is shown in Figure 20. 1 COM 2 3 COM 4 5 COM 6 7 COM 8 Use 2.21 K EOL Figure 20: DX2010 Sensor Loop Wiring, Single Loop Configuration 8.2.6.2 DX2010 Doubled Sensor Loop (Point) Wiring The doubled loop configuration for DX2010 sensor loop wiring is shown in Figure 21. Input Terminals Common 1 to 8 DX2010 Inputs (See Tables 7 and 8) DX2010 Inputs (See Table 7) Open for alarm otherwise Normally Closed Open for alarm otherwise Normally Closed Each loop is monitored as a separate point. 3.65K Ω 2.2K Ω Figure 21: DX2010 Sensor Loop Wiring, Doubled Loop Configuration Tables 9 and Table 10 identify the 106 and 107 DX2010 sensor loop addresses, respectively. EOL 3.65 K 2.2 K 1 9 17 2 10 18 DX2010 Sensor Loop 3 4 5 6 7 11 12 13 14 15 19 20 21 22 23 8 16 24 Table 9: DX2010 Address 106 EOL 3.65 K 2.2 K 1 25 33 2 26 34 DX2010 Sensor Loop 3 4 5 6 7 27 28 29 30 31 35 36 37 38 39 8 32 40 Table 10: DX2010 Address 107 (for D6412 only) 8.2.7 DX2010 Address Programming Each DX2010 module connected to the panel must have its address jumpers set to the addresses. These address settings are listed in Table 11. D6412/D4412 Operation and Installation Guide © 2003 Bosch Security Systems Page 37 45349E D6412/D4412 Off-Board Sensors Loops Panel Location # D6412/D4412 D6412/D4412 D6412/D4412 D6412 only D4412 only 1 to 8 9 to 16 17 to 24 25 to 32 33 to 40 For Standard Sensor Loop: Set Location’s Device Parameter to 2. Set DX2010 Address as shown below. SDI Address 101 SDI Address 102 SDI Address 103 SDI Address 104 SDI Address 105 For Doubled Sensor Loop: Set Location’s Device Parameter to 2. Set DX2010 Address as shown below. SDI Address 106 SDI Address 106 SDI Address 107 SDI Address 107 Table 11: DX2010 Address Settings For example: You want to use a DX2010 sensor loop for panel Point Location 9 (see Locations in the D6412/D4412 Program Entry Guide [P/N: 45351] for a detailed description of locations and their relationship to points). You must connect a DX2010 and set its address DIP switches to 102. Any time the address DIP switches are changed, you must cycle the power to the module OFF and then ON for the changes to take effect. Set the address DIP switches as shown in the Table 10. The proper DX2010 DIP switch configuration are shown in Figure 22. DIP Switch Settings DIP Switches S1 S2 S3 S4 S5 Module Address 101 102 103 32 OFF OFF OFF 16 OFF OFF OFF 8 OFF OFF OFF 4 OFF OFF OFF 2 OFF OFF ON 104 OFF OFF OFF OFF 105 106 OFF OFF OFF OFF OFF OFF ON ON ON OFF OFF 107 OFF OFF OFF ON ON S6 1 OFF ON OFF ON OFF ON OFF Table 12: DX2010 Address Jumper Settings ON Example: Module Address 102 ON OFF 1 2 3 4 5 6 Figure 22: DX2010 DIP Switch Configuration 8.2.8 DX2010 Status LED • One flash per second indicates normal operation. • LED steady ON can indicate any of the following: G wire is not connected or there is a communications problem between the control panel and the DX2010. - No locations (points) are assigned to the DX2010 with this address. See the Locations section in the D6412/D4412 Program Entry Guide (P/N: 45351). - Address on the DX2010 is not set correctly. ON 1 2 3 4 5 6 - Status LED Figure 23: DX2010 Status LED • LED OFF indicates that there is no power to the module. D6412/D4412 Operation and Installation Guide 45349E Page 38 © 2003 Bosch Security Systems D6412/D4412 Off-Board Outputs 9.0 On-Board Outputs The panel supports up to four on-board programmable outputs (PO1 to PO4). PO2 can be configured as a supervised siren driver. Refer to Global Output Configuration in the D6412/D4412 Program Entry Guide (P/N: 45351) for programming instructions. When programmed as a siren driver, PO2 draws power from the Alrm + terminal. When connected to a 4 Ω horn/speaker, PO2 draws 380 mA of power. When connected to an 8 Ω horn/speaker, it draws 330 mA of power. Use the appropriate current draw in your total alarm power calculation. • PO1: PO1 terminals can be configured as an alarm power output. JP2-PO1 Jumper must be closed. The default configuration for PO1 makes it a dry contact, Normally Open relay with PO1 Jumper open (see Figure 24). Short PO1 Jumper with Jumper Plug JP2-PO1 Select Alrm + R Y G B A PO1 + B (+) L-1 - (+) Alrm + A PO1 B + L-1 - (+) (-) Alrm + A PO1 B + L-1 - (+) (+) (-) (-) DC Power Source PO1 Dry Contact Wiring (without PO1 Jumper) PO1 Wiring (with PO1 Jumper shorted) PO1 Positive Alarm Trigger Wiring Figure 24: PO1 Wiring • PO2: Output PO2 can be used with Alarm+ as a supervised siren driver. Connect an approved 4 or 8 Ω siren. Alternatively, PO2 can sink up to 500 mA 12 VDC. For larger loads, use a Bosch Security Systems D133 Relay Module or a Bosch Security Systems D134 Dual Relay Module. • PO3 and PO4: Outputs PO3 and PO4 can be configured for Alarm Output. These outputs can sink up to 500 mA 12 VDC each. For larger loads, use a Bosch Security Systems D133 Relay Module or a Bosch Security Systems D134 Dual Relay Module (see Figure 25). JP2-PO1 Select R Y G B Alrm + A PO1 B + L-1 - (-) (+) Figure 25: PO2-PO4 Wiring Use the Fire System Power Formula (see Section 5.4.1 Available Power) to calculate the current available for fire and combined fire/burglary systems. IMPORTANT D6412/D4412 Operation and Installation Guide © 2003 Bosch Security Systems Page 39 45349E D6412/D4412 On-Board Outputs Unexpected Output at PO1 to PO4: If these outputs do not provide the alarm output you expect: • Check the programming for Programmable Outputs in the Outputs section of the D6412/D4412 Program Entry Guide (P/N: 45351). • Check the Point Index Configuration section of the D6412/D4412 Program Entry Guide to verify the points you are activating are programmed for alarm output. If Programmable Output 2 is configured as a supervised siren driver (in combination with the Alrm + terminal), you must connect a 4 Ω or 8 Ω siren/speaker to PO 2 to clear the siren/speaker supervision trouble. IMPORTANT D6412/D4412 Operation and Installation Guide 45349E Page 40 © 2003 Bosch Security Systems D6412/D4412 Off-Board Outputs 10.0 Off-Board Outputs 10.1 Overview You can expand the total number of programmable outputs to twenty for the D6412 (twelve for the D4412) using the DX3010 Octo-Output Module (two required for twenty outputs) or DX3020 Module. Instructions for the DX3010 Module are included in this guide (as well as with the module). The DX3020 Module emulates two DX3010 Modules with the D6412 (emulates one with the D4412). DX3020 specific instructions are included with the module. 10.2 DX3010 Octo-Output Module 10.2.1 Overview The DX3010 Octo-Output Module allows you to add outputs to your system in groups of eight. You can add up to two DX3010 Octo-Output Modules to the D6412 (one to the D4412). Combining the four on-board programmable outputs with two DX3010 Octo-Output Modules (one on the D4412) makes a total of twenty programmable outputs available for the D6412 (12 for the D4412). Review Section 5.0 Power Outputs to be sure you provide enough power for the Octo-Output Modules and any other powered devices you connect to the panel. You can assign any of the programmable output functions to the Octo-Output Module’s individual outputs separately. See Outputs in the D6412/D4412 Program Entry Guide (P/N: 45351) for programming details. The DX3010 relay outputs are not supervised and cannot be used in fire or combined fire/burglary installations for primary indicating devices. IMPORTANT Current Draw: 10 mA Standby plus 40 mA for each energized output (relay) for a total of 330 mA maximum with all eight outputs energized. Refer to the DX3010 Installation Guide (P/N: 46925) for complete installation, addressing, and operating instructions. 10.2.2 Configuring the DX3010 Octo-Output Module Outputs may activate when setting the DX3010’s switches, programming the panel, resetting the panel or applying power to the panel. You may want to disconnect equipment connected to outputs while performing these functions. 10.2.3 Relay Outputs Each DX3010 output provides a Form “C” dry contact rated for 5.0 A at 28 VDC. Normally-open, common, and normallyclosed terminals are available for each relay output. When an individual output is activated, there is continuity between the normally-open and common terminals. When the output is not activated, there is continuity between the normally-closed and common terminals. D6412/D4412 Operation and Installation Guide © 2003 Bosch Security Systems Page 41 45349E D6412/D4412 Off-Board Outputs 10.2.4 Installation You can install the DX3010 in the enclosure with the panel (see Figure 26) using the mounting hardware supplied with the DX3010. D6412/D4412 PCB JP1 AUXILIARY Installer R R1 JP2-PO1 Select T1 R Y G B T Alrm + Enclosure Wall DX3010 Terminals A PO1 B + L-1 - Com L-2 L-3 Com L-4 L-5 Com L-6 L-7 Com L-8 DX3010 Side Mounting Locations Mounting Hardware (supplied w/DX3010) Figure 26: DX3010 - Control Panel Enclosure Side Mounting Alternatively, you can mount the DX3010 remotely in its own D203 enclosure as shown in Figure 27. Distance from the panel is determined by the total combined wire length of all devices (including keypads) connected to the panels data terminals. The combined total wire length must not exceed 305 m (1000 ft.) 22 AWG (0.8 mm). Install the module in the D203 housing Figure 27: Installing the DX3010 in a Remote Enclosure 10.2.5 DX3010 to D6412/D4412 SDI Bus Wiring Connections Table 13 identifies the SDI bus wiring length requirements. If the DX3010 is to be installed far from the control panel, then the control panel cannot be used to power the DX3010. An external power supply must be used. See Figure 29 for external power supply connections. IMPORTANT D6412/D4412 to DX3010 D6412/D4412 to DX3010 External Power Supply to DX3010 Power Source D6412/D4412 External Power Supply #22 AWG (0.8 mm) 12. 2 m (40 ft.) 305 m (1000 ft.) 12.2 m (40 ft.) Table 13: DX3010 Wire Lengths #18 AWG (1.2 mm) 24.2 m (80 ft.) 610 m (2000 ft.) 24.4 m (80 ft.) D6412/D4412 Operation and Installation Guide 45349E Page 42 © 2003 Bosch Security Systems D6412/D4412 Off-Board Outputs Power down the panel to connect the DX3010 as shown in Figure 28. D6412/D4412 DX3010 Y Yellow G Green B Black R Green Yellow Black Red Output Activated State Red NC C NO Output De-activated State NC C R Y G B NO NC C 8 NO Figure 28: Wiring the DX3010 to the D6412/D4412 If necessary to power the DX3010 from an external power source, connect it to the power source and the panel as shown in Figure 29. See Section 4.3 External Power Supply for external power supply restrictions. D6412/D4412 DX3010 Y Yellow G Green B Black Green Yellow Black R + NC C 8 NO - External 12 VDC Power Supply R Y G B Figure 29: Wiring for External Power Supply D6412/D4412 Operation and Installation Guide © 2003 Bosch Security Systems Page 43 45349E D6412/D4412 Off-Board Outputs 10.2.6 Address Programming Each DX3010 Module connected to the panel must have its address jumpers set to the address shown in Table 14. Panel D6412/D4412 Output # 5 to 12 SDI Address SDI Address 150 D6412 only 13 to 20 SDI Address 151 Table 14: DX3010 Address Settings Any time the address jumpers are changed, you must cycle the control panel power OFF and then ON for the changes to take effect. Set the address jumpers as shown in the Table 15. “DN” indicates that the DIP switch is CLOSED (Down). See Figure 30 for DIP Switch configuration. Panel SDI Address DIP Switch, X = DIP Switch is CLOSED 1 2 4 8 16 D6412/D4412 150 UP UP UP UP UP DN D6412 only 13 to 20 DN UP UP UP UP DN Mode Table 15: DX3010 Address Jumper Settings OPEN Example: Module Address 150 1 2 3 4 5 6 =Switch OPEN (Up) =Switch CLOSED (Down) Figure 30: DX3010 Address DIP Switches D6412/D4412 Operation and Installation Guide 45349E Page 44 © 2003 Bosch Security Systems D6412/D4412 Arming Devices 11.0 Arming Devices 11.1 Description Command centers, maintained or momentary contact keyswitches, Premises RF arming devices, or any of these devices in combination are used to arm and disarm areas. The D6412 may contain up to four areas (up to two areas on the D4412) that can be armed and disarmed individually. 11.2 Command Centers A Bosch Security Systems command center is a four-wire SDI device used to arm and disarm areas, annunciate complete system status, initiate system tests, and control many functions of the security system. The panel can supervise up to eight wired command centers and 4 RF Keypads. The panel transmits a Serial Device Trouble Report, SDI MISSING in the Modem IIIa2 format or SYS PERIPHERAL TROUBLE in the CONTACT ID format, if it loses communication with a wired supervised command center. RF Keypads are shown as missing by SDI address. See RF Keypads in the D6412/D4412 Program Entry Guide (P/N: 45351). SYSTEM FAULT appears in any command center with text display capability that loses communication with the panel. A system trouble appears at all other command centers connected to the system. SYSTEM FAULT also appears for approximately 10 sec. during power up. See Command Center in the D6412/D4412 Program Entry Guide (P/N: 45351) for complete programming and operation details for command centers. 11.2.1 Assigning the Command Center an Address On-board DIP switches are used to assign a unique address to the command center. Command centers 1 to 8 are assigned to SDI address 1 to 8. See Command Centers in the D6412/D4412 Program Entry Guide (P/N: 45351) for a complete description of command center programming (area assignment, etc.). Table 14 shows the correct address setting for each command center address. See Figure 31 for proper command center DIP switch orientation. SDI Address Switch Number, X = Switch On 0* 1 1 2 4 8 16 Mode OFF OFF OFF OFF OFF OFF OFF OFF OFF OFF ON OFF OFF OFF ON ON OFF ON OFF OFF OFF OFF ON ON OFF OFF ON ON OFF OFF ON OFF OFF ON ON ON OFF OFF ON ON OFF ON OFF ON OFF OFF OFF ON ON OFF ON ON OFF 2 3 4 5 6 7 8 ON Table 16: Command Center Address Assignments DIP Switch Settings * Address 0 is reserved for the installer’s keypad. This keypad is not intended for permanent installation and should remain on-premises for future programming sessions. See Section 13.0 Installer’s Keypad and Installer’s Mode, for more information. ON Example: Module Address 2 ON OFF 1 2 1 2 3 4 4 8 ADDRESS 5 16 6 MODE Figure 31: Command Center DIP Switch Orientation D6412/D4412 Operation and Installation Guide © 2003 Bosch Security Systems Page 45 45349E D6412/D4412 Arming Devices 11.2.2 Command Center Installation Consult the command center Installation Guide for installation and mounting instructions. Command centers connect to the panel in parallel as shown in Figure 32. Green Yellow Black Red Red Yellow Green Black R Y G B Back of Command Center D6412/D4412 PCB Figure 32: Wiring Command Centers to the D6412/D4412 Refer to Table 17 for panel SDI Bus to command center wiring length requirements. #22 AWG (0.8 mm) #18 AWG (1.2 mm) D6421/D4412 to D621/D623 305 m (1000 ft.) 610 m (2000 ft.) D6412/D4412 to D625* 69 m (225 ft.) 183 m (600 ft.) D6412/D4412 to D621/D623/D625 using an External Power Supply 505 m (1000 ft.) 610 m (2000 ft.) * Due to higher current requirements for the D625 Vacuum Fluorescent Command Center, the wire lengths shown in this table must be used when wiring it from the control panel. Table 17: Command Center Wire Lengths If an external power supply is used, follow the lengths as shown in Table 17. Review Section 5.0 Power Outputs to determine the total power output requirements for your system. You may need to add one or more External Power Supply Modules for the number of command centers you want to use. Figure 33 shows an external power supply powering command centers in a stand-alone configuration. For UL certificated accounts, use a UL listed power supply. IMPORTANT See Section 4.3 External Power Supply for external power supply restrictions. Figure 33 shows the common from the External Power Supply Module connected to both the command centers’ common and the common on the control panel. A stand-alone power supply powering any device connected to the panel must also be connected to the Aux - (Aux negative) terminal on the panel. Do not connect the stand-alone power supply to earth ground. D6412/D4412 Operation and Installation Guide 45349E Page 46 © 2003 Bosch Security Systems D6412/D4412 Arming Devices Green Yellow Black Red Yellow Green Black R Y G B Red Back of Command Center + - D6412/D4412 PCB External 12 VDC Power Supply Figure 33: External Power for Command Centers 11.3 D268/D269, D279 Independent Zone Control You can program on-board points 2 to 8 so the D268’s, D269’s, or D279’s (or later versions’) Independent Zone Controls (IZC) operate as independent point controls (arms and disarms the point). See Point Index Configuration in the D6412/D4412 Program Entry Guide (P/N: 45351) for programming information. See the installation literature that accompanies the D268, D269, and D279 (or later versions) for wiring and operation instructions. To use the D268’s, D269’s, or D279’s (or later versions’) IZC, you must program the panel’s on-board points for 1 kΩ EOL resistors. Points 2 to 8 must all be supervised with 1 kW EOL resistors, even if an IZC is only used for one point. See Global Point Configuration in the D6412/D4412 Program Entry Guide (P/N: 45351) for programming instructions. Only use on-board points 2 to 8 with an IZC. No EOL resistor is used on the points connected to the IZC. 11.4 Keyswitch 11.4.1 Keyswitch Description You can connect a maintained or momentary contact arming station (UL Listed security device keyswitch) to master arm/ disarm any of the areas in the system. The keyswitch is connected to an on-board or off-board point’s sensor loop. Outputs can be programmed to activate arming status LEDs for keyswitch arming stations. See the Outputs section of the D6412/ D4412 Program Entry Guide (P/N: 45351) for more information. 11.4.2 Keyswitch Programming See Point Index Configuration in the D6412/D4412 Program Entry Guide (P/N: 45351) for point programming for keyswitches. D6412/D4412 Operation and Installation Guide © 2003 Bosch Security Systems Page 47 45349E D6412/D4412 Arming Devices 11.4.3 Keyswitch Installation For maintained switches, connect the EOL resistor for the point at the keyswitch so the switch opens the circuit when it operates. A short on the circuit produces an alarm if the area is armed and a trouble if it is disarmed (see Figure 34). For momentary switches, connect the EOL resistor for the point at the keyswitch so the switch shorts the resistor when it operates. If the area is armed, an open on the circuit produces an alarm; and when the area is disarmed, an open on the circuit produces a trouble (see Figure 34). Maintained Keysw itch Momentary Keyswitch Common Co mmon 2.2 K Point Inpu t Open o n Circuit Arm s Area 2 .2 K Sho rt on Circuit Tog gles Arm ing Sta te Point Input Figure 34: Keyswitches 11.4.4 Keyswitch Operation Arming/Disarming The panel offers a wide variety of keyswitch arming options. See Point Index Configuration in the D6412/D4412 Program Entry Guide (P/N: 45351) for details on configuring keyswitch arming options. Silencing Alarms • Momentary Keyswitch: To silence alarms (stop Alarm output), operate the keyswitch. If the area is armed, operating the keyswitch to silence the alarm also disarms the area. If the area is disarmed, operating a momentary keyswitch to silence the alarm does not arm the area. • Maintained Keyswitch: If the area is armed, turn the keyswitch to the disarmed position. The panel disarms the area and silences the alarm. If the area is disarmed, turn the keyswitch to the armed position (the panel does not arm) and return to the disarmed position. D6412/D4412 Operation and Installation Guide 45349E Page 48 © 2003 Bosch Security Systems D6412/D4412 SDI Devices 12.0 SDI Devices 12.1 Description The panel supports a variety of SDI devices, including the command centers, DX2010 Point Expanders, DX3010 Octo-Outputs discussed in previous sections. 12.2 Installation Consult the installation guide for the specific SDI device for complete installation instructions. SDI devices connect to the panel in parallel as shown in Figure 35. SDI Device SDI Device D6412/D4412 R B G R Y B G Y Green Green Yellow Yellow Black Black Red Red R Y G B Figure 35: SDI Device Wiring These devices may share power with the panel or be powered by a stand-alone power source. Review Section 5.0 Power Outputs to determine the total power output requirements for your system. You may need to add one or more External Power Supply Modules for the number of devices you want to use. Figure 33 shows an external power supply powering command centers. For UL certificated accounts, use a UL Listed power supply. Figure 36 shows the common from the External Power Supply Module connected to the command centers’ common and the common on the control panel. D6412/D4412 Operation and Installation Guide © 2003 Bosch Security Systems Page 49 45349E D6412/D4412 SDI Devices SDI Device D6412/D4412 R B G Y Green Yellow Black Red + - External 12 VDC Power Supply R Y G B Figure 36: External Power for SDI Devices 12.3 DX4010 RS-232 Serial Interface Module Bosch Security Systems’ DX4010 RS-232 Serial Interface Module can be used to connect a standard serial printer, or other serial devices, to the panel. It can also be used for a RAM IV remote programming direct connection. Refer to the DX4010 Installation Guide (P/N: 48210) for complete installation, addressing, and operating instructions. DB9 GND Enable Pins (P1) SDI Bus DB9 GND ENABLE P1 P5 ON 1 P2 LED ENABLE DB9 Connector 2 3 4 5 6 1 2 4 8 16 M SER RXTX RXTX BUS Diagnostic LEDs Diagnostic LED Enable Pins (P2) Address DIP Switches Figure 37: DX4010 RS-232 Serial Interface Module 12.3.1 DX4010 Installation The intended installation location for the DX4010 is in the plastic enclosure that it is shipped in. This is a low-profile, aesthetically appealing housing that can be placed on a desktop or similar surface. Distance from the panel is determined by the total combined wire length of all devices (including keypads) connected to the panel’s data terminals. The combined total wire length must not exceed 305 m (1000 ft.) for #22 AWG (0.8 mm), or 610 m (2000 ft.) for #18 AWG (1.2 mm). D6412/D4412 Operation and Installation Guide 45349E Page 50 © 2003 Bosch Security Systems D6412/D4412 SDI Devices 12.3.2 DX4010 to D6412/D4412 SDI Bus Wiring Connections See Figure 38 for acceptable power wiring connections. See Section 4.3 for external power supply restrictions. D6412/D4412 D6412/D4412 DX4010 DX4010 Green Green Yellow Yellow Black (-) Black (-) Red (+) Red (+) (+) R Y G B (-) External 12 VDC Power Supply DX4010 to D6412/D4412 Power Connections R Y G B DX4010 to External Power Supply Connections Figure 38: DX4010 Power Connections 12.3.3 RAM IV Direct Connection The DX4010 can be used to connect directly to the panel for RAM IV remote programming. It also lets the user perform diagnostic and history retrievals in RAM IV. To connect directly to the panel for a RAM IV session: 1. Make sure the DX4010’s Address DIP Switches are set to Address 0. See the DX4010 Installation Guide (P/N: 49539) for address DIP Switch location and positioning. 2. Using a null modem cable (not included), connect the DX4010 to COM port 1 or 2 (or an available COM port) on your computer. The DX4010 has a DB-9 male serial connector. If this does not fit your computer, you need an adapter. 3. Wire the flying leads of the colored cable connector (included with panel) to the DX4010’s SDI Bus terminals. Plug the connector end onto the D6412/D4412. See Figure 39 for details. 4. Plug the connector end of the cable onto the panel PCB. See Figure 40 for details. D6412/D4412 AUX/Data Connector Pin Location Com Port Serial Port JP2 Sel R Y G B DX4010 DX4010 SDI Bus Black (GND) Green Yellow Red Null Modem Cable Figure 39: Creating a RAM IV Direct Connection D6412/D4412 Operation and Installation Guide © 2003 Bosch Security Systems Page 51 45349E D6412/D4412 SDI Devices 12.3.4 Configuration Jumpers Diagnostic LED Pins (P2) Cable Ground Pins (P3) P2 – Diagnostic LED Pins Disabled The diagnostic LEDs can be used for troubleshooting purposes. See Figure 40 for jumper plug placements. The DX4010 draws more current when the diagnostic LEDs are enabled. Do not enable the diagnostic LEDs under normal operating conditions. Disabled Enabled Enabled Figure 40: DX4010 P2/P3 Jumper Pin Settings • BUS RX LED: SDI bus receives data from control panel. • BUS TX LED: SDI bus transmits data to control panel. • SER RX LED: RS-232 receives data from printer (or other serial device connected to DX4010). • SER TX LED: RS-232 transmits data to printer (or other serial device connected to DX4010). P3 – RS-232 Cable Ground Pins Some devices connected to the DB9 connector may cause a ground fault condition on the control panel. If this occurs, removing the plug across the P3 jumper pins may clear the ground condition. Some devices can cause a ground fault even if the P3 jumper plug is removed. • P3 Jumper Pins Disabled: Isolate DB9 Shield from SDI Common (Black) • P3 Jumper Pins Enabled: Connect DB9 Shield to SDI Common (Black) Address 0 (zero) Settings Address DIP Switches Use the address DIP switches to assign Address 250 to the DX4010 when a serial device is connected to it. Set the DIP switches to Address 0 (zero) when preforming a remote programming direct connection. See Figure 41 for proper DX4010 DIP Switch positioning, and Table 18 for DX4010 address settings. ON ON OFF 1 2 3 4 5 6 1 2 4 8 16 M O D E Figure 41: DX4010 DIP Switch Orientation DIP Switch Settings DIP Switches S1 S2 S3 S4 S5 S6 Module Address 0 1 ON 2 ON 4 ON 8 ON 16 ON Mode OFF 250 ON ON ON ON ON ON Table 18: DX4010 Address Settings 12.3.5 Supervision Supervision includes operation of the SDI bus, printer paper supply, and serial printer (or device) selected (on-line). The panel sends an SDI Missing Report if it fails to communicate with the DX4010 Module. 12.3.6 DX4010 Module’s DB9 Connector The DB9 pins are configured as shown in Figure 42. 1 - DCD 4 - DTR 7 - RTS 2 - RxD 5 - GND 8 - CTS 3 - TxD 6 - DSR 1 2 3 4 5 9 - RI 6 7 8 9 Figure 42: DX4010 D89 Connector Layout D6412/D4412 Operation and Installation Guide 45349E Page 52 © 2003 Bosch Security Systems D6412/D4412 Installer’s Keypad and Installer Mode 13.0 Installer’s Keypad and Installer Mode 13.1 Installer’s Keypad Connector The Installer’s Keypad must be set to Address 0 (set MODE to OFF) and the Installer Switch must be closed in order to program the panel from the keypad. Figure 43 shows you how to connect and disconnect an Installer’s Keypad (D623 or D625 Text Command Center) and enter the Installer’s Mode. Refer to D6412/D4412 Program Entry Guide (P/N: 45351) for complete information on programming the panel from a keypad. Connector supplied with keypad. R Y G B Red Yellow Green Black Back of Command Center R Y G B Connector supplied with panel. D6412/D4412 PCB Use wire assemblies supplied with keypad and panel to create a double ended “installer” cable. Figure 43: Installer’s Keypad 13.2 Entering the Installer Mode Press the [Cmd] key when the Text Command Center display prompts you to press the [#] key. IMPORTANT 13.2.1 Installer’s Passcode To enter the Installer’s Mode, first enter the installer’s passcode and then press [Cmd][4][1]. The default Installer Passcode is 6543210. The passcode length can be between 3 and 7 digits in length. The default length is four digits, which shortens the default Installer passcode to 6543. To change the default passcode length, see Section 2.9 Passcode Configuration, Installer Passcode in the D6412/D4412 Program Entry Guide (P/N: 45351). The system displays the Installer’s Menu described in Section 13.3 Installer’s Menu. The Installer Switch must be closed to select Keypad Program from the Installer’s Menu (see Figure 43). IMPORTANT D6412/D4412 Operation and Installation Guide © 2003 Bosch Security Systems Page 53 45349E D6412/D4412 Installer’s Keypad and Installer Mode 13.2.2 Service Start/Service End Reports After you enter your installer passcode and press [Cmd 41] to enter the Installer’s Mode, the panel sends a Service Start Report. When you exit the Installer’s Mode, it sends a Service End Report. INSTALLER SWITCH NORMAL (OPEN) JP1 AUXILIARY INSTALLER SWITCH LOCKED (CLOSED) Installer Figure 44: Installer Switch 13.3 Installer’s Menu 13.3.1 Press [1] for Bell Test The panel activates the Bell Time (1-5) and Alarm Output (1-8, 1-9, 1-10, 1-11, and 1-12.) functions for 3 seconds. See Outputs in the D6412/D4412 Program Entry Guide (P/N: 45351) for a complete description of output functions. 13.3.2 Press [2] for Strobe Test The panel activates the Strobe Output function (1 to 9) and waits for the installer to press the [Cmd] key to end the test. If the installer fails to press the [Cmd] key within 20 min., the panel automatically terminates the strobe test. 13.3.3 Press [3] for Battery Test The battery test causes the system to run on battery only for four min. If the battery voltage falls below 12.1 V during the four min. test or if the battery is missing, the system restores AC power and displays a system trouble at all keypads. 13.3.4 Press [4] for Test Report When you press the [4] key, the panel tries to send a Test Report. If there is a system trouble present at the time of the test, the panel sends a Test, Off Normal Report. The Test Report follows the routing for the Automatic Test Report. If the test communication is unsuccessful, the panel creates a system trouble and a communication failure. This Test Report is the only report sent when the Installer Switch is closed. No other reports are sent when the Installer Switch is closed. IMPORTANT 13.3.5 Press [5] for Point Status Pressing [5] displays the sensor loop status for the first location in the system. The location, area, point number, and electrical status (open, short, or normal) are shown. See Locations in the D6412/D4412 Program Entry Guide (P/N: 45351) for a complete description of the relationship between locations, areas, and points. Pressing the [*] key advances the display to the status for the next point. Pressing the [Cmd] key exits the Point Status Mode. D6412/D4412 Operation and Installation Guide 45349E Page 54 © 2003 Bosch Security Systems D6412/D4412 Installer’s Keypad and Installer Mode 13.3.6 Press [6] for Output Test When you press [6] for Output test, the display shows Output1, Hold [*] for ON. Press and hold the [*] key to turn output on. Press the [*] key (without holding) to end current output test and to advance to next output. Press [Cmd] to return to the Installer’s Menu. 13.3.7 Press [7] for RF Menu Pressing [7] moves the system into the RF Menu. This menu consists of three scrolling choices that allow you to add RF ID codes, test RF devices, and view or remove RF ID codes. 13.3.7.1 Adding RF ID Codes Location Area To add RF ID codes into the system, press [1] when “Add RF ID? Press 1.” scrolls across the display. Figure 45 illustrates what appears on the display. Loc9 A1 To add push 9*. To add the location shown in Figure 45 as an RF device to the system (Location 9 is used as an example), press [9] followed by [*]. The RF ID code appears as shown in Figure 46. Enter the nine-digit ID code found on the back of the RF device and then press [Cmd]. “ID added. Press Cmd.” appears on the second line of the display, indicating the code was successfully entered and accepted. Press [Cmd]. Point Number Pt9 Key sequence to press Figure 45: Adding RF ID Codes Menu Display If an error message appears, make sure you enter the code as printed on the back of the device and that you only enter nine digits. Enter ID for Loc9 A1 Pt9. Figure 46: RF ID Code Display Press [Cmd]. The display returns to the first location designated as an RF device and scrolls through other RF device locations (if any). You may enter the desired location number and add the ID code as described above. When all RF ID codes have been entered, press [Cmd] once. The first line of the display shows “Configuring RF Please Wait.” During this period, the RF Receiver’s LED blinks approximately once every second until all ID bytes have been recognized. If the devices are successfully configured, the display returns to the scrolling RF Menu. If an error message appears, make sure the RF Receiver’s transmit lines are properly connected to the D6412/D4412 and no shorted conditions are present. From the RF Menu, you may choose 1 to enter additional RF ID codes or you may select one of the other RF Menu choices. When you have finished with the RF Menu, press [Cmd] to return to the main programming menu. • Locations 41 to 44: RF Keypads (four maximum; one per location) • Locations 45 to 76: RF Keyfobs 3.3.7.2 Testing RF Devices To test RF devices that have been added to the system, press [2] when Test RF Devices? Press 2 scrolls across the display. Figure 47 shows what the appears in the display. The display scrolls through all properly configured devices and asks if you want to test. Using Location 9 as an example (as shown in Figure 47), press [9] followed by [*] to test the RF device at Location 9. The first line of the display shows Activate device!, indicating the device must be activated in order to test it. Once the device is activated, the display shown in Figure 48 appears: Location Area Loc9 A1 Test? Press 9*. Point Number Pt9 Key sequence to press Figure 47: Test RF Devices Display L03 Loc9 M01 A1 P08 Pt9 Figure 48: RF Device Test Status Display D6412/D4412 Operation and Installation Guide © 2003 Bosch Security Systems Page 55 45349E D6412/D4412 Installer’s Keypad and Installer Mode The first line in Figure 48 shows the RF device’s test status: • L03: System recognizes the device and that the device is operating properly. Other status displays include: - L02: System recognizes the device and that the device operation is fair. - L01: The device must be relocated to allow for proper operation. • M01: Counts the number of device activations. For example, an RF3401 Point Transmitter is the device being tested. When the magnetic assembly is removed from the point transmitter base, the activation counter tallies one activation. When the magnetic assembly is returned to the point transmitter base, the counter tallies a second activation. Opening and closing the point transmitter’s case are also considered activations. • P08: Message packet transmission. - Alarm, Panic and Restoral messages are transmitted with eight packets (Alarm and Restoral refer to the transitions in and out of alarm conditions). - Supervisory and Test transmissions (smoke detectors) consist of four packets. - RF keypads transmit four packets for all keys except the Emergency keys, which transmit eight packets. - RF key fobs transmit four packets for normal operation and eight packets for the Panic button (Arm and Disarm pressed simultaneously). RF receivers need to receive seven or eight data packets from a transmitter in order for that transmitter to be considered “Good.” When testing RF keypads or key fobs, the panic functions must be used, otherwise the units only transmit four packets (see packet count above). When testing the installation of a smoke unit, the test button should not be used. Doing so results in a 4 packet transmission. When you have finished testing a device, press [Cmd]. The list of RF devices begins to scroll beginning with the first (lowest) location assigned to an RF device. You may select another location to test by entering the location number followed by the [*] and repeating the procedure described above. If you are finished testing, press [Cmd] again to display the RF Menu. 3.3.7.3 Viewing/Removing RF ID Codes To view or remove RF ID codes that have been added to the system, press [3] when View or Remove RF ID? Press 3 scrolls across the display. The display then scrolls through the properly configured RF devices as shown in Figure 49. After each ID code is shown, the display toggles to the following message before moving to the next ID code: To remove ID press 9* (the number “9” represents the location number and is used as an example here and in Figure 49). To remove the ID code, press the number key(s) that corresponds with the location number (for this example, [9]). Then press the [*] key. The display then asks you to confirm your removal. Press the appropriate number key(s) followed by the [*] key. The display shows Removed ID on the first line with the location, area, and point numbers of the removed ID on the second line. Location Area Point Number Loc9 A1 Pt9 ID: XXXXXXXXX ID Code (see back of device) Figure 49: RF ID Code Display If you want to remove additional ID codes, press [Cmd]. The scrolling list of RF devices returns. Press [Cmd] again to return to the RF Menu when you have finished removing all ID codes. Pressing [Cmd] a third time returns to the Main Programming Menu. 13.3.8 Press [8] for Keypad Program Pressing [8] moves the system into keypad programming mode ONLY if the Installer Switch is closed (see Figure 44). Keypad programming must be enabled. The default setting enables keypad programming. See the D6412/D4412 Program Entry Guide (P/N: 45351) for more information. IMPORTANT See Appendix E Keypad Programming in the D6412/D4412 Program Entry Guide for complete instructions for programming from the keypad. D6412/D4412 Operation and Installation Guide 45349E Page 56 © 2003 Bosch Security Systems D6412/D4412 Installer’s Keypad and Installer Mode 13.3.9 Press [9] Program Key The PK32 Programming Key functions much like a blank floppy disk and can be used to copy a system’s programming to another system. This key can also be used as a backup in the event that the system’s programming entries are lost. To access the PK32 Programming Key Menu, press [9] from the main programming menu. This menu contains the following selections: • Key to Panel: Press [1] to send information from the Programming Key to the panel. • Panel to Key: Press [2] to send information from the panel to the Programming Key. • Check Key: Press [3] to perform a functional diagnostic on the Programming Key. The status LED on the Programming Key blinks during the check. When the display shows Check OK, the Programming Key is OK for use. Press [Cmd] to abort the check. • Erase Key: Press [4] to erase the contents of the Programming Key. A panel program stored on a PK32 key can only be used on like panel types (D6412 to D6412 and D4412 to D4412). IMPORTANT The PK32 connects to the pins marked AUXILIARY (JP1) on the panel’s PCB as shown in Figure 50. Status LED Programming Key (PK32) JP1 AUXILIARY Installer R R1 JP2-PO1 Select T1 R Y G B T Alrm + A PO1 B + L-1 - Com L-2 L-3 Com L-4 L-5 Com L-6 L-7 Com L-8 D6412/D4412 PCB Figure 50: PK32 to D6412/D4412 Connections D6412/D4412 Operation and Installation Guide © 2003 Bosch Security Systems Page 57 45349E D6412/D4412 Installer’s Keypad and Installer Mode 13.3.10 Exiting the Installer’s Menu When you are ready to exit the Installer’s Menu and return the system to normal operation, open the Installer’s Switch. The following screen appears for approximately 10 sec. (note that the panel model number may vary). D6412 Please Wait... Rev X.XX After the 10-sec. waiting period, the text command center display returns to normal (disarmed, no fault/trouble conditions). 13.3.11 Press [0] Call for Service Details When end users press [Cmd 42] to display system troubles and a Call for Service condition exists, the system displays Call for Service. The first line of the display is fixed. The second line is programmable text that can be used to enter the preferred phone number to use if a call for service must be placed. This number could be the central station’s phone number or a different number. The second line can also be used to show an instructional message, such as “PRESS 0 TO VIEW.” This message instructs the user to press the [0] key to view system trouble details. There is a variety of system conditions that can access the Call for Service display. The exact nature of the trouble is not shown to the end user because none of the conditions can be serviced by them. These conditions require attention of the servicing company. Call for Service Details Comm Fail, Destination 1 [2]: System tried to send report to this routing destination but failed. See Appendix A Routing Dialing Tables in the D6412/D4412 Program Entry Guide (P/N: 45351) for details on the communication failed event. System battery is low: Battery connected to the panel fell below 12.1 V. System battery is missing: Battery connected to the panel is badly discharged, damaged, or disconnected. Data bus missing, Device ###: SDI data bus device set to the address shown in the display (###) is missing or has stopped responding. Data bus tamper, Device ###: Tamper on the SDI data bus device set to the address shown in the display (###) is open. Data bus reset, Device ###: SDI data bus device set to the address shown in the display (###) has reset its microprocessor. Data bus trouble, Device ###: SDI data bus device set to the address shown in the display (###) is sending a trouble message to the panel. Troubles are defined per device type. See the instructions for the device shown to learn the exact nature of the trouble. Bell supervision fault PO2: Programmable Output 2 (marked PO2 on the panel) can be programmed as a supervised siren/ speaker. See Outputs in the D6412/D4412 Program Entry Guide (P/N: 45351). When PO2 is programmed for supervision, disconnecting the siren or speaker generates this fault condition. RF Rcvr Trouble, Device ###: Premises RF receiver set to the displayed SDI address (Device ###) is sending a trouble message to the panel. Troubles are defined per receiver type. See the instructions for the receiver shown to learn the exact nature of the trouble. RF Rcvr Jammed, Device ###: Premises RF receiver set to the displayed SDI address (Device ###) is sending a jammed message to the panel. D6412/D4412 Operation and Installation Guide 45349E Page 58 © 2003 Bosch Security Systems D6412/D4412 Installation Label 14.0 Installation Label This system should be installed in accordance with the National Electrical Code, NFPA 70, the National Fire Alarm Code, NFPA 72 and the local authority having jurisdiction. Depending on the application, the installation is to be in accordance with one or more of the following UL standards: UL681 Installation and Classification of Mercantile and Bank Burglar Alarm Systems; UL1076 Proprietary Burglar Alarm Systems and Units; UL1641 Installation and Classification of Residential Burglar Alarm Systems. Printed information describing proper installation, operation, testing, maintenance, repair service and response to an alarm is to be provided with this equipment. Warning: Owner's Instruction Notice: Not to be removed by anyone except occupant. D6412 Bosch Security Systems recommends testing the entire system at least once a week, and having a qualified technician check the system at a minimum of once every 3 years. This equipment has been type tested and found to comply with the specifications in Part 15 of FCC rules for Class B Computing Devices. Operation is subject to the two following conditions (1) this device may not cause any interference, and (2) this device must accept any interference received including interference that may cause undesired operation. Complies with Part 68, FCC Rules. FCC Registration Number: ESVMUL-46531-AL-E 0.1B Suitable for the following applications: 1) Household Burglar Alarm System Units, Grade A. 2) Household Fire Warning System Units. 3) Police Station connect, Grade A Mercantile Premise alarm system, Grade A Mercantile Safe and Vault alarm system and Grade AA Mercantile Safe and Vault alarm system when installed in conjunction with Model D8122 derived channel subscriber terminal unit. For all Police Station applications and grades, Model D8108A Attack Resistant Enclosure with a UL Listed local sounding device is required. 4) Local, Grade A Mercantile Premise alarm system and Grade A Mercantile Safe and Vault alarm system. For all local applications and grades, Model D8108A Attack Resistant Enclosure and a UL Listed local sounding device is required. 5) Central Station, Grade C application. Central Station, Grade B when installed with a UL Listed local sounding device. Central Station, Grade AA when installed with Model D8122 derived channel subscriber terminal unit. 6) Proprietary Burglar Alarm units, Grade A. Proprietary Burglar Alarm unit, Grade BB when installed with the Model D8122 derived channel subscriber terminal unit. D6412 must be installed in accordance with D6412/D4412 Installation Instructions (P/N:45349). Do not connect to a receptacle controlled by a switch. Do not share with D6412 uses a other CX4010 UL Listed equipment. Class 2 Transformer All external connections are inherently Class 2 power limited. Circuit Control Unit (Loop) Delay - Sec 18 VAC 22 VA 60 HZ 1 Earth Ground Green Black P P P P S S S S A B C Aux Pwr Red POWER SUPPLY REQUIREMENTSThe Power Supply provides a maximum of 600 mA for the Control Panel and All Accessory Devices. For System loading, See D6412/D4412 Installation Instructions (P/N:45349). Requirements for battery standby time may reduce allowable output. Aux Pwr + CAUTION: See D6412/D4412 Installation Instructions (P/N:45349) for power requirements relating to terminals [Alrm+] and [+Aux]. Installer Keypad Connect Lock Installer Switch to program. D Supervised with 2.2 kΩ EOL Resistor (P/N: 47819). Typical Initiating Devices are Door Contacts NO/NC, Floor Mats, Motion Sensors, Glass Break Detectors, etc. Maximum charging current is 1.1 A. BATTERY: Replace every 3 to 5 years. Use Bosch Security Systems Model D126, 12 V 7 Amp HR Sealed Lead Acid Battery for Burglary or Combination Fire and Burglary Systems. For additional load or standby power, refer to battery calculation sheet in D6412/D4412 Installation Instructions (P/N:45349). * Not investigated by UL. Installer Switch Disables Arming, Reports, and Relays. Lock for local programming. (a) 16 sec Auxilliary Powered Devices 11.5 to 12.4 VDC. Below 10.2 VDC, the D6412 stops processing Loop inputs. With 7.0 Ah battery, 120 mA for 24 hrs for Fire and Combined Fire/Burglary, 400 mA for 4 hrs for UL Burglary. 600 mA for other* Include keypads in calculations. Data Keypads, Expanders Printer modules & Communication modules (up to 19 total devices) Smoke Detector Model Delay - Sec (a) The delay (power-up) (start-up) time marked on the installation wiring diagram of the smoke detector or on the installed smoke detector(s) is to be used. Data Yellow See D6412/D4412 Installation Instructions (P/N:45349) for System Wiring Diagram System Delay Chart PO4 PO3 PO2 JP2 + PO1 A B Red Gray T1 T1 Brown T T Green L-1 Com + L-2 L-3 2 1 Outputs PO3 & PO4 can sink up to 500 mA 12 VDC. Use D133/ D134 for larger loads. R R1 Note 1: A supervisory alarm output module must be used on these terminals for household fire applications Note 2: Jumper J2-PO1 must be in place for connection to NAC or other powered alarm device. PO1 Terminals can be configured as an alarm power output. JP2PO1 Jumper must be closed. Alrm + R R1 Com 3 L-4 4 L-5 Com 5 L-6 6 L-7 Com 7 L-8 Use Bosch Security Systems D164 Phone Cord or equivalent. Ground Start requires D133/D134. Premises Phone Incoming Phone Line 8 - see Note 1 Output PO2 can be used with Alarm+ as a supervised siren driver. Connect an approved 4 or 8 Ω siren. Alternatively, PO2 can sink up to 500 mA 12 VDC. Use D133/D134 for larger loads. Use compatible NAC such as Bosch Security Systems D440 400 mA for Fire and Combined Fire/ Burglary; P/N 1500 mA for UL 25899 Burglary; 1850 mA for other* Applies to all four outputs combined. Supervised Loops Open 7.7 to 14.0 VDC Normal 6.3 to 7.3 VDC Powered Sensor Loop Short 0.0 to 6.0 VDC suitable for Two-Wire Smoke Detectors 2.2 kΩ 2.2 kΩ Resistor Resistor required at End of (P/N:47819) Line. For compatible smoke Required at End of Line detectors, see D6412/D4412 Technogram (P/N:46928). The UL Panel Compatibility Identifier = B. Also available for FourWire Smoke Detectors such as Bosch Security Systems D273TH. WARNING: THIS UNIT INCLUDES AN ALARM VERIFICATION FEATURE FOR L-1 (LOOP 1) THAT RESULTS IN A DELAY OF THE SYSTEM ALARM SIGNAL WHEN PROGRAMMED FOR THIS FEATURE. THE TOTAL DELAY (CONTROL UNIT PLUS SMOKE DETECTORS) SHALL NOT EXCEED 60 SECONDS. NO OTHER INITIATING DEVICES SHALL BE CONNECTED TO LOOP 1 WHEN PROGRAMMED FOR ALARM VERIFICATION, UNLESS APPROVED BY THE LOCAL AUTHORITY HAVING JURISDICTION. Minimum system requirements for Classification in Accordance with ANSI/SIA CP-01-2000: UL Listed and Classified control unit Model D6412; UL Listed and Classified keypad, one or more of the following: D621(W), D623(W), D625(W); UL Listed Local Bell. This box will be checked if L-1 is programmed for Alarm Verification. P/N:48259G 10/02 © 2002 Bosch Security Systems D6412/D4412 Operation and Installation Guide © 2003 Bosch Security Systems Page 59 45349E D6412/D4412 Installation Label This system should be installed in accordance with the National Electrical Code, NFPA 70, the National Fire Alarm Code, NFPA 72 and the local authority having jurisdiction. Depending on the application, the installation is to be in accordance with one or more of the following UL standards: UL681 Installation and Classification of Mercantile and Bank Burglar Alarm Systems; UL1076 Proprietary Burglar Alarm Systems and Units; UL1641 Installation and Classification of Residential Burglar Alarm Systems. Printed information describing proper installation, operation, testing, maintenance, repair service and response to an alarm is to be provided with this equipment. Warning: Owner's Instruction Notice: Not to be removed by anyone except occupant. D4412 Bosch Security Systems recommends testing the entire system at least once a week, and having a qualified technician check the system at a minimum of once every 3 years. This equipment has been type tested and found to comply with the specifications in Part 15 of FCC rules for Class B Computing Devices. Operation is subject to the two following conditions (1) this device may not cause any interference, and (2) this device must accept any interference received including interference that may cause undesired operation. Complies with Part 68, FCC Rules. FCC Registration Number: ESVMUL-46531-AL-E 0.1B Suitable for the following applications: 1) Household Burglar Alarm System Units, Grade A. 2) Household Fire Warning System Units. 3) Police Station connect, Grade A Mercantile Premise alarm system, Grade A Mercantile Safe and Vault alarm system and Grade AA Mercantile Safe and Vault alarm system when installed in conjunction with Model D8122 derived channel subscriber terminal unit. For all Police Station applications and grades, Model D8108A Attack Resistant Enclosure with a UL Listed local sounding device is required. 4) Local, Grade A Mercantile Premise alarm system and Grade A Mercantile Safe and Vault alarm system. For all local applications and grades, Model D8108A Attack Resistant Enclosure and a UL Listed local sounding device is required. 5) Central Station, Grade C application. Central Station, Grade B when installed with a UL Listed local sounding device. Central Station, Grade AA when installed with Model D8122 derived channel subscriber terminal unit. 6) Proprietary Burglar Alarm units, Grade A. Proprietary Burglar Alarm unit, Grade BB when installed with the Model D8122 derived channel subscriber terminal unit. D4412 must be installed in accordance with D6412/D4412 Installation Instructions (P/N:45349). Do not connect to a receptacle controlled by a switch. Do not share with D4412 uses a other CX4010 UL Listed equipment. Class 2 Transformer All external connections are inherently Class 2 power limited. Circuit Control Unit (Loop) Delay - Sec 18 VAC 22 VA 60 HZ 1 Earth Ground Green Black P P P P S S S S A B C Aux Pwr Red POWER SUPPLY REQUIREMENTS The Power Supply provides a maximum of 600 mA for the Control Panel and All Accessory Devices. For System loading, See D6412/D4412 Installation Instructions (P/N:45349). Requirements for battery standby time may reduce allowable output. CAUTION: See D6412/D4412 Installation Instructions (P/N:45349) for power requirements relating to terminals [Alrm+] and [+Aux]. Aux Pwr + Installer Keypad Connect Lock Installer Switch to program. D Supervised with 2.2 kΩ EOL Resistor (P/N: 47819). Typical Initiating Devices are Door Contacts NO/NC, Floor Mats, Motion Sensors, Glass Break Detectors, etc. Maximum charging current is 1.1 A. BATTERY: Replace every 3 to 5 years. Use Bosch Security Systems Model D126, 12 V 7 Amp HR Sealed Lead Acid Battery for Burglary or Combination Fire and Burglary Systems. For additional load or standby power, refer to battery calculation sheet in D6412/D4412 Installation Instructions (P/N:45349). * Not investigated by UL. Installer Switch Disables Arming, Reports, and Relays. Lock for local programming. (a) 16 sec Auxilliary Powered Devices 11.5 to 12.4 VDC. Below 10.2 VDC, the D4412 stops processing Loop inputs. With 7.0 Ah battery, 120 mA for 24 hrs for Fire and Combined Fire/Burglary, 400 mA for 4 hrs for UL Burglary. 600 mA for other* Include keypads in calculations. Data Keypads, Expanders Printer modules & Communication modules (up to 19 total devices) Smoke Detector Model Delay - Sec (a) The delay (power-up) (start-up) time marked on the installation wiring diagram of the smoke detector or on the installed smoke detector(s) is to be used. Data Yellow See D6412/D4412 Installation Instructions (P/N:45349) for System Wiring Diagram System Delay Chart PO4 PO3 PO2 JP2 + PO1 A B Red Gray T1 T1 Brown T T Green L-1 Com + L-2 L-3 2 1 Outputs PO3 & PO4 can sink up to 500 mA 12 VDC. Use D133/ D134 for larger loads. R R1 Note 1: A supervisory alarm output module must be used on these terminals for household fire applications Note 2: Jumper J2-PO1 must be in place for connection to NAC or other powered alarm device. PO1 Terminals can be configured as an alarm power output. JP2PO1 Jumper must be closed. Alrm + R R1 Com 3 L-4 4 L-5 Com 5 L-6 6 L-7 Com 7 L-8 Use Bosch Security Systems D164 Phone Cord or equivalent. Ground Start requires D133/D134. Premises Phone Incoming Phone Line 8 - see Note 1 Output PO2 can be used with Alarm+ as a supervised siren driver. Connect an approved 4 or 8 Ω siren. Alternatively, PO2 can sink up to 500 mA 12 VDC. Use D133/D134 for larger loads. Use compatible NAC such as Bosch Security Systems D440 400 mA for Fire and Combined Fire/ Burglary; P/N 1500 mA for UL 25899 Burglary; 1850 mA for other* Applies to all four outputs combined. Supervised Loops Open 7.7 to 14.0 VDC Normal 6.3 to 7.3 VDC Powered Sensor Loop Short 0.0 to 6.0 VDC suitable for Two-Wire Smoke Detectors 2.2 kΩ 2.2 kΩ Resistor Resistor required at End of (P/N:47819) Line. For compatible smoke Required at End of Line detectors, see D6412/D4412 Technogram (P/N:46928). The UL Panel Compatibility Identifier = B. Also available for FourWire Smoke Detectors such as Bosch Security Systems D273TH. WARNING: THIS UNIT INCLUDES AN ALARM VERIFICATION FEATURE FOR L-1(LOOP 1) THAT RESULTS IN A DELAY OF THE SYSTEM ALARM SIGNAL WHEN PROGRAMMED FOR THIS FEATURE. THE TOTAL DELAY (CONTROL UNIT PLUS SMOKE DETECTORS) SHALL NOT EXCEED 60 SECONDS. NO OTHER INITIATING DEVICES SHALL BE CONNECTED TO L-1 WHEN PROGRAMMED FOR ALARM VERIFICATION, UNLESS APPROVED BY THE LOCAL AUTHORITY HAVING JURISDICTION. Minimum system requirements for Classification in Accordance with ANSI/SIA CP-01-2000: UL Listed and Classified control unit Model D4412; UL Listed and Classified keypad, one or more of the following: D621(W), D623(W), D625(W); UL Listed Local Bell. This box will be checked if L-1 is programmed for Alarm Verification. P/N:50487D 10/02 © 2002 Bosch Security Systems D6412/D4412 Operation and Installation Guide 45349E Page 60 © 2003 Bosch Security Systems D6412/D4412 Terminal Quick Reference 15.0 Terminal Quick Reference Term Silkscreen (below terminals) 18 VAC Earth Ground Symbol 18 V, 22 VA; up to 15.3 m (50 ft.), #18 AWG (1.2 m), Stranded 4 Data, Grn (Green) SDI data on Terminals 4 & 5. Panel supports up to 1000 ft. (305 m) of #22 AWG (0.8 mm) wire on these terminals (any configuration). 5 Data, Yel (Yellow) Aux Power 12 VDC (-) Aux Power 12 VDC (+) Terminals 6 to 9 are Aux power, 600 mA. Include any programmable outputs (PO 1 to PO 4) not configured for alarm output. PTC protected. 1,2 3 6,7 8,9 JP3 Aux/Data (RYGB) Red (Bat +) Black (Bat -) 10 PO4 11 PO3 12 PO2 13 Alrm + 14 PO1, A 15 PO1, B 16 L-1 (+) L-1 (-) 18 Com 19 L-2 20 L-3 21 Com 22 L-4 23 L-5 24 Com 25 L-6 Description Earth Ground 4-pin connector to Data bus and Aux power. Use to connect an installer keypad for keypad programming. Battery (+) spade. Battery (-) spade. Programmable Output, up to 500 mA (-). Include in Aux Power calculations for all except 'Alarm' output functions. PTC protected Programmable Output, up to 500 mA (-). Include in Aux Power calculations for all except 'Alarm' output functions. PTC protected Programmable Output. 500 mA (-). Include in Aux Power calculations for all except “Alarm” output functions. Supervised for Horn/Speaker alarm function. PTC protected. Alarm power. Up to 1,850 mA. PTC protected. Provides power for supervised siren driver (PO 2) and Alarm Output (PO 1). Jumper sets PO 1 terminals A (14) and B (15) for 'dry' Form "A" contact or for Alarm Output. Positive terminal of powered loop. Supports up to 15 smoke detectors (see the D6412/D4412 Smoke Compatibility List, P/N: 46928). PTC protected, Negative terminal of powered loop. Common for Sensor Loop 2. Sensor Loop 2 input. Wire length for Sensor Loops 2 to 8 are limited only by the resistance on the loop and potential EMI problems. Resistance must be < 100 Ω with EOL resistor shorted and detection devices connected. Sensor Loop 3 input. Common for Sensor Loops 3 and 4. Sensor Loop 4 input. Sensor Loop 5 input. Common for Sensor Loops 5 and 6. Sensor Loop 6 input. 26 L-7 27 Com Sensor Loop 7 input. 28 L-8 Sensor Loop 8 input. 29 T Tip of telephone line. 30 T1 Tip of house (premises) phones. 31 R1 Ring of house (premises) phones. 32 R Ring of telephone line. Common for Sensor Loops 7 and 8. JP2, PO1 Select Configures PO 1 for Form "A" relay or Alarm Output. Auxiliary Auxiliary Module and/or Programming Key Header. Installer Installer Jumper. Jumper required for keypad programming. D6412/D4412 Operation and Installation Guide © 2003 Bosch Security Systems Page 61 45349E D6412/D4412 Terminal Quick Reference Notes: D6412/D4412 Operation and Installation Guide 45349E Page 62 © 2003 Bosch Security Systems D6412/D4412 Troubleshooting 16.0 Troubleshooting 16.1 Introduction Bosch Security Systems provides this guide to help you troubleshoot panel problems. To prevent problems from occurring, read the preceding sections of this guide and the D6412/D4412 Program Entry Guide (P/N: 45351) to verify the panel is correctly installed and programmed. Explanations of the problems (causes) and solutions are included in the following charts. 16.1.1 Arming Issues Problem Solution No points are programmed for that area; user does not have appropriate authority level to arm system. • Cannot tell if my panel is Part On armed or Part 2 armed. Command Center does not display which Part On arming feature is currently in use. There is no solution. The user who turns on the system must know which keys were pressed (Cmd 2 is Part On; Cmd 3 is Part 2 On). This only affects panels with Firmware v1.03 or lower. All On – No Exit arming option is enabled. When the panel was armed, nobody faulted an Exit Delay Point; therefore, the panel did not arm those internal points. N/A Armed my panel All On, but it keeps changing to Part On all by itself. 16.1.2 Cause Entered valid passcode to arm an area, but the area does not arm. • Add a minimum of one point to each area. Make sure all users who should be able to arm/disarm the system have the appropriate authority level. See Authority Level Configuration in the D6412/D4412 Program Entry Guide (P/N: 45351). To disable this feature, see the D6412/D4412 Program Entry Guide (P/N: 45351), Global Open/Close Options, Arming Options 1 (Nibble 0258). Point Issues Problem Cause Trouble on keyswitch point and it will not clear. Point is restored to normal condition. Swinger Bypass may be enabled on this point index. The point will not restore until the Swinger Bypass condition restores. Independent Zone Controller does not generate a “point fault” on command center when it’s disarmed. 9000 Series panels show a point fault during this condition. Command center shows Point 1 as faulted even though the 1K EOL resistor is in place. No output after alarming a point. This is normal panel operation. Solution Arm and disarm panel to clear current trouble. To prevent this in the future, check the keyswitch point index programming and make sure Swinger Bypass feature is disabled. N/A EOL Resistor Value Nibble (Nibble 1026) is programmed for 1K EOL resistors, and Point 1 always requires a 2.2K EOL resistor. Replace the 1K EOL resistor on Point 1 with a 2.2K EOL resistor. N/A Review the following sections in the D6412/D4412 Program Entry Guide (P/N: 45351): Outputs, and Point Index Configuration, Point Index Option 2. D6412/D4412 Operation and Installation Guide © 2003 Bosch Security Systems Page 63 45349E D6412/D4412 Troubleshooting 16.1.3 Command Center Issues Problem Entered Cmd 50 at my Command Center but it does not let me move to specific areas. 16.1.4 Cause Solution Cmd 50 (Move to Area) is disabled if there are no points assigned to a particular area. Program at least one point and assign it to the particular area. Cmd 50 should work as defined. Programming Issues Problem 16.1.5 Cause Solution Cannot enter into Programmer’s Mode. One or more areas are armed; keypad programming may be disabled; Installer’s Switch may be open. Enabled Open/Close Reports, but when in the Panel Part On Mode, these reports are still not sent. Open/Close Reports for Part On Mode is not programmed correctly. PK32 does not work (upload, download, erase, etc.) PK32 has not been enabled in the panel firmware. The off-board points added to the system display as missing. Device Location parameter is not programmed correctly. Panel is not following report routing as programmed. Lock Area Reporting parameter is enabled. • If one or more areas are armed, disarm all armed areas. Programmer’s Mode cannot be entered while one or more areas are armed. However, an Installer’s Keypad can access the Programming Mode regardless of the panel’s arming state. • Programming may be disabled. See Programming Options, Installer Switch, and Daylight Savings Time Options (Nibble 0257) in the D6412/D4412 Program Entry Guide (P/N: 45351.) Make sure the following options are enabled: Installer Switch, Keypad Programming, and PK32 (Programming Key). • To enter Programmer’s Mode, the Installer Switch must be closed. See the following sections in this installation guide for details: 3.4.2 Closing the Installer Switch and 13.2 Entering the Installer Mode. In Areas of the D6412/D4412 Program Entry Guide (P/N: 45351), see the Area # Opening/Closing Reporting Options parameter. Enable “Opening/Closing Reports for Part On Modes” for Nibbles 0296, 0318, 0340, and 0362. In Nibble 0257, enable PK32. See Section 2.5 Programming Options in the D6412/D4412 Program Entry Guide (P/N: 45351). See Locations in the D6412/D4412 Program Entry Guide (P/N: 45351). Verify which device type was added (e.g., RF point, off-board point, etc.). In the Device Location parameter, enter the correct value based on the Device Parameter Selections (1 = on-board; 2 = DX2010; 3 = DX2010, Doubled; 4 = RF Receiver 1: 5 = RF Receiver 2). Point configuration is locked into only those configuration types in the Device Parameter Selections. Set the Lock Area Reporting parameter to 0 (disabled). See the D6412/D4412 Program Entry Guide (P/N: 45351) for more information. Miscellaneous Issues Problem Entered Cmd 50 at my Command Center but it won’t let me move to specific areas. Cause Solution Cmd 50 (Move to Area) is disabled if there are no points assigned to a particular area. Program at least one point and assign it to the particular area. Cmd 50 should work as defined. D6412/D4412 Operation and Installation Guide 45349E Page 64 © 2003 Bosch Security Systems D6412/D4412 Appendix A: Approved Applications Compliance Guide Appendix A: Approved Applications Compliance Guide A-1 Listings and Approvals Fire • UL • CSFM • NYC-MEA - Approved by New York City’s Materials and Equipment Acceptance System. Burglary • UL • SIA Introduction The System Chart references components evaluated and listed by Underwriters’ Laboratories for compatibility with the control panel. These components meet the basic system requirements for the applicable standard. The System Wiring Diagram, Issue A shows the relationship between the panel and the accessory components referred to in the System Chart. Optional Compatible Equipment You can use UL Listed components that do not require evaluation for electrical compatibility in many applications when installed according to the manufacturer’s instructions. Burglary Applications You can use UL Listed burglary alarm sensors that do not require evaluation for electrical compatibility in burglary applications. In some cases you must use a UL Listed Bosch Security Systems interface module in conjunction with the sensors. Consult the individual component specification and installation documents to determine suitability. Test weekly: UL Standard 1023 requires a weekly test for residential burglary applications. Auto Arming for Bank Safe/Vault Applications (UL 609) To auto-arm for Bank Safe/Vault applications, use an Auto On/Auto Off Sked (schedule). Set the Auto On Sked to arm the system on a 7 day (1 week) timer no later than 10 p.m. Set the Auto Off Sked to disarm the system no sooner than 6 a.m. the next business day. Adjust these skeds so that the system is armed during non-business hours (such as holidays and weekends). These times may be adjusted if they conflict with normal business hours and/or any non-business hour carryover (extended holiday/closed periods). See Skeds in the D6412/D4412 Program Entry Guide (P/N: 45351) for Sked setup instructions. Fire Applications You can use UL Listed fire initiating devices not requiring electrical compatibility evaluation in any application. For example: four-wire smoke detectors, heat detectors, water flow switches, and manual pull stations are suitable fire initiating devices. Consult the individual component specification and installation documents to determine suitability. Two-wire smoke detectors only connect to the panel on the sensor loop for Location 1. Two-wire detectors must be evaluated for electrical compatibility, and must be UL listed for use with the panel. See the Bosch Security Systems D6412/ D4412 Technical Service Note: Smoke Detector Compatibility (P/N: 46928), or you may contact the detector manufacturer. When using four-wire smoke detectors, install a suitable power supervision unit according to the manufacturer’s instructions. Use the D130 Relay Module, DX3010 Octo-Output or PO1 to provide reset capability. See Section 9.0 On-Board Outputs and Section 10.0 Off-Board Outputs for details on the installation of the DX3010. For battery calculations, refer to Current Rating Chart for Standby Battery Calculations, Standby Battery Requirements, and Standby Battery Calculation for NFPA 72 Fire Alarm Applications. D6412/D4412 Operation and Installation Guide © 2003 Bosch Security Systems Page 65 45349E D6412/D4412 Appendix A: Approved Applications Compliance Guide Enclosures Bosch Security Systems offers three optional enclosures for the control panel. IMPORTANT The D8103 enclosure is suitable for residential fire and/or burglary installations and commercial burglary applications that do not require attack resistance or approval by Factory Mutual or NYC-MEA. (See Appendix B: System Chart for acceptable applications.) 2. The D8108A is attack resistant. It is intended primarily for UL commercial burglar alarm and mercantile safe and vault applications requiring a local bell. You can use the D8108A in any burglar or fire alarm application where the 5591 or D8109 enclosure is suitable. UL lists the D8108A for all commercial fire alarm applications. The D8108A is approved by Factory Mutual, California State Fire Marshal, and the New York City Materials and Equipment Acceptance System. 3. The D8109 is normally used for commercial fire alarm applications. UL lists the D8109 for all commercial fire alarm applications. The D8109 is approved by the California State Fire Marshal, NYC-MEA and FM. All references to NFPA and related requirements are based upon compliance with the 1993 edition of NFPA 72, National Fire Alarm Code. Since installation specifications are nearly always based on a specific edition of a standard that has been legally adopted by the Authority Having Jurisdiction (AHJ), earlier editions of NFPA standards generally apply. Consult the appropriate AHJ for confirmation. D8108A Enclosure D8109 Enclosure D126 Battery (7 Ah) D1218 Battery (18 Ah) D127 Reversing Relay D132A Smoke Detector Reversing Relay Module D164 Telephone Card D192C NAC Supervision Module D621, D623, D625 Command Center D262 Smoke Detector Head/D621 Base D282THS Smoke Detector w/ Sounder D431, D435, D438, D440, D442, D448 Indicating Device CX4010 Transformer D8004 Transformer Enclosure D8122 Derived Channel STU D8130 Release Module 45/60 4 72 24 hrs. + 4 min. 45/60 4 4 Included w/panel Optional 4 72 4 15 No Choose One 15 No No 15 No No 15 No No 15 No No 15 No No Proprietary Burglary 4 Local Burglary 4 Police Connected Burglary 4 Central Station Burglary (Grade C) Household Fire 72 24 hrs. + 4 min. 45/60 Mercantile (72 hrs.) Bank Safe/Vault Alarm Entry/Exit Time (sec.) Bell Time (min.) D2203 Enclosure D8103 Enclosure* 4 Key Mercantile (4 hrs.) Commercial NFP Standard Min.Hrs. of Standby Battery Household Fire/Burglary Combined System Chart Household Burglary (Grade A) A-2 1. No Req Opt 1+ 1• Optional Req Req Req Req Req Optional No No No No No Req Req Req Req Req Req Req No Req Opt Opt Opt Opt Opt Opt Opt Req Opt Opt Opt Opt Opt Opt Opt Opt Opt Opt Required if D192C is not used. Use D132A with compatible smoke detectors only. Required to connect panel to RJ131X Telco Block Required if D132A and compatible smoke detectors are not used. 1+ 1+ 1+ 1+ 1+ 1• ♦ 1+ 1+ 1+ 1+ ♦ ♦ ♦ ♦ 1• Use with D132A. Opt ♦ 1+ 1+ 1+ Opt Opt Required for all applications. Opt Opt Opt Opt Optional. Contact Telco for the availability of derived channel service. Optional Empty Cell ∗ ∗∗ Not acceptable for this application. Required for this application. Optional for this application. 1 or more required for this application. Consult the appropriate standard. At least one detector required. You can substitute other 2-wire detectors listed for use with the D6412/D4412. You can use D262 with D270 4-wire detectors. You must use a listed power supervision relay with 4-wire detectors. UL Listed bell (siren) housing required for burglary alarm bell or siren (Rothenbuhler 5110 Bell). Not used for this application. Not to exceed these Entry/Exit Delay limits for UL installations. D101 for this application. D6412/D4412 Operation and Installation Guide 45349E Page 66 © 2003 Bosch Security Systems D6412/D4412 Appendix A: Approved Applications Compliance Guide The D6412/D4412 control panel is suitable for Police Station connect applications, including Grade A Mercantile Premises and Grade A Mercantile Safe and Vault alarm systems. Suitable for Grade AA Mercantile Premises and Grade AA Mercantile Safe and Vault alarm systems when the Model D6412/D4412 DACT unit is installed in conjunction with the Model D8122 derived channel subscriber terminal unit. For all Police Station applications and grades, the Model D8108A Attack Resistant Enclosure with a UL Listed local sounding device is required. Per UL 365, keyswitches mounted outside the protected area must employ high security locking cylinders complying with the requirements for key locks, UL 437. Tamper protection must also be provided. The D6412/D4412 control panel is suitable for Local, Grade A Mercantile Premises and Local, Grade A Mercantile Safe and Vault alarm systems. For all local applications and grades, the D8108A Attack Resistant Enclosure and a UL Listed local sounding device are required. Per UL 609, when keyswitches are mounted outside the protected area, tamper protection must be provided. The D6412/D4412 control panel is suitable for Central Station, Grade C applications. It is suitable for Central Station, Grade B applications when the Model D6412/D4412 DACT unit is installed with a UL Listed local sounding device. Also suitable for Central Station Mercantile, Grade AA applications when installed with the Model D8122 derived channel subscriber terminal unit. A-3 System Wiring Diagrams, Issue A Do not connect to a receptacle controlled by a switch. Do not share with D4412 uses a other CX4010 UL Listed equipment. Class 2 Transformer All external connections are inherently Class 2 power limited. Circuit Control Unit (Loop) Delay - Sec 18 VAC 22 VA 60 HZ 1 Earth Ground Green Data Yellow Data Black Aux Pwr Red Keypads, Expanders Printer modules & Communication modules (up to 19 total devices) P P P P S S S S A B C D Supervised with 2.2 kΩ EOL Resistor (P/N: 47819). Typical Initiating Devices are Door Contacts NO/NC, Floor Mats, Motion Sensors, Glass Break Detectors, etc. Maximum charging current is 1.1 A. BATTERY: Replace every 3 to 5 years. Use Bosch Security Systems Model D126, 12 V 7 Amp HR Sealed Lead Acid Battery for Burglary or Combination Fire and Burglary Systems. For additional load or standby power, refer to battery calculation sheet in D6412/D4412 Installation Instructions (P/N:45349). * Not investigated by UL. See D6412/D4412 Installation Instructions (P/N:45349) for System Wiring Diagram System Delay Chart Smoke Detector Model Delay - Sec Installer Switch Disables Arming, Reports, and Relays. Lock for local programming. (a) 16 sec (a) The delay (power-up) (start-up) time marked on the installation wiring diagram of the smoke detector or on the installed smoke detector(s) is to be used. Auxilliary Powered Devices 11.5 to 12.4 VDC. Below 10.2 VDC, the D4412 stops processing Loop inputs. With 7.0 Ah battery, 120 mA for 24 hrs for Fire and Combined Fire/Burglary, 400 mA for 4 hrs for UL Burglary. 600 mA for other* Include keypads in calculations. R POWER SUPPLY REQUIREMENTS The Power Supply provides a maximum of 600 mA for the Control Panel and All Accessory Devices. For System loading, See D6412/D4412 Installation Instructions (P/N:45349). Requirements for battery standby time may reduce allowable output. CAUTION: See D6412/D4412 Installation Instructions (P/N:45349) for power requirements relating to terminals [Alrm+] and [+Aux]. Aux Pwr + Installer Keypad Connect Lock Installer Switch to program. PO4 PO3 PO2 JP2 Alrm + + PO1 A B Com + L-2 2 1 Outputs PO3 & PO4 can sink up to 500 mA 12 VDC. Use D133/ D134 for larger loads. R1 R1 Gray T1 Brown T T Green L-1 L-3 Com 3 L-4 4 L-5 Com 5 L-6 6 L-7 Com 7 Red T1 Note 1: A supervisory alarm output module must be used on these terminals for household fire applications Note 2: Jumper J2-PO1 must be in place for connection to NAC or other powered alarm device. PO1 Terminals can be configured as an alarm power output. JP2PO1 Jumper must be closed. R L-8 Use Bosch Security Systems D164 Phone Cord or equivalent. Ground Start requires D133/D134. Premises Phone Incoming Phone Line 8 - see Note 1 Output PO2 can be used with Alarm+ as a supervised siren driver. Connect an approved 4 or 8 Ω siren. Alternatively, PO2 can sink up to 500 mA 12 VDC. Use D133/D134 for larger loads. Use compatible NAC such as Bosch Security Systems D440 400 mA for Fire and Combined Fire/ Burglary; P/N 1500 mA for UL 25899 Burglary; 1850 mA for other* Applies to all four outputs combined. Supervised Loops Open 7.7 to 14.0 VDC Normal 6.3 to 7.3 VDC Short 0.0 to 6.0 VDC 2.2 kΩ Resistor (P/N:47819) Required at End of Line Powered Sensor Loop suitable for Two-Wire Smoke Detectors 2.2 kΩ Resistor required at End of Line. For compatible smoke detectors, see D6412/D4412 Technogram (P/N:46928). The UL Panel Compatibility Identifier = B. Also available for FourWire Smoke Detectors such as Bosch Security Systems D273TH. D6412/D4412 Operation and Installation Guide © 2003 Bosch Security Systems Page 67 45349E D6412/D4412 Appendix A: Approved Applications Compliance Guide A-4 Current Rating Chart for Standby Battery Calculations A AC Power On Normal Current Model Number Quantity Used D6412/D4412 Each Unit* 85 x1 = B AC Power Off Minimum Current Total Each Unit 85 85 C In Alarm Maximum Current Total x1 = 85 Each Unit 100 Total x1 = 100 Keypads D621 35 x Qty = 35 x Qty = 115 x Qty D623 100 x Qty = 100 x Qty = 100 x Qty = D625 270 x Qty = 270 x Qty = 270 x Qty = Accessories DX2010 35 x Qty = 35 x Qty = 35 x Qty = DX3010 10 x Qty = 10 x Qty = 10 x Qty = DX3020 10 x Qty = 10 x Qty = 10 x Qty = DX4010 25 x Qty = 25 x Qty = 25 x Qty = RF3224 30 x Qty = 30 x Qty = 30 x Qty = 0 x Qty = 0 x Qty = = 330 x Qty = Sounders connected to PO2 D118 8 Ω Speaker*** Ratings of other devices in the system which are not shown here. x Qty = = x Qty = x Qty = x Qty = x Qty = x Qty = x Qty = x Qty = x Qty = x Qty = x Qty = x Qty = x Qty = x Qty = x Qty = Total A = Total B = Total C = * Currents shown in milliamperes (1 ampere = 1000 milliampere). ** If the column C total exceeds 400 mA (600 mA for non UL applications), a D8132 is required to provide an additional 1400 mA. You may also use a UL Listed external power supply for this purpose. *** Not investigated by UL. A-5 Standby Battery Requirements Household Burglary and Commercial Burglary 4 hrs. of standby battery capacity required. Central Station or Local Fire Alarm 24 hrs. of standby plus 4 min. of alarm operation required. See Central Station or Local Systems Ampere-Hour Calculation Formula in the Standby Battery Calculation for NFPA 72 Fire Alarm Applications section. Household Fire Warning Equipment 24 hrs. of standby plus 4 min. of alarm operation required. See Household Fire Ampere-Hour Calculation A-6 Standby Battery Calculation for NFPA 72 Fire Alarm Applications NFPA 72 (Chapter 2) Household Fire Warning Equipment: The NFPA (Chapter 2) Household Fire Warning Equipment Standard requires 24 hrs. of standby plus 4 min. (0.067 hrs.) of alarm operation at the end of the 24-hr. period. You must use battery ampere hour (Ah) calculations to verify compliance, The formula in the next column includes a 10% contingency factor for depletion of battery capacity with age. NFPA 72 (Chapter 2) Ampere-Hour Calculation Formula: (Total B ___ x 24 hrs) + (Total C x 0.067 hrs) + (10% Contingency) = Total Ah required. Total Ah requirements must not exceed Ah capacity of batteries. D6412/D4412 Operation and Installation Guide 45349E Page 68 © 2003 Bosch Security Systems D6412/D4412 Appendix B: SDI Address Chart Appendix B: SDI Address Chart Panel D6412/D4412 D6412/D4412 D6412/D4412 D6412/D4412 D6412/D4412 D6412/D4412 D6412/D4412 D6412 only D4412 only D6412 only D4412 only D6412/D4412 SDI Address 0 1 to 8 40, 41 50 51 52 to 55 60 to 63 101 to 107 101 to 103, 106 150, 151 150 250 Device Description Installer Keypad or local connection to RAM IV Command Centers 1 to 8 DX8010 Telephone Control Module Premises RF Receiver 1 Premises RF Receiver 2 Premises RF Keypads Receiver 1 Premises RF Keypads Receiver 2 DX2010 Wired Point Expanders DX2010 Wired Point Expanders DX3010 Octo Outputs and/or DX3020 Module DX3010 Octo Outputs and/or DX3020 Module DX4010 Serial RS-232 Interface D6412/D4412 Operation and Installation Guide © 2003 Bosch Security Systems Page 69 45349E D6412/D4412 Appendix B: SDI Address Chart Notes: D6412/D4412 Operation and Installation Guide 45349E Page 70 © 2003 Bosch Security Systems D6412/D4412 Glossary 24-Hour Points Points that are always on even when the system is turned off. Two types: Fire Points and NonFire 24-Hour Points. Area An installer-specified collection of points that can be armed and disarmed independently. An area can report with its own account number. Opening, closing, alarm, trouble, and restoral reports are all associated with an area. You can organize the panel’s points and users into a maximum of four areas (two areas max on the D4412), in essence creating four independent systems within one control panel. All On All controlled points are armed. All On with No Delay (Instant) is an option. No Exit or Entry Delay is provided with the No Delay option. Authority Level A programmable feature that determines what a user can do in a given area. Burglary Alarm Tone A constant warble tone. Central Station A facility where trained personnel monitor a security system 24 hrs. a day. The security system may be programmed to contact the central station during alarm conditions, enabling central station personnel to dispatch the proper authorities. Control Panel A control panel combines the functionality of an alarm control panel and a digital dialer into a single unit. Controlled Point A point that responds to alarm conditions depending upon whether the system is turned on or off. Cross Point A group of points that are configured to initiate an alarm when two points have been faulted within a programmed time. Fire points cannot be set for Cross Point configuration. Duress Passcode A passcode that arms and disarms the system just like a personal passcode, however it sends an alarm signal to the central station without sounding an alarm on the premises. Entry Delay A programmed delay of the system alarm responses that allows a person to enter the building through the entry door to turn the system off. An alarm response begins if the area is not disarmed before Entry Delay expires. Error Tone The same warble tone as the Trouble tone, but not repeated. Exit Delay A programmed delay of the system alarm responses that allows a person to exit the area before the system turns on. An alarm response begins if a point is faulted after Exit Delay expires. Faulted Point A point that is not normal (for example, an open door or window). Fire Alarm Tone A warble tone that is on for 1 sec., then briefly off (repeatedly). Follower Point A point programmed to initiate an instant alarm unless a Delay point is faulted first. When a Delay point is faulted first, the Follower point assumes the Entry Delay time of the Delay point. Force Arming A method of overriding the safety feature that prevents arming with a faulted circuit on a control panel. Global Something that affects the entire system (for example, global point configuration refers to the programmable features that affect all points). Independent Zone Control A device that allows a single point or zone on a control panel to be armed or disarmed independently from the rest of the system. Instant Alarm A point type that initiates an alarm immediately when faulted. This point type does not follow any Entry/Exit Delay time. Invisible Point A point that does not display at any command center during alarm or trouble conditions. Keyfob A small, hand-held wireless device usually designed to fit on a key chain that consists of buttons that allow the user to perform various functions, depending on the keyfob, such as arming/disarming the system, operating outputs or sending reports. D6412/D4412 Operation and Installation Guide © 2003 Bosch Security Systems Page 71 45349E D6412/D4412 Glossary Keyswitch (Momentary) To operate a momentary keyswitch, insert the key, turn it, and then release it. The key returns to the starting position automatically. The key cannot be removed unless it is in the starting position. Keyswitch (Maintained) A maintained keyswitch typically has two positions marked “Armed” and “Disarmed.” To operate, insert the key, turn the key to the desired position, and remove the key. Latching The locking in of a circuit by means of a holding contact. Modem IIIa 2 Modem IIIa2 is a Bosch Security Systems reporting format (protocol) the D6412/D4412 uses to communicate to central station receivers. Even though you can program the panel to report in other formats, only Modem IIIa2 reports are referenced in this document. If you choose an alternate reporting format, see the D6412/D4412 Program Entry Guide (P/N: 45351) to determine which report is substituted for the Modem IIIa2 Report. Nibble Once the installer selects a value for a parameter, the panel stores the selection in E2 memory “Nibbles.” Each parameter uses one or more Nibbles. When programming from the command center, the installer enters a selection directly into the memory Nibbles. When programming from the remote programmer (RAM IV), the installer need only make one entry per parameter. No Delay Turning the system on without Entry or Exit Delay. Off The controlled points are not armed (system is off). Off Display The display that appears when the system is turned off and no keys have been pressed (normal display). Options Options are a unique type of parameter that allow the installer to configure up to four features by entering a value in a single Nibble. PSTN Public Switched Telephone Network. An assembly of communications facilities and central office equipment operated jointly by authorized common carriers that provides the general public with the ability to establish communications channels via discrete dialing codes. Parameter Each program parameter sets a specific value or chooses an option. Part On An installer-defined subset of the controlled points. Part On with No Delay (Instant) is an option. No Exit or Entry Delay is provided with the No Delay option. Part 2 On A user-defined subset of the controlled points. Part 2 On with No Delay (Instant) is an option. No Exit or Entry Delay is provided with the No Delay option. Points The panel reports changing conditions on the sensor loops it monitors as “point” events. For example, when the condition on On-board Sensor Loop 1 changes from normal (supervised, EOL resistor in place) to shorted, the panel can be programmed to create an alarm event for Point 1. That alarm event appears in command center displays as “Alarm, Pt 1.” If programmed for reporting , the panel would send an “Alarm, Pt 1” Report to the central station receiver in the Modem IIIa2 format. Other reporting formats typically use “Zones” (Zn). in their reports instead of “Points.” Point Index Used to construct “personality types” for points used in the D6412/D4412 system. Each unique point index number determines responses to specific conditions occurring on the protected points. Point Type Describes what the point does (for example, fire point, burglary point, 24-hr. point, etc.). Point Scan Time The amount of time that passes while a point is electronically off-normal. This duration determines the length of a pulse. D6412/D4412 Operation and Installation Guide 45349E Page 72 © 2003 Bosch Security Systems D6412/D4412 Glossary Programmable Outputs The D6412 provides up to 20 programmable outputs (D4412 provides up to 12). These outputs are activated by installer-selectable panel events. Event options include alarms, troubles, and scheduled events (Skeds). The panel’s on-board outputs provide power or dry contact switching upon activation. When programmed to activate on alarm events, outputs are sometimes described as “bell.” In some Modem IIIa2 reports, outputs are described as “relay.” Pulse Count A feature of an intrusion detection system in which an alarm is triggered only after there has been a series of detections in a short period of time. A pulse count is used in difficult environments where false alarms are a problem. RAM IV RAM (Remote Account Manager) IV is a Windows-based account management and panel programming utility designed to remotely set up and program specific control panels. Remote Programming System programming by means of the system user’s telephone line. Restoral Report A signal transmitted upon the removal of a trouble or alarm condition from an alarm circuit. SDI Serial Device Interface. Sked A scheduling parameter that allows a selected event to happen at a specific time. Trouble A service condition that needs to be corrected, such as a broken wire. Trouble Tone A warble tone that is on briefly, followed by a pause, followed by the warble tone (repeatedly). Visible Point A point that displays at command centers during alarm or trouble conditions. D6412/D4412 Operation and Installation Guide © 2003 Bosch Security Systems Page 73 45349E D6412/D4412 Glossary Notes: D6412/D4412 Operation and Installation Guide 45349E Page 74 © 2003 Bosch Security Systems D6412/D4412 Index Index A Alarm Power ........................................... 21 Applications Compliance Guide ............................. 65 Approvals ................................................. 65 Approved Applications Burglary ............................................... 65 Fire ...................................................... 65 Approved Applications Compliance Guide Burglary Applications ......................... 65 Fire Applications ................................ 65 Introduction ....................................... 65 Optional Compatible Equipment ..... 65 Arming Devices ....................................... 45 Command Centers ............................ 45 Keyswitch ............................................ 47 Auxiliary Power ....................................... 21 Available Power ....................................... 21 B Battery ..................................................... 19 Charging ...................................... 17. 20 Float Charge ....................................... 20 Installation ......................................... 19 Recharge Cycle .................................... 20 Replacement ....................................... 19 Supervision ......................................... 19 Battery Test ............................................. 54 Bell Test ................................................... 54 Burglary Approved Applications ...................... 65 Listing and Approvals ........................ 65 Burglary Applications Optional Compatible Equipment ..... 65 C Called Party Disconnect ......................... 24 Command Centers ................................. 45 Address Assignment ........................... 45 Installation ......................................... 46 Communication Failure ......................... 24 Compatible Equipment Optional ............................................. 65 Compliance Guide Approved Applications ...................... 65 Continuous Power Output ..................... 21 D I D9528 Point Expander Module ............ 33 Address Programming ....................... 37 Installation ......................................... 33 Status LED .......................................... 38 Tamper Input ..................................... 36 D9529 OctoOutput ................................ 41 Address Programming ....................... 44 Configuration ..................................... 41 Relay Outputs ..................................... 41 Wiring ................................................. 42 D9533 Configuration Jumpers ...................... 52 Installation ......................................... 50 Wiring ................................................. 51 D9533 RS232 Serial Interface Module .. 50 Device Stabilization ........................ 17. 18 Dialing Format ........................................ 23 Doubled Point Configuration ................ 29 Installation ...................................... 15. 17 Closing Installer Jumper .................... 16 Installer Mode ......................................... 53 Installer’s Keypad .................................... 53 Connector .......................................... 53 Installer's Menu Battery Test ......................................... 54 Bell Test .............................................. 54 Keypad Program ................................. 56 Output Test ........................................ 55 Point Status ........................................ 54 RF Menu ............................................. 55 Strobe Test .......................................... 54 Test Report .......................................... 54 Installer’s Menu ...................................... 54 Installer’s Passcode .................................. 53 Introduction Approved Applications Compliance Guide .............................................. 65 E Enclosures ............................................... 15 D8103 ................................................. 15 D8108A .............................................. 15 D8109 ................................................. 15 External Power Supply ........................... 20 F FCC Notice ............................................... 9 Part 15 .................................................. 9 Part 68 .................................................. 9 Fire Approved Applications ...................... 65 Listing and Approvals ........................ 65 Fire Alarm Verification ........................... 18 Fire Applications Optional Compatible Equipment ..... 65 G Ground Start ........................................... 24 K Keypad Program ...................................... 56 Keyswitch ................................................. 47 Installation ......................................... 48 Operation ........................................... 48 Programming ..................................... 47 Service Start ........................................ 54 Single Point Configuration .................... 28 Strobe Test ............................................... 54 System Status LED ................................. 23 L Listing and Approvals Burglary ............................................... 65 Fire ...................................................... 65 Listings .................................................... 65 Listings and Approvals ............................ 14 O Off-Board Outputs ................................. 41 Off-Board Sensor Loops ......................... 31 D9528 Point Expander Module ........ 33 SDI Point Expanders ......................... 31 On-Board Sensor Loops ......................... 27 Description ......................................... 27 Doubled Point Configuration ........... 29 Sensor Loop Response Time .............. 29 Single Point Configuration ............... 28 Optional Compatible Equipment Approved Applications Compliance Guide .............................................. 65 Output Programming ............................. 22 Output Test ............................................. 55 D6412/D4412 Operation and Installation Guide © 2003 Bosch Security Systems Page 75 45349E P T Phone Cord Connection ........................ 23 Phone Line Fault .................................... 24 Point Status ............................................. 54 Power ....................................................... 19 Alarm .................................................. 21 Auxiliary ............................................. 21 Available .............................................. 21 Primary ............................................... 19 Power Outputs ........................................ 21 Alarm Power ....................................... 21 Available Power ................................... 21 Continuous ........................................ 21 Primary Power ......................................... 19 Programming .................................. 13. 18 Outputs ............................................... 22 Telephone ................................................ 23 Called Party Disconnect .................... 24 Communication Failure .................... 24 Connections ....................................... 23 Dialing Format ................................... 23 Ground Start ...................................... 24 Line Fault ............................................ 24 Location .............................................. 23 Notification ........................................ 23 Phone Cord Connection ................... 23 Registration ........................................ 23 System Status LED ............................. 23 Test Report .............................................. 54 Testing ..................................................... 18 Battery Test ......................................... 54 Bell Test .............................................. 54 Strobe Test .......................................... 54 Test Report .......................................... 54 R RAM IV Direct Connection .................. 51 RF Menu ................................................. 55 RS232 Serial Interface Module .............. 50 S SDI Devices ............................................. 49 D9533 ................................................. 50 Installation ......................................... 49 SDI Point Expanders .............................. 31 Sensor Loop Response Time .................. 29 Service Reports ........................................ 54 Service End ......................................... 54 Windows® is either a registered trademark or trademark of Microsoft Corporation in the United States and/or other countries. © 2003 Bosch Security Systems 130 Perinton Parkway, Fairport, NY 14450-9199 USA Customer Service: (800) 289-0096; Technical Support: (888) 886-6189 45349E Operation and Installation Guide 07/03 D6412/D4412 Page 76 of 76