1
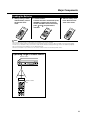
DVD RECORDER
MODEL
DV-SR3U
OPERATION MANUAL
1
•
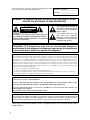
The region number
for this recorder is 1
IMPORTANT / IMPORTANTE
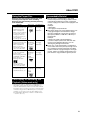
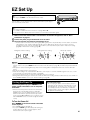
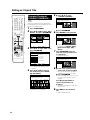
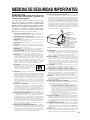
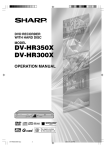
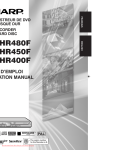
EZ SET UP (AUTO CHANNEL /CLOCK SET UP)
EZ SET UP (PROGRAMACIÓN AUTOMÁTICA DE
1 Connect Antenna/Cable
to Recorder first.
En primer lugar conecte
la antena/el cable a el
producto.
2 Then, plug into AC Power
Outlet.
A continuación,
enchúfelos al
tomacorriente de CA.
CANAL/PUESTA EN HORA DEL RELOJ)
3 Do not press the
POWER button until
completion of EZ Set Up.
No pulse el botón de
ALIMENTACIÓN
(POWER) hasta haber
terminado la EZ SET UP.
• Please read this Operation Manual carefully before using your Recorder.
• Instrucciones importantes de seguridad y guía de operación rápida en español
➝Página 95
4 EZ SET UP complete.
EZ SET UP completo.
Detail: Please see page 25.
Detalle: véase la página 98.
For future reference, record the model and serial number (located
on the rear of the product) in the space provided.
DV-SR3U
Model No.: ————————————
Serial No.: ————————————
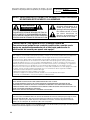
WARNING: TO REDUCE THE RISK OF FIRE OR ELECTRIC SHOCK, DO NOT
EXPOSE THIS APPLIANCE TO RAIN OR MOISTURE.
CAUTION
RISK OF ELECTRIC SHOCK
DO NOT OPEN
CAUTION:
TO REDUCE THE RISK OF ELECTRIC SHOCK, DO
NOT REMOVE COVER. NO USER-SERVICEABLE
PARTS INSIDE. REFER SERVICING TO QUALIFIED
SERVICE PERSONNEL.
This symbol warns the user of
uninsulated voltage within the
unit that can cause dangerous
electric shocks.
This symbol alerts the user
that there are important
operating and maintenance
instructions in the literature
accompanying this unit.
“WARNING—FCC Regulations state that any unauthorized changes or
modifications to this equipment not expressly approved by the manufacturer
could void the user’s authority to operate this equipment.”
INFORMATION
This equipment has been tested and found to comply with the limits for a Class B digital device, pursuant to
Part 15 of the FCC Rules. These limits are designed to provide reasonable protection against harmful
interference in a residential installation. This equipment generates, uses and can radiate radio frequency
energy and, if not installed and used in accordance with the instructions, may cause harmful interference to
radio communications. However, there is no guarantee that interference will not occur in a particular
installation. If this equipment does cause harmful interference to radio or television reception, which can be
determined by turning the equipment off and on, the user is encouraged to try to correct the interference by
one or more of the following measures:
—Reorient or relocate the receiving antenna.
—Increase the separation between the equipment and receiver.
—Connect the equipment into an outlet on a circuit different from that to which the receiver is connected.
—Consult the dealer or an experienced radio/TV technician for help.
CAUTION:
THIS UNIT IS A CLASS 1 LASER PRODUCT.
USE OF CONTROLS OR ADJUSTMENTS OR PERFORMANCE OF PROCEDURES OTHER THAN
THOSE SPECIFIED HEREIN MAY RESULT IN HAZARDOUS RADIATION EXPOSURE.
AS THE LASER BEAM USED IN THIS UNIT IS HARMFUL TO THE EYES, DO NOT ATTEMPT TO
DISASSEMBLE THE CABINET.
REFER SERVICING TO QUALIFIED PERSONNEL ONLY.
Note to CATV system installer:
This reminder is provided to call the CATV system installer’s attention to Article 820-40 of the National Electrical
Code that provides guidelines for proper grounding and, in particular, specifies that the cable ground shall be
connected to the grounding system of the building, as close to the point of cable entry as practical.
Products that have earned the ENERGY STARb are designed to protect the environment through superior
energy efficiency.
2
IMPORTANT SAFEGUARDS
CAUTION
: Please read all of these instructions
before you operate this product and save these instructions for later use.
ANTENNA LEAD-IN WIRE
Electrical energy can perform many useful functions. This
product has been engineered and manufactured to assure
your personal safety. BUT IMPROPER USE CAN RESULT IN
POTENTIAL ELECTRICAL SHOCK OR FIRE HAZARDS. In
order not to defeat the safeguards incorporated in this
product, observe the following basic rules for its installation,
use and servicing.
GROUND CLAMP
ANTENNA DISCHARGE UNIT
(NEC SECTION 810–20)
ELECTRICAL
SERVICE
EQUIPMENT
GROUND CLAMPS
1. Read Instructions – All the safety and operating instructions
should be read before the product is operated.
2. Retain Instructions – The safety and operating instructions
3.
4.
5.
6.
7.
8.
9.
10.
11.
12.
13.
14.
should be retained for future reference.
Heed Warnings – All warnings on the product and in the
operating instructions should be adhered to.
Follow Instructions – All operating and use instructions
should be followed.
Cleaning – Unplug this product from the wall outlet before
cleaning. Do not use liquid cleaners or aerosol cleaners. Use a
damp cloth for cleaning.
Attachments – Do not use attachments not recommended by
the product manufacturer as they may cause hazards.
Water and Moisture – Do not use this product near water–for
example, near a bath tub, wash bowl, kitchen sink, or laundry
tub; in a wet basement; or near a swimming pool; and the like.
Accessories – Do not place this product on an unstable cart,
stand, tripod, bracket, or table. The product may fall, causing
serious injury to a child or adult, and serious damage to the
product. Use only with a cart, stand, tripod, bracket, or table
recommended by the manufacturer, or sold with the product.
Any mounting of the product should follow the manufacturer’s
instructions, and should use a mounting accessory recommended by the manufacturer.
Transportation – A product and cart
combination should be moved with care.
Quick stops, excessive force, and
uneven surfaces may cause the product
and cart combination to overturn.
Ventilation – Slots and openings in the cabinet are provided
for ventilation to ensure reliable operation of the product and to
protect it from overheating, and these openings must not be
blocked or covered. The openings should never be blocked by
placing the product on a bed, sofa, rug, or other similar surface.
This product should not be placed in a built-in installation such
as a bookcase or rack unless proper ventilation is provided or
the manufacturer’s instructions have been adhered to.
Power Sources – This product should be operated only from
the type of power source indicated on the marking label. If you
are not sure of the type of power supply to your home, consult
your product dealer or local power company. For products
intended to operate from battery power, or other sources, refer
to the operating instructions.
Grounding or Polarization – This product is equipped with
either a two-wire polarized plug (one plug blade bigger than the
other) or a three-wire grounded plug (a third pin for grounding).
The two-wire polarized plug will fit only one way into the power
outlet. The three-wire grounded plug will fit only into a grounding-type power outlet.
If the plug does not fit, ask your electrician to replace your
obsolete outlet. Do not modify the plug. To do so will void the
safety feature.
Power-Cord Protection – Power-supply cords should be
routed so that they are not likely to be walked on or pinched by
items placed upon or against them, paying particular attention
to cords at plugs, convenience receptacles, and the point
where they exit from the product.
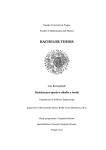
Outdoor Antenna Grounding – If an outside antenna or
cable system is connected to the product, be sure the antenna
or cable system is grounded so as to provide some protection
against voltage surges and built-up static charges. Article 810
of the National Electrical Code, ANSI/NFPA 70, provides
information with regard to proper grounding of the mast and
supporting structure, grounding of the lead-in wire to an
antenna discharge unit, size of grounding conductors, location
of antenna-discharge unit, connection to grounding electrodes,
and requirements for the grounding electrode. See diagram
below.
GROUNDING CONDUCTORS
(NEC SECTION 810–21)
NEC- NATIONAL ELECTRICAL CODE
POWER SERVICE GROUNDING
ELECTRODE SYSTEM
(NEC PART 250, PART H)
15. Lightning – For added protection for this product during a
16.
17.
18.
19.
20.
21.
22.
23.
lightning storm, or when it is left unattended and unused for
long periods of time, unplug it from the wall outlet and
disconnect the antenna or cable system. This will prevent
damage to the product due to lightning and power-line surges.
Power Lines – An outside antenna system should not be
located in the vicinity of overhead power lines or other electric
light or power circuits, or where it can fall into such power lines
or circuits. When installing an outside antenna system, extreme
care should be taken to keep from touching such power lines or
circuits as contact with them might be fatal.
Overloading – Do not overload wall outlets, extension cords,
or integral convenience receptacles as this can result in a risk of
fire or electric shock.
Object and Liquid Entry – Never push objects of any kind
into this product through openings as they may touch dangerous voltage points or short-out parts that could result in a fire or
electric shock. Never spill liquid of any kind on the product.
Servicing – Do not attempt to service this product yourself as
opening or removing covers may expose you to dangerous
voltage or other hazards. Refer all servicing to qualified service
personnel.
Damage Requiring Service – Unplug this product from the
wall outlet and refer servicing to qualified service personnel
under the following conditions:
a. When the power-supply cord or plug is damaged.
b. If liquid has been spilled, or objects have fallen into the
product.
c. If the product has been exposed to rain or water.
d. If the product does not operate normally by following the
operating instructions. Adjust only those controls that are
covered by the operating instructions, as an improper
adjustment of other controls may result in damage and
will often require extensive work by a qualified technician
to restore the product to normal operation.
e. If the product has been dropped or damaged in any way.
f. When the product exhibits a distinct change in performance, this indicates a need for service.
Replacement Parts – When replacement parts are required,
be sure the service technician has used replacement parts
specified by the manufacturer or have the same characteristics
as the original part. Unauthorized substitutions may result in fire,
electric shock, or other hazards.
Safety Check – Upon completion of any service or repairs to
this product, ask the service technician to perform safety
checks to determine that the product is in proper operating
condition.
Heat – This product should be situated away from heat sources
such as radiators, heat registers, stoves, or other products
(including amplifiers) that produce heat.
3
Contents
IMPORTANT SAFEGUARDS .......................
3
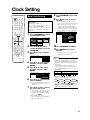
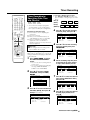
Clock Setting ............................................... 29
Features .......................................................
6
Accessories .................................................
7
Auto Clock Setting .........................................................
Manual Clock Setting .....................................................
Automatic Daylight Saving-Time (DST) Adjustment .......
Precautions about Using This Product .....
8
About DVD ................................................... 10
Types of Discs that Can Be Used with This Recorder ...
Discs that Cannot Be Used with This Recorder .............
Types of Discs for Recording .........................................
Recording Formats ........................................................
Recording Time ..............................................................
Disc Remaining Time .....................................................
Using the Proper Disc ....................................................
Time Display for Recording and Playback
(Video mode only) .......................................................
Unrecordable Material ....................................................
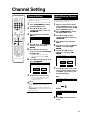
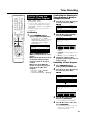
Channel Setting .............................................................
Adding/Erasing Channel Memory ..................................
31
31
Display Information ..................................... 32
13
13
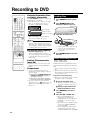
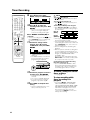
Loading Disc ..................................................................
Direct Recording to DVD ................................................
Setting the Record End Time during Direct Recording
(Simple Recording Timer) ............................................
14
14
About the Contents of the Disc ................. 14
Content of TV Screen Display ........................................
Checking the Channel ....................................................
Checking Remaining Time of DVD and
Number of Titles ..........................................................
Switching Front Panel Display .......................................
32
32
32
33
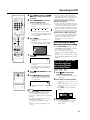
Recording to DVD ........................................ 34
34
34
35
Setting Recording Mode ............................. 36
DVD-RW/R Recording Mode and Recording Time ........
Setting the Manual Recording Mode (MN) .....................
36
36
14
15
15
Timer Recording .......................................... 37
Important Information ................................. 16
41
43
Title, Chapter and Track .................................................
Icons Used on DVD Video Disc Case ............................
The Icons Used in This Operation Manual .....................
Disc Precautions ............................................................
Copyright ........................................................................
Cautions Regarding Recording ......................................
16
16
16
Major Components ...................................... 17
Main Unit (Front) ............................................................
Front Panel Display ........................................................
Main Unit (Rear) .............................................................
Remote Control Unit ......................................................
Loading the Batteries .....................................................
Operating a TV Using the Remote Control (Universal
Remote Control) ..........................................................
Setting the Remote Control Code ..................................
17
17
17
18
19
20
20
Basic Connection ........................................ 21
Easy Connection ............................................................
Using Other Types of Video Output ...............................
21
22
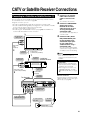
CATV or Satellite Receiver Connections ..... 23
Connecting to a Cable Box or Satellite Receiver (1) ......
Connecting to a Cable Box or Satellite Receiver (2) ......
23
24
EZ Set Up ..................................................... 25
Turning the Power On ....................................................
25
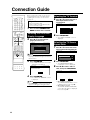
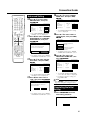
Connection Guide ....................................... 26
Selecting the On-screen Display Language ...................
Selecting the TV Terminal ..............................................
Selecting the TV Screen Aspect Ratio ...........................
Advanced Setting ...........................................................
Completing the Initial Setting .........................................
26
26
26
27
27
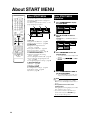
About START MENU .................................... 28
About START MENU ......................................................
Basic START MENU Operation .....................................
4
Channel Setting ........................................... 31
10
10
11
12
12
12
13
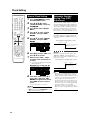
Initialization and Finalization ..................... 14
Initialization (Formatting) ................................................
Allowing Discs to Be Played Back
with Other DVD Players (Finalization) .........................
29
30
30
28
28
Easy Recording Guide ...................................................
Timer Recording with VCR Plus+® System ....................
Timer Recording by Specifying Date,
Time and Channel .......................................................
Confirm, Change and Cancel a Timer Program .............
37
39
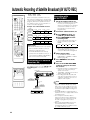
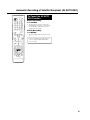
Automatic Recording of Satellite Broadcast
(AV AUTO REC) ..................................... 44
Connecting to a Satellite Receiver, etc. .........................
Recording with AV AUTO REC .......................................
To Cancel the AV AUTO REC Function ..........................
44
44
45
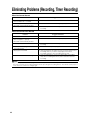
Eliminating Problems (Recording, Timer
Recording) ............................................. 46
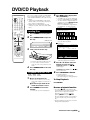
DVD/CD Playback ........................................ 47
Loading Disc ..................................................................
Playback from REC LIST ...............................................
DVD Video Playback ......................................................
Audio CD/Video CD Playback ........................................
Other Types of Playback ................................................
Playback by Selecting with the Menu in the DVD ...........
Setting a Clear Image and Powerful Sound ...................
47
47
48
49
49
53
54
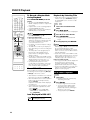
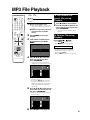
MP3 File Playback ....................................... 55
To Play Another File (music title) during Playback .........
To Skip the File during Playback ....................................
55
55
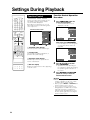
Settings During Playback ........................... 56
Function Control .............................................................
56
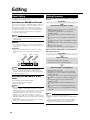
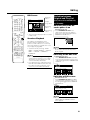
Editing .......................................................... 58
About Editing .................................................................. 58
Editing Procedure .......................................................... 58
Switching between Original and Play List (Play Lists can
be created only for VR mode) ...................................... 59
Contents
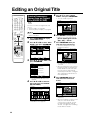
Editing an Original Title .............................. 60
Erasing Unnecessary Scenes from an Original Title
(ERASE SCENE) .........................................................
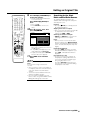
Inputting/Changing Title Name
(CHANGE TITLE NAME) .............................................
How to Enter Text ...........................................................
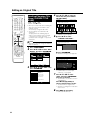
Changing Thumbnail (CHANGE THUMBNAIL) ..............
Making Sections in a Title (DIVIDE CHAPTER) .............
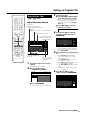
Combining Chapters Together
(COMBINE CHAPTERS) .............................................
Disabling Title Edit and Erase (TITLE PROTECT) .........
Erasing All Titles ............................................................
Erasing by Selecting a Title (or Chapter) .......................
60
62
63
64
65
66
66
67
67
Editing a Play List ....................................... 68
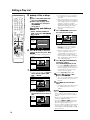
Creating a Play List ........................................................
Adding a Scene from an Original to a Play List
(ADD SCENE) .............................................................
Changing the Title Sequence (MOVE TITLE) ................
Erasing Unnecessary Scenes (ERASE SCENE) ...........
Inputting/Changing Title Name
(CHANGE TITLE NAME) .............................................
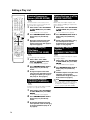
Changing Thumbnail (CHANGE THUMBNAIL) ..............
Making Sections in a Title (DIVIDE CHAPTER) .............
Combining Chapters Together
(COMBINE CHAPTERS) .............................................
68
69
71
72
72
72
72
72
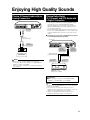
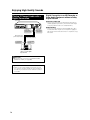
Enjoying High Quality Sounds ................... 73
Playing 2 Channel Audio with an Analog Connection .... 73
Playing Dolby Digital (5.1 Channel) and DTS Audio with a
Digital Connection ....................................................... 73
Playing 2 Channel Audio with a Digital Connection ....... 74
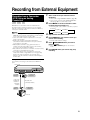
Recording from External Equipment ......... 75
Recording from a Camcorder (VCR) Using an Analog
Connection ..................................................................
75
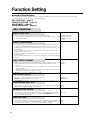
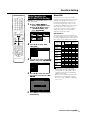
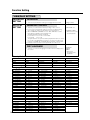
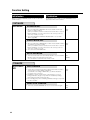
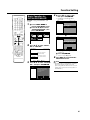
Function Setting .......................................... 76
Basic Operation for REC FUNCTION Setting ................
Basic Operation for VIEW/PLAY SETTING ....................
Basic Operation for ADJUSTMENT Setting ...................
Initialization ....................................................................
Finalization .....................................................................
Basic Operation for INITIALIZE/FINALIZE .....................
77
79
83
84
84
85
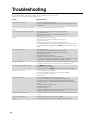
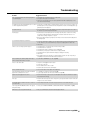
Troubleshooting .......................................... 86
Service Information (For the U.S.) ............. 88
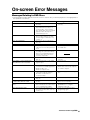
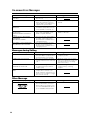
On-screen Error Messages ........................ 89
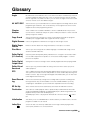
Glossary ....................................................... 91
Specifications .............................................. 94
5
Features
1
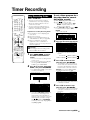
A new timer recording system:
“Easy Recording Guide”
• This feature makes timer recording easier. A
schedule grid of times and channels is displayed on
the screen, and by simply designating cells in the
grid with the remote control, timer programming
becomes as easy as circling your favorite shows in
the newspaper. You can also see at a glance which
time slots are already programmed, and avoid any
overlap.
2
DVD-RW/R recording/playback
with outstanding compatibility
• This Recorder is compatible with digital recording
on rewritable DVD-RW discs and one-time recordable DVD-R discs. It has two recording formats: “VR
(Video Recording) mode” which has a wealth of
editing functions, and “Video mode” which can be
played back with existing DVD players. This lets you
enjoy recording to suit your purpose.
3
High picture quality design
1Progressive scanning playback
High-quality, high-density video with no jagged
contours and no flicker.
2VBR (Variable Bit Rate) recording
Constantly maintains optimal high picture quality by
varying the bit rate (amount of video data) for each
scene depending on the video content (e.g. whether
movement is fast or slow).
4
Comprehensive editing functions
(Only titles recorded in VR mode on DVD-RW
can be edited.)
1Play list edit
This lets you gather only the needed parts (i.e. a “Play
List”) from a recorded original video (title). You can
rearrange scenes and combine them with other
scenes, or rearrange titles.
2Chapter edit
This lets you divide a title into chapter units during
recording/playback or using the edit screen. After
dividing, a list of recordings (thumbnails) can be
displayed in chapter units, so you can copy and
erase to the play list in chapter units.
3Erase scene
This lets you erase unnecessary scenes. This is
convenient when you want to cut out the commercials in a recorded program.
4Batch erasing of titles/chapters
Titles and chapters which become unnecessary
after editing can be batch erased by selecting them
from the list of recordings (thumbnails).
5Edit undo function*4
If you mistakenly erase data during editing, this
function lets you restore it to its immediately
preceding state, just like “Undo” on a PC, so you
can edit worry-free.
*4 Edit undo can only be used once. It only works when
“UNDO” is assigned to a colored button (green) displayed
on the screen.
6
5
Simple operation and user-friendly
design using a new remote control
1START MENU
Press START MENU button on the remote control,
and display the list of main functions on the screen.
After that, you can operate by using the Cursor
buttons and SET/ENTER button on the remote
control, so this Recorder can be used easily even
by a person who is unfamiliar with operation.
2Colored buttons
The remote control has colored buttons with four
different colors. Functions are displayed in four
different colors on the screen, and the Recorder
can be operated by directly designating these
functions.
3Luminous buttons
Luminous buttons are used for key control buttons
on the remote control so they are easy to see in the
dark.
6
MP3 file playback
• This Recorder allows you to playback MP3 files
recorded on CD-RW/R.
7
VCR Plus+*5 System
• The VCR Plus+ System allows you to program your
Recorder for timer recording simply by inputting the
PlusCode Programming number. The PlusCode
numbers are listed in most newspapers, television
guides, and local CATV listings. Simply by inputting
this PlusCode number, you can program your
Recorder for timer recording, eliminating the need
to input program start time, stop time, channel, date
and other information which is necessary for
ordinary timer programming.
*5 VCR Plus+ and PlusCode are registered trademarks of
Gemstar Development Corporation. The VCR Plus+
system is manufactured under license from Gemstar
Development Corporation.
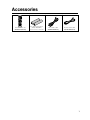
Accessories
Remote control unit
(RRMCGA199WJSA)
Two “AAA” size batteries
(R-03, UM/SUM-4)
for the remote control unit
Video/audio cable
(QCNW-A002WJPZ)
Round coaxial cable
(QCNW-A005WJPZ)
7
Precautions about Using This Product
Do not use at locations at high
temperature.
Do not place objects on the Recorder.
• If you leave this equipment at a location which rises to an
abnormally high temperature (like the inside of a car with
the windows shut), this may cause deformation of the
cabinet or malfunction. Be very careful not to allow the
area abound the Recorder or discs to reach a high
temperature.
• Do not place any objects, such as vases or lighted
candles on the top of the Recorder.
• Set up at a location where there is adequate space above
the Recorder
• Do not place a TV or other heavy object on the Recorder.
Doing so may result in problems like noise appearing on
the screen, or deformation of the cabinet.
• Do not place the Recorder on any equipment which gets
hot.
• Do not place at a location which is exposed to direct
sunlight, or near a heater. Be careful because doing so
will have an adverse effect on the cabinet and components.
Keep away from magnetic objects.
• Keep the Recorder away from strong magnetic objects.
Handle the Recorder carefully.
• Do not drop the Recorder, or subject it to strong impact or
vibration. Doing so will cause malfunction. Be careful
when carrying or moving the Recorder.
No fingers or other objects inside.
• Do not put any foreign object on the disc tray.
When moving or shipping the
Recorder
Do not remove the cabinets.
• Do not remove the Recorder cabinets. Touching parts
inside the cabinet could result in electric shock and/or
damage to the Recorder. For service and adjustment
inside the cabinet, please contact the nearest Sharp
Authorized Service Center.
Do not cover the fan or ventilation holes on the back of the Recorder.
• When setting up the Recorder, do not cover the fan or
ventilation holes on the rear of the Recorder. This will
interfere with the cooling fan and cause malfunction. Be
especially careful of this point when housing the Recorder
in a TV stand or AV rack.
• Do not use the Recorder on carpets, or on a bed or sofa,
or wrap the Recorder in cloth or other material. This will
interfere with the cooling fan and cause malfunction.
Avoid dust and smoke.
• Do not place the Recorder at a location which is unstable,
subject to heavy vibration or where there is a lot of dust or
tobacco smoke. Doing so may cause malfunction or
accidents.
Set up the Recorder so it is horizontal.
• Do not stand the Recorder up vertically or place it upside
down. Doing so will cause malfunction.
8
• Remove the disc before wrapping the Recorder. In case
you will not be using the Recorder for a while, remove the
disc, and turn off the power.
When using the Recorder during
rain or snow
• If you use the Recorder during rain or snow, be careful
not to allow it to get wet.
Dew formation
• Dew may form on the surface of and inside the Recorder
if you suddenly carry it from a cold location to a warm
location, or use it in a cold room where heating has just
been turned on (i.e. on a winter morning). If dew forms,
take out the disc and leave the Recorder with the power
off until the dew disappears. Using the Recorder with dew
formation may cause malfunction. (See page 16.)
Precautions about Using This Product
Notes about use
• The cabinet surface employs a lot of plastic. Do not wipe
these surfaces with benzene or thinner because this may
cause deterioration or paint peeling.
• The Recorder and cabinet may become a little hot,
depending on the use environment when using this
Recorder. This is not a malfunction.
• When unplugging the power cord (to move the Recorder,
etc.), first turn off power (STANDBY indicator on the front
of the Recorder lights up red).
• When power is turned on, the fan will rotate to cool the
Recorder.
• Immediately after plugging the power cord into an AC
outlet, or after recovery from a power failure, the unit may
fail to operate for more than ten seconds because the
Recorder is performing system adjustment.
benzene
Upkeep of cabinet
OIL
thinner
• Do not apply volatile liquids like insecticide to the
cabinet. Also, do not allow long-term contact with
materials like rubber, vinyl products or synthetic leather.
Doing so may cause problems like paint peeling.
• Do not affix stickers or tape to the Recorder. Doing so
may cause cabinet discoloration or damage.
• If the cabinet or front panel display gets dirty, gently wipe
it off with soft cloth like flannel. If it is extremely dirty, soak
a cloth in neutral detergent diluted with water, wring the
cloth well, wipe, and then wipe again with a dry cloth.
Using powerful cleaners may cause discoloration,
deterioration or paint peeling. We recommend testing any
cleaners at an inconspicuous location on the Recorder.
Notes about this operation
manual
• In this operation manual, the terms “the Recorder”, “this
Recorder” or “your Recorder” refer to the “DV-SR3U DVD
Recorder.
• The screen displays and Recorder illustrations given in
this operation manual are for explanatory purposes, and
may differ somewhat from the actual screen and Recorder.
Electromagnetic interference
• If you use a mobile phone or other electronic equipment
near the Recorder, video may be disturbed or become
noisy during playback or recording due to electromagnetic interference.
Antenna
• To avoid the effects of radio interference, set up the
antenna at a location away from busy roads, electric
wires for train, electric transmission lines and neon signs.
This is effective for preventing electric shock accidents in
the unlikely event that antenna falls down.
• Do not make the antenna line unnecessarily long, or
bundle it. Be careful because doing so will cause the
picture to be unstable.
• The antenna is exposed to the weather, so be careful to
periodically check and replace it. This will ensure a
beautiful picture. Antennas are particularly susceptible to
damage at locations with heavy smoke and soot, and
locations exposed to sea breeze.
Connected equipment
• Read carefully the “Precautions for Use” in the operation
manual for any equipment connected to the Recorder.
Power conservation
• When you are finished using the Recorder, conserve
power by turning power off. If you go on a trip, or
otherwise will not use the Recorder for a long time,
unplug the power cord from the AC outlet to ensure
safety.
If you do not use the Recorder for
a long time
• Failure to use the Recorder for a long time may cause
problems, so turn on power and operate the Recorder
from time to time.
Requests regarding setup
• Do not cover the fan or ventilation holes on the back of
the Recorder. Doing so will interfere with heat radiation
and cause malfunction.
9
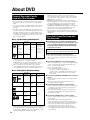
About DVD
Types of Discs that Can Be
Used with This Recorder
• The following discs can be played back and recorded
with this Recorder. Do not use an 8 cm (3") adapter (for
CDs).
• Since this Recorder is compatible with the NTSC format,
use discs that contain the letters “NTSC” on the disc or
package.
• Use discs that are compatible with standards as indicated by the presence of the following logo marks on the
disc label. Playback of discs not complying with these
standards is not guaranteed. In addition, image quality or
sound quality is not guaranteed even if such discs are
able to be played back.
Discs For Recording and Playback
Disc Type
DVD-RW
DVD-R
•Ver.1.1
•Ver.1.1
(CPRM
compatible)*1
•Ver.1.1/2g
(CPRM
compatible)*1
•Ver.2.0
•Ver.2.0/4g*3
Recording
Format
VR mode
Video mode
Contents
Disc Size
Audio + Video
(Movie)
12 cm (5"),
single-sided/
double-sided,
single layer disc
8 cm (3"), singlesided, single
layer disc *2
Video mode
4.7
*1
*2
*3
“Copy Once” broadcasts and other programs that can
be recorded only once can be recorded.
DVD-RW/R 8 cm (3") single-sided, single-layer discs can
only be used for recording in the Video mode. Some
discs of this type may not be able to be recorded.
Not compatible with 4X high speed dubbing. When high
speed dubbing is used, the system will switch to 2X.
Discs for Playback (Playback Only)
Disc Type
DVD Video Region
number
1
DVD+R/DVD+RW
Video CD
Recording
Format
Video mode
Contents
Disc Size
Audio + Video
(Movie)
12 cm (5")
8 cm (3")
Video mode
Audio + Video
(finalized disc (Movie)
only)
Video CD
Audio + Video
(Movie)
12 cm (5")
ALL
Audio CD *4
Audio CD
(CD-DA)
Audio
CD-R/CD-RW
Audio CD
(CD-DA)
Audio
12 cm (5")
8 cm (3")
MP3 file
Video CD
*4
10
Audio + Video
(Movie)
This Recorder has been designed on the premise of
playing back Audio CDs that comply with CD (Compact
Disc) standards. CDs containing a signal for the purpose
of protecting copyrights (copy control signal) may not be
able to be played back with this Recorder.
• DVD video players and discs have region numbers,
which dictate the regions in which a disc can be played.
The region number for this product is 1. (Discs marked
ALL will play in any player.)
• DVD Video operations and functions may be different
from the explanations in this manual and some operations
may be prohibited due to disc manufacturer’s setting.
• If “CANNOT OPERATE THIS FUNCTION.” or “THIS
OPERATION IS PROHIBITED BY THE DISC.” is displayed,
either the disc or Recorder is prohibiting the function.
Read the disc’s manual along with this manual.
• If a menu screen or operating instructions are displayed
during playback of a disc, follow the operating procedure
displayed.
Discs that Cannot Be Used with
This Recorder
■ The following discs are unable to be played back or
are not played back properly on this Recorder. If such
a disc is mistakenly played back, the speakers may
be damaged due to the large volume. Never attempt
to play back such discs.
CDG, Photo CD, CD-ROM, CD-TEXT, CD-EXTRA, SVCD,
SACD, PD, CDV, CVD, DVD-ROM, DVD-RAM, DVD-Audio
■ Discs with unusual shapes cannot be played.
• Discs with unusual shapes (heart-shaped or hexagonal
discs, etc.) cannot be used. The use of such discs will
cause a fault.
■ The following DVD video discs cannot be played.
• Discs not containing “1” or “ALL” for the region number
(discs sold outside the authorized marketing area).*5
• Discs recorded in PAL format.*6
• Discs produced illegally.
• Discs recorded for commercial use.
*5
The region number for this product is 1.
*6
This Recorder is compatible with the NTSC format.
Make sure to check the format of the disc before
purchasing.
■ The following DVD-RW/R, DVD+RW/R discs cannot be
played.
• Discs on which data has not been recorded cannot be
played back.
• Discs may not be played back depending on the
recorder used for recording.
■ The following Audio CD discs cannot be played.
• Discs containing a signal for the purpose of protecting
copyrights (copy control signal) may not be played
back with this Recorder.
• This Recorder has been designed on the premise of
playing back Audio CDs that comply with CD (Compact Disc) standards.
■ The following CD-RW/R discs cannot be played.
• Discs on which data has not been recorded cannot be
played back.
• Non-finalized discs cannot be played back.
• Discs recorded in a format other than a Video CD/
Audio CD and MP3 file format*7 cannot be played back.
• Discs may not be played back depending on their
recording status or the status of the disc itself.
• Discs may not be played back depending on their
compatibility with this Recorder or the recorder used
for recording.
About DVD
*7
About MP3 file format
MP3 files are audio data compressed in MPEG1 Audio
layer 3 file format. “MP3 files” have “.mp3” as extensions.
(Some files that have “.mp3” extensions or files that have
not been recorded in MP3 format will produce noise or
cannot be played.)
Æ Playing MP3 discs
• Some MP3 files are not played in the order they were
recorded.
• The maximum number of layers which can be
recognized, including files and folders, is 8.
• The multi-session discs cannot be played.
• It is recommended to record data at a lower speed as
data recorded at fast speed can produce noise and
may not be able to be played.
• The more folders there are, the longer the reading
time.
• Depending on the folder tree, reading MP3 files can
take time.
• Folder or track (file) names are limited to 8 characters.
Folder or track (file) names that go over 8 characters
will be abbreviated. (Certain letters or symbols in
folder names or title name may not be displayed.)
• The playing time may not be correctly displayed
during MP3 file playback.
Æ The following files cannot be played on this
Recorder.
• Discs that have more than 257 folders or 1,000 files.
• When both Audio CD format and MP3 files format are
recorded on a disc. (The disc is recognized to be an
Audio CD and only tracks in the Audio CD format are
played back.)
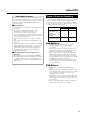
Types of Discs for Recording
• DVD-RW and DVD-R discs can be recorded with this
Recorder. The recording format that can be selected may
vary according to the disc version and type of disc.
• Make sure to use a disc that has the words “For Video” or
“For Recording” on the disc or disc jacket for recording
and playback with this Recorder.
Disc Type
DVD-RW Ver. 1.1
DVD-RW Ver. 1.1
(CPRM)
DVD-RW Ver. 1.1/2g
(CPRM)
DVD-R Ver. 2.0
DVD-R Ver. 2.0/4g
Recording Format
VR mode
Video mode
×
×
—
×
DVD-RW Discs
• DVD-RW discs are available in Ver. 1.1, Ver. 1.1
(CPRM compatible) or Ver. 1.1/2g (CPRM
compatible).
• When a disc has been recorded in the VR mode, it
can be recorded and erased repeatedly. Erasure also
allows the recording time to be increased.
• When a disc has been recorded in the Video mode,
additional recording is possible until the disc is full.
The recording time does not increase*8 even if titles
are erased, but if the disc is initialized (see pages 14
and 84) full recording time is possible.
*8
Recording time can only be increased when the last
title is erased (titles cannot be erased after a disc
has been finalized).
DVD-R Discs
• DVD-R discs can only be recorded in the Video
mode.
• Although additional recordings can be made until the
disc is full, disc space does not increase even if titles
are erased (because erasure here refers only to
making the titles not visible).
• Although these discs can be played back with other
DVD players once they have been finalized, the discs
can no longer be recorded or erased after they have
been finalized.
• Discs can be additionally recorded and edited with
this Recorder only until they are finalized.
11
About DVD
Recording Formats
• There are two recording formats available with this
Recorder: the VR mode and the Video mode.
• The recording format that can be selected may differ
depending on the disc. Refer to the section on Types of
Discs for Recording (page 11).
• Recording in the VR mode and Video mode cannot be
mixed on one disc.
Recording
Recordable Time
Mode
FINE
About 60 minutes
VR (Video Recording) Mode
SP
About 120 minutes
The VR mode is the basic DVD-RW recording format,
and lets you enjoy the various editing functions available with this Recorder.
• When a disc has been recorded in the VR mode, it can
be recorded and erased repeatedly. Erasure also allows
the recording time to be increased.
• Recorded discs can only be played back with DVD-RW
compatible DVD players*9.
• “Copy Once” programs can also be recorded*10.
LP
About 240 minutes
EP
About 360 minutes
*9
*10
• Although there are some cases in which the disc must
be finalized, the disc can be recorded and erased
after it has been finalized.
• DVD-RW compatible DVD players have the following
indication.
DVD players with this indication have the function of
being able to play back DVD-RW discs recorded in
the VR mode with a DVD recorder.
When using a DVD-RW Ver. 1.1 disc (CPRM compatible).
Recorded programs cannot be played back with other
DVD players (including DVD-RW players) or DVD
recorders not compatible with CPRM.
Video Mode
This recording format is compatible with commercially
available DVD players and DVD-ROM drives.
• Discs recorded in the Video mode cannot be recorded
repeatedly or their content overwritten.
• When recording in the Video mode, discs can be played
back, additionally recorded and edited only with this
Recorder until they are finalized. Editing functions are
limited.
• Discs recorded in the Video mode can be played back
with other DVD players by finalizing them after recording.
(However, this does not guarantee that these discs can
be played back on all DVD players.)
• Recordings onto DVD-RW/R discs using the Video mode
employ a new standard approved by the DVD Forum in
2000, and compatibility with this standard is left to the
discretion of the respective DVD player manufacturer.
Consequently, there are some models of DVD players
and DVD-ROM drives that are unable to play back DVDRW/R discs.
• “Copy Once” programs cannot be recorded.
12
Recording Time
• The recording mode that can be set varies according to
the recording format. Refer to the table below for the
applicable recording mode.
Description
When you want to record highquality images.
This is the standard recording
mode.
When you want to record for a long
period of time with slightly lower
image quality.
When you want to place priority on
recording time.
• Recordable time is based on the recording time when
using a 4.7 GB disc. Since recording capacity varies
according to the recorded material, there may be cases
where there is much more disc space remaining on the
disc when recording is completed.
• Refer to page 36 about the recordable times when you
choose “MN” (manual) Recording mode.
* Since recording to DVD is performed using VBR (variable
bit rate, refer to the section on VBR Control on page 93)
with the exception of some recording modes, recording
time varies according to the material to be recorded.
• Recordable time may be shorter than that indicated above in
the case of recording material of poor image quality such as
broadcasts from televisions with poor reception.
• This does not guarantee the length of recording time. Actual
recording time may be shorter than that indicated above
depending on image quality and other aspects.
• The total of recording time and remaining time may not always
agree with the recordable time of the recording mode.
• Block-like images may become conspicuous during scenes
containing rapid movement due to the characteristics of digital
image compression technology.
Disc Remaining Time
Æ VR mode
• Additional recordings can be made as long as there is
available space on the disc. (Additional recordings
can also be made after the disc is finalized.)
• Erasing unnecessary recordings lets you increase the
remaining time on the disc. (The disc can also be
erased after it has been finalized.)
• When a Play List (see page 68) is created, disc space
will not increase even if portions of titles or titles of
Play List are erased.
Æ Video mode
• Additional recordings can be made with this Recorder
provided there is available space on the disc until the
disc is finalized.
• In case you record on a DVD-RW disc, recordable
time will increase if you erase the last recorded title
unless you finalize the DVD-RW disc.
• In case you record on a DVD-R disc, recordable time
will not increase even if you erase titles (see page 67).
(The erase function only hides the title, it does not
actually erase it. It does not actually delete the
recorded contents.)
About DVD
Using the Proper Disc
Unrecordable Material
Select the disc and recording format to be used
according to the objective of the recording.
Select the disc and recording format by referring
to the table below.
Objective
• When you want to play
back a recorded disc with
a DVD player or DVD
Video compatible PC
• When not re-recording a
recorded disc (when
making a permanent
recording or when you
do not want the
recording to be erased)
• When you want to play
back a recorded disc with
a DVD player or DVD
Video compatible PC
• When you want to
repeatedly record and
erase a recorded disc
• When you want to edit
a disc recorded with
this Recorder
• When playing back with
a DVD-RW compatible
player with the
following indication
• When you want to
repeatedly record and
erase a recorded disc
• When you want to
record a “Copy Once”
satellite broadcast, etc.
Disc Used
Recordable
DVD-R disc
Recording Format
Video mode
recording
+
finalization
4.7
Recordable
DVD-RW disc
Ver. 1.1 or Ver.
1.1 (CPRM
compatible)
Video mode
recording
+
finalization
Recordable
DVD-RW disc
Ver. 1.1 or
Ver. 1.1
(CPRM
compatible)
VR mode
recording
+
(finalization)
Recordable
DVD-RW disc
Ver. 1.1
(CPRM
compatible)
VR mode
recording
Æ This Recorder is equipped with a copy guard
function that prevents recording of video software
or broadcast programs that contain a signal that
restricts copying in accordance with copyrights and
so forth.
Example:
• DVD videos
• PPV (pay-per-view) broadcasts
Æ The proper image may not be obtained in the case
a copy guard signal is contained in the images
input from equipment connected to the external
input jacks (LINE IN 1, LINE IN 2, LINE IN 3) of
this Recorder.
Example:
• Images not output at proper brightness
• Incorrect output of picture size and other data
Connect such equipment directly to your TV
without going through this Recorder.
Æ In the case a copy guard signal is contained in a
source video that occurs part way through recording, recording is paused at that point. Recording
resumes when the copy guard signal is no longer
present, while no recordings will be made for the
part where the copy prevention signal is present.
Time Display for Recording and
Playback (Video mode only)
• With this Recorder, the displayed record/playback time is
about 0.1% shorter than the actual recording time. In
video like TV broadcasts, video is sent at a rate of about
29.9 frames per second. For convenience, this Recorder
calculates using a value of 30 frames per second. (If, for
example, you record one hour, the time display on the
Recorder will be: 60 minutes K 0.999 ! 59.94 minutes
! 59 mins. 56 secs.)
13
Initialization and Finalization
Initialization (Formatting)
Initialization is required when using DVD-RW discs in the Video mode. (See page 84 for details about Initialization.)
When an unused DVD-RW disc is placed in the Recorder immediately after the disc has been purchased, the Recorder is set
to automatically begin initializing in the VR mode. The settings can also be changed so that discs are initialized in the Video
mode (page 84).
When using a DVD-RW disc in the Video mode without changing this setting, initialize the disc in the Video mode after first
completing initialization in the VR mode (page 84).
• Initialization causes the entire previously recorded contents of the disc to be erased.
• It takes about 1 minute to 1 minute and 30 seconds for initialization to be completed.
Allowing Discs to Be Played Back with Other DVD Players (Finalization)
Discs must always be finalized in order to play them back with another DVD player after having been recorded in
the Video mode. (See page 84 for details about Finalization)
Finalize discs on which all recordings have been completed so that they can be viewed with another DVD player or a DVD
Video compatible PC. Discs that are not finalized may not be able to be played back with other DVD players or DVD Video
compatible PCs. (However, this does not guarantee that finalized discs can be played back on all DVD players or DVD Video
compatible PCs.)
• Finalizing a DVD-R disc prevents all recording and editing of that disc.
• Although DVD-RW discs can be re-recorded by initializing even after they have been recorded in the Video mode and
finalized, all previously recorded contents are erased.
• Finalization is required if a disc recorded in the VR mode cannot be played back with a DVD-RW compatible player. (Discs
formatted in the VR mode can be recorded and edited even after finalization.)
• Finalization takes from several minutes to about an hour. (Processing takes longer if there is considerable available space
on the disc.)
The following operations may cause malfunction.
• Operating discs recorded or edited by this Recorder in a DVD recorder or PC’s DVD drive manufactured by other manufacturers.
• Using the discs in above situation again with this Recorder.
• Operating discs recorded or edited by a DVD recorder or PC’s DVD drive made by other manufacturers than the one for
this Recorder.
About the Contents of the Disc
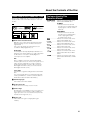
Title, Chapter and Track
• DVDs are divided into “Titles” and “Chapters”. If the disc
Example 1: DVD
has more than one movie on it, each movie would be a
separate “Title”. “Chapters”, on the other hand, are
subdivisions of titles. (See Example 1.)
Title 2
• Video CDs and Audio CDs are divided into “Tracks”. You
Title 1
can think of a “Track” as one tune on an Audio CD. (See
Example 2.)
Chapter 1
Chapter 2
Chapter 3
Chapter 1
Chapter 2
Recording on a DVD-RW/R disc
• One recording is treated as one title and the chapters will
be inserted automatically every 10 minutes. You can
Example 2: Video CD or Audio CD
choose the chapter interval from the following: 10
minutes, 15 minutes, 30 minutes, or off (page 76).
• Each title, chapter and track will be numbered in order.
Track 1
Track 2
Track 3
Track 4
Track 5
Title, chapter and track may not be numbered in some
discs.
Recording on a DVD-RW disc in VR mode
• When you pause during recording or erase the scene using edit function, chapter marks will be inserted automatically. You
can also insert chapter marks at your favorite scenes (page 65).
Recording in Video mode
• You cannot insert chapter marks at your favorite scenes.
14
About the Contents of the Disc
Icons Used on DVD Video Disc Case
When you buy a DVD Video disc, the back of the disc case
usually contains various information about the contents of
the disc.
1
2
2
1. English
2. Chinese
3
2
4
16:9 LB
1. English
2. Chinese
5
2
123
456
z Audio tracks and audio formats
DVD discs can contain up to 8 separate tracks with a
different language on each. The first in the list is the
original track.
This section also details the audio format of each
soundtrack—Dolby Digital, DTS, etc.
Dolby Digital
A sound system developed by Dolby Laboratories Inc.
that gives movie theater ambience to audio output when
the Recorder is connected to a Dolby Digital 5.1
channel processor or amplifier.
DTS
DTS is a digital sound system developed by Digital
Theater Systems for use in cinemas. This system uses 6
audio channels and provides accurate sound field
positioning and realistic acoustics. (By connecting a
DTS Digital Surround decoder, you can also listen to
DTS Digital Surround sound.)
The Icons Used in This
Operation Manual
DVD-RW
DVD-RW
VR MODE
VIDEO MODE
... Indicates the functions that can be
performed for DVD-RW discs.
VR MODE:
• Indicates that the function will
operate when recording in VR mode
or playing back a disc recorded in
VR mode.
VIDEO MODE:
• Indicates that the function will
operate when recording in Video
mode or playing back a disc
recorded in Video mode.
DVD-R ................... Indicates the functions that can be
performed for DVD-R discs.
DVD VIDEO .............. Indicates the functions that can be
performed for DVD Video discs.
VIDEO CD .................. Indicates the functions that can be
performed for Video CDs.
AUDIO CD .................. Indicates the functions that can be
performed for Audio CDs.
CD-R
.................. Indicates the functions that can be
MP3
performed for CD-R discs in MP3
format.
CD-RW .................. Indicates the functions that can be
MP3
performed for CD-RW discs in MP3
format.
Linear PCM
Linear PCM is a signal recording format used for Audio
CDs.
The sound on Audio CDs is recorded at 44.1 kHz with
16 bits. (On DVD discs, sound is recorded at between
48 kHz with 16 bits and 96 kHz with 24 bits.)
x Subtitle languages
This indicates the kind of subtitles.
c Screen aspect ratio
Movies are shot in a variety of screen modes.
v Camera angle
Recorded onto some DVD discs are scenes which have
been simultaneously shot from a number of different
angles (the same scene is shot from the front, from the
left side, from the right side, etc.).
b Region code
This indicates the region code (playable region
number).
15
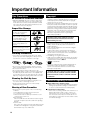
Important Information
Disc Precautions
Be Careful of Scratches and Dust
• DVD-R and DVD-RW discs are sensitive to dust, fingerprints and especially scratches. A scratched disc may
not be able to be recorded, or important data recorded
may not be able to be played back. Handle discs with
care and store them in a safe place.
Proper Disc Storage
Place the disc in the center of
the disc case and store the
case and disc upright.
Avoid storing discs in locations
subject to direct sunlight, next
to heating appliances or in
locations of high humidity.
Do not drop discs or subject
them to strong vibrations or
impacts.
Avoid storing discs in locations
where there are large amounts
of dust or locations where mold
tends to grow easily.
Handling Precautions
• If the surface is soiled, wipe gently with a soft, damp
(water only) cloth. When wiping discs, always move the
cloth from the center hole toward the outer edge.
Copyright
• It is the intent of Sharp that this product be used in full
compliance with the copyright laws of the United States
and that prior permission be obtained from copyright
owners whenever necessary.
• This product incorporates copyright protection technology
that is protected by method claims of certain U.S. patents
and other intellectual property right owned by Macrovision
Corporation and other rights owners. Use of this copyright
protection technology must be authorized by Macrovision
Corporation, and is intended for home and other limited
viewing uses only unless otherwise authorized by
Macrovision Corporation. Reverse engineering or
disassembly is prohibited.
Apparatus Claims of U.S. Patent Nos. 4,631,603,
4,577,216, 4,819,098 and 4,907,093 licensed for
limited viewing uses only.
• Manufactured under license from Dolby Laboratories.
“Dolby” and the double-D symbol are trademarks of
Dolby Laboratories.
• “DTS” and “DTS Digital Out” are trademarks of Digital
Theater Systems, Inc.
• Certain audio features of this product manufactured
under a license from Desper Products, Inc. Spatializer ®
N-2-2™ and the circle-in-square device are trademarks
owned by Desper Products, Inc.
• The DVD logo is a registered trademark.
• i.LINK refers to the IEEE 1394-1995 industry specification
and extensions thereof. The
logo is used for products
compliant with the i.LINK standard.
•
• Do not use record cleaning sprays, benzene, thinner,
static electricity prevention liquids or any other solvent.
• Do not touch the surface.
• Do not stick paper or adhesive labels to the disc.
• If the playing surface of a disc is soiled or scratched, the
Recorder may decide that the disc is incompatible and
eject the disc tray, or it may fail to play the disc correctly.
Wipe any soiling off the playing surface with a soft cloth.
is a trademark.
• VCR Plus+ and PlusCode are registered trademarks of
Gemstar Development Corporation. The VCR Plus+
system is manufactured under license from Gemstar
Development Corporation.
“Licensed under one or more of U.S. Pat. 4,972,484,
5,214,678, 5,323,396, 5,530,655, 5,539,829, 5,544,247,
5,606,618, 5,610,985, 5,740,317, 5,777,992, 5,878,080
or 5,960,037.”
Cleaning the Pick Up Lens
• Never use commercially available cleaning discs. The
use of these discs can damage the lens.
• Request cleaning of the lens to the nearest Sharp
Authorized Service Center.
Warning of Dew Formation
• Dew may form on pick up lens or disc in the following
conditions:
• Immediately after a heater has been turned on.
• In a steamy or very humid room.
• When the Recorder is suddenly moved from a cold
environment to a warm one.
When dew forms:
It becomes difficult for the Recorder to read the signals
on the disc and prevents the Recorder from operating
properly.
To remove dew:
Take out the disc and leave the Recorder with the power
off untill the dew disappears. Using the Recorder with
dew formation may cause malfunction.
16
Cautions Regarding Recording
Æ Always Make Sure to Test Record First
• Make a test recording with a DVD-RW disc first before
making any important recordings to confirm whether
or not the recorded material is recorded properly.
Æ Compensation for Recordings
• In the event a recording is unable to be made due to a
problem with this Recorder or a disc, or due to an
external factor such as a power failure or condensation of moisture and so forth, the manufacturer is not
responsible for compensation for unrecorded contents
or incidental damages.
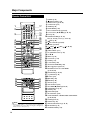
Major Components
Main Unit (Front)
1 2 3
6
To open the front door,
lay your finger on this
part and pull toward you.
1
2
3
4
S-VIDEO
RESET
VIDEO
L (MONO)-AUDIO-R
LINE IN 3
4
5
POWER (p. 25)
STANDBY indicator (p. 25)
Remote sensor (p. 19)
RESET (p. 88)
6
7
7
8 9 10 11 12 13
5
LINE IN 3 (p. 75)
• AUDIO Input jacks
• VIDEO Input jack
• S-VIDEO Input jack
Disc tray (p. 34)
OPEN/CLOSE (p. 34)
8 TIMER indicator (p. 38)
9 | PLAY (p. 47)
10 ■ STOP (pp. 35, 47)
11 STILL/PAUSE (pp. 35, 50)
12 CHANNEL "/'
13 E REC (p. 35)
Front Panel Display
12
3
4
5
8
1
2
3
4
5
6
7
6 7
9
8
9
10
10
Title indicator (p. 33)
Simple Recording Timer indicator (p. 35)
Chapter indicator (p. 33)
Disc Remaining Time indicator (p. 33)
AV AUTO REC indicator (p. 44)
DISC IN indicator
Æ) (p. 35)
Recording indicator (Æ
Play indicator (|) (p. 47)
Information Display (p. 33)
Recording Mode indicator (p. 35)
Tamper Proof indicator (p. 34)
Main Unit (Rear)
2
COMPONENT OUT
480i/
480p
IN
FROM
ANTENNA
IN 1
OUT 1
AUTO
REC
OUT 2
IN 2
LINE
R-AUDIO-L
VIDEO S-VIDEO
R-AUDIO-L
VIDEO
S-VIDEO LINE
1
OPTICAL
COAXIAL
VHF/UHF/CATV
DIGITAL AUDIO OUT
3
5
IN
FROM
ANTENNA
IN 1
OUT 1
AUTO
REC
OUT 2
IN 2
LINE
R-AUDIO-L
VIDEO S-VIDEO
2
1
R-AUDIO-L
3
PASS THROUGH
VIDEO
4
S-VIDEO LINE
7
4
COMPONENT OUT
480i/
480p
OPTICAL
COAXIAL
PASS THROUGH
VHF/UHF/CATV
6
LINE IN 1 (AUTO REC) (p. 44)
• AUDIO Input jacks
• VIDEO Input jack
• S-VIDEO Input jack
DIGITAL AUDIO OUT
8 9
5
6
7
8
9
LINE IN 2
• AUDIO Input jacks
• VIDEO Input jack
• S-VIDEO Input jack
LINE OUT 1 (p. 21)
• AUDIO Output jacks
• VIDEO Output jack
• S-VIDEO Output jack
LINE OUT 2 (p. 73)
• AUDIO Output jacks
• VIDEO Output jack
• S-VIDEO Output jack
IN FROM ANTENNA jack (antenna or
cable input) (p. 21)
PASS THROUGH jack (p. 21)
COMPONENT Video Output jacks (p. 22)
DIGITAL AUDIO Output OPTICAL terminal
(p. 73)
DIGITAL AUDIO Output COAXIAL jack
(p. 73)
17
Major Components
Remote Control Unit
1
2
3
4
5
6
7
8
9
10
11
12
13
14
15
16
17
18
19
20
21
22
23
24
25
26
27
28
29
30
31
32
33
34
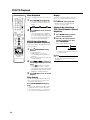
1 POWER (p. 25)
2 OPEN/CLOSE (p. 34)
3 Number buttons (pp. 20, 39)
4 CH DISPLAY (p. 32)
5 GAMMA (p. 54)
6 * START MENU (p. 28)
7 * REC LIST/DVD TITLE (pp. 47, 53)
8 * Cursor buttons (' /" /\ /|) (pp. 26, 28)
9 * EXIT (p. 28)
10*COLOR BUTTON (pp. 37, 47)
Blue (A), Red (B), Green (C), Yellow (D)
11
REV (p. 49)
12* STILL/PAUSE (pp. 35, 50)
13*■ STOP (pp. 35, 47)
14* F.ADV ,
SKIP
(pp. 49, 50)
15 Æ REC (p. 35)
16 TIMER PROG. (p. 37)
17 TV CONTROL buttons (p. 20)
18 CH " /'
19 DIRECT (p. 50)
20 VCR PLUS+ (p. 39)
21 ERASE (p. 39)
22 S. PICTURE (p. 54)
23 VIRTUAL SURROUND (p. 54)
24 INPUT/ Repeat (pp. 51, 75)
25 ORIGINAL/PLAY LIST / DVD MENU
(pp. 47, 53, 59)
35
36
37
38
39
40
41
42
43
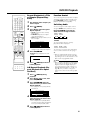
26*SET/ENTER (pp. 26, 28)
27*n RETURN (p. 28)
28*| PLAY (p. 47)
29* FWD (p. 49)
30* SLOW (p. 50)
31 REPLAY (p. 50)
32 SKIP SEARCH (p. 50)
33 REC MODE/ ZOOM (pp. 35, 52)
34 PROGRAM LIST (p. 43)
35 ANGLE (p. 52)
36 FUNCTION (p. 56)
37 AV AUTO REC (p. 44)
38 CHAPTER MARK / CONNECTION GUIDE/RESET
(pp. 26, 48, 65)
NOTE
• Buttons marked with “*” are made of luminous rubber for
easy visibility even in the dark. (The degree of brightness
will decrease as time passes.)
18
39 AUDIO (pp. 32, 51)
40 SUBTITLE (p. 52)
41 DISPLAY/BACKLIGHT (pp. 33, 38)
42 ON SCREEN (p. 32)
43 TAMPER PROOF (p. 34)
Major Components
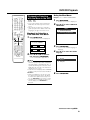
Loading the Batteries
1
•
•
•
•
•
While pressing Y down,
slide the battery cover in
the direction of the
arrow.
2
Load the batteries.
Load the two “AAA” size batteries (R-03,
UM/SUM-4) supplied with the remote
control unit. Make sure that the battery
poles
and
are positioned as
indicated.
3
Slide the battery cover
in the direction of the
arrow until it clicks.
NOTE
Do not subject the remote control unit to shock, water or excessive humidity.
The remote control unit may not function if the Recorder’s remote sensor is in direct sunlight or any other strong light.
Incorrect use of batteries may cause them to leak or burst. Read the battery warnings and use the batteries properly.
Do not mix old and new batteries, or mix different brands.
Remove the batteries if you will not use the remote control unit for an extended period of time.
Operating range of remote control
Remote sensor
About 30° About 30°
Front 22.96ft.
Remote control
unit
19
Major Components
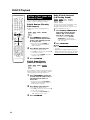
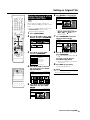
Operating a TV Using the
Remote Control
(Universal Remote Control)
The Universal Remote Control may operate the
basic functions of 21 different types of TVs.
To enter the Manufacturer’s Code for your TV,
follow the instructions below.
There is no guarantee that the universal
remote control will function with your TV.
Setting the
Manufacturer’s Code
1
2
3
Press POWER and CH ' of TV
CONTROL simultaneously.
Setting the Remote Control Code of the Remote
1
Point the remote control unit
towards the TV and then press
POWER of TV CONTROL.
Press and hold POWER and 2
together for more than 5 seconds.
2
Press POWER of this Recorder to
see if you can turn it on/off.
See the list below for the Manufacturer’s Code
and the buttons which work with each brand.
Buttons on the Remote
Brand
EMERSON
FISHER
FUNAI
GE
GOLDSTAR
HITACHI
JVC
MAGNAVOX
MITSUBISHI
PANASONIC
PIONEER
RCA
SAMSUNG
SANYO
SHARP
SONY
TECHNOL ACE
TOSHIBA
ZENITH
Code
19
17
06
07, 09
18
15
16
09
11
14
13, 21
03
07, 09
20
17
01
02
10
04
12
05
08
POWER
"
CH '/"
VOL /
×
×
×
×
×
×
×
×
×
×
×
×
×
×
×
×
×
×
×
×
×
×
INPUT
×
×
×
—
—
×
×
—
×
×
×
×
—
×
×
×
×
×
×
×
×
—
NOTE
• If the batteries in the remote control unit are
changed, the code settings must be reentered.
• Some brands have more than one code
listed above, due to changes in the codes.
In such cases, try another code to find the
code that operates your TV.
20
• Two types of remote control codes operate
this Recorder: RC-1 and RC-2. If you
operate this Recorder by remote control
along with another SHARP DVD recorder or
DVD player placed next to it simultaneously, switching the remote control code
(both the Recorder and remote control) to
one of the signals (RC-1 or RC-2) will let
you operate only with this Recorder.
• Make sure to set the Recorder and remote
control to the same remote code. You can
not operate the Recorder if they are not set
to the same code.
Enter the 2-digit Manufacturer’s
Code with the Number buttons
(Ex. 02-“0”, “2”) within 10 seconds after releasing POWER
and CH ' of TV CONTROL.
• If the TV turns on/off, setup was
successful. If not, repeat the procedure using another code.
Front display CHANNEL
' /"
"
panel
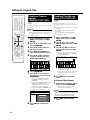
Setting the Remote
Control Code
Example: Setting the code to “RC-2”.
• If you cannot, go to step 3.
NOTE
• The remote control code of the remote
becomes “RC-1” when you change the
batteries.
Setting the Remote Control Code of the Recorder
3
Press POWER to turn off the
Recorder.
4
Press and hold CHANNEL" and
' on the Recorder together for
more than 5 seconds.
• Each time this operation is performed,
the code of the Recorder toggles
between “RC-1” and “RC-2”. The front
panel display changes as the code
changes.
• Press POWER on the remote control
to see if you can turn on/off the
Recorder.
If remote control does not
work
Press POWER on the remote control and
check the front panel display (RC-1 or RC-2).
Set the remote control code according to the
display and press POWER to see if you can
turn on/off the Recorder.
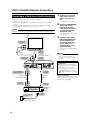
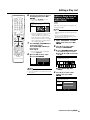
Basic Connection
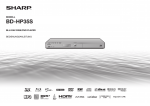
1
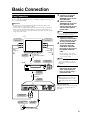
Easy Connection
The following connection is the basic connection to watch or record TV programs.
To use a cable box or satellite receiver, see “CATV or Satellite Receiver Connections” on pages 23 and 24.
Important!
• Be sure to turn off and unplug from the AC outlet this Recorder and all
equipment before connecting the cables.
• This Recorder is equipped with copy protection technology. The playback
picture from this Recorder will not appear correctly on your TV when you
connect this Recorder to your TV via a VCR (or your VCR via this Recorder)
using video/audio cables.
2
To video/audio
input jacks
4
Video/audio
cable
(commercially
available)
Video/audio
cable
(supplied)
4
5
Coaxial cable
(commercially available)
To antenna
input jack
3
To antenna
output jack
VCR
To video/audio
output jacks
2
Coaxial cable
(supplied)
IN 1
COMPONENT OUT
480i/
480p
OUT 1
AUTO
REC
OUT 2
IN 2
LINE
R-AUDIO-L
VIDEO S-VIDEO
R-AUDIO-L
VIDEO
S-VIDEO LINE
OPTICAL
COAXIAL
PASS THROUGH
VHF/UHF/CATV
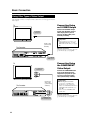
Connect the VIDEO/AUDIO
Output jacks on this Recorder to the video/audio
input jacks on your TV using
the supplied video/audio
cable.
NOTE
• To connect using S-video or
component cables, see “Using
Other Types of Video Output” on
page 22.
Connect the video/audio
output jacks on your VCR
to the video/audio input
jacks on your TV using a
video/audio cable.
Important!
• When using this connection, set
“PROGRESSIVE OUT” to “PROGRESSIVE SCAN OFF” (see page
80).
To PASS
THROUGH
IN
FROM
ANTENNA
Connect the antenna
output jack on your VCR to
antenna input jack on your
TV using a coaxial cable.
Be sure that the colors of the
jacks and plugs match up when
connecting the cable.
5
To antenna
input jack
Connect the PASS
THROUGH jack on the rear
of this Recorder to the
antenna input jack on your
VCR using the supplied
coaxial cable.
NOTE
• If you connect this Recorder directly
to your TV, skip the next step.
3
TV
To video/audio
input jacks
Connect the TV antenna
cable to the IN FROM
ANTENNA jack on the rear
of this Recorder.
DIGITAL AUDIO OUT
After the connection
Plug in the power cords of the TV and
VCR. Then go to “EZ Set Up” (see
page 25).
The Recorder
To VIDEO/AUDIO
Output jacks
To antenna/CATV
wall outlet
To IN FROM
ANTENNA
1
Antenna cable
(commercially available)
21
Basic Connection
Using Other Types of Video Output
In order to view clearer DVD images, it is recommended that you use a commercially available S-video or component video cable when connecting your TV to the
video output.
Connecting Using
an S-VIDEO Output
TV
Connect the S-VIDEO Output
jack on this Recorder to the Svideo input jack on your TV
using an S-video cable (commercially available).
To S-video
input jack
S-video cable
(commercially
available)
The Recorder
After the connection
Plug in the power cord of the TV. Then
go to “EZ Set Up” (see page 25).
IN
FROM
ANTENNA
IN 1
OUT 1
AUTO
REC
IN 2
LINE
OUT 2
R-AUDIO-L
VIDEO S-VIDEO
R-AUDIO-L
VIDEO
S-VIDEO LINE
Important!
• When using this connection, set
“PROGRESSIVE OUT” to “PROGRESSIVE SCAN OFF” (see page
80).
COMPONENT OUT
480i/
480p
OPTICAL
COAXIAL
PASS THROUGH
VHF/UHF/CATV
DIGITAL AUDIO OUT
To S-VIDEO
Output jack
TV
Connecting Using
the COMPONENT
Video Output
To component
input jacks
Component
video cable
(commercially
available)
The Recorder
IN
FROM
ANTENNA
IN 1
OUT 1
AUTO
REC
IN 2
LINE
OUT 2
R-AUDIO-L
VIDEO S-VIDEO
R-AUDIO-L
VIDEO
S-VIDEO LINE
Connect the COMPONENT OUT
jacks on this Recorder to the
component input jacks on your
TV using a component video
cable (commercially available).
COMPONENT OUT
480i/
480p
OPTICAL
COAXIAL
PASS THROUGH
VHF/UHF/CATV
DIGITAL AUDIO OUT
To COMPONENT
Video Output jacks
22
Important!
• When using this connection:
If your TV is compatible with
progressive-scan component
video, set “PROGRESSIVE OUT” to
“PROGRESSIVE SCAN ON” (see
page 80).
If not, set it to “PROGRESSIVE
SCAN OFF”.
After the connection
Plug in the power cord of the TV. Then
go to “EZ Set Up” (see page 25).
CATV or Satellite Receiver Connections
Connecting to a Cable Box or Satellite Receiver (1)
1
The following connection is the connection to a cable box or satellite receiver
when receiving only a few scrambled channels. When many or all the channels
are scrambled, see the connection on page 24.
Using this connection, you can:
• Record unscrambled CATV signals by selecting them on this Recorder.
• Record scrambled CATV signals by selecting them on the cable box or satellite
receiver and selecting the input used on the Recorder.
• Record a channel while you watch another.
• Record using the “AV AUTO REC” function (see page 44) when LINE IN 1 is
used for cable box/satellite receiver connection.
You can watch TV channels.
2
Connect the VIDEO/AUDIO
Output jacks on this
Recorder to the video/
audio input jacks on your
TV using the supplied
video/audio cable.
You can watch video played back
on the Recorder.
TV
To video/audio
input jacks
3
Video/audio
cable
(supplied)
2
Connect the TV antenna/
CATV cable and coaxial
cables as shown on the
left.
Connect the IN 1 (AUTO
REC) VIDEO/AUDIO jacks
on this Recorder to the
video/audio output jacks
on your cable box or
satellite receiver using a
video/audio cable.
You can record scrambled CATV
channels when using a cable box
or satellite receiver for decoding.
Coaxial cable
(commercially available)
To antenna
input jack
1
To antenna
output jack
To video/audio
output jacks
Cable box/
Satellite receiver
3
1
Coaxial cable
(supplied)
To PASS
THROUGH
The Recorder
OUT 1
OUT 2
IN 2
R-AUDIO-L
VIDEO S-VIDEO
R-AUDIO-L
VIDEO
S-VIDEO LINE
After the connection
Plug in the power cords of the TV and
cable box/satellite receiver. Then go to
“EZ Set Up” (see page 25).
COMPONENT OUT
480i/
480p
IN
FROM
ANTENNA
IN 1
AUTO
REC
LINE
Important!
• Connect this Recorder directly to
your TV and not via the cable box,
satellite receiver, or a VCR.
• When using this connection, set
“PROGRESSIVE OUT” to “PROGRESSIVE SCAN OFF” (see page
80).
To antenna
input jack
Video/audio cable
(commercially available)
NOTE
• These are standard video connections. You can use S-video or
component connections if they are
available.
OPTICAL
COAXIAL
PASS THROUGH
VHF/UHF/CATV
DIGITAL AUDIO OUT
To VIDEO/AUDIO
Output jacks
To IN 1 (AUTO REC)
VIDEO/AUDIO jacks
To antenna/CATV
wall outlet
To IN FROM
ANTENNA
1
Antenna cable
(commercially available)
23
CATV or Satellite Receiver Connections
Connecting to a Cable Box or Satellite Receiver (2)
1
The following connection is the connection to a cable box or satellite receiver
when many or all the channels received are scrambled.
Using this connection, you can:
• Record any CATV signals by selecting them on the cable box or satellite
receiver.
• Record using the “AV AUTO REC” function (see page 44) when LINE IN 1 is
used for cable box/satellite receiver connection.
You can watch TV channels.
2
NOTE
• With this connection, you cannot record a channel while you watch another.
3
To video/audio
input jacks
Connect the IN 1 (AUTO
REC) VIDEO/AUDIO jacks
on this Recorder to the
video/audio output jacks
on your cable box or
satellite receiver using a
video/audio cable.
You can record scrambled CATV
channels.
Video/audio
cable
(supplied)
To antenna
input jack
1
Coaxial cable
(commercially available)
To VIDEO/AUDIO
Output jacks
To PASS
THROUGH
COMPONENT OUT
480i/
480p
IN
FROM
ANTENNA
IN 1
OUT 1
AUTO
REC
IN 2
LINE
OUT 2
R-AUDIO-L
VIDEO S-VIDEO
R-AUDIO-L
VIDEO
S-VIDEO LINE
OPTICAL
COAXIAL
PASS THROUGH
VHF/UHF/CATV
DIGITAL AUDIO OUT
The Recorder
To IN FROM
ANTENNA
To IN 1 (AUTO REC)
VIDEO/AUDIO jacks
Video/audio cable
(commercially available)
Coaxial cable
(supplied)
3
1
To video/audio
output jacks
To antenna
output jack
Cable box/
Satellite
receiver
To antenna/CATV
wall outlet
To antenna
input jack
1
Antenna cable
(commercially available)
24
Connect the VIDEO/AUDIO
Output jacks on this
Recorder to the video/
audio input jacks on your
TV using the supplied
video/audio cable.
You can watch video played back
on the Recorder.
TV
2
Connect the TV antenna/
CATV cable and coaxial
cables as shown on the
left.
NOTE
• These are standard video connections. You can use S-video or
component connections if they are
available.
Important!
• Connect this Recorder directly to
your TV and not via the cable box,
satellite receiver, or a VCR.
• When using this connection, set
“PROGRESSIVE OUT” to “PROGRESSIVE SCAN OFF” (see page
80).
After the connection
Plug in the power cords of the TV and
cable box/satellite receiver. Then go to
“EZ Set Up” (see page 25).
EZ Set Up
Important! (Caution during EZ Set Up):
• Do not press POWER on the Recorder or remote control.
The EZ Set Up function automatically sets the tuner channels and clock when the
antenna cable is connected to the rear of the Recorder and the power plug is
then connected to an AC outlet.
POWER
Important!
When using a cable box:
• See “CATV or Satellite Receiver Connections” on pages 23 and 24.
• Leave power on the cable box turned on and select a channel that carries EDS signals.
1
2
3
Make sure that the antenna cable is connected. For connection configuration, refer to “Basic
Connection” on page 21.
Connect the power plug of the Recorder to an AC outlet.
The tuner channels and clock will automatically be set.
• This Recorder can monitor and use time-signals (EDS signals), which are provided by some TV stations, to automatically adjust the clock. This Recorder automatically searches EDS signals, but if you are in a hurry to use timer
recording or know the channel of the EDS signal carrier in your area, follow the procedure in “Auto Clock Setting”
(page 29) or “Manual Clock Setting” (page 30).
During Auto Channel Setting
During Auto Clock Setting
EZ Set Up complete
• Channel number is increasing.
NOTE
• If power is supplied to the Recorder before the cable is connected, EZ Set Up will not be able to preset the channels into
memory. If this occurs, press RESET inside the front door of the Recorder (see page 17). The EZ Set Up function will work
again.
• If the power is turned on during EZ Set Up, Auto Channel Setting will be interrupted and the tuner channels will not be
preset.
• Auto Clock Setting may take several minutes.
• If Auto Clock Setting is not completed within 30 minutes, there may be no channels with EDS signals. In this case, set the
clock manually. (See “Manual Clock Setting” on page 30.)
• If the antenna signal is weak, the Auto Clock Setting function may not operate.
• During initial channel setting, the channels are set into the AIR channel setting. To watch CATV channels, select “CATV” on
the “CHANNEL PRESET” screen. (See “Channel Setting” on page 31.)
Turning the Power On
After finishing EZ Set Up, press POWER on the
remote control or Recorder to turn on the power
of Recorder.
• When the Recorder power is turned on for the first time
after purchase, following EZ Set Up, the OSD LANGUAGE Select screen is displayed and the Connection
Guide function will then operate. Follow the procedure
shown on pages 26 and 27. From the second time on, the
OSD LANGUAGE Select screen will not appear after EZ
Set Up.
About the Power Supply
• Do not unplug the power cord immediately after you
plug it into the AC outlet (less than about 15 seconds
after plugging in). In very rare cases, this may cause
the memory to revert to its initial state, and all timer
programs will be erased. If this happens, EZ Setup will
be performed automatically.
To Turn the Power Off
Press POWER on the remote control or Recorder
to turn off power.
• The STANDBY indicator will light up.
• If you press POWER again immediately after turning off,
the Recorder may not turn on. If this happens, wait a
while and then turn on power again.
25
Connection Guide
Before using the Recorder, use the Connection Guide function for easy initial settings
regarding TV connection, on screen language, etc.
Selecting the TV Terminal
5
Preparation
• Turn on the power of TV.
• Switch TV input to the AV input used to
connect to the Recorder.
1
Press ' / " to select the type of
video input terminal on the
connected TV.
CONNECTION GUIDE
12 / 25 SAT 10 : 28 AM
SELECT TV TERMINAL
VIDEO
Press and hold CONNECTION
GUIDE for more than 2 seconds.
S-VIDEO
COMPONENT (Y, PB, PR)
Selecting the On-screen
Display Language
2
Press ' / " to select the language you want to use.
OSD LANGUAGE
12 / 25 SAT 10 : 28 AM
SELECT OSD LANGUAGE
6
• The “SELECT TV MODE” screen is
displayed.
Selecting the TV Screen
Aspect Ratio
7
ENGLISH
FRANÇAIS
Press SET/ENTER.
ESPAÑOL
Press ' / " to select the screen
aspect ratio of the connected TV.
CONNECTION GUIDE
12 / 25 SAT 10 : 28 AM
SELECT TV MODE
NOTE
• You can change On-Screen Display
Language afterward using the Connection
Guide function.
3
Press SET/ENTER.
• The “START TV SET UP” screen with
“OK” button is displayed.
CONNECTION GUIDE
12 / 25 SAT 10 : 28 AM
START TV SET UP.
SETUP CAN BE CHANGED AFTERWARD.
WIDE 16:9
NORMAL 4:3
8
Press SET/ENTER.
• The “ADVANCED SETTINGS”
Confirmation screen is displayed.
9
Press \ / | to select “YES” or
“NO”, then press SET/ENTER.
CONNECTION GUIDE
OK
4
Press SET/ENTER.
• The “SELECT TV TERMINAL” screen
is displayed.
NOTE
• Press RETURN to go back to the preceding screen during the setting procedure.
26
12 / 25 SAT 10 : 28 AM
ADVANCED SETTINGS
YES
NO
• When “YES” is selected
The “ADVANCED SETTINGS” screen
is displayed. Proceed to step 10.
• When “NO” is selected
The “INITIAL SETTING COMPLETE”
screen with “OK” button is displayed.
Proceed to step 17.
Connection Guide
14 Press ' / " to select “DIGITAL
Advanced Setting
10 Press ' / " to select “PROGRESSIVE OUT”, then press
SET/ENTER.
CONNECTION GUIDE
12 / 25 SAT 10 : 28 AM
IMAGE/SOUND SET LIST/ADV SET
TV MODE
[
NORMAL (4:3)
]
SET
PROGRESSIVE OUT
[
OFF
]
SET
DD OUTPUT LEVEL
[
NO
]
SET
DIGITAL AUDIO OUT
[
Dolby Digital
]
SET
• The “SETS PROGRESSIVE SCAN
OUTPUT” screen is displayed.
11 Press \ / | to select “PROGRESSIVE SCAN ON” or “PROGRESSIVE SCAN OFF”, then press
SET/ENTER.
AUDIO OUT”, then press SET/
ENTER.
CONNECTION GUIDE
TV MODE
[
NORMAL (4:3)
]
SET
PROGRESSIVE OUT
[
OFF
]
SET
DD OUTPUT LEVEL
[
NO
]
SET
DIGITAL AUDIO OUT
[
Dolby Digital
]
SET
• The “DIGITAL AUDIO OUT” setting
screen is displayed.
15 Press ' / " to select “PCM” or
“Dolby Digital”, then press SET/
ENTER.
CONNECTION GUIDE
PCM
SETS PROGRESSIVE SCAN OUTPUT
YOU CAN ENJOY CLEAR IMAGES WHEN PROGRESSIVE
TV IS PLAYED BACK VIA COMPONENT TERMINAL.
Dolby Digital
PROGRESSIVE SCAN OFF
PROGRESSIVE SCAN ON
• The display returns to the “IMAGE/
SOUND SET LIST/ADV SET” screen.
12 Press ' / " to select “DD OUT
PUT LEVEL”, then press SET/
ENTER.
CONNECTION GUIDE
12 / 25 SAT 10 : 28 AM
IMAGE/SOUND SET LIST/ADV SET
TV MODE
[
NORMAL (4:3)
]
SET
PROGRESSIVE OUT
[
OFF
]
SET
DD OUTPUT LEVEL
[
NO
]
SET
DIGITAL AUDIO OUT
[
Dolby Digital
]
SET
• The “Dolby Digital OUTPUT LEVEL
SETTING” screen is displayed.
13 Press \ / | to select “NO” or
“YES”, then press SET/ENTER.
CONNECTION GUIDE
12 / 25 SAT 10 : 28 AM
Dolby Digital OUTPUT LEVEL SETTING
12 / 25 SAT 10 : 28 AM
DIGITAL AUDIO OUT
12 / 25 SAT 10 : 28 AM
CONNECTION GUIDE
12 / 25 SAT 10 : 28 AM
IMAGE/SOUND SET LIST/ADV SET
CAN CONNECT TO NORMAL AUDIO
DEVICE (2CH).
SURROUND EFFECT BY CONNECTING
TO Dolby Digital COMPATIBLE
AUDIO DEVICE.
• The display returns to the “IMAGE/
SOUND SET LIST/ADV SET” screen.
16 Press ' / " to select “ADVANCED SET COMPLETE”, then
press SET/ENTER.
CONNECTION GUIDE
12 / 25 SAT 10 : 28 AM
IMAGE/SOUND SET LIST/ADV SET
TV MODE
[
NORMAL (4:3)
]
SET
PROGRESSIVE OUT
[
OFF
]
SET
DD OUTPUT LEVEL
[
NO
]
SET
DIGITAL AUDIO OUT
[
Dolby Digital
]
SET
ADVANCED SET COMPLETE
• The “INITIAL SETTING COMPLETE”
screen with “OK” button is displayed.
• For details of Function setting, see
pages 80 and 81.
NOTE
• Press RETURN to go back to the preceding screen during the setting procedure.
ADJUST AUDIO RANGE WHEN HARD TO HEAR DIALOG OF
Dolby Digital AUDIO PLAYBACK?
NO
YES
• The display returns to the “IMAGE/
SOUND SET LIST/ADV SET” screen.
Completing the Initial
Setting
17 Press SET/ENTER to end the
initial setting procedure.
12 / 25 SAT 10 : 28 AM
INITIAL SETTING COMPLETE
OK
27
About START MENU
About START MENU
With this Recorder, you can call up functions
like Playback, Edit and Other Settings from
the START MENU.
For details on operation procedures, see the
page explaining each option.
1
2
Basic START MENU
Operation
1
Press START MENU to display
the START MENU.
START MENU [REC LIST]
3
REC LIST
START MENU [REC LIST]
12 / 25 SAT 10 : 28 AM
12 / 25 SAT 10 : 28 AM
TIMER
PROGRAM/
CHECK
EDIT/
ERASE
DISPLAYS LIST OF RECORDED TITLES FOR PLAYBACK
REC LIST
EDIT/
ERASE
DISPLAYS LIST OF RECORDED TITLES FOR PLAYBACK
4
INITIALIZE/
FINALIZE
TIMER
PROGRAM/
CHECK
INITIALIZE/
FINALIZE
OTHER
SETTINGS
5
OTHER
SETTINGS
1 REC LIST
Playing back with REC LIST… page 47
Calling up various functions… page 48
2 EDIT/ERASE
Editing with the Original Title List/
Play List… page 60
Erasing all recorded titles… page 67
Erasing selected titles… page 67
Protecting titles from erasure… page 66
3 TIMER PROGRAM/CHECK
Programming with Easy Recording
Guide… page 37
Timer recording with VCR Plus+®… page 39
Timer recording by designating date and
time… page 41
Checking/Changing timer settings… page 43
4 INITIALIZE/FINALIZE
Initialization… page 84
Finalization… page 84
5 OTHER SETTINGS
Recording function settings… page 76
Viewing/Play setting… page 78
Adjustment… page 80
2
Press ' / " / \ / | to select an
option.
Example: When “OTHER SETTINGS” is
selected
START MENU[OTHER SETTINGS]
12 / 25 SAT 10 : 28 AM
REC LIST
EDIT/
ERASE
INITIALIZE/
FINALIZE
OTHER
SETTINGS
TIMER
PROGRAM/
CHECK
DISPLAYS SET ITEMS BEFORE REC/PLAYBACK
3
Press SET/ENTER to enter the
selected option.
• The screen for the selected option will
appear.
• Operate using ' / " / \ / | and SET/
ENTER.
OTHER SETTINGS[REC. FUNCTION]
REC. FUNCTION
VIEW/PLAY SETTING
12 / 25 SAT 10 : 28 AM
ADJUSTMENT
AUTO CHAPTER
EXACT RECORDING
REC. AUDIO FORMAT
EXTERNAL AUDIO
DUAL MONO REC. SET
MANUAL REC. MODE
SAP SETTING
4
Press START MENU or EXIT to
quit the START MENU.
• The “START MENU” screen will close,
and the screen will return to normal.
NOTE
• If you perform no operation, the “START
MENU” screen will disappear after about 1
minute.
• This operation will not work at the
following times:
During playback, during display of the REC
LIST, and at the erase screen.
• If you make a mistake in operation and
want to start over, press RETURN to go
back to the preceding screen.
28
Clock Setting
Auto Clock Setting
(If you know a channel that carries EDS
signals)
Important!
When using a cable box:
• See “CATV or Satellite Receiver Connections” on pages 23 and 24.
• Leave power on the cable box turned on
and select a channel that carries EDS
signals.
1
Press START MENU to display
the START MENU screen.
START MENU [REC LIST]
REC LIST
8
Press SET/ENTER to select “TIME
ZONE”.
9
Press \ / | to select the desired
time zone.
• If you want the Recorder to use the
time zone from which broadcasts with
EDS signals are received, choose
“AUTO”. If broadcasts with EDS
signals are received from a different
time zone than the one in which you
live, be sure to select your time zone.
OTHER SETTINGS[CLOCK SETTING]
12 / 25 SAT 10 : 28 AM
AUTO SETTING
ADJUST CLOCK USING EDS BROADCAST
MANUAL SETTING
SIGNAL.
SELECT THE EDS CH SETTING METHOD
EDS CH SET
AUTO
MANUAL
12 / 25 SAT 10 : 28 AM
SET THE TIME ZONE
TIME ZONE
TIMER
PROGRAM/
CHECK
EDIT/
ERASE
13
ATLANTIC
DISPLAYS LIST OF RECORDED TITLES FOR PLAYBACK
INITIALIZE/
FINALIZE
OTHER
SETTINGS
2
Press ' / " / \ / | to select
“OTHER SETTINGS”, then press
SET/ENTER.
3
Press \ / | to select “ADJUSTMENT”.
OTHER SETTINGS[ADJUSTMENT]
REC. FUNCTION
VIEW/PLAY SETTING
4
Press ' / " to select “CLOCK
SETTING”, then press SET/
ENTER.
5
Press ' / " to select “AUTO
SETTING”, then press SET/
ENTER.
OTHER SETTINGS[CLOCK SETTING]
12 / 25 SAT 10 : 28 AM
AUTO SETTING
ADJUST CLOCK USING EDS BROADCAST
MANUAL SETTING
SIGNAL.
SELECT THE EDS CH SETTING METHOD
EDS CH SET
AUTO
Press ' / " to set EDS CH SET
mode to “MANUAL”.
• If you do not know which channel
carries EDS signals, then select
“AUTO”.
7
Recorder.
• The Auto Clock Setting function will
automatically set the clock.
12 / 25 SAT 10 : 28 AM
ADJUSTMENT
CLOCK SETTING
VIDEO/AUDIO SETTING
CHANNEL PRESET
OPTION SETTING
6
10 Press SET/ENTER, then EXIT.
11 Press POWER to turn off the
Press \ / | to select a channel
that carries EDS signals.
NOTE
• If the “EDS CH SET” mode is set to
“MANUAL” in step 6 and a channel that
does not carry EDS signals is selected in
step 7, the Auto Clock Setting function will
not operate.
• In step 7, the number of selectable
channels depends on the mode setting on
the “CHANNEL PRESET” screen. See the
table below.
AIR/CATV
AIR
CATV
Selectable channels
02
01
03
02
04
03
68
124
69
125
02
01
• As you press \ / | in step 9, the TIME
ZONE choices change as follows.
AUTO ATLANTIC
HAWAII ALASKA
EASTERN CENTRAL
PACIFIC MOUNTAIN
• If you press RETURN, START MENU or
EXIT before pressing SET/ENTER in step
10, the data will not be stored.
• The number of channels that can be
selected depends on the mode
setting on the “CHANNEL PRESET”
screen. See NOTE.
When using a cable box:
• Input the output channel (02, 03, or
04) of the cable box.
29
Clock Setting
Manual Clock Setting
1
Press START MENU to display
the START MENU screen.
2
Press ' / " / \ / | to select
“OTHER SETTINGS”, then press
SET/ENTER.
3
Press \ / | to select “ADJUSTMENT”.
4
Press ' / " to select “CLOCK
SETTING”, then press SET/
ENTER.
5
Press ' / " to select “MANUAL
SETTING”, then press SET/
ENTER.
OTHER SETTINGS[CLOCK SETTING]
AUTO SETTING
SET CLOCK MANUALLY
MANUAL SETTING
TIME
Automatic Daylight
Saving-Time (DST)
Adjustment
This Recorder is equipped with an internal
Automatic Daylight Saving-Time Adjustment
function. In spring (first Sunday in April) and
autumn (last Sunday in October), the time is
adjusted as shown below. This function has
been preset to “ON” at the factory. Set the
DST mode in the “CLOCK SETTING” screen.
Spring
Programmed timer recording set within this
time frame (2:00 AM to 3:00 AM) will not be
carried out.
First Sunday in April (DST is ON)
1:00 AM
2:00 AM
12 / 25 SAT 10 : 28 AM
DATE
10 : 28 AM 12 / 25 [ SAT ]
YEAR
DST
2004
ON
The clock is automatically
advanced 1 hour.
3:00 AM
4:00 AM
SET
6
7
Press \ / | to select “TIME” and
press ' / " to set time.
Select and set “DATE”, “YEAR”
and “DST” in the same manner as
in step 6.
Autumn
Because there will be two time frames from
1:00 AM to 2:00 AM, a timer program set
between these time frames will be influenced
by the time change.
Last Sunday in October (DST is ON)
• See “Automatic Daylight Saving-Time
(DST) Adjustment”.
1:00 AM
The clock is automatically
set back 1 hour.
Example: Dec. 25, 2004, DST: ON
OTHER SETTINGS[CLOCK SETTING]
AUTO SETTING
SET CLOCK MANUALLY
MANUAL SETTING
TIME
12 / 25 SAT 10 : 28 AM
1:00 AM
DATE
10 : 28 AM 12 / 25 [ SAT ]
YEAR
DST
2004
ON
SET
8
If the data is correct, press | to
select “SET”, then press SET/
ENTER to complete clock setting.
Press EXIT to return to normal
screen.
• The screen returns to normal.
NOTE
• If you press RETURN, START MENU or
EXIT before pressing SET/ENTER in step
8, the data will not be stored.
30
2:00 AM
2:00 AM
NOTE
• If the timer recording program is affected
by the DST time change, check your TV
listing and find out when it reflects the time
change. Some TV listings will indicate the
time change in the same manner as is
programmed in this Recorder while others
do not show the time change until the next
morning. In that case, when programming
a timer recording, use the “CLOCK
SETTING” screen to set the DST mode to
OFF so the time change will not be carried
out.
Channel Setting
Channel Setting
Adding/Erasing Channel
Memory
This Recorder can receive a maximum of 181
channels as shown below by presetting the
channels into memory.
(VHF: 2 to 13, UHF: 14 to 69, CATV: 1 to 125)
Use this function to manually add or erase
channels to/from the memory.
1
Press START MENU to display
the START MENU screen.
1
2
Press ' / " / \ / | to select
“OTHER SETTINGS”, then press
SET/ENTER.
2
Press \ / | to select “ADJUSTMENT”.
Press START MENU to display
the START MENU screen.
3
Press ' / " / \ / | to select
“OTHER SETTINGS”, then press
SET/ENTER.
4
Press \ / | to select “ADJUSTMENT”.
3
OTHER SETTINGS[ADJUSTMENT]
REC. FUNCTION
VIEW/PLAY SETTING
12 / 25 SAT 10 : 28 AM
ADJUSTMENT
CLOCK SETTING
VIDEO/AUDIO SETTING
CHANNEL PRESET
OPTION SETTING
Select the channel to be added
with the Number buttons, or the
channel to be erased with the CH
' / " or Number buttons.
4
Press ' / " to select “CHANNEL
PRESET”, then press SET/
ENTER.
5
5
Press \ / | to select “AIR” or
“CATV”, then press SET/ENTER.
Press ' / " to select “CHANNEL
PRESET”, then press SET/
ENTER.
6
Press ' / " / \ / | to select
“MANUAL”, then press SET/
ENTER.
Example: AIR
• To watch CATV after EZ Set Up,
select “CATV”, then press SET/
ENTER.
6
OTHER SETTINGS[CHANNEL PRESET]
Press \ / | to select “AUTO”, then
press SET/ENTER.
OTHER SETTINGS[CHANNEL PRESET]
12 / 25 SAT 10 : 28 AM
SELECT RECEPTION TYPE
AIR
12 / 25 SAT 10 : 28 AM
CATV
SELECT CHANNEL PRESET METHOD
AUTO
MANUAL
SELECT RECEPTION TYPE
AIR
CATV
7
SELECT CHANNEL PRESET METHOD
AUTO
7
MANUAL
Auto Channel Preset will start.
Press \ / | to select “ADD” if you
want to add the channel memory,
or “ERASE” if you want to erase
the channel memory.
[ADD]
• The channel display will count up,
and, when finished, the screen
returns to normal.
OTHER SETTINGS[MANUAL CHANNEL SETUP]
12 / 25 SAT 10 : 28 AM
3 ADD
NOTE
• If the power is interrupted for more than
1 hour, AIR/CATV selection must be set
again.
• Auto Channel Preset will be interrupted if
START MENU is pressed before the screen
returns to normal.
\/|
[ERASE]
OTHER SETTINGS [MANUAL CHANNEL SETUP]
12 / 25 SAT 10 : 28 AM
3 ERASE
8
Press EXIT to return to normal
screen.
31
Display Information
Content of TV Screen
Display
When the power is turned on or the channel is
switched.
3
STEREO L R
SAP
1 2 34
SAP ON
Checking Remaining Time
of DVD and Number of
Titles
1
5
Press ON SCREEN (under the
cover).
• The DVD information screen is
displayed.
Display automatically
disappears in 3 seconds.
2
3
4
1 Channel currently selected
2 Audio type
Stereo: STEREO
3 Audio selected by AUDIO button
4 SAP signal reception
5 SAP mode display
Monitor Output when
Receiving a Stereo or SAP
Broadcast
When receiving a stereo or SAP broadcast,
press AUDIO to change the audio output
mode to select Monitor Output. See the table
of SAP on page 77 for details.
NOTE
• When the signal is weak (hard to hear) in a
stereo broadcast, press AUDIO to turn off
“L R” display on the TV screen and change
the audio output mode to MONO.
Checking the Channel
1
Press CH DISPLAY while viewing a live program (DVD stopping)
or recording (DVD recording).
• Channel information is displayed.
3
STEREO L R
SAP
SAP ON
• Each time you press CH DISPLAY,
the channel information display is
turned on/off.
• The channel information display will
automatically turn off in 1 minute.
5
6
DV D - R W
VR OR IG I N AL
F I NE REMAIN 0h30m
1 / 33
4/ 6
00 : 00 : 28
TI TL E RE PE AT
1
7
1 Disc type, recording format, original title
playback/Play List playback indicators
2 Mode display
• Playback:
• Recording:
• Stop:
3 Recording mode and remaining
(recordable) time
• “FINALIZED” indicator when a
finalized disc is played back.
4 Current title number/Total number of
titles
• Total number of titles (Stop mode)
• Title number currently played back
(Playback mode)
• Title number currently recorded
(Recording mode)
5 Current chapter number/Total number of
chapters
• Total number of chapters (Stop mode)
• Chapter number currently played
back (Playback mode)
• Chapter number currently recorded
(Recording mode)
6 Counter
7 Repeat Playback indicator
REC
2
Press ON SCREEN (under the
cover) again.
DVD-RW
VR ORIGINAL
00:00:51
3
• The screen changes to the counter
display.
Press ON SCREEN (under the
cover) again.
• Display is turned off.
NOTE
• The DVD information screen (step 1) will
automatically disappear in 1 minute.
• The counter display (step 2) will not
disappear automatically. Press ON
SCREEN (under the cover) to turn it off.
32
Display Information
Switching Front Panel
Display
Front panel display
1
Turn the power on.
• Channel display (when watching TV)
• Counter display (during playback/
recording)
Hour
2
Minute Second
Press DISPLAY (under the
cover).
• Remaining time display (when
watching TV)
Hour
Minute
• Current title number and chapter
number (during playback)
Current title Current chapter
• Channel currently recorded (during
recording)
3
Press DISPLAY (under the
cover) again.
• The screen returns to the display in
step 1.
33
Recording to DVD
Checking Remaining Time
and Other Information
Press ON SCREEN (under the cover) during
DVD playback or recording.
• Disc capacity and the number of recorded
titles, etc. are displayed. It is recommended to confirm before recording.
DVD-RW
VR OR IG IN AL
F I NE REMAIN 0h30m
2
10
00 : 00 : 00
Loading Disc
1
Press POWER to turn the power
on.
2
Press OPEN/CLOSE on the
Recorder to open the disc tray.
OPEN/CLOSE
Disc capacity
Number of titles
Number of chapters
3
Load disc on the disc tray.
• “REMAINING 0h0m” will be displayed
when an unrecordable disc is set.
NOTE
• Disc remaining time display is approximate
measure of disc capacity. There may be
space left in disc capacity after recording.
(Remaining time during recording and after
recording might not be the same.)
• Insert the disc with the label face up.
• In case of disc recorded on both
sides, face the side you want to
record down.
Not Enough Disc Capacity
• Exact Recording (page 76)
Exact recording functions when the
selected recording mode is not appropriate
to fit the program to the disc when you
timer record.
Cutting TV Commercials
(page 60)
• You cannot cut scenes when you record
programs by Video mode to DVD-RW or
DVD-R.
Tamper Proof
• You can set Tamper Proof to prevent
operations by mistake during recording or
timer recording.
1 Press and hold TAMPER PROOF (ON
SCREEN and DISPLAY together) for
more than 2 seconds.
2 Each time you perform this operation,
the function is activated or deactivated.
• If you try to operate the Recorder while
Tamper Proof is set, “
” blinks in the front
display panel and tells you that Tamper
Proof is set.
4
Press OPEN/CLOSE to close the
disc tray.
Direct Recording to DVD
DVD-RW
DVD-RW
VR MODE
VIDEO MODE
DVD-R
Explained below is the standard procedure
for recording the program being viewed onto
DVD.
• You can create a maximum of 99 original
titles.
• Record in VR mode when you want to edit
later. Edit functions will be limited when you
record in Video mode.
Preparation for Direct Recording
• When you record SAP broadcast, set “SAP
SETTING” to “ON” (see page 76).
1
1 Turn on the power of TV.
• When the recorder is connected to
other audio equipment, turn them on
as well.
2 Set the TV input mode to the
mode the recorder is set to.
2
3
Press POWER to turn on the
recorder.
Set a DVD-RW or DVD-R disc.
• When a new DVD-RW disc not
initialized yet is set, VR mode
initializing starts automatically. When
initializing is over, you can start
recording.
• When you want to re-initialize in Video
mode, select “VIDEO MODE INIT.”
screen (page 84).
• When you want to initialize in Video
mode from the beginning, select
“AUTO INITIALIZE” screen (page 84).
34
Recording to DVD
4
Press Number buttons or CHANNEL ' / " to select the channel
to record.
5
Press REC MODE to select the
desired recording mode.
• The recording mode changes as
shown below each time the button is
pressed.
FINE
SP
LP
EP
MNgg
• Recording mode set when “MNgg”
is selected is the recording mode set
on the “MANUAL REC. MODE” Select
screen (page 36).
6
Press ● REC.
• Recording begins and REC icon is
displayed.
• The REC indicator on the front of the
Recorder is lit red during recording.
DVD-RW
VR OR I G I N AL
F I NE REMAIN 1h0m
1/1
1/1
00 : 00 : 01
7
REC
Press STILL/PAUSE to pause
recording.
• Pause will not function during timer
recording.
• The REC indicator on the front of the
Recorder blinks during Recording
Pause mode.
8
Press STILL/PAUSE to resume
recording.
9
Press ■STOP to stop recording.
• “DATA IS BEING RECORDED TO
DISC.” displays on TV screen and
recording stops.
• Timer recording cannot be performed
during direct recording. To perform timer
recording, stop direct recording before the
preset start time for timer recording.
You may not be able to record on disc
edited by other recorder.
• If a disc edited by other DVD recorder has
more than 999 chapter marks, it cannot be
edited (or recorded) with this Recorder.
• If a disc edited by other DVD recorder has
added or erased scenes 51 times or more
per title or the disc is protected, it cannot
be edited (or recorded) with this Recorder.
About Recording to DVD in Video Mode
• In case you are recording to DVD in Video
mode and recording stops due to power
failure etc., recorded contents a few
minutes before the stop may not be
recorded.
Inserting Chapter Marks
Manually during Recording
Press CHAPTER MARK (under the cover).
• “RECORDED CHAPTER MARK.” displays
and chapter mark is recorded.
• You can only record chapter marks
manually when recording to DVD-RW (VR
mode).
• You cannot record chapter marks manually
when recording to DVD-RW (Video mode)
or DVD-R.
Setting the Record End
Time during Direct
Recording (Simple
Recording Timer)
DVD-RW
DVD-RW
VR MODE
VIDEO MODE
1
Press Æ REC on the remote
control during recording.
• The Record End Time Setting screen
is displayed.
2
Press ' / " to set the end time.
• The end time can be set in units of 15
minutes.
• Total recording time cannot exceed 6
hours so the end time has to be set
accordingly.
• Press EXIT to stop setting midway
through.
• Stop recording first when you take out
the disc.
NOTE
• Press ON SCREEN (under the cover) to
confirm remaining time of DVD or check
the counter display during recording.
• You cannot record programs which prohibit
recording.
• Recording either stops or pauses automatically in the following cases.
—Program which prohibits recording is on
air.
—Unable to continue recording for some
reason.
DVD-R
SET STOP TIME.
STOP TIME 10 : 30 PM
SELECT
3
ENTER
ENTER
Press SET/ENTER.
• The record end time is set, and the
clock mark lights up on the front
display panel.
35
Setting Recording Mode
LP
DVD-RW/R Recording Mode
and Recording Time
Setting the Manual
Recording Mode (MN)
DVD-RW
DVD-RW
DVD-RW
DVD-RW
VR MODE
VIDEO MODE
VR MODE
VIDEO MODE
DVD-R
Recording Recording
Recording Recording
Mode Time (approx.)
Mode Time (approx.)
MN1
360 Min EP MN1
360 Min
MN2
345 Min
MN2
345 Min
MN3
330 Min
MN3
330 Min
MN4
315 Min
MN4
315 Min
MN5
300 Min
MN5
300 Min
MN6
285 Min
MN6
285 Min
MN7
270 Min
MN7
270 Min
MN8
255 Min
MN8
255 Min
MN9
240 Min LP MN9
240 Min
MN10 230 Min
MN10 230 Min
MN11 220 Min
MN11 220 Min
MN12 210 Min
MN12 210 Min
MN13 200 Min
MN13 200 Min
MN14 190 Min
MN14 190 Min
MN15 180 Min
MN15 180 Min
MN16 170 Min
MN16 170 Min
MN17 160 Min
MN17 160 Min
MN18 150 Min
MN18 150 Min
MN19 140 Min
MN19 140 Min
MN20 130 Min
MN20 130 Min
MN21 120 Min SP MN21 120 Min
MN22 110 Min
MN22 110 Min
MN23 105 Min
MN23 105 Min
MN24 100 Min
MN24 100 Min
MN25
95 Min
MN25
95 Min
MN26
90 Min
MN26
90 Min
MN27
85 Min
MN27
85 Min
MN28
80 Min
MN28
80 Min
MN29
75 Min
MN29
75 Min
MN30
70 Min
MN30
70 Min
MN31
65 Min
MN31
65 Min
MN32
60 Min FINE MN32
60 Min
DVD-R
You can set the manual recording mode
which is used when you select “MNXX” with
REC MODE.
1
Press START MENU to display
the START MENU screen.
START MENU [REC LIST]
12 / 25 SAT 10 : 28 AM
DISPLAYS LIST OF RECORDED TITLES FOR PLAYBACK
INITIALIZE/
FINALIZE
OTHER
SETTINGS
2
Press ' / " / \ / | to select
“OTHER SETTINGS”, then press
SET/ENTER.
3
Press \ / | to select “REC. FUNCTION”.
4
Press ' / " to select “MANUAL
REC. MODE”, then press SET/
ENTER.
OTHER SETTINGS[REC. FUNCTION ]
REC. FUNCTION
VIEW/PLAY SETTING
NOTE
• Higher recording mode means higher
picture quality and lower recording mode
means longer recording time.
• Picture quality of recorded content
changes distinctively if the recording mode
changes from the recording modes right
below the bold lines in left chart and
recording modes right above the bold
lines. The positions of the bold lines differ
between DVD-RW (VR Mode) and DVDRW/R (Video Mode).
• With MN22-32, VBR recording has a large
effect, so the actual recording time will be
longer.
36
12 / 25 SAT 10 : 28 AM
ADJUSTMENT
AUTO CHAPTER
EXACT RECORDING
REC . AUDIO FORMAT
EXTERNAL AUDIO
DUAL MONO REC SETTING
MANUAL REC. MODE
SAP SETTING
5
Press \ / | to select the desired
recording mode, then press SET/
ENTER.
• Refer to table on left column.
OTHER SETTINGS[MANUAL REC. MODE]
12 / 25 SAT 10 : 28 AM
ABLE TO SELECT 1 OF 32 LEVELS OF PICTURE QUALITY IN
MANUAL REC. MODE WHEN USING RECORDING MODE SWITCH.
EP
LP
SP
FINE
CURRENT MODE : MN 21
• DVD recording time is approximate
measure using 4.7GB disc.
• This does not guarantee the length of
recording time. Actual recording time may
be shorter than that indicated above
depending on image quality and other
aspects.
TIMER
PROGRAM/
CHECK
EDIT/
ERASE
REC LIST
( : 3 Mbps )
REMAINING TIME : 1h26m
NOTE
When playing back a DVD-RW/R disc
(Video Mode) recorded with the recorder
using a DVD player.
• When you play back a disc recorded with
the manual mode of the recorder using a
DVD player, it may not be able to play back
depending on the model (some particular
modes cannot be played back).
Timer Recording
Easy Recording Guide
DVD-RW
DVD-RW
VR MODE
VIDEO MODE
DVD-R
• This lets you set the timer recording
schedule for the next 7 days simply by
filling in the pertinent blocks in the onscreen time schedule.
• You can set timer recording for up to a
maximum of 8 programs. (This includes
VCR Plus+ and Timer Recording.)
Preparation to Use Easy Recording Guide
1 Check that the clock is displaying the
correct time.
2 Preset the channels.
3 When you record SAP broadcast, set
“SAP SETTING” to “ON” (see page 76).
4 When recording from an external
equipment such as a CATV box or
satellite receiver, turn on the power of the
external equipment.
To set a timer program for a
day other than the current
day (within a week)
1 Press Green (C) (DATE/TIME Select).
2 Press \ / | to select the date.
• If you select a date and press SET/
ENTER, only date will be set, and
previous screen appears.
3 Press Yellow (D) (TIME), then press \ / |
to select the time, and press SET/
ENTER.
• Proceed to step 3.
DATE
0 AM
3
2
4
9
ENTER
ENTER
0 PM
3
n
ENTER
6
1 SAT
9
RETURN
TIME
Press ' / " to select the channel.
12 / 25 SAT 10 : 28 AM
30 THU 31 FRI
1 SAT
11
12
LINE IN 2 (EXT.2)
Press \ / | to select the start
time, then press SET/ENTER.
• The start time can be selected in 15
minute units. If the desired 15 minute
time frame will start within 3 minutes,
that time frame cannot be selected.
Example: If you select 10:30 at 10:28,
the start time will switch to 10:45.
EASY REC GUIDE
12 / 25 SAT 10 : 28 AM
TODAY 26 SUN 27 MON 28 TUE 29 WED 30 THU 30 THU 1 SAT
CHANNEL
10 AM
11
12
10
20
30
33
45
40
50
60
12 / 25 SAT 10 : 28 AM
SELECT AN ITEM BELOW FOR TIMER RECORDING OPERATION.
EASY REC. GUIDE
VCR Plus+
➡
• If you press Yellow (D) (TIMER LIST),
you can check and change timer
settings which have already been
made. To make a change, choose the
timer program you want to change
with ' / " and press SET/ENTER,
and then perform step 3 (page 41) to
step 13 (page 42).
6
LINE IN 3 (EXT.3)
• The “EASY REC. GUIDE” screen (time
schedule) is displayed.
EASY REC. GUIDE
12 / 25 SAT 10 : 28 AM
TODAY 26 SUN 27 MON 28 TUE 29 WED 30 THU 31 FRI 1 SAT
CHANNEL
10 AM
11
12
10
45
20
30
33
40
ENTER
• The channel can be selected as
follows.
TV channels LINE IN 1 (EXT.1)
Press ' / " to select “EASY REC.
GUIDE”, then press SET/ENTER.
TIMR PROG/CHCK[EASY REC. GUIDE]
ENTER
EASY REC. GUIDE
TODAY 26 SUN 27 MON 28 TUE 29 WED
CHANNEL
10 AM
10
20
30
45
33
40
50
60
Press TIMER PROG. to display
the TIMER PROGRAM/CHECK
screen.
• You can select the recording method
on this screen.
• You can also start timer recording by
selecting “TIMER PROGRAM/
CHECK” in the START MENU.
3
SELECT
RETURN
Important!
• When setting the timer recording, make
sure recordable disc is loaded.
1
SELECT DATE
TODAY 26 SUN 27 MON 28 TUE 29 WED 30 THU 31 FRI
• You cannot select a time frame which
is already scheduled.
5
Press \ / | to select the stop
time, then press SET/ENTER.
• The stop time can be set in 15 minute
units (up to a maximum of 6 hours in
the future).
EASY REC GUIDE
12 / 25 SAT 10 : 28 AM
TODAY 26 SUN 27 MON 28 TUE 29 WED 30 THU 31 FRI
1 SAT
CHANNEL
10 AM
11
12
10
20
30
33
45
30
40
50
60
Continued on Next Page |||
37
Timer Recording
6
Press \ / | to select “REC.
MODE”, then press SET/ENTER.
COMPLETE
SELECT
DAILY
REC. MODE
ENTER
n
ENTER
WEEKLY
RETURN
ONCE
• Press \ / | to select the item you
want to correct such as the start/stop
time, then press ' / " to correct.
(For details refer to page 40.)
• If you complete timer recording
setting less than 3 minutes before it
starts, timer recording start time
column will stay as selected. Reset
the timer recording start time at least
3 minutes after the present time.
7
Press ' / " to select the recording mode, then press SET/
ENTER.
TIMER PROGRAM
12/25 SAT 10:45 AM ~ 11:30 AM CH 33
12 / 25 SAT 10 : 28 AM
SELECT THE RECORDING MODE
HIGH QUALITY
FINE
SP
STANDARD
LP
2X
3X
EP
MANUAL SETTING (MN)
ABLE TO MANUALLY SELECT
1 OF 32 LEVELS.
• If there is not enough empty space
(time), a message is displayed.
Select the recording mode again.
When “MANUAL SETTING (MN)” is
selected:
• Select the recording mode with \ / |, then
press SET/ENTER. (The recording mode
can be selected from 32 levels.)
8
Confirm the setting of timer
program, press \ to select
“COMPLETE”, then press SET/
ENTER.
COMPLETE
SELECT
DAILY
REC. MODE
ENTER
WEEKLY
ENTER
n
RETURN
ONCE
• “TIMER PROGRAM LIST” screen is
displayed.
• The TIMER indicator on the front of
the Recorder lights up and timer
programming is completed.
38
9
Confirm the programs on the list
and then press SET/ENTER.
• The “TIMER PROGRAM/CHECK”
screen is displayed. If you continue
timer programming using Easy
Recording Guide, repeat from step 2.
10 Press START MENU or EXIT to
complete EASY REC. GUIDE timer
setting.
• Timer recording will function even
after you turn the power off.
NOTE
• Timer recording will not start during disc
playback.
• When the power is off while recording timer
is set, front display panel will light up once
timer recording starts. If you want to turn off
the light, set “LCD BACKLIGHT REC.”
(page 82) to “YES”.
You can also turn off the light by pressing
BACK LIGHT on the remote control (under
the cover) for more than 2 seconds.
Convenient Functions When Recording
Exact Recording (page 76)
• If you set EXACT RECORDING to “YES”,
the Recorder will automatically adjust the
recording mode of timer recording so the
recorded programs will fit into one disc.
To check, change or cancel
timer settings
• See page 43.
To stop recording while
timer recording is in
progress
• If you press ■STOP, “TIMER RECORDING IS IN PROGRESS. IF YOU PRESS
THE STOP BUTTON ONCE MORE, TIMER
RECORDING CANCELS AND RECORDING STOPS.” will appear on the screen.
Even that message goes out of the
screen, pressing ■STOP one more time
will stop the recording.
Timer Recording
Timer Recording with
VCR Plus+® System
DVD-RW
DVD-RW
VR MODE
VIDEO MODE
4
• When recording a program on a
channel for the first time, be sure to
enter the correct channel number in
this step, otherwise the PlusCode
number will not be successfully
decoded.
DVD-R
• The VCR Plus+® System allows you to
program your Recorder for timer recording
simply by inputting the PlusCode number.
• The PlusCode numbers are listed in most
newspapers, television guides, and local
CATV listings. Simply by inputting this
PlusCode number, you can program your
Recorder for timer recording, eliminating
the need to input program start time, stop
time, channel, date and other information
usually necessary for timer recording.
• Up to 8 timer programs can be stored.
(This includes Easy Recording Guide and
Timer Program.)
Preparation to Use VCR Plus+ System
1 Check that the clock is displaying the
correct time.
2 Preset the channels.
3 When you record SAP broadcast, set
“SAP SETTING” to “ON” (see page 76).
4 When recording from an external
equipment such as a CATV box or
satellite receiver, turn on the power of the
external equipment.
Press \ / | to select “REC.
MODE”, then press SET/ENTER.
COMPLETE
SELECT
DAILY
• If you press VCR PLUS+ (button)
when the clock has not been set, the
“CLOCK SETTING” screen will
appear.
2
Press Number buttons to enter
the PlusCode number.
VCR Plus+ system
12 / 25 SAT 10 : 28 AM
PRESS NUM KEYS TO ENTER PlusCode No.
1
2
3
4
5
–
–
–
5
Press ' / " to select the recording mode, then press SET/
ENTER.
SELECT THE RECORDING MODE
FINE
( QUALITY
HIGH
* * Mbps)
SP
( * * Mbps)
STANDARD
2X ( * * Mbps)
LP
MANUAL SETTING (MN)
• Press ERASE if you make a mistake
in the Plus Code number. Or Press \ /
| to select “ERASE”, then press SET/
ENTER. Each time you press the
button, one digit will be erased.
• Press VCR PLUS+ (button) to cancel
the entire number.
3
3X ( * * Mbps)
ABLE TO MANUALLY SELECT
1 OF 32 LEVELS.
REMAIN TIME: FINE 0h47m
• If there is not enough empty space
(time), a message is displayed.
Select the recording mode again.
When “MANUAL SETTING (MN)” is
selected:
• Select recording mode with \ / |, then
press SET/ENTER. (The recording mode
can be selected from 32 levels.)
6
Confirm the setting of timer
program, press \ to select
“COMPLETE”, then press SET/
ENTER.
–
ERASE
12 / 25 SAT 10 : 28 AM
TIMER PROGRAM
12/26 SUN 9:30 PM ~ 10:00 PM CH 1
COMPLETE
SELECT
SET
RETURN
ONCE
• Press \ / | to select the item you
want to correct such as the start/stop
time, then press ' / " to correct.
(For details refer to page 40.)
• If you complete timer recording
setting less than 3 minutes before it
starts, timer recording start time
column will stay as selected. Reset
the timer recording start time at least
3 minutes after the present time.
Important!
• When setting the timer recording, make
sure recordable disc is loaded.
Press VCR PLUS+ (button) to
display the VCR Plus+ Setting
screen.
n
ENTER
WEEKLY
EP
1
REC. MODE
ENTER
DAILY
REC. MODE
ENTER
WEEKLY
ENTER
n
RETURN
ONCE
• “TIMER PROGRAM LIST” screen is
displayed.
• The TIMER indicator on the front of
the Recorder lights up and timer
programming is completed.
Press \ / | to select “SET”, then
press SET/ENTER.
• The timer recording details such as
date, start time, end time and channel
will be displayed.
Continued on Next Page |||
39
Timer Recording
7
Confirm the programs on the list
and then press SET/ENTER.
• Timer Setting will be completed and
the recording method selection
screen will appear. To continue timer
recording with VCR Plus+, press SET/
ENTER and follow the same procedure from step 2.
8
Press EXIT to complete VCR
Plus+ timer setting.
NOTE
Timer Recording from an External Equipment (e.g. CATV box) using VCR Plus+
System
• Press \ / | in step 4 to select “AIR/CATV”,
then press ' / " to select “EXT.”. Next,
press \ / | to select “CH”, then press ' /
" to select the input used for external
equipment connection (L1/L2/L3), and then
press SET/ENTER.
To Correct Date in Step 4
• Press \ / | to select the date, then press
' / " to correct.
To Correct Time in Step 4
• Press \ / | to select hour or minute, then
press ' / " to correct.
To Set Daily and Weekly Timer Program
• Press Blue (A) or Red (B) in step 4. Each
time you press the button, setting changes
as shown below:
Blue (A)
DAILY
MO-SAT
MO-FRI
(DAILY):
Red (B)
SUNs
(WEEKLY):
MONs
FRIs
SATs
• A message will be displayed when two or
more timer programs overlap.
• If an error message is displayed, confirm
the PlusCode number and input the correct
number.
• Timer recording will not start during disc
playback.
• When the power is off while recording timer
is set, front display panel will light up once
timer recording starts. If you want to turn off
the light, set “LCD BACKLIGHT REC.”
(page 82) to “YES”.
You can also turn off the light, by pressing
BACK LIGHT on the remote control (under
the cover) for more than 2 seconds.
Convenient Functions When Recording
Exact Recording (page 76)
• If you set EXACT RECORDING to “YES”,
the Recorder will automatically adjust the
recording mode of timer recording so the
recorded programs will fit on one disc.
40
To check, change or cancel
timer settings
• See page 43.
To stop recording while
timer recording is in
progress
• If you press ■STOP, “TIMER RECORDING IS IN PROGRESS. IF YOU PRESS
THE STOP BUTTON ONCE MORE, TIMER
RECORDING CANCELS AND RECORDING STOPS.” will appear on the screen.
Even that message goes out of the
screen, pressing ■STOP one more time
will stop the recording.
Timer Recording
To Set Daily or Weekly Timer Program
• Press Blue (A) or Red (B). Each time you
press the button, setting changes as shown
below:
Timer Recording by
Specifying Date, Time
and Channel
DVD-RW
DVD-RW
VR MODE
VIDEO MODE
Blue (A)
(DAILY):
DVD-R
• You can timer record up to 8 programs
scheduled within a year, including VCR
Plus+ System and Easy Recording Guide.
Preparation for Timer Recording
1 Check that the clock is displaying the
correct time.
2 Preset the channels.
3 When you record SAP broadcast, set
“SAP SETTING” to “ON” (see page 76).
4 When recording from an external
equipment such as a CATV box or
satellite receiver, turn on the power of the
external equipment.
Red (B)
SUNs
(WEEKLY):
4
12 / 25 SAT 10 : 28 AM
SATs
12 / 25 SAT 10 : 28 AM
9 : 31 AM –
[SUN]
9 : 33 AM
AIR/CATV CH
1
– – – TIMER PROG INFO – – –
MODE:
FINE
REMAIN: 19h47m
5
REC. TIME: 0h02m
Press ' / " to set the recording
start time (minute), then press
SET/ENTER.
TIMER PROGRAM
12 / 25 SAT 10 : 28 AM
SET THE TIMER RECORDING DATE, TIME AND CHANNEL.
9 : 05 AM –
[SUN]
12/26
9 : 07 AM
AIR/CATV CH
1
– – – TIMER PROG INFO – – –
MODE:
FINE
REMAIN: 19h47m
6
REC. TIME: 0h02m
Set the recording stop time (hour
and minute) in the same manner
as steps 4 and 5, then press |.
12 / 25 SAT 10 : 28 AM
TIMER PROGRAM
SET THE TIMER RECORDING DATE, TIME AND CHANNEL.
9 : 05 AM –
[SUN]
12/26
Press ' / " to select “TIMER
PROGRAM”, then press SET/
ENTER.
TIMR PROG/CHCK[TIMER PROGRAM]
FRIs
Press ' / " to set the recording
start time (hour), then press |.
12/26
• You can select the recording method
on this screen.
• You can also start timer recording by
selecting “TIMER PROGRAM/
CHECK” in the START MENU.
2
MONs
MO-FRI
SET THE TIMER RECORDING DATE, TIME AND CHANNEL.
Example: Recording a TV program in the
FINE mode: the TV program is on channel 123
starting at 9:05 AM and stopping at 10:35 AM
on December 26.
Press TIMER PROG. to display
the TIMER PROGRAM/CHECK
screen.
MO-SAT
TIMER PROGRAM
Important!
• When setting the timer recording, make
sure recordable disc is loaded.
1
DAILY
10 : 35 AM AIR/CATV CH
1
– – – TIMER PROG INFO – – –
MODE:
FINE
REMAIN: 19h47m
7
SELECT AN ITEM BELOW FOR TIMER RECORDING OPERATION.
EASY REC. GUIDE
VCR Plus+
REC. TIME: 1h30m
Press ' / " to select the desired
input source (AIR/CATV or EXT.),
then press |.
TIMER PROGRAM
TIMER PROGRAM
12 / 25 SAT 10 : 28 AM
SET THE TIMER RECORDING DATE, TIME AND CHANNEL.
TIMER PROGRAM LIST
12/26
9 : 05 AM –
[SUN]
10 : 35 AM
AIR/CATV CH
1
– – – TIMER PROG INFO – – –
3
Press ' / " to select the desired
month/day (DATE), then press |.
Example: December 26
TIMER PROGRAM
12 / 25 SAT 10 : 28 AM
SET THE TIMER RECORDING DATE, TIME AND CHANNEL.
12/26
[SUN] 10 : 31 AM –
10 : 33 AM
AIR/CATV CH
---TIMER PROG INFO--MODE:
MODE:
FINE
REMAIN: 19h47m
8
REC. TIME: 1h30m
Press ' / " to select the desired
channel (input) number, then
press |.
12 / 25 SAT 10 : 28 AM
TIMER PROGRAM
1
SET THE TIMER RECORDING DATE, TIME AND CHANNEL.
12/26
[SUN]
9 : 05 AM –
10 : 35 AM
AIR/CATV CH 123
FINE
REMAIN: 0h47m
– – – TIMER PROG INFO – – –
REC. TIME: 0h02m
MODE:
FINE
REMAIN: 19h47m
REC. TIME: 1h30m
Continued on Next Page |||
41
Timer Recording
9
Press \ / | to select “REC.
MODE”, then press SET/ENTER.
COMPLETE
SELECT
DAILY
REC. MODE
ENTER
ENTER
WEEKLY
n
RETURN
ONCE
10 Press ' / " to select the
recording mode, then press SET/
ENTER.
• If there is not enough empty space
(time), a message is displayed.
Select the recording mode again.
When “MANUAL SETTING (MN)” is
selected:
• Select the recording mode with \ / |, then
press SET/ENTER. (The recording mode
can be selected from 32 levels.)
11 Confirm the setting of timer
program, press \ to select
“COMPLETE”, then press SET/
ENTER.
COMPLETE
SELECT
DAILY
REC. MODE
ENTER
WEEKLY
ENTER
n
RETURN
ONCE
• “TIMER PROGRAM LIST” screen is
displayed.
• The TIMER indicator on the front of
the Recorder lights up and timer
programming is completed.
12 Confirm the programs on the list
and then press SET/ENTER.
• Program that has just been set is
selected.
• The screen in step 2 is displayed.
• If you want to timer record more
programs, repeat from step 2.
13 Press EXIT to complete timer
setting.
• Timer recording will function even
after you turn the power off.
42
NOTE
To Correct Date in Step 3
• Press \ / | to select the date, then press
' / " to correct.
To Correct Time in Step 4, 5, 6
• Press \ / | to select hour or minute, then
press ' / " to correct.
To Set Daily and Weekly Timer Program
• Press Blue (A) or Red (B) in step 3. Each
time you press the button, setting changes
as shown below:
Blue (A)
DAILY
MO-SAT
MO-FRI
(DAILY):
Red (B)
SUNs
(WEEKLY):
MONs
FRIs
SATs
• A message will be displayed when two or
more timer programs overlap.
• A message will be displayed if previously
set timer programs total 8. Select “NO” and
press SET/ENTER. Then, cancel unnecessary timer programs.
• Timer recording will not start during disc
playback.
• When the power is off while recording timer
is set, front display panel will light up once
timer recording starts. If you want to turn off
the light, set “LCD BACKLIGHT REC.”
(page 82) to “YES”.
You can also turn off the light by pressing
BACK LIGHT on the remote control (under
the cover) for more than 2 seconds.
Convenient Functions When Recording
Exact Recording (page 76)
• If you set EXACT RECORDING to “YES”,
the Recorder will automatically adjust the
recording mode of timer recording so the
recorded programs will fit on one disc.
To check, change or cancel
timer settings
• See page 43.
To stop recording while
timer recording is in
progress
• If you press ■STOP, “TIMER RECORDING IS IN PROGRESS. IF YOU PRESS
THE STOP BUTTON ONCE MORE, TIMER
RECORDING CANCELS AND RECORDING STOPS.” will appear on the screen.
Even that message goes out of the
screen, pressing ■STOP one more time
will stop the recording.
Timer Recording
Confirm, Change and
Cancel a Timer Program
DVD-RW
DVD-RW
VR MODE
VIDEO MODE
DVD-R
Confirming the Content of a
Timer Program in Detail or
Change Its Content
2
• You can confirm, change and cancel the
content of timer programs set by “EASY
REC. GUIDE”, “VCR Plus+” and “TIMER
PROGRAM”.
• The Timer Program List shows all timer
programs set.
Confirming
1
Press PROGRAM LIST to
display “TIMER PROGRAM LIST”.
TIMER PROGRAM LIST
CAN CHECK, CHANGE OR CANCEL TIMER PROGRAM.
3
12 / 25 SAT 10 : 28 AM
PROGRAM DATE&TIME
12 / 25 SAT 7 : 00 PM –
7 : 30 PM
CH
CH 8
REC. MODE
SP
9 : 05 PM –
9 : 50 PM
CH 8
FINE
12 / 25 SAT 10 : 30 PM – 11 : 00 PM
CH 8
FINE
12 / 25 SAT
7 : 30 PM
CH
CH 8
REC. MODE
SP
9 : 05 PM –
9 : 50 PM
CH 8
FINE
12 / 25 SAT 10 : 30 PM – 11 : 00 PM
CH 8
FINE
Press \ / | to select “CHANGE”,
then press SET/ENTER.
TIMER PROGRAM LIST
12 / 25 SAT
9 : 05 PM –
REC. MODE:
• EASY REC. GUIDE.... Blue (A)
• VCR Plus+.... Red (B)
• TIMER PROGRAMMING.... Green (C)
12 / 25 SAT 10 : 28 AM
9 : 50 PM
CH 8
F INE
DO YOU WANT TO CANCEL, CHANGE OR EXIT WITHOUT CHANGING?
CANCEL
■ Press PROGRAM LIST or
EXIT to complete only the confirmation.
■ Proceed to step 2 if you want to
confirm the content of a timer
program in detail or change its
content.
■ Press one of the Colored
buttons to select timer programming screen to add a timer
program.
12 / 25 SAT 10 : 28 AM
PROGRAM DATE&TIME
12 / 25 SAT 7 : 00 PM –
12 / 25 SAT
• You can also go to the “TIMER
PROGRAM LIST” screen by selecting
TIMER PROGRAM/CHECK in the
START MENU and then TIMER
PROGRAM LIST.
TIMER PROGRAM LIST
CAN CHECK, CHANGE OR CANCEL TIMER PROGRAM.
Press ' / " to select the program
to change, then press SET/
ENTER.
CHANGE
EXIT
• CANCEL: The confirmation screen
appears.
• CHANGE: The Timer Program screen
appears.
• EXIT: The screen in step 2 appears.
4
Change the content of timer
program by following the steps on
pages 41 and 42.
Canceling a Timer Program
1
Press PROGRAM LIST to
display “TIMER PROGRAM LIST”.
2
Press ' / " to select the program
to cancel, then press SET/
ENTER.
TIMER PROGRAM LIST
CAN CHECK, CHANGE OR CANCEL TIMER PROGRAM.
12 / 25 SAT 10 : 28 AM
PROGRAM DATE&TIME
12 / 25 SAT 7 : 00 PM –
7 : 30 PM
CH
CH 8
REC. MODE
SP
12 / 25 SAT
9 : 50 PM
CH 8
FINE
12 / 25 SAT 10 : 30 PM – 11 : 00 PM
CH 8
FINE
9 : 05 PM –
➡
TIMER PROGRAM LIST
12 / 25 SAT
9 : 05 PM –
REC. MODE:
12 / 25 SAT 10 : 28 AM
9 : 50 PM
CH 8
FINE
DO YOU WANT TO CANCEL, CHANGE OR EXIT WITHOUT CHANGING?
CANCEL
3
CHANGE
EXIT
Press \ / | to select “CANCEL”,
then press SET/ENTER.
• The confirmation screen appears.
4
Press \ / | to select “YES”, then
press SET/ENTER.
• Selected timer program is canceled,
and the screen returns to Timer
Program List (step 1).
43
Automatic Recording of Satellite Broadcast (AV AUTO REC)
DVD-RW
DVD-RW
VR MODE
VIDEO MODE
DVD-R
When connected to a satellite receiver, etc.
with a timer recording function, this Recorder
can be used to automatically record the timer
program. (Refer to the operation manual of
the satellite receiver, etc. for instructions on
how to set the timer program.)
Recording with
AV AUTO REC
1
• Set the recording timer on the satellite
receiver, etc. for the program you
wish to record. (Refer to the operation
manual of the satellite receiver, etc.
for instructions on how to set the
program timer.)
Example: Use of AV AUTO REC Function
Satellite
receiver, etc.
2:00 AM
Set timer
program
This Recorder
Set AV AUTO
REC function
3:00 AM
4:00 AM
Timer
Program
2:00 AM
3:00 AM
4:00 AM
Records
timer program
Recording
begins
5:00 AM
2
3
Timer
Program
5:00 AM
Records
timer program
Recording
ends
Recording
begins
Recording
ends
Power
Power ON Power OFF Power ON
OFF
Important!
• The AV AUTO REC function only operates
when used with a satellite receiver, etc.
with timer recording functions.
• The AV AUTO REC function will only
operate when the satellite receiver, etc. is
connected to the LINE IN 1 (AUTO REC)
jacks on the rear of the Recorder.
Connecting to a Satellite
Receiver, etc.
To use the AV AUTO REC function, connect
the satellite receiver, etc. to the LINE IN 1 (AV
AUTO REC) jacks on the rear of the Recorder.
The Recorder
IN
FROM
ANTENNA
IN 1
OUT 1
AUTO
REC
IN 2
LINE
OUT 2
R-AUDIO-L
VIDEO S-VIDEO
R-AUDIO-L
VIDEO
S-VIDEO LINE
OPTICAL
VHF/UHF/CATV
To LINE IN 1
(AV AUTO REC) jacks
Video/audio cable
(supplied)
To video/audio
output jacks
Satellite receiver, etc.
44
COMPONENT OUT
480i/
480p
COAXIAL
PASS THROUGH
DIGITAL AUDIO OUT
Set up the satellite receiver, etc.
Turn off the satellite receiver, etc.
1 Press INPUT to select “L1”
(LINE IN 1 [AV AUTO REC]).
2 Press REC MODE to select
recording mode
• The recording mode will change as
follows each time you press REC
MODE.
FINE
SP
LP
EP
MNgg
• When selecting MNXX, the recording
mode will be set to the same as
selected in Manual Recording Mode.
4
Select external audio.
• Set “EXTERNAL AUDIO” of “REC.
FUNCTION” to “STEREO” or “DUAL
MONO” (page 76).
5
Press POWER to turn off the
Recorder.
6
Press and hold AV AUTO REC
(under the cover) for more than
two seconds.
• External automatic recording function
switches on or off every time you
operate this function.
• “AUTO REC” is displayed on the front
display panel (page 17).
• Recording automatically starts and
stops when the Recorder receives a
signal from satellite receiver, etc. at
start time and stop time.
NOTE
• When recording PPV (pay-per-view)
programs of satellite broadcasts, always
make sure to set the satellite receiver, etc.
to “Record”. Certain programs may not be
recorded or require additional charges for
recording.
• Use AV AUTO REC in combination with a
satellite receiver, etc. equipped with a timer
recording function.
• Since the power of this Recorder is
switched on after the video signal from a
satellite receiver, etc. has been received,
the start of a program may not be recorded.
• When using AV AUTO REC function, it is
recommended that you set the timer
recording start time for a satellite receiver
etc. a little earlier than usual.
Automatic Recording of Satellite Broadcast (AV AUTO REC)
To Cancel the AV AUTO
REC Function
Before Recording
Press POWER.
• The Recorder is turned on and the AV
AUTO REC function will be canceled with
the “AUTO REC” indicator on the front
display panel turned off.
During Recording
Press ■STOP.
• The “AUTO REC” indicator will be turned
off.
• Timer recording is given priority when
timer recording and AV AUTO REC
times overlap.
45
Eliminating Problems (Recording, Timer Recording)
When You Cannot Record
Problem
•
•
•
•
•
No disc in the Recorder.
Unrecordable disc is loaded.
Not enough disc capacity.
Recorder cannot identify the disc.
Disc is protected.
Suggested Solution
• Load recordable DVD.
• Load recordable DVD with enough capacity.
• Cancel disc protection or change to new recordable DVD for
recording.
When You Cannot Timer Record
Problem
•
•
•
•
•
No disc in the Recorder.
Unrecordable disc is loaded.
Not enough disc capacity.
Recorder cannot identify the disc.
Disc is protected.
• Number of timer programs set has
reached the limit.
• Playing back the DVD.
• In the middle of direct recording.
Suggested Solution
• Load recordable DVD.
• Load recordable DVD with enough capacity.
• Cancel disc protection or change to new recordable DVD for
recording.
• Erase unnecessary timer programs.
• Stop playing back the DVD more than 3 minutes before timer
recording starts. If you don’t stop playback until timer
recording start time, timer recording will not start.
• Timer recording does not function during direct recording.
Stop direct recording before the preset start time for timer
recording.
NOTE
• If you set multiple timers, and the programmed times overlap, or the end time of the previous timer is the same as the start
time of the next timer, timer recording will begin after the preceding timer recording finishes. There will be a delay of up to 1
minute before the next timer recording begins.
46
DVD/CD Playback
This section explains playback of DVD-RW/R
discs recorded with this Recorder, commercially available DVD Video discs (like movies)
and CDs.
• To play back a DVD-RW/R recorded with
this Recorder, select the title to be played
back, and then start playback.
• Display the list of initial images (thumbnails) for each title, and select a title. (REC
LIST)
3
Press REC LIST to display REC
LIST (THUMBNAIL).
• The REC LIST can also be displayed
from the START MENU (see page 28).
• To switch between Original Title List
and Play List, press ORIGINAL/PLAY
LIST. Each time the button is
pressed, “ORIGINAL” (original titles)
or “PLAY LIST” is selected in turn.
REC LIST(ORIGINAL)
12 / 25 SAT 10 : 28 AM
TITLE: CH33 FINE
Loading Disc
TITLE INFO: 10/11 MON 4:00 PM – 4:10 PM
1
1
Press POWER to turn the power
on.
2
Press OPEN/CLOSE to open the
disc tray.
2
4
3
5
6
• If you press Blue (A) (TITLE LIST),
you can switch to title list.
OPEN/CLOSE
" TITLE LIST
REC LIST(ORIGINAL)
12 / 25 SAT 10 : 28 AM
TITLE: CH33 FINE
TITLE INFO: 10/ 2 SAT 8:00 PM – 9:00 PM
3
BACK
1
2
3
4
5
6
NEXT
Load a disc on the disc tray.
TITLE
CH33 FINE 2004/10/ 2 SAT
CH33 FINE 2004/10/ 9 SAT
CH33 FINE 2004/10/16 SAT
CH33 FINE 2004/10/23 SAT
CH33 FINE 2004/10/30 SAT
CH33 FINE 2004/11/ 6 SAT
FROM NEW
P
P
P
P
P
P
REC. DATE
10 / 2 SAT
10 / 9 SAT
10 / 16 SAT
10 / 23 SAT
10 / 30 SAT
11 / 6 SAT
ENTER ENTER
SELECT
B SORT
THUMBNAIL
n
STR. TIME TIME
8 : 0 0 PM 10 MIN
8 : 0 0 PM 10 MIN
8 : 0 0 PM 10 MIN
8 : 0 0 PM 10 MIN
8 : 0 0 PM 10 MIN
8 : 0 0 PM 10 MIN
7/ 15
RETURN
• Press Blue (A) (THUMBNAIL) to
switch from title list to thumbnail.
• Insert the disc with the label face up.
• In case of disc recorded on both
sides, face the side you want to view
down.
4
DVD-RW
DVD-RW
VR MODE
VIDEO MODE
DVD-R
1 Turn on the power of TV.
• When the recorder is connected to
other audio equipment, turn them on
as well.
2 Set the TV input mode to the
mode the recorder is set to.
2
Press POWER to turn on the
recorder.
• Load a disc you wish to play back.
Press ' / "/ \ / | to select the
program you want to watch.
Thumbnail screen: Press ' / " to
switch pages.
Press OPEN/CLOSE to close the
disc tray.
Playback from REC LIST
1
4
Title Name List screen: Press ' / " to
select a title name.
5
Press SET/ENTER or |PLAY.
• Playback begins.
• PLAY indicator on the front of
Recorder is lit green during playback.
To Stop Playback
Press ■STOP.
Resume playback function
• If you press |PLAY next, playback will
resume from the point where it stopped the
previous time. To play back from the
beginning, cancel resume mode by
pressing ■STOP then press |PLAY.
(Resume playback will be canceled when
you open the disc tray or turn the power
off)
• Resume playback function does not work
during video CD playback.
Continued on Next Page |||
47
DVD/CD Playback
To Record a Chapter Mark
during Playback
Press CHAPTER MARK (under the
cover).
• The message “RECORDED CHAPTER
MARK.” is displayed, and the chapter mark
is recorded.
• Chapter marks can be set during playback
only with DVD-RW (VR mode).
• Chapter marks cannot be set manually for
DVD-RW (Video mode), DVD-R.
NOTE
• To display the counter during playback,
press ON SCREEN (page 32).
To play back edited video:
• When playing back video which has been
edited (for example, by making a play list),
use Seamless Playback for smoother
connection between scenes.
• For details on Seamless Playback settings,
see page 81.
• The final few seconds may not be played
back, depending on how the recording was
stopped.
• The end position of the program played
back may be shifted slightly from the
position where recording was stopped
during recording.
• If a title was set with another DVD recorder,
and it contains characters which cannot be
displayed with the Recorder, then “****....”
is displayed (up to 64 characters max.).
• If you play back a play list on a disc
recorded with another DVD recorder and 1
title is 12 hours or more in length, only 12
hours of that title will be played back.
About REC LIST
When the REC LIST is displayed, you can use
the following functions by pressing Blue (A)
or Red (B) on the remote control.
Playback by Selecting Title
• To play back a disc recorded and finalized
in Video mode, press DVD TITLE, display
the TITLE MENU screen, and select a title
to play back.
DVD-RW
DVD-R
VIDEO MODE
1
Load a disc recorded in Video
mode.
2
Press DVD TITLE.
3
4
Press ' / " to select the title.
• The TITLE MENU screen is displayed.
Press SET/ENTER.
• Playback of the selected title will
begin.
5
To stop playback, press ■STOP.
NOTE
• If a disc recorded in Video mode has been
finalized (pages 14, 84), a menu screen will
be created automatically to enable
playback with other DVD players. For that
reason, the menu screen is different before
and after finalization.
• If a title was set with another DVD recorder,
and it contains characters which cannot be
displayed with this Recorder, then “****....”
is displayed (up to 64 characters max.).
If there is a timer program:
• A message to that effect will be displayed 5
minutes prior to the start of the timer
recording. If that happens, stop DVD
playback and load the disc for recording.
• The timer recording will be canceled at the
start time of the timer recording if DVD
playback is still in progress.
DVD Video Playback
DVD VIDEO
• Switch between Thumbnail screen and Title
Name List screen by pressing Blue (A).
• When Thumbnail screen is selected, switch
between Title List and Chapter List by
pressing Red (B).
Chapters in selected title will be displayed
in Chapter List.
• Sort the Title List in the “From New”, “From
Old” or “Title Name (alphabetical)” order.
1 Press Red (B).
2 Press \ / | to select “FROM NEW”,
“FROM OLD” or “TITLE NAME”, then
press SET/ENTER.
Icon Displayed in REC LIST
TITLE PROTECTION
(DVD-RW [VR mode] only)
48
1
Load a disc.
• Playback may begin automatically,
depending on the disc.
2
Press |PLAY.
• Playback begins from the first title.
• The menu may be displayed first,
depending on the disc. Perform
playback operation by following the
directions on the screen.
• To stop playback, press ■STOP.
DVD/CD Playback
Audio CD/Video CD Playback
Other Types of Playback
VIDEO CD
DVD-RW
DVD-RW
VR MODE
VIDEO MODE
AUDIO CD
Playback from the beginning
1
2
Load a disc.
Press |PLAY.
• Playback begins from the first track.
3
To stop playback, press ■STOP.
Playback by selecting the
track
1
DVD VIDEO
VIDEO CD
AUDIO CD
• This section explains other types of DVD
playback operations.
Fast Forward/Reverse
(Search)
Use to fast forward/reverse programs being
played.
1
1 Press DIRECT.
2 Select the track number to be
played back using the Number
buttons, then press SET/
ENTER.
Press JFWD or GREV during
playback.
Example: When JFWD is pressed
• The search speed will cycle as
follows each time you press the
button.
When playing back a DVD
• Playback starts from the selected
track.
Example: To select the 12th song
(track), press 1, then 2.
• You can also select the track by
pressing ' / " .
• DIRECT does not work when playing
back a video CD with PBC on.
2
DVD-R
(Approx. 2g) (Approx. 8g) (Approx. 32g)
When playing back a video CD or
audio CD
(Approx. 2g) (Approx. 8g)
To stop playback, press ■STOP.
Video CD (with PBC) Playback
• Some video CD discs have Playback
Control (PBC) function which guides the
playback by the menu displayed.
Video CD (with PBC)
If you press |PLAY after you load a disc, the
menu displays. The functions of button
changes in the following manner during the
playback operation using the menu.
• Lbecomes the “NEXT” button.
• Kbecomes the “PREVIOUS” button.
Select the track number to be played back
from the menu using the Number buttons and
play back the track.
Example: To select the 5th track, press 0,
then 5.
(Operation method may differ depending on
the disc. Refer to the manual of the video
CD.)
Turning off PBC function when playing
back a PBC compatible video CD
Playback begins from track 1 when JFWD
is pressed before the menu is displayed after
you load a disc. Playback will follow the track
order like an audio CD.
* If you want to turn the PBC to “ON” when
playing back the CD with PBC off, press
■STOP twice and then press |PLAY to
display the menu.
2
Press |PLAY to cancel the
search.
• Search will be canceled and playback screen is displayed.
• You cannot fast forward or fast
reverse from one title and continue to
another title.
• When you fast forward or fast reverse
to the end or beginning of the title,
normal playback screen is displayed
automatically.
Skipping to Next Chapter
You can skip the chapter using this function.
Press Kor Lduring playback.
• Press Lto go to the start of the next
chapter.
• Press Konce to return to the start of
current chapter (track). If you press it again
(within about 5 seconds), it will skip to the
beginning of the previous chapter (track).
Continued on Next Page |||
49
DVD/CD Playback
Slow Playback
Replay
This lets you play back video at slow speed.
This lets you skip about 10 seconds back.
This is convenient for replaying a short scene
you missed.
1
2
Press
SLOW during playback.
• The slow playback speed will cycle
as follows each time you press the
button.
Press REPLAY during playback.
(Approx. 1/2g) (Approx. 1/8g) (Approx. 1/16g)
Playback by Selecting a
Title (Track) Number (Direct
Playback)
Press |PLAY to return to normal
playback.
• You cannot perform slow playback
over a boundary between titles. At
the end of the title, slow playback will
be canceled and normal playback
will be selected automatically.
Still Picture Playback/
Frame Advance Playback
• Playback reverses approximately 10
seconds, then starts again.
1
Press DIRECT while playback
stops or during playback.
2
Press ' / " to select the title
number you want to see, then
press SET/ENTER.
Title number currently selected
This feature enables still playback and frame
advance playback.
1
1
Press FSTILL/PAUSE during
playback.
• Playback pauses.
• PLAY indicator on the front of
Recorder blinks during Still Picture
Playback.
• If you are playing back an audio CD,
the CD will pause.
2
Press Lor Kto advance or
reverse playback image frame by
frame.
• Press Lto advance one frame.
Press Kto reverse one frame.
• Frame Reverse Playback will not work
with DVD-RW (Video mode), DVD-R,
DVD-Video and Video CD discs.
3
Press |PLAY to return to normal
playback.
Skip Search
This lets you skip about 30 seconds ahead.
This is convenient when you want to skip
commercials while viewing.
Press SKIP SEARCH during playback.
• You can skip approximately 30 seconds
forward each time you press the button.
• The maximum interval you can skip at one
time is 120 seconds (4 button presses).
50
/ 38
• Playback starts from the beginning of
the selected title.
NOTE
• You can select the title number to play
back by using Function Control screen
(page 56).
DVD/CD Playback
Repeat Playback of a Title
or Chapter (Repeat Playback)
1
2
3
Play back the title or chapter you
want to repeat.
(INPUT).
Press
Press \ / | to select the type of
Repeat Playback.
• TITLE: Repeats the title currently
playing back.
• CHAPTER: Repeats the chapter
currently playing back.
• A-B: Repeats the specified scene of
title or chapter.
Function Control
You can do things like specify a title or chapter,
and adjust settings for video and audio if you
press FUNCTION (under the cover) during
playback. (For details see page 56.)
Switching Audio
You can change the audio output channel
using the AUDIO button (under the cover).
Each time AUDIO is pressed, the
audio channels change as follows:
AUDIO CD
L+R
VIDEO CD
L
R
DVD VIDEO
SELECT TYPE OF REPEAT PLAYBACK.
TITLE
CHAPTER
\ | SELECT
ENTER
A-B
ENTER
• Press RETURN to cancel without
setting the type of Repeat Playback.
4
Press SET/ENTER.
Example: Repeat playback of a title
(TITLE).
TITLE REPEAT
5
The sound number which is currently
played back will be displayed.
Press
(INPUT) to return to
normal playback.
A-B Repeat Playback (Repeat Playback of a Specified Part)
1
Press
(INPUT) during
playback.
2
Press \ / | to select “A-B”, then
press SET/ENTER.
3
Press SET/ENTER when you
reach the scene you want to start
Repeat Playback.
DVD-RW
DVD-RW
VR MODE
VIDEO MODE
DVD-R
The sound you can select varies depending
on the sound recorded on the disc. (page
77)
• When recording SAP broadcast or stereo,
the way audio channel changes may differ
depending on the recorded sound. See the
table of SAP on page 77 for details.
NOTE
• When you play a program recorded in dual
mono, and if you are listening to the Dolby
Digital sound via the digital output jack,
you cannot select the audio channel. Set
“DIGITAL AUDIO OUTPUT” to “PCM” (see
page 80), or if you want to change the
audio channel, listen via the analog output
jacks.
• The start point of the part (A) will be
memorized.
SELECT TYPE OF REPEAT PLAYBACK.
TITLE
CHAPTER
A-B
SET START PT
ENTER
4
SET REPEAT START POINT
Press SET/ENTER when you
reach the scene you want to end
Repeat Playback.
• The end point of the part (B) will be
memorized and the Repeat Playback
for the specified part (A-B) starts.
5
Press
(INPUT) to return to
normal playback.
51
DVD/CD Playback
Switching Subtitles
DVD VIDEO
If subtitles are provided in multiple languages, you can switch between them.
1
Press SUBTITLE (under the
cover) during playback.
• The display indicates the subtitle
number currently being played back,
and the subtitles appear.
• “✕✕” is displayed if a disc has no
subtitles.
2
Press ' / " to select the subtitles
you want to see.
• You can select by pressing SUBTITLE.
• The display indicates the subtitle
number currently being played back,
and the subtitles appear.
• To hide the subtitles, press \ / | a
few times and select “OFF”.
You can also select “OFF” by
pressing SUBTITLE or ' / " .
Zoom
You can magnify your favorite section by
pressing ZOOM during playback.
• Each time you press this button, the zoom
setting cycles in the following sequence:
ZOOM: 1 (approx. 1.2✕)→ZOOM: 2
(approx. 1.5✕)→ZOOM: 3 (approx.
2.0✕)→OFF (No display)
• You can move the enlarged part with ' /
" / \ / |.
ZOOM: 1
Switching Angle
DVD VIDEO
If multiple angles are recorded, you can
switch between them.
Press ANGLE (under the cover)
during playback.
• The display indicates the angle number
currently being played back. Each time you
press this button, the angle switches.
• The angle can also be switched by
pressing ' / " .
• “✕✕” is displayed if a disc is recorded with
only one angle.
1
To return to the previous angle, press ANGLE
(under the cover) a few times to select the
original angle.
52
NOTE
Display of functions
• The display for subtitle, angle or audio
automatically disappears after 10 seconds.
The display can also be hidden by
pressing SET/ENTER.
Switching between functions
• You can switch subtitle, angle and audio at
the Function Control screen (page 56).
• Operation for each function varies depending on the disc. See the manual for the disc.
• The following operations will not work when
playing back an audio CD:
Replay, Slow Playback, Frame Advance/
Reverse
Fast Forward/Reverse
• You cannot perform Fast Forward/Fast
Reverse over a boundary between titles. At
the end or beginning of the title, Fast Forward/
Fast Reverse will be canceled and normal
playback will be selected automatically.
• Audio is not played back during Fast
Forward and Fast Reverse.
• Audio and subtitles are not played back
with DVD video discs and video CDs.
• Depending on the disc and the scene
being played back, the Recorder may not
operate at the speed listed in this manual
when performing Fast Forward.
Slow Playback
• You cannot perform slow playback over a
boundary between titles. At the end of the title,
slow playback will be canceled and normal
playback will be selected automatically.
Repeat Playback
• Repeat Playback will not work during PBC
playback of a video CD with PBC (Playback Control).
• Repeat Playback may be forbidden
depending on the disc.
• A-B Repeat Playback may not work in
multi-angle scenes.
• For A-B Repeat Playback, set the start and
end points within the same title.
DVD/CD Playback
Playback by Selecting
with the Menu in the DVD
DVD-RW
DVD-R
VIDEO MODE
Using the Disc Menu
Example: Select “SUBTITLE LANGUAGE”.
1
• The disc menu screen is displayed.
• This section explains how to play back a
DVD video disc with a top menu or disc
menu.
• Titles listed in the title menu, and a disc
guide (for options like subtitles and audio
languages) are given in the disc menu.
2
Press ' / " to select “SUBTITLE
LANGUAGE”.
MENU
1 AUDIO LANGUAGE
2 SUBTITLE LANGUAGE
3 AUDIO
Playback by Selecting a
Title from the Title Menu
1
Press DVD MENU.
Press DVD TITLE.
• The title menu screen is displayed.
T I TL E
MENU
1
Jazz
2
Latin
3
Classic
4
Rock
3
• Screen to select subtitle language is
displayed.
4
2
Press SET/ENTER.
Press ' / " to select the subtitle
language.
Press ' / " / \ / | to select the
title, then press SET/ENTER.
SUBTITLE LANGUAGE
• The selected title is played back.
NOTE
• The procedure explained on this page is
the basic operation procedure. Procedures
vary depending on the DVD video disc, so
operate by following the instructions in the
DVD video disc manual, or the instructions
displayed on the screen.
• A title menu is not displayed for a DVD-RW/
R (Video mode) if it has not been finalized.
Title menu
• With some DVD discs, the top menu may
be explained using the name “Top Menu”.
For the button explained as the top menu
key, use DVD TITLE on the remote control.
• If no title menu is available, the title menu
will not display even if DVD TITLE is
pressed.
1
2
3
5
English
Español
Français
Press SET/ENTER.
Continued on Next Page |||
53
DVD/CD Playback
Setting a Clear Image and
Powerful Sound
You can set picture quality and enjoy more
realistic sound according to your taste.
Digital Gamma (Viewing
Dark Images)
Dark images can be made brighter and
clearer.
DVD-RW
DVD-RW
VR MODE
VIDEO MODE
DVD-R
Dolby Virtual Surround
(3-D Feeling Sound)
DVD-RW
DVD-RW
VR MODE
VIDEO MODE
VIDEO CD
AUDIO CD
1
DVD VIDEO
Press GAMMA to display the
currently selected Gamma mode.
If “ON” is not selected, press ' /
" to select “ON”.
• Each time you press GAMMA, the
Gamma mode switches between
“ON” and “OFF”.
2
Press \ / | to adjust the level.
• You can select from 3 levels.
• Press | to increase the level. Press \
to decrease the level.
• To cancel, press GAMMA until “OFF”
appears on the screen.
3
Press SET/ENTER.
Digital Super Picture
(Increase Sharpness)
DVD-RW
DVD-RW
VR MODE
VIDEO MODE
DVD-R
DVD VIDEO
VIDEO CD
It is possible to sharpen images by increasing
detail and outline. It is also possible to obtain
clearer images by reducing interference.
1
Press S.PICTURE to display the
currently selected mode. If “ON” is
not selected, press ' / " to
select “ON”.
• Each time you press S.PICTURE, the
Digital Super Picture mode switches
between “ON” and “OFF”.
2
Press \ / | to adjust the level.
• You can select from 4 levels.
• Press | to increase the level. Press \
to decrease the level.
• To cancel, press S.PICTURE until
“OFF” appears on the screen.
3
54
Press SET/ENTER.
DVD VIDEO
You can enjoy surround sound with a TV that
has analog stereo (2ch) or with audio
equipment. This may be less effective or not
effective at all with some discs.
VIDEO CD
1
DVD-R
Press VIRTUAL SURROUND to
display the currently selected
mode. If “ON” is not selected,
press ' / " to select “ON”.
• Each time you press VIRTUAL
SURROUND, the Dolby Virtual
Surround mode switches between
“ON” and “OFF”.
2
Press SET/ENTER.
NOTE
• Each indicator will only appear for a few
seconds.
• Digital Gamma, Digital Super Picture and
Dolby Virtual Surround can be set using the
Function Control screen (page 56) as well.
MP3 File Playback
CD-R
MP3
CD-RW
MP3
NOTE
• See page 11 for details about the MP3 file
format.
1
1 Turn on the power of TV.
• When the recorder is connected to
other audio equipment, turn them on
as well.
2 Switch TV input to the AV input
used to connect to the Recorder.
2
3
Press POWER to turn on the
recorder.
Load an MP3 recorded CD-R or
the CD-RW, then press DVD
MENU.
To Play Another File
(music title) during
Playback
1
2
Press ■ STOP to stop playback.
Press ' / " / \ / | to select the file
(music title) you want to play, then
press SET/ENTER.
• The chosen file (music title) will be
played.
To Skip the File during
Playback
Press SKIP
or
SKIP.
• Press SKIP
to skip forward.
• Press
SKIP to skip backward.
CD MP3
While the MP3 disc is playing
1
1 WOLF
3 ANGEL
4
1
4
2 SHARK
1
4 TRISH
1
• Time Search is disabled.
• Programmed Playback is disabled.
• It is possible to repeat one track by
pressing
(INPUT).
• Dolby Virtual Surround does not operate.
Press ' / " / \ / | to select the
folder you want to play, then
press SET/ENTER.
• The file (music title) in the folder is
displayed on the file selection screen.
CD MP3
1 : 15
--:--:-WOLF
1 YOUNG
2 ANDREW
3 MAIN
4 BAY
5 BARDEN
6 QUEEN
7 BEACHES
9 YORK
8 VICTORIA
10 KING
• Press RETURN to return to the folder
selection screen.
• If you press |PLAY after selecting
the folder, the playback screen is
displayed, and the files in that folder
will be played from the beginning
repeatedly.
5
Press ' / " / \ / | to select the file
(music title) you want to play and
then press SET/ENTER.
• Playback will start from the selected
file (music title).
CD MP3
1 : 15
0 0 : 00 : 11
WOLF
1 YOUNG
2 ANDREW
3 MAIN
4 BAY
5 BARDEN
6 QUEEN
7 BEACHES
8 VICTORIA
9 YORK
6
10 KING
Press ■STOP to stop playback.
55
Settings During Playback
Function Control Operation
Procedure
Function Control
DVD-RW
DVD-RW
VR MODE
VIDEO MODE
DVD-R
DVD VIDEO
This lets you make various settings at once,
like subtitle and angle setting, and title
selection for Direct Playback.
Depending on your preferences, you can
adjust video and enjoy audio with a greater
sense of presence.
1
Press FUNCTION (under the
cover) during playback.
• The Function Control screen is
displayed on the TV.
DVD VIDEO
VIDEO
1/3
5 / 25
00:00:00
2 ENGLISH
1
2ch
1
OFF
OFF
OFF
Function Control screen
1
DVD VIDEO
VIDEO
1/3
5 / 25
00:00:00
2 ENGLISH
1
1
2ch
OFF
OFF
OFF
n
SELECT
RETURN
ENTER
3
ENTER
2
n
2
BIT RATE
0
5
10
Mbps
SELECT
RETURN
ENTER
ENTER
BIT RATE
0
10
Mbps
Press ' / " to select setting
items, then press SET/ENTER.
• For a description of each setting item,
see “Functions which can be set”
(page 57).
4
1 Playback status display
Shows the operation status and disc type.
DVD VIDEO
VIDEO
1/3
5 / 25
00:00:00
2 ENGLISH
1
2ch
1
OFF
OFF
OFF
2 Setting items
Selects a title or chapter for playback, or
performs video/audio settings.
3 Operation guide display
Provides help on how to operate with the
remote control buttons.
5
n
3
4 Bit rate display
Displays the data rate of the video appearing
on the TV screen.
SELECT
RETURN
ENTER
ENTER
BIT RATE
0
5
10
Mbps
Press ' / " / \ / | to set, then
press SET/ENTER.
• Operation may vary depending on
the setting item. Operate by following
the operation guide instructions on
the screen.
4
Press RETURN or FUNCTION
(under the cover) to close the
Function Control screen.
NOTE
• If “✕✕” is displayed for an option like title
number or subtitles, the disc has no titles
or subtitles which can be selected.
• When you press DIRECT or SUBTITLE, the
Function Control screen is closed.
• If you set to the Function Control screen
during playback of a DVD video, it may be
impossible to operate according to the
instructions from the DVD video. In cases
like this, operate again after canceling the
Function Control screen.
56
Settings During Playback
Functions which can be set
Title Number (Direct Title Skip)
• Shows the title number being played back. You can
skip to the start of the title.
Chapter Number (Direct Chapter Skip)
• Shows the chapter number being played back. You
can skip to the start of the chapter.
Playback Elapsed Time (Direct Time
Skip)
• Shows the elapsed time from the beginning of the disc
to the present.
This lets you skip based on time.
• Press \ / | to move to the field of Hour, Minute,
Second, then press ' / " to set the time. Press SET/
ENTER to start playback from that set time.
Subtitle Language
• Shows the currently selected subtitle language.
If subtitles are provided in other languages, you can
switch to your preferred language.
Angle Number
• Shows the currently selected angle number.
If the video is recorded with multiple angles, you can
switch the angle.
Audio
• Shows the currently selected type of audio.
You can select the desired type of audio.
Digital Super Picture
• Emphasizes and enhances definition of details and
contours in the video. This reduces noise and makes
video easier to see.
• Press ' / " to select “ON” or “OFF”, then press \ / |
to set the level. Then press SET/ENTER.
• There is one setting level on the “soft” side and 3
setting levels on the “sharp” side.
• If you want to enjoy a more defined picture (with
detailed pictures), press | while “ON” is displayed for
Digital Super Picture. For old movies or videos with a
lot of noise, you can reduce noise for an easier to see
picture by pressing \ while “ON” is displayed for
Digital Super Picture.
Digital Gamma
• If a video is dark and hard to see, you can brighten the
dark parts for easier viewing by setting Digital Gamma.
Set this when watching discs with many dark scenes
(i.e. movie and concert discs), and when viewing a
disc in a bright room. This lets you see dark parts
better and enjoy video with a greater sense of depth.
• Press ' / " to select “ON” or “OFF”, then press \ / |
to set the level. Then press SET/ENTER.
• Digital Gamma can be set to three different levels.
Dolby Virtual Surround
• Lets you enjoy surround audio via analog connection
with a stereo type (2ch) TV or audio equipment.
• Even if you use a digital connection, Dolby Virtual
Surround will work in the following cases.
– When playing back linear PCM audio from a DVD.
– When playing back Dolby Digital audio.
– When “DIGITAL AUDIO OUTPUT” (page 80) is set to
“PCM”.
• This Recorder uses a Spatializer System* for Dolby
Digital Surround.
* Certain audio features of this product manufactured
under a license from Desper Products, Inc.
Spatializer® N-2-2™ and the circle-in-square device
are trademarks owned by Desper Products, Inc.
• If audio recorded monaurally is played back with
Dolby Virtual Surround ON, the audio level may
decrease, making it hard to hear. If this happens, turn
Dolby Virtual Surround OFF.
• Dolby Virtual Surround will not work in the following
cases:
– While watching a TV broadcast or external input.
– Multi-karaoke audio from a karaoke disc, 96 kHz 24bit linear PCM audio, or DTS audio.
• If you set Dolby Virtual Surround to “ON” and audio
sounds abnormal during playback, set it to “OFF”.
• There are no level settings.
NOTE
• These functions cannot be used with all discs.
57
Editing
About Editing
Editing Procedure
Content that can be edited and editing operations vary
according to the recording mode.
Recordings on DVD-RW in VR mode
You can do various types of editing with this Recorder alone.
For example it is possible to create a compilation of your
favorite videos by gathering your favorite scenes from
recorded titles, moving scenes within a specified range, or
erasing unnecessary scenes. You can edit original videos
you have recorded into a Play List without changing the
content of the original videos.
NOTE
• If disc protection is set for a DVD-RW, it cannot be edited.
• If title protection is set, the only editing which can be done
is MOVE TITLE.
ORIGINAL
• A recorded video (title) in as is form is called an ORIGINAL. A single recording (from record start to stop) forms a
single title.
Basic procedure for editing an original title recorded in
VR mode
Load a disc.
Select the title to be edited, and edit.
• Erasing Unnecessary Scenes from an Original Title
(ERASE SCENE) (page 60).
• Inputting/Changing Title Name (CHANGE TITLE
NAME) (page 62).
• Changing Thumbnail (CHANGE THUMBNAIL) (page
64).
• Making Sections in a Title (DIVIDE CHAPTER) (page
65).
• Combining Chapters Together (COMBINE CHAPTERS)
(page 66).
• Disabling Title Edit and Erase (TITLE PROTECT) (page
66).
• Erasing All Titles (page 67).
• Erasing by Selecting a Title (or Chapter) (page 67).
PLAY LIST
• A title created by editing based on originals is called a
PLAY LIST. A play list can be remade any number of
times.
Original
Original
Original
Basic procedure for editing titles recorded in VR mode
after making a Play List
Load a disc.
Create a Play List.
Play List
• Creating from Original Titles (page 68).
• Creating from Part of an Original (page 68).
1
2
3
4
NOTE
• A Play List is a list which describes the playback sequence of originals, and it does not actually copy the
originals. This makes it possible to perform editing while
using only a little disc space.
Recordings on DVD-RW/R in Video
mode
The following content can be edited.
• Input (change) title name (page 62)
• Erase title (page 67)
NOTE
• ERASE TITLE for a recording in Video mode will change
settings so that the “erased” title cannot be seen in the
REC LIST, but this does not mean that the video is actually
erased. (Free time on the disc will not increase. With a
DVD-RW recorded in Video mode, free time on the disc
will increase when the title recorded last is erased.)
• Editing is not possible if the disc has been finalized (page
84). With a DVD-RW, editing is possible again if finalization
is canceled.
• Additional recording and editing can be done using only
this Recorder until the disc is finalized.
58
Select and edit the created play list.
• Erasing All Titles (page 67).
• Erasing by Selecting a Title (or Chapter) (page 67).
• Adding a Scene from an Original to a Play List (ADD
SCENE) (page 69).
• Changing the Title Sequence (MOVE TITLE) (page 71).
• Erasing Unnecessary Scenes (ERASE SCENE) (page
72).
• Inputting/Changing Title Name (CHANGE TITLE
NAME) (page 72).
• Changing Thumbnail (CHANGE THUMBNAIL) (page
72).
• Making Sections in a Title (DIVIDE CHAPTER) (page
72).
• Combining Chapters Together(COMBINE CHAPTERS)
(page 72).
NOTE
Editing cannot be done in the following cases.
• Play Lists cannot be created for discs recorded in Video
mode.
• Play Lists cannot be created for recordings on DVD-R.
• Finalized DVD-RWs (Video mode) cannot be edited.
(Editing can be enabled by canceling finalization.)
Editing
Edit Screen
Title being
edited
12 / 25 SAT 10 : 28 AM
EDIT(ORIGINAL)
TITLE: CH33 FINE
TITLE INFO: 10/4 MON 8:09 PM – 8:14 PM
ERASE SCENE
CHANGE TITLE NAME
CHANGE THUMBNAIL
DIVIDE CHAPTER
2
01
00: 00: 02
00
SPECIFY ERASE
RANGE
PLAY
PLAY BACK
ENTER
SET START POINT
Chapter
being edited
Time being
edited
Frame being
edited
• There is no frame display for titles recorded
in Video mode.
Switching between
Original and Play List
(Play Lists can be created only
for VR mode)
Switching when the Recorder power is on
ORIGINAL/PLAY LIST
Press ORIGINAL/PLAY LIST in the
stopped state. Each time this button is
pressed, the setting will toggle between
ORIGINAL and PLAY LIST.
Seamless Playback
This enables smooth playback at the
transitions between edited video scenes.
(However, a shift of about one second may
arise at the transitions, and part of the scene
may not appear.) (Page 81)
• Set this function by selecting: “START
MENU”→“OTHER SETTINGS” → “ADJUSTMENT” → “OPTION” → “SEAMLESS
PLAYBACK”.
NOTE
• When you perform editing like adding a
chapter mark or erasing a scene, a slight
discrepancy may arise between the edit
screen and actually edited video.
• If you play back a disc edited at the frame
level with another DVD recorder, there may
be a shift in the start or end point, or the
screen may show a different thumbnail.
DVD-RW
VR OR IG IN AL
F I NE REMAIN 1h0m
1/1
1/1
00:00:00
NOTE
• If recording is done while switched to play
list, the system will automatically switch
back to original.
Switching at the REC LIST
ORIGINAL/PLAY LIST
Press ORIGINAL/PLAY LIST at the REC
LIST. Each time this button is pressed, the
setting will toggle between ORIGINAL and
PLAY LIST.
12 / 25 SAT 10 : 28 AM
REC LIST (ORIGINAL)
TITLE: CH33 FINE
TITLE INFO: 10/4 MON 4:00 PM – 4:10 PM
1
2
4
3
5
6
Switching at Edit screen
ORIGINAL/PLAY LIST
Press ORIGINAL/PLAY LIST at the EDIT
screen. Each time this button is pressed,
the setting will toggle between ORIGINAL
and PLAY LIST.
EDIT(ORIGINAL)
12 / 25 SAT 10 : 28 AM
TITLE: CH33 FINE
TITLE INFO: 10/4 MON 4:00 PM – 4:10 PM
1
2
4
3
5
6
NOTE
• If a Play List has not been created, the
“SELECT EDIT OR CREATE PLAYLIST”
screen appears.
59
Editing an Original Title
Erasing Unnecessary
Scenes from an Original
Title (ERASE SCENE)
5
Press ' / " to select “ERASE
SCENE”, then press SET/ENTER.
• The selected title is paused.
12 / 25 SAT 10 : 28 AM
EDIT(ORIGINAL)
TITLE: CH 33 FINE
DVD-RW
TITLE INFO: 10/4 MON 8:09 PM – 8:14 PM
ERASE SCENE
CHANGE TITLE NAME
CHANGE THUMBNAIL
DIVIDE CHAPTER
VR MODE
Selects a scene from an original video and
erase it.
• To erase all titles, see page 67.
• To erase by title (or chapter), see page 67.
NOTE
• Scenes cannot be erased on DVD-RW/R
(Video mode) discs.
1
Press START MENU to display
START MENU screen.
2
Press ' / " / \ / | to select “EDIT/
ERASE”, then press SET/ENTER.
START MENU [EDIT/ERASE]
SPECIFY ERASE
RANGE
PLAY
6
REC LIST
7
ENTER
SET START POINT
Press |PLAY to start playback.
Press SET/ENTER when you
reach the scene to be erased.
• The erase start point is set. (Title
playback continues.)
TIMER
PROGRAM/
CHECK
12 / 25 SAT 10 : 28 AM
EDIT(ORIGINAL)
TITLE: CH33 FINE
EDITS/ERASES RECORDED TITLES
INITIALIZE/
FINALIZE
PLAY BACK
• Find the scene to be erased using
JFWD, GREV, FSTILL/PAUSE,
K, L, or SLOW.
12 / 25 SAT 10 : 28 AM
EDIT/
ERASE
2
01
00 : 00: 00
00
TITLE INFO: 10/4 MON 8:09 PM – 8:14 PM
ERASE SCENE
CHANGE TITLE NAME
CHANGE THUMBNAIL
DIVIDE CHAPTER
OTHER
SETTINGS
2
01
00: 00:12
00
SPECIFY ERASE
RANGE
SELECT
3
ENTER
n
ENTER
RETURN
Press ' / " to select “EDIT”, then
press SET/ENTER.
EDIT/ERASE
12 / 25 SAT 10 : 28 AM
DELETES SCENE,
CREATES / EDITS PLAYLIST.
EDIT
ERASES ALL TITLES ON DISC
(EXCEPT PROTECTED TITLES).
ERASE ALL TITLES
ERASE TITLES
ERASES SELECTED TITLES.
TITLE PROTECT / OFF
DISABLES EDIT/ERASE TITLES.
SELECT
ENTER
ENTER
n
RETURN
• The Original Edit Title List screen
appears.
4
ENTER
Press ' / " / \ / | to select the
title to edit, then press Yellow
(D) (EDIT MENU).
12 / 25 SAT 10 : 28 AM
EDIT(ORIGINAL)
TITLE: CH33 FINE
SET END POINT
• If you fast reverse to a scene before
the start point, the start point will be
canceled.
• When the start point is set to near the
beginning of a title, the beginning of
the title will be selected as the start
point. To make the original designated start point effective, set it again
after combining the title with the one
immediately before.
8
Press SET/ENTER when you
reach the end of scene to be
erased.
EDIT(ORIGINAL)
12 / 25 SAT 10 : 28 AM
TITLE: CH33 FINE
TITLE INFO: 10/4 MON 8:09 PM – 8:14 PM
ERASE SCENE
CHANGE TITLE NAME
CHANGE THUMBNAIL
DIVIDE CHAPTER
TITLE INFO: 10/4 MON 8:09 PM – 8:14 PM
1
2
4
SELECT
TITLE LIST
CONFIRM CONTENT
AFTER ERASING?
3
5
ENTER ENTER
CHAPTER
RETURN
• Edit Menu screen appears.
60
n RETURN
CONFIRMING
6
n
2
01
00: 00:32
00
EDIT MENU
ERASE
• The erase end point is set. (The title
will pause.)
• When the end point is near the end of
a title, the end of the title will be
selected as the end point. To make
the original designated end point
effective, set it again after combining
the title with the next title.
Editing an Original Title
9
Press Red (B) (CONFIRMING) to
confirm the contents.
• The title is played back without the
scene to be erased.
Press Yellow (D) (ERASE) to
erase.
• Go to step 10.
• Press RETURN to cancel scene
erase.
10 Press \ to select “YES”, then
press SET/ENTER.
EDIT(ORIGINAL)
TITLE: CH33 FINE
12 / 25 SAT 10 : 28 AM
TITLE INFO: 10/4 MON 8:09 PM – 8:14 PM
ERASE SCENE
CHANGE TITLE NAME
CHANGE THUMBNAIL
ERASE THIS SCENE?
DIVIDE CHAPTER
YES
SELECT
ENTER
ENTER
NO
n
RETURN
• Erase begins.
When erase completes, the screen in
step 5 appears.
• If “C (UNDO)” is displayed, you can
undo edit by pressing Green (C).
• To quit scene erase, press RETURN.
Then the edit screen appears.
11 Press EXIT to exit from Edit
mode.
NOTE
Selecting start and end points for scene
erase
You cannot set a range shorter than 3
seconds.
• Once you erase a section of an original, it
is completely erased. It cannot be restored,
so be very careful and confirm before
erasing.
• Scenes can only be added and erased a
maximum of 50 times per title.
• If scenes have been added 51 or more
times to a disc using another DVD recorder,
Editing (Recording) may not function.
Searching for the Start
Point and End Point Scenes
The following playback operations are
available when searching for the start point
and end point scenes.
Playback
• If you press |PLAY, the currently paused
title will be played back.
Skipping to the start of a chapter
• If the scene to be selected is in another title
or chapter, first search for the title or
chapter using Kor L.
Searching for scenes in a chapter
• GREV and JFWD are convenient for
searching for a scene in a chapter.
Pause
• When you reach a scene near the start
point or end point, press FSTILL/PAUSE
to pause. This will make it easier to find the
scene. The start and end points may shift
slightly.
Frame Advance/Reverse
• If you press Lafter pause, the video
will start Frame Advance Playback. If you
press K, it will start Frame Reverse
Playback.
Final selection of scene
• To select a scene more accurately, use
slow playback starting a little before the
scene to be selected. This will keep you
from going beyond the scene.
If you press SLOW after pausing, you
can select a scene at your leisure during
slow playback of the video.
Continued on Next Page |||
61
Editing an Original Title
Inputting/Changing Title
Name (CHANGE TITLE
NAME)
DVD-RW
DVD-RW
VR MODE
VIDEO MODE
4
Press ' / " / \ / | to select the
title to edit, then press Yellow
(D) (EDIT MENU).
12 / 25 SAT 10 : 28 AM
EDIT(ORIGINAL)
TITLE: CH33 FINE
DVD-R
TITLE INFO: 10/4 MON 8:09 PM – 8:14 PM
1
• When you record, a title name including the
date, time and channel number is automatically created.
You can freely change this title name.
• You can input up to a maximum of 64
characters.
To input, perform the following steps in
order: “Select characters to be changed”
→ “Delete unnecessary characters
(characters to be changed)” → “Input new
characters”.
2
4
3
5
SELECT
TITLE LIST
6
n
ENTER ENTER
CHAPTER
RETURN
EDIT MENU
• Edit Menu screen appears.
5
1 Press ' / " to select
“CHANGE TITLE NAME”.
EDIT(ORIGINAL)
1
2
12 / 25 SAT 10 : 28 AM
TITLE: CH 33 FINE
NOTE
• Title names cannot be changed in finalized
Video mode discs.
TITLE INFO: 10/4 MON 4:00 PM – 4:10 PM
ERASE SCENE
CHANGE TITLE NAME
CHANGE THUMBNAIL
CHANGE TITLE NAME.
DIVIDE CHAPTER
Press START MENU.
Press ' / " / \ / | to select “EDIT/
ERASE”, then press SET/ENTER.
START MENU [EDIT/ERASE]
2 Press SET/ENTER.
12 / 25 SAT 10 : 28 AM
• Title Name Change screen appears.
TIMER
PROGRAM/
CHECK
EDIT/
ERASE
REC LIST
EDITS/ERASES RECORDED TITLES
INITIALIZE/
FINALIZE
EDIT(ORIGINAL)
TITLE: CH 33 FINE
OTHER
SETTINGS
12 / 25 SAT 10 : 28 AM
TITLE INFO: 10/4 MON 4:00 PM – 4:10 PM
CH 33 FINE 2004/10/4 4:00 PM|
J K L M .
(
)
?
:
!
;
Á
Â
Ã
Ä
Å Æ Ç
È
É
Ê
Ë
Î
Ï
#
Ñ
Ò
Ó
Ô
Õ
Ø
Ù
Ú
Û
Ü
0 1 2 3 4 5 6 7 8 9
' * / [ \ ] ^
-
A B C D E
F G H
I
N O P Q R S T U V W X Y Z
SELECT
3
ENTER
n
ENTER
RETURN
Press ' / " to select “EDIT”, then
press SET/ENTER.
EDIT/ERASE
12 / 25 SAT 10 : 28 AM
EDIT
ERASE ALL TITLES
ERASE TITLES
TITLE PROTECT / OFF
SELECT
À
DELETES SCENE,
CREATES / EDITS PLAYLIST.
ERASES ALL TITLES ON DISC
(EXCEPT PROTECTED TITLES).
&
6
7
n
,
small
ß $ %
+ < = > " _
{
|
}
˜
END
i
Change Title Name.
Press ' / " / \ / | to select
“END”, then press SET/ENTER
after input is finished.
• The new title is set, and the screen in
step 5 displays.
DISABLES EDIT/ERASE TITLES.
ENTER
Í
• For information on how to input
characters, see page 63.
ERASES SELECTED TITLES.
ENTER
Ö
Ì
Press Green (C) (UNDO) to
return to the previously set title.
RETURN
• The title returns to original name.
• Operate according to the instructions
of the screen.
8
Press EXIT to quit editing.
• Edit mode will terminate.
62
Editing an Original Title
3
How to Enter Text
DVD-RW
DVD-RW
VR MODE
VIDEO MODE
DVD-R
• When you want to insert characters,
move the cursor to the position you
want to insert by pressing Red (B) or
Green (C).
Input Character Screen
Input field
(Displays title name. Can
change and input title name.)
Cursor
(Displays the position to input characters.)
Displays input characters.
Change title name
1 Press Red (B) or Green (C) to
select the character to change.
2 Press Blue (A) to erase the
character to change.
World Rail
4
Select when you switch
between capital letters
and small letters.
Press ' / " / \ / | to select the
character to input, then press
SET/ENTER.
M|
K L M .
(
)
?
:
!
;
Á
Â
Ã
Ä
Å Æ Ç
È
É
Ê
Ë
Í
Î
Ï
#
Ñ
Ò
Ó
Ô
Õ
Ö
Ø
Ù
Ú
Û
Ü
1
'
2
3
5
7
8
9
-
+
<
=
/
6
]
$ %
" _
*
4
[
ß
>
{
|
}
˜
i
A B C D E
F G H
I
J
N O P Q R S T U V W X Y Z
TIMER PROGRAM ADVANCED SETTINGS
12 / 25 SAT 10 : 28 AM
À
12/26 SUN 10:31 AM – 10:33 AM CH 1
PROGRAM NAME:
0
&
World Railway Trains |
K L M .
(
)
?
:
!
;
Á
Â
Ã
Ä
Å Æ Ç
È
É
Ê
Ë
Í
Î
Ï
#
Ñ
Ò
Ó
Ô
Õ
Ö
Ø
Ù
Ú
Û
Ü
1
'
2
3
5
7
8
9
-
+
<
=
/
6
]
$ %
" _
*
4
[
ß
>
{
|
}
˜
i
A B C D E
F G H
I
J
N O P Q R S T U V W X Y Z
À
0
&
SELECT
BACK SPACE
\
^
ENTER
BACK
ENTER
ERASE
Ì
ERASE ALL
FOWARD
Press ' / " / \ / | to
select the character to
be input.
1
,
small
END
n
RETURN
SPACE
5
Perform the steps from 1 to 4 on
page 62.
1 Press ' / " to select
“CHANGE TITLE NAME”.
EDIT(ORIGINAL)
12 / 25 SAT 10 : 28 AM
TITLE: CH 33 FINE
TITLE INFO: 10/4 MON 4:00 PM – 4:10 PM
ERASE SCENE
CHANGE TITLE NAME
CHANGE THUMBNAIL
CHANGE TITLE NAME.
DIVIDE CHAPTER
^
,
small
END
• Inputs character in input field.
• To switch between capital and small
letters, select “CAPS” or “small”, then
press SET/ENTER.
Input title letters by repeating step
4.
• Press Blue (A) (BACK SPACE) to
erase text to the left of the cursor, a
character at a time.
• Press Red (B) (BACK) to move the
cursor back one space.
• Press Green (C) (FORWARD) to move
the cursor forward one space.
• Press YELLOW(D) (SPACE) to input a
space.
• The maximum number of characters
you can input is 64.
Select when you
complete inputting
character.
• Edit Menu screen appears.
2
\
Ì
6
Press ' / " / \ / | to select
“END”, then press SET/ENTER.
TIMER PROGRAM ADVANCED SETTINGS
12 / 25 SAT 10 : 28 AM
12/26 SUN 10:31 AM – 10:33 AM CH 1
PROGRAM NAME:
My Favorite Series 1 |
A B C D E
F G H
I
J
K L M .
(
)
?
:
!
;
Í
Î
Ï
#
$ %
" _
i
N O P Q R S T U V W X Y Z
2 Press SET/ENTER.
• Title Name Change screen appears.
À
0
&
,
Á
Â
Ã
Ä
Å Æ Ç
È
É
Ê
Ë
Ñ
Ò
Ó
Ô
Õ
Ö
Ø
Ù
Ú
Û
Ü
1
'
2
3
5
8
9
-
+
<
=
/
6
]
7
*
4
[
ß
>
{
|
}
˜
\
^
Ì
small
END
• The screen in step 2 on is displayed.
Continued on Next Page |||
63
Editing an Original Title
Changing Thumbnail
(CHANGE THUMBNAIL)
5
EDIT(ORIGINAL)
TITLE: CH33 FINE
DVD-RW
12 / 25 SAT 10 : 28 AM
TITLE INFO: 10/4 MON 8:09 PM – 8:14 PM
ERASE SCENE
CHANGE TITLE NAME
CHANGE THUMBNAIL
DIVIDE CHAPTER
VR MODE
Changes the still frame picture displayed at
the Thumbnail screen of the REC LIST to your
favorite scene within the title.
1
2
1 Press ' / " to select
“CHANGE THUMBNAIL”.
SELECT SCENE FOR
THUMBNAIL
Press START MENU.
Press ' / " / \ / | to select “EDIT/
ERASE”, then press SET/ENTER.
START MENU [EDIT/ERASE]
1
00
00 : 00 : 00
00
2 Press SET/ENTER.
6
Press |PLAY to start playback.
EDIT(ORIGINAL)
12 / 25 SAT 10 : 28 AM
12 / 25 SAT 10 : 28 AM
TITLE: CH33 FINE
TIMER
PROGRAM/
CHECK
EDIT/
ERASE
REC LIST
TITLE INFO: 10/4 MON 8:09 PM – 8:14 PM
SCENE ERASE
CHANGE TITLE NAME
CHANGE THUMBNAIL
DIVIDE CHAPTERS
EDITS/ERASES RECORDED TITLES
INITIALIZE/
FINALIZE
OTHER
SETTINGS
1
01
00: 00 : 12
14
SELECT SCENE FOR
THUMBNAIL
SELECT
3
ENTER
n
ENTER
Press ' / " to select “EDIT”, then
press SET/ENTER.
EDIT/ERASE
• Find the scene you want to use as a
thumbnail using JFWD, GREV,
FSTILL/PAUSE, K, L, or
SLOW.
RETURN
12 / 25 SAT 10 : 28 AM
7
DELETES SCENE,
CREATES / EDITS PLAYLIST.
EDIT
• Playback is paused.
ERASES ALL TITLES ON DISC
(EXCEPT PROTECTED TITLES).
ERASE ALL TITLES
ERASE TITLES
Press SET/ENTER when you
reach the scene you want to use
as a thumbnail.
EDIT(ORIGINAL)
TITLE: CH33 FINE
12 / 25 SAT 10 : 28 AM
ERASES SELECTED TITLES.
TITLE INFO: 10/4 MON 8:09 PM – 8:14 PM
TITLE PROTECT / OFF
ERASE SCENE
CHANGE TITLE NAME
CHANGE THUMBNAIL
DIVIDE CHAPTER
DISABLES EDIT/ERASE TITLES.
SELECT
ENTER
ENTER
n
RETURN
• The Original Edit Title List screen
appears.
4
Press ' / " / \ / | to select the
title to edit, then press Yellow
(D) (EDIT MENU).
PUT THIS
SCENE IN THE
THUMBNAIL?
8
2 Press SET/ENTER.
• The new Thumbnail screen is set, and
the system returns to the screen in
step 5.
TITLE: CH33 FINE
TITLE INFO: 10/4 MON 8:09 PM – 8:14 PM
1
2
4
SELECT
TITLE LIST
3
5
ENTER ENTER
CHAPTER
Press Green (C) (UNDO) to
return to the previously set
thumbnail.
6
n
1 If this is the screen you want,
select “YES” by pressing \ / |.
• If you select “NO”, you can return to
step 5 and select the scene again.
12 / 25 SAT 10 : 28 AM
EDIT(ORIGINAL)
1
01
00 : 00: 41
12
• Operate according to the instructions
of the screen.
RETURN
EDIT MENU
• Edit Menu screen appears.
9
Press EXIT to quit Thumbnail
edit.
• Edit mode will terminate.
64
Editing an Original Title
Making Sections in a Title
(DIVIDE CHAPTER)
6
TITLE INFO: 10/4 MON 8:09 PM – 8:14 PM
ERASE SCENE
CHANGE TITLE NAME
CHANGE THUMBNAIL
DIVIDE CHAPTER
VR MODE
Divides a title into multiple chapters and
makes editing and dubbing of chapter as unit
easier.
• Find the scene to erase using
JFWD, GREV, FSTILL/PAUSE,
K, L, or SLOW on the
remote control.
Press START MENU.
START MENU [EDIT/ERASE]
7
12 / 25 SAT 10 : 28 AM
REC LIST
12 / 25 SAT 10 : 28 AM
TITLE INFO: 10/4 MON 8:09 PM – 8:14 PM
ERASE SCENE
CHANGE TITLE NAME
CHANGE THUMBNAIL
DIVIDE CHAPTER
EDITS/ERASES RECORDED TITLES
INITIALIZE/
FINALIZE
Press SET/ENTER at the point
where you want to divide.
EDIT(ORIGINAL)
TITLE: CH33 FINE
TIMER
PROGRAM/
CHECK
EDIT/
ERASE
2
01
00 : 00 :00
04
SELECT POSITION
TO DIVIDE
THIS CHAPTER.
• You can set chapter divisions by pressing
CHAPTER MARK (under the cover)
during recording or playback.
Press ' / " / \ / | to select “EDIT/
ERASE”, then press SET/ENTER.
12 / 25 SAT 10 : 28 AM
EDIT(ORIGINAL)
TITLE: CH33 FINE
DVD-RW
1
2
Press |PLAY to start playback.
OTHER
SETTINGS
1
01
00 : 00: 12
04
DIVIDE CHAPTER?
YES
3
Press ' / " to select “EDIT”,
then press SET/ENTER.
EDIT/ERASE
EDIT
ERASE ALL TITLES
ERASE TITLES
TITLE PROTECT / OFF
4
8
Press \ / | to select “YES”, then
press SET/ENTER.
• To continue dividing, repeat steps 5
to 7.
12 / 25 SAT 10 : 28 AM
DELETES SCENE,
CREATES / EDITS PLAYLIST.
To cancel a chapter division,
press Green (C) (UNDO).
ERASES ALL TITLES ON DISC
(EXCEPT PROTECTED TITLES).
• Operate according to the instructions
on the screen.
ERASES SELECTED TITLES.
DISABLES EDIT/ERASE TITLES.
Press ' / " / \ / | to select the
title to edit, then press Yellow
(D) (EDIT MENU).
12 / 25 SAT 10 : 28 AM
EDIT(ORIGINAL)
NO
9
Press EXIT to quit editing.
• Edit mode will terminate.
NOTE
• You cannot divide a chapter into a section
which is less than 3 seconds.
TITLE: CH33 FINE
TITLE INFO: 10/4 MON 8:09 PM – 8:14 PM
1
2
4
5
3
5
6
Press ' / " to select “DIVIDE
CHAPTER”, then press SET/
ENTER.
EDIT(ORIGINAL)
TITLE: CH33 FINE
12 / 25 SAT 10 : 28 AM
TITLE INFO: 10/4 MON 8:09 PM – 8:14 PM
ERASE SCENE
CHANGE TITLE NAME
CHANGE THUMBNAIL
DIVIDE CHAPTER
2
01
00 : 00: 00
04
SELECT POSITION
TO DIVIDE
THIS CHAPTER.
Continued on Next Page |||
65
Editing an Original Title
Combining Chapters
Together
(COMBINE CHAPTERS)
DVD-RW
VR MODE
Combines two adjacent chapters into a single
chapter.
NOTE
• You cannot combine chapters automatically recorded when a scene was erased,
or chapters recorded due to adding a
scene to a Play List.
1
Select “EDIT/ERASE” in START
MENU screen, then press SET/
ENTER.
2
Press ' / " to select “EDIT”, then
press SET/ENTER.
3
Press ' / " / \ / | to select the
title you wish to edit.
4
Press Red (B) (CHAPTER) to
select Chapter Thumbnail screen.
5
Press ' / " / \ / | to select the
chapter to combine, then press
Yellow (D) (EDIT MENU).
Disabling Title Edit and
Erase (TITLE PROTECT)
DVD-RW
VR MODE
Disables edit and erases so you cannot
mistakenly change or erase the content of a
title.
Lets you safely save a disc for which editing
is in progress.
• This operation will not work with Video
mode discs.
• Titles created with Play List (page 68)
cannot be protected.
1
Select “EDIT/ERASE” in START
MENU screen, then press SET/
ENTER.
2
Press ' / " to select “TITLE
PROTECT/OFF”, then press SET/
ENTER.
3
Press ' / " / \ / | to select the
title to protect, then press SET/
ENTER.
• Each time the button is pressed, the
setting toggles between “PROTECT”
and “NOT PROTECT”.
TITLE PROTECT OR NOT(ORIGINAL)
12 / 25 SAT 10 : 28 AM
TITLE: CH33 FINE
TITLE INFO: 10/13 WED 4:00 PM – 4:10 PM
1
2
4
5
SELECT
1
3
ENTER
6
7
4
6
ENTER
n
RETURN
Press SET/ENTER.
Press ' / " to select combine
procedure you prefer, then press
SET/ENTER.
• Select from: “COMBINE W/PREV”,
“COMBINE W/NEXT” or “DON’T
COMBINE”.
• If you select “COMBINE W/PREV” or
“COMBINE W/NEXT”, the two
chapters will join, and the Chapter
Thumbnail screen is displayed.
• If you select “DON’T COMBINE”, the
previous screen displays.
EDIT(ORIGINAL)
12 / 25 SAT 10 : 28 AM
TITLE: CH33 FINE
TITLE INFO: 10/4 MON 4:00 PM – 4:10 PM
COMBINE CHAPTERS
COMBINE W/PREV
COMBINE W/PREV CHAP
COMBINE W/NEXT
COMBINE W/NEXT CHAP
DON'T COMBINE
DO NOT COMBINE CHAPS
8
66
Press EXIT to exit from Edit
mode.
3
5
6
• The protect mark
is attached to
protected titles.
(The protect mark can be confirmed
at either the “REC LIST” screen or
“EDIT” screen.)
EDIT MENU
TITLE
2
4
Press EXIT to exit from Edit
mode.
To Cancel Title Protect
1
Select the title protected in step 3
above, and press SET/ENTER.
• Title protect is canceled, and the
protect mark disappears.
NOTE
• If “DVD DISC PROTECTION” is set for a
DVD-RW (VR mode) disc, protection cannot
be canceled for individual titles. Cancel
“DVD DISC PROTECTION” (page 82).
2
Press EXIT to exit from Edit
mode.
Editing an Original Title
Erasing All Titles
DVD-RW
DVD-RW
VR MODE
VIDEO MODE
Erasing by Selecting a
Title (or Chapter)
DVD-R
This erases the entire contents of a DVD-RW.
(Except titles for which title protect has been
set.)
You can erase the following:
• ORIGINAL:
Erases all titles recorded on DVD. When
originals are erased, play lists are also
erased.
• PLAY LIST:
Erases all play lists created on DVD. Even if
play lists are erased, the original titles are
not erased.
NOTE
• When a Video mode disc is finalized, you
can no longer erase all titles.
1
2
3
Select “EDIT/ERASE” in START
MENU screen, then press SET/
ENTER.
Press ' / " to select “ERASE
ALL TITLES”, then press SET/
ENTER.
Press ' / " to select what you
want to erase, then press SET/
ENTER.
DVD-RW
DVD-RW
VR MODE
VIDEO MODE
Allows you to select titles to erase, and erase
them in a batch.
• When erasing original titles:
If original titles are erased, those titles will
also be erased from play lists.
• When erasing play lists:
Even if play lists are erased, the original
titles will not be erased.
NOTE
• Up to a maximum of 20 titles (chapters)
can be selected at one time.
• When a Video mode disc is finalized, you
can no longer select and erase titles.
• You cannot erase chapters in DVD-RW/R
discs (Video mode).
1
Press ' / " to select “ERASE
TITLES”, then press SET/ENTER.
3
Press ' / " / \ / | to select titles
to erase.
• If you press Red (B) (CHAPTER), the
screen will switch to the chapter
thumbnail display so you can select
and erase chapters.
SELECT AN ITEM BELOW TO ERASE ALL TITLES
ORIGINAL
PLAYLIST
4
5
Press SET/ENTER.
• If there are other titles (chapters) you
wish to erase, select with ' / " / \ / |
and press SET/ENTER.
5
6
Press Yellow (D) (ERASE).
Press \ / | to select “YES”.
• Once a title (chapter) has been
erased, it cannot be restored.
Carefully confirm before executing
erase.
• If you select “NO” and enter, operate
form step 4 again.
Press SET/ENTER.
• All titles (or play lists) are erased, and
the screen in step 3 appears.
To restore the erased content, press
Green (C) (CNL ERSE). Operate
according to the instructions on the
screen. (Note: You can only undo
once, to the state immediately before
the last erase.)
6
4
Press \ / | to select “YES”, then
press SET/ENTER.
• Carefully confirm before executing
erase.
• If you select “NO” and enter, the
screen in step 3 appears.
Select “EDIT/ERASE” in START
MENU screen, then press SET/
ENTER.
2
12 / 25 SAT 10 : 28 AM
ERASE ALL TITLES
DVD-R
7
Press SET/ENTER.
• All selected titles (chapters) are
erased.
• To cancel erase, press Green (C)
(CNL ERSE).
• Operate according to the instructions
on the screen.
Press EXIT to exit from Edit
mode.
8
Press EXIT to exit from Edit
mode.
Continued on Next Page |||
67
Editing a Play List
Creating a Play List
5
DVD-RW
VR MODE
You can create a Play List by copying a title
or chapter units from an original. Also you can
select your favorite scenes from originals, and
compile them into a Play List.
1 Press ' / " to select “COPY
TITLE/CHAPTER”.
2 Press SET/ENTER.
• REC LIST (Thumbnail) screen of the
original appears.
6
1 Press ' / " / \ / | to select title
to copy.
EDIT(ORIGINAL)
NOTE
• Operations like “COPY TITLE/CHAPTER”
and “COPY SPECIFIED SCENE” do not
actually copy the original titles. These
operations merely write the information
“make this original title a title in the play
list”. Therefore, you can edit without
decreasing free space in the disc or
touching the original titles.
• When creating a play list from original titles,
the original title’s thumbnail and chapter
mark information are not copied.
Creating from Original
Titles
Makes a single original title into a play list
title.
1
Select “EDIT/ERASE” in START
MENU screen, then press SET/
ENTER.
2
Press ' / " to select “EDIT”, then
press SET/ENTER.
3
Press ORIGINAL/PLAY LIST to
switch to the PLAY LIST screen.
• The screen switches to the Play List
Edit Screen.
• There still is no title at this point, so a
“NEW” title frame with no image is
displayed.
• To create a new Play List later, select
the “NEW” title frame.
TITLE INFO: 10/4 MON 8:09 PM – 8:14 PM
1
3
5
6
• To select a chapter, press Red (B)
(CHAPTER).
2 Press SET/ENTER.
• The selected title (chapter) becomes
a Play List title.
Creating from Part of an
Original
You can select a desired scene from an
original title, and make it into a Play List title.
1
Perform steps 1-4 of “Creating
from Original Titles” in the left
column.
2
1 Press ' / " to select “COPY
SPECIFIED SCENE”.
2 Press SET/ENTER.
3
Press ' / " / \ / | to select title to
copy, then press SET/ENTER.
• To select from a chapter, press Red
(B) (CHAPTER) and select the
chapter.
4
Press |PLAY to start playback.
• Find the scene to copy using
FSTILL/PAUSE, JFWD, GREW,
K, L, or SLOW.
SELECT EDIT OR CREATE PLAYLIST
5
NEW
2
4
12 / 25 SAT 10 : 28 AM
EDIT(PLAYLIST)
12 / 25 SAT 10 : 28 AM
TITLE: CH33 FINE
Press SET/ENTER at the place
where you want to start copying.
SPECIFY A RANGE
TO COPY.
4
Press SET/ENTER.
12 / 25 SAT 10 : 28 AM
EDIT(PLAYLIST)
SPECIFY THE RANGE TO SET PLAYLIST
FROM THE ORIGINAL THEN CREATE PLAYLIST.
COPY TITLE/CHAPTER
SELECT ORIGINAL TITLE/CHAPTER AND ADD IT.
COPY SPECIFIED SCENE
SELECT A SCENE FROM ORIGINAL VIDEO
AND ADD IT.
SELECT
68
ENTER
ENTER
n
PREVIOUS
ENTER
SET END POINT
• If you fast reverse to a scene prior to
the start point, the start point will be
canceled.
• When the start point is set to near the
beginning of a chapter, the beginning
of the chapter will be selected as the
start point. To make the original
designated start point effective, set it
again after combining the chapter
with the one immediately before
(page 66).
Editing a Play List
6
Find the place where you want to
end copying, then press SET/
ENTER.
• If you press RETURN, you can
reselect the start point.
EDIT(ORIGINAL)
12 / 25 SAT 10 : 28 AM
TITLE: CH33 FINE
1
07
00 : 00 : 32
14
CONFIRM CONTENT?
• When the end point is set to near the
end of a chapter, the end of the
chapter will be selected as the end
point. To make the original designated end point effective, set it again
after combining the chapter with the
next chapter (page 66).
Press Red (B) (CONFIRMING) to
confirm the content.
Press Yellow (D) (CREATE) to
execute copy.
Go to step 8.
• You can reselect the end point by
pressing RETURN.
8
DVD-RW
VR MODE
TITLE INFO: 10/4 MON 8:09 PM – 8:14 PM
CREATE NEW
7
Adding a Scene from an
Original to a Play List
(ADD SCENE)
Adds video selected from an original to the
end of play list titles.
NOTE
• The selected scene cannot be added if
adding it will make the title longer than 12
hours.
• Scenes can be added as long as the
length of the title after adding is less than
the maximum of 12 hours.
1
Select “EDIT/ERASE” in START
MENU screen, then press SET/
ENTER.
2
Press ' / " to select “EDIT”,
then press SET/ENTER.
3
1 Press ORIGINAL/PLAY LIST
to switch to Play List screen.
2 Press ' / " / \ / | to select title
to edit.
1 Press \ / | to select “YES”.
2 Press SET/ENTER.
EDIT(PLAY LIST)
12 / 25 SAT 10 : 28 AM
TITLE: CH33 FINE
SAVE AS A NEW PLAYLIST?
TITLE INFO: 10/4 MON 8:09 PM – 8:14 PM
1
2
3
NEW
YES
SELECT
ENTER
ENTER
NO
n
4
RETURN
5
6
• One play list title is created.
NOTE
Selecting start or end point to add a scene.
• You cannot add a scene which is less than
3 seconds.
3 Press Yellow (D) (EDIT
MENU).
4
Press ' / " to select “ADD
SCENE” then press SET/
ENTER.
EDIT(PLAYLIST)
TITLE: CH33 FINE
12 / 25 SAT 10 : 28 AM
TITLE INFO: 10/4 MON 8:09 PM – 8:14 PM
ERASE SCENE
CHANGE TITLE NAME
ADD CHAPTER/TITLE
CHANGE THUMBNAIL
SELECT ORIGINAL TITLE/CHAPTER AND ADD IT
DIVIDE CHAPTER
ADD SCENE
MOVE TITLE
SPECIFY SCENE TO ADD
SELECT A SCENE FROM ORIGINAL VIDEO AND
ADD IT
SELECT
ENTER
ENTER
n
RETURN
Continued on Next Page |||
69
Editing a Play List
5
Adding a Title or Chapter
• If you fast reverse to a scene prior to
the start point, the start point will be
canceled.
• When the start point is set to near the
beginning of a chapter, the beginning
of the chapter will be selected as the
start point. To make the original
designated start point effective, set it
again after combining the chapter
with the one immediately before
(page 66).
1 Select “ADD CHAPTER/TITLE”,
then press SET/ENTER.
2 Select a title (chapter) at the
title (chapter) list, then press
SET/ENTER.
Go to step 9.
Specifying and Adding a
Scene
• Select “SPECIFY SCENE TO
ADD”, then press SET/ENTER.
Go to step 6.
EDIT(PLAYLIST)
TITLE: CH33 FINE
8
ERASE SCENE
CHANGE TITLE NAME
CHANGE THUMBNAIL
DIVIDE CHAPTER
ADD SCENE
MOVE TITLE
12 / 25 SAT 10 : 28 AM
TITLE INFO: 10/4 MON 8:09 PM – 8:14 PM
ERASE SCENE
CHANGE TITLE NAME
ADD CHAPTER/TITLE
CHANGE THUMBNAIL
SELECT ORIGINAL TITLE/CHAPTER AND ADD IT
DIVIDE CHAPTER
ADD SCENE
MOVE TITLE
SPECIFY SCENE TO ADD
6
ENTER
ENTER
n
RETURN
• The selected title (chapter) pauses.
12 / 25 SAT 10 : 28 AM
TITLE: CH33 FINE
TITLE INFO: 10/4 MON 8:09 PM – 8:14 PM
ERASE SCENE
CHANGE TITLE NAME
CHANGE THUMBNAIL
DIVIDE CHAPTER
ADD SCENE
MOVE TITLE
PLAY
7
PLAYBACK
ENTER
2
01
00 : 00: 00
04
SPECIFY RANGE TO
ADD
SET START POINT
1 Press |PLAY to start playback.
• Find the scene to add using FSTILL/
PAUSE, JFWD, GREV, K,
L, or SLOW.
EDIT(ORIGINAL)
12 / 25 SAT 10 : 28 AM
TITLE: CH33 FINE
TITLE INFO: 10/4 MON 8:09 PM – 8:14 PM
ERASE SCENE
CHANGE TITLE NAME
CHANGE THUMBNAIL
DIVIDE CHAPTER
ADD SCENE
MOVE TITLE
PLAY
PLAYBACK
ENTER
2
01
00 : 00 :12
00
SPECIFY RANGE TO
ADD
ERASE SCENE
CHANGE TITLE NAME
CHANGE THUMBNAIL
DIVIDE CHAPTER
ADD SCENE
MOVE TITLE
70
ADD
9
Press Red (B) (CONFIRMING) to
confirm the content.
Press Yellow (D) (ADD) to add.
• If you press Red (B) (CONFIRMING),
you can test play the added scene,
from the start point to the end point. It
may take about one minute for the
confirm screen to appear.
• Press Yellow (D) (ADD) to add.
10 1 Press \ / | to select “YES”.
2 Press SET/ENTER.
• The scene is added after the selected
title, and stored as a new title of the
play list.
11 Press EXIT to exit from EDIT
mode.
• A chapter mark is automatically set at
the start point where the scene is
added.
SET START POINT
2 Press SET/ENTER at the start
point of the scene you want to
add.
2
01
00 :00: 47
09
SPECIFY RANGE TO
ADD
ENTER
CONFIRM CONTENT?
• Press RETURN to reselect the start
point of the scene. You can press
RETURN to reselect the end point
even after it is already set.
• When the end point is set to near the
end of a chapter, the end of the
chapter will be selected as the end
point. To make the original designated end point effective, set it again
after combining the chapter with the
next chapter (page 66).
Press ' / " / \ / | to select title
(chapter) to edit, then press SET/
ENTER.
EDIT(ORIGINAL)
2
01
00: 00: 12
09
n RETURN
CONFIRMING
SELECT A SCENE FROM ORIGINAL VIDEO AND
ADD IT
SELECT
Press SET/ENTER at the end of
the scene you want to add.
SET END POINT
NOTE
• When adding a scene, select a scene
which continues for at least 3 seconds.
Scenes shorter than 3 seconds cannot be
added.
• Scenes can only be added and erased a
maximum of 50 times per title.
• If you press GREV or Kand reverse
beyond the start point after setting a start
point, the start point will cancel.
• If scenes have been added or erased 51 or
more times to a single title in a disc using
another DVD recorder, Editing (Recording)
may not function.
Editing a Play List
Changing the Title
Sequence (MOVE TITLE)
6
• If a point prior to the selected title is
selected as the destination, the title
will move to the point immediately
prior to the selected title.
• Press Green (C) (UNDO) to restore to
the state before the movement.
Operate according to the instructions
on the screen.
DVD-RW
VR MODE
Freely changes the sequence of titles.
EDIT(PLAYLIST)
Press SET/ENTER.
12 / 25 SAT 10 : 28 AM
SELECT EDIT OR CREATE PLAYLIST
12 / 25 SAT 10 : 28 AM
EDIT(PLAYLIST)
TITLE: CH33 FINE
1
2
TITLE INFO: 10/6 WED 4:00 PM – 4:10 PM
NEW
1
3
4
2
4
SELECT
TITLE LIST
1
ENTER
n
ENTER
2
Press ' / " to select “EDIT”, then
press SET/ENTER.
3
1 Press ORIGINAL/PLAY LIST
to switch to Play List screen.
2 Press ' / " / \ / | to select title
to edit.
EDIT(PLAYLIST)
TITLE: CH33 FINE
SELECT
TITLE LIST
6
1
2
RETURN
3
5
n
TITLE LIST
6
RETURN
UNDO
Example: If Title 3 is selected and the
destination cursor is set to Title 1, Title 3
is moved to the spot in front of Title 1.
• If a point after the selected title is
selected as the destination, the title
will move to the point immediately
after the selected title.
2
5
n
n
12 / 25 SAT 10 : 28 AM
4
NEW
4
ENTER
TITLE INFO: 10/4 MON 4:00 PM – 4:10 PM
TITLE INFO: 10/4 MON 4:00 PM – 4:10 PM
1
ENTER
EDIT(PLAYLIST)
TITLE: CH33
12 / 25 SAT 10 : 28 AM
ENTER ENTER
SELECT
CHAPTER
TITLE LIST
5
RETURN
Select “EDIT/ERASE” in START
MENU screen, then press SET/
ENTER.
3
3
5
RETURN
EDIT(PLAYLIST)
EDIT MENU
12 / 25 SAT 10 : 28 AM
TITLE: CH33 FINE
3 Press Yellow (D) (EDIT
MENU).
4
Press ' / " to select “MOVE
TITLE”, then press SET/ENTER.
5
Press ' / " / \ / | to select the
thumbnail to move the title to.
EDIT(PLAYLIST)
TITLE: CH33 FINE
TITLE INFO: 10/7 THU 8:09 PM – 8:14 PM
1
4
SELECT
TITLE LIST
3
5
ENTER
n
RETURN
ENTER
12 / 25 SAT 10 : 28 AM
2
3
6
4
Selected title
ENTER
6
TITLE INFO: 10/6 WED 4:00 PM – 4:10 PM
1
SELECT
TITLE LIST
5
EDIT(PLAYLIST)
TITLE: CH33 FINE
2
4
3
12 / 25 SAT 10 : 28 AM
TITLE INFO: 10/8 FRI 4:00 PM – 4:10 PM
1
2
ENTER
n
5
6
RETURN
n
Cursor on the
thumbnail to move
the selected title to
TITLE LIST
RETURN
UNDO
Example: If Title 3 is selected and the
destination cursor is set to Title 4, Title 3
is moved to the spot after Title 4.
7
Press EXIT to exit from EDIT
mode.
71
Editing a Play List
Erasing Unnecessary
Scenes (ERASE SCENE)
Making Sections in a Title
(DIVIDE CHAPTER)
DVD-RW
DVD-RW
VR MODE
VR MODE
Selects and erases unnecessary scenes.
Even if you erase a scene in a play list, this
will not affect the original video.
Divides a title into multiple chapters. This
makes editing and dubbing in chapter units
more convenient.
1
1
Select “EDIT” at the “EDIT/ERASE”
in START MENU, then press SET/
ENTER.
• The Thumbnail screen appears.
2
3
Press ORIGINAL/PLAY LIST to
display Play List (Thumbnail)
screen.
Erase the scene using the same
operation used for erasing an
original scene (step 4 on page 60step 11 on page 61).
• The Thumbnail screen appears.
2
3
Press ORIGINAL/PLAY LIST to
display Play List (Thumbnail)
screen.
Divide a title into chapters using
the same operation used for
chapter division of originals
(steps 4 - 9 on page 65).
Inputting/Changing
Title Name
(CHANGE TITLE NAME)
Combining Chapters
Together
(COMBINE CHAPTERS)
DVD-RW
DVD-RW
VR MODE
You can input up to 64 characters.
1
Select “EDIT” at the “EDIT/
ERASE” in START MENU, then
press SET/ENTER.
VR MODE
This lets you combine two adjacent chapters
into a single chapter.
1
• The Thumbnail screen appears.
2
3
2
Change or input the title name
using the same operation used for
changing or inputting an original
title (steps 4 - 8 on page 62).
3
DVD-RW
VR MODE
Changes the image of title displayed in REC
LIST to a scene you like in the title.
1
Select “EDIT” at the “EDIT/ERASE”
in START MENU, then press SET/
ENTER.
• The Thumbnail screen appears.
2
3
Press ORIGINAL/PLAY LIST to
display Play List (Thumbnail)
screen.
Change the thumbnail using the
same operation used for changing
an original thumbnail (steps 4 - 9
on page 64).
Select “EDIT” at the “EDIT/ERASE”
in START MENU, then press SET/
ENTER.
• The Thumbnail screen appears.
Press ORIGINAL/PLAY LIST to
display Play List (Thumbnail)
screen.
Changing Thumbnail
(CHANGE THUMBNAIL)
72
Select “EDIT” at the “EDIT/ERASE”
in START MENU, then press SET/
ENTER.
Press ORIGINAL/PLAY LIST to
display Play List (Thumbnail)
screen.
Combine chapters using the same
operation used for chapter
combination of originals (steps 38, left column on page 66).
NOTE
• You cannot combine chapters automatically recorded when a scene was erased,
or chapters recorded due to adding a
scene to a play list (with ADD SCENE).
Enjoying High Quality Sounds
Playing 2 Channel Audio with an
Analog Connection
The Recorder
IN
FROM
ANTENNA
IN 1
OUT 1
AUTO
REC
OUT 2
IN 2
LINE
COMPONENT OUT
480i/
480p
R-AUDIO-L
VIDEO S-VIDEO
(Red)
R-AUDIO-L
VIDEO
S-VIDEO LINE
OPTICAL
COAXIAL
PASS THROUGH
VHF/UHF/CATV
(White)
DIGITAL AUDIO OUT
To AUDIO
Output jacks
Audio cable
(commercially available)
(Red)
(White)
To amplifier
audio input jacks
Playing Dolby Digital
(5.1 Channel) and DTS Audio with
a Digital Connection
• Connecting an amplifier with a Dolby Digital/DTS digital
surround processor or a Dolby Digital/DTS digital
surround amplifier to the Recorder’s coaxial or optical
DIGITAL AUDIO Output jack (terminal) provides richer,
more powerful audio play.
• To enjoy DTS Digital Surround audio, select DTS audio at
the disc menu during DVD playback, or select DTS audio
using the AUDIO button (under the cover) of the remote
control.
■ Connection to a processor or amplifier with an optical
or coaxial digital input jack (terminal)
The Recorder
COMPONENT OUT
480i/
480p
IN
FROM
ANTENNA
IN 1
OUT 1
AUTO
REC
IN 2
LINE
OUT 2
R-AUDIO-L
VIDEO S-VIDEO
R-AUDIO-L
VIDEO
S-VIDEO LINE
OPTICAL
COAXIAL
PASS THROUGH
VHF/UHF/CATV
DIGITAL AUDIO OUT
To DIGITAL
AUDIO Output
OPTICAL terminal
To DIGITAL
AUDIO Output
COAXIAL jack
Audio equipment, etc.
Jack and Plug Colors
Audio Left: White
Audio Right: Red
NOTE
• When connecting audio equipment using analog
connection, we recommend that you set “DD OUTPUT
LEVEL” to “NO” (see page 81).
If you set to “YES”, audio may sound abnormal during
disc playback.
Optical digital cable
(commercially available)
To optical digital
input terminal
or
Coaxial digital cable
(commercially available)
To coaxial digital
input jack
Dolby Digital (5.1ch)/
DTS processor or amplifier
Important!
• When using this connection, set “DIGITAL AUDIO
OUTPUT” to “Dolby Digital” (see page 80).
NOTE
• To play a disc recorded with DTS, you need to use DTS
processor or amplifier.
• This connection is not possible if the processor or
amplifier to which you want to connect does not have an
optical or coaxial digital input jack (terminal).
• Refer to the operation manual for the processor or
amplifier for information about connecting to it.
73
Enjoying High Quality Sounds
Playing 2 Channel Audio with a
Digital Connection
The Recorder
Audio CD or Video CD
IN 1
OUT 1
AUTO
REC
IN 2
OUT 2
R-AUDIO-L
VIDEO S-VIDEO
R-AUDIO-L
VIDEO
S-VIDEO LINE
• You can enjoy these discs by playing them back by the
ordinary playback procedure. (The normal audio output
is not played back for discs recorded with DTS.)
COMPONENT OUT
480i/
480p
IN
FROM
ANTENNA
LINE
OPTICAL
COAXIAL
Optical digital cable
(commercially available)
To optical digital
input terminal
DVD Video Disc
PASS THROUGH
VHF/UHF/CATV
DIGITAL AUDIO OUT
To DIGITAL
AUDIO Output
OPTICAL terminal
To DIGITAL
AUDIO Output
COAXIAL jack
or
Coaxial digital cable
(commercially available)
To coaxial digital
input jack
Audio equipment with an
optical or coaxial digital
input terminal
Important!
• When using this connection, set “DIGITAL AUDIO
OUTPUT” to “PCM” (see page 80).
Digital Connection to an MD Recorder to Record a CD
• When you are using a digital connection to record
the contents of a CD to an MD, the track numbers of
the CD may not match the track numbers recorded
to the MD.
74
Digital Connection to an MD Recorder or
Other Audio Equipment without a Dolby
Digital Decoder
• There is no audio signal generated for DVD video discs
recorded with DTS. A processor or amplifier equipped
with a DTS Surround decoder function is required to enjoy
DTS audio.
Recording from External Equipment
Recording from a Camcorder
(VCR) Using an Analog
Connection
DVD-RW
DVD-RW
VR MODE
VIDEO MODE
1
• Select audio using “EXTERNAL AUDIO” (page 76).
• Select “L CH” or “R CH” with “DUAL MONO REC.
SET” (page 76) to record in Video mode.
2
DVD-R
Material from a camcorder can be recorded with this
Recorder using an analog connection. You can capture
video by connecting a camcorder or VCR to the LINE IN 1,
2 or 3 jacks of this Recorder.
•
•
•
•
•
•
NOTE
More vivid images can be viewed by connecting the SVIDEO IN jack on this Recorder with the S-video Out jack
on the camcorder using an S-video cable.
Some camcorders may be required to be connected
using a special cable.
Refer to the operation manual provided with the
camcorder for further information on the procedure for
connecting the camcorder.
Material protected with a copy guard cannot be recorded. It may be impossible to get the correct video,
even if you just view without recording.
Date and time as well as the contents of cassette memory
cannot be recorded with this Recorder.
If you input video from an external device to this Recorder, there will be a slight difference in image quality
between the video viewed from the external device
directly on the TV, and video viewed as external input to
the Recorder.
Select audio to be input from the external
equipment.
Press INPUT to set the connection to external input channel (example: L3).
• The setting will cycle as follows each time you press
the button.
3
4
L1 (IN 1)
L2 (IN 2)
TV channels
L3 (IN 3)
Play back the camcorder or VCR.
Press ●REC when you reach the scene you
want to start recording.
• The Recorder starts recording.
5
Press STILL/PAUSE when you want to
pause recording.
• Press
mode.
6
STILL/PAUSE again to cancel Pause
Press ■STOP when you want to stop (end)
recording.
Example:
To record by connecting a camcorder to the LINE IN 3
jacks.
The Recorder
S-VIDEO
RESET
To S-VIDEO
Input jack
S-video cable
(provided with
camcorder or
commercially
available)
To S-video
output jack
VIDEO
L (MONO)-AUDIO-R
LINE IN 3
To VIDEO/AUDIO
Input jacks
Video/audio cable
(commercially available)
To video/audio
output jack
Camcorder
75
Function Setting
Settings of This Recorder
This section explains various settings relating to recording and playback which can be used to get more out of the Recorder.
• For details about each setting, see the corresponding pages.
REC. FUNCTION s page 76
VIEW/PLAY SETTING s page 78
ADJUSTMENT s page 80
INITIALIZE/FINALIZE s page 84
REC. FUNCTION
AUTO CHAPTER
• This sets the interval of automatic chapter setting during recording.
• Chapter marks set on a DVD in Video mode cannot be combined by editing, so select
an appropriate interval.
10 (10 min interval)
15 (15 min interval)
30 (30 min interval)
- - (off)
EXACT RECORDING
YES
• This function works when timer recording (Easy Recording Guide/VCR Plus+/Timer
NO
Program) onto DVD-RW/R. If disc capacity runs low, and the program cannot be
recorded to the end, this function will automatically change the recording mode so the
program will fit.
(The recording mode set in above situation will have lower picture quality than the
originally set recording mode.)
• If there is very little disc capacity left on the disc, the program may not fit even if Exact
Recording is set.
• When recording in EP mode, there is no lower recording mode, so Exact Recording will
not work.
REC. AUDIO FORMAT
• PCM: If you record by setting the recording mode to “FINE” or “MN32”, you can record
audio as PCM (uncompressed) audio which can be played back with 2ch audio
equipment.
* This will not work when recording with the recording mode set to anything other than
“FINE” or “MN32”.
* Recording is done with a recording mode whose image quality is slightly lower than
FINE mode recorded with the “DD 2CH” setting.
• DD 2CH: Records audio as Dolby Digital 2ch audio.
PCM
DD 2CH
EXTERNAL AUDIO
• This selects audio to be input from an external equipment.
STEREO: Recording standard stereo sound.
DUAL MONO: Recording the sound that each channel carries as a separate sound.
STEREO
DUAL MONO
DUAL MONO REC. SET
• This lets you select whether to record the left or right audio channel when recording an
external source onto DVD-RW/R in Video mode.
L CH
R CH
MANUAL REC. MODE
• If you set by selecting one of the 32 picture quality levels for “MN”, recording will be
done at that picture quality when “MN” is selected using REC MODE on the remote
control. For details, see page 36.
32 levels
SAP SETTING
• If you set this to “ON” while receiving a SAP (Separate Audio Program) broadcast, you
can listen to and record the SAP audio. For details on ON/OFF setting, the audio you
can listen to, and the audio you can record, see “About SAP” on page 77.
76
ON
OFF
Function Setting
Basic Operation for
REC FUNCTION Setting
Example: Setting “EXTERNAL AUDIO” under
“REC. FUNCTION”
1
1 Press START MENU to
display START MENU screen.
2 Press ' / " / \ / | to select
“OTHER SETTINGS”, then
press SET/ENTER.
START MENU[OTHER SETTINGS]
12 / 25 SAT 10 : 28 AM
TIMER
PROGRAM/
CHECK
EDIT/
ERASE
REC LIST
INITIALIZE/
FINALIZE
OTHER
SETTINGS
DISPLAYS SET ITEMS BEFORE REC/PLAYBACK
2
Press \ / | to select “REC.
FUNCTION”.
OTHER SETTINGS[REC. FUNCTION]
REC. FUNCTION
VIEW/PLAY SETTING
12 / 25 SAT 10 : 28 AM
ADJUSTMENT
AUTO CHAPTER
EXACT RECORDING
REC. AUDIO FORMAT
EXTERNAL AUDIO
DUAL MONO REC. SET
MANUAL REC. MODE
SAP SETTING
3
This Recorder can record stereo or SAP
(Separate Audio Program) broadcasts, where
available. If the broadcast is in stereo, the
Recorder automatically records the stereo
sound. If the broadcast is in SAP, you can
record both the MAIN and the SAP sounds. If
the broadcast is in stereo/SAP, you can
record either the SAP sound by setting the
SAP mode to “ON”, or stereo sound by
setting the SAP mode to “OFF”.
SAP Broadcast
The monitor output listed in the table shows
the audio output mode. The contents of audio
recording are different between VR mode and
Video mode. See the table below for details.
Broadcast
Received/SAP AUDIO Recording
Mode
ON or OFF
L
R
AUDIO
OUTPUT
L
R
STEREO+SAP
SAP OFF
STEREO+SAP
SAP ON
L+R
L
L+R
SAP
L+R
L
L+R
L
MONO
MONO
MONO
SAP
MONO
MONO
MONO
MONO
STEREO
SAP OFF
Press ' / " to select “EXTERNAL
AUDIO”, then press SET/ENTER.
OTHER SETTINGS[REC. FUNCTION]
REC. FUNCTION
VIEW/PLAY SETTING
12 / 25 THU 10 : 28 PM
ADJUSTMENT
AUTO CHAPTER
EXACT RECORDING
REC. AUDIO FORMAT
EXTERNAL AUDIO
DUAL MONO REC. SET
MANUAL REC. MODE
SAP SETTING
4
About SAP
STEREO
SAP ON
MONO+SAP
SAP OFF
MONO+SAP
SAP ON
MONO
SAP OFF
MONO
SAP ON
Press \ / | to select the option
you want to set, then press SET/
ENTER.
OTHER SETTINGS[EXTERNAL AUDIO]
12 / 25 SAT 10 : 28 AM
MONO
LR
MAIN
SAP
MONO
LR
MONO
LR
MONO
LR
MAIN
SAP
MONO
LR
MONO
LR
L+R
L
L+R
L+R
L+R
L
L+R
L
MONO
MONO
MONO
MONO
MONO
MONO
MONO
MONO
L+R
R
L+R
SAP
L+R
R
L+R
R
MONO
MONO
MONO
SAP
MONO
MONO
MONO
MONO
L+R
R
L+R
SAP
L+R
R
L+R
R
MONO
MONO
MONO
SAP
MONO
MONO
MONO
MONO
: When recording to a DVD-RW/R disc in Video mode,
the SAP channel is recorded on this channel.
When recording audio in the PCM format with the
recording mode set to “FINE” or “MN32”, audio is
recorded in the same format as recorded to DVDRW/R disc in Video mode.
• When a disc recorded in monaural audio is
played back, monaural audio is played
back even though “STEREO” is diaplayed
on the screen.
SELECT EXTERNAL AUDIO MODE WHEN
RECORDING.FROM EXTERNAL EQUIPMENT.
STEREO
SELECT
5
DUAL MONO
ENTER
ENTER
n
RETURN
Press EXIT to exit from External
Audio Setting.
Continued on Next Page |||
77
Function Setting
VIEW/PLAY SETTING
PASSWORD
SETTING
DVD PLAY
SETTING
PASSWORD
• This sets the password for setting or changing Parental Control.
4 digit number
PARENTAL CONTROL
• This lets you set Parental Control depending on disc content.
• Level 1: For most restricted viewing → Level 8: For adult viewing
(The smaller the number, the greater the level of restriction.)
• When “PARENTAL CONTROL” is set to “OFF”, DVD discs can be
played back regardless of the parental level.
The parental level for USA is as follows.
Level 7: NC-17 Level 6: R Level 4: PG13
Level 3: PG
Level 1: G
The parental level set up for Canada is prepared for future use. As for
the set up of an appropriate level, please check the level when you
purchase your DVD disc equipped with the parental control feature.
• Parental Control cannot be set if a password has not been set.
DISC LANGUAGE
• This lets you select the language for audio and menus displayed on
the screen.
OFF, LEVEL 1-8
COUNTRY CODE
* Refer to the Country
Code List below.
SUBTITLE
AUDIO
MENU
* Refer to the
Language Code
List below.
Country Code List
USA
CANADA
JAPAN
GERMANY
FRANCE
UK
ITALY
SPAIN
SWISS
SWEDEN
HOLLAND
NORWAY
DENMARK
FINLAND
BELGIUM
HONG KONG
SINGAPORE
THAILAND
MALAYSIA
INDONESIA
TAIWAN
PHILIPPINE
AUSTRALIA
RUSSIA
CHINA
KK
KL
KM
KN
KO
KS
KU
KY
LA
LN
LO
LT
LV
MG
MI
MK
ML
MN
MO
MR
MS
MT
MY
NA
NE
NL
NO
OC
OM
OR
PA
PL
PS
PT
QU
RM
RN
RO
RU
RW
SA
SD
SG
SH
SI
SK
SL
SM
SN
SO
SQ
SR
SS
ST
SU
SV
SW
TA
TE
TG
TH
TI
TK
TL
TN
TO
TR
TS
TT
TW
UK
UR
UZ
VI
VO
WO
XH
YO
ZH
ZU
Language Code List
AA
AB
AF
AM
AR
AS
AY
AZ
BA
BE
BG
BH
BI
BN
BO
BR
CA
CO
CS
CY
DA
DE
DZ
EL
EN
EO
ES
ET
78
Afar
Abkhazian
Afrikaans
Ameharic
Arabic
Assamese
Aymara
Azerbaijani
Bashkir
Byelorussian
Bulgarian
Bihari
Bislama
Bengali, Bangla
Tibetan
Breton
Catalan
Corsican
Czech
Welsh
Danish
German
Bhutani
Greek
English
Esperanto
Spanish
Estonian
EU
FA
FI
FJ
FO
FR
FY
GA
GD
GL
GN
GU
HA
HI
HR
HU
HY
IA
IE
IK
IN
IS
IT
IW
JA
JI
JW
KA
Basque
Persian
Finnish
Fiji
Faroese
French
Frisian
Irish
Scots Gaelic
Galician
Guarani
Gujarati
Hausa
Hindi
Croatian
Hungarian
Armenian
Interlingua
Interlingue
Inupiak
Indonesian
Icelandic
Italian
Hebrew
Japanese
Yiddish
Javanese
Georgian
Kazakh
Greenlandic
Cambodian
Kannada
Korean
Kashmiri
Kurdish
Kirghiz
Latin
Lingala
Laothian
Lithuanian
Latvian, Lettish
Malagasy
Maori
Macedonian
Malayalam
Mongolian
Moldavian
Marathi
Malay
Maltese
Burmese
Nauru
Nepali
Dutch
Norwegian
Occitan
Afan (Oromo)
Oriya
Panjabi
Polish
Pashto, Pushto
Portuguese
Quechua
Rhaeto-Romance
Kirundi
Romanian
Russian
Kinyarwanda
Sanskrit
Sindhi
Sangho
Serbo-Croatian
Singhalese
Slovak
Slovenian
Samoan
Shona
Somali
Albanian
Serbian
Siswat
Sesotho
Sundanese
Swedish
Swahili
Tamil
Telugu
Tajik
Thai
Tigrinya
Turkmen
Tagalog
Setswana
Tonga
Turkish
Tsonga
Tatar
Twi
Ukrainian
Urdu
Uzbek
Vietnamese
Volapük
Wolof
Xhosa
Yoruba
Chinese
Zulu
Function Setting
Basic Operation for
VIEW/PLAY SETTING
Example: Setting “DVD PLAY SETTING”
under “VIEW/PLAY SETTING”
1
1 Press START MENU to
display START MENU screen.
2 Press ' / " / \ / | to select
“OTHER SETTINGS”, then
press SET/ENTER.
START MENU[OTHER SETTINGS]
12 / 25 SAT 10 : 28 AM
REC LIST
EDIT/
ERASE
INITIALIZE/
FINALIZE
OTHER
SETTINGS
TIMER
PROGRAM/
CHECK
DISPLAYS SET ITEMS BEFORE REC/PLAYBACK
2
Press \ / | to select “VIEW/PLAY
SETTING”, then press SET/
ENTER.
OTHER SETTINGS[VIEW/PLAY SETTING]
REC. FUNCTION
VIEW/PLAY SETTING
12 / 25 SAT 10 : 28 AM
ADJUSTMENT
PASSWORD SETTING
DVD PLAY SETTING
3
Press ' / " to select “DVD PLAY
SETTING”, then press SET/
ENTER.
OTHER SETTINGS[VIEW/PLAY SETTING]
REC. FUNCTION
VIEW/PLAY SETTING
12 / 25 SAT 10 : 28 AM
ADJUSTMENT
PASSWORD SETTING
DVD PLAY SETTING
4
Password Setting
1 Select “PASSWORD SETTING” in
step 3, then press SET/ENTER.
2 Press \ / | to select “YES”, then
press SET/ENTER.
3 Press Number buttons to input 4
digit password, then press SET/
ENTER.
4 Press Number buttons to input
password for confirmation, then
press SET/ENTER.
5 Press SET/ENTER at the “OK”
screen.
NOTE
If you forget your password
• If you forget your password, and you wish
to return the password to its initial state,
press ■STOP 4 times in a row at the
Password Setting screen.
Disc Language Setting
• You can set subtitle language, audio
language and menu language.
1 Select “DISC LANGUAGE” in step 4,
then press SET/ENTER.
2 Press \ / | to select subtitle
language, then press SET/ENTER.
3 Press \ / | to select audio language, then press SET/ENTER.
4 Press \ / | to select menu language, then press SET/ENTER.
Press ' / " to select “PARENTAL CONTROL”, then press
SET/ENTER.
• The password input screen appears.
It changes to the following screen
after you input your password and
press SET/ENTER.
OTHER SETTINGS[DVD PLAY SETTING]
PARENTAL CONTROL
DISC LANGUAGE
12 / 25 SAT 10 : 28 AM
SETS THE PARENTAL CONTROL OF DVD VIDEO
SET THE PARENTAL CONTROL LEVEL
OFF
SET THE COUNTRY CODE
USA
SELECT
ENTER
ENTER
n
RETURN
5
Press \ / | to select the desired
parental control level, then press
SET/ENTER.
6
Press \ / | to select the country
code, then press SET/ENTER.
7
Press EXIT to exit from Parental
Control Setting screen.
Continued on Next Page |||
79
Function Setting
ADJUSTMENT
CLOCK
SETTING
VIDEO/
AUDIO SETTING
AUTO SETTING/MANUAL SETTING
• Before timer programming, check that the clock is set correctly, and
set it correctly if it is not. If the clock is not set correctly, you cannot
perform setting for features like VCR Plus+ programming.
• Setting methods are slightly different from basic operation. See page
29.
AUTO SETTING
AUTO
MANUAL
TIME ZONE
MANUAL SETTING
TIME: XX:XX
DATE: Month/Day
YEAR: XXXX
DST: ON/OFF
TV MODE
• If you switch your TV (i.e. because you have bought a new one) and
WIDE 16:9
the screen size of the connected TV changes, you will have to change NORMAL 4:3
the “TV MODE” setting.
LETTER BOX
• You can set the screen aspect ratio of the connected TV, and adjust
PAN SCAN
video output.
• Select “TV MODE” from “VIDEO/AUDIO SETTING”.
WIDE 16:9:
Select this when connecting with a TV with a 16:9
screen aspect ratio.
NORMAL 4:3: Select this when connecting with a TV with a 4:3 screen
aspect ratio.
LETTER BOX: If you connect with a TV whose screen aspect ratio is
4:3 and play back a DVD with 16:9 video, the video will
be played back with black bands at the top and bottom,
while maintaining the 16:9 ratio.
PAN SCAN: If you connect with a TV whose screen aspect ratio is
4:3 and play back a DVD with 16:9 video, the video will
be played back with the left and right sides of the image
cut off to display in 4:3 screen aspect ratio.
(This function works if the disc is labeled for 4:3PS.)
CONNECTING TERMINAL
• If you switch your TV (i.e. because you have bought a new one) and
you change the TV terminal to which you connect, you will have to
change the “CONNECTING TERMINAL” setting.
• For details on connection with a TV, and connecting terminals, please
see pages 21 to 24.
• “PROGRESSIVE OUT” can be set when you have selected “COMPONENT”.
VIDEO/S-VIDEO
COMPONENT
PROGRESSIVE OUT
• If you connect with the component terminal of a progressive compatible TV, playback of DVD video will be cleaner, with less flicker.
• If you connect with a TV which is not progressive compatible, select
“PROGRESSIVE SCAN OFF”.
* If you connect with a TV which is not progressive compatible and set
to “PROGRESSIVE SCAN ON”, video playback from the DVD will not
be output to the TV.
PROGRESSIVE
SCAN ON
PROGRESSIVE
SCAN OFF
DIGITAL AUDIO OUTPUT
80
• You can set this to enjoy Dolby Digital Surround when connecting with
digital input compatible device using Digital cable.
PCM:
This setting is for when you digitally connect with 2ch
audio device or an MD recorder. This changes Dolby
Digital audio to PCM (uncompressed) output which can
be played back with 2ch audio device.
Dolby Digital: This setting is for when you digitally connect with audio
device which is compatible with Dolby Digital (5.1ch).
You can also enjoy DTS audio if you connect with an
amplifier or other component which is compatible with
DTS digital surround.
PCM
Dolby Digital
Function Setting
ADJUSTMENT
VIDEO/
AUDIO SETTING
DD OUTPUT LEVEL
• This lets you adjust the range between the loudest and softest sound
(dynamic range), and play back at the average volume. Use this
when it is hard to hear dialog.
NO:
This outputs recorded audio as is.
YES*:
This raises the average volume when playing back
Dolby Digital audio so that the volume sounds the same
as an audio CD. (If the audio sounds abnormal, set to
“NO”.)
* Lower the volume before setting. If you do not do so, the speaker
may emit a loud sound, or excessive input may be applied to the
speaker.
NO
YES
3D Y/C SEPARATION
YES
• This setting enables cleaner viewing and recording of TV broadcasts,
and video from equipment connected to external input jacks (terminals). NO
YES:
This enables recording with higher picture quality.
(Normally this is set to “YES”.)
NO:
Set this to “NO” if the picture looks abnormal when
receiving a weak broadcast signal, or when the picture is
disturbed because you have connected VCR or game
equipment to the external input terminals of the Recorder.
DNR (DIGITAL NOISE REDUCTION)
• This lets you reduce noise for an easier to view picture when noise in
the played back image is bothering you. It is recommended to set this
to “ON” when playing back video recorded in long play modes like LP
mode or EP mode, and to “OFF” when playing back discs with little
noise (like DVD video).
CHANNEL
PRESET
ON
OFF
SELECT RECEPTION TYPE
• This sets the type of TV broadcast received (AIR or CATV).
AIR
CATV
SELECT CHANNEL PRESET METHOD
• This sets whether to perform channel setting automatically or
manually.
OPTION
SETTING
AUTO
MANUAL
SEAMLESS PLAYBACK
• This setting is for smoother playback of the transitions between
scenes when you have edited an original title or play list. (The
transition point may shift about one second.)
YES
NO
Continued on Next Page |||
81
Function Setting
ADJUSTMENT
OPTION
SETTING
LCD BACKLIGHT REC.
• This sets whether to turn the LCD backlight on or off during timer
recording.
NO:
This sets so that the LCD backlight remains lit, even during timer
recording.
YES:
This lets you turn off the LCD backlight only when the power is off
(standby state) and timer recording starts. It is convenient to set this,
for example, when the light disturbs your sleep.
NO
YES
AUTO POWER OFF
• This sets the Recorder so that power is automatically shut off if it is in
stopped state for about 3 hours.
YES
NO
BLUE SCREEN
• This lets you set so that noise on the TV screen is automatically
switched to a blue screen if you select a channel whose broadcast is
finished, or a channel with no broadcast.
OFF
ON
DVD DISC PROTECTION
• This protects the disc so you do not mistakenly record on it or erase
its content.
82
NOT PROTECT
PROTECT
Function Setting
Basic Operation for
ADJUSTMENT Setting
Example: Setting “VIDEO/AUDIO SETTING”
under “ADJUSTMENT”
1
1 Press START MENU to
display START MENU screen.
2 Press ' / " / \ / | to select
“OTHER SETTINGS”, then
press SET/ENTER.
START MENU[OTHER SETTINGS]
12 / 25 SAT 10 : 28 AM
REC LIST
EDIT/
ERASE
INITIALIZE/
FINALIZE
OTHER
SETTINGS
TIMER
PROGRAM/
CHECK
DISPLAYS SET ITEMS BEFORE REC/PLAYBACK
2
Press \ / | to select “ADJUSTMENT”.
OTHER SETTINGS[ADJUSTMENT]
REC. FUNCTION
VIEW/PLAY SETTING
12 / 25 SAT 10 : 28 AM
ADJUSTMENT
CLOCK SETTING
VIDEO/AUDIO SETTING
CHANNEL PRESET
OPTION SETTING
3
Press ' / " to select the setting
you want to set, then press SET/
ENTER.
OTHER SETTINGS[ADJUSTMENT]
REC. FUNCTION
VIEW/PLAY SETTING
12 / 25 SAT 10 : 28 AM
ADJUSTMENT
CLOCK SETTING
VIDEO/AUDIO SETTING
CHANNEL PRESET
OPTION SETTING
4
1 Press ' / " to select the item
you want to select, then press
SET/ENTER.
OTHER SETTINGS[VIDEO/AUDIO SETTING]
TV MODE
CONNECTING TERMINAL
PROGRESSIVE OUT
DIGITAL AUDIO OUTPUT
DD OUTPUT LEVEL
3D Y/C SEPARATION
DNR
12 / 25 SAT 10 : 28 AM
SETS PROGRESSIVE SCAN OUTPUT
YOU CAN ENJOY CLEAR IMAGES
WHEN PROGRESSIVE TV IS PLAYED
BACK VIA COMPONENT TERMINAL
PROGRESSIVE
SCAN ON
SELECT
ENTER
ENTER
PROGRESSIVE
SCAN OFF
n
RETURN
2 Press \ / | to select the desired option, then press SET/
ENTER.
5
Press EXIT to exit.
Continued on Next Page |||
83
Function Setting
Initialization
Finalization
Before recording to DVD-RW, initialize the disc in VR mode
or Video mode.
Finalization is done so that a recorded DVD-RW/R can be
played back with other recorders.
INITIALIZE
INITIALIZE
VR MODE INIT.
• When recording with a DVD-RW in VR mode, initialize in VR mode
before you start recording.
(When you initialize, all of the recorded content of the disc is erased.
Before initializing, check the content of the disc so that you do not
erase any content you need.)
• You cannot initialize if “DVD DISC PROTECTION” is set to “PROTECT”. (page 82)
YES
NO
VIDEO MODE INIT.
• When recording with a DVD-RW disc in Video mode, initialize in Video
mode before you start recording.
(When you initialize, all of the recorded content of the disc is erased.
Before initializing, check the content of the disc so that you do not
erase any content you need.)
• You cannot erase with DVD-R disc.
YES
NO
AUTO INITIALIZE
• This sets the Recorder so it automatically initializes any unused DVDRW discs which are loaded into the Recorder.
You can initialize in either VR mode or Video mode.
VR
VIDEO
FINALIZE
DVD FINALIZE
DVD FINALIZE
• Set this when you want to play back a VR mode or Video mode disc
using another recorder capable of playback.
If you finalize a recording on DVD-R disc, you will not be able to
record any more on the disc.
• Finalization can take anywhere from a few minutes to one hour.
During finalization, all types of operation are disabled (including
turning off power and removing the disc).
• Do not unplug the power cord during finalization. Doing so may make
the disc unusable.
YES
NO
UNDO DVD FINALIZE
• This resets a finalized DVD-RW disc so you can record on it again.
84
YES
NO
Function Setting
Basic Operation for
INITIALIZE/FINALIZE
4
• Initializing (or finalizing) will be
executed.
Example: Setting “VR MODE INIT.” (VR
mode)
1
INITIALIZE
VR MODE INIT.
VIDEO MODE INIT.
AUTO INITIALIZE
1 Press START MENU to
display START MENU screen.
2 Press ' / " / \ / | to select
“INITIALIZE/FINALIZE”, then
press SET/ENTER.
START MENU[INITIALIZE/FINALIZE]
1 Press \ / | to select “YES”,
then press SET/ENTER.
12 / 25 SAT 10 : 28 AM
INITIALIZING
12 / 25 SAT 10 : 28 AM
REC LIST
EDIT/
ERASE
INITIALIZE/
FINALIZE
OTHER
SETTINGS
TIMER
PROGRAM/
CHECK
12 / 25 SAT 10 : 28 AM
INITIALIZE
VR MODE INIT.
VIDEO MODE INIT.
AUTO INITIALIZE
INITIALIZES DVD AND FINALIZES DVD
2
INITIALIZING COMPLETED
Press ' / " to select “INITIALIZE” or “FINALIZE”.
INITIALIZE
OK
12 / 25 SAT 10 : 28 AM
INITIALIZE/FINALIZE
ENTER
ENTER
• Initializing (or finalizing) will be
completed.
REVERTS DISC TO UNUSED STATE
(ALL STORED DATA ERASED).
2 Press SET/ENTER.
• Screen in step 2 appears.
DVD FINALIZE
SELECT
3
ENABLES PLAYBACK OF RECORDED
DVD DISC ON OTHER DVD PLAYERS.
ENTER
ENTER
n
INITIALIZE
Press EXIT to exit from INITIALIZE/FINALIZE screen.
RETURN
Press ' / " to select “VR MODE
INIT.”, then press SET/ENTER.
12 / 25 SAT 10 : 28 AM
VR MODE INIT.
VIDEO MODE INIT.
AUTO INITIALIZE
5
AFTER RECORDING, IT IS POSSIBLE TO
USE A VERIETY OF EDITING FUNCTIONS
TO CUSTOMIZE YOUR VIDEO.
NOTE
• Finalization processing will take anywhere
from a few minutes to about an hour.
(Processing will take time if there is a lot of
empty space or if there are many titles on
the DVD disc.)
INITIALIZE DVD?
YES
SELECT
ENTER
ENTER
NO
n
RETURN
85
Troubleshooting
The following problems do not always suggest a defect or malfunction of this Recorder.
Perform the checks listed below before calling service.
Problem
86
Suggested Solution
The Recorder power does not turn on.
• Is the power cord firmly plugged into the AC outlet?
• If the power cord is plugged into the outlet, unplug it once, wait about one minute, and then plug it in again.
Then turn power on.
The Recorder sounds like it is operating, even when power is
turned off.
• This is the sound the Recorder makes during operation like timer recording.
The disc is automatically ejected after closing the disc tray.
•
•
•
•
Make sure that the disc is loaded properly (aligned in disc tray and label-side up).
Take out the disc and clean it.
Make sure that region number on the disc match the region number in this Recorder.
Make sure that the disc is playable.
No picture.
•
•
•
•
•
Make sure that the cables are connected correctly.
Make sure that the connected TV or the AV amplifier is set to the correct input.
Take out the disc and clean it.
Make sure that region number on the disc match the region number in this Recorder.
If you set to “PROGRESSIVE SCAN ON”, non-broadcast video signals will not be output from terminals other
than COMPONENT Output jacks. (Page 80) When pressing | PLAY, “480P” is displayed on the Front panel
display.
The Recorder does not play a disc.
•
•
•
•
•
•
•
Take out the disc and clean it.
Make sure that the disc is loaded properly (aligned in disc tray and label-side up).
Make sure that region number on the disc match the region number in this Recorder.
Remove the dew in the Recorder.
Check that the disc is recorded in NTSC format.
The Recorder cannot play back video which was not recorded normally.
Proper playback may be impossible due to the state of the disc recording, a scratched, warped or dirty disc, the
state of the pick-up, or compatibility issues between this Recorder and the disc being used.
Settings have disappeared.
• If, while its power is on, the Recorder is unplugged (or there is a power failure) for more than about 1 hour, the
settings will be lost. Make sure that you turn off the Recorder before unplugging the power cord.
Screen freezes and operation buttons do not work.
• Press ■STOP and restart playback.
• Turn off the power and turn on the power again.
• If power does not go off, press the RESET button inside the front door of the Recorder. (Page 88)
The remote control does not work.
•
•
•
•
No sound or sound is distorted.
• If the volume of TV or amplifier is set to minimum, turn the volume up.
• There is no sound during still mode, slow motion playback, fast forward and fast reverse.
• DVD audio recorded in DTS is only output from the DIGITAL AUDIO Output terminals. Connect a DTScompatible digital amplifier or decoder to the DIGITAL AUDIO Output OPTICAL or COAXIAL terminal on this
Recorder.
• Check that the audio cable is connected correctly.
• Check that the cable plugs are clean.
• Take out the disc and clean it.
• Audio may not be output depending on the audio recording status, such as when audio other than an audio
signal or non-standard audio is recorded for the audio content of the disc.
The picture from external input is distorted.
• If the signal is copy-protected, you cannot connect via this Recorder. Connect the external equipment directly
to your TV.
The screen is stretched vertically or
horizontally.
• Set the TV mode according to the TV you are connecting. (Page 80)
• If the above operation does not set the TV mode, set it using the functions of the connected TV.
Is the Tamper Proof function active? (Page 34)
Set the remote control and the Recorder to the same remote control code. (Page 20)
Use the remote control within its operating range.
Replace the batteries.
Troubleshooting
Problem
A disc recorded using this Recorder cannot be played back
on another DVD player.
Suggested Solution
• Check that the disc is finalized when the disc is in video mode.
• Some players will not play even a finalized disc.
• If the disc was recorded in VR mode, it can only be played back with an RW compatible player. (In some
cases, the disc must be finalized.)
The playback screen will be disturbed if DVD video is recorded • This Recorder is compatible with the copy guard of analog copy protect system. Some discs contain a copy
to a VCR, or played back through a VCR.
prohibiting signal. If you try to play back such a disc through a VCR, or record to a VCR and playback, copy
guard will prevent normal playback.
TV operates incorrectly.
• Some TVs with wireless remote control capability may operate incorrectly when using the remote control of
this Recorder. Use such TV away from this Recorder.
Recording stops.
• Recording may stop temporarily at parts where recording is impossible (due to scratches or disc fouling,
etc.). When recording starts again, the starting part will be recorded as another title. If the disc is in a
condition where recording is impossible, it is ejected.
• When the recoding is interrupted, you might lose a few minutes of the recorded content immediately before
the interrupted point.
You recorded, but nothing was recorded on disc.
• If you record a channel with no broadcast (i.e. where the broadcast has ended), recording will be done with
no video. Likewise, if you record a channel with poor reception, recording may be done with no video.
• Clean the disc.
Cannot record, or recording stops while in progress.
•
•
•
•
•
•
•
Video is disturbed (looks abnormal) during external input or
when receiving a broadcast with poor reception.
• Use with “3D Y/C SEPARATION” set to “NO”. (Page 81)
There is no video and no audio.
•
•
•
•
There is just audio with no video.
• Is the connection cable for video output connected properly?
Horizontally wide video appears vertically tall, or black bands
appear at the top and bottom of the screen.
• Is “TV MODE” set to match the connected TV. (Page 80)
• If you are using a wide TV, is the TV mode set to “WIDE 16:9”? (Page 80)
Square noise (mosaic) appears on the screen.
• Pictures in blocks may be conspicuous in scenes with rapid movement due to the characteristics of digital
image compression technology.
Video stops.
• Has the Recorder been subjected to shock or impact? Are you using it at an unstable location? The Recorder
will stop if it senses shock or vibration.
Check whether there is enough empty space on the disc being recorded to.
Check whether the disc is protected.
Check whether the number of original titles is 99 (for a DVD-RW/R).
Check whether you are trying to record video whose recording is prohibited.
Check whether there was a power failure while waiting for (or during) timer recording.
Clean the disc.
Proper playback may be impossible due to a scratched, warped or dirty disc, the state of the pick-up, or
compatibility issues between this Recorder and the disc being used.
Is the power cord unplugged from the AC outlet?
Is power in the “OFF” state?
Does the broadcast have no video or audio?
Has the Recorder been switched to external input?
Left and right channels of audio are reversed, or sound comes • Are left and right audio cables connected to the opposite terminal, or is one side disconnected?
out of only one side.
If the message SET PROGRESSIVE SCAN TO “OFF” appears
during Other Settings.
• Correctly set “CONNECTING TERMINAL” at “VIDEO/AUDIO SETTING” in “ADJUSTMENT”. (Page 80)
DVD Video discs does not play back automatically.
• Have you set a DVD Video disc that has an automatic playback function?
Continued on Next Page |||
87
Troubleshooting
Problem
Suggested Solution
Timer recording was set, but not executed.
• Was there a power failure while standing by for timer recording?
• Is the DVD full? Erase unnecessary titles from the list.
• Is the power cord unplugged from the AC outlet?
The timer recorded content stops in the middle of recording.
•
•
•
•
•
Was the power plug unplugged, or was there a power failure, during timer recording?
Is the DVD full? Erase unnecessary titles from the list.
Recording will stop if a program whose recording is forbidden begins in the middle of recording.
Clean the disc.
If there is a power failure or other power problem during recording to DVD-RW/R, recording will stop in the
middle.
When a CD is recorded to MD using digital connection, the CD • If the interval between CD tracks is short, the track numbers on the recorded MD may differ from the CD.
and MD do not have the same track numbers.
The Recorder heats up during use.
• When using this Recorder, the console cabinet may heat up, depending on the use environment. This is not a
malfunction.
A blinking “----” appears on the front display panel.
• The clock has not been set. Set the clock.
NOTE
• If this Recorder receives strong interference from strong external noise such as excessive static electricity, malfunction of
power supply voltage caused by lightning during Recorder use or a wrong operation is sent to the Recorder, errors like the
Recorder not accepting an operation may occur.
• Press RESET with a toothpick or other narrow rod-like object (nonmetal) when the Recorder does not operate properly
even after the power has been turned off and then back on again.
• Since the clock, channel, timer recording programs and other data in memory are also reset when RESET has been
pressed, they must be set again.
• EZ Set Up function starts automatically when RESET is pressed.
• When the problem persists even after pressing RESET, pull out the plug and put it back
again. If this does not solve the problem, contact the nearest Sharp Authorized Service
Center.
RESET button
S-VIDEO
RESET
VIDEO
L (MONO)-AUDIO-R
LINE IN 3
Service Information (For the U.S.)
For the location of the nearest Sharp Authorized Service Center, or to obtain product literature, accessories, supplies or
customer assistance, please call 1-800-BE-SHARP (1-800-237-4277) or visit SHARP’s website (http://www.sharpusa.com).
1. Do not attempt to service this product yourself. Instead, unplug it and contact a qualified service technician.
(See CONSUMER LIMITED WARRANTY at the end of this manual.)
2. Be sure the service technician uses authorized replacement parts or their equivalents. Unauthorized parts may cause fire,
electrical shock, or other hazards.
3. Following any service or repair, be sure the service technician performs safety checks to certify that this product is in safe
operating order.
88
On-screen Error Messages
Messages Relating to DVD Discs
• The following messages appear on the TV screen in case the disc you tried to play back is not appropriate or
the operation is not correct.
Error message
CANNOT PLAY BACK THIS DISC.
THIS IS A NON-STANDARD DISC.
REGION CODE OF DISC IS WRONG.
DISC NOT INSERTED.
CANNOT OPERATE THIS FUNCTION.
DISC IS PROTECTED.
COULD NOT REPAIR THE DISC.
COULD NOT FINALIZE.
THIS VIDEO IS COPY PROTECTED.
RECORDING IS NOT POSSIBLE.
CANNOT RECORD MORE.
CANNOT RECORD ON THIS DISC.
COULD NOT INITIALIZE.
DISC IS FULL.
CANNOT RECORD OR STORE.
CANNOT RECORD VIDEO TO THIS
DISC.
SET THE DATE AND TIME.
Possible Error
Suggested Solution
• The disc cannot be played with this
Recorder.
• If you load a disc which cannot be
played with this Recorder (i.e. a
scratched disc), or if you load a
disc upside down, this message will
appear, and the disc tray will
automatically pop out.
• Occurs if you load a DVD disc
whose region number is not “ALL”
or whose region number does not
contain “1”.
• Occurs if no disc is loaded in the
disc tray.
• Occurs if operation is incorrect.
• Occurs if you attempt to record or
edit a disc for which disc protection
is set.
• If there is a power failure during DVD
recording, the system automatically
tries to recover data after power is
restored. This error occurs if such
recovery is impossible.
• Occurs if the disc is scratched or
dirty, etc.
• Occurs if video with a copy guard
signal is input.
• Check the disc, and load it
correctly.
• Occurs if a title or chapter mark
exceeds the recordable upper limit.
• Number of titles: 99.
Number of chapters: 999
• Occurs if you load a disc which
cannot be recorded to with this
Recorder, or a disc which is
scratched or dirty.
• Occurs if the disc is scratched or
dirty, etc.
• Occurs if there is no empty space in
the disc.
• Occurs if you try to record a “Copy
Once” broadcast onto a disc which
is not compatible with CPRM.
• Occurs if timer programming is
done when the Recorder clock has
not been set.
• Erase unnecessary titles.
• Either erase unnecessary chapters,
or combine chapters.
• Cancel disc protection, or reload a
recordable disc.
• Check the disc, and load it
correctly.
• Cannot record.
• Reload an appropriate recording
disc.
• Check the disc, and load it correctly.
• Load a disc with empty space.
• Erase unnecessary titles.
• Load a CPRM compatible disc
(DVD-RW Ver. 1.1 or higher)
initialized in VR mode.
• Set the clock and perform timer
programming again.
Continued on Next Page |||
89
On-screen Error Messages
Error message
Possible Error
RECORDING WAS STOPPED DUE TO
FULL DISC.
REPAIRING THE DISC.
• Occurs when empty space in the
disc runs out.
• Occurs when recording stops
before disc information has been
correctly written onto a DVD, due to
a problem like a power failure.
• Occurs if the loaded disc cannot be
recorded to or played because it is
a non-standard or scratched, etc.
• Occurs if you try to record “Copy
Once” video onto DVD-R or nonCPRM compatible DVD-RW.
THIS IS A NON-STANDARD DISC.
REMOVE IT.
THIS VIDEO CANNOT BE RECORDED
TO THIS DISC.
TIMER RECORDING COULD NOT
START.
LIVE BROADCAST RECORDING
PROHIBITED.
RECORDING STOPPED.
THIS VIDEO IS COPY PROTECTED.
RECORDING IS NOT POSSIBLE.
Suggested Solution
• Wait until DVD disc recovery is
finished.
• Remove the disc.
• Record on CPRM compatible DVDRW disc in VR mode.
• Occurs if a program begins during
recording, and recording of the
broadcast itself is forbidden due to
copyright protection.
• Occurs if you attempt to record a
program, and recording of the
broadcast itself is forbidden due to
copyright protection.
Messages during Editing
Error message
CANNOT SELECT MORE.
CANNOT SET THIS POSITION.
CHAPTER IS FULL. CANNOT
OPERATE THIS FUNCTION.
CANNOT COMBINE THESE CHAPTERS.
Possible Error
• Occurs if you attempt to select
more than 20 titles (chapters) when
you perform Erase Selected Title.
• Occurs if you attempt to designate
a range shorter than 3 seconds and
edit.
• Occurs if the editing result exceeds
the upper limit of total number of
chapters (999).
• Occurs if you attempt to combine
chapters which cannot be combined. (Chapters created when you
erase a scene or chapter in a single
title cannot be erased).
Suggested Solution
• Erase a maximum of 20 titles
(chapters) at a time.
• Designate a range of 3 seconds or
more. (If you designate a range of 3
seconds or more, you can designate in frame units.)
• Edit after erasing unnecessary
chapter marks by combining
chapters.
Other Message
Front panel display message
Possible Error
• Occurs if pressing the play button
when the Recorder is connected
with the Video In or S-Video In jack
of a TV, and PROGRESSIVE OUT is
set to “PROGRESSIVE SCAN ON”.
90
Suggested Solution
Glossary
Angle
Recorded onto some DVD discs are scenes which have been simultaneously shot from
a number of different angles (the same scene is shot from the front, from the left side,
from the right side, etc.). With such discs, you can select the angle on Function Control
Screen to view the scene from different angles.
AV AUTO REC
This function lets you record video from an external equipment in linkage with the timer
programming of that device. This can be done by connecting with a receiver or other
equipment with a timer programming function.
Chapter
Number
These numbers are recorded on DVD discs. A title is subdivided into many sections,
each of which is numbered, and specific parts of video presentations can be searched
quickly using these numbers.
Copy Guard
This function prevents copying. You cannot record software or broadcast programs
marked by the copyright holder with a signal which limits copying.
Digital Gamma
Corrects for gradations in dark areas of images to make images clearer.
Digital Super
Picture
Enhances the fine detail of the image and outlines of the objects it contains.
Disc Menu
This lets you select things like the subtitle language or overdub audio using a menu
stored on the DVD video disc.
Dolby Digital
(5.1 channel)
A sound system developed by Dolby Laboratories Inc. that gives movie theater ambience to audio output when the product is connected to a Dolby Digital 5.1 channel
processor or amplifier.
Dolby Digital
Output Level
Setting that increases the average volume of Dolby Digital audio when playing a DVD.
Dolby Virtual
Surround
This lets you enjoy Surround audio via analog connection with a stereo (2ch) TV or
audio equipment.
DTS
This is a digital sound system developed by Digital Theater Systems for use in cinemas.
This system uses 6 audio channels and provides accurate sound field positioning and
realistic acoustics. (By connecting a DTS Digital Surround decoder, you can also listen
to DTS Digital Surround sound.)
Exact Recording
This function automatically changes the recording mode to prevent recordings from
running out before they are finished due to a lack of available DVD disc space by
comparing the available disc space and the time required for the timer recording.
EZ Set Up
Tuner channels and clock are automatically set for both Air and CATV channels.
Finalization
This is done to enable playback of discs (Video mode) recorded with this Recorder
using other DVD-RW and DVD-R compatible DVD players. (We do not guarantee that
playback will be possible with all DVD players.)
The DVD players which can play back VR mode discs are those with an “ ” indication.
Initialization
This allows you to use a DVD-RW disc in this Recorder. If you initialize a disc, all of the
programs recorded on it are erased.
Letter Box
Screen size that cuts off the top and bottom of the image to allow playing of widescreen (16:9) software on a connected 4:3 TV.
4:3
LB
Continued on Next Page |||
91
Glossary
Linear PCM
Sound
Linear PCM is a signal recording format used for Audio CDs.
The sound on Audio CDs is recorded at 44.1 kHz with 16 bits. (On DVD discs, sound is
recorded at between 48 kHz with 16 bits and 96 kHz with 24 bits.)
MP3
One type of audio compression that uses MPEG1. This format compresses sound to
about 1/10, without impairing the original sound quality.
Multi Angle
This is a feature of DVD video discs. In some discs, the same picture is shot from
different angles, and these are stored in a single disc so you can enjoy playback from
different angles. (This function can be enjoyed if the disc is recorded with multiple
angles.)
Multi Audio
This is a feature of DVD video discs. This function makes it possible to record multiple
different audio tracks for the same video, so you can enhance your enjoyment by
switching audio. (You can enjoy this function with discs recorded with multiple audio
tracks.)
Original
A video (title) recorded from a TV broadcast or external input is called an “Original”.
Pan Scan
Screen size that cuts off the sides of the image to allow playing of wide-screen (16:9)
software on a connected 4:3 TV.
4:3
92
PS
Parental Control
In some digital broadcasts and DVD video discs, a control level for disc viewing is set
depending on the age of the viewer. With this Recorder, you can set the control level for
viewing such broadcasts and discs.
Play List
A set of titles created by copying just the needed scenes from original titles is called a
“Play List”. (The original titles remain as are.)
Playback
Control (PBC)
This information is recorded on video CDs (version 2.0). This allows you to actively
select the sections to be viewed or listened to, using a menu displayed on the TV.
REC LIST
This is a list screen which lets you check the recorded programs (titles) in list form. You
can select either Thumbnail or Title List as the REC LIST.
Region
Number
Number identifying a geographic region of compatibility for a DVD.
Remote Control Code
This is the type of the remote control signal for operating the recorder. There are two
types of remote control signal: “Remote Control No. 1” (RC-1) and “Remote Control No.
2” (RC-2).
Resume Playback
If you stop playback while it is in progress, the Recorder stores the stop position in
memory, and this function lets you play back from that stopping point.
Skip
This returns to the start of the chapter (or track) being played, or skips to the next
chapter (or track).
Subtitles
These are the printed lines appearing at the bottom of the screen which translate or
transcribe the dialog. They are recorded on DVD discs.
Time Number
This indicates the play time which has elapsed from the start of a disc or a title. It can
be used to find a specific scene quickly. (It may not work with some discs.)
Title Menu
In a DVD video disc, this is the menu for selecting things like the chapter to be played
back and the subtitle language. In some DVD video discs, the top menu may be called
the “Title”.
Glossary
Title Number
These numbers are recorded on DVD discs. When a disc contains two or more movies,
these movies are numbered as title 1, title 2, etc.
Track Number
These numbers are assigned to the tracks which are recorded on video CDs and Audio
CDs. They enable specific tracks to be located quickly.
VBR Control
VBR is the abbreviation for Variable Bit Rate control. This feature performs control by
varying the bit rate (the amount of code transferred in a fixed period of time) by assigning a larger amount of code to complex video images such as sections containing rapid
movement or sections containing sudden changes in color, and assigning a smaller
amount of code in the opposite cases.
Video Mode
This is a recording format for making DVD -RW/R discs playable with other commercially available DVD players. (We do not guarantee that playback will be possible with
all DVD players.)
VR Mode
This recording format is the basic DVD-RW recording format, and lets you enjoy the
various editing functions available with this Recorder.
93
Specifications
General
Power supply: ................................. AC 120 V, 60 Hz
Power consumption
(Normal): ..................................... 23 W
Power consumption
(Standby): ................................... 0.7 W (While the Front Panel
Display is off)
Dimensions: .................................... Approx. 430 mm × 69 mm × 257
mm (W × H × D)
Approx. 1615/16" × 223/32" × 101/8"
Weight: ............................................ Approx. 3.6 kg (8.0 lbs)
Operating temperature ................... 41°F to 95°F (5°C to 35°C)
Storage temperature: ...................... –4°F to 131°F (–20°C to 55°C)
Operating humidity: ........................ 10% to 80% (no condensation)
TV systems: ..................................... NTSC system, 525 lines, 60
fields
Recording
Recordable disc media: ................. DVD-RW, DVD-R
Recording system (DVD-RW/R): ..... Video: DVD-Video Recording
(VR mode) DVD-VIDEO (Video
mode)
Audio: Dolby Digital (2ch)/Linear
PCM (FINE mode only)
Recording time
(With 4.7GB DVD-RW/R): ........... FINE (High picture quality):
Approx. 1 hour
SP (Standard): Approx. 2 hours
LP (2X): Approx. 4 hours
EP (3X): Approx. 6 hours
MN (Manual): 32 levels between
FINE and EP
Playback
Playable discs: ................................ DVD Video, DVD-RW/R, Audio
CD (CD-DA), Video CD, CD-RW/
R (CD-DA, Video CD format,
MP3 file format)
Tuner
Channel coverage: ......................... VHF 2-13
UHF 14-69
CATV 1-125
Timer
Programs: ....................................... 8 programs/1 year
Clock: .............................................. Quartz lock
(12-hour digital display)
Memory backup: ............................. Approx. 1 hour
94
Input/Output
VHF/UHF antenna input/
output terminal: ...........................
Video input: .....................................
Input level: ...............................
Jacks: ......................................
Video output:
Output level: ............................
Jacks: ......................................
S-Video input: .................................
Y-Input level: ............................
C-Input level: ...........................
Jacks: ......................................
S-Video output:
Y-Output level: .........................
C-Output level: ........................
Jacks: ......................................
Component video output:
Output level: ............................
Jacks: ......................................
Audio input: .....................................
Input level: ...............................
Jacks: ......................................
Audio output: ..................................
Input level: ...............................
75Ω (F-shape connector)
Input 1, 2 (rear), 3 (front)
1 Vp-p (75Ω)
RCA jack
1 Vp-p (75Ω)
RCA jack
Input 1, 2 (rear), 3 (front)
1 Vp-p (75Ω)
0.286 Vp-p (75Ω)
4 pin mini DIN
1 Vp-p (75Ω)
0.286 Vp-p (75Ω)
4 pin mini DIN
Y: 1 Vp-p (75Ω)
PB, PR: 0.7 Vp-p (75Ω)
RCA jack
Input 1, 2 (rear), 3 (front) L/R
2 V rms (Input impedance: more
than 22 kΩ)
RCA jack
L/R
2 V rms (Output impedance:
less than 1.5 kΩ)
RCA jack
Jack: ........................................
Digital audio optical output:
Terminal: .................................. Square Optical terminal
Digital audio coaxial output:
Jack: ........................................ RCA jack
LASER Specification
Wave length: ................................... DVD: 658 nm
CD: 784 nm
Laser power: ................................... DVD: 100 mW
CD: 225 mW
Specifications are subject to change without notice.
ESPAÑOL
(Guía de operación rápida)
MEDIDAS DE SEGURIDAD IMPORTANTES .... 97
Guía de operación rápida en español ............. 98
Conexión básica ................................................................. 98
EZ Set Up ........................................................................... 98
Antes de utilizar la grabadora ............................................ 99
Grabación directa en DVD ................................................. 99
Reproducción DVD-RW/R .................................................. 100
Reproducción de DVD Vídeo ............................................. 100
Reproducción de Audio CD/Vídeo CD ............................... 100
95
Para futura referencia, anote los números de modelo y de serie
(indicados en la parte posterior este producto) en el espacio provisto.
No. de modelo: DV-SR3U
No. de serie:
AVISO: PARA REDUCIR EL RIESGO DE INCENDIO O ELECTROCHOQUE
NO EXPONGA ESTE APARATO A LA HUMEDAD.
PRECAUCION
PELIGRO DE DESCARGA
ELECTRICA NO ABRIR
PRECAUCION:
TPARA REDUCIR EL RIESGO DE DESCARGA ELECTRICA, NO
QUITE LA CUBIERTA. EL USUARIO NO DEBERA DAR NINGUN
TIPO DE SERVICIO A NINGUNA PARTE INTERNA. DEBERA SER
REALIZADO SOLO POR PERSONAL DE SERVICIO CALIFICADO.
Este símbolo previene al usuario
del voltaje aislado dentro de la
unidad que puede provocar
descargas eléctricas peligrosas.
Este símbolo advierte al usuario
que existen instrucciones de
operación y de mantenimiento en la
literatura incluida en esta unidad.
“ADVERTENCIA—Las reglas de la FCC (Comisión Federal de
Comunicaciones) estipulan que cualquier modificación o cambio a este
equipo no aprobado expresamente por el fabricante podrá anular la
autorización del usuario para operar este equipo”.
INFORMACION
Este equipo se ha sometido a todo tipo de pruebas y cumple con las normas establecidas para dispositivo
digital de Clase B, de conformidad con la Parte 15 de las reglas de la FCC (Comisión Federal de
Comunicaciones). Estas reglas están diseñadas para asegurar una protección razonable contra
interferencias perjudiciales en las instalaciones residenciales. Este equipo genera, utiliza y puede emitir
energía de radiofrecuencia y, si no se instala y utiliza debidamente, es decir, conforme a las instrucciones,
podrían producirse interferencias perjudiciales en las radiocomunicaciones. Sin embargo, no se garantiza
que estas interferencias no se produzcan en una instalación determinada. Si este equipo ocasiona
interferencias en la recepción de radio o televisión, lo cual puede comprobarse con sólo apagar y encender
el equipo, intente corregir el problema mediante una o una combinación de las siguientes medidas:
—Reoriente la antena receptora o cámbiela de lugar.
—Aumente la separación entre el equipo y el receptor.
—Enchufe el equipo a una toma de corriente situada en un circuito distinto del receptor.
—Consulte a su distribuidor o a un técnico experto en radio/televisión.
PRECAUCION:
ESTA UNIDAD HA SIDO CLASIFICADA COMO PRODUCTO CLASS 1 LASER.
EL USO DE MANDOS O AJUSTES O LA REALIZACION DE PROCEDIMIENTOS DISTINTOS DE LOS
INDICADOS EN LA PRESENTE IMPLICA EL RIESGO DE EXPOSICION A UNA RADIACION PELIGROSA.
COMO LOS RAYOS LASER UTILIZADOS EN ESTA UNIDAD PUEDEN RESULTAR PERJUDICIALES PARA SUS
OJOS, NO INTENTE DESARMAR EL GABINETE.
SOLICITE EL SERVICIO UNICAMENTE A PERSONAL CUALIFICADO.
Aviso al instalador de sistemas CATV:
Este aviso tiene la finalidad de llamar la atención del instalador de sistemas CATV para que tenga en cuenta
el Artículo 820-40 de NEC, que ofrece instrucciones para realizar una conexión a tierra apropiada y, en
particular, especifica que el cable de puesta a tierra deberá conectarse al sistema de puesta a tierra del
edificio tan cerca del punto de entrada del cable como sea posible.
Los productos que han ganado la marca ENERGY STAR® han sido diseñados para proteger el medio ambiente
mediante una eficiencia superior en el uso de la energía.
96
MEDIDAS DE SEGURIDAD IMPORTANTES
PRECAUCIÓN: Lea todas estas instrucciones
14. Puesta a tierra de la antena exterior – Si una antena exterior
o sistema de cables esta conectado al producto, asegúrese de
que la antena o sistema de cables esté puesto a tierra de forma
que proporcione cierta protección contra sobretensiones y
acumulaciones de cargas estáticas. El estatuto 810 del Código
Eléctrico Nacional ANSI/NFPA 70 proporciona información relativa
a la puesta a tierra adecuada del poste y de la estructura de soporte,
puesta a tierra del cable de entrada a una unidad de descarga de
antena, tamaño de los conductores de puesta a tierra, ubicación
de la unidad de descarga de antena, conexión a los electrodos de
puesta a tierra y los requisitos correspondientes al electrodo de
puesta a tierra. Refiérase al diagrama siguiente.
antes de utilizar este producto y guárdelas para
consultarlas posteriormente.
La energía eléctrica permite realizar muchas funciones
útiles. Este producto se ha diseñado y fabricado para
garantizar su seguridad personal. EL USO INADECUADO
PUEDE RESULTAR EN PELIGROS DE DESCARGAS
ELÉCTRICAS O INCENDIOS POTENCIALES. Con el fin
de respetar las medidas de seguridad incorporadas en
este producto, tenga en cuenta las siguientes reglas
básicas de instalación, uso y servicio técnico.
CABLE DE ENTRADA
DE ANTENA
1. Lectura de las instrucciones – Todas las instrucciones de
seguridad y uso deben leerse antes de utilizar el producto.
ABRAZADERA DE PUESTA
A TIERRA
2. Conservación de las instrucciones – Las instrucciones
3.
4.
5.
6.
7.
8.
9.
de seguridad y uso deben guardarse para usarlas como
referencia en el futuro.
Advertencias – Deben observarse todas las advertencias del
producto y de las instrucciones de uso.
Instrucciones – Deben seguirse todas las instrucciones de
uso.
Limpieza – Desenchufe este producto de la toma de
alimentación antes de limpiarlo. No utilice limpiadores líquidos ni
aerosoles. Utilice un paño húmedo.
Aditamentos – No utilice aditamentos no recomendados por
el fabricante del producto, ya que pueden causar peligros.
Agua y humedad – No utilice este producto cerca del agua,
por ejemplo, cerca de una bañera, cubeta de lavado, fregadero
de cocina, en un sótano húmedo, ni cerca de una piscina, etc.
Accesorios – No coloque este producto sobre un carrito,
soporte, trípode o mesa inestable. El producto podría caerse,
causando heridas graves a niños o adultos y daños graves al
propio producto. Utilícelo solamente con un carrito, soporte,
trípode o mesa recomendado por el fabricante o vendido con el
producto. Cualquier trabajo de montaje del producto deberá
realizarse según las instrucciones del fabricante, y deberán
utilizarse los accesorios de montaje recomendados por él.
Transporte – Mueva el producto con cuidado
cuando se encuentre en un carrito. Las
paradas bruscas, la fuerza excesiva o las
superficies desniveladas pueden causar que
el producto y el carrito se caigan.
UNIDAD DE DESCARGA
DE ANTENA
(ESTATUTO 810–20 DEL NEC)
EQUIPO DE
SERVICIO
ELÉCTRICO
ABRAZADERAS DE PUESTA A TIERRA
SISTEMA DE ELECTRODO DE
PUESTA A TIERRA DEL SERVICIO
DE ALIMENTACIÓN
(PARTE 250. PARTE H DEL NEC)
NEC- NATIONAL ELECTRICAL CODE (CÓDIGO ELÉCTRICO NACIONAL)
15. Relámpagos – Como protección complementaria para este
16.
17.
18.
10. Ventilación – Las ranuras y aberturas de la caja se proporcionan
para la ventilación del producto, para asegurar un funcionamiento
fiable y para protegerlo contra el sobrecalentamiento, y a la misma
vez, estas aberturas no deben bloquearse ni cubrirse. Con el fin
de que las aberturas no queden bloqueadas, no coloque el
producto sobre una cama, sofá, alfombra u otras superficies
similares. Este producto no debe instalarse en un espacio cerrado,
como un estante para libros, a menos que reciba una ventilación
adecuada o que las instrucciones del fabricante hayan sido
observadas.
11. Fuentes de alimentación – Este producto debe utilizarse
únicamente con el tipo de fuente de alimentación especificada
en la etiqueta de características. Si no está seguro del tipo de
suministro eléctrico existente en su hogar, consulte con el
proveedor de producto o con la compañía eléctrica local. Con
respecto al producto diseñado para utilizarse con pilas, o otras
fuentes de suministro consulte el manual de instrucciones.
12. Puesta a tierra o polarización – Este producto dispone de
un enchufe polarizado de dos cables (una cuchilla del enchufe
es màs grande que la otra) o con un enchufe puesto a tierra de
tres cables (un tercer conector para puesta a tierra). El enchufe
polarizado de dos cables encaja en la toma de alimentación en
una única posición solamente. El enchufe a tierra de tres cables
se conecta solamente en un tomacorriente con descarga a tierra.
Si el enchufe no encaja, solicite a un electricista la sustitución de
la toma de alimentación obsoleta. No modifique el enchufe y
respete esta medida de seguridad.
13. Protección del cable de la alimentación – Los cables de
la alimentación deben instalarse de forma que nadie pueda
caminar sobre ellos ni queden atrapados por artículos colocados
sobre o contra ellos, poniendo mucha atención a las partes donde
los cables entran en contacto con las clavijas, a las tomas de
corriente y a los puntos por donde salen del producto.
CONDUCTORES DE PUESTA
A TIERRA
(ESTATUTO 810–21 DEL NEC)
19.
20.
producto durante tormentas eléctricas o cuando no lo utilice durante
mucho tiempo, desenchúfelo de la toma mural y desconecte la
antena o sistema de cables. De esta forma se evitará que el
producto se dañe debido a relámpagos y sobretensiones.
Lineas eléctricas – Los sistemas de antenas exteriores no
deben encontrarse cerca de líneas eléctricas aéreas o de otros
circuitos de alimentación o de luz eléctrica, ni donde puedan
caer sobre dichos circuitos o líneas. Cuando se instale un sistema
de antena exterior, debe tenerse especial cuidado para evitar
entrar en contacto con tales circuitos o líneas eléctricas, ya que
tal contacto puede ser mortal.
Sobrecarga – No sobrecargue las tomas murales, los cables
prolongadores ni los receptores integrales, ya que si lo hace
pueden producirse incendios o descargas eléctricas.
Introducción de objetos sólidos y líquidos – No
introduzca nunca ningún tipo de objeto en este producto a través
de las ranuras de la caja, ya que pueden entrar en contacto con
puntos de tensión peligrosos o cortocircuitar componentes, lo
que podría provocar incendios o descargas eléctricas. No
derrame nunca ningún tipo de líquido sobre el producto.
Servicio – No intente reparar por sí mismo este producto, ya
que al abrir o extraer las cubiertas puede quedar expuesto a
tensión peligrosa y demás peligros. Solicite asistencia técnica a
personal especializado.
Averías que necesitan ser reparadas – Desenchufe este
producto de la toma mural y solicite asistencia técnica a personal
especializado en las siguientes condiciones:
a.
b.
c.
d.
Cuando el cable de alimentación o el enchufe esté dañado.
Si se ha derramado líquido sobre o caído objetos dentro del producto.
Si el producto ha estado expuesto a la lluvia o al agua.
Si el producto no funciona con normalidad al seguir las instrucciones
del manual. Ajuste solamente los controles especificados en el
manual de instrucciones, ya que el ajuste inadecuado de otros
controles puede provocar daños que a menudo requieren un trabajo
extenso por parte de un técnico especializado para que el producto
recupere su funcionamiento normal.
e . Si el producto se ha caído o se ha dañado de alguna manera.
f . Cuando el producto exhiba un cambio evidente en su rendimiento
(esto indica la necesidad de asistencia técnica).
21. Piezas de recambio – Cuando sean necesarias piezas de
sustitución, asegúrese de que el personal de servicio técnico ha
utilizado las especificadas por el fabricante o que cuenten con
las mismas características que las originales. Las sustituciones
no autorizadas pueden provocar incendios, descargas eléctricas
u otros peligros.
22. Comprobación de seguridad – Después de haber finalizado
cualquier servicio técnico o de reparación de este producto,
solicite al técnico que realice comprobaciones de seguridad para
determinar que el producto se encuentra en condiciones de
funcionamiento.
23. Calor – Este aparato deberá situarse alejado de fuentes de calor
como, por ejemplo, radiadores, salidas de calor, estufas y otros
aparatos que produzcan calor (incluyendo amplificadores).
97
Guía de operación rápida en español
5
Conexión básica
La conexión siguiente es la conexión básica para ver o
grabar programas de TV.
Conecte los enchufes de salida VIDEO/
AUDIO en su VCR, a los enchufes de entrada
de VIDEO/AUDIO en su TV usando un cable
de audio/video.
TV
Para los enchufes
Video/audio IN
Para los enchufes
Video/audio IN
Cable de
Video/audio
(disponible
comercialmente)
Cable de
Video/audio
(includio)
4
Cable coaxial
(disponible comercialmente)
Para el enchufe de
ebtrada de antena
5
3
Después de la conexión
Conecte los cables de alimentación del TV y VCR. Luego
vaya "EZ Set Up".
EZ Set Up
IMPORTANTE (Precaución durante EZ Set Up):
• No pulse el botón POWER de la grabadora ni del
control remoto.
Para los enchufes de
salida del video/audio
Para el enchufe de
salida de antena
VCR
Para el enchufe de
entrada de antena
2
Coaxial cable
(incluido)
La función de EZ Set Up ajusta automáticamente los canales
del sintonizador y el reloj cuando el cable de la antena está
conectado al panel trasero de la grabadora y la clavija del
cable de alimentación está conectada a una toma de CA.
Pala el enchufe
PASS THIROUGH
COMPONENT OUT
480i/
480p
IN
FROM
ANTENNA
IN 1
OUT 1
AUTO
REC
OUT 2
IN 2
LINE
R-AUDIO-L
VIDEO S-VIDEO
R-AUDIO-L
VIDEO
S-VIDEO LINE
POWER
OPTICAL
COAXIAL
PASS THROUGH
VHF/UHF/CATV
DIGITAL AUDIO OUT
1
La grabadora
Para los enchufes
de salida del
VIDEO/AUDIO
2
A la salida de pared
de anena/cable TV
Para le enchufe IN
FROM ANTENNA
1
Cable de antena
(disponible comercialmente)
1
2
Conecte el cable de antena de TV al enchufe
IN FROM ANTENNA en la parte trasera de
esta grabadora.
Conecte el enchufe PASS THROUGH en la
parte trasera de esta grabadora, al enchufe
de entrada de antena en su VCR usando el
cable coaxial sumimistrado.
NOTA
• Si conecta esta grabadora directamente a su TV, omita el
paso siguiente.
3
4
Conecte el enchufe de salida de antena en
su VCR al enchufe de entrada de antena en
su TV, usando el cable coaxial.
Conecte los enchufes de salida VIDEO/AUDIO
en esta grabadora, a los enchufes de entrada
VIDEO/AUDIO en su TV usando el cable de
video/audio suministrado.
Asegúrese de que los colores de los enchufes y
clavijas coincidan cuando conecta el cable.
98
3
Asegúrese de que el cable de la antena esté
conectado. Para conocer la configuración de
la conexión, consulte “Conexión básica”.
Conecte el enchufe de alimentación de la
grabadora un tomacorriente y el reloj de CA.
Los canales del sintonizador se ajustarán
automáticamente.
• Esta grabadora puede controlar y utilizar señales
horarias (señales EDS), emitidas por algunos
canales de televisión, para poner automáticamente
en hora el reloj.
NOTA
• Si la alimentación se suministra a la grabadora antes de
que el cable se encuentre conectado, EZ Setup Up no
podrá preajustar los canales en la memoria. Si esto llega
a suceder, pulse RESET en la parte delantera de la
grabadora. La función EZ Set Up volverá a funcionar
nuevamente.
• Si se conecta la alimentación durante EZ Set Up, el
ajuste automático de los canales se interrumpirá y los
canales del sintonizador no podrán ser preajustados.
• La Puesta en Hora Automática del Reloj puede tardar
varios minutos.
Guía de operación rápida en español
Antes de utilizar la grabadora
1
Coencte la alimentación del
televisor.
4
Pulse los botones Number o CH
" para seleccionar el canal
'/"
que va a grabar.
5
Pulse REC MODE para
seleccionar el modo de grabación
deseado.
• Cuando la grabadora esté conectada
a otro equipo de audio, encienda
también ese equipo.
• Cambie la entrada de TV a la entrada
de AV utilizada para conectar la
grabadora.
2
• El modo de grabación cambia como
se muestra abajo cada vez que se
pulsa el botón.
FINE
Pulse POWER para encender la
grabadora.
• Cuando se conecte la alimentación
de la grabadora por primera vez
después de adquirirla, siguiendo EZ
Set Up, se visualizará la pantalla OSD
LANGUAGE Select y la función Guía
de conexión se activará.
Siga las instrucciones de la pantalla.
6
FP
MNgg
Pulse Æ REC.
• Empieza la grabación y se visualiza
el icono REC.
• El indicador REC de la parte
delantera de la grabadora se
enciende en rojo durante la
grabación.
Pulse OPEN/CLOSE en la
grabadora para abrir la bandeja
del disco.
DVD-RW
OR IG INAL VR
F I NE REST. 1h0m
1/1
1/1
00 : 00 : 01
OPEN/CLOSE
7
2
TP
• El modo de grabación establecido
seleccionando “MN x x” es el modo
de grabación establecido en la
pantalla de selección MANUAL REC
MODE.
Grabación directa en DVD
1
SP
Ponga un disco DVD-RW o DVD-R
en la bandeja del disco.
REC
Pulse STILL/PAUSE para
hacer una pausa en la grabación.
• La pausa no funcionará durante la
grabación con temporizador.
• Durante la pausa, el indicador REC
en la parte delantera de la grabadora
parpadea.
• Introduzca el disco con la cara de la
etiqueta hacia arriba.
• En el caso de un disco grabado en
ambas caras, ponga la cara que
quiera grabar hacia abajo.
3
8
Pulse STILL/PAUSE para
reanudar la grabación.
9
Pulse ■STOP para detener la
grabación.
Pulse OPEN/CLOSE para cerrar
la bandeja del disco.
99
Guía de operación rápida en español
Reproducción DVD-RW/R
DVD RW
DVD RW
VR MODE
VIDEO MODE
1
DVD R
Pulse OPEN/CLOSE en la
grabadora para abrir la bandeja
del disco.
OPEN/CLOSE
2
Ponga el disco que quiera
reproducir en la bandeja del
disco.
Función de reanudación
de la reproducción.
• Si pulsa | PLAY a continuación, la
reproducción se reanudará desde el punto
donde usted la detuvo la última vez. Para
reproducir desde el principio, cancele el
modo de reanudación pulsando ■ STOP y
luego pulse | PLAY. (La reanudación de la
reproducción se cancelará cuando usted
abra o cierre la bandeja del disco,
desconecte la alimentación.)
• La función de reanudación de la
reproducción no se activa durante la
reproducción de CDs de vídeo.
Reproducción de DVD Vídeo
DVD VIDEO
1
• Introduzca el disco con la cara de la
etiqueta hacia arriba.
• En el caso de un disco grabado en
ambas caras, ponga la cara que
quiera ver hacia abajo.
3
Pulse OPEN/CLOSE para cerrar
la bandeja del disco.
4
Pulse REC LIST para visualizar
la pantalla REC LIST (imágenes
miniatura).
• Si el disco introducido tiene una lista
de reproducción y usted pulsa
ORIGINAL/PLAY LIST, la pantalla
cambiará a la lista de reproducción.
5
"/\
\ / | para seleccionar
Pulse '/"
el título (o capítulo) que quiera
ver.
LISTA DE GRABCIONES(ORIGINAL)
12 / 25 SÃB 10 : 28 AM
TÎTULO: CH33 FINE
INF TÎTULO: 10/4 MON 4:00 PM – 4:10 PM
1
2
4
6
7
100
3
5
6
Pulse SET/ENTER.
Para detener la reproducción,
pulse ■ STOP.
2
Introduzca un disco.
• La reproducción puede empezar
automáticamente dependiendo del
disco.
Pulse | PLAY.
• La reproducción empieza desde el
primer título.
• El menú tal vez se visualice en primer
lugar dependiendo del disco. Haga la
operación de reproducción siguiendo
las indicaciones de la pantalla.
• Para detener la reproducción, pulse
■ STOP.
Reproducción de Audio CD/Vídeo CD
VIDEO CD
1
2
AUDIO CD
Introduzca un disco.
Pulse | PLAY.
• La reproducción empieza desde la
primera pista.
3
Para detener la reproducción,
pulse ■ STOP.
CONSUMER LIMITED WARRANTY
(Valid for warranty service in the U.S. only)
CONSUMER LIMITED WARRANTY
SHARP ELECTRONICS CORPORATION warrants to the first consumer purchaser that this Sharp brand product (the
“Product”), when shipped in its original container, will be free from defective workmanship and materials, and agrees
that it will, at its option, either repair the defect or replace the defective Product or part thereof with a new or
remanufactured equivalent at no charge to the purchaser for parts or labor for the period(s) set forth below.
This warranty does not apply to any appearance items of the Product nor to the additional excluded item(s) set forth
below nor to any Product the exterior of which has been damaged or defaced, which has been subjected to improper
voltage or other misuse, abnormal service or handling, or which has been altered or modified in design or
construction.
In order to enforce the rights under this limited warranty, the purchaser should follow the steps set forth below and
provide proof of purchase to the servicer.
The limited warranty described herein is in addition to whatever implied warranties may be granted to purchasers by
law. ALL IMPLIED WARRANTIES INCLUDING THE WARRANTIES OF MERCHANTABILITY AND FITNESS FOR USE
ARE LIMITED TO THE PERIOD(S) FROM THE DATE OF PURCHASE SET FORTH BELOW. Some states do not allow
limitations on how long an implied warranty lasts, so the above limitation may not apply to you.
Neither the sales personnel of the seller nor any other person is authorized to make any warranties other than those
described herein, or to extend the duration of any warranties beyond the time period described herein on behalf of
Sharp.
The warranties described herein shall be the sole and exclusive warranties granted by Sharp and shall be the sole
and exclusive remedy available to the purchaser. Correction of defects, in the manner and for the period of time
described herein, shall constitute complete fulfillment of all liabilities and responsibilities of Sharp to the purchaser
with respect to the Product, and shall constitute full satisfaction of all claims, whether based on contract, negligence,
strict liability or otherwise. In no event shall Sharp be liable, or in any way responsible, for any damages or defects in
the Product which were caused by repairs or attempted repairs performed by anyone other than an authorized
servicer. Nor shall Sharp be liable or in any way responsible for any incidental or consequential economic or property
damage. Some states do not allow the exclusion of incidental or consequential damages, so the above exclusion may
not apply to you.
THIS WARRANTY GIVES YOU SPECIFIC LEGAL RIGHTS. YOU MAY ALSO HAVE OTHER RIGHTS WHICH VARY
FROM STATE TO STATE.
Model Specific Section
Your Product Model Number & Description:
DV-SR3U DVD RECORDER
(Be sure to have this information available when you need service
for your Product.)
Warranty Period for this Product:
One (1) year parts and ninety (90) days labor from date of purchase.
Additional Item(s) Excluded from
Warranty Coverage (if any):
Non-rechargeable batteries.
Where to Obtain Service:
From a Sharp Authorized Servicer located in the United States. To
find the location of the nearest Sharp Authorized Servicer, call Sharp
toll free at 1-800-BE-SHARP.
What to do to Obtain Service:
Ship prepaid or carry in your Product to a Sharp Authorized Servicer.
Be sure to have Proof of Purchase available. If you ship the Product, be sure it is insured and packaged securely.
TO OBTAIN SUPPLY, ACCESSORY OR PRODUCT INFORMATION, GO TO OUR WEBSITE AT www.sharpusa.com
OR CALL 1-800-BE-SHARP.
SHARP ELECTRONICS CORPORATION
Sharp Plaza, Mahwah, New Jersey 07430-2135
SHARP CORPORATION
Osaka, Japan
Printed in Malaysia
Impreso en Malasia
TINS-B036WJZZ
04P01-MSK