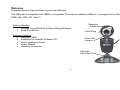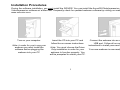
1
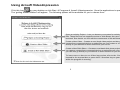
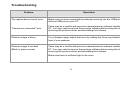
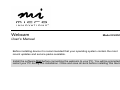
Webcam
Model IC435C
User’s Manual
Before installing device it is recommended that your operating system contain the most
recent updates and service packs available.
Install the software first before connecting the webcam to your PC. You will be prompted to
restart your PC during this installation. Close and save all work before installing this device.
FCC STATEMENT
IC435C
This device complies with part 15 of FCC Rules. Operation is subject to the following two conditions: (1) this device may not cause harmful
interference, and (2) this device must accept any interference received, including interference that may cause undesired operation. This equipment
has been tested and found to comply with the limits for a Class B digital device, pursuant to part 15 of FCC Rules. These limits are designed to
provide reasonable protection against harmful interference when the equipment is operated in a residential installation. This equipment generates,
uses, and can radiate radio frequency energy and, if not installed and used in accordance with the instruction guide, may cause harmful
interference to radio communications. However, there is no guarantee that interference will not occur in a particular installation. If this equipment
does cause harmful interference to radio or television reception, which can be determined by turning the equipment off and on, the user is
encouraged to try to correct the interference by one or more of the following measures:
•
Reorient or relocate the receiving antenna.
•
Increase the separation between the equipment and the receiver.
•
Connect the equipment into an outlet on a circuit different from that to which the receiver is connected.
•
Consult a service representative for help.
Properly shielded and grounded cables and connectors must be used in order to comply with FCC emission limits. Micro Innovations is not
responsible for any radio or television interference caused by using other than recommended cables and connectors or by unauthorized changes or
modifications to this equipment. Unauthorized changes or modifications could void the user’s authority to operate the equipment.
Responsible party:
Micro Innovations
400 Clearview Ave.
Edison, NJ 08837
Telephone: 1(732)346-9333
Tested To Comply With FCC Standards
FOR HOME OR OFFICE USE
2
Table of Contents
Welcome…………………………………..…………………………………………………………………………..….….
Page 4
Installation Procedures…...………………….………………………………………………..………...…………………
Page 5
Using Your Webcam…………………………………………...…………………………………………….……………..
Page 6
Using Your Arcsoft® PhotoImpression……………………………………………………………………………….......
Page 7
Capturing Images from “Live” Video…………………………………….………………………………………………...
Page 8
Using Arcsoft® VideoImpression …………………..……………………………………………………………………..
Troubleshooting ……………………………………………………………..……………………………………….……..
Page 9
Page 10
Helpful Hints and Technical Support……………………………………………………………...…..…………………..
Page 11
3
Welcome
Congratulations on the purchase of your new Webcam.
The Webcam is compatible with IBM® or compatible PCs with an available USB port. It is supported by Windows®
98SE, Me, 2000, XP, Vista™.
Feature Benefits:
• Includes Arcsoft® Photo & Video Editing Software
• Snap Shot Button
Package Contents
• Webcam (USB)
• Installation & Arcsoft® Software CD
• Quick Installation Guide
• User’s Manual
• Warranty Information
Snapshot
Button
Focus Ring
Active LED
Indicator
Adjustable
Swivel Base
4
Installation Procedures
During the software installation, you must install the DRIVER. You can install the Arcsoft® PhotoImpression and
VideoImpression software at a later time. Frequently check for updated webcam software by visiting our website,
www.microinv.com.
Turn on your computer.
Note: In order for you to use your
webcam you must install the
software before plugging the
webcam into your PC.
Insert the CD into your PC and
follow the on-screen instructions.
Note: You must choose the Driver
Only installation in order for your
webcam to function properly. You
will be prompted to restart your PC.
5
Connect the webcam into an available
USB port. Follow all on-screen
instructions to install your new hardware.
Your new webcam is now ready for use.
Using Your Webcam
To use the camera, click StartÆ ProgramsÆ Micro InnovationsÆ Webcam. Make sure that “Webcam” is checked under the
Devices menu and that “Preview” is checked under the Options menu. At this point, you should see “Live” video capture in the
window. If you do not please reference the Troubleshooting section in this manual.
To Capture “Live” Video Clips (.avi)
1. Click “Capture” and choose “Start Capture”
2.
Click “OK” from the “Ready to Capture” window. You will notice the elapsed time of video capture will be displayed in the
lower left hand corner of the video capture window.
3.
To stop capturing video click “Capture” again and choose “Stop Capture”. To save the video clip click “File” and select
“Save Capture video as”. Select the location of where the file is to be saved and name the file. Click “ok” to finish.
Video Capture Settings
To adjust video capture properties click “Options”, choose “Video Capture Filter” and select the “Video Proc Amp” tab. Here you
can modify properties and setting such as Brightness, Contrast, Saturation and sharpness. Note: By clicking “Default” you can
return to the original settings.
Clicking “Options” and choosing “Video Capture Pin” can modify additional video capture settings. From this window, you can
modify Frame Rate, Compression, Output Size and Quality.
To set limits on video capture time, click “Capture” and select “Set Time Limit”.
Note: You can limit the size of the video capture size by clicking “File” and choosing “Allocate File Space”. Enter the amount of disk
space to be used in the capture size field. Any video (data) that exceeds the allocated size will be lost.
6
Using Arcsoft PhotoImpression
Click the Icon
on your desktop or click Start Æ Arcsoft PhotoImpression. Note: The Get Photo control panel will be
displayed on your screen.
•
•
and select your device
to begin downloading your photos.
Choose the Camera/ Scanner Icon
Using the “View Mode” located in the upper right-hand corner of the applications window, you can view your photos
accordingly. Single Photo, Large Thumbnails, Small Thumbnails, Detail mode, or Full Screen.
•
To sort your photos by Name. Type, Size or Date, click “Sort” button.
•
To Locate a photo by using it’s name or description use “Find” button.
•
To create a slide show, simply click t the “Slide Show” Icon and choose your presentation settings. Click “Save” and
choose a destination to save the file. Click “OK” to finish.
•
To write save your Slide Show to CD/DVD, click the “write “CD/DVD” button.
To learn how to enhance, create effects, print and send your photos refer to the “Help” section located in the top tool bar
or press the F1 function key on your keyboard while the program is running.
7
Capturing Images from “Live” Video
Click the Icon
on your desktop or click Start Æ ProgramsÆ Arcsoft PhotoImpression .
From the “Get Photo” control Panel, choose the Video Icon
will appear with the following options:
for “live” video capture. The “Live” Video capture control panel
•
Source: allows you to modify the Video Camera capture properties and settings such as Brightness, Hue, Saturation,
White Balance, Exposure and Light Frequency.
•
Live: initializes the video camera option and starts the “live” video capture.
•
Capture: takes still snapshots from your “live” video capture.
•
Done: will close the capture image options box.
8
Using Arcsoft VideoImpression
Click this Icon
on your desktop or click Start Æ ProgramsÆ Arcsoft Videoimpression. Once the applications is opened,
The “getting Started Wizard” will appear. The following options will be available for you to choose from:
Open an existing Project – Lets you browse your system for existing project
files. These files are not complete movies or slide shows; they are “work-inprogress” files that let you fully edit the components of the storyboard.
Create a New Video – Creates a new, blank video project and lets you capture
content from connected devices or select files on your system or you can go
directly to your albums to select content for your movie.
Create a New Slide Show – Creates a new blank slide show project and lets
you capture content from connected devices or select files on your system,
you can also go directly to your albums to select content for your movie
To learn more on how to use Video Impression refer to the “Help” section
located in the top tool bar or press the F1 function key on your keyboard
while the program is running.
9
Troubleshooting
Problem
“No capture device found” error
“Camera not connected” error
Resolution
Make sure you have connected the webcam correctly into the USB port or try a
different USB port on your PC.
There may be a conflict with previous camera/scanner software installed on your
PC. You may need to remove the previous software before using this device. Try
removing the previous driver and reinstalling the software.
Webcam image is blurry
For a sharper image, adjust the focus by rotating the focus ring located on the
front of your webcam.
Webcam image is too dark
(Black or green screen)
There may be a conflict with previous camera/scanner software installed on your
PC. You may need to remove the previous software before using this device. Try
removing the previous driver and reinstalling the software.
Make sure there is sufficient light in the room.
10
Helpful Hints
The following hints will help you achieve the best results with your webcam:
Webcam placement
•
Position the webcam so that the subject is centered.
Lighting
•
Use sufficient lighting.
Maintenance
•
Keep the webcam away from moisture and extreme temperature.
•
Never use harsh or abrasive cleaners or organic solvents on the webcam or on any of its parts.
•
Never disassemble or touch the inside of the webcam. Only Micro Innovations may service or repair this device.
For technical assistance visit www.microinv.com or call toll free: 1-877-550-5534.
Technical Support hours of operation: Monday - Friday 8:30am to 7:00pm E.S.T.
11