1
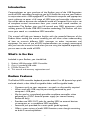
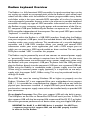
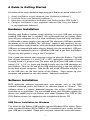
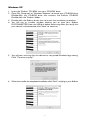
Radium Manual
version: RAD-050503
User Guide
Introduction . . . . . . . . . . . . . . . . . . . . . . . . . . . . . . . . . . . . . . . . . . . . .2
What’s in the Box . . . . . . . . . . . . . . . . . . . . . . . . . . . . . . . . . . . . . . . . .2
Radium Features . . . . . . . . . . . . . . . . . . . . . . . . . . . . . . . . . . . . . . . . . .2
Radium keyboard Overview . . . . . . . . . . . . . . . . . . . . . . . . . . . . . . . . .3
A Guide to Getting Started . . . . . . . . . . . . . . . . . . . . . . . . . . . . . . . . .4
Hardware Installation . . . . . . . . . . . . . . . . . . . . . . . . . . . . . . . . . . . . . .4
Software Installation . . . . . . . . . . . . . . . . . . . . . . . . . . . . . . . . . . . . . . .4
Windows XP . . . . . . . . . . . . . . . . . . . . . . . . . . . . . . . . . . . . . . . . .5
Windows 2000 . . . . . . . . . . . . . . . . . . . . . . . . . . . . . . . . . . . . . . .7
Windows Me and Windows 98 Second Edition . . . . . . . . . . . . . .10
Mac OS X . . . . . . . . . . . . . . . . . . . . . . . . . . . . . . . . . . . . . . . . . .11
Mac OS 9 . . . . . . . . . . . . . . . . . . . . . . . . . . . . . . . . . . . . . . . . . .11
Setting Up Your MIDI Studio . . . . . . . . . . . . . . . . . . . . . . . . . . . . . . . .13
Using the Radium with Your Application Software . . . . . . . . . . . . . . .14
MIDI Functions . . . . . . . . . . . . . . . . . . . . . . . . . . . . . . . . . . . . . .14
Standalone Mode . . . . . . . . . . . . . . . . . . . . . . . . . . . . . . . . . . . . .15
Default Settings . . . . . . . . . . . . . . . . . . . . . . . . . . . . . . . . . . . . . .15
Top Panel Features . . . . . . . . . . . . . . . . . . . . . . . . . . . . . . . . . . . . . . .16
Utilizing the Programming Assignment Keys . . . . . . . . . . . . . . . .17
The Data Entry Slider . . . . . . . . . . . . . . . . . . . . . . . . . . . . . .17
Assignable Sliders and Knobs . . . . . . . . . . . . . . . . . . . . . . . .18
Other Buttons and Keys . . . . . . . . . . . . . . . . . . . . . . . . . . . .19
Rear Panel Features . . . . . . . . . . . . . . . . . . . . . . . . . . . . . . . . . . . . . .22
Technical Support & Contact Information . . . . . . . . . . . . . . . . . . . . . .23
Radium Warranty Information . . . . . . . . . . . . . . . . . . . . . . . . . . . . . .24
Specifications . . . . . . . . . . . . . . . . . . . . . . . . . . . . . . . . . . . . . . . . . . .25
Appendix A - MIDI Controller Information . . . . . . . . . . . . . . . . . . . .26
Appendix B - Radium MIDI Implementations . . . . . . . . . . . . . . . . . . .27
Introduction
Congratulations on your purchase of the Radium, part of the USB Keystation
series of MIDI controllers brought to you by M-Audio.You may use your Radium
in conjunction with a USB equipped PC or Macintosh computer and appropriate
music software to enter a full range of MIDI note and controller information.
You will be able to discover the wonderful world of Computer Music with a set
of complete musical instruments from your sound card, sound modules, or
workstation. The Radium gives you full control over MIDI parameters, while
utilizing proven M-Audio USB MIDI interface technology. The Radium will also
serve your needs as a standalone MIDI controller.
This manual will help you become familiar with the powerful features of the
Radium. After reading the manual carefully, you will have a clear understanding
of how to transmit different MIDI messages to other instruments and
equipment. For ease of use of MIDI implementation, we strongly recommend
that you have the manual at hand when you are using the keyboard, especially if
you are new to the world of MIDI.
What’s in the Box
Included in your Radium, you should find:
1.
2.
3.
4.
Radium USB Keystation MIDI Controller
One (1) standard USB cable
PC/Mac Driver CD
This manual and warranty registration card
Radium Features
The Radium MIDI controller keyboard provides either 61 or 49 dynamic keys, pitch
and mod wheels, a data slider, 8 assignable sliders and 8 assignable knobs.
•
•
•
•
•
•
Connects easily to your computer—no tools or disassembly required
When used with USB, may be parasitically powered by your
computer’s USB port
May be used as a completely portable standalone controller when
powered by a 9VDC external power supply (or internal battery,
Radium49 only)
Provides two MIDI OUT jacks for sending MIDI to external devices
via computer or as standalone MIDI controller
Footswith jack provided for sustain pedal (pedal optional)
Offers a great variety of useful MIDI functions, even though containing
no built-in sound capabilities
2
Radium keyboard Overview
The Radium is a fully functional MIDI controller. Its touch-sensitive keys can be
set to play any octave or transposed pitch, while the Radium’s pitch wheel, mod
wheel and data slider with the addition of sixteen programmable rotary knobs
and sliders make it the most versatile MIDI controller of its class. Its compact
size and powerful controller features make it the ultimate in portable keyboard
controllers.Virtually any type of MIDI controller information can be sent from
the Radium to your computer, using the power and convenience of the Mac or
PC computer’s USB port.Additionally, the Radium can operate as a “standalone”
MIDI controller, independent of the computer.The rear panel MIDI port marked
“keyboard” is used for this purpose.
Contained within the Radium is a USB MIDI interface. Simply plug the Radium
into your computer’s USB port, install the included drivers and enable the MIDI
interface within your music software. This combination of a versatile keyboard
controller and a USB MIDI interface allows you record and control MIDI
information within your music application, plus adds a MIDI output port to
which you can connect a MIDI sound module or drum machine.The rear panel
MIDI port marked “USB” is used for this purpose.
The Radium may be powered by one of two sources: an external power supply
or “parasitically” from the voltage it receives from the USB port. For the most
consistent performance, we recommend using a power supply, even when using
the Radium with your computer’s USB port.To power from the USB port only,
plug the Radium directly into the computer’s USB port, not a powered USB hub.
When using the Radium in standalone mode, a power supply must be used.
When using an external power supply (optional), it is important to use only a
supply with the proper 9vDC, 500ma rating. This may be purchased locally or
through M-Audio.
On a PC: You must be running Windows 98 or higher to properly use the
Radium. Windows NT is not supported. Also, your motherboard must support
USB 1.1. It is possible for a motherboard to support USB and yet not have the
physical port connectors installed. A simple USB back panel extender can be
purchased at a computer supply store and can be installed easily to provide USB
port connectors.
On an Apple Computer: Your Mac must support USB with the built-in ports.
The USB ports on the iMac or PowerMac G3/G4 will work just fine. A Mac OS
that supports USB will also be required.We recommend MacOS 9.2.2 or higher.
We cannot guarantee performance of device when using non-Apple USB ports.
IMPORTANT: For MacOS 9, an OMS MIDI driver is provided. You MUST have
a sequencer program that supports OMS, and have OMS properly installed
in order to use the Radium.
3
A Guide to Getting Started
An outline of the steps needed to begin using your Radium on either a Mac or PC:
1.
2.
3.
4.
Attach the Radium to your computer (see “Hardware Installation”).
Install the Driver (see “Software Installation”).
Hook your sound module to the Radium (see “Setting Up Your MIDI Studio”).
Configure the Radium in your application software (see “Using the Radium
in your Application Software”).
Hardware Installation
Installing your Radium involves simply attaching it to your USB port using the
standard USB cable that is included. We recommend that you power down
(turn off) your computer for a first time installation. If you are using the Radium
in USB mode, a power supply is not required.The computer’s USB port provides
the power to run the Radium.The “wall-wart” supply is only necessary for use
in the standalone mode. However, when the Radium receives its power from the
USB port, we recommend either plugging directly into the computer’s USB port
(not into the keyboard’s port or a powered USB hub). If you own the Radium
49, you may also power it using 6 size C batteries.
Find a good spot around your computer station to place the Radium. The USB
port on your computer is a small (1/8” x 3/8”), rectangular connector (A) and
is usually found in a group of two. The other end (B) of your USB cable is ‘more
square’ (1/4” x 1/4”) in shape, and should fit easily into the USB connector on
your Radium. Take the (A) end of the USB cable and plug it into the USB port
on the back of your computer. Take the (B) end of the USB cable and plug it in
to the USB port on the back panel of the Radium. Next, power up your
computer and proceed to the next section, “Software Installation.”
Software Installation
MIDI application software communicates with devices such as the MIDI
interface contained within the Radium via software known as “drivers.” This
software driver is a special, dedicated program that makes a MIDI interface
accessible to an application. On the included driver disk, M-Audio supplies the
drivers that enable you to use Radium with either Windows, Mac OS9 or Mac
OSX. Radium drivers are supplied on the included dual format CD.
USB Driver Installation for Windows
This driver for the Radium USB interface requires Windows 98 or higher. Please
make sure that Windows 98, Me, 2000 or XP is installed on your system, and that
your USB port is enabled. Check your computer manual for more information.
4
Windows XP
1. Insert the 'Radium' CD-ROM into your CD-ROM drive.
2. Open 'My Computer' or 'Windows Explorer' to locate your CD-ROM drive.
Double-click the CD-ROM drive that contains the Radium CD-ROM.
Double-click the 'Radium' folder.
3. Double-click the Radium driver icon to launch the installation procedure.
4. You will see an installer window advising you to have your Radium
DISCONNECTED from the USB bus before continuing.After you verify that
your device is disconnected, click 'Next' to continue.
5. You will see a warning that this device has not passed Windows logo testing.
Click "Continue anyway".
6. When the installer has completed installation,click “Finish” and plug in your Radium.
5
7. You will see a “New Hardware found” dialog. (If you don’t see this dialog at
first, unplug your Radium and try again.) Click Next.
8. You will see another warning that the product has not passed Windows logo
testing. Click "Continue anyway".
9. The installer will finish. Click “Finish” to continue.
10. You will see another window telling you that New Hardware has been found.
Click “Next”.
6
11. Again, the computer reminds you that the product has not passed Windows
Logo testing. Click "Continue anyway".
12. The driver has been installed.
Windows XP Installation is now complete.
Windows 2000
1. Service Pack 2 or higher is required for proper operation of the Radium
driver. This service pack is available from Microsoft Downloads at
www.microsoft.com/downloads.
2. Insert the M-Audio Driver CD into your CD-ROM drive. Open 'My
Computer' or 'Windows Explorer' to locate your CD-ROM drive.
Double-click the CD-ROM drive that contains the Radium CD-ROM.
3. Double-click the Radium Folder to open it.
4. Double-click on the Radium Installer icon
5. A dialog box will appear, reminding you to exit all currently running programs
and to disconnect the Radium from the USB port. Do so now, if necessary,
and click “Next” to continue.
7
The installer will scan your hard drive (this can take some time) and will then
install the necessary files and perform setup actions on your system.A series of
progress bars will show you how the process is going.
6. At the next prompt, the installer will warn you that this product does not
have a Windows Digital Signature. Click “Yes” to continue.
7. A dialog box will appear, stating that the installation has succeeded. Click
“Finish” to complete the driver installation.
8. Be sure that the power switch is set to “9V” with the power supply
connected, or to “USB Power” if the supply is not being used. and plug the
Radium into your computer’s USB port. Upon doing so, the computer will
find and install the necessary drivers.
9. The installer will next warn you that this product does not have a Windows
Digital Signature. Click “Yes,” to continue.
8
10. The installer will now warn you, a second time, that this product does not
have a Windows Digital Signature - again, click “Yes”.
Windows 2000 Installation is now complete.
Windows Me and Windows 98 Second Edition
1. Insert the M-Audio Driver CD into your CD-ROM drive. Open 'My
Computer' or 'Windows Explorer' to locate your CD-ROM drive. Doubleclick the CD-ROM drive that contains the Radium CD-ROM.
2. Double-click the Radium Folder to open it.
3. Double-click on the Radium Installer icon.
4. A dialog box will appear, reminding you to exit all currently running programs
and to disconnect the Radium from the USB port. Do this, and then click
“Next” to continue.
The installer will scan your hard drive (this can take some time) and will then
install the necessary files and perform setup actions on your system.A series of
progress bars will show you how the process is going.
9
5. A dialog box will appear, stating that the installation has succeeded. Click
“Finish” to complete the driver installation.
6. Plug the Radium MIDI interface into your USB port. Be sure to either have
the power supply connected and power switch set to 9V, or if not using
power supply, be sure to set the power switch to USB Power. Upon doing
so, the computer will find and install the necessary drivers.
Windows Me or 98SE Installation is now complete.
Mac OS X
USB Driver Installation
The drivers for MacOS X are found on the Driver CD which comes with the
product.You may also wish to check the MIDISPORT drivers page of our website
to make sure you have the most recent version. The driver may be labeled
“Keystation” or “M-Audio USB”.The OSX Installer Package icon looks like a cube
of Jello rising out of a cardboard box and usually ends with the suffix “.pkg”.
To install the OSX driver:
1. Double-click on the installer package.
2. Click on the lock icon and enter the administrator password you chose
when you installed OSX.
3. Follow the prompts to install the software.
Your Radium is ready for use. Refer to the sections “Setting Up Your MIDI Studio”
and “Using the KEYSTATION in your Application Software” for more information.
Mac OS 9
USB Driver Installation
You must first install Opcode’s OMS. This is available on the MIDISPORT drivers
page of our website, or can be installed from the driver CD by opening the OMS
folder and then double clicking the OMS install icon.
10
This release version of the Radium driver requires Macintosh operating system
OS 9.2.2 or higher. Some updates are offered free to Apple owners. Please
check the Apple website at http://www.info.apple.com for update information.
OMS is a MIDI manager program developed by Opcode. We have included it on
the CD disk for your convenience, and also offer it as a free download from our
website’s MIDISPORT drivers page. OMS is required to run the Radium on the
Macintosh, and it is important that you install OMS before running the Radium
Installer. Locate the OMS installer program on this CD in the OMS 2.3.8 folder,
and simply double click its icon to install OMS. After installing OMS, you will
need to restart. Once installation has been successfully completed, you can
move on to the next step, the KEYSTATION Installer.
NOTE FOR FIRST TIME INSTALLATIONS: If you power up your Mac with the
Radium attached and powered up, you will receive a message that an “unknown
USB device has been detected.” Click OK and proceed with the driver
installation.You may also install the drivers first, and then plug in the Radium.
KEYSTATION Installer
1. Insert the Driver Software CD. Open the KEYSTATION folder, then the
USB folder. There, you will find the KEYSTATION Installer program.
2. Run the KEYSTATION Installer by double clicking on it.This installs all of the
KEYSTATION’s extensions as well as the KEYSTATION OMS Driver.
However, YOU MUST HAVE OMS INSTALLED FIRST BEFORE YOU RUN
THIS INSTALLER PROGRAM. Otherwise, the KEYSTATION OMS Driver
will not be placed in the OMS folder.
Once installed, you should have one new extension in your Extensions folder
(the Extensions folder is inside your System folder).This file is named “M-Audio
USB Support.” The installer will also place the file “M-Audio OMS Support” in
the OMS folder, which also resides in your system folder. It is now time to
configure OMS.
Go to the Chooser under the Apple Menu, and make sure AppleTalk is turned off
(this is recommended, even though OMS will sense that it is on and prompt you
to turn it off). Unless you have previously installied the KEYSTATION driver and
OMS, and configured OMS, you must do so now, by completing the steps listed
in the following section.
First Time OMS Configuration Instructions
1. In the Opcode folder, which you will find on your hard drive, locate the OMS
Applications folder, then OMS Setup. Double click on OMS Setup.
2. OMS will inform you that it has not yet been configured. Click OK.
3. The Create A New Studio Setup dialog box now appears. Click OK.
11
4. The “OMS Driver Search” box asks you to choose the port on which you’ve
attached the Radium (either Modem or Printer). DO NOT choose a port
(since we’re using USB), just click “Search.” OMS begins Searching.
IMPORTANT: If the USB cable is not correctly hooked up to the Radium, or
the Radium is not switched on, setup will fail.
5. After OMS successfully finds the driver,“OMS Driver Setup” the Radium will
appear in a list as “KEYSTATION SERIES”. Click OK. OMS will then define
the Radium output port (it will show “Identifying”).
7. The “OMS MIDI Device Setup” dialog box will appear showing the Radium’s
output port (labeled KEYSTATION SERIES) with an open check box to the
left of the port. You will now have to check this open box to enable the
output port. Click on OK.
8. Next, the “My Studio Setup” appears with a file save dialog box over it. You
will now need to name and save your new Studio Setup (or use the default
name) before you can assign an instrument to the Radium’s output (labeled
KEYSTATION SERIES). Assign your instrument (this step is optional) and
you are done.
9. Your Radium is ready for use.
You can run the OMS ‘Test Studio’ utility by going to the ‘Studio’ menu and
releasing the mouse on “Test Studio.” Playing a note on your keyboard will give
you an audio message from your computer, “MIDI received,” while the arrow
pointing to the keyboard icon flashes. Clicking on the keyboard icon with the
mouse pointer will send a tone cluster to the Radium output port. The sound
module connected to the Radium MIDI Out port should play the chord.
You may now exit OMS Setup by quitting the application. The rest is up to
configuration within your music software. Generally, this means selecting “OMS
Compatibility,” or “Open Music System” for your MIDI system setup.
Setting Up Your MIDI Studio
A typical MIDI system set-up would include your Radium, a computer, MIDI
sequencing software and/or a MIDI compatible sound module. This type of
set-up can be connected as follows:
1. The Radium is connected to the computer via the USB port connectors,
using the supplied USB standard cable.
2. The Radium can play the synthesizer that is part of an internal sound card,
as well as any software synthesizers that are installed in your system.This will
depend on how you set up your software (see the section “Using the Radium
in Your Application Software”). The audio output of the sound card can be
plugged directly into a sound system, or into a mixer, which is then
connected to a sound system.
12
3. The MIDI Output of the Radium is connected to the MIDI In of a sound
module. The audio output of the sound module can be plugged directly into
a sound system, or into a mixer, which is then connected to a sound system.
In the setup pictured below, the Radium is being used as a MIDI controller as
well as a MIDI interface, inputting MIDI data to the computer and its application
software, and outputting MIDI to a sound module from which sounds will be
produced. The Radium as a controller may also send MIDI information to an
existing internal soundcard’s MIDI synthesizer or any installed software
synthesizer, outputting the audio from the computer soundcard.
In this scenario, it may not be necessary to apply external power to the Radium.
With the power switch set to “USB Power,” the Radium receives power from
the USB port on your computer. It is recommended that you plug directly into
the USB port on the computer. You may also choose to use power from
batteries (Radium49 only) or an external power supply.
Additionally, the Radium may be used as a “standalone” keyboard controller,
independent of the computer and its USB port. In this case, the Radium must
receive power from a power supply, by switching the power setting on from the
rear panel. Also, you will want to use the MIDI out port that is labeled
“Keyboard.” A setup such as this may be used in a performance situation, or
when you wish to use the keyboard without the computer.
13
Using the Radium with Your Application Software
Once the Radium driver has been installed, you will need to configure your MIDI
application software to utilize the Radium. The manner in which this is done
varies between applications, so we can just cover the basics here.
Generally with both the Mac and PC, most MIDI applications have a MIDI port
configuration or settings dialog box, sometimes called “MIDI Devices” or “MIDI
Setup.” It is within this dialog box that you will select or enable your MIDI input
and output devices.
If the Radium drivers are properly installed, then the port selection in this case
will be the KEYSTATION SERIES (or “Port 1” on the Mac) in the input column,
and then KEYSTATION SERIES (or Port 1) in the output column. KEYSTATION
SERIES will appear twice under the inputs and outputs. You must choose the
second selection for each time it is listed in order for OMS to properly process
the flow of MIDI information to and from the computer. Make sure that those
items are highlighted or checked. The output port that you select on a specific
MIDI track within your sequence will output MIDI information to the keyboard
or sound module that is attached to that port.
MIDI Functions
MIDI is the acronym for Musical Instrument Digital Interface, which makes all
digital musical instruments equipped with this standardized interface able to
exchange their MIDI data or “talk to each other.”
To explain how MIDI works on your instrument in more detail, the following
descriptions outline the MIDI functions of the Radium, which allow you to
connect the keyboard to other MIDI instruments and to your computer. The
versatile MIDI capability of the Radium will offer you tremendous power in a
MIDI environment.
The keys on the Radium, in conjunction with the MIDI/SELECT button, give you
the extra programming capability that is unique to the Keystation series of MIDI
controllers.You can use the Data Entry key to enter in values, or the keys that
are labeled with numbers. The keys labeled for specific MIDI functions can be
used to assign that function to the data slider.The “Set CTRL” key can be used
with the numeric value keys to program the knobs and sliders to send MIDI
controller information on specific MIDI channels.
Standalone Mode
To transmit MIDI data from your keyboard to other professional MIDI instruments,
purchase a standard MIDI cable and use it to connect the MIDI OUT jack of your
Radium labeled “Keyboard” to the MIDI IN jack of the other instrument.
14
1. Power up the Radium using a 9VDC adapter. Set the power switch to the the
9vDC setting.
2. Make sure that the MIDI port “transmit” channel within you music
application matches the MIDI “receive” channel of the other instrument.
3. Refer to the diagram in the section, “Setting Up Your MIDI Studio” for
audio connections.
Default Settings
The Radium will select the following default parameter values when its power is
first turned on.
•
•
•
•
•
•
•
•
•
•
•
•
•
Default Transmit MIDI Channel number will be 1
Default Octave will be from C4(60) to C6(84)
Default After Touch value will be 0
Default Velocity value will be 0
Default Reverb Depth value will be 64
Default Pan Pot value will be 64
Default Volume value will be 127
Default CC Data value will be 0
Default Slider CC Data numbers are 20-27 on Channel 1Default Slider and
Knob CC Data, refer to “Sliders and Knobs” section.
Default Knob CC Data numbers are 70-77 on Channel 1
Default CC Number value will be 0
Default Control Change (CC-00=0, CC-32=0) message will be transmitted
Default Program Change (PG=1) message will be transmitted
15
Top Panel Features
1. Pitch Bend Wheel: The Pitch Bend wheel is used for raising or lowering
the pitch of a voice during performance, starting from and always returning
to a center “detent” point.The range of pitch values depends on the sound
generator (sound card or module) being used. Please refer to the manuals of
your devices for information on how to change the Pitch Bend range. To
bend the pitch up, move the wheel away from you. To bend the pitch down,
move the wheel towards you.
2. Modulation Wheel: It is very common to use the modulation wheel to
change the intensity of effects, such as Vibrato (pitch change), Tremolo
(change in volume), and Modulation (change in tone).The Modulation Wheel
produces a vibrato effect shortly after the sound is generated, and is most
effective for solo instruments such as saxophone, strings, and oboe. Similar
to the pitch wheel, the actual effect and range of that effect will be set within
your MIDI sound module.
3. Controller Sliders: These eight programmable sliders can be used to send
any MIDI controller data on any MIDI channel. This is perfect for use with
hardware and software synthesizers, for automating software mixers, or for
controlling any devices that will respond to MIDI commands. In the next
section, the “Set Controller Key” instructions will show you how to program
this special feature.
4. Controller Knobs: Like the Controller Sliders, these eight programmable
rotary knobs can be used to send any MIDI controller data on any MIDI
channel. In the next section, the “Set Controller Key” instructions will show
you how to program this special feature.
16
5. Octave Up & Octave Down Buttons: These buttons allow you to set the
octave orientation of the Radium’s keyboard.
6. Data Entry Slider: This slide controller allows you to adjust the value of
parameters such as Volume,Velocity, Aftertouch, and virtually any assignable
MIDI control parameter directly from your keyboard. Setting the data slider
is covered in the next section.
7. MIDI/SELECT button: Use this button to select different MIDI commands
using certain keys from your keyboard. Activating this key is indicated by a lit
LED on the MIDI/Select button.When MIDI/SELECT is activated, the keyboard
becomes a set of function keys for setting MIDI parameter commands.
8. Programming Assignments Keys: After pressing the MIDI/SELECT
button, these keys on the Radium act as function keys which allow you to
assign certain MIDI parameters and Program Change/MIDI Channel
selections by the numbered key group.
Utilizing the Programming Assignment Keys
This section contains the information you will need to program the Radium and
to send MIDI parameter data from the keyboard.You may set the data slider to
send MIDI controller data of your choice, send program change data from the
keyboard, select the MIDI transmit channel of the Radium, set the octave or
pitch of the keyboard, and program the sixteen knob and slider controllers.
The Data Entry Slider
You may select the transmitting value of various MIDI functions (such as velocity
offset, aftertouch, reverb depth, pan pot, volume, CC data) by pressing the
MIDI/SELECT button followed by the key labeled with that MIDI function, then
moving the DATA ENTRY slider to select the desired value. For example, if you
want to change the value of the velocity offset, first press the MIDI/SELECT
button, then the velocity key. Next, change the DATA ENTRY slider to the value
you want and press the MIDI/SELECT button again to complete the change.
You can also assign any MIDI Controller to the DATA ENTRY slider, by using the
controller’s number.* This is done with the following steps.
1.
2.
3.
4.
5.
Press
Press
Press
Press
Press
the
the
the
the
the
MIDI/Select button
CC No. key
number keys to select the desired MIDI Controller number
Enter key
MIDI/Select button to finish your selection.
* For a chart of MIDI Control Change values, see Appendix A of this manual.
The DATA ENTRY slider may be used to send MIDI controller information in
real-time.When the Radium powers up, the DATA ENTRY slider defaults to a MIDI
Controller value of 7 (Controller # 7 is MIDI volume).After a MIDI controller (such
as velocity, aftertouch, pan, etc.) has been selected, by pressing one of the keys that
17
represents the controller’s function or the Controller #, the DATA ENTRY slider
will immediately function to select the transmitted value of that specific controller
when the slider is moved.This can be very useful for manipulating various functions
during actual performance, mixing or recording, etc..
Assignable Sliders and Knobs
The Radium keyboard comes with 9 banks of factory presets. These presets
work well with a variety of MIDI devices.The default assignments for the sliders
and knobs which load when the Radium is powered on have been selected in
order to work well with General MIDI instruments. They are listed in the
following table.*
Preset # Channel # Contoller #
(Sliders:)
1
2
3
4
5
6
7
8
(Knobs:)
9
10
11
12
13
14
15
16
Definition
Application
1
1
1
1
1
1
1
1
82
83
28
29
81
74
71
2
Attack
Decay
Sustain
Release
Filter Envelope
Cutoff
Resonance
Breath
Filter
“
“
“
“
“
“
Misc. Controls
1
1
1
1
1
1
1
1
5
10
21
77
16
19
18
80
Glide Time
Pan
Pitch, Coarse
Pitch, Fine
Filter Rate
Filter Depth
Pitch Depth
Amp. Depth
“
“
Oscillator
“
LFO
“
“
“
*Refer to Appendix B of this manual for the information of the remaining preset banks.
Programming the Sliders and Knobs:
Pressing the MIDI/SELECT button and then the SET CTRL key will allow you to
begin programming the controller sliders and knobs. In order to change the
value of each slider (1 - 8) and knob (9 - 16), do as follows:
1. Press MIDI/SELECT, then the Set Controller key (marked “SET CTRL.)” The
display will show a small “n” to indicate that the desired controller knob
“number” should be entered next.
18
2. Choose the number of the desired controller slider or knob, using the
number key group (1 - 16), then press the Enter key.The display will show a
“P” in anticipation of the “parameter” number.
3. Assign the desired MIDI controller parameter number, using the number key
group (1-127), then press Enter. (See the chart displayed in “Appendix A” fo
this manual for a list of controller numbers.) The display will show a “C” in
anticipation of the MIDI “channel” number.
4. Assign the MIDI channel number, using the number key group (1-16), then
press Enter. This channel assignment will apply only to the controller knob
that you are programming.
Finally, press the MIDI/SELECT key one more time, to finish assigning values to
the controller sliders and knobs. You can program 15 sets of controls to the
sliders and knobs and then switch between them using “presets” (see the
paragraph titled “Presets:,” contained within the following section).
Other Buttons and Keys
RESET Key: Pressing the MIDI/SELECT button, the RESET key, and then the
Enter key will send out a message to send an “All Notes Off” message and
return all external MIDI instruments to their default setting. This can be useful
if notes on a synthesizer become “stuck” on. Press the MIDI/SELECT button
again to return to the previous state.
“Flat” & “Sharp” Keys: By pressing the MIDI/SELECT button in combination with
the flat and sharp keys, you can shift the active keyboard pitch higher or lower, one
note (half-step) for each key press. For example, if you want to lower the pitch by
2 notes (two half-steps or a whole step), press the MIDI/SELECT button then the
“flat” key twice. Press the MIDI/SELECT button to finish the change.
Octave Keys: To change the Radium’s octave range, press the OCTAVE UP or
OCTAVE DOWN button, according to your preference.The octave shift range
available includes a maximum increment of plus or minus three octaves and the
display will read “-3”,“-2”,“-1”,“0” (for default),“1”,“2” or “3”, corresponding to
the setting currently selected.
MIDI CHANNEL Key: By pressing the MIDI/SELECT button, then pressing the
MIDI CHANNEL key, you select your keyboard’s transmitting MIDI channel.The
default channel will be 1 when the Radium’s power is first turned on.To change
this setting (for example, to set MIDI channel to Channel 2), do the following:
1. Press the MIDI/SELECT button.
2. Press the MIDI CHANNEL key.
3. Press the “2” key, then the Enter key. Lastly, press the MIDI/SELECT button
one more time (this will change the MIDI transmit channel from 1 to 2.)
19
Number Keys: The Radium allows you to use the numeric keys instead of the
DATA ENTRY slider to specify the Control Change parameter data.This is done
by pressing the MIDI/SELECT button, CC (No. or Data) key, required number
key(s), and the Enter key.As an example, to assign a Control Change value of 7,
and CC Data value of 123:
1.
2.
3.
4.
5.
6.
7.
Press the MIDI/SELECT button.
Press the CC No. key.
Press the key labeled “7.”
Press the Enter key, in order to specify the Control Change as 7.
Press the CC Data key.
Press the number keys 1, 2 and 3, in order.
Press the Enter key, to specify the value 123, then press the MIDI/SELECT
button.This completes the process.
PROGRAM Key: By use of the MIDI/SELECT button and PROGRAM key, in
combination with the numeric and ENTER keys, you can select any patch
number between 1 and 128. This is done using the following sequence. If, for
example, you want to change the voice to 67 (General MIDI TenorSax), press the
MIDI/SELECT button and then the PROGRAM key. Now press numeric key
number 6, then 7. Lastly, press the ENTER key, followed by the MIDI/SELECT
button to finish the change.
NOTE: After pressing either the ENTER or CANCEL key, the LED display will
show “—”, and will not clear until you press the MIDI/SELECT button to
finish your choice.
Presets: The Radium can save fifteen Presets in memory. This allows you to
assign 16 controller values to the sliders and knobs in one preset, then assign 16
different values to those same sliders and knobs, without losing the initial
settings. To change to another Preset, press the MIDI/SELECT button and then
the UP/DOWN buttons to choose one of the fifteen Presets. The display will
read “P1” through “P15” while you are changing presets.
The chart on the following page lists the factory default Presets, desugned to be
useful in a variety of software programs and performance scenarios.
20
Radium Prest Bank Descriptions:
- Please note that verification of listed synthesizer* MIDI-controller information (against
manufacturer’s published specifications) may be necessary, since some manufacturers
vary from the MIDI Manufacturer’s Association standard referenced in this table.
*All listed synthesizers and modules are trademarks of their respective owners, and
are in no way associated or affiliated with M-Audio. These other manufacturer’s
trademarks are used here for the sole purpose of describing the useful applications
of the Radium keyboards which are catered to these products.
21
Rear Panel Features
1. Sustain Jack - This jack allows you to connect an optional footswitch to the
keyboard. When the footswitch is depressed, notes played on the keyboard
will continuously sound as long as the footswitch is held, while MIDI
controller information is sent from the Radium.
2. MIDI “Keyboard” Out Jack - This standard MIDI jack is a direct MIDI out
from the keyboard in “standalone” mode, and is used to send MIDI messages
to another MIDI instrument (such as sound module).
3. MIDI “USB” Out Jack” - This standard MIDI jack receives its source from
the computer when software is set to Radium MIDI Out, and is used to send
MIDI messages to another MIDI instrument (such as sound module).
4. USB Port - This USB connector jack is used to connect the Radium to the
computer’s USB port using a standard USB cable (included).
5. Power Switch - The 3-way power switch selects the Radium’s power
mode—powered by USB connection, by external power supply or internal
battery (6 size C - Radium49 only), or power off.When set to “USB Power”
the Radium receives power only after the computer is powered on. When
the Radium’s power is turned on, the keyboard will reset to it’s default
settings.
6. Power Jack - This jack is used to connect the keyboard to an optional
9VDC, 500mA “wall-wart” type power supply.
22
Technical Support & Contact Information
For additional technical assistance, contact M-Audio Technical Support by
telephone (626-445-8495, 9-5 PST M-F), by fax (626-445-7564) or by e-mail
([email protected]).
If you have questions, comments or suggestions about this product, or any MAudio product, we invite you to contact us directly at:
M-AUDIO U.S.
M-AUDIO U.K.
45 E. Saint Joseph St.
Arcadia, CA 91006-2861
U.S.A.
Unit 5, Saracen Industrial Estate
Mark Rd.
Hemel Hempstead, Herts HP2 7BJ
England
Sales Information:
626-445-2842
Sales Information (email):
[email protected]
Tech Support:
626-445-8495
Tech Support (email):
[email protected]
Fax:
626-445-7564
Internet Home Page:
http://www.m-audio.com
Sales Information:
44 (0) 144 241 6590
Sales Information (email):
[email protected]
Technical Support:
44 (0) 871 717 7102
Tech Support (email): [email protected]
Fax:
44 (0) 144 224 6832
Internet Home Page:
http://www.maudio.co.uk
M-AUDIO Canada
M-AUDIO France
1400 St-Jean Baptiste Ave., #150
Quebec City, QC G2E 5B7
Canada
Unit 5, Saracen Industrial Estate
Mark Rd.
Hemel Hempstead, Herts HP2 7BJ
England
Tel:
418-872-0444
Fax:
418-872-0034
Email:
[email protected]
Internet Home Page:
http://www.m-audio.ca
Sales Information:
0810 001 105
Sales Information (email): [email protected]
Technical Support:
0820 00 731
Tech Support (email): [email protected]
Fax:
44 (0) 144 224 6832
Internet Home Page:
http://www.maudio.co.uk
M-AUDIO Deutschland (Germany)
M-AUDIO Japan
Kuhallmand 34
D-74613 Ohringen
Germany
Annex Buliding 6F
2-18-10 Marunouchi
Naka-Ku, Nagoya 460-0002
Japan
Sales Information:
Sales Information (email):
Technical Support:
Technical Support (email):
Fax:
Internet Home Page:
49 7941 98 7000
[email protected]
49 7941 98 70030
[email protected]
07941 98 70070
http://www.m-audio.de
Tel:
Fax:
Technical Support:
Email:
Internet Home Page:
23
81 52 218 3375
81 52 218 0875
0820 00 731
[email protected]
http://www.m-audio.co.jp
Radium Warranty Information
M-Audio warrants that this product is free of defects in materials and
workmanship under normal conditions for 90 days, so long as the product is:
owned by the original purchaser; the original purchaser has proof of purchase
from an authorized M-Audio dealer; and the purchaser has registered his/her
ownership of the product by sending in the completed warranty card.
In the event that M-Audio receives written notice of defects in materials or
workmanship from such an original purchaser, M-Audio will either replace the
product, repair the product, or refund the purchase price at its option. In the
event any repair is required, shipment to and from M-Audio and a nominal
handling charge shall be borne by the purchaser. In the event that repair is
required, a Return Authorization number must be obtained from M-Audio.After
this number is obtained, the unit should be shipped back to M-Audio in a
protective package with a description of the problem and the Return
Authorization clearly written on the package.
In the event that M-Audio determines that the product requires repair because
of user misuse or regular wear, it will assess a fair repair or replacement fee.The
customer will have the option to pay this fee and have the unit repaired and
returned, or not pay this fee and have the unit returned unrepaired.
The remedy for breach of this limited warranty shall not include any other
damages. M-Audio will not be liable for consequential, special, indirect, or similar
damages or claims including loss of profit or any other commercial damage, even
if its agents have been advised of the possibility of such damages, and in no event
will M-Audio's liability for any damages to the purchaser or any other person
exceed the price paid for the product, regardless of any form of the claim. MAudio specifically disclaims all other warranties, expressed or implied. Specifically,
M-Audio makes no warranty that the product is fit for any particular purpose.
This warranty shall be construed, interpreted, and governed by the laws of the
state of California. If any provision of this warranty is found void, invalid or
unenforceable, it will not affect the validity of the balance of the warranty, which
shall remain valid and enforceable according to its terms. In the event any
remedy hereunder is determined to have failed of its essential purpose, all
limitations of liability and exclusion of damages set forth herein shall remain in
full force and effect.
24
Specifications
Tested to
comply
with FCC
Standards
For Home or Studio Use
25
Appendix A - MIDI Controller Information
26
Appendix B - Radium MIDI Implementations
27