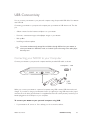
1
User Guide
Version 1.5
Barnes & Noble, Inc. 122 Fifth Avenue, New York, NY 10011 USA.
© 2009-2010 Barnes & Noble, Inc. All rights reserved. NOOK and the NOOK logo are
trademarks of Barnes & Noble, Inc. or its affiliates. Patent pending.
Screenshots and product images are simulated and for instructional purposes only. They may differ
from the actual product and are subject to change without notice. Your use of the NOOK is subject
to the NOOK Terms of Service in “NOOK™ Terms of Service” on page 185. The Terms of service
can also be found here:
www.nook.com/legal
For warranty information, see “One Year Limited Warranty” on page 205.
Customer Service
You can reach Customer Service for your NOOK by sending an email to [email protected], or
at these telephone numbers:
•
Within the United States: 1-800-THE-BOOK (1-800-843-2665)
•
Outside the United States: 1-201-438-1834
How to Use this Guide
This NOOK User Guide documents all features of your NOOK. It is available as an eBook in the
My Documents section of your NOOK Library. It is also available for download from the support
section of the NOOK website in PDF format:
www.nook.com/support
If you want a printed copy of the User Guide, you can print the PDF on your own printer from
Adobe Acrobat Reader.
Quick Start Guide
The Quick Start Guide covers the basics needed to get you started. It is printed and in the package
with your NOOK, as well as at the above website.
Tour
Get the most out of your NOOK. The NOOK Tour takes you on a tour of your NOOK’s key
features. We highly recommend that you take the tour during the welcome process when you first
turn on your NOOK. The NOOK Tour is also in the My Documents section of your Library and at
the above website.
NOOK User Guide
2
Using this Guide
To find specific information in this guide, you can use the table of contents or search the guide. In
the EPUB version, tap Go to > Chapter on the touchscreen to go to a chapter. To search the User
Guide for a specific word or phrase, tap Find, type the word or phrase, and then tap Submit.
The User Guide on your NOOK is an eBook, so you can try out NOOK features like bookmarks and
notes using the User Guide.
Conventions
Following are conventions used in the User Guide:
This is a caution. Cautions contain important information, for example about safety and
the loss of data.
This is a note. Notes contain helpful information that we highlight to draw your attention
to it.
Menu choices on the touchscreen are shown in gray type, with greater than signs indicating
successive choices. For example: Tap Bookmarks > Go to bookmark.
Guide Updates
If needed, new versions of the User Guide and Tour will be automatically downloaded to the My
Documents section of your library through software updates.
Guide updates are also posted on the support section of the NOOK website:
www.nook.com/support
More Information Online
More information is available online:
•
FAQs
•
Video tutorials
This information is available on the Support website:
www.nook.com/support
Guide Revision 1.5.0.1
NOOK User Guide
3
Contents
Customer Service . . . . . . . . . . . . . . . . . . . . . . . . . . . . . . . . . . . . . . . . . . . . . . . . . . . . . . . . . . . . . . . 2
How to Use this Guide. . . . . . . . . . . . . . . . . . . . . . . . . . . . . . . . . . . . . . . . . . . . . . . . . . . . . . . . . . . 2
More Information Online . . . . . . . . . . . . . . . . . . . . . . . . . . . . . . . . . . . . . . . . . . . . . . . . . . . . . . . . . 3
Getting Started . . . . . . . . . . . . . . . . . . . . . . . . . . . . . . . . . . . . . . . . . . . . . . . . 10
In the Package. . . . . . . . . . . . . . . . . . . . . . . . . . . . . . . . . . . . . . . . . . . . . . . . . . . . . . . . . . . . . . . . . 10
Charge your NOOK. . . . . . . . . . . . . . . . . . . . . . . . . . . . . . . . . . . . . . . . . . . . . . . . . . . . . . . . . . . . . . . . . . . . 11
Learn the Controls . . . . . . . . . . . . . . . . . . . . . . . . . . . . . . . . . . . . . . . . . . . . . . . . . . . . . . . . . . . . . 11
Register your NOOK. . . . . . . . . . . . . . . . . . . . . . . . . . . . . . . . . . . . . . . . . . . . . . . . . . . . . . . . . . . . . . . . . . . 13
Explore. . . . . . . . . . . . . . . . . . . . . . . . . . . . . . . . . . . . . . . . . . . . . . . . . . . . . . . . . . . . . . . . . . . . . . 13
Power and Charging. . . . . . . . . . . . . . . . . . . . . . . . . . . . . . . . . . . . . . . . . . . . . 15
Device States. . . . . . . . . . . . . . . . . . . . . . . . . . . . . . . . . . . . . . . . . . . . . . . . . . . . . . . . . . . . . . . . . . 15
Power Button. . . . . . . . . . . . . . . . . . . . . . . . . . . . . . . . . . . . . . . . . . . . . . . . . . . . . . . . . . . . . . . . . . 16
Power Management. . . . . . . . . . . . . . . . . . . . . . . . . . . . . . . . . . . . . . . . . . . . . . . . . . . . . . . . . . . . . 17
Low Charge Alerts . . . . . . . . . . . . . . . . . . . . . . . . . . . . . . . . . . . . . . . . . . . . . . . . . . . . . . . . . . . . . 17
Battery Charge and Charging Indicators. . . . . . . . . . . . . . . . . . . . . . . . . . . . . . . . . . . . . . . . . . . . . 18
Charging your NOOK. . . . . . . . . . . . . . . . . . . . . . . . . . . . . . . . . . . . . . . . . . . . . . . . . . . . . . . . . . . . . . . . . . 19
Wall Charging . . . . . . . . . . . . . . . . . . . . . . . . . . . . . . . . . . . . . . . . . . . . . . . . . . . . . . . . . . . . . . . . . 20
USB Charging. . . . . . . . . . . . . . . . . . . . . . . . . . . . . . . . . . . . . . . . . . . . . . . . . . . . . . . . . . . . . . . . . . 20
Charging Recommendations. . . . . . . . . . . . . . . . . . . . . . . . . . . . . . . . . . . . . . . . . . . . . . . . . . . . . . 22
Hard Reset. . . . . . . . . . . . . . . . . . . . . . . . . . . . . . . . . . . . . . . . . . . . . . . . . . . . . . . . . . . . . . . . . . . . 22
Your NOOK. . . . . . . . . . . . . . . . . . . . . . . . . . . . . . . . . . . . . . . . . . . . . . . . . . . . . . . . . . 24
Hardware Highlights . . . . . . . . . . . . . . . . . . . . . . . . . . . . . . . . . . . . . . . . . . . . . . . . . . . . . . . . . . . . 24
NOOK Models . . . . . . . . . . . . . . . . . . . . . . . . . . . . . . . . . . . . . . . . . . . . . . . . . . . . . . . . . . . . . . . . 25
Feature Highlights . . . . . . . . . . . . . . . . . . . . . . . . . . . . . . . . . . . . . . . . . . . . . . . . . . . . . . . . . . . . . . 25
Home Menu. . . . . . . . . . . . . . . . . . . . . . . . . . . . . . . . . . . . . . . . . . . . . . . . . . . . . . . . . . . . . . . . . . . 27
Home Screen. . . . . . . . . . . . . . . . . . . . . . . . . . . . . . . . . . . . . . . . . . . . . . . . . . . . . . . . . . . . . . . . . . 28
Back Cover . . . . . . . . . . . . . . . . . . . . . . . . . . . . . . . . . . . . . . . . . . . . . . . . . . . . . . . . . . . . . . . . . . . 28
SIM Card. . . . . . . . . . . . . . . . . . . . . . . . . . . . . . . . . . . . . . . . . . . . . . . . . . . . . . . . . . . . . . . . . . . . . 31
Built-in Storage . . . . . . . . . . . . . . . . . . . . . . . . . . . . . . . . . . . . . . . . . . . . . . . . . . . . . . . . . . . . . . . . 32
Battery. . . . . . . . . . . . . . . . . . . . . . . . . . . . . . . . . . . . . . . . . . . . . . . . . . . . . . . . . . . . . . . . . . . . . . . 32
Optional Accessories. . . . . . . . . . . . . . . . . . . . . . . . . . . . . . . . . . . . . . . . . . . . . . . . . . . . . . . . . . . . 33
NOOK User Guide

4
International Use and Languages. . . . . . . . . . . . . . . . . . . . . . . . . . . . . . . . . . 35
Using your NOOK abroad. . . . . . . . . . . . . . . . . . . . . . . . . . . . . . . . . . . . . . . . . . . . . . . . . . . . . . . . 35
Languages. . . . . . . . . . . . . . . . . . . . . . . . . . . . . . . . . . . . . . . . . . . . . . . . . . . . . . . . . . . . . . . . . . . . . 36
Safety and Care. . . . . . . . . . . . . . . . . . . . . . . . . . . . . . . . . . . . . . . . . . . . . . . . 37
Safety. . . . . . . . . . . . . . . . . . . . . . . . . . . . . . . . . . . . . . . . . . . . . . . . . . . . . . . . . . . . . . . . . . . . . . . . 37
Use on Airplanes . . . . . . . . . . . . . . . . . . . . . . . . . . . . . . . . . . . . . . . . . . . . . . . . . . . . . . . . . . . . . . 38
Caring for Your NOOK. . . . . . . . . . . . . . . . . . . . . . . . . . . . . . . . . . . . . . . . . . . . . . . . . . . . . . . . . . . . . . . . . 39
Warranty Coverage and the B&N Protection Plan. . . . . . . . . . . . . . . . . . . . . . . . . . . . . . . . . . . . . 41
Operating the Controls. . . . . . . . . . . . . . . . . . . . . . . . . . . . . . . . . . . . . . . . . . 42
Home Button. . . . . . . . . . . . . . . . . . . . . . . . . . . . . . . . . . . . . . . . . . . . . . . . . . . . . . . . . . . . . . . . . . 42
Turning Pages. . . . . . . . . . . . . . . . . . . . . . . . . . . . . . . . . . . . . . . . . . . . . . . . . . . . . . . . . . . . . . . . . . 42
Page Indicators for Lists and Feeds. . . . . . . . . . . . . . . . . . . . . . . . . . . . . . . . . . . . . . . . . . . . . . . . . 43
Color Touchscreen . . . . . . . . . . . . . . . . . . . . . . . . . . . . . . . . . . . . . . . . . . . . . . . . . . . . . . . . . . . . . 44
Gestures . . . . . . . . . . . . . . . . . . . . . . . . . . . . . . . . . . . . . . . . . . . . . . . . . . . . . . . . . . . . . . . . . . . . . 44
Menus . . . . . . . . . . . . . . . . . . . . . . . . . . . . . . . . . . . . . . . . . . . . . . . . . . . . . . . . . . . . . . . . . . . . . . . 46
Navigation on the Reading Screen . . . . . . . . . . . . . . . . . . . . . . . . . . . . . . . . . . . . . . . . . . . . . . . . . 48
Form Navigation and Data Entry . . . . . . . . . . . . . . . . . . . . . . . . . . . . . . . . . . . . . . . . . . . . . . . . . . 49
Keyboards and Typing. . . . . . . . . . . . . . . . . . . . . . . . . . . . . . . . . . . . . . . . . . . . . . . . . . . . . . . . . . . 50
D-pad. . . . . . . . . . . . . . . . . . . . . . . . . . . . . . . . . . . . . . . . . . . . . . . . . . . . . . . . . . . . . . . . . . . . . . . . 52
Browsing . . . . . . . . . . . . . . . . . . . . . . . . . . . . . . . . . . . . . . . . . . . . . . . . . . . . . . . . . . . . . . . . . . . . . 52
Searching. . . . . . . . . . . . . . . . . . . . . . . . . . . . . . . . . . . . . . . . . . . . . . . . . . . . . . . . . . . . . . . . . . . . . 52
Sorting Lists. . . . . . . . . . . . . . . . . . . . . . . . . . . . . . . . . . . . . . . . . . . . . . . . . . . . . . . . . . . . . . . . . . . 53
Filtering Lists . . . . . . . . . . . . . . . . . . . . . . . . . . . . . . . . . . . . . . . . . . . . . . . . . . . . . . . . . . . . . . . . . . 54
Viewing a Gallery of Covers. . . . . . . . . . . . . . . . . . . . . . . . . . . . . . . . . . . . . . . . . . . . . . . . . . . . . . 54
Status Bar. . . . . . . . . . . . . . . . . . . . . . . . . . . . . . . . . . . . . . . . . . . . . . . . . . . . . . . . . . . . . . . . . . . . . 54
Wireless Connectivity. . . . . . . . . . . . . . . . . . . . . . . . . . . . . . . . . . . . . . . . . . . 57
Wi-Fi. . . . . . . . . . . . . . . . . . . . . . . . . . . . . . . . . . . . . . . . . . . . . . . . . . . . . . . . . . . . . . . . . . . . . . . . 58
B&N Fast & Free Wireless . . . . . . . . . . . . . . . . . . . . . . . . . . . . . . . . . . . . . . . . . . . . . . . . . . . . . . . 62
Dropped Connections and Lost Wi-Fi Connectivity . . . . . . . . . . . . . . . . . . . . . . . . . . . . . . . . . . . 63
In Areas with No Wireless Connectivity . . . . . . . . . . . . . . . . . . . . . . . . . . . . . . . . . . . . . . . . . . . . 63
Registering your NOOK. . . . . . . . . . . . . . . . . . . . . . . . . . . . . . . . . . . . . . . . . . . . . . . 64
Account Creation . . . . . . . . . . . . . . . . . . . . . . . . . . . . . . . . . . . . . . . . . . . . . . . . . . . . . . . . . . . . . . 64
Registration. . . . . . . . . . . . . . . . . . . . . . . . . . . . . . . . . . . . . . . . . . . . . . . . . . . . . . . . . . . . . . . . . . . 64
Initial Library Synchronization and Downloads. . . . . . . . . . . . . . . . . . . . . . . . . . . . . . . . . . . . . . . . 66
NOOK User Guide

5
An Unregistered NOOK. . . . . . . . . . . . . . . . . . . . . . . . . . . . . . . . . . . . . . . . . . . . . . . . . . . . . . . . . . . . . . . . 66
Unregistering your NOOK . . . . . . . . . . . . . . . . . . . . . . . . . . . . . . . . . . . . . . . . . . . . . . . . . . . . . . . . . . . . . . 67
Re-registering your NOOK. . . . . . . . . . . . . . . . . . . . . . . . . . . . . . . . . . . . . . . . . . . . . . . . . . . . . . . . . . . . . . 68
Personalizing your NOOK. . . . . . . . . . . . . . . . . . . . . . . . . . . . . . . . . . . . . . . . . . . . . 70
Wallpaper Images . . . . . . . . . . . . . . . . . . . . . . . . . . . . . . . . . . . . . . . . . . . . . . . . . . . . . . . . . . . . . . 70
Screensaver Images. . . . . . . . . . . . . . . . . . . . . . . . . . . . . . . . . . . . . . . . . . . . . . . . . . . . . . . . . . . . . 71
Reader Settings. . . . . . . . . . . . . . . . . . . . . . . . . . . . . . . . . . . . . . . . . . . . . . . . . . . . . . . . . . . . . . . . 72
Settings . . . . . . . . . . . . . . . . . . . . . . . . . . . . . . . . . . . . . . . . . . . . . . . . . . . . . . . . . . . . . . . . . . . . . . 72
The Daily . . . . . . . . . . . . . . . . . . . . . . . . . . . . . . . . . . . . . . . . . . . . . . . . . . . . . 73
Message Types. . . . . . . . . . . . . . . . . . . . . . . . . . . . . . . . . . . . . . . . . . . . . . . . . . . . . . . . . . . . . . . . . 73
Feeds. . . . . . . . . . . . . . . . . . . . . . . . . . . . . . . . . . . . . . . . . . . . . . . . . . . . . . . . . . . . . . . . . . . . . . . . 73
Notifications . . . . . . . . . . . . . . . . . . . . . . . . . . . . . . . . . . . . . . . . . . . . . . . . . . . . . . . . . . . . . . . . . . 74
Procedures for The Daily . . . . . . . . . . . . . . . . . . . . . . . . . . . . . . . . . . . . . . . . . . . . . . . . . . . . . . . . 74
Shop . . . . . . . . . . . . . . . . . . . . . . . . . . . . . . . . . . . . . . . . . . . . . . . . . . . . . . . . . 76
Shopfront. . . . . . . . . . . . . . . . . . . . . . . . . . . . . . . . . . . . . . . . . . . . . . . . . . . . . . . . . . . . . . . . . . . . . 76
Magazines and Newspapers . . . . . . . . . . . . . . . . . . . . . . . . . . . . . . . . . . . . . . . . . . . . . . . . . . . . . . 77
Indicators. . . . . . . . . . . . . . . . . . . . . . . . . . . . . . . . . . . . . . . . . . . . . . . . . . . . . . . . . . . . . . . . . . . . . 77
Browsing the Shop. . . . . . . . . . . . . . . . . . . . . . . . . . . . . . . . . . . . . . . . . . . . . . . . . . . . . . . . . . . . . . 77
Searching the Shop . . . . . . . . . . . . . . . . . . . . . . . . . . . . . . . . . . . . . . . . . . . . . . . . . . . . . . . . . . . . . 78
Result Lists. . . . . . . . . . . . . . . . . . . . . . . . . . . . . . . . . . . . . . . . . . . . . . . . . . . . . . . . . . . . . . . . . . . . 79
Browsing a Gallery of Covers. . . . . . . . . . . . . . . . . . . . . . . . . . . . . . . . . . . . . . . . . . . . . . . . . . . . . 79
Viewing Item Details. . . . . . . . . . . . . . . . . . . . . . . . . . . . . . . . . . . . . . . . . . . . . . . . . . . . . . . . . . . . 80
Password Protection for Purchases. . . . . . . . . . . . . . . . . . . . . . . . . . . . . . . . . . . . . . . . . . . . . . . . . 80
Making Purchases. . . . . . . . . . . . . . . . . . . . . . . . . . . . . . . . . . . . . . . . . . . . . . . . . . . . . . . . . . . . . . . 80
Payment. . . . . . . . . . . . . . . . . . . . . . . . . . . . . . . . . . . . . . . . . . . . . . . . . . . . . . . . . . . . . . . . . . . . . . 81
Orders. . . . . . . . . . . . . . . . . . . . . . . . . . . . . . . . . . . . . . . . . . . . . . . . . . . . . . . . . . . . . . . . . . . . . . . 82
Ordering from your NOOK. . . . . . . . . . . . . . . . . . . . . . . . . . . . . . . . . . . . . . . . . . . . . . . . . . . . . . . . . . . . . 82
Content Delivery. . . . . . . . . . . . . . . . . . . . . . . . . . . . . . . . . . . . . . . . . . . . . . . . . . . . . . . . . . . . . . . 84
eWish List. . . . . . . . . . . . . . . . . . . . . . . . . . . . . . . . . . . . . . . . . . . . . . . . . . . . . . . . . . . . . . . . . . . . 85
In-Store Experience. . . . . . . . . . . . . . . . . . . . . . . . . . . . . . . . . . . . . . . . . . . . . 87
Welcome. . . . . . . . . . . . . . . . . . . . . . . . . . . . . . . . . . . . . . . . . . . . . . . . . . . . . . . . . . . . . . . . . . . . . 87
Shopfront. . . . . . . . . . . . . . . . . . . . . . . . . . . . . . . . . . . . . . . . . . . . . . . . . . . . . . . . . . . . . . . . . . . . . 87
Read in Stores. . . . . . . . . . . . . . . . . . . . . . . . . . . . . . . . . . . . . . . . . . . . . . . . . . . . . . . . . . . . . . . . . 88
NOOK User Guide

6
Library . . . . . . . . . . . . . . . . . . . . . . . . . . . . . . . . . . . . . . . . . . . . . . . . . . . . . . . 90
My B&N Library . . . . . . . . . . . . . . . . . . . . . . . . . . . . . . . . . . . . . . . . . . . . . . . . . . . . . . . . . . . . . . . 90
Reading Something . . . . . . . . . . . . . . . . . . . . . . . . . . . . . . . . . . . . . . . . . . . . . . . . . . . . . . . . . . . . . 92
Library Synchronization. . . . . . . . . . . . . . . . . . . . . . . . . . . . . . . . . . . . . . . . . . . . . . . . . . . . . . . . . . 92
Downloading Content. . . . . . . . . . . . . . . . . . . . . . . . . . . . . . . . . . . . . . . . . . . . . . . . . . . . . . . . . . . 93
Organizing Your Library . . . . . . . . . . . . . . . . . . . . . . . . . . . . . . . . . . . . . . . . . . . . . . . . . . . . . . . . . 95
Finding What You Want to Read in My B&N Library. . . . . . . . . . . . . . . . . . . . . . . . . . . . . . . . . . 99
Searching My B&N Library . . . . . . . . . . . . . . . . . . . . . . . . . . . . . . . . . . . . . . . . . . . . . . . . . . . . . . 101
Browsing a Gallery of Covers. . . . . . . . . . . . . . . . . . . . . . . . . . . . . . . . . . . . . . . . . . . . . . . . . . . . 102
Viewing Item Details for B&N Content . . . . . . . . . . . . . . . . . . . . . . . . . . . . . . . . . . . . . . . . . . . . 103
Archiving B&N Digital Content. . . . . . . . . . . . . . . . . . . . . . . . . . . . . . . . . . . . . . . . . . . . . . . . . . . 104
Managing Subscriptions. . . . . . . . . . . . . . . . . . . . . . . . . . . . . . . . . . . . . . . . . . . . . . . . . . . . . . . . . 106
Managing Periodical Issues. . . . . . . . . . . . . . . . . . . . . . . . . . . . . . . . . . . . . . . . . . . . . . . . . . . . . . . 106
Deleting B&N Content. . . . . . . . . . . . . . . . . . . . . . . . . . . . . . . . . . . . . . . . . . . . . . . . . . . . . . . . . 109
My Documents . . . . . . . . . . . . . . . . . . . . . . . . . . . . . . . . . . . . . . . . . . . . . . . . . . . . . . . . . . . . . . . 110
Adobe Digital Editions. . . . . . . . . . . . . . . . . . . . . . . . . . . . . . . . . . . . . . . . . . . . . . . . . . . . . . . . . . 114
Reading. . . . . . . . . . . . . . . . . . . . . . . . . . . . . . . . . . . . . . . . . . . . . . . . . . . . . . 115
Supported File Formats. . . . . . . . . . . . . . . . . . . . . . . . . . . . . . . . . . . . . . . . . . . . . . . . . . . . . . . . . 115
Orientation . . . . . . . . . . . . . . . . . . . . . . . . . . . . . . . . . . . . . . . . . . . . . . . . . . . . . . . . . . . . . . . . . . 115
Ergonomics . . . . . . . . . . . . . . . . . . . . . . . . . . . . . . . . . . . . . . . . . . . . . . . . . . . . . . . . . . . . . . . . . . 116
Beginning Reading . . . . . . . . . . . . . . . . . . . . . . . . . . . . . . . . . . . . . . . . . . . . . . . . . . . . . . . . . . . . . 117
Resuming Reading. . . . . . . . . . . . . . . . . . . . . . . . . . . . . . . . . . . . . . . . . . . . . . . . . . . . . . . . . . . . . 119
Turning Pages. . . . . . . . . . . . . . . . . . . . . . . . . . . . . . . . . . . . . . . . . . . . . . . . . . . . . . . . . . . . . . . . . 119
Navigating . . . . . . . . . . . . . . . . . . . . . . . . . . . . . . . . . . . . . . . . . . . . . . . . . . . . . . . . . . . . . . . . . . . 120
Reader Text Fonts. . . . . . . . . . . . . . . . . . . . . . . . . . . . . . . . . . . . . . . . . . . . . . . . . . . . . . . . . . . . . 121
Reader Text Sizes . . . . . . . . . . . . . . . . . . . . . . . . . . . . . . . . . . . . . . . . . . . . . . . . . . . . . . . . . . . . . 122
Images. . . . . . . . . . . . . . . . . . . . . . . . . . . . . . . . . . . . . . . . . . . . . . . . . . . . . . . . . . . . . . . . . . . . . . 124
Opening DRM-secured Digital Content. . . . . . . . . . . . . . . . . . . . . . . . . . . . . . . . . . . . . . . . . . . . 124
Opening Password-Secured PDF Files. . . . . . . . . . . . . . . . . . . . . . . . . . . . . . . . . . . . . . . . . . . . . 125
Reading Status Bar. . . . . . . . . . . . . . . . . . . . . . . . . . . . . . . . . . . . . . . . . . . . . . . . . . . . . . . . . . . . . 125
Reading Progress and Page Numbers. . . . . . . . . . . . . . . . . . . . . . . . . . . . . . . . . . . . . . . . . . . . . . 126
Page Numbering . . . . . . . . . . . . . . . . . . . . . . . . . . . . . . . . . . . . . . . . . . . . . . . . . . . . . . . . . . . . . . 126
Synchronizing Reading Across Devices. . . . . . . . . . . . . . . . . . . . . . . . . . . . . . . . . . . . . . . . . . . . . 127
Finding Words and Phrases. . . . . . . . . . . . . . . . . . . . . . . . . . . . . . . . . . . . . . . . . . . . . . . . . . . . . . 128
Looking up Words. . . . . . . . . . . . . . . . . . . . . . . . . . . . . . . . . . . . . . . . . . . . . . . . . . . . . . . . . . . . . 129
NOOK User Guide

7
Lending eBooks. . . . . . . . . . . . . . . . . . . . . . . . . . . . . . . . . . . . . . . . . . . . . . . 131
Rules . . . . . . . . . . . . . . . . . . . . . . . . . . . . . . . . . . . . . . . . . . . . . . . . . . . . . . . . . . . . . . . . . . . . . . . 131
Determining Whether an eBook Can Be Lent. . . . . . . . . . . . . . . . . . . . . . . . . . . . . . . . . . . . . . . 132
Lending an eBook . . . . . . . . . . . . . . . . . . . . . . . . . . . . . . . . . . . . . . . . . . . . . . . . . . . . . . . . . . . . . 132
Borrowing an eBook on a NOOK. . . . . . . . . . . . . . . . . . . . . . . . . . . . . . . . . . . . . . . . . . . . . . . . . . . . . . . 134
Bookmarks, Highlights, and Notes. . . . . . . . . . . . . . . . . . . . . . . . . . . . . . . . 137
Bookmarks. . . . . . . . . . . . . . . . . . . . . . . . . . . . . . . . . . . . . . . . . . . . . . . . . . . . . . . . . . . . . . . . . . . 137
Highlights and Notes. . . . . . . . . . . . . . . . . . . . . . . . . . . . . . . . . . . . . . . . . . . . . . . . . . . . . . . . . . . 138
Rating. . . . . . . . . . . . . . . . . . . . . . . . . . . . . . . . . . . . . . . . . . . . . . . . . . . . . . . 141
Rating eBooks and Periodicals. . . . . . . . . . . . . . . . . . . . . . . . . . . . . . . . . . . . . . . . . . . . . . . . . . . . 141
Web Browsing . . . . . . . . . . . . . . . . . . . . . . . . . . . . . . . . . . . . . . . . . . . . . . . . 142
Using a Browser on Two Screens. . . . . . . . . . . . . . . . . . . . . . . . . . . . . . . . . . . . . . . . . . . . . . . . . 142
Tool Bar. . . . . . . . . . . . . . . . . . . . . . . . . . . . . . . . . . . . . . . . . . . . . . . . . . . . . . . . . . . . . . . . . . . . . 143
Choosing a Web Page. . . . . . . . . . . . . . . . . . . . . . . . . . . . . . . . . . . . . . . . . . . . . . . . . . . . . . . . . . 144
Zooming In and Out. . . . . . . . . . . . . . . . . . . . . . . . . . . . . . . . . . . . . . . . . . . . . . . . . . . . . . . . . . . 145
Managing Favorites . . . . . . . . . . . . . . . . . . . . . . . . . . . . . . . . . . . . . . . . . . . . . . . . . . . . . . . . . . . . 145
Browser Settings. . . . . . . . . . . . . . . . . . . . . . . . . . . . . . . . . . . . . . . . . . . . . . . . . . . . . . . . . . . . . . 146
Browser Status Bar . . . . . . . . . . . . . . . . . . . . . . . . . . . . . . . . . . . . . . . . . . . . . . . . . . . . . . . . . . . . 147
Games. . . . . . . . . . . . . . . . . . . . . . . . . . . . . . . . . . . . . . . . . . . . . . . . . . . . . . . 148
Chess. . . . . . . . . . . . . . . . . . . . . . . . . . . . . . . . . . . . . . . . . . . . . . . . . . . . . . . . . . . . . . . . . . . . . . . 148
Sudoku. . . . . . . . . . . . . . . . . . . . . . . . . . . . . . . . . . . . . . . . . . . . . . . . . . . . . . . . . . . . . . . . . . . . . . 151
USB Connectivity . . . . . . . . . . . . . . . . . . . . . . . . . . . . . . . . . . . . . . . . . . . . . 155
Connecting your NOOK to your Computer. . . . . . . . . . . . . . . . . . . . . . . . . . . . . . . . . . . . . . . . 155
Disconnecting your NOOK from your Computer. . . . . . . . . . . . . . . . . . . . . . . . . . . . . . . . . . . . 156
One Drive or Two . . . . . . . . . . . . . . . . . . . . . . . . . . . . . . . . . . . . . . . . . . . . . . . . . . . . . . . . . . . . 157
Protection from Viruses and Other Malware. . . . . . . . . . . . . . . . . . . . . . . . . . . . . . . . . . . . . . . . 158
Audio . . . . . . . . . . . . . . . . . . . . . . . . . . . . . . . . . . . . . . . . . . . . . . . . . . . . . . . 159
Speaker and Headphones. . . . . . . . . . . . . . . . . . . . . . . . . . . . . . . . . . . . . . . . . . . . . . . . . . . . . . . 159
Supported File Types. . . . . . . . . . . . . . . . . . . . . . . . . . . . . . . . . . . . . . . . . . . . . . . . . . . . . . . . . . . 159
Managing Audio Files. . . . . . . . . . . . . . . . . . . . . . . . . . . . . . . . . . . . . . . . . . . . . . . . . . . . . . . . . . . 159
Playlist . . . . . . . . . . . . . . . . . . . . . . . . . . . . . . . . . . . . . . . . . . . . . . . . . . . . . . . . . . . . . . . . . . . . . . 160
Playing an Audio File. . . . . . . . . . . . . . . . . . . . . . . . . . . . . . . . . . . . . . . . . . . . . . . . . . . . . . . . . . . 160
NOOK User Guide

8
Viewing what is Currently Playing. . . . . . . . . . . . . . . . . . . . . . . . . . . . . . . . . . . . . . . . . . . . . . . . . 161
Audio Player . . . . . . . . . . . . . . . . . . . . . . . . . . . . . . . . . . . . . . . . . . . . . . . . . . . . . . . . . . . . . . . . . 161
Files and Folders . . . . . . . . . . . . . . . . . . . . . . . . . . . . . . . . . . . . . . . . . . . . . . 163
Where You Can Put Files. . . . . . . . . . . . . . . . . . . . . . . . . . . . . . . . . . . . . . . . . . . . . . . . . . . . . . . 163
USB Access and microSD Card Access . . . . . . . . . . . . . . . . . . . . . . . . . . . . . . . . . . . . . . . . . . . . 164
Managing Files. . . . . . . . . . . . . . . . . . . . . . . . . . . . . . . . . . . . . . . . . . . . . . . . . . . . . . . . . . . . . . . . 164
Adding Storage . . . . . . . . . . . . . . . . . . . . . . . . . . . . . . . . . . . . . . . . . . . . . . . . . . . . . . . . . . . . . . . 166
Platforms . . . . . . . . . . . . . . . . . . . . . . . . . . . . . . . . . . . . . . . . . . . . . . . . . . . . 172
Software Updates . . . . . . . . . . . . . . . . . . . . . . . . . . . . . . . . . . . . . . . . . . . . . 173
Wireless Updates . . . . . . . . . . . . . . . . . . . . . . . . . . . . . . . . . . . . . . . . . . . . . . . . . . . . . . . . . . . . . 173
USB Updates. . . . . . . . . . . . . . . . . . . . . . . . . . . . . . . . . . . . . . . . . . . . . . . . . . . . . . . . . . . . . . . . . 173
Update Stages. . . . . . . . . . . . . . . . . . . . . . . . . . . . . . . . . . . . . . . . . . . . . . . . . . . . . . . . . . . . . . . . 174
Settings. . . . . . . . . . . . . . . . . . . . . . . . . . . . . . . . . . . . . . . . . . . . . . . . . . . . . . 176
Settings Summary . . . . . . . . . . . . . . . . . . . . . . . . . . . . . . . . . . . . . . . . . . . . . . . . . . . . . . . . . . . . . 176
All Settings. . . . . . . . . . . . . . . . . . . . . . . . . . . . . . . . . . . . . . . . . . . . . . . . . . . . . . . . . . . . . . . . . . . 177
Procedures for Contacts. . . . . . . . . . . . . . . . . . . . . . . . . . . . . . . . . . . . . . . . . . . . . . . . . . . . . . . . 179
Security Settings. . . . . . . . . . . . . . . . . . . . . . . . . . . . . . . . . . . . . . . . . . . . . . . . . . . . . . . . . . . . . . . 180
Resetting to Factory Settings. . . . . . . . . . . . . . . . . . . . . . . . . . . . . . . . . . . . . . . . . . . . . . . . . . . . . 183
Policies . . . . . . . . . . . . . . . . . . . . . . . . . . . . . . . . . . . . . . . . . . . . . . . . . . . . . . 184
Legal Notices. . . . . . . . . . . . . . . . . . . . . . . . . . . . . . . . . . . . . . . . . . . . . . . . . . . . . . . . . . . . . . . . . 184
NOOK™ Terms of Service . . . . . . . . . . . . . . . . . . . . . . . . . . . . . . . . . . . . . . . . . . . . . . . . . . . . . 185
One Year Limited Warranty. . . . . . . . . . . . . . . . . . . . . . . . . . . . . . . . . . . . . . . . . . . . . . . . . . . . . 205
AT&T Terms of Service & Acceptable Use Policy . . . . . . . . . . . . . . . . . . . . . . . . . . . . . . . . . . . . 209
FCC Notices. . . . . . . . . . . . . . . . . . . . . . . . . . . . . . . . . . . . . . . . . . . . . . . . . . . . . . . . . . . . . . . . . 222
NOOK User Guide

9
Getting Started
This section gives an overview of what you need to do to start using your NOOK.
In the Package
The package your NOOK comes in contains four things:
•
Your NOOK
•
A power adapter that can be plugged into an electrical outlet. It has a nonpolarized type-A
plug for use in North America. The standard-A plug on the USB cable (the big end) fits into the
power adapter to connect the power adapter to your NOOK.
•
A USB cable for transferring files to and from a personal computer, and for charging from a
wall outlet or computer. The USB cable has a micro-B plug on the NOOK end and a standard-A
plug on the computer end. It is a shielded USB 2.0 cable.
•
A printed Quick Start Guide
The battery is preinstalled in your NOOK.
You can save the package as a convenient place to store your NOOK when not in use, and as an
inner shipping box in the event you need to send your NOOK in for repairs or replacement.
NOOK User Guide
Getting Started
10
Charge your NOOK
Charge your NOOK with the supplied power adapter and USB cable until the yellow charging
indicator light goes out. Your NOOK will turn on when you plug it in. Do not turn it off. A typical
charging time using a wall outlet is 3.5 hours.
Wall
Outlet
USB
Cable
Power
Adapter
Learn the Controls
These are the main controls for your NOOK:
Power Button
Reading Screen
Page Turn Buttons
Home Button
Color Touchscreen
NOOK User Guide
Getting Started
11
•
Power button: Press and release the power button to turn on your NOOK. When your NOOK
is on, tap the power button to awaken it and to cause it to sleep. Press and hold the power
button for 5 seconds to turn off your NOOK fully.
•
Reading screen: This is where you read your eBooks, magazines, and newspapers. The
reading screen is a 600 x 800, 3.57 x 4.82 inch (6-inch diagonal), reflective high-resolution E Ink
electronic paper display. The reading screen is not a touchscreen; you navigate on the reading
screen using the color touchscreen.
•
Page turn buttons: Press the Next Page and Previous Page buttons to turn pages in digital
content and in a paginated list.
•
Home button: Tap the Home button to display the Home menu and Home screen, which
displays your wallpaper. If you have new periodical issues or lending offers, a bubble on the
Home screen tells you. If the touchscreen is dark, tap the Home button or touchscreen to light
up the touchscreen.
•
Color touchscreen: Tap an icon on the Home menu to display The Daily, your library, the
®
Shop, what you are reading now, games, Wi-Fi settings, the audio player, the web browser,
or settings. Swipe the Home menu to the left and right to see all of the icons. Tap menu items
to do things like buying an eBook and selecting something to read. Swipe the touchscreen to
browse a gallery of covers, and to turn pages in an eBook or periodical when the touchscreen is
not lit.
Here are a few pointers about using the touchscreen:
•
To light it up: The touchscreen dims to save power, and because you do not need to look
at it while reading. When you are reading and the touchscreen is not lit, you can turn pages by
swiping your finger on the touchscreen. To light up the touchscreen, tap it. If your NOOK is
sleeping (you will see a screensaver image); press and release the power button to wake it.
•
Tap: Most of the time, when you choose things in menus and touch buttons on the
touchscreen, you “tap”: touch a menu or button and then immediately raise your finger.
•
Swipe and scroll: To browse the gallery of covers, swipe your finger from left to right and
from right to left. Touch the touchscreen, move your finger to the left or right, and then raise
your finger. If there are more than four menu choices, a scrollbar is displayed. To scroll, touch a
menu choice (not the scrollbar), move your finger up or down, and then raise your finger. When
you swipe to turn pages while reading, your finger should already be moving to the left or right
when it first touches the touchscreen.
NOOK User Guide
Getting Started
12
•
Navigating on the reading screen: Use the Up
and Down
buttons to move a
highlight, often indicated by a symbol, up and down on the reading screen. This is an example:
•
Selecting an item on the reading screen: Tap the Select button
to select the
highlighted item on the reading screen. The result is an action that depends on the context, for
example, opening an eBook or displaying item details.
•
Backing up: In some places in the menus, there is a Back button:
. Tap the Back button to
back up a step. You can also use the Back button to return to the jumping-off page when you
navigate using a link.
Register your NOOK
Registration is associating your NOOK with a Barnes & Noble online account, an account on the
BN.com website (www.barnesandnoble.com or www.BN.com). If you do not have a Barnes &
Noble online account, create one online at BN.com. You should register your NOOK, because
doing so allows you to buy digital content from the Barnes & Noble eBookstore and provides other
benefits.
To register your NOOK, you need a wireless connection.
You register from your NOOK, not on the Barnes & Noble website. When you first turn on your
NOOK, your NOOK leads you through registration. If you defer registration, you can register later
by tapping settings > Device > Register your nook.
Explore
Now that your NOOK is charged and registered, you can explore its features. For example:
•
Visit The Daily: Tap the Home button and then tap the daily. The Daily is a message center
for daily B&N feeds and notifications. Check back daily to read feeds and to learn about special
offers, deliveries to your Library, subscriptions, lending offers, and software updates.
•
Shop: Tap the Home button and then tap shop. With your NOOK, it is easy to buy eBooks,
magazines, and newspapers from the Barnes & Noble eBookstore. Some content is even free!
You can also download eBooks to your NOOK from your personal computer.
NOOK User Guide
Getting Started
13
•
Visit your library: Tap the Home button and then tap my library. Your library provides access
to your B&N eBooks, magazines, and newspapers. It also provides access to your other eBooks.
For B&N content, you have a unified view of the content on your NOOK and in your online
digital library. You can browse and search for content in your library.
•
Read: On your new NOOK, you will find some eBooks are already in your library. You can read
those, eBooks and periodicals you purchase from the Barnes & Noble eBookstore, and digital
content you copy to your NOOK from a personal computer. Navigate to an item in your library
and tap Select to read it.
•
Read in stores: While in Barnes & Noble Bookstores, you can read many eBooks free of
charge. These are not samples, but are entire eBooks. Read an eBook for up to one hour per
day.
•
Browse the World Wide Web: When connected to a Wi-Fi hotspot, you can browse the
World Wide Web on your NOOK.
•
Play games: Play games on your NOOK. Play chess and Sudoku.
•
Add personal content and music: You are not limited to B&N content on your NOOK.
You can download digital content to your NOOK from your personal computer. To download
personal content to your NOOK, connect it to a personal computer using the USB cable. Put
your own eBooks and digital reading content in the folder my documents. Put music in the
folder my music.
•
Listen to music: You can listen to music while reading. Tap audio on the Home menu or
Open Audio Player in the Reader to listen to music.
•
Personalize your NOOK: You can download screensaver and wallpaper images to your NOOK
and choose among several text fonts and six text sizes for reading. Put screensaver images in
first-level subfolders of the folder my screensavers. Put wallpaper images in the top-level
folder my wallpapers. You can also set settings to your liking. Tap settings.
NOOK User Guide
Getting Started
14
Power and Charging
This section explains your NOOK’s power management and charging.
Device States
Your NOOK is in one of five states:
Off:
Your NOOK is off. Nothing is running.
When you first take your NOOK out of the package, it is off. We recommend that you also turn
your NOOK off when in checked baggage on an airplane. After 72 hours of sleep, your NOOK turns
off automatically to conserve battery charge.
To turn your NOOK off, press and hold the power button for about 5 seconds, until the reading
screen is white and the touchscreen is dark. Then release the power button.
Do not turn off your NOOK while it is plugged into a power adapter or USB. If you do, it
will not charge.
On:
Your NOOK is on. When your NOOK is on, everything works. The main and touch screens are both
lit, and you can read content and listen to music or audiobooks. If Airplane mode is on, you cannot
do things that require the radio, such as shopping at the B&N eBookstore.
To turn your NOOK on, press the power button briefly (for a second or so) and release it, connect
your NOOK to a personal computer using the USB cable, or begin charging your NOOK using a wall
outlet.
When your NOOK powers on, it takes you to the Home screen. It also connects to the network
TM
and scans the microSD card to check for changes in content.
If you are just charging your NOOK and don’t need it to be on, don’t worry. It will go to sleep.
Touchscreen backlight dimmed and then turned off:
To save power, your NOOK automatically dims the touchscreen and then turns it off when the
touchscreen is not being used. Everything else is still on. You can continue turning pages with the
Next Page and Previous Page buttons, or by swiping your finger on the unlit touchscreen. You
can continue listening to music or an audiobook. Configure the touchscreen timer in Settings. Tap
settings > Display > Touchscreen timer.
NOOK User Guide
Power and Charging
15
When the touchscreen is dimmed, you can still use it. Tap a menu choice or button, that action will
be carried out, and the touchscreen will brighten.
To light up the touchscreen, tap the touchscreen, tap the Home button, or press and release the
power button.
Sleep:
To save power, your NOOK sleeps after a period of inactivity. It turns off its touchscreen and
wireless circuitry. While your NOOK is sleeping it displays a screensaver image on the reading
screen. Configure the sleep timer in Settings. Tap settings > Display > Sleep timer.
Do not rely on sleep mode when you should turn on Airplane mode (for example, on an
airplane).
To wake your NOOK from sleep, press the power button briefly (for a second or so) and release it.
When your NOOK awakens from sleep, you are right where you were when it went to sleep.
After 72 hours of sleep, your NOOK turns off automatically to conserve battery charge.
For normal use, because the reading screen does not consume power, just let your NOOK
sleep. It takes longer for your NOOK to turn on from off than it does to wake from sleep.
Also, by letting it sleep instead of turning it off, your NOOK wakes up periodically to
perform tasks like downloading new content.
USB drive mode:
When you plug your NOOK into a personal computer, it connects to USB. This puts your NOOK in
USB drive mode. In this mode, you can access files on your NOOK from your personal computer,
but your NOOK is locked until you disconnect it from USB.
Power Button
The shiny metal strip at the top of your NOOK is the power button:
NOOK User Guide
Power and Charging
16
To turn your NOOK on, display the touchscreen, awaken your NOOK from sleep, or cause your
NOOK to sleep, press the power button for about 1 second and then release it.
To turn your NOOK off, press and hold the power button for about 5 seconds, until the reading
screen is white and the touchscreen is dark. Then release the power button.
Power Management
Your NOOK uses quite modest amounts of power compared to a laptop computer. It uses a small
amount of power to turn a page on the reading screen, but no power to keep the page displayed.
The touchscreen does use power when it is lit. After 72 hours of sleep, your NOOK turns off
automatically to conserve battery charge.
To allow you to manage power use, and to give you the experience that suits your reading habits,
you can configure two inactivity periods:
•
Touchscreen timer: Time from last touchscreen activity until the touchscreen backlight
is turned off. You can choose among 10, 30 (the default), and 60 seconds. The touchscreen
backlight is dimmed by 50% after half of this time period (5, 15, or 30 seconds). To set the
touchscreen timer, tap settings > Display > Touchscreen timer.
•
Sleep timer: Time from last activity (touchscreen or button presses) until your NOOK sleeps.
During sleep, a screensaver image is displayed on the reading screen and the touchscreen is unlit.
You can choose among 2, 5 (the default), 10, 15, and 20 minutes. To set the sleep timer, tap
settings > Display > Sleep timer.
Low Charge Alerts
Your NOOK has two low-charge alerts:
Low charge alert:
When the battery charge is rather low (about 15% charge), your NOOK displays a message to
charge it. You can dismiss the message and continue using your NOOK, but you should charge it as
soon as possible. To extend the time that the charge lasts, you can turn Airplane mode on, which
disables all wireless connectivity. If you turn Airplane mode on, you cannot access your online digital
library, The Daily, the Shop, or browse the web.
After your NOOK displays the low charge alert, it might turn off wireless connectivity.
When it does, you will not be able to access the your online digital library, The Daily, the
Shop, or browse the web until you charge your NOOK.
Critically low charge alert:
NOOK User Guide
Power and Charging
17
When the battery charge is critically low (too low for continued operation), your NOOK displays a
message to charge it and shuts down. The critically low battery level is about 5%.
You must charge your NOOK before using it. It will charge faster using the power adapter. When
your NOOK has enough charge to run, it will start, but remember that it still has very little charge.
You can use it, but should continue charging it.
Battery Charge and Charging Indicators
Your NOOK ships with a partially charged battery. We recommend that you charge your NOOK
before using it.
Your NOOK has the following indicators of the battery charge and charging.
Battery Charge Indicators
Your NOOK indicates in two places the amount of charge remaining in the battery:
•
With an icon in the status bar:
Battery charge levels when your NOOK is not charging (from low to full charge):
Battery charge levels when your NOOK is charging (from low to high):
•
With a percentage of full charge on the Settings page. The percentage is updated when
the battery charge changes.
In some cases, the Battery Charge on the Settings summary reads Not available. This is normal.
It means that the software that reads the charge got some readings that it could not interpret.
After a few minutes, your NOOK will get more readings and display the battery charge.
Charging Indicators
Your NOOK indicates in two places when it is charging the battery:
•
With a charging indicator light next to the data/charging port. When your NOOK
is charging, the charging indicator light to the left of the USB port lights up yellow. When the
device is not charging or is fully charged, the charging indicator light is not lit.
NOOK User Guide
Power and Charging
18
Charging
Indicator Light
If the charge in your NOOK’s battery is very low, it can take up to about 15 minutes before
the charging indicator light turns on. If it does not turn on after half an hour, make sure the
USB cable is firmly seated.
•
With a plus sign in the battery charge icon in the status bar (shown above)
It can take up to about 15 seconds before the battery charge icon in the status bar is
updated to reflect plugging in or unplugging your NOOK.
Charging your NOOK
Charge your NOOK using:
•
A power adapter. Use the supplied power adapter connected to your NOOK through the
supplied USB cable.
•
A USB cable (the supplied one or a different one)
Wall charging is faster than USB charging. Approximate charging times from fully discharged to fully
charged are:
•
Wall charging: 3.5 hours
•
USB charging: 6 hours
A fully discharged NOOK will turn on after charging for about 15 minutes or less in most cases, but
the charge is still low. When your NOOK does turn on, it will charge most quickly if you do not use
it while it charges. However, you can use it if you keep it plugged in and charging while you do. If
the battery charge is very low, it can take an hour before your NOOK turns on.
Your NOOK must be on or sleeping to charge. When your NOOK is off and you plug it in
to charge it, your NOOK turns on. Do not turn it off again; it needs to be on to charge. If
you are not using your NOOK, it will sleep and continue to charge.
NOOK User Guide
Power and Charging
19
Wall Charging
Wall charging is the recommended way to charge your NOOK, because it is faster than USB
charging. You can charge your NOOK when it is on or sleeping. If your NOOK is off, it turns on
when you plug it in. You can use your NOOK while it is charging.
Only use the supplied NOOK power adapter. Other power adapters might damage your
battery and NOOK.
Wall
Outlet
USB
Cable
Power
Adapter
To charge your NOOK using the power adapter:
1 Assemble the power adapter and USB cable. Insert the large end of the USB cable into the
matching receptacle on the power adapter.
2 Plug the NOOK end of the USB cable into your NOOK.
3 Plug the power adapter into a compatible electrical outlet. If your NOOK was off, it turns on.
Do not turn it off again. Your NOOK charges.
4 When charging, the charging indicator light to the left of the USB port lights up yellow.
5 When your NOOK is fully charged, the charging indicator light goes out.
6 Unplug the power adapter from the electrical outlet and unplug the USB cable from your NOOK.
USB Charging
While your NOOK is charging through USB, you can use it as a USB drive, or you can eject/
unmount the NOOK drive and a supplemental microSD card drive if present and use your
NOOK for reading. We recommend that you do not shop or download content while USB
charging.
You can charge your NOOK from a USB port on a personal computer. This is convenient if you are
using USB drive mode on your NOOK to transfer files, or if you are using a personal computer for
NOOK User Guide
Power and Charging
20
other things. It is not, however, the fastest way to charge your NOOK. You can charge your NOOK
through USB when it is on or sleeping. If your NOOK is off, it will not charge, so it turns on when
you plug it in.
If your personal computer sleeps or hibernates, it will probably stop charging your NOOK.
To charge your NOOK, adjust the settings on your computer so that it does not sleep or
hibernate.
We recommend that you turn your NOOK on before plugging it into USB. If you plug your NOOK
into USB when it is off, your personal computer might have trouble recognizing your NOOK while it
is starting. Your computer should recognize your NOOK after your NOOK has completed its startup.
The first time you connect your NOOK to a personal computer, your NOOK should be
on. The computer will install USB drivers for your NOOK, and display a message that this
operation is in progress. It will also display a message when it completes installing drivers.
You can ignore these messages. They do not affect charging.
Computer / USB
USB
Cable
To charge your NOOK using USB:
1 Power on your personal computer.
2 Plug the smaller end of the USB cable into the USB/charging port on your device.
3 Plug the larger end of the USB cable into a USB port on your computer. The USB cable
connections are shown in the drawing above.
What happens now depends on power state your NOOK is in:
Off: Your NOOK turns on and charges. Do not turn it off again. After it starts, it displays a popup message that indicates USB is available.
While your NOOK is starting, your computer might try to recognize your NOOK as
a USB device and fail. When this happens, your computer displays a message about an
unrecognized USB device. You can ignore and dismiss the message.
NOOK User Guide
Power and Charging
21
Sleeping: Your NOOK charges and enters USB drive mode.
On (including when the touchscreen backlight is off ): If the touchscreen backlight is off, it is
turned on. Your NOOK charges and enters USB drive mode.
When charging, the charging indicator light to the left of the USB port lights up yellow. You can
use your NOOK for reading while it is charging by ejecting/unmounting the NOOK drive, and a
supplemental drive if present. For more information, see “USB Connectivity” on page 155.
4 When your NOOK is fully charged, the charging indicator light goes out.
5 If you have not already ejected/unmounted the NOOK drive from your computer, and a
supplemental drive if present, do so now.
6 Unplug both ends of the USB cable.
Charging Recommendations
Your NOOK contains a lithium polymer battery. To maximize battery life:
•
Partially discharge the battery rather than fully discharging it. For example, charge
your NOOK when you see the low charge alert, rather than continuing to use it until it turns
itself off.
•
Avoid high temperatures if possible for charging, use, and storage. For more information,
see “Temperature Ranges” on page 40.
•
Charge the battery half way before storing your NOOK for a week or more.
•
Turn your NOOK off for storage. If you are going to store your NOOK for more than a
week, turn it off.
Hard Reset
A hard reset is a more aggressive way of turning off your NOOK. It is not resetting your
NOOK to factory settings, which is explained in “Security Settings” on page 180.
A hard reset turns your NOOK off. It also clears some state information. No content or metadata is
deleted. You should generally not need to perform a hard reset of your NOOK.
You might want to perform a hard reset in these circumstances:
•
If your NOOK is not charging
•
If your NOOK is on but not responsive
NOOK User Guide
Power and Charging
22
•
When asked to do so by Customer Service
To perform a hard reset:
1 Get a clock or watch that shows seconds.
2 Press and hold the power button of your NOOK for 20 seconds, then release the power button.
3 Press and release the power button to turn on your NOOK.
If you remove the battery and leave it out for 10 seconds, put it back in, and then turn on your
NOOK, your NOOK also performs a hard reset.
NOOK User Guide
Power and Charging
23
Your NOOK
This section explains your NOOK hardware. It also summarizes key features and explains the Home
menu.
Hardware Highlights
Your NOOK has:
•
Reading screen: This is where you read your eBooks, magazines, and newspapers. The
reading screen is a 600 x 800, 3.57 x 4.82 inch (6-inch diagonal), reflective high-resolution E Ink
electronic paper display. The reading screen displays 16 levels of gray. The reading screen is not
a touchscreen; you navigate on the reading screen using the color touchscreen.
Reading Screen
Touchscreen
the daily
my library
shop
reading now
games
•
Color touchscreen: A 480 x 144 color touchscreen is used for menu navigation, D-pad
navigation, a keyboard, and display of cover thumbnail graphics. The touchscreen supports
gestures (for example, tapping your finger to choose a menu item and swiping your finger to
scroll through eBook covers). The screen brightness is controlled by an ambient-light sensor (or
you can set a fixed level). When you are reading and the touchscreen is not lit, you can turn
pages by swiping your finger on the touchscreen.
•
Wireless connectivity: Your NOOK or NOOK Wi-Fi can use Wi-Fi connectivity to connect
to the Barnes & Noble eBookstore, to synchronize with your online digital library, and for
NOOK User Guide
Your NOOK
24
other tasks that require Wi-Fi (for example, using the web browser or downloading large files,
including software updates). Your NOOK or NOOK Wi-Fi can connect to Wi-Fi hotspots in
TM
Barnes & Noble Bookstores, AT&T hotspots in the United States, and many other Wi-Fi
hotspots. The NOOK (Wi-Fi + 3G model) can also use B&N Fast & Free Wireless (a fast cellular
data network) for all connectivity that does not require a Wi-Fi hotspot connection.
•
Speakers and a headphone jack: Your NOOK has a speaker for audio. For better sound
quality, you can use headphones.
•
A USB socket: Your NOOK has a micro-B USB socket for managing files from a personal
computer. It is also used for charging.
Speaker
Headphone
Jack
USB Port
Charging
Indicator Light
NOOK Models
There are two NOOK models:
•
A NOOK Wi-Fi can connect to Wi-Fi hotspots only.
•
A NOOK (Wi-Fi + 3G model) can connect to Wi-Fi hotspots and the B&N Fast & Free
Wireless network (a cellular data network).
Most of the time when this guide refers to a NOOK, it means any NOOK (both models).
When there is a need to distinguish between a NOOK (meaning any NOOK) and a NOOK
(meaning the Wi-Fi + 3G model), we add “Wi-Fi + 3G model” to the latter.
Feature Highlights
What can you do with your NOOK? Here are some highlights:
•
The Daily: The Daily is a message center for daily B&N feeds and notifications. Check
back daily to read issues of feeds and to learn about special offers, deliveries to your library,
subscriptions, lending offers, and software updates.
NOOK User Guide
Your NOOK
25
•
Shopping: With your NOOK, it is easy to buy eBooks, magazines, and newspapers from the
Barnes & Noble eBookstore. Some digital content is even free! You can also download eBooks
to your NOOK from your personal computer.
•
In-Store content and merchandising: When you bring your NOOK into a Barnes & Noble
Bookstore, you can access in-store content and merchandising. Merchandising content includes
in-store, exclusive editorial content, promotion coupons, and information about in-store events.
•
Library: Your library provides access to your B&N eBooks, magazines, and newspapers. It also
provides access to your other eBooks. For B&N content, you have a unified view of the content
on your NOOK and in your online digital library. You can browse and search for content in your
library. The My Documents part of your library provides access to your other eBooks in ePub,
PDB, and PDF formats.
•
Lending eBooks: You can lend many eBooks in your library to friends. You can lend a book
that can be lent one time for 14 days.
•
Reading: You can read eBooks, newspapers, magazines, and feeds in The Daily on your
NOOK. Your NOOK supports ePub and PDB files (like those you’ll get from the Barnes & Noble
eBookstore), as well as PDF files. You can load reading matter from your computer using the
included USB cable. In addition to reading on your NOOK, you can read the same content on
B&N eReader applications on a wide range of platforms.
•
In-store reading: While in Barnes & Noble Bookstores, you can read many eBooks free of
charge. These are not samples, but are entire eBooks. Read an eBook for up to one hour per
calendar day.
•
Browsing: When connected to a Wi-Fi hotspot, you can browse the World Wide Web on
your NOOK.
•
Games: Play games on your NOOK. Play chess and Sudoku.
•
Bookmarking, highlighting, and annotating: While reading an eBook, you can bookmark
pages, highlight text, and add notes.
•
Ratings: Are you reading a good eBook or periodical? You can rate the eBook or periodical
from your NOOK.
•
Personal content and audio: You are not limited to B&N content on your NOOK. You can
download digital content to your NOOK from your personal computer using USB.
•
Music and audiobooks: You can listen to music while reading. You can also listen to
audiobooks.
•
Personalize your NOOK: You can download screensaver and wallpaper images to your
NOOK and choose among several text fonts and six text sizes for reading.
NOOK User Guide
Your NOOK
26
Home Menu
The starting point for everything is the Home menu. You see the Home menu when you first power
on your NOOK, and can reach at other times by tapping the Home button between the reading
screen and touchscreen (it has the NOOK logo on it:
).
The Home menu looks like this:
the daily
my library
shop
reading now
games
wi-fi
audio
web
settings
The Home menu has 9 buttons. The black frame above indicates the part of the Home menu you
can see without scrolling. Scroll the Home menu to the left and right to reveal all of the buttons.
From the Home menu, choose one of the main areas of your NOOK and follow the menus to
accomplish your goal:
•
the daily: Receive exclusive new content in The Daily. Daybook presents a digest of B&N
review content, an article of the day, and a significant event that occurred on this date in literary
history. Unbound is a NOOK and B&N eReader blog. Look for daily posts on great new
eReads, bestselling eBooks, and eBook offers (including free downloads). The Daily is also a
message center. You receive notifications about delivery of periodical issues, offers from friends
to lend you eBooks, and free software updates and enhancements.
•
my library: Your library gives you easy access to your eBooks, magazines, and newspapers.
Your NOOK has lots of space for eBooks (about 1500), which can be expanded by adding your
own microSD card. Your library keeps online back-up copies of all of the eBooks you have
previously purchased from BN.com or your NOOK.
•
shop: Access the eBookstore at Barnes & Noble.com from your NOOK anytime. The
eBookstore has the world’s largest selection of electronic books and periodicals. You can
wirelessly purchase and download eBooks, subscribe to newspapers and magazines, purchase
single issues of newspapers and magazines, and download free samples of eBooks so you can
try before you buy. When in a Barnes & Noble Bookstore, select eBooks and current issues of
periodicals to read in the store.
•
reading now: Your NOOK remembers where you are reading in each eBook or periodical. Tap
reading now on the Home menu to pick up right where you left off.
•
web: When connected to a Wi-Fi hotspot, you can browse the World Wide Web on your
NOOK.
•
wi-fi: Connect to Wi-Fi hotspots.
•
games: Play games on your NOOK. Play chess and Sudoku.
NOOK User Guide
Your NOOK
27
•
audio: Listen to music, audiobooks, and other audio files such as podcasts.
•
settings: Personalize your NOOK to suit your taste. Choose your own wallpaper and
screensavers. Store email addresses of friends and family to help you share great books easily.
Register your NOOK to take advantage of its full functionality. You’ll want to connect your
NOOK to your BN.com account so that you can make purchases and download free samples.
Home Screen
The Home screen is on the reading screen when the Home menu is on the touchscreen. The Home
screen displays your wallpaper.
A tip bubble might be displayed in the lower left corner of the reading screen. The tip bubble gives:
•
The number of new periodical issues, that is, the number of periodical issues delivered to your
online digital library during the last 48 hours that you have not opened and read.
•
The number of new offers to lend you eBooks, that is, the number of offers to lend you eBooks
received during the last 48 hours that you have neither accepted nor declined.
Back Cover
This section explains how to remove and re-attach the back cover of your NOOK.
You should almost never have to remove the back cover. The only times when you need to remove
the back cover are:
•
To insert a microSD card to add storage capacity to your NOOK
•
To replace the battery
Removing the Back Cover
The first time you do this, you might want to do it over a soft surface such as a sofa
cushion, in case you drop your NOOK. The back cover is biased toward staying on, rather
than toward coming off.
To remove the back cover:
1 Unplug your NOOK from the power adapter or USB cable.
2 Press the power button for about 5 seconds to turn off your NOOK.
3 Hold your NOOK in one hand with the front facing your hand and the bottom edge up.
NOOK User Guide
Your NOOK
28
4 Locate the tab protruding from near the center of the bottom of the back cover, adjacent to the
USB port (see the drawing below).
5 Place a finger of your other hand on the tab and pull the tab away from the device, as shown.
The back cover will start to separate from your NOOK. The tab will move away from your
NOOK, as will one or both of the adjacent corners of the back cover. As the back cover
separates from your NOOK, you will hear unsnapping sounds.
6 Separate the other adjacent corner if it did not already separate.
7 Move the fingers holding the cover 1/3 of the distance down the cover. Apply outward pressure
(away from your NOOK) on the cover. You can insert your fingers between your NOOK and
back cover as you do this. You will hear more unsnapping sounds and the cover will come free.
NOOK User Guide
Your NOOK
29
Attaching the Back Cover
This section explains how to attach the back cover of your NOOK.
To attach the back cover:
1 Place your NOOK face down with the bottom facing you on a hard, flat surface, for example on
a table or desk.
2 Line up the bottom of the cover with the bottom of your NOOK, as shown in the drawing
below.
3 Moving your hands up the edges of the back cover (where the raised parts of the back are),
press down gently in the places shown. You should hear snapping sounds.
NOOK User Guide
Your NOOK
30
Removable
Back Cover
Do not press on the middle of the back cover or bend your NOOK. Doing so might
damage the screens.
4 Look around the edges of your NOOK to see that the back cover is securely attached. If the
back cover is not securely attached, press edges together that did not seat correctly. If that does
not work, remove the back cover and repeat this procedure.
SIM Card
This section applies to the NOOK (Wi-Fi + 3G model) only.
The SIM card in your NOOK (Wi-Fi + 3G model) is pre-installed. It is used when your NOOK
connects to the Barnes & Noble eBookstore and NOOK data services over B&N Fast & Free
Wireless. You will never need to remove or change the SIM card. Specifically, please note the
following about the SIM card:
•
You cannot use your NOOK’s SIM card in a different mobile device, for example, a mobile
phone.
•
You cannot use a different SIM card, for example, from a mobile phone, in your NOOK.
NOOK User Guide
Your NOOK
31
•
The SIM card in your NOOK is associated with your NOOK, whether registered or not. Do not
swap SIM cards between NOOKs. There is no reason to, and afterwards they will not be able to
connect to B&N Fast & Free Wireless.
Built-in Storage
Your NOOK has 2 GB of built-in flash memory. Of this, about 1.3 GB is available for storage of
your digital content. This is enough storage space for about 1500 eBooks or 300 periodical issues.
Periodicals tend to be larger because they have more graphical content.
The storage capacity for eBooks and other digital content will be affected by how many
personal files (for example, music files) you download onto your NOOK.
For information about how to add a supplemental microSD or microSDHC card, see “Adding
Storage” on page 166.
Battery
You do not install the battery. It is pre-installed and should last for years.
Replacing the Battery
If necessary, the battery can be replaced. A replacement battery must be of the following type:
Barnes & Noble Lithium Polymer battery
Model Number BNRB1530
Rating: 3.7V, 1530mAh, 5.66Wh
Replacement batteries are available in the Accessories section of the www.nook.com website. You
will need a small Phillips head screw driver (size 0 or 00).
To replace the battery:
1 Unplug your NOOK from the power adapter or USB cable.
2 Turn off your NOOK.
3 Carefully remove the back cover. Full instructions are given in “Removing the Back Cover” on
page 28.
NOOK User Guide
Your NOOK
32
Screw
Battery
Back (Inside)
4 With the back facing you, turn your NOOK so that the top is directed away from you. The
screw and tab holding the battery in place are at the top of the battery, as shown in the drawing
above.
5 Unscrew and remove the screw that holds the battery in place. Sit it down where it won’t get
lost. You will need it in a moment.
6 Lift the battery out as if it has a hinge long the bottom edge. Insert your finger nail in the
semicircular space at the upper left of the battery, press against the top of the battery (pressure
toward the bottom of your NOOK), and move your finger upward. The top edge of the battery
should rise up out of the slot that holds the battery.
7 Grasp the battery with your other hand, and lift it out.
8 Insert the replacement battery. Insert the two tabs on the bottom edge of the battery in
matching slots in the bottom edge of the battery compartment. Lower the top edge into place.
The battery should lie flat.
9 Screw in the screw.
10 Replace the back cover. Full instructions are given in “Attaching the Back Cover” on page 30.
Optional Accessories
Optional accessories are available at your local Barnes & Noble Bookstore and online at BN.com.
Some are only available online. If you purchase an accessory from a vendor other than BN.com,
ensure that it is compatible with your NOOK. For NOOK accessories on the BN.com website, direct
your browser to:
www.barnesandnoble.com/nook/accessories/
NOOK User Guide
Your NOOK
33
B&N and Designer Covers
You can purchase a B&N cover for your NOOK at your local Barnes & Noble Bookstore or online
from BN.com. The cover helps protect your NOOK from daily wear and tear. For example, it
keeps dust from accumulating on the screens, reducing the need to clean them. It provides some
protection against spills.
Device Backs and Frames
Add color to your nook by changing the device back or adding a device frame.
Lights
Add a clip-on light or light case to read where there is otherwise not enough light.
Power Adapter and USB Cable Kit
You can purchase an additional or replacement NOOK power adapter and USB cable online at
BN.com.
Only use the NOOK power adapter. Other power adapters might damage your battery and NOOK.
You can use any USB 2.0 compatible USB cable that has a standard-A and micro-B plug. If you use a
different USB cable than the one in the box, we recommend a shielded one.
microSD and microSDHC cards
You can purchase 2 GB microSD and 4, 8, and 16 GB microSDHC cards to add storage space to
your NOOK.
NOOK User Guide
Your NOOK
34
International Use and Languages
This chapter summarizes information about using your NOOK outside of the United States and
explains your NOOK’s support of languages.
Using your NOOK abroad
Your NOOK is designed for use in the United States, Canada, and the United States territories. You
can use it to read anything already on your NOOK when travelling anywhere in the world.
If you live or travel outside of the United States, be aware of the following points regarding using
your NOOK:
•
Purchasing a NOOK: You can only purchase a NOOK if you have a billing address in the
United States, U.S. territories, or Canada. You cannot purchase a NOOK if you have an
international or APO/FPO (Army Post Office / Fleet Post Office) billing address.
•
B&N Fast & Free Wireless Coverage: Cellular coverage for the NOOK (Wi-Fi + 3G
model) is available in specific areas of the continental United States, Alaska, Hawaii, Puerto Rico,
TM
and the U.S. Virgin Islands. Coverage is provided by AT&T Wireless. A coverage map can be
found on the web (look for data coverage).
Coverage does not extend to other networks through roaming.
•
Pre-ordering eBooks: You can only pre-order eBooks if you have a billing address in the
United States or Canada. You cannot pre-order eBooks if you have an international, U.S.
territory, or APO/FPO (Army Post Office / Fleet Post Office) billing address. You can only
pre-order digital content when physically within the United States (including Alaska and Hawaii),
American Samoa, Guam, Puerto Rico, Palau, the U.S. Virgin Islands, and Canada. Some items are
not available for purchase in Canada.
•
Purchasing digital content from the Barnes & Noble eBookstore on your NOOK:
You can only purchase digital content if you have a billing address in the United States, U.S.
territories, or Canada. You cannot purchase digital content if you have an international or APO/
FPO billing address. You can only purchase digital content when physically within the United
States (including Alaska and Hawaii), American Samoa, Guam, Puerto Rico, Palau, the U.S. Virgin
Islands, and Canada. When you travel outside of these areas, you can download digital content
to your NOOK that you have already purchased (if you have a Wi-Fi connection), but you
cannot buy digital content. Some items are not available for purchase in Canada.
•
Purchasing items on the BN.com website: You can only purchase digital content if you
have a billing address in the United States, U.S. territories, or Canada. You cannot purchase
digital content if you have an international or APO/FPO (Army Post Office / Fleet Post Office)
billing address. You can only purchase digital content when physically within the United States
(including Alaska and Hawaii), American Samoa, Guam, Puerto Rico, Palau, the U.S. Virgin
Islands, and Canada. Some items are not available for purchase in Canada.
NOOK User Guide
International Use and Languages
35
•
Automatic connection to AT&T hotspots: Automatic connection to AT&T hotspots only
happens in the United States. In other places, you can connect to AT&T hotspots manually.
•
Registering and unregistering your NOOK: You can register and unregister your NOOK
from anywhere that you have a Wi-Fi hotspot that your NOOK can use.
•
Downloading previously purchased items: You can download previously purchased items
to your NOOK from anywhere that you have a Wi-Fi hotspot that your NOOK can use.
•
Lending and borrowing eBooks: You can lend and borrow eBooks from anywhere that you
have a Wi-Fi hotspot that your NOOK can use.
•
Automatic delivery of periodicals: Periodicals are automatically downloaded to your NOOK
from anywhere that you have a Wi-Fi hotspot that your NOOK can use.
•
Archiving and unarchiving content: You can archive and unarchive items from anywhere
that you have a Wi-Fi hotspot that your NOOK can use.
Languages
Your NOOK has fonts with Latin character sets that support the following languages when reading
eBooks and other digital content, when fonts are not embedded:
Afrikaans, Basque, Catalan, Danish, Dutch, English, Finnish, French, German, Icelandic,
Indonesian, Italian, Norwegian, Portuguese, Spanish, and Swedish
Your NOOK can display eBooks in other languages if the fonts are embedded in the eBook files.
Language support in other parts of the NOOK, for example in the Library and Audio Player, is variable.
NOOK User Guide
International Use and Languages
36
Safety and Care
This section explains important information about safety and about caring for your NOOK.
Safety
If you follow some straightforward precautions, your NOOK is a safe device.
Electricity
Your NOOK is an electrical device. Only use an approved power adapter. If you open the back
cover, unplug the device from the power adapter and turn it off first.
Water
Your NOOK is not a waterproof device. If it starts to rain, get under cover or put your NOOK
away. Don’t read in the bathtub. You could ruin your NOOK.
Situations that Demand Your Attention
Some situations demand your attention. If you shouldn’t be reading a book while doing them, then
you shouldn’t be reading on your NOOK either. Driving? Don’t even think about it. Operating a
train? Don’t be daft. Watching children? Yes, but only if you can do it in a way that fairly divides
your attention and does not endanger them. Use common sense—the eBook will still be on your
NOOK to read tomorrow.
Airplanes
To use your NOOK on an airplane, set it to Airplane mode. For more information about use on
airplanes, see “Use on Airplanes” on page 38.
Electronic Equipment
If you are around sensitive electronic equipment, for example in a hospital, ask if you may use your
NOOK. You probably can if you set it to Airplane mode, except in an intensive care setting.
Battery
Please note the following safety information about the battery:
•
Do not disassemble or open, crush, bend or deform, puncture or shred the battery.
•
Do not modify or remanufacture the battery, attempt to insert foreign objects into the battery,
immerse the battery in or expose it to water or other liquids, or expose the battery to fire,
explosions, or other hazards.
NOOK User Guide
Safety and Care
37
•
Only use the battery for the system for which it is specified.
•
Only use the battery with a charging system that has been qualified with the system per this
standard. Use of an unqualified battery or charger may present a risk of fire, explosion, leakage,
or other hazards.
•
Do not short circuit a battery or allow metallic conductive objects to contact battery terminals.
•
Replace the battery only with another battery that has been qualified with the system. Use of an
unqualified battery may present a risk of fire, explosion, leakage, or other hazards.
•
Promptly dispose of used batteries in accordance with local regulations.
•
Battery usage by children should be supervised.
•
Avoid dropping the device or battery. If the device or battery is dropped, especially on a hard
surface, and the user suspects damage, take it to a service center for inspection.
•
Improper battery use may result in a fire, explosion, or other hazards.
•
For battery charging through USB, only connect your NOOK to products that bear the USB-IF
logo or have completed the USB-IF compliance program.
Use on Airplanes
Your NOOK is a portable electronic device, and as its use on airplanes is regulated. Here is the
story:
•
Always obey the instructions of the flight crew. They will inform you when you can and cannot
use portable electronic devices.
•
Before pushback from the gate, you can use your NOOK with Airplane mode on or off. This is
the time to set Airplane mode to on, if you haven’t already done so.
•
During takeoff, your NOOK must be turned off (not just asleep) and stowed. You cannot use it.
•
At cruising altitude, when instructed by the flight crew that portable electronic devices are
permitted, you can use your NOOK with Airplane mode on.
•
During landing, your NOOK must be turned off and stowed. You cannot use it.
•
After landing, you can use your NOOK with Airplane mode on or off.
Also remember that, on an airplane, material you read should be appropriate for a public setting.
Turning Airplane mode On and Off
Turning Airplane mode on turns the wireless circuitry off. Your NOOK will not send or receive
radio signals until Airplane mode is turned off.
NOOK User Guide
Safety and Care
38
Turn Airplane mode on for the duration of an airplane flight, from take-off through landing.
Turn Airplane mode on in other settings where radio signal broadcasting is prohibited. Ask
someone whether Airplane mode should be turned on in other settings such as hospitals.
Turning Airplane mode off (the default setting) lets your NOOK manage when the wireless circuitry
is turned on and off, so that your NOOK can send and receive radio signals when it needs to.
When Airplane mode is on, the status bar contains this icon:
To turn Airplane mode on or off:
1 On the Home menu, tap wi-fi. The current setting is displayed in the Airplane mode menu.
2 Tap the Airplane mode menu to toggle between On and Off.
You can also toggle Airplane mode on and off from the settings > Airplane mode menu.
On the NOOK (Wi-Fi + 3G model), when you turn Airplane mode off, Wi-Fi remains off if
it was off prior to Airplane mode being turned on, and Wi-Fi is turned on if it was on prior
to Airplane mode being turned on.
Checked Baggage
You will want to use your NOOK on the flight, of course, but we have to mention this. Rules
are rules. If you travel on an airplane with your NOOK in checked baggage, the Federal Aviation
Administration requires that:
•
Your NOOK is turned off (fully off, not just asleep).
•
Your NOOK is packed to prevent it from being turned on inadvertently. It should be packed
so that nothing can press against the power button. This might take a bit of care. Packing your
NOOK with its optional B&N cover on will help.
Caring for Your NOOK
Here are some recommendations about caring for your NOOK. If you follow them, your NOOK
should have a long productive life.
NOOK User Guide
Safety and Care
39
Temperature Ranges
Your NOOK should function as designed in these temperature ranges:
Use
Charging
Operation
Storage
Fahrenheit
41– 95 ºF
32 – 104 ºF
5 – 113 ºF
Celsius
5 – 35 ºC
0 – 40 ºC
-15 – 45 ºC
Outside of these ranges, your NOOK might develop power, display, and/or software issues. If
temperatures are extremely cold or hot, permanent physical damage can result. Such damage is
not covered by the warranty. Storage applies to temporary locations like the trunk of your car (or
other motor vehicle) as well as long-term storage.
Even on a day that is not very hot, the passenger compartment or trunk of a car can be
extremely hot. Do not leave your NOOK in a car.
High storage temperatures reduce battery life. For more information, see “Charging
Recommendations” on page 22.
Water and Weather
Your NOOK has a degree of water resistance, for example, to a misty fog. (We do want San
Francisco residents to buy NOOKs.) If your NOOK gets damp, just dry the surface with a clean, dry
cloth before you put it away. But don’t let your NOOK get too wet. It is not water proof. If it does
get wet, let it dry completely before using it.
Reading Screen
You do not need to touch the reading screen, and should try to not do so. Fingerprints can
permanently damage the reading screen if they are not removed. If the screen gets fingerprints,
grime, dust, or water on it (or for that matter, red wine, spaghetti sauce, or mustard), you should
clean it with a damp soft cloth (for example, a micro-fiber cloth). Do not use any chemicals to clean
the reading screen.
The reading screen has a scratch-resistant coating, but it is possible to scratch the screen, so you
should clean it carefully. Keeping the screen clean in the first place is a better strategy than cleaning
it. You should clean it infrequently, not often.
Color Touchscreen
The color touchscreen is meant for touching, but you should also clean it. You might clean it after
several days of use, or if you notice the screen needs cleaning. Clean the touchscreen with a damp
soft cloth (for example, a micro-fiber cloth). Do not use any chemicals to clean the touchscreen.
NOOK User Guide
Safety and Care
40
B&N and Designer Covers
You can purchase an optional B&N or designer cover for your NOOK at your local Barnes & Noble
Bookstore or online from BN.com. The cover helps protect your NOOK from daily wear and tear.
For example, it keeps dust from accumulating on the screens, reducing the need to clean them. It
provides some protection against spills.
For more information about the covers, see “B&N and Designer Covers” on page 34.
Warranty Coverage and the B&N Protection Plan
Your NOOK is backed by a one year manufacturer’s warranty against defects in materials and
workmanship. For a copy of this warranty, see “One Year Limited Warranty” on page 205. The
warranty is also available at:
www.barnesandnoble.com/nook/protectionplan
You can extend your NOOK’s coverage by purchasing a two-year B&N Protection Plan to help
safeguard NOOK against spills, drops, and other accidents. The B&N Protection Plan can only be
purchased together with a NOOK, not later.
Information about the B&N Protection Plan can be found at:
www.barnesandnoble.com/nook/protectionplan
NOOK User Guide
Safety and Care
41
Operating the Controls
This section explains all the buttons and menus you use to control your NOOK. For information
about the power button, see “Power Button” on page 16.
Home Button
The Home button has the NOOK logo on it:
. It uses a capacitive touch sensor, which can detect
a light touch. Tap or touch it; you do not need to press it, and nothing moves up and down.
Use the Home button as follows:
•
When your NOOK is awake, tap the Home button to display the Home menu on the
touchscreen. On the reading screen you see your wallpaper. If you have new issues of
periodicals or lending offers, their numbers appear in a tip bubble.
•
When the touchscreen is dark but your NOOK is not sleeping, you can tap the Home button
one time to light up the touchscreen. You can also tap the touchscreen.
Turning Pages
You can turn pages using the Next Page and Previous Page buttons. Turn pages while reading, and in
The Daily, the Shop, and your Library. In the Browser, turn to the next and previous web pages in a
series of pages you have visited.
While reading, you can also swipe your finger on the dark touchscreen to turn pages.
When browsing a list of items (for example, in your library or the Shop), if you are on the
last item on a page, you can tap
(the Down button) to turn to the next page. If you are
on the first item on a page, you can tap
(the Up button) to turn to the prior page.
Next Page and Previous Page Buttons
On each side of your NOOK, there are two buttons for turning pages:
(Previous Page): Display the previous page of content or of a paginated list
(Next Page): Display the next page of content or of a paginated list.
The Next Page and Previous Page buttons are typical buttons. When you press one, it moves down.
You can immediately raise your finger.
NOOK User Guide
Operating the Controls
42
The Next Page and Previous Page buttons have a small dimple next to them; just to the right of the
buttons on the right side of your NOOK and just to the left of the buttons on the left side of your
NOOK. The touch dimples help you find the buttons by touch while reading.
Swiping Your Finger
When the touchscreen is dark, you can swipe your finger to turn pages:
forward
back
Touch a spot on the touchscreen with your finger already moving sideways. The
swipe does not need to be a long one (it can be about 3/4 inch long), and it can be
anywhere on the touchscreen.
Page Indicators for Lists and Feeds
When you are turning pages in a list of items in The Daily, your library, the Shop, or in a feed, the
current page number and total number of pages are displayed in the upper right corner of the
reading screen. If there are between two and twelve pages, the current page is displayed graphically
at the bottom of the reading screen. For example, this indicates that you are on page 2 of 7:
NOOK User Guide
Operating the Controls
43
Color Touchscreen
The color touchscreen displays menus, navigation controls, and when needed, a keyboard.
Reach areas of your NOOK including your library, the Shop, and the Reader from the Home menu.
Submenus allow you to use all of your NOOK’s features.
To light up the touchscreen when it is unlit, but your NOOK is not sleeping, tap the touchscreen, tap
the Home button, or press and release the power button.
Gestures
The touchscreen recognizes several gestures.
Touch
This is the most basic gesture for the touchscreen. When you touch a Home menu button, menu
choice, button, or key, the touchscreen highlights the chosen item. But your NOOK does not
perform the requested action until you raise your finger.
To move quickly to the top or bottom of a list in your library or the Shop, touch the Up or Down
button and hold it for about a second, and then raise your finger.
Tap
Briefly touch a Home menu button, menu choice, button, or key and then immediately raise your
finger. Your NOOK performs the action. If you tap very quickly, your NOOK might not register the
tap (and the highlighting does not happen). If what you expect to happen doesn’t, try a longer tap.
Double-Tap
Tap the same button twice in rapid succession. This is used for the Previous button in the audio
player to play the previous track.
Swipe
You can swipe to scroll through the Home menu and the covers in the gallery (Show Covers).
When you are reading and the touchscreen is not lit, you can swipe to turn pages.
How you swipe is slightly different for lit and dark touchscreens:
•
Lit touchscreen: Touch a spot on the touchscreen, move your finger to another point, and
then raise your finger. Your finger can be moving laterally when you touch, or not. You can move
your finger a short distance or a long one. As you do, what is displayed on the touchscreen will
move.
NOOK User Guide
Operating the Controls
44
•
Dark touchscreen: Touch a spot on the touchscreen with your finger already moving
sideways. The swipe does not need to be a long one (it can be about 3/4 inch long), and it can
be anywhere on the touchscreen.
Scroll
If a context has more than four menu choices, not all of them fit on the touchscreen at the same
time. The first four are displayed, along with a scroll bar. You can scroll up and down in the menus
NOOK User Guide
Operating the Controls
45
by swiping your finger. Swipe up to scroll down and vice versa. Place your finger on a menu choice
to scroll, not on the scrollbar. You also swipe to scroll the Home menu, as explained above.
Find
Go to
Bookmarks
Highlights and notes
Throw
If you swipe quickly in the gallery (Show Covers) and your finger is still moving when you raise it,
the covers continue to scroll for a little while. This is called “momentum,” and the gesture is to
throw. It also applies to scrolling in menus.
Menus
For everything that you are doing with your NOOK—reading, browsing the Shop, buying a
subscription, searching your library, and so forth—the touchscreen displays context-sensitive menus.
You use the menus to control what happens.
For example, here is the menu you see while viewing the My B&N Library section of your library:
Go to My Documents
Show Covers
Change view
Manage shelves
In this menu, you can:
•
Go to My Documents (the other section of the library)
NOOK User Guide
Operating the Controls
46
•
View the gallery of covers
•
Change view options:
•
•
Showing and hiding shelves
•
Sorting items in the library by most recent, title, or author
•
Filtering what is displayed by content type (all, eBooks, magazines, or newspapers)
•
Showing and hiding archived items
Manage shelves
In the remainder of the menu, which you can scroll to, you can:
•
View item details and options such as lending, rating, and archiving
•
Check for new B&N content
•
Search for items in the My B&N Library section of your library
Navigating the Menus
To display a lower-level menu:
A menu item with a sign near the right edge has submenus. Tap the menu item to display the
submenus. The higher level menu slides to the left.
To move back to a higher-level menu:
When you are below the top level of the menus, tap
(the Back button) to return to the
immediately higher menu. The Back button is also used to return to the jumping-off page after
navigating using a link when reading.
To scroll when there are more than four menus:
When there are more than four menus, a scrollbar is displayed to the right of the menus:
To scroll in the menus, swipe your finger up and down on the menu items (not on the scrollbar).
To make a choice in the menus:
A menu choice without a sign near the right edge does not have submenus. Tap it to cause
something to happen. For example, tap Search to display a data-entry form on the main screen and
a keyboard on the touchscreen.
NOOK User Guide
Operating the Controls
47
A menu choice with a sign near the right edge has submenus. Tap the menu choice to display the
submenus. For example, tap Preferences in the Reader to display the submenus Text size, Text font,
and Auto Save Page on BN.com.
Menus with On/Off choices toggle when you tap them. In Settings, tap Airplane mode to turn
Airplane mode on. Tap Airplane mode again to turn Airplane mode off.
You will sometimes see a menu item that is gray. This means that you cannot choose that
menu item. The choice might not be relevant; for example, you cannot change the font for
a PDF file, so the Text font menu item is gray. This can also indicate that an operation is in
progress. For example, when your NOOK is automatically checking for new content in My
B&N Library, the Check for new B&N content menu item is gray until it has completed the
operation.
Navigation on the Reading Screen
Some content on the reading screen is navigable. That is, it has on-the-page navigation. These cases
are:
•
Navigable lists, including ones that span more than one page. Examples include your library and
eBooks in the Shop.
•
Navigable parts of documents, including tables of contents in books, magazines, and newspapers
and links from one part of a periodical to another part.
When you navigate on the reading screen, where you are is highlighted by a line above and below
and a in the left margin:
Text content of books, magazines, and newspapers is navigable when creating highlights and notes,
and when looking up words. For information about this navigation, see “D-pad” on page 52.
To move up and down in a navigable list on the reading screen:
Tap
(the Up button) to move up. Tap
(the Down button) to move down. Touch and hold
the Up button for 2 seconds to move directly to the top of the page. Touch and hold the Down
button for 2 seconds to move directly to the bottom of the page.
NOOK User Guide
Operating the Controls
48
If you are on the last item on a page, you can tap
If you are on the first item on a page, you can tap
(the Down button) to turn to the next page.
(the Up button) to turn to the prior page.
In some cases, navigation on the reading screen uses the D-pad. For more information, see “D-pad”
on page 52.
To select the highlighted item in a list:
Tap
(the Select button). The result is an action that depends on the context, for example,
opening an eBook or displaying item details.
Form Navigation and Data Entry
When you need to enter data, for example to register your NOOK or search, your NOOK displays a
data entry form on the main screen and a keyboard on the touchscreen.
Use the keyboard to type in the form, and to submit what you typed. Here is some information
about navigation in forms. More information about the keyboard is given below.
Single-page Form
Use the following controls to navigate on a single-page form:
To move to the right in a text entry box on a form: Tap the Right Arrow key.
To move to the left in a text entry box on a form: Tap the Left Arrow key.
To delete a character: Tap the Backspace key.
To clear the current text entry box on a form: Tap the Clear key.
or
To move up one field on a multi-field form: Tap the Up Arrow key or Up button.
or
To move down one field on a multi-field form: Tap the Down Arrow key or Down
button.
To move down one field on a multi-field form: As an alternative to the Down Arrow key,
you can tap the Return key to move down one line in a multi-line form. When on the
last line, pressing Return does nothing; it does not submit the form.
To cancel data entry: Tap Cancel. This cancels data entry and returns you to the menus.
To submit the entered data: Tap Submit.
NOOK User Guide
Operating the Controls
49
Fields that Require a Choice
Some fields in data entry forms require a choice among specific values, for example among Wi-Fi
security types (Auto, None, WEP, WPA, or WPA2). When you navigate to such a field on a form,
the choices appear as touchscreen menu items. Tap your choice, and then use the Down button or
Down Arrow key to move to the next field.
Multi-page Form
Navigation on each page of a multi-page form is the same as for a single-page form. Use the
following controls to navigate between pages of a multi-page form:
To turn to the next page in a multi-page form: Press the Next Page button on the right
or left side of your NOOK.
To turn to the previous page in a multi-page form: Press the Previous Page button on the
right or left side of your NOOK.
Complete all pages of a multi-page form before submitting it, or an error will result. Submit the
form by tapping the Submit button.
Keyboards and Typing
When you choose a task that requires data entry, your NOOK displays a keyboard. There are
actually four keyboards, shown and described below.
Slight variations of these keyboards are used in specific circumstances. For example, the
keyboard for entering email addresses substitutes the underscore, @ sign, and period for
the Clear key.
Uppercase
A standard keyboard that displays the uppercase alphabet. Switch to this keyboard from the
lowercase keyboard by tapping
. On any other keyboard, tap ABC and then
. To lock the
uppercase keyboard (Caps Lock), tap
on the uppercase keyboard.
Cancel 123
NOOK User Guide
Clear
Submit
Operating the Controls
50
Lowercase
A standard keyboard that displays the lowercase alphabet. This is the keyboard that is displayed
first. Switch to this keyboard from the uppercase keyboard by tapping
twice. Switch to it from
other keyboards by tapping ABC.
Cancel 123
Clear
Submit
Numbers and Symbols
A keyboard that displays the numbers and some symbols. Switch to this keyboard from the
lowercase or uppercase keyboard by tapping 123. Switch to it from the Additional Symbols
keyboard by tapping 123.
#+=
“
.
,
?
!
Cancel ABC
‘
Clear
Submit
Additional Symbols
A keyboard that displays the remaining symbols. Switch to this keyboard from the lowercase or
uppercase keyboard by tapping 123 and then #+=. From the Numbers and Symbols keyboard, tap
#+=.
[
]
{
}
#
%
^
*
+
_
/
|
`
<
>
€
£
¥
123
“
?
!
‘
.
Cancel ABC
,
Clear
=
Submit
Number Pad
For data entry in a field that can only contain numbers, your NOOK displays a number pad:
NOOK User Guide
Operating the Controls
51
D-pad
The D-pad (directional pad) control is displayed when you add highlights or annotations, and to
navigate on a page to look up a word. It lets you move the cursor in all four directions in the text,
so you can choose start and end points for highlights. It is also used to highlight a word to look up.
When navigating in an EPUB file, the up and down arrows on the D-pad controller
sometimes skip lines (for example, the last line in a paragraph if that line contains only one
word). You can reach every word using the left and right arrows.
Browsing
Browse content in your library and the Shop using navigation controls on the touchscreen and the
Next Page and Previous Page buttons.
Searching
You can search in your library (in the section of the library where you currently are, My B&N
Library or My Documents) and in the Shop. The procedure is the same.
In My B&N Library and the Shop, the search looks for items with all of the terms in any of the
following metadata fields:
•
Title
•
Contributors
•
Author
•
Publisher
•
Subjects
In My Documents, the search looks for items with all of the terms in any of the following metadata
fields:
•
Title
•
Author
NOOK User Guide
Operating the Controls
52
To search:
1 In the library (in My B&N Library or My Documents) or Shop, tap Search. Search is available
from the top-level menus, as well as from some submenus. If you want to search, and search is
not in the menu, use the Back button to move up a level.
2 Your NOOK displays a form on the main screen and a keyboard on the touchscreen.
3 Type the word or words for which you want to search. This is not a phrase search. The search
must match all of the words, but in any order and in any of the fields that are searched.
4 Tap Search.
5 Your NOOK displays a list of items that match your search. The search is for all content types.
If the list is longer than one page, it is paginated; you can navigate between pages with the Next
Page and Previous Page buttons.
6 (Optional) Tap Change view > Show and choose one of the content types: All, eBooks,
Magazines, or Newspapers.
Sorting Lists
In the My B&N Library part of the library, you can sort lists of items. You can sort by:
•
Most recent (default): The list is sorted by how recently you have read the content. Content
that you have not read is sorted by how recently it was downloaded.
•
Title: The list is sorted by the item’s title. The sort is a “smart” one, discounting the leading
words “A” and “The.”
•
Author: The list is sorted by the last name of the first author.
You cannot sort a list of items after a search. A list of items found in a search is always
sorted by relevance. The algorithm gives more importance to title and author matches and
considers the numbers of matches in the fields searched.
To sort a list:
1 On the Home menu, tap my library.
2 (Optional) Tap Change view > Show and choose one of the content types: All, eBooks,
Magazines, or Newspapers.
3 Tap Change view > Sort by and choose a sorting order: Most recent, Title, or Author.
NOOK User Guide
Operating the Controls
53
Filtering Lists
In the My B&N Library part of your library, you can filter lists my content type. (In the Shop, you
can browse by content type, but you cannot filter lists by content type.) You can show:
•
All
•
eBooks
•
Magazines
•
Newspapers
To filter a list:
1 On the Home menu, tap my library.
2 (Optional) Perform a search.
3 Tap Change view > Show and choose one of the content types: All, eBooks, Magazines, or
Newspapers.
4 (Optional; if you did not perform a search) Tap Change view > Sort by and choose a sorting
order: Most recent, Title, or Author.
Viewing a Gallery of Covers
In the My B&N Library section of your library and when browsing in the Shop, you can browse a
gallery of covers on the touchscreen.
The procedure for displaying and using the gallery of covers is documented in “Shop” on page 76 and
“Library” on page 90.
Status Bar
Your NOOK has a status bar at the top of the reading screen. The information displayed in the
status bar is the same everywhere except when you are reading. When you are reading, the status
bar displays different information. For information about the status bar when reading, see “Reading
Status Bar” on page 125.
NOOK User Guide
Operating the Controls
54
This is the information displayed at all times except when you are reading:
Your NOOK is connected to a Wi-Fi hotspot in a Barnes & Noble Bookstore:
Airplane mode is on:
B&N Fast & Free Wireless signal strength (from low to high) if your NOOK (Wi-Fi + 3G model) is
connected to a B&N Fast & Free Wireless network:
Wi-Fi signal strength (from low to high) if your NOOK is connected to a Wi-Fi hotspot:
Battery charge levels when your NOOK is not charging (from low to full charge):
Battery charge levels when your NOOK is charging (from low to high):
The current time is displayed in 12-hour or 24-hour format, for example: 3:25 PM or 15:25. Tap
settings > Display > Clock > Clock format to set the clock format.
The current time can be incorrect on a NOOK Wi-Fi, and on a NOOK (Wi-Fi + 3G model)
in an area without access to a B&N Fast & Free Wireless network. If the time is not
correct, first connect to a Wi-Fi hotspot. This sets the minutes value. If the hour or AM/
PM value is not correct, tap settings > Display > Clock > Time zone to set the time zone
and settings > Display > Clock > Daylight Saving Time to turn Daylight Saving Time on or
off.
B&N Fast & Free Wireless Signal Strength Indicator
This section applies to the NOOK (Wi-Fi + 3G model) only.
NOOK User Guide
Operating the Controls
55
Note the following about the B&N Fast & Free Wireless signal strength indicator:
•
When Airplane mode is on: no B&N Fast & Free Wireless signal indicator is displayed, but the
Airplane mode indicator is displayed.
•
When your NOOK is able to connect to a Wi-Fi hotspot, it preferentially uses the Wi-Fi
hotspot. It does not connect to B&N Fast & Free Wireless, and it does not display a B&N Fast &
Free Wireless signal strength indicator.
When Airplane mode is off and your NOOK is not connected to a Wi-Fi hotspot:
•
When no compatible B&N Fast & Free Wireless network is detected, no B&N Fast & Free
Wireless signal strength indicator is displayed.
•
When a compatible B&N Fast & Free Wireless network is detected, but the signal strength is
too low to permit a connection to the network, no B&N Fast & Free Wireless signal strength
indicator is displayed.
•
When a B&N Fast & Free Wireless network connection has been established: the B&N Fast &
Free Wireless signal indicator shows a signal strength that ranges from one to four bars.
Wi-Fi Signal Strength Indicator
Note the following about the Wi-Fi signal strength indicator:
When Airplane mode is on: no Wi-Fi signal strength indicator is displayed, but the Airplane mode
indicator is displayed.
When Airplane mode is off:
•
When Wi-Fi is off: no Wi-Fi signal strength indicator is displayed.
•
When Wi-Fi is on but your NOOK is not connected to a Wi-Fi hotspot: no Wi-Fi signal strength
indicator is displayed.
•
When Wi-Fi is on and a Wi-Fi connection has been established: the Wi-Fi indicator shows a
signal strength that ranges from one dot to one dot and three waves.
NOOK User Guide
Operating the Controls
56
Wireless Connectivity
While reading and during most tasks, the radio in your NOOK is not on. It does not need to be,
and it would consume power. Even browsing your library, including B&N content in your online
digital library, is done on your NOOK. However, some tasks, such as browsing or searching the B&N
eBookstore, do require a wireless connection.
NOOK Models
There are two NOOK models:
TM
•
A NOOK Wi-Fi can connect to Wi-Fi
•
A NOOK can connect to Wi-Fi hotspots and the B&N Fast & Free Wireless network (a cellular
data network).
hotspots only.
Most of the time when this guide refers to a NOOK, it means any NOOK (both models).
When there is a need to distinguish between a NOOK (meaning any NOOK) and a NOOK
(meaning the Wi-Fi + 3G model), we write NOOK Wi-Fi for the former and add “Wi-Fi +
3G model” to the latter.
Choosing a Connection
When your NOOK needs a connection, it starts the radio, determines the best network to connect
to, and connects. When it no longer needs the connection, it disconnects.
Your NOOK uses the best network it can find, considering network speed and signal strength. From
top priority to lowest priority, the choices are:
•
In a Barnes & Noble store, your NOOK uses the store’s Wi-Fi hotspot.
•
When within range of an AT&T hotspot in the United States, your NOOK uses the AT&T
hotspot.
•
If you instruct your NOOK to use other Wi-Fi hotspots (by connecting to detected hotspots or
configuring hotspots), it uses one of those when it needs a network connection (if the signal
strength is OK).
•
(Wi-Fi + 3G model NOOKs only) If none of the abovementioned Wi-Fi hotspots are
available, your NOOK uses B&N Fast & Free Wireless (a cellular data network). It picks the best
B&N Fast & Free Wireless connection based on speed and signal strength.
Some operations require a Wi-Fi connection. These include downloads of very large
eBooks, periodicals, and magazines; and some software updates.
NOOK User Guide
Wireless Connectivity
57
Wi-Fi
Your NOOK can connect to Wi-Fi hotspots (places that offer wireless Internet access) that use the
802.11b or 802.11g standard.
Display menus for managing Wi-Fi hotspots by tapping wi-fi on the Home menu:
wi-fi
Alternatively, tap settings on the Home menu, then tap Wi-Fi. The menus are the same. Here we
will assume that you tap wi-fi on the Home menu.
Connecting to Wi-Fi Hotspots
Your NOOK can connect to Wi-Fi hotspots as follows:
•
Your NOOK automatically detects and connects to Wi-Fi hotspots in Barnes & Noble
Bookstores.
•
Your NOOK automatically detects and connects to AT&T Wi-Fi hotspots in the United States.
•
Your NOOK automatically detects Wi-Fi hotspots that broadcast their network name (Service
Set Identifier, or SSID). It does not automatically connect to them, but in Settings you can
choose to connect to one of them. After you have chosen to connect to a hotspot, your
NOOK connects to it automatically in the future. If you no longer want to connect to a hotspot
automatically, you can ask your NOOK to forget the hotspot.
•
You can configure one or more Wi-Fi hotspots, irrespective of whether they broadcast their
SSIDs. For example, you can configure Wi-Fi settings for a home network or the coffee shop
around the corner. If you configure other Wi-Fi hotspots, your NOOK automatically connects to
them.
For a secured hotspot, you must provide the credentials needed to connect—the network
name (SSID), security type, and security code.
•
Your NOOK can use most Wi-Fi hotspots that require acceptance of terms and conditions or
that require you to enter additional information for authentication (such as an account number
or a room number at a hotel) or payment information. When you attempt to connect to such a
hotspot, you are prompted to launch the web browser to supply the required information. After
you complete that step, your NOOK connects to the hotspot.
NOOK User Guide
Wireless Connectivity
58
Automatic detection of hotspots requires three things:
•
Airplane mode is off
•
Wi-Fi is on
•
Your NOOK has a sufficient battery charge to continue running the Wi-Fi circuitry. When the
battery level is very low, your NOOK turns off wireless circuitry.
Your NOOK always automatically connects to Wi-Fi hotspots in Barnes & Noble Bookstores and
AT&T Wi-Fi hotspots. If your NOOK connects to one of these hotspots and you want to connect
to a different hotspot, navigate to the other hotspot in the Wi-Fi hotspot menu, choose the
hotspot, and tap Connect.
For hotspots other than Barnes & Noble Bookstore and AT&T hotspots, your NOOK automatically
connects to any detected Wi-Fi hotspot that you have either configured or previously connected to
and not asked your NOOK to forget. It does not automatically connect to other detected hotspots.
To connect to a hotspot for the first time:
1 Tap wi-fi > Wi-Fi hotspot.
2 After your NOOK scans for and displays detected hotspots, tap the hotspot in the menu. If no
password is needed to connect, your NOOK connects to the hotspot.
3 If a password is needed to connect, your NOOK prompts for it. Type the password and then tap
Submit. You only need to enter the password for a secure hotspot one time.
4 If terms and conditions or similar information is needed to connect, your NOOK displays a
message to that effect. Tap Launch Browser. Your NOOK opens the page on which you supply
that information in the web browser. Enter the required information and submit it. Your NOOK
connects to the hotspot.
Turning Wi-Fi On and Off
This section applies to the NOOK (Wi-Fi + 3G model). To turn Wi-Fi on and off on a
NOOK Wi-Fi, turn Airplane mode on and off. For that procedure, see “Turning Airplane
mode On and Off” on page 38.
If you don’t have a Wi-Fi hotspot to connect to and are not visiting a Barnes & Noble Bookstore,
you can turn Wi-Fi off. Doing so will give you longer battery life. Remember to turn Wi-Fi back on
when visiting a Barnes & Noble Bookstore. You also might need Wi-Fi for some software updates
(or you can obtain them from the www.nook.com/support website).
Your NOOK is smart about when it automatically turns Wi-Fi off. For example, it does so
when you are reading.
NOOK User Guide
Wireless Connectivity
59
To turn Wi-Fi on or off:
On the Home menu, tap wi-fi. The current setting is displayed in the Wi-Fi menu. Tap the Wi-Fi
submenu to toggle between On and Off.
Viewing Wi-Fi Hotspots
With Airplane mode off and Wi-Fi on, your NOOK displays a Wi-Fi hotspot menu. When you tap
Wi-Fi hotspot, your NOOK scans for hotspots. While it is scanning, the uppermost menu item reads
Scanning, please wait....When your NOOK has finished scanning, it displays a list of Wi-Fi hotspots
that are detected (in range and that have sufficient signal strength to connect to).
At the bottom of the hotspot list, your NOOK displays hotspots that are not in range, but that are
remembered. Remembered hotspots include those that have been detected before or configured,
and that have been connected to. If your NOOK is currently connected to a Wi-Fi hotspot, that
hotspot has the word connected next to it.
Hotspots have the following indicator icons next to them:
•
An icon that gives the Wi-Fi signal strength (from low to high):
•
If the hotspot is secured, a lock icon is displayed:
A string next to the hotspot name describes the status of the hotspot:
•
connected: Your NOOK is currently connected to this hotspot.
•
connecting: Your NOOK is in the process of connecting to this hotspot.
•
remembered: This hotspot has either been detected before and connected to or has been
manually configured. It is in range, but your NOOK is not connected to it.
•
not in range, remembered: This hotspot has either been detected before and connected to
or has been manually configured, but it is not in range.
When Multiple Hotspots are In Range
When multiple Wi-Fi hotspots are in range, if you connect to more than one hotspot, your NOOK
will preferentially use the last hotspot connected to. If you want to use a different hotspot, have
your NOOK forget the most recently defined hotspot.
For example:
1 Your NOOK detects your home hotspot, and you choose to connect to it.
NOOK User Guide
Wireless Connectivity
60
2 Later, you have issues with your own hotspot, and you choose to connect to a neighbor’s
hotspot (after asking politely).
3 You fix your hotspot, and want to use it again. To do so, tap wi-fi > Wi-Fi hotspot > neighbor’s
hotspot name > Forget.
4 Your NOOK will forget your neighbor’s hotspot (remember to thank him) and automatically
connect to your home hotspot.
Configuring and Using Wi-Fi Hotspots
This section explains procedures for configuring and using Wi-Fi hotspots.
To determine the Wi-Fi connection status and signal strength:
If your NOOK is connected to a Wi-Fi hotspot, the status bar contains an icon that gives the Wi-Fi
signal strength (from low to high):
The connection status and signal strength are also shown at the top level of the Wi-Fi application
on the reading screen, and in the Wi-Fi hotspot menu.
To view the currently connected Wi-Fi hotspot:
If your NOOK is connected to a Wi-Fi hotspot, the name is displayed at the top level of the Wi-Fi
application on the reading screen, next to Wi-Fi hotspot on the Settings summary, and in the
Wi-Fi hotspot menu in the Wi-Fi application and in Settings.
To connect to a detected Wi-Fi hotspot:
Your NOOK automatically connects to AT&T hotspots, including those in Barnes & Noble
Bookstores, and to detected Wi-Fi hotspots that you have previously connected to or configured.
For other hotspots, tap wi-fi > Wi-Fi hotspot. After your NOOK scans for and displays detected
hotspots, tap the hotspot in the menu and then tap Connect. If no password is needed to connect,
your NOOK connects to the hotspot. If a password is needed to connect, your NOOK prompts
for it. Type the password and then tap Submit. You only need to enter the password for a secure
hotspot one time.
NOOK User Guide
Wireless Connectivity
61
To manually add and connect to a Wi-Fi hotspot:
To manually add a Wi-Fi hotspot, you must be within range of the hotspot. Your NOOK
connects to the hotspot when you add it. If it fails to connect, it does not add the hotspot.
You will need the following information:
•
Network SSID (Service Set Identifier, that is, the network name for the hotspot)
•
Security (Auto, None, WEP, WPA, or WPA2)
•
Password: A code needed when connecting to a secured hotspot
Tap wi-fi > Wi-Fi hotspot > Other hotspot.... In the data-entry form, type the SSID, select the
security, and then tap Submit. If a password is needed, your NOOK prompts for it. Enter the
password and then tap Submit.
To disconnect from and forget a Wi-Fi hotspot:
Tap wi-fi > Wi-Fi hotspot. Tap the hotspot, and then tap Forget. This does two things. It
disconnects your NOOK from the hotspot, and it removes it from the list of networks to which
your NOOK connects automatically.
B&N Fast & Free Wireless
This section applies to the NOOK (Wi-Fi + 3G model) only.
Your NOOK (Wi-Fi + 3G model) can connect to B&N Fast & Free Wireless networks in the United
States (including Alaska and Hawaii), Canada, Puerto Rico, and the U.S. Virgin Islands. These
networks are AT&T cellular data networks that are available in specific areas of the continental
United States, Alaska, Hawaii, Puerto Rico, and the U.S. Virgin Islands. Coverage is provided by
AT&T Wireless. A coverage map can be found on the web (look for data coverage). You are not
charged for access to these wireless networks.
In areas without B&N Fast & Free Wireless coverage, you can rely on Wi-Fi to access network
services. Wi-Fi access is available in all Barnes & Noble Bookstores.
Your NOOK cannot connect to other cellular data networks. Wi-Fi connectivity is possible
globally. Purchasing is not possible globally. For more information about purchasing, see
“Ordering from your NOOK” on page 82.
The cellular radio connectivity is 850/1900 MHz dual band. Your NOOK can use GPRS, EDGE,
NOOK User Guide
Wireless Connectivity
62
UMTS W-CDMA (3G), and HSDPA B&N Fast & Free Wireless networks. Your NOOK automatically
connects to the fastest network present that has sufficient signal strength.
When not in the Reader, if your NOOK is connected to B&N Fast & Free Wireless, the status bar
contains an icon that gives the B&N Fast & Free Wireless signal strength (from low to high):
In Areas Without B&N Fast & Free Wireless
In areas without B&N Fast & Free Wireless, your NOOK can connect to supported Wi-Fi hotspots.
For information about Wi-Fi hotspots, see “Configuring and Using Wi-Fi Hotspots” on page 61.
If you use your NOOK in an area without B&N Fast & Free Wireless coverage:
1 If you have never been in an area with B&N Fast & Free Wireless coverage, connect to a Wi-Fi
hotspot. This sets the minutes value of the time.
2 Set the time zone in which you use your NOOK. Tap settings > Display > Clock > Time zone
and choose your time zone and settings > Display > Clock > Daylight Saving Time to turn
Daylight Saving Time on or off.
If you choose a time zone from the menus, and then travel somewhere with B&N Fast & Free
Wireless coverage, your NOOK will switch to the time zone indicated by the wireless network
connection, and Daylight Saving Time will be taken into account.
If you travel back to an area without coverage, choose the time zone again and set Daylight Saving
Time if necessary.
Dropped Connections and Lost Wi-Fi Connectivity
If your NOOK is performing an action over the air and the B&N Fast & Free Wireless connection is
dropped (for example, if the signal strength is poor), or if the Wi-Fi network goes down, it will do
its best to resume what it is doing. If it can resume, it will not inform you about the lost connection.
If it cannot resume, it will inform you that you should repeat the operation in an area with better
signal strength or when the Wi-Fi network is up again.
In Areas with No Wireless Connectivity
In areas with no wireless connectivity (no B&N Fast & Free Wireless, no Barnes & Noble Bookstore
hotspot, and no manually configured Wi-Fi hotspot), you can still use your NOOK as an eReader.
You can read anything that is in the local library on your NOOK. You can also obtain new B&N
content through an Internet connection on your personal computer (buy digital content from the
Barnes & Noble online store), and then transfer the files from your computer to the My Documents
part of your library on your NOOK using the USB cable.
NOOK User Guide
Wireless Connectivity
63
Registering your NOOK
When you first turn on your NOOK, it leads you through registration. If you do not have
a Barnes & Noble online account, you must create one online at www.nook.com/setup.
After registration, your NOOK downloads information about the digital content in your
online digital library.
Registration is associating your NOOK with a Barnes & Noble online account (an account on the
BN.com website (www.barnesandnoble.com or www.BN.com). You must do this on your NOOK.
By registering your NOOK, you agree to the NOOK Terms of Service in “NOOK™ Terms of
Service” on page 185. The Terms of Service can also be found here:
www.nook.com/legal
A specific NOOK can be associated with only one Barnes & Noble online account.
Account Creation
Creating a Barnes & Noble online account precedes registration. During the welcome, you
are asked to choose an existing Barnes & Noble online account. You can also choose to defer
registration (for example, until after you create an account on the BN.com website).
If you cancel or otherwise do not complete registration from the welcome pages, you can
register later by tapping settings > Device > Register your nook.
You can create an account by directing your browser to www.nook.com/setup and clicking the Sign
in or create account image.
Your password can be 6 to 15 characters long. It can only contain alphanumeric characters (letters
A-Z and a-z and numbers 0-9), with no symbols, punctuation marks, special characters, or spaces.
Your password is case sensitive.
Default Credit Card and Billing Information
When you create an account online, specify a default credit card and billing information. This
information is required for you to make purchases from your NOOK. It is also required to borrow
eBooks.
Registration
This section explains how to register your NOOK. You also use these procedures to re-register a
NOOK that has been unregistered.
NOOK User Guide
Registering your NOOK
64
Your NOOK leads you through the welcome pages that include registration the first time you turn it
on.
To register your NOOK (Wi-Fi + 3G model) using the welcome pages, you must be in an
area with B&N Fast & Free Wireless network coverage, in a Barnes & Noble Bookstore in
the United States, or at an AT&T hotspot in the United States. Alternatively, tap Register
later and register after connecting to any Wi-Fi hotspot.
To register your NOOK Wi-Fi using the welcome pages, you can be in a Barnes & Noble
Bookstore in the United States, at an AT&T hotspot in the United States, or you can
connect to any other Wi-Fi hotspot.
You can register either nook model later from Settings if the abovementioned circumstances are
true, as well as after connecting to any Wi-Fi hotspot.
The information you need during registration is:
•
BN.com account email address
•
BN.com account password
If your NOOK informs you that your account information is not valid, double check the information
you entered. You might have mistyped something.
To register your NOOK (Wi-Fi + 3G model):
1 When you first power on your NOOK, it displays pages and menus for registration.
2 Tap Tap here to get started.
3 Tap Register with your existing account.
4 Enter the email address and password for your Barnes & Noble online account, and tap Submit.
5 Tap OK to close the message about successful registration.
6 You are given the chance to take a quick tour, to learn about your NOOK’s controls and
features. Tap Take the tour.
To register your NOOK Wi-Fi:
1 When you first power on your NOOK, it displays pages and menus for registration.
2 Tap Tap here to get started.
3 (NOOK Wi-Fi) If you are not already connected to a Wi-Fi hotspot in a Barnes & Noble
Bookstore or an AT&T hotspot in the United States, your NOOK Wi-Fi prompts you to
connect to a local Wi-Fi hotspot. Tap Go to Wi-Fi Settings.
NOOK User Guide
Registering your NOOK
65
4 Tap Wi-Fi hotspot and connect to a Wi-Fi hotspot. If a Barnes & Noble Bookstore or AT&T
hotspot is in range, connection will be automatic. Procedures for connecting to a detected
hotspot and for defining and connecting to a hotspot are in “Configuring and Using Wi-Fi
Hotspots” on page 61.
5 After connecting to a Wi-Fi hotspot, tap the Back button twice to return to the welcome pages.
6 Tap Register with your existing account.
7 Enter the email address and password for your Barnes & Noble online account, and tap Submit.
8 Tap OK to close the message about successful registration.
9 Tap OK to close the message about setting the clock.
10 You are given the chance to take a quick tour, to learn about your NOOK’s controls and
features. Tap Take the tour.
Initial Library Synchronization and Downloads
Immediately after registration, your NOOK downloads a local copy of the catalog from your online
digital library. It uses this catalog copy when searching your library. Your NOOK keeps the local
catalog in sync with the online catalog. For more information about synchronization, see “Library
Synchronization” on page 92.
Your NOOK does not assume that you want to download all of the content in your library to
your NOOK. It downloads content when you ask it to, or when you ask to read it. Your NOOK
does automatically download the five most recently purchased eBooks that were purchased from
BN.com within the 30 days prior to registering your NOOK.
Later, when you make purchases from the Barnes & Noble eBookstore, what you buy is
downloaded automatically to your NOOK.
An Unregistered NOOK
Fewer features are supported on an unregistered NOOK than on a registered one. On an
unregistered NOOK:
•
You can browse the Shop, but not buy anything (including free eBooks and samples). If you try
to buy something, you will be prompted to register.
•
You can read, bookmark, highlight, and take notes
•
You cannot rate eBooks and periodicals.
•
You can manage personal files and listen to music and audiobooks.
NOOK User Guide
Registering your NOOK
66
•
In Barnes & Noble Bookstores, you receive in-store special offers, but you cannot purchase
eBooks or periodicals until you register your NOOK. You also cannot use Read In Store to read
many eBooks in Barnes & Noble Bookstores.
Unregistering your NOOK
You should not need to unregister your NOOK. But in three cases you would want to:
•
If you change the email address and/or password of your BN.com account. In this case,
unregister your NOOK, then make the account changes, and then re-register your NOOK with
the new information. Read the information below about the impact of unregistration and
re-registration.
•
If you are giving your NOOK to a family member or friend, but do not want that person to
make purchases.
•
If your NOOK is lost or stolen.
If you plan to sell your NOOK, we recommend that you back up your B&N and personal content,
unregister your NOOK, and then reset your NOOK to factory settings. For more information, see
“Resetting to Factory Settings” on page 183.
Unregistering your NOOK does not delete B&N or personal content, but it does delete
other information, as explained here. Note, however, that if you re-register your NOOK,
B&N content is deleted at that point. If you want to save the B&N content, you must copy
it to a location for personal content, for example, the my documents folder or to a
supplemental microSD card if present. Before re-registering your NOOK, also back up your
B&N content to your personal computer.
Unregistering your NOOK:
•
Unregisters your NOOK, severing the association between your NOOK and your
Barnes & Noble online account
•
Does not delete B&N content or personal content from the internal memory
•
Does not delete personal content from a supplemental microSD card if present
•
Moves B&N content from the my B&N downloads folder to the my documents folder in
the internal memory
•
Deletes all metadata (for example, bookmarks, highlights, notes, and current reading position).
Information about shelves and shelving of items in your library is also deleted.
•
Deletes information used to unlock DRM-secured content. To open the content on the
unregistered NOOK, you will need to enter your first name, last name, and default credit card
one time. If you purchased the content with different default credit cards, you will need to enter
NOOK User Guide
Registering your NOOK
67
each credit card one time. For example, if you bought 10 eBooks last year with a credit card
ending in 1111, and another 10 eBooks this year with a credit card ending in 2222, then when
you open one of the eBooks from last year, you will need to supply the credit card ending in
1111, and when you open one of the eBooks from this year, you will need to enter the credit
card ending in 2222. After that, you can open all of the eBooks.
•
Deletes the owner and device profile, information about Wi-Fi hotspots, contacts, and choices
of screensavers and wallpaper, from Settings
•
Does not change other settings. For example, the settings for sleep and touchscreen timers and
Reader fonts are not changed.
To unregister your NOOK:
1 On the Home menu, tap settings.
2 Tap Device > Unregister your nook.
3 Tap Confirm.
Re-registering your NOOK
Re-registering a NOOK that has been reset to factory settings is exactly the same process as
registering a NOOK that has never been registered. For information about that process, see
“Registration” on page 64.
This section explains what happens during re-registration of a NOOK that has been unregistered.
Re-registering your NOOK deletes B&N content (the contents of the My B&N Library
section of your library, which is in the my B&N downloads folder on your NOOK). If you
want to save the B&N content, you must copy it to a location for personal content, for
example, the my documents folder or to a supplemental microSD card if present. Before
re-registering your NOOK, also back up your B&N content to your personal computer.
Re-registering your NOOK:
•
Associates your NOOK with a Barnes & Noble online account (the same one as before or a
different one)
•
Does not affect My B&N Library (B&N content in the my B&N downloads folder on
your NOOK), because there are no contents in My B&N Library on an unregistered NOOK.
If contents were present in the my B&N downloads folder, they were moved to the my
documents folder when your NOOK was unregistered.
•
Does not delete personal content in the internal memory (documents, music, audiobooks,
screensavers, and wallpaper), or on a supplemental microSD card (documents, music, and
audiobooks) if present
NOOK User Guide
Registering your NOOK
68
•
Deletes all metadata (for example, bookmarks, highlights, notes, and current reading position).
Information about shelves and shelving of items in your library is also deleted.
•
Deletes information used to unlock DRM-secured content
•
Deletes the owner and device profile, information about Wi-Fi hotspots, contacts, and choices
of screensavers and wallpaper, from Settings
•
Does not change other settings. For example, the settings for sleep and touchscreen timers and
Reader fonts are not changed.
After re-registration, you can download content from the online digital library for the new account.
If metadata for the current reading page and rating is associated with the content, it is downloaded
too.
NOOK User Guide
Registering your NOOK
69
Personalizing your NOOK
Your NOOK is yours, and you can personalize it. You can:
•
Choose among predefined wallpaper images, or supply your own. The wallpaper image is
displayed on the Home screen.
•
Use one of the predefined screensaver sets, or provide your own sets of screensaver images. A
screensaver is a single, static image displayed on the reading screen when your NOOK is asleep.
•
Customize settings. For example, you can change the text font and text size for the Reader. You
can also change the sleep and touchscreen timers.
•
Add accessories, including covers, colored device backs and frames, and lights. For more
information, see “Optional Accessories” on page 33.
Wallpaper Images
To use your own wallpaper images, copy them from your personal computer to the folder
my wallpapers. You cannot place wallpaper images in other locations in the internal
memory, or on a supplemental microSD card. For more information, see “Files and
Folders” on page 163.
Choose among predefined wallpaper images, or choose one of your own images. Wallpaper images
must have file types JPG (or JPEG), GIF, PNG, and BMP.
To copy wallpaper images to your NOOK:
1 On your computer, prepare the files you want to use as wallpaper images. You can pick images
from different locations on your computer, but it simplifies the procedure to collect them into
one folder on your computer.
2 Connect your NOOK to your computer. For that procedure, see “Connecting your NOOK to
your Computer” on page 155.
3 Open the nook drive by double-clicking on its icon. Then open the my wallpapers folder.
4 Open the folder on your computer that contains the images you want to use as wallpaper
images.
5 Select the images in the folder on your computer and drag and drop them (or copy and paste
them) to the my wallpapers folder on the nook drive.
If images are in zip/archive files, extract them. If space on your computer is a consideration,
you can extract the images directly to the my wallpapers folder on the nook drive.
6 Close the window that displays the contents of the my wallpapers folder.
NOOK User Guide
Personalizing your NOOK
70
7 Eject/unmount the nook drive and disconnect your NOOK from your computer. For that
procedure, see “Disconnecting your NOOK from your Computer” on page 156.
To choose a wallpaper image:
1 On the Home menu, tap settings.
2 Tap Display > Wallpaper.
3 Tap the wallpaper image you want to use.
4 Tap the Home button to view the wallpaper.
Screensaver Images
To use your own screensaver images, copy them from your personal computer to top-level
sub-folders of the folder my screensavers. The names of the sub-folders are displayed
in the Screensaver menu. You cannot place screensaver images in other locations in the
internal memory, or on a supplemental microSD card. For more information, see “Files and
Folders” on page 163.
Use one of the predefined screensaver sets Authors, Cityscape, or Nature, or provide your own
sets of screensaver images and then choose a set in Settings. Screensaver images must have file
types JPG (or JPEG), GIF, PNG, and BMP.
To copy screensaver images to your NOOK:
1 On your computer, prepare the files you want to use as screensaver images. Collect them into
one folder on your computer, or into several folders (for example, “beaches,” “mountains,”
and “cats.” Give each folder the name for the screensaver set. If images are in zip/archive files,
extract them. (You can also extract them directly to the destination folders on your NOOK.)
2 Connect your NOOK to your computer. For that procedure, see “Connecting your NOOK to
your Computer” on page 155.
3 Open the nook drive by double-clicking on its icon. Then open the my screensavers folder.
4 Open the folder on your computer above the one that contains the screensaver-set folder(s).
5 Select the screensaver-set folder(s) on your computer and drag and drop (or copy and paste)
the folder(s) to the my screensavers folder on the nook drive. The screensaver images must
not be in the my screensavers folder, but rather in top-level subfolders.
6 Close the window that displays the contents of the my screensavers folder.
7 Eject/unmount the nook drive and disconnect your NOOK from your computer. For that
procedure, see “Disconnecting your NOOK from your Computer” on page 156.
NOOK User Guide
Personalizing your NOOK
71
To choose a screensaver set:
1 On the Home menu, tap settings.
2 Tap Display > Screensaver.
3 Tap the screensaver set you want to use. The names correspond to folder names in the folder
my screensavers in the internal memory. When your NOOK sleeps, you will see the next
screensaver image in the set.
Reader Settings
You can choose a text font and text size in the Reader:
•
Preferences > Text font: You can choose among several text fonts, including serif and sans
serif style fonts. For more information about text font choices, see “Reader Text Fonts” on page
121.
•
Preferences > Text size: You can choose among six text sizes: Extra small, Small, Medium
(the default), Large, Extra large, and Extra extra large. For more information about text size
choices, see “Reader Text Sizes” on page 122.
Settings
You can configure settings to make your reading experience the best for you. Several of the key
settings are explained here. For the full list, see “Settings” on page 176.
•
Sleep timer (Display > Sleep timer): Time from last activity (touchscreen or button presses)
until your NOOK sleeps. During sleep, a screensaver picture is displayed on the main screen. The
touchscreen backlight will already be unlit. You can choose among 2, 5 (default), 10, 15, and 20
minutes.
•
Touchscreen timer (Display > Touchscreen timer): Time from last touchscreen activity until
touchscreen backlight is turned off. You can choose among 10, 30 (default), and 60 seconds.
•
Owner and NOOK names (Device > Edit your profile): You can specify your name and your
NOOK’s name. Tap settings > Device > Edit profile, fill in the form, and tap Submit. The name
of your NOOK is displayed in the status bar on the Home screen and on the Settings summary
page. If you specify only your name, that is used to name your NOOK (for example, Jeff ’s
NOOK).
NOOK User Guide
Personalizing your NOOK
72
The Daily
The Daily is a bulletin-board style message center. You automatically receive daily editorial content
and notifications.
Read The Daily by tapping the daily on the Home menu:
the daily
When you visit The Daily, your NOOK retrieves up-to-date information from the data service,
unless it has already done so within the last 3 hours.
Message Types
The Daily lists four kinds of messages:
•
Feeds: Also referred to as blogs, these are short pieces of writing.
•
Notifications: Notifications inform you about events such as special offers and lending offers.
•
Subscriptions: Subscription messages inform you about the delivery of issues of subscriptions.
The number of new issues is displayed in a tip bubble on the Home screen.
•
Software Updates: Software update messages inform you about device software updates that
require Wi-Fi or a web download and USB transfer to your NOOK.
Tap Show and then tap the kind of messages you want to display: All (the default), Feeds,
Notifications, Subscriptions, or Software Updates.
Feeds
The Daily is where you receive issues of Barnes & Noble feeds. These include:
•
Daybook presents a digest of B&N review content and an article of the day. It can also include
this day in literature. Did you know that on December 27th, 1831 Charles Darwin set sail on
H.M.S. Beagle, a journey that he would record in The Voyage of the Beagle, and that would
provide the foundation for his writings about evolution? Writing of his stay in the Galapagos
Islands, Darwin remarks:
NOOK User Guide
The Daily
73
“I had not yet noticed by far the most remarkable feature in the natural history of this
archipelago; it is that the different islands to a considerable extent are inhabited by a different set
of beings.” He goes on to write “I never dreamed that islands, about 50 or 60 miles apart, and
most of them in sight of each other, formed of precisely the same rocks, placed under a quite
similar climate, rising to a nearly equal height, would have been differently tenanted; but we shall
soon see that this is the case.”
•
Unbound is a NOOK and B&N eReader blog. Look for daily posts on great new eReads,
bestselling eBooks, and eBook offers (including free downloads).
Notifications
Notifications include:
•
Notifications about promotions and special offers
•
Notifications about the expiration of the trial period for subscriptions
•
Notifications about offers from friends to lend you books. The number of lending offers is
displayed in a tip bubble on the Home screen.
•
Notifications regarding your NOOK or account
Procedures for The Daily
Following are procedures for The Daily:
To open The Daily and view messages:
On the Home menu, tap the daily. Your NOOK communicates with the data service and retrieves
up-to-date information.
To read an issue of a feed:
Navigate to the issue of the feed using the Up and Down buttons, and the Next Page and Previous
Page buttons if the issue is on a different page. Then tap Select. If the issue is longer than one page,
use the Next Page and Previous Page buttons to turn pages. (You cannot swipe your finger to turn
pages.) To return to The Daily, tap the Back button.
To read an issue of a periodical:
Navigate to the periodical issue using the Up and Down buttons, and the Next Page and Previous
Page buttons if the issue is on a different page. Then tap Select. If the periodical issue has already
NOOK User Guide
The Daily
74
been downloaded, it opens in the Reader. If it has not been downloaded, tap Download. After the
issue downloads, tap Read.
To filter items:
Tap Show and then tap the kind of messages you want to display: All (the default), Feeds,
Notifications, Subscriptions, or Software Updates.
To sort items:
Tap Sort by and then tap a sorting order: Most Recent (the default), Type, or Author.
To view details for an item:
Navigate to the item using the Up and Down buttons, and the Next Page and Previous Page buttons
if the item is on a different page. Then tap Select.
To act on a notification:
Navigate to the notification using the Up and Down buttons, and the Next Page and Previous Page
buttons if the notification is on a different page. Then tap the menu choice for the intended action,
for example, Yes, Borrow This.
NOOK User Guide
The Daily
75
Shop
Your NOOK’s wireless connectivity lets you shop for eBooks, magazines, and newspapers from the
Barnes & Noble eBookstore from your NOOK. There is no need to visit a website. You can buy
subscriptions to magazines and newspapers, or single issues.
What you buy is delivered to your online digital library immediately and downloaded to your NOOK
within about a minute. For a subscription, the current issue is delivered and downloaded.
For the NOOK (Wi-Fi + 3G model), downloads of very large eBooks, periodicals, and
magazines require a Wi-Fi connection.
Enter the Shop by tapping shop on the Home menu:
shop
You can browse and search in the Shop on an unregistered NOOK. You just can’t buy anything. If
you try to buy something from an unregistered NOOK, your NOOK will prompt you to register.
Shopfront
The first page of the Shop is the shopfront. It is a navigable page with three parts:
•
Content types (eBooks, Magazines, and Newspapers) allow you to browse items of each
content type. Within a content type, you can browse subjects, for example, Romance and
Historical Fiction.
•
Collections contains lists of content, such as Bestsellers and New Releases.
•
A merchandising area at the bottom of the reading screen displays B&N corporate
promotions such as special offers. When you are in a Barnes & Noble Bookstore, the
merchandising area also displays in-store special offers (look for More in Store). The
merchandising area can span several pages. Use the Next Page and Previous Page buttons to
turn pages.
NOOK User Guide
Shop
76
Magazines and Newspapers
You can purchase subscriptions to magazines and newspapers, as well as single issues. Issues
delivered by subscription and single issues have the same content. They are digital versions of the
magazines and newspapers that are delivered by Barnes & Noble to your NOOK. They differ from
print versions of the magazines and newspapers, and from web versions that are in some cases
available directly from publishers. For example, advertisements are not present.
Barnes & Noble subscriptions and web subscriptions are different. Purchasing one does not get you
the other.
Issues of periodicals purchased singly and delivered by subscription behave differently in your
library. For more information, see “Managing Periodical Issues” on page 106.
Indicators
Items in the Shop can have the following indicators displayed:
An item that can be pre-ordered but that is not yet available
An item that has been available for purchase for less than one month
An eBook that can be lent
Occasionally, you will see items in the Shop that are displayed in gray. These items are in the Shop’s
catalog but for some reason are not currently available. You can check the BN.com website for
more information.
Browsing the Shop
You can browse the Shop to look for content. In any list of content, you can also sort and filter the
list, to make it easier to find what you are looking for.
To browse a content type or collection:
1 Navigate up and down the shopfront with the Up and Down buttons. When you reach the area
you want to browse, tap Select.
2 Navigate to an item using the Up and Down buttons, and the Next Page and Previous Page
buttons if the contents of the area fill more than one page.
3 Tap Select to view details about an item. From the details page, you can act on the item (for
example, you can purchase it).
NOOK User Guide
Shop
77
To browse subjects:
1 From the shopfront, select one of the content types—eBooks, Magazines, or Newspapers.
2 Tap Browse subjects and then tap a subject.
3 Within a subject, there might be subordinate subjects. If so, you will see the Browse subjects
menu, and can tap Browse subjects and make another choice.
To browse the merchandising area:
1 Navigate from page to page of the merchandising area using the Next Page and Previous Page
buttons.
2 If an item in the merchandising area can be selected, View Promotion appears in the menus. Tap
View Promotion.
Alternatively:
1 Navigate from page to page of the merchandising area using the Next Page and Previous Page
buttons.
2 Move the highlight to the merchandising area using the Down button.
3 Tap Select to select an item in the merchandising area. This displays details about the item. From
the details page, you can act on the item (for example, you can purchase it). In some cases,
choosing an item in the merchandising area performs a search and displays matching items, for
example, all books by a specific author.
Searching the Shop
From the Shop on your NOOK you can search the Barnes & Noble eBookstore for eBooks,
newspapers, and magazines that can be downloaded to your NOOK. You cannot search for printed
books, digital audiobooks, NOOKs, or accessories. For those, visit the BN.com website or a Barnes
& Noble Bookstore.
The search looks for items with all of the search words in any of the following metadata fields:
•
Title
•
Contributors
•
Author
•
Publisher
•
Subject
No matter where you are in the Shop, a search is throughout the entire Shop.
NOOK User Guide
Shop
78
To search the Shop:
1 In the Shop, tap Search.
2 Use the keyboard to enter one or more search words in the form.
3 Tap Search. Your NOOK performs the search.
4 To return to the Shop, tap the Back button.
Result Lists
When a search completes, your NOOK displays the items that matched your search criteria. If no
items matched, a message indicates that.
Navigate up and down the search results list with the Up and Down buttons. Turn pages in a multipage list using the Next Page and Previous Page buttons. Tap Select to select an item.
Browsing a Gallery of Covers
When browsing a content type or collection, or when displaying a list of search results in the Shop,
you can browse a gallery of covers on the touchscreen.
To use the gallery of covers:
1 On the Home menu, tap shop.
2 Navigate to the part of the Shop where you want to browse covers. You can browse covers
for any list of content: a content type (for example, eBooks), a collection (for example, Best
Sellers), or a subject (for example, Children’s Books). Alternatively, tap Search, enter search
words, and tap Search to find items that match the search words.
3 Tap Show Covers. The cover for the item that is highlighted on the reading screen is in the
center.
4 Swipe your finger to the left and right to browse through the covers. If your finger is still moving
when you lift it, covers continue to move briefly (the “throw” gesture). Tap a cover to center
it in the gallery. As you move through the gallery, the reading screen is updated to highlight the
item in the center of the gallery. You can also use the Next Page and Previous Page buttons
NOOK User Guide
Shop
79
to move through the paginated list. In this case, the covers on the touchscreen are updated to
correspond to the new pages.
5 Tap the cover in the center of the gallery to select the item and display item details. From the
item details, you can tap Buy for $n.nn or Get a free sample, amongst other choices.
To close the gallery of covers:
Tap the
in the upper right corner of the touchscreen.
Viewing Item Details
You can view details about the items in the Shop.
To view item details:
In the Shop, when you navigate to and select an item, your NOOK displays a page with detailed
information about the item.
From that page, you can:
•
Tap View > Overview to view a synopsis of the item, as well as information about the author if
available. If the overview is longer than a page, use the Next Page and Previous Page buttons to
turn pages.
•
Tap View > Editorial reviews to view editorial reviews.
•
Tap View > Reader reviews to view reader reviews.
•
Tap View > Product details to view all of the data about the item, for example, the ISBN,
publisher, number of pages, etc.
Password Protection for Purchases
You can configure your NOOK to require entry of the Barnes & Noble account password when
making a purchase. By default, you do not need to enter a password. For information, see
“Requiring an Account Password for All Purchases” on page 182.
Making Purchases
Making purchases in the Shop is simple. The process described here applies to eBooks and
periodicals, to content that costs money and that is free.
NOOK User Guide
Shop
80
To make a purchase:
1 On the Home menu, tap shop.
2 Browse to or search for content:
Use the Browse and Collections menus and navigation buttons (Up, Down, and Select) to
browse content types and collections. In a content type, you can also Browse subjects.
Or use the Search menu to search for what you want. Details on browsing and searching follow
this section.
3 Tap Select to select the item you want to buy. Your NOOK displays a detail page for the item
that includes pricing information.
4 Tap Buy for $amount.
5 Tap Buy Now to confirm your purchase. The item is immediately delivered to your online digital
library and downloaded to your NOOK.
6 If you are prompted to enter the password for your Barnes & Noble online account, type the
password and tap Submit.
7 Tap OK to dismiss the message about a successful purchase.
8 To read what you just bought, go to the My B&N Library section of your library, navigate to the
item, and tap Select. If the item has not been downloaded to your NOOK, your NOOK displays
item details when you tap Select. Tap Download. When the item has finished downloading, tap
Read.
Payment
Payment for purchases occurs as follows:
•
eBooks and single issues of periodicals, including eBook pre-orders: If you have a
gift-card balance, the purchase is charged to your gift card, with any remainder being charged to
your default credit card. If you do not have a gift-card balance, the purchase is charged to your
default credit card. The charge is processed when the purchase is made.
•
Periodical subscriptions: The first monthly charge is charged to your default credit card
on the 15th calendar day after the purchase is made. There is a 14 day free trial. For example,
for a subscription purchased on March 1st, the free trial is March 1st through 14th, and your
credit card is charged on March 15th. Subsequent monthly charges are charged to your default
credit card on the same day of the month (or the last day for a shorter month), the 15th of
each month in this example. A subscriptions continues, and you are charged, until you cancel
the subscription. If you cancel a subscription, you will receive a prorated refund to your default
credit card, based on the number of remaining issues in the billing period.
NOOK User Guide
Shop
81
Orders
From your NOOK you can make the following kinds of orders:
eBook
Purchase
Pre-order
Download free item
Download free sample
Free trial period
Yes
Yes
Yes
Yes
No
Periodical single
issue
Yes
No
No
No
No
Periodical
subscription
Yes
No
No
No
Yes
Ordering from your NOOK
Note the following about ordering from your NOOK:
•
Your NOOK must be registered. If you try to order content from an unregistered NOOK, you
will be asked to register.
•
Only customers with billing addresses in the United States, U.S. territories, and Canada can
purchase digital content. It cannot be purchased by customers with International or APO/FPO
(Army Post Office / Fleet Post Office) billing addresses.
•
Only customers with billing addresses in the United States and Canada can pre-order eBooks.
Pre-orders cannot be placed by customers with International, U.S. territory, or APO/FPO billing
addresses.
•
You can only purchase or pre-order digital content when physically within the United States,
American Samoa, Guam, Puerto Rico, Palau, the U.S. Virgin Islands, and Canada. When you
travel outside of these areas, you can download digital content to your NOOK that you have
already purchased (if you have a Wi-Fi connection), but you cannot buy digital content. An
exception to this is free eBook samples, which can be purchased from anywhere there is
supported Wi-Fi connectivity.
•
Some items are not available for purchase in Canada.
•
Purchases made from your NOOK are charged to your default credit card, or gift card and
default credit card, as explained in “Payment” on page 81.
•
If your default credit card has expired when you try to order an item (including a free eBook),
you will be asked to update the expiration date. Go to www.nook.com/account to update the
expiration date.
•
Have you ever bought a book twice? I have. Your NOOK prevents you from ordering content
that you have previously ordered.
NOOK User Guide
Shop
82
Pre-Ordering eBooks
You can pre-order eBooks that are not currently available, but that will be available soon. When the
eBook becomes available, it is delivered to your online digital library, you are charged for it, and you
receive a notification in The Daily that it is available.
You can only pre-order eBooks if you have a billing address in the United States or Canada. You
cannot pre-order eBooks if you have an international, U.S. territory, or APO/FPO (Army Post
Office / Fleet Post Office) billing address. You can only pre-order digital content when physically
within the United States (including Alaska and Hawaii), American Samoa, Guam, Puerto Rico, Palau,
the U.S. Virgin Islands, and Canada. Some items are not available for purchase in Canada.
Ordering Periodicals
For periodicals, you can purchase a single issue or a subscription:
•
When you purchase a single issue, the current issue is delivered and downloaded to your
NOOK.
•
When you purchase a subscription, you begin a 14-day free trial period. The current issue is
delivered and downloaded to your NOOK. On the 15th day, your default credit card is charged.
•
You cannot order back issues of periodicals, or begin subscriptions in the past.
•
You cannot pre-order periodical issues or subscriptions.
Downloading Free eBooks
When you view item details for an eBook and the eBook is free, you “purchase” it just as you
would for an eBook that costs something. The only difference is that there is no charge.
Downloading Free Samples
Some eBooks have a free sample you can download. The free sample is typically the first part of the
book.
If there is a free sample for an eBook, Get free sample is a choice in the menus. If you have already
downloaded the free sample, you cannot download it again (you don’t need to).
If you own an eBook, including one that is currently lent to a friend, you cannot download the free
sample.
Free Trials for Periodicals
When you purchase a subscription to a periodical for the first time, you automatically get a 14-day
free trial.
NOOK User Guide
Shop
83
During the free trial period, your credit card is not charged. During the free trial period, you can
cancel your subscription and you will not be charged. If you cancel the subscription, you cannot
restart the free trial (but you can purchase the subscription).
If you do not cancel your subscription during the free trial period, you will continue to receive
issues and you will be charged for the subscription.
Content Delivery
eBooks and just-purchased issues of periodicals are delivered to your online digital library
immediately.
Subsequent issues of periodicals are delivered to your online digital library once a day between 2
AM and 5 AM local time, approximately.
Pre-ordered eBooks are visible in your on-line digital library but are not available for download.
eBooks that you borrow are delivered when you accept the lending offers.
Late Deliveries
Has content you expected not arrived? Perhaps it is late. We hope content is never late, but we
also live in the real world. If content has not arrived, other possible explanations include:
•
Your NOOK was off when the delivery attempt was made.
•
A content-delivery server went down.
When B&N is able to deliver the content, we will. And you will receive a notification about its
delivery.
New Content
For new content, including purchases and current issues of subscriptions:
•
The content is delivered to your online digital library.
•
New content is flagged in the library with a
you read an item.
•
A notice about the content delivery is sent to your NOOK. You can view it in The Daily.
•
Some content is automatically downloaded to your NOOK. For other content, you must request
a download.
NOOK User Guide
indicator. The indicator is removed when
Shop
84
eWish List
Your eWish list is a list of books, magazines, and newspapers you would like to read. When a friend
recommends a book, add it to your eWish list. While searching for the book you are buying today,
you found others that intrigue you? Add them to your eWish list. You can revisit them later, and
decide whether you want to buy them. Are you over budget for book purchases this month? Well,
there is always next month, or your birthday. Add them to your eWish list.
Your eWish list is associated with your online digital library. It is the same eWish list as
the one on the Barnes & Noble.com website. To manage your eWish list on the website,
choose My B&N > Visit your eBooks library > View your eBooks Wish List.
To view your eWish list:
In the top-level menu for the Shop, tap My eWish List.
To add an item to your eWish list:
Navigate to the item in the Shop and tap Select to view item details. Then tap Add to eWish list.
To remove an item from your eWish list while viewing your eWish list:
1 In the top-level menu for the Shop, tap My eWish List.
2 Navigate to the item you want to remove from your wish list, and then tap Remove from eWish
list.
To remove an item from your eWish list while viewing the item:
Navigate to the item in the Shop and tap Select to view item details. Then tap Remove from eWish
list.
To buy an item on your eWish list:
1 In the Shop, tap My eWish List to view your wish list.
2 Using the Up and Down buttons, navigate to the item you want to buy and tap Select. Your
NOOK displays details for the item.
3 Tap Buy.
4 Tap Buy Now to confirm your purchase. The item is immediately delivered to your online digital
library and downloaded to your NOOK.
5 If you are prompted to enter the password for your Barnes & Noble online account, type the
password and tap Submit.
NOOK User Guide
Shop
85
6 Tap OK to dismiss the message about a successful purchase.
7 To read what you just bought, go to the My B&N Library section of your library, navigate to the
item, and tap Select. If the item has not been downloaded to your NOOK, your NOOK displays
item details when you tap Select. Tap Download. When the item has finished downloading, tap
Read.
NOOK User Guide
Shop
86
In-Store Experience
Special things are in store for you when you visit a Barnes & Noble Bookstore with your NOOK:
•
You receive information on local events, unique content, special offers, and coupons.
•
You can read many eBooks for free, for up to one hour per eBook per day.
Your Barnes & Noble Bookstore also has NOOKs, NOOK accessories, and paperback and hardback
books, magazines, and newspapers.
Welcome
When you enter a Barnes & Noble Bookstore, your NOOK automatically connects to a Barnes &
Noble Wi-Fi hotspot so you can access the eBookstore. It also displays a welcome message that
alerts you to in-store content.
in
st
or
e
When you are in a Barnes & Noble Bookstore, the shop button on the Home menu has an in store
badge:
shop
If you are in a Barnes & Noble Bookstore and the shop button does not have an in store badge,
check that Airplane mode is off and Wi-Fi is on.
Shopfront
In a Barnes & Noble Bookstore, More in Store is added to the merchandising area of the Shop on
your NOOK. It includes in-store offers and announcements.
All NOOKs, whether registered or not, display the welcome message and add More in
Store to the merchandising area. To be able to make purchases or read an eBook for free,
your NOOK must be registered.
NOOK User Guide
In-Store Experience
87
Read in Stores
You can read many eBooks in a Barnes & Noble Bookstore free of charge. Read a specific eBook
for a maximum of one hour every calendar day.
The time period of one hour is of active reading. After two minutes of not turning a
page (and not going to different parts of the eBook using the Go to menu), your NOOK
stops the clock, and starts it again when you resume actively reading. For example, if you
read an eBook for half an hour, then go out for lunch, and return to the store to read,
about 28 minutes of reading time for the eBook will remain today.
Several restrictions apply to reading free content:
•
Read in Store is only available on registered NOOKs.
•
Read In Store is limited to eBooks.
•
Reading time is limited to one hour per calendar day.
•
You cannot save or archive free content. At the end of the hour or when you leave the store, it
will no longer be available. You can read it another time (tomorrow or later).
•
You cannot bookmark, highlight, or annotate free content.
•
You cannot change the font or text size while reading free content.
The eBooks that you have read in stores are available in the Recently Read In Store menu in the
Shop, with the most recently read eBooks at the top.
To read an eBook in a store:
1 Go to a Barnes & Noble Bookstore.
2 On the Home menu, tap shop.
3 Browse to or search for an eBook that you want to read in the store and tap Select. If the
eBook can be read in the store, Read in Store is among the menus. If Read in Store is not in the
menus, you cannot read the eBook in the store (unless you buy it).
4 Tap Read in Store. Your NOOK displays the eBook in the Reader. Not all reader features are
available.
To browse recent in-store reading:
1 On the Home menu, tap shop.
2 Tap Recently Read In Store. The next level of menus lists the eBooks that you have read in
Barnes & Noble Bookstores.
NOOK User Guide
In-Store Experience
88
3 Tap an eBook to display item details and menus with actions such as Read in Store, Buy, and Get
free sample.
To buy an eBook you are reading in a store:
While reading an eBook in a store, Buy is a menu option. Tap Buy to buy the eBook. At the end of
the one-hour reading period, a message is displayed and you can also buy the eBook.
NOOK User Guide
In-Store Experience
89
Library
Your library is where all of your eBooks, magazines, and newspapers reside. Enter your library by
tapping my library on the Home menu:
my library
Your library has two sections:
•
My B&N Library (tap my library > Go to My B&N Library) provides access to the eBooks,
magazines, and newspapers that you have purchased from the Barnes & Noble eBookstore,
including purchases made from your NOOK and on the BN.com website. You have a unified
view of the B&N digital content on your NOOK and in your online digital library. You can show
or hide archived B&N content, that is, content that is in your online digital library but not on
your NOOK.
•
My Documents (tap my library > Go to My Documents) provides access to your personal
eBooks and periodicals in EPUB, PDB, and PDF formats.
You can create shelves to organize the items in your library. Shelves span the two sections of your
library. For that procedure, see “Organizing Your Library” on page 95.
My B&N Library
My B&N Library is the section of your library that stores your B&N content, including eBooks and
issues of magazines and newspapers. You select content to read from your library. You can also
lend and rate content from the My B&N Library section of your library.
Digital content in My B&N Library is in one of two states:
•
Local and online: This content has been purchased, delivered to your online digital library, and
downloaded to your NOOK.
•
Online only: This content has not yet been downloaded to your NOOK (through automatic
synchronization or request), or has been but has subsequently been archived, which removes
the copy from your NOOK.
By default, My B&N Library on your NOOK shows you all B&N content in both your online digital
library and on your NOOK. You can choose to hide content that is only in the online digital library.
NOOK User Guide
Library
90
Previously Purchased Content
If you purchased content before registering your NOOK, this is what happens with it:
•
eBooks purchased from BN.com are automatically delivered to your online digital library a short
time after you register your NOOK.
•
The five most recently purchased eBooks that were purchased from BN.com within the 30 days
prior to registering your NOOK are automatically downloaded to your NOOK.
•
Other eBooks purchased from BN.com are not automatically downloaded to your NOOK. You
can download them manually from My B&N Library (select an item and tap Download), or just
leave them in the online digital library. They will be there to download in the future.
•
eBooks not purchased from BN.com, including those from Fictionwise and eReader.com,
are not delivered to your online digital library or downloaded to your NOOK. You can copy
these eBooks from your personal computer to your NOOK using USB. They will be in the My
Documents section of your library.
•
The current issue of a periodical subscription is automatically downloaded to your NOOK.
•
Individually purchased issues of periodicals are automatically downloaded to your NOOK.
Indicators
Items in My B&N Library can have the following indicators displayed:
An item that has been delivered to your online digital library within the
previous 48 hours and that you have not read
An eBook sample
An eBook that you can lend
An eBook that you have lent to a friend
An eBook for which there is a lending offer from a friend
An eBook that is borrowed from a friend
An eBook that you pre-ordered but is not yet available
on page X of Y
For items you are reading, the current reading page is displayed after the
author’s name. This is the current reading page in the item on your NOOK. If
you are saving the current reading page on BN.com, a different current reading
page might have been saved on BN.com. For information, see “Synchronizing
Reading Across Devices” on page 127.
Archived items (items that are in your online digital library but that are no longer on your NOOK
because they have been archived) are indicated by being displayed in gray, if archived items are
shown.
NOOK User Guide
Library
91
Reading Something
To read something in My B&N Library:
1 On the Home menu, choose my library.
2 If you are viewing My Documents, tap Go to My B&N Library.
3 Navigate to what you want to read. Browse to the item you want to read, or search and then
browse. Flip pages in the list using the Next Page and Previous Page buttons. Move the selection
indicator up and down on the reading screen and from page to page using the Up and Down
buttons. Details about choosing something to read are in “Finding What You Want to Read in
My B&N Library” on page 99.
4 Tap Select. If the item has already been downloaded, it opens in the Reader. If it has not been
downloaded, tap Download. After the item downloads, tap Read.
5 Read is also a choice if you are viewing item details. Navigate to the item, tap Item details &
options, and then tap Read.
Library Synchronization
Immediately after registration, your NOOK downloads a local copy of the catalog from your online
digital library. It uses this catalog copy when searching your library. Your NOOK keeps the local
catalog in sync with the online catalog.
Your NOOK also synchronizes the current reading position, so that you can return to the page you
are reading across multiple devices.
Library synchronization occurs:
•
Once every three days between 2:00 AM and 6:00 AM. If you subscribe to periodicals, the
morning synchronization happens daily.
•
When you buy something in the Shop
•
When you send, accept, or reject a lending offer
•
When a Wi-Fi connection is established and it has been 12 or more hours since the last library
synchronization
•
When your NOOK powers on from fully off
•
When you tap Check for new B&N content in your library.
If you want to be sure that the My B&N Library information on your NOOK is up-to-date,
tap Check for new B&N content.
NOOK User Guide
Library
92
Downloading Content
To download content from your online digital library:
•
Your NOOK must be registered.
•
Your NOOK must have established a wireless connection.
For the NOOK (Wi-Fi + 3G model), downloads of very large eBooks, periodicals, and
magazines require a Wi-Fi connection.
When you download DRM-secured content that was purchased from your NOOK or on the
BN.com website, it is encrypted using your first and last name and default credit card number.
Usually, you do not need to enter this information to open DRM-secured content. In rare
circumstances, you might have to enter this information.
If you transfer DRM-secured content to your NOOK using USB, you must enter your first and last
name and default credit card number the first time you open digital content secured with a specific
name and credit card. You only need to enter the information one time, not for every eBook.
Automatic Downloads
eBooks, just-purchased single issues of periodicals, and current issues of subscriptions are
downloaded to your NOOK automatically after delivery to your online digital library. Just-purchased
content should be available on your NOOK a minute or two after you purchase it.
eBooks you borrow are also downloaded immediately following delivery to your online digital
library.
Manual Downloads
In several cases, you might need to manually download digital content:
•
If you have previously purchased digital content, and it was not automatically downloaded to
your NOOK, according to the rules in “Previously Purchased Content” on page 91
•
If you have subscribed to a periodical, and your NOOK has not been able to automatically
download current issues (for example, if you were travelling outside areas with connectivity)
•
If you unregister and re-register your device to the same Barnes & Noble online account
•
If you archive content. How to unarchive content is explained in “Unarchiving B&N Digital
Content” on page 105.
•
If your NOOK automatically deleted content when My B&N Library was approaching full
You can download content from your online digital library to your NOOK an unlimited number of
times.
NOOK User Guide
Library
93
If you cannot download recently purchased content, some problem might have occurred
during the purchase process. Check notifications in The Daily to see if there is a problem.
For DRM-secured content, the default credit card used to secure the content is the one that is
current when you download the content. In general, you will not need to enter the credit card
information.
To manually download content:
1 On the Home menu, tap my library.
2 If you are viewing My Documents, tap Go to My B&N Library.
3 Navigate to the content item you want to download.
4 Tap Select.
5 Tap Download.
Download Retries
If an automatic or manual download fails, for example, because of wireless connectivity problems,
your NOOK retries the download several times over several minutes. If after three minutes, the
download has not succeeded, wait a few more minutes and then try a manual download request.
Checking for New Content in Your Online Digital Library
When you shop from your NOOK, and when issues of magazines and newspapers are delivered to
your NOOK, they appear in your library on your NOOK. You do not need to check for them.
When you buy eBooks from the BN.com website, they are delivered to your online digital library,
but they are not automatically delivered to your NOOK. The library on your NOOK is not updated
immediately to list the new items. The library is updated every morning, when your NOOK checks
for new issues of periodicals.
If you have purchased eBooks online and do not see them in My B&N Library, you can instruct your
NOOK to check for new content in your online digital library.
This requires a wireless connection.
Other reasons that you might not see content that you expect to see are:
•
Content might not have been delivered yet.
•
Older issues of periodicals might have been automatically deleted.
NOOK User Guide
Library
94
•
Content might have been archived (deleted from your NOOK but kept in your online digital
library) and the archived items are hidden. Tap Change view > Show archived items to show
archived items.
To check for new content in your online digital library:
1 On the Home menu, tap my library.
2 If you are viewing My Documents, tap Go to My B&N Library.
3 Tap Check for new B&N content.
Organizing Your Library
This section applies to both sections of your library (My B&N Library and My Documents), with
differences noted.
You can place the items in your library on shelves that you create. For example, you might want
to create SCIENCE FICTION and ROMANCE shelves. Or you could place your favorite eBooks on a
FAVORITES shelf. Before being placed on a shelf, items are unshelved.
Shelves span the two sections of your library (My B&N Library and My Documents). When
you create, re-order, or delete a shelf, that action effects both sections of your library.
Items place on a shelf remain in one section of your library or the other.
Shelf names are displayed on the reading screen in all uppercase letters above the items on the
shelf, for example, CLASSICS and FANTASY here:
Note the following about shelves:
•
You can shelve eBooks, newspapers, and magazines.
NOOK User Guide
Library
95
•
(My B&N Library) For issues of newspapers and magazines, whether purchased as single issues
or by subscription, the issue you place on a shelf remains on the shelf. For newspapers and
magazines delivered by subscription, the most recently delivered issue is not placed on the shelf
automatically. Shelved issues of newspapers and magazines are still subject to automatic deletion
unless you archive them.
•
You can place a single item on multiple shelves, if that helps you to organize your B&N library.
For example, you could create both SCIENCE FICTION and SCI-FI CLASSICS shelves. You could
place The War of the Worlds by H.G. Wells on both shelves.
•
When you first create a shelf, it is displayed at the beginning of your B&N library. You can
change the order of shelves. After all of your shelves, your NOOK displays unshelved items
under the heading UNSHELVED.
•
You can show or hide the shelves.
When the shelves are hidden, all items in your library (or for My B&N Library a subset based on
the Change view > Show choice, for example, eBooks) are displayed in the chosen Change view
> Sort by order.
When the shelves are shown, the items on each shelf (or for My B&N Library a subset based on
the Change view > Show choice, for example, eBooks) are displayed in the chosen Change view
> Sort by order. Unshelved items are displayed last (also subject to the Change view > Show
and Change view > Sort by choices).
•
You can create, reorder, rename, and remove shelves.
•
You can go to a shelf. This takes you to the start of the shelf; it does not re-order shelves.
•
Shelf names can contain any letters, numbers, special characters, and spaces. Shelf names are
not case sensitive and are displayed in entered case in the menus and in uppercase on the
reading screen. For example, you could create the shelf “Science Fiction,” “Science fiction,”
“science fiction,” or “SCIENCE FICTION.” The shelf would be displayed as entered in the menus
and as “SCIENCE FICTION” on the reading screen.
•
Shelf names are limited in length to 36 characters.
•
Removing a shelf does not remove or delete the items on it. They remain in your library, but
become unshelved, or remain on other shelves if you have placed them on more than one shelf.
•
If you unregister your NOOK and re-register it (to the same Barnes & Noble online account or
a different one), information about shelves and the shelving of items in your B&N library is not
retained.
Managing Shelves
You can create, reorder, rename, and remove shelves.
NOOK User Guide
Library
96
Before managing shelves, you might want to show them if they are hidden. Tap Change
view > Show shelves.
To create a shelf:
1 On the Home menu, tap my library.
2 You can create a shelf from either section of your library. Optionally, tap Go to My Documents
or tap Go to My B&N Library to change to the other section.
3 Tap Manage shelves > Create a new shelf.
4 Type the name of the new shelf, and then tap Submit.
To reorder shelves:
1 On the Home menu, tap my library.
2 You can reorder shelves from either section of your library. Optionally, tap Go to My
Documents or tap Go to My B&N Library to change to the other section.
3 Tap Manage shelves > Reorder shelves. On the reading screen, you will see a list of your shelves
in the current order, with the first shelf highlighted.
4 To move the highlighted shelf up, tap Move this shelf up. To move the highlighted shelf down,
tap Move this shelf down.
5 To choose a different shelf, tap the Up and Down arrows.
6 When you have finished reordering shelves, tap the Back button.
To rename a shelf:
1 On the Home menu, tap my library.
2 You can rename a shelf from either section of your library. Optionally, tap Go to My Documents
or tap Go to My B&N Library to change to the other section.
3 Tap Manage shelves > Rename shelf, and then tap the shelf you want to rename.
4 Type the new name of the shelf, and then tap Submit.
To remove a shelf:
1 On the Home menu, tap my library.
2 You can remove a shelf from either section of your library. Optionally, tap Go to My Documents
or tap Go to My B&N Library to change to the other section.
3 Tap Manage shelves > Remove shelf, and then tap the shelf you want to remove.
NOOK User Guide
Library
97
4 Tap OK to confirm that you want to remove the shelf.
Placing Items on and Removing Them from Shelves
To start with, all items in your B&N library and My Documents are unshelved (not on a specific
shelf ). After you create one or more shelves, you can place items in your library on them. You can
also remove items from shelves.
Unlike a physical book, you can place a digital item (eBook, newspaper, or magazine) on
more than one shelf, if that helps you to organize items. For example, you could create a
FANTASY shelf and a WIZARDS shelf, and put books that feature wizards on both shelves.
To place an item on or remove it from a shelf or shelves:
1 On the Home menu, tap my library.
2 Go to the section of your library that contains the item you want to shelve.
3 Tap Manage shelves > Place on or remove from shelf.
4 Using the Up and Down arrows, navigate to each item in your B&N library that you want to
place on a shelf or unshelve. The item is highlighted on the reading screen.
5 Tap a shelf or shelves as follows. If a scroll bar is present, scroll the menus to see all of the
shelves.
•
The item is already on every shelf that has a check mark on the menu. To remove the item
from that shelf, tap the menu and the check mark disappears.
•
The item is not already on a shelf without a check mark on the menu. To add the item to a
shelf, tap the menu and a check mark appears.
6 Repeat steps 4 and 5 for all of the items that you want to shelve or unshelve.
7 When you have finished shelving and unshelving items, tap the Back button. You are returned to
the beginning of your library with shelves shown.
Going to a Shelf
Shelves are in the order in which you arrange them. There are two ways of going to a shelf:
•
By paging through your library
•
By going directly to the shelf. Tap Manage shelves > Go to shelf, and then navigate to and tap
the shelf name.
NOOK User Guide
Library
98
Showing and Hiding Shelves
You can show or hide shelves. Shelves are shown by default.
To show shelves:
1 On the Home menu, tap my library.
2 If you are viewing My Documents, tap Go to My B&N Library.
3 Tap Change view > Show shelves.
Shelves are also shown automatically after you place items on or remove them from shelves.
To hide shelves:
1 On the Home menu, tap my library.
2 If you are viewing My Documents, tap Go to My B&N Library.
3 Tap Change view > Hide shelves.
Finding What You Want to Read in My B&N Library
There are several ways to find what you want to read in the My B&N Library section of your
library:
•
You can browse, turning from page to page with the Next Page and Previous Page buttons.
•
You can filter by content type, for example, to show only eBooks or newspapers.
•
You can sort your library, for example, by title or author.
•
You can search for one or more words, for example, for words in the title or the author’s name.
You can filter the search results by content type.
•
You can browse a gallery of covers. For information, see “Browsing a Gallery of Covers” on
page 102.
•
You can place items in your B&N library on shelves. For more information, see “Organizing Your
Library” on page 95.
Browsing My B&N Library
Digital content in My B&N Library is displayed as a paginated list. The order of items in the list is
determined by the value of Change view > Sort by and whether or not shelves are used.
When the content type is not filtered, the top-level list contains:
NOOK User Guide
Library
99
•
eBooks
•
The most recent issues of periodicals, whether purchased singly or delivered by subscription
•
All singly purchased issues of periodicals
For periodicals, an additional paginated list displays all issues of a periodical.
To browse My B&N Library:
1 On the Home menu, tap my library.
2 Browse up and down the list using the Up and Down buttons.
3 Move from page to page using the Next Page and Previous Page buttons. If you are on the last
item on a page, you can tap the Down button to turn to the next page. If you are on the first
item on a page, you can tap the Up button to turn to the prior page.
To browse all issues of a periodical in My B&N Library:
Only the most recent issue of a periodical is visible in the top-level paginated list in My B&N Library.
This is true for singly purchased issues and issues delivered by subscription. To view all issues:
1 Navigate to any issue of the periodical in the My B&N Library section of your library.
2 Tap View older issues.
Filtering My B&N Library
You can filter the items presented when browsing and searching My B&N Library, to view all
content types (the default) or only each of the following:
•
eBooks
•
Newspapers
•
Magazines
To filter My B&N Library:
1 On the Home menu, tap my library.
2 If you are viewing My Documents, tap Go to My B&N Library.
3 (Optional) Tap Search, enter search words, and tap Search to narrow the item list by searching.
4 Tap Change view > Show and choose one of the content types: All, eBooks, Magazines, or
Newspapers.
NOOK User Guide
Library
100
5 (Optional; if you did not perform a search) Tap Change view > Sort by and choose a sorting
order: Most recent, Title, or Author.
Sorting My B&N Library
You can sort My B&N Library by:
•
Most recent. For eBooks, the date used is when the eBook was last read. If you have not
read the eBook, the date used is when the eBook was added to your online digital library. For
periodicals, the issue date is used. This is the default sorting order.
•
Title
•
Author. For eBooks, this is the author. For periodicals, it is the publisher.
If you create and show shelves, items on each shelf are sorted.
To sort My B&N Library:
1 On the Home menu, tap my library.
2 If you are viewing My Documents, tap Go to My B&N Library.
3 (Optional) Tap Change view > Show and choose one of the filtering options: All, eBooks,
Magazines, or Newspapers.
4 Tap Change view > Sort by and choose a sorting order: Most recent, Title, or Author.
Searching My B&N Library
You can search the My B&N Library section of your library. The search looks for items with all of
the terms in any of the following metadata fields:
•
Title
•
Contributors
•
Author
•
Publisher
•
Subject
To search My B&N Library:
1 On the Home menu, tap my library.
NOOK User Guide
Library
101
2 If you are viewing My Documents, tap Go to My B&N Library.
3 Tap Search.
Your NOOK displays a form on the main screen and a keyboard on the touchscreen.
4 Type the word or words for which you want to search. This is not a phrase search. The search
must match all of the words, but in any order and in any of the fields that are searched.
5 Tap Search.
Your NOOK displays a list of results that match your search. If the list is longer than one page, it
is paginated; you can navigate between pages with the Next Page and Previous Page buttons.
6 (Optional) To filter the search results by content type, tap Change view > Show and choose one
of the content types: All, eBooks, Magazines, or Newspapers.
7 To return to My B&N Library, tap the Back button.
Browsing a Gallery of Covers
In My B&N Library, you can browse a gallery of covers on the touchscreen.
To use the gallery of covers:
1 On the Home menu, tap my library.
2 If you are viewing My Documents, tap Go to My B&N Library.
3 (Optional) Tap Change view > Show and choose a content type to filter the item list by content
type.
4 (Optional) Tap Search, enter search words, and tap Search to find items that match the search
words.
5 Tap Show Covers. The cover for the item that is highlighted on the reading screen is in the
center.
6 Swipe your finger to the left and right to browse through the covers. If your finger is still moving
when you lift it, covers continue to move briefly (the “throw” gesture). Tap a cover to center
it in the gallery. As you move through the gallery, the reading screen is updated to highlight the
item in the center of the gallery. You can also use the Next Page and Previous Page buttons
NOOK User Guide
Library
102
to move through the paginated list. In this case, the covers on the touchscreen are updated to
correspond to the new pages.
7 Tap the cover in the center of the gallery to read the item. If the item has not been downloaded
to your NOOK, your NOOK displays item details. Tap Download. When the item has finished
downloading, tap Read.
To close the gallery of covers:
Tap the
in the upper right corner of the touchscreen.
Viewing Item Details for B&N Content
You can view details about the B&N content in your library.
To view item details for eBooks and periodical issues:
1 In the My B&N Library section of your library, navigate to the item for which you want to view
details.
2 Tap Item details & options.
3 Choose the details you want to view:
•
Tap View > Overview to view a synopsis of the eBook, as well as information about the
author if available. If the overview exceeds a page in length, use the Next Page and Previous
Page buttons to navigate. Item overviews are often not present for periodical issues.
Overviews for periodicals are associated with the entry for the subscription. See the next
procedure.
•
Tap View > Details to view all of the data about the eBook, for example, the publisher,
publication date, number of printed pages, EAN (an identifying number), and file size. For a
periodical issue, the publisher, publication date, EAN, and file size are listed.
To view item details for a periodical subscription:
1 In the My B&N Library section of your library, tap Search, type the name of the periodical, and
tap Search.
2 Navigate to the entry for the subscription. It is the entry that lacks a date.
3 Tap Item details & options.
4 Choose the details you want to view:
•
Tap View > Overview to view a synopsis of the periodical. If the overview exceeds a page in
length, use the Next Page and Previous Page buttons to navigate.
NOOK User Guide
Library
103
•
Tap View > Details to view data about the periodical subscription, for example, the publisher
and EAN (an identifying number).
Archiving B&N Digital Content
B&N digital content can be:
•
In your online digital library but not on your NOOK. The content has been delivered to the
online digital library but not downloaded to your NOOK.
•
In your online digital library and on your NOOK. The content has been delivered to the online
digital library and downloaded automatically or manually to your NOOK.
•
Archived. This content was previously both in the online digital library and on your NOOK, and
has now been deleted from your NOOK (and other devices associated with your account) and is
displayed in gray in My B&N Library.
Free samples and in-store content cannot be archived. Free eBooks can be archived. To delete a
sample from your NOOK, delete it from your eBook library on the BN.com website. The next time
your NOOK synchronizes, the eBook will be deleted from your NOOK.
Archiving Content
The primary use of archiving is to remove eBooks from your NOOK. They are deleted
from your NOOK but remain in your online digital library. You can also archive issues of
periodicals (including those purchased as single issues and by subscription). If you do not
archive periodical issues that are delivered by subscription, they are subject to automatic
deletion.
Archiving B&N content does three things:
•
It deletes the content from your NOOK. An eBook is retained in your online digital library.
You still own the content and retain the rights to it. A periodical issue is saved (it will not be
automatically deleted in the future) and you retain the rights to the issue. To save a copy of
a periodical issue delivered by subscription in your online digital library and on your NOOK,
archive the issue and then download it.
•
It displays the item in gray in My B&N Library, to indicate that it is not on your NOOK.
•
When other devices associated with your Barnes & Noble online account synchronize with the
online digital library, they also delete the content from the devices.
To archive content:
1 On the Home menu, tap my library.
2 If you are viewing My Documents, tap Go to My B&N Library.
NOOK User Guide
Library
104
3 Ensure that archived items are not hidden. Tap Change view:
If one of the menus reads Hide archived items, then archived items are already shown.
If the menu reads Show archived items, then tap Show archived items.
4 Navigate to the content item you want to archive. If it is grayed out, it is already archived. If it is
not grayed out, you can archive it.
5 Tap Archive.
Unarchiving B&N Digital Content
The reverse of the archiving process is accomplished by unarchiving content. When you unarchive
content:
•
The content is downloaded to your NOOK.
•
The content is displayed in black in your library.
To unarchive content:
1 On the Home menu, tap my library.
2 If you are viewing My Documents, tap Go to My B&N Library.
3 Ensure that archived items are not hidden. Tap Change view:
If one of the menus reads Hide archived items, then archived items are already shown.
If the menu reads Show archived items, then tap Show archived items.
4 Navigate to the content item you want to download. If it is grayed out, it is not on your NOOK.
If it is not grayed out, it is on your NOOK and you do not need to download it.
5 Tap Unarchive.
Showing and Hiding Archived Items
When you browse the My B&N Library section of your library, you can:
•
Show archived items: Show content that is on your NOOK and in your online digital library,
as well as content that is only in your online digital library.
•
Hide archived items: Only show content that is both on your NOOK and in your online
digital library.
NOOK User Guide
Library
105
Show archived items and Hide archived items are menu choices under Change view in the My B&N
Library section of your library.
To show archived items:
1 On the Home menu, tap my library.
2 If you are viewing My Documents, tap Go to My B&N Library.
3 Tap Change view.
4 If one of the menus reads Hide archived items, then archived items are already shown.
5 Tap Show archived items.
To hide archived items:
1 On the Home menu, tap my library.
2 If you are viewing My Documents, tap Go to My B&N Library.
3 Tap Change view.
4 If one of the menus reads Show archived items, then archived items are already hidden.
5 Tap Hide archived items.
Managing Subscriptions
You can purchase subscriptions to magazines and newspapers, as well as single issues. For more
information, see “Magazines and Newspapers” on page 77.
Note the following about managing subscriptions:
•
You can purchase a subscription to a magazine or newspaper on your NOOK (in the Shop) or
on the BN.com website.
•
Subscriptions are not visible in the library. Only issues delivered by subscription are (and any
issues purchased as single issues).
•
You can only cancel a subscription on the BN.com website.
Managing Periodical Issues
Issues of periodicals purchased singly and delivered by subscription are both present in My B&N
Library. They are presented the same:
NOOK User Guide
Library
106
•
The most recently delivered issue, whether purchased singly or delivered based on a
subscription, is at the top level of your B&N library.
•
Older issues, whether purchased singly or delivered based on a subscription, can be viewed by
tapping View older issues.
How singly purchased issues and those delivered by subscription are managed differs.
Issues of periodicals that you buy as single issues:
•
Are not automatically deleted.
•
Can be archived and downloaded again, but this is not necessary to save an issue.
Issues of periodicals delivered by subscription:
•
Are subject to automatic deletion. For more information, see “Automatic Deletion of Periodical
Issues” on page 108.
•
Can be archived and downloaded again. To save an issue delivered by subscription, you must
archive it.
To browse all issues of a periodical, ensure that archived issues are shown and tap View
older issues if that menu item is present.
When you search for a periodical, all issues of the periodical, whether purchased singly or delivered
by subscription, are returned in the search (as are other items that match the search criteria).
Search results do not indicate the status of the periodical regarding archiving. The search also
returns an entry for the subscription; it is the entry without a date. You can view an overview or
details. You can also rate the periodical.
To browse all issues of a periodical in your library:
1 On the Home menu, tap my library.
2 If you are viewing My Documents, tap Go to My B&N Library.
3 Tap Change view.
4 If one of the menus reads Hide archived items, then archived items are already shown. If not,
tap Show archived items.
5 Browse to an issue of the periodical. It can be any issue; it does not have to be the most recent
issue.
6 Tap View older issues. If this menu item is not present, then there are no older issues in the My
B&N Library section of your library.
NOOK User Guide
Library
107
Automatic Deletion of Periodical Issues
Older issues of magazines and newspapers delivered by subscription are automatically deleted from
your online digital library and NOOK, unless you archive the issues. Individually purchased issues are
not subject to automatic deletion.
The number of issues that are kept varies, depending on the frequency of delivery:
•
Daily (one or more issues per day): 10 issues
•
Weekly: 10 issues
•
Biweekly: 10 issues
•
Semi-weekly: 10 issues
•
Monthly: 12 issues
•
Bimonthly: 6 issues
•
Quarterly: 4 issues
•
Annual/Seasonal: 4 issues
If there are currently the above number of issues of a periodical, and a new issue is delivered, the
oldest issue is deleted. For example, if you have 10 issues of a weekly magazine, and an 11th is
delivered, then the oldest issue is deleted, so that 10 issues are kept.
If you have 10 issues of a weekly magazine, and you archive three, then three more issues will be
delivered without resulting in deletion of the oldest issue.
Issues delivered by subscription that are not archived are deleted automatically whether or
not they have been read.
Saving Issues of Periodicals
When you subscribe to a periodical, new issues are delivered automatically to your online digital
library, and downloaded automatically if your NOOK has a wireless connection. You can manually
download issues that your NOOK has not downloaded automatically.
Your online digital library keeps up to a specific number of issues of a periodical delivered by
subscription (explained above) and automatically deletes older issues unless you save them.
You can save any issue that you want to save, and any number of issues. To save an issue, it must
be in on your NOOK. This is because the way you save an issue is to archive it.
Saving an issue of a periodical deletes it from your NOOK, archives it in your online digital library
(thereby saving it), and deletes it from other devices, if other devices are associated with your
Barnes & Noble online account.
NOOK User Guide
Library
108
To save an issue of a periodical:
1 On the Home menu, tap my library.
2 If you are viewing My Documents, tap Go to My B&N Library.
3 Navigate to the periodical issue you want to save.
4 Tap Item details & options to view details about the issue.
5 Tap Archive.
Deleting B&N Content
The preferred method of removing B&N content from your NOOK is archiving. For
information about archiving, see “Archiving B&N Digital Content” on page 104.
This section explains what happens if you manually delete B&N content from your NOOK or from
your online digital library. It also explains one case when B&N content is deleted from your NOOK
automatically.
Manually Deleting B&N Content from Your NOOK
You can delete B&N content from your NOOK by deleting files from the my B&N downloads
folder on the NOOK drive. We do not recommend this approach.
If you do delete files from the my B&N downloads folder:
•
The items remain in your online digital library.
•
The catalog information remains on your NOOK. The deleted items are shown in black, not gray,
in your library.
•
The items are not deleted from other devices registered to the same account.
•
To read an item on your NOOK, you must download it.
Automatic Deletion of B&N Content from Your NOOK
Your NOOK automatically deletes eBooks and saved issues of periodicals if you are close to filling
up the My B&N Library section of the library on your NOOK. It deletes all eBooks and saved
periodical issues that you have not read in the last three months.
This process is not archiving. The content is not deleted from other devices associated with your
account, and the items in the library are in black, not gray.
NOOK User Guide
Library
109
Deleting B&N Content from your Online Digital Library
We recommend that you not delete B&N content. Instead, archive it, which removes the content
from your NOOK (and other devices associated with your Barnes & Noble online account) and flags
the content as archived in your library.
If you delete content from your online digital library, you cannot get it back, even by calling
customer service. By deleting the content, you no longer own it, so the only option is
to re-purchase it. Think of it in the same terms as throwing away a book. Before deleting
content from your online digital library, we recommend that you save a backup copy by
copying the item from your NOOK to your personal computer.
There is no way to just delete content from your NOOK. To free up space on your NOOK, archive
the content, which deletes it from your NOOK, deletes it from other devices associated with the
account, and flags the item as archived in your library.
If you really do want to delete B&N content, you can do so from your account (the one associated
with your NOOK) on the BN.com website.
When you delete content from your online digital library using the BN.com website:
•
It is deleted permanently from your online digital library.
•
It is deleted permanently from your NOOK and from all other devices associated with the
account.
If you save a copy of digital content before deleting it, you can copy it from your personal computer
to your NOOK using USB. Copy it to the my documents folder on your NOOK, which shows up
as the My Documents section of your library. If you copy it back to my B&N downloads, your
NOOK will delete it.
My Documents
Accessible from the library icon on the Home menu, My Documents is a view of your personal
digital content (eBooks and periodicals with file formats EPUB, PDB, and PDF). Your NOOK
supports digital reading content (for example, eBooks and periodicals) in the following formats:
•
ePub, including DRM-secured files and files without DRM
•
PDB, including DRM-secured files and files without DRM
•
PDF, including password-secured files and files that are not secured
When you eject/unmount your NOOK drive from USB (and a supplemental microSD card drive if
present), your NOOK scans for changes in content, and displays an up-to-date list in My Documents.
Where you can put your files differs for the internal memory and a supplemental microSD card:
NOOK User Guide
Library
110
•
For the internal memory, place your files in the folder my documents, or in folders under that
folder. Any hierarchy under my documents is fine. You can also place your files in other toplevel folders that you create, or in subfolders of those folders.
•
For a supplemental microSD card, place your files anywhere on the card, in any hierarchy.
When viewed from your personal computer, the files retain this organization. Your NOOK does not
move them. The My Documents section of your library is not a view of the files and folders, but of
information about the files. It is a flat view, a list. The hierarchy is not reflected in the list.
In the My Documents section of your library, you can:
•
Read documents
•
Manage shelves and place documents on shelves
•
Browse documents
•
Sort documents
•
Check for new content
•
Search for documents
•
View item details
•
Delete documents
Indicator
Items in My Documents can have the following indicator displayed:
on page X of Y
For items you are reading, the current reading page is displayed after the
author’s name.
For items in My Documents, the current reading page is not synchronized across devices.
Organizing My Documents
You can organize the items in My Documents using shelves. For more information, see “Organizing
Your Library” on page 95.
Finding What You Want to Read in My Documents
There are several ways to find what you want to read in the My Documents section of your library:
•
You can browse, turning from page to page with the Next Page and Previous Page buttons.
NOOK User Guide
Library
111
•
You can sort your library by title or author.
•
You can search for one or more words in the title or the author’s name.
To browse My Documents:
1 On the Home menu, tap my library.
2 If you are viewing My B&N Library, tap Go to My Documents.
3 Browse up and down the list using the Up and Down buttons.
4 Move from page to page using the Next Page and Previous Page buttons. If you are on the last
item on a page, you can tap the Down button to turn to the next page. If you are on the first
item on a page, you can tap the Up button to turn to the prior page.
5 (Optional) To sort the list of documents, tap Change view > Sort by and choose Most recent,
Title (the default), or Author.
To sort My Documents:
1 On the Home menu, tap my library.
2 If you are viewing My B&N Library, tap Go to My Documents.
3 Tap Change view > Sort by and choose a sorting order: Most recent, Title (the default), or
Author.
To search My Documents:
1 On the Home menu, tap my library.
2 If you are viewing My B&N Library, tap Go to My Documents.
3 Tap Search.
Your NOOK displays a form on the main screen and a keyboard on the touchscreen.
4 Type the word or words for which you want to search. This is not a phrase search. The search
must match all of the words, but in any order and in any of the fields that are searched.
5 Tap Search.
Your NOOK displays a list of results that match your search. If the list is longer than one page, it
is paginated; you can navigate between pages with the Next Page and Previous Page buttons.
6 To return to My Documents, tap the Back button.
NOOK User Guide
Library
112
To view item details for eBooks and periodicals:
1 In the My Documents section of your library, navigate to the item for which you want to view
details.
2 Tap Item details & options. Your NOOK displays limited available details about the file, possibly
including the publisher, publication date, and file path.
To read something in My Documents:
1 Browse to the item you want to read.
2 Tap Select. The item opens in the Reader.
3 Read is also a choice if you are viewing item details. Navigate to the item, tap Item details &
options, and then tap Read.
Checking for New Personal Content
Your NOOK checks for new content to display in My Documents when you choose Go to My
Documents. Unlike checking for new content in My B&N Library, this does not require a wireless
connection.
If you are in the My Documents section of your library when you transfer files to your NOOK, or
otherwise manage files on your NOOK, there is no automatic check for new content when you
disconnect from USB. Manually request that your NOOK check for new content.
To check for new personal content:
1 On the Home menu, tap my library.
2 In the My Documents section of your library, tap Check for new content.
Deleting Personal Content
If you delete content from the My Documents section of your library, you cannot get
it back. If you might want the content again, back it up to a personal computer before
deleting it. For information about managing files on your NOOK through USB from a
computer, see “Managing Files” on page 164.
To delete an item from My Documents:
1 In the My Documents section of your library, navigate to the item that you want to delete.
2 Tap Item Details & Options > Delete.
NOOK User Guide
Library
113
3 Tap OK twice to confirm the deletion.
Adobe Digital Editions
Adobe Digital Editions (ADE) is software for viewing and managing eBooks and other digital
content. To use ADE, you need an Adobe account.
You can find information about ADE, and download the software, here:
www.adobe.com/products/digitaleditions/
After you authorize your NOOK, your NOOK appears as a device in ADE. You can drag and drop
eBooks from your ADE collection to your NOOK and vice versa.
If an ADE eBook has an expiration, it will expire on your NOOK. If an eBook is returned in ADE
before it expires, the next time you connect your NOOK to your personal computer, ADE updates
the status of the returned eBook on your NOOK, and you will not be able to read it.
Adobe Digital Editions creates the folders .adobe-digital-editions and Digital Editions on your
NOOK. These folders do not contain digital content.
To authorize your NOOK for Adobe Digital Editions:
1 Start Adobe Digital Editions and then connect your NOOK to your computer, or connect your
NOOK and then start Adobe Digital Editions.
2 Adobe Digital Editions detects your NOOK and displays the Device Setup Assistant.
3 Click Authorize Device.
4 Click Finished.
NOOK User Guide
Library
114
Reading
This section explains the features available when reading an eBook or periodical chosen from your
library. For information about reading eBooks when in Barnes & Noble Bookstores, see “Read in
Stores” on page 88.
To resume reading, tap reading now on the Home menu:
reading now
When you tap reading now, you are returned to the last read page in the eBook or periodical that
you were reading last on your NOOK, even if you have turned your NOOK off since you were last
reading.
Supported File Formats
Your NOOK supports digital reading content (for example, eBooks and periodicals) in the following
formats:
•
ePub, including DRM-secured files and files without DRM
•
PDB, including DRM-secured files and files without DRM
•
PDF, including password-secured files and files that are not secured
Orientation
The reading orientation is vertical (often called portrait orientation). You hold the reader upright,
and text is displayed in lines across the reading screen.
PDF documents can support rotated pages, though this is not common and not especially useful
for eBooks. In such a PDF, one or more pages (and possibly an entire document) can have pages
that have been rotated 90 degrees clockwise, 90 degrees counterclockwise, or 180 degrees. Your
NOOK doesn’t exactly support such documents, but it tries. It does not rotate the text but does
rotate any graphics.
NOOK User Guide
Reading
115
Ergonomics
Ergonomics is a big word for the study of how to make things comfortable and easy to use, and to
reduce injuries. Your NOOK was designed with you and reading in mind.
The best advice we can give is to find what is comfortable for you.
Reading must be a comfortable activity. With your NOOK, it will be. If one reading position is not
comfortable, try a different one. Balance your NOOK differently. Place your hands differently. Press
the Next Page and Previous Page buttons differently. We are quite sure that some of the ergonomic
suggestions that follow will work for you.
Holding your NOOK
Hold your NOOK so it is balanced well and does not feel top-heavy. You can change the balance of
your NOOK by moving your hands further up or holding your NOOK in a more vertical position.
You probably will want to hold it with both hands. If you hold it with one hand, rest that hand or
arm on something, for example, your leg.
One way of holding your NOOK is shown in this drawing. The person shown is right-handed, and
she is holding her NOOK with the left hand further up the side, for balance, and the right hand
closer to the bottom, to easily press the Next Page button on the right side of your NOOK.
NOOK User Guide
Reading
116
Next Page and Previous Page Buttons
Position the hand with which you turn pages so it is not a strain to reach one of the Next Page
buttons. You will probably use the Previous Page buttons less frequently, but when you do, position
your hands so that reaching a button is not a strain. With page turn buttons on each side of your
NOOK, you can change the hand with which you turn pages.
Keyboard
There are several ways to use your NOOK’s keyboards:
•
With your NOOK on a flat surface, you can type on the keyboard is an approximation of
standard-keyboard typing (or for that matter “hunt and peck” typing).
•
You can hold your NOOK in one hand and tap keys on the keyboard with the index finger of
your other hand.
•
You can use a mobile-device approach to typing by holding the device on each side near the
bottom and using your thumbs to type. To do this, you might want to rest the top of your
NOOK against your knee or the edge of a table.
Eyeglasses
If you use eyeglasses to read paper books, you should wear them to read your NOOK.
Reading Distance
The optimal reading distance varies depending on your eyes, but somewhere between 13 and 16
inches is probably ideal. You can change the text size on your NOOK so that you can read at an
optimal distance.
Light
Your NOOK’s reading screen is like a piece of paper. You need light to read it, and the light level
should be adequate. Make sure you have enough light, and position your NOOK relative to the lights
so that there are no direct reflections.
Take Breaks
As you would do with paper books when reading, take breaks to reduce eye strain.
Beginning Reading
When you select an item to read, you are taken to:
•
The first page if you have not read this item before
•
The most recently read page if you have read this item before
NOOK User Guide
Reading
117
Procedures for Beginning Reading
Following are procedures for beginning reading.
To pick something to read in the your library:
1 On the Home menu, choose my library.
2 Navigate to the other section of your library if necessary. Tap Go to My B&N Library or Go to
My Documents.
3 Navigate to what you want to read. Browse to the item you want to read, or search and then
browse. Flip pages in the list using the Next Page and Previous Page buttons. Move the selection
indicator up and down on the reading screen using the Up and Down buttons. Details about
choosing something to read are in “Organizing Your Library” on page 95.
4 Tap Select. If the item has already been downloaded or is in My Documents, it opens in the
Reader. If it is in My B&N Library and has not been downloaded, tap Download. After the item
downloads, tap Read.
5 Read is also a choice if you are viewing item details. Navigate to the item, tap Item details &
options, and then tap Read.
To read something referred to in a notice in The Daily that you do not have to buy:
1 On the Home menu, tap the daily.
2 Navigate to the notification using the Up and Down buttons, and the Next Page and Previous
Page buttons if the notification is on a different page.
3 Tap Read or Yes, Borrow This (for a lending offer).
To read something referred to in a notice in The Daily that you have to buy to read:
1 On the Home menu, tap the daily.
2 Navigate to the notice using the Up and Down buttons, and the Next Page and Previous Page
buttons if the notice is on a different page.
3 Tap Buy.
To accept a lending offer and begin reading a borrowed eBook:
1 On the Home menu, tap the daily.
2 Navigate to the notification using the Up and Down buttons, and the Next Page and Previous
Page buttons if the notification is on a different page.
3 Tap Yes, Borrow This. Your NOOK downloads the eBook. After it finishes, tap Read.
NOOK User Guide
Reading
118
To buy and then read something:
1 On the Home menu, tap shop.
2 Browse to or search for content.
3 Buy something and confirm your purchase. For details, see “Shop” on page 76. Your NOOK
downloads the content.
4 Tap Read.
Resuming Reading
There are several ways to resume reading something:
•
If your NOOK has gone to sleep while you were reading, just awaken it. You are returned to
where you were reading when your NOOK went to sleep.
•
If you are using other NOOK features such as the Shop and library, tap the Home button and
then tap reading now to return to where you were reading.
If another NOOK is associated with the same Barnes & Noble account, tapping reading now
returns the person reading on that NOOK to whatever was last read on that NOOK.
•
When you pick an item to read in your library, if you have read it before, you are returned to
the most recently read page when you read it again.
When you resume reading, the current reading page is the page you were reading last on your
NOOK.
For items in your B&N library, your NOOK and other B&N eReader platforms can keep track of
where you were last reading in each item across devices. For more information, see “Synchronizing
Reading Across Devices” on page 127.
Turning Pages
On each side of your NOOK, there are two buttons for turning pages:
(Next Page): Display the next page of content or of a paginated list.
(Previous Page): Display the previous page of content or of a paginated list
When the touchscreen is not lit, you can swipe your finger to turn pages. You have to press a page
turn button or swipe to turn each page. To move through an eBook more quickly, tap Go to and
NOOK User Guide
Reading
119
choose a page or destination in the eBook. If the eBook has bookmarks, tap Bookmarks > Go to
bookmark to jump to a bookmarked page.
forward
back
Touch a spot on the touchscreen with your finger already moving sideways. The
swipe does not need to be a long one (it can be about 3/4 inch long), and it can be
anywhere on the touchscreen.
Navigating
You can go to these locations in an eBook, newspaper, or magazine using the menus:
•
A specific page
•
For items in your B&N library, if your NOOK is automatically saving the current reading page to
BN.com, you can go to the current reading page that was last saved on BN.com (possibly from a
different B&N eReader). For information, see “Synchronizing Reading Across Devices” on page 127.
•
Cover (eBooks) or Front page (newspapers and magazines)
•
Chapters (eBooks) or Sections (newspapers and magazines)
•
Bookmarks (eBooks)
NOOK User Guide
Reading
120
To go to a specific page in an eBook or periodical:
To go to a specific page in an eBook, tap Go to > Page. Move the slider to the page you want to
go to. When available, chapter names are displayed above the page numbers. When you raise your
finger, you are taken to that page. Move the slider again to go to a different page. Tap
to close
the slider.
To go to a specific location in an eBook or periodical:
To go to a specific location in an eBook, tap Go to and choose one of the destinations (Page,
Cover, or Chapter and choose a chapter).
For eBooks that have a large number of chapters, it can take about a minute before all of
the chapters are present in the Go to menu. If the chapter you want is not present in the
menu, tap the Back button, wait a little while, tap Chapter, and scroll to the chapter again.
To go to a specific location in a periodical, tap Go to and choose one of the destinations (Page,
Front page, or Section and choose a section).
To go to a specific location via a link:
Navigation in newspapers and magazines is mainly accomplished using links. eBooks can also contain
links, for example, to footnotes or endnotes. When links are present on a page, the first link on
the page is highlighted and the Up and Down buttons are present on the touchscreen. Tap the Up
and Down buttons to highlight different links. Tap Select to go to a link’s destination. Tap the Back
button to return to the page with the link. You can only jump back one jump.
To go to a bookmark in an eBook:
Tap Bookmarks > Go to bookmark and choose a bookmark.
Reader Text Fonts
Some eBooks and periodicals specify the text font in which the digital content is displayed. If the
publisher specifies a text font, then the content is displayed in that font if the font is embedded in
the content.
Other eBooks and periodicals leave the choice of font to the Reader, in which case your NOOK
®
uses one of three fonts. Amasis is a serif font. Helvetica Neue is a sans serif font. Light Classic is a
serif font. Here are Amasis and Helvetica Neue:
NOOK User Guide
Reading
121
The rules for the choice of text font are:
•
EPUB format: Content is displayed using fonts embedded in the EPUB file if present. If fonts
are not embedded, content is displayed in the text font you choose in the Reader.
•
PDB format: Content is displayed in the text font you choose in the Reader, with one
exception: Light Classic is not available for PDB files. If you choose Light Classic, then your
NOOK uses Amasis for content in PDB format.
•
PDF format: Content is displayed in the font(s) embedded in the PDF file, or in the font Light
Classic if a font is not embedded in the PDF file. You cannot change the font in which a PDF file
is displayed. For PDF files, the Preferences > Text font menu item is gray (not selectable).
In all cases, scanned content that has not been processed with character recognition (for example,
scans of entire pages or images that contain text) displays whatever text font was scanned.
Changes in the text font only affect EPUB and PDB files in the Reader. They do not change
the text font for PDF files. They do not change the text font in The Daily, Shop, Library, or
Settings. They do not change the text font in the touchscreen menus.
To change the Reader text font:
1 In the Reader, choose Preferences > Text font.
2 Choose among the text fonts listed in the menu.
When you change the Reader text font in a PDB file, your NOOK repaginates the content.
It can take up to several minutes before your NOOK displays the progress bar and page
numbers.
Reader Text Sizes
You have a choice of six text sizes for all eBooks and periodicals. You can choose the text size Extra
small, Small, Medium, Large, Extra large, or Extra extra large. Your choice affects the actual text
size, but it does so differently for PDB, EPUB, and PDF files.
Other text in digital content, for example, chapter and section headings, is also sized proportionally
based on the choice of Reader text size.
NOOK User Guide
Reading
122
Changes in the text size only affect the Reader. They do not change the size of text in
The Daily, Shop, Library, or Settings. They also do not change the size of text in the
touchscreen menus.
Here are examples of the text sizes Extra small, Medium, and Extra large for the font Amasis.
PDB Files
Text sizes are simplest for PDB files. The six sizes are the same from file to file. Medium in one
eBook is the same as Medium in the next one. The other sizes are the same as well.
When you change the Reader text size in a PDB file, your NOOK repaginates the content. It can
take up to several minutes before your NOOK displays the progress bar and page numbers.
EPUB Files
EPUB files can contain instructions that specify the size of body text and other text, for example
chapter titles.
When displayed, the text of digital content in EPUB, PDB, and reflowable PDF documents is in one
of six sizes. For most digital content, medium will be the same size medium. The other sizes will be
the same as well. But there are exceptions to every rule. In some cases, the fonts will be larger than
usual, and in other cases smaller. In these cases, you should still be able to choose a text size that
works for you.
NOOK User Guide
Reading
123
PDF Files
In PDF files, the content is scaled to fit the Reader when the text size is Small. When the text
size is small, you will see the PDF as it would appear on a larger screen, with layout and graphics
preserved.
When viewing a PDF file, try the Small text size first. If that is too small, try larger sizes.
Larger text sizes and Extra small involve scaling the font and reflowing the text.
For PDF files in some foreign languages, your NOOK is not able to resize the fonts. For
these, you will see one size (Small).
To change the Reader text size:
1 In the Reader, choose Preferences > Text size.
2 Choose a text size: Extra small, Small, Medium, Large, Extra large, or Extra extra large.
Images
Some eBooks and most magazines and newspapers contain images. The images that are present are
those that were included in the item by the publisher.
•
For EPUB and PDB files, your NOOK displays the images, irrespective of the text font size. The
images are a fixed size; you cannot zoom in or out.
•
For PDF files when the text size is Small, you will see the PDF as it would appear on a larger
screen, with layout and images preserved. An attempt is made to display images in other text
sizes than Small, but image display is not guaranteed in other text sizes. When images are
displayed at other text sizes, they are displayed in the sizes embedded in the PDF file.
Opening DRM-secured Digital Content
Some digital content is protected by Digital Rights Management (DRM). Your NOOK manages
encryption information it needs to open digital content that is protected by DRM. Different rules
apply for the My B&N Library and My Documents sections of your library.
NOOK User Guide
Reading
124
My B&N Library
Your NOOK stores the information it needs to open DRM-secured digital content that you purchase
from the Shop on your NOOK or on the BN.com website. Just open an eBook or periodical you
have bought, and it opens.
If you unregister your NOOK, the information needed to open DRM-secured content is deleted. To
open the content on an unregistered NOOK, you will need to enter your first name, last name, and
default credit card number one time. You enter the first name, last name, and default credit card
number that were in use when you downloaded the content.
If you downloaded the content at times when your Barnes & Noble online account had different
default credit cards, you will need to enter each credit card one time. For example, if you
downloaded 10 eBooks last year with a credit card ending in 1111, and another 10 eBooks this year
with a credit card ending in 2222, then when you open one of the eBooks from last year, you will
need to enter the credit card ending in 1111, and when you open one of the eBooks from this year,
you will need to enter the credit card ending in 2222. After that, you can open all of the eBooks.
Take the same precautions you normally would with your credit card number.
My Documents
For DRM-secured content in My Documents, including content that you have transferred to your
NOOK from your personal computer and that you have copied from My B&N Library, you must
enter your first name, last name, and default credit card number. Enter the information that is
current for your Barnes & Noble online account. Take the same precautions you normally would
with your credit card number.
You only need to enter this information the first time you open one item of digital content that was
purchased with that credit card.
Opening Password-Secured PDF Files
When you open a PDF file that is secured with a password, the Reader prompts you for the
password. Enter the password, and tap Submit.
Reading Status Bar
When you are reading, a reading status bar is displayed instead of the main status bar. It contains:
Title
Airplane mode icon
NOOK User Guide
Title of what you are reading
If airplane mode is on, the Airplane mode icon is displayed.
Reading
125
Battery charge icon
Current time
Battery charge level and whether your NOOK is charging. For more
information, see “Battery Charge Indicators” on page 18.
The current time is displayed in 12-hour or 24-hour format. Tap settings >
Display > Clock > Clock format to set the clock format, for example: 3:25
PM or 15:25.
You might also see the B&N Fast & Free Wireless signal strength or Wi-Fi signal strength icon when
you are reading. When you read, your NOOK turns off the radios. If you are reading when your
NOOK decides to synchronize your library (in the morning between about 5:15 and 6:00 AM), your
NOOK turns on its radios.
This is an example:
Reading Progress and Page Numbers
When you are reading, your NOOK displays a reading progress bar at the bottom of the page. This
represents your reading progress through the entire book.
Two page numbers are displayed to the right of the reading progress bar: the current page number
and the total number of pages, separated by a vertical bar.
Depending on the size of the eBook, it can take up to about five minutes before the
reading progress bar and page numbers are displayed. During this time, you can read.
For items you are reading, progress is also displayed in your library (My B&N Library and My
Documents), by appending “on page X of Y” after the author’s name.
Page Numbering
Pages in eBooks and periodicals are numbered. How the pages are numbered and displayed on your
NOOK differs based on the file format of the digital content:
•
eBooks in PDB format: Page numbering is for the entire eBook and reflects the number
of pages after formatting for the text size. What page something is on changes as well. For
example, when the reader text is Amasis Small, Oliver Twist says “Please, sir, I want some
NOOK User Guide
Reading
126
more” on page 26 of 817 pages. When the text is Amasis Medium, he says it on page 30 of 956.
When the text is Amasis Large, he says it on page 40 of 1274.
•
eBooks (and periodicals) in EPUB format: Page numbering is for the entire eBook and
reflects some prior account of page numbering, before formatting for the text size. This means
that, if the original book had 525 pages, then so does the eBook. But the pages are re-flowed,
so a page from the book might start in the middle of the page in the eBook. A page in the book
also might be smaller or larger than will fit on one page of the eBook. So, looking at the reading
status bar when turning pages you might encounter page 45, and the page after that will still be
page 45, and maybe the one after that too. And then you will reach page 46. Or, you will turn
from page 45 to 47. What happened to page 46? It was on the same page as page 45. When
you make the text size larger, the same page in the eBook will flow over more pages in the
Reader.
•
Reflowable eBooks in PDF format: Page numbering is for the entire book and reflects
some prior account of page numbering, before formatting for the text size. The behavior is the
same as for eBooks in EPUB format, described above.
•
Non-reflowable (scanned without character recognition) eBooks in PDF format:
Page numbering is for the entire book, and reflects the number of scanned pages. Page numbers
also might be on the scanned pages, but there is no necessary relationship. Page 6 in the eBook
might have the scanned page number iv, and page 30 in the eBook might have the scanned page
number 5.
Synchronizing Reading Across Devices
If you only read Barnes & Noble content on your NOOK, you can skip this section. If
you read items in My B&N Library on your NOOK and other devices, for example, other
mobile devices or a personal computer, this section is for you.
B&N eReader applications are available on a wide range of other platforms. For information, see
“Platforms” on page 172. At the time when this guide goes to press, synchronization of the current
reading position works on all platforms except for BlackBerry® smartphones and Mac® laptops.
If you read the same B&N content on multiple devices, you can have your NOOK and the other
B&N eReaders synchronize your current reading position across devices. If you don’t synchronize
the current reading position, you can still go to where you were reading on other devices. You just
have to find the page yourself.
Saving and obtaining the current reading position requires a wireless connection. If Airplane
mode is on, or if Wi-Fi is turned off and a B&N Fast & Free Wireless network is not
available (for the Wi-Fi + 3G model NOOK), or your NOOK cannot connect to a WiFi hotspot, then when you try to go to the current reading position saved on BN.com,
nothing will happen.
NOOK User Guide
Reading
127
When synchronization of your current reading position is enabled, your NOOK saves your current
reading position to BN.com:
•
When you exit the Reader
•
When your NOOK begins to sleep
To enable synchronization of your current reading position on your NOOK:
1 Open any item from your B&N library in the Reader.
2 Tap Preferences > Auto Save Page On BN.com. The value should be On.
To disable synchronization of your current reading position on your NOOK:
1 Open any item from your B&N library in the Reader.
2 Tap Preferences > Auto Save Page On BN.com. The value should be Off.
To go to the current reading position saved on BN.com:
On other platforms, you are automatically taken to the current reading page saved on
BN.com. When an item from your B&N library opens on your NOOK, you are taken to
the local current reading page and can ask to go to the page saved on BN.com.
1 Open any item from your B&N library in the Reader.
2 Tap Go to > Last Page Saved On BN.com.
Finding Words and Phrases
You can search for occurrences of words and phrases in what you read. You can search in ePub,
PDB, and PDF files. Searches do not consider the case of words. It is best if you do not include
punctuation in the phrases.
Find and Find next search from the current location in the digital content toward the end.
If you are on page 25 and search of a phrase that happens to be on page 23, the search
will not find it. You can search backwards with Find previous, but only if one occurrence
is found searching forward. If you want to be certain that you are searching the entire
content, go to the cover and begin the search there.
To find occurrences of a word or phrase:
1 Open what you want to read in the Reader.
NOOK User Guide
Reading
128
2 Go to the page on which you want to begin the search, which proceeds from there toward the
end of the content. To be sure you search all of the content, tap Go to > Cover.
3 Tap Find.
4 Type the word or phrase, and then tap Search.
5 If one occurrence of the word or phrase is found, you can choose Find next and Find previous
to find later and earlier occurrences.
Looking up Words
You can look up words while reading. Your NOOK looks up the words in Merriam-Webster’s
®
Collegiate dictionary.
You can look up words in eBooks in EPUB and PDB formats in the My B&N Library and My
Documents sections of your library. You cannot look up words in periodicals in My B&N
Library. You cannot look up words in PDF files.
You can look up words, not phrases. However, the dictionary does define some phrases. For
example, if you look up “carry,” the phrases “carry a torch,” “carry the ball,” and “carry the day”
are also defined.
To look up a word in the text:
1 In the digital reading content, navigate to the page on which the word occurs.
2 Tap Look up word.
3 Select the word you want to look up using the D-pad controller. Pressing the up, down, right,
and left arrows on the D-pad controller moves the selection from word to word.
When navigating in an EPUB file, the up and down arrows on the D-pad controller
sometimes skip lines (for example, the last line in a paragraph if that line contains only one
word). You can reach every word using the left and right arrows.
4 Tap Look up to display the definition in a dialog panel overlaying the reading content. A
definition can be more than one page in length. Move between pages using the Next Page and
Previous Page buttons.
5 Tap OK when you have finished reading the definition to return to your reading. You are still in
word lookup mode, and can look up another word.
6 Tap Cancel to exit word lookup mode.
NOOK User Guide
Reading
129
To look up any word:
1 Tap Look up word.
2 Tap Keyboard.
3 Enter the word you want to look up and tap Search. The definition is displayed in a dialog panel
overlaying the reading content. A definition can be more than one page in length. Move between
pages using the Next Page and Previous Page buttons.
4 Tap OK when you have finished reading the definition to return to your reading. You are still in
word lookup mode, and can look up another word.
5 Tap Cancel to exit word lookup mode.
NOOK User Guide
Reading
130
Lending eBooks
With LendMe™ technology from Barnes & Noble, you can now share eBooks from NOOK to
NOOK. But it doesn’t stop there. You can lend to and from any device with the Barnes & Noble
eReader application, including iPhone® and iPod touch®, BlackBerry® smartphones, and most
Windows® and Mac® laptops and desktop computers. All you need to know is your friend’s email
address.
Share your favorite eBooks with friends, family members, or with members of your book club, by
lending many of your eBooks one time for 14 days.
When you use our LendMe™ technology, you cannot read an eBook while the lending offer is
pending and while it is on loan, but you always get it back.
Rules
Here are some rules regarding lending eBooks:
•
You can only lend eBooks that are in your online digital library. Not all eBooks can be lent
(though many can).
•
You can only lend from a registered NOOK to users of other registered NOOKs (or other
registered B&N eReader devices). You can send a lending offer to any email address, but to
accept the offer, the other person must have an email address associated with a Barnes & Noble
online account and a NOOK or other B&N eReader that supports lending.
•
You can lend an eBook from anywhere with supported wireless connectivity (including Wi-Fi
hotspots outside of the United States, U.S. territories, and Canada)
•
You can only lend an eBook one time.
It only counts as the one time lending if your friend accepts the lending offer. If the lending
offer expires or your friend rejects the offer, you can still lend the eBook.
•
A loan is for 14 calendar days, counting the day on which the lending offer is received. A lent
eBook is automatically returned at the beginning of the 15th calendar day (if the borrower has
not returned it more quickly).
•
When you lend an eBook, you temporarily lend the digital rights to the eBook. During the
period when the lending offer is pending and while the book is lent, you cannot read it. When
the book is returned, you get the digital rights back, and can read the book again.
•
You cannot lend an eBook that has been lent to you.
•
You cannot save a copy of a lent eBook to the microSD card.
•
You cannot archive an eBook that has been lent to you.
NOOK User Guide
Lending eBooks
131
Determining Whether an eBook Can Be Lent
Not all eBooks can be lent. Please note the following about determining whether an eBook can be
lent:
•
The shopfront in the Shop on your NOOK has a collection called LendMe eBooks. Select that to
view a selection of eBooks that can be lent. (This is not all lendable eBooks.)
•
For eBooks that you have purchased, when browsing the My B&N Library section of your
library, a LendMe™ badge is present to the right of the eBook title. The badge indicates that
you can lend the eBook.
•
LendMe™ badges are present when you are browsing and searching for eBooks in the
eBookstore on the BN.com website. When you navigate to the details page for an eBook by
clicking on the title, the badge is located below the cover image if that eBook title can be lent.
•
LendMe™ badges are present in your eBooks library on the BN.com website. If you can lend an
eBook, a LendMe™ badge is present below the date added. Click the badge to lend the eBook.
Lending an eBook
You lend an eBook to a friend with an email address. You can choose one of the friends (contacts in
Settings) you have previously defined, or you can specify a new email address.
While a Lending Offer is Pending
While a lending offer is pending, you do not have access to the eBook. You cannot read the eBook.
You cannot make lending offers of the same eBook to other friends.
While an eBook is Lent
When a friend accepts a lending offer, the 14-day lending period starts. You do not have access to
the eBook. You cannot read the eBook. You cannot make lending offers to other friends. The book
information is grayed out in your library and an
indicator is displayed.
To lend an eBook:
You do not have to download an eBook to your NOOK before you lend it.
1 On the Home menu, tap my library.
2 If you are viewing My Documents, tap Go to My B&N Library.
NOOK User Guide
Lending eBooks
132
3 Browse to the item you want to lend, or search and then browse. Move the selection indicator
up and down on the reading screen using the Up and Down buttons. Flip pages in the list using
the Next Page and Previous Page buttons.
4 Do one of the following:
Choose an already defined friend. Tap Lend and the menu with the friend’s name.
Define a friend and then choose that friend. Tap Lend > Add a New Contact. Specify the name
and email address of the friend, and tap Submit to save the new contact. Tap the menu item for
the newly defined contact.
5 You are prompted to enter a personal message. The message can be up to 30 characters in
length. Optionally, enter a message.
6 Tap Submit.
7 You are prompted to confirm the loan. Tap Confirm. Your NOOK contacts the server, and the
server sends a lending offer email to your friend. If he/she has a Barnes & Noble online account,
a lending offer is also on his/her My B&N. If he/she has a NOOK, a lending notification appears
in The Daily. The lending notification expires and is removed after seven days.
To view a list of books that you have lent to friends:
1 On the Home menu, tap my library.
2 If you are viewing My Documents, tap Go to My B&N Library.
3 Browse or search in your library. eBooks that are on loan have the
indicator.
To view notifications about eBooks that you have lent:
1 On the Home menu, tap the daily.
2 Ensure that notifications are displayed. Tap Show and choose All or Notifications.
3 Browse notifications. Notifications about eBooks that you have lent include:
•
Notifications that friends have accepted lending offers
•
Notifications that friends have declined lending offers
•
Notifications that eBooks you have lent have been automatically returned
NOOK User Guide
Lending eBooks
133
Borrowing an eBook on a NOOK
This section is written from the viewpoint of you receiving a notification about a lending
offer. It applies equally to others with registered NOOKs receiving lending offers.
Rules
Here are some rules regarding borrowing eBooks from your NOOK:
•
You can only borrow on a registered NOOK.
•
The Barnes & Noble online account to which your NOOK is registered must have a default
credit card and billing information defined.
•
You can borrow an eBook from anywhere with supported wireless connectivity (including Wi-Fi
hotspots outside of the United States, U.S. territories, and Canada)
•
You can borrow an eBook for which you have a free sample.
•
You cannot borrow an eBook that you already own.
Notification that Lending Offer Will Expire Soon
If a friend offers to lend you a book, you receive a lending offer notification among the notifications
in The Daily. You have seven calendar days to accept or decline the offer. At the beginning of the
seventh day, you receive a warning that the lending offer will expire today At the beginning of the
eighth calendar day, the lending offer expires.
When viewing a lending offer notification, Yes, Borrow This and No, Thank You are choices in the
menus. You do not need to navigate to the original lending offer notification.
Expiration of a Lending Offer
If you receive a lending offer and neither accept nor decline the offer before the end of the seventh
calendar day, the offer expires. The notification remains in The daily, but it cannot be accepted or
declined. You receive an additional notification informing you that the lending offer has expired.
Declining a Lending Offer
When you receive a lending offer on your NOOK, you can accept the offer and borrow the eBook,
or you can decline the offer.
Why decline a lending offer if it will expire automatically after 7 days? Because until you
decline the offer or it expires, your friend cannot read the eBook or make the lending offer
to someone else.
NOOK User Guide
Lending eBooks
134
Procedures
To view offers to lend you eBooks:
1 On the Home menu, tap the daily.
2 View the notifications. Among them, you might see an offer to lend you an eBook.
To accept a lending offer from The Daily:
1 On the Home menu, tap the daily.
2 In The Daily, navigate to the lending offer in the section FROM A FRIEND and tap Select.
3 Tap Yes, Borrow this. Your NOOK displays a pop-up message that tells you the eBook has been
delivered to your online digital library and downloaded to your NOOK.
To accept a lending offer from your library:
1 On the Home menu, tap my library.
2 If you are viewing My Documents, tap Go to My B&N Library.
3 Navigate to the eBook. It will have
next to it. Tap Select.
4 Tap Yes, Borrow this.
5 Your NOOK downloads the eBook. After it finishes, tap Read.
To decline a lending offer:
1 In The Daily, navigate to the lending offer and tap Select.
2 Tap No, Thank You.
To read a borrowed eBook:
You read a borrowed eBook just as you read any other eBook. To resume reading, tap reading now
on the Home menu. To pick something to read in your library:
1 On the Home menu, choose my library.
2 If you are viewing My Documents, tap Go to My B&N Library.
3 Navigate to what you want to read. Details about choosing something to read are in “Organizing
Your Library” on page 95.
4 Tap Select. If the item has already been downloaded, it opens in the Reader. If it has not been
downloaded, tap Download. After the item downloads, tap Read.
NOOK User Guide
Lending eBooks
135
5 Read is also a choice if you are viewing item details. Navigate to the item, tap Item details &
options, and then tap Read.
To buy a copy of a borrowed eBook from your library:
1 On the Home menu, tap my library.
2 Navigate to the borrowed eBook that you want to buy.
3 Tap Select. Your NOOK displays a detail page for the item that includes pricing information.
4 Tap Buy for $amount.
5 Tap Purchase Now to confirm your purchase. The item is immediately delivered to your online
digital library and downloaded to your NOOK.
To buy a copy of a borrowed eBook while reading it:
1 Tap Buy. Your NOOK displays a detail page for the item that includes pricing information.
2 Tap Buy for $amount.
3 Tap Purchase Now to confirm your purchase. The item is immediately delivered to your online
digital library and downloaded to your NOOK.
Delivery and Download
When you accept a lending offer, the eBook is delivered to your online digital library and
automatically downloaded to your NOOK.
Borrowed Indicator
When someone has lent you a book, it is in your library. It has a
indicator next to it.
Returning a Borrowed eBook
An eBook that is lent to you is returned automatically after 14 days (at the beginning of the 15th
calendar day).
NOOK User Guide
Lending eBooks
136
Bookmarks, Highlights, and Notes
You can bookmark, highlight, and annotate the eBooks that you read. Bookmark pages you might
want to refer back to in the future. Highlight interesting passages. Add your own notes.
Your annotations, highlights, and bookmarks remain in the eBook (or you can delete them).
Bookmarks
Bookmark pages with key passages in an eBook to make them easier to find. You can create as
many bookmarks in a book as you want.
You can bookmark all eBooks and periodicals in both sections of your library, with one
exception: You cannot bookmark borrowed eBooks. You also cannot bookmark eBooks
that you are reading with Read In Store.
A page with a bookmark has this symbol in the upper right corner of the page, just below the
reading status bar:
. For example:
Procedures for Bookmarks
To add a bookmark:
Turn to the page you want to bookmark and tap Bookmarks > Add bookmark.
To go to a bookmark:
Tap Bookmarks > Go to bookmark. Tap the bookmark in the list on the touchscreen. You might
need to scroll.
To remove a bookmark:
Turn to or go to the page on which you want to remove a bookmark. Tap Bookmarks > Remove
bookmark.
To remove all bookmarks:
Tap Bookmarks > Remove all bookmarks.
NOOK User Guide
Bookmarks, Highlights, and Notes
137
Highlights and Notes
Highlight what you read to draw your attention to specific passages. You can associate notes with
the highlights.
You can highlight and annotate eBooks in EPUB and PDB formats in both sections of your
library, with one exception: You cannot highlight and annotate borrowed books. You also
cannot highlight and annotate periodicals in My B&N Library, eBooks in PDF format, and
eBooks that you are reading with Read In Store.
Highlights and notes are related:
•
A highlight draws your attention to text. For example, you might want to highlight a word,
sentence, or paragraph. The highlight is displayed as a light gray color background around the
words. The highlight includes the words, but not the terminal punctuation. You can show and
hide highlights.
•
A highlight can also serve as an anchor in the text for a note. A note is text that you can
optionally associate with a highlight. The text says what it says, but you might have something to
say about it.
•
A highlight with or without a note is indicated by this always-on marker in the left margin, at the
beginning of the line where the highlight starts:
•
You cannot enter a note without a highlight. You can use a one-word highlight.
When you add or edit a highlight, a D-pad controller appears. The up and down arrows move the
current position (indicated by a word highlight) to the prior or next line. The left and right arrows
move the current position to the prior or next word.
A highlight cannot span pages (in the sense of what is displayed each time you press a page
turn button). The maximum length of a highlight is affected by the amount of text that fits
on the page. You can highlight a longer passage with text size Small than Large because
more text fits on a page. If you change the text size, it is possible that existing notes would
span page boundaries. If this happens, the notes are truncated at the end of the page for
the current text size. Choosing the text size used when the highlight was created displays
the entire highlight.
Procedures for Highlights and Notes
When navigating in an EPUB file, the up and down arrows on the D-pad controller
sometimes skip lines (for example, the last line in a paragraph if that line contains only one
word). You can reach every word using the left and right arrows.
NOOK User Guide
Bookmarks, Highlights, and Notes
138
To show highlights:
Tap Highlights and notes > Show highlights.
To hide highlights:
Tap Highlights and notes > Hide highlights.
To add highlights:
1 Tap Highlights and notes > Add highlight or note.
2 Use the D-pad to navigate to the place where you want to start the highlight.
3 Tap Start selection.
4 Use the D-pad to navigate to the place where you want to end the highlight.
5 Tap End selection. Your NOOK displays a form for entering a note. You are just creating a
highlight, so tap Submit.
6 To add additional highlights on the same page of a PDB document, repeat steps 2 through 5,
and tap Cancel when you are done. To add additional highlights on the same page in an ePub
document, repeat steps 1 through 5.
To add highlights and notes:
1 Tap Highlights and notes > Add highlight or note.
2 Highlight one or more words in the text, as explained in the procedure above.
3 Tap End selection. Your NOOK displays a form for entering a note.
4 Type a note, and then tap Submit.
5 To add additional highlights and notes on the same page of a PDB document, repeat steps 2
through 4, and tap Cancel when you are done. To add additional highlights and notes on the
same page in an ePub document, repeat steps 1 through 4.
To step through highlights on a page viewing the associated notes:
You can step through highlights on a specific page, and view the notes associated with them.
1 Navigate to the page.
2 Tap Highlights and notes > View notes for this page.
3 Tap Next highlight and Previous highlight to step through the highlights.
4 To view the note associated with a highlight, tap View/Edit note.
NOOK User Guide
Bookmarks, Highlights, and Notes
139
5 To return to the page and menus, tap Cancel.
To edit a note but not change the highlight:
1 Navigate to the page.
2 Tap Highlights and notes > View notes for this page.
3 Tap Next highlight and Previous highlight to step through highlights until you reach the highlight
that has the note you want to edit.
4 Tap View/Edit note.
5 Edit the note, and then tap Submit.
To replace one or more highlights and notes:
1 Delete the existing highlights and notes.
2 Add new highlights and notes.
To delete a note but keep the highlight:
1 Navigate to the page.
2 Tap Highlights and notes > View notes for this page.
3 Tap Next highlight and Previous highlight to step through highlights until you reach the highlight
that has the note you want to delete.
4 Tap View/Edit note.
5 Tap Clear to delete the note, and then tap Submit.
To delete a highlight and its note:
1 Navigate to the page.
2 Tap Highlights and notes > View notes for this page.
3 Tap Next highlight and Previous highlight to step through highlights until you reach the highlight
and note you want to delete.
4 Tap Delete highlight.
NOOK User Guide
Bookmarks, Highlights, and Notes
140
Rating
Your opinion of what you read matters. Ratings, reviews, and recommendations of books by others
guide your choices toward eBooks and periodicals that you are more likely to enjoy. Your ratings,
reviews, and recommendations help guide other readers.
On your NOOK, you can:
•
View reader ratings of eBooks in the eBookstore and in your library
•
Rate eBooks and periodicals in your library
You can rate digital content in the My B&N Library section of your library. You cannot rate
personal content in My Documents.
On the B&N website, you can:
•
View reader ratings of eBooks in the eBookstore and in your library
•
Rate eBooks in the eBookstore and in your library
•
View reviews of eBooks in the eBookstore
•
Write reviews of eBooks in the eBookstore or in your library
Rating eBooks and Periodicals
You can rate eBooks and periodicals that you own from the detail page for an item in your library.
To rate an item:
1 On the Home menu, tap my library.
2 If you are viewing My Documents, tap Go to My B&N Library.
3 Browse or search for the item you want to rate. Using the Up and Down buttons, move the
selection marker on the reading screen to the item.
4 Tap Item details & options. Your NOOK displays a page of details for the item.
5 Tap the menu item that consists of stars. Your NOOK displays the ratings slider.
6 Tap the location of your rating or slide your finger to that position and then raise your finger.
NOOK User Guide
Rating
141
Web Browsing
Your NOOK has a web browser that you can use to browse or search the World Wide Web.
To use the browser, your NOOK must be connected to a Wi-Fi hotspot. You cannot use
the browser with a B&N Fast & Free Wireless connection.
To open the browser, tap web on the Home menu:
web
If you are not connected to a Wi-Fi hotspot when you tap web, your NOOK takes you to the Wi-Fi
menus to connect to a hotspot. After you connect to a hotspot, tap the Back button to return to
the browser.
When you tap web, you are returned to the web page you were viewing when you left the browser,
if you left by tapping the Home button. If you closed the browser by tapping the Back button,
your new browsing session starts on your home page. You can specify a home page in the browser
settings.
Using a Browser on Two Screens
Web pages display on the reading screen. A part of the page is also displayed on the touchscreen.
The part on the touchscreen is indicated by a black rectangle on the reading screen. The rectangle
can be displayed only when you are moving the web page (the default) or all the time, based on the
browser setting Hide location indicator.
Moving Around on a Web Page
Move around on a web page by swiping your finger on the touchscreen. This is called panning or
scrolling. The page moves with your finger, and there is momentum. The web page on the reading
screen is only refreshed when necessary.
You can also pan using the page turn buttons on the sides of your NOOK:
Left side of NOOK: Moves toward the left side of the web page.
Right side of NOOK: Moves up the web page.
NOOK User Guide
Web Browsing
142
Left side of NOOK: Moves toward the right side of the web page.
Right side of NOOK: Moves down the web page.
Moving From Page To Page
Move from page to page by tapping links on web pages, or buttons, for example to move between
pages in an article. Links are indicated by the means used on the web pages, for example, a
difference in color, an underline, or both. When you tap a link, an orange box is drawn around the
link, and the requested page loads.
You can also move to pages by specifying their addresses. Tap Go To... > Web page.
Filling In Fields and Submitting Requests
Some web pages have fields in which you enter data, for example, a login name or a search term.
To fill in a field and submit a request:
1 Tap the field. An orange box appears around it, and your NOOK displays a keyboard.
2 Fill in the field and then tap Submit.
3 Tap the button on the form to submit what you typed, for example, a search button.
Tool Bar
Browser controls are in a tool bar that you can display and hide. The browser also automatically
hides the tool bar when it is not needed. This is the tool bar:
Go To...
Web page
Home page
Search
Use the browser tool bar for page navigation, zooming, favorites, and settings.
Tool Bar Buttons
From left to right, the buttons are:
Control
NOOK User Guide
Explanation
Show/Hide tool bar: Tap this button to alternately show and hide the tool bar.
The browser also automatically hides the tool bar when it is not needed.
Go To: Tap this button for web-page navigation options.
Web Browsing
143
Reload: Tap this button to reload (refresh) a web page.
Page loading indicator and stop button: When a page is loading, animation
on this button indicates this. Tap the button to stop the page loading process at its
current point. Depending on timing, the page might have not loaded, be partially
loaded, or have completely loaded.
Favorites: Tap this button to manage favorites. You can also use this button to
go to a favorite (or you can use the Go To... button).
Previous: Tap this button to move back to the previously loaded page.
Next: Tap this button to move forward one page in a sequence of previously
loaded pages.
Zoom: Tap this button to zoom in or out on a page. The zoom level is retained
and applies to future pages until you change the zoom level again. You can also
reset the zoom level to the default, which fits the web page to the screen width.
Settings: Display menus for settings. For more information about settings, see
“Browser Settings” on page 146.
Choosing a Web Page
The main way of choosing web pages is to move from one page to a linked page. Tap a link on the
current page to display the page that is linked to.
Links are displayed on the reading screen and touchscreen in whatever way the web page indicates
they should be displayed. For example, a different color might be used to indicate links.
To determine what is a link, touch it, but do not raise your finger. If an orange box appears
around the text or graphic on the touchscreen, it is a link. If you want to go there, raise
your finger. If you do not want to, move your finger and then raise it.
Tap the Back and Forward buttons to move backward and forward along a series of web pages that
you have visited most recently.
There are five other ways to select web pages. Access these with the Go To... button:
•
Web page: Go to a web page. You enter the web page address (also called a URL). You can
omit the leading http:// (or https://) and www.
•
Home: Go to your home page, which is defined in the browser settings. The default home page
gives some help information about the browser. Its location is:
file:///android_asset/browser.html
•
Search: Perform a web search with the words you specify. The search is performed using your
default search provider, which is defined in the browser settings.
•
Favorites: Go to a favorite web page.
NOOK User Guide
Web Browsing
144
•
History: Select a recently visited web page and go to it.
Zooming In and Out
When a web page is first displayed after starting the browser, it is displayed at a size that fits the
page width. You can zoom in and out to change the size of the text and graphics.
Text is not reflowed when zooming. When you zoom in, part of the page width will be
truncated. Scroll the page on the touchscreen to view the parts that are not visible.
To zoom in or out:
1 On the browser tool bar, tap the Zoom button.
2 Tap Zoom in and Zoom out until the web page is the size you want.
3 Tap the Zoom button again to hide the zoom menus.
Managing Favorites
You can mark pages in your browser as favorites to be able to return to them quickly. This feature
is also often referred to as creating “favorites.” You can add, edit, and delete favorites and go to
favorite pages.
To add a favorite:
1 On the browser tool bar, tap the Favorites button.
2 Tap the Add Favorite button. The browser displays a text box for specifying the name of the
favorite and a keyboard on the touchscreen. A proposed name for the favorite is displayed,
based on the title of the web page.
3 You can edit that name or type a different one.
4 Tap Submit to save the favorite.
To go to a favorite using Go To:
1 On the browser tool bar, tap the Go To... button, then tap Favorite.
2 Scroll to and then tap the favorite you want to go to.
To go to a favorite using the favorites menu:
1 On the browser tool bar, tap the Favorites button.
NOOK User Guide
Web Browsing
145
2 Scroll to and then tap the favorite you want to go to.
To delete a favorite:
1 On the browser tool bar, tap the Favorites button.
2 Swipe the favorites to find the one you want to delete. Center the favorite you want to delete,
but do not tap it when it is in the center.
3 Tap the Menu button.
4 Tap Delete.
To edit a favorite:
1 On the browser tool bar, tap the Favorites button.
2 Swipe the favorites to find the one you want to edit. Center the favorite you want to edit, but
do not tap it when it is in the center.
3 Tap the Menu button.
4 Tap Edit.
5 Edit the name of the favorite (and possibly the location) and tap Submit.
Browser Settings
The following are the browser settings:
Setting
Hide tool bar
Explanation and Values
Whether to automatically hide the tool bar:
On: Automatically hide the tool bar when it is not needed. This is
the default.
Hide panning indicator
Off: Do not automatically hide the tool bar.
Indicate the part of the reading screen that is visible on the
touchscreen. The indicator is a black rectangle.
On: Display the indicator when panning (scrolling) the page on the
touchscreen. Hide the indicator automatically when panning stops.
This is the default.
Home page
Default search engine
NOOK User Guide
Off: Always display the panning indicator.
Enter the location (URL) of your home page.
Choose the default search engine.
Web Browsing
146
Clear cookies
Clear history
Clear (delete) cookies. Cookies are saved by some websites to
persist information such as passwords on your NOOK.
Clear (delete) your browsing history.
Browser Status Bar
Your NOOK has a status bar at the top of the reading screen. The following information is displayed
when browsing.
URL (uniform resource locator, that is, the address) of current page: The most significant part
of the URL is shown. The http:// or https:// and hostname (often www) are omitted from the
beginning of the URL. The end of the URL might also be truncated. You can view the entire URL by
adding a favorite for the page.
Your NOOK is connected to a Wi-Fi hotspot in a Barnes & Noble Bookstore:
Wi-Fi signal strength (from low to high):
Battery charge levels when your NOOK is not charging (from low to full charge):
Battery charge levels when your NOOK is charging (from low to high):
The current time is displayed in 12-hour or 24-hour format, for example: 3:25 PM or 15:25. Tap
settings > Display > Clock > Clock format to set the clock format.
The current time can be incorrect on a NOOK Wi-Fi, and on a NOOK (Wi-Fi + 3G model)
in an area without access to a B&N Fast & Free Wireless network. If the time is not
correct, first connect to a Wi-Fi hotspot. This sets the minutes value. If the hour or AM/
PM value is not correct, tap settings > Display > Clock > Time zone to set the time zone
and settings > Display > Clock > Daylight Saving Time to turn Daylight Saving Time on or
off.
NOOK User Guide
Web Browsing
147
Games
Play games on your NOOK. In this release, chess and Sudoku are available.
Display a menu of available games by tapping games on the Home menu:
games
Chess
Chess is a board game with origins in 6th century India (the game chaturanga). Chess has been
played in essentially modern form since the later part of the 15th century (information paraphrased
from Wikipedia). You can use your NOOK’s web browser to search online for information about
playing chess.
On the Home menu, tap games > chess to play chess:
chess
This is the chess board. In this case, you are white and the NOOK is black. From left to right, the
pieces in the first rank (row 1) are the rook, knight, bishop, queen, king, bishop, knight, and rook.
The second rank (row 2) consists of pawns.
NOOK User Guide
Games
148
Help
Help information is available in the chess application. Tap Help to display it. You can use your
NOOK’s web browser to search online for information about playing chess.
Overview
Here is an overview of NOOK Chess to get you started:
•
Starting: On the Home menu, tap games > chess to start the chess application.
•
Settings: In the Chess application, tap Settings to choose your color, difficulty level, time
controls, and other settings.
•
Playing: Tap Play against nook to play a game. Depending on settings, you will start a new game
or resume the prior game.
•
Moves: To move, tap the piece you want to move on the touchscreen, and then tap the
position you want to move it to. To change your mind about the piece to move before moving
it, just tap a different piece. You can undo a move by tapping Undo.
•
Time controls: Time controls in the upper right corner of the touchscreen indicate the
remaining time for each player. A triangle indicates the player whose move it is. No time control
(unlimited time) is displayed as 00:00.
NOOK User Guide
Games
149
•
Menus: When playing, tap the Menu button in the upper left corner of the touchscreen to
display menus. Tap it again to hide them. Start new game, Resign, and View history are the menu
choices.
•
View a history of moves in the current game: Tap the Menu button and then View
history. To dismiss the history, tap the
and then the Menu button again to hide the menus.
Settings
The following are the settings for Chess. You might want to set them before playing.
Setting
Your color
Difficulty
Explanation and Values
Choose your color, White, Black, or Random.
Level of difficulty for the games, including new games and resumed
games. Levels are:
Easy: Level for those who are learning chess. This is the default.
Normal: Level for those who play chess
Time control
Save game before exit
Hard: Level for more experienced chess players
Time limit for cumulative moves for each player. Values are 5, 10 (the
default), and 15.
Whether to automatically save the current game when exiting
Chess.
Yes: Save the current game on exit. This is the default.
Resume prior game on
startup
No: Do not save the current game on exit.
Whether to automatically resume the prior game on startup:
Yes: Resume the prior game on startup (when you choose Play
against nook). If the prior game was finished, start a new game. This
is the default.
No: Start a new game on startup (when you choose Play against
nook).
Starting and Resuming Games
When you leave the Chess application using the Back button or by tapping the Home button, your
NOOK pauses the chess game (the timer controls stop and the last positions are remembered).
To start a chess game, tap Play against nook:
•
If the setting Resume prior game on startup is Yes, and there is a prior game to resume, your
NOOK resumes the prior game.
•
If the setting Resume prior game on startup is No, or if there is no prior game to resume, your
NOOK starts a new game.
NOOK User Guide
Games
150
Playing a Game
You play a game of chess just like you do on a physical chessboard. White moves first. All of the
pieces have their standard moves, which you can look up on the Internet using your NOOK’s web
browser.
To make a move:
1 Study the chess board on the reading screen and decide on your move.
2 On the touchscreen, tap the piece you want to move. You might need to scroll the board to see
the piece. A yellow square appears around that piece on the touchscreen. To change your mind
about the piece to move before moving it, just tap a different piece.
3 Tap the square to which you want to move the piece. If the move is not a permitted one,
nothing happens. If the move is a permitted one, the piece moves.
To undo a move:
If you make a move and do not like it, you can undo it. You can even undo it after the NOOK
makes its move. To undo a move, tap Undo.
To resign:
To resign, tap the Menu button and then tap Resign.
Sudoku
Sudoku is a number puzzle that appeared in French newspapers near the end of the 19th century. It
re-appeared in Dell Magazines in 1979. It is from Japan that we get the name Sudoku. (Information
paraphrased from Wikipedia)
On the Home menu, tap games > sudoku to play Sudoku:
sudoku
The goal of Sudoku is to fill a 9x9 grid so that each column, row, and 3x3 region contains the
numbers from 1 to 9. Each game starts with a partially completed grid. Following is an example of a
puzzle with only the given numbers and the same puzzle completed:
NOOK User Guide
Games
151
Difficulty Levels
All Sudoku puzzles have one solution that can be obtained by logic, without guessing. But they
differ in difficulty based on the number of givens and the difficulty of the logic required to solve the
puzzles.
When you start a game, you choose a difficulty level: Easy, Medium, Hard, or Extreme.
Starting and Resuming Games
If no game is in progress when you start Sudoku, you start a new game. Tap the difficulty level
(Easy, Medium, Hard, or Extreme) to begin the game.
If a game is in progress when you exit Sudoku by tapping the Back button or Home button, the inprogress game is saved. When you play Sudoku again, the saved game resumes.
To abandon a game and start a new one, tap the Back button and then choose a difficulty level for
the new game.
What You Can Enter in a Square
You can enter these numbers in each square:
•
Values: Values are what you want to enter to solve the puzzle. If you have a 3x3 square
that already contains the numbers 1-9, except for 7, you would enter the value 7. Values are
indicated in a font that looks like it was written by hand.
•
Notes: Notes are your notes about possible values. They appear as smaller, hand-written
numbers.
NOOK User Guide
Games
152
•
Hints: Hints are additional given values (that is, they are correct values). If you cannot figure
out the value to put in a square, or have gotten conflicting values, you could enter a hint.
Entering Values
Playing Sudoku entails entering a value in each empty square.
To enter a value in a square:
1 Study the Sudoku grid on the reading screen and decide on a value to enter in a specific square.
2 Scroll the Sudoku board on the touchscreen so that the square is visible.
3 Tap the square.
4 If Notes mode is active (the Notes button is blue), tap Notes.
5 Tap the value you want to enter. One of two things happens:
A black value appears on the touchscreen, and the value appears on the reading screen. In this
case, the value you chose does not conflict with any other values already on the board. It is not,
however, necessarily the correct value to solve the puzzle.
A red value appears on the touchscreen, and the value appears on the reading screen. In this
case, there is some conflict between the value you entered and a value already on the board.
For example, you might have entered a 7 in a square, failing to observe that there is already a 7
further down in the same column,
Entering Notes
Before entering values in squares, you might want to enter notes. Notes let you consider multiple
possibilities. At some stage in the game, you might determine that a square can contain a 4 or 7.
You can enter those as notes. Later, when it becomes clear that the square must contain a 4, you
can replace the notes with the value 4.
When you enter notes, no notes or values are flagged with red to indicate conflicts.
You can use the following procedure to enter notes in an empty square, a square that already
contains notes, and a square that contains a value.
To enter notes or change the notes in a square:
1 Decide on notes to enter in a specific square.
2 Scroll the Sudoku board on the touchscreen so that the square is visible.
3 Tap the square.
4 If the square already contains a value, tap Clear.
NOOK User Guide
Games
153
5 If Notes mode is not active (the Notes button is gray), tap Notes. The Notes button and
numbers turn blue.
6 Tap the numbers you want to enter as notes. The numbers are toggles. If you tap a number and
change your mind, tap the number again.
7 Tap the Back button to continue playing.
Entering Hints
Hints are additional givens that you might want to enter if you cannot figure out values for some of
the squares.
To enter a hint in a square:
1 Study the Sudoku grid on the reading screen and decide to enter a hint in a specific square.
2 Scroll the Sudoku board on the touchscreen so that the square is visible.
3 Tap the square.
4 Tap Hint. A given appears in the square. If values in other squares conflict with the new given,
they are displayed in red.
NOOK User Guide
Games
154
USB Connectivity
You can connect your NOOK to your personal computer using the provided USB cable. Your NOOK
uses USB 2.0.
Connecting your NOOK to your personal computer puts your NOOK in USB drive mode. This lets
you:
•
Obtain content from the Internet and place it on your NOOK
•
Put music, screensaver images, and wallpaper images on your NOOK
•
Back up files
•
Install large software updates
You cannot simultaneously manage files and folders through USB and use your NOOK, so
when your NOOK is in USB drive mode, it is locked. If you are listening to the audio player,
that stops too.
Connecting your NOOK to your Computer
Connect your NOOK to your personal computer with the provided USB cable, as shown.
Computer / USB
USB
Cable
When you connect your NOOK to a personal computer using USB, it enters USB drive mode and
charges. If you want to charge your NOOK and use it (as opposed to using USB drive mode), eject/
unmount the nook drive (and the drive for a supplemental microSD card if present), but leave your
NOOK plugged into the USB port on your computer.
To connect your NOOK to your personal computer using USB:
1 If your NOOK is off, turn it on. If it is asleep, you do not need to wake it.
NOOK User Guide
USB Connectivity
155
2 Using the USB cable, connect your NOOK to a USB port on your computer. Your NOOK enters
USB drive mode, and displays a screen that indicates how to use the device while it is connected
to USB.
3 When your NOOK has connected to USB, your personal computer should detect it:
•
On a PC running Microsoft Windows, you are presented with a choice that includes Open
folder to view files. Choose that. You can also open the nook drive from My Computer.
•
On a Mac, an icon labeled nook appears on your desktop.
•
On a computer running Linux, an icon labeled nook appears on the desktop and a file
manager window appears.
Disconnecting your NOOK from your Computer
Do not simply pull the USB cable out to disconnect your NOOK from your computer. It is
important that you eject/unmount the nook drive, and a drive for a supplemental microSD card if
present.
When you eject/unmount your nook drive from USB (and a supplemental microSD card drive if
present), your NOOK scans for changes in content, and displays an up-to-date list in My Documents.
To disconnect your NOOK from your personal computer:
1 Ensure that no USB operations are still in progress.
2 Use the procedure that is appropriate for your computer to eject or unmount the nook USB
drive, and the drive for the supplemental microSD card if present:
On a PC running Microsoft Windows, click Start > Computer, right-click the nook drive and
choose Eject. If you have a supplemental microSD card, also eject that drive. Choosing Safely
Remove from the right-click menu or Safely Remove Hardware from the taskbar does not
work. You must eject the drives.
On a Mac, Ctrl-Click the icon for each drive and choose Eject.
On a computer running Linux, right-click the icon for each drive and choose Unmount.
At this point, you can use your NOOK for reading. We recommend that you do not shop
or download content while USB charging.
3 Unplug the USB cable from your computer and your NOOK.
NOOK User Guide
USB Connectivity
156
If you don’t eject the drive, you might interrupt an operation that is still in progress. This
can result in files that are corrupted or not copied. It can also leave your NOOK in a state
where it is temporarily not able to connect to USB. If this happens, turn off your NOOK
completely and turn it on again.
One Drive or Two
All NOOKs have internal memory, which is presented as a USB drive when you connect to USB.
The drive has the name NOOK.
If you insert a supplemental microSD card in your NOOK, your NOOK will have two USB drives.
The second one is for the supplemental card.
If you put personal files in the correct locations in the internal memory and on a
supplemental microSD card, then the content will be found. If you put personal files
anywhere else, they will be on your NOOK, but your NOOK will not find them. For more
information, see “Where You Can Put Files” on page 163.
Note the following key points between these drives:
•
The nook drive (for your NOOK’s internal memory) has predefined top-level folders that you
must retain and use.
•
Your NOOK will not find folders or files placed outside of the predefined folder hierarchy on the
nook drive.
•
Your NOOK places B&N content in the folder my B&N downloads. You cannot place content
there.
•
Screensaver and wallpaper images must be placed in the correct folders on the nook drive.
Images placed on the drive for the supplemental microSD card are not available for screensavers
or wallpapers.
•
You can place digital content (eBooks, magazines, and newspapers in EPUB, PDB, and PDF
formats), music (MP3 and OGG files), and audiobooks (MP3 and OGG files) on either drive.
Content you place on the drive for the internal memory competes for space with your
NOOK’s library of B&N content. Your NOOK automatically archives content in the My
B&N Library section of your library if it is running short of space in its internal memory.
If you have a supplemental microSD card, we suggest that you put your personal digital
content and music files on the supplemental microSD card.
NOOK User Guide
USB Connectivity
157
Protection from Viruses and Other Malware
It is unlikely that your NOOK could become infected by a virus or other malware. Your NOOK does
not host applications; this reduces the likelihood of malware infection. The file types supported by
your NOOK are also unlikely to harbor malware, although some of them can. Your nook does have
an Internet browser, which could be a source of infection.
It is possible to transfer files containing malware to and from your NOOK using USB, just as it
is possible to transfer files that are not infected. In some cases, infected computers can transfer
infections to USB drives automatically.
We recommend that any computer to which you connect your NOOK is scanned routinely
with up-to-date antivirus/anti-malware software, and that you scan files before transferring
them to your NOOK.
You can also scan the nook drive and a drive for a supplemental microSD card if present, when
your NOOK is connected to USB.
NOOK User Guide
USB Connectivity
158
Audio
Listen to your favorite music while reading, or while doing other things with your NOOK, such as
browsing your library or shopping. You can also listen to audiobooks, podcasts, or any other MP3
or OGG files.
Open the audio player by tapping audio on the Home menu:
audio
You can also tap Open Audio Player in the top-level menus of the Reader.
Speaker and Headphones
You could listen on your NOOK’s built-in speaker, but we suggest you use a headset (not included)
for audio quality and to not disturb those around you.
You can use any headphones or earphones with your NOOK that have a mini jack (3.5 mm) plug.
This is the standard size for music players and personal computers.
Supported File Types
The audio player supports two file types:
•
MP3: Audio files that use the MPEG-1 Audio Layer 3 digital audio encoding format. Any MP3
file can be played, irrespective of its sampling frequency and bit rate.
•
OGG: Audio files that use the Ogg Vorbis compression format.
Audio streaming is not supported.
Managing Audio Files
You manage audio files on your NOOK through its USB connection to a personal computer. For
more information, see “Files and Folders” on page 163.
NOOK User Guide
Audio
159
Your NOOK looks for audio files in these places:
•
In the my music and my audiobooks folders in your NOOK’s internal memory
•
In any top-level folders that you create in the internal memory or on a supplemental microSD
card
Optionally, you can place audio files in subfolders if you want to organize the files hierarchically.
Playlist
Your NOOK creates one playlist (a series of audio files), which it assembles from all MP3 and OGG
files in the locations mentioned in “Managing Audio Files” above.
You can play the playlist in unshuffled sequence or in a shuffled sequence:
•
The default, unshuffled sequence of the playlist is alphabetical by the titles of songs and
audiobooks.
•
Shuffle the playlist by tapping the Shuffle icon on the audio player.
•
Re-shuffling (tapping the Unshuffle icon and then the Shuffle icon) gives you a different sequence.
When you view the playlist, you see the title and artist (or author for an audiobook). To view
information about the album (or collection or volume for an audiobook), select the item to play it.
Playing an Audio File
You can play music while using your NOOK. You can launch the audio player from any the Home
menu and from the Reader.
To play music:
1 Tap audio on the Home menu or Open Audio Player in the Reader.
Your NOOK displays the audio player on the touchscreen.
It can take a little while before the audio player displays an audio file. This is because it
sometimes has to scan for audio files and construct a playlist.
2 Tap the Play icon to play the currently selected audio file, or tap the Playlist icon to view the
playlist and choose an audio file to play. When you choose the file, it starts playing and the audio
player is displayed.
NOOK User Guide
Audio
160
Viewing what is Currently Playing
In the audio player, this information is displayed about the music that is currently playing:
•
Music: Title, artist, and album, if available. If not available, the file name is displayed.
•
Audiobooks: Title and author, if available. If not available, the file name is displayed.
Audio Player
The same audio player is used for music files and audiobooks (and any other MP3 and OGG files).
Here is the audio player:
From left to right, the controls are:
Control
Explanation
Previous: Double-tap the Previous button to start playing the previous track in
the playlist (or the last track if at the beginning of the playlist).
Tap the Previous button to start playing the currently playing track from the
beginning.
Play/Pause: Tap the Play button to start playing the current music. Tap the Pause
button to pause playing. With playing paused, the next time you open the audio
player, you start on that track unless the audio player scans for audio files, which it
does when you turn your NOOK on and after you manage files using USB.
Next: Tap the Next button to start playing the next track in the playlist.
Volume: Tap the Volume button to change the volume. To change the volume, tap
the desired volume on the volume slider, or touch the ball, move your finger to the
desired volume, and then raise your finger. When you raise your finger, the volume
slider disappears.
NOOK User Guide
Audio
161
Position: Tap the Position button to display or change the current position in the
track. To change the current position in the track, tap the desired position on the
position slider, or touch the ball, move your finger to the desired position, and
then raise your finger. When you raise your finger, the position slider disappears.
00:00
03:26
Shuffle/Unshuffle: Tapping the Shuffle button shuffles the playlist, changing the
order in which the audio files are played. Each random order is different. The
button changes to the Unshuffle button.
Tapping the Unshuffle button restores the playlist to its default, unsorted order
(alphabetical by the Title). The button changes to the Shuffle button.
If an audio file is currently playing, tapping the Shuffle or Unshuffle button does not
change what is playing.
Playlist: Tapping the Playlist button displays a menu that allows you to select
a specific item to play. At the top of the playlist is the Shuffle Playlist or Default
Playlist menu item. These menu items shuffle and unshuffle the playlist in the same
way as the Shuffle and Unshuffle buttons.
Close: Tapping the Close button closes the audio player.
NOOK User Guide
Audio
162
Files and Folders
When your NOOK is connected to your personal computer through USB, you can manage files and
folders on your NOOK.
You can manage personal content on the internal flash memory and on the supplemental microSD
or microSDHC card, if there is one. You also have some ability to manage B&N content.
Use the file manager on your personal computer to manage files and folder. For more information
about this procedure, see “Managing Files” on page 164.
Files you transfer to your NOOK could harbor viruses or other malware. For information about
protecting your NOOK, see “Protection from Viruses and Other Malware” on page 158.
Where You Can Put Files
Your NOOK uses some top-level folders in internal memory to locate specific kinds of
content. You must put specific kinds of files in specific folders, so your NOOK will find
them.
You can put files in these places on your NOOK:
•
Digital reading content (EPUB, PDB, and PDF formats): Place these files in the my
documents folder in your NOOK’s internal memory, or in any top-level folders that you create
in the internal memory or on a supplemental microSD card. Optionally, you can organize the
files using subfolders.
•
Audio files (MP3 and OGG formats): Place these files in the my music and my audiobooks
folders in your NOOK’s internal memory, or in any top-level folders that you create in the
internal memory or on a supplemental microSD card. Optionally, you can organize the files using
subfolders.
•
Screensaver files ( JPG, JPEG, GIF, PNG, and BMP formats): You must place these files in
top-level sub-folders of the folder my screensavers in your NOOK’s internal memory. For
example, in the following organization, only the dogs screensaver files can be used:
rabbit.jpg
my screensavers
     antelope.bmp
     dogs
          schnauzer.png
          poodle.gif
     cats
          longhair
NOOK User Guide
Files and Folders
163
               Persian.jpg
               Balinese.jpg
•
Wallpaper files ( JPG, JPEG, GIF, PNG, and BMP formats): You must place these files in the
folder my wallpapers in your NOOK’s internal memory, not in subfolders.
•
Other files: You can put other files on your NOOK, but your NOOK will not be able to
use them. You can only access them through USB. If you do put other files on your NOOK,
we recommend that you place them in top-level folders that you create, and ideally on a
supplemental microSD card, so that they do not reduce the space available for the My B&N
Library section of your library.
If you use subfolders to organize your digital reading and audio content, when your NOOK presents
the files to you, it flattens the hierarchy and presents a single list.
There are several places that you should not place files:
•
my B&N downloads: Digital content that you purchased and downloaded from Barnes
& Noble.com or from your NOOK (in EPUB and PDB formats). The contents of this folder
are displayed in the My B&N Library section of your library. Do not organize these files into
subfolders.
You can copy files from the my B&N downloads folder, but if you place files in that
folder, your NOOK deletes them.
•
If you authorize your NOOK for use with Adobe Digital Editions, you will also see the folders
.adobe-digital-editions and Digital Editions. These folders do not contain digital content.
Do not place files in these folders.
Do not delete the predefined directories.
USB Access and microSD Card Access
Your NOOK is designed for USB access to your files and folders in the internal memory and on a
supplemental microSD card if present. You can also access the files and folders on a supplemental
microSD card using a suitable card reader (not supplied with your NOOK). If you do use a card
reader, turn off your NOOK fully before removing the microSD card.
Managing Files
Transfer personal files to your NOOK, copying them to the appropriate folders. If you decide
you no longer want specific files on your NOOK, delete them (but keep a copy on your personal
computer).
NOOK User Guide
Files and Folders
164
Use the file manager on your personal computer to manage personal files on your NOOK.
If you put personal files in the correct locations in the internal memory, then the content
will be found. If you put personal files anywhere else, they will be on your NOOK, but your
NOOK will not find them. For more information, see “One Drive or Two” on page 157 and
“Where You Can Put Files” on page 163.
To manage personal files and folders on your NOOK:
1 Connect your NOOK to your personal computer using USB, as explained in “Connecting your
NOOK to your Computer” on page 155.
2 Using a file manager, manage the files and folders. Copy files from your computer to your
NOOK, or from your NOOK to your computer, or move or delete files, or manage folders, in
the same manner as you would manage files on your computer.
3 When you have finished managing files, eject your NOOK.
To copy files to a new microSD card:
1 Use a file explorer to copy or move files from the old microSD card to your personal computer.
2 Insert the new microSD card in your NOOK. For this procedure, see “Changing microSD Cards”
on page 169.
3 Copy or move the files to the new microSD card in your NOOK. Copying is a better idea than
moving, because you have backup copies.
4 After you have verified that the copy operation succeeded, you could delete unneeded files.
Keep a Copy of Your Personal Files
Electronic storage media sometimes fail to preserve your files. They encounter magnetic fields that
are too feisty, get dropped from boats into lakes, and get stolen. It is a good idea to keep copies of
the personal files on your NOOK on your computer.
Regarding your B&N content in the My B&N Library part of your library, if you lose copies
on your NOOK, you can retrieve them from your online digital library. You can also back
them up yourself on your personal computer. If you copy them back to your NOOK, place
them in the my documents folder or on a supplemental microSD card. They will appear
in the My Documents section of your library.
NOOK User Guide
Files and Folders
165
Adding Storage
If you want to increase the storage capacity of your NOOK, you can purchase and insert a
TM
TM
microSD or microSDHC card. microSD and microSDHC cards have the following logos:
Supplemental microSD and microSDHC cards will hold about 1000 eBooks per gigabyte. The
amount of space for eBooks is affected by how much space you devote to other files, such as music
and audiobooks.
Supported Cards
Following are the specifications of supported cards:
•
A microSD or microSDHC card with a storage capacity of up to 16 GB. For simplicity’s sake, we
refer to these both as microSD cards below.
•
Class 2, 4, and 6 microSD cards are supported. Class 6 is faster than class 4, which is faster than
class 2. The class should be mentioned on the packaging for the microSD card and printed on
the card itself. If no speed is indicated, the card is a class 2 card. The speed of the card does
not affect page display speeds. It can affect read and write speeds when transferring eBooks and
personal files to and from the SD card.
•
The microSD card must be formatted with a FAT32 or FAT16 file system.
Inserting a microSD Card
This section explains how to insert a microSD card in your NOOK.
To insert a microSD card:
1 Press the power button for about 5 seconds, until your NOOK turns off. Your NOOK must be
fully off, not just asleep, to insert a microSD card.
2 Remove the back cover. Full instructions are given in “Removing the Back Cover” on page 28.
3 Place your NOOK on a flat surface with the open back facing up and the top away from you.
4 Unlock the metal cover by inserting a fingernail in the slot in the middle of the cover and pushing
the cover toward the top of your NOOK. The metal cover only moves about 1/16th of an inch.
The drawing below shows the orientation of the microSD card and the open microSD card
holder.
NOOK User Guide
Files and Folders
166
microSD Card
Holder
Back (Inside)
5 A rounded, cut-out area below the cover allows you to insert a fingernail to lift the cover. With
your fingernail, lift up the bottom edge of the metal cover, until the cover points up. In the space
for the microSD card, you see eight contacts toward the top of the holder (near the hinge).
6 With the contacts on the microSD card facing down and lined up with the contacts in the holder
(the thicker base toward you and the notch to the right), drop the microSD card into place. You
might need to move it around a bit. It should fit snuggly.
7 With a finger, close the metal cover until it lies flat. The drawing below shows the closed
microSD card holder.
If the cover does not close easily, do not force it. Doing so will damage the microSD card
holder. Instead, ensure that the microSD card is correctly positioned (contacts facing down
and the notch to the right and flat and snug in the holder), and then try again.
microSD Card
Back (Inside)
NOOK User Guide
Files and Folders
167
8 Lock the metal cover by inserting a fingernail in the slot in the middle of the cover and pushing
the cover toward the bottom of your NOOK. The metal cover only moves about 1/16th of an
inch.
9 Replace the back cover. Full instructions are given in “Attaching the Back Cover” on page 30.
10 Power on your NOOK.
Removing a microSD Card
This section explains how to remove a microSD card from your NOOK.
To remove a microSD card:
1 Press the power button for about 5 seconds, until your NOOK turns off. Your NOOK must be
fully off, not just asleep, to remove a microSD card.
2 Remove the back cover. Full instructions are given in “Removing the Back Cover” on page 28.
3 Place your NOOK on a flat surface with the open back facing up and the top away from you.
The microSD card holder has a little metal cover.
microSD Card
Back (Inside)
4 Unlock the metal cover by inserting a fingernail in the slot in the middle of the cover (shown
above as a gray line) and pushing the cover toward the top of your NOOK. The metal cover
only moves about 1/16th of an inch.
5 A rounded, cut-out area below the cover allows you to insert a fingernail to lift the cover. With
your fingernail, lift up the bottom edge of the metal cover, until the cover points straight up. This
reveals the microSD card, as shown in the drawing below.
6 Pick up your NOOK. Holding it over a table, turn your NOOK over so the front is up. The
microSD card will fall out and land on the table. Pick it up and put it somewhere.
NOOK User Guide
Files and Folders
168
microSD Card
Back (Inside)
7 With a finger, close the metal cover until it lies flat.
8 Lock the metal cover by inserting a fingernail in the slot in the middle of the cover and pushing
the cover toward the bottom of your NOOK. The metal cover only moves about 1/16th of an
inch.
9 Replace the back cover. Full instructions are given in “Attaching the Back Cover” on page 30.
10 Power on your NOOK.
Changing microSD Cards
If you decide to change the microSD card in your NOOK (take one out you are currently using and
put a different one in), note the following:
•
For B&N content in your library and personal content in your NOOK’s internal memory, you do
not need to transfer it. It is not on the microSD card.
•
For personal content on the microSD card, you must transfer the content manually, using a USB
connection to a personal computer.
To change the microSD card:
1 Press the power button for 5-9 seconds to turn off your NOOK. Your NOOK must be fully off,
not just asleep, to change a microSD card.
2 Remove the back cover. Full instructions are given in “Removing the Back Cover” on page 28.
3 Place your NOOK on a flat surface with the open back facing up and the top away from you.
4 Unlock the metal cover by inserting a fingernail in the slot in the middle of the cover and pushing
the cover toward the top of your NOOK. The metal cover only moves about 1/16th of an inch.
NOOK User Guide
Files and Folders
169
5 A rounded, cut-out area below the cover allows you to insert a fingernail to lift the cover. With
your fingernail, lift up the bottom edge of the metal cover, until the cover points straight up. This
reveals the microSD card.
6 Pick up your NOOK. Holding it over a table, turn your NOOK over so the front is up. The
microSD card will fall out and land on the table. Pick it up and put it somewhere.
7 Place your NOOK on a flat surface with the open back facing up and the top away from you.
The metal holder should be open.
8 With the contacts on the new microSD card facing down and lined up with the contacts in the
holder (the thicker base toward you and the notch to the right), drop the microSD card into
place. You might need to move it around a bit. It should fit snuggly.
9 With a finger, close the metal cover until it lies flat.
If the cover does not close easily, do not force it. Doing so will damage the microSD card
holder. Instead, ensure that the microSD card is correctly positioned (contacts facing down
and the notch to the right and flat and snug in the holder), and then try again.
10 Lock the metal cover by inserting a fingernail in the slot in the middle of the cover and pushing
the cover toward the bottom of your NOOK. The metal cover only moves about 1/16th of an
inch.
11 Replace the back cover. Full instructions are given in “Attaching the Back Cover” on page 30.
12 Power on your NOOK.
Media Scanning After a microSD Card Change
If you turn your NOOK completely off before inserting, removing, or changing the microSD card (as
recommended), then when your NOOK turns on, it scans the microSD card to look for changes and
updates the library catalog accordingly.
If you inserted, removed, or changed the microSD card with the device on or sleeping, this media
scan does not happen. To cause the media scan to happen, turn your NOOK off (completely; not
just causing it to sleep) and then turn it on again.
Putting a microSD card from One NOOK into a Replacement NOOK
This section concerns the supplemental microSD card. But here is a reminder: Remember
to back up any files in the internal memory that you want to keep.
NOOK User Guide
Files and Folders
170
If you take a microSD card out of one NOOK and put it into a replacement NOOK, the personal
files on the microSD card will be available on the replacement NOOK.
B&N content in the library will be available on the replacement NOOK after registration.
B&N content that is not in your library (that has been copied to personal folders) will also be
available, if you placed it on the supplemental microSD card or copy it back to your NOOK from a
personal computer using USB.
NOOK User Guide
Files and Folders
171
Platforms
You can read your B&N eBooks across a wide range of platforms in addition to your NOOK,
including the iPhone® and iPod touch®, BlackBerry® smartphones, as well as most Windows® and
Mac® laptops and desktop computers.
Start the day reading an eBook on your NOOK, switch to a smartphone while commuting (not while
driving), to your personal computer during your lunch break, and back to your NOOK when you get
home.
The online digital library for all of your B&N eReaders is the same. You can also access your online
digital library from BN.com.
Synchronizing Reading Across Devices
If you read the same B&N content on multiple devices, you can have your NOOK and the other
B&N eReaders synchronize your current reading position across devices. At the time when this
guide goes to press, synchronization of the current reading position works on all platforms except
for BlackBerry® smartphones and Mac® laptops. For information, see “Synchronizing Reading
Across Devices” on page 127.
NOOK User Guide
Platforms
172
Software Updates
If your NOOK is not registered, you will not receive messages about software updates in
The Daily. You can download software updates from the support section of the NOOK
website, www.nook.com/support.
Software updates fix problems with the software. They also contain new features. Updates are
required. You can find out what an update contains at www.nook.com/support.
Wireless Updates
Each time your registered NOOK turns on from fully off or synchronizes, it checks to determine
whether the software it is running is the latest available. It also checks immediately after registration.
If more current software is available and your NOOK can download it wirelessly, your NOOK
downloads and installs the software. It displays a message that informs you that the update is
occurring. A restart is a part of the update process. Do not turn off your NOOK.
Prior to downloading the software update, your NOOK determines whether the wireless signal
strength is sufficient for the download.
Your nook might not be able to download the update wirelessly in these cases:
•
NOOK Wi-Fi: Your NOOK is not connected to a Wi-Fi hotspot.
•
NOOK (Wi-Fi + 3G model): Your NOOK is not connected to a Wi-Fi hotspot. Your NOOK
has also not detected a B&N Fast & Free Wireless network, or the update is too large to
download over the B&N Fast & Free Wireless network.
Some software updates require a Wi-Fi connection. If your nook cannot download an
update wirelessly, you receive a message in The Daily that contains information about how
to connect to a Wi-Fi hotspot, and about how to obtain the update from www.nook.com/
support and transfer it to your NOOK using USB.
USB Updates
Some software updates must be downloaded over Wi-Fi or transferred to your NOOK using USB.
Software updates for unregistered NOOKs must be transferred using USB. You can obtain the
current software update from the website www.nook.com/support. Information about how to
transfer the update to your NOOK using USB is also available from the website.
NOOK User Guide
Software Updates
173
To update software using USB:
1 Tap settings on your NOOK’s home menu, and ensure that the battery charge is at 20% or
more. If it is not, charge your NOOK.
2 Connect your NOOK to your personal computer using USB. For this procedure, see
“Connecting your NOOK to your Computer” on page 155.
3 Direct a web browser to www.nook.com/support and find the update file.
4 Click on the file in the browser, which will display an option to save the file. Save the update file
to the top of the main NOOK USB drive (which is named nook). Or save it on your computer
and then drag and drop it onto the nook drive. Wait for the file transfer to complete.
5 Eject/unmount the nook drive (and supplemental drive if you have one). Your NOOK will
recognize the file and begin the update process. Do not turn off your NOOK until after it has
restarted.
Update Stages
The update process has several stages:
Wireless Download
Some software updates are downloaded wirelessly. During the download, you can continue using
your NOOK.
If a download does not complete, for example, because the wireless connection is lost, your NOOK
attempts to continue the download the next time it synchronizes.
Preparation
After an update is downloaded wirelessly or transferred to your NOOK via USB, your NOOK
prepares for installation. During this process, your NOOK displays a Preparing update message in
the lower right corner of the reading screen, along with a percentage complete. You can continue
to use your NOOK, but the installation process will start soon.
Installation
After the preparation stage, your NOOK installs the update. While it installs the update, your NOOK
displays a message on the reading screen that indicates it is doing so. During this stage and the next
one, you cannot use your NOOK.
If the installation fails for some reason, for example, if the battery charge is critically low, your
NOOK will try the installation again the next time it is powered on.
NOOK User Guide
Software Updates
174
Restart
Following installation of a software update, your NOOK restarts. When it restarts, your NOOK:
•
Saves any unsaved state information such as reading position and notes
•
Closes the audio player, if it is running
•
Displays the Home screen when it reboots. The daily will have a notification that the update has
completed.
If you were reading when the update occurred, you will be returned to your last reading position
when you re-open the book.
NOOK User Guide
Software Updates
175
Settings
Settings let you control your NOOK experience. Set display characteristics, wallpaper, screensavers,
etc.
Manage settings by tapping settings on the Home menu:
settings
To change a setting:
1 On the Home menu, tap settings.
2 Scroll up and down in the menus, choosing sub-menus until you reach the choice of settings.
The current value of the setting has a check mark
next to it.
3 Tap the setting to choose it.
Settings Summary
When you tap settings on the Home menu, your NOOK displays a summary of important settings.
The settings on the first page of the settings summary are:
Setting
Owner name
Name of your nook
Email address
Software version
microSD card
Internal memory
Total memory
Battery charge
Wi-Fi hotspot
Serial number
MAC address
NOOK User Guide
Explanation and Values
Your name
An optional name for your NOOK
Email address of the Barnes & Noble online account associated with your
NOOK (if registered)
Version of the software running on your NOOK
Available and total memory on the supplemental microSD card, if present
Available and total internal memory
Available and total memory counting both the internal memory and a
supplemental microSD card, if present
Battery charge percentage
The name of the Wi-Fi hotspot to which your NOOK is connected, or
Disconnected
(NOOK Wi-Fi) Serial number of your NOOK
(NOOK Wi-Fi) A hardware address for your NOOK
Settings
176
On the Wi-Fi + 3G model, the settings summary has a second page. The second page displays
device information that you will not need to refer to, but that might be useful for Customer Service.
All Settings
The following are all of the settings:
Setting
Airplane mode
Wi-Fi
Explanation and Values
Off (default): The radio is on. Wi-Fi connections work, unless
Wi-Fi is turned off (on Wi-Fi + 3G model NOOKs). On Wi-Fi
+ 3G model NOOKs, B&N Fast and Free Wireless connections
work. Features that require wireless connections work.
On: For use on airplanes and in other settings where radio
transmissions are not allowed. Turns the radio off. On Wi-Fi +
3G model NOOKs, both B&N Fast and Free Wireless and Wi-Fi
connections are off. The Shop is not accessible, synchronizations
do not occur, notices are not delivered to The Daily, content
cannot be downloaded to your NOOK, and you cannot browse the
web.
NOOK (Wi-Fi + 3G model): On (default): Wi-Fi connectivity is
turned on. Your NOOK detects Wi-Fi hotspots and can connect
to them.
NOOK (Wi-Fi + 3G model): Off: Wi-Fi connectivity is turned
off. Your NOOK does not detect or connect to Wi-Fi hotspots.
For NOOK Wi-Fi, use Airplane mode to turn Wi-Fi on and off.
Wi-Fi hotspot > Add Wi-Fi hotspot: Manually add a Wi-Fi
hotspot.
Display > Sleep timer
Display > Screensaver
Display > Wallpaper
Display > Clock > Time zone
NOOK User Guide
Wi-Fi hotspot > Hotspot names: The names of detected,
remembered, and configured hotspots are listed. You can
connect to and forget hotspots.
Time from last activity (touch screen or button presses) until
your NOOK sleeps. During sleep, a screensaver picture is
displayed on the main screen. The touch screen will already
be unlit. You can choose among 2, 5 (default), 10, 15, and 20
minutes.
Choose a screensaver theme. Your NOOK comes with the
screensaver themes Authors, Nature, and Cityscape preinstalled.
Choose a wallpaper image.
Time zone in which you use your NOOK. You only need to set
the time zone on a NOOK Wi-Fi, and on a NOOK (Wi-Fi +
3G model) when you are in an area without B&N Fast & Free
Wireless coverage.
Settings
177
Display > Clock > Daylight Saving On: The time is adjusted for Daylight Saving Time.
Time
Off (default): The time is not adjusted for Daylight Saving Time.
Display > Clock > Clock format 12 hour (for example, 3:25 PM)
24 hour (for example, 15:25)
Display > Auto adjust brightness
The clock format change is not immediate, but happens the next
time the time changes.
On (default): Brightness of the touchscreen is adjusted
automatically based on ambient light. Both the full brightness
and the half brightness (when the touch screen is dimmed after
a period of inactivity) are adjusted.
Off: Brightness of the touchscreen is determined by the Display
> Brightness setting.
Display > Touchscreen brightness Brightness of the touchscreen. A slider control is displayed. Tap
the desired location on the slider, or touch the ball, move your
finger to the desired location, and then raise your finger.
Display > Touchscreen timer
Device > Edit your profile
Device > Register your nook
Device > Unregister your nook
Device > Disable purchase
password protection
NOOK User Guide
Tap
to close the slider.
Time from last touch screen activity until the touch screen
backlight is turned off. You can choose among 10, 30 (default),
and 60 seconds.
When half of this time period is reached, your NOOK dims the
touch screen to 50% of its current brightness.
Specify your name and a name for your NOOK. The name of
your NOOK is displayed in the status bar on the Home screen
and on the Settings summary page. If you specify only your
name, that is used to name your NOOK (for example, Jeff’s
nook).
Associate your NOOK with a Barnes & Noble online account
that has been previously created on the Barnes & Noble.com
website.
Unregister your NOOK. This removes the association of your
NOOK with a Barnes & Noble online account. It also removes
B&N content from your NOOK.
Your NOOK does not prompt for the Barnes & Noble online
account password when the user makes a purchase, including
purchasing free samples and items.
Settings
178
Device > Enable purchase
password protection
Device > Reset to factory
settings
Contacts > Add a New Contact
Your NOOK prompts for the Barnes & Noble online account
password when the user makes a purchase, including purchasing
free samples and items. For more information, see “Requiring an
Account Password for All Purchases” on page 182.
Disable pass code protection of your NOOK.
Enable pass code protection of your NOOK. You will need to
enter the pass code each time your NOOK turns on or wakes
from sleep. For more information, see “Protecting your NOOK
with a Pass Code” on page 180.
Reset all settings to factory defaults. For more information, see
“Resetting to Factory Settings” on page 183.
Specify the contact’s name and email address.
Contacts > Contact name
The name can be in any format (first name first or last, etc.)
Contacts are listed in the menus in alphabetical order.
You can edit or delete an existing contact.
Device > Disable pass code
Device > Enable pass code
Procedures for Contacts
Following are procedures for contacts.
To view defined contacts:
1 On the Home menu, tap settings.
2 Tap Contacts. Defined contacts are listed in the menus.
To add a contact:
1 On the Home menu, tap settings.
2 Tap Contacts > Add a New Contact.
3 Type the contact’s name and email address in the form.
4 Tap Submit.
To edit a contact:
1 On the Home menu, tap settings.
2 Tap Contacts.
3 Tap the name of the contact you want to edit.
4 Make edits in the form.
NOOK User Guide
Settings
179
5 Tap Submit.
To delete a contact:
1 On the Home menu, tap settings.
2 Tap Contacts.
3 Tap the name of the contact you want to delete.
4 Tap Delete.
Security Settings
This section explains optional settings that provide additional security for your NOOK.
Protecting your NOOK with a Pass Code
It is important that you remember your pass code. Write it down somewhere. There
are procedures for getting around a forgotten pass code, but those can entail a call to
Customer Service and/or resetting your NOOK to factory settings, which can result in the
loss of content as explained in “Resetting to Factory Settings” on page 183.
You can require that the person using your NOOK enter a pass code (that is, a password) to do so.
If a pass code is enabled, you would need to enter a password in these cases:
•
After your NOOK powers on
•
When waking your NOOK from sleep
When your NOOK prompts for the pass code, type it and tap Submit.
This pass code does not need to be the same as the password for your Barnes & Noble
online account (though it can be the same). It is a separate password; changing one does
not change the other.
To enable pass code protection and set your pass code:
1 On the Home menu, tap settings.
2 Tap Device > Enable pass code.
3 Type and confirm your pass code in the form, and then tap Submit.
NOOK User Guide
Settings
180
To change your pass code:
To change your pass code, disable your pass code and then enable the pass code again.
To disable pass code protection:
1 On the Home menu, tap settings.
2 Tap Device > Disable pass code.
3 Type your pass code in the form, and then tap Submit.
If you forget your pass code or typed it wrong on a registered NOOK:
1 If you mistype your passcode, your NOOK prompts you to try again. Tap OK and re-enter your
pass code. You can try again twice.
2 When you have entered your pass code wrong three times, you are given the choice to Start
over or to Disable pass code using account credentials. Start over lets you try three more times,
and then Start over is an option again. You can start over as many times as you like.
3 If you tap Disable pass code using account credentials, you have three chances to enter the
Email address and password of the Barnes & Noble online account to which your NOOK is
registered.
4 If you enter your account email address and password wrong three times, you are again given
the option to start over. You start over from the beginning (entering your pass code, followed by
entering your account credentials).
5 The other option at this point is to call Customer Service. The message on the reading screen
gives you the phone number. Don’t tap I have spoken with Customer Service until after you
have spoken with Customer Service. Call Customer Service. Customer Service will confirm
your identity and then issue a forgotten-password email. The email is sent to the email account
associated with your account. It contains a new password. Customer Service also unregisters
your NOOK.
6 Tap I have spoken with Customer Service. You are informed that your NOOK will be reset to
factory settings. If you tap OK, your NOOK will be reset to factory settings. For information
about the impact of resetting your NOOK to factory settings, see “Resetting to Factory Settings”
on page 183. Then tap Confirm twice to confirm that you want to reset your NOOK to factory
settings.
If you do not want to reset your NOOK to factory settings, the only other option is to tap
Cancel and start again from the beginning of this procedure.
7 Register your NOOK again using the email address associated with your online Barnes & Noble
account and the new password from the forgotten password email.
NOOK User Guide
Settings
181
If you forget your pass code or typed it wrong on an unregistered NOOK:
1 If you mistype your passcode, your NOOK prompts you to try again. Tap OK and re-enter your
pass code. You can try again twice.
2 When you have entered your pass code wrong three times, you are given the choice to Start
over or to Perform factory reset. Start over lets you try three more times, and then Start over is
an option again. You can start over as many times as you like.
3 The only other option is to perform a factory reset. For information about the impact of
resetting your NOOK to factory settings, see “Resetting to Factory Settings” on page 183. Tap
Perform factory reset, and then tap Confirm twice to confirm that you want to reset your
NOOK to factory settings.
Requiring an Account Password for All Purchases
By default, anyone using your NOOK can make purchases. As a means of preventing unauthorized
purchases, you can require that anyone making purchases enter the password of the Barnes &
Noble online account to which the NOOK is registered. This is not the same password as the one
for password protecting your NOOK, which is explained in “Protecting your NOOK with a Pass
Code” on page 180.
If you require a password for purchases, the password applies to all purchases, including
free samples and free items.
Examples of when this would be useful include:
•
When the NOOK is shared, for example in a family, but you do not want everyone in the family
to be able to purchase digital reading content.
•
If you loan your NOOK to a friend who might imagine (incorrectly) that the friendship extends
to him/her buying four books. (“I knew you wouldn’t mind....”)
•
To add security if you are concerned about the impact of possible loss or theft.
To require an account password for purchases:
1 On the Home menu, tap settings.
2 Tap Device > Enable purchase password protection.
3 In the form, type the account password of the Barnes & Noble online account to which your
NOOK is registered, and then tap Submit. If you type your password incorrectly, you can try
again as many times as needed.
To not require an account password for purchases:
1 On the Home menu, tap settings.
NOOK User Guide
Settings
182
2 Tap Device > Disable purchase password protection.
3 In the form, type the account password of the Barnes & Noble online account to which your
NOOK is registered, and then tap Submit. If you type your password incorrectly, you can try
again as many times as needed.
Resetting to Factory Settings
You can reset your NOOK to factory settings. You might want to do this before selling your NOOK,
for example.
Resetting your NOOK deletes all B&N content from your NOOK. It also deletes all
personal content from your NOOK’s internal memory. Make sure anything you want to
keep is backed up to your personal computer. Resetting your NOOK to factory settings
does not unregister your NOOK. You must unregister your NOOK first.
Resetting your NOOK to factory settings:
•
Deletes B&N content on your NOOK
•
Deletes personal content in the internal memory
•
Does not delete personal content on a supplemental microSD card if present. Delete personal
content using USB or remove the microSD card as appropriate.
•
Deletes all metadata (for example, bookmarks, highlights, notes, and current reading position)
•
Deletes information used to unlock DRM-secured content
•
Resets settings to factory defaults. Wi-Fi hotspots and the owner and device profile are deleted.
To reset your NOOK factory settings:
Unregister your NOOK as a separate, prior step. Resetting to factory defaults does not
delete content on a supplemental microSD card. Delete content using USB or remove the
card as appropriate.
1 On the Home menu, tap settings.
2 Unregister your NOOK. Tap Device > Unregister your nook. If the unregistration does not
succeed, make sure you have network connectivity and try again later.
3 After the unregistration succeeds, reset your NOOK to factory settings. Tap Device > Reset to
factory settings. Then tap Confirm twice.
NOOK User Guide
Settings
183
Policies
This chapter contains B&N policies and regulatory notices that apply to your NOOK and your use
of your NOOK, as well as additional information about the wireless radio:
•
Legal notices: See “Legal Notices” below.
•
Terms of Service: See “NOOK™ Terms of Service” on page 185. Terms of Service can also be
found here:
www.nook.com/legal
•
One Year Limited Warranty: See “One Year Limited Warranty” on page 205. The warranty
can also be found here:
www.barnesandnoble.com/nook/protectionplan
•
B&N Protection Plan: The B&N Protection Plan can be found here:
www.barnesandnoble.com/nook/protectionplan
•
AT&T Terms of Service & Acceptable Use Policy: These policies govern your use of
AT&T Wi-Fi hotspots with your NOOK. See “AT&T Terms of Service & Acceptable Use Policy”
on page 209.
•
FCC notices and links to additional information about the wireless radio: See “FCC
Notices” on page 222.
Legal Notices
Following are legal notices pertaining to your NOOK. Also see “AT&T Terms of Service &
Acceptable Use Policy” on page 209.
Abobe® Reader® Mobile Software
®
®
This NOOK contains Adobe Reader Mobile software under license from Adobe Systems
Incorporated, Copyright © 1995-2009 Adobe Systems Incorporated. All rights reserved. Adobe and
Reader are trademarks of Adobe Systems Incorporated.
Helvetica® Font
Helvetica is a trademark of Linotype Corp. registered in the U.S. Patent and Trademark Office
and may be registered in certain other jurisdictions in the name of Linotype Corp. or its licensee
Linotype GmbH.
NOOK User Guide
Policies
184
Merriam-Webster® and Collegiate®
Merriam-Webster and Collegiate are trademarks of Merriam-Webster, Inc. and are used herein
pursuant to license. Copyright © 2009 Merriam-Webster, Inc. All rights reserved.
microSDTM and microSDHCTM Logos
microSD and microSDHC Logos are trademarks of SD-3C, LLC.
Wi-Fi®
®
®
The term Wi-Fi is a registered trademark of the Wi-Fi Alliance .
AT&TTM
AT&T, the AT&T logo and all other AT&T marks contained herein are trademarks of AT&T
Intellectual Property and/or AT&T affiliated companies.
NOOK™ Terms of Service
These Terms of Service (this “Agreement”) is a legally binding agreement made by and between
Barnes & Noble, Inc. (“we,” “us,” or “our”) and you regarding your use of your NOOK™ eReader
(“NOOK”).
THIS AGREEMENT SETS FORTH THE RIGHTS AND OBLIGATIONS APPLICABLE TO THE
USE OF YOUR NOOK, SO PLEASE READ IT CAREFULLY BEFORE USING YOUR NOOK. BY
USING YOUR NOOK, YOU AGREE THAT YOU HAVE READ, UNDERSTAND AND AGREE TO
BE BOUND BY THIS AGREEMENT. IF YOU DO NOT AGREE TO BE SO BOUND, YOU MUST
RETURN YOUR NOOK AND RELATED SOFTWARE AS PROVIDED IN SECTION 1(b) BELOW.
1.
Using Your NOOK.
(a)
Your NOOK, the Service and Digital Content. Your NOOK is an electronic device that is
designed to allow you to read digitized electronic content such as eBooks and digital periodicals
(“Digital Content”). Your NOOK is also designed to connect wirelessly to the Internet to enable
you to browse, preview, search for, purchase and download Digital Content; access the Barnes &
Noble.com Web Site (the “Web Site”); and access, use, and participate in other services, features,
functions and promotions (collectively, the “Service”).
(b)
Returns. You may return your NOOK (and any related accessories and documentation
that were shipped with your NOOK) within fourteen (14) days of the date of purchase (sixty (60)
days with a gift receipt) for a refund of its purchase price; provided that you return your NOOK
(including any included accessories and peripherals) in its original packaging and in undamaged
condition. The procedures for contacting us to arrange for a return are provided in the One Year
Limited Warranty. Unless we determine that your NOOK is covered by the One Year Limited
Warranty, a ten percent (10%) restocking fee will be deducted from the refund if the package has
been opened. If you discover a defect in your NOOK after fourteen (14) days (sixty (60) days with
NOOK User Guide
Policies
185
a gift receipt), your rights to receive a replacement NOOK or a refund are provided in the One Year
Limited Warranty.
(c)
Terms of Use. You must open a Barnes & Noble.com account and register your NOOK
in accordance with the Terms of Use on the Web Site (the “Terms of Use”) in order to use the
Service. In your use of the Service, in particular, your downloading and use of Digital Content, you
must comply with the Terms of Use and any terms applicable to any Digital Content that you obtain
from a third party. The Terms of Use will apply when you access the Web Site in connection with
using your NOOK.
(d)
Wireless Connection. Your NOOK has built-in wireless Internet connectivity capabilities.
We will use commercially reasonable efforts to provide wireless Internet connectivity at no
additional cost to you. The wireless connectivity is provided by a third-party carrier and may be
subject to restrictions and limitations imposed by such carrier, such as coverage area, file size and
carrier policies.
(e)
No Responsibility for Digital Content. Your NOOK is designed to permit you access to
a wide variety of Digital Content, some of which may be inappropriate for, or offensive to, some
readers. We do not exercise any editorial control over the Digital Content. We provide only your
NOOK and the Service, which are intended to allow you access to the Digital Content. Under no
circumstance will we be liable for any loss, damage or harm caused by your access to or reliance
on the Digital Content. You must determine whether the Digital Content accessed through your
NOOK is appropriate, useful, accurate and complete. Your use of the Digital Content and the
Service is solely at your own risk.
2.
License and Intellectual Property.
(a)
License. Subject to your compliance with and the terms and conditions of this Agreement,
we grant you a non-exclusive, revocable license to make personal, non-commercial use of: (i) the
Service; (ii) the software loaded onto your NOOK, as may be updated, modified, added to or
upgraded from time to time (the “Software”); and (iii) any printed or electronic documentation for
such Software (the “Documentation”), all solely for the purposes that we intend, as described on
the Web Site and in the Documentation.
(b)
Third-Party Software. Certain portions of the Software are subject to separate licensing
terms as set forth in Attachment 1. By using your NOOK, you agree that you have read, understand
and agree to be bound by such terms.
(c)
Reservation of Rights. The sale of your NOOK to you does not transfer to you any right,
title or interest in or to any of our intellectual property rights or those of our suppliers or licensors.
For example, all Software is either owned by us or is the property of our suppliers or licensors.
The Software has been licensed, not sold, to you. © 2009 BARNES & NOBLE, INC. ALL RIGHTS
RESERVED. Your NOOK, portions thereof, the Service or methods or processes related to either
of them may be covered by one or more patents or pending patent applications. NOOK™, n™,
Barnes & Noble® and B&N® are our trademarks. Other trademarks shown on your NOOK or
through the Service are owned by our suppliers or licensors. Other than the limited license granted
to you in this Section 2, you have no other right, title or interest in or to the Service, Software
or Documentation. Any rights not expressly granted to you are fully reserved by us and our
NOOK User Guide
Policies
186
suppliers or licensors, as applicable, and no such rights are conferred by estoppel, operation of law,
implication or otherwise.
(d)
Restrictions. Except as may be expressly permitted by this Agreement, you may not,
directly or indirectly: (i) use the Software on any device other than your NOOK; (ii) use, copy,
modify, distribute copies of, display or transmit the Software; (iii) disassemble, reverse engineer,
emulate, decompile, tamper with, create derivative works from or otherwise attempt to discover
the source code of the Software or technology used to provide the Service or attempt to reduce
the Software to human-readable form; (iv) bypass, modify, defeat, tamper with or circumvent any of
the security features of your NOOK or the Service, including, without limitation, altering any digital
rights management functionality of your NOOK or the Software; or (v) share access to the Software
or Service, whether through a network, resale or other means.
(e)
U.S. Government End Users. The Software and Documentation are “commercial computer
software” or “commercial computer software documentation” as those terms are defined in 48
C.F.R. 252.227-7014(a)(1) (2007) and 252.227-7014(a)(5) (2007). The U.S. Government’s rights
with respect to the Software and Documentation are limited by this Agreement pursuant to FAR §§
12.212 (Computer Software) (1995) and 12.211 (Technical Data) (1995) and/or DFAR 227.7202-3,
as applicable. As such, the Software and Documentation are being licensed to the U.S. Government
end users: (i) only as “Commercial Items” as that term is defined in FAR 2.101 generally and as
incorporated in DFAR 212.102; and (ii) with only those limited rights as are granted to the public
pursuant to this Agreement. Under no circumstance will the U.S. Government or its end users be
granted any greater rights than we grant to other users, as provided for in this Agreement.
3.
Prohibited Conduct. In your use of your NOOK or the Service, you may not: (i)
transfer the Digital Content from one electronic reading device to another without maintaining
the applicable digital rights management solution for that Digital Content; (ii) infringe, violate, or
interfere with any patent, trademark, trade secret, copyright, right of publicity or any other right of
any party; (iii) violate any law, rule or regulation, including, without limitation, U.S. export control
laws; (iv) copy, transfer, sublicense, assign, rent, lease, lend, resell or in any way transfer any rights
to, all or any portion of the Digital Content to any third party, except in connection with the
normal use of the lending feature available through the Service, or as expressly permitted by the
Terms of Use or applicable third-party license agreement; (v) broadcast, transmit or distribute the
Digital Content in any manner, such as online streaming or making the Digital Content available
for download; (vi) interfere with or damage the Service, including, without limitation, through the
use of viruses, cancel bots, Trojan horses, harmful code, flood pings, denial of service attacks,
packet or IP spoofing, forged routing or electronic mail address information or similar methods or
technology; (vii) violate any third-party contract or policy governing the Service, Software or Digital
Content; (viii) open, modify, service or tamper with your NOOK; (ix) engage in any activity that
interferes with any third party’s ability to use or enjoy the Service; (x) delete, destroy or alter in
any manner the proprietary rights notices, markings and legends appearing on your NOOK, or the
Digital Content, Software or Service; (xi) use the wireless connectivity provided by us for any other
purpose other than in connection with the Service; or (xii) assist or encourage any third party in
engaging in any activity prohibited by this Agreement.
4.
Privacy and Security.
NOOK User Guide
Policies
187
(a)
Privacy. You agree that we may use, collect and share your information in accordance with
our Privacy Policy. In particular, we will collect, use and/or disclose information regarding you and
your use of your NOOK and the Service in order to: (i) provide the Service to you; (ii) permit you
to engage in activities that you initiate through the Service, such as purchasing Digital Content and
reviewing products; and (iii) analyze, operate, support, maintain and improve your NOOK or the
Service.
(b)
Security. We employ measures designed to ensure the security of the Service, but, as
provided below, make no guarantees in this regard.
5.
SUPPORT. WE HAVE NO OBLIGATION TO MAINTAIN OR SUPPORT THE
SOFTWARE OR THE SERVICE. WE AND OUR SUPPLIERS OR LICENSORS MAY, WITHOUT
FURTHER NOTICE TO YOU, PERIODICALLY ACCESS YOUR NOOK REMOTELY TO UPDATE,
MODIFY, ADD TO OR UPGRADE THE SOFTWARE. IN RARE INSTANCES, SUCH UPDATES,
MODIFICATIONS, ADDITIONS OR UPGRADES MAY CAUSE DATA LOSS OR OTHER ISSUES.
YOU ARE SOLELY RESPONSIBLE FOR REGULARLY BACKING UP THE DATA STORED ON
YOUR NOOK TO PREVENT THIS FROM OCCURRING.
6.
Indemnification. You will defend, indemnify and hold us and our affiliates, and our and
their employees, representatives, agents, attorneys, directors, officers, managers, shareholders,
suppliers and licensors (the “Indemnified Parties”) harmless from any damage, loss, cost or expense
(including, without limitation, attorneys’ fees and costs) incurred in connection with any third-party
claim, demand or action (“Claim”) brought or asserted against any of the Indemnified Parties arising
from, related to, or connected with your alleged breach of this Agreement. If you are obligated
to provide indemnification pursuant to this provision, we may, in our sole and absolute discretion,
control the disposition of any Claim at your sole cost and expense. Without limitation of the
foregoing, you may not settle, compromise or in any other manner dispose of any Claim without
our written consent.
7.
DISCLAIMERS; EXCLUSIONS AND LIMITATIONS.
(a)
DISCLAIMER OF WARRANTIES. EXCEPT FOR THE ONE YEAR LIMITED WARRANTY
THAT WE PROVIDE FOR YOUR NOOK, WE AND OUR SUPPLIERS AND LICENSORS
PROVIDE YOUR NOOK, THE DIGITAL CONTENT, THE SOFTWARE AND THE SERVICE ON
AN “AS IS” AND “AS AVAILABLE” BASIS WITHOUT ANY REPRESENTATION OR WARRANTY
WHATSOEVER. THE USE OF YOUR NOOK, THE SERVICE, DIGITAL CONTENT AND
SOFTWARE IS AT YOUR SOLE RISK. WE DO NOT REPRESENT OR WARRANT THAT YOUR
NOOK, THE SOFTWARE, THE SERVICE OR THE DIGITAL CONTENT, OR ITS OR THEIR
USE WILL: (I) BE UNINTERRUPTED OR SECURE; (II) BE FREE OF DEFECTS, INACCURACIES
OR ERRORS; OR (III) MEET YOUR REQUIREMENTS. WE HEREBY DISCLAIM ANY AND ALL
WARRANTIES, EXPRESS OR IMPLIED, INCLUDING, WITHOUT LIMITATION, THE IMPLIED
WARRANTIES OF FITNESS FOR A PARTICULAR PURPOSE, LACK OF HIDDEN OR LATENT
DEFECTS, SECURITY, MERCHANTABILITY, QUIET ENJOYMENT AND NON-INFRINGEMENT.
(b)
EXCLUSION OF DAMAGES. TO THE MAXIMUM EXTENT PERMITTED BY LAW, WE
AND OUR SUPPLIERS AND LICENSORS WILL NOT BE LIABLE TO YOU OR ANY THIRD
PARTY FOR ANY CONSEQUENTIAL, SPECIAL, INCIDENTAL, PUNITIVE OR OTHER INDIRECT
DAMAGES ARISING FROM, RELATING TO OR CONNECTED WITH YOUR PURCHASE
NOOK User Guide
Policies
188
OR USE OF YOUR NOOK, THE SERVICE, THE SOFTWARE, OR THE DIGITAL CONTENT,
INCLUDING, WITHOUT LIMITATION, LOST PROFITS, LOST REVENUE OR LOST DATA,
REGARDLESS OF THE CAUSE OF ACTION ON WHICH THE CLAIM IS BASED, INCLUDING,
WITHOUT LIMITATION, NEGLIGENCE, TORT, CONTRACT, STRICT LIABILITY, PRODUCT
DEFECT OR MISREPRESENTATION, EVEN IF ADVISED OF THE POSSIBILITY OF SUCH
DAMAGES.
(c)
LIMITATION OF LIABILITY. TO THE MAXIMUM EXTENT PERMITTED BY LAW, IN NO
EVENT WILL OUR OR OUR SUPPLIERS’ OR LICENSORS’ AGGREGATE LIABILITY ARISING
FROM, RELATING TO OR IN CONNECTION WITH THIS AGREEMENT (INCLUDING,
WITHOUT LIMITATION, CLAIMS RELATING TO YOUR NOOK, THE DIGITAL CONTENT, THE
SOFTWARE OR THE SERVICE) EXCEED THE PRICE PAID BY YOU FOR YOUR NOOK.
(d)
STATE LAW. CERTAIN STATE LAWS DO NOT ALLOW LIMITATIONS ON IMPLIED
WARRANTIES OR THE EXCLUSION OR LIMITATION OF CERTAIN DAMAGES. AS SUCH,
SOME OR ALL OF THE ABOVE DISCLAIMERS, EXCLUSIONS OR LIMITATIONS MAY NOT
APPLY TO YOU, AND YOU MAY HAVE ADDITIONAL RIGHTS.
(e)
ESSENTIAL PURPOSE. UNLESS LIMITED OR MODIFIED BY APPLICABLE LAW, THE
FOREGOING DISCLAIMERS, EXCLUSIONS AND LIMITATIONS APPLY, EVEN IF ANY REMEDY
FAILS OF ITS ESSENTIAL PURPOSE.
8.
Force Majeure. We will not be liable for failing to perform under this Agreement because
of any event beyond our reasonable control, including, without limitation, a labor disturbance, an
Internet outage or interruption of service, a communications outage, failure by a service provider or
any other third party to perform, fire, an act of terrorism, natural disaster or war.
9.
Choice of Law. The laws of the State of New York will govern and be used to interpret
this Agreement, without giving effect to any principle that would allow for the application of the law
of any other State. For purposes of any Claim that is not subject to the arbitration procedures in
Section 10 below, we both agree to submit to the nonexclusive personal jurisdiction of the courts
located within New York County, New York and waive any objection to the laying of venue of any
litigation in said courts.
10.
Dispute Resolution. Any Claim arising from, relating to, or connected with this Agreement
will be resolved through binding arbitration conducted by telephone, online or based solely upon
written submissions where no in-person appearance is required. In such cases, the arbitration will
be administered by the American Arbitration Association under its Commercial Arbitration Rules
(including, without limitation, the Supplementary Procedures for Consumer-Related Disputes,
if applicable), and judgment on the award rendered by the arbitrator(s) may be entered in any
court having jurisdiction thereof. Notwithstanding this Section 10, we may bring a claim for
injunctive or other equitable relief in any court of competent jurisdiction as necessary to enforce
our intellectual property rights or those of our affiliates, suppliers, or licensors. Any Claim will
be arbitrated or litigated, as the case may be, on an individual basis and shall not be consolidated
with any Claim of any other party whether through class action proceedings, class arbitration
proceedings or otherwise. EACH OF THE PARTIES HEREBY KNOWINGLY, VOLUNTARILY
AND INTENTIONALLY WAIVES ANY RIGHT IT MAY HAVE TO A TRIAL BY JURY IN RESPECT
OF ANY LITIGATION ARISING OUT OF, RELATING TO OR IN CONNECTION WITH THIS
NOOK User Guide
Policies
189
AGREEMENT. FURTHER, EACH PARTY CERTIFIES THAT NO REPRESENTATIVE OR AGENT
OF EITHER PARTY HAS REPRESENTED, EXPRESSLY OR OTHERWISE, THAT SUCH PARTY
WOULD NOT, IN THE EVENT OF SUCH LITIGATION, SEEK TO ENFORCE THIS WAIVER
OF RIGHT TO JURY TRIAL PROVISION. Each of the parties acknowledges that this Section is
a material inducement for the other party to enter into this Agreement. You acknowledge and
agree that, regardless of any statute or law to the contrary, any claim or cause of action you may
have arising out of, relating to, or in connection with this Agreement must be filed within one (1)
calendar year after such claim or cause of action arises, or forever be barred.
11.
Termination of the Service.
(a)
By Us. If we have a reasonable basis to believe that you have violated any term or
condition of this Agreement or may cause us, our suppliers or licensors, or another user of the
Service financial loss or legal liability, we may, in our sole discretion, upon notice to you, issue a
warning, temporarily suspend, indefinitely suspend or terminate any of your rights to use or access
all or any part of the Service.
(b)
By You. You may terminate your use of the Service at any time by ceasing all use of the
Service and deregistering your NOOK by following the process provided for on the Web Site.
(c)
Effect of Termination. Following termination or suspension, you will not be permitted
to use the Service, though termination/suspension of your right to use the Service will not affect
your right to view Digital Content that you have already lawfully acquired and downloaded to your
NOOK. If your access to the Service is terminated or suspended, we reserve the right to exercise
whatever means we deem necessary to prevent unauthorized access to the Service, including, but
not limited to, technological barriers, IP mapping and our direct contacts with telecommunications
companies. This Agreement will survive indefinitely unless and until we choose to terminate it,
regardless of whether any account you open is terminated by you or us or if you have the right to
access or use the Service. You are responsible for payment of all outstanding balances accrued up
to and through the termination date. All amounts paid to us are non-refundable, unless otherwise
expressly provided for in this Agreement, the One-Year Limited Warranty, or the Terms of Use.
12.
Notice. You hereby consent to receive electronic communications from us, whether
addressed to the email address associated with your Barnes & Noble.com account or other email
address that you provide to us, or sent directly to your NOOK. You acknowledge and agree that
any communication via email, message to your device or by postings on the Web Site satisfies any
legal requirement that such communications be made in writing. You may give notice to us via email
to the following address: [email protected]. If you have general questions regarding
your NOOK, you may also call 1-800-THE-BOOK or 1-201-438-1834, though such a call will not
suffice for notice under this paragraph. Notice will be effective upon our sending or receipt of it, as
applicable.
13.
Changes to Service; Amendment. We may, in our sole discretion, change, modify, suspend,
make improvements to or discontinue any aspect of the Service, temporarily or permanently, at any
time without notice to you, and we will not be liable for doing so.
14.
Assignment. This Agreement and all of your rights and obligations under it may not be
assignable or transferable by you without our prior written consent. You may, however, sell, give
NOOK User Guide
Policies
190
away, or otherwise transfer your NOOK; provided, however, that the person to whom you transfer
your NOOK must register your NOOK in their name. You will be responsible for all use of your
NOOK until that NOOK is registered in their name. Similarly, if you lend your NOOK to another
person or another person otherwise uses your NOOK, you will be responsible for that person’s
use of your NOOK. We may freely assign or transfer this Agreement or any of our rights and
obligations under it.
15.
Additional Terms. This Agreement contains the entire understanding between you and us
regarding the use of your NOOK and the Service, and supersedes all prior and contemporaneous
agreements and understandings between you and us regarding this subject matter. The provisions
of this Agreement are intended to be severable. If for any reason any provision of this Agreement
is held invalid or unenforceable in whole or in part in any applicable jurisdiction, such provision
shall, as to such jurisdiction, be ineffective to the extent of such invalidity or unenforceability
without in any manner affecting the validity or enforceability thereof in any other jurisdiction or the
remaining provisions hereof in that or any other jurisdiction. Our affiliates, suppliers and licensors
are intended third-party beneficiaries of Sections 2, 3, 5, 6, 7, and Attachment 1 of this Agreement.
Our failure to exercise or enforce any right or provision of this Agreement will not operate as a
waiver of such right or provision. This Agreement is binding upon each party and its successors and
permitted assigns.
ATTACHMENT 1
THIRD PARTY SOFTWARE TERMS
1.
Notwithstanding anything to the contrary in this Agreement, certain components of the
Software are licensed subject to the General Public License Version 2.0, a copy of which is attached
as Exhibit A (the “GPL License”). You may not use these components except in compliance with
the GPL License. In addition, you may have additional rights with respect to such components
under the GPL License, including, without limitation, the right to obtain the source code for such
components from us. You may obtain a copy of such source code by contacting us through the
contact information provided on the Web Site. We will provide such source code in accordance
with the GPL License.
2.
Notwithstanding anything to the contrary in this Agreement, certain components of the
Software (as defined herein) are licensed subject to the Apache License, Version 2.0, a copy of
which is attached as Exhibit B (the “Apache License”). You may not use these components except
in compliance with the Apache License. In addition, you may have additional rights with respect
to such components under the Apache License. Unless required by applicable law or agreed
to in writing, software distributed under the Apache License is distributed on an “AS IS” BASIS,
WITHOUT WARRANTIES OR CONDITIONS OF ANY KIND, either express or implied. See the
Apache License for the specific language governing permissions and limitations under the Apache
License.
3.
Notwithstanding anything to the contrary in this Agreement, the Software includes
software developed by Marvell International Ltd. (“Marvell”) and its affiliates (“Marvell Software”).
Copyright © MARVELL INTERNATIONAL LTD. AND ITS AFFILIATES. ALL RIGHTS RESERVED.
Redistribution and use in binary form, without modification, are permitted provided that the
following conditions are met: (a) Redistributions must reproduce the above copyright notice and
NOOK User Guide
Policies
191
the following disclaimer in the documentation and/or other materials provided with the distribution;
(b) Neither the name of Marvell International Ltd. nor the names of its suppliers may be used to
endorse or promote products derived from the Marvell Software without specific prior written
permission; and (c) No reverse engineering, decompilation, or disassembly of the Marvell Software
is permitted. Marvell International Ltd. grants a world-wide, royalty-free, non-exclusive license under
patents it now or hereafter owns or controls to make, have made, use, import, offer to sell and
sell (“Utilize”) the Marvell Software, but solely to the extent that any such patent is necessary to
Utilize the Marvell Software alone, or in combination with an operating system licensed under an
approved Open Source license as listed by the Open Source Initiative at http://opensource.org/
licenses. The patent license shall not apply to any other combinations which include the Marvell
Software. No hardware per se is licensed hereunder. THE MARVELL SOFTWARE IS PROVIDED
BY THE COPYRIGHT HOLDERS AND CONTRIBUTORS “AS IS” AND ANY EXPRESS OR
IMPLIED WARRANTIES, INCLUDING, BUT NOT LIMITED TO, THE IMPLIED WARRANTIES
OF MERCHANTABILITY AND FITNESS FOR A PARTICULAR PURPOSE ARE DISCLAIMED. IN
NO EVENT SHALL THE COPYRIGHT OWNER OR CONTRIBUTORS BE LIABLE FOR ANY
DIRECT, INDIRECT, INCIDENTAL, SPECIAL, EXEMPLARY, OR CONSEQUENTIAL DAMAGES
(INCLUDING, BUT NOT LIMITED TO, PROCUREMENT OF SUBSTITUTE GOODS OR
SERVICES; LOSS OF USE, DATA, OR PROFITS; OR BUSINESS INTERRUPTION) HOWEVER
CAUSED AND ON ANY THEORY OF LIABILITY, WHETHER IN CONTRACT, STRICT
LIABILITY, OR TORT (INCLUDING NEGLIGENCE OR OTHERWISE) ARISING IN ANY WAY
OUT OF THE USE OF THE MARVELL SOFTWARE, EVEN IF ADVISED OF THE POSSIBILITY
OF SUCH DAMAGE. THE COLLECTIVE LIABILITY OF MARVELL, IT’S AFFILIATES AND
THEIR SUPPLIERS SHALL BE LIMITED TO U.S. $100.00. THESE LIMITATIONS SHALL APPLY
NOTWITHSTANDING ANY FAILURE OF ESSENTIAL PURPOSE OF ANY LIMITED REMEDY.
IN JURISDICTIONS THAT PROHIBIT EXCLUSION OF LIABILITY OR LIMITATION OF IMPLIED
WARRANTIES, THE ABOVE LIMITATIONS AND EXCLUSIONS MAY BE LIMITED IN THEIR
APPLICATION TO YOU AND, DEPENDING ON LOCAL LAW, YOU MAY HAVE OTHER
SPECIFIC LEGAL RIGHTS.
4.
Notwithstanding anything to the contrary in this Agreement, the Software includes software
developed by The FreeType Project (“FreeType Software”). Copyright © 2006 THE FREETYPE
PROJECT (WWW.FREETYPE.ORG). ALL RIGHTS RESERVED. The FreeType Software is licensed
subject to The FreeType Project License, a copy of which is attached as Exhibit C (the “FreeType
License”). You may not use these components except in compliance with the FreeType License.
In addition, you may have additional rights with respect to such components under the FreeType
License.
5.
Your NOOK contains Adobe® Reader® Mobile software under license from Adobe
Systems Incorporated, Copyright © 1995-2009 ADOBE SYSTEMS INCORPORATED. ALL
RIGHTS RESERVED. Adobe and Reader are trademarks of Adobe Systems Incorporated.
Exhibit A
NOOK User Guide
Policies
192
GPL Version 2
GNU GENERAL PUBLIC LICENSE
Version 2, June 1991
Copyright (C) 1989, 1991 Free Software Foundation, Inc. 51 Franklin St, Fifth Floor, Boston, MA
02110-1301 USA
Everyone is permitted to copy and distribute verbatim copies of this license document, but changing
it is not allowed.
Preamble
The licenses for most software are designed to take away your freedom to share and change it.
By contrast, the GNU General Public License is intended to guarantee your freedom to share and
change free software--to make sure the software is free for all its users. This General Public License
applies to most of the Free Software Foundation’s software and to any other program whose
authors commit to using it. (Some other Free Software Foundation software is covered by the
GNU Library General Public License instead.) You can apply it to your programs, too.
When we speak of free software, we are referring to freedom, not price. Our General Public
Licenses are designed to make sure that you have the freedom to distribute copies of free software
(and charge for this service if you wish), that you receive source code or can get it if you want it,
that you can change the software or use pieces of it in new free programs; and that you know you
can do these things.
To protect your rights, we need to make restrictions that forbid anyone to deny you these rights or
to ask you to surrender the rights. These restrictions translate to certain responsibilities for you if
you distribute copies of the software, or if you modify it.
For example, if you distribute copies of such a program, whether gratis or for a fee, you must give
the recipients all the rights that you have. You must make sure that they, too, receive or can get the
source code. And you must show them these terms so they know their rights.
We protect your rights with two steps: (1) copyright the software, and (2) offer you this license
which gives you legal permission to copy, distribute and/or modify the software.
Also, for each author’s protection and ours, we want to make certain that everyone understands
that there is no warranty for this free software. If the software is modified by someone else and
passed on, we want its recipients to know that what they have is not the original, so that any
problems introduced by others will not reflect on the original authors’ reputations.
Finally, any free program is threatened constantly by software patents. We wish to avoid the danger
that redistributors of a free program will individually obtain patent licenses, in effect making the
program proprietary. To prevent this, we have made it clear that any patent must be licensed for
everyone’s free use or not licensed at all.
NOOK User Guide
Policies
193
The precise terms and conditions for copying, distribution and modification follow.
GNU GENERAL PUBLIC LICENSE
TERMS AND CONDITIONS FOR COPYING, DISTRIBUTION AND MODIFICATION
0. This License applies to any program or other work which contains a notice placed by the
copyright holder saying it may be distributed under the terms of this General Public License. The
“Program”, below, refers to any such program or work, and a “work based on the Program” means
either the Program or any derivative work under copyright law: that is to say, a work containing the
Program or a portion of it, either verbatim or with modifications and/or translated into another
language. (Hereinafter, translation is included without limitation in the term “modification”.) Each
licensee is addressed as “you”.
Activities other than copying, distribution and modification are not covered by this License; they
are outside its scope. The act of running the Program is not restricted, and the output from the
Program is covered only if its contents constitute a work based on the Program (independent of
having been made by running the Program). Whether that is true depends on what the Program
does.
1. You may copy and distribute verbatim copies of the Program’s source code as you receive
it, in any medium, provided that you conspicuously and appropriately publish on each copy an
appropriate copyright notice and disclaimer of warranty; keep intact all the notices that refer to this
License and to the absence of any warranty; and give any other recipients of the Program a copy of
this License along with the Program.
You may charge a fee for the physical act of transferring a copy, and you may at your option offer
warranty protection in exchange for a fee.
2. You may modify your copy or copies of the Program or any portion of it, thus forming a work
based on the Program, and copy and distribute such modifications or work under the terms of
Section 1 above, provided that you also meet all of these conditions:
a) You must cause the modified files to carry prominent notices stating that you changed the files
and the date of any change.
b) You must cause any work that you distribute or publish, that in whole or in part contains or is
derived from the Program or any part thereof, to be licensed as a whole at no charge to all third
parties under the terms of this License.
c) If the modified program normally reads commands interactively when run, you must cause
it, when started running for such interactive use in the most ordinary way, to print or display an
announcement including an appropriate copyright notice and a notice that there is no warranty (or
else, saying that you provide a warranty) and that users may redistribute the program under these
conditions, and telling the user how to view a copy of this License. (Exception: if the Program itself
NOOK User Guide
Policies
194
is interactive but does not normally print such an announcement, your work based on the Program
is not required to print an announcement.)
These requirements apply to the modified work as a whole. If identifiable sections of that work are
not derived from the Program, and can be reasonably considered independent and separate works
in themselves, then this License, and its terms, do not apply to those sections when you distribute
them as separate works. But when you distribute the same sections as part of a whole which is a
work based on the Program, the distribution of the whole must be on the terms of this License,
whose permissions for other licensees extend to the entire whole, and thus to each and every part
regardless of who wrote it.
Thus, it is not the intent of this section to claim rights or contest your rights to work written
entirely by you; rather, the intent is to exercise the right to control the distribution of derivative or
collective works based on the Program.
In addition, mere aggregation of another work not based on the Program with the Program (or
with a work based on the Program) on a volume of a storage or distribution medium does not
bring the other work under the scope of this License.
3. You may copy and distribute the Program (or a work based on it, under Section 2) in object code
or executable form under the terms of Sections 1 and 2 above provided that you also do one of
the following:
a) Accompany it with the complete corresponding machine-readable source code, which must be
distributed under the terms of Sections 1 and 2 above on a medium customarily used for software
interchange; or,
b) Accompany it with a written offer, valid for at least three years, to give any third party, for a
charge no more than your cost of physically performing source distribution, a complete machinereadable copy of the corresponding source code, to be distributed under the terms of Sections 1
and 2 above on a medium customarily used for software interchange; or,
c) Accompany it with the information you received as to the offer to distribute corresponding
source code. (This alternative is allowed only for noncommercial distribution and only if you
received the program in object code or executable form with such an offer, in accord with
Subsection b above.)
The source code for a work means the preferred form of the work for making modifications to
it. For an executable work, complete source code means all the source code for all modules it
contains, plus any associated interface definition files, plus the scripts used to control compilation
and installation of the executable. However, as a special exception, the source code distributed
need not include anything that is normally distributed (in either source or binary form) with the
major components (compiler, kernel, and so on) of the operating system on which the executable
runs, unless that component itself accompanies the executable.
If distribution of executable or object code is made by offering access to copy from a designated
place, then offering equivalent access to copy the source code from the same place counts as
NOOK User Guide
Policies
195
distribution of the source code, even though third parties are not compelled to copy the source
along with the object code.
4. You may not copy, modify, sublicense, or distribute the Program except as expressly provided
under this License. Any attempt otherwise to copy, modify, sublicense or distribute the Program
is void, and will automatically terminate your rights under this License. However, parties who have
received copies, or rights, from you under this License will not have their licenses terminated so
long as such parties remain in full compliance.
5. You are not required to accept this License, since you have not signed it. However, nothing else
grants you permission to modify or distribute the Program or its derivative works. These actions
are prohibited by law if you do not accept this License. Therefore, by modifying or distributing
the Program (or any work based on the Program), you indicate your acceptance of this License to
do so, and all its terms and conditions for copying, distributing or modifying the Program or works
based on it.
6. Each time you redistribute the Program (or any work based on the Program), the recipient
automatically receives a license from the original licensor to copy, distribute or modify the Program
subject to these terms and conditions. You may not impose any further restrictions on the
recipients’ exercise of the rights granted herein. You are not responsible for enforcing compliance
by third parties to this License.
7. If, as a consequence of a court judgment or allegation of patent infringement or for any other
reason (not limited to patent issues), conditions are imposed on you (whether by court order,
agreement or otherwise) that contradict the conditions of this License, they do not excuse you
from the conditions of this License. If you cannot distribute so as to satisfy simultaneously your
obligations under this License and any other pertinent obligations, then as a consequence you
may not distribute the Program at all. For example, if a patent license would not permit royaltyfree redistribution of the Program by all those who receive copies directly or indirectly through
you, then the only way you could satisfy both it and this License would be to refrain entirely from
distribution of the Program.
If any portion of this section is held invalid or unenforceable under any particular circumstance, the
balance of the section is intended to apply and the section as a whole is intended to apply in other
circumstances.
It is not the purpose of this section to induce you to infringe any patents or other property right
claims or to contest validity of any such claims; this section has the sole purpose of protecting the
integrity of the free software distribution system, which is implemented by public license practices.
Many people have made generous contributions to the wide range of software distributed through
that system in reliance on consistent application of that system; it is up to the author/donor to
decide if he or she is willing to distribute software through any other system and a licensee cannot
impose that choice.
This section is intended to make thoroughly clear what is believed to be a consequence of the rest
of this License.
NOOK User Guide
Policies
196
8. If the distribution and/or use of the Program is restricted in certain countries either by patents
or by copyrighted interfaces, the original copyright holder who places the Program under this
License may add an explicit geographical distribution limitation excluding those countries, so that
distribution is permitted only in or among countries not thus excluded. In such case, this License
incorporates the limitation as if written in the body of this License.
9. The Free Software Foundation may publish revised and/or new versions of the General Public
License from time to time. Such new versions will be similar in spirit to the present version, but
may differ in detail to address new problems or concerns.
Each version is given a distinguishing version number. If the Program specifies a version number
of this License which applies to it and “any later version”, you have the option of following the
terms and conditions either of that version or of any later version published by the Free Software
Foundation. If the Program does not specify a version number of this License, you may choose any
version ever published by the Free Software Foundation.
10. If you wish to incorporate parts of the Program into other free programs whose distribution
conditions are different, write to the author to ask for permission. For software which is
copyrighted by the Free Software Foundation, write to the Free Software Foundation; we
sometimes make exceptions for this. Our decision will be guided by the two goals of preserving
the free status of all derivatives of our free software and of promoting the sharing and reuse of
software generally.
NO WARRANTY
11. BECAUSE THE PROGRAM IS LICENSED FREE OF CHARGE, THERE IS NO WARRANTY
FOR THE PROGRAM, TO THE EXTENT PERMITTED BY APPLICABLE LAW. EXCEPT
WHEN OTHERWISE STATED IN WRITING THE COPYRIGHT HOLDERS AND/OR OTHER
PARTIES PROVIDE THE PROGRAM “AS IS” WITHOUT WARRANTY OF ANY KIND, EITHER
EXPRESSED OR IMPLIED, INCLUDING, BUT NOT LIMITED TO, THE IMPLIED WARRANTIES
OF MERCHANTABILITY AND FITNESS FOR A PARTICULAR PURPOSE. THE ENTIRE RISK AS
TO THE QUALITY AND PERFORMANCE OF THE PROGRAM IS WITH YOU. SHOULD THE
PROGRAM PROVE DEFECTIVE, YOU ASSUME THE COST OF ALL NECESSARY SERVICING,
REPAIR OR CORRECTION.
12. IN NO EVENT UNLESS REQUIRED BY APPLICABLE LAW OR AGREED TO IN WRITING
WILL ANY COPYRIGHT HOLDER, OR ANY OTHER PARTY WHO MAY MODIFY AND/OR
REDISTRIBUTE THE PROGRAM AS PERMITTED ABOVE, BE LIABLE TO YOU FOR DAMAGES,
INCLUDING ANY GENERAL, SPECIAL, INCIDENTAL OR CONSEQUENTIAL DAMAGES
ARISING OUT OF THE USE OR INABILITY TO USE THE PROGRAM (INCLUDING BUT
NOT LIMITED TO LOSS OF DATA OR DATA BEING RENDERED INACCURATE OR LOSSES
SUSTAINED BY YOU OR THIRD PARTIES OR A FAILURE OF THE PROGRAM TO OPERATE
WITH ANY OTHER PROGRAMS), EVEN IF SUCH HOLDER OR OTHER PARTY HAS BEEN
ADVISED OF THE POSSIBILITY OF SUCH DAMAGES.
END OF TERMS AND CONDITIONS
How to Apply These Terms to Your New Programs
NOOK User Guide
Policies
197
If you develop a new program, and you want it to be of the greatest possible use to the public,
the best way to achieve this is to make it free software which everyone can redistribute and change
under these terms.
To do so, attach the following notices to the program. It is safest to attach them to the start of
each source file to most effectively convey the exclusion of warranty; and each file should have at
least the “copyright” line and a pointer to where the full notice is found.
<one line to give the program’s name and a brief idea of what it does.>
Copyright (C) <year> <name of author>
This program is free software; you can redistribute it and/or modify it under the terms of the
GNU General Public License as published by the Free Software Foundation; either version 2 of the
License, or (at your option) any later version.
This program is distributed in the hope that it will be useful, but WITHOUT ANY WARRANTY;
without even the implied warranty of MERCHANTABILITY or FITNESS FOR A PARTICULAR
PURPOSE. See the GNU General Public License for more details.
You should have received a copy of the GNU General Public License along with this program; if
not, write to the Free Software Foundation, Inc., 51 Franklin St, Fifth Floor, Boston, MA 021101301 USA
Also add information on how to contact you by electronic and paper mail.
If the program is interactive, make it output a short notice like this when it starts in an interactive
mode:
Gnomovision version 69, Copyright (C) year name of author
Gnomovision comes with ABSOLUTELY NO WARRANTY; for details type `show w’.
This is free software, and you are welcome to redistribute it under certain conditions; type `show c’
for details.
The hypothetical commands `show w’ and `show c’ should show the appropriate parts of the
General Public License. Of course, the commands you use may be called something other than
`show w’ and `show c’; they could even be mouse-clicks or menu items--whatever suits your
program.
You should also get your employer (if you work as a programmer) or your school, if any, to sign a
“copyright disclaimer” for the program, if necessary. Here is a sample; alter the names:
Yoyodyne, Inc., hereby disclaims all copyright interest in the program
`Gnomovision’ (which makes passes at compilers) written by James Hacker.
<signature of Ty Coon>, 1 April 1989
NOOK User Guide
Policies
198
Ty Coon, President of Vice
This General Public License does not permit incorporating your program into proprietary
programs. If your program is a subroutine library, you may consider it more useful to permit linking
proprietary applications with the library. If this is what you want to do, use the GNU Library
General Public License instead of this License.
Exhibit B
Apache License
Apache License
Version 2.0, January 2004
http://www.apache.org/licenses/
TERMS AND CONDITIONS FOR USE, REPRODUCTION, AND DISTRIBUTION
1. Definitions.
“License” shall mean the terms and conditions for use, reproduction, and distribution as defined by
Sections 1 through 9 of this document.
“Licensor” shall mean the copyright owner or entity authorized by the copyright owner that is
granting the License.
“Legal Entity” shall mean the union of the acting entity and all other entities that control, are
controlled by, or are under common control with that entity. For the purposes of this definition,
“control” means (i) the power, direct or indirect, to cause the direction or management of such
entity, whether by contract or otherwise, or (ii) ownership of fifty percent (50%) or more of the
outstanding shares, or (iii) beneficial ownership of such entity.
“You” (or “Your”) shall mean an individual or Legal Entity exercising permissions granted by this
License.
“Source” form shall mean the preferred form for making modifications, including but not limited to
software source code, documentation source, and configuration files.
“Object” form shall mean any form resulting from mechanical transformation or translation of a
Source form, including but not limited to compiled object code, generated documentation, and
conversions to other media types.
NOOK User Guide
Policies
199
“Work” shall mean the work of authorship, whether in Source or Object form, made available
under the License, as indicated by a copyright notice that is included in or attached to the work (an
example is provided in the Appendix below).
“Derivative Works” shall mean any work, whether in Source or Object form, that is based on
(or derived from) the Work and for which the editorial revisions, annotations, elaborations, or
other modifications represent, as a whole, an original work of authorship. For the purposes of this
License, Derivative Works shall not include works that remain separable from, or merely link (or
bind by name) to the interfaces of, the Work and Derivative Works thereof.
“Contribution” shall mean any work of authorship, including the original version of the Work and
any modifications or additions to that Work or Derivative Works thereof, that is intentionally
submitted to Licensor for inclusion in the Work by the copyright owner or by an individual or
Legal Entity authorized to submit on behalf of the copyright owner. For the purposes of this
definition, “submitted” means any form of electronic, verbal, or written communication sent to the
Licensor or its representatives, including but not limited to communication on electronic mailing
lists, source code control systems, and issue tracking systems that are managed by, or on behalf of,
the Licensor for the purpose of discussing and improving the Work, but excluding communication
that is conspicuously marked or otherwise designated in writing by the copyright owner as “Not a
Contribution.”
“Contributor” shall mean Licensor and any individual or Legal Entity on behalf of whom a
Contribution has been received by Licensor and subsequently incorporated within the Work.
2. Grant of Copyright License. Subject to the terms and conditions of this License, each
Contributor hereby grants to You a perpetual, worldwide, non-exclusive, no-charge, royalty-free,
irrevocable copyright license to reproduce, prepare Derivative Works of, publicly display, publicly
perform, sublicense, and distribute the Work and such Derivative Works in Source or Object form.
3. Grant of Patent License. Subject to the terms and conditions of this License, each Contributor
hereby grants to You a perpetual, worldwide, non-exclusive, no-charge, royalty-free, irrevocable
(except as stated in this section) patent license to make, have made, use, offer to sell, sell, import,
and otherwise transfer the Work, where such license applies only to those patent claims licensable
by such Contributor that are necessarily infringed by their Contribution(s) alone or by combination
of their Contribution(s) with the Work to which such Contribution(s) was submitted. If You
institute patent litigation against any entity (including a cross-claim or counterclaim in a lawsuit)
alleging that the Work or a Contribution incorporated within the Work constitutes direct or
contributory patent infringement, then any patent licenses granted to You under this License for that
Work shall terminate as of the date such litigation is filed.
4. Redistribution. You may reproduce and distribute copies of the Work or Derivative Works
thereof in any medium, with or without modifications, and in Source or Object form, provided that
You meet the following conditions:
a.
You must give any other recipients of the Work or Derivative Works a copy of this
License; and
NOOK User Guide
Policies
200
b.
You must cause any modified files to carry prominent notices stating that You changed the
files; and
c.
You must retain, in the Source form of any Derivative Works that You distribute, all
copyright, patent, trademark, and attribution notices from the Source form of the Work, excluding
those notices that do not pertain to any part of the Derivative Works; and
d.
If the Work includes a “NOTICE” text file as part of its distribution, then any Derivative
Works that You distribute must include a readable copy of the attribution notices contained
within such NOTICE file, excluding those notices that do not pertain to any part of the Derivative
Works, in at least one of the following places: within a NOTICE text file distributed as part of the
Derivative Works; within the Source form or documentation, if provided along with the Derivative
Works; or, within a display generated by the Derivative Works, if and wherever such third-party
notices normally appear. The contents of the NOTICE file are for informational purposes only and
do not modify the License. You may add Your own attribution notices within Derivative Works that
You distribute, alongside or as an addendum to the NOTICE text from the Work, provided that
such additional attribution notices cannot be construed as modifying the License.
You may add Your own copyright statement to Your modifications and may provide additional or
different license terms and conditions for use, reproduction, or distribution of Your modifications,
or for any such Derivative Works as a whole, provided Your use, reproduction, and distribution of
the Work otherwise complies with the conditions stated in this License.
5. Submission of Contributions. Unless You explicitly state otherwise, any Contribution intentionally
submitted for inclusion in the Work by You to the Licensor shall be under the terms and conditions
of this License, without any additional terms or conditions. Notwithstanding the above, nothing
herein shall supersede or modify the terms of any separate license agreement you may have
executed with Licensor regarding such Contributions.
6. Trademarks. This License does not grant permission to use the trade names, trademarks, service
marks, or product names of the Licensor, except as required for reasonable and customary use in
describing the origin of the Work and reproducing the content of the NOTICE file.
7. Disclaimer of Warranty. Unless required by applicable law or agreed to in writing, Licensor
provides the Work (and each Contributor provides its Contributions) on an “AS IS” BASIS,
WITHOUT WARRANTIES OR CONDITIONS OF ANY KIND, either express or implied,
including, without limitation, any warranties or conditions of TITLE, NON-INFRINGEMENT,
MERCHANTABILITY, or FITNESS FOR A PARTICULAR PURPOSE. You are solely responsible
for determining the appropriateness of using or redistributing the Work and assume any risks
associated with Your exercise of permissions under this License.
8. Limitation of Liability. In no event and under no legal theory, whether in tort (including
negligence), contract, or otherwise, unless required by applicable law (such as deliberate and
grossly negligent acts) or agreed to in writing, shall any Contributor be liable to You for damages,
including any direct, indirect, special, incidental, or consequential damages of any character arising as
a result of this License or out of the use or inability to use the Work (including but not limited to
damages for loss of goodwill, work stoppage, computer failure or malfunction, or any and all other
NOOK User Guide
Policies
201
commercial damages or losses), even if such Contributor has been advised of the possibility of such
damages.
9. Accepting Warranty or Additional Liability. While redistributing the Work or Derivative Works
thereof, You may choose to offer, and charge a fee for, acceptance of support, warranty, indemnity,
or other liability obligations and/or rights consistent with this License. However, in accepting such
obligations, You may act only on Your own behalf and on Your sole responsibility, not on behalf
of any other Contributor, and only if You agree to indemnify, defend, and hold each Contributor
harmless for any liability incurred by, or claims asserted against, such Contributor by reason of your
accepting any such warranty or additional liability.
END OF TERMS AND CONDITIONS
APPENDIX: How to apply the Apache License to your work
To apply the Apache License to your work, attach the following boilerplate notice, with the fields
enclosed by brackets “[]” replaced with your own identifying information. (Don’t include the
brackets!) The text should be enclosed in the appropriate comment syntax for the file format. We
also recommend that a file or class name and description of purpose be included on the same
“printed page” as the copyright notice for easier identification within third-party archives.
Copyright [yyyy] [name of copyright owner] Licensed under the Apache License, Version 2.0 (the
“License”); you may not use this file except in compliance with the License. You may obtain a copy
of the License at http://www.apache.org/licenses/LICENSE-2.0 Unless required by applicable law
or agreed to in writing, software distributed under the License is distributed on an “AS IS” BASIS,
WITHOUT WARRANTIES OR CONDITIONS OF ANY KIND, either express or implied. See the
License for the specific language governing permissions and limitations under the License.
Exhibit C
FreeType License
This software is based in part on the work of the FreeType Team.
---------------------The FreeType Project LICENSE
---------------------2006-Jan-27
Copyright 1996-2002, 2006 by
David Turner, Robert Wilhelm, and Werner Lemberg
Introduction
============
NOOK User Guide
Policies
202
The FreeType Project is distributed in several archive packages; some of them may contain, in
addition to the FreeType font engine, various tools and contributions which rely on, or relate to,
the FreeType Project.
This license applies to all files found in such packages, and which do not fall under their own
explicit license. The license affects thus the FreeType font engine, the test programs,
documentation and makefiles, at the very least.
This license was inspired by the BSD, Artistic, and IJG (Independent JPEG Group) licenses,
which all encourage inclusion and use of free software in commercial and freeware products
alike. As a consequence, its main points are that:
We don’t promise that this software works. However, we will be interested in any kind of bug
reports. (`as is’ distribution)
You can use this software for whatever you want, in parts or full form, without having to pay us.
(`royalty-free’ usage)
You may not pretend that you wrote this software. If you use it, or only parts of it, in a program,
you must acknowledge somewhere in your documentation that you have used the FreeType code.
(`credits’)
We specifically permit and encourage the inclusion of this software, with or without modifications,
in commercial products.
We disclaim all warranties covering The FreeType Project and assume no liability related to The
FreeType Project.
Finally, many people asked us for a preferred form for a credit/disclaimer to use in compliance with
this license. We thus encourage you to use the following text:
Portions of this software are copyright © <year> The FreeType Project (www.freetype.org). All
rights reserved.
Please replace <year> with the value from the FreeType version you actually use.
Legal Terms
===========
0. Definitions
-------------Throughout this license, the terms `package’, `FreeType Project’, and `FreeType archive’ refer to
the set of files originally distributed by the authors (David Turner, Robert Wilhelm, and Werner
Lemberg) as the `FreeType Project’, be they named as alpha, beta or final release.
NOOK User Guide
Policies
203
`You’ refers to the licensee, or person using the project, where `using’ is a generic term including
compiling the project’s source code as well as linking it to form a `program’ or `executable’. This
program is referred to as `a program using the FreeType engine’.
This license applies to all files distributed in the original FreeType Project, including all source
code, binaries and documentation, unless otherwise stated in the file in its original, unmodified form
as distributed in the original archive.
If you are unsure whether or not a particular file is covered by this license, you must contact us to
verify this.
The FreeType Project is copyright (C) 1996-2000 by David Turner, Robert Wilhelm, and Werner
Lemberg. All rights reserved except as specified below.
1. No Warranty
-------------THE FREETYPE PROJECT IS PROVIDED `AS IS’ WITHOUT WARRANTY OF ANY KIND,
EITHER EXPRESS OR IMPLIED, INCLUDING, BUT NOT LIMITED TO, WARRANTIES OF
MERCHANTABILITY AND FITNESS FOR A PARTICULAR PURPOSE. IN NO EVENT WILL ANY
OF THE AUTHORS OR COPYRIGHT HOLDERS BE LIABLE FOR ANY DAMAGES CAUSED BY
THE USE OR THE INABILITY TO USE, OF THE FREETYPE PROJECT.
2. Redistribution
----------------This license grants a worldwide, royalty-free, perpetual and irrevocable right and license to use,
execute, perform, compile, display, copy, create derivative works of, distribute and sublicense the
FreeType Project (in both source and object code forms) and derivative works thereof for any
purpose; and to authorize others to exercise some or all of the rights granted herein, subject to the
following conditions:
Redistribution of source code must retain this license file (`FTL.TXT’) unaltered; any additions,
deletions or changes to the original files must be clearly indicated in accompanying documentation.
The copyright notices of the unaltered, original files must be preserved in all copies of source files.
Redistribution in binary form must provide a disclaimer that states that the software is based in part
of the work of the FreeType Team, in the distribution documentation. We also encourage you to
put an URL to the FreeType web page in your documentation, though this isn’t mandatory.
These conditions apply to any software derived from or based on the FreeType Project, not just the
unmodified files. If you use our work, you must acknowledge us. However, no fee need be paid to
us.
3. Advertising
NOOK User Guide
Policies
204
-------------Neither the FreeType authors and contributors nor you shall use the name of the other for
commercial, advertising, or promotional purposes without specific prior written permission.
We suggest, but do not require, that you use one or more of the following phrases to refer to this
software in your documentation or advertising materials: `FreeType Project’, `FreeType Engine’,
`FreeType library’, or `FreeType Distribution’.
As you have not signed this license, you are not required to accept it. However, as the FreeType
Project is copyrighted material, only this license, or another one contracted with the authors,
grants you the right to use, distribute, and modify it. Therefore, by using, distributing, or modifying
the FreeType Project, you indicate that you understand and accept all the terms of this license.
4. Contacts
----------There are two mailing lists related to FreeType:
[email protected]
Discusses general use and applications of FreeType, as well as future and wanted additions to the
library and distribution. If you are looking for support, start in this list if you haven’t found anything
to help you in the documentation.
[email protected]
Discusses bugs, as well as engine internals, design issues, specific licenses, porting, etc.
Our home page can be found at
http://www.freetype.org
--- end of FTL.TXT ---
One Year Limited Warranty
This Limited Warranty provides for specific legal rights with respect to your NOOK™ eReader.
Please review it carefully. You may also have other rights, which vary from state to state.
NOOK User Guide
Policies
205
WHAT WARRANTIES APPLY TO MY NOOK?
What is Covered?
This Limited Warranty covers your NOOK. For purposes of this Limited Warranty, “NOOK” means
only the hardware comprising: (i) your NOOK eReader unit; and (ii) the peripherals included in the
packaging with your NOOK.
Express Warranty
Subject to the terms and conditions of this Limited Warranty, Barnes & Noble, Inc. (“B&N”)
warrants to the original retail purchaser only (“you”) that your NOOK will be free from defects in
materials and workmanship under normal consumer use for a period of one (1) year from the date
of original retail purchase (the “Warranty Period”). This express warranty is not transferable to
subsequent owners of the product. If your NOOK was originally purchased by someone else as a
gift for you, as shown by a gift receipt, you will be considered the “original retail purchaser” of that
NOOK.
Implied Warranty
You may also have implied warranties under the laws of some jurisdictions. To the extent
permitted by applicable law, such implied warranties are limited to the duration of the Warranty
Period. Some jurisdictions do not allow limitations on the duration of an implied warranty, so this
limitation may not apply to you. You may not assign or otherwise transfer such implied warranties.
However, some jurisdictions extend the protection of implied warranties to subsequent consumers,
so this limitation may not apply to you.
HOW DO I MAKE A WARRANTY CLAIM OR OTHERWISE ARRANGE FOR THE
RETURN OF MY NOOK?
To make a warranty claim or arrange for the return of your NOOK pursuant to the NOOK™
TERMS OF SERVICE, you must contact B&N at one of the following numbers during the Warranty
Period:
•
Within the United States – 1-800-THE-BOOK
•
Outside the United States – 1-201-438-1834
HOW DO I RETURN MY NOOK TO B&N?
When you contact B&N at one of the numbers above, B&N will provide instructions to you as
to how and where to return your NOOK. Your NOOK must be shipped, prepaid and insured, in
appropriate protective packaging, together with proof of purchase and the Return Authorization
Number provided by B&N, to the address specified by B&N. You must return your NOOK within
the timeframe provided by B&N. You may also be required to provide a credit card to obtain an
advance replacement before B&N receives your NOOK at its returns center.
NOOK User Guide
Policies
206
All returned NOOKs become the property of B&N.
Before you send your NOOK to B&N, it is your responsibility to back up any data, software or files
stored on your NOOK because B&N will only return your NOOK to you if it is not covered by this
Limited Warranty and B&N has not provided an advance replacement. B&N is not responsible for
any loss of your data, software or files or for the cost of backing up your data, software or files.
If you do not comply with the terms above or with B&N’s instructions, there may be delays in
service or you many incur additional expenses. In particular, if you do not return your NOOK
within the timeframe specified by B&N, B&N reserves the right to charge you the purchase price for
a replacement NOOK. You will be solely responsible for any cost, expense, loss or the like relating
to your failure to comply with such terms or B&N’s instructions.
B&N DOES NOT PROVIDE, AND HEREBY DISCLAIMS, ANY EXPRESS OR IMPLIED
WARRANTIES REGARDING ITS WARRANTY SERVICES, INCLUDING, WITHOUT LIMITATION,
ALL DUTIES (IF ANY) OF WORKMANLIKE EFFORT AND OF REASONABLE CARE.
IF I MAKE A WARRANTY CLAIM, WHAT WILL B&N DO WHEN IT RECEIVES MY
NOOK?
When B&N receives your NOOK, it will examine it and determine whether it is covered by this
Limited Warranty. If, upon examination, B&N determines that your NOOK is covered by this
Limited Warranty, B&N will, within a reasonable period of time, at its option and at no additional
charge, do one of the following:
•
replace your NOOK with a new or refurbished model of equal or greater value; or
•
refund the purchase price you paid for your NOOK.
If B&N replaces your NOOK, B&N will bear the cost of sending a replacement NOOK to you,
freight prepaid.
THE FOREGOING IS YOUR SOLE AND EXCLUSIVE REMEDY FOR BREACH OF WARRANTY
OR FOR ANY OTHER CLAIMS OTHERWISE RELATING TO THIS LIMITED WARRANTY.
WHAT WILL BE THE WARRANTY PERIOD IF MY NOOK IS REPLACED?
If your NOOK is replaced during the Warranty Period, it will be covered by this Limited Warranty
for the remainder of the original Warranty Period or ninety (90) days from the date of shipment of
the replaced NOOK, whichever is longer.
WHAT IF MY NOOK IS NOT COVERED BY THIS LIMITED WARRANTY?
If your NOOK is not covered by this Limited Warranty, B&N will return your NOOK to you, at your
expense, or will charge your credit card for any advance replacement NOOK provided to you.
NOOK User Guide
Policies
207
WHAT IS NOT COVERED BY THE WARRANTY?
This Limited Warranty does not cover damage or malfunctions caused by accident, disaster, misuse,
abuse, negligence or other external causes; third-party products; Internet or telecommunications
failures; commercial use; unauthorized opening, use, service, tampering, alteration, repair or
modification; or inadequate packing or shipping procedures. This Limited Warranty also does not
cover cosmetic damage or normal wear and tear. This Limited Warranty does not apply to NOOKs
sold as used, refurbished or reconditioned. This Limited Warranty will be void if the Serial Number
on your NOOK has been removed, tampered with or defaced or if your NOOK has been opened or
serviced without authorization, tampered with, altered or modified. Please note that opening the
back cover of your NOOK to change the battery, external SD card or back cover will not void this
Limited Warranty.
This Limited Warranty applies to your NOOK only (i.e., the hardware), and not to the software
within your NOOK. Please refer to the NOOK™ TERMS OF SERVICE for your rights and remedies
with respect to such software.
Similarly, this Limited Warranty does not cover downloaded data or materials, or accessories and
peripherals, except as expressly provided above.
WHAT OTHER LEGAL TERMS APPLY TO THIS LIMITED WARRANTY?
Disclaimer
TO THE EXTENT PERMITTED BY APPLICABLE LAW, THIS LIMITED WARRANTY AND THE
REMEDIES SET FORTH ABOVE ARE EXCLUSIVE AND IN LIEU OF ALL OTHER WARRANTIES,
REMEDIES AND CONDITIONS, WHETHER ORAL, WRITTEN, STATUTORY, EXPRESS
OR IMPLIED. TO THE EXTENT PERMITTED BY APPLICABLE LAW, B&N SPECIFICALLY
DISCLAIMS ANY AND ALL WARRANTIES AND CONDITIONS NOT EXPRESSLY PROVIDED
FOR IN THIS LIMITED WARRANTY, INCLUDING, WITHOUT LIMITATION, WARRANTIES
OF MERCHANTABILITY, NON-INFRINGEMENT, SECURITY, FITNESS FOR A PARTICULAR
PURPOSE AND AGAINST HIDDEN OR LATENT DEFECTS.
Modification
No employee or representative of B&N or its affiliates or any third party is authorized to make any
modification, extension or addition to this Limited Warranty. If any term of this Limited Warranty
is held to be illegal or unenforceable, the remaining terms of this Limited Warranty will remain in
full force and effect.
Exclusion of Indirect Damages
TO THE MAXIMUM EXTENT PERMITTED BY LAW, NEITHER B&N NOR ITS AFFILIATES
NOR ITS LICENSORS WILL BE LIABLE TO YOU OR ANY THIRD PARTY FOR ANY
CONSEQUENTIAL, SPECIAL, INCIDENTAL, PUNITIVE OR OTHER INDIRECT DAMAGES
ARISING FROM, RELATING TO OR CONNECTED WITH YOUR PURCHASE OR USE OF
NOOK User Guide
Policies
208
YOUR NOOK, INCLUDING, WITHOUT LIMITATION, LOST PROFITS, LOST REVENUE OR
LOST DATA, REGARDLESS OF THE CAUSE OF ACTION ON WHICH THE CLAIM IS BASED,
INCLUDING, WITHOUT LIMITATION, NEGLIGENCE, TORT, CONTRACT, STRICT LIABILITY,
PRODUCT DEFECT OR MISREPRESENTATION, EVEN IF ADVISED OF THE POSSIBILITY
OF SUCH DAMAGES OCCURRING, AND EVEN IF ANY REMEDY FAILS OF ITS ESSENTIAL
PURPOSE.
Some states do not allow the exclusion or limitation of incidental or consequential damages, so the
above exclusion may not apply to you.
Applicable Law
This Limited Warranty is valid only in the United States of America. The laws of the State of New
York, U.S.A. will apply to this Limited Warranty, though the laws of your state of residence may
apply to any tort claims and any claims under any consumer protection statutes, as provided under
applicable law.
AT&T Terms of Service & Acceptable Use Policy
The following AT&T Terms of Service & Acceptable Use Policy governs your use of AT&T
Wi-Fi hotspots with your NOOK. They are current at the time of production of this guide.
The current version can be found at:
https://secure.sbc.com/tosaup.adp
These Terms of Service & Acceptable Use Policy (the “Terms”) govern your use of AT&T Internet
Services’ AT&T Wi-Fi service (“Service”) and the AT&T Internet Services network (“Network”).
If you connect to the AT&T Wi-Fi service via one of AT&T’s roaming partners, your use of the
Service will also be governed by that provider’s Terms of Service and Acceptable Use Policy, which
will be available on the first screen that you see when you access the Wi-Fi service. Before using
the Service, read the following Terms. Your use of the Service represents your agreement to these
Terms. If you do not agree with these Terms, do not use the Service.
Terms of Service
Description of the Service
The Service is provided by AT&T Internet Services (“AT&T”). The Service provides you with
wireless access to the Internet via certain AT&T high-speed Internet access points (“Locations”)
and, depending on your Service plan, certain roaming partner locations. AT&T offers two types
of plans: (1) subscription plans for AT&T High Speed Internet Customers (“Subscription”); and
(2) membership plans for those who do not have AT&T High Speed Internet (“Membership”)
(Membership plans include special offers such as the Starbucks Loyalty Membership and Starbucks
Partner Membership program). Membership customers are also subject to the terms of conditions
of the applicable End User Membership Agreement.
NOOK User Guide
Policies
209
AT&T may, but is not obligated to, extend its Locations through roaming agreements with other
Internet Service Providers. If AT&T does extend its Locations and you access the Service of a
roaming partner, you will be responsible for any applicable roaming charges if you do not subscribe
to a roaming Service plan from AT&T.
Charges/Billing/Payment
You agree to pay all charges and fees specified when your ordered the Service, including any
monthly recurring or nonrecurring charges, taxes, fees, surcharges or other assessments applicable
to the Service. All AT&T charges for the Service are billed in advance. Membership customers
are billed according to the terms and conditions of the Membership Agreement. Subscription
customers’ charges will appear monthly on the AT&T portion of your AT&T local telephone bill.
The Service is provided on a month-to-month basis and the monthly charges are subject to change.
Payment for the Service is due on the date specified on the AT&T local telephone bill. If any portion
of payment is received after the payment due date, a monthly late charge may apply. The monthly
late charge will be administered according to standard AT&T billing procedures and will not exceed
the highest amount allowed by law. The late charge will be applied to the entire outstanding balance
for each month or portion thereof for which the balance remains unpaid. In the event you fail to
pay charges, AT&T may suspend or terminate your Service and may assign unpaid late balances
to a collection agency for appropriate action . In the event legal action is necessary to collect
on balances due, you agree to reimburse AT&T for all expenses incurred to recover sums due,
including attorneys’ fees and other legal expenses. You also agree to pay all current charges for the
Service as well as taxes and fees assessed against you or AT&T on the charges and all late payment,
interest or other fees as stated on your bill. You will also be charged a fee for any check returned
to AT&T relating to the Service. AT&T may modify its billing practices or late payment charges by
providing you with prior written notice of the modification.
Service Suspension/Termination/Cancellation
AT&T respects freedom of expression and believes it is a foundation of our free society to express
differing points of view. AT&T will not terminate, disconnect or suspend service because of the
views you or we express on public policy matters, political issues or political campaigns. However,
AT&T may immediately terminate or suspend all or a portion of your Service, without notice,
for conduct that AT&T believes (a) violates the Acceptable Use Policy, set forth below; or (b)
constitutes a violation of any law, regulation or tariff (including, without limitation, copyright and
intellectual property laws) or a violation of these Terms, or any applicable policies or guidelines.
Your Service may be suspended or terminated if your payment is past due and such condition
continues un-remedied for thirty (30) days. Termination or suspension by AT&T of Service also
constitutes termination or suspension (as applicable) of your license to use any Software. AT&T
may also terminate or suspend your Service if you provide false or inaccurate information that
is required for the provision of Service or is necessary to allow AT&T to bill you for Service.
Membership customers: customer cancellation of Services is governed by the terms and conditions
of your Membership Agreement. Subscription customers: you may cancel your subscription to the
Service at any time by contacting AT&T. If canceled after the first month, subscription charges will
be prorated to the date the Service is cancelled. If you disconnect your DSL or Dial Internet access
services, your subscription to the Service will also automatically cancel.
Modifications to the Service / Updates to the Terms
NOOK User Guide
Policies
210
AT&T reserves the right to modify or discontinue, temporarily or permanently, at any time and from
time to time, the Service (or any function or feature of the Service or any part thereof, including
but not limited to rates and charges) with or without notice. You agree that AT&T will not be liable
to you or to any third party for any such modification, suspension or discontinuance of the Service.
Without limiting the foregoing, AT&T may post, or email, notices of changes in the Service. It is
your responsibility to check our website and your AT&T email address for any such notices. You
agree that AT&T will not be liable to you or to any third party for any such modification, suspension
or discontinuance of the Service.
These Terms may be updated or changed from time to time. The current Terms shall be posted
at: (“Website”). If AT&T makes a change to these Terms and that change has a material impact on
the Service, you will be provided electronic notice of that change via e-mail or other written notice.
Your continued use of the Service following such notice constitutes your acceptance of those
changes. If you do not agree to the revisions, you must terminate your Service immediately.
Operational Limits of the Service.
Provisioning of the Service is subject to the availability and the operational limitations of the
requisite equipment and associated facilities. You understand and agree that temporary interruptions
of the Service may occur as normal events in the provision of the Service and that AT&T will not
be liable for such interruptions. You further understand and agree that AT&T has no control over
third party networks you may access in the course of your use of the Service, and therefore, delays
and disruptions of other network transmissions are beyond the control of AT&T. AT&T will not be
liable for any failure of performance, if such failure is due to any cause beyond AT&T’s reasonable
control, including acts of God, fire, explosion, vandalism, nuclear disaster, terrorism, cable cut,
storm or other similar occurrence, any law, order or regulation by any government, civil, or
military authority, national emergencies, insurrections, riots, wars, labor difficulties, supplier failures,
shortages, breaches, or delays, or delays caused by you or your equipment.
Registration/Customer Information/Password Security
All information that you provide to AT&T must be accurate, including your name, email address,
physical address, credit or charge card numbers and expiration dates and any Service payment
information (“Registration Data”). You are responsible for keeping such information up-to-date
and must provide changes promptly to AT&T. You agree to keep confidential your log-in ID and
password and are solely responsible for any liability or damages resulting from your failure to
maintain that confidentiality. You are also solely and fully responsible and liable for all activities that
occur under your member ID. You agree to immediately notify AT&T if you suspect any breach of
security such as loss, theft, or unauthorized disclosure or use of your member ID or password.
Third Party Content Disclaimer/ Links to Third Party Sites
Materials provided by Third Party Providers have not been independently authenticated in whole
or in part by AT&T. AT&T does not provide, sell, license, or lease any of the Materials other than
those specifically identified as being provided by AT&T. This Service may be linked to other websites
which are not under the control of and are not maintained by AT&T. AT&T is not responsible for
the content of those sites. AT&T is providing these links to you only as a convenience, and the
inclusion of any link to such sites does not imply endorsement by AT&T of those sites.
NOOK User Guide
Policies
211
Privacy Policy
Registration data and certain other information about you is subject to the AT&T Wi-Fi Privacy
Policy. For more information see: http://secure.sbc.com/privacy_statement.adp.
General Use Restrictions
Subject to your acceptance of and compliance with these Terms, payment to AT&T for the Service
and compliance with all AT&T Online Policies identified below, you are hereby granted the right
to use the Service through a non-exclusive, non-transferable and non-assignable limited license.
The Service is provided for your use only (unless otherwise specifically stated) and you agree not
to reproduce, duplicate, copy, sell, transfer, resell or exploit for any commercial purposes your
subscription to or membership in the Service, any portion of the Service, use of the Service, or
access to the Service. You have no right to resell, sublicense, assign or transfer your right to access
the Service or use the AT&T Network. All information, documents, products, and software (the
“Materials”) provided with this Service were provided by or to AT&T Internet Services (AT&T)
by their respective manufacturers, authors, developers, licensees and vendors (including, without
limitation, Wayport, Inc.) (the “Third Party Providers”) and are the copyrighted work of AT&T
and/or the Third Party Providers. Except as stated herein, none of the Materials may be copied,
reproduced, resold, distributed, republished, downloaded, displayed, posted or transmitted in any
form or by any means, including, but not limited to, electronic, mechanical, photocopying, recording,
or otherwise, without the prior express written permission of AT&T or the Third Party Provider.
You also may not, without AT&T’ prior express written permission, “mirror” any Material provided
with this Service on any other server. Nothing provided with this Service shall be construed as
conferring any license under any of AT&T’ or any Third Party Provider’s intellectual property rights,
whether by estoppels, implication, or otherwise. You acknowledge sole responsibility for obtaining
any such licenses. Any unauthorized use of any Materials provided with or through this Service
may violate copyright laws, trademark laws, the laws of privacy and publicity, and communications
regulations and statutes.
Software Use Restrictions
Any software that is made available to download with the Service (the “Software”) is the
copyrighted work of AT&T and/or Third Party Providers. Use of the Software is governed by the
terms of the end user license agreement, if any, which accompanies or is included with the Software
(the “License Agreement”). An end user will be unable to install any Software that is accompanied
by or includes a License Agreement, unless the end user first agrees to the terms of the License
Agreement. Except as set forth in the applicable License Agreement, any further copying,
reproduction or redistribution of the Software is expressly prohibited.
Installation assistance, product support and maintenance, if any, of the Software is available from
AT&T and/or the Third Party Providers, as the case may be.
SOFTWARE IS WARRANTED, IF AT ALL, IN ACCORDANCE WITH THE TERMS OF THE
LICENSE AGREEMENT. EXCEPT AS SET FORTH IN THE LICENSE AGREEMENT, ALL EXPRESS
OR IMPLIED CONDITIONS, REPRESENTATIONS AND WARRANTIES, INCLUDING ANY
IMPLIED WARRANTY OF MERCHANTABILITY, FITNESS FOR A PARTICULAR PURPOSE,
NOOK User Guide
Policies
212
OR NON-INFRINGEMENT, ARE DISCLAIMED, EXCEPT TO THE EXTENT THAT SUCH
DISCLAIMERS ARE HELD TO BE LEGALLY INVALID.
Submissions
Unless otherwise explicitly stated, any Materials provided by you in connection with this Service
shall be deemed to be provided on a non-proprietary and non-confidential basis. AT&T shall have
no obligation of any kind with respect to such Materials and shall be free to use or disseminate such
Materials on an unrestricted basis for any purpose. You acknowledge that you are responsible for
the Materials that you submit, and you, not AT&T, have full responsibility for the Materials, including
their legality, reliability, appropriateness, originality and copyright.
Disclaimer of Warranties
UNLESS OTHERWISE EXPLICITY STATED, THE MATERIALS AND THE SERVICE ARE PROVIDED
“AS IS”, AND ARE FOR PERSONAL USE ONLY. ALL EXPRESS OR IMPLIED CONDITIONS,
REPRESENTATIONS AND WARRANTIES, INCLUDING ANY IMPLIED WARRANTY OF
MERCHANTABILITY, FITNESS FOR A PARTICULAR PURPOSE, OR NON-INFRINGEMENT,
ARE DISCLAIMED, EXCEPT TO THE EXTENT THAT SUCH DISCLAIMERS ARE HELD TO BE
LEGALLY INVALID. AT&T MAKES NO REPRESENTATIONS, WARRANTIES, GUARANTIES AS
TO THE QUALITY, SUITABILITY, TRUTH, ACCURACY OR COMPLETENESS OF ANY OF THE
MATERIALS PROVIDED WITH THE SERVICE. ANY QUESTIONS REGARDING THE MATERIALS
SHOULD BE DIRECTED TO THE PROVIDERS OF SUCH MATERIALS. HOWEVER, AT&T DOES
NOT AUTHORIZE ANYONE OT MAKE A WARRANTY ON AT&T’ BEHALF AND YOU MAY
NOT RELY ON ANY STATEMENT OF WARRANTY BY A THIRD PARTY AS A WARRANTY OF
AT&T.
Limitation of AT&T Liability
AT&T SHALL NOT BE LIABLE FOR ANY DAMAGES SUFFERED AS A RESULT OF USING,
MODIFYING, CONTRIBUTING, COPYING, DISTRIBUTING, OR DOWNLOADING THE
MATERIALS. MOREOVER, IN NO EVENT SHALL AT&T BE LIABLE FOR ANY INDIRECT,
PUNITIVE, SPECIAL, INCIDENTAL, OR CONSEQUENTIAL DAMAGES (INCLUDING,
WITHOUT LIMITATION, LOSS OF BUSINESS, LOST REVENUE, LOST PROFITS, LOSS OF
USE, LOSS OF DATA OR OTHER ECONOMIC ADVANTAGE) HOWEVER THEY ARISE,
WHETHER FOR BREACH OR IN TORT, EVEN IF AT&T HAS BEEN PREVIOUSLY ADVISED OF
THE POSSIBILITY OF SUCH DAMAGE. IN JURISDICTIONS WHERE PERMITTED, AT&T’ SOLE
LIABILITY TO YOU UNDER THESE TERMS SHALL BE LIMITED TO THE TOTAL AMOUNT OF
MONEY PAID TO AT&T BY YOU FOR USE OF THE SERVICE.
Indemnity
You agree to indemnify and hold harmless AT&T and its subsidiaries, affiliates, officers, agents,
co-branders, licensors or other partners and employees from any claim or demand, including
reasonable attorneys’ fees, made by any third party due to or arising out of: (a) content you submit,
post, transmit or otherwise make available through the Service; (b) your use of the Service; (c)
your violation of these TOS; (d) your violation of the AUP; (d) your violation of any rights of
NOOK User Guide
Policies
213
another; and (e) use of your account and any Sub-Account whether or not such usage is expressly
authorized by you.
Liability of Customer
YOU HAVE SOLE RESPONSIBILITY FOR ADEQUATE PROTECTION AND BACKUP OF DATA
AND/OR EQUIPMENT USED IN CONNECTION WITH THE SERVICE AND WILL NOT MAKE
A CLAIM AGAINST AT&T FOR LOST DATA, RE-RUN TIME, INACCURATE OUTPUT, WORK
DELAYS OR LOST PROFITS RESULTING FROM THE USE OF THE SERVICE AND MATERIALS.
YOU AGREE TO DEFEND, INDEMNIFY AND HOLD HARMLESS AT&T (INCLUDING ITS
PARENT AND AFFILIATE COMPANIES, EMPLOYEES, OFFICERS, DIRECTORS AND AGENTS)
FROM, AND YOU COVENANT NOT TO SUE AT&T FOR, ANY CLAIMS BASED ON, OR
STEMMING FROM, YOUR USE OF THE SERVICE AND MATERIALS.
Local Laws; Export Control
AT&T and/or the applicable Third Party Provider control and operate this Service from its or their
headquarters in various locations in the United States of America and makes no representation that
these Materials or the Service are appropriate or available for use in other locations. If you use this
Service or the Materials from other locations, you are responsible for compliance with applicable
local laws including but not limited to the export and import regulations of other countries.
Unless otherwise explicitly stated, all marketing or promotional materials provided with or through
this the Materials or the Service are solely directed to individuals, companies or other entities
located in the United States, the United Kingdom and Australia. You acknowledge and agree
that Materials are subject to the U.S. Export Administration Laws and Regulations. Diversion of
such Materials contrary to U.S. law is prohibited. You agree that none of the Materials, nor any
direct product there from, is being or will be acquired for, shipped, transferred, or re-exported,
directly or indirectly, to proscribed or embargoed countries or their nationals, nor be used for
nuclear activities, chemical biological weapons, or missile projects unless authorized by the U.S.
Government. Proscribed countries are set forth in the U.S. Export Administration Regulations.
Countries subject to U.S. embargo are: Cuba, Iran, Iraq, Libya, North Korea, Syria, and the Sudan.
This list is subject to change without further notice from AT&T, and you must comply with the list
as it exists in fact. You certify that you are not on the U.S. Department of Commerce’s Denied
Persons List or affiliated lists or on the U.S. Department of Treasury’s Specially Designated
Nationals List. You agree to comply strictly with all U.S. export laws and assume sole responsibility
for obtaining licenses to export or re-export as may be required.
U.S. Government Rights
The Materials on this Service are provided with the following restrictions: Use, duplication, or
disclosure by the U.S. Government is subject to the restrictions set forth in the FAR 52.227-19
( June 1987), FAR 52.227-14 (ALT II & ALT III) ( June 1987), or if DoD, as specified in DFARS
252.7202-1(a) and 252.7202-3(a) and vendor’s applicable license terms, and DFARS 252.2277013 (Nov 1995) and 252.227-7014(Nov 1995), as applicable. Use of the Materials by the U.S.
Government constitutes acknowledgment of AT&T’ and/or the Third Party Provider’s proprietary
rights in them.
NOOK User Guide
Policies
214
General
This Service could include inaccuracies or typographical errors. Any action related to these Terms
will be governed by Texas law and controlling U.S. federal law. No choice of law rules of any
jurisdiction will apply. These Terms provide basic guidelines for your use of the Service, and will be
enforced in conjunction with other Terms of Service or Membership Agreement, if any, that govern
AT&T products or services that you use or that you have purchased. In the event that any provision
of these Terms shall be rendered invalid or unenforceable, such invalidity or unenforceability
shall not invalidate or render unenforceable any other provision of these Terms and these Terms
shall continue in full force and effect and be construed as if they did not contain the invalid or
unenforceable provision.
Infringement of Intellectual Property Rights
You are prohibited from infringing, publishing, submitting, copying, uploading, downloading, posting,
transmitting, reproducing, or distributing software, video or audio content, or any other material
that is protected by copyright, trademark, patent, trade secret, any other type of intellectual
property rights, trademark laws (by rights of privacy or publicity) or other proprietary right of
any party unless you own or control the rights thereto or have received all necessary consent to
do the same. This prohibition includes the use of any material or information including images or
photographs that are made available through an AT&T site or Service(s).
For more information about AT&T’s copyright protection practices under the Digital Millennium
Copyright Act (DMCA) of 1998, and for information on how to contact AT&T’s DMCA agent,
please refer to: www.att.net/legal/copyright
ACCEPTABLE USE POLICY
The AT&T Acceptable Use Policy is designed to help protect AT&T’s assets, the assets of its
Customers, and the Internet community, from irresponsible or illegal activities of AT&T Customers
and its Users. These activities may disrupt or degrade AT&T IP Services, pose a threat to AT&T’s
assets, expose AT&T (or other providers of IP Services) to claims of civil or criminal liability or
other legal sanctions. Moreover, because of various conventions used in the industry (including
blocking, filtering and blacklisting) these activities may impair AT&T’s ability to interconnect with
other providers of IP Service. These activities may relate to the content stored or transmitted by
Customers or its Users or to the nature of the transmissions themselves such as sending large
numbers of unsolicited messages (Spam).
Customers are responsible for avoiding the prohibited activities and strictly following the AUP terms
set forth herein.
AUP Coverage
The AT&T Acceptable Use Policy (“AUP”) applies to the services that provide (or include) access to
the Internet, services provided over the Internet, and Hosting services (collectively “IP Services”).
Customer is responsible for the actions of others who may be using the IP Service(s) under
Customer’s account. It is Customer’s obligation to take whatever measures are necessary to protect
access to Customer’s account (e.g., to keep the access password secure). If a Customer or its
NOOK User Guide
Policies
215
User(s) violate the AUP, AT&T may, depending on the nature and severity of the violation, suspend
or terminate service, as specified below.
Customer may have access through the AT&T network(s) and Service(s) to search engines,
subscription web services, chat areas, bulletin boards, web pages, USENET, or other services that
promulgate rules, guidelines or agreements to govern their use. Failure to adhere to any such rules,
guidelines, or agreements shall be a violation of this AUP.
AT&T is aware that some of its Customers are, themselves, providers of Internet based services,
and that information reaching AT&T network(s) or facilities from those Customers may have
originated from the AT&T Customer or from another third-party. AT&T reserves the right to take
action against AT&T Customer and directly against such Customers’ subscribers, even though the
AT&T’s corrective action may affect other non-offending subscribers of the AT&T Customer.
AUP Enforcement and Notice
Customer’s failure to observe the guidelines set forth in this AUP may result in AT&T taking actions
anywhere from a warning to a suspension of privileges or termination of your Service(s). AT&T
reserves the right, but does not assume the obligation, to strictly enforce the AUP. When feasible,
AT&T may provide Customer with notice of an AUP violation via e-mail or otherwise and demand
that such violation is immediately corrected.
However, AT&T reserves the right to act immediately and without notice to suspend or terminate
IP Service(s) in response to a court order or other legal requirement that certain conduct should be
stopped or when AT&T determines, in its sole discretion, that the conduct may: (1) expose AT&T
to sanctions, prosecution, civil action or any other liability, (2) cause harm to or interfere with the
integrity or normal operations of AT&T’s network(s) or facilities, (3) interfere with another person’s
use of AT&T’s IP Service(s) or the Internet, or (4) otherwise present a risk of harm to AT&T or
AT&T Customers or other parties AT&T interconnects with.
AT&T’s decisions with respect to interpretation of the AUP and appropriate remedial actions are
final and determined by AT&T in its sole discretion. AT&T may refer potential violations of law(s)
to the proper authorities, may cooperate in the investigation of any suspected criminal or civil
wrongdoing, and will cooperate with authorities when required to do so by law, subpoena, or when
the public safety is at stake. AT&T assumes no obligation to inform you that your information has
been disclosed, and, in some cases, may be prohibited by law from providing such notice.
AT&T does not, as an ordinary practice, proactively monitor the activities of those who use its IP
Service(s) or exercise any editorial control over any material transmitted, hosted or posted using IP
Services to ensure that its Customers comply with the AUP and/or the law, although it reserves the
right to do so. If AT&T is alerted to violations or potential violations of this AUP, AT&T will take
whatever measures it deems necessary and appropriate to stop or prevent such violations including
the actions described in this AUP. For example, AT&T may in its sole discretion refuse to transmit,
screen, or editing content prior to delivery of the IP Service(s), block access to certain categories of
numbers or certain sites as AT&T determines needed to enforce these policies.
If your Service is suspended or terminated for any AUP violation, you must get written approval
from the AT&T Abuse Team (outside of the normal ordering process) prior to reactivating or
NOOK User Guide
Policies
216
ordering new service. In any case, AT&T may, in its discretion, decline to reinstate your Service.
If AT&T approves you for reinstatement or new service, set-up fees, reactivation fees or deposits
may apply. If AT&T discovers that you have renewed Service, or ordered new Service, following
termination for an AUP violation without the prior written consent of the AT&T abuse team, it may
terminate your Service without further notice. In such case, you are responsible for any applicable
early termination charges.
AT&T will not issue any refunds, credits or other forms of compensation for the period when IP
Service(s) have been suspended as a result of violation(s) or alleged violation(s) of this AUP.
AT&T shall not be liable for any damages of any nature suffered by any Customer, User, or third
party resulting in whole or in part from AT&T’s exercise of its rights under this AUP.
Prohibited Actions
AT&T respects freedom of expression and believes it is a foundation of our free society to express
differing points of view. AT&T will not terminate, disconnect or suspend service because of the
views you or we express on public policy matters, political issues or political campaigns. AT&T
is committed at all times, however, to complying with the laws and regulations governing use of
the Internet and e-mail transmissions and to preserving for all of its Customers the ability to use
AT&T’s network and the Internet without interference or harassment from other users. AT&T
prohibits use of its IP Services in any way that is unlawful, interferes with use of AT&T’s network
or the Internet, interferes in any way with the usage or enjoyment of services received by others,
infringes intellectual property rights, results in the publication of threatening or offensive material,
constitutes Spam/E-mail/Usenet abuse, or presents security or privacy risks. Customer will
not resell or provide Service(s) to unauthorized third parties, whether as part of a commercial
enterprise or otherwise.
Customer is prohibited from engaging in any other activity, whether legal or not, that AT&T
determines in its sole discretion, to be harmful to its subscribers, operations, network(s).
Unlawful Activities
AT&T IP Services shall not be used in connection with any criminal, civil or administrative violation
of any applicable local, state, and provincial, federal, national or international law, treaty, court
order, ordinance, regulation or administrative rule.
By using the IP Service(s), Customer represents and warrants to AT&T that Customer (and its
Users) are not resident(s) of any country or affiliated with any of organization prohibited to do
business within the United States as defined and set forth at: http://www.treas.gov/ofac and
http://www.bxa.doc.gov/dpl/thedeniallist.asp. Accounts registered using false or misleading
information may be terminated immediately and without notice.
Intellectual Property
You are prohibited from infringing, publishing, submitting, copying, uploading, downloading, posting,
transmitting, reproducing, or distributing software, video or audio content, or any other material
that is protected by copyright, trademark, patent, trade secret, any other type of intellectual
NOOK User Guide
Policies
217
property rights, trademark laws (by rights of privacy or publicity) or other proprietary right of
any party unless you own or control the rights thereto or have received all necessary consent to
do the same. This prohibition includes the use of any material or information including images or
photographs that are made available through an AT&T site or Service(s).
For more information about AT&T’s copyright protection practices under the Digital Millennium
Copyright Act (DMCA) of 1998:, and for information on how to contact AT&T’s DMCA agent,
please refer to: http://www.att.net/legal/copyright.
Offensive or Threatening Material or Content
AT&T IP Services shall not be used to host, post, transmit, or re-transmit any content or material
that is threatening, harassing, obscene, indecent, hateful, malicious, racist, fraudulent, deceptive,
invasive of privacy or publicity rights, abusive, inflammatory, or otherwise harmful or offensive
to third parties, treasonous, excessively violent or promotes the use of violence, or provides
instruction, information or assistance in causing or carrying out violence against any government,
organization, group or individual, or provides guidance, information or assistance with respect to
causing damage or security breaches to AT&T’s network or to the network of any other IP Service
provider. Customer shall not create or attempt to utilize a domain name that is fraudulent, indecent,
offensive, deceptive, threatening, abusive or harassing.
Interaction with Minors
AT&T has a zero tolerance policy regarding use of its Service to engage in inappropriate conduct
with a minor (anyone under 18 years of age). You shall not knowingly collect or solicit personal
information from a minor without the express consent of the parent or guardian of the minor, nor
shall you use this Service to harm or intimidate a minor. AT&T complies with all federal and state
laws pertaining to the protection of minors, including the reporting of all apparent cases of child
pornography or exploitation to the National Center for Missing and Exploited Children. For more
information about online safety, visit www.ncmec.org or www.att.com/safety.
Spam/E-mail/Usenet Abuse
Violation of the CAN-SPAM Act of 2003, or any state or federal law regulating e-mail services,
constitutes an automatic violation of this AUP and AT&T reserves the right to seek damages and
other available relief against Customer, as applicable.
Spam/E-mail/Usenet Abuse is prohibited on AT&T IP Services. Examples of Spam/E-mail/Usenet
Abuse include but are not limited to the following activities:
Sending unsolicited electronic mail messages and “mail-bombing” (sending mass unsolicited e-mail
messages to a single user, or group of users, commercial or otherwise, or deliberately sending very
large attachments to one recipient) using IP Service(s) are prohibited.
using another site’s mail server to relay mail without the express permission of the site;
using another computer, without authorization, to send multiple e-mail messages or to retransmit
e-mail messages for the purpose of misleading recipients as to the origin;
NOOK User Guide
Policies
218
using IP addresses that the Customer does not have a right to use;
collecting the responses from unsolicited electronic messages;
maintaining a site that is advertised via unsolicited electronic messages, regardless of the origin of
the unsolicited electronic messages;
spamming, or sending unsolicited commercial e-mail, sending unsolicited electronic messages with
petitions for signatures, or any chain mail related materials, or requests for charitable donations;;
sending messages that are harassing or malicious, or otherwise could reasonably be predicted
to interfere with another party’s quiet enjoyment of the AT&T IP Services or the Internet (e.g.,
through language, frequency, size or otherwise);
sending bulk (i.e., twenty-five or more recipients) electronic messages without identifying, within the
message, a reasonable means of opting out from receiving additional messages from the sender;
using distribution lists containing addresses that include those who have opted out;
sending electronic messages that do not accurately identify the sender, the sender’s return address,
the e-mail address of origin, or other information contained in the subject line or header.
forging headers or identifiers in order to disguise the origin of e-mail;
use of redirect links in unsolicited commercial e-mail to advertise a website or service;
posting a single message, or messages to online forums or newsgroups, that could reasonably be
expected to provoke complaints;
posting messages to or canceling or superseding messages on an online forum or newsgroup
in a manner that violates the rules of the forum or newsgroup or that contain forged header
information.
sending bulk electronic messages in quantities that exceed standard industry norms or that
create the potential for disruption of the AT&T network or of the networks with which AT&T
interconnects
intercepting, redirecting or otherwise interfering or attempting to interfere with e-mail intended for
other parties
knowingly deleting any author attributions, legal notices or proprietary designations or labels in a file
that the user mails or sends
using, distributing, advertising, transmitting, or otherwise making available any software program,
product, or service that is designed to violate this AUP or the AUP of any other Internet Service
Provider, including, but not limited to, the facilitation of the means to spam;
Spam Damages: Because spam related damages are often difficult to quantify, in those cases where
the actual damages cannot be reasonably calculated AT&T reserves the right to seek from the
NOOK User Guide
Policies
219
Customer liquidated damages in the amount of five dollars (US$5.00) for each piece of ‘spam’
or unsolicited bulk email transmitted from or otherwise connected with Customer’s account, in
addition to any other rights and remedies AT&T my have in contract, law and equity.
Security Violations
It is Customer’s responsibility to ensure the security of its network and the machines that connect
to and use IP Service(s). You are responsible for configuring and securing your services to prevent
damage to the AT&T network and/or the disruption of Service(s) to other customers, and ensuring
that your customers and users use the Service(s) in an appropriate manner. Customer is required to
take all necessary steps to manage the use of the IP Service(s) in such a manner that network abuse
is prevented or minimized to the greatest extent possible. It is Customer’s responsibility to take
corrective actions on vulnerable or exploited systems to prevent continued abuse. Violations of
system or network security are prohibited and may result in criminal and/or civil liability.
AT&T IP Services may not be used to interfere with, to gain unauthorized access to, or otherwise
violate the security of AT&T’s or another party’s server, network, personal computer, network
access or control devices, software or data, or other system, or to attempt to do any of the
foregoing. Examples of violations of system or network security include but are not limited to:
intercepting, interfering with or redirecting e-mail intended for third parties, or any form of network
monitoring, scanning or probing, or other action for the unauthorized interception of data or
harvesting of e-mail addresses;
hacking - attempting to attack, breach, circumvent or test the vulnerability of the user authentication
or security of any host, network, server, personal computer, network access and control devices,
software or data without express authorization of the owner of the system or network;
impersonating others in order to obtain another user’s account password or other personal
information.
using the IP Service(s) to deliver spyware, or secretly or deceptively obtain the personal information
of third parties (phishing, etc.), or engage in modem hi-jacking;
using any program, file, script, command or the transmission of any message or content of any
kind, designed to interfere with a terminal session or the access or use of the Internet or any other
means of communication;
distributing or using tools designed to compromise security, including cracking tools, password
guessing programs, packet sniffers or network probing tools (except in the case of authorized
legitimate network security operations);
unauthorized monitoring of data or traffic on any network or system without express authorization
of the owner of the system or network; this would include use of sniffers or SNMP tools;
falsifying packet header, sender, or User information whether in whole or in part to mask the
identity of the sender, originator or point of origin;
NOOK User Guide
Policies
220
knowingly uploading or distributing files that contain viruses, Trojan horses, worms, time bombs,
cancel bots, corrupted files, or any other similar software or programs that may damage the
operation of another’s computer or property of another;
engaging in the transmission of pirated software;
with respect to dial-up accounts, using any software or device designed to defeat system timeout limits or to allow your account to stay logged on while you are not actively using the AT&T IP
Service(s) or using your account for the purpose of operating a server of any type;
using manual or electronic means to avoid any use limitations placed on the Services;
gaining unauthorized access to private networks;
violating rules, regulations, and policies applicable to any network, server, computer database, web
site, or ISP that you access through the IP Service(s).
Network Usage
Where an AT&T Service account, service or feature description specifies limits on bandwidth, disk
utilization, simultaneous connections, and/or aggregate data download or upload, use in excess of
those limits is not permitted without an appropriate change in account type or status and may incur
additional charges for such usage.
Bandwidth, disk utilization, simultaneous connections, and aggregate data downloads/uploads will
be computed or determined by AT&T from time to time in developing its product and service
offerings. In the event AT&T determines that an account is exceeding the relevant bandwidth, disk
utilization, aggregate data download/upload limits, simultaneous connections, or reasonable session
times, the account owner will generally be notified by E-mail. If the excess use continues after such
notification, the owner may be requested to upgrade the type of account or to modify the activity
creating the excess use, or the account may be terminated.
If excessive bandwidth, disk space utilization, simultaneous connections, aggregate data download
or upload, or session length is determined to adversely affect AT&T’s ability to provide service,
immediate action may be taken. The account owner may be notified by e-mail as soon as practical
thereafter.
Customer Responsibilities
Customer remains solely and fully responsible for the content of any material posted, hosted,
downloaded/uploaded, created, accessed or transmitted using the IP Services. AT&T takes no
responsibility and assumes no liability for any material created or accessible on or through the AT&T
network(s) using IP Service(s), or for any mistakes, defamation, slander, libel, omissions, falsehoods,
obscenity, pornography, or profanity Customer (or its Users) may encounter. As the provider of IP
Service(s), AT&T is only a forum and is not liable for any statements, representations, or content
provided by the users of IP Services in any public forum. AT&T shall not be obligated to monitor or
exercise any editorial control over such material, but reserves the right to do so. In the event that
AT&T becomes aware that any such material may violate this AUP, other applicable terms of use
NOOK User Guide
Policies
221
or contract provisions, and/or expose AT&T to civil or criminal liability, AT&T reserves the right to
block access to such material and suspend or terminate the Service of any user creating, storing or
disseminating such material. AT&T further reserves the right to conduct investigations into fraud,
violations of the Terms of Service, this AUP or other laws or regulations, and to cooperate with
legal authorities and third parties in the investigation of alleged wrongdoing, including disclosing the
identity of the user that AT&T deems responsible for the wrongdoing.
Customer agrees to indemnify and hold AT&T harmless from any claim, action, demand, loss, or
damage (including attorneys’ fees) made by any third party against AT&T as a provider of the IP
Service(s) arising out of or relating to any violation(s) of this AUP by Customer (or its Users).
Incident Reporting
Any complaints (other than claims of copyright or trademark infringement) regarding violation of
this AUP by an AT&T Customer (or its User) should be directed to [email protected]. Where possible,
include details that would assist AT&T in investigating and resolving such complaint (i.e. expanded
headers and a copy of the offending transmission).
Revisions to the AUP
AT&T reserves the right to modify its Acceptable Use Policy at any time, and effective when posted
to AT&T’s web site (http://www.corp.att.com/aup). Notice of any change to this AUP may also
be provided to a Customer via electronic mail, if Customer subscribes to AT&T’s automated
notification system regarding any AUP changes. It is your responsibility to notify AT&T of any change
of address. You must respond in a timely manner to complaints concerning misuse of the Service(s)
obtained from AT&T. Failure to responsibly manage the use of the Service(s) obtained from AT&T
may be cause for termination of Service(s) to you and, depending upon the terms under which you
acquired your Service(s), could lead to the imposition of early termination fees.
FCC Notices
FCC IDs
NOOK (Wi-Fi + 3G model): XHHBNRZ100 and XHHBNRZ100-01
NOOK Wi-Fi: XHHBNRV100
This device complies with Part 15 of the FCC Rules. Operation is subject to the following two
conditions: (1) this device may not cause harmful interference, and (2) this device must accept any
interference received, including interference that may cause undesired operation.
FEDERAL COMMUNICATIONS COMMISSION (FCC) STATEMENT INFORMATION
TO THE USER
CAUTION: Changes or modifications to the equipment not expressly approved by the party
responsible for compliance could void the user’s authority to operate the equipment.
NOOK User Guide
Policies
222
This equipment has been tested and found to comply with the limits for a Class B digital device,
pursuant to Part 15 of the FCC Rules. These limits are designed to provide reasonable protection
against harmful interference in a residential installation. This equipment generates, uses and can
radiate radio frequency energy and, if not installed and used in accordance with the instructions,
may cause harmful interference to radio communications. However, there is no guarantee that
interference will not occur in a particular installation. If this equipment does cause harmful
interference to radio or television reception, which can be determined by turning the equipment off
and on, the user is encouraged to try to correct the interference by one or more of the following
measures:
1. Reorient or relocate the receiving antenna.
2. Increase the separation between the equipment and receiver.
3. If applicable, connect the equipment into an outlet on a circuit different from that to which the
receiver is connected.
4. Consult the dealer or an experienced radio / TV technician for help.
FCC Radiation Exposure Statement
This equipment complies with FCC radiation exposure limits set forth for an uncontrolled
environment. This device is designed for hand-held operation only. The antenna(s) used for
this transmitter must not be collocated or operating in conjunction with any other antenna
or transmitter within a host device, except in accordance with FCC multi-transmitter product
procedures.
Other Information Related to the Radio
Also note the following:
•
Information about wireless connectivity is in “Wireless Connectivity” on page 57.
•
Your NOOK has an Airplane mode that turns off the radio. It should be used on airplanes. For
more information, see “Use on Airplanes” on page 38.
•
Your NOOK should be fully off when stowed onboard an airplane. For more information, see
“Checked Baggage” on page 39.
•
When around sensitive electronic equipment, ask whether you can use your NOOK. You might
need to use Airplane mode. In some places, for example in a hospital, you might be asked to
not use your device. For more information, see “Electronic Equipment” on page 37.
•
Use a shielded USB cable when connecting your NOOK to a personal computer. The provided
USB cable is shielded.
NOOK User Guide
Policies
223